#How to use cricut maker for beginners
Explore tagged Tumblr posts
Visit Tumblr Blog
Explore Tumblr blogs with no restrictions, modern design and the best experience.
Last Seen Tumblr Blogs


Fun Fact
Tumblr.com rank in the US is 25.
Text
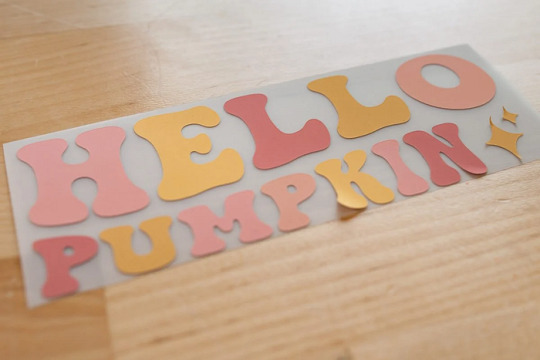
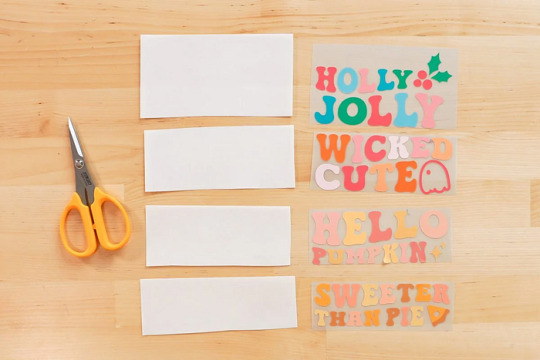
How to Use Cricut Maker: Create a Siser Easy Color DTV Project!
Have you just bought a new Cricut Maker and are wondering how to use Cricut Maker? This brilliant Cricut machine may be overwhelming for beginners, but it is simpler than you think. You get many amazing features with this crafting machine. Let’s get ready to use it and make creative DIY projects with it. I will tell you how to prepare a desired project using this Cricut cutting machine.
Cricut Maker offers various adaptive features that help you create unique and beautiful projects effortlessly. Plus, you get a slot for inserting pens and a number of Cricut tools and supplies. It will be all fun to create something with this ultimate machine. Here, I’ll tell you the best methods to prepare personalized apparel using Siser EasyColor DTV. You’ll learn more about it later in this blog. So, let’s get started.
Supplies and Tools You Will Need for Your Cricut Project
Before we get started to learn how to use Cricut Maker, you must gather some important accessories. I’m listing all of the best accessories here. Use them and follow my step-by-step instructions to create your own project. Check the steps below.
● Brand new Cricut Maker or Explore
● Siser EasyColor DTV
● Siser Easy Mask
● An inkjet printer
● Cricut StandardGrip mat
● A weeding tool
● A Cricut EasyPress
● A Cricut scraper tool
Let me tell you what a Siser EasyColor DTV is. It is an iron-on vinyl type that is typically used on lighter blanks such as garments, T-shirts, etc. This unique vinyl is very convenient and useful for creating better designs and sublimation projects. Let’s check the complete method to create the best project.
How to Use Cricut Maker to Make Personalized Apparel?
Finally, we are here to learn the process of creating personalized T-shirts. So, before we move on to the final steps, measure your blank so that you can create an appropriate design. So, let’s check how to use Cricut Maker for beginners.
Step 1: Upload an SVG File to Cricut Design Space
In the first and foremost step, you’ll need to upload your SVG design file to the Cricut software. If you want, you can create a design manually as well. Once you’re ready, just resize your design and make it fit to your blank.
As you’ll have to print this image, ensure that your Cricut machine will recognize it as a printable file and not a file to be cut. To ensure this, choose your image and hit the Flatten option beneath the Layers Panel.
After that, your Cricut machine will show a preview of the image. When you’re ready, just click the Make It button. And now, this design will go through a Print Then Cut feature. To access it, hit the Continue button.
In the next step, you’re allowed to send that image to your inkjet printer and select the paper type you want to print on. I prefer specialty matte. You can select one based on your printer. Get ready with your printer and insert the Siser EasyColor DTV into it.
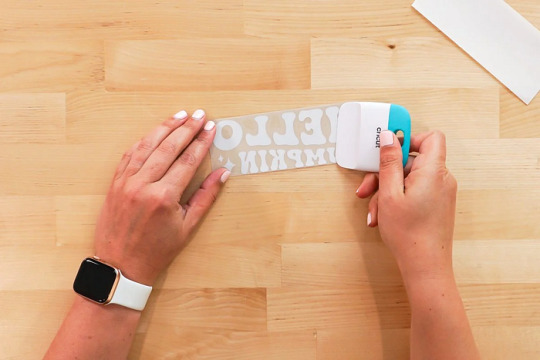
Step 2: Start Cutting the Siser EasyColor DTV
In the following step, you’ll need to cut your material. On your Cricut machine, select your material as Premium Vinyl Permanent Glossy and set the pressure to More using the drop-down menu.
Next, load your vinyl material on the Cricut mat at the left-side corner and make it stick to the mat using a brayer tool. Now, load the mat with vinyl into the Cricut machine and hit the Play button to allow your Cricut to cut the image. Continue with the steps to learn how to use Cricut Maker.
Once the cut is done, take off the paper sheet from your mat, turn the mat over, and take the mat away from your DTV. Please note that you don’t have to peel off the DTV from the mat. You can also use a pair of scissors to cut the design if necessary.
Step 3: Weed Out the Excess Vinyl
Once you cut your design, you should weed out the excess vinyl from your design. Do this carefully, so that your design doesn’t ruin. This step will add more detail to your project.
Step 4: Cover Your Image With a Mask
Moving forward, cut your mask to the size of your design. Now, take off the transparent film from the mask and then apply the mask alone to your DTV image. Moreover, ensure that the final design is flat and that there are no air gaps between the mask and the design.
Step 5: Transfer Your Design to Apparel
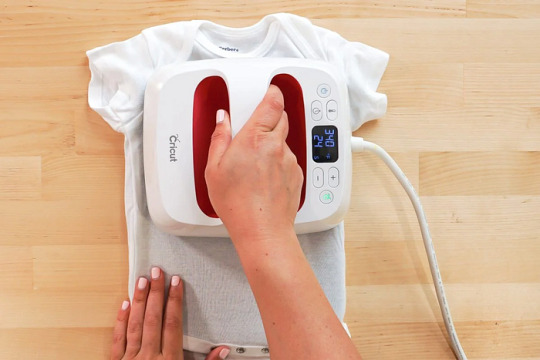

This design is so amazing; I love making it. This is how to use Cricut Maker to reap good results. All the best to all of you who are keen to make something unique and precise.
FAQs
How to Use a Cricut Maker to Make Shirts?
To create a shirt with your Cricut cutting machine, you’ll need to use the Cricut Design Space and a heating press to create a desired design. Get started with the Cricut software, make a design, resize it, and then print and cut it with your Cricut machine. Now, weed away the excess vinyl, and then preheat it with your Cricut heat press, and give a final heat to it.
Which Heat Press Is Suitable for Making an Iron-on Cricut Project?
As there are many options to create an iron-on Cricut project, you can use any of them depending on your requirements. So, the common machines are Cricut EasyPress, Cricut EasyPress 2 & 3, Cricut EasyPress Mini, etc. You can utilize a heat press to transfer the design to your apparel effortlessly.
Can You Use Regular Iron With a Cricut Machine?
Yes, you can. A regular iron is also effective for your minimalist iron-on projects. However, a regular iron may not deliver the results you want and not give a permanent design. Overall, we can say you can use a household iron for normal, sensitive projects but not for complex projects.
Read more: install cricut design space app
cricut.com/setup
cricut.com/setup mac
Source: How to Use Cricut Maker
#How to Use Cricut Maker#How to use cricut maker for beginners#how to use a cricut maker to make shirts#cricut.com/setup mac#cricut explore 3#www.cricut.com setup login#cricut design space#cricut explore air 2#cricut.com/setup#cricut new machine setup#cricut.com setup mac#cricut setup on computer
0 notes
Text
🇲🇽 Mexico 2025 Gold Cup Font – Customize Your Jersey Like El Tri!

Get ready for the 2025 CONCACAF Gold Cup with the official Mexico Jersey Font. You can print your name or honor stars like Lozano, Santi Giménez, or Ochoa. This font pack has everything you need to make your own jersey at home.
👉 Get the Mexico 2025 Gold Cup Font on Etsy Here
🇲🇽 Adidas Mexico 2025 Gold Cup Kit + Font Collection
The Adidas Mexico 2025 Gold Cup Kit was released on March 14, 2025. It debuted in the Concacaf Nations League semi-final against Canada. This kit is a bold design that honors Mexican culture and tradition.

🔥 Design Features:
The kit is black with gold accents, inspired by Mariachi clothing
A special pixelated font mimics Aztec pyramids and architecture
The unique stepped and blocky numbers resemble historic pyramid structures like Teotihuacan and Chichen Itza
Green Trefoil keeper shirt provided by Adidas
A full merchandise collection was released alongside the jersey

This kit combines modern wear with ancient symbols, making it one of Mexico’s most stunning kits.
✍️ What’s Included in the Font Pack
✅ OTF & TTF Font Files (for easy installation)
✅ Perfect for Cricut, Silhouette, etc.)
✅ Numbers 0-9 & Full Alphabet
✅ Pixel-style font inspired by Aztec pyramids
✅ Perfect for fans, creators, and gift-makers
youtube
🖨️ How to Use and Print the Font
Want to customize a jersey with your own name or your favorite player’s number? Here's how:
How to Use the Font:
Download the font from Etsy after purchase
Install the OTF or TTF file on your computer
Use design tools like Canva, Cricut Design Space, or Illustrator
Choose your name + number layout
Print it using DTF paper or HTV (heat transfer vinyl)
Apply the print using a heat press
Done! You’ve created your custom Mexico jersey 🔥
💻 Best 5 Tools for Font Design
Here are our top picks to design with ease:
Canva – Easy-to-use and beginner-friendly
Cricut Design Space – Ideal for precise cutting
Adobe Illustrator – Pro-level vector editing
CorelDRAW – Another great option for advanced designers
Inkscape – Free, open-source alternative to Illustrator

🛍️ Why Buy from Etsy?
Etsy is a secure and trusted platform that supports independent creators. Buying from our official Etsy store guarantees:
Instant download after payment
Secure transactions
High-quality files
Personal use license
Fast customer support from real designers
👉 Get the Mexico 2025 Gold Cup Font on Etsy Here
❓ FAQ – Mexico Gold Cup Jersey Font
Can I use this with Cricut or Silhouette? Yes, the download includes SVG and AI files.
Is this the official font? It’s a fan-made version based on the 2025 Gold Cup jersey design.
Can I print my own name and number? Absolutely! The font is fully editable for any name or number.
Is it for personal or commercial use? This license is for personal use only.
How do I print it on a shirt? Use DTF or HTV paper and a heat press machine.
#Font Football#Font football jersey#Mexico 2025 Gold#Mexico 2025 Gold font#font#font design#fonts#fonts & typography#football#football jerseys#football numbers#jersey#soccer font#Soccer typography#TTF#OTF#script writing#Font script#mexico#Youtube
3 notes
·
View notes
Text
How to Use Cricut Pens? (Easy Steps!)
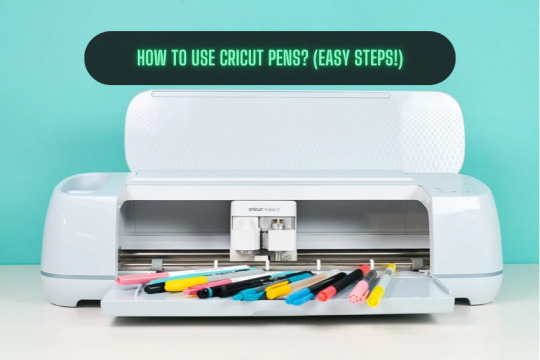
If you are a Cricut user, then surely you know that this brand makes some smart tools and machines. You know about its capabilities and how useful it is. But did you know that apart from cutting materials, you can use pens to simplify the crafting process significantly? But how to use Cricut pens? Cricut machines are not only used for cutting different shapes out of paper or vinyl. These machines use pens to create doodles, illustrations, and intricate designs. However, you need to know some basic steps you need to perform when you are designing your projects to make them better.
Using the pens is easy and straightforward, but the important thing is that you know the process. Read this blog to discover all about Cricut pens and what projects you can make with them.
What Types of Cricut Pens Are Available?
All of the current Cricut machines can use a pen, whether Maker, Explore, or Joy. The Maker and Explore machines have interchangeable pens, and Joy has a lineup of small pens. Joy pens are incompatible with other machines due to their unique, smaller size. Before you proceed with how to use Cricut pens, here is the list of pens that you can use with the machine:
Fine Point Pens
This has an F stamped on it for fine, has a 0.4mm tip, and comes in multiple colors.
Extra Fine Point Pens
These are finer, and the pens are just 0.3mm thick.
1.0 Pens and Markers
They have a thickness of 1.0mm and can be called markers, too.
Gel Pens
Gel Pens have a roller ball instead of a tip and are 0.8 mm in size.
Glitter Gel Pens
It has a roller ball and is 0.8 mm in size.
Calligraphy Pens
These pens have a gray barrel and have C stamped to denote calligraphy.
Infusible Ink Pens
It has a 1.0mm tip, and it is used for sublimation and infusing the ink on the surfaces.
How to Use Cricut Pens: Easy and Simple Steps
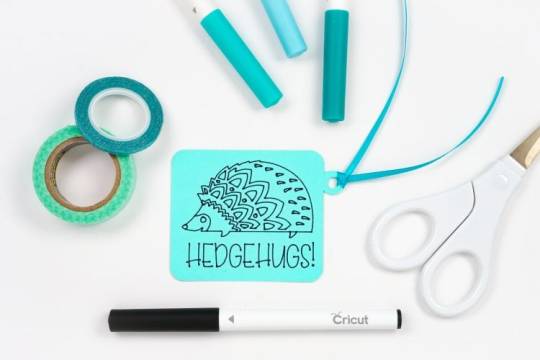
Placing or installing pens is easy, but if you are a beginner, then it will be a new thing for you. Always use the pens carefully, and pens should always be fitted to the clamp A of the cutting machine. Here, I am going to show you something different about using Cricut pens to create a simple gift tag. Now, let’s look at the below process to understand how to use it:
First, go to the Design Space and click on a new project to create a design.
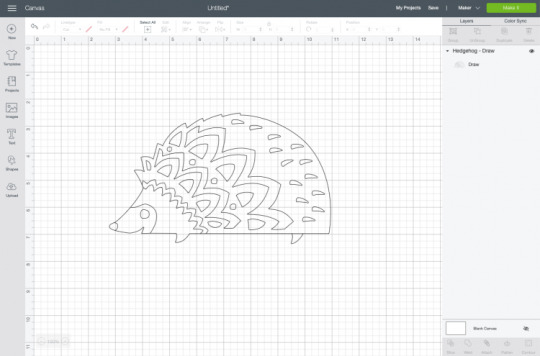
Then, create a design, or you can choose a text that you want to use with your pen. Cricut Design Space has its own vast library of images for your DIY projects.
Now, remember you have to draw, not cut the image. So, go to the Edit toolbar, and from there, select the Draw option in the Layers panel.

When you click the colored square box next to the line type dropdown, you can select the type of pen and choose the Fine Point pen.

After you have completed drawing your design, it is time to add text. In the Font menu, you can filter by Cricut Writing fonts. Choose the writing style font.
You can insert a shape into your Canvas. Then, using the Align tool, you can change its size and color and move it to the back of your Canvas.
Next, select your drawing and text layer and click Attach on the right-hand side of the Layers panel.
On the preview screen, your image will appear on the mat. Click Continue, and in the Make screen option, select the material you are using. Here, I am using cardstock. The Cricut Design Space app will prompt you to insert your pen, and you can use a fine-point blade.
In the last step, you have to insert your mat into the machine, and your machine will draw and cut the tag.
Conclusion
Now you know how simple it was to learn ‘how to use Cricut pens‘.? In this post, I have explained the types of pens and how you can craft your project with the pen. After reading this blog, you can choose a pen for your project, load it into the machine, and start crafting. Start crafting with your pen and unlock the full potential of the machine.
FAQs
How Do You Load the Pen Into Cricut Machine?
When you open the machine, you will see two clamps: Clamp A and Clamp B. To load the pen into your cutting machine, open Clamp A and insert the pen into it. Gently press the pen into the clamp until it fits properly, and you hear a click sound. Then, close the cover, and you are ready to use the machine.
What Are Cricut Pens?
Cricut makes different types of pens, which are great ways to add drawn or handwritten details to your projects. Cricut pens come in different sizes and can be easily loaded into the machine. This can be used for various creative projects, such as writing on gift tag cards or adding doodles.
What Is the Difference Between Cricut Pens and Markers?
A Cricut pen usually has a fine tip, which allows it to create a thinner line, compared to a marker, which has a thick tip and creates a thicker line. Pens are ideal for writing detailed text, signatures, or fine lines within a design, whereas markers are better for filling large areas with color.
Source: How to Use Cricut Pens
#how to use Cricut pens#cricut design space download#cricut design space app#cricut maker#cricut joy#cricut pens
4 notes
·
View notes
Text
How Do I Set Up My Cricut Maker? [Ultimate Guide]
Buying a new Cricut Maker can be overwhelming for all of us. Initially, setup can be daunting, but once you do it, you will love the overall process. However, you can easily set up any Cricut machine without needing much assistance.
The post is all about how do I set up my Cricut Maker. Through this write-up, we will see the items while unboxing the new Cricut Maker. Further, you will explore the Cricut Maker and its types. Afterward, we will explain the complete process of setting up your Cricut Maker machine.
What Do You Get in the Cricut Maker Box?
Unboxing a new product is always an exciting task. While unboxing the Cricut Maker machine, we got several items that we will be discussing here. However, you always have the option to select the bundles when you buy the machine from Cricut's official website.
Following are the items that you get in the box of the new Cricut Maker:
Apart from these, you will get the following:
The best thing is that we get the blades and tools along with the new Cricut machine. These blades allow us to try various products before buying more blades.
How Do I Set Up My Cricut Maker on a Computer?
When we talk about setting up Cricut Maker machine, it means we want to connect it to our devices like computers or mobile phones. However, there are certain ways to connect these machines to our devices. For example, we can connect our Cricut Maker to our computer or phone via Bluetooth or USB cable. So, it is the users’ choice to choose which way is the most suitable for them.
Below, we explain how to set up Cricut Maker. This method is only applicable for Windows or Mac users only:
How Do I Set Up My Cricut Maker on a Mobile?
Here's how to set up your Cricut Maker on Mobile devices with iOS or Android operating systems:
Cricut Maker is the most advanced and versatile in Cricut's lineup. However, the box contains various items that you can use to make several projects uninterruptedly. In this write-up, we explained the Maker and its features in detail. It helps the users to get an overview of machines so that they can use them without any hassle. After exploring the Maker cutting machine, the blog found out how do I set up my Cricut Maker.
FAQs
Question 1: Can I set up the Cricut Maker easily?
Answer: People think the setup is daunting, but this is not the case. Cricut machines are just like printers. The only difference is that Cricut has blades to cut. However, when you go through the notice period, you will find the setup is too easy and complete in less time. While setting up, you will need to download and install the Design Space app. This app will guide you through the further setup process, making it easy for beginners to set up the machine in one go.
Question 2: How do I connect my mobile phone to my Cricut?
Answer: Here, we are going to show you the method to connect your mobile device to the Cricut machine. Here, we are using iPhone or iOS devices. So, ensure you have an iOS device.
Question 3: Can I use the Cricut without its software?
Answer: No, you must use the Cricut Design Space app to send your design to your Cricut device. The machine is the companion for your Cricut cutting machine. Without this machine, you can't cut anything. However, the Design Space is essential for creating intricate designs and then sending them to the machine. Also, the app is the only way to maintain communication between your computer and Cricut.
Visit: cricut.com/setup
cricut.com/setup
Source: https://cricutmakersetup.wordpress.com/2023/10/21/how-do-i-set-up-my-cricut-maker-ultimate-guide/
#cricut explore air 2#design space setup#cricut maker#cricut.com/setup#cricut.com design space#cricut.com/create#cricut.com sign in#design cricut.com download#digital design
2 notes
·
View notes
Text
How to Pair Cricut Machine via Bluetooth or USB? (Easy Tips)
Cricut machines are a must-have for DIY crafters, designers, and small business owners. Whether you’re working on vinyl decals, paper crafts, or fabric designs, pairing your Cricut machine correctly is the first step to getting started.
I still remember the day my Cricut machine arrived as if it were yesterday. But within minutes, my excitement faded as I struggled to connect the machine to my laptop. I couldn’t figure out how to connect it to my laptop. But you don’t have to worry about that. Pairing your Cricut isn’t as complicated as it seems once you know what to do.
In this blog, I’ll explain exactly how to pair Cricut machine with your Windows or Mac, whether you use Bluetooth or a USB cable. It’s a beginner-friendly guide designed to help you avoid the roadblocks I encountered.
Let’s get your machine up and running so you can start creating!
Step 1: Turn On Your Cricut Machine
Before you start pairing, make sure your machine is powered on. Follow these steps:
Plug in your machine: Make sure the power cable is connected to the machine and plugged into a power source.
Turn on the machine: Press the power button (usually located on the side or top) to turn it on. A blinking light indicates readiness.
Step 2: Connect via Bluetooth (Wireless Connection)
You can connect your machine wirelessly via Bluetooth. Here’s how to do it:
For Windows Users
Follow the steps given below to learn how to pair Cricut machine via Bluetooth on Windows:
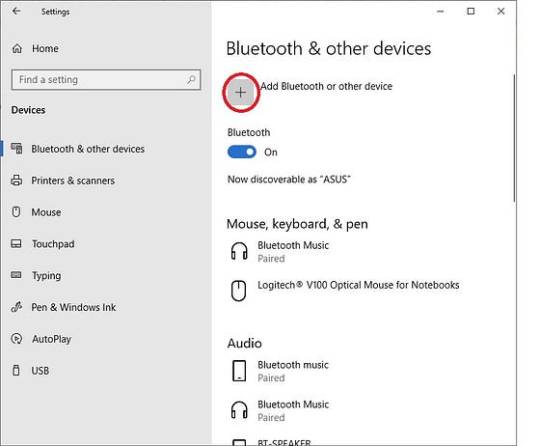
Open Bluetooth settings: Click onthe Start menu, then select Settings, then Devices. After that, go to Bluetooth & other devices.
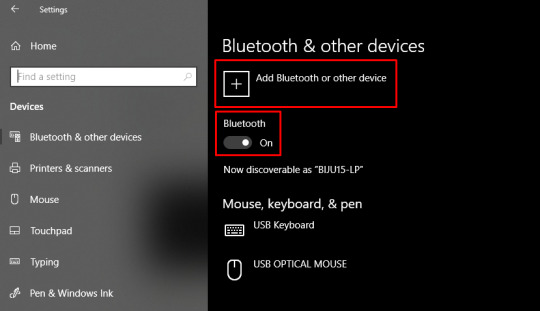
Turn on Bluetooth: Ensure Bluetooth is turned on in your computer’s settings.
Put your machine in pairing mode: Press and hold the Bluetooth button on the machine. The machine’s Bluetooth light will begin blinking, indicating that it’s ready to pair.
Select your machine in Bluetooth settings: On your computer, under the “Bluetooth & other devices” settings, click on Add Bluetooth or another device. Choose Bluetooth, then select your machine from the list of available devices.
Confirm the connection: Once paired, the Bluetooth light on your machine will stop blinking and become solid, indicating that it is connected to your computer.
TIP: Cricut Explore and Maker models include Bluetooth functionality by default. Older models may require a separate Bluetooth adapter.
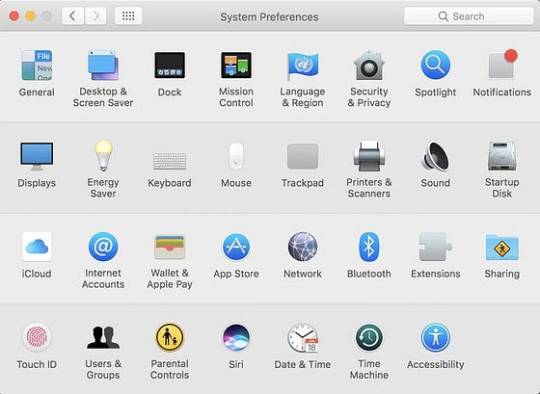
For Mac Users
Follow the stepwise guide listed below to learn how to pair Cricut machine via Bluetooth on a Mac:
Open Bluetooth settings: Tap on the Apple menu > System Preferences > Bluetooth.
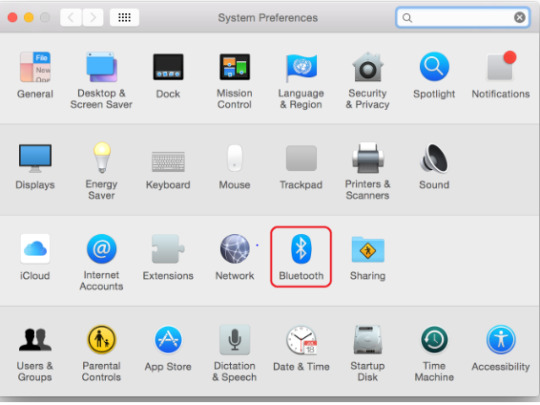
Enable Bluetooth: Make sure Bluetooth is turned on in your Mac’s settings.
Put your machine in pairing mode: Press and hold the Bluetooth button on your machine until the Bluetooth light blinks.
Select your machine name: On your Mac, you should see your machine model in the list of available Bluetooth devices. Click on Pair to connect.
Confirm the pairing: After pairing, the Bluetooth light on your machine will remain solid, confirming the connection.
Step 3: Connect Using a USB Cable (Wired Connection)
If you prefer a wired connection or your device doesn’t support Bluetooth, you can connect your crafting machine using a USB cable.
Locate the USB port on your machine: The USB port is on the left side of the machine, where you can connect the USB cable.
Plug in the USB cable: Now, connect one end of the USB cable to the machine and the other end to a USB port on your computer.
Open Design Space: Launch the software on your computer, and the machine should be automatically recognized.
If prompted, follow the on-screen prompt to complete the setup.
Step 4: Setup Cricut Design Space on Your Device
Now that your Cricut machine is paired with your device, you need to set up Design Space to start creating designs.
Download Design Space: If you haven’t already, download and install Design Space on your computer or mobile device.
Create or sign in to your account: Open the software and either sign in with your existing account or create a new account.
Select your machine name: Once logged in, the software will automatically detect your machine. If not, go to Settings and select your machine from the list.
Start designing: Once everything is set up, you can start creating your projects in Design Space and send them to the cutting machine for cutting.
Troubleshooting Cricut Pairing Issues
Sometimes, your machine may not pair correctly due to device settings or software glitches. Here are quick fixes.
Turn off both the machine and your computer or phone. Turn them back on and retry the pairing steps.
Remove any old Bluetooth devices that could be conflicting.
Ensure both your device’s operating system and the Design Space software are updated to their latest versions.
Clear the cache in the Cricut Design Space software.
Reopen the software and attempt to pair again.
Final Words
Pairing your machine doesn’t have to be difficult. Whether you use Bluetooth or a USB cable, the steps above will help you connect quickly and efficiently. Just keep your software up to date, follow the correct steps, and stay patient!
Once your Cricut machine is paired, the world of crafting will be at your fingertips!
Frequently Asked Questions (FAQs)
What to do if Design Space doesn’t recognize my Cricut machine?
If Design Space isn’t recognizing your machine, make sure of the following key points:
Ensure that the Bluetooth or USB connection is enabled and that the machine is discoverable.
Restart both your computer and machine.
Ensure your machine is within the recommended range of 15 feet from your device.
Make sure Cricut Design Space and your machine’s firmware are up to date.
If updates don’t resolve the issue, consider uninstalling and reinstalling Cricut Design Space.
Do all Cricut Machines have Bluetooth?
No, not all Cricut machines have Bluetooth connectivity out of the box. While newer models like the Cricut Joy, Joy Xtra, Maker, Maker 3, Explore Air 2, Explore 3, and Venture utilize Bluetooth, older models like the Explore One require a separate Bluetooth adapter to connect to devices.
Note: Cricut Explore and Explore One require a Bluetooth adapter.
Can I pair the same Cricut Machine with multiple devices?
Yes, you can connect extra devices to one Cricut machine, but only one device can actively control the machine at a time. This prevents conflicts and ensures that the machine receives clear instructions. You can install Cricut Design Space on multiple devices and access the same account and projects. You can connect to the machine via USB or Bluetooth, and the software will guide you through selecting the desired machine for your project.
SOURCE: How to Pair Cricut Machine via Bluetooth or USB
#how to pair Cricut machine#Cricut Setup#Cricut software app#cricut machine setup#cricut design space app#cricut design space software
0 notes
Text
How to Change Blade in Cricut: A Complete Guide for Beginners
How to change blade in Cricut with ease? This is one of the most frequently asked questions by numerous Cricut users. Don't worry; we have got you covered. The process is really simple! Open the clamp and insert your new blade. This guide provides step-by-step instructions covering the entire process of changing the blade.
Cricut machine blades need to be replaced because they wear down with use, especially when cutting thicker or tougher materials. If you're cutting with it quite often, you may need to adjust it every six weeks.
However, the exact time and frequency of blade changes depend on the machine's usage. If you use a different variety of materials every day, your blade is likely to be damaged faster than that of the casual crafter.
Note: Whether you have Explore, Maker, Joy Xtra, or Venture, the process of changing the blades is almost the same for all.
How Often Should You Change Your Cricut Blade?
I have listed down some of the tips that will help you remember when to change your blade:
How to Clean Your Cricut Blade Before Replacement?
Before changing the blade, clean the existing one to see if it resolves the issue. To clean your blade, follow the instructions listed below:
But if everything goes well, perform a test cut to check the sharpness of the blade.
Important: Exercise caution when cleaning or changing the blades to prevent injury, as they are sharp enough to cause harm.
Changing Deep Cut, Bonded Fabric, & Fine-Point Blades in Cricut
Please note that deep-cut, bonded fabric, and fine-point blades all utilize the same housing.
If you want to save some dollars, simply buy the new blades and swap them while cutting for different materials, because buying the whole blade housing will cost you five times more than buying just the blade.
Therefore, you should not touch your housing unless it has severe damage, as it is designed to last the lifetime of the machine.
Now it's time to learn how to change blade in Cricut easily.
Step 1: Locate Clamp B on your Maker/ Explore machine and open it. If you're using an older model, you need to unscrew the arms that hold the machine in place.
Step 2: Gently remove the blade housing from the machine.
Step 3: Push the plunger on top of the housing and carefully pull out the old blade. You can also use your tweezers or nose pliers to grab the end of the blade.
Step 4: Take the new blade from its packaging and remove the protective cover.
Step 5: Grab the end of your new blade with the pliers and depress the plunger on the blade housing again.
Step 6: Insert the new blade into the housing so that the sharp side of the blade is facing outward.
Step 7: The magnet in the housing will hold the new blade in place.
Step 8: Release the plunger, and you're ready to try out your new blade.
Step 9: Place the blade housing back into Clamp B and close the clamp.
Don't forget to perform a test cut before embarking on a large project.
Note: The Cricut Maker series checks the blade before cutting, while the Explore series does not. If you encounter any difficulty when trying to cut, verify that your blade is installed correctly.
Final Thoughts
You’re all finished. Your blade is ready for precise cutting projects. The only tricky part when changing your blade is to ensure that the blade is fully down before closing the clamp.
I hope this guide helped you while changing your blade in the Cricut machine with ease. Ensure to follow the instructions given above to change your blade safely.
Frequently Asked Questions
How to change blade in Cricut Joy and Joy Xtra?
If you want to change the blade in Joy and Joy Xtra, follow these steps:
How do I change the blade on a Cricut paper trimmer?
Follow the steps given below to replace the blade on a paper trimmer:
How do you use Cricut tweezers?
Cricut tweezers are used for precise lifting and handling of small, delicate materials, particularly when weeding intricate vinyl designs or removing debris from the cutting mat. They are used by squeezing the handles to open the tips, placing the tweezers around the object, and then releasing pressure to secure it.
They are especially useful when removing blades from the blade housing, as they allow for gentle grasping of the blade's end and easy lifting out.
Visit: cricut.com/setup crcut.com setup mac install cricut design space app
Source: https://cricutcreate.blogspot.com/2025/05/how-to-change-blade-in-cricut-complete.html
#HowtoChangeBladeinCricut#cricutcomsetup#installcricutdesignspaceapp#wwwcricutcomsetuplogin#cricutcreateconnecttocomputer#cricutnewproductsetup#settingupmycricutmaker#connectingcricutmakertocomputer#cricutsetupcreateaccount#cricutcuttingmachinesetup#cricutsetuponcomputer#settingupnewcricutmaker#cricutsetuplogin#cricutaccountsetup#cricutcomsetupdownload#cricutinstallsetup#cricutprintersetup
0 notes
Text
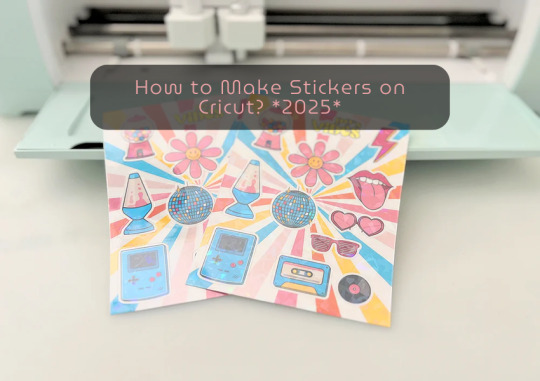
How to Make Stickers on Cricut? 2025
learn ‘how to make stickers on Cricut‘, then you have come to the right place. Stickers are loved by everyone, whether you’re a child or an adult. You do not need a printer to make custom stickers. You can create stickers at home using the crafting machine and some supplies and tools.
Stickers may look like ordinary sheets of paper, but they are a great way to personalize journals or gifts. Whether you are a Cricut user or a beginner, if you have a crafting machine and Cricut Design Space app downloaded to your device, you can make stickers in any shape, color, or size you can imagine.
There are three general types of stickers you can create with your Cricut cutting machine: written labels, vinyl decals, and Print Then Cut stickers. In this blog, you will learn about Print Then Cut stickers.
What Materials Do You Need for Your Project?
Before starting the process of how to make stickers on Cricut the first step is gathering all of the supplies and equipment needed for sticker making.
Cricut Explore, Explore Air 2, and Maker 3
Design Space
LightGrip cutting mat
Inkjet printer
StandardGrip mat
Sticker paper, printable vinyl sticker paper
Making Print Then Cut stickers is a great way to personalize gifts, decorate water bottles, or add stickers to scrapbooks and journals. Creating stickers is fun and easy, but to get started, you need to gather the materials mentioned above and then follow the steps below to proceed with the sticker-making.
How to Make Stickers on Cricut: 6 Simple Steps
Here are the steps you will need to follow for creating stickers on your crafting machine. So, let’s get started right away.
Step 1: Calibrate Your Machine for Print Then Cut
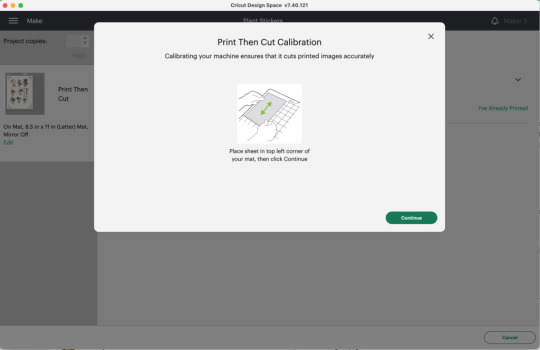
Calibrating your machine can sound optional, but this is the important part of making stickers with Cricut. In the Cricut Design Space app, choose Calibration from the menu, and then choose Print Then Cut. The software will prompt you to print a test sheet and load it into your machine. Tip: If possible, try to use a lightGrip machine mat.
Step 2: Add a Printable Image to Your Canvas
Now, within the Cricut Design Space Software, you can add multiple images to your canvas to make custom stickers. Or you can upload your SVG file. Once you have placed the images on your canvas, select Print Then Cut under the Operation menu and change the design from a Basic cut to a printable design.
Step 3: Format Images With Offset Feature
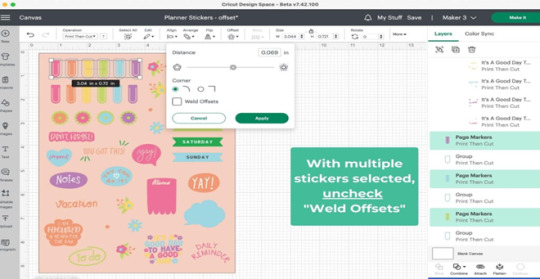
When you are done creating your stickers, you can add a finishing touch. To do this, you need to create a white border around your images. This creates a decorative outline called an offset, adding dimension to your sticker. Choose the design/ image that you want to offset, and then click the Offset option in the toolbar. When you are done selecting the offset feature by default, it can show you dark gray, which you may need to change to white.
Step 4: Attach the Images

Once you are done formatting your stickers, select each with its layers in the layers panel and click Flatten. When you flatten the images, make them into one layer, and to keep your project in order, select all photos and click on the Attach option.
After flattening the design, you cannot change the colors. But you can always Unflatten the images and make changes later.
Step 5: Print Sticker Sheet
Now, you’ve reached the best part of sticker making. Once you click the Make It button, you are ready to print your design. Click on Use System Dialog, and a preview box will appear where you can fix your print settings. Printer settings vary depending on your model, but select the highest-quality print setting if possible. Make sure the sticker paper is compatible with the printer and the paper you have chosen.
Step 6: Cut the Image Using Your Machine
This is the last step of ‘how to make stickers on Cricut‘. Firstly, when your stickers are printed, put them on the Cricut mat, then choose your material settings. After that, load your cutting mat and press start to cut using the standard fine-point blade. Remember to change your custom settings to Sticker paper. They have clear white options, so choose accordingly. When the stickers are done cutting, remove them from the mat, and it is ready to use.
Summary
Making stickers with Cricut is a very fun and creative process. Using your machine, you can make different kinds of stickers in different colors for your journals, scrapbooks, or for your gift hampers. It is a great way to get kids involved in a fun and creative activity. You can create stickers for your journal, notebook, or customized gifts. Not only is it a creative process, but it is also a great way to add a unique touch to your belongings.
In this blog, you explore ‘how to make stickers on Cricut’, and now you can decide which kind of stickers you want to make.
Source: How to Make Stickers on Cricut
#how to make stickers on Cricut#cricut stickers#cricut design space app#cricut design space software#cricut maker setup
1 note
·
View note
Text
How to Make Stickers With Cricut? (Easy Guide)
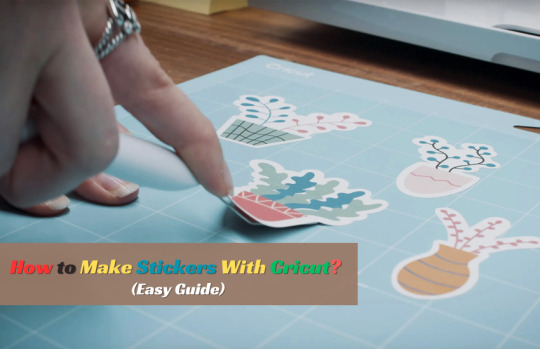
Everyone likes stickers, and it does not matter if you are a child or a grown-up. You do not need a printer to make stickers. Making stickers with Cricut is easy, but you need a basic understanding of the designs, supplies, and ‘how to make stickers with Cricut‘.
Stickers may seem like a normal sheet of paper, but they’re a great way to personalize and decorate your gifts. Whether you are a Cricut user, run a small business, or work on your planner or any other DIY project, you can tap into the fun and creative side of Cricut. Whether you are a craft expert or a beginner, with a machine and Cricut Design Space, you can make any kind of sticker in any shape, color, and size you can imagine.
There are three general types of stickers you can create with Cricut: vinyl decals, Print Then Cut stickers, and written labels. In this blog, you will learn how to make Print Then Cutstickers.
Materials You Need for Print Then Cut Stickers
These are the main tools and supplies you need to create custom stickers with your crafting machine.
Cricut Explore 3, Explore Air 2, and Maker or Maker 3
Cricut Design Space
LightGrip cutting mat
Inkjet printer
Finally, you know the basic materials for creating stickers. Now, let’s start learning the complete procedure to make stickers using the Print Then Cut feature.
How to Make Stickers With Cricut: Simple Steps
Here are some quick and easy steps to make unique and beautiful stickers with your crafting machine:
If you have never printed anything with your machine, you should first calibrate it. It is necessary; otherwise, your stickers will not be properly cut.
In Design Space, choose the Calibrate option from the main menu. Then, it will show you three options. Choose the Print Then Cut option.
After that, you can design your sticker using the Cricut Design Space software or choose a pre-design sticker that Cricut members upload. Or you can upload your SVG file.
Now, select the Offset feature once you have uploaded or chosen your sticker design from the app library. You can change the offset width and color. By default, it shows dark gray, which you can change to white.
Next, group your offset and flatten it together. In the software, the Flatten button is on the right-hand side, down towards the bottom. Flattering items makes them into one layer. You can also unflatten the image. You can select attach to keep your sticker intact and in one layer.
Afterward, select Basic from the Operation dropdown menu tool and change it from Basic to Print Then Cut.
Once you are done designing your stickers, click on “Make It.”
After that, you will be prompted to print your design. Now, a preview box will appear, and you can check your print settings. For Print Then Cut, the crafting machine can print a maximum image size of 9.25 in x 6.75 in.
Your design is ready to send to the printer, so load your printer with the sticker/printable paper. When your stickers are printed, put them on the machine mat, and they will be ready to be cut.
The final process is to cut the stickers using a machine. Remember to change your Custom settings to Sticker paper. They have white and clear options, so choose accordingly. When the stickers are done cutting, remove them from the mat, and they’re ready to use.
Finally, we create custom stickers with the help of a crafting machine and the Cricut Design Space software. Now, you make a variety of projects at home using this machine.
Conclusion
The Cricut Design Space app and your cutting machine allow you to design and cut personalized stickers in various colors, shapes, and sizes. You can create stickers for your journal, notebook, or customized gifts. Not just from an artistic perspective, but it is also a great way to add a unique touch to your belongings.
This blog explored the Print Then Cut feature and how to make stickers with Cricut. Now, you can choose which type of stickers you want to create.
FAQS
Which printer is compatible with Cricut Print Then Cut feature?
The printer needs to be an inkjet printer, not a laser printer. Using a laser printer can cause damage to the materials and stickers. The material you are planning to print on should be printable paper, sticker paper, vinyl, or clear sticker paper. Cricut recommends the whiter material, but you can use light to medium colors.
What is the process for making stickers?
First, calibrate your printer. After that, design your sticker using the Cricut Design Space app or upload your printable images. Offset the sticker, flatten it, and attach it. Then, choose the Print Then Cut feature and load the mat with stickers that need to be printed. The machine is ready to cut the stickers.
What is the offset feature in Cricut app?
You must use an offset feature while designing your stickers because it adds an outline and a decorative shadow. It works best with closed paths images. You can change the color of the offset, and you can use it for print cut design as well as regular cut design.
Source: How to Make Stickers With Cricut
#how to make stickers with Cricut#cricut design space app#cricut design space software#Cricut.com/setup
1 note
·
View note
Text
How to Use a Cricut Maker to Create a DIY Project? (Easy Guide)
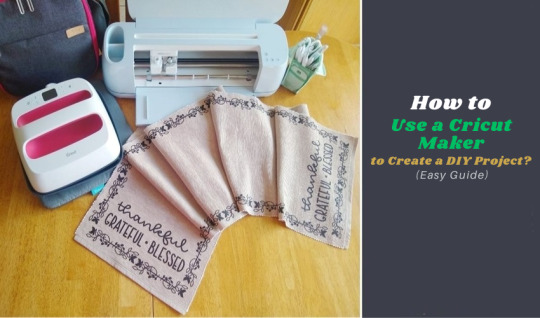
Are you thinking of buying a Cricut Maker? Or you have just got one and are not sure where to start? This guide will walk you through all the different ways to learn how to use a Cricut Maker without any previous experience.
This cutting machine is advanced and unique from other models, like Explore Air 2 and Joy machine. It delivers a wide range of features, tools, and accessories for crafting projects. With this machine, you can cut fabric, vinyl, cardstock, chipboard, and more precisely.
So, if you are a beginner and don’t know how to use this machine—don’t worry; we are here to help! Read this blog, and you will learn how to use it easily.
How to Use a Cricut Maker: Unboxing and Initial Setup
Once you have got your machine in your hands, it is time to check if you have all the necessary supplies and tools that come with the machine or not. So, in order to do that, you must follow these steps:
Step 1: Unbox Your Machine
Carefully remove the machine from the box, ensuring that all packaging materials are removed. Inside the box, you will find the machine, a power cable, a USB cable, a cutting mat, a fine-point blade, and a welcome guide.
Step 2: Positioning Your Machine
Place the machine on a flat surface, ensuring at least 10 inches of space in front and behind the machine. This space allows the cutting machine to move freely during operation.
Step 3: Connecting to Power
Now that you have unboxed your machine, it’s time to take the most important step: giving it life support. To do that, you must insert the power cable into the back of the machine and plug it into an electrical outlet. Once you finish the connection part, let us look into how to activate your machine.
How to Activate a Cricut Maker: Quick and Easy Steps
The first thing to do is activate the machine. To do so, from your Windows/Mac, you must head over to cricut.com/setup from any browser of your choice. Activating the machine is even easier if you have already used the Design Space app. To set up the machine from the app, go to the Menu icon and then select ‘Cricut New Product Setup.’ After that, follow the prompts that let you choose your machine.
To open the machine, you must lift its lid. This will open the cover of the machine automatically.
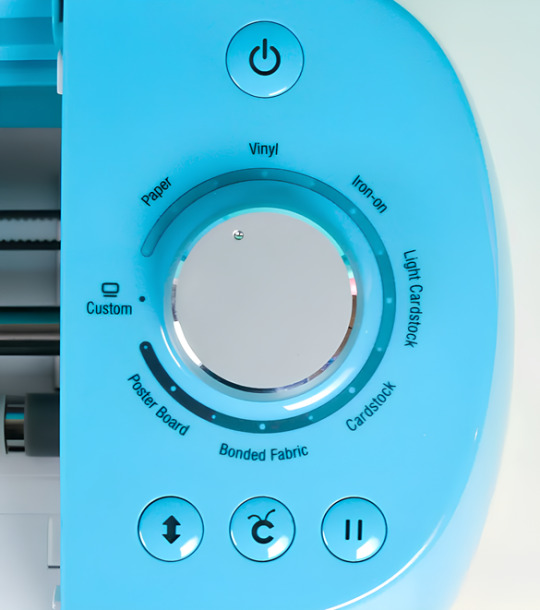
Power button: With this button, you can turn the machine on and off.

Feeding switch: This button lets you feed your mat into the machine.

Cricut switch: This is the button with the initial C. Press it when you want to start cutting (it is also called the confirm button).

Pause button: This button gives you the flexibility to pause your machine in between. It’s extremely handy if you’re in the middle of a cut and want to change something or for any other reason.

That’s all in terms of design. In the next section, we’ll look at the steps to create a project.
How to Use a Cricut Maker: 5 Easy-To-Follow Steps
To use a machine, follow these detailed steps from setup to your first project. As the Cricut Maker Setup is a versatile cutting machine, it can handle various materials, making it ideal for crafting projects.
Step 1: Connecting to Your Device
In order to get a hold of the machine, you must connect it to your desktop or computer. This is crucial because, without the connection, the machine cannot communicate with your device. Even though the Design Space app can work offline, you still need a connection at least once to save it on the app.
You can connect your machine to your device via a USB cable or Bluetooth. Connect the square end to the machine and the USB end to your PC via USB. To pair your device with the machine using Bluetooth, turn on the machine and then go to the Bluetooth settings.
Visit the official website or surf design.cricut.com and download the Design Space application. It is essential for project creation and supports various platforms, like Mac, iPad, and iPhone.
Step 2: Setting Up Design Space
This is the most important step after connecting the machine and your device (Mac/Windows). Once you have downloaded the app, you must do these things for a smooth experience:
Open the software and fill out the required fields to create an account. The account allows one to save their projects and access various design features.
In the software, select “New Machine Setup” from your profile. Finish the on-screen steps to choose your machine model and perform the setup process. The app will guide you in connecting your device to the machine.
Step 3: Designing Your DIY Project
Now that you have done all this, let’s start creating your first project. To do so, let’s look at these steps:
Start a New Project: Once your machine is connected, you can start a new project using the software. Select the type of project you want to create, such as a card, decal, or label.
Choose Your Materials: Design Space allows you to select the material. If you use cardstock, set the material type accordingly.
Prepare Your Cutting Mat: Place your chosen material onto the mat. Ensure it is aligned correctly and adheres well to avoid shifting during cutting.
Step 4: Start the Cutting Process
Now that you are familiar with downloading the app and activating the machine, let us look at its main purpose: the cutting process. It happens as described below; follow the steps carefully for a seamless cutting.
Load the Mat: Insert the mat into your crafting machine until it clicks into place. This will automatically feed the mat in for cutting.
Start Cutting: Press the “C” button on the machine to begin cutting. Your device will display a percentage of the cut completion and allow you to monitor the progress.
Completion: Once the cutting is finished, the machine will signal it is done. Carefully remove the mat and peel off your cut material.
Step 5: Post-Cutting Steps
It is equally important to know what to do after you are done with your cutting process.
Removing Your Cut Material: Gently lift the material from the machine mat. If you use delicate materials, such as intricate designs, use a spatula tool to help lift them without curling.
Assemble Your Project: Depending on your project, you may also need to assemble various pieces. Follow any additional steps to add embellishments or complete your design.
Conclusion
Don’t be discouraged if your first project isn’t perfect. The more you use your cutting machine, the more comfortable you will become with the process. Take time to explore the features of Design Space, like templates, images, and fonts. This exploration can inspire new project ideas. Using a crafting machine opens up a world of creative possibilities. Following these steps, you can confidently set up your machine, design your projects, and bring your creative ideas to life. Happy crafting!
FAQs
How do you use a Cricut for beginners?
To use a crafting machine as a beginner, unbox your machine and follow the setup steps. Download the Design Space software on your computer or mobile device for project creation. Familiarize yourself with basic operations like uploading images, selecting materials, and changing settings. Start with modest projects, such as stickers or paper cards, to build confidence. Use online resources and community forums to get more support and inspiration.
What do you use a Cricut Maker for?
A Cricut Maker is a versatile creative gadget that can cut materials like vinyl, paper, and fabric. It’s excellent for making unique designs for home decor, apparel, and more. The machine is capable of cutting a variety of materials, making it appropriate for both simple and intricate crafts. Beginners begin with projects such as greeting cards or decals, gradually discovering their full potential as they gain skills.
Do I need a computer to use a Cricut?
While a computer is not required to use a Cricut, it is suggested for maximum performance. The Design Space software can be accessible from a computer, tablet, or smartphone, making design management easier. Using a computer allows for a wider screen and more accurate control when making complex designs. However, several users have operated their machines using mobile apps, allowing them to create while on the road.
Source: How to Use a Cricut Maker
#how to use a cricut maker#cricut design space download#cricut design space app#cricut design space software#Cricut Maker Setup#cricut new product setup#how to setup cricut maker#cricut new machine setup
1 note
·
View note
Text
How to Download Images From Cricut Design Space: Full Guide

If you are new to the Design Space app and want to know how to download images from Cricut Design Space, then you are in the right place. Most beginners and crafters wish to learn how to download and upload images to the Cricut app. But let’s know a bit about the Design Space app. It is a free digital design app that allows you to cut and draw for the Cricut machine and is compatible with desktop and mobile devices. And to cut with it, you need to use Cricut cutting machines.
Suppose you intend to learn the full download process of the image. Read this blog.
Functions of the Cricut Design Space App
This app allows you to create your designs online and offline. We have compiled the software’s functions and then read them to learn.
It lets you make your designs, cut, and edit your craft projects with the help of easy tools.
You can use pre-designed images and fonts for your crafts.
You can edit the pre-made projects if required.
You can connect to Cricut Explore and Cricut Maker machines using Bluetooth.
It has a feature to auto-save projects.
How to Download Images From the Cricut Design Space App
Follow the below steps to learn the process of the Cricut Design Space app:
Step 1: Search and Download an Image
First, switch on your device and search for the image you want to download in the search engine. When you are done searching and choosing the picture, right-click on it and click the Save as Image to Downloads option. The image will be successfully downloaded to your downloads folder.
Step 2: Upload the Image to the App
Now, open your Cricut Design Space app and sign in with your Cricut ID and password. Next, a new web page will appear. Click on the New Project at the top right-hand corner of the page.
On the left side of the page, under the Menu bar, click on the Upload tool to upload the image, and then browse to open the downloaded pictures in your folder.
Step 3: Remove Background From the Image
To remove the background, use the background remover tool and select the background of the downloaded image. Then, click on the places you want to make the changes and click the Apply and Continue button on the bottom right side of the page. Another method to remove the background image is to choose the Cut Image and remove the background of your downloaded image.
Step 4: Upload the SVG File to the Design Space App
After following the above steps, tap the Upload button at the bottom right side of the page. Navigate to Recently viewed images, and you can locate your edited photos. Then, choose the image and click on the Add to Canvas button to add it. Then, resize and select the Make It option. Select the image on the cutting mat and proceed towards the cutting process.
Methods to upload images
Here are the steps you need to follow to upload basic and vector images on Design Space app:
Method 1: Uploading Basic Image
Choose the basic JPG, GIF, or PNG images and drag them to your Design Space app Upload window. Then, choose the image type and click on the Continue option. Next, select the Crop tool to remove, erase, or restore unwanted background. If you wish to preview the edited image, look at the preview button on your screen and modify it according to the project’s needs. Afterwards, select the Continue option.
Method 2: Uploading the Vector Image
On the contrary, if you use vector and complex images, .svg or .dxf file to the file selector and select the Open option. Then, drop the file in the image upload window, give it a name, and click on the Upload box. Then, search for your vector file by inserting its name inside the search bar.
Then, choose the file. It will be directly moved to your Cricut app canvas. Finally, the images designed with layers will appear as grouped images. After ungrouping the photos, you can move and change their size separately according to your project.
Conclusion
After reading this guide, you will know how to download images from the Cricut Design Space app. It opens the possibility of making your projects with the Design Space app, and you can do endless projects with it. Keep designing and using the cutting machine to unleash your creativity and make new projects.
FAQs
Where can we find uploaded images in Cricut Design Space?
Follow the steps below to learn how to find the uploaded images in Cricut Design Space.
First, open your Cricut Design Space app.
Then, under the Menu panel, click on the given Images option.
Now, from the list, you can find all the downloaded and uploaded images by name.
Also, you can find the image in the Upload section.
Can you search for the project without an internet connection?
No, you cannot search or browse through the projects or images without an internet connection. However, you can use the offline features if you have saved the downloaded file to your computer. You can find your saved projects on the home screen, or you can also click View All to see all your saved projects.
How do you download free images from the Cricut Design Space app?
There are some quick and easy steps by which you can download free images:
Open the Design Space app in your system.
Create a new project.
Then, click on the images from the bottom navigation.
Now, select free under Highlighted Categories.
All the free images will be displayed.
#how to download images from cricut design space#cricut design space app#cricut design space download#cricut design space software#install cricut design space app#cricut software app#cricut new product setup
1 note
·
View note
Text
How to Connect Laptop to Cricut: A Beginners Setup Guide
A Cricut is an electronic cutting machine designed to simplify the process of cutting all sorts of designs from materials like paper, vinyl, cardstock, and fabric. Some Cricut machines can also cut wood and leather, making them powerful tools for any craft project. Cricut can be used to cut about anything that would be cut with scissors or an X-acto knife. With the added advantage that a Cricut machine can cut with much more precision and speed that is almost impossible to ever achieve by hand, it is worthwhile to buy this machine. Setting it up would require one to go to cricut com setup and download the required software, “Design Space.”
www.cricut.com setup login install cricut design space app cricut.com setup mac cricut maker software Cricut Design Space setup cricut setup for pc cricut design space login cricut create connect to computer cricut maker new machine setup how to setup cricut maker how to setup cricut explore
setting up your cricut maker cricut setup on computer cricut.com setup mac cricut maker new machine setup cricut maker machine set up cricut setup download cricut download laptop install cricut setup maker install cricut printer cricut new product setup cricut design space for windows cricut device setup
#install cricut design space app#cricut.com/setup#www.cricut.com setup login#cricut setup#cricut design space setup#cricut.com setup mac#cricut create connect to computer
0 notes
Text
How to Install Cricut Design Space on Windows [Beginners Tutorial]
We all know that you should have a device if you want to use a Cricut machine. It can be a phone or a computer. One such device is a computer with Windows 11 on it. It is an excellent choice for a Cricut machine. To use your crafting machine, you must learn how to install Cricut Design Space on Windows 11. For that, I would suggest you read this blog till the end. This guide will help you not only download the app on a computer but also connect the machine to your device wirelessly. You will also be able to check the computer’s system requirements.
You can download the Design Space software from the Internet for free. To download it on Windows 11, you have to visit the official site. This blog explains the process for downloading the app. So, let’s dive into it to start the crafting journey today.
Minimum System Requirements for Cricut App on Windows 11
If you want to use a Windows computer on your machine, you have to first make sure that it is capable of downloading and running Design Space. The computer will require certain features that are essential to run the app. The features that the computer requires for Design Space are mentioned below:
How to Connect Cricut Machine to Windows 11?
Once you make sure that your computer has the required system features in the process of learning how to install Cricut Design Space on Windows 11, you should connect it to the machine. Here, we will see the connection process of the Windows PC to a machine via Bluetooth:
How to Install Cricut Design Space on Windows 11?
By now, you have checked the features of your computer and have learned the Bluetooth connection process on the machine. Now, you have to download the app on a Windows 11 computer. But before downloading the software on your computer, you have to connect it to a stable Wi-Fi network. To download the app, you have to follow the steps written below:
Conclusion
To conclude, I would say this blog helped you learn how to install Cricut Design Space on Windows 11. Windows 11 is one of the newest operating systems and has the ability to run the app on it. But before you download the software on a computer, you must know about the minimum features any computer needs to run the app on it. Once you are sure of your computer’s compatibility, you can connect it to the machine. You read about the Bluetooth connection on the computer. Finally, you saw the Design Space installation process. Now, you can easily set up a machine on a Windows PC.
FAQs
Is Cricut Design Space Available for Windows?
Yes, it is! Design Space is an official app, and it is essential for Cricut machines. It works with multiple devices, including a Windows computer. If you want to use the machine on a Windows PC, you will have to download the software from the Internet. It is available on the official site. After installing the app, you can start crafting on your desktop.
Why Is Cricut Design Space Not Installing on My Computer?
If you are trying to install the app on your computer but are unable to do so, you should do a few things. First, you must ensure that your computer is connected to good internet broadband. After that, you will have to check the compatibility of your computer. If the computer lacks the required features, you might have trouble downloading the app. Also, you have to check the browser you are using to download the app. If it is an outdated browser, you must update it.
Is Windows 11 Compatible With Cricut Design Space?
Windows 11’s operating system is good enough to download the Design Space software on it. A Cricut machine requires Windows 10 or newer. But to make sure that it is actually compatible with the machine, you also have to check its features. The computer should have at least 2 GB free disk space and 4GB RAM. It needs to have a resolution of 1024 x 768 pixels and 2-3 Mbps of internet speed.
Visit: cricut com setup www.cicut.com setup login setting up my cricut maker install cicut design space app
Source: https://cricutspaces.blogspot.com/2024/09/how-to-install-cricut-design-space-on.html
#cricut.com/setup#cricut.com/setup login#cricut setup#install cricut explore air 2#cricut.com setup mac#www.cricut.com/setup login#www.cricut.com/setup#cricut install setup#install cricut design space app#cricut design space setup#cricut design#setting up new cricut maker#setting up your cricut maker#cricut design space app#cricut explore air 2
1 note
·
View note
Text
How to Connect Cricut Maker Bluetooth: All Devices Covered!
If you are a beginner who has just bought a new Cricut cutting machine and wants to use it, then you must know how to connect Cricut Maker Bluetooth. Connecting your machine to your device is necessary to start making your crafting projects. To make the connection, you need a mobile phone or computer. You can connect it to your machine using Bluetooth or USB, but today, I will talk about wireless Bluetooth connection in particular. Keep reading the blog to learn how to connect your device to your machine.
Cricut machines can be paired with 4 various devices that are Android, iOS, Windows, and Mac. Here, I am going to discuss connecting all four devices to your machine. You will be able to connect whichever device you are using to your machine.
How to Connect Cricut Maker Bluetooth to Windows?
To connect your cutting machine via Bluetooth, you need a device. A Windows desktop or laptop is a great option. Just remember that your computer needs to be either Windows 10 or newer. Apart from that, the computer needs some other features. Once you make sure that the computer is compatible with your machine, you can continue connecting the machine to your PC.
First, you must turn on your machine. To do that, you have to press the power button and hold it for a few seconds.
Then, make sure that you have put the machine within 10–15 feet of the device.
Once you have turned on the machine, you should move to your computer and check whether it is Bluetooth-enabled or not. To do that, go to Device Manager on your computer.
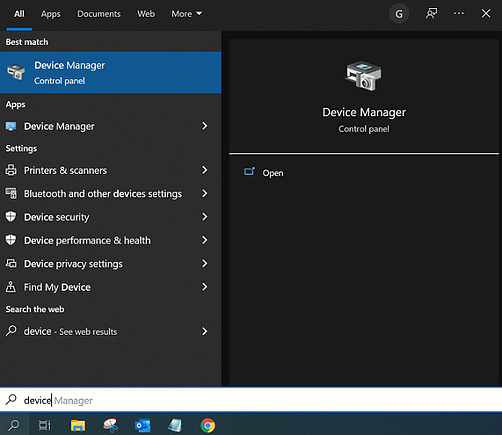
Now, check to see if Bluetooth is listed on the computer. If it is, your computer is enabled to use Bluetooth. If it isn’t, you will have to purchase an external Bluetooth dongle.
After checking Bluetooth inability, close the Device Manager and open Settings from the Start menu.
Next, open the Devices option, turn on Bluetooth, and click Add Bluetooth or other device.
After that, select the Bluetooth option.
You need to wait until the device searches for the machine model. When you see it among other devices, you have to select it.
If the computer prompts, type 0000 as the PIN and select Connect.
Your crafting machine is now connected to your Windows computer.
How to Connect Cricut Maker Bluetooth to Mac?
If you have a Mac instead of a Windows PC, you can also use this one with your machine. The computer is compatible with the Design Space app, and you can easily connect it to your cutting machine. Before connecting a computer, you just need to make sure that it is running macOS 11 or later and has other required features.
This is how you can connect the crafting machine to a Mac system:
Add your machine to an electric socket and then press the power button.
Next, keep the device and the machine in the range of 10–15 ft.
Then, open your desktop computer and go to the Apple menu.
Now, move to System Preferences and open the Bluetooth option.
Once you open Bluetooth, turn it on and look for your machine model.
Also, when the machine appears, tap on it.
If the computer asks you for a PIN, type 0000 and then select Pair.
Your pairing process for the machine and Mac is complete.
How to Connect Cricut Maker Bluetooth to Android?
You can also use a smartphone with your machine. Cricut is a versatile tool that works on both phones and desktops. You can connect an Android or iOS phone to your cutting machine and work with it. This is how you will have to connect your Android to the machine.
Start by turning on the machine and then keeping it within 10–15 feet of the phone.
Then, open Settings and go to Bluetooth.
Next, turn the Bluetooth on and search for your machine.
Now, click on the model when you see it.
Finally, your machine is paired with your Android phone.
How to Connect Cricut Maker Bluetooth to iOS?
To connect your machine to an iPhone, you have to follow these steps.
Initiate by enabling the machine to connect by pressing the power button and then putting it within 10–15 feet of your iPhone.
After that, go to the Bluetooth setting on your phone and turn the Bluetooth on.
Again, search for the machine’s name, and when you find it, tap on it.
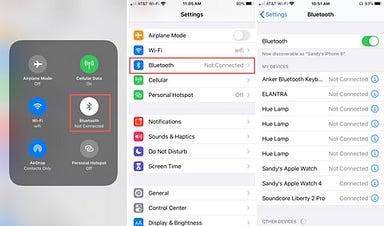
If prompted, you will need to enter the password — 0000.
In the last step, the pairing procedure will be complete.
Conclusion
I hope you read the blog till the end, and I am sure you have learned how to connect Cricut Maker to Bluetooth. Connecting your machine to your device is essential to start making crafts. Only after you connect the machine to your operating system will you be able to create projects on the Design Space software and cut unique designs on your machine. You have two options for connecting Cricut to your machine either using Bluetooth or USB. In this blog, I only talked about Bluetooth connection.
FAQs
How Can I Fix My Cricut Connection via Bluetooth?
If you are having connection problems while connecting your machine to any device via Bluetooth, you should make sure of a few things. First, you must check whether you have turned on Bluetooth on your device. You should also check and ensure that your machine is connected to a wall socket properly and is available for the connection. Lastly, check that the machine does not exceed the permitted distance of 10–15 feet. In that case, you will have to bring them closer.
Does Cricut Maker Have Built-in Bluetooth for Connection?
Yes, it does have. Although this machine is a first-generation crafting model, it is enabled with built-in Bluetooth. Hence, you will not need an external Bluetooth adapter to connect the machine to a Bluetooth device. You can simply turn on the machine, and it will be available for the connection on your device. You have to go to Bluetooth settings on your device and select the machine’s name. And your wireless connection will be done.
Does Cricut Maker Need a Wi-Fi Connection?
The answer depends on what you want Wi-Fi for. For example, if you want to know whether you need Wi-Fi to connect your machine to your device, then the answer is no; it does not need Wi-Fi. But if you want to use Wi-Fi for the internet connection, you can use it to download the Design Space app and work on your craft projects. However, you don’t necessarily need Wi-Fi for your machine.
Source: how to connect Cricut Maker Bluetooth
Visit here to Know More: Cricut.com/setup
Twitter
Pinterest
0 notes
Text
How to Install Cricut Maker 3? (Full Guide)
Have you bought a Cricut Maker 3? Then, you need to install it on your device. I’m a craft expert, and in this guide, I’ll share with you ‘how to install Cricut Maker 3‘ on your operating system.

As an expert, I have been using this machine for 4 years, and now I’m guiding beginners in installing their crafting machine. Now, let’s dive into the steps for installing your ultimate DIY machine to start your creative journey.
A Little Introduction About Cricut Maker 3
Before stepping into the installation process, let’s learn a little about its features and capabilities in detail. So, as we already know, it’s a machine full of wonder and joy. This machine has an extremely impressive range of features that I admire the most. With a sleek design and appearance, it has become the most desired machine in the DIY field.
Talking about its abilities, it can cut a huge number of materials, including delicate and complex ones. For instance, it can cut paper and wood precisely and effortlessly. To install it, you must first unbox it and connect it to a power supply. Once it is connected to the power supply, connect it to your device and proceed with your machine’s installation.
How to Install Cricut Maker 3 on Your Device?
After unboxing and checking all the equipment inside the machine’s box, let’s uncover the easiest way to install your machine on a computer device. Although you can connect it to a smartphone, I’m focusing on the computer connection.
After unboxing, place your cutting machine in a cool, safe place.
Then, connect it to a power supply. Use the power cord you received inside your machine’s box.
Now, hit the power button and switch on your DIY machine.

Thenceforth, connect your machine to the computer via Bluetooth. Otherwise, use the USB cord you received with the package.
Go to your computer and open a browser of your choice.
Next, navigate to design.cricut.com.
After that, click the Download button when you see it.
Also, head over to the Product Setup window.
On the next window, choose the Smart Cutting Machine option.
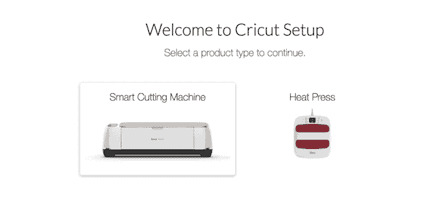
Proceed with the on-screen instructions.
At last, you can try doing a project with your machine to test its features.
That’s it for installing the crafting machine on your computer device. If you’re a little concerned about its connection to your device, let’s check it, too.
How to Connect Cricut Maker 3 to Your Device via Bluetooth?
After learning how to install Cricut Maker 3, you may have a query about connecting your both devices together. If you’re trying it for the first time, let me guide you through it.
Make your first move by turning on the machine and computer.
Then, head to the Start menu and locate the Devices option.
Now, under the Bluetooth settings, hit the Add Bluetooth or other device option.
After that, your PC will detect the devices that are available nearby.
Once your machine appears, select it and let it connect to your PC.
Finally, go to the Machine Setup option, and you’ll see your machine connected there.
You can connect your devices together using a USB connection, but a wireless connection such as Bluetooth will install your machine effortlessly. When you know everything about the installation, start with your machine and create whatever you want. There are so many projects you can try with it.
Important Note: Don’t forget to check the minimum system requirements before trying to install your machine and connect it with your computer.
FAQs
How to Install Cricut Maker 3 on Mac?
To install your machine on a Mac, follow these steps:
First, unbox your machine and connect it to a power supply.
Then, turn on your machine.
Now, get your computer and connect it to your machine.
Choose either USB or Bluetooth to connect your devices together.
Next, pair your devices together.
Visit cricut.com/setup and download the Design Space app.
Continue installing the app and sign in to it.
Finally, your machine is paired with your Mac.
Is Cricut Design Space a Good Software?
Yes, Design Space is excellent software for your DIY routine. It has several amazing features that work best for beginners—to pro-level crafters. Since this software is absolutely free, you don’t feel it is a heavy investment.
How Can I Connect My Cricut Maker 3 to My iPhone?
To connect your product to an iPhone, use these steps:
First, connect your machine and iPhone with a suitable connection.
You can select from the USB or Bluetooth connection.
Now, download the app on your iPhone using the App Store.
Then, open the app and sign in with your account details.
Finally, your crafting machine will be connected to the iPhone.
Source: How to Install Cricut Maker 3
#cricut maker setup#cricut maker 3 setup#install cricut maker 3#how to install cricut maker 3#cricut machine setup#design.cricut.com#cricut design space app#cricut design space software#cricut design space download
0 notes
Text
How to Use Cricut Joy to Create Your First Project?
Are you looking for an easy guide on how to use Cricut Joy? You are in the right place. Cricut Joy is one of the smallest cutting machines, and it is great for beginners and anyone who wants to craft occasionally. Its lightweight, compact, and portable design makes it unique and a good choice for crafters. This machine can be used to make last-minute projects as it can be carried anywhere.
Read this beginner guide to explore what you can do with this crafting machine. Follow this guide to the end to make the most of Cricut Joy’s features.
Step 1: Unboxing Your Cricut Machine
The very first step is to unbox your machine and assemble all the tools and supplies in one place. Let’s look at the list of materials under the box:
Step 2: Turn on Your Machine
Before you continue, discover how to use Cricut Joy to make your DIY projects. Here’s how to set up your machine for the first time at home.
Step 3: Connect Cricut to Your Computer
This step is very important. In this step, you will read how to add your machine to the computer. Make sure your machine is placed on a flat surface and is 10-15 feet away from your PC. Now, follow these simple steps:
Step 4: Add Your Machine to Design Space
Once you have installed and logged into the Design Space software, it’s time to launch your machine into the application. Here, click on the drop-down menu, and then select the New Machine Setup option, and choose your machine model from the list.
Step 5: Materials You Will Need
You will need some materials to complete your project with this machine. Here is a complete list.
Step 6: Create a Design
Above, you read the materials you will need to create your project. Here, you will be reading how to make the design in the program and then how to use Cricut Joy to cut out your design:
Step 7: Weed Out Excess Vinyl
After finalizing your design and the machine has finished cutting, it will automatically unload your design. Next, you can use the weeding tool to remove the excess parts from the design.
Step 8: Apply Your Design
Now that you have removed extra parts from your design, it is time to apply them to your desired surface. To do this, cut the transfer tape a bit larger than your design and use it to the design. After that, place the vinyl on the wood with the adhesive side up. Then, scrape off the transfer tape on your wooden box and carefully remove the tape from your vinyl to get the results. You can use a scraper tool to make sure that the design sticks properly to the wooden box.
Note: Remember to mirror your design in the Cricut app before cutting. This is done so your machine can cut your text and leave the liner intact with the design. If you do not do this process, your text may appear backward.
Conclusion
Hopefully, this write-up will help you know how to use Cricut Joy to create your first project. It is an amazing crafting tool that gives you many options, and crafting projects with this machine are endless. You can make decals, cards, gift tags, stickers, and more. Here, we have discussed setting up the machine and using it with other tools to complete your project in detail. It is not difficult to understand if you follow this guide thoroughly.
FAQs
How do I connect a Cricut Joy to a mobile?
To add your machine to the smartphone, you can use Bluetooth to pair both devices:
Can I connect Cricut Joy using USB?
No, you cannot connect this machine by using a USB cable as it does not have a USB port like Cricut Explore and Maker models. It is a small machine that uses Bluetooth technology. So, if you want to connect your device to this machine, you can only connect it via Bluetooth.
Do I need any software to access Cricut Joy?
Yes, you do need the Design Space software to access the machine. With this app, you can use your machine to cut your design. To start using the machine, you have to install this program to create unique designs for your projects, connect your machine to the device, and send your design for cutting.
Visit: cricut.com/setup www.cricut.com/stup login
Source: https://cricricutdesigncut.wordpress.com/2024/12/17/how-to-use-cricut-joy-to-create-your-first-project/
#design space setup#digital design#cricut setup#www.cricut.com/setup\cricut explore air 2 setup#www.cricut.com/seup#www.cricut.com/setup login#www.cricut.com setup#cricut design space setup#cricut design space app#cricut design space download#cricut design space software#cricut design space login#setup cricut design space
0 notes
Text
How to Setup Cricut Maker 3: A Complete Guide for Beginners
Have you purchased a Cricut Maker 3 and want to learn how to setup Cricut Maker 3? In this case, you have reached the right place. Here, you will learn about the basic procedure for your machine setup. To start using the machine, you should follow the steps below and set your machine up accordingly.
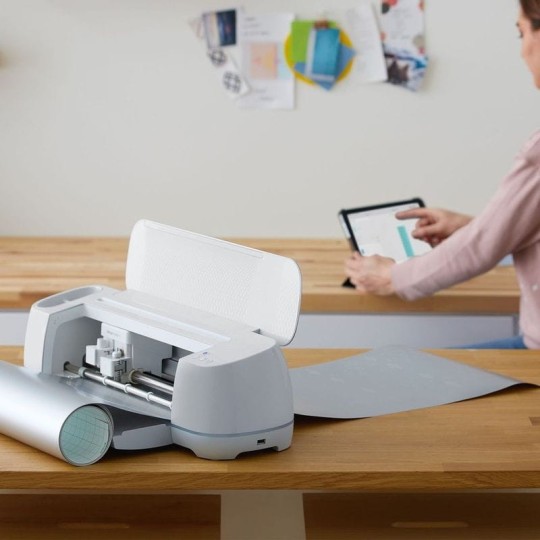
This machine has advanced features since it is the latest tool in the Cricut family. It can cut more than 300+ materials, including smart materials that do not need a mat. In this blog, I will discuss how to connect your machine to a computer and then download the Design Space software. So, let’s get started.
Preparing Your Cricut Machine for Setup
To begin learning how to setup Cricut Maker 3, you should start by preparing the machine. Before you go on to the setup process, you need to do the following things.
First, unpack the machine and remove all the items inside the box.
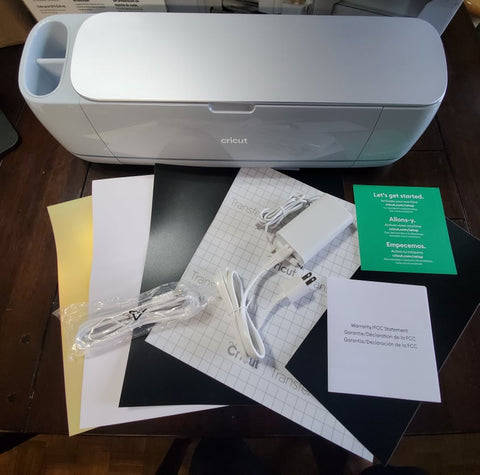
Next, you should check them all and ensure that all the materials are there and nothing is missing.
Then, you have to place the machine in a safe place on a flat surface.
Now, the machine is ready to setup. You can start the process by following these steps.
The first thing you need to do is plug the machine into a socket using the power adapter.
After that, press the power button on the machine and hold it for a while. When the machine is on, it will be ready to connect.
Now, connect the machine to your computer using Bluetooth. Although you can connect them using USB as well.
Also, download the Design Space software on your computer and sign in.
If you are a new user, you may have to create a new account.
How to Connect Cricut Maker 3 to Computer via Bluetooth?
When you want to learn how to setup Cricut Maker 3, one of the most important things you need to do is connect the machine to your computer, either a Windows or Mac. Here, you will see the connection process for a Mac computer.
To initiate the connection, plug the machine’s power adapter into the wall socket and press the power button of the machine.
Next, the distance between the machine and your system does not have to exceed 10-15 feet so that your computer can easily detect the machine.
Then, go to the Apple menu, System Preferences, and Bluetooth.
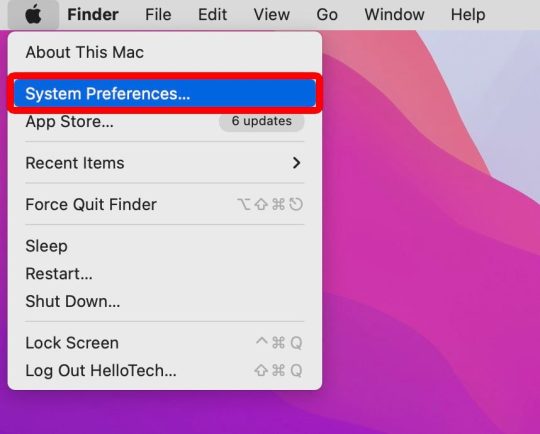
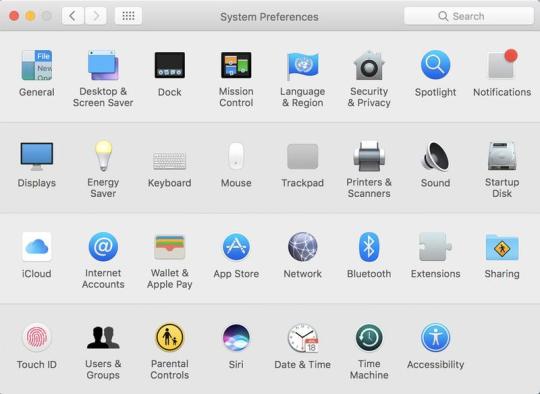
After that, turn on Bluetooth and start searching for your machine’s name.
Now, you will find the machine on your screen; you have to select it and wait.
The machine will be paired to your computer in no time.
In the end, you should go to the app and check New Product Setup. The machine will appear to be connected.
How to Download Cricut Design Space on Computer?
The final step in learning how to setup Cricut Maker 3 is downloading the app. The app is a must for your machine as it operates on your computer. It is also important to start creating projects. To download this software on your Mac, follow the steps below:
To begin, open your Mac computer and go to cricut.com/setup.
Then, you should look for the Design Space app and click Download. Before downloading the file, you will have to agree to Cricut’s Terms and Conditions.
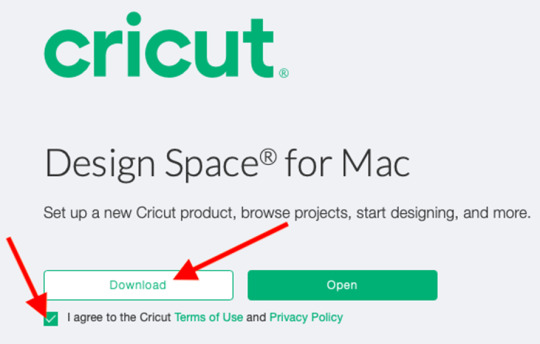
Next, the file will be saved in the Downloads folder, although you can choose a folder where you would like to download it.
After that, you have to go to the folder and double-click on the file.
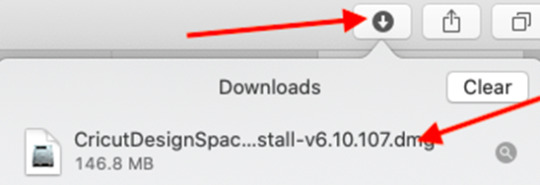
Now, a new window will pop up on the computer screen. The window has two icons: the Cricut icon and the Applications icon. You have to drag the app icon into the Applications icon.
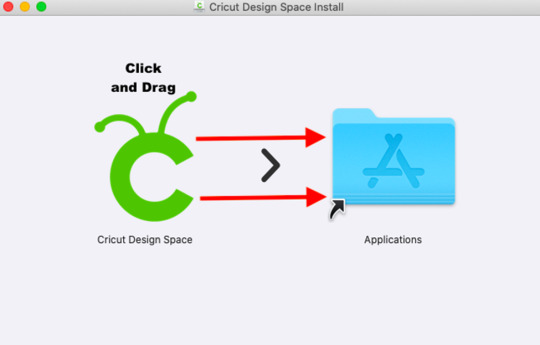
Also, you need to open the Applications folder and click on the software to launch it.
Click on Open,and the Design Space will be installed on your computer.
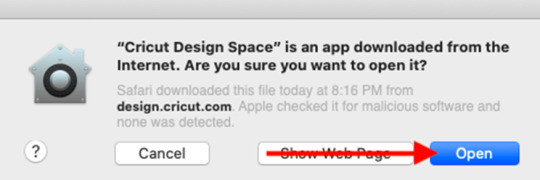
Log into your account, and the app will be ready to use.
Finally, you learn the full process of how-to setup Cricut Maker 3. Now, you can easily setup your machine and work on your projects.
0 notes