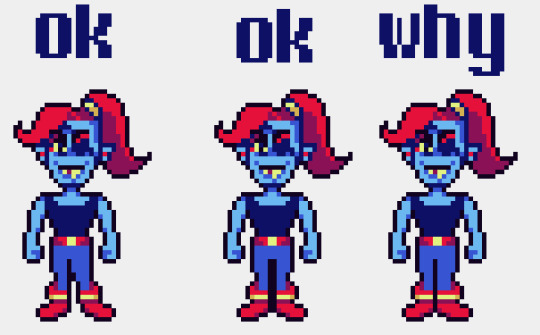
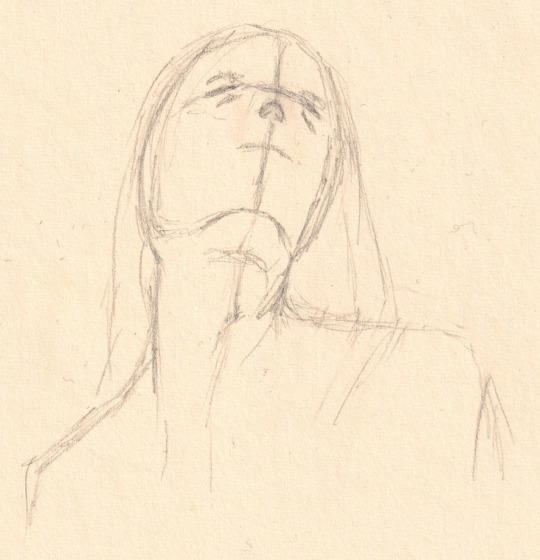
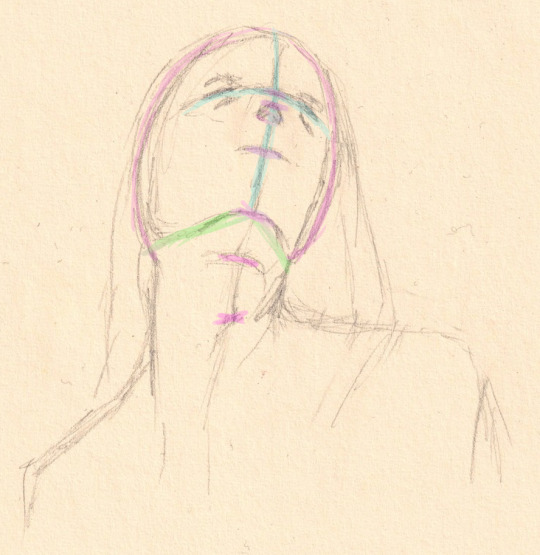
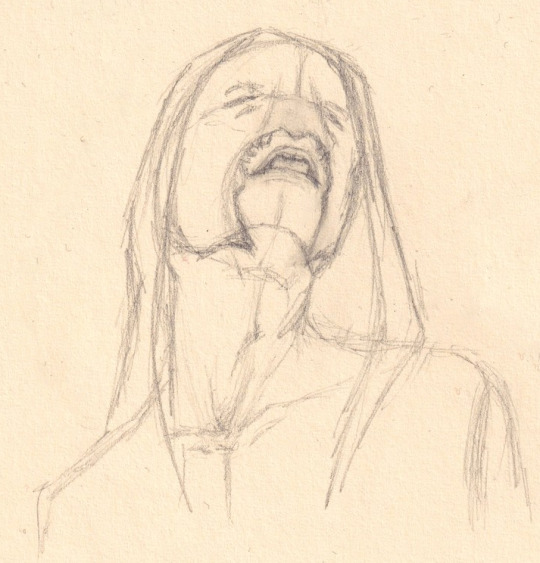
#I need to work on my angles and proportions a lot
Text

Poor poppy, a three tiered cake is simply not big enough!
#wally darling#welcome home art#wally#poppy partridge#sally starlight#creepy#disturbing#horror#kay ima be honest#I forgot how much poppy’s design changed#And so I had to basically redo her xD#Cause I had her most recent design alongside their older designs#I was like oh phooey#I’m still struggling to figure out why he stares at certain things#This poor baby child lol#I’m actually like a super amateur artist#I need to work on my angles and proportions a lot#yus the life of a hooman
5K notes
·
View notes
Text
Ok! I've finally decided to put together a (somewhat) comprehensive tutorial on my latest art~
Please enjoy this little step-by-step 💁♀️
First things first--references!
Now I'm not saying you have to go overboard, but I always find that this is a crucial starting point in any art piece I intend on making. Especially if you're a detail freak like me and want to make it as realistic as possible 🙃
As such, your web browser should look like this at any given point:

Since this is a historical piece, it means hours upon hours of meaningless research just to see what color the socks are, but...again. that isn't, strictly, necessary 😅
Once I've compiled all my lovely ref pics, I usually dump them into a big-ass collage ⬇️
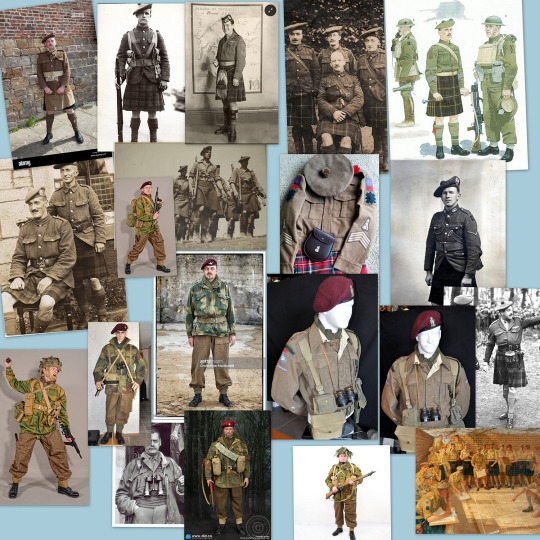
(I will end up not using half of these, alas :'D)
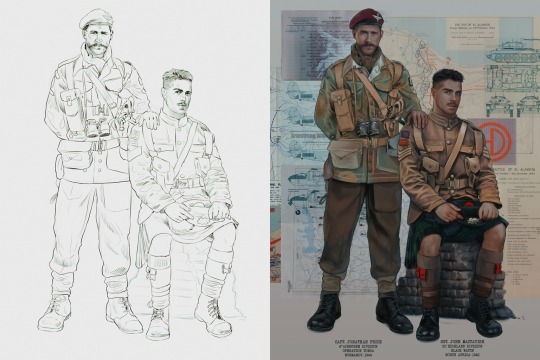
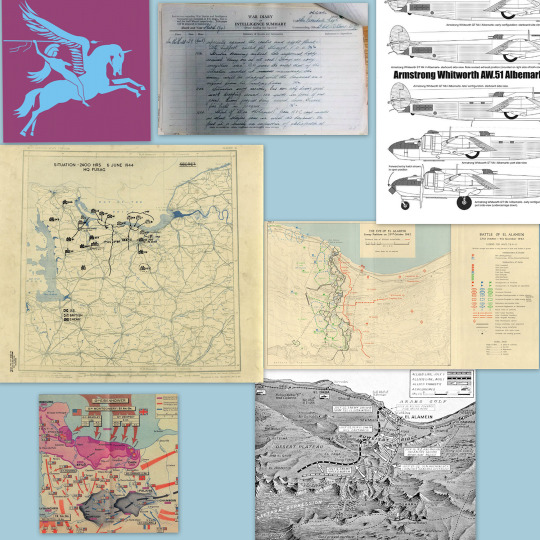
Another reference search for background material, and getting to showcase our models of choice for this occasion~
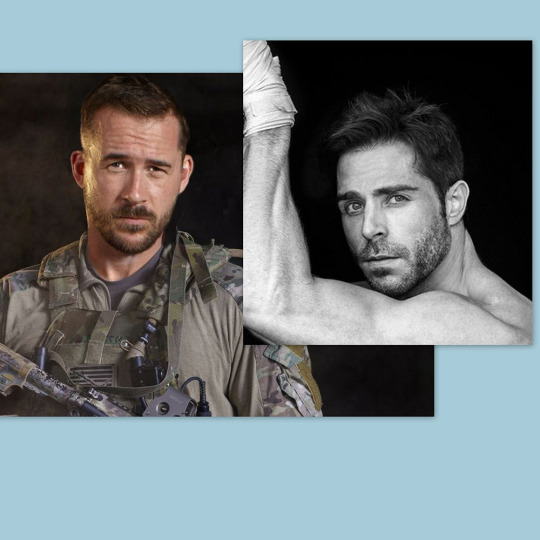
When picking a reference for an actor or model, the main thing I keep in mind (besides prettiness 🤭) is lighting and orientation. Because I already kinda know what pose I'm gonna go with for this piece, I can look for specific angles that might fit the criteria. I should mention that I am a reference hound, and my current COD actor ref folder looks like this:

Also keep in mind, if you're using a ref that you need to flip, make sure you adjust accordingly. This especially applies to clothing, as certain things like pants zippers and belt buckles can be quite specific ☝️
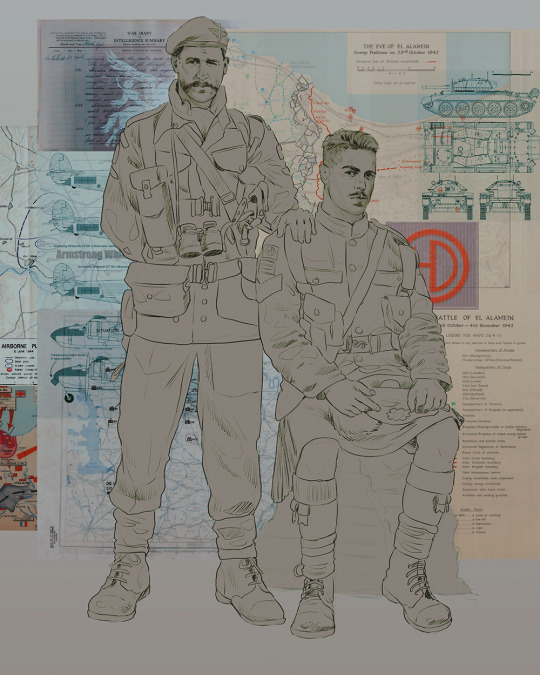
Now that we've spent countless hours googling, it's time to start with a rough sketch:
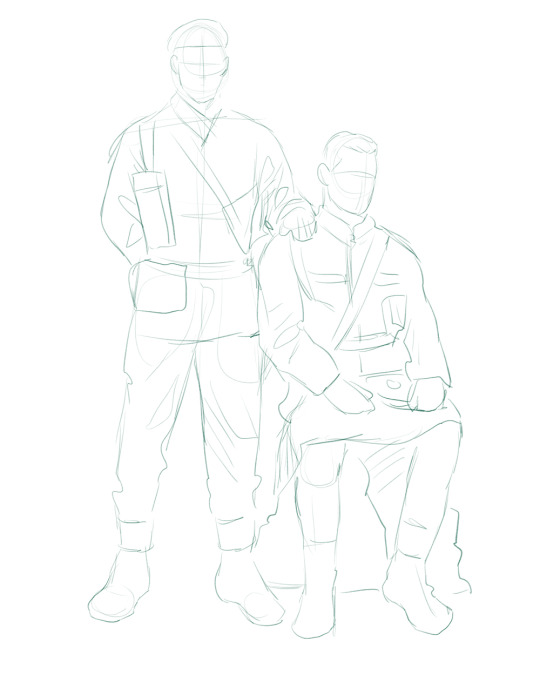
It doesn't have to be pretty, folks, just a basic guideline of where you want the figures to be.
The next step is to define it more, and I know this looks like that 'how to draw an owl' meme, but I promise--getting from the loose sketch above to below is not that difficult.
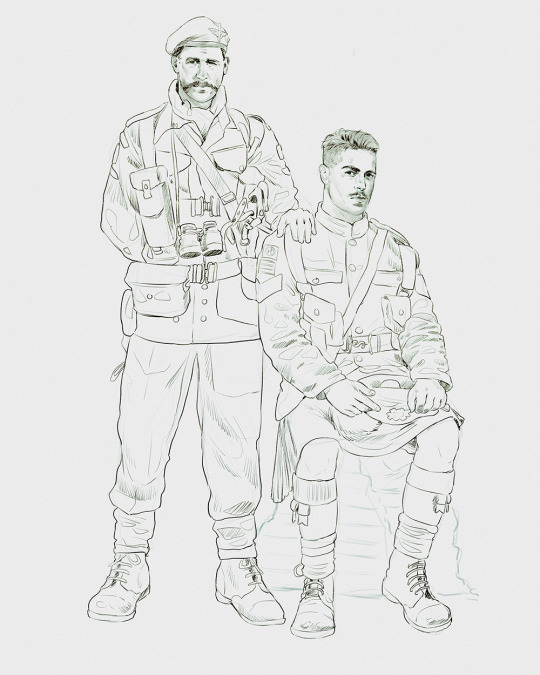
Things to keep in mind are--don't go too in-depth with the details, because things are still subject to change at this point. In terms of making a suitable anatomically-correct sketch, I would suggest lots of studying. This doesn't even have to be things like figure drawing, I genuinely look at people around me for inspiration all the time. Familiarize yourself with the human form, and things like weight, proportions, posing will seem a little more feasible.
It's also important at this stage to consider your composition. Remember to flip the canvas frequently to make sure you're not leaning to one side too often. I'm sure something can be said for the spiral fibonacci stuff, which I don't really try to do on purpose, but I think keeping things like symmetry and balance in mind is a good start ✌️

Next step is just blocking in the figures. Standard. No fuss 👍
Now onto the background!
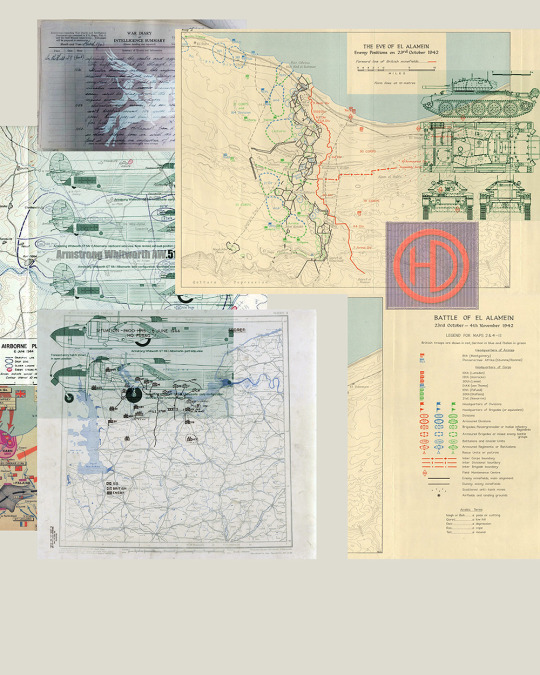
It's frankly hilarious how many people thought I was *hand-drawing* these maps and stuff 😂😂 I cannot even begin to comprehend how insanely difficult that would be. So yeah, we're just taking the lazy copy and paste way out 🤙
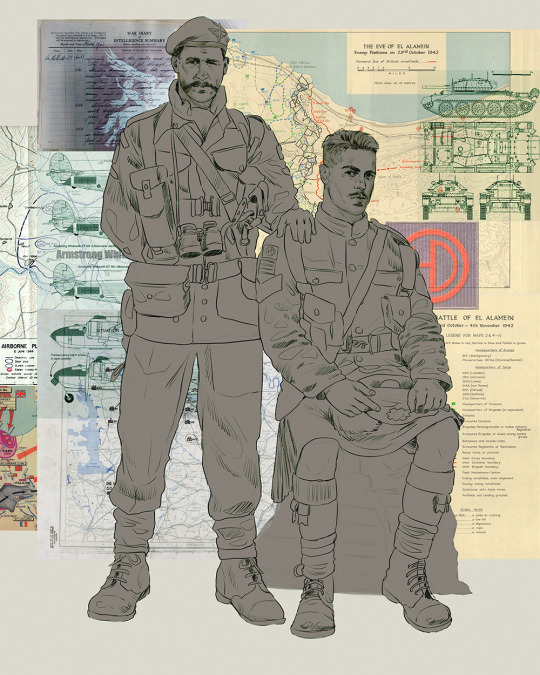
I almost always prepare my backgrounds first, and this is mostly to get a general color scheme off the bat. For collage work, it's really just a matter of trial and error, sticking this here, slapping this there, etc. I like to futz around with different overlay options until I've found a nice arrangement. Advice for this is just--go nuts 🤷♀️
Next, I add a few color adjustments. I tend to make at least 2 colors pop in an art piece, and low and behold, they usually tend to be red and blue ❤️💙There's something about warm/cool vibes, idk man..
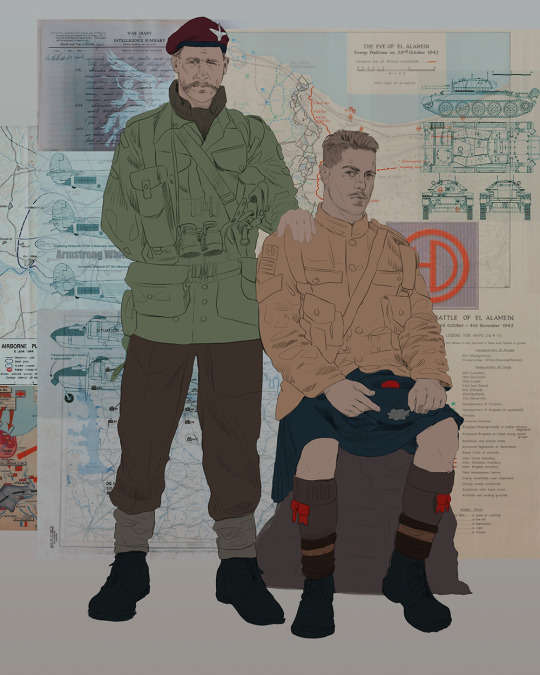
Now we move on to coloring the figures. This is just a basic block and fill, not really defining any of the details yet.
Next, we add some cursory values. Sloppy airbrush works fine, it'll look better soon I promise 🙏
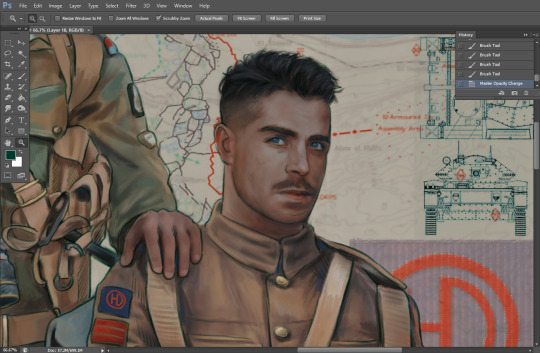
And now--rendering!
I know a lot of beginner artists are intimidated by rendering, and I can totally understand why. It's just one of those things you have to commit to 💪
I've decided to show a brief process of rendering our dear Johnny's face here:
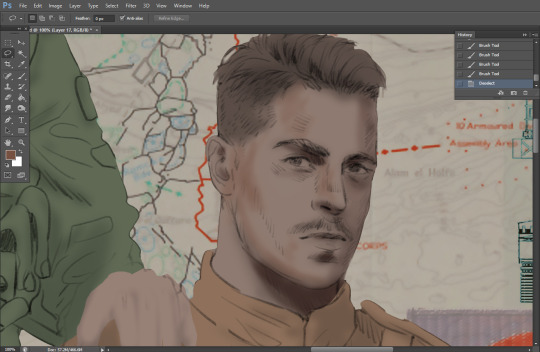
Starting off, I usually rely on the trusty airbrush just to get some color values going. Note--I've kept my sketch layer on top, but feel free to turn it on and off as you work, so as to not be too bound to the sketch. For now, it's just a guideline.
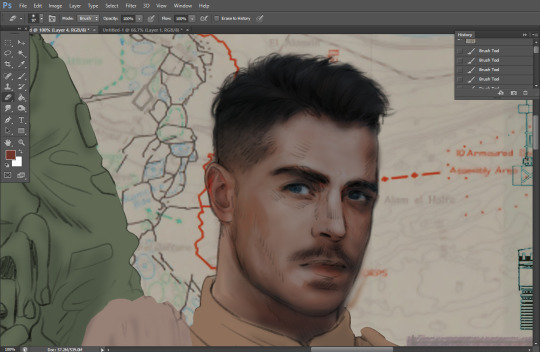
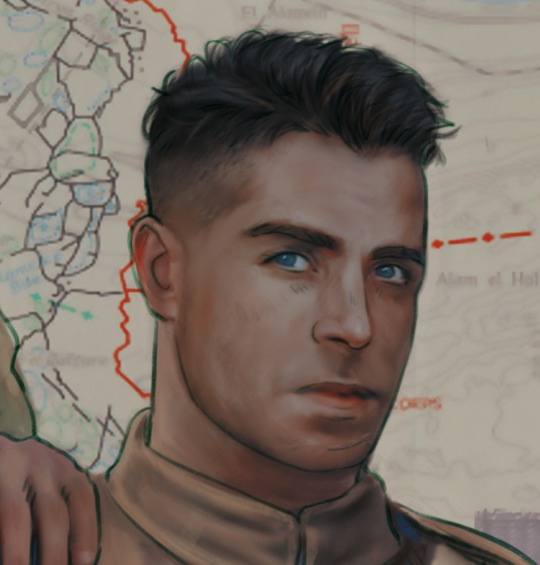
This next stage may look like a huge jump, but it's really just adding more to the foundation. I try to think of it like putting on make-up in a way~ Adding contours, accentuating highlights. This is also where I start adding in more saturation, especially around areas such as ears, nose and lips. Still a bit fuzzy at this point, but that's why we keep adding to it 💪
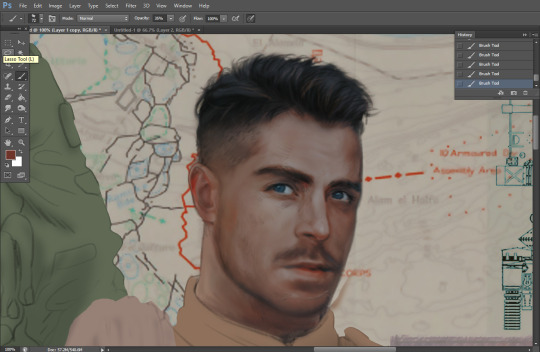
A boy has appeared! See--now I've removed most of the line layer, and it holds up on its own. I'll admit that in order to achieve this realistic style, you'll need lots and lots of practice and skill, which shouldn't be discouraging! Just motivate yourself with the prospect of getting to look at pretty men for countless hours 🙆♀️
I'll probably do a more in-depth explanation about rendering at some point, but let's keep this rolling~

Moving forward is just a process of adding to the figures bit by bit. I do lean towards filling in each section from top to bottom, but you can feel free to pop around to certain parts that appeal to you more. I almost always do the faces first though, because if they end up sucking, I feel less guilty about scrapping it 😂 But no--I think he's pretty enough to proceed 😚
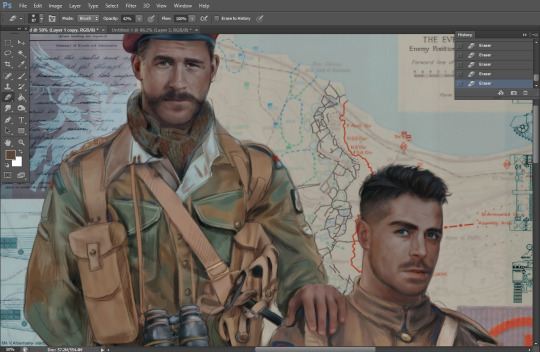
They're coming together now 🙆♀️ Another helpful tip--make sure you reuse color. By that, I mean--try to incorporate various colors throughout your piece, using the eyedropper tool to keep a consistent palette. I try to put in bits of red and blue where I can
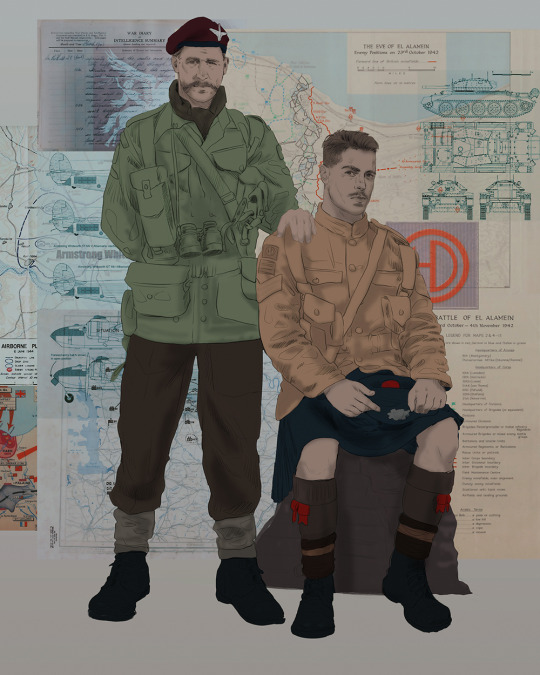
Here they are fully rendered! Notice I've made a few subtle changes from the sketch, like adjusting the belt buckles because I made a mistake 😬 Hence why you shouldn't put too much stock in your initial sketch~
The next step is more of a stylistic choice, but I usually go over everything with an outline, typically in a bright color like green. Occasionally, I can just use my initial line layer, but for this, I've made a brand new, cleaner line 👍
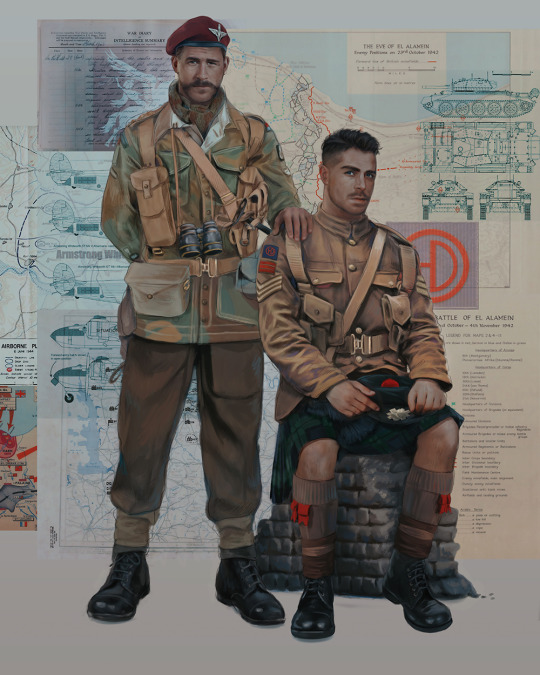
And the final step is adjusting the color and adding some text:
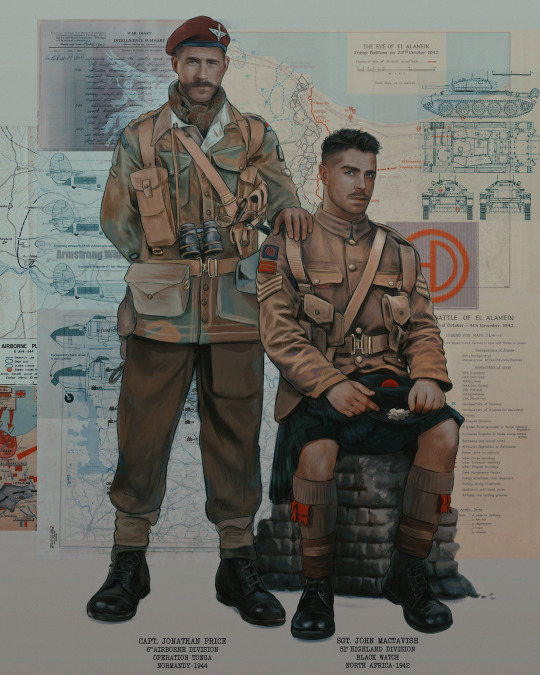
Tada!! It's done!
All in all, this took me the better part of a week, but I have a lot of free time, so yeah ✌️
I hope you appreciated that little walkthrough~ I know people have been asking me how I do my art, but the truth is--I usually have no clue how to explain myself 😅 So have this half-assed tutorial~
As a bonus, here is a cute (cursed) image of Johnny without his mustache:
A baby, a literal infant child !!! who put this wee bairn on the front lines ??! 😭
Anyway! peace out ✌️
#tutorial#my art#art tutorial#since people have been asking#I remembered to save my process from this latest work~#enjoy 🙆♀️
1K notes
·
View notes
Text


A set of very conceptual notes I drafted a while back for someone asking for advice on learning to draw humans. I'm entirely self-taught so this is less of a tutorial and more of a very rambling set of general principles I follow and ideas that helped while I was learning. I figured I'd post it in case anyone else could get use out of it!
I also recommend checking out:
Drawing East Asian Faces by Chuwenjie
How to Think When you Draw (lots of good tutorials in this series)
Pose reference sites such as Adorkastock
Transcript and some elaboration under the cut:
Img 1 - Drawing a face
The two most important elements (at least for me) when drawing a face are the outline of the cheek/jaw and the nose*. I often start with a circle to indicate the round part of the skull, then add a straight like and a 'V' to one side [to create the side of the face and the jaw].
The nose creates an easy template for the rest of the face's features to follow (eyebrows at the top of the nose bridge, eyes towards the center of the bridge, ear lines up to eye) and the placement/direction and overlap with other features is a very simple way to indicate dimension.
[A sketch of a face that has been adjusted by moving its parts to create 3 different angles. The following text is underneath:]
-Different 3/4th views can be created just by adjusting the position of and amount of overlap between the facial features.
- The top of the ear usually lines up with the corner of the eye. Think of how glasses are designed [specifically, how the arms run from the eyeline to the ear]
[I go on a tangent in these next few paragraphs]
*One thing I see many artists do - not just beginners - is learn how to draw A Person. As in, one singular person with one set of bodily proportions and one set of facial features. It's an issue that runs a bit deeper than 'same face syndrome' because sometimes these artists can draw more than one face, they're just not very representative of [the diversity present across] real people.
Part of the reason I'm talking more about how to think about approaches to drawing - rather than showing specific how-to's - is because there is no one correct or right way to draw a person. The sooner you allow yourself to explore variety - fat people, old people, people of color, people with [conventionally] 'unattractive' features - the easier it'll be! Artists often draw their own features honestly and without [harmful] caricature, so it's always a good idea to look at art made by the kinds of people you're trying to draw if you're ever unsure about how to handle something.
In general, it's far more important to learn how to interpret a variety of forms than to learn how to replicate the Platonic Ideal of the Human Body.
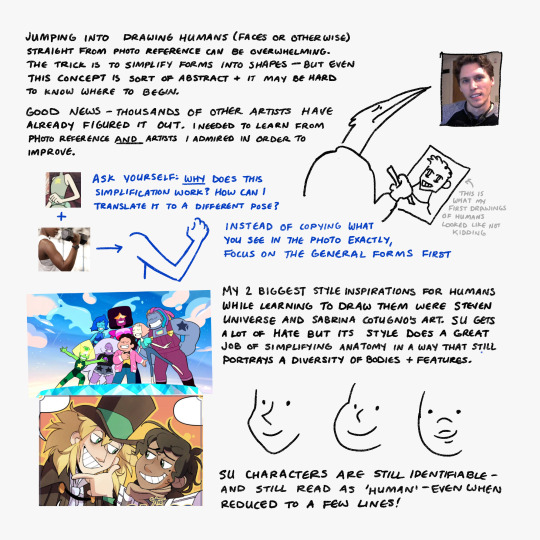
Img 2 - Stuff that helped me
Jumping into drawing humans (faces or otherwise) straight from photo reference can be overwhelming. The trick is to simplify forms into shapes - but even this concept is sort of abstract and it may be hard to know where to begin.
Good news - Thousands of other artists have already figured it out. [When starting out] I needed to learn from photo reference AND artists I admired in order to improve.
[When looking at stylization you are inspired by] ask yourself: WHY does this simplification work? How can I translate it into a different pose? Instead of copying what you see in a photo reference exactly, try to focus on the general forms first.
My two biggest style inspirations for humans while learning to draw them were Steven Universe and Sabrina Cotugno's art. SU gets a lot of hate [in this instance I was specifically referring to a time on tumblr when the art was knocked for 'losing quality'] but its style does a great job of simplifying anatomy in a way that still portrays a diversity of bodies + features.
[Extremely simplified drawings of Lapis, Steven, and Amethyst]
SU characters are still identifiable- and still read as 'human' - even when reduced to just a few lines!
Img 3 - Things I keep in mind while drawing side profiles
- Eyebrows + eyes close to the 'edge' of the face
- Forehead needs enough room for a brain
- Eye is > shaped from the sides
- Mouth kinda halfway [between the nose and the chin] but closer to the nose
- Skin/fat exists under the jaw [and connects to the neck]
- neck is about one half the width of the whole head
- the back of the skull always sticks out a bit further than you might expect
- Sometimes less is more - contours exist on every face, but drawing them in may make your character seem much older than they're supposed to be. However, it's a good idea to use them when you *want* your character to look old!
These are very general notes- every face is different and has different proportions [and playing around with them creates unique and interesting character designs]
#2023#may 2023#i realized this is pretty nonsensical while transcribing it LOL#feel free to send asks if anything is unclear#but again im not any sort of professional
562 notes
·
View notes
Note
Any advice on drawing McCoy? I’m not used to drawing ancient wrinkley bastards (affectionate) and it’s surprisingly tough v-v
FOR SURE lmao i made. a diagram. just a warning that i am going to be irritating and long winded because u just hit a topic i really like sorry lmao
so first off i did some traces just to show whats there vs redraws to show my interpretation
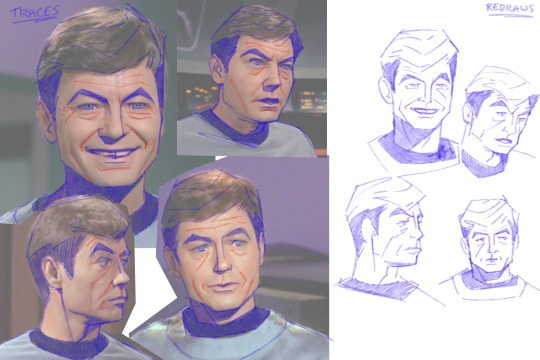
ive said this on other asks but again jsyk, tracing isnt bad!! its a tool. theres some stuff with intellectual property and whatnot but using tracing to study shapes and forms is a really valuable practice.
also just taking some time to learn facial structures and anatomy is super useful, reading what bones and muscles are where and how they interact with one another. taking this info and staring in the mirror and moving your face around and thinking about it. just really furthers understanding of how the face works. trying to sound normal about this but i love anatomy and motion and physics and whatever


anyways im going to go through all the numbered points so there's no confusion.
1. forehead lines - self explanatory. more prominent when brows are raised
2. crows feet - at the outer corners of the eyes, more prominent when smiling or squinting
3. nasolabial folds - the folds that go from the corners of the nose to the corners of the mouth. more prominent when the mouth is wide, like smiling
4. brow furrow - self explanatory, most prominent when brows are furrowed. mccoy tends to have two right next to his eyebrows, kirk has one in the middle. everyones face works different lmao
5. chin crease - caused by how the chin and lower lip interact.
6. nasojugal groove - start from the inner corners of the eye and can extent over the cheeks. everyone has these and idk why people dont like them i think theyre really cool!!!! but Society. i guess. :/
7. eye bags - caused by the skin sagging beneath the eyes. mccoy isnt even that old in tos i think hes meant to be mid 40s by the end of the 5 year mission, hes just got really prominent eye bags lmao
8. idk what the name is for these, but when the mouth is wide and pushes the skin to the sides, these folds sometimes form outside of the nasolabial folds
9. philtrum - the groove above the upper lip. i dont usually draw this but mccoy's struck me as prominent enough that i usually draw it on him
10. masseter - the muscle that moves the jaw up and down. its a pretty rugged muscle and while i wouldnt say mccoy's is especially prominent, it kind of extends that nasojugal groove from certain angles/positions
11. orbicularis oris - mouth muscle, usually easier to see when lips are pursed or frowns are pulled. mccoy's is pretty prominent from 3/4ths or side, his mouth tends to protrude in profile
12. this isnt a muscle but more of a line defining the planes of the face, but since i drew it i felt i should explain lmao
a few points:
im an animator i tend to exaggerate and emphasize certain things so i usually make him more square.
i like to combine eyebags and crows feet for brevity/flow, same with nasojugal grooves, eyebags, and masseter lines. my approach is always subject to change based on pose, expression, reference image, etc.
i take out details that i deem redundant or cluttering and keep what details i need to make things feel Right
all this info is applicable to any character of any age, its just in how you apply it and facial proportions that willl change how old a character is perceived to be
there's a lot more with drawing a Character rather than an Actor, just because the features are there doesnt necessarily mean things will feel correct? its very much in the mannerisms and poses and expressions
i only went over my approach to his likeness but not really body type or posing or anything idk if u want that i could always try to answer that later haha
_______________
anyways all that info kind of exists nebulously in my brain while i draw its not like im sitting there thinking Must Draw. Nasolabial Fold...... i jsut do what feels right with the visual info i have. also i love specificity in faces.... i dont like to be a hater but when every character is drawn the same it pisses me off a little lmao. so
also dont take my word as The Only Way to do anything i just draw how i like to draw and no one should feel like these are things that Must be done to be a good artist or anything do whatever the hell u wanna do
#anyways my apologies that was. a lot#it will happen again if asked of me.#anon#ask#everyone has this stuff going on with their face and its really cool but capitalism and the beauty industry and whatnot#have been rotting peoples brains since the moment they came to be#the more u look at and appreciate how ur skin an muscles and bones interact with one another the more fine u are with your own face#trust me#because its really cool. like mechanically and stuff#idk if its like theraputic or something but maybe it is or maybe i think about it all way too much#how i draw#ive got some other similar things under that tag i think pertaining to merlin but still similar info
154 notes
·
View notes
Text
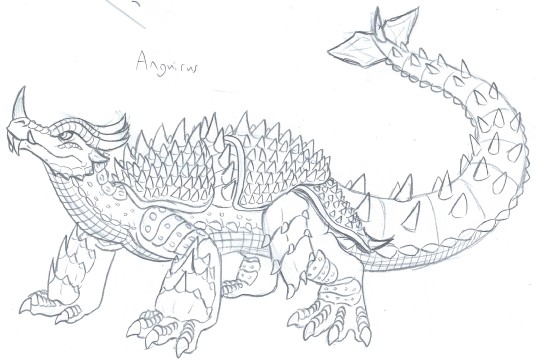
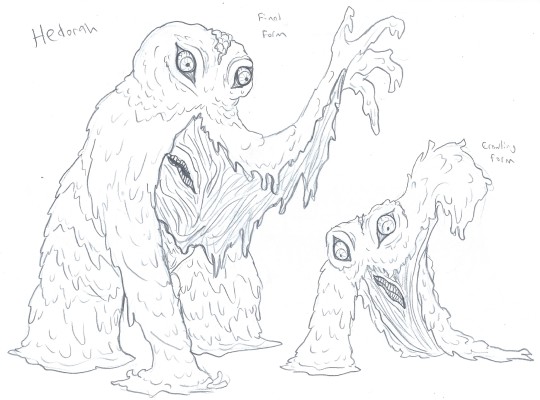

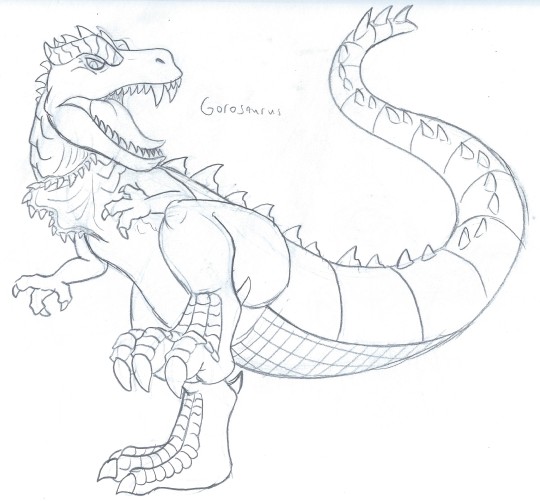
Alright, some more Godzilla monster sketches. First, a batch of polished designs for Anguirus, Hedorah, and Gorosaurus. If you're thinking, "Wait, did I miss Gorosaurus sketches?", the answer is you did not...
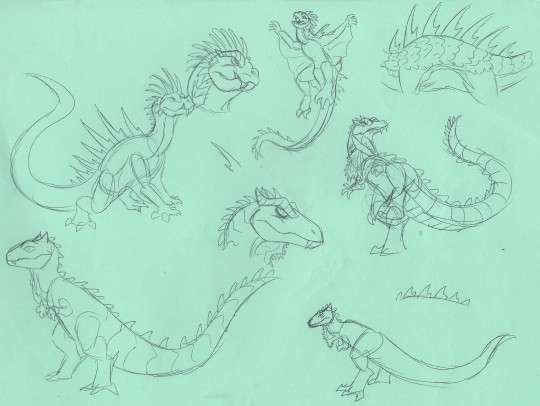
...because I figured him out pretty quickly. Retrosaurs come easy to me by this point. Varan's going to need some more work, though.
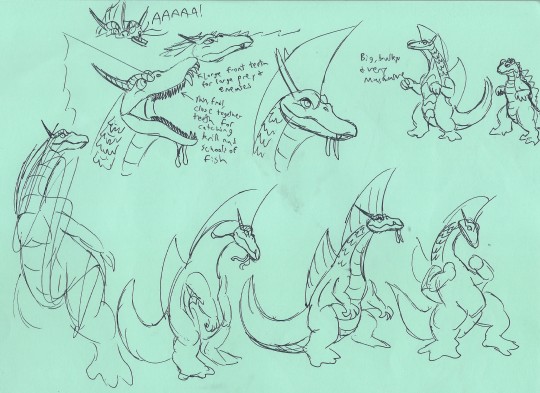
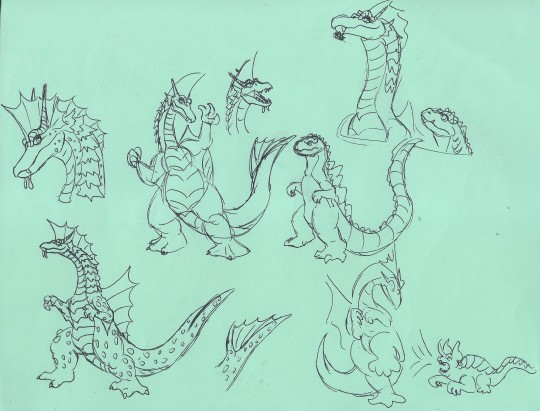
I think I got my approach for Titanosaurus pretty quickly, but had to spend a while refining the details. The original Titanosaurus's head has all these details fighting for prominence - the big fin, the fin ears, the horns, AND some catfish barbells, all clustered around the eyes. It's a lot! Figuring out how to work them all in elegantly was difficult, and I ended up shifting things around. Even then, I think I'm probably going to cut the barbells in the finished design.
You might notice that both Titanosaurus and Gorosaurus (and Varan's unfinished sketches) have some details in common with my Godzilla. I'm kinda taking a page from Singular Point and making them part of the same clade of fictitious prehistoric reptiles - Goro's species lost the gills as it took on a fully terretrial existence, while Titano's gills are more prominent to enable her almost entirely aquatic lifestyle.
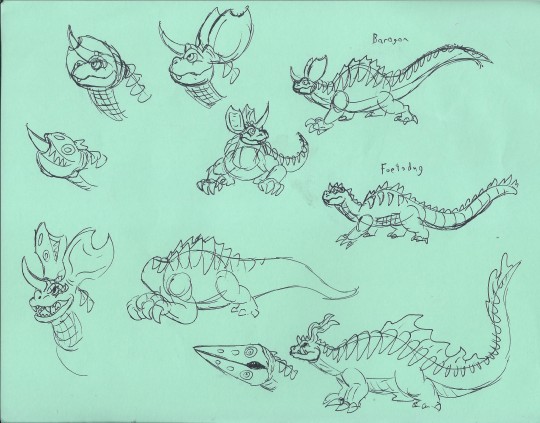
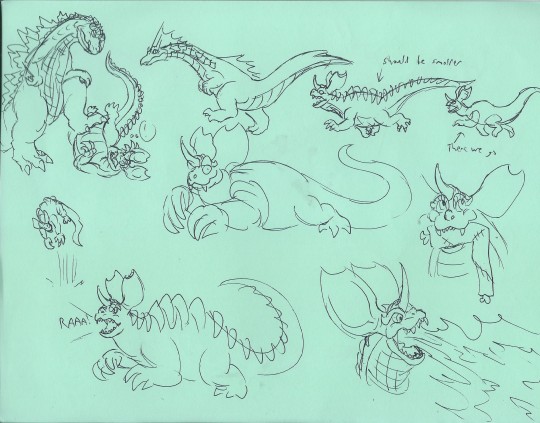
Baragon gets to join the Godzilla relative train too, mainly for meta reasons. He's somewhere between Godzilla's branch of the family tree and Gorosaurus's - because his role in Frankenstein Conquers the Role was at one point pitched to be Godzilla's, and his role in DAM was ultimately taken by Gorosaurus, you see. I didn't change his design very much beyond skewing some proportions to make him seem more mole-y - I mean, I tried to, but Baragon's hard to improve upon, he's already weird as fuck as is. Baragon's... kinda perfect?
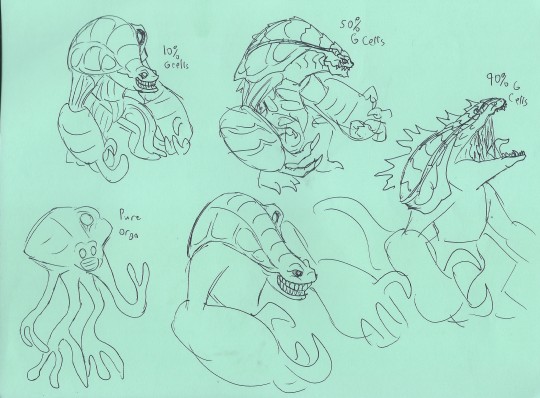

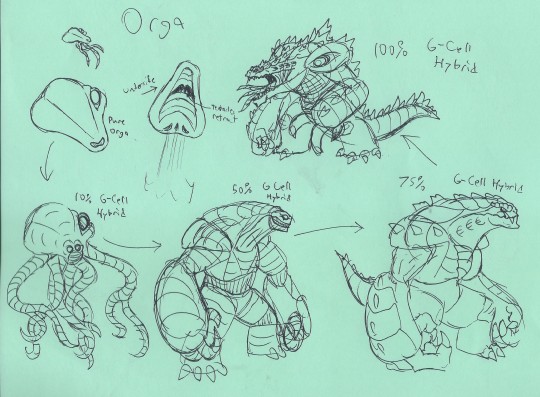
Stepping away from prehistoric monsters, I had fun with Orga, mainly by playing with elements of his Godzilla Unleashed: Double Smash incarnation. He's gonna getcha with his big ol' grabby hands, you see. God I wish I could find that tumblr post. EDIT: There it is!
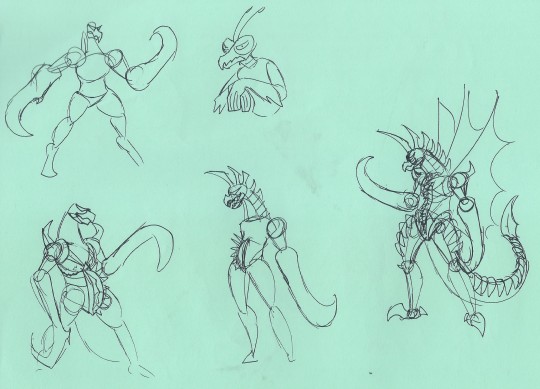
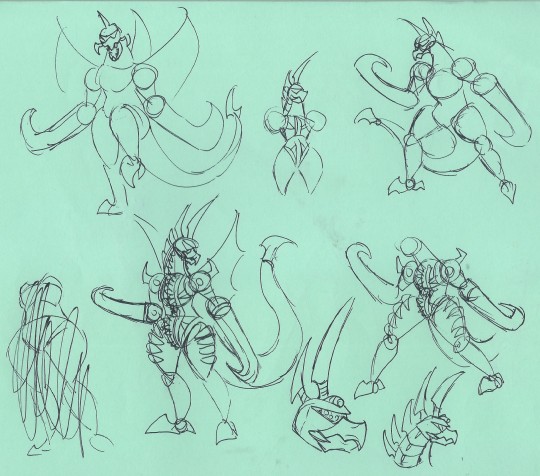
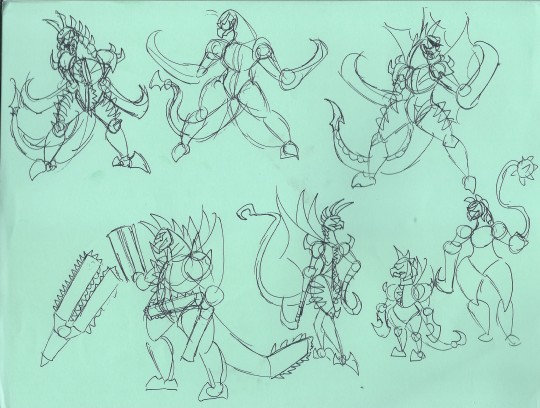
Finally (for now), I'm... still figuring out Gigan, honestly. Not really sure what angle I'm going to end up with, he's proving hard to pin down. Will require more sketching.
218 notes
·
View notes
Note
hi hi!!!
I'm a CFX artist (I do hair and cloth for 3D animated movies) and I wanted to clarify something!!
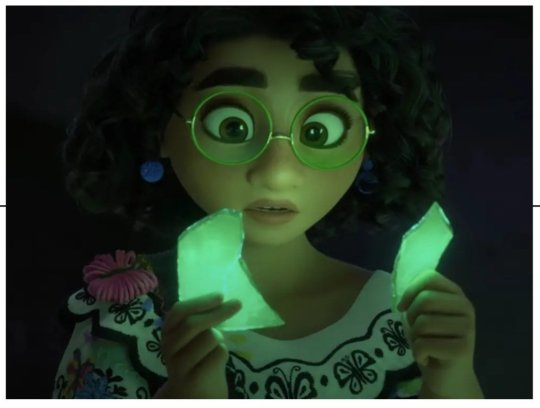
the encanto post? we talked about that one at length at work when it was first made, and it is incredibly evident that the guy who posted it is just bad at his job. the exact same effect can be archieved by changing the camera focal length- but animators never reach for technically competent solutions. (this is a roast.)
and even if thats not possible, there is NO reason for why her shoulder area or chest are completely crushed or why her feet are inside of her hip bone.
and also, since I am in the department that comes right after animation- if I had gotten that shot, I would have either sent it straight back to the animator to fix it, OR cleaned it up myself, by which I mean it absolutely did not look like this off-camera by the time we send it for final light render.
essentially if animation looks that messed up off-camera, it is not "animation magic", it is actually someone doing a bad job.
I'm going to have to respectfully disagree.
For one thing, the behind the scenes image was not close to a final render so I don't think you can fairly judge what was probably just the animator lining up and blocking the shot. I don't think at that state they were concerned with the shoulders, chest, and feet. I'm betting the final polished version looked much better.
And I also disagree the exact effect could be achieved by changing the focal length.
As a photographer, focal length is not just about cramming everything into the field of view. I don't only use a wide angle because I want more stuff in the photo.
It is also an artistic decision.
Wide angle lenses exaggerate distance and can make foreground objects seem massive and background objects seem tiny.
Look at this super wide angle shot of Otis lusting after a tennis ball.

The ball has a huge presence in the photo. It is only two feet away, but the distance between them seems immense. The ball takes up as much space in the photo as Otis.
Compare that to the ball in this telephoto image.
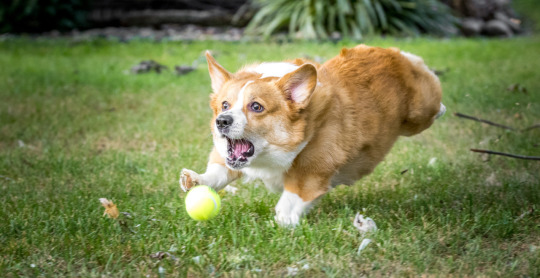
The picture now becomes less about the ball and more about the act of chasing it. The ball is literally only a foot closer to Otis, but it has no commanding presence like in the super wide shot.
So what artistic intention comes from using a telephoto lens like in Encanto?
Telephoto focal lengths compress distance. Background objects appear much larger in the frame. They also flatten the face and give a more flattering perspective of said face. Human faces can look a bit alien at wider focal lengths.
So what if you want the background to look large and encompassing and you want the flattering facial proportions from a telephoto lens, but you also want a foreground object to have a commanding presence like the ball?
You cheat!

This is not a technique confined to the world of 3D animation though. It is actually an old live-action trick. They will actually use another person's hands to do effectively the same thing as above.
In Hellboy II, Guillermo had two problems. He wanted a telephoto feel and depth of field and he also wanted a very intricate practical egg prop that could open mechanically.
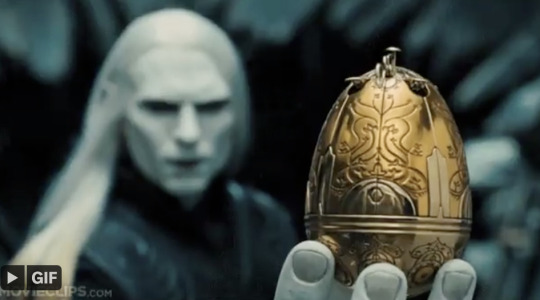
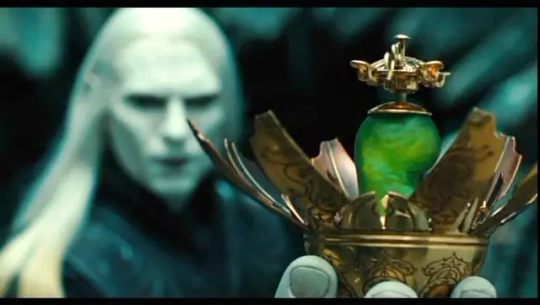
To get the proportions and the framing and the feel of the shot as intended, he double cheated!
He made a big freaking egg with a big freaking fake hand.
(I know there is a picture of the giant hand somewhere but my googling failed me.)
In any case, I think this is just a case of good problem solving over incompetence. I think the director or the animation lead wanted this scene to fit within a specific focal length and it was easier and more efficient to just give her crazy long arms.
I'm not trying to dispute your expertise or animation-splain. Perhaps there was a better way to achieve the same look. But if the final result looked good, I don't think we need to bash someone who was probably under tight deadlines and had a lot of other work to complete. At least not without a lot more information.
51 notes
·
View notes
Text
New DCTL Graphic Novel Pages Look Bad
Whose surprised? New ones got released just today, they're bad too! Look at them under the cut while I ramble a bit

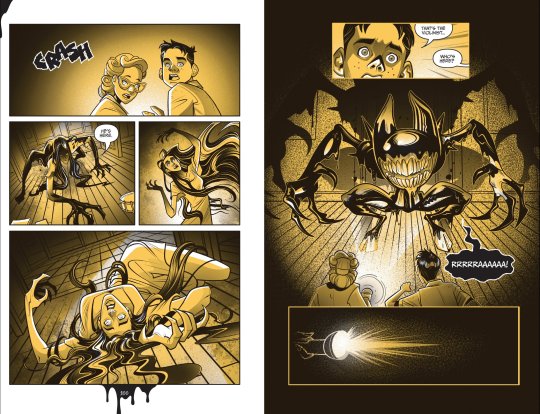
Dot's skinny and generic looking, that's a shame but at this point I'm not surprised but dear god is someone allergic to establishing shots here? It's so hard to keep track of where the characters are, I feel like they just keep teleporting around and I have no idea where anything is in relation to each other?
Also yikes that pig nose Buddy gets in what I assume is an attempt at him looking up? But none of his other facial features inticate that sort of camera angle.
Violinist seems to have just, teleported in, alongside an ink demon that looks stupid [the pose is weird n wonky the proportions look awful] and is the wrong design! So time to become a lot more annoying about how bad BATDR's ink demon design is,,, great-
I like how lively and wispy the ink looks though, very much feels alive in a way I like. Violinist is creepy even though I have no idea what's going on [where she came from, what those poses are? What is even happening here tbh] Everything else though,,, the piss yellow colors used with only pure white highlights + pure black shadows, the fact it's not even sketchy or remotely close to Batim's actual art style [despite how confusing it is they chose to stick closer to batim's when they already retconned the ink demon design from that, why not go the full way and let the pallete be more diverse like BATDR's at that point?]
It's bad, dear god... Can we all agree to just pirate the shit out of this instead of finachially rewarding Mike n Meatly for overworking and underpaying this poor artist? They don't deserve to have this shit stain on their portfolio when all they probably needed was more time to work on it to make it better and read the book to actually Understand the characters, etc.
To put bluntly my expectations have reached the floor, sadly Mike and Meatly are very good with shovels so I ended up upset anyways.
#ramblez#batim#batdr#bendy and the ink machine#bendy and the dark revival#bendy is so good at being just as mean as its corporate peers with none of the polish that those peers have hoorayyyyy#anyways dont pay for this please Im begging as a fandom lets make it clear we dont want this its so bad
30 notes
·
View notes
Text

a weeks worth of work... for a show i love to hate, and hate to love.
over the course of getting stockholmed into enjoying the setting of hazbin hotel, i ended up liking angel dust the most. even if he's an annoying gay stereotype with the most cliche'd backstory possible, at its heart i still like him and see potential for a three dimensional character if he was just written better. i think he's a fan favorite for a reason, despite his cliches: he's charismatic, funny, and pathetic with probably the only backstory taken seriously by the story.
he's also the only one to go through real character development in a breezy 8 episodes, being probably the only upstanding member of the hazbin hotel by the end of season 1 but my critiques on pacing and writing are better left to my friend robin who's a lot better versed in analysing *why* hazbin's writing is so bad.
anyway, here's a portfolio-worthy turnaround of my angel dust redesign. a lot of it was just making him more spider like, for the most part aside from all the random spots on his body i think his design is pretty well done but it could be stockholm again. read more cause its an essay on all the design choices i made
one of the main things i did was flesh out his head shape: for a long time angel dust's head shape felt like the worst of drawing for 2d, his hair and tufts are so entirely cheated to the side no matter the angle that it was impossible to understand what he'd look like at every angle, so i simplified it to a half circle shape where his big hair tuft is just overlayed on top, cheated to the side no matter the angle unless he's looking up/down, where i drew what i think those angles would look like.
he also now has spider fangs at the sides of his mouth, with one gold to match valentino's gold tooth. since spiders don't have teeth, he doesn't either, but can be drawn with some if the expression needs it (though i noticed that stolas is never drawn with teeth no matter his expression, so maybe that's not needed.)
instead of a bowtie he has a choker with a cock ring on it. you know what its referencing.
the spider thorax is attached a bit higher up than a tail would be, not only because of actual spider anatomy but to give him enough room to get dirty as his career requires him to do. it can flip up as well, i imagine its very manipulable.
leg designs were mostly to specify the sort of rhythm and curving i want his legs to work at. it's not perfect, but i think if someone was drawing from this reference they'd have a good understanding of how i want his legs to be drawn. they're one of my favorite aspects of his design and i think specifying how they'd bend is very important.
fun fact: i thought i made his legs too long, but comparatively to the canonical design he's a LOT more leggy. i even think you could get away with giving him more leg and the design still feels proportional.
42 notes
·
View notes
Note
eep sorry if youve been asked this, but when u go abt drawing bgs for ur comics, do u look up references or use imagination, and how do u practice drawing bgs for storyboards rather than illustrations? im rlly not sure where to start, and i feel like a lot of advice focuses on rendering bgs rather than it feeling ~lived in~ or actively being used or augh not sure how to say!!
hhhh ok this is something I am also still in the process of trying to figure out, and I am not a professional storyboard artist so I will attempt to answer to the best of my ability.
when it comes to storyboards, the amount of detail bgs will have during the boards phase will depend largely on both the studio AND the specific production. some 3D shows will have a render of a commonly used room the board artists can angle around for their shots. Adventure Time boards tended to be pretty loose, while the Owl House boards are EXCEPTIONALLY clean. DTVA seems to have bgs created in a several step process, and I'm not exactly sure of the timeline, but I know they have vis dev artists that do more illustrative, conceptual drawings to get the vibe, then the board artists draw out what general angles will actually be used, then layout artists/bg designers who actually go in and DRAW those bgs and add in all the little details, and THEN the colorist comes in and...colors it. I don't think every studio distributes the work in this same way. Not every studio is going to want board artists to draw clean backgrounds, but MOST will get pissed if you refuse to draw them at all djfhgdjf
If you want some tips about adding small details, this has some really useful advice.
I don't add lighting or grayscale values to my comics unless it's important to the tone/clarity, and I think that's generally the case with boards too (at least for TV, I don't know as much about boarding for feature). Here's some advice about adding lighting.

^ here's a bg I put a little more effort into than usual. I referenced some images of thrift shops I pulled up on duck duck go, some of my own memories of thrift shops I've been to, and even went on the shiftythrifting tumblr. This was just a silly comic I knew I'd be posting on tumblr rather than a serious board, so it didn't matter to me if it was perfectly clean or not. some of the shapes are... vague. and loose. but who cares sdjhfjd I think (?) it conveys the concept that this is a thrift shop.
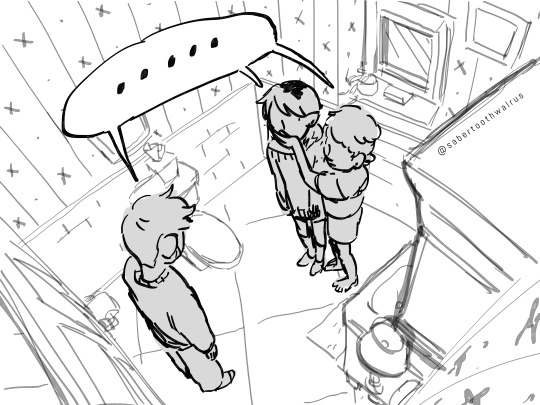
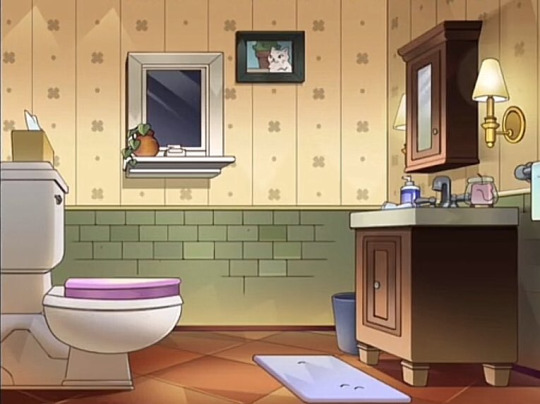
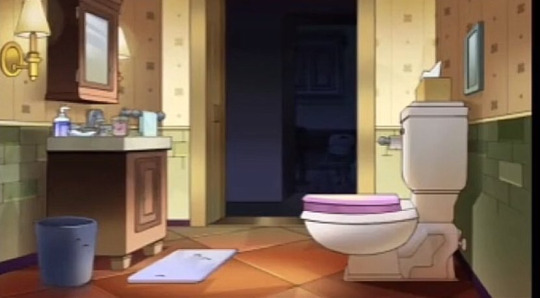
^ for THIS comic I wanted imply hunter crowded them in the bathroom to "talk in private" which felt like a very 16 year old thing to do + there were already some nifty references of the Noceda's bathroom. and listen I know it's not perfect. I didn't draw ANY perspective guides, did more trial and error than I probably needed to, the cabinet is WAY too high. (even in the original, why is this bathroom so spacious???? why is the toilet so far from the wall where the toilet paper is???) but even with all the mistakes, it doesn't matter! no one probably noticed while watching. you see it so briefly, and your attention is still focused on the characters.
I'd say the main thing when drawing bgs for storyboarding & comics is to focus on Perspective and Composition above all else. It's ok to be loose, but make sure you still have Clarity. Be mindful of proportion ("how big is this character in comparison to the objects around them?") and angles ("if this is a low angle, shouldn't I be seeing the ceiling/sky?") etc etc because even if you know you won't be drawing it perfectly, it helps to still have it in mind.
410 notes
·
View notes
Note
Im trying to draw godzilla but idk where to start. Can you help?
i know it's considered a cliche answer, but i promise reference makes a world of difference! i still use it to double check my proportions and angles when drawing legendgoji cuz his head and general anatomy is still tricky for me sometimes. also look at ref of irl animals for texture inspo too! crocs/gators are great, but even other reptiles like crocodile skinks and monitor lizards can be helpful too
no matter what design it is that you're drawing, he can be a lot to tackle, honestly. i find the best way to start is to break his form down to it's simplest shapes, which for me usually ends up being a circle for the barrel of his chest, sorta oblong circle for his hips/thighs, and a circle for his head. then a line to decide where the tail should go. i tend to keep his arms and legs pretty gestural until i have a decent foundation worked out with his main shape. the secondary and tertiary forms are a bit easier to work on if the largest shapes get dealt with first, if that makes sense? o:
i have a bad habit of rendering too early and painting myself into a corner before realizing aspects of the anatomy kinda suck, so learn from my mistakes and go slow, start simple! not every drawing needs to become a finished piece, either. try not to put too much pressure on yourself to Draw Godzilla(tm), it likely won't be perfect when you start, but it should be fun, it can take some time to learn, but trust process and you'll see progress =w=
37 notes
·
View notes
Text

Thanks for the ask, @strrwbrrryjam ! i'm flattered that you think I do a good job of that, because I'm still learning! (and I also struggle heavily with proportions. I have to resize my heads and arms so, so much...)
I'm afraid I don't have any secrets. I think the answer is to just practice, over and over again. But specifically, this is what I try to focus on as I'm learning:
references
quick practices - 30 second to 5 minute studies that help with getting a full scope of the shape and energy of the body, not meant to be perfect
studies - deep dives into certain anatomical structures (videos linked below)
Below the cut is how I use references go from this to this:

References:
Use a bunch of references! Pictures you take, stock images, from shows--practice real people. Even if your style is heavily stylized, it all starts from an understanding of anatomy.
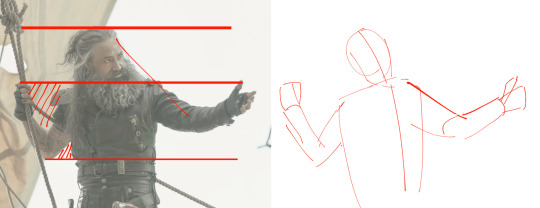
How I Use a Reference When I Struggle With Proportions:
The first step I take while looking at a reference is to just draw a very loose sketch with a line of action that goes then entire length of the piece, and I try to section it out. I find if I don't think about the body as a whole, and just start drawing a head, the head will be way bigger than the rest of the image. So my first step is just really boxy and basic, just to get all appendages on paper. My first pass could look like this:

Okay, not bad. But the right arm is going way too far down--the forearm is really long. The head is too big for the style I want, and the left arm is at a 90 degree angle, unlike the picture. But, I have the general scope of everything on the page, so it's easier to adjust and look at the full picture!
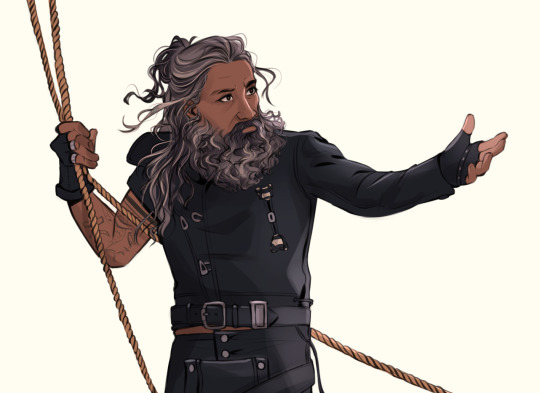
Then, I try to focus on landmarks. I look at where certain body parts fall in the reference. For instance, Blackbeard's right elbow doesn't reach his belt, so his elbow shouldn't be near his waist. I can tell that his left arm is closer to being straight than at a right angle, and I can see that his head isn't as big on his shoulders as I have. I can also look at the negative space and see that the gaps between his right arm need to be smaller. So my next pass might look like this:
(I don't usually draw on the reference image, and I just "draw" the lines in my mind, but the for sake of things...)
Now it's looking a bit closer!
The next is the harder part. It's making things shapes, and is closer to the lineart stage. I try to follow curves, separate the chest from the torso, get the angle of the shoulders and head, etc. I have some video links at the end that explain this step much more in def.
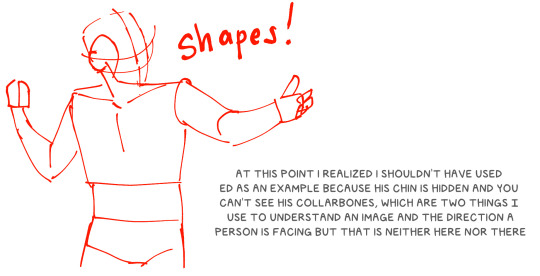
You may notice that the head angle is a bit different than the image, and the shoulders are a bit lower. Sometimes, following a reference image completely either doesn't fit your style or, in some cases, the more accurate drawing following a reference can actually look "wrong" (anatomically) when drawn. Figure out what works best for you, and for the message you're trying to get across in the piece!
[sliiiight flashing in timelapse]
And here is the final timelapse, with a little refining and polishing of the anatomy. Not everything is completely accurate to the reference image, but I've created a believable image in the likeness.
I hope this helped! This was a quick and dirty post of something I'm still learning. Here are some youtube tutorial artists, resources, and books that I use to learn!
Youtube:
-ModerndayJames has lots of videos on creating shapes and understanding anatomy, and placing people in perspective. He has a lot of free videos, and then some cheap ones on gumroad that go more into it.
-Proko has lots of videos on anatomy!
Practice Resources:
-Pose Maniacs - figures in different poses. You can move the camera around to see different angles.
-QuickPoses has images for figure drawing and quick gesture drawing! You can even have different timers.
Books:
Morpho Series. There used to be the one on "Fat and Skin Folds" that was a free PDF download that was on tumblr for a while, but I don't believe the books are that expensive.
Taco's Books, published by Lezhin. This is heavily anime styled, but talks a lot about anatomy, and is a great resource!
#art tutorial#asks#mytutoirals#myart#proportions#turns out you can't add videos to asks and if you try it makes the post uneditable#so i couldn't answer your ask directly. hope you see it sorry!#anatomy tutorials
53 notes
·
View notes
Text


Cheers, loveys!
Here is post 1 of 3 about Pattern Construction. I’ll make a diagram post like this and then also take photos of my actual coat and with me in it.
I don’t remember how I started off doing the pattern, but I will guess that I took a tailcoat that I already possess and used it as a base, which in general seems to be a helpful way to start making clothes that fit if you’re not a master pattern maker (which I’m not, and I made plenty of mistakes which we’ll get into.)
There are two people I want to thank, and the first is Aria Couture [X] and their quality photos and observations, vocabulary and groundwork. They are the shoulders I stand on. Their photos were how I made all of the notes discussed in these diagrams, and how I discerned what kind of pattern needed to be made.
So the main changes that needed to happen to my base pattern was 1.) jacking up the shoulders to high heavens, 2.) elongating the side pieces (which I’ve come to call panels so go with me), 3.) adding pleats in that squared off spot in the back between them, 4.) adding a custom collar and cuffs, 5.) designing my own lining.
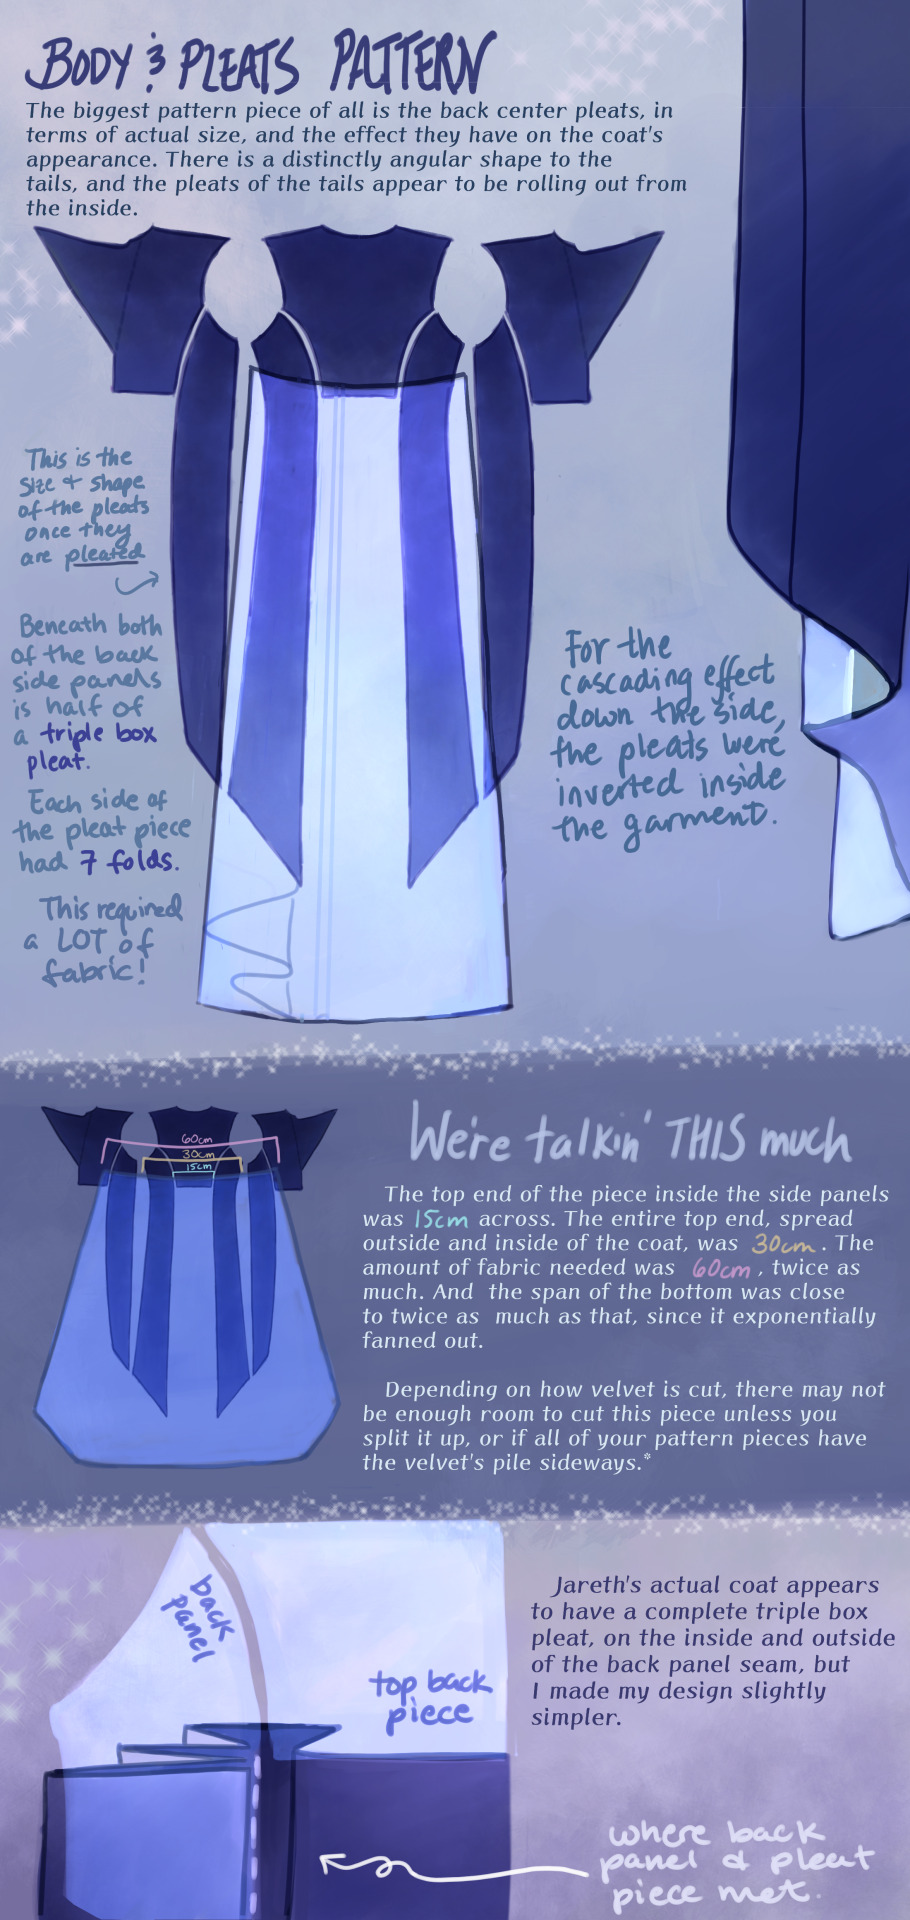
THE PLEATS were a nightmare. There was a lot of math involved, and math that was not necessary, but the most important thing was creating a shape that would fold together into a straight line on top, look cascading on the sides, and marry the rest of the coat in a reasonable place. After a lot of trial and error, I ended up with this rounded wedge that spreads out on the inside of the coat, but also folds backwards onto itself (like half of a box pleat), to reattach to the back side panels. This is what gives the coat its look of all this shiny velvet blossoming from beneath the back buttons and gushing out the sides.
As to why the pleat piece is rounded, all of the pleat lines were diagonal, so that the coat would flare out. Cutting this piece as a completely straight line on top meant it ran out of fabric in the top corners, and more of it needed to be pulled in, more and more sideways. Adding a sloped height to its corners helped it do what it was supposed to and become a mostly straight line when folded together.
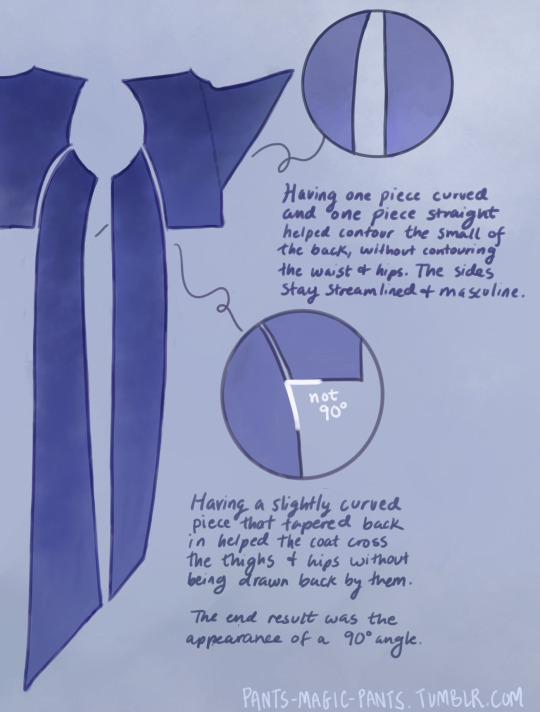
THE PANELS (second image), there are just a few notes about those which I think are important. As I am female cosplaying a male and wish to keep the masculine shape of the garment, some tricks needed to be pulled to hide my waist and hips, so this is what I came up with.
PROPORTIONS MATH. It’s a thing I started doing a couple cosplays ago, to get accurate shapes and lengths of garments, to give me the same silhouette as characters. It’s worked out really well for me. It’s been a real life application of algebra that I wasn’t expecting, as a former student who hated math. Now, I love math! Armed with a ruler and a protractor, I have taken down a lot of notes about such silly things as: what degrees the angles of the lapels are, and how wide are the shoulders compared to the head? (In Jareth’s coat’s case, the ratio of head:shoulders is 1:4.) With that knowledge, I took a photo of myself in the bathroom, measured my own head and shoulders in pixels, wearing a mock-up, and corrected shoulder span measurements to fit this ratio. It was a whooole thing, but I think it was worth it.
And I used proportions math for everything. How much of the arm do the cuffs take up? Where along the legs did the dramatic slope of Jareth’s “fishtail” start? Those things aren’t listed here, but hopefully this post gives you enough tools to figure it out on your own for your specific garment, or any garment you ever want to make.
THE COLLAR. Not much to say about it, but there’s how it looks.
SLEEVES. Dear God. I was stuck on sleeves for months because go ahead and look around online for detailed information about how to add basically football gear sized padding to your shoulders, and all of the intertwined modifications that needs. It isn’t out there.
One thing I can at least say is that it helps to start off with a great base, and the other person I have to thank is a tailor on YT called Chris Sartorial [X]. This guy hasn’t been active for years, but when he was, he was no nonsense, such a professional who knew what he was doing that he couldn’t even take the time to properly light his videos. Such a king. His channel helped me with my dress shirt, and also with making the base sleeves for this coat, which were of the “2 piece” variety. This kind of sleeve is used for blazers and coats so that it appears to fall in a nice boxy shape off the arm, usually from a shoulder pad, and then slightly turn at the elbow. While he doesn’t go into shoulder pads, this still halfway set me up for success, and knowing the relationship between shoulder and sleeve.
However, there are a few things I learned about shoulder+sleeve modification as shown above, and hopefully it’s a good “bouncing off” observation.
THE CUFFS. Again, not much to say, but this is how my pattern came out, to create that nice tear-drop shaped gap, with that sort of blooming and expanding height that his cuffs have, like a vase. The lace trim will be in another post. One thing I should mention is that the lace trim is tall enough that the bottom of the cuff won’t end on your wrist if you want to be able to see your own hands. The cuff needs to be measured so that it will end 2-3 inches up from your wrist.
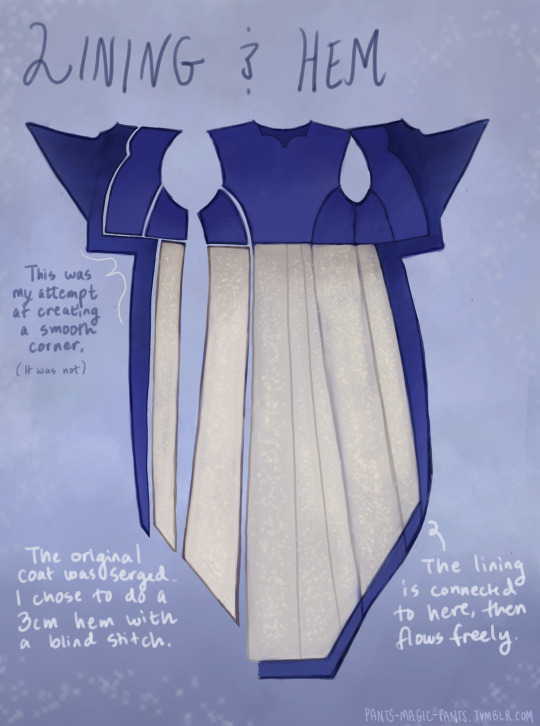
THE LINING
Dear God, she’s still writing. I am a huge fan of lining even though I’m not good at it, and my actual lining didn’t turn out looking as smooth as my drawings, but this is what I came up with, which in theory should look good. haha Any deviations from the norm that you see are just stylistic choices. I wanted the area in the top back to look sort of dripping like the back lace piece.
Was this interesting? I sure hope so. Please ask me questions if I’ve glossed over something.
53 notes
·
View notes
Note
OH GREAT ONE! Please. . . Can you please give us a tutorial on how to make Pixel Character sprites on Asepeite? You do them so beautifully. . . *Sheds a tear*
please don't call me "oh great one" even as a joke; don't put me on a pedestal. I'm just Some Guy.
anyway there are plenty of cool tutorials on youtube, just search stuff like "pixel art tutorial" or "pixel grass" or "pixel trees" for specifics
but what i'd recommend as my top rule: experiment! make more art! Have fun! just make things and you'll naturally improve
but past that, for some more tangible advice:
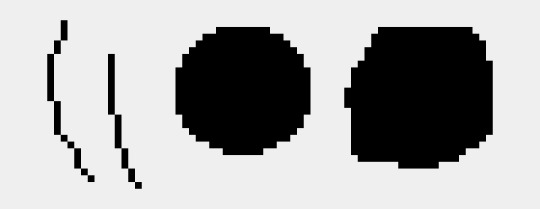
look into stylization. pixel art NEEDS clarity and simple shapes to work. you can achieve this by thinking of the shapes (thus the importance of stylization) and by doing simple math or consistent "scales" of going down or up in number. see how the second line goes from looong to long to short shorter then a dot vs. how the left one just does things randomly, there's no scale here. it shows purpose and confidence when you use more math-based art. see how the circle uses the scale/ math vs. this blob where i purposefully didn't?
keep the linework clean:

aesprite has a feature called "pixel perfect" which prevents jaggies, which are these clumps of pixels as you can see on the right.
keep the art consitant. don't use blur effects or gradients, i'd say that's more so for VERY rare circumstances and should only be approached from a more experienced hand. (ie, bigger background pieces and used sparingly)
how you draw the shapes/angles matters a lot as well.
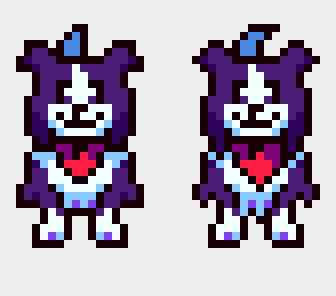
left, i kept things more "blocky" and less "sharp" I also simplified the shape (note the fur on the side of the legs) is more clumped together while the other has a larger emphasis on separating them and making them sharper. overall, the right one is a lot more complex which I don't want for a character who is moving a lot, and seen from a smaller size. its a SMALL cartoon! i want it to be clear to the viewer without any details to muddy things.
note how by making the sideburn fluff more jagged removes some of the room for the white fur. you only see ONE shaded white/blue pixel on the left, which adds more contrast and emphasizes that spot. there's less of a clear distinction between he had and the body.
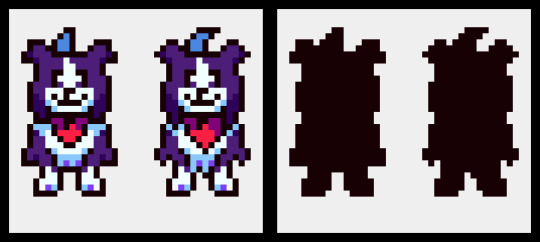
here's the silhouettes, you cans see how the body on the left is more clear in what part is what. Tail, ear, head, body and legs. the other one, sure, i know what those are, but its less distinct.

add "weight" to the shapes. have one side of the shape be bigger in proportion. note how the head has a wider bottom than the top, even from the jaw to the tip of the head. the overall body is bigger than the head as well.
symmetry is important and your life savior in pixel art. but not EVERYTHING should be symmetrical. look at the head stripe, mouth, chest fluff, and handkerchief. have one side favored or the other and not a perfect head-on position creates this asymmetry as well a more "organic" view of the character. (typically you want to avoid direct head-on looks unless it's for 3d modeling or character reference sheets, otherwise your character won't feel as "alive." it's not natural to stand perfectly 1-1 facing the camera perfectly)
note on legs and bodies: you can't always get an accurate symmetry based on the head size. depending on if it's an odd or even number of pixels wide, it'll affect how the body becomes symmetrical to it. in this case, there's a pixel difference that prevents a gap. note how the middle looks like a SUPER thick line because there's no room for a single pixel line. my solution was to have her favor one leg over the other, which works nicely as it adds a more weighted interest to the right leg while her bangs favor the left, creating balance. toby's solution to this problem was to give the humans one wider leg and it haunts me.
another example of this is toriel

toriel's side mouth would be fine if it was a consistent choice and other characters did it (sonic is famous for this stylistic choice) but because she doesn't even match her family regarding this, it stands out and confuses people. i originally, and many people I've met have thought this was her nose. EVEN THO you can see her mouth open when speaking in-game.
btw even tho this also haunts me, i don't mind it as much cause i know this is a result of early game development inconstancies born from inexperience. its a cute quirk honestly, even if it was an easy fix. i actually ADMIRE that toby doesn't go and retroactively fix things, and instead prioritizes making new things with the information of how to do better now. its very easy and exhausting to go back and fix things rather than move on. mad respect for that.
34 notes
·
View notes
Note
Hello! I hope you're well ^^ um.. May I ask as a brand new starting artist, could you give any insight or tips that helped you learn to draw?
Ok I've been drawing for basically my entire life so it's kinda hard to come up with specific advice to help people who are starting out later in life, but here's some that I think will help any artist, new or not. It's a long list so hit the keep reading tab if you're interested in my art advice ramblings.
Draw what you like, and when it doesn't look as good as you want, keep drawing it until you're able to mentally break it down into its basic shapes and improve the form of the drawing.
If you need even more basic skills maybe focus on drawing just the basic shapes first until you can get them consistent! Cubes, Cylinders, Circles/Spheres are all the building blocks of most art (especially character art) so it's important to be able to draw those 3D shapes at different angles and perspectives accurately if you want to be able to do the same with characters and their proportions.
Use references to learn. Look directly at the things you want to draw when learning to draw them. Even trace stuff, so long as you credit what you traced from if you're posting it online. It can open your eyes to stuff you wouldn't think of just by drawing from memory.
Don't get discouraged if your art doesn't look "good enough" after drawing for a few months or even years. Everyone learns at different rates and it takes a very large amount of effort to get "good" at art (even though that shouldn't necessarily be your final goal)
Draw for FUN. The "draw every day" advice only works until you burn out, which will happen much quicker if you're drawing every day. Take it from me, a person who has drawn almost every day when physically possible since they were able to pick up a pencil. Don't get caught up in engagement or social media popularity either. It will just make drawing feel like a slog trying to chase a very very fleeting goal that is more often than not, almost completely unrelated to your skill level and more so luck. I didn't start posting my art online until I had already been drawing for like 14 years (not saying you have to wait that long, just that the internet is cruel and often unhelpful for new artists' mental states)
Just remember you have to start off bad at art in order to get good at it. And it takes time. A lot of time. It's *never* a lost cause at any point. So many people give up before they've even given themselves the chance to improve.

Hope that was helpful and I wish all new artists the best of luck!
103 notes
·
View notes
Text
How i do stuff | Part 2
Okay so i'm kinda doing this backwards going from the shading back to the sketching but not like i did anything logically ever.
THIS IS NOT GOING TO BE A LINE FOR LINE PROCESS because i am not that insane. Yet.
To be honest the entire sketching process is very intuitive on my part so i don't think i can provide much insight here but i'll try to make it make sense.
It is really not as conscious as the shading.
So first: have an idea to work with
Find a concept i like and go from there.
I decided that i want Vessel to look upwards and a little bit to the side and add some other details (which you are not going to see here yet. We are talking about sketching people here not background or whatever.)
Next step: i try to find a reference image that is as close to the desired pose as possible. It could either be made by a posing tool or actual reference image. Whichever is at hand.
(For whatever mysterious reasons i have a small catalog of IV pics in my head rent free so i actually knew what i was looking for.)
I use reference pictures for a few reasons. For one, they make it so much easier to figure out poses and movements. But more importantly by looking at them i can figure out the flow of the body much more faster than just from memory. They also help with understanding how cloth is draping or the way light hits certain shapes and surfaces. There are a lot of benefits.
Anyway so we have our reference picture:
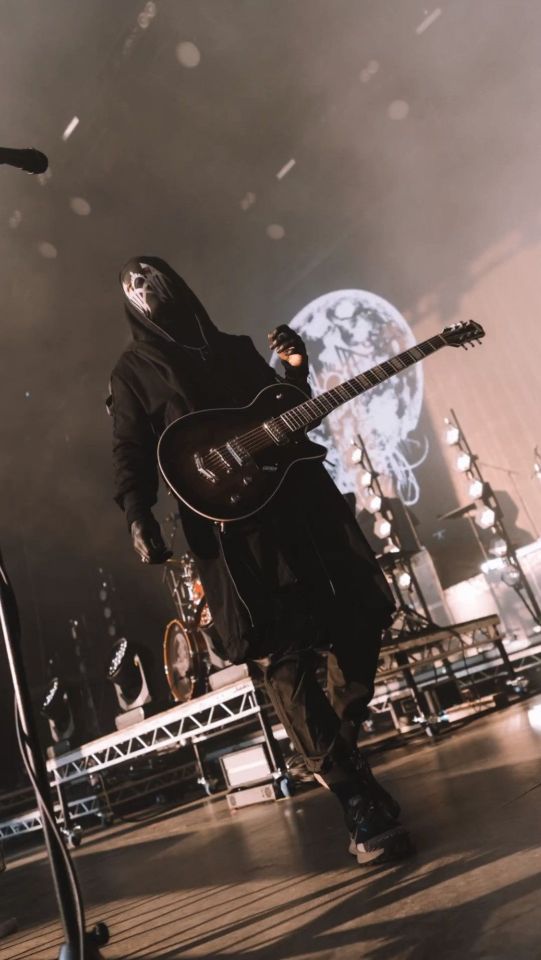
But i wanted Vessel to look the other way so flipped it. (Zoom in not mandatory but we don't need the rest of IV for this.)
Ye okay i can now kind of figure out where goes what in relation to one and other.
Okay okay okay i know: draw a circle than finish the fucking owl.. no bear with me. I need something on the page to talk about what i do. Lemme explain:
So first i'm starting with the traditional x or cross (blue on the pic below). I usually i orient it in my head that the meeting point of the line is the part of your nose dips right above the nosebridge. Because that is usually in the same level as the eyes. At least how i start, they could be moved up or down later.
So the horizontal line for me is the middle of the middle pair of eyes/eyeholes for Vessel or if there is only one set of eyes than it is the middle line for the eyes. I found it most comfortable in proportion wise for me to start with. (This horizontal line would be the tip of the ears as well if i had ears on here.)
Than i pick where the tip of the nose and the mouth is going to be roughly. Doesn't have to be more than a little dot or line, it is going to be changed later anyway.(pink lines below)
I also pick a comfortable spot on the vertical line where the point of the chin is going to be, where throat starts and pick a spot for the addam's apple.(pink lines below)
Than i make the whole head into somewhat head like shape (pink egg like shape below), because where that ends is basically what i'm connecting with the chin point to find the jawline. (green lines below)
Maybe even add to a line or two for where i imagine the hood to go just for funsies.
What else i do simultaniously with this is finding the flow of the face because where his adam's apple is, will tell me where the neck bends in the movement, the neck curving point will show where the shoulder connects, but also where the tendons are going towards the suprasternal hollow and then where the collarbones start and angle back up towards the shoulders etc. Everything connects to the next thing.
(I also do this for half or full body figures as well, only there i'm trying to find the flow of the entire body. Or more accurately the curve of the spine in a natural or close to natural shape first and then figure out the smaller parts.)

Look i'm not gonna lie, for this to be eyeballed off of even a pretty close reference picture in a way that looks close to natural or makes sense, you have to have a basic understanding of anatomy.
It doesn't have to be a conscious understanding but it has to be there. There are endless tutorials out there to help with this and i highly recommend looking up a few because i know not everyone can learn it just by looking at dancers and anatomy lab videos.

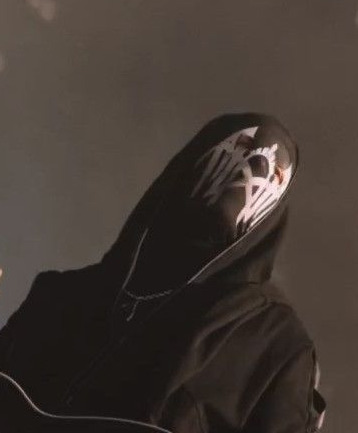
Next step: find a reference for the mask and preferably for the mouth because i'm bad at drawing mouths and i want to learn. If it is moving make it not moving, it helps a lot. Kill it with a screenshot, put it in Paint, bury it in a jpeg. Simple as that.


When i have my mask reference, i'm just trying to find a sweet spot that matches it in a way that feels good. First i'm going for the rough outline of it, details can be added later. It is not going to be a one-to-one to the reference because it is not the exact same angle, but it still helps.
And from here it is mostly just trial end error of putting lines and details in and than erasing them until i reach a state where i can say: yup this is look decent enough and can refine it into a lineart and start shading.
Not much else i could share here about this part of the process because as i've said most of it is pretty intuitive and based on a certain level of anatomical understanding.
(Hopefully you'll see the end result in a couple of days but we'll see how much time i'm going to have.)
Love you all and i'm sorry i can't provide more than this ♥
17 notes
·
View notes
Text
It took me a minute to finally get my notes straight so I could answer this— I hope it was worth the wait! I’ll give some bullet points of tips I use to help boost my production speed in addition to the strategies I use to try to keep characters consistent. Let’s get into it!

First up: How I draw faster!
Note that these mostly apply to digital art, as that’s my preferred medium.
If your art program has them, experiment with brush stabilization levels. My hands shake really bad, especially while I’m drawing, so I put a lot of effort into finding a stabilizer level that works with my need to control lines while also smoothing out the tremors in my hands. It’s made it so much easier to draw lines like I want to, and therefore lets me move on instead of redrawing the same line over and over again.
Creating templates for your art helps so much— setting up things like canvas size, color profile, DPI, background colors and images like the paper texture PNGs that I love to use ahead of time helps me get drawing faster, while I’m excited and inspired! Similarly, having a naming system for your art files is useful for speed as well as finding and organizing old pieces easier.
Having premade color palettes of local colors for characters is also super helpful for speed, as well as keeping characters on model :>
Personally, I use a single brush for lineart and rely on the selection tool and bucket fill for coloring when I actually bother to color things in. My lines are pretty loose nowadays, and the same goes for when I color things— I don't abide exactly by the lineart I draw, and get pretty messy with the selection tool and bucket fill!
I simplify character designs as much as possible— the standard design of a sigilyph, for example, is pretty complex. But I made Sen a lot simpler (and also forgot the spikes on her torso in this panel. Oops)
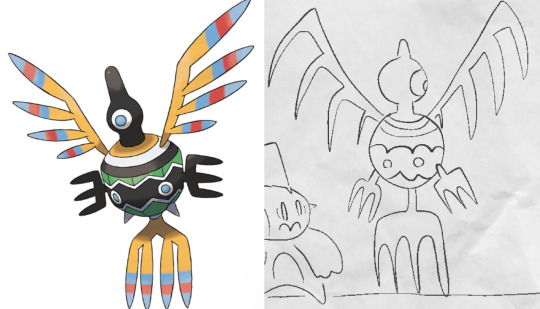
As for keeping characters on-model…
I’m very flattered that you feel otherwise, but I actually don't keep characters very on-model between different drawings— just look at the different ways I've drawn Ark below— however, I'm improving over time as I become more familiar with how I want to draw the characters! A big part of my process of keeping characters on model is drawing characters over and over to familiarize myself with how they should look through trial and error.

Learning common angles and poses I will draw characters in is very helpful for making sure they look consistent. As a bit of a downside, though, it makes wonkier angles stick out like a sore thumb! Drawing Ark with his head slightly angled downward was really hard, and I don't think I communicated it that well here:
I try to have the characters broken down into as many simple shapes that fit into each other as I possibly can, like Twig’s head (circle + rectangle snout + angled rectangle horn) Ark's hair (that weird bangs shape) and Dusknoir's upper body (beanbag shape / slightly elongated circle torso, arms coming out of his frill that comes in a very particular arcing line). This makes it way easier to draw characters quickly and consistently, because I can learn those lines and shapes and get the motion of drawing them into muscle memory.

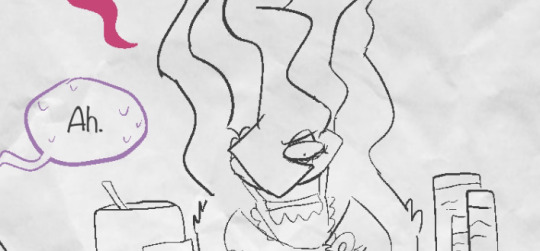
Also, knowing the ways characters emote is like knowing cheat codes. Giving characters things like a signature comedic expression of shock or grin that they make when they're happy are very helpful!

The biggest tip I can give on the topic of keeping characters on-model (at least without model sheets— model sheets are THE way to go. Don’t be like Sofie and neglect those pieces of gold) is really just to practice. Build up familiarity with the shapes and proportions of characters, get a feel for how your hand and wrist moves to get the lines right.

#creativity tips with sofie#art tips#drawing tips#drawing advice#art advice#stuff by sofie#sofie answers asks#(kinda)
19 notes
·
View notes
Last Seen Blogs

1mmun3
DISEASE / HEALTH

the-ironic-monster
Let's See What happens!
barstoolblues
IF WE MEET ALONG THE WAY

agusandelnorte
ADN 2012-2013

cassi3-20
🪐Cassie🪐