#I’ve bought so many patterns from Etsy now
Text
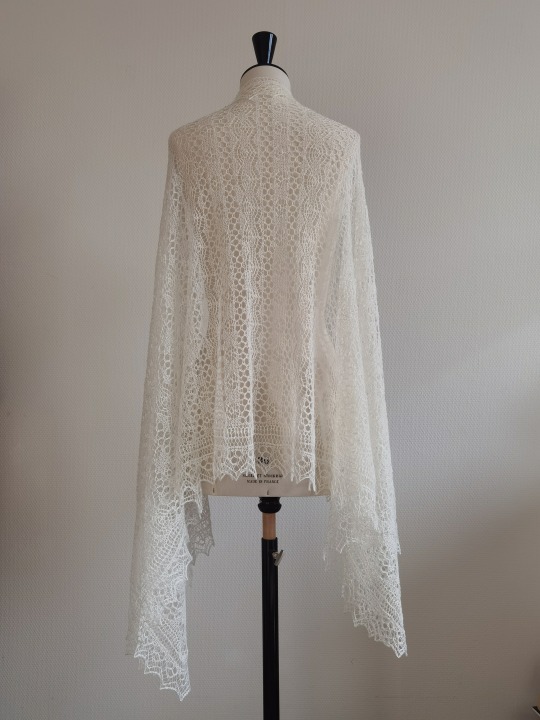
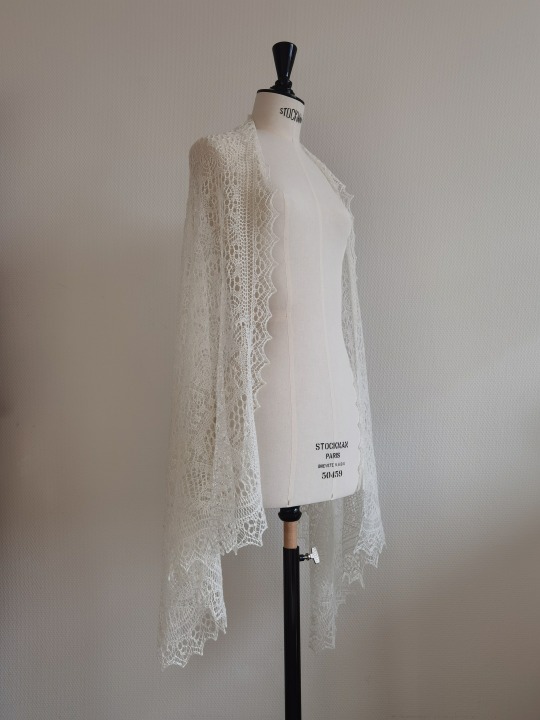
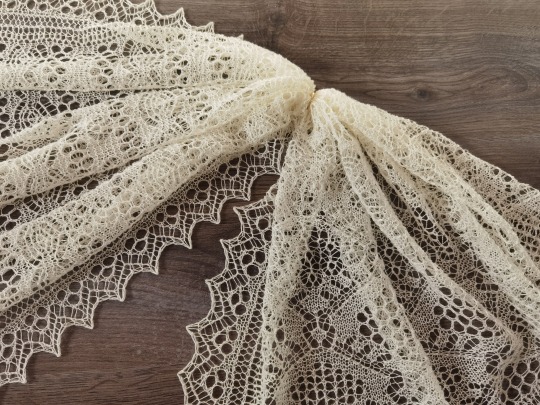
April, 2024 | Shetland lace shawl
Hi there! It’s been a while. I’ve been kept busy by all my university work…and this shawl.
The shawl is knitted to celebrate the wedding of my friend (now friends, I should say). A wedding is really the perfect excuse for all the heritage crafts and heirloom projects that might seem too serious to gift in other occasions. I did ask the recipient beforehand if she would like it, though, and I was so, so honoured that I got an enthusiastic ‘yes’. I’m sure this sentiment is shared by many makers, whatever gift they are making.
Shetland fine openwork, a knitted lace, seems to have emerged with the beginning of the reign of Queen Victoria, who championed and popularised the craft. It was probably spread from the Isle of Unst to other parts of Shetland. What surprised me the most when I first read about it was that Shetland shawls and other lace pieces were largely exported as luxury items and rarely worn by islanders themselves. Women bought yarn from spinners and knitted mostly in their homes. They then took them to local merchants and exchange the finished objects for goods or (commonly after the 1880s) money to supplement the household income. The ‘supplement’ nature of this work probably means it was not compensated as much as a job outside the home would be for the same hours and skills. Besides, it was not always easy to spin an even 1-ply yarn at 1600 metres per 100 grams. For a piece of knitting with a large ‘plain’ area (i.e. only knit stitches), the unevenness was impossible to hide but could only be discovered after the area was worked. Then the maker had to either frog (unravel) the area or continue with the risk of the whole piece not being able to sell.
Whilst it is very reasonable to point out that Shetland ladies did not usually wear this type of lace (I’ve been to the Scottish Highlands once, in summer, and it was not fine lace weather), I imagine that at least for some, it wasn’t just about making money. Some sort of fulfilment must have been from the satisfaction of having a piece ‘properly done’ by continuing and adapting a traditional pattern, technique or material. I think this sort of satisfaction is also why many modern knitters are willing to spend hundreds of hours on lacework.
Intricate handknitted lace items can still be bought today (a quick search on Etsy would show many are form eastern European countries with a long and prominent craft tradition), but many are knitted for friends or family members. It always makes me so happy to see people share the gifts they have made, whether big or small, simple or complex. I joke with my online craft friends that no handmade fibre project can claim to be so unless they have a hair or two woven into it. It is the proof of existence for the maker, who tries to go against the irregular nature of handicrafts and, at the same time, accepts it. It is about wrapping up hours, weeks or months in one’s life, along with the songs they have listened to and the perfume they have worn and the memories they have made, and putting it squarely in someone else’s hands and saying: ‘All this, for you.’
A Wedding Shawl
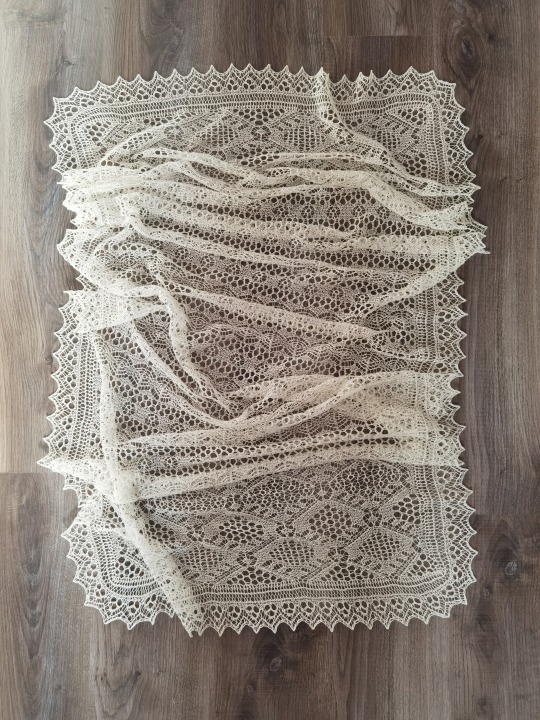
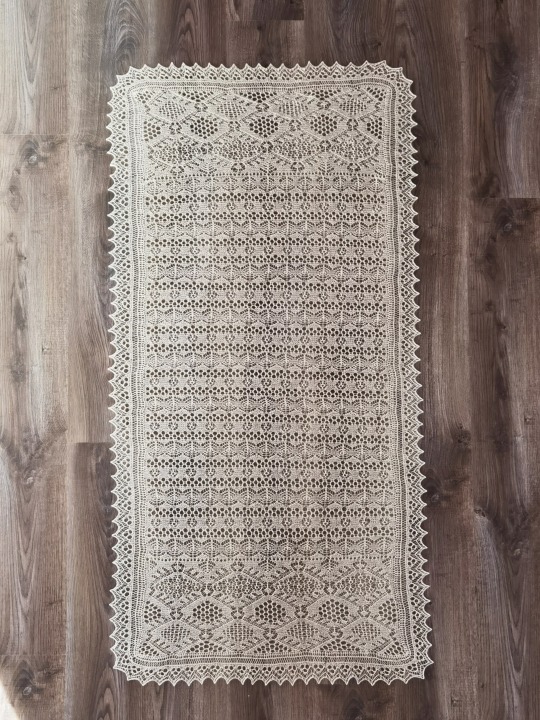
I have not read anything about there being a standard form of ‘wedding shawl’ in the Shetland tradition. However, there is definitely a category of square shawls with similar sizes and a few construction methods. The samples I’ve seen mostly measure 1.5-2m on one side and have three parts: a central panel, four borders and a strip of edging. It is worked flat in garter lace from centre out.
Neither is there a standardised yarn weight. A widely available yarn is the Shetland Supreme Lace Weight 1-ply by Jamieson and Smith, which weighs at 400m/25g. The Queen Ring Shawl examined by Sharon Miller used a yarn at 700m/25g. From my experience, if you want the shawl to be a true ring shawl (i.e. you want to be able to pull the shawl through a ring) at the size of the Queen Ring Shawl (210cm on the side), go for 700m/25g or finer.
I chose a rectangular shawl because I had very limited time, but I did enlarge it because for me, an abundance of fabric does mean an abundance of cozy happiness.
Pattern
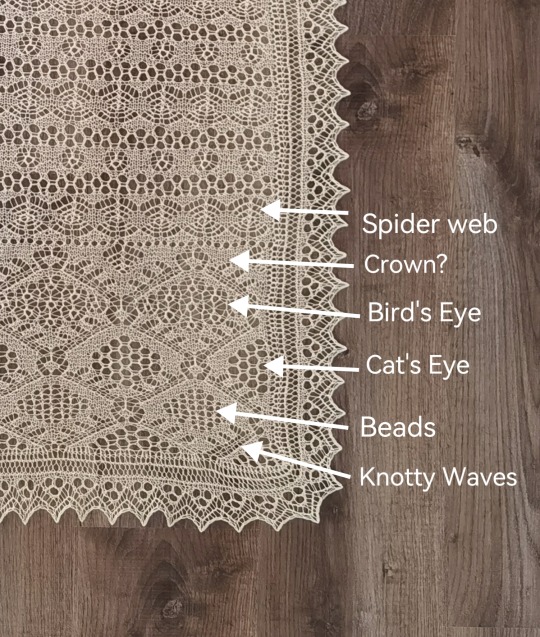
Shell Grid and Spider Webs Puzzle, pattern No.19 in the book Shetland Knitting Lace by Toshiyuki Shimada.
The names of the motifs are confusing. One motif (or two highly similar motifs) might just have two different names if they are produced in two different regions. Names do not mean everything, but I’ve had fun trying to match the motifs with names according to this article by Carol Christiansen at the Shetland Museum.
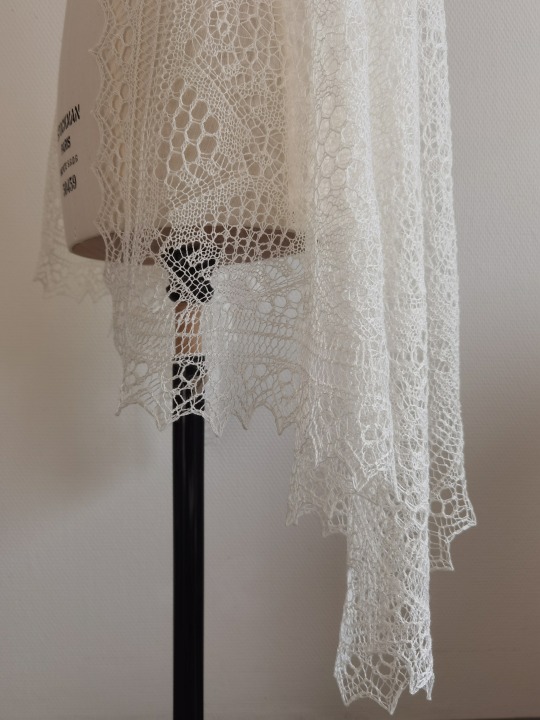
The double yarnovers (YO's) in the diamonds were called Cat's Eye, but perhaps the 'Spider Web' in the pattern name is referring to the three rows of double YO's in the centre panel. It has a really simple but effective edging.
Yarn
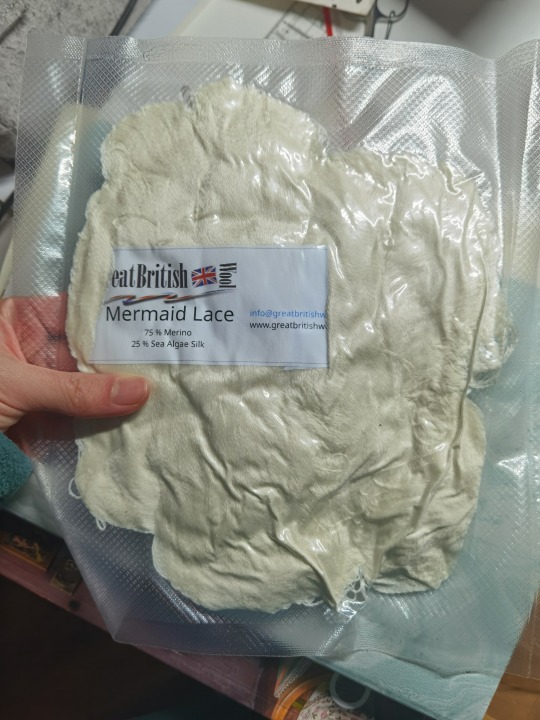
Mermaid Lace, in colourway #naturel, sold by Great British Wool in the Netherlands. This yarn is 75% merino and 25% sea algae silk. ‘Sea algae silk’ seems to be a semi-synthetic plant fibre like viscose, with algae involved as part of the raw material. (At this price point I don’t think it has anything to do with sea silk, which is fibre produced by actual shells.) The brand name for the most popular product of its type is probably Seacell.
I bought the yarn, because I had never worked with this fibre before and was curious. What I like: it was a little cheaper than a wool/silk blend and has blocked very well. The whole skein was continuous so I didn’t have to deal with a single yarn joint. What I do not like: it lacks the sheen and smoothness of real silk and doesn’t feel as strong, although it doesn’t shed. In conclusion, I’d rather use a traditional Shetland 1-ply or another natural fibre yarn.
It's also worth mentioning that whilst I prefer to support small businesses, it was disappointing to have received a 93-gram skein when I had ordered 100 grams. It was one of those days between Christmas and the New Year and I somehow did not contact the customer service, but I really should have.
Needle
2.5mm 80cm circular needles. See modification below.
Modification
This Japanese knitting book follows Japanese sizing for knitting needles. The suggested size was no. 1=2.4mm. I figured that I could use a 2.5mm since I knitted on the tighter side, and in any case it was probably okay to make the lacework a little more open by going up a needle size.
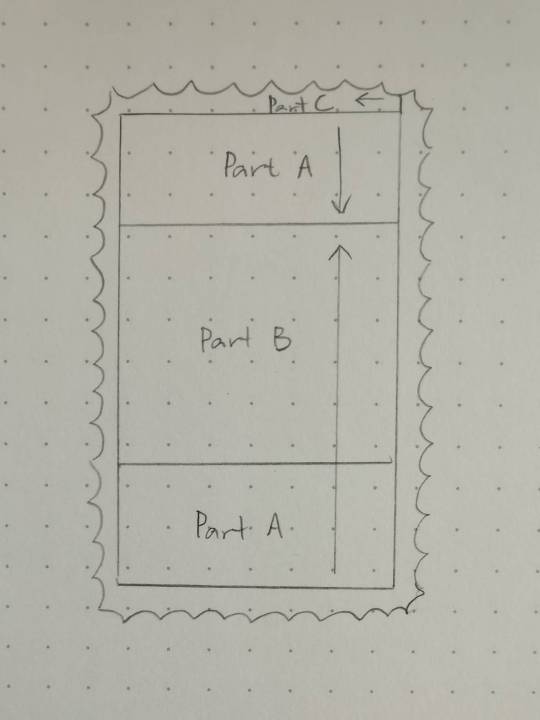
I am not going to give out the pattern, but it is probably necessary to explain the structure of this shawl. The centre is knitted first, and then an edging is knitted onto it by picking up either live stitches or the vertical edge of the centre as you go (see schematic below). The four ‘corners’ of the edging have short-row shaping to help it lay flat. I know that traditionally people can achieve this by other methods, but I haven’t tried any of those yet.
I enlarged the pattern by increasing both the width and the length. I casted on 133 stitches instead of 101 for the centre panel and knitted Part B 8.5 times instead of 5.5. The spider web pattern in Part B requires the stitch count to be (something dividable by four) plus two, so I made one central increase before the spider web to get 134 and a central decrease after it to get it back to 133. Due to the openness of the lace, the change of one stitch is not visible.
The enlargement meant I had to recalculate the edging as well, because the number of stitches available for pick-up changed. Originally, at each corner you do two repeats with four short-row shaping each. I did 1.5 repeats following the original placement of short-row shaping in order to make the total number of repeats fit the number of edge stitches on the centre panel.
The pattern says to Kitchener-stitch the last row of the edging to the provisional cast-on. It just didn’t make sense because that would be two rows too much (the Kitchener stitch row plus the provisional cast-on row). To make the number perfectly fit, I knitted only ten rows of the last repeat (there were usually twelve in each repeat). Then I Kitchener-stitched the end to the provisional cast-on, following the lace pattern. I am quite proud of this solution because it is completely invisible.
Somewhere in the pattern it said to purl (looking from the right side). It seemed strange because the rest of the lace was entirely garter. I knitted those stitches and so far I haven’t sensed a ‘mistake’.
The pattern originally calls for 45 grams of yarn. I estimated (based on the increase of stitches in the centre panel) to need about 80 grams. I ended up using 86 grams. Besides the inaccuracies in my estimation, it was probably also because I knitted much more loosely than expected as it was difficult to tension the yarn tightly at such a weight. Like I've point out in the Yarn section above, I was lucky not to have needed more than 93 grams.
The original finished size is 53*118cm. I ended up with approximately 70*170cm.
Conclusion
This shawl took about three months of my craft time i.e. one full day every week for three months and many mornings before I had to leave for university. Knitting outside my room just didn’t work because I was a) engaged in some other activities that made it difficult to steady my hands, and b) worried about putting a white shawl on any public surface.
The pattern itself is relatively straightforward. The first difficulty was, of course, to understand the instruction written in Japanese. Google translate was horrible so I had to rely on my knitting experience. Fortunately, much of the text description was also found in graphs and charts. Then I had to get my hands used to the tiny yarn. After that, it was only fiddly when I did the edging, because I had to turn about every twelve stitches, and by that time I was handling a giant cloud of stitches on my lap. It did give me a lot of time to go over my favourite documentaries and films, and the last bit of edging was surprisingly quick!
Traditionally, Shetland shawls could be sent back to the maker for maintenance. I think it only fair for me to offer that too because I don’t want a gift to become a trouble (same as how you do not use non-machine-washable yarn for baby knits).
In general, I am very pleased with this shawl. It does pass the ring test, despite not being a traditional wedding shawl size or thickness. I do have a whole lot of actual Shetland 1-ply in my stash, so I am really looking forward to taking my Queen Ring Shawl project out of hibernation in the near future.
Reference list for Introduction
Christiansen, Carol. Shetland fine lace knitting: Recreating patterns from the past. Marlborough: Crowood, 2024.
Mann, Joanna. 'Knitting the Archive: Shetland Lace and Ecologies of Skilled Practice'. Cultural Geographies 25, no. 1 (January 28, 2017): 91–106. https://doi.org/10.1177/1474474016688911.
382 notes
·
View notes
Text
okay i did something ridiculously cool today and i gotta talk about it somewhere!!!
so i love D&D that’s not news, i run multiple campaigns, and i also happen to have a ridiculous amount of dice. my dice addiction got out of hand a few years ago and just kind of exploded from there, i have no idea how many sets i have now, but i love them all equally (that’s a lie, but shh)
at first to store them i made myself a very simplistic dice pouch, but grew frustrated with having to search to find each kind of die amidst the bulk of them. then, i bought a dice box with multiple compartments and painted it with a unique design. i’ve been using the box to keep my dice stored for a long time, but the collection is fast outgrowing the box
now, thing is, i’ve been in love with Laura Bailey’s giant multi-pocket dice bags for literally years - ever since I saw her very first one that she had for Vex. i searched everywhere online for something similar after discovering those were by commission only and far outside my price range, and i found a few other sellers on Etsy with multi-pocket designs, but here’s the kicker: every single design was 4, or 6, or 8 pockets. every single one, even Critical Role’s dice bags of hoarding
and how many dice come in a polyhedral D&D dice set?
seven
i was twitching violently that there wasn’t a single seller pitching a 7 pocket dice bag. 8 pockets is too many - one would perpetually be empty. i could split one of the sizes of dice up, but that would bother me, because i am weird. 6 pockets was too few, i’d have to combine the d10s and d100s and there’d be double the dice in that pocket and that would bother me (running theme here). i realized, having some very minor experience with sewing, the problem here was that an uneven amount of pockets complicates the design/pattern massively. even numbers of pockets makes the design simpler, straightforward, even easy once you know what you’re doing. seven pockets? there’s a reason it hasn’t been done before
so there was only one thing to do (or, well, five things to do)
1. i’d have to remember how to sew (having done all of maybe 3 minor sewing projects over the course of my lifetime, all within the last 6 years, lol)
2. i’d have to set up my new sewing machine that i got for my birthday (which i have no idea how to do, loller)
3. i’d have to then design a completely original pattern (never done that either, son of lol)
4. i’d have to make a prototype out of whatever was available (paper towel and staples, not even kidding)
5. and if that prototype worked, i’d then have to make a fabric prototype from scraps and keep making it over and over until i could actually complete a successful, functional, never done before seven pocket dice bag
and y’all
y’all
i fucking DID it
I FUCKING DID IT
there were tears! there were furious sobs of hysterical frustration! there was enraged ripping of fabric and accidental bending of machine needles! there was a very melodramatic episode of running out of all the black thread in the house (fucking HOW) and racing out to the shops for more! but in the end, somehow, after 3 straight days of multiple scrap fabric prototypes and failure after failure, i made it and it worked
and now, i am fucking exhausted and i am going to BED but here’s some pictures of my baby!!
the original paper towel prototype:


the first fabric prototype, a HUGE failure. the gap in the middle of the inner webbing was a problem to solve, and the outer case was way, way too big and had to be fully revised

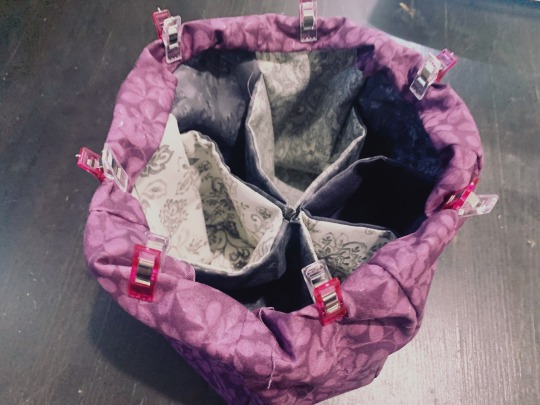
and finally, prototype #3, my second fabric prototype and my first full success - and yes, she’s ugly and made of scraps, but she’s still my baby goddammit


and now you’ve seen the world’s first (probably not, but shh let me have this) seven pocket dice bag!!
67 notes
·
View notes
Note
I LOVE THE CROSS STITCH!! OMG!!! And cosplay! I love to cosplay but I haven’t in years.
I don’t have like, anything finished. And I’m not sure how to send pics over anon.
But I have a small sunflower cross stitch I’m close to finishing! And I finished a sunflower diamond painting; my stepmom gave me both of those.
I bought 75 patterns from Etsy to do bug cross stitch! i’m excited to do the spider and one of the moths! i don’t have many threads, or money to buy threads, but my friend has every single DMC thread possible lmaooo so im just gonna borrow hers. Said friend also crochets! I’ve got yarn and needles to learn over the summer!
Do you have any cross stitch or crochet WIPs? Or any planned cosplays? I can’t wait to see the final hellfire blanket!
🎸
If you were my irl friend I'd give you full access to my DMC thread collection and we could hang out and do a stitch n bitch.
Here's a WIP of an obscure character that you've probably never heard of
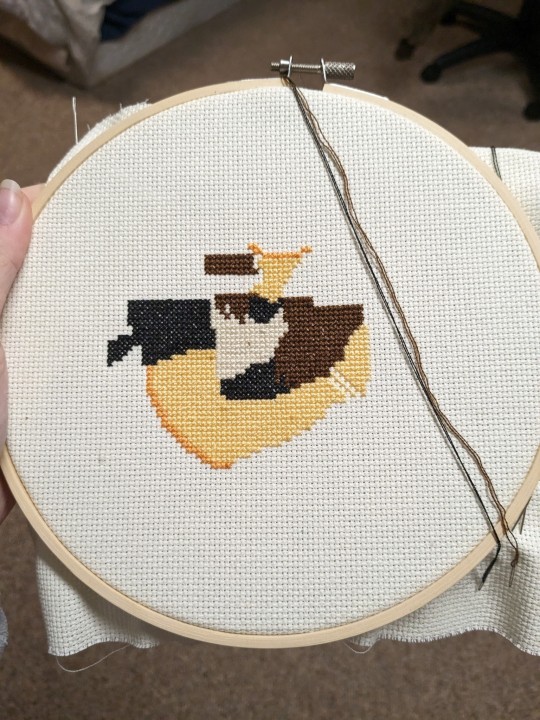
Other than that I don't have any WIPs on my fiber crafts other than the Hellfire Club blanket. Everything else is all the writing WIPs lol.
Also HOLY MOLEY that's a lot of patterns! I hope you have fun with them and if you ever COME OFF ANON I'd be thrilled to see your work!
Also since you're my friend I'm just gonna talk about how a man pissed me off today. So like, I was at Target minding my own business right? And this guy randomly comes up to me and I swear he's probably drunk at Target on a Tuesday afternoon. Like, whatever, good for you. But he starts trying to talk to me about why does GA like Mountain Dew? Ok, weird. I politely smile and nod and try and leave but then he starts talking about football, and then Taylor Swift and how he's glad that GA hates Taylor Swift and that pissed me off. I only kept my mouth shut because I didn't wanna talk to him anymore because he's some dad, Brad, or Chad.
So long story short, I now have Folklore on vinyl.
3 notes
·
View notes
Text
Some Small Dumb Projects Wot Yrs Truly Has Tackled Lately, all of which (it should be emphasized) involved some degree of experimentation that would probably scandalize actual experts:
experimentally felting a bit of roving onto the threadbare heel of an old smartwool sock as a patch. we will see how this goes! an obvious problem with this approach is that if yr sock becomes too much felt and too little knit you will no longer be able to get it onto yr foot. also frankly highly probable that i haven't felted the patch on *enough* and it will pull away either in the wash or in the wearing. but worth a try, i thought!
shd note that bc the roving i have is vaguely cream-colored, while the sock in question is dark brown, the fibers of the patch are absolutely visible on the outside and it looks very stupid. fortunately i find that charming!
rebuilding the heels of my birks, which, yes, i DO wear with increasingly-thick socks as long into the fall as i can get away with it. glad the fashion world is coming around on this deeply gorpcore move. but anyway: i have been a heel dragger since my stroller days and continue to be, so that portion of my soles reliably wears away disproportionately quickly. Real Birkenstock Repair Places, understandably, want more money than i want to pay them to fix this, so instead i bought a bit of foam sheeting for a dollar at michaels a while back, along with some contact cement, and have been cutting out little heel pads, cementing them on, and then cutting/sanding to size. it honestly works pretty well!
really the only downside is that because the foam i bought is softer than the original soling, it needs redoing more often; someone on etsy sells half-sheets of actual birk soling foam for less than ten bucks last i checked, so at some point i might try getting some and seeing how that goes. (it would alter the process slightly because in order to preserve the treading pattern, which my current foam doesn't have, i'd need to cut away the relevant portion of the preexisting sole, rather than just sanding down the patch. seems doable though! i might try it once i run out of this foam but like. even this method honestly lasts a while so. we'll see.)
changing the fucking flat i mysteriously gave myself (more on this in a bit) maybe last week sometime?? this would not be a big deal at all except that i have gatorskin tires which, while *great* for avoiding punctures, are unbelievably terrible to get on and off the wheel, because they're SO tight. i have googled about this in the past and wound up on bike forums that led me to the depressing albeit validating conclusion that no, there was nothing i was doing wrong, these tires just suck to change. in theory the upside is that you don't have to DO it that often because they prevent punctures! but if you wind up with a flat for a different reason... sadface.
now the reason *i* had a flat was that the last time i went to stick a little extra air in my tires, i somehow managed to (as i thought at the time) totally fuck up the valve with my bike pump. this was extremely irritating and also extremely confusing, because i've used this bike pump many times without issue! fine, i said, i'll swap out the fucking inner tube. once i calm down.
then i fucked up another inner tube pumping it up.
what the fuck, i said, very furious at this point and also very mystified. fine. guess i'll go to the LBS and get ANOTHER fucking inner tube. (some people, at this point, would have explained their difficulties to the LBS employee who assisted them and asked for advice. i did not. this was partially for soc anx reasons, partially because i'm always braced for condescension from the cis men who staff every LBS i've ever been to [this is probably unfair because ALMOST every time they've actually been really lovely to me! but alas, i have a big gendery chip on my shoulder. stuff 2 work on.], and partially because i do just get more gratification out of figuring a problem out for myself! toxic masculinity, etc.)
at this point (armed with, may i remind you, my *third* inner tube) i was like, okay, what the fuck. time to do a google. so i said to google, bike pump unscrews valve. talk to me. and discovered: some presta valves have removable cores! which i guess has some utility, although not for any use case i personally have, but when you've got a pump that screws on... shocker, unscrewing it can also unscrew the valve core, if it isn't absolutely thoroughly tightened. so! massively irritating but also educational. i bought a little valve core tool, which is tiny and adorable, and tightened down the valve core of, again, my third inner tube before trying to inflate it: hey presto, success.
so, you know, now i have two extra inner tubes hanging around unspooled and flaccid, that there's actually nothing wrong with! which i guess is cool, because it means i still have them to use at a later date, but, you know. good luck 2 me with folding them back up into a configuration it's at all possible to carry... we'll see how that goes. but on the whole i feel like: i learned a thing and also seem to have a rideable bike again! so. choosing not to be TOO bitter. :)
and this has been today's installment of Extremely Long-Winded Anecdotes Abt Very Mundane Problem-Solving with yr friendly-if-incompetent host K! thx for spending this time with me. :)
#journaling#mundanities#long post#(like. did this post need to be almost four pages long? absolutely not. is it? yes.)
18 notes
·
View notes
Text
How to Long Furb
For whatever reason, furbies have taken over the internet. It’s beautiful and terrifying and I desperately want one. Original 1998 furbies are hard to acquire but that doesn’t mean you can’t make one of your own. Imagine the potential for neck pillows with long furbies! I’m going to walk you through step-by-step how I acquired the supplies and compiled these monstrosities. Note, this is not by any means a comprehensive guide, just my personal experience. I am an ameteur. There is a huge community of furby fans online with tips and tricks on executing a variety of furby modifications. Read more below!
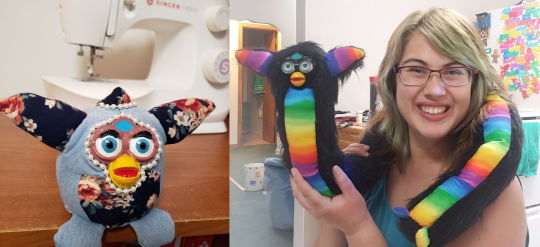
I will start off by saying there were many points throughout this whole process where I got frustrated and set the project aside for weeks at a time. I initially started hand-sewing long furbs but was disappointed with the poor craftsmanship. That’s when I impulse bought a cheap Singer over the 2020 holidays and retaught myself how to use the machine. The point I want to make here is to persevere. Every furby is beautiful! Crooked faceplates and chunky bellies just give a furby more personality. They say practice makes perfect, right? So let’s get started. The main components of a furby are:
1) The faceplate: unless you can get your hands on an original furby, finding a faceplate for your project can be tricky. There are a variety of people online selling furby faceplates. You can also 3D print faceplates using files from thingiverse. I’ve even seen faceplates pressed in resin. My favorite faceplate is from MrDsPrintedCreations on Etsy. The iris of the eyes are recessed so you can easily insert glass eye chips. The first thing I do with my faceplate is glue a piece of fabric behind it so it’s easier to sew into the head. I paint my faceplate with acrylic craft paint and top it off with a clear gloss coat.
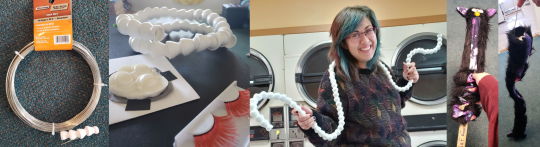
2) The spine: for a poseable long furb, there needs to be a flexible inner piece. I thought thin wire from Menards would do the job, but once it’s in the plush it doesn’t hold it’s shape. I found plastic doll armature works well as a spine. It even creaks when bent for that extra spritz of cursed, spooky energy! You can also use a flexible coolant hose as a spine. I’ve ordered doll armature online from CR’s Crafts: the 1/8th and 1/4th size works well. The 1/2th inch armature is hard to stuff around.
3) Fabric! Fur and belly piece: In order to make furbs, I knew I first needed a sewing pattern. Tumblr user Cavity Sam created a template based on the 1998 furby and I used this to make my first furb with my new machine and scrap fabric lying around. My friend Gunnar 3D printed a rudimentary faceplate to use. After using Cavity Sam’s sewing template, I modified the pattern to use for long furbs specifically. You can download that sewing pattern here.
You’ll need the following supplies per one 3-foot long furby:
quarter of a yard faux fur fabric (9 inches x 44 inches)
patterned fabric for belly, ears, feet (~3 inches x 44 inches)
sewing machine (thread, needle, scissors, pins)
faceplate, 14mm eye chips, eyelashes
E600 glue, scrap fabric
paint (acrylic or nail polish), paintbrushes, clear top coat
spine (plastic doll armature)
cotton stuffing (I cut open cheap pillows from Walmart)

Step one: Use the sewing pattern to cut fabric pieces for the head and body. When cutting on fur, make sure to trace the pattern on the flat backside of the fabric with the fur flattened in the right direction. For example, the hair on the Y-mane piece (back of the head) should be pointed downwards. I made notes on the paper pattern pieces where you can eyeball more or less space. The mane piece should have more rounded corners, for example. I made my furbies 3 feet long, so the front belly piece was 2 inches wide by 3 feet long. The back fur was 6.5 inches wide by 3 feet long.

Step two, feet and ears: Depending on how small you cut your fabric, it can be really hard to combine two separate pieces. For the feet I folded a piece of fabric in half and sewed the C-shapes before cutting them out. Using tweezers made it much easier to turn them back right-side-out. After cutting the ear pieces (making sure the hair on the fur was pointed in the right direction, inside out) I pinned them together before sewing. Turn back right-side-out.

Step three, head: Line the pattern pieces up so the Y-mane is in the middle. Sew the sides of the head to the mane first. Once that is one solid piece, fold it in half to sew the top curve of the head. I have pinned these pieces to ensure they don’t slip when going through the machine. Slow and steady wins the race; make sure to turn the fabric as you’re curving the top of the head. Finally you can sew the piece under the ear together, leaving a gap for the ear to go in.
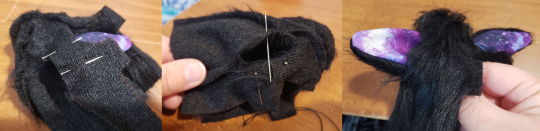
Step four, ears: Everything up to this point has been done on the machine. I haven’t figured out a way to attach the ears with the machine, so this step was done by hand. With the ear facing right side out, pin the ear to the inside-out head. Make sure the patterned part of the ear is facing outwards (where the faceplate goes). By hand, sew the ear to the hole in the head. After the ear is secured, turn the head right side out and voila!

Step five, body: Lining up these pieces is important and a little tricky. You’ll want some excess belly fabric on the top to merge with the bottom of the beak on the faceplate. See the diagram; rotate everything 180 degrees to begin sewing. The fur hair needs to be pointed upwards and the belly fabric pattern is facing down on top of that. After sewing the belly fabric to the fur, fold it over to sew the other side. The fur should be on the inside of the sausage/ body piece. Once you’re finished sewing, the finished piece needs to be turned fur side out.

Step six: Faceplate break time! This step can be done at any point in the process, up until you hand sew the faceplate into the head. To start, glue a piece of fabric behind the faceplate. The faceplate itself should just be the eyes and the beak, making it easier to sew into the head of the furb. You don’t need that extra plastic around the bottom of the beak (or at least I haven’t figured out how to sew that in convincingly). I used grey scrap fabric and E6000 glue to adhere the faceplate. Then you need to paint the faceplates. In earlier furbs I used acrylic paint topped with clear DecoArt gloss varnish on top. You can also use colored nail polish with a clear coat on top. In the pictured furbs I tried sealing the faceplates with mod podge but it dried tacky/ uneven. Optional: you can accessorize your furb with jewelry!

Step seven, inserting the faceplate: You need to sew this part into the head by hand as well. Start from the top center (head inside out, faceplate facing into head) and work your way down the right. Make sure to use a thicker needle and poke the needle through as close as you can get to the faceplate to ensure the fabric fur is flush to the face. The needle may be stubborn (poking through the hardened glue) so use a thimble or bottle cap to help push the needle. When you get to the bottom corner of the eye, the fabric may not line up perfectly. Use excess fabric to sew a seam, effectively acting like a cheek. This part takes a little finessing. Finish attaching the fur fabric one third of the way down the beak. This is where the belly piece will connect to. The final step (later) will be to put the eye + glass chip in.

Step eight, attaching the head to body: I was able to use the machine for this part. Turning the head inside out, pin the head to the outside of the back fur. The head and back should line up so a gap is left for connecting the patterned belly to the bottom of the beak (that step comes later). After the head is connected to the back, I do a second pass to make sure there isn’t any gap in the seam. When turned right side out, you’ll see that excess patterned belly spills out the top. Keep the furb inside out to connect under the beak.

Step nine, connecting the belly to the beak: On the excess patterned fabric sticking out the top of the body, trace the shape of the “M” to cut out. See the highlighted yellow portion in the picture, as well as the printed sewing pattern piece. The piece directly below the beak needs to be done by hand. If you can manage it, you can sew a diagonal line with your machine before trimming the patterned belly. I found it easiest to start from the right and work my way to the left. The acute angle under the cheek will need finessing, but with small and tight enough stitches the end result is good. Turn the furb inside out to see your long sausage of a creation!
Step ten, spine insertion and stuffing: Now THIS is where I may have messed up (i.e. got frustrated multiple times) and need feedback from the furby community. The furby is essentially complete, it just needs the butt and feet attached to seal it off. Because of this long sausage of a furb, it was hard to push stuffing all the way up into the head/ ears, even using a yard stick. Maybe if I printed my original sewing pattern at 115% or 130% size, the completed project wouldn’t have been so narrow. (The ears are a perfect size now that I think about it, so maybe just the head pieces need to be bigger.) This resizing would make for a larger in diameter, plushier furby too. I thought I could insert the spine after stuffing, but the opposite is true. Insert your wire or doll armature after the ears and head are stuffed but before you begin stuffing below the beak. Alternatively, you can fasten the top of the spine behind the faceplate before stuffing. I taped a cup to the end of a yard stick and that helped push handfuls of stuffing into the furb at a time. Leave 2 to 4 inches of the bottom unstuffed so it’s easier to sew on the bottom circle. We will leave a small gap for the rest to be stuffed before totally sealing it off.

Step eleven, connecting the feet and bottom: Stuff the feet and seal them off with a couple stitches. Don’t stuff the feet completely full, the top seam should lay flat. Place the two feet on the bottom of the belly, pointing upwards. Sew the feet onto the belly in a straight line. Now comes the part that takes more finessing, the bottom. When you line up the bottom circle, make sure the hairs of the fabric are pointed backwards. If you can manage it with the machine, sew the bottom circle to the bottom of your furby where the feet connect to the belly, about a third of the way around the full circle. The fur of the circle should be facing down, touching the belly of the furb. Once you’ve attached the circle to the feet, you can fold the circle back to see the butt starting to take shape! You can give it another pass on the machine, sewing the opposite side/ flip the furby so you can see the backside of the belly. Leave enough room to stuff the rest of the cotton and close the gap by hand sewing. Now that your furby is essentially complete, you can add the finishing touches! I always leave the eye chips for last so I don’t scratch them in the process of turning my furb inside out. You can print or paint the eye designs to place behind the glass chip. Use clear glue like superglue or E600 for the best results. Gluing eyelashes on with superglue is an optional last step.

Aaaaaaand the furbies are done! Again, I’m an ameteur sewer who’s learning as I go. I’m always open to suggestions and feedback; if there’s a way to revise this process to make more efficient and better quality furbs, I’d love to know. Thanks yall and enjoy making these cursed friends!
117 notes
·
View notes
Text
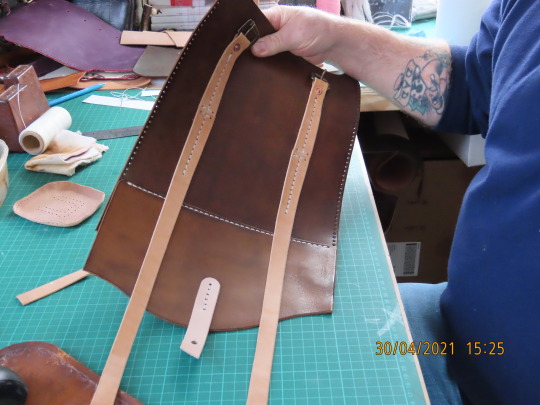
Bike Tool Pouch
Hi Guys, sorry it’s been a few weeks but life and Covid got in the way for a bit after the Large explorer bag. But I finally got some free time to sit down and make something. This time I purchased a pattern from Tony See at Dieselpunk.ro ( ‘ro’ standing for ‘Romania’..I think. ). The pattern is actually for a Bag with either carry handles or a shoulder strap, but I want the main body of this pattern to alter it into a Pouch / saddle bag for my bike to carry a few tools and maybe a spare inner tube etc and I gotta say....it has turned out great. See for yourself and join me in this short build along to see me put this lovely little pouch / saddle bag together. It’s a fairly easy build and I would recommend it to a more ‘adventurous’ beginner. As usual as I am hoping to peek the interest of a few of you to give it a go yourself I will add that Leather crafting can be expensive and can become addictive...in a good way. But Leather, especially in the UK is very expensive, so maybe pick a small project as your first one to keep costs down whilst you learn. That being said, this is an amazing hobby and very satisfying when your skill level increases and you start to see better results. I almost forgot, I have been getting into making videos of me building these projects and I show them on my new YOUTUBE Channel called Shamancraftprojects, I hope you will drop by for a look, My filming and editing skills will improve with time, but they are fun to watch. If you do would you please ‘Like’ Subscribe and click the Bell and click on ‘ALL’ so you will know when I put a new one up. Thanks. Ok,, lets get into it.
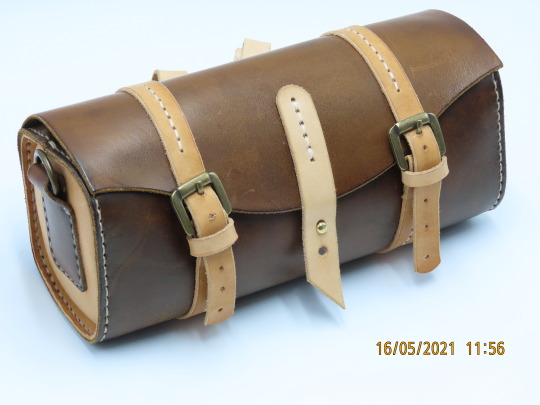
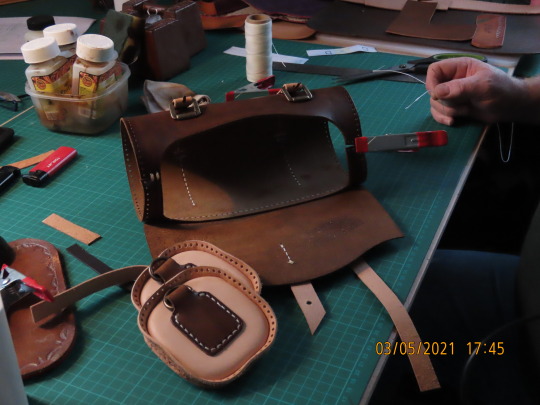
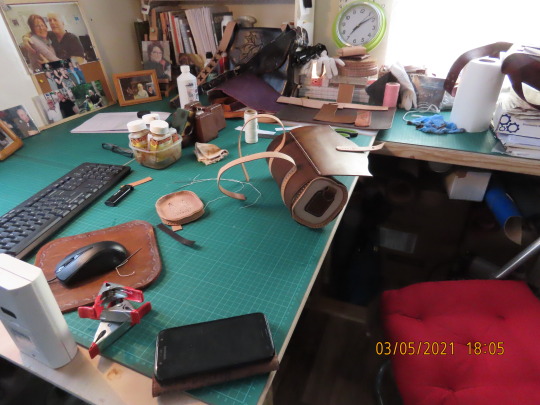
Pic 1: Turned out great, not very difficult to make and recommended for adventurous beginners. I keep getting asked How long it will take,...well, how long is a piece of string ? ..I took 3 days to make this but that’s with normal life getting in the way, so it all depends how long you can give it your attention for really. Let’s crack on.

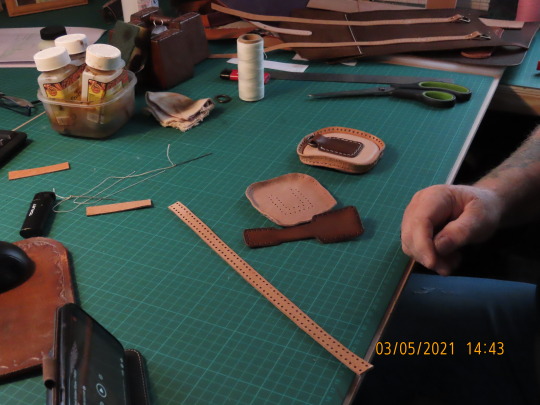
Pic 2 : As always the patterns are printed out in ‘sections’ which have to be cut out and taped together to make the full pattern, this bit came in two halves which I’ve taped together across the middle with decorators paper tape. All other pieces are treated the same way and then any holes are punched out as per the markings. I have shown this many times in past projects so if you have any issues go check out my archive, I’m sure the information you want will be in there.

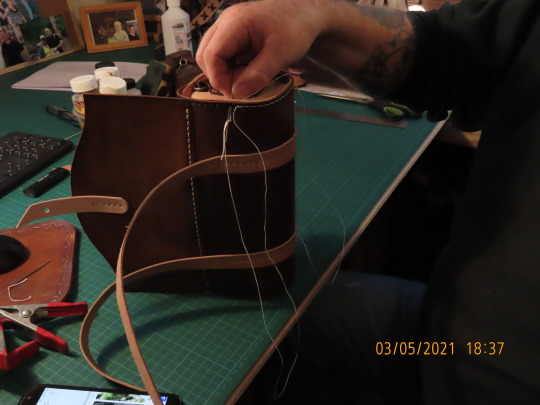
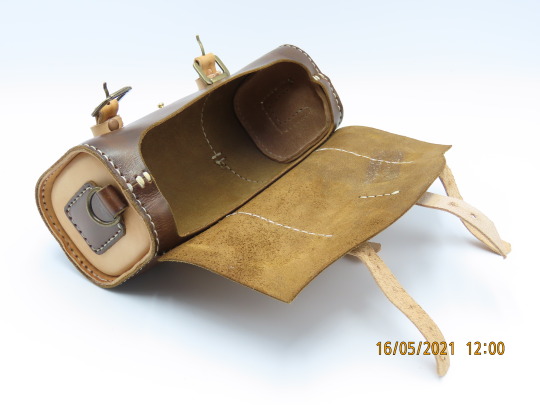
Pic 3 : I have used a Walnut water stain dye by fiebings, I use this color a lot, it’s one of my favourites and for me personally it gives leather the color most people expect leather to be..traditionally speaking that is, but feel free to dye your projects any color you wish it’s your project. Once all the patterns were transferred and the parts were cut out of the leather, I first hand stitched the top flap onto the main body as seen here using a saddle stitch.

Pic 4 : For all those out there who have followed my projects from the beginning, six years ago...wow time flies, firstly..thank you and please tell your friends,...anyyyhoooo..for all of you regulars you will remember that I enjoy hand stitching and the saddle stitch is my ‘go to’. My stitching has definitely improved thanks to practice and also to the advice given to me by many people..thanks guys if you are seeing this for all your help and free advice and from videos on youtube. Here you can see the stitching in a nice consistant line, if your stitching is ‘wobbly’ check when you do it how you cross your needles over on the first stitch, if your left needle goes behind the right needle keep doing that...and continue crossing them the same on every stitch. If your fingers hurt a lot, do four or five stitches lightly and ‘then’ pull tight...that’s approx five stitches for one pull...less stress than pulling on every stitch.
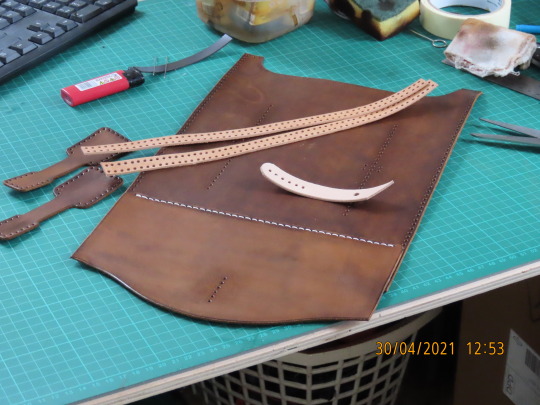
Pic 5 : Here I’ve cut a couple of the ‘skirt’ pieces ( just what I call them ) that will stitch to the end pieces to enable them to be connected to the main body as you will see later and also the front strap that will ‘pop’ over a ‘Sam Brown’. on the left are the two pieces that will eventually hold ‘D’ rings.

Pic 6 : On the main Pattern the straps are intended as carry handles as you will see if you watch the Build Tutorial Video put out by ‘Tony See’ at Dieselpunk.ro. But as I’m making it into a Tool Pouch I have used the part of the strap that will be stitched to the main body but I have cut it in half and shortened the strap to take a buckle. In this pic you see the strap cut in half and positioned ready for stitching after a buckle is fitted.
Pic 7 : if you zoom in you will see here that the strap was cut in half, however, since doing this I realise that cutting it isn’t necessary if you just remember to make one end shorter whilst leaving it longer on the other end so you can cut it to the required length later. Also here you can see the shorter ‘button’ strap is fitted. If you would like to see the build in more detail I have a four part build video with audio on Youtube ‘Shamancraftprojects’. titled ‘Bike Tool Pouch PT1, PT2, PT3, and PT4. I also have a shop now on ‘Folksy’ where I sell a lot of my projects, this one is for myself but I will be making more of these. I no longer have a shop on ETSY and for anyone wondering why, after being on it so long, they were taking 3/4s of my money on each sale and ripping me off in other smaller charges, seemed like more every week, so I’m now on ‘Folksy’. That being said..lets carry on.

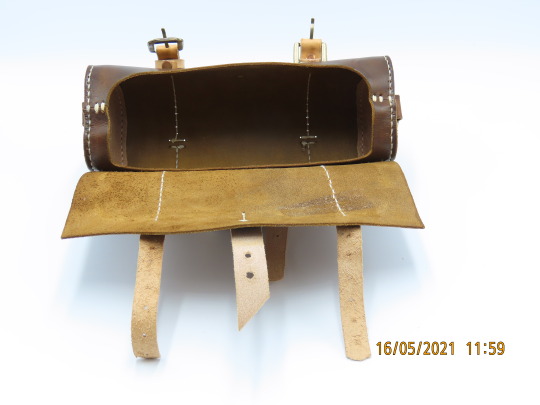
Pic 8 : Stitching the ‘D’ring holders and ‘skirts’ on to the end sections starting on the smaller underside piece then fold the top over and stitch the upper one ‘over’ the under one.
Pic 9 : Here is what I call the ‘skirt’ as it stitches around the edge of the end section on one side and then stitches to the main section on the other side, hence the two rows of holes.
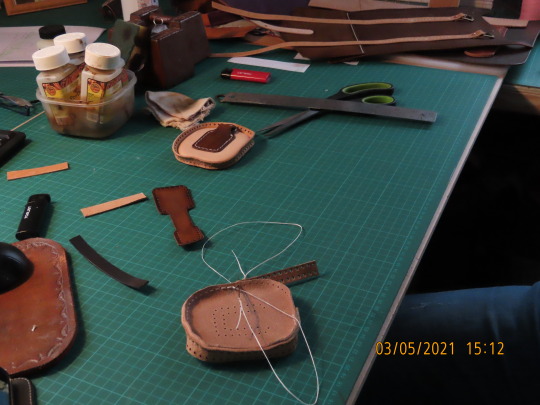
Pic 10 : Here I am putting on the ‘Skirt’, (mainly because I can’t remember what it’s called hahaha ) ...onto the second of the two end sections. It’s a simple thing to do, you just find the center mark on the two pieces which are marked on the pattern, so make sure to look for them on your pattern and to mark them on your leather as these are the starting points for the stitching.
Pic 11 : Once the ‘skirt’ is attached the next step was to attach the ‘D’ ring holders on as seen here. I bought the ‘Kit’ of buckles,rivets etc from Dieselpunk.ro also.
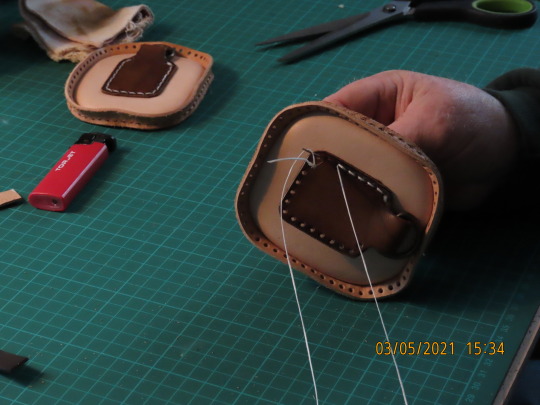
Pic 12 : Next I attached the end pieces to the main body, I used a clip to hold the two edges together leaving the four holes I neded to stitch, as seen here on the main body one end is already done, the outside holes are to be stitched to the end sections.
Pic 13 : Here, I’m stitching an end section to the main body using the saddle stitch.
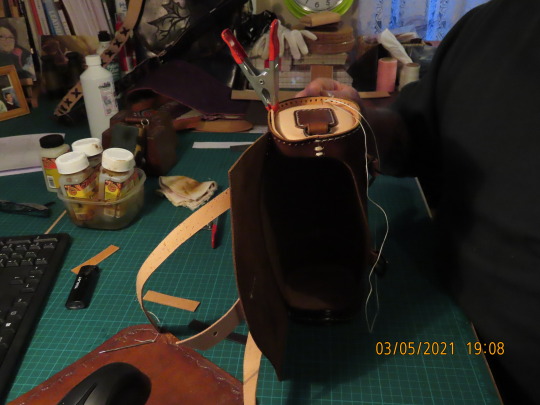
Pic 14 : Another view showing the outside stitching now incorporating the ‘left over’ outside holes as I go around the outside.
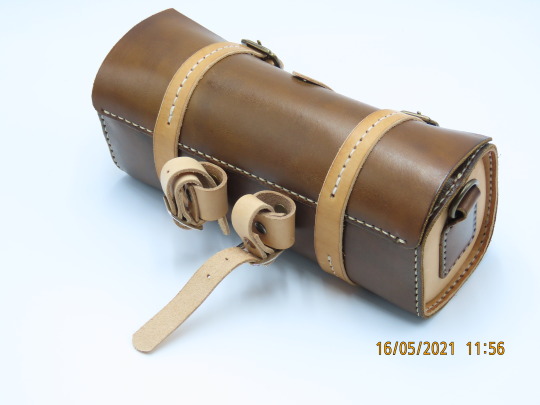
Pic 15 : Once done they should pull to shape like this.
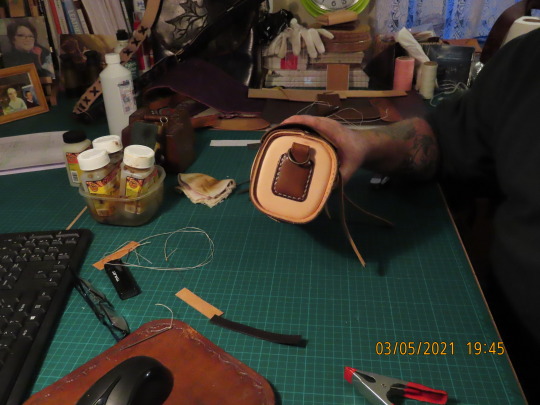
Pic 16 : Now the buckles and ‘Sam Brown’ need fitting.

Pic 17 : The Buckles and Sam Brown are fitted, very easy to do even for a beginner and I think a Beginner ...once they can stitch, should be fine making this. ‘Stays will be fitted later to hold the straps better.
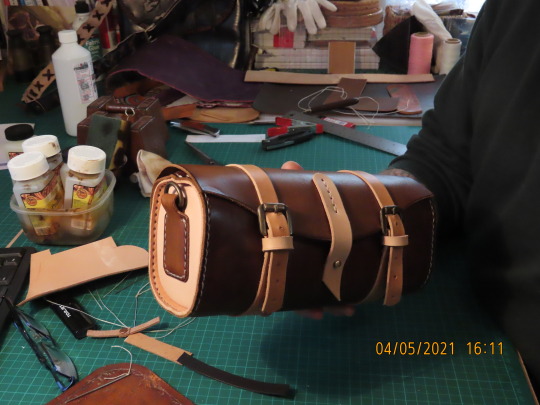
Pic 18 : Here I’ve fitted the ‘stays’. Now to make some straps to attach the bag to the Bike.
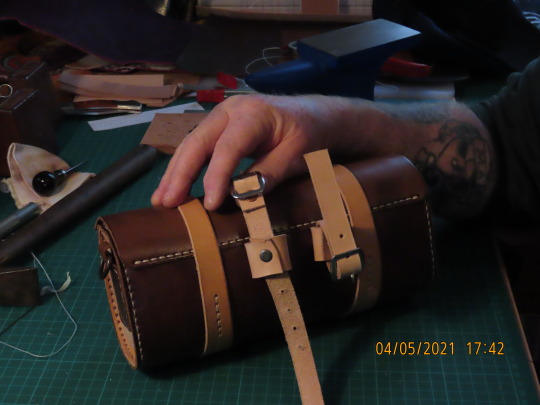
Pic 19 : As I’ve said, straps are no problem to make, I just cut two small ones and riveted them to the bag and then fitted buckles to them and riveted the straps to them as shown here.
Pic 20 : Plenty of strap here to connect it to the frame of the Bike.
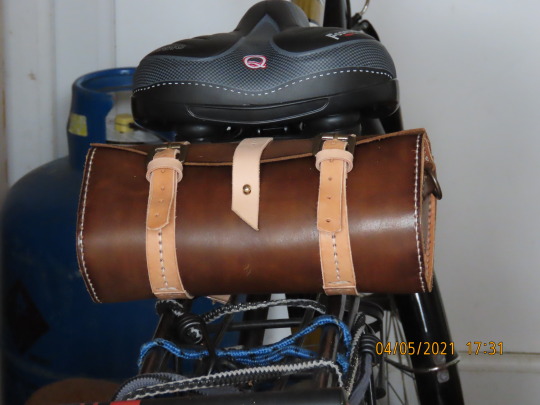
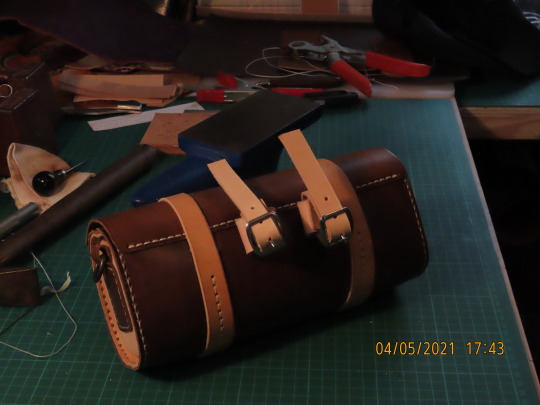
Pic 21 : Ta daaaa, I always wanted one of these on my bike to carry tools, spare inner tubes, puncture kit, gloves, hat etc. There’s more room than at first appears in this neat little bag. I recommend this project for beginners, but practice the saddle stitch first. You don’t have to use veg tan but I would recommend using a firm material that will last. I can re water proof this bag and treat it with balm now and again to keep it in good condition, I coated this in Effax Leather Balm. Hope you have enjoyed this small project, after the explorer bag I wanted a quick easy project and this fit the bill nicely. More to come, watch this space. I hope some of you will have a go yourself. ‘till next time...Stay Crafty, Stay Safe.


10 notes
·
View notes
Text
accountability post for my personal reference (too long to post on twt and I’m too lazy to handwrite it out). you can read below the cut if ya nosy.
1. costuming - finished historical costume, got my cosplay in the mail and need to lose like 10 pounds to fit into the pants lol. Got the fabric and materials ready for the other costumes but too lazy to work on them, I’ll work on them on my staycation. Still have a few props to finish for my older ones, too. I’m currently deciding on which costume to wear for work meeting, maybe 3 Musketeers, I don’t want to wear clown lolita since I’m not doing so great lol, don’t want to confirm I’m a fool. My other option is pulling out some patterns I bought for renaissance/medieval costumes but I would have to buy a lot of yardage for them and I’m not in the mood for buying new materials when I have a lot at home. I am tentatively going to a small Halloween lolita meet and maybe a con in December, but that depends on my mood those particular weekends. And of course, I’ll have to make a face mask to match my costume.
2. language learning - missed a few days, which turned into weeks, then months. as you do. I think immersion programs and apps and textbooks don’t work for me, I really do need a class for discipline.
3. videogame studio - I’ve mostly given up on this because I really wanted to work with a team like a real studio, but my friends are sick and/or stressed out due to the pandemic and I don’t want to burden them with more responsibilities. Also, like above, unless I have a hard deadline and someone else grading me, I won’t finish anything or even start things, I’m just historically bad about that. Right now I’m working on learning how to design assets and use creative application of video game technology and just absorbing inspiration from games that I’m already playing, it’s better than nothing.
4. gardening - my main stressor is if these plants will produce fruit before the winter since I planted them in early summer instead of early spring. I know the tomato plants specifically will not survive a frost in the rare instance we have severe frosts in my area, so I have planted (will plant) a few in pots I can take inside by November 3 (expected temps below 50). At least I partially hung up patio lights, but the rest of the garden and garage cleanup hasn’t been done yet. Guess that’s what I’m doing on my days off lol (before November 3!)
5. website - priority is archiving all my blogs even though I trust wordpress and blogspot to not delete my stuff randomly and I’m not sure how many years I’ll be paying for my own domain or if the planet won’t be snuffed out in a heat death in 5 years. I do need to decide if I should keep my blogs separate by subject or not. I blog about a wide variety of things that audiences wouldn’t really have a crossover interest in. But if I’m just using my domain as an archive and don’t expect many visitors, I guess I can just tag it specifically and leave it at that? I’m not doing a great job listening to other people...
6. Etsy shop - this is not a huge priority for me but I do want to list the clothing or accessory items so it can be more fashion focused instead of just listing weeb fanmerch and technically grey-market items. Still not sure what I want to sew since my sewing isn’t flawless (and same for jewelry making skills lol), but I think for clearing out my scraps, I’ll just make masks and bows and headbands/scrunchies like I’ve been making because I think those are fun. Can’t really think of anything else to make that doesn’t require a lot of expensive hardware or setting in zippers.
If I think of more, then I’ll add to this list, but these are my current ongoing projects outside of fanart/fanfic and trying to cook.
2 notes
·
View notes
Text
The Power Inside
I’ve seen many ask me’s with the same energy, same questions. I hold absolutely zero judgement for any of it because I have been where you all are, and because I have been there, I want to help you guys get out of there.
So many of you are in the state where you choose to give your power away to others. Now these comes from habits that go far back, so it is ‘natural’ in a sense to each and every one of you. But I want you to know that no one holds the power of your life, only you.
No one can continue to hurt you now unless you allow them to, and no one can deprive you of love, only you can do. Now I know that this is a lot to take in and that a lot of you will read it, resist it and reject it. But hopefully it will at least plant a seed.
If you want to experience love, you have to choose to experience love. If you believe that love is not for you and that love only hurts and bring pain, then you need to change that belief or else you will just keep experiencing more of the same.
You might want to confront me and deny that you have chosen hurt for yourself, but I choose to believe that everyone that reads this, knows deep inside that they did and also why. You can see the patterns in your life, the power you chose to give away, the importance you placed in other people, and how you allowed them to hurt you by allowing them to define you when that was never their choice to make.
Let me reiterate again that I know that this comes from years, years and years of subconscious programming throughout our lives so I do not blame or judge any single one of you just as I have learned to release judgement and blame for myself for having all of the same and different experiences as you.
Through the process of ‘awakening’ I want you all to awaken to not only the power you hold within but also the infinite love that exists within that is there for you all, at all times. There is absolutely nothing that you can’t accomplish, it’s just going to take a little bit of work to change your mindset, to reprogram your subconscious mind into only believing what is the very best for you so that you can experience the most beautiful amazing life for yourself in all areas of your life.
So I have said it before and I will say it again and I will continue to repeat it until you all do it with me: AFFIRMATIONS. Use affirmations suited for you and your experience, for what you wish to change or what you wish to see. Repeat, repeat, repeat them until they feel completely natural to you. If you keep repeating an affirmation it will sink into your subconscious mind and when your subconscious mind shifts and changes, you will start seeing this shift and change in your waking life, believe me.
Read: Power of the subconscious mind by Dr Joseph Murphy, if you are ready for it, it will probably change your life.
Edit: To add ‘continue to hurt you now’ to clarify as I do believe I may have been a bit general in my statement. Shit hurts sometimes and it’s not easy to not feel and react to things and people that we have given value in our lives. But it is important to not feed thoughts that keeps us hurting.
To further clarify I mean this text to reference adult individuals and not children after receiving a comment that interpreted my text to mean that children would or could allow abuse to occur, they do not, they do not have the capacity to consent nor make sense of what is happening to them. I apologise if this was not clear. This is one of the many things I mean by years of subconscious programming that may hold us back today (things we suffered and experienced in the past). I myself as you know made a video with Mirax where we talked about our experience of growing up with an alcoholic parent and the emotional abuse and neglect we both suffered as result as well as the video I made where I speak about when I was raped at the age of 16. I personally suffered complex PTSD for many years as a result of my childhood. I do not believe I chose that experience, but I do believe that experience instilled many wrongful subconscious beliefs of worthiness etc that I have worked on as an adult to correct and change. I was actually thinking last night of making a separate blog post about this to explain this as I’m sure this is a question many of you might have, but I figured it would be best to include the edit in the post itself. I hope this helps clear things up.
There are many other things that can be said about this particular subject but I will leave it here and you can email me or use the “ask me” function for anything that might be on your mind, or on your heart. I am here for you all, always.
Please consider supporting my intention art business in return for my time and energy by purchasing or sharing my shop on any of your social media, every page click helps my business grow and I appreciate all of your support.
You can get a sticker for less than $2 and if you make a purchase and send me an email to let me know what you bought I will happily give you a free 3 card reading for a question of your choosing regardless of the cost of your purchase! 🧡
If you'd like to donate to my channel/blog I gratefully receive energy donations via Paypal, every little helps! 🧡
For anyone that feels so inclined I do have an etsy shop for readings or if you prefer I now also have an email where you can send requests for readings or for anything you'd like to share etc: [email protected]. I will consider requests for conscious manifestation coaching via email, payments will be over PayPal only but the amount is negotiable depending on your own affordability for I am here to try and help <3
Much love and light to you all and to the universe 💛💜
~ Lady Blue
#manifestation#affirmation#power of the subconscious mind#subconscious#ascension#awakening#love#life#light#power#strength#art#aenablue#etsy#redbubble#free reading#coaching#ladyblue#twin flame#soul mate#twinflame#soulmate#universe#spirit#change#possibility#positivity#joseph murphy#conscious manifestation#success
14 notes
·
View notes
Note
allow me to rant about the only thing that has been in my brain for the past two months and that is doll customizing babeyyyyy
i know there’s a 90% chance that you wont give a Shit about any of this but here we go anyways
SO first you gotta choose a doll. preferably one with a high range of motion to avoid creating new joints or having annoying limitations like not having elbow joints for some fucking reason. what the fuck mattel. give monster high dolls back their ball jointed shoulders and elbow joints. smh
the most common dolls ive seen used as bases are monster high and ever after high. most customs ive seen are highly stylized so the stylized face molds work well for those types of dolls but dolls like barbies are good for when you want a more realistic face-ups.
once you’ve got your base picked out you gotta wipe that bitch’s face off with like. acetone or nail polish remover or something strong like that. you can also use acetone to shrink doll heads which is cool as hell imo. n e way once the face is wiped you gotta chop off the hair and remove the hair plugs from the inside. ive seen this done several ways but the easiest and most common way ive seen is to dunk the head into boiling water for ~30 seconds until it gets squishy and malleable. once you’ve got the head back, you can use pliers (i think tweezers would work in a pinch) to pull out the hair plugs which are kinda icky because theyre covered in glue and other gross shit. ew
now you must decapitate the doll. dunk em back in the boiling water to soften them back up then just tug the head off. the neck pegs look funky and are usually a different color than the body so thats cool ig
once the head’s off, you can start the face-up which is basically just giving the doll a new face using stuff like watercolor pencils, acrylic paint, gouache, and a whole lot of other stuff. hell ive seen people use person makeup on these dolls.
next,,,,, hair. there’s about twenty million ways to do hair from gluing yarn wefts to sewing to rerooting with purchased nylon doll hair or yarn wefts but i’m gonna talk about the most common one ive seen which is rerooting and gluing.
before you can reroot, you need doll hair. which, as i mentioned, can be bought at stores like the doll planet or made at home with yarn in literally any color. have fun with it! make rainbow hair or something idk
to make homemade wefts, you take some acrylic yarn, cut it twice as long as you want the hair to be (keep in mind you can cut and style the hair once it’s been rerooted), fold them in half, and tie it to something sturdy like a wire coat hanger for the next step.
once you’ve got your yarn tied to your hanger, use a pet brush and brush the yarn until it’s wispy and looks like hair. then take a straightening iron and iron the weft flat. then remove from the hanger and boom. hair wefts. ta-da
to reroot the wefts onto the head, use a rerooting tool (which can be as simple as a needle with the eye cut at angle) (just google it please i’m shit at descriptions)) to poke small sections of the hair into the head. you can use the pre-existing rooting holes for your own reroot as they’re usually pretty reliable. to reroot, take a small length of you doll hair (about 10-15 strands), loop it in half, and put the middle of the loop into the reroot tool. poke the end of the tool with the hair on it into the pre-existing hole and remove the tool. the hair *should* stay in and fill up that plug!! also remember to plug thickly at the hairline and part of the hair where it's most noticeable. it doesnt matter as much in the center of the head as that’s not usually visible on the doll. once you’ve rerooted, squeeze in strong glue through the neck hole and squish around the head to make sure it covers all the plugs and secures them in place. then pour hot water onto the head to make the hair lay flat for styling later.
also, you can reroot yarn directly into the head to make thicker, more textured hairstyles. and since the yarn is thicker, you dont need to glue the inside of the head for the hair to stay in place!!
if youre not doing body modifications (which are also cool as hell) then it’s time for clothes but clothes are boring and i like body mods more so i’m gonna rant about them instead
the material ive seen most doll artists use is apoxie sculpt, which is like play doh on steroids. it comes in two parts which you gotta mix together for some reason. why dont they sell it pre-mixed. what was the reason. also once it’s dry it’s super super strong and you can sand it, drill into it, paint it, and all kinds of stuff. very nice and i want some for myself.
you can use hand saws and drills and shit to whack off doll limbs to make stuff like digitigrade legs or new joints. also dont be afraid to use other mismatching doll parts when customizing like heads and bodies and forearms and hands and shit. it literally does not matter if youre gonna recolor the doll anyways so have fun with it. make frankenstein’s doll if youre feeling spicy
accessories my beloved. stuff like tiny beads and clay baubles and shit will literally transform the entire doll plus they’re adorable and multi-purpose
i suppose i must talk about clothes now. ah well. you can find great clothing patterns if youre new to customizing on other customizer’s etsy shops and probably google although those will probably be lower quality than paid pattern pieces. and keep in mind that if it exists as clothing irl, you can likely make it doll-sized. there are literally no limits to your clothing options as long as you can execute your idea.
the once all your components have been made, you can assemble the doll again!! and finally see what all the parts look like together!! very cool 10/10 stars.
ight that wraps up my doll rant. i could really go into more detail on certain parts but thats a whole other rant for a whole other day smh. sorry for fucking flooding your inbox ender ahaha……………. you asked for this
little did you know that dolls have been one of my favorite things since like ever. if i can read a 25 chapter long fanfic i can read this B)
mattel definitely fucked up by completely ruining MH doll designs and just stopping EAH, alot of their profits most likely came from people who collect and customize dolls and by changing MH doll designs/Stopping EAH dolls they 1. most likely lost a small (or big if we're not jus talking people who customize dolls) part of their profit and 2. made it harder for doll customizers to make dolls/get commissions out rather quickly because they probably have to waste more time making joints or learning how to make joints.
EAH/MH dolls (specifically MH dolls) had AMAZING MODELS because there was so much variety with height, face shapes, etc (my favorite molds had to be the short/tall dolls and the cat molds because of the tails) and doll customizers really went all out with enhancing a molds unique features. The only "downside" abt MH dolls is that they (or atleast most)(from what i remember)) had slimmer faces but wider eyes while EAH dolls have wider faces with slimmer smaller which left a canvas for the face and not the eyes (and vice versa for MH dolls)
I've never seen any videos where a barbie is customized (maybe because i absolutely despised barbies at the time) so I'll definitely have to check those out but they seem to be good for realistic makeovers. I've seen like like semi realistic makeovers for EAH/MH dolls that were pretty good too tho (pretty sure mostly EAH dolls since yk MH dolls were used for creature makeovers while most EAH dolls weren't)
yeah i was always amazed by the head shrinking with acetone. honestly i still am?? idunno i have no idea how that chemical bullshit works. Ive seen a few of uh makeovers that just pain over the face (in multiple layers ofcourse) but that's usually when they're painting the entire body a different colour (again usually when they're turning a doll into a funky little baby man). I've also seen a few that just chop the hair off and take out the hair plugs yk without uuh like softening the head or just go straight for the hair plugs after taking off the head (i used to do that it was funny to me??). i always really liked when they used watercolour pencils or just colour pencils in general to draw/sketch on the face cause like wow ur drawing on ur doll without ruining it?? kinda epic maybe even poggers and pogchamp?? oh god my brain is failing wjshsmsj.
Watching them putting the hair back on the doll was, other than the face stuff, was the BEST part for me. Favorite type of hair was iuuuuuh was either thick yarn or brushed out yarn. Literally worship the people that would reroot the hair, theyre the most patience people on this earth!! it's literally insane but i guess that's what happens when you've been doing that for years? you guess kinda get used to it. when they put glue into the head does it just become stiff?? like it's just a clump of dried glue or does it like..hollow out again??
dude you literally cannot convince me most of the supplies used for doll makeovers. APOXIE CLAY LOOKS SO FECKING GOOD. its edible and i will die on that hill. The body mods are literally so amazing!!!!! it's so impressive how theyre able to imagine certain features THEN LIKE ACTUALLY MAKE IT LOOK ACCURATE TO WHAT THEY WANTED TO LOOK LIKE AFTER LIKE ON TRY (or many yk trial and error is very necessary for..everything). Absolutely loved when doll customizers would saw off a dolls legs and use different ones or just completely get rid of the torso to use a different one. it's like uuh that one big guy that's mismatched and sewn together. very cool. The accessories are so fun!! just small little details you seen really need but can add because it's your feckin doll!! I used to be absolutely obsessed over the doll clothes i would find on etsy, so much so that i started sewing shitty shirts and dresses for my uh "customized" dolls (they were absolute HORRORS idk WHY my mom let me feck up my dolls like that).
Thank you for this!! i haven't been able to talk about any of my interests for a while and this just really made me happy!!
Question fer u my fellow MH/EAH enthusiast: what was your favorite MH/EAH movie/episode and doll series. Mine was The fusion dolls (MH obvi) and that MH movie "Haunted" cause we got to know more about Spectra :D
#YOOOO LONG POST?!#long post#:) hehehe#this was very fun to read cant wait for ur next fanfic length ask#asks :D#theoreticallyjasper
2 notes
·
View notes
Text
1, 17 48 for the end of year asks?
(from @serenbach86…it was a submission format so I’m not sure if that shows up like in an ask?) Thank you!
1. How many lockdowns did you go through until now?
Well, really just the spring one. Once they started opening things back up again…I don’t know what it would take to get this state to go back on a true lockdown again but apparently the current skyrocketing of cases isn’t it. So it’s been all “masks are mandated, but that’s not actually enforced” and social distancing/masking protocols at school (where we can actually enforce it, but boy did I get tired of telling the same two kids every A day to pull the mask up over their noses. It’s been like 12 weeks, you could have bought a mask that fits your face by now) until eventually we had too many teachers either just quarantined or actually sick to staff the building and had to go to full remote. So that was sort of like a quasi-lockdown, with only teachers in the building, teaching over Canvas and Google Meet all day long.
17. Favorite mask you own?
I have three from this Etsy shop that are the most comfortable fit (with space enough to talk in all day when I wear it for school! Some masks are just too close to your mouth, you know? It makes a world of difference having one shaped to give you breathing room). Oh, and it looks like none of the fabrics my mask orders were in are still available in the listing, but they were really pretty- a pink/white pattern, a very dark purple/white, and a green/white, all sort of floral/paisley type patterns.
48. Trying new baking recipes or new cooking recipes?
Lots of new cooking recipes – last winter I started getting one of those weekly meal kit delivery things, and when we went into lockdown that came in extra handy! Mine is EveryPlate and I have tried some awesome new recipes/techniques with it, especially anything coated in panko (which was what I just made for lunch in fact, Crispy Italian Chicken with sauteed zucchini and garlic couscous!) Best thing I’ve learned to cook from these kits: Linguine Carbonara! I have also gotten pretty good at making mashed potatoes, which I never bothered with before this subscription and which turn out to be ridiculously easy. A lot of the recipes I pick have roasted vegetables involved though, and that’s been one of my favorite cooking techniques for years, so the style and methods of these meal kits work out for me pretty well. (And ha, now that I’m singing their praises, I also have a referral link that I’ve never used but if anyone wants to try it, have fun!)
I…might need a baking kit delivery thingy too, come to think of it, because I haven’t done nearly as much of that this year! I did some over the spring/summer lockdown, but baking (and prepping to bake) take more time than I’ve had since school resumed.
End of the Year Ask Game
6 notes
·
View notes
Text
“Yes, you can afford one of my gowns! READ HOW!
“I cannot afford your gowns.” I hear this ALL the time. But what really frustrates me is that most of you don’t understand that a bargain is only a bargain if it is quality made. YES! You can have an amazing gown from me for around $800!
I sell mostly on Etsy, with the exception of cast mates who know my work, or some of my followers on Facebook, Tumblr, or Instagram, the majority of my sales go through Etsy.
There are hidden costs the average consumer doesn’t understand. First of all, Etsy takes about 20% or more out of each sale I make. That on top of the listing fees I have to pay, as well as the cost of having an upgraded store, and a website that is separate from my store. All those things add up. I also offer FREE shipping inside the US - - But I did NOT raise my prices to cover that expense. I do deduct it from my taxes as an expense, but the average cost to ship a gown First Class via USPS is about $45 to 50.
Most vendors on Etsy, Ebay, or even vendors at Renfaire buy bulk fabrics and crank out the same gown over, and over, and over ad naseum. However, all of my work is custom couture with MANY hand-sewn elements.
I charge by the piece. That means I charge for EVERY cut piece I physically sew together, and that includes the lining, and piping! If I charged by the hour, just a basic gown would retail for no less than $4,000 to $5,000.
Embroidery affects the cost of my work because it takes MORE time than the actual construction of our gowns, and beading and pearling or hand-tacking down trims takes even longer than embroidery. Again, In’t charge an hourly wage, but I charge by the stitch count of the embroidery pattern and a flat rate for beading and hand work - which usually is merely a pittance of what it should be because I WANT to make my work affordable while still being fairly compensated for my time and labor.
The average basic 16th Century court gown I make only runs about $800 to $900 for labor - - it’s all the embellishment that costs!
So, if you choose a gown with tabs around the bottom of the bodice and/or around the shoulders, or a sleeve that is paned, this is going to drive up my labor fees because we STILL charge by the piece. Those tabs are DETAILED ya’ll! They are piped, and lined and take a lot of labor on my part. But listen . . . we can customize a gown that is more basic and forego all the bling and STILL offer you something amazing. So don’t let the price of the gowns you see listed scare you! Before you go to another vendor and buy on the cheap, give me a chance!
Let me put it this way: You look at my work and you drool. You then look at the listed price and say, I can’t afford it, so you go to a vendor who is going to offer you a basic cut gown - that may not be an historically accurate style, or they use fabric they purchased in bulk, say a synthetic brocade. The brocade is more than HALF the design aesthetic for these bargain priced gowns! There is much MORE involved in creating a quality-made garment. So, why not choose a more affordable fabric and ask me to make you a basic gown!? Yes, you might pay $400+ more for one my basic gowns, but at least it will be made with my quality standards! - AND you only need a 20% deposit and can split the balance up into 6 payments.
Let’s do the math:
The following link takes you to one of my “basic” gowns.
https://www.etsy.com/listing/781566625/plus-sized-elizabethan-costume-bridal?ref=shop_home_active_6&frs=1
Here is the cost breakdown of this gown:
Specialized Supplies provided by DFT: $124.03
Embroidery Labor: $200
Gown Construction & Pattern Drafting Fees - $790
Beading Fees: $150
The basic gown, to include the specialized supplies I use for construction, is ONLY $914.03. It’s the embroidery and beading fees that up-ticks the labor costs.
20% Non-refundable deposit would be: $182.80
Balance due: $731.23
If you placed this gown on my six month payment plan your monthly installments would be $121.23.
NOW. . . that cost doesn’t include fabrics. So keep that in mind, but I can help you bargain shop for good quality textiles. You can peruse some gorgeous brocades and Jacquard fabrics on my Pinterest board. You will need about 8 yards of fabric for the skirt and bodice, 2.5 yards for the forepart, and another 1.5 yards for fitted sleeves.
https://www.pinterest.com/designsfromtime/costume-fabrics-common-supplies/brocades-jacquards/
Here’s another example using a gown made of brocade:
https://www.etsy.com/listing/620386905/womens-plus-sized-renaissance-dress?ref=shop_home_active_68&frs=1
Specialized Supplies provided by DFT: $109.99
Embroidery Labor: $350
Labor & Drafting fees - $740
Beading/Spangle Labor - $150
The basic gown is $849.99! I added piping in a complimentary olive green silk, gold trim which I beaded, and custom embroidered the sleeves and forepart, but you can use a different brocade pattern (such as a diamond shape) for the sleeves and forepart and still stay in budget.
The gowns in my store are priced for “style” and the level of “embellishment.” But if you take the time to read my cost breakdown I provide in each listing you can see the basic labor fees just for the gown construction.
Here is the bottom line:
You CAN use “fabrics” to provide a wow factor rather than the trims and embroidery I use to create a more budget friendly gown. No, they aren’t going to bring the BLING I am famous for, but a basic gown without tabs on the bottom of the bodice made up in a beautiful brocade, with minimal embellishment will allow you to purchase one of our quality made gowns.
If you have a properly constructed over skirt with meticulously placed cartridge pleats, bodices with built in under structure, lining added to overskirt fabrics so that these less expensive brocades “drape” properly, and finish the edges with hand-made piping, not only can we put you in a gown within your budget, BUT offer you a durable quality made gown that is gorgeously styled. The devil is in the details folks! And the details in our work is more than just the sparkly bits. It’s about quality of construction.
You can spend $300 to $400 for one of these “more affordable” gowns and then have to turn around and spend another $300 to $400 when the gown doesn’t hold up to the rigors of reenacting, or you can spend $800 to $900 in labor for one our gowns that will last you a minimum of 5 or 6 years - or more! . Most of the gowns selling for $300 to $400 that I’ve seen won’t last more than 2 seasons - if that - before they start falling apart. How do I know this? Because many of my cast mates bought these bargain priced gowns and they literally fell apart the first time they wore them. The longevity of the gown will be profoundly effected by the fabric you chose, as well as the quality of construction. If properly cared for, our gowns will last many, MANY seasons. If you don’t wad it up and throw it in a suitcase, as I’ve seen some people do with our work, they will retain their beauty and shape for years to come - and THAT my friends is a bargain.
HERE’S THE 411 OF WHAT SETS OUR WORK APART:
- Our Bodices are highly structured.
First of all, my bodices are custom drafted to fit your body. They are cut in a historically accurate pattern - rather than using a commercial pattern in a style that has no historical basis. I use imported products from the UK that aren’t available here in the States.
My bodices are MORE than just two pieces of fabric sewn together. Mine have multiple layers with built-in under structure hand-tailored into them. One layer, is a fusible cotton interlining to stabilize your fashion fabrics to add body. We also add a second layer of a product used to stiffen it (no, I’m not gonna tell ya what we use), PLUS we add an additional layer in front of a product that acts like buckram, which was used in the 16th, 17th, and 18th centuries to stiffen and add structure. I also add a few stays to keep the point at the bottom from flipping up when you sit. YES - You still have to wear stays with our gown bodices! Anyone who says otherwise doesn’t know what they’re talking about and needs to hit the books and do more research.
Some vendors DO add a layer of interfacing, but they tend to use a Pellon fusible interfacing like you can find at JoAnns. I have found this product to be inferior. First of all, it’s made out of petroleum and will hold in heat. Second, it doesn’t stay affixed in place to the fabric but will loosen and bunch up over a short period of time.��
- Skirts that have ENOUGH fabric to properly cartridge pleat and drape.
My skirts are made with panels 55″ to 58″ wide. On average we use 4 panels, but this will depend on your fabric. Using four panels creates that beautiful volume you see in my gowns. You can tell when a seamstress has scrimped on fabric because the fabric doesn’t DRAPE but clings to the farthingale at the bottom. The fabric should NOT pull or look stretched.
I flat line ALL silks or faux silks so that they drape properly and have enough body to cartridge pleat. My cartridge pleats are no LESS than 3/8 inch in width. They are deep, copious, and neat in appearance. I reinforce them by hand tacking them together so that they won’t lose their shape over time.
- Grommets: I use a .000 size grommet and because our bodices are MORE than just two layers of fabric and a layer of Pellon fusible interfacing, our grommets DON’T pull away from the garment or fall out. I ALSO couch all the grommets to secure them in place.
I work with color: I use color theory based on your skin, hair, and eye color to choose colors that will be more flattering on you. I also use a color wheel for unique color combinations.
So, perhaps you cannot afford one of my highly embellished gowns with embroidered textiles and beading, but you CAN afford a basic gown that still offers quality construction.
Look, I’m not trying to corner the market. I have more work I can shake a stick at, but what drives me a little nuts is watching people spend their hard earned money on a sub-quality gown because they are convinced my work is out of their price range.
I die a little every time I get messages in my Etsy store wanting me to make them a hat or a headdress to wear with one of these bargain priced gowns. Inevitably, they send me pictures and I have to stuff a sock in my mouth to keep from saying, “WHYYYY???” I can’t tell them, “Hey, that gown you just bought from that particular vendor is gonna fall apart and you’ll be ordering another gown next season.” I have to keep my mouth shut, suck it up, and construct a headdresss or a hat wherein there will be a disparity in quality. In other words, there will be a difference in the quality of my work against the gown they’ll be wearing it with because most of these “bargain” gowns are painfully simplistic both in the style and in the construction. All I DARE to do is offer a politely worded, “When you’re gown shopping again, keep us in mind.” I did break my cardinal rule the other day when I was approached, once again, by a girl who was working with a vendor who I know falls in the category I just harped about and wanted to know my “thoughts.” Be warned. Never, ever ask me my thoughts or opinion unless you are ready for truth. I can’t help it! I have too much integrity to lie. The bad thing about being direct is that the written word doesn’t allow for my true intent and tone and I come off sounding like a b****. Sorry. :(
One thing that sets me a part as a professional designer is not just my experience, or my penchant for directness (which not everyone appreciates obviously), but having a very keen eye for detail, which is reflected in my craftsmanship. This ability has been honed over the course of 40 years and allows me to be able to edit work for quality with just a glance. That can be a double edge sword. On one hand, it drives my own efforts for quality, but can make me VERY unpopular if I point things out in others’ work. :(
I WISH there was enough of me to spread around and be able make ALL OF YOU a quality constructed gown, but time and age restricts how much we can crank out and maintain our quality standards. I also WISH I could teach other costumers the simple steps they can take to elevate their craftsmanship. But look, I’m pragmatic. What’s their motivation to do so if they stay busy cranking out hundreds of gowns for $400 a pop? Most aren’t interested in growing their skills, and believe me, they are NOT happy with me for pointing out the disparity between their work and mine. So, all I can do is educate consumers who want to develop an eye for quality and know the difference between a $400 gown and one that costs $900 or more.
Don't let the price of gowns in my store scare you. I can work with many budget levels to create high quality, historically accurate gowns that will be durable, fit you like a glove, and last you many, MANY seasons as a reenactor. As the director of a reenactment group, and a cast member at faire since 2001, I have a practical understanding of the unique needs of reenactors and offer costumes that will stand up to the rigors of reenacting - - and believe me they do take a beating. So keep me in mind when you are gown shopping again!
www.DesignsFromTime.com
#elizabethan dress#historicalclothing#historical costume#historical fashion#period costume#costume design
34 notes
·
View notes
Text
Every person has a creative side, and it can be expressed in many ways: problem solving, original and innovative thinking, and artistically, to name a few. Describe how you express your creative side.
I'm sitting on my unmade bed in my cluttered room, and around me are the marks of the journey throughout my life. On one of my two desks are my thirty Pop figures, all bought months apart, each handpicked by a different me. There's one of red-haired Charlie Bradbury in Supernatural who made my heart flutter before I even knew I was gay, one of Hermione Granger who I dressed up as for three consecutive Halloweens, and three of them are of Good Omens characters. They aren't official, but custom; made with about $100 of figures and three weeks of work, my prized possessions.
On my paint-splattered and time-worn dresser, there are eye-hooks and jump rings, polymer clay and handmade charms. I woke up one day with the urge to reinvent myself, and I began to make earrings. First, clunky shapes that my parents desperately tried to identify. Then it was an Etsy shop, baking huge batches of custom earrings for the holiday rush.
My windowsill is full of plants, some 7 years old, like the plant I got for my 6th-grade promotion. Under it is the base of an entertainment center that I salvaged and restored from the dump, covered by a cushion that I 'had to make by hand, otherwise it obviously wouldn't fit.' It fits now. The seams are crooked and the filling is lumpy but it does make a perfect seat. It's covered in balls of yarn from when I crocheted matching sweaters for me and my Build a Bear frog, and embroidery thread from a Good Omens cross stitch pattern that caught my eye. I hope to eventually display it behind my custom figures.
Behind me is a wall of faces, people I've never met. All of them are commissions. People who paid me to recreate them in marker, the streaks and imperfections a part of my style. They saw my faults and chose me not in spite of them, but because of them. So yes, my room is messy, but it's also uniquely mine, and I wouldn't have it any other way.
I like this one *way* more than I thought I would. My final college app ranking is reading, this one, mythology, and hospital. As always feel free to tear it down to make it better because I’m submitting today D:
#catlynnscontent#catlynnappliestocollege#catlynnwrites#uc application#personal insight questions#college applications#appblr#please edit
3 notes
·
View notes
Text
In The Cards
It all started with James Bond, the arbiter of worldliness and all things cool when I was just a kid stuck in suburbia. The movies were frequently shown on TV and I made it a point to watch them all over and over again. One of my early favorites was Live and Let Die: the theme song kicked ass, it was Roger Moore's first film so he would never look more handsome, and the movie was full of straight-up magic. The bad guys have a fortune teller on their side, and she can seemingly see everything James Bond will do, even from a great distance. The key to her abilities, aside from her being a virgin (which Bond *ahem* takes care of) was her use of tarot cards. Drawing randomly from this special deck of cards, she could literally see the past, the present, and the future.
I had never heard of tarot cards before but I knew I wanted them. I could not have been older than 12.
When I got my hands on a deck, likely from a book store at the mall, there was an instant level of disappointment. The tarot cards in the Live and Let Die had a very specific look to them, and I had presumed that was just how all tarot cards would look. The deck which I bought (received? I don't remember if my parents were in on this) looked different. All the cards were there, but the art I had expected was not. The biggest difference that stood out to me was the "Death" card: in Live and Let Die that card has a super badass drawing of Death-incarnate wearing a suit of armor while riding a Pale Horse as all manner of human beings knelt or simply fell before him. In my deck, Death looked like a cartoon skeleton without clothes or a horse as he literally reaped the grass with a scythe. I am not here to judge aesthetics, but if you see something in a movie and you end up buying something else, especially as a kid, that's not going to sit right.
(I have tried to use modern search engine tools to discover what kind of deck I had: it was easy to figure out that Live and Let Die used a kind of Rider-Waite-Smith deck, but I think I might have ended up with a variant on a Marseilles deck - exactly which variant, I could not say)
Artistically it was a let down but the appeal of the tarot cards only increased as I learned more about them. First, I discovered that the deck was huge with 78 different cards: the big-picture cards that were featured in the film with names like "The Lovers" and "The Fool" were part of the Major Arcana, but there was also a full set of Minor Arcana which resembled playing cards: four suits, lots of numbers, and several face cards. Secondly, every card had two different "readings," depending on which direction the card faced when drawn.
78 cards, all with two different meanings, meant memorization. As a kid, I was all about memorization. In elementary school my friend Sasha and I tried to memorize the Periodic Table and I think we made it to the lanthanides. When I discovered the joy of watching professional sports, I made a point of memorizing all the teams - by division - in all four major sports leagues. Then I started memorizing the championship winners (and the runners-up) of each major sports league for the last ten years...then the last 20. These tarot cards were going to be my new thing, I could feel it.
I started carrying the cards with me wherever I went. As a kid in school this was easy since I always had a backpack on so the size of the cards meant nothing. Sasha and I (we had watched Live and Let Die together, so this became a team obsession) each had our own deck and we both would take turns drawing cards and looking them up in the little booklet that came in the box. I can remember taking them with us on a school trip to Boston and when we weren't in awe of the historical sights (do I need to tell you we were both nerds?) we kept up our tarot studies while walking around town. On one occasion, just as we drew a card and the booklet said it meant "danger," a car honked its horn at us. We were walking in the middle of the street! Clearly, the magic was real.
The tiny booklet also included a recommended layout when "reading" the cards. The lady in the movie just turned them over one at a time and everything made sense to her, but instead these instructions had us laying out ten different cards in a pattern where each card has a different relationship to the reader. Today I can tell you this pattern is called a "celtic cross" and it is only one of many, many shapes and patterns that can be used, but preteen me did not have that information. I had clear directions: to read the cards I had to flip over ten of them and explain them all.
Before I knew it, before either of us were really ready to be doing anything like this, I remember both of us became tarot card readers at our synagogue for a Purim festival. At the time I didn't think anything was weird, but in hindsight I am impressed that no one raised an objection to kids bringing such a thing into the synagogue so we could be fortune tellers. I should say that we were members of a Reform Temple and I cannot recall ever hearing words like "blasphemy" or "occult" used by our rabbi or anyone else in authority; it stood in contrast to all those self-described Christians I would see on TV who were mad about evolution being taught in schools, talking animals existing as characters in children's books, or anything else we might read in a Chick Tract (which come to think of it, we also discovered around this time while riding Metro-North trains into New York City).
My tarot reading habit did not last; Sasha and I had a falling out of sorts and other things just became more important than these strange cards. My deck sat on a shelf in my room for years until I moved out of my childhood home. I cannot say for certain but it more than likely did not leave with me. But my curiosity surrounding the tarot would linger in my mind and resurface soon enough just as my next big obsession would come along and reveal itself to be tarot-adjacent: JoJo's Bizarre Adventure.

When I discovered JoJo via a fan-subtitled bootleg VHS in the late 1990s, I had no idea the six episodes of anime I just saw covered only one small part of an ongoing (to this day!) manga. The story, as presented on the tape, started in the middle of the action. A lot of it did not make sense, but I latched onto one element right away: every character had superpowers which were embodied - literally - in a spiritual version of themselves on screen and all these alter-egos had tarot-related names: Star Platinum. Hierophant Green. THE WORLD. There wasn't much connection between the card names and the powers they possessed, but it was the coolest thing I had ever seen. If I had still owned a deck I might have started imagining other powers for the other cards not shown on screen (not knowing that they were all represented in some fashion in the original manga).
Leap forward another - gosh, twenty years? - and my tarot fascination never really went away. When I see a Kickstarter or an Etsy page for a new take on tarot cards, I often take a peek at what ideas are on display. A lot of them are just...porn-y. Some are cute. But I'm old(er) now, I don't have the raw enthusiasm I did when I was in 7th grade and the prospect of magic playing cards just made perfect sense. I see daily horoscopes on Japanese TV which I recognize aren't "real," how could I scoff at one kind of fortune telling and then pick up a deck of tarot cards?
Except...who cares if it's "real." What does it matter if these cards are, ultimately, a random assortment of quality art? It's been three entire decades since I first saw them and I'm still deeply intrigued. Part of being old(er) is coming to terms with your own tastes and biases; I no longer need to apologize or feel shame for liking old pop songs or macho action movies and if I've always had a feeling that tarot cards are cool, that feeling is correct.
There's also the feeling that I know so little about tarot cards that I cannot possibly pass judgement on people who use them. I recently started testing a Body Positivity mobile app that uses tarot cards as a means to spark self-reflection and, well, body positivity. The tarot cards in the app are not "real," they're not even physical. They're just drawings on a screen. But the drawings are nice, and if flipping a virtual card over can have a real impact on my own mind, who's to say what flipping real cards over could do?
Even though I felt a need to write all this down, I'm not actually seeking permission here. I already made up my mind and bought a brand-new deck of tarot cards. It's here, next to me. I’ve opened them. I try to draw a few cards whenever I have a chance, but I don't know where this reignited interest will take me. Will I start memorizing them all, again? Will I have another car-honking-its-horn-at-me moment? Maybe I'll just enjoy them aesthetically (they are very nice-looking if I may say so). I don't know what will come next any more than these cards do, but I know I like having them here and I want to know more. At the very least, tarot cards have already taught me an important lesson: I know better than to try and read them while walking in the middle of the road.
----
I shared this story with my Patreon supporters before posting it publicly. Want to help me write more things? Join today: patreon.com/feitclub
Ko-fi works too: ko-fi.com/feitclub
1 note
·
View note
Note
1, 7, and 10!
1) How long have you been stitching?
I’ve been stitching since I was a wee teen! maybe around 12 or 13? I’ll be 35 in 2 months. All I know is, since my mom was big into cross stitching when my brother and I were tots, she thought it would be great to get me a small kit from hobby lobby. At least I THINK she was the one who got me the kit, now that I think upon it. Maybe I got the kit MYSELF with my allowance? I have no idea now...All I know is, my first ever project was a little bee, stitched on 11ct aida fabric. The kit came with all the pattern, thread, needle, hoop, and cloth From there, I just remember my ADHD getting hooked on this new thing, and as common with ADHD people, we tend to go big or go home while the adrenaline courses through our veins, and i remember buying more cross stitch pattern kit things at hobby lobby (a few still sit in my crafting drawer).Thought it would be a life long hobby, but also with ADHD people, we lose interest eventually (or quickly) and we have to move on to something else that gives us that instant gratification/excitement. I lost that interest for SO many years..15 years, my threads just collecting dust...until one day, I got that inspiration again...that “go big or go home” and thought “OMG I SHOULD CROSS STITCH SAILOR MOON STUFF!!” and I had all these ideas, bought all these threads and hoops...then...never touched them. until about 2 or 3 years ago when i had this GRAND idea to stitch a baby bib for the baby still inside her comfy, warm, and wet, home. But I wanted my own patter, so i went to MS paint and started pixelating a T.A.R.D.I.S...and from there, that excitement kicked in, and it’s been kicked on ever since.
7) Do you have any other crafty/artsy hobbies?
any other hobbies? well, aside from cross stitch and knit? Uh, drawing used to be a hobby. I think mainly because I was in school, and one way that kept my ADHD attention focused was to fidget, and i fidgeted by doodling on my notes/notebooks...Man, from middle school onward. Sketch books. Weeb art. OC characters. And as time progressed, my art skills got better. I took art classes in high school, in college...hell, even thought that getting an illustration degree was what i wanted to do, only because i was pressured to pick a degree by my mom, and illustration looked cool because i saw ONE portfolio that had an anime drawing in it. After college, it seems my art has taken a back seat. I never seem motivated or inspired to draw these days. other hobbies include reading (something i used to do A WHOLE FUCK TON until i got into a reading slump. I’ll be lucky if i read one short story a month. and by short, i mean...ones on my kindle that say “read time: 2 hours” or less. I own so many books and manga...and back in high school and college, i was a HUUUGE WEEB. the annoying kind of weeb who tried to use japanese words in everything. I used to read SO much manga. I hope i can get back into reading more...But i’m not going to hold my breath...I love to cook. This hobby i do often...or often enough when my anxiety isn’t running amok...I do it often BECAUSE MY FAMILY HAS TO EAT so i’ll feed them delicious meals! Thankfully, the rule in this house is: who ever cooks, the other person cleans up. I HATE CLEANING UP BUT I LOVE COOKING! works in my favor! great, now i have to think about what to cook for dinner tonight with the tofu i have. I would say sewing...but...i only do it out of necessity...when i have a hole in a shirt, or need to finish a commission book mark, or need to work on halloween costumes. I wouldn’t say that this is a hobby per se. Or maybe it is? I did take a sewing class through the park district for 2 sessions...in those 3 months...i leanred new techniques and things...but she didn’t teach any seamstress sewing, as the instructor doesn’t know how to sew clothes. Only projects, bags, etc. I saved all her hand outs and projects. I hope one day, to have the space in a new home so that i CAN get back into sewing. I’ll add gaming too! I don’t do it often, as i am very indecisive on what to play next unless a new fav of mine comes out...and i know that when i DO play, i get addicted and i can play for 8 hours straight if you let me. I am currently playing FALLOUT: NEW VEGAS...as I’ve never played it before...and it’s been sitting on our game shelf for years. I’m the gamer type who like to explore too much...so games for me take 3x or 4x as long to finish because i can’t just do the story line and be done!
10: How/where do you get your patterns?
For the most part, I make my own via KG CHART (look up kg chart or kg-chart in the search when you are on my blog page). I got so tired of seeing nothing but cute bears and flowers, so I decided to make my own, and then sell them on my Sturdy Nerdy Stitchery Etsy page.
I also may look on etsy and buy some patterns that I see that I like...or, since craft stores seem to be expanding, I can find more selection of cross stitch kits and things and they aren’t just limited to cute bears and flowers! I bought a unicorn one at the AC Moore craft store!
#ask#sturdy nerdy responds#crafting#cross stitch#knitting#gaming#cooking#reading#etsy#heartmarierose
4 notes
·
View notes
Text
Dopp Kit Bag: Finished...finally.
Hi guys, as promised here’s the other little project I was doing recently, unfortunately I had to wait quite some time for delivery of some items to finish it, all covid related problems with the couriers, but we got there at last..with a funny ( if slightly annoying ) lesson learned. So..lets get on.
I wanted some high quality leather so purchased a half shoulder from ‘BuyLeatheronline’ (Tuscany, Italy.).I got a small piece for now because of Cost, and Brexit negotiations...or lack of at the moment. I mention it only incase anyone in the UK is thinking of buying their first piece from abroad and you are not aware that the value of something you buy from abroad needs to be no more than a certain amount or else you will incurr customs charges. check it out first. I bought a lovely factory dyed ‘Black’ veg tanned shoulder 1.5 - 2mm thick which I find is a nice thickness for bags and book covers etc. Then I purchased the pattern from ‘Dieselpunkro (Spain) who make great patterns at reasonable prices and you can buy them on PDF download.

Pic 1 : Taping.

Pic 1 and Pic 1A : After printing off the Pattern you’ll need to tape some of the pieces together to make the ‘whole’ of certain pieces as I’m seen doing here. I use Decoraters Tape as it doesn’t mark the leather when peeled off, the only down side it that sometimes it doesn’t stick very well and can ‘slip’ when attached to the leather that you want to cut out and it’s a C*w to line up again so a little easy tip..once it’s all stuck..take a small piece of tape and wrap it over the edges here and there to help it stay in position.
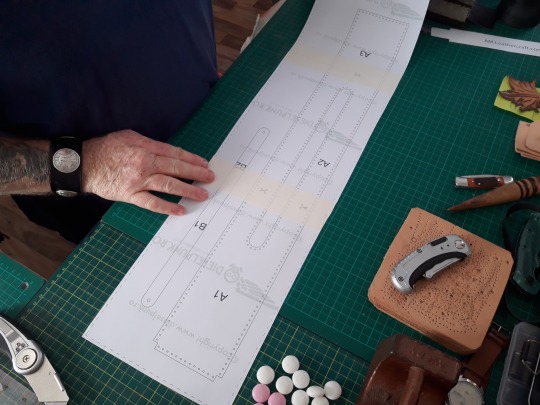
Pic 2 : Here you seehow the patterns should be looking when done correctly.
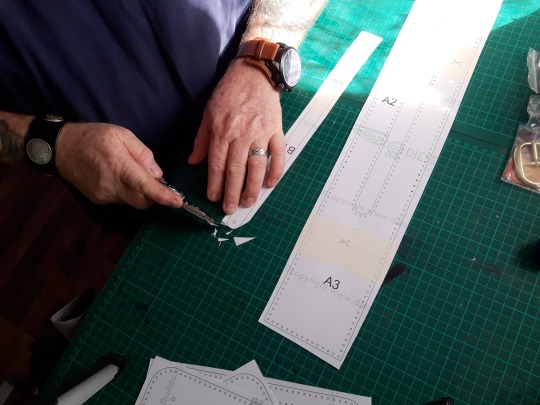
Pic 3 : Then it’s time to cut the pattern pieces out

Pic 4 : Be careful to cut along the black lines rather than outside of or inside of.

Pic 5 :make sure you have good lighting..I turned my bench light on just after this pic was taken, I have a light behind me and one in front , that helps to cancel ‘some’ of the shadows created helping you to see the lines better...especially if you wear glasses when ‘staring’ can make your eyes ‘wobble’ just when you are cutting an important bit. ( Yeah...I said ‘eye wobble’...it’s a real thing.....it is hahahaha )

Pic 6 : So just keep cutting until all the patterns are cut out and have all of the required holes punched. I used a round punch 1-1.5mm I find it makes a hole big enough to pass two needles across each other but small enough to close with a hammer tap when done to make a neat finish.

Pic 7 :
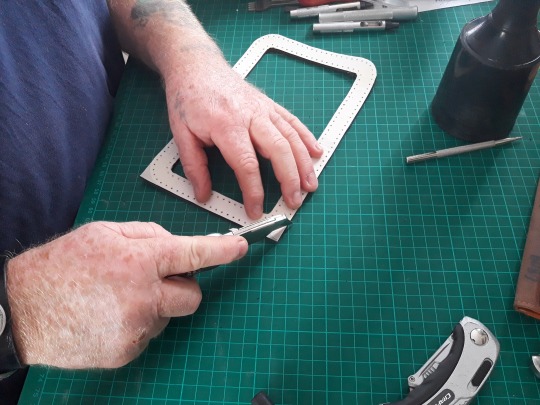
Pic 8 :

Pic 9 : You see here how I’ve taped it down to the leather to transfer the patter to it, at this point the tape was holding so I just ‘cracked on’ with it but if you think it’s going to come loose...put small pieces over the edges to hold it in position. Here I’m punching holes with my stitch awl as I was waiting on the delivery that had my smaller round punch in it, this did the job but was a lot slower.
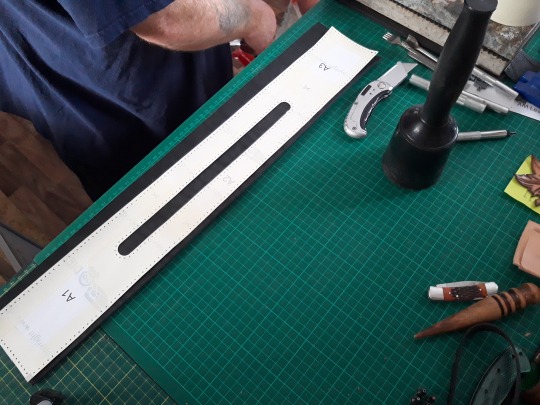
Pic 10 : Lay the patterns on the leather as seen here.
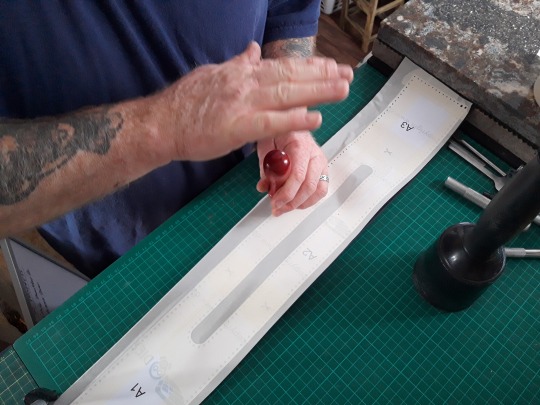
Pic 11 : stick it down. another good thing about decorators tape it that you can see the hole marks through it.

Pic 12 : If you don’t have any patience..pick another hobby, there are hundreds of holes to punch and it takes time and you should line the punch up with each hole mark carefully, the better you do here the straighter yours titching will be later, ( however..you are going to ‘wobble’ from time to time..it is Handmade after all, but try not to at least. You can use a stitch punch as long as the teeth gaps are the same measurements as the holes on the patterns or else it won’t line up.

Pic 13 : Then carefull cut out the middle hole for the Zipper, I do find that the zips only barely sit on the edge when glued so unless you can find really wide zippers try to cut the hole a bit narrower than the pattern, I found it helped.
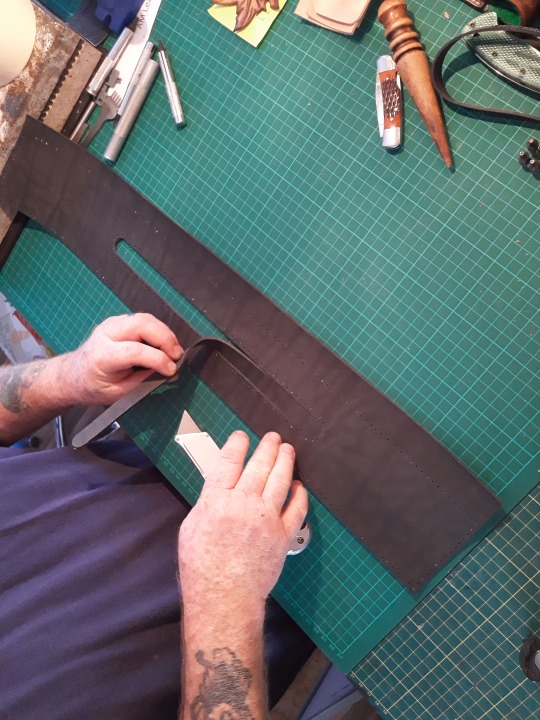
Pic 14 : Cutting out the zipper hole.
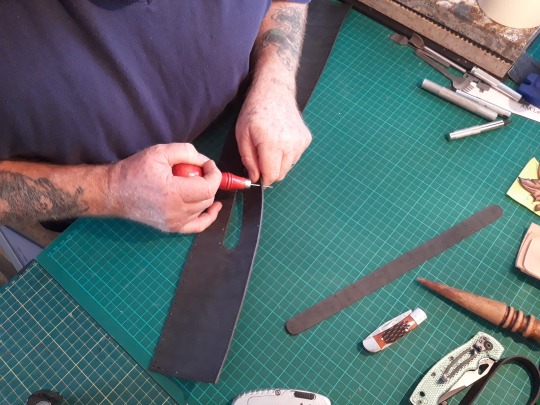
Pic 15 : Using the stitch awl to make the holes a bit wider. ( This issue was resolved once my new punch arrived as it made the hole in one shot. )
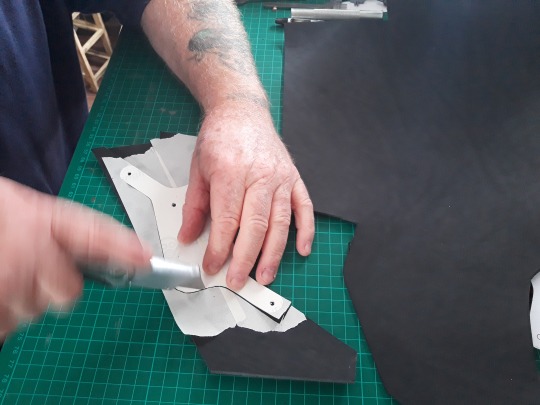
Pic 16 :same process to transfer the smaller sections, be careful if there are two of something that you don’t cut two ‘right or left pieces’ ( yup, done that too )
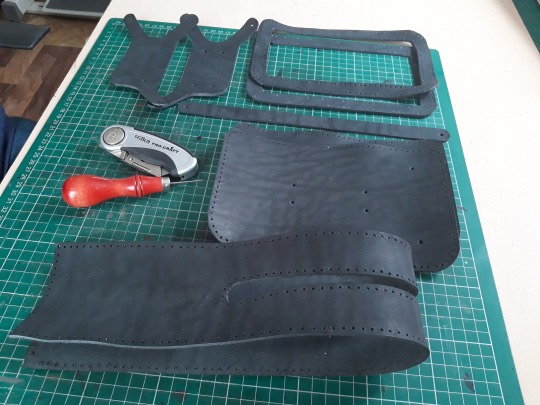
Pic 17 : We now have all the pieces cut from leather and all the holes punched, time to build it.

Pic 18 : The zippers finally arrived, I decided on a double zip for this one but it’s your project so your choice, they fit as easily as any other zips.
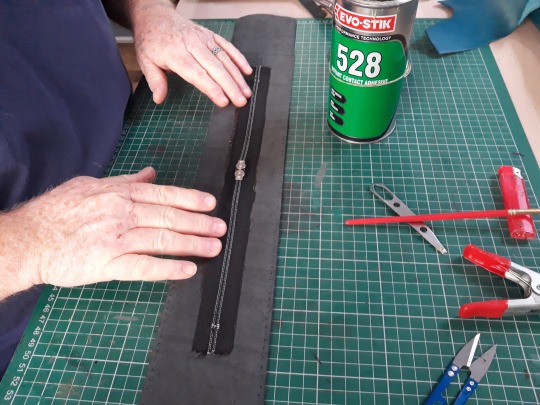
Pic 19 : I layed a line of 528 contact cement to fix the zipper in place ready for stitching. The 528 is really good..so good that if you use it as instructed..once it touches it is a sure bet it’s not coming apart, so until you are confident I’d choose a glue with a longer setting time incase you need to adjust position.
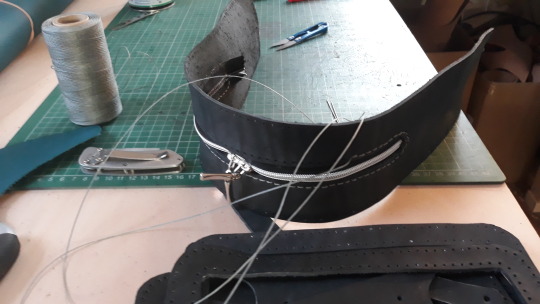
Pic 20 : Next I used a saddle stitch to attach it more permanently.

Pic 21 : I usually use a Stitch horse but this thing flopped around too much so had to do this ‘Old School’. So many projects on the go all at the same time.

Pic 22: Nearly there, takes a while so you need a lot of patience.
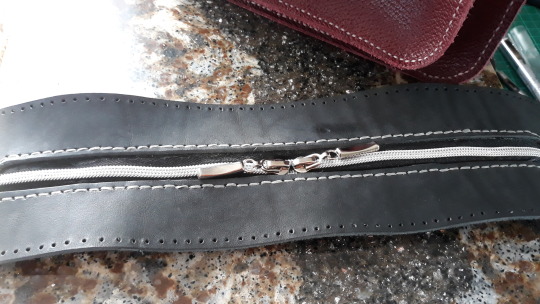
Pic 23 : Done.
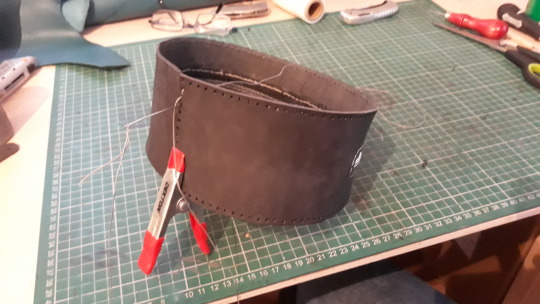
Pic 24 : I bent the zipper section back on itself as shown and used a clip to hold in place whilst I stitched it
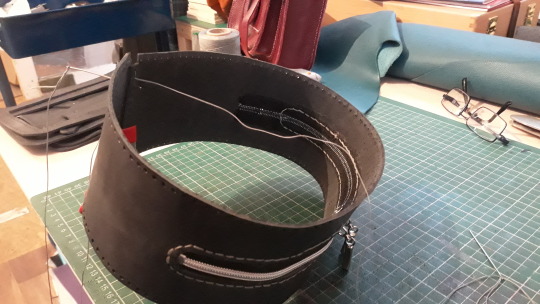
Pic 25 : other view.
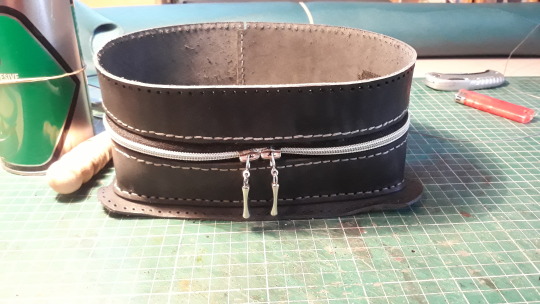
Pic 26 : attaching the outer ‘skirt’ that the actual side piece will later be attached to, here I’m just aligning the holes to mark them where I need them. The actual mis-alignement came later.
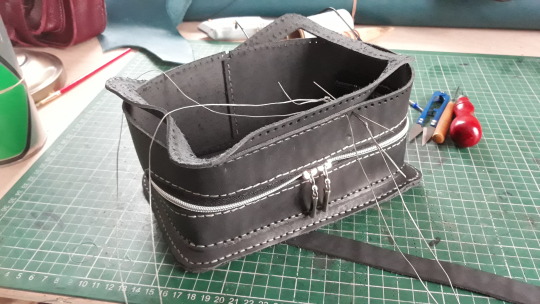
Pic 26A : a closer look at a ‘skirt’ being attached.
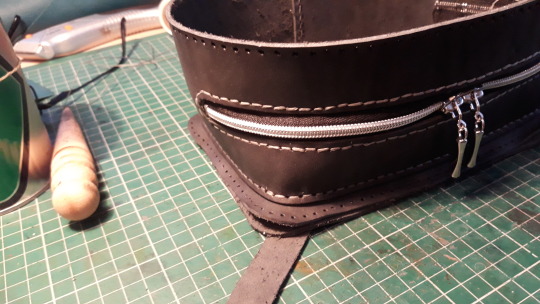
Pic 27 : close up. You can also see here the strap section which has been riveted to the side piece ..at one end using silver double cap rivets. I always use double cap unless the back will be hidden from view, It’s a personal thing I just think it looks better ir when you look inside the rivets look as good as on the outside. Again..if you are making one yourself, it’s your choice.

Pic 28 Here’s a view of the side section that I’m about to attach.
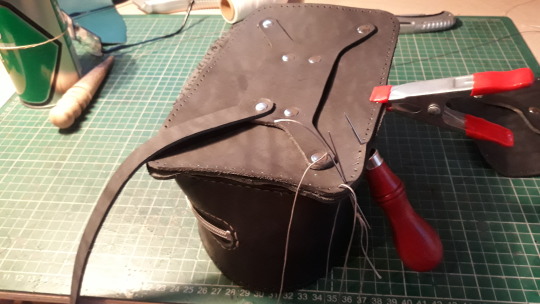
Pic 29 : You can see I am using the stitch awl as well as the clip to keep the holes lined up...or so I thought.
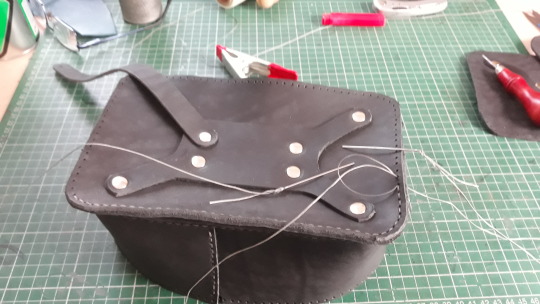
Pic 30 : Saddle stitched all the way round.
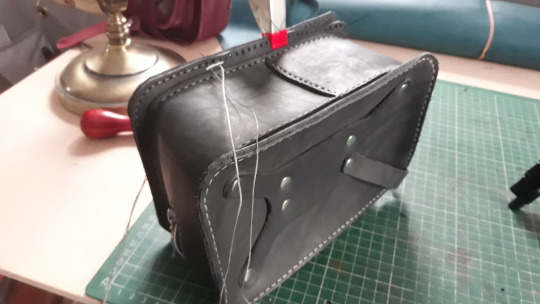
Pic 31 : First side on now side two, a repeat of the same.

Pic 32 : almost there, if you are thinking of trying some leather craft for the first time, be warned, the thread can cut right into your hand after a few hours, at the very least your fingers will be sore, you never see it on my pics but I ususally have plasters everywhere just to prevent it, after almost six years I have grown more used to it but it can still get sore after a few hundred stitches.

Pic 33 : Oops. it looks like I took my eye off the ball and mis-aligned a couple of holes at the beginning causing a twist in the body as seen here, nothing else for it but to carefully pick the stitches and re do it being a bit more precise. As I said earlier..an annoying Lesson but a good reminder to check twice before stitching. But..these things happen and even after a few hours of stitching it can go wrong. If you can take it as a lesson and just move ahead...go for it, because it’s going to happen at some point.

Pic 34 : It’s all feeling a bit ‘De ja vous’ at this point as I begin to correct the mistake.

Pic 34A : After unpicking the whole side and skirt, I first did the skirt again and then I realigned the side using half tooth picks to go around the edge and kept doing this until it aligned perfectly and ‘sat’ nice and flat. Then I started the stitching all over again. Lesson learned.
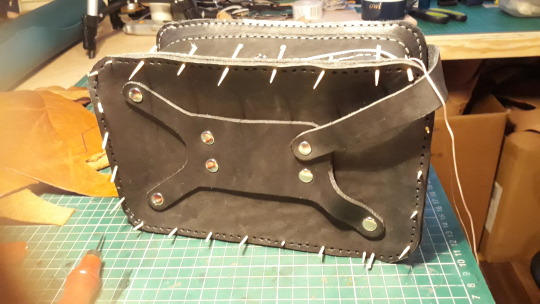
Pic 35 : from another angle.

Pic 36: continuing the stitch but being careful that each hole I marked after aligning meets up exactly as before.

Pic 37 : using the clip until it’s got enough stitch to hold it in place the rest of the way.

Pic 38 Anotherangle as I proceeded to adjust.:

Pic 39 : Almost there. ( Thank god hahahaha )
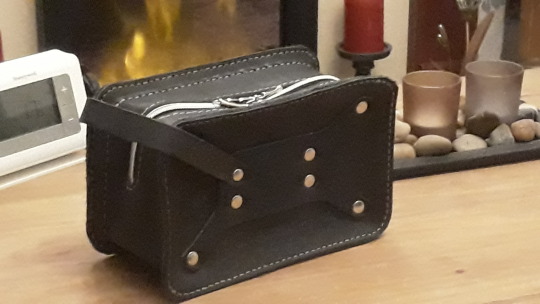
Pic 40 : And Voila..all straightened out, no more twist and looking the complete business. A beautiful Handmade Dopp kit bag. But I guess it can be used for many things. I’ll sell this on to someone that will appreciate the hard work that went into it and who also appreciates real 100% Leather goods. This can be found on my Etsy shop as from tomorrow. ( Please understand if any of my projects are not on Etsy when you look, it may be that they have been sold already and that this post has aged a bit.) Well guys I hope this has inspired some of you to give it a go yourself, this particular project is a little more advanced, I wouldn’t recommend a beginner to try this as this Leather is expensive and shouldn’t really be used to ‘learn’ on. But if you bought a cheaper quality leather to practice on then I guess you could make this..if you take it slow and follow Dieselpunkro’s instructional video which can be found on their website by the same name. Thanks for following my little projects I appreciate it, please tell your friends. There will be more projects to come this year, so as always, Watch this space ‘Stay Crafty’ and Stay safe everyone.
#wash kit#wash gear#mens wash#possibles bag#leather goods#just for him#just for her#unisex bag#handmade bag
3 notes
·
View notes
Text
336.
What is your favorite game to play on your phone?
>> Gems of War. I usually get tired of phone games after a week or so, even if they were really engaging at first, but for some reason I’ve stuck with this one. It’s the perfect combination of easy-to-play yet sometimes challenging (but not in a way that prevents me from moving forward), and there’s a lot of variety regarding things to do within the game itself. I even uninstalled it at one point thinking I’d gotten bored of it only to end up reinstalling it later and picking up right where I’d left off. It Just Works(tm)
What is the last thing you bought at the dollar store?
>> I don’t remember, probably some snacks. The Dollar Tree nearest to me changes their inventory often, which is aggravating because sometimes they’ll start stocking a snack I really like (and can’t seem to find elsewhere) and then in a couple of months... it’s gone. D:
Do you like getting caught in the rain?
>> Nope, I hate the sensation of rain hitting my skin, it’s like being tapped by someone repeatedly but like, all over my body. Gah. Also, I don’t like being in wet clothing.
Who was the last person who was rude to you?
>> I don’t remember.
Do you have anyone you can really talk to?
>> I talk to inworlders. Outworld people are fickle and have their own shit. (Source: I am an outworld people and I am fickle and have my own shit. I know how it goes.)
What is your newest hobby?
>> I haven’t picked up any new hobbies lately.
What is one way in which this year is different from last year?
>> I can’t really think of anything right now.
Do you own a swimming pool?
>> No.
What is your favorite thing to do in a swimming pool?
>> I don’t get into swimming pools, usually.
How long can you tread water for?
>> I don’t tread water.
Do you feel like you have too much on your plate and your life is too hard?
>> No. This is the easiest my life has ever been.
What color is your bicycle?
>> Black and orange.
Do you know anyone who is colorblind?
>> Probably.
What color are your bedsheets right now?
>> Light grey.
What do you do when there are no new or good surveys on bzoink?
>> If there aren’t any surveys to take on tumblr or bzoink I just give up for the time being, lol. There’s not a plethora of sources anymore like there were last decade.
Did you do anything you regret within the last 24 hours?
>> No.
What is your favorite day to go grocery shopping?
>> I don’t have a favourite day. Our shopping day is Saturday (sometimes Sunday) because it’s convenient.
Which stovetop burner do you use the most?
>> The front left one.
Are you behind on chores?
>> No.
How many months until your birthday?
>> Nine or so.
Do you wish you had someone you could go to for support?
>> I don’t believe my problem is a lack of possibly-supportive people. My problem is a lack of ability to allow people to support me. My trust level is in the negative integers when it comes to believing that other people have any ability or desire to be supportive of me in the ways that I’d require/desire. And honestly, I have no comprehension of how that’s ever supposed to change? Like, this is hard-wired into my brain and it’d take some real intense siege weaponry for that ironclad wall to be weakened.
Would you follow God even if it meant losing your home, your source of food, all of your friends, or even your life?
>> You couldn’t get me to follow anyone if those are the consequences.
Who do you wish you were best friends with right now?
>> ---
Who’s death has affected you the most?
>> ---
Do you have a youtube channel?
>> No.
If yes, do your parents approve of it?
>> ---
Have you made any huge mistakes?
>> Sure.
Do you think everyone has made huge mistakes?
>> I guess it’s highly likely.
Name one perfect person you know.
>> I don’t believe in that.
What was the last thing you ate?
>> A string cheese.
Have you ever grown sunflowers?
>> When I was a child.
What was the last thing you bought at the Farmer’s Market?
>> Strawberries! And microgreens because I wanted to try them. The strawberries were so fucking good, though.
Do you know what you are going to wear for the 4th of July?
>> ---
Do you own a boat?
>> No.
Have you ever been in prison?
>> No.
Are you scared to stand up to a police officer?
>> I’m afraid of being misinterpreted (because the real awful thing about some neurodivergent behaviour patterns is that they often read as either “aggressive” or “suspicious” to law enforcement) and having that misinterpretation put me into an escalated legal situation that I can’t get out of. Or, you know, being shot by a trigger-happy boy in blue because I’m wearing a hoodie and eating candy. But mostly, I don’t find myself under the undivided attentions of law enforcement often enough for that to matter. (One of the perks of no longer living in NYC.)
Do you have a dreamcatcher in your room?
>> No.
Have you downloaded unique fonts for your computer?
>> I used to do that when I made graphics and layouts, but since I don’t do any of that anymore, no.
What was the last thing you played on your phone?
>> Gems of War.
What’s one item on your wish list right now?
>> I don’t really have a wishlist aside from the few things I have favourited on Etsy.
What is your doctor’s first name?
>> ---
1 note
·
View note
Last Seen Blogs

aliceindrugland
let's hope this one works

lexch4n
Alexane

alexames09
Untitled

fandercalendar
Daily Fan-made Content In 2022

elmoltqacompany
El Moltqa For Real Estate Investment