#Image to Text Converter Tool
Explore tagged Tumblr posts
Visit Tumblr Blog
Explore Tumblr blogs with no restrictions, modern design and the best experience.
Last Seen Tumblr Blogs


Fun Fact
1,644 Tumblr posts in 1 second.
Text
Image to Text Converter - Bulk SEO Solutions

An image-to-text converter is an advanced tool that transforms visual data into editable text using Optical Character Recognition (OCR) technology. This process improves accessibility and convenience by allowing users to extract text from different image sources, such as photographs, scanned documents, and digital graphics. By using sophisticated algorithms, these converters enhance recognition accuracy and streamline workflows across various applications, including academic research and business documentation.
#Image to Text Converter#Image to Text Converter Tool#digital marketing#free seo tools#online marketing#seo tools#small seo tools#bulk seo tools#bulk seo solutions#bulkseosolutions#free small seo tools
0 notes
Text
today i learned that we weebs are responsible for the existence of the .ass file type. #heritage
#花話#i actually learned this yesterday i've just been cracking myself up over the 'hashtag-heritage' thing ever since#.ass is a subtitle file btw!!! they're what make the really pretty ones with the elaborate typesetting and positioning n stuff#i always thought they did that shit by burning the fonts into the video via aftereffects or smth but it turns out#that while you could burn an ass file to a video for hardsubbing you can apparently just. like it's a text file you can use a text editor#and also turn them off when watching your stuff if you wish and god i was so surprised when i realized you could do that#with the pretty subtitles bc when using online streaming the soft subs were usually so ugly#anyway through a series of wacky hijinks i've ended up coding a subtitle file type converter these last few hours#and in looking up the standards for how .srt .ass and .vtt files are formatted i learned this gem#and you know what!!!! it makes soooo much sense#of course we weebs went off and made a file type for elaborate subtitle styling and positioning and timing#the intersection of art and technology in the weeb fan sphere is actually pretty cool!! there's niche ass software for so much shit#bc of the tendency of weebs to be into tech and stuff#in my spelunkinh around the old web i've also found a bunch of old specialized scanlation software from the 2000s!!! that's so cool!!!!#i just use a notes program and photoshop but they were out there in 2004 or so making photo editors that#could not only open up and edit multiple images in sequence you could page through but also load up your translation txt file#and i think also had specialized tools for cleaning text bubbles and stuff#and also obviously correcting scan issues and straightening things out AND THIS IS SO COOL!!!!#like we did that!! that's how things were done before i got into anime!!! back when i was a little kid; before i was even rlly sentient!!!!!
5 notes
·
View notes
Text
Unlock Your Potential: The Ultimate Guide to HugeTools.net
In today’s fast-paced digital world, having access to the right tools can make all the difference in boosting productivity, saving time, and achieving success. Enter HugeTools.net , your ultimate toolkit designed to simplify even the most complex tasks. Whether you're a developer, marketer, student, or entrepreneur, this platform has everything you need to get things done efficiently.
Welcome to our comprehensive guide where we’ll explore what makes HugeTools.net so special, highlight its key features, and show you how it can transform the way you work. Let's dive in!
What Is HugeTools.net?
HugeTools.net is an innovative online platform offering a vast array of free tools tailored to meet the needs of modern professionals and hobbyists alike. From text manipulation and image optimization to data conversion and SEO utilities, HugeTools.net provides solutions for almost every task imaginable.
Our mission is simple: empower users by delivering powerful, user-friendly tools that save time, reduce effort, and deliver high-quality results. No matter your skill level, you'll find something here to help you achieve your goals.
Key Features of HugeTools.net
Let’s take a closer look at some of the standout features available on HugeTools.net:
1. Text Tools
Manipulating text has never been easier with our collection of text tools:
Convert case (uppercase, lowercase, sentence case).
Remove extra spaces or duplicate lines.
Generate Lorem Ipsum for testing purposes.
Perfect for writers, developers, and anyone working with large amounts of text.
2. Image Optimization Tools
Optimize your images effortlessly with these handy utilities:
Resize images for web or print.
Convert file formats (JPEG to PNG, etc.).
Add watermarks for branding purposes.
Ideal for designers, bloggers, and photographers who need optimized visuals without compromising quality.
3. Data Conversion Tools
Transform data into different formats quickly and easily:
CSV to JSON converter.
XML to HTML transformer.
Base64 encoder/decoder.
Great for developers and analysts handling complex datasets.
4. SEO & Marketing Tools
Enhance your online presence with our suite of SEO and marketing tools:
Meta tag generator.
URL shortener.
Keyword density checker.
Helps marketers and content creators improve website performance and visibility.
5. Developer Utilities
Streamline coding tasks with specialized developer tools:
Color picker and palette generator.
Regex tester.
QR code generator.
Saves time for developers and simplifies common coding challenges.
Why Choose HugeTools.net?
Here are just a few reasons why HugeTools.net stands out from the competition:
User-Friendly Interface: Our tools are intuitive and require no technical expertise to operate.
Free to Use: Access all our tools without any hidden fees or subscriptions.
Constant Updates: We regularly update our platform with new features based on user feedback.
Reliable Performance: Trust us to deliver accurate results every time.
At HugeTools.net, usability, reliability, and accessibility are our top priorities. That’s why thousands of users worldwide rely on us to simplify their workflows.
How to Get Started
Ready to try HugeTools.net? Follow these simple steps:
Visit https://hugetools.net and browse through the categories.
Select the tool that matches your needs.
Follow the on-screen prompts to input your data or upload files.
Download or copy the output as needed.
Explore additional options within each tool for advanced functionality.
It’s that easy! Within minutes, you’ll be up and running with one of our powerful tools.
Tips and Tricks
To get the most out of HugeTools.net, consider these pro tips:
Combine multiple tools for enhanced productivity (e.g., optimize an image and then add a watermark).
Bookmark frequently used tools for quick access.
Check the "Help" section for tutorials and FAQs if you encounter any issues.
Share your experience with others—your feedback helps us improve!
Success Stories
Don’t just take our word for it—here’s what real users have to say about HugeTools.net:
"As a freelance graphic designer, I rely heavily on HugeTools.net to compress my images before sending them to clients. It saves me hours of work every week!" – Sarah M., Graphic Designer
"The CSV-to-JSON converter saved my team during a tight deadline. We couldn’t have completed the project without it." – John D., Software Engineer
These testimonials speak volumes about the impact HugeTools.net can have on your workflow.
Conclusion
HugeTools.net isn’t just another collection of tools—it’s a powerhouse designed to revolutionize the way you work. With its diverse range of functionalities, commitment to user satisfaction, and constant innovation, there’s no reason not to give it a try.
Start exploring today and discover how HugeTools.net can transform your productivity. Who knows? You might just find your new favorite tool!
Call to Action
Ready to boost your productivity? Head over to HugeTools.net now and start using our free tools! Don’t forget to leave a comment below sharing your favorite tool or suggesting new ones we could add. Happy tooling!
#Secondary Tags (Specific Features)#Text Tools#Image Optimization#Data Conversion#SEO Tools#Marketing Tools#Developer Utilities#CSV to JSON Converter#QR Code Generator#Regex Tester#Meta Tag Generator#Tertiary Tags (Audience & Use Cases)#For Developers#For Marketers#For Students#For Entrepreneurs#For Designers#Work-from-Home Tools#Remote Work Tools#Digital Marketing Tools#Content Creation Tools#Graphic Design Tools#Long-Tail Tags (Specific Phrases)#Best Free Online Tools#Tools for Boosting Productivity#How to Optimize Images Online#Convert CSV to JSON Easily#Free SEO Tools for Beginners#Quick Text Manipulation Tools#Enhance Your Workflow with HugeTools.net
0 notes
Text
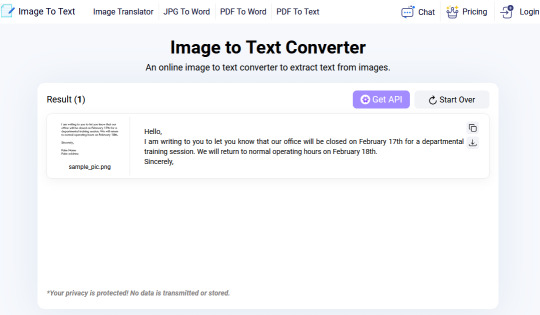
Image to Text Converter
Don't you hate it when you have to rewrite an entire document, because the only version you have is that of picture or a PDF of a picture?
There are ways to help resolve this issue like find someone with time to type or use a image to text converter tool. I've found one at https://www.imagetotext.info/ that has pretty good accuracy and I only had to make some formatting adjustments.
They have a free service where you can do up to 3 pictures at a time.
An online image to text converter to extract text from images.
#online tool#convert pictures#convert picture to text#image to text#avoid rewriting#efficiency#tools#web tool#graphic-photo
0 notes
Text
Use Cases of OCR Translation. Which is the best Image to Text Converter Online?
Learn How Optical Character Recognition Can Make a Difference Discover how OCR with enhanced efficiency, accuracy, and automation is transforming finance, healthcare, logistics, and much more.
OCR Translation helps to read and transform the printed, written, or scribbled characters. The computer alters the image content into machine-encoded texts. This is a subcategory of image recognition. The character recognition application converts a digitized or scanned material into a written document.
In this in-depth write-up, we explore OCR use cases and the uses of OCR Translation technology and common and industry-specific applications that highlight the importance of text extraction. OCR APIs were developed to transcribe text coming from handwritten documents for better interpretation by machines. There are now increasing applications being used across industries.
There are common applications of OCR Translation such as:
Extracting text from scanned documents for digital archiving
Text recognition for images to automate data entry.
Convert readable PDFs into writable formats.
Increase accessibility by converting printed text into digital text for screen readers.
OCR technology improves data accuracy, manages workflows, and increases industry productivity.
Common Optical Character Recognition (OCR) applications and use cases
1. Invoice processing
Data extraction: Retrieves invoice numbers, vendor information, amounts, and dates to ensure precise and error-free data capture.
Efficiency boost: It enhances overall efficiency in managing documents through ease of handling and organizing large volumes of documents.
Knowledge management: It assists the organization in better management and exploiting its knowledge assets.
2. Document digitization
Physical to digital conversion: Image to Text Converter Online is used to convert paper-based documents to digital, thus making their handling and storage easier.
Easy access: Makes historic records, contracts, and legal papers easily traceable; hence, access to information will be faster.
Storage needs: It reduces the use of physical storage space contributes to less clutter and saves on the cost of storage.
3. Recover information from forms
Automatic processing of forms: Assists in gathering information fast and accurately through form processing using registration documents, application forms, and survey forms.
Environmental impact: It applies in reducing paper usage toward achieving sustainability since it reduces the carbon footprint of any organization.
Saving time: This accelerates the data entry processes that enable the applications and forms to be processed fast.
Applications in industry: It is useful for the intake forms of patients in hospitals, loan applications in banks, and all application procedures in government offices.
Error Reduction: It greatly diminishes the likelihood of data entry errors. More accurate records are ensured.
4. Making documents searchable
Text scanning: Scanned images and documents are made into searchable text for ease of retrieval.
Improved retrieval: The process improves the location of specific information in big text repositories, saving time and effort.
Documentation management: Organizing files and retrieval in virtual archives enhances efficiency in a firm's operational activities.
OCR Translation technology has enormous potential in all industries. We discussed how OCR enhances data management. Automated digitized documents and invoice processing extract data to enhance document searchability and different forms of image content.
Organizations can perform data entry from printed papers or data records using OCR as input, including passports, portfolios, financial records, sales receipts, and business cards.
#Online OCR Tools#Image To Text Converters#Free OCR Software#Best OCR Technology#Accurate Text Recognition
0 notes
Text
Introduction
In our fast-paced world, time is a precious commodity. Whether you’re a student, professional, or entrepreneur, finding ways to streamline your daily tasks can significantly boost productivity. Enter ChatGPT, an AI language model that can assist you in automating various aspects of your work. In this article, we’ll explore nine ChatGPT prompts that can revolutionize the way you tackle your busy schedule.
1. Calendar Management
ChatGPT prompts: “Schedule a meeting for next Tuesday at 2 PM.”
ChatGPT can interact with your calendar application, whether it’s Google Calendar, Outlook, or any other platform. By providing clear instructions, you can effortlessly set up appointments, reminders, and events. Imagine the time saved when ChatGPT handles your scheduling!
2. Email Drafting
ChatGPT prompts: “Compose an email to my team about the upcoming project deadline.”
ChatGPT can draft professional emails, complete with subject lines, body text, and even attachments. Simply describe the purpose of the email, and let ChatGPT do the rest. It’s like having a virtual assistant dedicated to your inbox.
3. Code Generation
ChatGPT prompts: “Write a Python function that calculates Fibonacci numbers.”
Whether you’re a programmer or a student, ChatGPT can generate code snippets for various programming languages. From simple functions to complex algorithms, ChatGPT can save you hours of coding time.
4. Content Summarisation
ChatGPT prompts: “Summarise this 10-page research paper on climate change.”
Reading lengthy documents can be daunting. ChatGPT can analyse and condense large texts into concise summaries, allowing you to grasp essential information quickly.
5. Social Media Posts
ChatGPT prompts: “Create a tweet announcing our new product launch.”
Crafting engaging social media content is essential for businesses. ChatGPT can generate catchy posts for platforms like Twitter, LinkedIn, or Instagram, ensuring your message reaches your audience effectively.
6. Language Translation
ChatGPT prompts: “Translate this paragraph from English to Spanish.”
Whether you’re communicating with international clients or learning a new language, ChatGPT can provide accurate translations. Say goodbye to language barriers!
7. Data Analysis
ChatGPT prompts: “Analyse this sales dataset and identify trends.”
ChatGPT can process data, create visualisations, and extract insights. Whether it’s sales figures, customer behavior, or market trends, ChatGPT can help you make informed decisions.
8. Creative Writing
ChatGPT prompts: “Write a short story about time travel.”
Beyond practical tasks, ChatGPT can unleash creativity. From poems to fictional narratives, ChatGPT can be your muse when inspiration strikes.
9. Personalised Recommendations
ChatGPT prompts: “Suggest a book based on my interests in science fiction.”
ChatGPT can recommend books, movies, restaurants, or travel destinations tailored to your preferences. It’s like having a knowledgeable friend who knows your tastes.
Conclusion:
These nine ChatGPT prompts demonstrate its versatility. By integrating ChatGPT into your workflow, you can automate repetitive tasks, enhance communication, and free up valuable time. So, next time you’re swamped with work, turn to ChatGPT—it’s like having a digital assistant that works tirelessly to simplify your life.
In addition to ChatGPT, there are several other powerful AI tools designed to automate various tasks. Let’s explore some of them:
ACCELQ: A codeless AI-powered tool that seamlessly tests software across multiple channels (mobile, desktop, etc.). It offers continuous test automation and minimizes maintenance efforts1. You can find more information on their website.
Katalon: An AI tool for test automation that provides a complete solution for testing mobile applications and websites. It features a robust object repository, multi-language support, and efficient test results1. Check out Katalon’s website for details.
Selenium: An open-source AI tool for automating web and application testing. It’s commonly used for regression testing, functional testing, and performance testing1. You can explore more about Selenium on their official website.
Appium: Specifically designed for mobile app automation, Appium supports both Android and iOS platforms. It’s an excellent choice for mobile testing1.
Cypress: Known for its fast execution and real-time reloading, Cypress is an end-to-end testing framework for web applications. It provides a great developer experience1.
Parasoft: Offers comprehensive testing solutions, including static analysis, unit testing, and API testing. It’s widely used in the industry1.
Cucumber: A behavior-driven development (BDD) tool that allows collaboration between developers, testers, and non-technical stakeholders. It uses plain text specifications for test cases1.
TestNG: A testing framework inspired by JUnit and NUnit, TestNG supports parallel execution, data-driven testing, and test configuration flexibility1.
LambdaTest: A cloud-based cross-browser testing platform that allows you to test your web applications across various browsers and operating systems1.
Robot Framework: An open-source test automation framework that uses a keyword-driven approach. It’s highly extensible and supports both web and mobile testing1.
TestCraft: A codeless automation platform that integrates with popular tools like Selenium and Appium. It’s suitable for both manual and automated testing1.
Watir: A Ruby library for automating web browsers, Watir provides a simple and expressive syntax for testing web applications1.
Remember that each tool has its strengths and weaknesses, so choose the one that best fits your specific needs. Whether it’s testing, content creation, or workflow automation, these AI tools can significantly enhance your productivity and efficiency.
#generate-a-random-password#convert-a-pdf-to-a-text-file#create-a-qr-code-for-a-url#calculate-income-tax#convert-a-video-to-gif#extract-text-from-an-image#merge-multiple-pdf-files#generate-a-summary-of-a-long-text#find-duplicate-files-in-a-directory#ChatGPT prompts#Automate busy work#Blog writing workflow#Content creation#Keyword research#SEO optimization#Productivity hacks#Time-saving tools#Streamline workflow#9 ChatGPT Prompts to Automate Your Busy Work
1 note
·
View note
Text
I Helped Launch a PMD Fanfiction Website!
So you might've seen in my recent fic updates but there's a new Website specifically for PMD Fanfiction! And I totally helped make it! It's run and operated by members of the PMD Fic Writing community and they've all been hard at work updating and keeping the place running! We got a few fics on there already, so we'd love it if you gave it a try!

It's got:
Built-in Text to Speech reading!
Color/Saturation/Font adjust sliders!
The ability to tag paragraphs as sensitive so readers can hide them!
Pretty Splash pages!
Image and Music hosting!
An AO3 Chapter HTML Converter tool for quickly porting your own stories! (There's steps for using it with FFN stories, too!)
Robust bookmarks and a 'read later' button that adds a story to your 'bookshelf' for later!
Super fancy commenting / review tools!
444 notes
·
View notes
Text
This is my online accessibility (especially image description) masterpost, which I update periodically whenever I find a new resource or guide. I worry this has the side effect of looking overwhelming in scope, so if you're learning about IDs and/or Tumblr-specific accessibility for the first time, I recommend you start with the first six posts, under "The Basics". All post titles are clickable links!
The Basics
[Plain text: "The Basics". End PT]
Why and how to write image descriptions
Accessibility on Tumblr for new users (has templates, also talks about how to tag for flashing lights to accommodate photosensitive folks)
I see an image and want to describe it: a step by step guide
Fanart-specific and Tumblr-specific advice for image descriptions
How to describe screenshots of tags
IDs versus Alt Text, from a visually impaired Tumblr user (spoiler alert: sometimes it makes sense to use both)
Level of Detail
[Plain text: "Level of Detail?" End PT]
Why a short ID is always better than no ID
Blind people discuss the level of detail to include in IDs
The key word for writing IDs: "Relevancy"
Helpful Communities, Tips, and Tools
[Plain text: "Helpful Communities, Tips, and Tools." End PT]
I want to make my posts more accessible, but can’t write IDs myself: a guide
The People's Accessibility Discord sever (also mentioned in the previous link. It's a friendly server for crowdsourcing image descriptions, with description requests and feedback requests both welcomed)
Google Doc full of template descriptions for memes
Online image to text converter
Describing skin tone and describing hair (heads up that the posts themselves are undescribed and were written with fiction writers in mind; potentially still very useful)
How to remember to write descriptions (spoiler: by putting yourself in situations where you see descriptions more often)
Related, a Google doc of described blogs (almost all the blogs linked earlier in this post have tons of described posts and resources too)
(In my opinion, writing IDs is easiest to learn by doing — but especially if combined with watching other people do so. So follow some described blogs!)
Miscellaneous
[Plain text: "Miscellaneous". End PT]
Alt text vs IDs vs Captions with examples
Why not to put image descriptions in small fonts/italics (also, some non-definitive thoughts on IDs vs alt text)
Special characters read by all screen readers
Brief Intro to Transcripts/Video Descriptions
Myths That Harm Blind People
How to make your blog's colors visually accessible - one of the easiest thing on this list!
Other easy things: show love to artists who describe their work, edit descriptions into your original post when someone provides one in the notes, and copy-paste inaccessible (eg, small text or italicized) descriptions as plain text when you reblog!
Lastly, and maybe most importantly, how to continue writing image descriptions while avoiding burnout.
Let me know if any of these links break! I personally don't describe nearly as much audio/video (got those audio processing issues), so this list is sparse on those resources, but if anyone has good guides/blog recommendations for that too, feel free to add on!
703 notes
·
View notes
Text
Vidu and the Quest to Make More Toons
So, a ways back I talked about Minmax, but I've been trying out basically all the video generators looking for the tools I need, and low and behold this week I find out I've been accepted into the Vidu Artists program now, wherein I get credits and access to access their cooler features in in exchange for... talking about the tech and how I use it.
Well twist my arm. I shall endeavor to be objective and informative despite free stuff (a challenge my spirit needs practice withstanding if anyone else wishes to test me)
So let's talk Vidu.
(outside of being converted to gif, no animations in this post have been cut or edited)

Also, everyone say hi to Maureen the Lizard Queen, every hero needs an evil queen that really wants in his pteruges, and she's that for TyrannoMax.
Vidu's got a bit more oomph under the hood than MinMax (no shade to MinMax, they're brand new and very promising) and it's way too early to be picking winners when it comes to video.
Anyhow, basic features that are nice include the options to upload start and end frames, options for a 4 or 8 second duration (more about that later), and a cleanup/upscale. Credits line up more or less with seconds. 4 credits for a 4 second clip, 8 for an 8 second, and again at upscale. It's straightforward in a way a lot of services aren't.

Apetomic Pyle, done on the fast settings. (not to shabby still, and it gave him monkey legs which a lot of systems balk at)
If you're on the $30/mo tier, you can choose to do a double-cost "quality" over "speed" option. Thankfully, the artist program gets me access. Since there's not yet a seed option it's hard to do a direct comparison, but the quality is going to be a must if you're doing anything that looks like cel. Much cleaner, much smoother.


(4 and 8 second quality gens)
One of the nicest features is the character reference feature. Basically it's like Midjourney's --cref, but with a very strict adherence to character details.
The above images used reference shots of Maureen and Dr. Underfang, and it got the stripes on Underfang's tie right in basically every gen. That's a ridiculous level of character model adherence and, for my purposes, all but essential.
It did misinterpret Maureen's undertail coloration for a sort of fin or drape, but the shot I used was oddly cropped, and sometimes stuff like that happens with gen AI. Given my measuring stick for errors is the era of animation I'm emulating, whatever does slip through is only going to make it more authentic.


There is a limitation in that character-reference and text-only prompts default to 16:9 presently with no options to adjust, but some room to pan is always handy and most people are going to be outputting for phone and not outdated CRT televisions, so, it's understandable it'd be a lower priority feature for the devs.


Walk cycles! By Saint Eniac it's a miracle!
On the left we have one prompted with TyrannoMax's control art, and on the right we have one using that art as the starting frame (4 and 8 seconds, respectively).
Way More details under the fold.
Vidu likes a hefty prompt.
A lot of detail and evocative language helps, and older prompting tricks like mojo-jojoing important concepts are back. For the Max walk cycles above I used:
1986 vintage cel-shaded cartoon character walk cycle. The orange dinosaur-anthro wearing blue gladiator armor walks toward screen right, the camera tracks him, holding him in center-frame. He completes a full, brisk walk cycles from the side view. He walks boldly, back straight, head high, heroic. His tail sways behind him as he moves. The whole clip has the look and feel of vintage 1986 action adventure cel-animated cartoons. The animation quality is high, with flawless motion and anatomy. animated by Tokyo Movie Shinsha, studio Ghibli, don bluth. BluRay remaster. flat chroma-key green screen background
The potential for use with my Filmation-inspired technique is readily apparent. Both versions are on-model as much as any two shots in a 1980s action-figure shilling cartoon would be, some minor blurring to clean up in post but nothing serious. It should be pretty easy to extract the needed frames for looping and compositing.
Some Extra Points
There are the usual issues with hands, though more often than not it corrects my four-fingered anthros to having a human five-fingered hand. Buzby Spurlock animation was known for those kinds of inconsistencies, though. So an opening credits video is much less far off than it was at the last post.
It's also generally impressive how well it does with my dinosaur characters. Non-humanoid dinosaurs are difficult for most image generators, much less anthrosaurs in a vintage aesthetic. Vidu has yet to override the character art to give Underfang or Max the Jurassic Park style t-rex jaw, which is something both MJ and Dall-E 3 have trouble with.


Human characters like Kitty Concolor here, much more stable.
As always, clips are curated. I didn't choose my absolute best ones (gotta have something for the videos), and I'm working on a fun series of jank reels across all the generators.
#vidu#vidu artist plan#ai video#ai animation#tyrannomax#ai tutorial#ai assisted art#cartoons#80s nostalgia#unreality#maureen the lizard queen#dr. underfang#ApeTromic Pyle
79 notes
·
View notes
Text
gif making tools that i use
NOBODY asked for this. but i'm still gonna share what i use as a resource ༊*·˚

find the video you want to turn into a gif (obviously)
i use cobalt to download youtube videos ! u can always download straight from drive & tumblr posts , but this website downloads videos at (more or less) their original quality
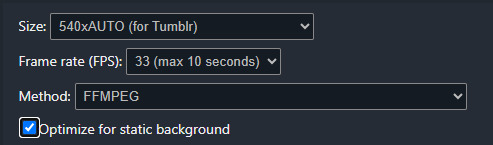
upload the video (or link to the video) on ezgif
this website has EVERYTHINGG bro. u can resize the gif, optimize it, cut it, crop it, add text, yada yada. AND THERE'S AN OPTION TO CONVERT A GIF TO AN MP4 ! this website is great
save the settings u want ur gif to be at & press the button to convert it to a gif. this is what i usually choose:
6. save it as an image OR convert it to a link. i use catbox for literally everything
.
.
and there u go ! cute little gifs
36 notes
·
View notes
Text


Everything that you believe in only works because you believe in it, you have given it the power to become real.
Religion , crystals , tarot, divination, affirmation, placebo effect or any tool, practice, method & set of beliefs only work & are true because you have given it the power to be so. Prayers are answered because you stood strong in your faith (believe/assumption)that it will be answered (you persisted in your faith). The power that they all have in common is the power you have given it. The power doesn’t come from the outside it comes from within. The power is in our subconscious mind.
YOU & ONLY YOU create your reality & destiny , you have the power to change your destiny at any moment because infinite realities/ parallel realities exist in the quantum field. The biggest illusion has been that power/god is outside of us when it has always been within each one of us. So please don’t ever stop believing in your power, and the capacity you have to have whatever you desire.
The same divine intelligence/ power that created you and me plus everything else also resides WITHIN YOU & by default you hold the same power. By believing in your godly power you believe in God, the all, divine intelligence whatever name you want to call it.
All religious texts, spiritual teachings, philosophers, esoteric & occult teachings are all saying/implying the same thing over and over again in different ways, we are reminded we hold the power, create our realities and are the gods of our reality. The message is there but only “the ones who have eyes to see and ears to hear” will receive the message. It is everywhere in movies, tv shows, religious scripture, spiritual teachings, and books.
Now I’ll give you a few examples of how it is written & spoken of everywhere. Followed by my interpretation of it.
Side note : The Bible is not meant to be taken literally, but to be understood at a metaphysical level.
Genesis means "origin, creation, generation". The book of Genesis is about creation and the birth of all things in existence.
"And God said, let their be light, and there was light" Genesis 1:3
God affirmed and it was so.
"So God created man in his own image, in the image of God created he him” -Genesis 1:27
We are God, we are a reflection of god , we hold the same power as God, God/Divine intelligence is In us all. We are all God experiencing itself through different ways.
Jesus says "The kingdom of God is within you" Luke 17:21
God can be found within you as it has always been within you. If we are made in the image of God then we don't need any other validation but our own self. Everything you want comes from you not outside of you.
Jesus says " Varily I say unto you, except ye be converted and become as little children ye shall not enter the kingdom of heaven" Matthew 18:3
In other words dare to dream & have a big imagination just as children have. Create & imagine whatever you desire, no dream is too big or impossible if you dare to dream it in imagination. Use your creative child like imagination to create your heaven on earth. Your imagination is the kingdom of heaven. Don’t ever lose your imagination. Don’t rely on logic or the 3D to create, if you can see it in your minds eye then it is very real & possible.
“Ask and it will be given to you; seek and you will find; knock and the door will be opened to you.”
“For everyone who asks receives; the one who seeks finds; and to the one who knocks, the door will be opened.”
Matthew 7-8
If you want it, decide & assume you have it and you will receive it. It is as simple as that.
“so is my word that goes out from my mouth:It will not return to me empty, but will accomplish what I desire and achieve the purpose for which I sent it.” - Isaiah 55:11
Everything that you assume will become manifest, you must not have any doubts that it will not be so, because it is already done. Know that everything you want is already yours, simply affirm it to be yours
“Thy Kingdom come. Thy will be done on earth, as it is in Heaven.” -Matthew 6:10
Similar to the saying “As within, so without, as above, so below.” Everything & everyone is a mirror/ reflection of your mind & what you assume to be true. The world is a mirror of your assumptions.
"Power resides where men believe it resides. It's a trick. A shadow on the wall. And a very small man can cast a very large shadow. " - Varys from Game of Thrones
There is 7 Hermitic Principles. The first principle is the principle of mentalism.
" The all is mind; the universe is mental"
In other words everything in existence, our outer world is all a mental construct. It is a hologram projected out based on subconscious programming. Everything we see is first created in our mind by programming of our subconscious & imagination. The world is a mirror of our assumptions. What we believe to be true is projected out into the outer world. If you want to see change in the 3D then you must first make the change within.
Now do you see how everything points back to YOU? How things are made possible by you & you only?! Do you understand the power of your mind?? Do you get that the 3D is a reflection of your inner mind (3D reflects the 4D). Do you understand that you are the only validation you need? Do you understand that imagination is real and not the 3D?? Do you understand that everything that exists and can possible exists is true and real? It all exists in some reality, there is infinite realities. Do you see how things have the power to be when you give it your awareness? Do you see how you are a reflection of God working & experiencing itself & creation through you= you are the operant power & god of your reality?!!!
xoxo, the cosmic angel ⭐️🪽
#loassumption#loa tumblr#loa#loa blog#master manifestor#law of attraction#manifesting#manifest#affirm and persist#affirmations#affirmdaily#law of assumption motivation#neville goddard#joseph murphy#subconscious#subconciousmind#programming subconscious mind#mindset#positive thoughts#positive affirmations#quantum field#source#god#imagination#law of assumption#law of assumption blog#manifesation#quantum realities#theallismind#the universe is mental
91 notes
·
View notes
Note
Hi! I was wondering if you’d be up to share how you made the before and after slider on this post:
https://www.tumblr.com/freckleslikestars/780305824654540800/before-after-gif-colouring-challenge
It’s really cool! Thank you!
Aww thank you so much! I literally had a dream about doing this two weeks ago, and when @sophsun1 tagged me I was like "oh my gosh lets try it!"

Now, before we start, I'm going to assume basic knowledge of gif making, colouring, etc. I'm using Adobe Photoshop 2025, but you should be able to adapt the steps for pretty much any software that has a timeline and allows for vector masks.
Once you understand key frames and vector masks, it's super easy to do!
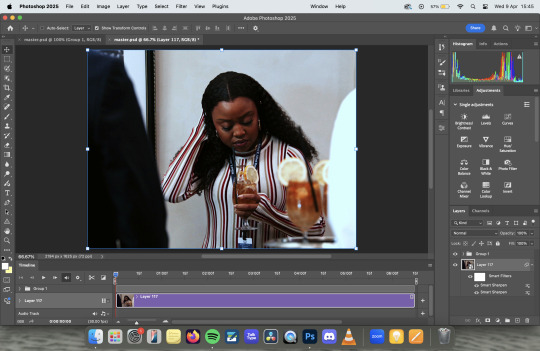
First, we're going to open our gif in video timeline view, with our colouring already done. (My colouring is all in "Group 1")

Next, I converted the footage to a smart object, leaving the colouring as it's own independant group. This isn't technically necessary, but I do this to a) apply sharpening and b) so my layers tab is less cluttered. This is normally also where I'd make sure my image size is correct (I do 540X400 pixels) but I forgot so I did that later on this one.
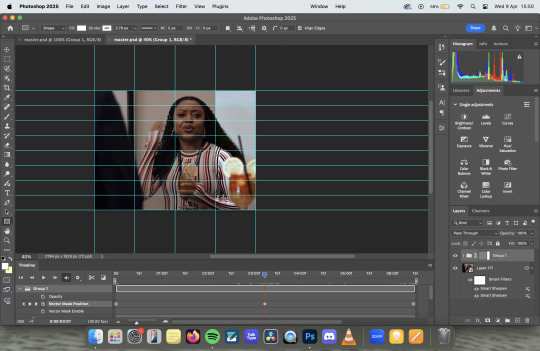
At this point, I turned some guides on and, using the rectangle tool, drew a rectangle that was around the size of the canvas, clicked to the last column on the right hand side.

The next step is to turn it into a vector mask. With command held down on a mac (I think it's alt on windows, but don't quote me on that) drag the rectangle layer onto the colouring group layer. It will fill in the whole canvas with colour.

Delete the rectangle layer, so that you're just left with the gif itself and the colouring layer with the rectangle vector mask over the top.

Next we're going to animate it, so you need to open the dropdown for the colouring layer on the timeline, and you'll want to scroll down to where it says Vector Mask Position

Making sure your playhead is at the very beginning of the gif, click on Vector Mask Position and drop a keyframe. Then, move your playhead to the very end of your gif and drop another keyframe - at this point you don't need to move the vector mask at all.


The next thing you need to do is find the middle of your gif - this doesn't need to be overly precise, particularly with longer gifs, but the precision means that the vector mask moves at the same spead both ways. Drop another keyframe there.
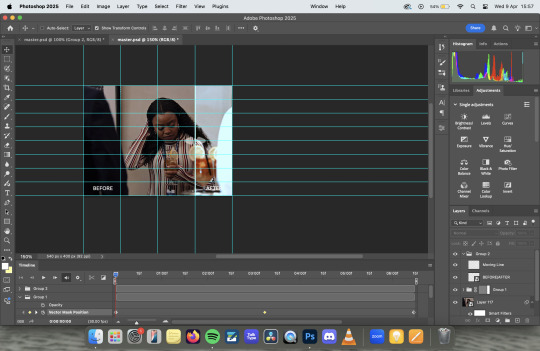
With the playhead over the keyframe, select the vector mask on the layers panel and using the move tool, move it across to the first column on the left. I personally prefer to use my arrow keys to just nudge it left, rather than faffing about with clicking and dragging.

If you were to export it at this point, it would be perfectly fine, you'd get the moving vector mask to show the before and after, which has a pretty cool aesthetic all of it's own. But lets add some details to make it look like a before and after sample image.

I started by adding the BEFORE and AFTER - I used Adobe Clean as my font, but font choice is really personal preference. I just centred them in the bottom left and right squares of my guidelines. I then drew a white line, using the line tool, down where the divide is, added a couple of rounded arrows (and lowered their opacity), and merged the three of them together (keeping the text separate).
Then I simply followed the same steps to add key frames to the line in the same places as I did with the vector mask, making sure that the centre one was nudged to the location for the vector mask on the centre key frame.
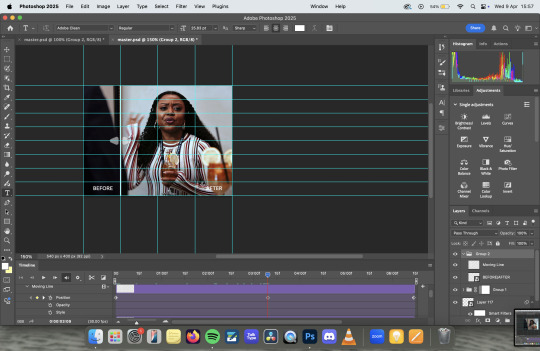
Export as usual and et voila!
Something to note is that this effect works better with longer gifs. As you'll see, this X Files gif was a touch too short, and so the slider feels a little too rushed:

Also, if you're wanting all of the sliders to move at the same time/speed, you're going to want to make sure all of your gifs are the same length, which I didn't do because I'd had a long day and I was procrastinating from postgrad work for an assessment I have tomorrow. Which is incidentally what I'm also doing right now.
Anyway, there you have it! Super simple when you know how! If you have any further questions, don't hesitate to ask! :)
#my gifs#gif tutorial#I genuinely love the colouring of that Abbott gif. The X Files one pisses me off because it started off so dark#that when you don't see the comparison it looks like i did absolutely nothing. but the comparison makes it slightly better
25 notes
·
View notes
Note
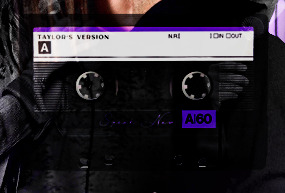
Hey!! I just wanted to say that your recent speak now gif set is sooo stunning. I was wondering how you managed to create that cassette tape effect if it isn’t any trouble? It’s really so pretty.
Have a great day! ✨
ahhh thank you so so much! first of all, i cannot take any credit for this effect, as it was greatly inspired by this amazing yellowjacket gifset by @thewintersoldier!!
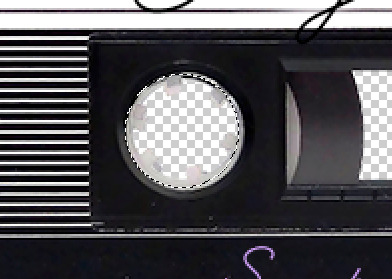
but here's how i recreated the effect, from a cassette png (found on pngwing here), to this animated cassette effect (as seen in my speak now set):
psst: i usually always create in photoshop cs5, but for this effect you need a recent version of photoshop because it's using transform keyframes (i think cs5 doesn't let you do that, or i just don't know how to lol). i used cc 2019 for this.
sorry if this is lengthy or has too much or too little details haha, but i hope it's comprehensible! english is not my first language so i also apologize in advance for any mistakes!
I. PREPARING THE CASSETTE
so, starting with the png here:

i removing everything i didn't want on the cassette png with the brush tool by just drawing the right color over the unwanted text. for the color, i then went to image > adjustments > hue/saturation and in the red tab, i played with the hue slider to get that purple color. finally, i added some text to my liking, and this is what i ended up with:
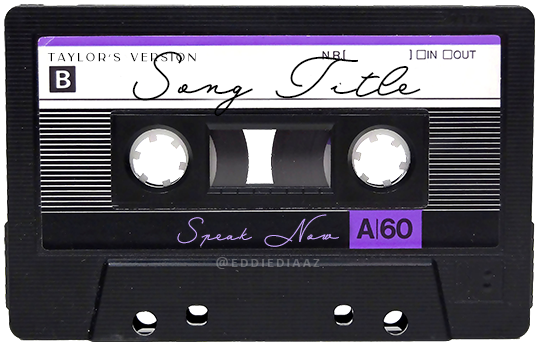
(not necessary but: i also selected the white lines on each side with the magic wand tool because i wanted these lines to be transparent. once your selection is done, go right click > layer via cut. it will create a new layer of the cutout you just made. you just need to disable or delete the layer to make the selection (lines) transparent.)
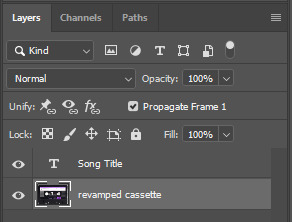
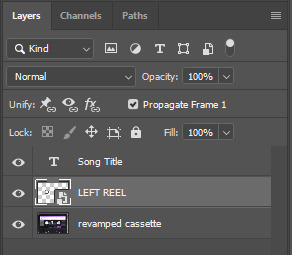
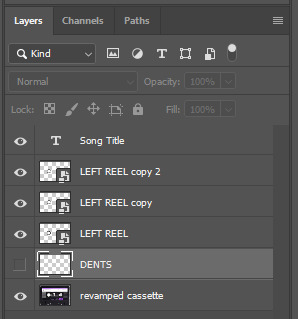
at this point you want to have only 2 layers: the revamped cassette and the text layer. you can remove the text layer actually, and just add the title back at the end, as it is not necessary for this effect. i just like to have the visual.
if you have multiple layers, you need to select all of them (except the song title layer), right click on the png layer and click on merge layers. this will create one layer with all the editing you made on the cassette. if you think you will need to edit this later though, i would save the file as a psd before merging the layers.
II. THE EFFECT
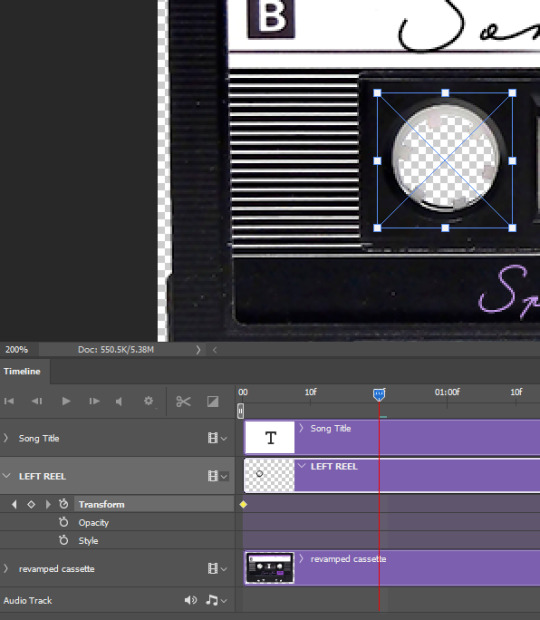
okay, so now that you have your cassette, make sure your video timeline is activated, not frame animation, and you are ready to go.
first, you want to create a perfect circle shape around one of the reel with the elliptical marquee tool (hold shift while dragging the circle). make sure it covers the entire area that will later be rotated. make sure this circle is perfectly centered around the reel or otherwise the animation will be a bit lopsided.
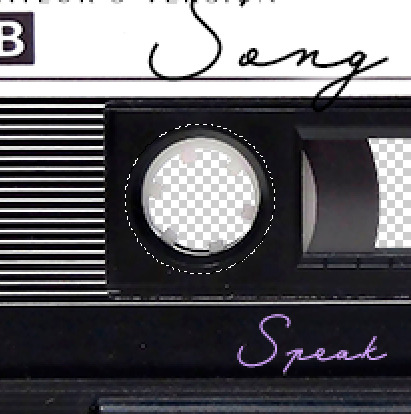
then right click on this selection and go "layer via copy". this will create a layer of only that circle selection. important step: right click on that new layer and go "convert to smart object". the layer should look like that, i've renamed mine:
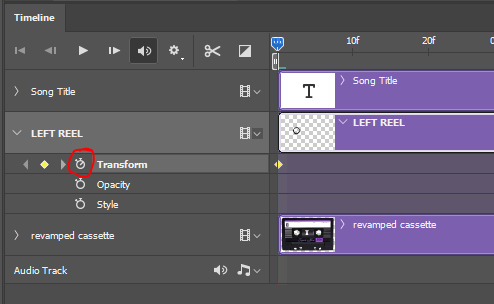
now if you go to your timeline and open that new smart object layer, you will see that you have 3 keyframe options. we only need the transform one.
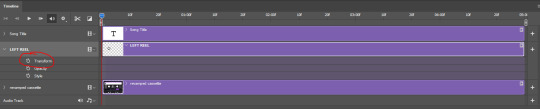
go to the start of the timeline and activate the transform animation by clicking on the stopwatch button. a keyframe will be created automatically.
to create the actual animation, move the position of the cursor on the timeline further, i put mine at the 01:00f mark so it's easier to create the right timing.
then what you want to do is select the reel smart object layer and hit ctrl + T. a box will appear and this is how you will make the reel rotate.
to rotate the reel shape, move your cursor near the blue box on your canvas and drag it until you have rotated the shape halfway through and hit enter. another keyframe will be created and if you play your animation, the reel should rotate on itself for half a turn

move your position on the timeline to 02:00f and do the same thing: select the left reel smart object, hit ctrl + T, rotate for another half turn, and hit enter. this third keyframe should be the last one needed for the animation and you should have a full animated rotation of the reel.
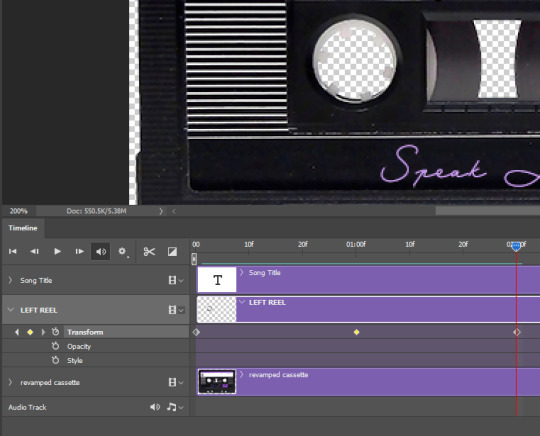
play your animation, and adjust the speed to your liking by dragging the keyframes on the timeline (but make sure they stay within the same distance from each other). the closer the keyframes are, the faster the animation are, and the further they are, the slower it'll be.
then you can just trim the smart object to your animation's length, and duplicate (right click the smart object > duplicate layer) this layer the amount of times needed (i find this less finicky than duplicating keyframes), and placing them one after the other. three full turns should be enough. this is what my timeline looks like right now:
and my animation for the left side looks like this:
as you can see, we can see the little "dents" peeking through behind the animation. we don't want that! to remove it, select the revamped cassette layer (that should be under the reel smart object), and create another perfect circle around it with the marquee tool. this time make sure it's smaller than the previous one, it just needs to cover these dents.
then right click on this selection on your canvas and go "layer via cut". this will create a new layer with that selection, and all you need to do is to disable it. this is removing the information in that circle.
once you are happy and the animation works, you can just delete that cut layer. now the animation is done and looks like this:

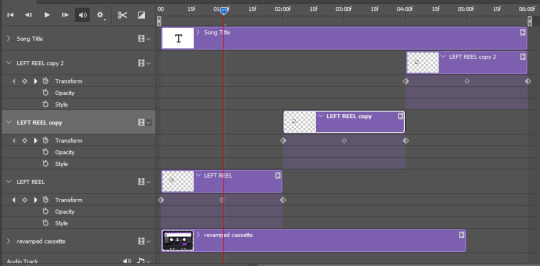
III. SECOND ANIMATION
one you have done it on the left side, you just gotta do the same thing on the right side. you can also try duplicating it, but i found it finicky for some reason (or maybe i'm just not used to the controls of this 2019 photoshop version?).
this is what i have once i've done the same thing on the right reel:
once i am happy with the speed and everything, i want to have only one layer so it's easier to use on gifs. first, i will save this animation as a psd file, in case i want to reuse it. then i am removing the song title layer and will be flattening everything and creating frames from this animation. to do so i am using the "save" action from here.
i'm not sure why it does that, but it's creating a couple of frames where the reels are a bit offset from their position everytime there's a full circle done, so i just delete these 5-6 frames. you can also change the speed here, but by default it should be 0.05.
once you are happy with it, just turn these frames into a smart object with the video timeline again (convert frame animation to video timeline and select all the frame layers > right click > convert to smart object)
now you have a smart object that is ready to be used anywhere!
IV. FINAL TOUCHES
for my particular speak now gifset, i have multiple layers of the animated cassette on each gif:
1, bottom one - cassette layer set to the blending mode "hard light" and set to opacity 86%:
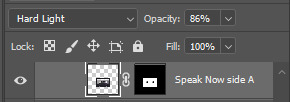

2, middle - this same cassette layer set to hard light, but with the opacity at 100%, AND with a layer mask so it's only applied to the animated reels (i wanted them to show up more):

3, top one - and finally a third layer with another layer mask because i wanted the white label and speak now area to be less see through. it's set to the normal blending mode and the opacity is at 75%


and then i just added the song title on top at 100% opacity and normal blending mode, and added some drop shadows, and tada!
there we have it, i hope this was helpful <3
#alie replies#Anonymous#photoshop#tutorial#*ps help#completeresources#allresources#resourcemarket#userrobin#userraffa#userpjo#usertreena#tuservaleria#tuserheidi#userdean#userrainbow#usersalty#userzaynab#usernik#swearphil
422 notes
·
View notes
Note
hi kelli i love the gif set you made for jimin's birthday especially the "choose your album" one. is it possible you could give a tutorial or show how you made the effect? or the imessage one too its so cute!! only if you want!!
thanks anon 💛🥺 that's the first gif i started with when i started making the set because i wanted to make sure i could execute it well lol. i can break it down and show you how i made those, but i won't call it a tutorial since it might be messy lol. i also didn't come up with the concepts, so please note that i took inspo from gifs in sets like this, this, this, and this. since i didn't have any templates for these overlays, i referenced those as a guide for making my own.
i'll put this under a read more because it might be long.
we'll start with this one!!

there are three main things going on in this gif that i'll focus on: a playlist overlay, a cross-fade transition between mutliple elements (background gif, album logos, and years), and the "selected album" switching in conjunction with the transition.
i like to organize all my layers into groups and label them so i can find everything easily if i need to make adjustments, so here is what my layers palette looks like for the finished gif.

i'll break down everything starting from the bottom since that's how you build things in photoshop.
the background gif is two gifs with the same amount of frames and similar camera movement because i thought the transition would look cool if the shot was circling around jimin in both gifs. i applied my sharpen and noise settings to each gif's smart layer, then put them both on the same timeline track. next, i dragged the cross fade transition with the fastest speed (0.25 s) onto the timeline between my gifs.

then i added a few adjustment layers to make it black and white with some contrast and grouped those into a folder labeled as "b&w psd" to keep it organized.
now time for the overlay group!
starting with the "player" folder first, here's what's inside.
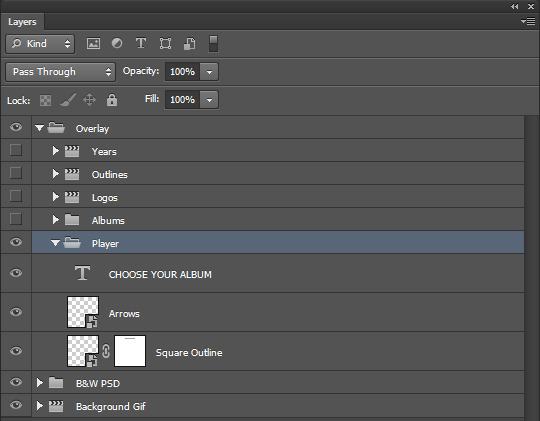
two smart objects and a text layer.
the "square outline" layer is essentially just a square that i selected with the marquee tool, then applied a new color fill with the fill at 0% opacity. then i added a 2px white stroke to it, which left me with just an outline of a square. i converted that to a smart object.
the "arrows" layer, i just used the eclipse shape tool (no fill, 2px white stroke) and some custom shape arrows inside. i duplicated those shapes, flipped them, then positioned each skip button where i wanted them before coverting them both to a single smart object as well.
then i added my "choose your album" text at the top of the square, selected around it with the marquee tool on the "square outline" layer, and applied a layer mask to erase where the outline cut through it. i made this all as centered as possible and made these three layers the same length as my background gif on the timeline.
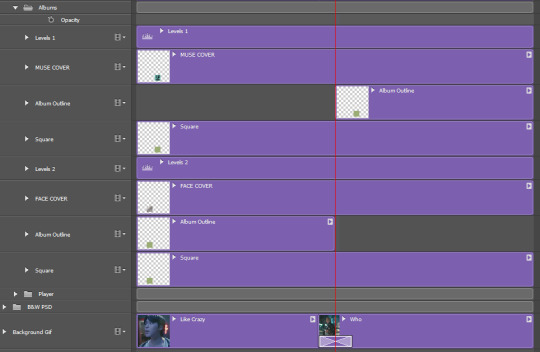
onto the "abums" folder, here's what's inside.
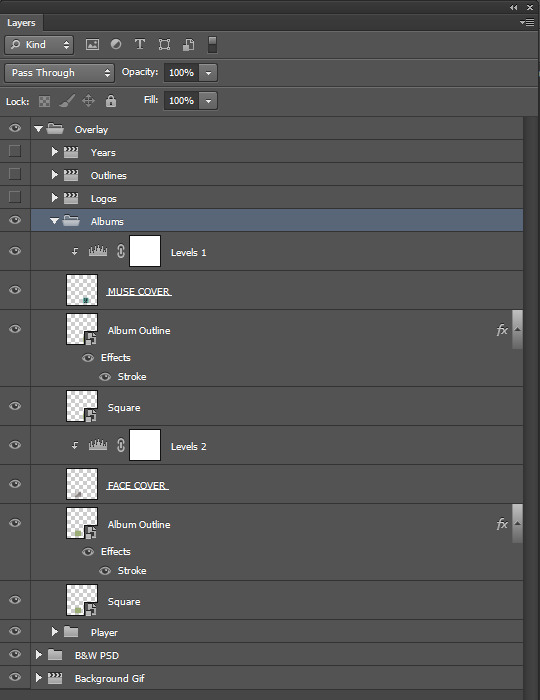
i made two 100px by 100px square shapes and positioned them along the bottom line of the big square outline with equal distance between the center and the corners. all i had to do was resize images of jimin's album covers atop each shape. i also clipped levels adjustments to both covers to make them pop.
the "album outline" layers are just duplicates of the square layers with a 2px stroke in alternate colors per that album's color scheme. i referenced album images and used the eyedropper tool for accurate colors.
to make the strokes visible at different times, those two layers are trimmed on the timeline at the very center of the cross fade transition on the background gif to emulate switching between albums. TECHNICALLY, no, i didn't need to keep the shape layers and i could have deleted them after i positioned the covers + added the stroke to a duplicated cover image instead, but i liked having them as a guide.
anyway it looks like this:
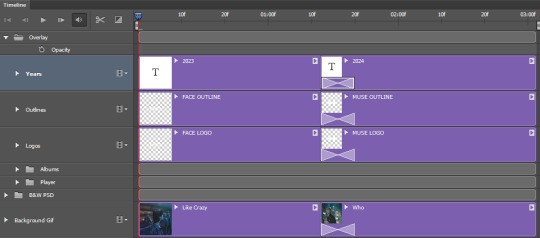
next, came the album title logos and extra text! here are the "logos", "outlines", and "years" folders open.

these are all in seperate folders because i stacked each title logo and it's outline back to back on the timeline in order to add the cross fade transition to them into each other along with the background gif. i thought it would look too abrupt if the logos changed without the same transition.
so i found large png files of each of jimin's album title fonts, made them white, and positioned them in the center. i set the blending modes on each of them to "exclusion", then applied a color overlay set to "color" in those same colors i used for the album cover outlines. i then duplicated the logos and changed the fill to 0%, added a 1px white stroke around them and then nudged them a few pixels away from the real ones for that depth look.
i also added the years each album came out too. i trimmed and stacked them accordingly on the timeline and added the same transition between them all as the one on the background gif.
here is what it looks like on the timeline:
then i converted to frames and saved at 0.05 speed and i was done!
as for the imessage gif...
here's what my layers palette looked like:
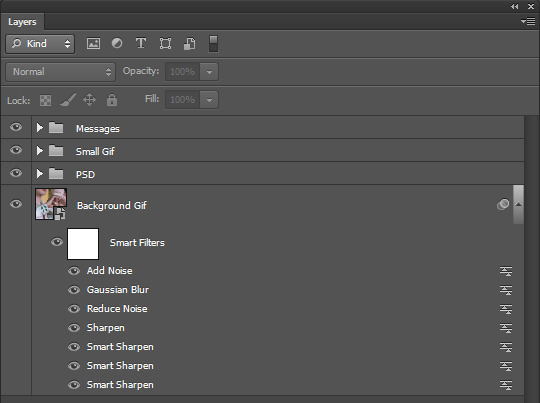
i made my background gif blurry so it wouldn't distract too much from the smaller gif and the messages, but i still needed it to look clear. i really lucked out with that shot of jimin against a yellow couch with teal detailing on his sleeve because look how well it matches the color theme!!! AND he's making a hand heart??? score.
anyway, it was mostly about spacing all the imessage bubbles so everything was nice and equal. i didn't think i could make the bubbles look good if i made them manually with the shape tool, so i just searched for imessage bubble pngs online at differing lengths and made the ones i used white before converting them to smart objects. i resized them all to 48px in height and positioned them with 15px gaps between each other (10px from the top and bottom edges of the gif, 15px from the sides). i set them each to "exclusion" and added a color overlay to them set to "color" and chose which teal or gray color to use.
then i added my text on top of them.

the "small gif" folder is just a 280px high rounded square shape with my gif and adjustment layers clipped to it. there's a smaller 3px gap between the small gif and text below it just like an iphone displays images sent with text. i completely scored with this gif too since he's already against a yellow background and he's wearing green, so all i needed to adjust were the tones of those colors to get it as close as i could to the muse colors.
that's pretty much it!!! i hope you found this interesting or fun to read. thank you for liking the set and being curious how i made some of it <3
again, i can't take credit for these concepts. i only tried to recreate them to the best of my own abilities.
38 notes
·
View notes
Note
hi mona!! this set of yours (usergif/774343430011813888/first-kanaphan-as-kant-pattanawat-khaotung) is absolutely gorgeous!! would you be able to share how you made the third gif?
hi abigail!!! thank you so much! your sets are always so pretty and inspiring to me <333 ofc, i'm happy to share!
(here's the set)
and the gif in question:

it's a clipping mask!
i used a glitch effect psd file i already had on hand (it's a free download from freepik here)

after opening the file in ps, i expanded the 'effect' folder layer and selected the mask on the image 5 layer by holding ctrl and clicking the mask.
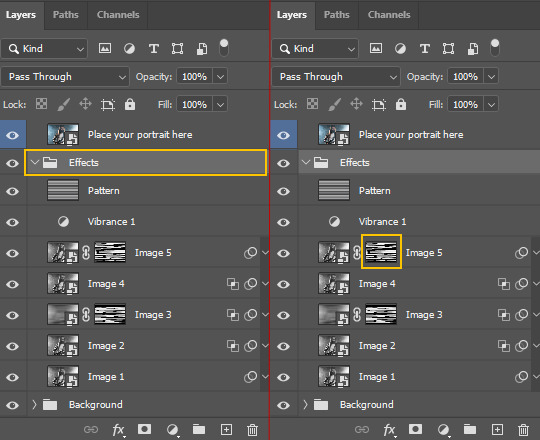
which gives me the marching ants around the glitchy effect:

next i copied that selection (ctrl + c) and pasted it onto a new document, giving me this:

now, i wanted to be able to actually see how it looks, so i inverted the layer with ctrl + i:
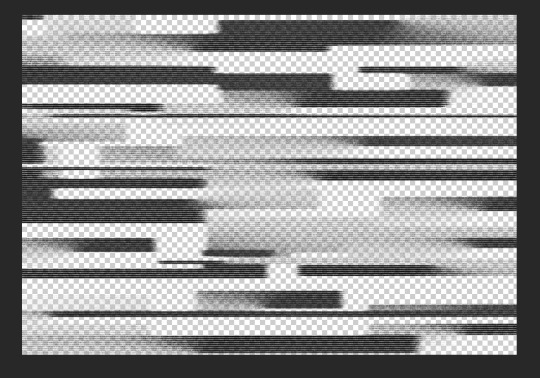
from here i converted this into a smart object. (whenever i need to resize something, i always convert the image in a smart object first bc it helps preserve the clarity.)
okay! now! i went back to my base gif of guilt-ridden kant:
then duplicated my glitchy effect smart object on top of it and resized/moved the smart object using the transform tool (ctrl + t) until it was at a size and position that i liked:

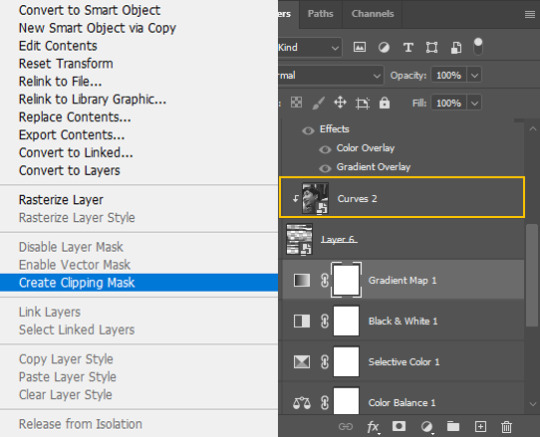
from here, i just set my gif of boba-eyed bison directly above the glitchy thing, right-clicked on that layer to activate the drop-down menu, and selected 'create clipping mask' to attach it to the smart object 'shape' below it.
which gave me this:

i upped the black in a selective color adjustment layer, added my text, and here's the final product:
i hope that helps!
35 notes
·
View notes
Text


Day 2: Rockstar // Face Tattoo Set
Set includes:
⋆ hauntedtrait's Bad Decisions, converted from TS4
⋆ peachyfaerie's Spellbound, converted from TS4
⋆ peachyfaerie's Zodiac Face Tats, converted from TS4
Link, swatch and more info under the cut ♡

Can't believe how long this set took for some reason... Anyway, hi, today I'm bringing you 114 face tattoos! They are all available for TU-EU sims. You can find them in the blush category, and they are divided into layer groups, meaning that your sim can have as many tattoos as you want as long as they don't overlap.
I wasn't sure if blush is the perfect place for them since it's usually cluttered with stuff, but my other option was face paint, which, as far as I'm aware, doesn't normally have custom thumbnails. Which could maybe be changed just like with accessories, but that doesn't show up in Bodyshop anyway, does it? And I would really like for it to be easily accessible in Bodyshop, so. Didn't look into overlay boxes here for the same reason, but maybe it would be a cool wip :)
There's a couple of tats that didn't make the cut, but almost all of them did. Some were separated, some were moved a bit. The textures only work in the face zone, so some of them look a little bit chewed on because they were originally intended to cover the scalp as well. Nothing too extreme tho.
Of course, everything is tooltipped, compressed, and has cute previews. I also tried my best to give all the files clear names because I love when everything is labeled. Important note: when I labeled a tattoo as left or right, I meant the way a sim would see it from their own perspective. Sorry if it's a bit of a mindfuck, just made more sense to me personally, lol.
Credits: aside from the creators that made all of this really cool stuff, I also want to really thank Lifa for their wonderful Birthday Suit skintones that I used in all the in-game previews, specifically the original and the colorful ones (mostly Zodiac, lol). And, of course, The Tattooer, a stunning tool that made it all possible.
☁ Download
SFS | Mediafire | simblr.cc
☁ Swatch
⋆ hauntedtrait Bad Decisions. 27 edgy tattoos that inspired me to convert all of this in the first place. Some of these are pretty big. If you hate spiders, be careful – there's a couple.

⋆ peachyfaerie Spellbound. 39 tattoos. Most of these are small and located under the eyes. Many flower-themed images. My personal favorites are the beautiful leaves.
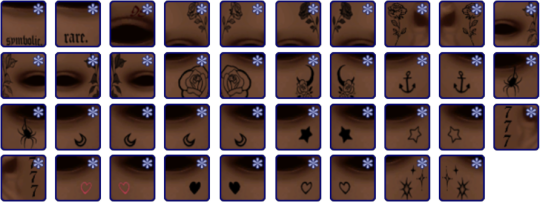
⋆ peachyfaerie Zodiac Face Tats. 48 tattoos. No comment on the color choices for the preview. Anyway, these are quite simple: 4 tattoos for each sign, including symbols and text.

#s2cc#my cc#the sims 2#sims 2 cc#ts2cc#sims 2 face tattoo#4t2 conversion#4t2#ts2 cc#ts2#hauntedtrait#peachyfaerie
162 notes
·
View notes