#JavaScript Template Literals
Explore tagged Tumblr posts
Visit Tumblr Blog
Explore Tumblr blogs with no restrictions, modern design and the best experience.
Last Seen Tumblr Blogs


Fun Fact
Forty percent of Tumblr users are between the ages of 18 to 25.
Text
...
#bruh i have a coworker who's fairly new (hired like a year after me) who keeps trying to take credit for things i've worked on and#a) STOP wtf lady#and b).......i'm literally the ONLY person who works on the brand i work on that knows javascript and illustrator's native automation#systems......... and made a bunch of templates that use them#(cuz like i'm in a graphic production house that does production for like a lot of brands kidswear)#so like.... my art director (for the final production side)...her art director (from the creative dev side) and the art vp#like know what's going on exactly.... like??? stoP???#personal
0 notes
Text
hey you, make your own website.
sure you can use neocities or carrd or strawpage or whatever whatever but also. make your own from scratch!
there's plenty of free website hosters, github(owned by microsoft), gitlab, and cloudflare have "pages" services which are all free and you can just host whatever html pages even use things like static site generators as well to help yourself from copying and pasting.
if you have your own domains you can also use those, and other than digging deep into web requests or stupid shit there's no way to know you're not hosting it yourself.
i use cloudflare pages, but github/gitlab pages is probably much easier, and if you dont like it, you can just pick it up and move it somewhere else. if you have a custom domain as well you dont even have to tell people "move to the new website". you're not tied down to any service and the site is what you have
It's very flexible too! for beginners you can just put raw html and css and upload it and it'll show, if you need more than this, you can just add more.
my website, ranid.space, also uses cloudflare pages (it can be easily done on the other two), and it's generated using Astro with templates i've created, it has a [shitty] blog Content Management System with an Atom feed, there's pages with javascript, and i even have SEO optimizations (i was really bored okay i really dont care if i show up on google).
it is as simple or as complex as you want it to be.
it is literally JUST hosting your own website you have full and entire control over. note it's a static website so you cant really do things like live updates without connecting it to another server, however for posting to a blog once in a while it's perfectly fine
i've not used gitlab pages, it seems to be a bit more manual setup than github pages, but i think beyond that first setup it's the same
329 notes
·
View notes
Text
A structured way to learn JavaScript.
I came across a post on Twitter that I thought would be helpful to share with those who are struggling to find a structured way to learn Javascript on their own. Personally, I wish I had access to this information when I first started learning in January. However, I am grateful for my learning journey so far, as I have covered most topics, albeit in a less structured manner.
N/B: Not everyone learns in the same way; it's important to find what works for you. This is a guide, not a rulebook.
EASY
What is JavaScript and its role in web development?
Brief history and evolution of JavaScript.
Basic syntax and structure of JavaScript code.
Understanding variables, constants, and their declaration.
Data types: numbers, strings, boolean, and null/undefined.
Arithmetic, assignment, comparison, and logical operators.
Combining operators to create expressions.
Conditional statements (if, else if, else) for decision making.
Loops (for, while) for repetitive tasks. - Switch statements for multiple conditional cases.
MEDIUM
Defining functions, including parameters and return values.
Function scope, closures, and their practical applications.
Creating and manipulating arrays.
Working with objects, properties, and methods.
Iterating through arrays and objects.Understanding the Document Object Model (DOM).
Selecting and modifying HTML elements with JavaScript.Handling events (click, submit, etc.) with event listeners.
Using try-catch blocks to handle exceptions.
Common error types and debugging techniques.
HARD
Callback functions and their limitations.
Dealing with asynchronous operations, such as AJAX requests.
Promises for handling asynchronous operations.
Async/await for cleaner asynchronous code.
Arrow functions for concise function syntax.
Template literals for flexible string interpolation.
Destructuring for unpacking values from arrays and objects.
Spread/rest operators.
Design Patterns.
Writing unit tests with testing frameworks.
Code optimization techniques.
That's it I guess!
872 notes
·
View notes
Note
Im learning how to code on Twine as i want to make my own story BUT ITS SO DIFFICULT 😭😭😭 may you tell me how you learnt and explanation of the codes IF IT WONT TAKE LONG OFC sjudurhf
Really not sure why everyone's flocking to me for coding advice (I am not that smart people) but I can kind of try? 😭
Honestly, it will depend on which you choose but I work with SugarCube and it wasn't that hard for me to grasp it and it really isn't unless you're dealing with Javascript.
One of the first things I did was get a template because I hated the way default SugarCube thing looked so I would suggest get one of those if you care about looks and can't code it to be pretty.
One of the main things that helped me was the SugarCube Documentation it quite literally has everything ever and you can check how to use certain things if you're ever confused.
I also used @idrellegames' Coding in Twine Masterpost as my guide while I was figuring things out and honestly I still go and check it once in a while lol. I think this was my biggest help since I didn't really have anyone to ask things to + I'm insanely shy when asking for help.
Other than that, I just googled whatever difficulty I was facing and figured things out lol. 😭 I'm sorry if this isn't helpful but I don't think I can explain all of my code (it is a mess too lol) but you got this #trust. Good luck!
98 notes
·
View notes
Note
Hi so sorry to bother you but I want to learn how to make IFs, so I've been using twine and trying to learn how to use sugarcube but like how 😭😭😭
Babes I am so embarassed I'm literally studying computer science oh my god. Like in theory I know that programming languages are different but this is the first time java vs javascript is really hitting,,,,
Do you have links to any resources you used to learn? Like how you randomized variables (for the 'i'm into both men and women' option's gender setting) and how to do the pronoun thing properly, and stuff like the codex, plus if you can how you customized that sidebar
Thank you and I'm sorry to bother you!!
No worries at all!! Here's a masterlist of Twine resources you can use for the things you mentioned and more. It includes tutorials for beginners, including multiple different ways on how to code pronouns, CSS customization and templates for your game, etc.
For the randomization of variables, the line of code you want is <<set $variable to either("option1", "option2", "option3", ...)>>
But for my purposes specifically, to maintain an even 2 male/2 female LI split, I had to use the code in a little more convoluted way since randomizing all the genders with that code could end up with an "uneven" balance (like 3 out of 4 LIs being randomized as female, or all LIs ending up as male).
If you want to do something similar with having a 2 male/2 female LI randomization, here's how I went about it, though I'm sure there's a much quicker way to do it. Mind you I was a total beginner when I wrote this haha:
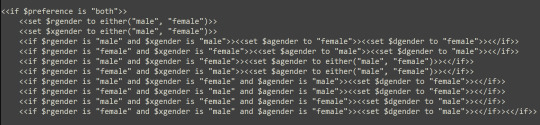
Basically what this does is randomize R's gender and randomize X's gender first to either male or female with the first two lines. If R and X are both set as male or female, then A and D will both be set as the opposite. If R and X are set as different genders, however, then A's gender will be randomized next. Then, based on whether A is male or female, D's gender will be selected to complete the 2/2 split.
Hope this helps!!
132 notes
·
View notes
Text
intro!
hey! my name is xavier, i also go by xavi. my main/bts blog is @xavigav
this is my selfship sideblog! i'm very new to the selfship community and this blog was made Literally Yesterday, so i'm still working some stuff out. this post will probably get more organized later :)
i go by he/him, i'm bisexual, i'm autistic, i'm proship, and i'm so very very gay for kim namjoon.
if rpf selfshipping makes you uncomfortable, click off this blog because there's a whole lot of it here 👍
my f/o's are kim namjoon, aka RM, of bts and nikki su of the nikkiverse
i am not okay with sharing namjoon, but i am okay with sharing nikki :)
if you want to know more about me, i made a lil about page for this blog! plus, i have a more detailed about page on my main. (both are 'hosted' on my main account because i'm not cleared for javascript on this blog and i don't feel like going through the hassle)
tag navigation below the cut!
general selfship stuff
#selfship, #selfship imagines, #selfship positivity, #selfship memes, #selfship polls, #selfship discourse (prob won't be used much (hopefully)), #other peoples ships
activities
#cute ideas, #reblog games, #ask games, #templates, #prompts, #about xavi (posts relating to me/that i find relatable), #about this blog, #xavi writes
my ships
joonvier (xavier x namjoon)
#joonvier, #namjoon, #joonvier s/i, #xavi talks joonvier
xavikki (xavier x nikki)
#xavikki, #nikki, #xavikki s/i, #xavi talks xavikki
#self ship community#selfship community#proship selfship#proship self ship#proselfship#proship safe#proship please interact
5 notes
·
View notes
Text
¡Hola! Vengo a asomar la cabeza. Revisé mis codes viejos y pues tengo algunos por compartir pero el código está tan outdated queeee necesito actualizarlo o al menos dejarlo de modo que se pueda subir a pastebin y no maree pero tengo ideas acumuladas y vengo queriendo saber qué tipo de tablillas les gustan.
Mis favoritas de hacer siempre son las fichas y las que más rápido me salen son los clásicos trama/rol (de hecho si volviera a rolear lo haría en rol libre), pero pues quiero saber si les interesan otras cosas. Baules, monadas (como mi credencial de My Hero Academia), otro tipo de tablas.
Cosas de skins no hago como aportes porque lo que hago yo tiene trampa: usualmente trabajo con ModernBB porque sí tiene responsivo (aunque adapto a phpBB3 por practicidad) y desactivo TODO el CSS base de Foroactivo, entonces me paso por el arco del triunfo las clases y bastardizo los templates así que hacer eso como para que todo el mundo lo pueda adaptar está cañón.
También tengo un tutorial para hacer foros en light y dark mode con javascript (aviso de que no uso jQuery a menos de que quiera morir porque está obsoleto y pues literal paso 8 horas al día mirando TypeScript con REACT, así que el Javascript puro se me hace más a gusto... y carga más rápido, pero funciona igual re bien para foroactivo). Si les interesa estaría chido.
También tengo para diseño responsivo, pero sólo aplica para Modern BB porque phpBB3 está más absoleto que mi abuelita que no conocí y si no usa sus plantillas móviles (horribles, por cierto) forza a que la pantalla del celular salga como si fuera compu y ps no está chido.
En fin, en realidad todo esto es pa dejarles mi ask y que me cuenten como que no han visto, quieren, etc. No es trabajo de comisión y sólo ando buscando ideas generales, nada asegura que vaya a hacer nada, no más quiero darme una idea del panorama.
(Para comisiones, info por mensaje aquí, trabajo con hourly rate de 20dlls, que es la mitad de mi hourly rate en el trabajo y lo que cuesta ir a la comida rápida medio no tan cara para dos porciones; lo sé, es caro, vivo en un lugar muy caro ;_; lo siento).
4 notes
·
View notes
Text
7 Essential JavaScript Features Every Developer Should Know Early.
JavaScript is the backbone of modern web development. Whether you're just starting out or already have some coding experience, mastering the core features of JavaScript early on can make a big difference in your growth as a developer. These essential features form the building blocks for writing cleaner, faster, and more efficient code.

Here are 7 JavaScript features every developer should get familiar with early in their journey:
Let & Const Before ES6, var was the only way to declare variables. Now, let and const offer better ways to manage variable scope and immutability.
let allows you to declare block-scoped variables.
const is for variables that should not be reassigned.
javascript Copy Edit let count = 10; const name = "JavaScript"; // name = "Python"; // This will throw an error Knowing when to use let vs. const helps prevent bugs and makes code easier to understand.
Arrow Functions Arrow functions offer a concise syntax and automatically bind this, which is useful in callbacks and object methods.
javascript Copy Edit // Traditional function function add(a, b) { return a + b; }
// Arrow function const add = (a, b) => a + b; They’re not just syntactic sugar—they simplify your code and avoid common scope issues.
Template Literals Template literals (${}) make string interpolation more readable and powerful, especially when dealing with dynamic content.
javascript Copy Edit const user = "Alex"; console.log(Hello, ${user}! Welcome back.); No more awkward string concatenation—just cleaner, more intuitive strings.
Destructuring Assignment Destructuring allows you to extract values from objects or arrays and assign them to variables in a single line.
javascript Copy Edit const user = { name: "Sara", age: 25 }; const { name, age } = user; console.log(name); // "Sara" This feature reduces boilerplate and improves clarity when accessing object properties.
Spread and Rest Operators The spread (…) and rest (…) operators may look the same, but they serve different purposes:
Spread: Expands an array or object.
Rest: Collects arguments into an array.
javascript Copy Edit // Spread const arr1 = [1, 2]; const arr2 = […arr1, 3, 4];
// Rest function sum(…numbers) { return numbers.reduce((a, b) => a + b); } Understanding these makes working with arrays and objects more flexible and expressive.
Promises & Async/Await JavaScript is asynchronous by nature. Promises and async/await are the key to writing asynchronous code that reads like synchronous code.
javascript Copy Edit // Promise fetch('https://api.example.com/data') .then(response => response.json()) .then(data => console.log(data));
// Async/Await async function getData() { const response = await fetch('https://api.example.com/data'); const data = await response.json(); console.log(data); } Mastering these will help you handle APIs, databases, and other async operations smoothly.
Array Methods (map, filter, reduce) High-order array methods are essential for transforming and managing data.
javascript Copy Edit const numbers = [1, 2, 3, 4, 5];
// map const doubled = numbers.map(n => n * 2);
// filter const even = numbers.filter(n => n % 2 === 0);
// reduce const sum = numbers.reduce((total, n) => total + n, 0); These methods are clean, efficient, and favored in modern JavaScript codebases.
Final Thoughts Learning these JavaScript features early gives you a solid foundation to write better, more modern code. They’re widely used in frameworks like React, Vue, and Node.js, and understanding them will help you grow faster as a developer.
Start with these, build projects to apply them, and your JavaScript skills will take off.
0 notes
Text
5 Essential Skills to Look for When You Hire a Vue.js Developer

Vue.js is quickly becoming the preferred front-end framework for companies wishing to create adaptable, high-performing web apps. The developer behind your user interface frequently determines its quality, whether you're working on an MVP or developing a sophisticated platform.
For this reason, a lot of tech firms are opting to use Vue.js engineers to power their projects. Hiring someone with Vue knowledge alone won't help; you need someone who knows the framework and its ecosystem better. When hiring vue js developers, you should look for the five essential abilities listed below.
Build Better Interfaces by Hiring the Right Front-End Talent
Core proficiency in Vue.js
Although it may seem apparent, a strong grasp of Vue's fundamental features—reactive data binding, components, directives, and lifecycle hooks—is the cornerstone of any successful Vue developer. Additionally, a strong applicant should understand when and how to use Vue Router and Vue CLI.
Make sure Vue.js engineers are at ease with Vue 3 and the Composition API before hiring them for long-term projects. For scalable applications, current IT businesses desire enhanced performance and better code organization, which the most recent version offers.
Deep knowledge of JavaScript and ES6+
Since Vue.js is based on JavaScript, knowing how to use contemporary JavaScript (ES6+) is essential. The ideal developer should feel at ease with promises, destructuring, array methods, arrow functions, and template literals. This guarantees their ability to write code that is clear, modular, and maintainable. Additionally, it's critical that they comprehend how JavaScript works with the DOM, particularly when responsiveness and performance are major considerations.
Experience in front-end ecosystems and tools
Vue is rarely utilized alone. It is frequently integrated by developers with testing libraries like Jest, Axios for managing APIs, and Vuex for state management. Proficient Vue.js developers should be able to use Webpack or Vite to create effective development pipelines. Knowing CSS pre-processors like SASS or LESS is also a plus because many tech businesses demand front-end engineers to know how to use them.
For this reason, it is essential to hire front-end developers who are knowledgeable with all aspects of contemporary online tools, not just the framework.
API integration and backend collaboration
The work of front-end developers is not isolated. They must communicate with RESTful APIs and backend systems with ease. Seek applicants who have experience working in teams utilizing Agile approaches and who are proficient in processing authentication tokens, testing API endpoints, and gracefully handling errors. To prevent a skills mismatch, be sure to include this criterion if you are working with an IT staffing agency.
Problem-solving and communication skills
Technical proficiency is important, but so is the ability for independent problem-solving and effective communication. The top Vue.js developers collaborate as often as they code. They grasp the business implications of their code, provide better solutions, and pose pertinent questions. These soft skills can have a significant impact on the success of a project, whether you're working with a small startup or a huge tech company.
Concluding Thoughts
Hiring Vue js developers involves more than just checking off boxes on a CV. Professionals who are well-versed in the framework, work well with others, and stay up to date with changing tech stacks are what you require. Hiring the appropriate person can improve your front-end experience, cut down on development time, and increase the marketability of your product.
0 notes
Text
Front end web developer skills you need to know
To become a successful front-end web developer, you’ll need a solid foundation in key skills. Mastering HTML & CSS is essential for creating the structure and style of websites.
JavaScript and ES6 add interactivity and modern functionality, while CSS & JS frameworks like Bootstrap and React streamline development.
Understanding GIT & GITHUB for version control and implementing responsive design ensures your projects work seamlessly across all devices.
In this article, we will review some of the key skills required for expert front web development.

Download Infographic
HTML & CSS
HTML (HyperText Markup Language) and CSS (Cascading Style Sheets) are the backbone of front-end web development. HTML structures the content of a web page, using elements like headings, paragraphs, links, and images.
CSS styles that content, controlling layout, colours, fonts, spacing, and responsiveness. Together, they allow developers to create visually engaging and well-structured websites.
Mastering HTML & CSS is crucial before moving on to more advanced topics like JavaScript or frameworks. You’ll need to understand concepts such as semantic HTML, CSS selectors, the box model, and media queries.
There are plenty of free and paid resources to help you learn. Great starting points include MDN Web Docs, W3Schools, and freeCodeCamp’s Responsive Web Design certification.
Platforms like Codecademy and Coursera also offer beginner-friendly courses. Practising by building small projects is one of the most effective ways to reinforce your learning.
JavaScript
JavaScript is a core technology of front-end web development, used alongside HTML and CSS to create dynamic, interactive websites. While HTML provides the structure and CSS handles styling, JavaScript enables user interaction by manipulating elements on the page in real-time.
It’s responsible for features such as form validation, image sliders, dropdown menus, modal windows, and dynamic content updates without reloading the page (using AJAX). JavaScript interacts with the Document Object Model (DOM), allowing developers to modify HTML and CSS based on user actions like clicks, scrolls, or keystrokes.
Modern front-end development often uses JavaScript libraries and frameworks such as React, Vue.js, or jQuery to streamline development and enhance functionality. Understanding JavaScript fundamentals is essential before diving into these tools.
There are excellent resources to learn JavaScript, whether you’re a beginner or looking to advance your skills. Top recommendations include JavaScript.info, MDN Web Docs, and freeCodeCamp. You can also find interactive tutorials on Codecademy, as well as comprehensive courses on platforms like Udemy and Coursera.
For in-depth understanding, the book Eloquent JavaScript is highly regarded in the developer community. Practising through small projects and coding challenges will solidify your knowledge.
ES6
ES6 (ECMAScript 2015) is a major update to the JavaScript language, introducing powerful new features that make coding more efficient and maintainable. It brought significant improvements to JavaScript syntax and functionality, including let and const for block-scoped variable declarations, arrow functions for cleaner, more concise function expressions, template literals for easier string formatting, and destructuring for simplifying data extraction from arrays and objects.
ES6 also introduced promises for better handling of asynchronous operations, modules for organising code into reusable components, and classes for a more structured, object-oriented approach to JavaScript development.
ES6 has become a standard in front-end web development, forming the backbone of modern frameworks like React, Vue.js, and Angular, where these features are heavily utilised to create fast, scalable, and maintainable web applications. It also improves code readability and reduces common bugs, making it an essential skill for front-end developers.
To learn ES6, great resources include MDN Web Docs, JavaScript.info, freeCodeCamp’s JavaScript course, and Codecademy’s interactive tutorials. The book Eloquent JavaScript also covers ES6 in depth, while platforms like Udemy and Coursera offer structured courses for more in-depth learning. Practising with real-world projects is the best way to master ES6.
CSS & JS Frameworks
CSS and JavaScript frameworks play a vital role in front-end web development by streamlining the coding process and reducing development time.
CSS frameworks like Bootstrap, Tailwind CSS, and Foundation provide pre-written CSS classes and components for creating responsive layouts, navigation menus, buttons, and more. They help ensure consistent design and save developers from writing repetitive code.
JavaScript frameworks such as React, Vue.js, and Angular offer structured approaches to building interactive user interfaces and managing complex application states. These frameworks simplify DOM manipulation, improve performance, and enable the creation of reusable components.
By using these frameworks, developers can build modern, responsive, and scalable web applications more efficiently.
To learn CSS frameworks, explore the official documentation for Bootstrap or Tailwind CSS, as well as tutorials on freeCodeCamp and W3Schools. For JS frameworks, the React and Vue.js official docs, MDN Web Docs, Codecademy, and Scrimba offer excellent learning paths.
GIT & GITHUB
GIT and GitHub are essential tools for front-end web developers, enabling efficient version control and collaboration. GIT is a distributed version control system that tracks code changes, allowing developers to manage project history, revert to earlier versions, and work on multiple features simultaneously using branches.
GitHub is a cloud-based platform that hosts GIT repositories, making it easy for developers to collaborate, share code, and contribute to open-source projects. It also offers features like pull requests, code reviews, and issue tracking to streamline development workflows.
In front-end web development, GIT and GitHub are used to manage code for websites and applications, ensuring version control and seamless collaboration. They also make it easy to showcase projects in a professional portfolio.
To learn GIT and GitHub, consider GitHub Learning Lab, freeCodeCamp, Codecademy, and MDN Web Docs. Platforms like GitHub Docs and GitKraken also provide excellent guides and tutorials for beginners.
Responsive Design
Responsive design is a crucial aspect of front-end web development, ensuring that websites look and function well across a wide range of devices, from mobile phones to large desktop screens.
It focuses on creating flexible layouts, images, and components that automatically adjust to different screen sizes and orientations. This approach enhances user experience, boosts SEO, and reduces bounce rates by delivering a consistent browsing experience, regardless of the device.
Responsive design relies on key techniques like media queries, flexbox, and CSS grid to control the layout and structure of a website. Fluid grids and responsive images ensure content scales appropriately, while mobile-first design prioritises smaller screens before scaling up to larger devices.
Many front-end frameworks, like Bootstrap and Tailwind CSS, include built-in responsive design features, making it easier to create flexible layouts.
In modern front-end development, responsive design is essential, as mobile traffic continues to grow. It’s a core requirement for building professional websites and web applications.
To learn responsive design, consider resources like MDN Web Docs, W3Schools, and freeCodeCamp’s Responsive Web Design certification.
Books like Responsive Web Design with HTML5 and CSS by Ben Frain and platforms like Codecademy also offer comprehensive tutorials.
Building small projects and experimenting with media queries is a practical way to master this vital skill, ensuring your web pages deliver a seamless experience across all devices.
Conclusion
Mastering front-end web development skills like HTML & CSS, JavaScript, ES6, CSS & JS frameworks, GIT & GitHub, and responsive design is essential for building modern, high-performing websites.
These skills form the foundation of interactive, responsive, and visually appealing web pages. By leveraging powerful frameworks and adopting best practices, you can streamline your workflow and create exceptional user experiences.
With countless online resources available, from MDN Web Docs to freeCodeCamp, there’s never been a better time to start your front-end development journey. Keep practising, stay curious, and continue expanding your skill set to become a proficient developer.
Article first published: https://dcpweb.co.uk/blog/front-end-web-developer-skills-you-need-to-know
0 notes
Text
JavaScript 6 🧬 escape characters and template literals
New Post has been published on https://tuts.kandz.me/javascript-6-%f0%9f%a7%ac-escape-characters-and-template-literals/
JavaScript 6 🧬 escape characters and template literals

youtube
a - escape characters escape characters are used to represent special characters in strings example = "This is a backslash: \\"; → This is a backslash: \ example = 'He said, \'Hello!\''; → He said, 'Hello!' example = "She said, \"Hi there!\""; → She said, "Hi there!" example = "Line 1\nLine 2"; → Line 1 Line 2 example = "This is an octal escape: \101 (\u0041 in hex)"; → This is an octal escape: A (Unicode 0x0041) example = "This is a hex escape: \x41 (\u0041 in octal)"; → This is a hex escape: A (Unicode 0x0041) example = "This is a Unicode escape: \u03A9 (Omega symbol)"; → This is a Unicode escape: Ω (Greek Capital Letter Omega) b - template literals template literals provide a new way to work with strings They allow to embed expressions inside string literals using ` This makes it easier to create multi-line strings and perform string interpolation. Template Literals, introduced in ES6 (ECMAScript 2015) let greeting = `Hello, $name!`; → Basic Usage let message = ` This is a multi-line string.` → Multi-Line Strings `The sum of $a and $b is $a + b.` → Expression Interpolation
0 notes
Text
MERN Full Stack Training: Your Path to Web Development Success
The MERN stack consists of MongoDB, Express.js, React.js, and Node.js, forming a complete technology stack that enables developers to build dynamic and scalable web applications. Enrolling in a mern full stack developer course program is the perfect way to gain expertise in this powerful technology stack.
Understanding the MERN Stack
The MERN stack is a JavaScript-based framework that allows developers to handle both frontend and backend development efficiently.
MongoDB: A flexible NoSQL database used to store data in a document-based format.
Node.js: A runtime environment that enables JavaScript to run on the server side, making full-stack development seamless.
MERN Full Stack Course: Main Modules
1. JavaScript Fundamentals and ES6+ Concepts
A strong foundation in JavaScript is essential for working with the MERN stack. The mern full stack developer course in ameerpet starts with:
JavaScript syntax and functions
ES6+ features such as destructuring, arrow functions, and template literals
Asynchronous programming with promises and async/await
2. Backend Development with Node.js and Express.js
The full stack mern training in ameerpet covers backend development using Node.js and Express.js, including:
Setting up a Node.js environment
Creating RESTful APIs with Express.js
Middleware functions and routing
4. Frontend Development with React.js
A full stack mern online course in ameerpet teaches how to build dynamic frontends with React.js, covering:
React components, props, and state management
Handling user input and events
Managing application state with Context API and Redux
5. Connecting the Frontend and Backend
A key skill taught in a mern stack web development online course in ameerpet is integrating the frontend with the backend, including:
Making API calls to fetch and display data
Implementing authentication and authorization
Managing user sessions and role-based access control
Why Choose a MERN Full Stack Course?
JavaScript-Based Full-Stack Development
By learning the MERN stack, developers can build both frontend and backend applications using a single programming language—JavaScript.
Scalable and Efficient Applications
Web applications built with the MERN stack are scalable and perform efficiently under high loads.
Practical Learning Approach
The best mern classroom course in ameerpet and full stack mern online training in ameerpet programs focus on hands-on learning, enabling students to work on real-world projects.
Where to Enroll in the Best MERN Stack Course Online?
If you’re looking for the best mern classroom training in ameerpet or an online training option, many institutes offer:
Live instructor-led classes
Self-paced courses with recorded sessions
Real-world projects for hands-on experience
Placement assistance and industry-recognized certifications
The combination of MongoDB, Express.js, React.js, and Node.js allows developers to create modern, high-performance applications. Whether you choose a full stack mern online training in ameerpet program or an in-person classroom course, mastering the MERN stack will open doors to exciting career opportunities in the tech industry.
0 notes
Text
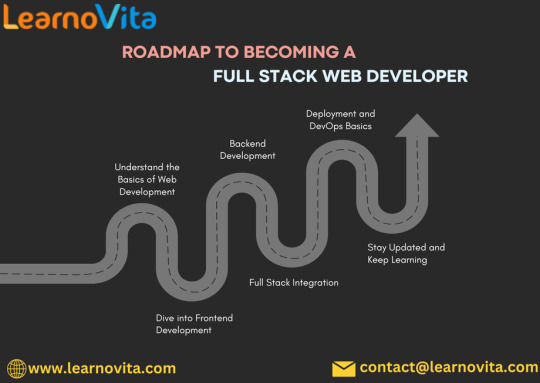
The Definitive Blueprint for Aspiring Full Stack Web Developers
Embarking on a career as a full stack web developer is an exciting journey filled with endless possibilities. Full stack developers are equipped to handle both the frontend and backend aspects of web applications, making them invaluable in the tech industry. This blog serves as your definitive blueprint, guiding you through the essential skills and steps needed to achieve success in this field.
For those looking to enhance their skills, Full Stack Developer Course Online programs offer comprehensive education and job placement assistance, making it easier to master this tool and advance your career.

Step 1: Lay the Groundwork
Master HTML & CSS
Start by learning the foundational technologies of the web:
HTML (HyperText Markup Language): Understand how to structure web content using various elements and tags. Familiarize yourself with semantic HTML to improve accessibility and SEO.
CSS (Cascading Style Sheets): Learn to style your web pages effectively. Focus on layout techniques, color schemes, typography, and responsive design principles.
Get Comfortable with JavaScript
JavaScript: This powerful scripting language is essential for adding interactivity to your web applications. Concentrate on:
Variables, data types, and operators
Control structures (if statements, loops)
Functions, scope, and DOM manipulation for dynamic content
Step 2: Strengthen Your Frontend Skills
Deepen Your JavaScript Knowledge
ES6 and Modern Features: Become proficient in newer JavaScript features such as arrow functions, destructuring, template literals, and modules.
Explore Frontend Frameworks
React: Dive into this popular library for building user interfaces. Understand components, state management, and hooks.
Alternative Frameworks: Consider learning Vue.js or Angular to broaden your perspective on frontend development.
Responsive Design Practices
Learn how to create mobile-friendly applications using responsive design techniques. Frameworks like Bootstrap or Tailwind CSS can expedite your design process.
Version Control with Git
Git: Familiarize yourself with version control systems. Learn to track changes in your code and collaborate using platforms like GitHub.
Step 3: Transition to Backend Development
Learn Server-Side Technologies
Node.js: Get to know this JavaScript runtime for server-side programming. Understand its architecture and how to build scalable applications.
Express.js: Learn this framework for Node.js that simplifies the creation of robust APIs and web applications.
Database Management
SQL Databases: Start with relational databases like PostgreSQL or MySQL. Learn how to write queries and manage data effectively.
NoSQL Databases: Explore MongoDB for handling unstructured data, and understand when to use NoSQL versus SQL.
API Development
Master the principles of RESTful API design. Learn to create and consume APIs using HTTP methods and status codes.
With the aid of Best Online Training & Placement programs, which offer comprehensive training and job placement support to anyone looking to develop their talents, it’s easier to learn this tool and advance your career.
Step 4: Full Stack Integration
Build Complete Applications
Combine your frontend and backend skills to create full stack projects. Ideas include:
A personal blog or portfolio site
A task management application
An e-commerce store
Implement User Authentication
Learn to secure your applications by implementing user authentication and authorization. Explore techniques such as JWT (JSON Web Tokens) and OAuth.
With the aid of Best Online Training & Placement programs, which offer comprehensive training and job placement support to anyone looking to develop their talents, it’s easier to learn this tool and advance your career.
Step 5: Deployment and DevOps Fundamentals
Deploy Your Applications
Understand the deployment process using platforms like Heroku, Vercel, or AWS. Learn how to configure your applications for production environments.
Basic DevOps Knowledge
Familiarize yourself with key DevOps practices, including Continuous Integration/Continuous Deployment (CI/CD) and containerization with Docker.
Step 6: Engage with the Community and Continuous Learning
Join Online Developer Communities
Connect with fellow developers through forums such as Stack Overflow, Reddit, or Discord. Engaging with a community can provide support, resources, and networking opportunities.
Stay Current
Follow blogs, podcasts, and YouTube channels dedicated to web development. Continuous learning is vital in this fast-paced industry.
Create a Professional Portfolio
Build a portfolio showcasing your projects, skills, and experiences. Highlight your best work to attract potential employers and clients.
Conclusion
The path to becoming a full stack web developer is filled with challenges and opportunities for growth. By following this definitive blueprint, you can equip yourself with the skills and knowledge needed to thrive in this dynamic field. Embrace the learning journey, stay curious, and enjoy the process of becoming a skilled developer
0 notes
Text
The Complete JavaScript Course 2025: From Zero to Expert
JavaScript is one of the most in-demand programming languages today, and mastering it opens the door to numerous opportunities in web development. Whether you're a beginner eager to learn or someone looking to enhance your existing skills, the Complete JavaScript Course 2025 from BIIT Technology is designed for you. This course takes you from zero to expert, offering a structured path to becoming proficient in JavaScript and building dynamic web applications. Below is a comprehensive guide to this course and why it could be the best choice for you in 2025
Introduction to JavaScript
In today's digital age, JavaScript is the backbone of web development. It's the language that brings websites to life, enabling interactive and dynamic elements. Whether you are building websites, web apps, or mobile applications, JavaScript is essential to your toolkit. This comprehensive article will guide you through what makes the Complete JavaScript Course 2025 from BIIT Technology stand out.

What is JavaScript?
JavaScript is a high-level, dynamic, and interpreted programming language that is primarily used for creating interactive effects within web browsers. It allows developers to implement complex features like interactive forms, animations, real-time updates, and much more on web pages.
Originally developed by Netscape as a way to add simple interactivity to websites, JavaScript has grown into one of the core technologies of the web, alongside HTML and CSS.
Why JavaScript is Essential for Web Development
JavaScript has become indispensable in modern web development. It's a versatile language that works across all browsers and platforms. Whether you're building a front-end user interface or working with back-end systems, JavaScript can do it all with the help of libraries and frameworks like React, Angular, and Node.js.
Key Benefits of Learning JavaScript:
Builds dynamic and interactive websites
Works seamlessly with HTML and CSS
Used for both front-end and back-end development (full-stack development)
Enhances your employability and career prospects
Powers popular frameworks and libraries (React, Vue, Angular)
Course Overview: The Complete JavaScript Course 2025
The Complete JavaScript Course 2025 by BIIT Technology is a carefully designed, step-by-step program tailored to take you from a beginner to an expert in JavaScript. It’s structured to cater to learners of all levels, whether you're just starting or looking to sharpen your skills.
Course Structure
The course is divided into beginner, intermediate, and advanced levels. Each section builds on the previous one, ensuring a smooth learning curve.
Beginner Level: Covers the fundamentals of JavaScript, including variables, data types, and basic functions.
Intermediate Level: Focuses on more complex topics like arrays, objects, loops, and DOM manipulation.
Advanced Level: Deals with advanced concepts such as asynchronous programming, APIs, error handling, and modern JavaScript frameworks.
Modules and Topics Covered
The course includes a variety of modules designed to give you a deep understanding of JavaScript and its applications:
JavaScript Basics: Learn about variables, operators, functions, and conditionals.
DOM Manipulation: Master how to interact with HTML elements and create dynamic web pages.
Event Handling: Understand how to respond to user actions, such as clicks and key presses.
AJAX and Fetch API: Learn how to retrieve data from external sources and update web pages without reloading.
ES6+ Features: Explore modern JavaScript features such as arrow functions, classes, and template literals.
JavaScript Frameworks: Dive into React, Vue, and Node.js for full-stack development.
Benefits of Enrolling in the Best JavaScript Course
Learn at Your Own Pace
One of the standout features of this course is its flexibility. You can learn at your own pace, taking the time to absorb each lesson before moving to the next. This self-paced learning allows you to balance your study with other commitments.
Hands-On Projects
The course emphasizes practical learning with multiple projects that help reinforce the concepts you’ve learned. These real-world projects include building interactive websites, creating web applications, and solving coding challenges. Each project helps you gain confidence in your skills and prepares you for the job market.
Read More: Best Computer Classes in Laxmi Nagar
What You Will Learn in the Course
Fundamentals of JavaScript
In the early stages of the course, you’ll cover the basics of JavaScript, such as:
Variables and Data Types: Learn about numbers, strings, booleans, arrays, and objects.
Control Flow: Understand conditional statements, loops, and functions.
Error Handling: Learn how to handle errors in your code to avoid crashes.
Advanced JavaScript Concepts
Once you're comfortable with the basics, the course takes you into more advanced topics:
Asynchronous JavaScript: Learn how to work with promises, async/await, and setTimeout/setInterval.
APIs and Fetching Data: Learn how to work with APIs, parse JSON, and display external data on your website.
Object-Oriented JavaScript: Understand the concepts of classes, inheritance, and modules.
Working with Modern Frameworks
You will also gain experience working with the latest JavaScript frameworks and libraries, including:
React: The most popular library for building user interfaces.
Vue.js: A progressive framework for building UI and single-page applications.
Node.js: JavaScript runtime for building scalable back-end systems.
Is This the Best JavaScript Course?
The Complete JavaScript Course 2025 by BIIT Technology is tailored to meet the needs of every learner, from beginners to advanced developers. With its practical approach and up-to-date curriculum, it stands out as one of the best JavaScript courses available.
Features That Set This Course Apart
Expert Trainers: Learn from seasoned JavaScript professionals with years of experience.
Interactive Learning: Engage in live coding exercises and real-time feedback.
Comprehensive Curriculum: Covers everything from basic syntax to advanced topics in one course.
Lifetime Access: Once enrolled, you’ll have lifetime access to course materials, updates, and support.
JavaScript Course with Certification
Upon completion of the course, you'll receive a certification that showcases your expertise in JavaScript. This certificate is valuable for potential employers and can help boost your career.
Frequently Asked Questions (FAQs)
1. What are the prerequisites for taking the JavaScript course?
No prior programming experience is needed. The course starts with the basics and gradually moves to advanced topics.
2. Can I get a job after completing the course?
Yes, the course prepares you with all the necessary skills to start working as a web developer, front-end developer, or full-stack developer.
3. How long will it take to complete the course?
The duration depends on your pace, but on average, students complete the course in about 3-6 months.
4. Is there any support during the course?
Yes, BIIT Technology offers full support throughout the course, including access to forums, live sessions, and one-on-one mentoring.
5. Do I need to install anything to start?
You will need a code editor like VS Code and a web browser to start working on exercises. All required tools are provided during the course.
Conclusion
The Complete JavaScript Course 2025 by BIIT Technology is a top-tier program for anyone interested in mastering JavaScript. Whether you’re a complete beginner or looking to refine your skills, this course provides the structure, resources, and hands-on experience to make you an expert in the language. With the added benefit of a certificate, you can showcase your new skills to potential employers and take your web development career to new heights. Don't wait—enroll today and start your journey to becoming a JavaScript expert.
#JavaScript Course 2025#JavaScript expert#JavaScript professionals#best JavaScript courses#basics of JavaScript#programming languag#Best online javascript course#javascript course fees
0 notes
Text
Web Components Demystified
New Post has been published on https://thedigitalinsider.com/web-components-demystified/
Web Components Demystified
Scott Jehl released a course called Web Components Demystified. I love that name because it says what the course is about right on the tin: you’re going to learn about web components and clear up any confusion you may already have about them.
And there’s plenty of confusion to go around! “Components” is already a loaded term that’s come to mean everything from a piece of UI, like a search component, to an element you can drop in and reuse anywhere, such as a React component. The web is chock-full of components, tell you what.
But what we’re talking about here is a set of standards where HTML, CSS, and JavaScript rally together so that we can create custom elements that behave exactly how we want them to. It’s how we can make an element called <tasty-pizza> and the browser knows what to do with it.
This is my full set of notes from Scott’s course. I wouldn’t say they’re complete or even a direct one-to-one replacement for watching the course. You’ll still want to do that on your own, and I encourage you to because Scott is an excellent teacher who makes all of this stuff extremely accessible, even to noobs like me.
Chapter 1: What Web Components Are… and Aren’t
Web components are not built-in elements, even though that’s what they might look like at first glance. Rather, they are a set of technologies that allow us to instruct what the element is and how it behaves. Think of it the same way that “responsive web design” is not a thing but rather a set of strategies for adapting design to different web contexts. So, just as responsive web design is a set of ingredients — including media fluid grids, flexible images, and media queries — web components are a concoction involving:
Custom elements
These are HTML elements that are not built into the browser. We make them up. They include a letter and a dash.
<my-fancy-heading> Hey, I'm Fancy </my-fancy-heading>
We’ll go over these in greater detail in the next module.
HTML templates
Templates are bits of reusable markup that generate more markup. We can hide something until we make use of it.
<template> <li class="user"> <h2 class="name"></h2> <p class="bio"></p> </li> </template>
Much more on this in the third module.
Shadow DOM
The DOM is queryable.
document.querySelector("h1"); // <h1>Hello, World</h1>
The Shadow DOM is a fragment of the DOM where markup, scripts, and styles are encapsulated from other DOM elements. We’ll cover this in the fourth module, including how to <slot> content.
There used to be a fourth “ingredient” called HTML Imports, but those have been nixed.
In short, web components might be called “components” but they aren’t really components more than technologies. In React, components sort of work like partials. It defines a snippet of HTML that you drop into your code and it outputs in the DOM. Web Components are built off of HTML Elements. They are not replaced when rendered the way they are in JavaScript component frameworks. Web components are quite literally HTML elements and have to obey HTML rules. For example:
<!-- Nope --> <ul> <my-list-item></my-list-item> <!-- etc. --> </ul> <!-- Yep --> <ul> <li> <my-list-item></my-list-item> </li> </ul>
We’re generating meaningful HTML up-front rather than rendering it in the browser through the client after the fact. Provide the markup and enhance it! Web components have been around a while now, even if it seems we’re only starting to talk about them now.
Chapter 2: Custom Elements
First off, custom elements are not built-in HTML elements. We instruct what they are and how they behave. They are named with a dash and at must contain least one letter. All of the following are valid names for custom elements:
<super-component>
<a->
<a-4->
<card-10.0.1>
<card-♠️>
Just remember that there are some reserved names for MathML and SVG elements, like <font-face>. Also, they cannot be void elements, e.g. <my-element />, meaning they have to have a correspoonding closing tag.
Since custom elements are not built-in elements, they are undefined by default — and being undefined can be a useful thing! That means we can use them as containers with default properties. For example, they are display: inline by default and inherit the current font-family, which can be useful to pass down to the contents. We can also use them as styling hooks since they can be selected in CSS. Or maybe they can be used for accessibility hints. The bottom line is that they do not require JavaScript in order to make them immediately useful.
Working with JavaScript. If there is one <my-button> on the page, we can query it and set a click handler on it with an event listener. But if we were to insert more instances on the page later, we would need to query it when it’s appended and re-run the function since it is not part of the original document rendering.
Defining a custom element
This defines and registers the custom element. It teaches the browser that this is an instance of the Custom Elements API and extends the same class that makes other HTML elements valid HTML elements:
<my-element>My Element</my-element> <script> customElements.define("my-element", class extends HTMLElement ); </script>
Check out the methods we get immediate access to:
Breaking down the syntax
customElements .define( "my-element", class extends HTMLElement ); // Functionally the same as: class MyElement extends HTMLElement customElements.define("my-element", MyElement); export default myElement // ...which makes it importable by other elements: import MyElement from './MyElement.js'; const myElement = new MyElement(); document.body.appendChild(myElement); // <body> // <my-element></my-element> // </body> // Or simply pull it into a page // Don't need to `export default` but it doesn't hurt to leave it // <my-element>My Element</my-element> // <script type="module" src="my-element.js"></script>
It’s possible to define a custom element by extending a specific HTML element. The specification documents this, but Scott is focusing on the primary way.
class WordCount extends HTMLParagraphElement customElements.define("word-count", WordCount, extends: "p" ); // <p is="word-count">This is a custom paragraph!</p>
Scott says do not use this because WebKit is not going to implement it. We would have to polyfill it forever, or as long as WebKit holds out. Consider it a dead end.
The lifecycle
A component has various moments in its “life” span:
Constructed (constructor)
Connected (connectedCallback)
Adopted (adoptedCallback)
Attribute Changed (attributeChangedCallback)
Disconnected (disconnectedCallback)
We can hook into these to define the element’s behavior.
class myElement extends HTMLElement constructor() connectedCallback() adoptedCallback() attributeChangedCallback() disconnectedCallback() customElements.define("my-element", MyElement);
constructor()
class myElement extends HTMLElement constructor() // provides us with the `this` keyword super() // add a property this.someProperty = "Some value goes here"; // add event listener this.addEventListener("click", () => ); customElements.define("my-element", MyElement);
“When the constructor is called, do this…” We don’t have to have a constructor when working with custom elements, but if we do, then we need to call super() because we’re extending another class and we’ll get all of those properties.
Constructor is useful, but not for a lot of things. It’s useful for setting up initial state, registering default properties, adding event listeners, and even creating Shadow DOM (which Scott will get into in a later module). For example, we are unable to sniff out whether or not the custom element is in another element because we don’t know anything about its parent container yet (that’s where other lifecycle methods come into play) — we’ve merely defined it.
connectedCallback()
class myElement extends HTMLElement // the constructor is unnecessary in this example but doesn't hurt. constructor() super() // let me know when my element has been found on the page. connectedCallback() console.log(`$this.nodeName was added to the page.`); customElements.define("my-element", MyElement);
Note that there is some strangeness when it comes to timing things. Sometimes isConnected returns true during the constructor. connectedCallback() is our best way to know when the component is found on the page. This is the moment it is connected to the DOM. Use it to attach event listeners.
If the <script> tag comes before the DOM is parsed, then it might not recognize childNodes. This is not an uncommon situation. But if we add type="module" to the <script>, then the script is deferred and we get the child nodes. Using setTimeout can also work, but it looks a little gross.
disconnectedCallback
class myElement extends HTMLElement // let me know when my element has been found on the page. disconnectedCallback() console.log(`$this.nodeName was removed from the page.`); customElements.define("my-element", MyElement);
This is useful when the component needs to be cleaned up, perhaps like stopping an animation or preventing memory links.
adoptedCallback()
This is when the component is adopted by another document or page. Say you have some iframes on a page and move a custom element from the page into an iframe, then it would be adopted in that scenario. It would be created, then added, then removed, then adopted, then added again. That’s a full lifecycle! This callback is adopted automatically simply by picking it up and dragging it between documents in the DOM.
Custom elements and attributes
Unlike React, HTML attributes are strings (not props!). Global attributes work as you’d expect, though some global attributes are reflected as properties. You can make any attribute do that if you want, just be sure to use care and caution when naming because, well, we don’t want any conflicts.
Avoid standard attributes on a custom element as well, as that can be confusing particularly when handing a component to another developer. Example: using type as an attribute which is also used by <input> elements. We could say data-type instead. (Remember that Chris has a comprehensive guide on using data attributes.)
Examples
Here’s a quick example showing how to get a greeting attribute and set it on the custom element:
class MyElement extends HTMLElement get greeting() return this.getAttribute('greeting'); // return this.hasAttribute('greeting'); set greeting(val) if(val) this.setAttribute('greeting', val); // this setAttribute('greeting', ''); else this.removeAttribute('greeting'); customElements.define("my-element", MyElement);
Another example, this time showing a callback for when the attribute has changed, which prints it in the element’s contents:
<my-element greeting="hello">hello</my-element> <!-- Change text greeting when attribite greeting changes --> <script> class MyElement extends HTMLElement static observedAttributes = ["greeting"]; attributeChangedCallback(name, oldValue, newValue) if (name === 'greeting' && oldValue && oldValue !== newValue) console.log(name + " changed"); this.textContent = newValue; customElements.define("my-element", MyElement); </script>
A few more custom element methods:
customElements.get('my-element'); // returns MyElement Class customElements.getName(MyElement); // returns 'my-element' customElements.whenDefined("my-element"); // waits for custom element to be defined const el = document.createElement("spider-man"); class SpiderMan extends HTMLElement constructor() super(); console.log("constructor!!"); customElements.define("spider-man", SpiderMan); customElements.upgrade(el); // returns "constructor!!"
Custom methods and events:
<my-element><button>My Element</button></my-element> <script> customElements.define("my-element", class extends HTMLElement connectedCallback() const btn = this.firstElementChild; btn.addEventListener("click", this.handleClick) handleClick() console.log(this); ); </script>
Bring your own base class, in the same way web components frameworks like Lit do:
class BaseElement extends HTMLElement $ = this.querySelector; // extend the base, use its helper class myElement extends BaseElement firstLi = this.$("li");
Practice prompt
Create a custom HTML element called <say-hi> that displays the text “Hi, World!” when added to the page:
Enhance the element to accept a name attribute, displaying "Hi, [Name]!" instead:
Chapter 3: HTML Templates
The <template> element is not for users but developers. It is not exposed visibly by browsers.
<template>The browser ignores everything in here.</template>
Templates are designed to hold HTML fragments:
<template> <div class="user-profile"> <h2 class="name">Scott</h2> <p class="bio">Author</p> </div> </template>
A template is selectable in CSS; it just doesn’t render. It’s a document fragment. The inner document is a #document-fragment. Not sure why you’d do this, but it illustrates the point that templates are selectable:
template display: block; ` /* Nope */ template + div height: 100px; width: 100px; /* Works */
The content property
No, not in CSS, but JavaScript. We can query the inner contents of a template and print them somewhere else.
<template> <p>Hi</p> </template> <script> const myTmpl = documenty.querySelector("template").content; console.log(myTmpl); </script>
Using a Document Fragment without a <template>
const myFrag = document.createDocumentFragment(); myFrag.innerHTML = "<p>Test</p>"; // Nope const myP = document.createElement("p"); // Yep myP.textContent = "Hi!"; myFrag.append(myP); // use the fragment document.body.append(myFrag);
Clone a node
<template> <p>Hi</p> </template> <script> const myTmpl = documenty.querySelector("template").content; console.log(myTmpl); // Oops, only works one time! We need to clone it. </script>
Oops, the component only works one time! We need to clone it if we want multiple instances:
<template> <p>Hi</p> </template> <script> const myTmpl = document.querySelector("template").content; document.body.append(myTmpl.cloneNode(true)); // true is necessary document.body.append(myTmpl.cloneNode(true)); document.body.append(myTmpl.cloneNode(true)); document.body.append(myTmpl.cloneNode(true)); </script>
A more practical example
Let’s stub out a template for a list item and then insert them into an unordered list:
<template id="tmpl-user"><li><strong></strong>: <span></span></li></template> <ul id="users"></ul> <script> const usersElement = document.querySelector("#users"); const userTmpl = document.querySelector("#tmpl-user").content; const users = [name: "Bob", title: "Artist", name: "Jane", title: "Doctor"]; users.forEach(user => let thisLi = userTmpl.cloneNode(true); thisLi.querySelector("strong").textContent = user.name; thisLi.querySelector("span").textContent = user.title; usersElement.append(thisLi); ); </script>
The other way to use templates that we’ll get to in the next module: Shadow DOM
<template shadowroot=open> <p>Hi, I'm in the Shadow DOM</p> </template>
Chapter 4: Shadow DOM
Here we go, this is a heady chapter! The Shadow DOM reminds me of playing bass in a band: it’s easy to understand but incredibly difficult to master. It’s easy to understand that there are these nodes in the DOM that are encapsulated from everything else. They’re there, we just can’t really touch them with regular CSS and JavaScript without some finagling. It’s the finagling that’s difficult to master. There are times when the Shadow DOM is going to be your best friend because it prevents outside styles and scripts from leaking in and mucking things up. Then again, you’re most certainly going go want to style or apply scripts to those nodes and you have to figure that part out.
That’s where web components really shine. We get the benefits of an element that’s encapsulated from outside noise but we’re left with the responsibility of defining everything for it ourselves.
Select elements are a great example of the Shadow DOM. Shadow roots! Slots! They’re all part of the puzzle.
Using the Shadow DOM
We covered the <template> element in the last chapter and determined that it renders in the Shadow DOM without getting displayed on the page.
<template shadowrootmode="closed"> <p>This will render in the Shadow DOM.</p> </template>
In this case, the <template> is rendered as a #shadow-root without the <template> element’s tags. It’s a fragment of code. So, while the paragraph inside the template is rendered, the <template> itself is not. It effectively marks the Shadow DOM’s boundaries. If we were to omit the shadowrootmode attribute, then we simply get an unrendered template. Either way, though, the paragraph is there in the DOM and it is encapsulated from other styles and scripts on the page.
These are all of the elements that can have a shadow.
Breaching the shadow
There are times you’re going to want to “pierce” the Shadow DOM to allow for some styling and scripts. The content is relatively protected but we can open the shadowrootmode and allow some access.
<div> <template shadowrootmode="open"> <p>This will render in the Shadow DOM.</p> </template> </div>
Now we can query the div that contains the <template> and select the #shadow-root:
document.querySelector("div").shadowRoot // #shadow-root (open) // <p>This will render in the Shadow DOM.</p>
We need that <div> in there so we have something to query in the DOM to get to the paragraph. Remember, the <template> is not actually rendered at all.
Additional shadow attributes
<!-- should this root stay with a parent clone? --> <template shadowrootcloneable> <!-- allow shadow to be serialized into a string object — can forget about this --> <template shadowrootserializable> <!-- click in element focuses first focusable element --> <template shadowrootdelegatesfocus>
Shadow DOM siblings
When you add a shadow root, it becomes the only rendered root in that shadow host. Any elements after a shadow root node in the DOM simply don’t render. If a DOM element contains more than one shadow root node, the ones after the first just become template tags. It’s sort of like the Shadow DOM is a monster that eats the siblings.
Slots bring those siblings back!
<div> <template shadowroot="closed"> <slot></slot> <p>I'm a sibling of a shadow root, and I am visible.</p> </template> </div>
All of the siblings go through the slots and are distributed that way. It’s sort of like slots allow us to open the monster’s mouth and see what’s inside.
Declaring the Shadow DOM
Using templates is the declarative way to define the Shadow DOM. We can also define the Shadow DOM imperatively using JavaScript. So, this is doing the exact same thing as the last code snippet, only it’s done programmatically in JavaScript:
<my-element> <template shadowroot="open"> <p>This will render in the Shadow DOM.</p> </template> </my-element> <script> customElements.define('my-element', class extends HTMLElement constructor() super(); // attaches a shadow root node this.attachShadow(mode: "open"); // inserts a slot into the template this.shadowRoot.innerHTML = '<slot></slot>'; ); </script>
Another example:
<my-status>available</my-status> <script> customElements.define('my-status', class extends HTMLElement constructor() super(); this.attachShadow(mode: "open"); this.shadowRoot.innerHTML = '<p>This item is currently: <slot></slot></p>'; ); </script>
So, is it better to be declarative or imperative? Like the weather where I live, it just depends.
Both approaches have their benefits.
We can set the shadow mode via Javascript as well:
// open this.attachShadow(mode: open); // closed this.attachShadow(mode: closed); // cloneable this.attachShadow(cloneable: true); // delegateFocus this.attachShadow(delegatesFocus: true); // serialized this.attachShadow(serializable: true); // Manually assign an element to a slot this.attachShadow(slotAssignment: "manual");
About that last one, it says we have to manually insert the <slot> elements in JavaScript:
<my-element> <p>This WILL render in shadow DOM but not automatically.</p> </my-element> <script> customElements.define('my-element', class extends HTMLElement constructor() super(); this.attachShadow( mode: "open", slotAssignment: "manual" ); this.shadowRoot.innerHTML = '<slot></slot>'; connectedCallback() const slotElem = this.querySelector('p'); this.shadowRoot.querySelector('slot').assign(slotElem); ); </script>
Examples
Scott spent a great deal of time sharing examples that demonstrate different sorts of things you might want to do with the Shadow DOM when working with web components. I’ll rapid-fire those in here.
Get an array of element nodes in a slot
this.shadowRoot.querySelector('slot') .assignedElements(); // get an array of all nodes in a slot, text too this.shadowRoot.querySelector('slot') .assignedNodes();
When did a slot’s nodes change?
let slot = document.querySelector('div') .shadowRoot.querySelector("slot"); slot.addEventListener("slotchange", (e) => console.log(`Slot "$slot.name" changed`); // > Slot "saying" changed )
Combining imperative Shadow DOM with templates
Back to this example:
<my-status>available</my-status> <script> customElements.define('my-status', class extends HTMLElement constructor() super(); this.attachShadow(mode: "open"); this.shadowRoot.innerHTML = '<p>This item is currently: <slot></slot></p>'; ); </script>
Let’s get that string out of our JavaScript with reusable imperative shadow HTML:
<my-status>available</my-status> <template id="my-status"> <p>This item is currently: <slot></slot> </p> </template> <script> customElements.define('my-status', class extends HTMLElement constructor() super(); this.attachShadow(mode: 'open'); const template = document.getElementById('my-status'); this.shadowRoot.append(template.content.cloneNode(true)); ); </script>
Slightly better as it grabs the component’s name programmatically to prevent name collisions:
<my-status>available</my-status> <template id="my-status"> <p>This item is currently: <slot></slot> </p> </template> <script> customElements.define('my-status', class extends HTMLElement constructor() super(); this.attachShadow(mode: 'open'); const template = document.getElementById( this.nodeName.toLowerCase() ); this.shadowRoot.append(template.content.cloneNode(true)); ); </script>
Forms with Shadow DOM
Long story, cut short: maybe don’t create custom form controls as web components. We get a lot of free features and functionalities — including accessibility — with native form controls that we have to recreate from scratch if we decide to roll our own.
In the case of forms, one of the oddities of encapsulation is that form submissions are not automatically connected. Let’s look at a broken form that contains a web component for a custom input:
<form> <my-input> <template shadowrootmode="open"> <label> <slot></slot> <input type="text" name="your-name"> </label> </template> Type your name! </my-input> <label><input type="checkbox" name="remember">Remember Me</label> <button>Submit</button> </form> <script> document.forms[0].addEventListener('input', function() let data = new FormData(this); console.log(new URLSearchParams(data).toString()); ); </script>
This input’s value won’t be in the submission! Also, form validation and states are not communicated in the Shadow DOM. Similar connectivity issues with accessibility, where the shadow boundary can interfere with ARIA. For example, IDs are local to the Shadow DOM. Consider how much you really need the Shadow DOM when working with forms.
Element internals
The moral of the last section is to tread carefully when creating your own web components for form controls. Scott suggests avoiding that altogether, but he continued to demonstrate how we could theoretically fix functional and accessibility issues using element internals.
Let’s start with an input value that will be included in the form submission.
<form> <my-input name="name"></my-input> <button>Submit</button> </form>
Now let’s slot this imperatively:
<script> customElements.define('my-input', class extends HTMLElement constructor() super(); this.attachShadow(mode: 'open'); this.shadowRoot.innerHTML = '<label><slot></slot><input type="text"></label>' ); </script>
The value is not communicated yet. We’ll add a static formAssociated variable with internals attached:
<script> customElements.define('my-input', class extends HTMLElement static formAssociated = true; constructor() super(); this.attachShadow(mode: 'open'); this.shadowRoot.innerHTML = '<label><slot></slot><input type="text"></label>' this.internals = this.attachedInternals(); ); </script>
Then we’ll set the form value as part of the internals when the input’s value changes:
<script> customElements.define('my-input', class extends HTMLElement static formAssociated = true; constructor() super(); this.attachShadow(mode: 'open'); this.shadowRoot.innerHTML = '<label><slot></slot><input type="text"></label>' this.internals = this.attachedInternals(); this.addEventListener('input', () => this-internals.setFormValue(this.shadowRoot.querySelector('input').value); ); ); </script>
Here’s how we set states with element internals:
// add a checked state this.internals.states.add("checked"); // remove a checked state this.internals.states.delete("checked");
Let’s toggle a “add” or “delete” a boolean state:
<form> <my-check name="remember">Remember Me?</my-check> </form> <script> customElements.define('my-check', class extends HTMLElement static formAssociated = true; constructor() super(); this.attachShadow(mode: 'open'); this.shadowRoot.innerHTML = '<slot></slot>'; this.internals = this.attachInternals(); let addDelete = false; this.addEventListener("click", ()=> addDelete = !addDelete; this.internals.states[addDelete ? "add" : "delete"]("checked"); ); ); </script>
Let’s refactor this for ARIA improvements:
<form> <style> my-check display: inline-block; inline-size: 1em; block-size: 1em; background: #eee; my-check:state(checked)::before content: "[x]"; </style> <my-check name="remember" id="remember"></my-check><label for="remember">Remember Me?</label> </form> <script> customElements.define('my-check', class extends HTMLElement static formAssociated = true; constructor() super(); this.attachShadow(mode: 'open'); this.internals = this.attachInternals(); this.internals.role = 'checkbox'; this.setAttribute('tabindex', '0'); let addDelete = false; this.addEventListener("click", ()=> addDelete = !addDelete; this.internals.states[addDelete ? "add" : "delete"]("checked"); this[addDelete ? "setAttribute" : "removeAttribute"]("aria-checked", true); ); ); </script>
Phew, that’s a lot of work! And sure, this gets us a lot closer to a more functional and accessible custom form input, but there’s still a long way’s to go to achieve what we already get for free from using native form controls. Always question whether you can rely on a light DOM form instead.
Chapter 5: Styling Web Components
Styling web components comes in levels of complexity. For example, we don’t need any JavaScript at all to slap a few styles on a custom element.
<my-element theme="suave" class="priority"> <h1>I'm in the Light DOM!</h1> </my-element> <style> /* Element, class, attribute, and complex selectors all work. */ my-element display: block; /* custom elements are inline by default */ .my-element[theme=suave] color: #fff; .my-element.priority background: purple; .my-element h1 font-size: 3rem; </style>
This is not encapsulated! This is scoped off of a single element just light any other CSS in the Light DOM.
Changing the Shadow DOM mode from closed to open doesn’t change CSS. It allows JavaScript to pierce the Shadow DOM but CSS isn’t affected.
Let’s poke at it
<style> p color: red; </style> <p>Hi</p> <div> <template shadowrootmode="open"> <p>Hi</p> </template> </div> <p>Hi</p>
This is three stacked paragraphs, the second of which is in the shadow root.
The first and third paragraphs are red; the second is not styled because it is in a <template>, even if the shadow root’s mode is set to open.
Let’s poke at it from the other direction:
<style> p color: red; </style> <p>Hi</p> <div> <template shadowrootmode="open"> <style> p color: blue; </style> <p>Hi</p> </template> </div> <p>Hi</p>
The first and third paragraphs are still receiving the red color from the Light DOM’s CSS.
The <style> declarations in the <template> are encapsulated and do not leak out to the other paragraphs, even though it is declared later in the cascade.
Same idea, but setting the color on the <body>:
<style> body color: red; </style> <p>Hi</p> <div> <template shadowrootmode="open"> <p>Hi</p> </template> </div> <p>Hi</p>
Everything is red! This isn’t a bug. Inheritable styles do pass through the Shadow DOM barrier.
Inherited styles are those that are set by the computed values of their parent styles. Many properties are inheritable, including color. The <body> is the parent and everything in it is a child that inherits these styles, including custom elements.
Let’s fight with inheritance
We can target the paragraph in the <template> style block to override the styles set on the <body>. Those won’t leak back to the other paragraphs.
<style> body color: red; font-family: fantasy; font-size: 2em; </style> <p>Hi</p> <div> <template shadowrootmode="open"> <style> /* reset the light dom styles */ p color: initial; font-family: initial; font-size: initial; </style> <p>Hi</p> </template> </div> <p>Hi</p>
This is protected, but the problem here is that it’s still possible for a new role or property to be introduced that passes along inherited styles that we haven’t thought to reset.
Perhaps we could use all: initital as a defensive strategy against future inheritable styles. But what if we add more elements to the custom element? It’s a constant fight.
Host styles!
We can scope things to the shadow root’s :host selector to keep things protected.
<style> body color: red; font-family: fantasy; font-size: 2em; </style> <p>Hi</p> <div> <template shadowrootmode="open"> <style> /* reset the light dom styles */ :host all: initial; </style> <p>Hi</p> <a href="#">Click me</a> </template> </div> <p>Hi</p>
New problem! What if the Light DOM styles are scoped to the universal selector instead?
<style> * color: red; font-family: fantasy; font-size: 2em; </style> <p>Hi</p> <div> <template shadowrootmode="open"> <style> /* reset the light dom styles */ :host all: initial; </style> <p>Hi</p> <a href="#">Click me</a> </template> </div> <p>Hi</p>
This breaks the custom element’s styles. But that’s because Shadow DOM styles are applied before Light DOM styles. The styles scoped to the universal selector are simply applied after the :host styles, which overrides what we have in the shadow root. So, we’re still locked in a brutal fight over inheritance and need stronger specificity.
According to Scott, !important is one of the only ways we have to apply brute force to protect our custom elements from outside styles leaking in. The keyword gets a bad rap — and rightfully so in the vast majority of cases — but this is a case where it works well and using it is an encouraged practice. It’s not like it has an impact on the styles outside the custom element, anyway.
<style> * color: red; font-family: fantasy; font-size: 2em; </style> <p>Hi</p> <div> <template shadowrootmode="open"> <style> /* reset the light dom styles */ :host all: initial; !important </style> <p>Hi</p> <a href="#">Click me</a> </template> </div> <p>Hi</p>
Special selectors
There are some useful selectors we have to look at components from the outside, looking in.
:host()
We just looked at this! But note how it is a function in addition to being a pseudo-selector. It’s sort of a parent selector in the sense that we can pass in the <div> that contains the <template> and that becomes the scoping context for the entire selector, meaning the !important keyword is no longer needed.
<style> * color: red; font-family: fantasy; font-size: 2em; </style> <p>Hi</p> <div> <template shadowrootmode="open"> <style> /* reset the light dom styles */ :host(div) all: initial; </style> <p>Hi</p> <a href="#">Click me</a> </template> </div> <p>Hi</p>
:host-context()
<header> <my-element> <template shadowrootmode="open"> <style> :host-context(header) ... /* matches the host! */ </style> </template> </my-element> </header>
This targets the shadow host but only if the provided selector is a parent node anywhere up the tree. This is super helpful for styling custom elements where the layout context might change, say, from being contained in an <article> versus being contained in a <header>.
:defined
Defining an element occurs when it is created, and this pseudo-selector is how we can select the element in that initially-defined state. I imagine this is mostly useful for when a custom element is defined imperatively in JavaScript so that we can target the very moment that the element is constructed, and then set styles right then and there.
<style> simple-custom:defined display: block; background: green; color: #fff; </style> <simple-custom></simple-custom> <script> customElements.define('simple-custom', class extends HTMLElement constructor() super(); this.attachShadow(mode: 'open'); this.shadowRoot.innerHTML = "<p>Defined!</p>"; ); </script>
Minor note about protecting against a flash of unstyled content (FOUC)… or unstyled element in this case. Some elements are effectively useless until JavsScript has interacted with it to generate content. For example, an empty custom element that only becomes meaningful once JavaScript runs and generates content. Here’s how we can prevent the inevitable flash that happens after the content is generated:
<style> js-dependent-element:not(:defined) visibility: hidden; </style> <js-dependent-element></js-dependent-element>
Warning zone! It’s best for elements that are empty and not yet defined. If you’re working with a meaningful element up-front, then it’s best to style as much as you can up-front.
Styling slots
This does not style the paragraph green as you might expect:
<div> <template shadowrootmode="open"> <style> p color: green; </style> <slot></slot> </template> <p>Slotted Element</p> </div>
The Shadow DOM cannot style this content directly. The styles would apply to a paragraph in the <template> that gets rendered in the Light DOM, but it cannot style it when it is slotted into the <template>.
Slots are part of the Light DOM. So, this works:
<style> p color: green; </style> <div> <template shadowrootmode="open"> <slot></slot> </template> <p>Slotted Element</p> </div>
This means that slots are easier to target when it comes to piercing the shadow root with styles, making them a great method of progressive style enhancement.
We have another special selected, the ::slotted() pseudo-element that’s also a function. We pass it an element or class and that allows us to select elements from within the shadow root.
<div> <template shadowrootmode="open"> <style> ::slotted(p) color: red; </style> <slot></slot> </template> <p>Slotted Element</p> </div>
Unfortunately, ::slotted() is a weak selected when compared to global selectors. So, if we were to make this a little more complicated by introducing an outside inheritable style, then we’d be hosed again.
<style> /* global paragraph style... */ p color: green; </style> <div> <template shadowrootmode="open"> <style> /* ...overrides the slotted style */ ::slotted(p) color: red; </style> <slot></slot> </template> <p>Slotted Element</p> </div>
This is another place where !important could make sense. It even wins if the global style is also set to !important. We could get more defensive and pass the universal selector to ::slotted and set everything back to its initial value so that all slotted content is encapsulated from outside styles leaking in.
<style> /* global paragraph style... */ p color: green; </style> <div> <template shadowrootmode="open"> <style> /* ...can't override this important statement */ ::slotted(*) all: initial !important; </style> <slot></slot> </template> <p>Slotted Element</p> </div>
Styling :parts
A part is a way of offering up Shadow DOM elements to the parent document for styling. Let’s add a part to a custom element:
<div> <template shadowrootmode="open"> <p part="hi">Hi there, I'm a part!</p> </template> </div>
Without the part attribute, there is no way to write styles that reach the paragraph. But with it, the part is exposed as something that can be styled.
<style> ::part(hi) color: green; ::part(hi) b color: green; /* nope! */ </style> <div> <template shadowrootmode="open"> <p part="hi">Hi there, I'm a <b>part</b>!</p> </template> </div>
We can use this to expose specific “parts” of the custom element that are open to outside styling, which is almost like establishing a styling API with specifications for what can and can’t be styled. Just note that ::part cannot be used as part of a complex selector, like a descendant selector:
A bit in the weeds here, but we can export parts in the sense that we can nest elements within elements within elements, and so on. This way, we include parts within elements.
<my-component> <!-- exposes three parts to the nested component --> <nested-component exportparts="part1, part2, part5"></nested-component> </my-component>
Styling states and validity
We discussed this when going over element internals in the chapter about the Shadow DOM. But it’s worth revisiting that now that we’re specifically talking about styling. We have a :state pseudo-function that accepts our defined states.
<script> this.internals.states.add("checked"); </script> <style> my-checkbox:state(checked) /* ... */ </style>
We also have access to the :invalid pseudo-class.
Cross-barrier custom properties
<style> :root --text-primary: navy; --bg-primary: #abe1e1; --padding: 1.5em 1em; p color: var(--text-primary); background: var(--bg-primary); padding: var(--padding); </style>
Custom properties cross the Shadow DOM barrier!
<my-elem></my-elem> <script> customElements.define('my-elem', class extends HTMLElement constructor() super(); this.attachShadow(mode: 'open'); this.shadowRoot.innerHTML = ` <style> p color: var(--text-primary); background: var(--bg-primary); padding: var(--padding); </style> <p>Hi there!</p>`; ) </script>
Adding stylesheets to custom elements
There’s the classic ol’ external <link> way of going about it:
<simple-custom> <template shadowrootmode="open"> <link rel="stylesheet" href="../../assets/external.css"> <p>This one's in the shadow Dom.</p> <slot></slot> </template> <p>Slotted <b>Element</b></p> </simple-custom>
It might seem like an anti-DRY approach to call the same external stylesheet at the top of all web components. To be clear, yes, it is repetitive — but only as far as writing it. Once the sheet has been downloaded once, it is available across the board without any additional requests, so we’re still technically dry in the sense of performance.
CSS imports also work:
<style> @import url("../../assets/external.css"); </style> <simple-custom> <template shadowrootmode="open"> <style> @import url("../../assets/external.css"); </style> <p>This one's in the shadow Dom.</p> <slot></slot> </template> <p>Slotted <b>Element</b></p> </simple-custom>
One more way using a JavaScript-based approach. It’s probably better to make CSS work without a JavaScript dependency, but it’s still a valid option.
<my-elem></my-elem> <script type="module"> import sheet from '../../assets/external.css' with type: 'css' ; customElements.define('my-elem', class extends HTMLElement constructor() super(); this.attachShadow(mode: 'open'); this.shadowRoot.innerHTML = '<p>Hi there</p>'; this.shadowRoot.adoptedStyleSheets = [sheet]; ) </script>
We have a JavaScript module and import CSS into a string that is then adopted by the shadow root using shadowRoort.adoptedStyleSheets . And since adopted stylesheets are dynamic, we can construct one, share it across multiple instances, and update styles via the CSSOM that ripple across the board to all components that adopt it.
Container queries!
Container queries are nice to pair with components, as custom elements and web components are containers and we can query them and adjust things as the container changes.
<div> <template shadowrootmode="open"> <style> :host container-type: inline-size; background-color: tan; display: block; padding: 2em; ul display: block; list-style: none; margin: 0; li padding: .5em; margin: .5em 0; background-color: #fff; @container (min-width: 50em) ul display: flex; justify-content: space-between; gap: 1em; li flex: 1 1 auto; </style> <ul> <li>First Item</li> <li>Second Item</li> </ul> </template> </div>
In this example, we’re setting styles on the :host() to define a new container, as well as some general styles that are protected and scoped to the shadow root. From there, we introduce a container query that updates the unordered list’s layout when the custom element is at least 50em wide.
Next up…
How web component features are used together!
Chapter 6: HTML-First Patterns
In this chapter, Scott focuses on how other people are using web components in the wild and highlights a few of the more interesting and smart patterns he’s seen.
Let’s start with a typical counter
It’s often the very first example used in React tutorials.
<counter-element></counter-element> <script type="module"> customElements.define('counter-element', class extends HTMLElement #count = 0; connectedCallback() this.innerHTML = `<button id="dec">-</button><p id="count">$this.#count</p><button id="inc">+</button>`; this.addEventListener('click', e => this.update(e) ); update(e) if( e.target.nodeName !== 'BUTTON' ) return this.#count = e.target.id === 'inc' ? this.#count + 1 : this.#count - 1; this.querySelector('#count').textContent = this.#count; ); </script>
Reef
Reef is a tiny library by Chris Ferdinandi that weighs just 2.6KB minified and zipped yet still provides DOM diffing for reactive state-based UIs like React, which weighs significantly more. An example of how it works in a standalone way:
<div id="greeting"></div> <script type="module"> import signal, component from '.../reef.es..min.js'; // Create a signal let data = signal( greeting: 'Hello', name: 'World' ); component('#greeting', () => `<p>$data.greeting, $data.name!</p>`); </script>
This sets up a “signal” that is basically a live-update object, then calls the component() method to select where we want to make the update, and it injects a template literal in there that passes in the variables with the markup we want.
So, for example, we can update those values on setTimeout:
<div id="greeting"></div> <script type="module"> import signal, component from '.../reef.es..min.js'; // Create a signal let data = signal( greeting: 'Hello', name: 'World' ); component('#greeting', () => `<p>$data.greeting, $data.name!</p>`); setTimeout(() => data.greeting = '¡Hola' data,name = 'Scott' , 3000) </script>
We can combine this sort of library with a web component. Here, Scott imports Reef and constructs the data outside the component so that it’s like the application state:
<my-greeting></my-greeting> <script type="module"> import signal, component from 'https://cdn.jsdelivr.net/npm/reefjs@13/dist/reef.es.min.js'; window.data = signal( greeting: 'Hi', name: 'Scott' ); customElements.define('my-greeting', class extends HTMLElement connectedCallback() component(this, () => `<p>$data.greeting, $data.name!</p>` ); ); </script>
It’s the virtual DOM in a web component! Another approach that is more reactive in the sense that it watches for changes in attributes and then updates the application state in response which, in turn, updates the greeting.
<my-greeting greeting="Hi" name="Scott"></my-greeting> <script type="module"> import signal, component from 'https://cdn.jsdelivr.net/npm/reefjs@13/dist/reef.es.min.js'; customElements.define('my-greeting', class extends HTMLElement static observedAttributes = ["name", "greeting"]; constructor() super(); this.data = signal( greeting: '', name: '' ); attributeChangedCallback(name, oldValue, newValue) this.data[name] = newValue; connectedCallback() component(this, () => `<p>$this.data.greeting, $this.data.name!</p>` ); ); </script>
If the attribute changes, it only changes that instance. The data is registered at the time the component is constructed and we’re only changing string attributes rather than objects with properties.
HTML Web Components
This describes web components that are not empty by default like this:
<my-greeting></my-greeting>
This is a “React” mindset where all the functionality, content, and behavior comes from JavaScript. But Scott reminds us that web components are pretty useful right out of the box without JavaScript. So, ��HTML web components” refers to web components that are packed with meaningful content right out of the gate and Scott points to Jeremy Keith’s 2023 article coining the term.
[…] we could call them “HTML web components.” If your custom element is empty, it’s not an HTML web component. But if you’re using a custom element to extend existing markup, that’s an HTML web component.
Jeremy cites something Robin Rendle mused about the distinction:
[…] I’ve started to come around and see Web Components as filling in the blanks of what we can do with hypertext: they’re really just small, reusable chunks of code that extends the language of HTML.
The “React” way:
<UserAvatar src="https://example.com/path/to/img.jpg" alt="..." />
The props look like HTML but they’re not. Instead, the props provide information used to completely swap out the <UserAvatar /> tag with the JavaScript-based markup.
Web components can do that, too:
<user-avatar src="https://example.com/path/to/img.jpg" alt="..." ></user-avatar>
Same deal, real HTML. Progressive enhancement is at the heart of an HTML web component mindset. Here’s how that web component might work:
class UserAvatar extends HTMLElement connectedCallback() const src = this.getAttribute("src"); const name = this.getAttribute("name"); this.innerHTML = ` <div> <img src="$src" alt="Profile photo of $name" width="32" height="32" /> <!-- Markup for the tooltip --> </div> `; customElements.define('user-avatar', UserAvatar);
But a better starting point would be to include the <img> directly in the component so that the markup is immediately available:
<user-avatar> <img src="https://example.com/path/to/img.jpg" alt="..." /> </user-avatar>
This way, the image is downloaded and ready before JavaScript even loads on the page. Strive for augmentation over replacement!
resizeasaurus
This helps developers test responsive component layouts, particularly ones that use container queries.
<resize-asaurus> Drop any HTML in here to test. </resize-asaurus> <!-- for example: --> <resize-asaurus> <div class="my-responsive-grid"> <div>Cell 1</div> <div>Cell 2</div> <div>Cell 3</div> <!-- ... --> </div> </resize-asaurus>
lite-youtube-embed
This is like embedding a YouTube video, but without bringing along all the baggage that YouTube packs into a typical embed snippet.
<lite-youtube videoid="ogYfd705cRs" style="background-image: url(...);"> <a href="https://youtube.com/watch?v=ogYfd705cRs" class="lyt-playbtn" title="Play Video"> <span class="lyt-visually-hidden">Play Video: Keynote (Google I/O '18)</span> </a> </lite-youtube> <link rel="stylesheet" href="./src.lite-yt-embed.css" /> <script src="./src.lite-yt-embed.js" defer></script>
It starts with a link which is a nice fallback if the video fails to load for whatever reason. When the script runs, the HTML is augmented to include the video <iframe>.
Chapter 7: Web Components Frameworks Tour
Lit
Lit extends the base class and then extends what that class provides, but you’re still working directly on top of web components. There are syntax shortcuts for common patterns and a more structured approach.
The package includes all this in about 5-7KB:
Fast templating
Reactive properties
Reactive update lifecycle
Scoped styles
<simple-greeting name="Geoff"></simple-greeting> <script> import html, css, LitElement from 'lit'; export class SimpleGreeting extends LitElement state styles = css`p color: blue `; static properties = name: type = String, ; constructor() super(); this.name = 'Somebody'; render() return html`<p>Hello, $this.name!</p>`; customElements.define('simple-greeting', SimpleGreeting); </script>
Pros Cons Ecosystem No official SSR story (but that is changing) Community Familiar ergonomics Lightweight Industry-proven
webc
This is part of the 11ty project. It allows you to define custom elements as files, writing everything as a single file component.
<!-- starting element / index.html --> <my-element></my-element> <!-- ../components/my-element.webc --> <p>This is inside the element</p> <style> /* etc. */ </style> <script> // etc. </script>
Pros Cons Community Geared toward SSG SSG progressive enhancement Still in early stages Single file component syntax Zach Leatherman!
Enhance
This is Scott’s favorite! It renders web components on the server. Web components can render based on application state per request. It’s a way to use custom elements on the server side.
Pros Cons Ergonomics Still in early stages Progressive enhancement Single file component syntax Full-stack stateful, dynamic SSR components
Chapter 8: Web Components Libraries Tour
This is a super short module simply highlighting a few of the more notable libraries for web components that are offered by third parties. Scott is quick to note that all of them are closer in spirit to a React-based approach where custom elements are more like replaced elements with very little meaningful markup to display up-front. That’s not to throw shade at the libraries, but rather to call out that there’s a cost when we require JavaScript to render meaningful content.
Spectrum
<sp-button variant="accent" href="components/button"> Use Spectrum Web Component buttons </sp-button>
This is Adobe’s design system.
One of the more ambitious projects, as it supports other frameworks like React
Open source
Built on Lit
Most components are not exactly HTML-first. The pattern is closer to replaced elements. There’s plenty of complexity, but that makes sense for a system that drives an application like Photoshop and is meant to drop into any project. But still, there is a cost when it comes to delivering meaningful content to users up-front. An all-or-nothing approach like this might be too stark for a small website project.
FAST
<fast-checkbox>Checkbox</fast-checkbox>
This is Microsoft’s system.
It’s philosophically like Spectrum where there’s very little meaningful HTML up-front.
Fluent is a library that extends the system for UI components.
Microsoft Edge rebuilt the browser’s Chrome using these components.
Shoelace
<sl-button>Click Me</sl-button>
Purely meant for third-party developers to use in their projects
The name is a play on Bootstrap. 🙂
The markup is mostly a custom element with some text in it rather than a pure HTML-first approach.
Acquired by Font Awesome and they are creating Web Awesome Components as a new era of Shoelace that is subscription-based
Chapter 9: What’s Next With Web Components
Scott covers what the future holds for web components as far as he is aware.
Declarative custom elements
Define an element in HTML alone that can be used time and again with a simpler syntax. There’s a GitHub issue that explains the idea, and Zach Leatherman has a great write-up as well.
Cross-root ARIA
Make it easier to pair custom elements with other elements in the Light DOM as well as other custom elements through ARIA.
Container Queries
How can we use container queries without needing an extra wrapper around the custom element?
HTML Modules
This was one of the web components’ core features but was removed at some point. They can define HTML in an external place that could be used over and over.
External styling
This is also known as “open styling.”
DOM Parts
This would be a templating feature that allows for JSX-string-literal-like syntax where variables inject data.
<section> <h1 id="name">name</h1> Email: <a id="link" href="mailto:email">email</a> </section>
And the application has produced a template with the following content:
<template> <section> <h1 id="name"></h1> Email: <a id="link" href=""></a> </section> </template>
Scoped element registries
Using variations of the same web component without name collisions.
#:not#2023#Accessibility#ADD#adobe#amp#animation#API#approach#aria#Article#assets#attributes#author#avatar#background#background-image#barrier#bass#Behavior#Blue#board#Bootstrap#box#browser#bug#buttons#cascade#cdn#cell
0 notes
Text
How to Learn JavaScript Fast in 2025

Introduction
How to Learn JavaScript Fast in 2025 is a question many aspiring web developers and tech enthusiasts are asking. Starting in 2025, JavaScript is ranked as one of the most sought-after programming languages. Whether you're an aspiring web developer or a technophile wanting to improve your tech skills, learning JavaScript opens the door to many opportunities.
But the big question: can anyone learn JavaScript in a short time? Yes, but that is only possible with the right approach.
Several tips and techniques will be discussed in this guide to learn JavaScript fast and effectively.
Understanding the Basics
What Is JavaScript?
JavaScript is a high-level and versatile programming language primarily used to create interactive web applications. It controls dynamic content, animations, form validations, and even back-end full-stack applications.
Why Is JavaScript Essential in Modern Web Development?
JavaScript plays a very pivotal role between small personal blogs and large-scale web applications. It almost feels like every website you come across utilizes JavaScript to some extent in enhancing user experience.
JavaScript versus Other Programming Languages
JavaScript, in comparison to Python or Java, has primarily been designed for front-end and full-stack web development. Convenient as it is for integration into HTML and CSS, JavaScript is widely embraced by developers all around.
Preparing to Conceive Your Learning
Choosing The Best Coding Environment
Great coding editors make code writing easier. Here are some of the popular choices:
VS Code (Most Highly Recommended)
Sublime Text
Atom
Installing Node.js and a Browser Console
On the one hand, installation of Node.js gives you an environment to run JavaScript outside the browser; on the other hand, browser-based developer tools (Chrome DevTools, Firefox DevTools) help with fast and efficient debugging of the JavaScript codes.
Online Platforms and Resources for Learning JavaScript
The foremost among many platforms to learn JavaScript are:
MDN Web Docs (Official documentation)
freeCodeCamp (Coding with hands-on exercises)
JavaScript.info (Written in a tutorial form with complete instructions)
Learning Core JavaScript Concepts
JavaScript Syntax and Fundamentals
You will need to learn all concerning the basic syntax in JavaScript. Start with:
Variables (var, let, const)
Data types (strings, numbers, booleans)
Operators (+, -, *, /, %)
Conditional statements (if, else, switch)
Functions & Scope
Functions are reusable blocks of code. For making finely tuned JavaScript programs, understanding function scope and closures are key.
JavaScript Objects and Arrays
JavaScript is an object-oriented language designed to store and manipulate data efficiently. Learn-how to:
Create and modify objects
Use important methods of arrays such as map(), filter(), and reduce()
Further Adventures with JavaScript
dom manipulation
The Document Object Model (DOM) allows JavaScript to perform dynamic manipulations on HTML elements. Learn how to:
Select elements (document.querySelector())
Modify content (innerHTML, textContent)
Events and Event Listeners
Event listeners are responsible for detecting user interactions, from mouse clicks to keyboard input.
For example
Asynchronous JavaScript
Understanding callbacks, promises, and async/await is imperative in making API requests and non-blocking code execution.
Advanced And Interesting Topics In JavaScript
Some of the modern JavaScript topics near and dear to programmers illustrious in the web development realm encompass:
ES6 and Beyond (Arrow Functions, Template Literals, and Destructuring)
Frameworks and Libraries (React, Vue, Angular)
Working With APIs and JSON (Fetching data from external)
Best Way to Practice JavaScript
Develop projects such as a to-do, weather app, calculator
Practice JavaScript coding challenges on LeetCode, CodeWars, HackerRank
Contribute to open-source projects on GitHub
In What Ways TCCI Can Help You to Learn JavaScript Quickly
TCCI Computer Coaching Institute, offers:
JavaScript training from industry experts
Real-world project-oriented learning
Flexible schedule with online and offline classes
Mistakes to Avoid While Trying to Learn JavaScript
Not learning the fundamentals
Not writing enough code
Getting stuck in tutorial hell
How to Learn JavaScript Fast
Have a clear roadmap that you will follow
Learn by building, not just reading
Get engaged in coding communities and mentorship programs
Conclusion
JavaScript was fast learning in 2025; this is possible with a solid approach. Basics, constant practicing, building real projects- be it your career or personal interest, JavaScript is an important skill to have.
Location: Ahmedabad, Gujarat
Call now on +91 9825618292
Get information from https://tccicomputercoaching.wordpress.com/
#Best Computer Training Institute Bopal Ahmedabad#Computer classes near me#JavaScript training Ahmedabad#Learn JavaScript fast 2025#TCCI - Tririd Computer Coaching Institute
0 notes