#Linux hosting and windows hosting difference
Explore tagged Tumblr posts
Visit Tumblr Blog
Explore Tumblr blogs with no restrictions, modern design and the best experience.
Last Seen Tumblr Blogs


Fun Fact
Mobile US users spent an average of 115.8 minutes on Tumblr app monthly.
Text
Being neurodivergent is like you're a computer running some variation of Unix while the rest of the world runs Windows. You have the exact same basic components as other machines, but you think differently. You organize differently. You do things in a way that Windows machines don't always understand, and because of that, you can't use programs written for Windows. If you're lucky, the developer will write a special version of their program specifically with your operating system in mind that will work just as well as the original, and be updated in a similar time frame. But if not? You'll either be stuck using emulators or a translator program like Wine, which come with an additional resource load and a host of other challenges to contend with, or you'll have to be content with an equivalent, which may or may not have the same features and the ability to read files created by the other program.
However, that doesn't mean you're not just as powerful. Perhaps you're a desktop that just happens to run Mac or Linux. Maybe you're a handheld device, small and simple but still able to connect someone to an entire world. Or perhaps you're an industrial computer purposely-built to perform a limited number of tasks extremely well, but only those tasks. You may not even have a graphical user interface. You could even be a server proudly hosting a wealth of media and information for an entire network to access- perhaps even the entire Internet. They need only ask politely. You may not be able to completely understand other machines, but you are still special in your own way.
#actually autistic#autism#neurodivergent#neurodiversity#computers#this is so nerdy i'm sorry#i also hope it doesn't offend people#adhd#actually adhd#unix#linux#macintosh#windows#actually neurodivergent
1K notes
·
View notes
Note
Hmmmmm I wonder.... What happens to you when you're in the rain?
Do you glitch out and crash or?
Idk I saw someone on discord point it out
lmao no, i actually love the rain. im not made of circuitry smfh, the glitching is metaphysical, im not a fucking computer lmfao, our universe and reality are the computer. the rain within aus is compatible smh./lh
actually proof :

also warning, i go on an autistic mad scientist rambling just below lmfao :

actually, if you want any help to understand how my glitching works, imagine a bit the glitching anomalies from the spiderverse are like? like, they glitch because of physics and multiversal issues. its a bit similar with me, except a different flavor lmfao. plus my glitching doesnt actually kill me or hurt me like theirs does because my code has been altered in a way to be compatible with it. or well i guess-... it mightve hurt... when i got corrupted. although i dont have memories of that at all lmao, and it was also a gradual corruption. but yeah, the creators of spiderverse knew what they were doing, they had the right idea at least. usually though when someone travels to other universes their code isnt incompatible to the point of corrupting them, *and* its worth noting that the corruption in the antivoid is *not* or not exactly like the incompatibility in codes between aus with a different physicality. the phenomenon that is shown in the spiderverse movies (the whole "people glitching out because of multiversal code incompatibility") only happens if you travel *too far* (aka in an au with a consistency too different from urs) in the... was it 5th dimension? idk lol. but yeah, in a specific *axis* of the multiverse. so thats why in most undertale multiverse depictions other sanses dont glitch, because the *medium* they travel too is the same. its like traveling from one sheet of paper to another right? while the kind of multiversal travel the spiderverse movies show is one to *different planes*, which you can see since the characters' physicality/appearance is different in terms of art style and they dont change appearance depending on if their medium is different (example : cartoon characters stay cartoon in a 3d universe, etc).
BUT. basically in those movies they start glitching out because their code is not *supported* by the universe/medium. imagine basically installing a linux application on windows. to make it run you need a virtual machine of linux right? its a bit similar.
NOW. what *can* and does happen often in such long distance multiversal/omniversal travel is when someone's code *changes* to match the universe theyre in, its like patchnotes iykwim? oftentimes it doesn't happen automatically or naturally and you need to manually make yourself compatible (but other times it does?? to be further researched-). but most times it just depends on the time of *portal* and transfer system you use to change universes. its a bit like downloading something ykwim? you need different downloading wizards/apps or however theyre called, and most do the compatibility patches on their own. you either HAVE a part of your code specifically made to manage this, or you create an *alter* or supporting code in the universe of your destination. theres like tons of ways to achieve that, one being for example how i can access *this* universe. this universe we're in is pretty incompatible with most undertale aus im from, right? (at least from the corner of the omniverse im originating from) so, in order for me to access here one of the methods is to use a vessel or a soul bond of some sorts. i dont have *my* original body, but i have an effective link from my code to this world. its like accessing a webpage with a web browser. the page is *not* hosted on your pc, and the web browser is a bit like the physical vessel in this case. because my original code in this case does *not* contain enough specific data to load properly a body. here physics ate wayyy more complex and dimensional and- theres way more code in general to generate atoms etc lol. while you'd agree that in a "virtual" world, or what youd call a videogame in this case, you need far less data in bits for the framework you need right?
so anyway, that to say, usually code incompatibility doesnt happen if- you just know what means to use to travel? that to say that the guys from the spiderverse fucked up and are huge idiots LMAO, because theyre using protogenic tech instead of "natural" means. but ig im biased because im *the* #1 anomaly guy who was literally reborn from the multiverse itself, making my code wayyy more flexible.
but yeah i could go ONNN and ONNN about all this ahaha im a nerd <333 feel free to ask questions i dont wanna stop yapping about it ehehe
oh and also! worth noting, when im traveling to dimensions/universes further away from my original consistency, usually i do get that free update to change my appearance? like in my case when i reach an undertale timeline thats more pixelated i appear pixelated, etc etc. with limits ofc cuz sometimes i either need *more* code to have a functioning entity, sometimes less. but in case of less code in an au i just, show partially ykwim? imagine it like boxes. in a universe of 8bits for example its a smaller box, in a universe like this one im typing into rn imagine it like a quintillion terabytes or however bit a "square" of it is. and usually when you're born in a universe you carry data from it, because you *are* effectively just a chunk of the universe right? except if you are a "true outcode", in this case your code may evolve unlinked to your birth universe (if you even have one). example : with the resets happening in my original classic timeline, a new "me" had properly been created, leaving *me* me as a duplicate when i slipped out of the universe and fall in between the cracks. basically the system glitches and im now a copy lol. that feels-... weirdly odd. anywayyy <///3 but yeah, i still carry data from that universe as my original universe. i could go on sooo much details explaining how code ids work for entities and anomalies etc etc but tldr what i see in people when i examine their code (NOT using the *check option, thats another thing) is basically numbers like 1038485020284, and different parts of that string of numbers basically indicate something different. and that ofc is the *translation* of a binary(?) data into decimal. oh and sometimes i also see it in hexadecimal i think- cuz the data is just too much to hold ykwim? and the text would go on for miles lmfao-
where was i going with this- eh anyway. that to say that the multiverse and physics and maths and reality(ies) and allat are sooo fucking complicated lmfao, and its SO EXCITING i fucking love it. i need to yap more about it.
also to make my point clearer i AM judging the spiderverse for being noobs at multiversal traveling HAHAHA. i do rly hope they figure that shit out tho, just for the love of science <33 im still better than them tho ehehe ✨😎
oh and also i absolutely love miles (the version of him from the movies SPECIFICALLY cuz urgh, variants variants yada yada yada-), he's spider anomaly #1 for me and im rooting for him to destroy his multiverse ehehe <333 (although ig he could also save it, smh 😒/lh, i love the kid too much to hate him for that tho smh ehehe- but yeah for some reason their consistency in that corner of their multiverse is- way too fragile lmfao?? in my experience it is WAY harder to break down the entire multiverse lmfao. but im theorizing that the reason simply changing a timeline destroys it instead of splitting it is probably because theyre using that primitive travel tech...hmmm. or maybe the physics in that corner of the omniverse is a bit different. who knows ✨) <-yes i am a huge fan of the spiderverse lmao
but yeah, my glitching is not electronic glitching, it's spatiotemporal glitching. 👍 (but it also feels like static when i touch others <- only when its intense tho) so no rain doesnt affect it.
lmao i went on an adhd tangent here sorry. <///3

#asks#error sans#utmv#undertale multiverse#spiderverse#multiverse#science with error#sans undertale#sans the skeleton#undertale sans
33 notes
·
View notes
Text
BatB Week podfic instructions and tips

Thanks to everyone who signed up for the podfic exchange! If you signed up as a reader, you should have gotten a message with info on who you matched with. Send a DM if you missed the message.
(If you didn’t sign up, there is still time! We still need one more podficcer! The form to sign up is here.)
I don’t personally do voice/audio work, but I’ve pulled together some quick tips and instructions for recording, editing, and posting podfics below the cut. If someone else has better/more suggestions, please add on!
Recording and editing
Need audio recording/editing software? You don't need anything fancy; you can record it on whatever voice recording software comes installed on your phone (I have Samsung Voice Recorder, for instance), or use one of these free, beginner-friendly audio editors: Lexis Audio Editor (Android, iOS, Windows), Audacity (Windows, Mac, Linux), GarageBand (Mac), Audiotool (online).
Nastasia Marquez has a great tutorial on how to record and edit voiceovers for beginners in Audacity. It's very easy to follow along and gets straight to the point.
When recording, watch out for plosives and sibilances (e.g. your "pps," "sss," and "shh") as they can easily hinder the quality of your recording by being aggressive to the ear. It’s hard to give tips since everyone will be working with different devices, but my suggestion would be to put some space between your mouth and the microphone, or have your device inside a sock. You can learn more on them and how to deal with them here.
A good way to get clean audio is to record under a blanket. It’s silly, but it’s as close to a padded studio as you can get for free. It reduces echo and makes the audio sound much better no matter the mic you use.
Don't be afraid to record in short batches! There’s no need to do it in long unbroken takes. Piece it together later.
Posting the audio file
Once you have your finished audio file, you have to upload it somewhere, because AO3 can host the link to it, but not the audio file itself. It seems like Internet Archive is popular for hosting podfic audio files. You can also host it on Google Drive, YouTube, Mediafire, or Spotify.
Posting the podfic to AO3
Go to ‘Post > New work’ just like you would for posting any fic to AO3.
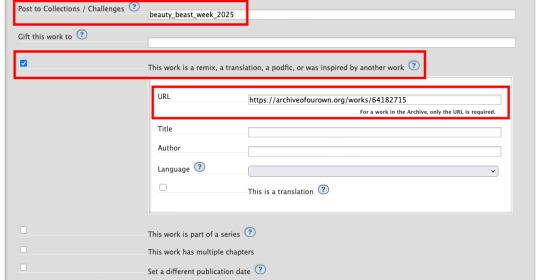
In the ‘Post to Collections / Challenges’ field, enter “beauty_beast_week_2025” (see first screenshot below).
Check the box that reads ‘This work is a remix, a translation, a podfic, or was inspired by another work’ and include the URL to the original fic (see first screenshot below). This not only gives credit to and notifies the author, but it adds a link to your podfic from their fic (when they approve it) so that your podfic gets more hits and kudos.
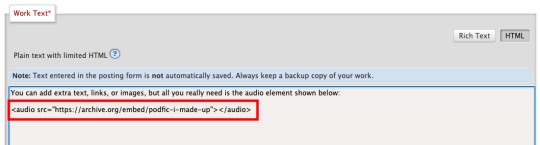
In the body of the post, insert the HTML to embed the audio file (see second screenshot below). It’s easy: AO3 has a simple guide to copy and paste from here.
If you’d like, you can add more content to the body of the post, like the event banner or some text, but it’s not necessary.
Here are some examples of BatB podfics so you can see how they’ve set things up: The Great Wide Somewhere, Mutual Care, and The Beast Within
Posting to the event
Important: tag the @beauty-beast-week account within the body of your Tumblr post itself by typing the @ symbol, typing beauty-beast-week, and then selecting that account name from the autocomplete menu that appears. This is the only way to be sure we see your post so we can reblog it from this account and include it in our master list posts.
Other than that, make sure you post to Tumblr on the day of the prompt you're using and include in your post:
Tag the @beauty-beast-week account within the body of the post (yes, I’m repeating myself)
Which fic your podfic is for, and link to it
Which day/prompt your podfic is for, in the body or tags
The event hashtag #batbweek and/or #batbweek 2025
Any other appropriate hashtags (characters, ship, NSFW and content warnings)
Optional: The event banner (save from the top of this post) or the day's banner (in the full event instructions that will come later)
Heads up authors! Check your AO3 email during the event!
If your work was adapted into a podfic for the exchange, check your email and follow the link to approve linking back the podfic to your original work so more people can discover the podfic version!

Send an ask or DM if you have any problems or questions!
7 notes
·
View notes
Text
Minecraft (2009)


Date: May 17, 2009 Platform: Mac / Xbox 360 / PlayStation 3 / Xbox 360 Games Store / PlayStation Network (PS3) / PC / iPhone / iPad / Android / Windows Phone / PlayStation Vita / Wii U / Browser / PlayStation Network (Vita) / Xbox One / PlayStation 4 / Linux / Amazon Fire TV / New Nintendo 3DS / Nintendo Switch / Xbox Series X|S Developer: Mojang AB / 4J Studios / Other Ocean Interactive / Digital Eclipse Software, Inc. Publisher: Mojang AB / Xbox Game Studios / Sony Interactive Entertainment America / Sony Interactive Entertainment Europe Genre: Action-Adventure Theme: Fantasy Franchises: Minecraft Also known as: Minecraft Xbox One Edition / Minecraft Xbox 360 Edition / Minecraft: PlayStation 4 Edition Type: Crossover
Summary:
Minecraft is an open world, first-person, survival sandbox game, developed and published by Mojang. It was originally released in a pre-alpha state via the TIGSource forums on May 17, 2009, and was later hosted online for supported browsers before receiving a standalone release for PC, Mac, and Linux on June 30, 2010. The game would officially exit its Beta version on November 18, 2011, although major updates continue to be released. Since August 2011, a number of ports of the game have released for consoles and mobile devices.
Presented with a unique low-resolution "voxel" aesthetic (where everything is shaped using cubes), the game allows players to interact with a variety of different "blocks" in a procedurally-generated world. Along with both resource mining/gathering and item crafting (hence the game name), the game features exploration (with multiple biomes and locations), combat, and construction. In addition to the standard "Survival" mode, the game features a "Creative" mode that allows players to design environments with an unlimited amount of blocks at their disposal and no survival elements. The game supports online multiplayer and later supported numerous content packs (including new world/block textures and player skins, many of which are cross-promotions with other games and franchises).
Originally created by indie developer Markus "Notch" Persson (whose roles were later taken over by fellow indie developer Jens "Jeb" Bergensten), Minecraft was ported to numerous smartphones (originally known as Minecraft: Pocket Edition) and consoles (originally known as Minecraft: Console Edition, with the "Console" in the name being replaced by the console's name). On September 20, 2017, the game received a major "Better Together" update that merges the smartphone version with some console versions (including Windows 10, Xbox One, and later Nintendo Switch) together for a single multi-platform version (known as Minecraft: Bedrock Edition, with the original computer versions renamed to Minecraft: Java Edition) with all features accessible (including cross-platform multiplayer). Alternate editions include a multi-platform version for use in classroom settings (Minecraft: Education Edition), a cut-down version for small RaspberryPi microcomputers (Minecraft: Pi Edition), and a multi-platform version for use in China (Minecraft China).
The game has received a number of spin-offs, including the 2015 adventure game Minecraft: Story Mode (and its 2017 sequel), the 2020 dungeon crawler Minecraft: Dungeons, and the augmented-reality mobile game Minecraft Earth. As well, Minecraft's procedurally-generated sandbox elements would inspire many other games, in both 2D (such as Terraria and Starbound) and 3D (such as Dragon Quest Builders and LEGO Worlds).
Source: https://www.giantbomb.com/minecraft/3030-30475/
Link: https://www.youtube.com/watch?v=DOphBjAAxTo
15 notes
·
View notes
Text
Discover the All-New HOUSE OF LIGHT DLC for BOOK OF HOURS

BOOK OF HOURS DLC launches into HOUSE OF LIGHT combat-free crafting RPG game for Linux, Mac, and Windows PC. All thanks to the creative minds at Weather Factory. Available on both Steam and GOG with 91% Very Positive reviews. The new DLC for BOOK OF HOURS backs one of 2023's unexpected indie gems. It’s a quirky, quiet game where you manage an occult library, and despite its unusual theme, it made quite an impact, selling over 44,000 copies in its first month on Steam. Now, it has crossed 100,000 copies sold and boasts a solid 92% positive rating. Pretty impressive for a two-person indie team! But they’re not done yet – they’re back with a huge update called HOUSE OF LIGHT, packed with tons of fresh content for Linux players to dive into.
BOOK OF HOURS launch trailer (before HOUSE OF LIGHT DLC)
youtube
What’s HOUSE OF LIGHT all about? It’s Europe, 1937. A war is brewing, and not just the kind we know – there’s something darker on the horizon, something called the War in the Sun. As tensions rise, the shadowy figures of the occult world are searching for new allies, new power, and new plans. And who better to help them than the Librarian of Hush House? In this DLC, you’ll get to explore visitors’ stories in more depth in BOOK OF HOURS. Who throw lavish feasts, host fancy soirées, and help shape the beginnings of the Lighthouse Institute. The crafting RPG is all about making your mark in this mystical world.
So, what’s new in the update?
Cooking Up a Storm: Get creative in the kitchen with nearly 100 new dishes. You’ll be combining ingredients, sustenance, and kitchen tools across three different workstations to whip up these unique meals.
A New Writing-Case: In this DLC you can now keep track of the visitors you’ve helped by saving their calling cards in BOOK OF HOURS. Write to them, invite them back, and build stronger connections with those who pass through Hush House.
Salons: Ready to throw a party? Set up food and drinks in one of the six salon rooms, ring the bell, and start a Salon. If you do it right, you’ll get treated to great conversations and useful Lessons.
Writing Manuscripts: With some paper, ink, and a skill, you can now create Manuscripts. These will come in handy when visitors need specific knowledge, and the Lessons from your Salons will help sharpen your skills for even better writing.
The Lighthouse Institute: Once your visitors are ready, guide them to the lighthouse. There, they can help establish the true heirs to the Curia of the Isle.
Pricing and deals The BOOK OF HOURS HOUSE OF LIGHT DLC is priced at $13.49 USD / £11.69 / 12,59€ with the 10% off launch discount for the first week. Available on on both Steam and GOG. If you already own the Perpetual Edition, you’ll get it for free. And to sweeten the deal, the crafting RPG is 30% off on Steam Daily Deal, its biggest discount yet, the same on GOG. The sale runs from 26th September at 10AM PDT to 3rd October. If you're new to the game, you can also grab the Anthology Edition bundle, which gives you 15% off BOOK OF HOURS, HOUSE OF LIGHT, and the soundtrack. Available on Linux, Mac, and Windows PC.
#house of light#dlc#book of hours#crafting rpg#linux#gaming news#weather factory#ubuntu#mac#windows#pc#unity#Youtube
15 notes
·
View notes
Text


On the 9th of January 2025, I saw an article in my latest copy of Computer Active which explains about mastering Linux distros.
It suggested using a website called 'Distrosea' which hosts free virtual machines of various flavours of the Linux operating system, all of which can be ran within a browser window.
Visit the site here:
https://distrosea.com/
Here is a list of the Linux distros I had a go at running with their desktop environments:
Ubuntu 24.04 LTS - GNOME
Ubuntu 8.10 - GNOME 2 (old, 2008)
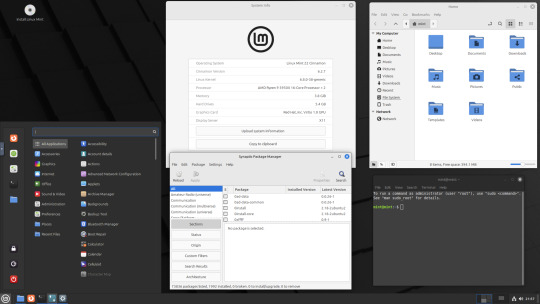
Linux Mint 22 - Cinnamon, Ubuntu base
Ubuntu 24.04 LTS - Cinnamon
Fedora Linux 40 - MATE
OpenSUSE Leap 15.5 - KDE
Alma Linux 9 - GNOME
Debian Linux 12.5 - LXqt (lightweight)
Zorin OS 17 Core64 - GNOME (configurable)
There are a total of 71 Linux operating systems to try on the website at the time of this write up.
To install, update and manage software on Linux using a package manager, the distros mentioned on this list based on Debian & Ubuntu use the APT (Advanced Package Tool) and the distros based on Fedora & Red Hat use the DNF (Dandified Yellow-Dog Updater Modified) package managers.
Their are many other types of package managers for Linux. Since Windows 11, users can choose to install software using UnigetUI (a.k.a Winget commands).
About Distrosea:
When you click on any of the distro entries before selecting a desktop environment, you can read a great description of the background information for each.
I think this website is amazing as it allows you to test distros in your browser without the need to plug in a USB or use virtual machine software. basically it gives you a live install copy of Linux to try online for free. It profits from ads shown on its homepage.
Some of the distros have a 'popular' badge, to show which ones are most likely to have more online traffic. Most of these distros are updated to latest versions available.
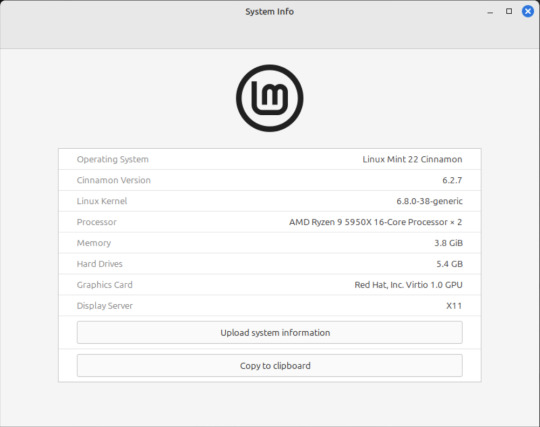
When you run the operating systems the system information dialogue will contain the server CPU information and displays the virtual graphics card called Red Hat, Inc Virtio 1.0 GPU.
However the site uses limited user traffic to reduce load on the servers, so when you select a version of Linux, there is a queue system. Each session is free, however it is timed when idle to create space for another user. Also the server connection, which is based in India, can disconnect you from your testing frequency, so whilst it works well you have to reset your VM which will continue where you last left off.
Also some of the Linux distros didn't automatically scale to full screen, and so leave bars at the top and bottom of the screen. The old Ubuntu remains surrounded by a large bar around itself as no modern drivers will work with this old version of Ubuntu.
You can sign into your Google account and gain internet access in your VMs as well.
Read the developers notes on Reddit:
https://www.reddit.com/r/linux/comments/139sj6z/distrosea_test_drive_linux_distros_online/?rdt=33513
I would recommend trying this out on a large computer screen as the distros take advantage of hardware acceleration, scaling and look great in full screen mode!
Watch this Distrosea video on YouTube to see it in action!
youtube
Remember that this is another way of testing Linux through the internet, the experience will be different if it is installed on an actual computer.
6 notes
·
View notes
Text
Setting Up Calibre + FanFicFare
I've talked before about using Calibre to download fic off of fiction archives, so that's where I decided to start with this series. If you're interested in learning more about how to download fanfic for offline reading/local archiving, then watch the #ficArchiving tag. And if you're not interested in seeing these posts then that's also the tag to block.
Edit (3/22/25) - I've updated the post due to changes in how FanFicFare works with regards to site ratings metadata - the type of column this information needs to be stored in has changed as it no longer works with selectable, pre-set options as originally outlined. Also adding note that additional plugins are required to make FanFicFare's anthology options available.
(Since this is a long post, I'm sticking it under the cut.)
First some background on what Calibre is. It's an open source eBook manager and is really quite versatile for it's usage, thanks in part to the robust library of plugins that it utilizes. The default Calibre app comes bundled not only with management software but an e-reader, server options for locally hosting your library (or libraries), and a whole host of options for managing metadata. Default metadata being tracked include title, author, series, publishing data, synopsis, and tags, but you can manually add columns for any additional data you want - which comes in handy when managing a local fanfiction archive. You can add columns for the fandom the fic is written for, the included ships, characters, completion status, whether it's a single fic or a series turned into an anthology. If the information is useful for you, then you can add a method to track it.
Now, for what Calibre does not do. Because it only runs on Windows/Mac/Linux systems - aka it only runs on a PC - you cannot install it on your phone or tablet. There's no official Calibre apps for Android or iPhones either, though there are unofficial ones that can work with Calibre in server mode. I've never tried the unofficial apps, however, as they tend to cost money that I don't really think they're worth. That's largely because in server mode you can log in to the local instance of Calibre with a regular old browser. Just book mark the page and, so long as your on a network where the local instance is running, your phone or tablet will have access to every book on your Calibre's library (or libraries, depending on how you set things up). You can then either read the eBook directly on the browser or, my preferred method, download the file and read it on the e-reader app of your choice. (You can also make the server available outside your local network, but I've never bothered to learn to set that up.)
Given everything Calibre can do, I'm not particularly bothered by the lack of official apps for phones or tablets - as far as I'm concerned it doesn't need one.
This post is going to be focused on using Calibre for fanfictions specifically, but if you want more information on the other things it can be used for, the Calibre FAQ pages are quite extensive and goes into detail about it's format support, eBook conversion abilities, device integration, news download services, library management, and more.
Alrighty, so first thing you'll want to do is download the version of Calibre that works with your computer. You can also create a portable version that runs off a USB drive if you prefer. Once you've downloaded and installed Calibre, it's time to decide where you want your fanfics to live. Do you want all your eBooks to live in one spot or do you want separate libraries for fanfiction vs original fiction? Since I like to collect more metadata for my fanfic collection than for my regular eBooks - and then completely different extra data for tracking my Star Trek books, or Doctor Who books - I like to have multiple libraries for managing my eBook files. And Calibre makes managing multiple libraries at one time very, very simple.
In Calibre's header there are going to be a lot of icons - I’ve modified the header toolbar for my Calibre instance, but most of the default options are still visible in the picture below.

Specifically you want the one that looks like four books leaning against each other on a shelf. It should have the default library name displayed there - Calibre Library.
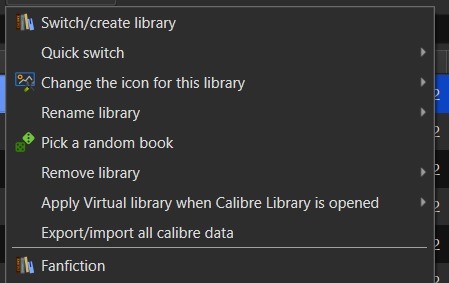
Clicking on that will open the menu used for maintaining multiple libraries. While the application only sets up one library by default, it can link to multiple libraries located anywhere on your computer's filesystem. Since I like to use Dropbox to back up my libraries, I usually locate mine in my local Dropbox folder. You can import existing libraries from one instance of Calibre to another, which makes moving from one computer to another, or maintaining the same library across multiple computers, very simple.
Let’s assume you want to have a separate library just for fanfiction. To that end, you'll want the first option on the menu - labeled "Switch/create library".
From there you'll want to select the folder - or create a new folder - with the name of the library you want to use in Calibre. I'd recommend something straightforward and call it "Fanfiction". Then you'll select the radio button labeled "Create an empty library at the new location".
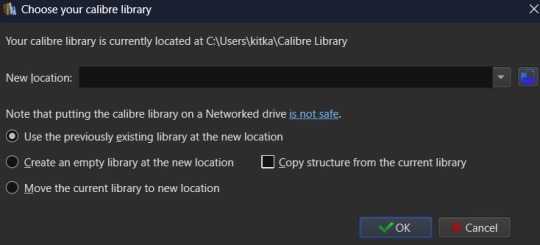
You don't need to copy the current library's structure since every library is created with Calibre's default structure and you won't have added any specialized data tracking at this point to copy over. Once you've set your library location and selected the option for creating a new library, hit the OK button. It'll create the new library and immediately change so that it's managing that library instance instead of the default Calibre Library instance.
If you aren't sure which library is currently open in the Calibre app, then the icon with the four books in the header is where you want to check. It will always be labeled with the name of the currently open library. The most recently opened libraries will be listed at the bottom of the menu opened by that icon for easy switching between libraries and the "Quick switch" option will list all the available libraries registered to your Calibre instance. The icon with the four books is the default icon for a library - if you change the icon for a library then keep in mind that the icon will change in the header when the library is the currently selected on.
Alright, so step one is completed. You now have a dedicated Fanfiction library for maintaining any fics you choose to download. But the default metadata being tracked for the books isn't as robust as it could be. Time to bulk that information up. You'll want to look back at the header again, this time for an icon that looks like a crossed screwdriver and wrench. It's labeled Preferences. Click on that in the center of the icon to bring up the Preferences modal instead of just the menu (which you can access by clicking the associated down arrow beside the icon instead).
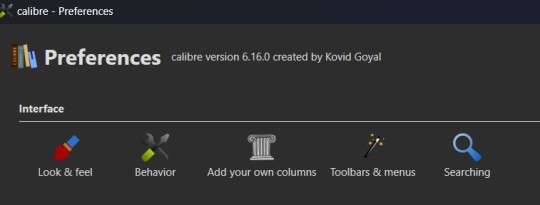
The Preferences modal is where you can access options to tweak the appearance, behavior, and various other functions of Calibre. And I certainly encourage experimenting with the application as it can be customized to your heart's desire to make it meet your accessibility needs. For now, however, we're only interested in the "Add your own columns" option on the top layer of the modal, under "Interface". The associated icon for the "Add your own columns" option is, appropriately, a small Greek column.
This will open the column maintenance modal which presents with a table listing all the existing columns - these all track some kind of metadata for the ebook - and will have checkboxes on the left most of the table indicating whether these columns are displayed on the main interface or are accessible only through the Edit Metadata modal. (We'll get to the Edit Metadata modal later.)
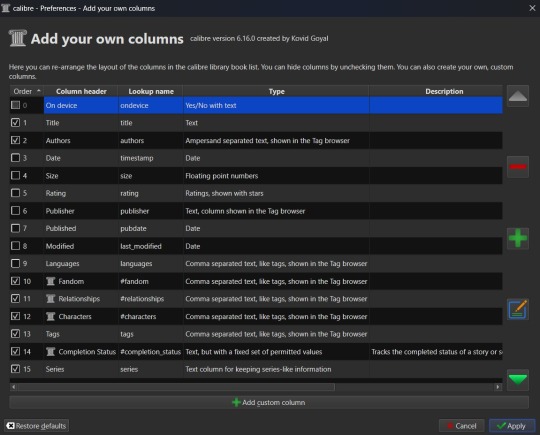
To the right of the table are options for moving a column up or down in the list order, a minus sign used for deleting unnecessary columns, a plus sign for adding new columns, and an edit option for editing existing columns. I'd recommend unchecking columns you don't want displayed in the main table, but not deleting columns. That way you can still store the metadata - and search on it - in that column, but it won't clutter up the main page.
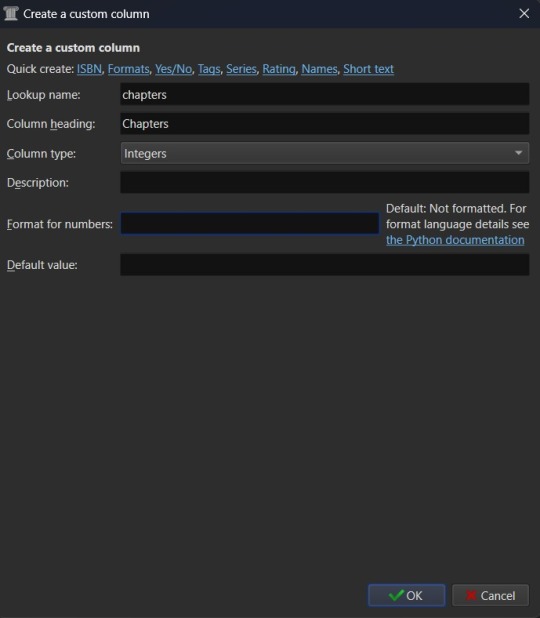
Alright, so now it's time to add some columns. Click the plus button to bring up a custom column form.
The "Lookup name" is what Calibre uses to do searches, so it needs to be something that can be safely saved in a database. "Column heading" is the pretty name that displays either as a column heading in the main Calibre table or as the metadata entry name in the "Edit metadata" modal. "Column type" has a dropdown of the different types of metadata that can be stored in a column and has an option to show checkmarks (a checkbox) for additional true/false parsing. There are a lot of options in the dropdown for metadata types, some of which will offer up additional column creation form options, and this is something that cannot be changed once a column has been saved. If you select the wrong one and realize it later, you'll have to delete the column and create a new one to take it's place. "Description" is there to help clarify things if the "Column header" isn't descriptive enough to make clear what the metadata being tracked by the column is for. And, finally, you can use the optional "Default value" if you want that column to be auto filled with a value you can update later.
Note that the form may add further fields to it, depending on the selected “Column type”.
Since this is going to be tracking fanfiction metadata, some good ideas for creating tag-type metadata columns would be "Fandom", "Ship", and "Characters". You might also consider "Rating", "Content Warnings", “Chapters”, or other data which might be better suited for other types of metadata. We'll start with the "Fandom" column.
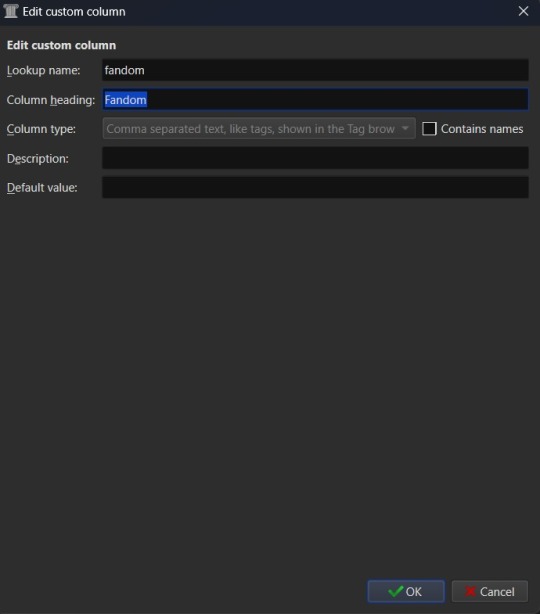
You'll want to set the "Lookup name" to "fandom" (note the lowercase here), the "Column heading" to "Fandom" (uppercase this time), and the "Column type" to "Comma separated text, like tags, shown in the Tag browser". The "Description" is optional, so add what you like (or don't) there and the same goes for "Default value", which you might want to list as "Unsorted" or simply leave blank to indicate the fandom is currently unlisted. Once you're satisfied with your selections, click "OK" and you can either then "Apply" your settings changes or continue on to add more columns.
The "Ship" and "Character" data also work best as comma separated data, so I recommend making those columns in the same fashion as the "Fandom" column. “Chapters” you may want to add as an integer column, shown below.
If you're wanting to add "Rating" as a column, then you might want to have specific options for rating a fic, such as limiting the options to the same ones used by Ao3. To this end, you'd fill out the form more like this. "Lookup name" as "rating_level" so as not to confuse it with the existing rating column for star ratings, "Column heading" as "Rating" or maybe "Rating Level", and "Column type" as "Text, but with a fixed set of permitted values". This "Column type" selection will bring up two more inputs on the column creation form - "Values" and "Colors". These two inputs work together and can be edited later. In the "Values" input, you can add a list of comma separated values. In this case the list for "Values" would look like "General Audiences, Teen and Up Audiences, Mature, Explicit, Not Rated". "Colors" is an optional list that will assign a different color to every option on the "Values" list that corresponds to an entry in the "Colors" list. So if you want General Audiences to be blue and no other option to have a color, you'd list "blue" for colors. Or "blue, blue, red, red, red" to have the first to options on the "Values" list as blue and the last three as red. You can play around with this more or leave it blank to have the options all be the same default colors.
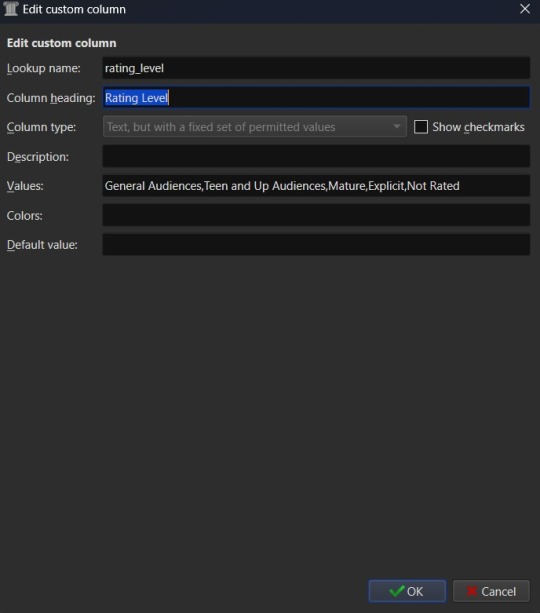
Once you've finalized your selections, hit OK to create the column.
Edit (3/22/25) - FanFicFare currently no longer accurately scrapes ratings data into a column setup as "Text, but with a fixed set of permitted values". Instead you will need to use the "Comma separated text, like tags, shown in the Tag browser" option. Fixed values should still work for things like fic status, which have the Completed and In-Progress settings only, but changes either to FanFicFare or Ao3 (and thus any Ao3 clones) have made the fixed values option for ratings fail to correctly connect site tags to the preset values. The good news is that this will now set the ratings for an anthology fic made from a series page with the ratings of all fics within the series - so if some are General Audiences and others are Mature within a single anthology, that will be accurately reflected in your captured metadata after downloading a fic.
After creating all your new columns and selecting which ones you want present on the main table, hit the "Apply" button. You'll likely be prompted to restart Calibre. Do so and when the program reloads it should display the main table with all the columns exactly how you set them up. Which means step two is complete. At this point if you have any fanfiction eBooks already, you can drag and drop them into the table from folder files or use the "Add books" option at the left most side of the header toolbar to start adding those. You can manually update the metadata either by clicking on newly added book and then selecting a column or by clicking the book and then selecting the "Edit metadata" option in the header. So now it's time to take a quick look at the metadata editor modal.
By default, the metadata modal will only have one screen but, because you've added custom columns, there should be tabs at the top. One for "Basic metadata" and one for "Custom metadata". The "Basic metadata" includes options for title, title sort, author(s), author sort, series, series number, file versions (for tracking if you have epub, mobi, pdf, etc files of the same book), cover management options, the star-based rating system, tags, ids, upload date, published date, associated publisher, languages, and "Comments" which is where the story summery/synopsis should go. For regular, non-fanfiction eBooks, you might also take note of the "Download metadata" button which allows for scrapping official metadata off of sites like Barnes and Noble, Amazon, or other eBook sellers or archives.
The "Custom metadata" is where your custom column data will be found. It should be found at the top of the page and fill space downwards with however many custom columns you've added. Inputs that allow for comma separated values will still have a dropdown option associated to allow adding tags you've entered previously for other ebooks. Columns that only allow using preselected data are more likely to appear as select boxes or other form types. This is where you might notice you created a column type incorrectly, so make sure to check over all the data entry options for each metadata type you're collecting. If it doesn't look like it's set up the way you wanted it to be, you can go back to the column editing modal and try again.

The big draw of using Calibre to manage fanfiction eBooks, however, is being able to use Calibre to download the fanfictions from the web and convert them to eBook format for you. And that's where Calibre's plugin library comes in handy.
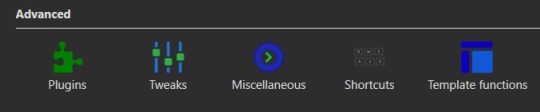
If you were making any edits to an existing eBook, save those and close the metadata editor. Head back over to the Preferences modal and check the Advanced settings options at the bottom of the modal. There should be a green puzzle piece icon labeled "Plugins" - click that to open the Plugins modal.
It will take you to a table used for monitoring and controlling existing plugins and, yes, it does already have 'plugins' installed. These are really more the application's default modules, but because of how Calibre works they can be edited and controlled in the same way that external plugins are. At the bottom of the page you'll see three buttons - "Get new plugins", "Check for updated plugins", and "Load plugin from file". These are concerned with the external plugins that you can add to Calibre. "Get new plugins" will allow you search through the official library of third party plugins available to Calibre - plugins that the Calibre team have vetted to confirm aren't actually malware. But they're by no means the only plugins you can install, as the "Load plugin from file" will allow you to load pretty much any plugin you want to. Such as a plugin for, say… stripping DRM off of purchased eBooks.

In this case, you want to select the "Get new plugins" option. This brings up a modal for User plugins and the displayed list will automatically be filtered by available plugins that have not yet been installed. You can filter this list further by typing "FanFicFare" into the "Filter by name" text input.
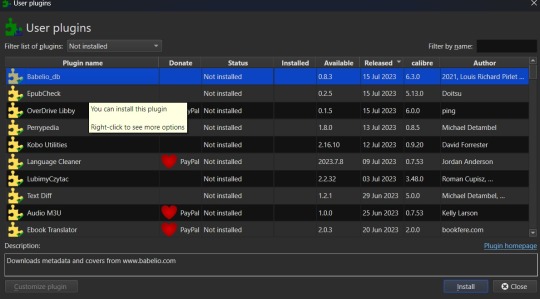
You can then select the FanFicFare plugin and install it. After installing the plugin, you should select the option to restart the application, to ensure that it installed properly. I'd also recommend adding the FanFicFare icon to the optional bottom toolbar instead of the header toolbar, since that'll make it much easier to find since, unless you add more plugins and assign them to that toolbar, it should be the only option on the bar right now.
Edit (3/22/25) - In addition to the FanFicFare plugin, you'll want to include two additional plugins so that FanFicFare can make it's anthology options available. These two plugins are EpubMerge and EpubSplit. These plugins can be used on their own to create anthologies by creating a new epub file from multiple epubs or splitting anthology books into separate epubs for each book contained within. Without these plugins FanFicFare's anthology options will be hidden, as it utilizes them for merging fics in a series together after downloading them separately.
So, full disclosure, you don't need Calibre to run FanFicFare. You could download it and run it from a command line interface instead. However, I prefer it's Calibre interface, especially since it really lets you take advantage of the best Calibre has to offer in metadata tracking, as it can be set up through Calibre to auto fill those columns I walked you through setting up earlier. But I'll get to more on that in a minute.Once Calibre has restarted, you should now have FanFicFare available on one of your toolbars. It's associated icon is a green text bubble with the letters "FF" in it pointing down at a picture of a book.
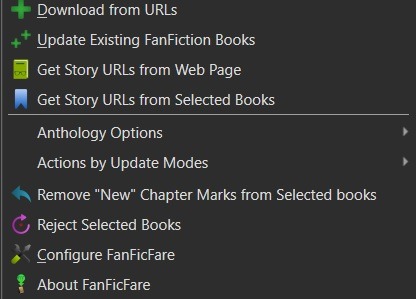
It'll have a small down arrow next to it, which you'll want to select in order to bring up FanFicFare's menu. At this point you can start downloading fics if you want - but let's do a little customizing first. Select the "Configure FanFicFare" option to bring up the configuration modal.
So this modal has a lot going on. And I do encourage doing some exploration on your own, because FanFicFare is a powerful tool made all the more powerful here in conjunction with Calibre's built in tools. Cover generation is very useful, "Reading lists" can be used to auto send new books to any devices you've linked to Calibre when they're connected to the computer, you can tie into email accounts to pull fanfics from email or pull URL links for downloading... there is just so much this plugin can do.
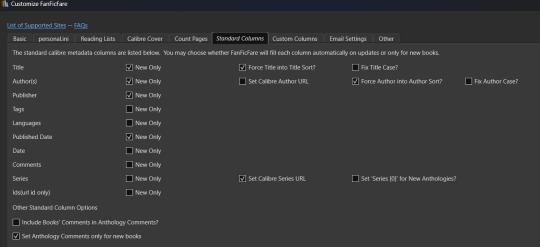
For now, however, we're interested in the column related options. First, check out the tab for "Standard Columns". Look over the options there carefully to make sure that the default settings are actually what you want. They're pretty straight foward - most are determining whether the metadata gets scraped and updated every time you update a fanfic eBook or if they're only scraped for new books. The rest have to do with title and author sorting, setting series related data, and setting the comment data for anthologies.
Once you've set that data how you want, head over to the "Custom Columns" tab where things get more interesting.
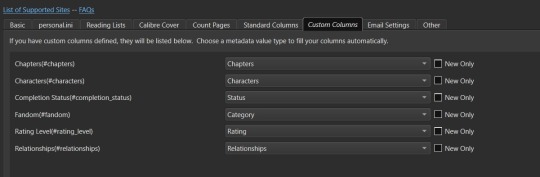
You should now be looking at a list of all those custom columns you created earlier, in alphabetical order. Each column will have a corresponding select box with nothing selected and an unchecked checkbox marked "New Only". This works in a pretty straightforward manner. Let's use "Fandom" as the example. Click the associated select box to open the dropdown and you'll see a bunch of potential metadata that FanFicFare scrapes listed there. It'll all go into the default tags column - found over in the "Standard Columns" section - but you can also parse it out to specific custom columns here. It might give you a few ideas for more columns you want to add for metadata sorting purposes. "Fandom" you'll want to link to "Category". I left "New Only" unchecked so that if I update an eBook later and it has a new fandom attached to the fic then that new metadata will be picked up and added to my Fandom tags for the fic.
Go through each custom column and set them up to be auto filled with the data you think fits it best. Select OK to save your changes and congratulations, this library has now been set up to import fanfiction.
Do keep in mind that FanFicFare's settings are on a per-library basis. So if you decide to do a separate library for different types of fanfics then you'll need to configure FanFicFare separate for every library. You may want separate libraries for different repositories, for example. Though FanFicFare is often smart enough to recognize when it already has an eBook version of a fanfiction from one repository - such as FFnet - when trying to download the same fic from another place - like Ao3.
You may need to make changes later to the personal.ini file associated with the library (which is also set up on a per-library basis) but I'll write up a separate post for that later. While sites protected by Cloud Flare more stringent protections will likely result in 403 responses and failed downloads, most fanfiction sites are going to work with the default FanFicFare settings. You could head over to, say, Archive of Our Own or Twisting the Hellmouth and grab a URL for a story from there. Or a URL for a series, which has links to multiple stories.
Now that the set up is done, it's time for the fun part. Downloading and maintaining fanfiction in your library. I'll be using a few of my fanfictions on Ao3 as example URLs. Awaken, which is already in my fanfiction library. What Balance Means, which is not already in my library. And the two series Hartmonfest 2023 and Eobard vs Eobard.
We'll start with the single URL uploads.
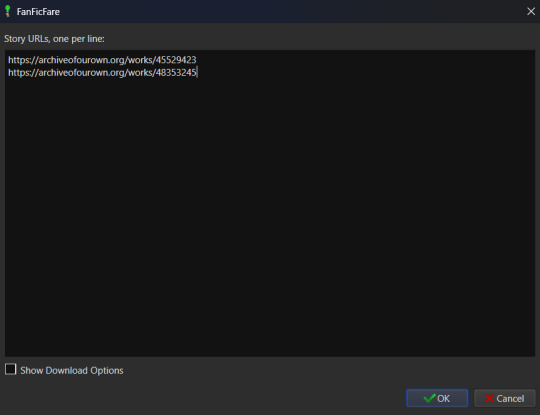
Click on the FanFicFare down arrow to bring up the menu and select the first option on the menu, labeled "Download from URLs". If you have a URL in your clipboard and have the option to grab URLs from the clipboard selected in the FanFicFare configuration (it's a default option, so you most likely do) then you should see that URL prepopulated in the text area when the Story URLs modal loads. You can add more URLs, one per line, to this text area and when you select OK each one will be individually downloaded as a separate epub file. For multi-chapter fics you only need to provide the url for the first chapter. FanFicFare will be able to detect the additional chapters and download them into the same epub file as the first chapter. All providing additional chapter URLs will do is lead to FanFicFare attempting to create multiple epubs of the same fanfic.
Once you've added your list of URLs to the text area, select OK. FanFicFare will do the rest, fetching metadata for the fic (or fics) and compiling the epub file(s). When it's finished compiling the data but hasn't officially saved the epubs, it will pop up a message letting you know how many "good" and "bad" entries it found.
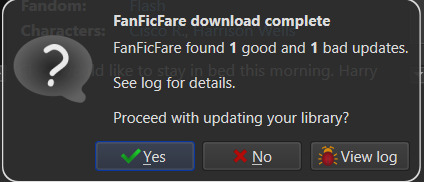
"Good" means it made an epub file and it's good to go. "Bad" could mean that you've already got the fanfic downloaded and no updates - such as new chapters - were available. Or it could mean that it failed to grab the web pages for whatever reason… like Cloud Flare blocking the download. You can go forward with the download at this point, adding the good epubs to your library. Or you could cancel the download, meaning none of the epubs are saved. Before choosing one of those options you can also choose to look at the job output, seen in the pop up as a button labeled "View log". This will display a list of every url you tried to download a fanfic for and information on either it's success or why it failed, the associated URL, and how many chapters were downloaded.
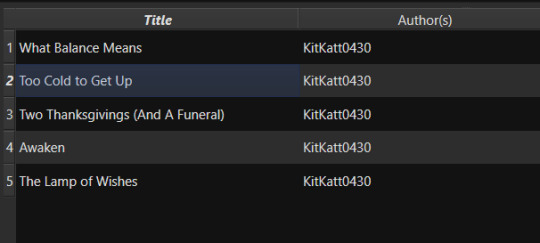
Since I already had Awaken downloaded and there have been no updates since the last time I downloaded it, that is the bad update from my list and the result I was expecting. What Balance Means hadn't been downloaded before, so it was the expected good update. Once Yes is selected in the dialog, the new fanfiction eBooks will be added to the library and will appear at the top of the main list in the application.
That's great for updating one fic at a time or copy-pasting in a list of fanfictions, but let's get ambitious. Maybe you want to import an entire page of bookmarked fanfictions at once or a series of fanfictions as individual books. Instead of copying every single URL by hand, you can take the URL for the series main page or the Bookmarks URL. With that URL copied, you can head over to the FanFicFare menu again, but this time select the option "Get Story URLs from Web Page"
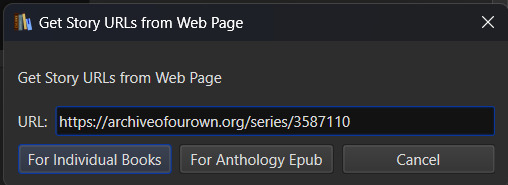
The modal that pops up only allows for inputting one URL - the URL for the page you want it to scour for fanfic URLs. Once you've inputted that URL click the button labeled "For Individual Books." It might take a bit but it's going to pull up the same Story URLs modal from before, this time prepopulated with every URL from the page you gave it. Pretty cool, right? Click OK and watch it run the job just like before.
I gave it the URL for my Hartmonfest 2023 series, which is a complete series and it downloaded all three books. Once they're populated on the list, I could scroll over to the Series column to see that they all are listed as being part of the Hartmonfest 2023 series in the same series order they're listed in on Ao3.
However, what if I'm uploading an unfinished series, like Eobard vs Eobard, and want to be able to track when it updates later on? Single books can track when new chapters are updated; is there any way to do the same thing but on a larger scale? The answer is yes, but you have to upload the series as an anthology.
Head back to the "Get Story URLs from Web Page" option on the FanFicFare menu and give it another series URL. But, this time, click the button labeled For Anthology Epub. This will trigger the Story URLs modal again once it's gathered all the story URLs, but this time it looks a little different.
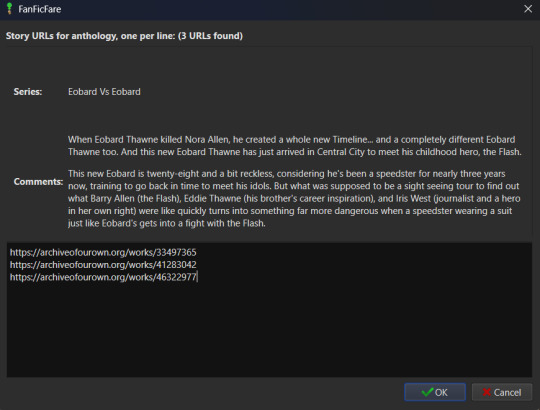
This time there will be text indicating the Series and Comments/description, the information for which will have been taken from the series metadata. The series story URLs will be present in the text area, allowing you to remove a story from the anthology if there's a fic in there you don't want included. Click OK to run the import job, which will run like normal.
When the job completes, there should be multiple good updates listed - one for every URL - but when you click yes to add the eBook to the library, you'll only see one added. It should be named following the convention "<Series Name> Anthology". So now I've got the "Eobard vs Eobard Anthology" in my library.
Last but not least, how to check for updates to incomplete fanfictions or series. It's generally pretty easy to do. Select the fanfiction(s) on the list that you want to check for updates on. If it's a single fanfiction (or several single fanfictions), you go to the FanFicFare menu and click the option "Update Existing FanFiction Books"
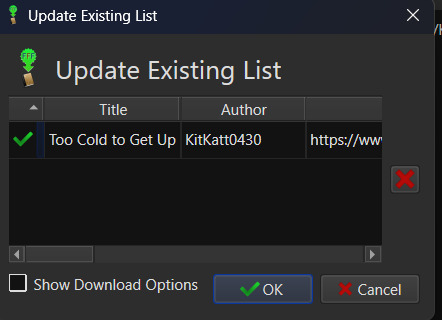
Click OK and let it run. Any fanfictions that don't have new chapters will return as bad entries. Any that have new chapters will be listed as good. Selecting Yes to add the good entries to the list will update the existing epub files with the new chapters.
However, if it's a series you want to update, I recommend doing those one at a time. Select the anthology from the eBook list and head back over to the FanFicFare menu. This time select "Anthology Options"; it'll open a fly-out menu. You want the bottom option, labeled "Update Anthology Epub". The associated URL for the series is saved as part of the eBook's metadata already, so it will pull the series metadata and associated URLs again, before returning you to that same modified Story URLs modal seen before. When you click OK, it'll pull all the fanfictions in the series - new and old - and any new chapters as well, bundling it up in a new eBook file that will replace the old one.
There's still a lot to talk about when it comes to managing fanfictions in Calibre, but I think I'll end here for now. You should be able to download, and manage, fanfiction from most websites at this point. So go back up your bookmarked fics and rest easy knowing that from this point forward a missing bookmark on your bookmarks list is no longer cause for sadness - it'll still be in your local archive to enjoy offline. Just don't go abusing this power, okay guys?
#kitkatt0430 explains#ficArchiving#calibre#fanficfare#the images all have alt text but if you find my image descriptions lacking feel free to add additional descriptions
61 notes
·
View notes
Text
Installing Kali Linux on a USB Stick: A Step-by-Step Guide
If you want a portable, powerful cybersecurity toolkit you can carry in your pocket, installing Kali Linux on a USB stick is the perfect solution. With Kali on a USB, you can boot into your personalized hacking environment on almost any computer without leaving a trace — making it a favorite setup for ethical hackers, penetration testers, and cybersecurity enthusiasts.

In this guide, we'll walk you through how to install Kali Linux onto a USB drive — step-by-step — so you can have a portable Kali environment ready wherever you go.
Why Install Kali Linux on a USB?
Before we dive into the steps, here’s why you might want a Kali USB:
Portability: Carry your entire hacking setup with you.
Privacy: No need to install anything on the host machine.
Persistence: Save your settings, files, and tools even after rebooting.
Flexibility: Boot into Kali on any system that allows USB boot.
There are two main ways to use Kali on a USB:
Live USB: Runs Kali temporarily without saving changes after reboot.
Persistent USB: Saves your files and system changes across reboots.
In this article, we’ll focus on setting up a Live USB, and I'll also mention how to add persistence if you want. and if you seek knowledge about kali linux you can visit our website any time
Website Name : Linux Tools Guide
What You’ll Need
✅ A USB drive (at least 8GB; 16GB or more recommended if you want persistence). ✅ Kali Linux ISO file (download it from the official Kali website). ✅ Rufus (for Windows) or Etcher/balenaEtcher (for Mac/Linux/Windows). ✅ A computer that can boot from USB.
Step 1: Download the Kali Linux ISO
Go to the Kali Linux Downloads page and grab the latest version of the ISO. You can choose between the full version or a lightweight version depending on your USB size and system requirements.
Tip: Always verify the checksum of the ISO to ensure it hasn't been tampered with!
Step 2: Insert Your USB Drive
Plug your USB stick into your computer. ⚠️ Warning: Installing Kali onto the USB will erase all existing data on it. Backup anything important first!
Step 3: Create a Bootable Kali Linux USB
Depending on your operating system, the tool you use may vary:
For Windows Users (using Rufus):
Download and open Rufus (Get Rufus here).
Select your USB drive under Device.
Under Boot selection, choose the Kali Linux ISO you downloaded.
Keep the Partition scheme as MBR (for BIOS) or GPT (for UEFI) based on your system.
Click Start and wait for the process to complete.
For Mac/Linux Users (using balenaEtcher):
Download and open balenaEtcher (Get Etcher here).
Select the Kali ISO.
Select the USB drive.
Click Flash and wait until it's done.
That's it! You now have a Live Kali USB ready.
Step 4: Boot Kali Linux from the USB
Restart your computer with the USB plugged in.
Enter the BIOS/UEFI settings (usually by pressing a key like F12, Esc, Del, or F2 right after starting the computer).
Change the boot order to boot from the USB first.
Save changes and reboot.
You should now see the Kali Linux boot menu! Select "Live (amd64)" to start Kali without installation.
(Optional) Step 5: Adding Persistence
Persistence allows you to save files, system changes, or even installed tools across reboots — super useful for real-world usage.
Setting up persistence requires creating an extra partition on the USB and tweaking a few settings. Here's a quick overview:
Create a second partition labeled persistence.
Format it as ext4.
Mount it and create a file /persistence.conf inside it with the content: cppCopyEdit/ union
When booting Kali, choose the "Live USB Persistence" option.
Persistence is a little more technical but absolutely worth it if you want a real working Kali USB system!
Troubleshooting Common Issues
USB not showing up in boot menu?
Make sure Secure Boot is disabled in BIOS.
Ensure the USB was properly written (try writing it again if necessary).
Kali not booting properly?
Verify the ISO file integrity.
Try a different USB port (preferably USB 2.0 instead of 3.0 sometimes).
Persistence not working?
Double-check the /persistence.conf file and make sure it's correctly placed.
Conclusion
Installing Kali Linux onto a USB stick is one of the smartest ways to carry a secure, full-featured hacking lab with you anywhere. Whether you’re practicing ethical hacking, doing security audits, or just exploring the world of cybersecurity, a Kali USB drive gives you power, portability, and flexibility all at once.
Once you’re set up, the possibilities are endless — happy hacking! 🔥
2 notes
·
View notes
Text
Can you explain the differences between A+, Network+, and Security+ certifications from CompTIA? Which certification is considered more valuable and why?
Certainly! CompTIA offers several certifications that are widely recognized in the IT industry. A+, Network+, and Security+ are three of the most popular certifications, each focusing on different areas of IT. Here's a breakdown of each:
A+ Certification:
Focus: This certification is geared towards entry-level IT professionals and covers foundational skills in IT hardware, software, networking, and troubleshooting.
Topics: A+ covers areas such as PC hardware, operating systems (Windows, Linux, macOS), networking, mobile devices, security, and troubleshooting.
Job Roles: A+ certification holders often work in roles such as technical support specialists, help desk technicians, and field service technicians.
Value: A+ is valuable for individuals starting their IT careers as it provides a solid foundation of IT knowledge and skills. It's often a prerequisite for more advanced certifications.
Network+ Certification:
Focus: Network+ focuses specifically on networking concepts and skills required for IT professionals working with networks, both wired and wireless.
Topics: Network+ covers areas such as network technologies, installation and configuration, media and topologies, management, security, and troubleshooting.
Job Roles: Network+ certification holders typically work in roles such as network administrators, network technicians, and systems engineers.
Value: Network+ is valuable for individuals seeking to specialize in networking. It provides a comprehensive understanding of networking fundamentals and is recognized by employers as validation of networking knowledge and skills.
Security+ Certification:
Focus: Security+ is focused on cybersecurity concepts and skills, covering best practices in securing networks, systems, and applications.
Topics: Security+ covers areas such as network security, compliance and operational security, threats and vulnerabilities, application, data, and host security, access control, identity management, and cryptography.
Job Roles: Security+ certification holders often work in roles such as security analysts, security specialists, security administrators, and network security engineers.
Value: Security+ is highly valuable in today's cybersecurity landscape. It demonstrates proficiency in cybersecurity principles and practices and is often required or recommended for cybersecurity-related roles.
In terms of which certification is considered more valuable, it largely depends on your career goals and the specific job role you're targeting. However, comptia Security+ certification is often regarded as more valuable in terms of salary and job prospects due to the increasing demand for cybersecurity professionals and the critical importance of cybersecurity in modern IT environments. That said, all three certifications have their own merit and can be valuable depending on your career path and interests.
#online certification and training#cybersecuritycourse#comptia security plus#comptia#comptiasecuritypluscertification
7 notes
·
View notes
Text
From Frames to Connections: Behind the Scenes of My First Art Pop-Up
Preparing for my first in-person art sale was an intense but rewarding experience. I want to share some highlights from this journey—from finding creative ways to present my work to the unexpected moments that made it all worthwhile.
I started by collecting second-hand frames for my signed prints. There’s something special about giving these frames a second life, and I know how much people appreciate art that’s ready to hang. Refurbishing these frames felt like honouring their potential. Watching a piece come together in a frame, blending something old with something new, was incredibly satisfying.

The pop-up was held at a local shop in my neighbourhood called Loohoo. The name caught my attention because it reminded me of my cat, Lulu, and the shop itself offered such a creative way to connect with the community. The owner provided space for local businesses to host pop-ups, and I was thrilled to have this opportunity to share my art.
As the event approached, my days were packed with prepping prints, designing small details, and juggling my day job. I even created holographic stickers with a QR code linking to a new digital card I’d set up. It’s a modern take on business cards, making it easy for people to find all my links in one place.
To promote the event, I collaborated with the shop owner to design a poster that was displayed in her window and around the neighbourhood.

While recovering from an illness, I tried to balance work and pop-up prep from home. I don’t know how to code, but I had to learn a bit to make my backup Linux gaming console work for me as a backup work pc. It was exhausting, and the illness eventually got the upper hand. Preparing for the pop-up took a backseat while I focused on recovering from a month-long battle with back-to-back flus. My doctor jokingly called me "lucky."
The week before the pop-up was a frenzy of activity. I curated stickers, cleaned up frames, and set up displays for my silk scarves in some cheap boxes I found at the dollar store. They worked surprisingly well and kept the setup neat and approachable. My packaging leaned toward simplicity and sustainability: tissue-wrapped art in mismatched secondhand paper bags. It wasn’t fancy, but it felt like the right approach—practical and aligned with my values.

The pop-up itself was an incredible experience. Meeting people, hearing their stories, and seeing how they connected with my art was one of the most rewarding parts.

One piece that stood out to visitors was Wildflower Hair. Two people were especially drawn to it for very different reasons: one said it gave her a sense of strength and independence, while another shared her love for dandelions, despite their reputation as weeds. This piece was my way of saying that even when you feel like a "weed," you’re a beautiful flower, deserving of celebration.

Heart of Gold was another favourite. One woman added it to her growing collection of anatomical hearts, while another loved the contrast of strength and openness in the design. The gold in the piece was meant to represent that delicate balance: strong boundaries that still let love shine through.

After the pop-up, I took some time to rest and recharge. Reflecting on the experience, I realized how important it is to have a solid plan, especially when balancing a full-time job with creative projects. The event also gave me valuable insights into what works for markets, from display setups to the kinds of art that resonate most with people.
Connecting with people in person was a game-changer. Unlike the online world, which can feel like shouting into the void, the pop-up allowed me to see real reactions and have meaningful conversations. It confirmed that the emotions I aim to convey through my art resonate with others, even as they interpret those emotions in their own ways.
This experience has inspired me to think about how I might create a stronger sense of community around my art, even though I’m still figuring out how to do that. While online will remain my main focus, I’m excited to explore more in-person markets in the future.
Thank you for sharing this journey with me.
#artist on tumblr#illustration#digital art#my art#Artist Journey#Indie Designer#fine art#fineart#contemporary art#women artists#artwork#painting#pop surrealism#popsurrealism#female illustrators#lowbrow#surealism#surreal art#FineArtCollectors#OriginalArtForSale#SurrealistArt#ArtWithMystery#SustainableArt#SecondLifeArt#ConnectingThroughArt#ArtThatSpeaks#ArtistJourney#BehindTheCanvas#ArtPopUpShow#SupportLocalArtists
2 notes
·
View notes
Text
Amazon DCV 2024.0 Supports Ubuntu 24.04 LTS With Security

NICE DCV is a different entity now. Along with improvements and bug fixes, NICE DCV is now known as Amazon DCV with the 2024.0 release.
The DCV protocol that powers Amazon Web Services(AWS) managed services like Amazon AppStream 2.0 and Amazon WorkSpaces is now regularly referred to by its new moniker.
What’s new with version 2024.0?
A number of improvements and updates are included in Amazon DCV 2024.0 for better usability, security, and performance. The most recent Ubuntu 24.04 LTS is now supported by the 2024.0 release, which also offers extended long-term support to ease system maintenance and the most recent security patches. Wayland support is incorporated into the DCV client on Ubuntu 24.04, which improves application isolation and graphical rendering efficiency. Furthermore, DCV 2024.0 now activates the QUIC UDP protocol by default, providing clients with optimal streaming performance. Additionally, when a remote user connects, the update adds the option to wipe the Linux host screen, blocking local access and interaction with the distant session.
What is Amazon DCV?
Customers may securely provide remote desktops and application streaming from any cloud or data center to any device, over a variety of network conditions, with Amazon DCV, a high-performance remote display protocol. Customers can run graphic-intensive programs remotely on EC2 instances and stream their user interface to less complex client PCs, doing away with the requirement for pricey dedicated workstations, thanks to Amazon DCV and Amazon EC2. Customers use Amazon DCV for their remote visualization needs across a wide spectrum of HPC workloads. Moreover, well-known services like Amazon Appstream 2.0, AWS Nimble Studio, and AWS RoboMaker use the Amazon DCV streaming protocol.
Advantages
Elevated Efficiency
You don’t have to pick between responsiveness and visual quality when using Amazon DCV. With no loss of image accuracy, it can respond to your apps almost instantly thanks to the bandwidth-adaptive streaming protocol.
Reduced Costs
Customers may run graphics-intensive apps remotely and avoid spending a lot of money on dedicated workstations or moving big volumes of data from the cloud to client PCs thanks to a very responsive streaming experience. It also allows several sessions to share a single GPU on Linux servers, which further reduces server infrastructure expenses for clients.
Adaptable Implementations
Service providers have access to a reliable and adaptable protocol for streaming apps that supports both on-premises and cloud usage thanks to browser-based access and cross-OS interoperability.
Entire Security
To protect customer data privacy, it sends pixels rather than geometry. To further guarantee the security of client data, it uses TLS protocol to secure end-user inputs as well as pixels.
Features
In addition to native clients for Windows, Linux, and MacOS and an HTML5 client for web browser access, it supports remote environments running both Windows and Linux. Multiple displays, 4K resolution, USB devices, multi-channel audio, smart cards, stylus/touch capabilities, and file redirection are all supported by native clients.
The lifecycle of it session may be easily created and managed programmatically across a fleet of servers with the help of DCV Session Manager. Developers can create personalized Amazon DCV web browser client applications with the help of the Amazon DCV web client SDK.
How to Install DCV on Amazon EC2?
Implement:
Sign up for an AWS account and activate it.
Open the AWS Management Console and log in.
Either download and install the relevant Amazon DCV server on your EC2 instance, or choose the proper Amazon DCV AMI from the Amazon Web Services Marketplace, then create an AMI using your application stack.
After confirming that traffic on port 8443 is permitted by your security group’s inbound rules, deploy EC2 instances with the Amazon DCV server installed.
Link:
On your device, download and install the relevant Amazon DCV native client.
Use the web client or native Amazon DCV client to connect to your distant computer at https://:8443.
Stream:
Use AmazonDCV to stream your graphics apps across several devices.
Use cases
Visualization of 3D Graphics
HPC workloads are becoming more complicated and consuming enormous volumes of data in a variety of industrial verticals, including Oil & Gas, Life Sciences, and Design & Engineering. The streaming protocol offered by Amazon DCV makes it unnecessary to send output files to client devices and offers a seamless, bandwidth-efficient remote streaming experience for HPC 3D graphics.
Application Access via a Browser
The Web Client for Amazon DCV is compatible with all HTML5 browsers and offers a mobile device-portable streaming experience. By removing the need to manage native clients without sacrificing streaming speed, the Web Client significantly lessens the operational pressure on IT departments. With the Amazon DCV Web Client SDK, you can create your own DCV Web Client.
Personalized Remote Apps
The simplicity with which it offers streaming protocol integration might be advantageous for custom remote applications and managed services. With native clients that support up to 4 monitors at 4K resolution each, Amazon DCV uses end-to-end AES-256 encryption to safeguard both pixels and end-user inputs.
Amazon DCV Pricing
Amazon Entire Cloud:
Using Amazon DCV on AWS does not incur any additional fees. Clients only have to pay for the EC2 resources they really utilize.
On-site and third-party cloud computing
Please get in touch with DCV distributors or resellers in your area here for more information about licensing and pricing for Amazon DCV.
Read more on Govindhtech.com
#AmazonDCV#Ubuntu24.04LTS#Ubuntu#DCV#AmazonWebServices#AmazonAppStream#EC2instances#AmazonEC2#News#TechNews#TechnologyNews#Technologytrends#technology#govindhtech
2 notes
·
View notes
Text
DEV04 - Pican'te (trowel pico thoughts)
almost a year ago, amidst bbsprint development and trowel development i have decided to ask my small playerbase about the editor's fate and settled on further expanding the scope of the game's demo and allow people to make their own levels while they wait for the full versions. this would be done through something called "trowel pico", which is a version that is intentionally much more limited than the regular trowel, and is web-based for maximum compatibility (because trowel is a windows app that could probably be compiled to linux and macOS)

the route that leads to me developing trowel pico is a route that would amplify the game's deliverable and development time in general because i would need to juggle some things as well as 2 versions of a program to achieve the same thing with different targets in mind. i however believe it's gonna be worth it.
as it stands right now, trowel pico itself is about 80% feature complete, now reaching feature parity with trowel desktop in many aspects and able to generate a project file (yes, now they export project files by default instead of just the stage) that is cross-compatible with trowel desktop (except you can't load in stages from trowel desktop because i have intentionally added a guard to prevent using stages generated with desktop for the future)
i find that i am making some gui compromises compared to trowel desktop in favor of development speed, but i can't really stop myself from polishing the gui a little bit more adding things i've always wanted to add to a game/editor for game (read: startup screens) and as such, i have reached a milestone by finally being able to implement the startup splash artwork i made a few months ago as well as the startup jingle i made like 2 days ago
have a video.
i do not quite have a release date, because although trowel pico is 80% complete, Scaffold (the online service hosting and serving stage info for the update's plans) still needs to be made and that is its own beast, but at least, i do not have to worry as much about a wildly customizable gui for that one, the bulk of the development there is backend.
i'm thinking of letting people in my server try out trowel pico before anybody else while scaffold is being developed.
now, there's one question i left for last intentionally one may wonder "why did you make these separate projects instead of implementing them in the game itself?"
the reason is that i wanted to challenge myself by making things for one common goal in different toolkits, that's how trowel desktop started, since it's made in monogame
second i wanted to update the editor irrespective of the game, and third, which is trowel pico's reason for existing, is that doing things in web is terrible as it is
10 notes
·
View notes
Text
Top Web Hosting Solutions on https://eweball.com/
Choosing the right web hosting solution can be a daunting task, given the myriad of options available. This is where https://eweball.com/ comes into play, offering an extensive comparison of top web hosting providers, tailored to meet various needs and budgets. In this blog post, we will explore different types of web hosting solutions available on https://eweball.com/ and help you find the right one for your needs.
Understanding What Web Hosting Is and Why It’s Essential
Web hosting serves as the foundational service that allows websites to be accessible on the internet. Essentially, web hosting providers offer the technology and resources necessary to store your website's files on a server, ensuring these files are available to visitors at any time. Without a reliable web hosting service, your website would not have the infrastructure required to stay online. One of the critical aspects of web hosting is its impact on your website's performance. Factors such as server speed, reliability, and security directly influence the user experience. A fast-loading website with minimal downtime not only improves user satisfaction but also positively affects your search engine rankings. Security features, including SSL certificates, regular backups, and firewalls, help protect your site from cyber threats, making web hosting a crucial component in safeguarding sensitive data. Different types of web hosting solutions cater to varying needs. For example, shared hosting is suitable for beginners or small businesses with low traffic, while VPS and dedicated hosting are better for growing sites requiring more resources and control. Cloud hosting offers the scalability needed for websites experiencing fluctuating traffic levels, and managed hosting provides professional server management for those who prefer a hands-off approach. Choosing the right web hosting solution is pivotal for your online success, influencing everything from website speed to security. Understanding these elements can help you make an informed decision, ensuring your website performs optimally and remains secure.
Shared Hosting – An Affordable Option for Beginners
For those just starting their online journey, shared hosting is often the most economical and accessible option. This type of hosting involves multiple websites sharing the same server resources, which helps to keep costs down. It's ideal for personal blogs, small business websites, and portfolios that do not anticipate high traffic volumes. One of the main advantages of shared hosting is its user-friendliness. Many providers offer intuitive control panels and one-click installations for popular platforms like WordPress, making it easier for beginners to set up and manage their websites without needing extensive technical knowledge. Furthermore, shared hosting plans often come with essential features such as email accounts, sufficient storage space, and customer support, providing a solid foundation for those new to website ownership. Despite sharing server resources, many shared hosting providers implement measures to ensure fair allocation and minimise the risk of one site affecting the performance of others. The plans available on https://eweball.com/ often highlight these features, helping you choose a provider that balances affordability with reliable performance. Shared hosting is a great starting point for anyone looking to establish an online presence without a significant financial commitment. As your website grows, you can easily upgrade to more advanced hosting options to meet your evolving needs.
Virtual Private Server (VPS) Hosting – A Step Up
As your website expands, shared hosting might fall short in meeting its growing demands. This is where Virtual Private Server (VPS) hosting steps in, offering a perfect middle ground between shared and dedicated hosting. VPS hosting allows your website to benefit from dedicated resources within a shared server environment, ensuring improved performance and greater stability. With VPS hosting, you gain more control over your hosting environment. This includes the ability to install custom software and make advanced configurations tailored to your specific needs. This flexibility is invaluable for businesses experiencing increased traffic or requiring more robust applications. VPS hosting is also characterised by enhanced security compared to shared hosting. Since your site operates within its own virtual space, it is better insulated from the potential vulnerabilities of neighbouring websites. This makes VPS an attractive option for e-commerce sites or any platform handling sensitive information. The scalability of VPS hosting is another significant advantage. You can easily upgrade resources such as RAM, CPU, and storage as your website continues to grow. This adaptability ensures that your site can handle increasing traffic without compromising on performance. Providers listed on https://eweball.com/ often offer a variety of VPS plans, making it easier for you to find a solution that fits your budget and technical requirements.
Dedicated Hosting – Ultimate Performance and Control
For websites with high traffic or those handling sensitive data, dedicated hosting offers unparalleled performance and control. Unlike shared or VPS hosting, dedicated hosting provides an entire server solely for your website, ensuring optimal speed and reliability. This exclusive access to server resources means you can customise the hardware and software to meet your specific requirements, allowing for extensive modifications and fine-tuning. Dedicated hosting is particularly beneficial for large enterprises, e-commerce sites, and platforms requiring robust security measures. The isolation from other websites eliminates the risk of neighbouring sites affecting your performance or security, providing a stable and secure environment for your data. One of the standout features of dedicated hosting is its ability to handle significant traffic spikes without compromising on performance. This makes it ideal for websites experiencing high volumes of visitors or running complex applications that demand substantial resources. Providers listed on https://eweball.com/ offer various dedicated hosting plans, often including premium support services, regular maintenance, and advanced security features. These additional services ensure that your server runs smoothly, allowing you to focus on your core business activities. While dedicated hosting comes at a higher cost compared to other hosting types, the investment is justified by the superior performance, security, and customisation options it provides. By exploring the dedicated hosting options on https://eweball.com/, you can find a solution that aligns with your technical needs and budget.
Cloud Hosting – Flexibility and Scalability
Cloud hosting leverages a network of interconnected servers to provide flexibility and scalability, accommodating fluctuating traffic levels with ease. Unlike traditional hosting that relies on a single server, cloud hosting distributes your website’s resources across multiple servers, ensuring high availability and resilience. This setup allows your site to seamlessly scale resources up or down based on real-time demands, making it an excellent choice for businesses with variable traffic patterns. Cloud hosting is designed for optimal performance, with features like load balancing and automated failover to maintain uptime and speed. This means your site remains accessible and performs consistently well, even during traffic spikes or server outages. E-commerce sites, media platforms, and growing businesses particularly benefit from cloud hosting's adaptability and robustness. Security is another strong suit of cloud hosting. The distributed nature of cloud servers helps mitigate the risk of DDoS attacks and other security threats, as the traffic load is spread across multiple servers. Additionally, most cloud hosting providers offer advanced security protocols, regular updates, and continuous monitoring to safeguard your data. The hosting plans showcased on https://eweball.com/ often come with comprehensive features, such as easy resource scaling, robust security measures, and efficient load balancing, making it straightforward to find a cloud hosting solution that aligns with your requirements.
Managed Hosting – Let Experts Handle It for You
Managed hosting is a fantastic option for those who prefer to delegate server management tasks to experienced professionals. With managed hosting, the provider takes on the responsibility of maintaining the server, performing regular updates, backups, and security monitoring, thus allowing you to focus solely on your business operations. This service is particularly advantageous for businesses that may not have a dedicated in-house IT team. In managed hosting, providers often offer enhanced support services, including 24/7 monitoring, automated performance optimisation, and advanced security measures. These features ensure that your website runs smoothly and securely, minimising downtime and protecting against potential threats. Another benefit is the proactive approach to problem-solving. Managed hosting providers typically identify and resolve issues before they impact your website's performance, offering a layer of reliability and peace of mind that is hard to achieve with self-managed hosting. Additionally, managed hosting plans frequently include a suite of useful tools and services, such as staging environments, caching solutions, and CDN integration, which further enhance your site's performance and functionality. This comprehensive support enables you to deliver a seamless user experience, even during peak traffic periods. Managed hosting is also scalable, allowing your website to grow without the hassle of manual upgrades or configurations. The plans available on https://eweball.com/ highlight these benefits, making it easier for you to choose a managed hosting provider that aligns with your needs.
WordPress Hosting – Optimised for WordPress Websites
WordPress hosting is crafted to enhance the performance and security of WordPress sites. These specialised plans often come with pre-installed plugins and themes, optimised server configurations, and automatic updates, ensuring your site operates at peak efficiency. Enhanced security measures, such as malware scanning and daily backups, offer added protection against potential threats, while dedicated customer support can assist with WordPress-specific issues. Performance-boosting features like caching and CDN integration are typically included, facilitating faster load times and smoother user experiences. As highlighted on https://eweball.com/, leading providers offer WordPress hosting plans that cater to various needs, from personal blogs to high-traffic commercial websites.
Factors to Consider When Choosing a Web Hosting Service
When selecting a web hosting service, it’s important to evaluate several key factors to ensure it meets your specific needs. Start by identifying the type of website you plan to create and your expected traffic levels, as different hosting types (shared, VPS, dedicated, cloud, managed, and WordPress) cater to varying demands. Assess the reliability and uptime guarantees offered by potential hosts, as consistent performance is crucial for maintaining user engagement and avoiding revenue loss. Budget is another significant consideration. While cheaper options may appeal initially, they might lack essential features or scalability. Carefully examine what each hosting plan includes, such as storage, bandwidth, and support, to ensure it aligns with your requirements. Pay attention to any hidden fees and renewal rates, which can differ substantially from initial promotional prices. Customer support quality is also vital; opt for providers offering 24/7 support through various channels like live chat, phone, and email. This ensures prompt assistance whenever issues arise. Additionally, consider the scalability of the hosting plans. As your website grows, you'll want a host that allows easy upgrades to more robust packages without causing downtime or complications. Lastly, review security features like SSL certificates, regular backups, and malware protection. A secure hosting environment safeguards your data and enhances user trust. By considering these factors, you can choose a web hosting service that supports both your current and future needs.
Best Practices for Migrating Your Website to a New Host
Migrating your website to a new host requires careful planning to ensure a seamless transition. Begin by thoroughly backing up all your website data, including databases, files, and emails. This ensures you have a complete copy of your site in case anything goes wrong during the migration process. Next, gather all necessary credentials and access details for both your current and new hosting accounts to streamline the transfer. Utilise a temporary URL or staging environment on the new host to test your site before making it live. This allows you to identify and rectify any issues without disrupting your current site’s functionality. Ensure that all links, forms, and functionalities are working correctly in this test environment. Update your DNS settings to point to the new host once you’re confident everything is functioning as expected. Keep in mind that DNS changes can take up to 48 hours to propagate fully. During this period, some users may still be directed to your old site, so maintain your existing hosting account until the transition is complete. Communicate the migration to your audience, especially if any downtime is anticipated. Clear communication can mitigate frustration and keep your users informed. Lastly, resources available on https://eweball.com/ offer detailed guidance on the entire migration process, helping you navigate any complexities that may arise.
Understanding Web Hosting Costs and Pricing Structures
When evaluating web hosting costs, it’s important to understand the various pricing structures offered by different providers. Monthly and yearly billing options often differ significantly in price, with many providers offering discounts for longer-term commitments. Additionally, be aware of promotional pricing that may increase after the initial term, impacting your long-term budget. Transparent pricing comparisons on https://eweball.com/ can help you identify any hidden fees, such as setup charges or costs for additional features like SSL certificates and backups. Analysing these details will ensure that you choose a web hosting plan that fits your financial needs without compromising on essential services and scalability options.
Enhancing Website Performance with the Right Hosting
Selecting the appropriate web hosting service can significantly elevate your website's performance. Crucial elements such as server location, bandwidth, and resource allocation directly influence your site's speed and responsiveness. Hosting solutions that incorporate content delivery networks (CDNs) are particularly advantageous, as they cache content across various servers, facilitating rapid load times for users regardless of their geographical location. Another key factor is the server technology employed by the hosting provider. Solutions featuring SSD storage, high-speed CPUs, and ample RAM can markedly improve performance. Some hosts offer performance-boosting features like caching mechanisms and optimised software stacks, which further enhance loading speeds and user experience. Load balancing is also an essential component of high-performance hosting. By distributing incoming traffic evenly across multiple servers, load balancing ensures that no single server becomes overwhelmed, maintaining consistent performance even during peak traffic periods. For those operating e-commerce sites or media-heavy platforms, opting for a hosting solution with robust scalability options is crucial. As your website grows, being able to seamlessly upgrade resources without downtime is vital for sustained performance. In addition, choosing a hosting provider with a strong uptime guarantee minimises the risk of your site going offline, ensuring a reliable user experience. With the detailed comparisons available on https://eweball.com/, you can identify hosting solutions that offer these performance-enhancing features, allowing your website to operate at its best.
Security Features to Look for in a Web Hosting Provider
Website security is paramount for maintaining user trust and protecting sensitive information. When evaluating hosting providers, prioritise those that offer robust security features. SSL certificates are essential, encrypting data transmitted between your website and its visitors to prevent unauthorised access. Regular backups are also crucial, allowing you to restore your site quickly in the event of data loss or corruption. Firewalls act as a barrier between your website and potential threats, filtering out malicious traffic before it can cause harm. Additionally, malware scanning and removal services are vital for identifying and eliminating harmful software that could compromise your site. Advanced security measures such as DDoS protection help safeguard your website against distributed denial-of-service attacks, which can overwhelm your server and cause downtime. Some providers offer additional security layers, like intrusion detection systems and security audits, to further bolster your site's defences. Providers with a dedicated security team monitoring for threats and vulnerabilities can offer an added layer of protection, proactively addressing issues before they become serious problems. Features like two-factor authentication (2FA) for account logins can enhance security by requiring an additional verification step, making it harder for unauthorised users to gain access. It's also beneficial to choose a provider that offers security patches and updates automatically, ensuring that your website stays protected against newly discovered vulnerabilities without requiring manual intervention. By focusing on these security features, you can ensure your website remains secure and trustworthy.
Customer Support – The Backbone of Reliable Hosting
Effective customer support is crucial for any web hosting service, providing the assurance that help is available whenever you encounter issues. Seek out hosting providers that offer 24/7 support through multiple channels, such as live chat, phone, and email, ensuring you have access to assistance at all times. A responsive and knowledgeable support team can swiftly resolve technical problems, minimising downtime and maintaining your website's performance. Look for providers that boast a robust support infrastructure, including comprehensive knowledge bases, detailed FAQs, and community forums. These resources enable you to troubleshoot common issues independently, which can be particularly useful outside of regular business hours. Additionally, some hosting providers offer dedicated account managers for a more personalised support experience, guiding you through complex technical challenges and optimising your hosting environment. Providers that invest in customer support training and continuously update their teams on the latest technologies tend to offer superior service. Pay attention to customer reviews and testimonials available on https://eweball.com/ to gauge the effectiveness and reliability of a provider's support. Opting for a host with a proven track record in customer service can significantly enhance your hosting experience, ensuring that expert help is just a call or click away when you need it most.
Reviewing Top Web Hosting Providers on https://eweball.com/
Navigating the web hosting landscape can be overwhelming, but the extensive reviews and comparisons on https://eweball.com/ simplify this process. The platform meticulously evaluates leading web hosting providers, considering factors like performance, security, customer support, and pricing structures. Each hosting type, from shared to dedicated, is analysed to help you find a solution that aligns with your specific requirements and budget. By leveraging the detailed insights available, you can easily compare features such as uptime guarantees, scalability options, and advanced security measures. Whether you're running a small personal blog or managing a high-traffic e-commerce site, https://eweball.com/ offers the information needed to make a well-informed decision. User testimonials and expert reviews further enhance the reliability of the recommendations, ensuring that you choose a hosting provider capable of supporting your online growth.
#hosting#managed wordpress hosting#cheap web hosting#web hosting#businesss#wordpress hosting#website hosting#online businesses#cheap website hosting#online
2 notes
·
View notes
Text
A weird build issue
Today I released version 0.3.1 of the software library I'm working intensely on. At this point in the project, I expect releases to go smoothly, but this one didn't.
For this project, a release consists of 4 different software artifacts, each one built by a different job, running on a different build host: one on Windows, one on Linux, and so on. First I build normally, to ensure the project is in a working state. Then I "push a Git tag" that causes the build hosts to upload their artifacts to a staging repository. Since the build hosts and the staging repo are owned by different vendors, I generate a security token at the staging repo and feed that token to the build hosts, to assure the repo that I authorized all 4 uploads. Then I log into the staging repo and publish the uploaded artifacts.
It's a complex process, which took many tries to get right. However, it worked for 0.3.0 release, just 4 days ago.
Today, the normal build worked perfectly, but when I pushed the tag, all four uploads failed with permission errors. Logging into the staging repo, I discovered that the security token had a different value than I expected. Apparently it changed sometime in the past 4 days.
At this point, I got a little nervous, since *I* hadn't changed the token. But perhaps someone changed it for a good reason, such as in response to a security breach. It wasn't difficult to update the build hosts with the new token and restart the failed jobs.
The 2nd time around, one of the 4 jobs failed with a permission error. The other 3 were fine. I was puzzled. All 4 jobs were using the same token, stored in the same place. As far as permissions were concerned, either they should all succeed, or they should all fail. I double-checked the token and re-ran that job. It failed again.
The failing job was the one running on Windows. And I noticed that the first character in the token was a slash (/). And on Windows a slash is used to indicate a command-line option.
Perhaps the token didn't work on Windows because at some point it got passed in a command line, where the slash was mistaken for a command-line option and skipped, or erroneously escaped.
I generated a new token with no slash, re-ran the failing job, and it succeeded. So probably that slash was the issue.
Chalk up another weird build issue! I should gain some XP for this one...
#software development#software engineering#microsoft windows#repository#new release#artifacts#git#tags#weird bug#war stories#token#permissions#troubleshooting#experience#xp
3 notes
·
View notes
Text
Windows VPS Server and Linux VPS Server: A Complete Evaluation
In the reliably causing situation of web hosting and servers the pioneers, Virtual Confidential Servers (VPS) have arisen as a versatile and strong reaction for affiliations and architects the same. Two of the most detectable sorts of VPS are Windows VPS and Linux VPS. Each offers interesting parts and benefits, taking exceptional care of various necessities and propensities. This article plunges into the central places of the two Windows VPS and Linux VPS, looking at their parts, execution, security, cost, and fittingness for different use cases.
Making Sense Of VPS Hosting
Before we jump into the points of interest of Windows and Linux VPS, it's critical to understand what a VPS is. A Virtual Mystery Server (VPS) is a virtualized server that copies a serious server inside a normal hosting environment. Imaginatively, a VPS is made by partitioning a real server into various virtual servers, each running its own working system). This plan sets the moderateness of shared hosting with the control and division of given hosting.
Windows VPS Server
Outline
A Windows VPS runs on a Microsoft Windows working design. This climate is unquestionable to different clients due to the immense utilization of Windows work areas and servers. Windows VPS is especially notable among affiliations that require a Windows-based climate for unequivocal applications or associations.
Key Highlights
Indisputable Affiliation Point: For clients familiar with Windows, the GUI (graphical UI) is instinctual and easy to use. The indisputable work area climate can, on an exceptionally essential level, reduce the suspicion of holding information for new clients.
Comparability: Windows VPS is reasonable with a wide grouping of programming applications, especially those made by Microsoft, such as ASP.NET, MSSQL, and Microsoft Trade. This seeks after it a leaning toward a decision for affiliations that depend upon these turns of events.
Distant Work Area Access: Windows VPS keeps up with the Far Off Work Area Show (RDP), permitting clients to interface with their server from a distance with a full graphical sign of participation. This part is immense for regulatory undertakings and far-away associations.
Ordinary Updates And Backing: Microsoft gives standard updates and fixes to its working designs to guarantee security deficiencies. Moreover, Windows VPS clients can profit from Microsoft's wide, consoling get-storewide.
Execution
Windows VPS Server are known for having significant solid areas for them, particularly while running Windows- Express applications. Notwithstanding, the show can differ considering the server's arrangement and the errands it handles. For the most part, Windows VPS requires more assets (focal processor, Sledge) than Linux, considering the above GUI and other fundamental highlights.
Security
Windows VPS offers several central security highlights, including Windows Safeguard, BitLocker, and solid firewall courses of action. In any case, security additionally relies on normal updates and a verifiable game plan. Windows structures are routinely allowed by malware and high-level assaults because of their reputation, making concluded security rehearses major.
Cost
Windows VPS is generally more costly than Linux VPS. The expense is driven by supporting charges for the Windows working system and extra programming. While the cost can be an obstacle for certain, affiliations that depend upon Windows-express applications could be seen as the expense maintained.
Use Cases
Affiliations Utilizing Microsoft Programming: Affiliations that utilize Microsoft Trade, SharePoint, or ASP.NET applications benefit from an overall perspective from Windows VPS.
Originators Working With.Net: Planners making applications with the.NET system as frequently as conceivable grade toward Windows VPS for its close-by likeness.
Clients Requiring Gui-Based Association: people who like or require a graphical affiliation point for the bosses will find Windows VPS really obliging.
Linux VPS Server
Outline
A Linux VPS runs on a Linux working framework. Linux is an open-source working system known for its tenacity, security, and adaptability. It comes in different streams (distros) like Ubuntu, CentOS, Debian, and Fedora, each taking uncommon thought of various necessities and propensities.
Key Parts
Open Source: Linux is open-source, meaning clients can shift and direct their renditions. This adaptability considers wide customization to determine express issues.
Demand Line Affiliation Point: Linux essentially utilizes a solicitation line interface (CLI), which, despite having an incredible suspicion to learn and change, has serious solid areas for offering strong association limits. For people who slant toward a GUI, choices like Minimal Individual and KDE are open.
Asset Reasonability: Linux is known for its asset ability. It requires fewer assets than Windows, making it suitable for conditions with bound gear limits.
Gathering Of Scatterings: With various developments accessible, clients can pick the one that best suits their necessities. For example, CentOS is leaned toward strength, while Ubuntu is known for its benefit.
Execution
Linux VPS Server are remarkably competent, sometimes beating Windows VPS in asset-obliged conditions. The misfortune of a default GUI and the lightweight idea of Linux add to chop down the central processor and memory use, meaning quicker execution and better adaptability.
Security
Linux is unmistakable for its great security highlights. The open-source nature thinks about ceaseless assessment and improvement by the general area. Highlights like SELinux (Security-Updated Linux) and iptables provide solid security structures. Moreover, the lower repeat of malware focusing in on Linux adds an extra layer of safety.
Cost
One of the essential benefits of Linux VPS is its expense practicality. Since Linux is open-source, there are no endorsing costs, which fundamentally lessens the general expense. This reasonableness makes Linux VPS a connecting choice for new associations, free undertakings, and subject matter experts.
Use Cases
Web Hosting: Linux VPS is all around utilized for web hosting considering its sufficiency and comparability with striking web movements like Apache, Nginx, PHP, and MySQL.
Organizers and software engineers: Architects who use languages like Python, PHP, Ruby, and Java routinely incline toward Linux for its versatility and strong CLI.
Affiliations Requiring Watchful Strategies: Exclusive organizations and new associations searching for a dependable and reasonable server plan reliably select Linux VPS.
Near Assessment: Windows VPS Versus Linux VPS
Convenience
Windows VPS: Offers an indisputable GUI, making it all the more clear for clients with a Windows foundation. Ideal for those messed up with demand line interfaces.
Linux VPS: Dominantly utilizes CLI, which can be pursued by fledglings at any rate and offers more perceptible control and capacity for experienced clients. Several developments offer GUI choices, however, they are not precisely so especially coordinated as Windows.
Execution And Assets Of The Board
Windows VPS: Requires more assets because of its graphical affiliation point and grasped parts. Reasonable for applications that request a Windows climate.
Linux VPS: More assets are valuable, ready for pushing forward exactly as expected on lower-end gear. Wins in conditions where execution and adaptability are key.
Security
Windows VPS: Solid security consolidates in any case requires excited association and standard updates to alleviate weaknesses. Much more, as often as possible, is allowed by malware.
Linux VPS: Known for solid areas for its. The open-source nature ponders consistent improvement. The lower speed of malware assaults stood apart from Windows.
Cost
Windows VPS: More imperative expense because of endorsing charges. Reasonable for affiliations that need Windows-unequivocal applications.
Linux VPS: More reasonable considering the lack of supporting expenses. Ideal for frugal clients and affiliations.
Programming Similarity
Windows VPS: Sensible with Microsoft programming and movements. Major for affiliations utilizing ASP.NET, MSSQL, and other Microsoft things.
Linux VPS: Sensible with a wide collection of open-source programming. Liked for web hosting and improvement conditions utilizing LightStack (Linux, Apache, MySQL, PHP).
Backing And Neighborhood
Windows VPS: Consent to Microsoft's lord help associations. Extensive documentation and assets are accessible from Microsoft.
Linux VPS: Solid social class support with various parties, online assets, and documentation. The open-source area adds to inspection and improvement.
Picking The Right VPS
The decision between Windows VPS and Linux VPS relies on several variables:
Business Necessities: Consider the things and applications your business depends upon. In the event that you want Microsoft-express movements, a Windows VPS is the better decision.
Money-Related Course Of Action: Review your spending plan for server hosting. Linux VPS is for the most part, wise, making it reasonable for new associations and classified attempts.
Explicit Limit: Audit your get-together's specific limits. On the off chance that your social event is even greater with a GUI and Windows climate, pick Windows VPS. For those capable of CLI and searching for more control, Linux VPS is awesome.
Execution Needs: Pick the basics of your applications. Linux VPS offers better execution for asset-obliged conditions.
Security Concerns: Consider your security needs. The two stages are solid areas for offer, yet Linux VPS has a slight edge because of its lower vulnerability to malware.
The two Windows VPS and Linux VPS offer solid responses for different necessities. Windows VPS shimmers in conditions requiring Microsoft programming and a conspicuous GUI, while Linux VPS prevails in resource efficiency, cost-reasonability, and adaptability. By understanding the characteristics and deficiencies of each, associations and planners can seek informed decisions that best line up with their goals and particular necessities. Whether you pick Windows or Linux, VPS hosting remains a strong and flexible response for current web hosting and application sending.
2 notes
·
View notes
Text
Unchain Your Website's Potential: The Ultimate Guide to VPS Hosting!

Is your website sluggish, unreliable, and constantly battling for resources? Shared hosting might have been a lifesaver when you were starting out, but now it's holding you back. Upgrading to a Virtual Private Server (VPS) can be the game-changer you need. But what exactly is a VPS, and how can it unleash your website's true potential?
This comprehensive guide dives deep into the world of VPS hosting, explaining how it works, its benefits for tasks like Forex trading, and the key factors to consider when choosing the perfect plan for your needs. We'll even show you how to navigate the setup process and unlock the power of your VPS with tools like Remote Desktop Protocol (RDP).
By the end of this article, you'll be armed with the knowledge to confidently choose a reliable VPS hosting provider like Data Base Mart and propel your website or application to new heights of performance and security.
Unveiling the VPS: How It Works
Imagine a high-rise apartment building. The entire building represents a physical server owned by a hosting provider. Now, imagine dividing each floor into individual, self-contained units. These units are your VPS!
VPS hosting leverages virtualization technology to carve a single physical server into multiple virtual ones. Each VPS functions like a dedicated server, with its own operating system, software, and allocated resources like CPU, memory, and storage. This isolation ensures your website or application enjoys a stable environment, unaffected by activity on other virtual servers sharing the physical machine.
How VPS Hosting Works
VPS hosting builds upon the core principle explained above. Hosting providers like Data Base Mart offer various VPS plans with different resource allocations. You choose a plan that aligns with your needs and budget. The provider then sets up your virtual server on their physical infrastructure, granting you root access for complete control and customization.
Powering Forex Trading with VPS
Foreign exchange (Forex) trading thrives on speed and reliability. A VPS ensures uninterrupted access to the market, even during peak trading hours. With a VPS, you can run trading bots and automated strategies 24/7 without worrying about downtime caused by shared hosting issues.
Choosing the Right VPS
Selecting the ideal VPS hinges on your specific needs. Here's a breakdown of key factors to consider:
Resource Requirements: Evaluate your CPU, memory, and storage needs based on the website or application you'll be running.
Operating System: Choose a provider offering the operating system you're comfortable with, such as Linux or Windows.
Managed vs. Unmanaged: Managed VPS plans include maintenance and support, while unmanaged plans require you to handle server administration.
Scalability: If you anticipate future growth, choose a provider that allows easy scaling of your VPS resources.
How to Use VPS with Remote Desktop Protocol (RDP)
Many VPS providers offer remote access via RDP, a graphical interface that lets you manage your server from a remote computer. This is particularly useful for installing software, configuring settings, and troubleshooting issues.
Creating a VPS Account
The signup process for a VPS account is straightforward. Head to your chosen provider's website, select a plan, and follow the on-screen instructions. They'll typically guide you through the account creation and server setup process.
VPS Pricing
VPS plans are generally more expensive than shared hosting but significantly cheaper than dedicated servers. Pricing varies based on resource allocation and features. Providers like Data Base Mart offer competitive rates for reliable VPS solutions.
VPS Terminology Explained
VPS Stands For: Virtual Private Server
VPS Airport (doesn't exist): VPS is not an airport code.
VPS in Basketball (doesn't exist): VPS has no meaning specific to basketball.
VPS Hosting: As explained earlier, refers to a hosting service that provides virtual private servers.
VPS in Business: In a business context, VPS can refer to a virtual private server used for web hosting, application deployment, or other IT needs.
VPS in School (uncommon): While uncommon, schools might use VPS for specific applications requiring a dedicated server environment.
Final Thoughts
VPS offers a compelling middle ground between shared hosting and dedicated servers. It provides the power and control of a dedicated server at a fraction of the cost. By understanding how VPS works and choosing the right plan, you can unlock a secure and reliable platform for your website, application, or even Forex trading needs.
#How Do Vps Work#How Does Vps Work#How Does Vps Work In Forex Trading#How Does Vps Hosting Work#How Are Vps Chosen#How To Vps Rdp#How To Vps Account#How To Vps Price#What Does Vps Stand For#What Does Vps Airport Stand For#What Does Vps Mean In Basketball#What Does Vps Hosting Mean#What Does Vps Stand For In Business#What Does Vps Stand For In School#How Much Does Vps Cost
2 notes
·
View notes