#Live Linux ISO
Explore tagged Tumblr posts
Visit Tumblr Blog
Explore Tumblr blogs with no restrictions, modern design and the best experience.
Last Seen Tumblr Blogs


Fun Fact
In Q3 of 2020, 31% of US users access the Tumblr app daily.
Text
What will you create today? Make it on a worthy operating system. Catbird Linux is the real deal - power and freedom for your PC.

#Catbird Linux#Debian Sid#Linux Audio#Linux Video#Linux with Neovim#Linux with Python#Linux with Streaming Radio#Sid with Window Manager#Linux Content Creation#Linux forSchool#Linux for Note-Taking#Live Linux ISO
0 notes
Text
decided to give myself a treat and installed arch linux again
#only took 40 mins this time!#that's to root login screen#still had some config but at that point it's actually installed#did not forgor the bootloader or network manager this time#this is fun but i do wish arch had an arm variant#i know there's arch linux arm but that's a distro not really arch itself#and i simply cannot be bothered to figure out how to get it installed in a vm that expects iso images to live boot into#lizabeth talkabeth#linuxposting
6 notes
·
View notes
Text
Have YOU got an old Windows PC Microsoft has told you can't run Windows 11? It's time to give it a new life!
How to install Windows 11 on unsupported PC Hardware using Rufus. You can also disable some other Windows 11 bullshit like data harvesting and needing a Microsoft account.
It has been in the news a lot lately that Windows 11 isn't allowed to be installed on PCs without certain requirements, including the TPM 2.0, a chip that was only included in PCs made in 2018 or later. This means that once Windows 10 stops receiving security updates, those PCs will not be able to (officially) run a safe, updated version of Windows anymore. This has led to an estimated 240 million PCs bound for the landfill. Thanks Microsoft! I get you don't want to be seen as the insecure one, but creating this much waste can't be the solution.
(I know nerds, Linux is a thing. I love you but we are not having that conversation. If you want to use Linux on an old PC you are already doing it and you don't need to tell me about it. People need Windows for all sorts of reasons that Linux won't cut.)
So lately I have been helping some under privileged teens get set up with PCs. Their school was giving away their old lab computers, and these kids would usually have no chance to afford even a basic computer. They had their hard drives pulled so I have been setting them up with SSDs, but the question was, what to do about the operating system? So I looked into it and I found out there IS actually a way to bypass Microsoft's system requirement and put Windows 11 on PCs as old as 2010.
You will need: Rufus: An open source ISO burning tool.
A Windows 11 ISO: Available from Microsoft.
A USB Flash Drive, at least 16GB.
A working PC to make the ISO, and a PC from 2018 or older you want to install Windows 11 on.
Here is the guide I used, but I will put it in my own words as well.
Download your Windows 11 ISO, and plug in your USB drive. It will be erased, so don't have anything valuable on it. Run Rufus, select your USB drive in the Device window, and select your Windows 11 ISO with the Select button. (There is supposed to be a feature in Rufus to download your ISO but I couldn't get it to work.?
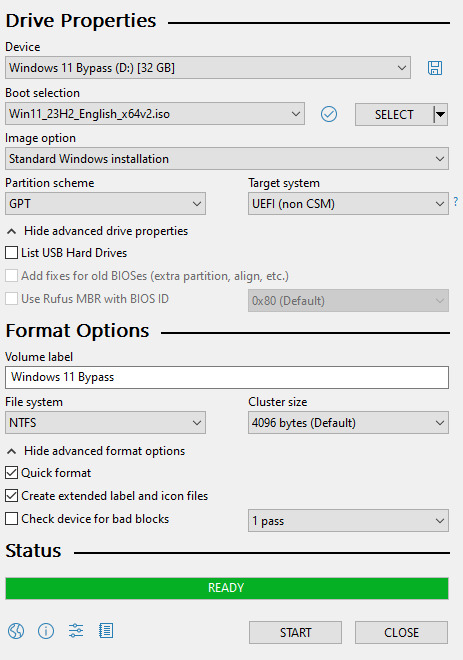
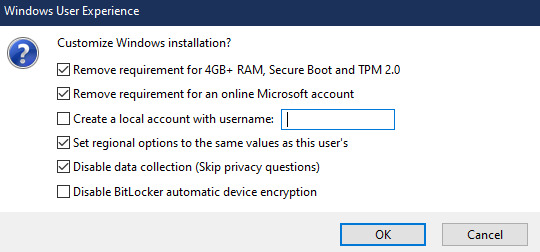
Choose standard windows installation, and follow the screenshot for your settings. Once you are done that, press Start, and then the magic happens. Another window pops up allowing you to remove the system requirements, the need for a microsoft account, and turn off data collecting. Just click the options you want, and press ok to write your iso to a drive.
From there you just need to use the USB drive to install windows. I won't go into details here, but here are some resources if you don't know how to do it.
Boot your PC from a USB Drive
Install Windows 11 from USB Drive
If you had a licensed copy of Windows 10, Windows 11 will already be licensed. If you don't, then perhaps you can use some kind of... Activation Scripts for Microsoft software, that will allow you to activate them. Of course I cannot link such tools here. So there you go, now you can save a PC made from before 2018 from the landfill, and maybe give it to a deserving teen in the process. The more we can extend the lives of technology and keep it out of the trash, the better.
Additional note: This removes the requirement for having 4GB Minimum of RAM, but I think that requirement should honestly be higher. Windows 11 will be unusable slow on any system with below 8GB of RAM. 8GB is the minimum I think you should have before trying this but it still really not enough for modern use outside of light web and office work. I wouldn't recommend trying this on anything with 4GB or less. I am honestly shocked they are still selling brand new Windows 11 PCs with 4GB of ram. If you're not sure how much RAM you have, you can find out in the performance tab of Task Manager in Windows, if you click the More Details icon on the bottom right. If you don't have enough, RAM for old systems is super cheap and widely available so it would definitely be worth upgrading if you have a ram starved machine you'd like to give a new life.

#Windows#Windows 11#tech#tech advice#pc#TPM 2.0#rufus#open source#open source software#technology#tech tips
720 notes
·
View notes
Text

Skywave Linux v5.3 is available for download! It is a self-contained live Linux operating for shortwave listening. Connect easily and stream from internet based SDR sites. The picture is from a nice night enjoying CBC Radio 1, picked up on a receiver in Newfoundland, Canada.
Get the iso image, burn it to a USB stick, boot the system and have fun. Shut down and unplug the USB, your PC never knew it was running a live Linux system…
#skywave linux#linux software defined radio#Python SDR apps#Debian Sid with DWM#internet sdrs#KiwiSDR#WebSDR
8 notes
·
View notes
Text


07.05.25
I tried out two Linux distributions on my test laptop today.
Before I started the task, I updated Linux Mint Cinnamon with the update manager to receive the latest updates for the system and installed apps.
I can also use the terminal to update everything by typing the APT command 'sudo apt-get update'.
'sudo' elevates root (admin) privileges, 'apt-get' receives the packages needed and 'update' checks for updates. I then type 'sudo apt-get upgrade' and press enter to upgrade all the applications and the system.
System up to date!
Firstly, I downloaded Debian from: https://www.debian.org/distrib/
I chose the Debian Live MATE desktop environment.
I then went to download Linux Mint from: https://linuxmint.com/download.php
I chose the Mint MATE Edition desktop environment.
Debian MATE was 3.1 Giga-Bytes and Linux Mint MATE was 2.9 Giga-Bytes to download.
Once they had downloaded, I located them in Downloads and opened the built in USB writer application.
I wrote the ISO files to the sticks to create two bootable USB sticks.
After this step I booted Debian 12 MATE.
I selected 'try' on the boot menu screen.
Here it is in action! I played around with the user interface and tested the sound, which worked brilliantly!
Next, I booted Linux Mint 22.1 MATE.
Again, I selected 'try' to boot up the live environment.
Here it is in action! Again I tested the sound, played a YouTube video in Firefox and customised the panels and themes.
Both MATE desktops in both distros were very interesting and seemed even snappier when compared to the operating systems I have installed on this laptop, which are Linux Mint 22.1 Cinnamon and Ubuntu 24.04!
I found Debian with the MATE desktop to be the most stable environment however.
See blog below to learn more about the modern take on the classic GNOME 2 experience!
4 notes
·
View notes
Text
Installing Kali Linux on a USB Stick: A Step-by-Step Guide
If you want a portable, powerful cybersecurity toolkit you can carry in your pocket, installing Kali Linux on a USB stick is the perfect solution. With Kali on a USB, you can boot into your personalized hacking environment on almost any computer without leaving a trace — making it a favorite setup for ethical hackers, penetration testers, and cybersecurity enthusiasts.

In this guide, we'll walk you through how to install Kali Linux onto a USB drive — step-by-step — so you can have a portable Kali environment ready wherever you go.
Why Install Kali Linux on a USB?
Before we dive into the steps, here’s why you might want a Kali USB:
Portability: Carry your entire hacking setup with you.
Privacy: No need to install anything on the host machine.
Persistence: Save your settings, files, and tools even after rebooting.
Flexibility: Boot into Kali on any system that allows USB boot.
There are two main ways to use Kali on a USB:
Live USB: Runs Kali temporarily without saving changes after reboot.
Persistent USB: Saves your files and system changes across reboots.
In this article, we’ll focus on setting up a Live USB, and I'll also mention how to add persistence if you want. and if you seek knowledge about kali linux you can visit our website any time
Website Name : Linux Tools Guide
What You’ll Need
✅ A USB drive (at least 8GB; 16GB or more recommended if you want persistence). ✅ Kali Linux ISO file (download it from the official Kali website). ✅ Rufus (for Windows) or Etcher/balenaEtcher (for Mac/Linux/Windows). ✅ A computer that can boot from USB.
Step 1: Download the Kali Linux ISO
Go to the Kali Linux Downloads page and grab the latest version of the ISO. You can choose between the full version or a lightweight version depending on your USB size and system requirements.
Tip: Always verify the checksum of the ISO to ensure it hasn't been tampered with!
Step 2: Insert Your USB Drive
Plug your USB stick into your computer. ⚠️ Warning: Installing Kali onto the USB will erase all existing data on it. Backup anything important first!
Step 3: Create a Bootable Kali Linux USB
Depending on your operating system, the tool you use may vary:
For Windows Users (using Rufus):
Download and open Rufus (Get Rufus here).
Select your USB drive under Device.
Under Boot selection, choose the Kali Linux ISO you downloaded.
Keep the Partition scheme as MBR (for BIOS) or GPT (for UEFI) based on your system.
Click Start and wait for the process to complete.
For Mac/Linux Users (using balenaEtcher):
Download and open balenaEtcher (Get Etcher here).
Select the Kali ISO.
Select the USB drive.
Click Flash and wait until it's done.
That's it! You now have a Live Kali USB ready.
Step 4: Boot Kali Linux from the USB
Restart your computer with the USB plugged in.
Enter the BIOS/UEFI settings (usually by pressing a key like F12, Esc, Del, or F2 right after starting the computer).
Change the boot order to boot from the USB first.
Save changes and reboot.
You should now see the Kali Linux boot menu! Select "Live (amd64)" to start Kali without installation.
(Optional) Step 5: Adding Persistence
Persistence allows you to save files, system changes, or even installed tools across reboots — super useful for real-world usage.
Setting up persistence requires creating an extra partition on the USB and tweaking a few settings. Here's a quick overview:
Create a second partition labeled persistence.
Format it as ext4.
Mount it and create a file /persistence.conf inside it with the content: cppCopyEdit/ union
When booting Kali, choose the "Live USB Persistence" option.
Persistence is a little more technical but absolutely worth it if you want a real working Kali USB system!
Troubleshooting Common Issues
USB not showing up in boot menu?
Make sure Secure Boot is disabled in BIOS.
Ensure the USB was properly written (try writing it again if necessary).
Kali not booting properly?
Verify the ISO file integrity.
Try a different USB port (preferably USB 2.0 instead of 3.0 sometimes).
Persistence not working?
Double-check the /persistence.conf file and make sure it's correctly placed.
Conclusion
Installing Kali Linux onto a USB stick is one of the smartest ways to carry a secure, full-featured hacking lab with you anywhere. Whether you’re practicing ethical hacking, doing security audits, or just exploring the world of cybersecurity, a Kali USB drive gives you power, portability, and flexibility all at once.
Once you’re set up, the possibilities are endless — happy hacking! 🔥
2 notes
·
View notes
Note
Truly and earnestly, good luck
Let's say that you find out that your current Linux OS was busted somehow. What do you migrate to?
Funnily enough I’m actually migrating distros rn. My old install was so shit and bloated that at this point it was just best to nuke it. It was a hard to decide which one I’d migrate to, but I decided on Linux Mint with the help of an advisor. However, if by some unholy miracle that the third most popular Linux distro on distrowatch went bust literally tomorrow, I’d probably switch to Zorin.
#get an iso with a live preview and hopefully get all your files before you reinstall Linux#but like I don’t even know if that’s possible with a corrupted file system#how does that even happen?#anywyas I hope you get the help you need
20 notes
·
View notes
Text
I'm no longer a Linux Mint user, I moved upstream to Debian, the distro Mint is based on. Now Debian was part of Linux's forbidding reputation of being difficult to install and use for non-tech-savvy users. Now this wasn't entirely unearned, as this video of trying to install a 1999 boxed edition of Debian demonstrates. Part of this was Debian's commitment to free software, so they didn't include proprietary drivers for hardware in the install, so you had to figure out how to get your wi-fi card to work on your own if you installed Debian on your laptop for example. They are actually one of the distros that call it "GNU/Linux"
The point of both Ubuntu and Mint back in the 00s was to take what Debian did well, but make it more user-friendly. And it worked, Ubuntu nowadays has declined with the Snap pacakage format, but it did do a lot for making desktop Linux user-friendly and more viable (Mint today is essentially what Ubuntu was pre-snap). Debian remains one of the biggest server OS out there, but on desktop Ubuntu by all accounts became way more popular.
However Debian has learned over the years and the latest release from June 2023, Debian 12 "Bookworm" is a massive improvement in user-friendliness. The install process is easy. There is both a slightly more complicated "net-installer" with all ISOs, and a simplified Calameres installer included with live systems that can be run off usbs to test things out. And even the net-installer is quite a simple process that is good at explaining what it does, and having sane defaults it encourages you to pick if you are unsure. This video about Debian 12 is a good counterpoint to the Debian 2.1 video linked above.
It did involve being more pragmatic about their approach to free software and including non-free firmware, so things like wi-fi now work without any problems for the end-user. Now I'm against proprietary software and hardware manufactures should have open source drivers for their shit, but I can't argue with how my laptop's wi-fi and bluetooth worked entirely without hassle.
Now Debian still requires more of the user than Mint does, like you have to figure out how to enable flatpak support and I did have to go into the terminal to install all the packages I wanted. That was a leesser part of the experience with Mint, I only had to do that to install 32bit libraries for my retro games and speciailized things like that.
(And you do want flatpak, the one thing you need to know it's a form of software package that works on basically all Linux distros, so a lot of developers package their programs as flatpaks instead of creating multiple versions for for all the various Linux file systems. So you get a lot of variety in software, and there are other positives as well)
I was happy for having a few months of training in how Linux works from Mint, it taught me how packages work. why flatpaks are useful (they are included by default in Mint and its package manager), how to use the terminal and other useful stuff. So if you are completely new to Linux, Mint is still the distro I recommend. I recently installed Mint on the computer of a 70-year old friend of mine, not Debian for a reason.
Still, It's nice to be at the distro that is the source rather than two steps downstream. Having to set up my Debian, instead of all the things the Ubuntu and Mint devs have added on top (even if what the Mint team adds does make for a smoother out-of-the-box experience). Again I'm not that technically proficient, but I find some enjoyment in tinkering. So setting up things like flatpak in Debian was a fun little challenge for me to do, made quite safe and easy by all the guides there are for such things.
I'm probably going to stick with Debian stable. I like long-term support distro way of doing updates, where you get important security updates, but other updates are released only after being tested for bugs. This ensures sytem stability. The other way is rolling release, where updates are constant. Package updates are released as soon as they are available, which might lead to bugs and other forms of system instability.
LTS does mean you won't get flashy new features for awhile, but I'm usually quite happy with the way I currently use my programs, my current workflow. Despite being a transgendered ultra-leftist, I'm creature of routine and habit (it's the autism), so LTS distros fit me quite well. If it ain't broke, don't fix it. So i'm probably not going to use arch btw, not because I'm afraid of not figuring it out, it might even be a fun challenge, but because I don't care about rolling release cycles.
And Debian is the best of LTS distros, the one most off them are based on. Also Debian is for lesbians.
22 notes
·
View notes
Text
LighthousePup
LighthousePup – a Puppy Linux based live ISO, is a quick and easy to set up https://archiveos.org/lighthousepup/

2 notes
·
View notes
Text
Catbird Linux v3.2 is USB pluggable Live Linux for writers, programmers, data crunchers, and content creators.

#catbird linux#debian sid#Sid with Window Manager#Linux Content Creation#Linux forSchool#Linux for Note-Taking#Live Linux ISO
0 notes
Note
Just got a new laptop which unfortunately comes with windows 11, so I’m kinda tempted to throw Linux on it out of spite
Would that be a good idea, seeing as I have never to my knowledge used linux?
Ok so this is in my honest opinion, if you want something good for beginners, then Linux Mint is your best option
If you already know how to flash an ISO to a USB drive and boot to it and all that, then you don't have to click the read more button, but if you don't there's some more instructions below the cut
There's a really easy way to get started
First, get a torrent client like qBittorrent, Deluge, Transmission, whatever, they're all pretty good open source torrent clients (although I'm biased towards qBittorrent because that's my personal client of choice)
Then you're gonna wanna go to https://linuxmint.com and you're gonna wanna click that download button
You're gonna come across three different editions of Linux Mint, I recommend going with the first option, Cinnamon edition as Cinnamon is pretty good at helping you feel at home when coming from Windows
Hit the download button and then click the button that says Torrent Download: 64-bit, and you'll get a torrent file that you can open up in your torrent client
Or you could just do a direct download if you're gonna wipe the damn laptop, no point in trying to seed the ISO when Windows 11 is gonna get wiped
Anyway, let that iso download and then you're gonna wanna grab a piece of software called rufus
Go to https://rufus.ie/en/ and download the correct version for your platform
Now get a USB drive you don't mind wiping the data off of, because you need to flash the ISO to it
Then you're gonna wanna plug the USB drive into your computer and open up rufus and select the USB drive you just plugged in, if it didn't already do that
Then you're gonna wanna select the ISO you downloaded in Rufus
Leave all the settings as is, it'll be fine, but given you have a new laptop, I'm gonna assume it's one of the newer models and not something like a Thinkpad, so you should set the partition scheme to GPT
Then you just hit start, click through a couple of prompts, and then you just wait
At this point, just reboot your computer and figure out which key gets you into the boot menu, could be escape, f11, f12, delete, beats me, it's always something different
You may need to disable secureboot because it may prevent you from booting the USB, so there's that
Anyway, boot into the USB, hit enter to start Linux Mint and you'll be dropped into the live desktop
You can poke around and see if you like what you see, or if you don't, then that's alright, you can shutdown and pull the USB and flash a different edition or use a completely different distro
Just poke around in it, see what looks good to you, see what doesn't, you won't affect any of your disks until you decide to install
But yeah, there should be a CD looking icon on the desktop, and you can click it to start the install process
Once you go through it all and wiped Windows 11, there you go, Linux Mint on your computer
And if a video guide works better for you, then maybe this tutorial might help, it's a little old, but the same broad strokes still apply
youtube
Have fun on linux and enjoy the wild west of computing
9 notes
·
View notes
Text
LFS 12.0 is released! Gonna celebrate,,,,
Linux From Scratch releases on about a 6 month cycle and felt a good way to celebrate is by doing a live stream or just basic ASMR video for my YouTube channel of installing LFS 12.0, the multilib version maintained by Thomas. Right now, I got QEMU set up (I think) and I'm downloading the Gentoo livegui ISO so I can put it in QEMU and install everything,, Gonna download all the tarballs and a pdf/html of the multilib cuz I don't wanna set up a bridge, seems complicated at the moment!! No Steam or anything, just a basic LFS install, no BLFS. When 12.1 rolls around, or glibc-2.39, I will do another installation on my main system and try to do a more in-depth tutorial on how the hell I used black magic in my aid of trying to get Steam to work against all odds. Eep well, and I apologize for ramming all your feeds with my art the other day!!
5 notes
·
View notes
Text
I'll just do it here.
Linux FAFO
this method is going to be a bit slow compared to what you're used to, but this is the price we pay for virtualization.
1.) download and install virtualbox
2.) download linux mint
3.) launch virtualbox and set up a virtual machine
here's how:

Your left panel will likely be blank, don't worry about it, press NEW

type a name, anything you feel like
select the iso you downloaded in the ISO Image dropdown, it should figure out the rest for you, but if it doesn't Type: Linux, Version: Ubuntu are fine. Mint is based off Ubunutu.

I changed the username and stuff on the left, but I don't think I needed to.

this is asking how much RAM and how many cores (if you have more than one) you want to use for your homunculus computer. stay in the green and you should be fine, but you can keep it at the default too. don't worry about EFI

how big do you want your homunculus hard-drive? KEEP IT LESS THAN YOUR ACTUAL EMPTY SPACE
the next screen will be a summary of everything we've done so far, press finish.
gz you configured a virtual machine.
to start it:
Select your machine of choice, and press Start, then it will boot up. The first time, I got a thing that said it couldn't find an optical drive or something, with a dropdown; I would have picked the same mint iso as we did earlier for the dropdown, but I accidentally closed it. when I opened it again, there was no problem.

chances are it will slowly open you in to a linux desktop. this is because Mint isos are live discs, meaning they load linux in to your ram and you can fuck around without installation, but it's usually a bit slow and somewhat limited
in our case it will be a virtual environment inside a virtual environment and will suck, so just click the install from either the corner menu or the shortcut on the desktop.
installation was literally so easy i basically just pressed next all the way through, but i did capture some things I thought might be less intuitive for neophytes.

yea, go ahead, won't hurt
you'll see some screens about what language you speak, what your keyboard language is, and that sort of thing, set it up accordingly or just don't touch anything.

this sounds scary, it's not, it's talking about the homunculus simulated computer which currently has nothing on it, this is safe
you'll get a confirmation about the changes it's writing to the disc, etcetera. unless you know what you're doing just use the defaults.
this is around the last screen, set it up the way you want, just make sure you can remember the username and password you want for your sim computer.

continue, finish, etc. it will put you back on the desktop from before and give you a thing that says you should restart, go ahead and do that

there, you now have a tiny computer running inside your computer. you can use you sim computer to fuck around without worrying about screwing up your main computer.
either use it like a normal person or go around breaking and trying to fix stuff.
ubuntu has official tech support, some of that will translate to mint, although I never needed to go further than the user community. mint has it's own forums also, and there are generic all-linux forums like linuxquestions

that's your beginner friendly app store, click the corner menu button --you know exactly how that works -> Administration -> Software Manager. you can find open source linux stuff there, and you can also find certain other things like Discord, Spotify, etc.
anyway this is just intro stuff, you can customize the ever-living fuck out of linux and do some cool shit with just a little bit of experience with the technicals, if you want to, or just use it out of the box.
I'll follow up on that technicals shit later i guess.
25 ways to be a little more punk in 2025
Cut fast fashion - buy used, learn to mend and/or make your own clothes, buy fewer clothes less often so you can save up for ethically made quality
Cancel subscriptions - relearn how to pirate media, spend $10/month buying a digital album from a small artist instead of on Spotify, stream on free services since the paid ones make you watch ads anyway
Green your community - there's lots of ways to do this, like seedbombing or joining a community garden or organizing neighborhood trash pickups
Be kind - stop to give directions, check on stopped cars, smile at kids, let people cut you in line, offer to get stuff off the high shelf, hold the door, ask people if they're okay
Intervene - learn bystander intervention techniques and be prepared to use them, even if it feels awkward
Get closer to your food - grow it yourself, can and preserve it, buy from a farmstand, learn where it's from, go fishing, make it from scratch, learn a new ingredient
Use opensource software - try LibreOffice, try Reaper, learn Linux, use a free Photoshop clone. The next time an app tries to force you to pay, look to see if there's an opensource alternative
Make less trash - start a compost, be mindful of packaging, find another use for that plastic, make it a challenge for yourself!
Get involved in local politics - show up at meetings for city council, the zoning commission, the park district, school boards; fight the NIMBYs that always show up and force them to focus on the things impacting the most vulnerable folks in your community
DIY > fashion - shake off the obsession with pristine presentation that you've been taught! Cut your own hair, use homemade cosmetics, exchange mani/pedis with friends, make your own jewelry, duct tape those broken headphones!
Ditch Google - Chromium browsers (which is almost all of them) are now bloated spyware, and Google search sucks now, so why not finally make the jump to Firefox and another search like DuckDuckGo? Or put the Wikipedia app on your phone and look things up there?
Forage - learn about local edible plants and how to safely and sustainably harvest them or go find fruit trees and such accessible to the public.
Volunteer - every week tutoring at the library or once a month at the humane society or twice a year serving food at the soup kitchen, you can find something that matches your availability
Help your neighbors - which means you have to meet them first and find out how you can help (including your unhoused neighbors), like elderly or disabled folks that might need help with yardwork or who that escape artist dog belongs to or whether the police have been hassling people sleeping rough
Fix stuff - the next time something breaks (a small appliance, an electronic, a piece of furniture, etc.), see if you can figure out what's wrong with it, if there are tutorials on fixing it, or if you can order a replacement part from the manufacturer instead of trashing the whole thing
Mix up your transit - find out what's walkable, try biking instead of driving, try public transit and complain to the city if it sucks, take a train instead of a plane, start a carpool at work
Engage in the arts - go see a local play, check out an art gallery or a small museum, buy art from the farmer's market
Go to the library - to check out a book or a movie or a CD, to use the computers or the printer, to find out if they have other weird rentals like a seed library or luggage, to use meeting space, to file your taxes, to take a class, to ask question
Listen local - see what's happening at local music venues or other events where local musicians will be performing, stop for buskers, find a favorite artist, and support them
Buy local - it's less convenient than online shopping or going to a big box store that sells everything, but try buying what you can from small local shops in your area
Become unmarketable - there are a lot of ways you can disrupt your online marketing surveillance, including buying less, using decoy emails, deleting or removing permissions from apps that spy on you, checking your privacy settings, not clicking advertising links, and...
Use cash - go to the bank and take out cash instead of using your credit card or e-payment for everything! It's better on small businesses and it's untraceable
Give what you can - as capitalism churns on, normal shmucks have less and less, so think about what you can give (time, money, skills, space, stuff) and how it will make the most impact
Talk about wages - with your coworkers, with your friends, while unionizing! Stop thinking about wages as a measure of your worth and talk about whether or not the bosses are paying fairly for the labor they receive
Think about wealthflow - there are a thousand little mechanisms that corporations and billionaires use to capture wealth from the lower class: fees for transactions, interest, vendor platforms, subscriptions, and more. Start thinking about where your money goes, how and where it's getting captured and removed from our class, and where you have the ability to cut off the flow and pass cash directly to your fellow working class people
51K notes
·
View notes
Text
Beginner’s Guide to Ethical Hacking Tools 🔐
Ethical hacking is more than a buzzword—it’s a critical skillset in 2025’s cybersecurity landscape. If you’ve ever wondered how hackers think and how companies stay one step ahead of cybercriminals, you need to know the essential tools of the trade. Here’s your beginner’s toolkit:
1. Kali Linux – The Hacker’s Operating System
A Linux distribution packed with security and penetration-testing tools.
Why use it? Pre-installed tools, live-boot capability, regular updates.
Get started: Download the ISO, create a bootable USB, and explore tools like Nmap and Metasploit.
2. Nmap – Network Mapper
Scans networks to discover hosts, services, and vulnerabilities.
bash
CopyEdit
nmap -sS -sV -O target_ip
-sS for stealth scan
-sV to detect service versions
-O for OS detection
3. Metasploit Framework – Exploitation Powerhouse
Automates exploiting known vulnerabilities.
Use case: After identifying an open port with Nmap, launch an exploit module in Metasploit to test the weakness.
Basic commands: bashCopyEditmsfconsole use exploit/windows/smb/ms17_010_eternalblue set RHOST target_ip run
4. Wireshark – Packet Analyzer
Captures and analyzes network traffic in real time.
Why it matters: See exactly what data is flowing across the network—useful for finding unencrypted credentials.
Tip: Apply display filters like http or ftp to focus on specific protocols.
5. Burp Suite – Web Application Scanner
Interacts with web applications to find vulnerabilities (SQLi, XSS, CSRF).
Features: Proxy traffic, automated scanner, intruder for fuzzing.
Getting started: Configure your browser to use Burp’s proxy, then browse the target site to capture requests.
6. John the Ripper – Password Cracker
Tests password strength by performing dictionary and brute-force attacks.
bash
CopyEdit
john --wordlist=/usr/share/wordlists/rockyou.txt hashfile.txt
Tip: Always test on hashes you have permission to crack.
7. Nikto – Web Server Scanner
Checks web servers for dangerous files, outdated software, and misconfigurations.
bash
CopyEdit
nikto -h http://target_website
Quick win: Identify default files and known vulnerabilities in seconds.
8. Aircrack-ng – Wireless Network Auditor
Assesses Wi-Fi network security by capturing and cracking WEP/WPA-PSK keys.
Workflow:
airodump-ng to capture packets
airmon-ng to enable monitor mode
aircrack-ng to crack the handshake
9. OWASP ZAP – Web Vulnerability Scanner
An open-source alternative to Burp Suite with active community support.
Use case: Automated scans plus manual testing of web applications.
Bonus: Integrated API for custom scripting.
10. Hydra – Fast Login Cracker
Performs rapid brute-force attacks on network and web services.
bash
CopyEdit
hydra -l admin -P passwords.txt ssh://target_ip
Warning: Use only in lab environments or with explicit permission.
Putting It into Practice
Set up a lab with virtual machines (Kali Linux + victim OS).
Scan the network with Nmap.
Analyze traffic in Wireshark.
Exploit a vulnerability with Metasploit.
Validate web app security using Burp Suite and OWASP ZAP.
Crack test passwords with John the Ripper and Hydra.
Ready to Dive Deeper?
If you’re serious about ethical hacking, check out our Ethical Hacking Course in Jodhpur at TechFly (no link here per your request). You’ll get hands-on labs, expert mentorship, and real-world attack/defense scenarios.
1 note
·
View note
Video
youtube
How to use Cachy-chroot from a Live iso | Bootloader and system Repair | #linux #FOSS #CachyOS #Nobara #EndeavourOS
0 notes
Text


08.10.24
I downloaded Linux Mint 22 with the 'MATE' Desktop today.
https://www.linuxmint.com/download.php
Using Linux Mint Cinnamon's built in USB writer, I wrote the ISO file to my 16 GB USB stick. The file size is 2.8 Giga-bytes for MATE.
Once this had completed, I then restarted the computer and from the boot screen, selected 'Start Linux Mint 22 MATE.'
The laptop booted into the live USB environment of Mint, where I could play around with it and at a later time chose to install it onto one of the hard disk partitions.
Linux Mint 22 MATE like the Cinnamon and XFCE desktop choices is based on Ubuntu 24.04, and features the MATE desktop 1.28 (2024).
https://mate-desktop.org/
MATE is based on the classic Gnome 2 codebase which was a very stable and popular desktop environment between 1997 to 2011.
The screenshot shows how the panels can be re-arranged to match the 'traditional' Gnome 2 layout seen on Ubuntu and other Linux desktops. XViewer is the default image viewer on all Mint desktops.
The operating system also comes with a selection of modern and classic colourful themes.
Underneath is a screen capture of Linux Mint 7 featuring GNOME 2, which was released in 2009!
I will install it alongside Linux Mint 22 Cinnamon and Ubuntu 24.04!
4 notes
·
View notes