#PSRAM
Explore tagged Tumblr posts
Visit Tumblr Blog
Explore Tumblr blogs with no restrictions, modern design and the best experience.
Last Seen Tumblr Blogs


Fun Fact
If you dial 1-866-584-6757, you can leave an audio post for your followers.
Text

Fruit Jam RP2350B credit-card mini computer with all the fixin's 🍓🍇💾
We were catching up on a recent Hackaday hackchat with Eben Upton (https://hackaday.io/event/202122-raspberry-pi-hack-chat-with-eben-upton) and learned some fun facts: such as the DVI hack for the RP2040 was inspired by a device called the IchigoJam (https://www.hackster.io/news/ichigojam-combines-strawberry-and-raspberry-to-deliver-a-raspberry-pi-pico-powered-educational-micro-66aa5d2f6eec). We remember reading about this back when it was an LPC1114, now it uses an RP2040. Well, we're wrapping up the Metro RP2350 (https://www.adafruit.com/product/6003), and lately, we've been joking around that with DVI output and USB Host support via bit-banged PIO, you could sorta build a little stand-alone computer. Well, one pear-green-tea-fueled-afternoon later we tried our hand at designing a 'credit card sized' computer - that's 3.375" x 2.125", about the same size as a business card (https://hackaday.com/2024/05/07/the-2024-business-card-challenge-starts-now/) and turns out there's even a standard named for it: ISO/IEC 7810 ID-1 (https://www.iso.org/standard/70483.html).
Anyhow, with the extra pins of the QFN-80 RP2350B, we're able to jam a ridonkulous amount of hardware into this shape: RP2350B dual 150MHz Cortex M33 w/ PicoProbe debug port, 16 MB Flash + 8 MB PSRAM, USB type C for bootloading/USB client, Micro SD card with SPI or SDIO, DVI output on the HSTX port, I2S stereo headphone + mono speaker via the TLV320DAC3100 (https://www.digikey.com/en/products/detail/texas-instruments/tlv320dac3100irhbt/2353656), 2-port USB type A hub for both keyboard and mouse or game controllers, chunky on-off switch, Stemma QT I2C + Stemma classic JST 3-pin, EYESPI for TFT displays, 5x NeoPixels, 3x tactile switches, and a 16-pin socket header with 10 A/D GPIO + 5V/3V/GND power pins. The PSRAM will help when we want to do things like run emulations that we need to store in fast RAM access, and it will also let us use the main SRAM as the DVI video buffer.
When we get the PCBs back and assembled, what should we try running on this hardware? We're pretty sure it can run DOOM. Should that be first? :) We also need a name. Right now, we're just calling it Fruit Jam since it's inspired by the IchigoJam project.
#fruitjam#rp2350b#raspberrypi#microcomputer#hackaday#diyelectronics#retrocomputing#creditcardpc#hardwarehacking#usbhost#dvioutput#psram#retrogaming#makercommunity#opensourcehardware#homemadecomputer#minipc#embeddeddevelopment#techinnovation#electronicsproject#tinkering#cortexm33#doomport#custompcb#hacktheplanet#hardwaredesign#diytech#retroconsole#handheldgaming#fruitjampc
34 notes
·
View notes
Text
Introducing the S2 Mini V1.0.0 ESP32-S2 Development Board!
Looking to power up your next IoT project? Meet the S2 Mini V1.0.0 – a compact yet powerful Wi-Fi development board that's perfect for all your tech experiments.
Key Features:
4MB FLASH for plenty of storage
2MB PSRAM for speedy performance
Wi-Fi connectivity to take your projects online
Ideal for home automation, wearables, and DIY smart gadgets!
Type-C USB Interface: Easy and convenient connectivity.
27 Digital I/O Pins: Supports interrupt, PWM, I2C, single wire ADC, DAC, SPI, UART, and USB OTG.
With the ESP32-S2 at its heart, this development board is designed to handle everything from real-time data processing to seamless web communication. Whether you're a hobbyist or a professional, this is the board you need for cutting-edge projects.
Click here to purchase the product: https://dhakarobotics.com/.../1045-s2-mini-v1-0-0-esp32.../
Contact Us: +8801740298319
visit our website: https://dhakarobotics.com/

#ESP32S2#DevelopmentBoard#WiFiBoard#IoTProjects#SmartDevices#DIYTech#EmbeddedSystems#TechInnovation#HomeAutomation#WearableTech#MakersCommunity#TechGadgets#PSRAM#Microcontroller#Electronics#dhakarobotics
0 notes
Text
Now there's a cheap path for me to experiment with Halow which is a protocol like LoRa but shorter distance with the upshot that it's better for cities. I'll get this when the latest donations get to my account
7 notes
·
View notes
Text
CrowPanel Advance 7“ HMI von Elecrow – großes Display, großer Funktionsumfang

Mit dem CrowPanel Advance 7“ hat Elecrow ein spannendes All-in-One-Display im Sortiment, das nicht nur durch seine Größe auffällt. Das Touch-Display bringt alles mit, was man für moderne IoT- oder UI-Projekte braucht: Ein hochauflösendes IPS-Panel, einen leistungsstarken ESP32-S3 mit KI-Funktionen und zahlreiche Schnittstellen. Ich habe mir das Panel in den letzten Tagen genauer angeschaut – hier kommt mein erster Eindruck. https://youtu.be/mYx4jaoDOHQ Hinweis: Das hier vorgestellte Produkt – das CrowPanel Advance 7“ HMI – wurde mir von Elecrow kostenfrei für ein Review zur Verfügung gestellt. Der Beitrag spiegelt ausschließlich meine persönliche Meinung wider. Es gab keinerlei Vorgaben oder Einflussnahme auf Inhalt oder Bewertung.


Technische Daten – kompakt zusammengefasst
Hier die wichtigsten Eckdaten auf einen Blick: - Displaygröße: 7 Zoll IPS, 800x480 Pixel - Touch: Kapazitiver Touchscreen - Controller: ESP32-S3, Dual-Core, 240 MHz, mit KI-Unterstützung - Speicher: 16 MB Flash + 8 MB PSRAM - Schnittstellen: USB-C, GPIOs, microSD, Audio, Kamera-Port - Betriebssysteme/Sprachen: Unterstützt Arduino, LVGL, MicroPython und Meshtastic - Stromversorgung: 5 V via USB-C Diese Kombination macht das Panel zu einer interessanten Lösung für viele Anwendungen – ob als HMI (Human Machine Interface), Info-Terminal, DIY-Steuerung oder sogar als kleines Smart-Home-Display.
Ausgepackt und begutachtet
Das Panel kam gut verpackt bei mir an. Im Lieferumfang enthalten war neben dem Display auch ein passendes USB-C-Kabel sowie eine kleine Stiftleiste für GPIO-Anschlüsse. Das Gehäuse wirkt solide, die Rückseite ist sauber verarbeitet und bietet mehrere Befestigungspunkte, z. B. für den Einbau in ein Gehäuse oder Frontpanel. Was mir besonders gefallen hat: Trotz seiner Größe ist das Gerät erstaunlich leicht und flach. Das macht es deutlich einfacher, das Panel in eigene Projekte zu integrieren – z. B. in eine Steuerbox oder ein Dashboard.
Display & Touch – ein echter Hingucker
Das 7-Zoll-IPS-Display überzeugt direkt beim ersten Einschalten: Die Farben sind kräftig, die Blickwinkelstabilität ist hervorragend und die Auflösung ist für diese Größe völlig ausreichend. Auch der Touchscreen reagiert präzise und flüssig – so, wie man es von einem kapazitiven Panel erwartet. Es fühlt sich an wie ein kleiner Tablet-Bildschirm, allerdings offen für deine eigenen Ideen und Projekte.
Viel Power unter der Haube: ESP32-S3
Das Herzstück des Panels ist ein ESP32-S3 – ein leistungsfähiger Mikrocontroller mit zwei Kernen, 240 MHz Taktfrequenz und integrierten Funktionen rund um künstliche Intelligenz (KI). In Kombination mit dem großzügigen Speicher (16 MB Flash, 8 MB PSRAM) eignet sich das Gerät nicht nur für einfache UI-Anwendungen, sondern auch für Projekte mit Machine Learning oder Bildverarbeitung – zum Beispiel in Verbindung mit einer angeschlossenen Kamera.
Schnittstellen & Möglichkeiten
Ein Blick auf die Anschlussmöglichkeiten zeigt: Das Panel will mehr sein als nur ein Display. Neben USB-C (für Daten und Strom) sind auch ein microSD-Karten-Slot, ein Audio-Ausgang, ein Kamera-Port und eine GPIO-Stiftleiste vorhanden. Damit lässt sich das CrowPanel leicht erweitern und in größere Projekte einbinden – sei es zur Datenspeicherung, als Audioplayer oder zur Anbindung an Sensoren und Aktoren. Read the full article
2 notes
·
View notes
Text
JL Bluetooth Speaker Chip Classification: Entry-Level 706, Mid-Range 701, High-End Auracast & Lavalier Mic Guide
AI Quick Summary
From the entry-level AC706N to the flagship JL7033A, JL’s Bluetooth chip lineup covers the full spectrum of use cases: 192MHz processing power ensures stable connections and FM reception; dual-core DSP delivers ultra-high-definition 24bit/384KHz audio; and Auracast broadcasting technology unlocks a new era in wireless audio. This document introduces the classification and application of JL Bluetooth speaker chips.
Entry-Level: AC706N – 192MHz CPU, supports FM radio, multi-device broadcasting, matches models like SSOE SSK02.
Mid-Range: JL7012C / 7016C – Dual 160MHz CPUs with proprietary sound algorithms, used in products like Anker Select 2S.
Flagship: JL7033A / 7034A – 320MHz dual-core DSP, full-featured but complex, applied in Huawei Yueying.
Auracast Support: AC6894A – Dual-core 192MHz, 24bit/384KHz audio, used in xiaomo Sound Outdoor.
Live Streaming Microphones: AC706N & AW32N – Latency <5ms, suitable for Edifier’s Xiaojinmai M1.
Karaoke Speakers – Two configurations:
1. Bluetooth Speaker Chip Selection – Entry-Level: AC706N
Advantages:
192MHz CPU provides strong processing capability
Excellent RF performance ensures stable connectivity
Supports multi-device broadcasting, FM reception, stereo output
Low-noise DAC, great sound quality and effects
Visual SDK enables fast mass production
Stable supply chain and simplified peripheral design
Specifications:
Bluetooth Version: v6.0
RAM: 136KB
RF Performance (Tx/Rx): 10dBm / -93dBm
Audio Codecs: SBC / AAC / LC3
LE Audio: Supported
DAC: 2 channels, 24bit/96KHz, SNR 103dB
FM Radio: Supported
Built-in RTC: Yes

2. Bluetooth Speaker Chip Selection – Mid-Range: JL701N Series
Advantages:
Dual-core 160MHz CPUs
Larger RAM
Excellent vocal clarity
High SNR DAC with very low noise floor
Stable Bluetooth connection
Third-generation proprietary sound enhancement algorithm
Specifications:
Bluetooth Version: v6.0 (dual-mode)
CPU/DSP: Dual 160MHz
RAM: 640KB
RF Performance (Tx/Rx): 9dBm / -95dBm
Audio Codecs: … / LC3 / LDAC / LHDC
LE Audio: Supported
DAC: 2 channels, 24bit/96KHz, SNR 105dB
ADC: Up to 4 channels, 24bit/48KHz, SNR 95dB
Broadcast (BIS): Supported

3. Bluetooth Speaker Chip Selection – High-End: JL703N Series (Not Recommended)
Note: Too complex for general use.
Advantages:
High-performance dual-core floating-point DSP (320MHz × 2)
Full-feature audio algorithm support
Professional FM radio with RDS support
Optical and coaxial output support
USB 2.0 (High Speed)
NFC and LE Audio support
Specifications:
Bluetooth Version: v6.0 (dual-mode)
CPU/DSP: Dual 320MHz
RAM: 448KB
RF Performance (Tx/Rx): 11dBm / -95.5dBm
PSRAM Expansion: Supported
Audio Codecs: … / LC3 / LDAC / LHDC
LE Audio: Supported
DAC: 4 channels, 24bit/96KHz, SNR 109dB
ADC: Up to 4 channels, 24bit/48KHz, SNR 105dB

4. Bluetooth Speaker Chip Selection – Auracast Support: One-to-Many Wireless Broadcast
Advantages:
Bluetooth 6.0 with LE Audio
Standard-compliant Auracast broadcasting
Dual-core 192MHz DSP processing
Ultra-clear audio: 24bit/384KHz
Excellent sound quality: SNR 113dB
Extremely low noise floor: 1.2uVrms
Specifications:
Bluetooth Version: v6.0 (dual-mode)
CPU/DSP: Dual-core 192MHz
RAM: 400KB
RF Performance (Tx/Rx): 13dBm / -97dBm
Audio Codecs: … / LC3 / LDAC / LHDC
LE Audio: Not supported
DAC: 2 channels, 24bit/384KHz, SNR 113dB
ADC: Up to 3 channels, 24bit/48KHz, SNR 103dB
Broadcast (BIS): Supported

Related Searches: JL Bluetooth Speaker Chip Full Breakdown, Auracast Lavalier Mic Reviews
#JLBluetoothChip #AC706NSpeakerChip #JL7016CAudioProcessor #JL7033ADSPChip #AuracastWirelessAudio #LEAudioBroadcast #LowLatencyLiveMic #KaraokeSpeakerSolution #FMBluetoothSpeaker #HiFiBluetoothAudio #24bit384KHzAudio #DualCoreDSPChip #AnkerSelect2SCompatible #EdifierXiaojinmaiM1 #OutdoorBluetoothSpeaker
0 notes
Text

ESP32 WROVER Kit, Compatible with Arduino IDE The starter kit is based on the development board from esp32 wrover. It integrates with bluetooth and wireless.A powerful dev board for IOT module project development.ESP32-WROVER series is developed by Espressif Systems, below is key features and applications are summarized: I. ESP32 Wrover Specifications - Chip Architecture - Dual-core SoC (ESP32-D0WD or D0WD-V3) with a clock speed of 80–240 MHz (dynamic frequency scaling)13 - 520 KB integrated SRAM, expandable via external SPI RAM/Flash1 - Built-in 4–16 MB SPI Flash and 8 MB SPI PSRAM (depending on model, e.g., WROVER-B/E)37 - Wireless Connectivity - 2.4 GHz Wi-Fi (802.11 b/g/n) with up to 150 Mbps throughput36 - Dual-mode Bluetooth: Classic (BT) and Low Energy (BLE)36 - Peripherals & Interfaces - SPI, I2C, UART, SDIO, Ethernet interfaces3 - Support for capacitive touch, Hall effect sensors, PWM outputs37 II. ESP32 Wrover Kit Development Environment & Tools - Programming Frameworks - Official ESP-IDF framework (FreeRTOS + LwIP stack), C/C++-based16 - Arduino IDE compatibility via ESP32 board manager28 - Optional Python/C hybrid development using Zerynth Studio5 - Hardware Debugging Tips - Use 5V power for camera modules (3.3V may cause image instability)2 - Adjust SPI pin definitions (e.g., SCK=14, MISO=12) based on hardware layout4 III. ESP32 Devkit Typical Applications - IoT Devices - Sensor networks, smart home controllers with ultra-low-power modes (sleep current Read the full article
0 notes
Text
VeriSilicon presenta GPU OpenGL ES de muy bajo consumo con renderizado híbrido 3D/2.5D para dispositivos para vestir
La IP de GPU GCNano3DVG incorpora renderizado sensible al contenido para maximizar la eficiencia en las aplicaciones de los dispositivos para vestir
VeriSilicon acaba de anunciar la presentación de GCNano3DVG, una nueva IP de unidad de procesamiento gráfico (GPU) que consume muy poco y fue diseñada específicamente para los dispositivos para vestir y otros dispositivos compactos con batería, que requieren renderizado gráfico dinámico. Con funciones de renderizado de gráficos 3D y 2,5D, GCNano3DVG asegura un equilibrio óptimo entre rendimiento visual y eficiencia energética y por eso, es ideal para una amplia gama de aplicaciones, en particular, relojes inteligentes, pulseras inteligentes y anteojos de IA/AR.
La IP GCNano3DVG de VeriSilicon combina canalizaciones de hardware optimizadas con una pila de software liviana y configurable, de modo tal que puede ofrecer un procesamiento gráfico eficiente y de bajo consumo. Incorpora canales de renderizado independientes para gráficos 3D y 2,5D, lo cual agiliza el renderizado de las escenas complejas compuestas por objetos 3D y gráficos vectoriales. Estos canales se han ajustado para mejorar el rendimiento, la potencia y el área. Por otro lado, el motor de comandos unificado y los diversos mecanismos de sincronización CPU-GPU reducen aún más la sobrecarga del sistema, al tiempo que las configuraciones sin DDR que utilizan memoria estática de acceso aleatorio (SRAM) o memoria pseudoestática de acceso aleatorio (PSRAM) aseguran una solución rentable y de bajo consumo para procesar los gráficos integrados.
GCNano3DVG es compatible con las interfaces de programación de aplicaciones (API) GLLite y VGLite de VeriSilicon para renderizar gráficos 3D y 2,5D/2D. El controlador GLLite es muy configurable y totalmente compatible con OpenGL ES 2.0, con un compilador opcional de sombreadores OpenGL Shading Language (GLSL) en tiempo de ejecución, o bien funciona en modo de canalización de función fija OpenGL ES 1.1 para usar al mínimo la memoria. Además, es compatible con el renderizado del formato de transmisión de bibliotecas gráficas (glTF) de Khronos, de modo que asegura la eficacia en el manejo de los activos de 3D para las aplicaciones modernas. El controlador VGLite es compatible con las bibliotecas de gráficos vectoriales más populares, como LVGL y NanoVG. Las API GLLite y VGLite se pueden usar de forma flexible y sincrónica dentro de una misma aplicación, lo que proporciona soluciones gráficas versátiles y de alto rendimiento para diversos casos de uso integrados.
"A medida que se expanden las aplicaciones para vestir, aumenta la demanda de interfaces de usuario más envolventes, con contenidos renderizados en 3D pero se mantiene la expectativa de que el consumo de energía sea ultrabajo", señaló Weijin Dai, director de Estrategia, vicepresidente ejecutivo y gerente general de la División IP de VeriSilicon. "Para responder a estas demandas, hemos diseñado una arquitectura de GPU híbrida, desarrollada a partir de nuestras tecnologías de GPU Nano 3D y Nano 2.5D, de muy bajo consumo. Gracias a esta innovación, se pueden renderizar con eficiencia los contenidos mixtos 3D y 2.5D con un consumo mínimo de energía".
Ya se pueden solicitar las licencias para la IP de GPU GCNano3DVG de VeriSilicon. Para obtener más información o consultar sobre oportunidades de colaboración, visite www.verisilicon.com/en/ContactUs.
0 notes
Text
UHF Reader Based on Pico W & ESP32 with 50 Tags/Second Reading within 1.5 Meter Range

A UHF Reader (Ultra High Frequency Reader) is a device that is used to read and write data from UHF RFID tags within the 860MHz-960MHz frequency range. It is a multi tags 50 tags/second reading/writing device within 1-1.5 meter range designed with cutting edge UHF technology. It is a compact, portable and easy to use device.
The UHF reader has 2 variants: one is UHF Reader by Pico W and another is UHF Reader by ESP32. The Pico W variant comes with RP2040 microcontroller with Wi-Fi and BLE support. It is compatible with MicroPython, CircuitPython and Arduino for programming. ESP32 variant comes with ESP32 S3 series microcontroller and has 2.4GHz & Bluetooth 5 (LE) support. It is compatible with Arduino and Espressif IDE for programming.
Key Features and Specifications:
UHF Reader Pico Variant:

Powered by Raspberry Pi Pico W
RP2040 microcontroller dual-core Arm Cortex M0+ microprocessor with 264kB RAM
Supports Wi-Fi and BLE
1.14” TFT display for better visualization
Multi-tone buzzer for audio alerts
Micro USB Support for programming & Type C support for power
3 programmable buttons and Reset button
SD card slot for data storage/transfer
LED Status for power and battery charging
Multipurpose GPIOs breakout for interfacing external peripherals
SWD pins breakout for serial debugging
Supports MicroPython, CircuitPython, and Arduino for programming
UHF Reader ESP32 Variant:

Powered by ESP32 S3 WROOM-1
Dual-core 32 bit LX7 microprocessor with Up to 8 MB PSRAM and up to 16 MB flash memory
Supports 2.4GHz (802.11b/g/n) Wi-Fi and Bluetooth 5 (LE)
1.14” TFT display with ST7789 display driver
Comes with a Read and Write UHF module.
Frequency range of 865.1MHz-867.9MHz (for EU/UK) and 902.25MHz-927.75MHz (for US)
Can Identify 50 tags/second up to the 1.5-meter range.
TTL UART communication interface and communication baud rates 115200bps-38400bps
output power 18-26dBm and output power accuracy +/- 1dB
operation current 180mA at 3.5V (26 dBm Output), 110mA at 3.5V (18 dBm Output)
Multi-tone buzzer for audio alerts
2 user programmable buttons, Boot and Reset buttons
For power and programming support, the Type C Interface
SD Card slot for data transfer/storage
LED status for power and charging
Multipurpose GPIOs breakout for interfacing external peripherals
Supports Arduino and Espressif IDE for programming
By using ESP32 and RP2040, you can build a UHF RFID reader for scan tags and data tracking. This UHF Reader with ESP32 and Pico by SB Components is suitable for applications like warehouses, retail stores, and many other applications where you want to track your inventory data accurately.
#technology#innovation#tech#iot#rfid#uhf#uhf reader#arduino#espressif#iot applications#raspberry pi#rp2040#esp32#projects#programming#ultra high frequency reader#rfid tags#data tracking#electronics
1 note
·
View note
Text
0 notes
Text
0 notes
Text
Metro RP2350 is wrappin' up testing ✨🐢
This week we got our Metro RP2350 boards
https://blog.adafruit.com/2024/11/11/metro-rp2350-now-with-bigger-better-rp2350b/
back and after fixing the pin direction and rerouting
the whole thing, it came up and pretty much works perfectly! Just one component needed a swap - we were able to test all GPIO, analog inputs, MicroSD slot, PSRAM, LEDs & NeoPixel, user button, I2C/SPI/UART, aaand power supplies. The 5V supply is great, we got a nice clean 5V out at 2A+ from 12V DC in. The last thing to check is the HSTX port, which gives us DVI access, and it works, thanks to this festive turtle demo!
We're aiming to get this into the shop before the end of the year, wouldn't that be smashing?
#metro#rp2350#adafruit#circuitpython#electronics#testing#hardware#makers#neopixel#gpio#microsd#psram#i2c#spi#uart#dvi#turtlegraphics#5vsupply#powersupply#prototyping#innovation#techdemo#embedded#microcontroller#diyelectronics#makerspace#electronicsproject#comingsoon#makersgonnamake
30 notes
·
View notes
Text
NXP and Xiaomi Vela jointly build an IoT ecosystem to provide a powerful technology engine for the IoT development community
【Lansheng Technology News】Recently, at the 2023 Xiaomi IoT Ecological Partner Conference, NXP Semiconductors was invited to attend as an important partner of Xiaomi and demonstrated the powerful technical resource support provided to the Xiaomi Vela ecological community.
Xiaomi Vela is an embedded IoT software platform built on the open source real-time operating system NuttX and customized for consumer-grade IoT. It can provide a unified software platform on various IoT hardware, shielding the differences in underlying hardware. Through rich components and standardized software frameworks, it provides a unified software interface for upper-level device developers to open up fragmented things. Networked application scenarios greatly reduce the complexity of development and improve development efficiency.
As a global ecological partner of Xiaomi Vela, NXP is deeply involved in the construction of the ecosystem of this development community and has launched a series of technical resources. At this event, NXP highlighted the i.MX RT1060 EVK development kit.
NXP's i.MX RT1060 cross-border MCU is based on the 600MHz Arm Cortex-M7 core and has 1MB on-chip SRAM. It has strong real-time performance and high integration, and is suitable for various industrial and IoT applications. The i.MX RT1060 series provides 2D graphics, camera and various memory interfaces, as well as a wide range of connection interfaces, including UART, SPI, I2C, USB, 2 10/100M Ethernet interfaces and 3 CAN interfaces. Its other features for real-time applications include: high-speed GPIO, CAN-FD, and synchronous parallel NAND/NOR/PSRAM controller.
In addition, i.MX RT1060 has a 2D hardware graphics acceleration PXP module, 3 I2S interfaces for high-performance multi-channel audio, and supports LCD display controller (up to WXGA 1366 x 768). The i.MX RT1060 is available in 225BGA and 196BGA packages, providing greater flexibility with an extended temperature range of -40°C to 125°C.
The i.MX RT1060 series can be developed using NXP's official MCUXpresso tool chain, including SDK, IDE options, and security configuration and configuration tools, enabling rapid development and supporting various real-time operating systems (RTOS) such as FreeRTOS, Xiaomi Vela, Nuttx, Zephyr, etc. .
Xiaomi Vela is fully scalable from micro (8-bit) to mid-range embedded (64-bit) systems with a high degree of standards compliance, easy to port, fully open, highly real-time and powerful. i.MX RT1060 fully supports Xiaomi Vela. Currently supported drivers include ADC, CAN, eLCDIF, ENC, ENET, GPIO, I2S, PWM, SPI, UART and USB. It also supports Vela’s LVGL Demo and can be adapted to Xiaomi The upper component of Vela framework. This combination of soft and hard will provide a powerful technical engine for the development of the Xiaomi Vela ecological community.
Lansheng Technology Limited, which is a spot stock distributor of many well-known brands, we have price advantage of the first-hand spot channel, and have technical supports.
Our main brands: STMicroelectronics, Toshiba, Microchip, Vishay, Marvell, ON Semiconductor, AOS, DIODES, Murata, Samsung, Hyundai/Hynix, Xilinx, Micron, Infinone, Texas Instruments, ADI, Maxim Integrated, NXP, etc
To learn more about our products, services, and capabilities, please visit our website at http://www.lanshengic.com
0 notes
Text

ESP32-S3 board with high-rez VGA output - #maker bitluni made tremendous update to their ESP32 VGA board with an OctalSPI PSRAM. 👍😍👏
#esp32 #arduino #DIY #Electronics #hardware
Know More - https://youtu.be/muuhgrige5Q
0 notes
Text
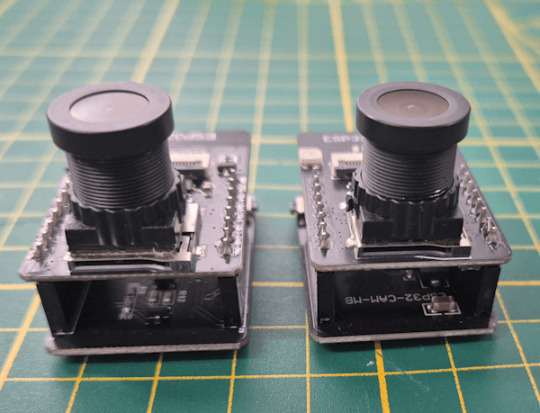
ESP32-S3 CAM: Der leistungsstarke Nachfolger der ESP32-CAM

Die ESP32-CAM hat sich in vielen Projekten bewährt – vom Überwachungssystem bis zur smarten Bilderkennung. Mit der ESP32-S3 CAM steht nun ein noch leistungsfähigeres Board zur Verfügung, das auf dem ESP32-S3 Chip basiert. In diesem Beitrag zeige ich dir, was die neue Version auszeichnet und wie du sie in Betrieb nimmst. https://youtu.be/tqNIc5_bHsw
Technische Highlights der ESP32-S3 CAM
Die ESP32-S3 CAM bringt einige wichtige Neuerungen mit, die sie besonders für KI- und Bildverarbeitungsanwendungen interessant machen: - Xtensa® LX7 Dual-Core mit 240 MHz - 8 MB PSRAM für anspruchsvolle Bildverarbeitung - Unterstützung für Wi-Fi (802.11 b/g/n) und Bluetooth 5.0 LE + Mesh - 45 programmierbare GPIOs - Unterstützt neuronale Netzwerke durch spezielle Vektor-Erweiterungen - Spannungsbereich: 3,0 – 3,6 V, Temperaturbereich: -40 bis +65 °C
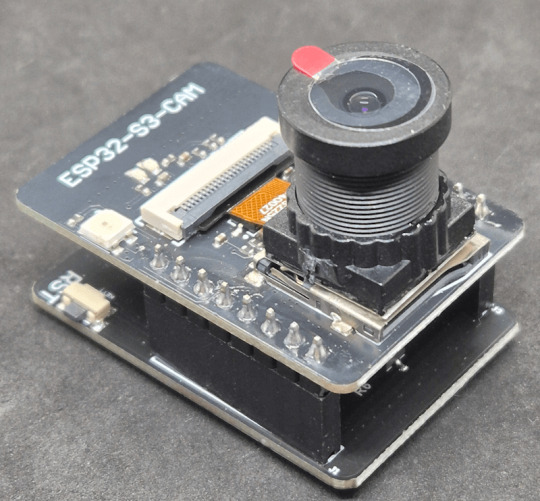
ESP32-S3-CAM mit OV3660
Lieferumfang und erster Eindruck
Die Kamera wird in einer antistatischen Tüte geliefert. Du bekommst die CAM in unterschiedlichen Ausführungen, zum einen entweder mit OV2640 Kameramodul oder mit OV3660 Kameramodul und auch mit/ohne Board um das Modul zu programmieren.


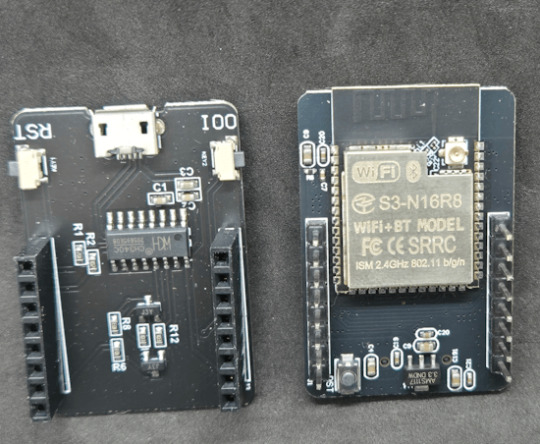
Was mich etwas stört ist das dieses Board immernoch mit einer veralteten Micro-USB Buchse für den Anschluss an den Computer daher kommt. Hier hätte ich erwartet das eine zeitgemäße USB-C Schnittstelle verbaut würde.
Inbetriebnahme: Erste Schritte mit der ESP32-S3 CAM
Wie bereits erwähnt, liegt manchen Sets ein separates Adapterboard bei, das den direkten Anschluss der ESP32-S3 CAM an den Computer über USB ermöglicht. Falls dein Set dieses Board nicht enthält, benötigst du stattdessen einen FTDI-Adapter (USB-zu-Seriell-Konverter) sowie ein paar Breadboardkabel. Damit du das Board trotzdem problemlos programmieren kannst, findest du hier den passenden Anschlussplan für den FTDI-Adapter. Das Pinlayout der Kamera entspricht dem des Vorgängers, daher kannst du den bekannten Schaltplan weiterhin verwenden.

Schematischer Aufbau der Schaltung "ESP32-CAM mit FTDI Modul" In meinem Fall habe ich dieses Board und kann direkt ein Micro-USB Kabel anschließen und den Mikrocontroller in der Arduino IDE programmieren. Davor müssen wir jedoch den Boardtreiber installieren. Das gute an dem Boardtreiber ist, das wir zusätzlich noch einpaar Beispiele erhalten und dort wiederum eines für die ESP CAM um im Browser das Livebild zu streamen, aber dazu später mehr. Installieren des Boardtreibers in der Arduino IDE Die nachfolgende URL muss zu den "zusätzlichen Boardverwalter URLs" hinzugefügt werden: https://espressif.github.io/arduino-esp32/package_esp32_index.json Wenn dieses erfolgt ist, können wir im Boardverwalter nach esp32 suchen und dort das Paket "esp32 von Espressif Systems" installieren.
Erstes Projekt: Kamera-Bild im Browser anzeigen
Der installierte Boardtreiber bringt ein praktisches Beispiel mit, das ein Livebild der Kamera im Browser anzeigt. Über eine einfache Weboberfläche lassen sich dabei verschiedene Einstellungen vornehmen – z. B. Auflösung, Helligkeit oder Kontrast –, um das Kamerabild bzw. den Stream ganz nach Wunsch anzupassen. Damit die Beispiele überhaupt sichtbar sind, musst du zuvor das passende Board in der Arduino IDE auswählen: Werkzeuge > Board > ESP32 > ESP32S3 Dev Module (siehe Grafik unten)
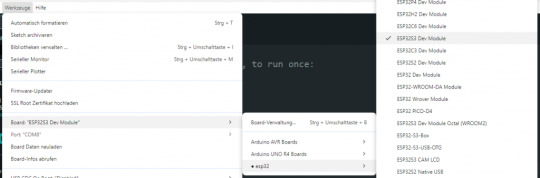
Auswahl des ESP32S3 Dev Module in der Arduino IDE Nach erfolgreicher Einrichtung der Entwicklungsumgebung findest du unter Datei > Beispiele zahlreiche Beispielsketche, die verschiedene Funktionen des ESP32 demonstrieren. Besonders interessant für Kamera-Projekte ist das Beispiel „CameraWebServer“, mit dem du direkt ein Live-Bild im Browser anzeigen lassen kannst.

Beispiel für den betrieb der ESP32-S3 CAM im Webbrowser Im Beispielsketch CameraWebServer sind zahlreiche verschiedene Kamera-Module für den ESP32 aufgeführt. Damit das Beispiel mit der ESP32-S3 CAM funktioniert, musst du die entsprechende Zeile aktivieren. Kommentiere dazu die Zeile für dein Modell ein und lösche oder kommentiere alle anderen aus, damit es nicht zu Konflikten kommt. Für die ESP32-S3 CAM sieht die passende Zeile z. B. so aus: #define CAMERA_MODEL_ESP32S3_EYE Achte darauf, dass du nur eine Kamera-Definition aktiv lässt. Angepasstes Beispiel für die ESP32-S3 CAM Herunterladen

Live-Stream und Einzelbilder im Browser abrufen
Mit dem Beispielprogramm CameraWebServer kannst du das Kamerabild nicht nur live im Browser anzeigen, sondern auch einen Stream wiedergeben oder Einzelbilder aufnehmen – ganz ohne zusätzliche Software. Hier die wichtigsten Adressen, sobald die ESP32-S3 CAM im Netzwerk eingebunden ist: - 📹 Live-Stream: http://:81/stream - 📸 Einzelbild (Snapshot): http:///capture - ⚙️ Einstellungen (Konfigurations-Frontend): http:/// Die jeweils zuletzt gespeicherten Einstellungen aus dem Konfigurationsmenü werden automatisch übernommen – egal, ob es um Auflösung, Helligkeit oder Kontrast geht. ⚠️ Wichtiger Hinweis zur Nutzung der ESP32-CAM & ESP32-S3 CAM: Ein bekanntes Limit dieser Kamera-Module – sowohl beim Vorgänger als auch bei der hier vorgestellten ESP32-S3 CAM – ist, dass immer nur ein Client gleichzeitig auf das Kameramodul zugreifen kann. Das bedeutet: - Wenn du den Live-Stream, das Einzelbild oder das Konfigurations-Frontend nutzen möchtest, darf jeweils nur ein Browser-Tab oder eine App wie VLC aktiv sein. - Möchtest du zwischen den Funktionen wechseln (z. B. vom Stream zum Einstellungsmenü), musst du den zuvor geöffneten Reiter oder die App zuerst schließen, bevor du die nächste Ansicht aufrufst. Andernfalls bleibt die Kamera „blockiert“ und neue Verbindungen schlagen fehl.
Vergleich: ESP32-CAM vs. ESP32-S3 CAM
Die klassische ESP32-CAM war lange Zeit die erste Wahl, wenn es darum ging, günstige Kamera-Projekte mit WLAN-Anbindung umzusetzen. Mit der neuen CAM bringt Espressif nun einen Nachfolger auf den Markt, der in vielen Bereichen deutlich leistungsfähiger ist. Doch worin unterscheiden sich die beiden Boards genau? In der folgenden Tabelle habe ich die wichtigsten Merkmale gegenübergestellt, damit du schnell erkennen kannst, ob sich der Umstieg auf die S3-Variante für dein Projekt lohnt.

Vergleich ESP32-CAM und ESP32-S3 CAM
Vergleich ESP32-CAM und ESP32-S3 CAM MerkmalESP32-CAMESP32-S3 CAMProzessorXtensa LX6Xtensa LX7 Dual-CoreRAM520 KB + 4MB PSRAM512 KB + 8MB PSRAMKamera-UnterstützungOV2640OV2640 / OV5640USB-AnschlussNeinNeinBluetoothNeinBluetooth 5.0 LE
Fazit: Die ESP32-S3 CAM überzeugt auf ganzer Linie
Mit der ESP32-S3 CAM hat Espressif ein würdiges Upgrade zur beliebten ESP32-CAM veröffentlicht. Der neue Chip bietet nicht nur mehr Leistung und Speicher, sondern punktet auch mit praktischen Features wie Bluetooth LE, USB-Anschluss (je nach Modell) und Unterstützung für KI-Anwendungen. Gerade für Projekte mit Livebild, Objekterkennung oder smarter Bildverarbeitung ist die S3-Variante eine spannende Alternative – und das bei einem Preis, der nur minimal über dem Vorgängermodell liegt. Wer bereits mit der ESP32-CAM gearbeitet hat, wird sich schnell zurechtfinden. Neueinsteiger profitieren von der perfekten Integration in die Arduino IDE und der stabileren Performance bei höheren Auflösungen und Bildraten. 👉 Du willst mehr Projekte mit ESP32 sehen? Dann schau regelmäßig auf meinem Blog vorbei oder abonniere meinen YouTube-Kanal! Read the full article
0 notes
Text
I know for sure you can embed Lua on the ESP32 (the new Tangara music player uses Lua for scripting), I'll have to try running this on my micro and see how it holds up, biggest constraint is probably RAM (stock ESP32-C3 has 400KiB of SRAM but you can outfit it with significant PSRAM expansions so that might be the answer).
I mostly wrote this because @compiler-specific suggested it and I was like hey that sounds fun.
There's probably signficant memory optimizations I can make here, too.
Finally sat down with the LED DSL again. I kept running into problems above my skill level while writing the parser because I was trying to do optimized processing during parsing so I decided to take a lesson from textiles and Do It Bad. I think this parser works. It's a lisp because parsing lisps is easy.
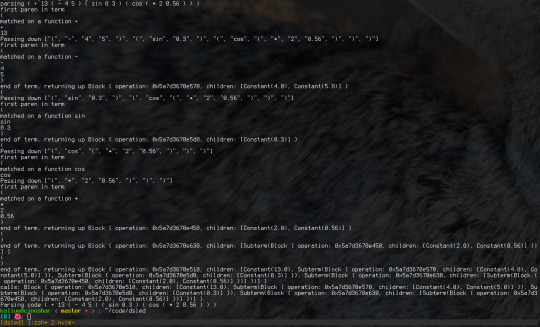
Those functions are the right ones trust me I looked. at the bits. You can't just derive debug on function pointers. Just need to write the function definitions and this should be pretty easy to run, just walk down the tree.
21 notes
·
View notes