#Populate HTML Template Document
Explore tagged Tumblr posts
Visit Tumblr Blog
Explore Tumblr blogs with no restrictions, modern design and the best experience.
Last Seen Tumblr Blogs


Fun Fact
The KCSC sent more than 20K requests to delete posts related to prostitution and porn to Tumblr from January to June 2017.
Note
hi! i’m wanting to make custom templates for my twine games. i was wondering — for the main menu screen you have on your template, did you have to delve into the storyinterface? honestly thats the only part thats confusing me 😂
Hi there! I'm not entirely sure which of the two templates you're referring to, but I did use StoryInterface for both of the templates 😊
Using StoryInterface allows you to build the user interface entirely yourself using HTML, but it will replace all of SugarCube's built in code, so you'll have to create all the elements of the UI yourself - if that makes sense.
You must include an element with the id "passages" for your story's passages to show up, for example with a <div id="passages"></div> element. Just leave it empty, and Twine will populate it with your story's passages.
Another neat trick is using the "data-passages" attribute to populate elements with content from certain passages. For example, in my first template the StoryInterface contains this element:

class="story-author" obviously allows me to style the element using CSS in the Story Stylesheet, whereas the data-passage attribute is an attribute native to Twine that allows you to populate elements with the content of specific passages. This one has the value "storyAuthor", which means that Twine will automatically populate the <h2> element with whatever content is inside a passage called "storyAuthor" when the game runs.
Other than that, if you're looking to learn more coding, I find w3schools really helpful, it's completely free and you find everything you need there. I also used the Twine documentation a lot. To learn more about how everything works, maybe download one of my templates and play around with the StoryInterface that's already built to learn what everything does? 💁🏼♀️
Hope that helps, anon! Have a nice weekend 🤎
29 notes
·
View notes
Text
Step-by-Step Guide to Sending Letters and Postcards with a Direct Mail API

Direct mail APIs are powerful tools that enable businesses to automate the process of sending physical mail such as letters and postcards. By integrating these APIs into marketing platforms or CRMs, companies can execute data-driven, personalized campaigns with minimal manual intervention. In this comprehensive guide, we walk through the steps required to send letters and postcards via a direct mail API.
Step 1: Choose a Direct Mail API Provider
Start by selecting a direct mail API that suits your business needs. Some top providers include Lob, PostGrid, Click2Mail, and Postalytics.
Factors to consider:
API documentation and ease of integration
Pricing and scalability
Print and delivery speed
Address verification and formatting support
Step 2: Register and Obtain API Keys
Once you choose a provider, sign up and access your API key. This key allows you to authenticate your requests securely.
Pro Tip: Keep your API keys confidential and use environment variables to manage them safely in production environments.
Step 3: Prepare Your Address Data
Make sure your recipient address data is clean and standardized. Some APIs offer built-in address verification services to correct and format addresses according to postal standards.
Best practices:
Use verified, deliverable addresses
Segment your audience for personalization
Include fallback options for failed deliveries
Step 4: Design Your Mail Piece
Create your letter or postcard template. Most APIs support PDF files or HTML-based templates that can be populated with variable data.
Considerations:
Use high-resolution images and readable fonts
Incorporate brand colors and logos
Leave room for dynamic text (e.g., recipient name, offer code)
Step 5: Send a Test Mail
Before launching a full campaign, run a test. This helps you catch formatting errors, verify delivery details, and ensure data merges correctly.
Why it matters:
Prevents waste of print and postage
Ensures accurate personalization
Saves money on misprints or incorrect addresses
Step 6: Integrate With Your CRM or Workflow
Connect your mail automation workflow with your existing marketing tools. Use tools like Zapier or native integrations to trigger mail from actions like form submissions or e-commerce checkouts.
Examples:
Trigger welcome letters after user signup
Send postcards for upcoming renewal notices
Step 7: Track and Analyze Results
Many direct mail APIs offer tracking features to monitor mail status, delivery confirmation, and response rates. Integrate this data into your analytics stack to refine future campaigns.
Metrics to watch:
Delivery rate
Response rate or conversions
Time to delivery
Conclusion Sending letters and postcards using a direct mail API is simple when approached step-by-step. With the right provider and workflow, businesses can scale physical mail just like email campaigns, all while improving customer experience and ROI.
youtube
SITES WE SUPPORT
Automated Mailing APIs – Wix
1 note
·
View note
Text
Advanced HTML Concepts

Understanding advanced HTML concepts can help you build more dynamic and modular web applications. Here’s a guide to some of these advanced features.
1. HTML Templates (<template>)
The <template> element is used to declare fragments of HTML that are not rendered when the page loads but can be instantiated later using JavaScript.
Purpose:
Provides a way to define reusable HTML snippets that can be cloned and inserted into the DOM as needed.
How It Works:
Content inside a <template> tag is not rendered immediately. It can be accessed and manipulated using JavaScript.
Example:
<!DOCTYPE html> <html> <head> <title>HTML Template Example</title> </head> <body> <template id="my-template"> <div class="card"> <h2></h2> <p></p> </div> </template> <div id="container"></div> <script> const template = document.getElementById('my-template'); const container = document.getElementById('container'); function createCard(title, content) { const clone = document.importNode(template.content, true); clone.querySelector('h2').textContent = title; clone.querySelector('p').textContent = content; container.appendChild(clone); } createCard('Card Title 1', 'Card content 1'); createCard('Card Title 2', 'Card content 2'); </script> </body> </html>
Explanation:
The <template> element holds the HTML structure for a "card" but is not rendered.
JavaScript is used to clone the template content, populate it, and insert it into the DOM.
2. Custom Data Attributes (data-*)
Custom data attributes allow you to store extra information on HTML elements that is not meant to be visible to users. These attributes are prefixed with data-.
Purpose:
Store custom data that can be used by JavaScript or CSS.
How It Works:
You can access these attributes using JavaScript with the dataset property.
Example:
<!DOCTYPE html> <html> <head> <title>Data Attributes Example</title> </head> <body> <div id="product" data-id="12345" data-name="Sample Product" data-price="29.99"> Product Info </div> <script> const product = document.getElementById('product'); const id = product.dataset.id; const name = product.dataset.name; const price = product.dataset.price; console.log(`Product ID: ${id}`); console.log(`Product Name: ${name}`); console.log(`Product Price: ${price}`); </script> </body> </html>
Explanation:
Custom data attributes (data-id, data-name, data-price) are used to store additional information about the product.
JavaScript is used to access these attributes and use them as needed.
3. HTML Imports (Deprecated in Favor of JavaScript Modules)
HTML Imports were a feature that allowed HTML documents to include and reuse other HTML documents. This feature has been deprecated in favor of JavaScript modules and other modern web components technologies.
What It Was:
Allowed you to import HTML documents, styles, and scripts into other HTML documents.
Example (Deprecated):
<!DOCTYPE html> <html> <head> <title>HTML Imports Example</title> <link rel="import" href="my-component.html"> </head> <body> <!-- Content here --> </body> </html>
Explanation:
The <link rel="import"> tag was used to include external HTML documents.
This feature is now deprecated and should be replaced with JavaScript modules or other modern alternatives.
4. Web Components
Web Components is a suite of technologies that allows you to create custom, reusable HTML elements and encapsulate their behavior and style.
Core Technologies:
Custom Elements: Define new HTML elements.
Shadow DOM: Encapsulates the internal structure of a component, preventing style leakage.
HTML Templates: Define markup that is not rendered immediately but can be used by custom elements.
Creating a Web Component:
Define a Custom Element:
<!DOCTYPE html> <html> <head> <title>Web Component Example</title> <style> my-element { display: block; border: 1px solid #ddd; padding: 10px; background-color: #f9f9f9; } </style> </head> <body> <template id="my-element-template"> <style> .content { color: blue; } </style> <div class="content"> <h2>Hello, Web Component!</h2> <p>This is a custom element.</p> </div> </template> <script> class MyElement extends HTMLElement { constructor() { super(); const template = document.getElementById('my-element-template').content; const shadowRoot = this.attachShadow({ mode: 'open' }); shadowRoot.appendChild(template.cloneNode(true)); } } customElements.define('my-element', MyElement); </script> <my-element></my-element> </body> </html>
Explanation:
Defines a new custom element <my-element>.
Uses the Shadow DOM to encapsulate styles and markup, preventing them from affecting other elements.
The template content is used within the custom element, providing reusable and modular HTML.
Best Practices:
Encapsulation: Use Shadow DOM to encapsulate styles and scripts to avoid conflicts with the rest of the page.
Reusability: Create components that can be reused across different parts of your application or different projects.
Maintainability: Structure components logically and keep them focused on a single responsibility or feature.
By mastering these advanced HTML concepts, you can create more modular, maintainable, and dynamic web applications that leverage the latest web technologies.
Read Me…
0 notes
Text

Accessibility is not a feature, it is a social course. This quote by Tim Berners-Lee encapsulates the importance of accessibility in the digital age. As we move towards an increasingly digital world, ensuring that all users can access and benefit from web content is not just a legal requirement but a moral imperative. In this article, we will delve into the essentials of building a winning accessibility strategy for your brand, leveraging Accessibility Testing Services to future-proof your business.
Understanding the Importance of Accessibility
Web accessibility refers to the inclusive practice of ensuring there are no obstacles that prevent interaction with, or access to, websites by people with disablement. According to the World Health Organization, over 1 billion people, about 15% of the world’s population, experience some form of disability. This statistic underscores the significant market share that can be lost if accessibility is not prioritized. Accessibility Testing Services are crucial in identifying and remedying barriers to access, ensuring that your digital content is usable by everyone.
The Role of Accessibility Testing Services
Accessibility Testing Services involve evaluating a website or digital product to ensure it meets the Web Content Accessibility Guidelines (WCAG) standards. These services are essential for identifying issues that automated testing tools might miss, such as nuanced usability problems that only manual testing by accessibility experts can uncover. Accessible Minds Tech, a leader in the field, emphasizes the importance of combining automated and manual testing for a comprehensive accessibility evaluation.
Components of an Effective Accessibility Strategy
Building an effective accessibility strategy involves several key components:
1. Comprehensive Accessibility Evaluation: — A thorough Accessibility Evaluation is the first step in identifying barriers. This involves both automated scans and manual testing to detect issues like poor color contrast, missing alt text, and non-functional keyboard navigation. Accessibility Evaluation Services provided by Accessible Minds ensure a holistic review of your digital assets, highlighting areas needing improvement.
2. Expert Recommendations and Remediation: — Once issues are identified, the next step is remediation. Recommendations for fixing accessibility components are crucial for guiding your development team in making necessary adjustments. Accessibility remediation and fixing services offered by Accessible Minds Tech ensure that identified issues are resolved effectively, enhancing the usability of your site.
3. Ongoing Monitoring and Testing: — Accessibility is not a one-time fix but an ongoing process. Regular Digital Accessibility Testing Services help maintain compliance with accessibility standards as your website evolves. Monthly or quarterly testing ensures that new content or updates do not introduce new barriers.
4. Accessibility Design Review: — Incorporating accessibility from the design phase can prevent many issues from arising in the first place. An Accessibility Design Review involves assessing visual elements and user interface components to ensure they meet accessibility standards. This bold approach can save time and resources in the long run.
5. Document Accessibility Testing and Remediation: — Many organizations overlook the accessibility of non-HTML content like PDFs and Word documents. Document accessibility testing and remediation services ensure that all digital documents are accessible, providing equal access to information for all users.
6. Drafting Voluntary Product Accessibility Template (VPAT): — For businesses that want to publicly demonstrate their commitment to accessibility, drafting a VPAT is essential. VPAT’s developing services provided by accessibility experts can help you create accurate and comprehensive accessibility statements, enhancing your brand’s credibility.
Implementing and Maintaining Your Strategy
Implementing a successful accessibility strategy requires commitment from all levels of an organization. Training staff on accessibility principles and integrating accessibility checks into the development workflow are crucial steps. Additionally, leveraging Web Accessibility Development Services ensures that new projects start with accessibility in mind, reducing the need for extensive remediation later.
The Business Case for Accessibility
Investing in accessibility is not just the right thing to do; it also makes good business sense. According to a report by the Click-Away Pound Survey, 71% of users with disablement will leave a website that is not accessible. This translates to a significant loss in returns. Conversely, accessible websites often see increased traffic and customer loyalty. By incorporating Accessibility Testing Services and other accessibility solutions, brands can tap into a larger, loyal customer base and enhance their market presence.
Conclusion
Thus, by building a stable accessibility strategy that includes comprehensive evaluations, expert recommendations, ongoing monitoring, and proactive design reviews, brands can ensure they are inclusive to all users. Accessibility Testing Services, such as those offered by Accessible Minds Tech, provide the expertise and tools needed to identify and fix accessibility issues, future-proofing your brand. Embrace accessibility not just as a compliance requirement but as a core value, and watch as it transforms your business, making it more inclusive, innovative, and successful.
#Accessible Minds Tech#Accessible Minds#accessibility experts#Accessibility Solutions#Accessibility Evaluation#Accessibility Evaluation Services#Accessibility Evaluation Experts#accessibility component#fixing accessibility component#Recommendations for fixing accessibility component#Accessibility component recommendations#Drafting Voluntary Product Accessibility Template#Drafting VPAT services#VPAT’s developing services#Accessibility Design Review#Design Review for Accessibility#Accessibility visual elements review#Website Accessibility Remediation#Accessibility remediation and fixing services#Website Remediation and Fixing Services#Document Accessibility Services#Document testing and remediation#Document accessibility testing and remediation#Web Accessibility Development Services#Web Accessibility services#Web Accessibility Development experts#Digital Accessibility Testing Services#Accessibility Testing Services#Digital accessibility services
0 notes
Text
The Rise of Web Components: A Comprehensive Guide for Front-End Developers

Introduction
Developing modern, effective, and maintainable web applications requires staying ahead of the curve in the ever changing field of web development. The use of web components is one of the most recent innovations that is becoming popular in the front-end development community. We will examine the emergence of web components, their advantages, their creation and application processes, and their influence on the direction of web development in this extensive book.
Comprehending Web Components
Web components are a collection of web platform APIs that enable developers to design encapsulated, configurable, and reusable web application components. These comprise Custom Elements, Shadow DOM, HTML Templates, and HTML Imports as its four primary components.
1.Custom Elements: Developers are allowed to define their own HTML elements with unique behaviours thanks to Custom Elements. This makes it possible to create reusable parts that fit into any website with ease.
2.Shadow DOM: By building a scoped subtree of DOM elements and styles, Shadow DOM encapsulates web components. By doing this, you can make sure that styles and functions that are defined inside a web component stay contained and don’t affect other parts of the website.
3.HTML Templates: These allow you to define HTML sections that may be copied and added to the Document Object Model (DOM) as needed. This is helpful for building data-populated component structures that are reusable and dynamic.
4.HTML Imports: With HTML Imports, web component developers can include external HTML pages as dependencies. This facilitates the management of dependencies and the reuse of components in other projects.
Advantages of Web Elements Front-end developers and web applications can benefit from the following when using web components:
1.Reusability: By encapsulating functionality into self-contained components that are readily reused across several projects, web components facilitate code reusability.
2.Encapsulation: Web components are protected from styles and functionality leaking out and clashing with other areas of the page by the shadow DOM.
3.Maintainability: Developers can design more manageable and modular codebases, which facilitate the management and updating of large-scale web applications, by encapsulating functionality and styling within web components.
4.Interoperability: Web components are compatible with current web frameworks and libraries since they are constructed using common web technologies like HTML, CSS, and JavaScript.
Creating and Using Web Components: The process of creating and utilising web components is simple and may be carried out with either standard JavaScript or well-known front-end frameworks such as Angular, React, or Vue.js. This is a simple illustration of how to make and utilise a unique web component:
<!DOCTYPE html> <html> <head> <title>Web Component Example</title> <script> // Define a new custom element class MyComponent extends HTMLElement { constructor() { super(); this.attachShadow({ mode: ‘open’ }); this.shadowRoot.innerHTML = ` <style> /* Styles scoped to the shadow DOM */ :host { display: block; padding: 1rem; background-color: lightblue; } </style> <p>Hello, World!</p> `; } } // Register the custom element customElements.define(‘my-component’, MyComponent); </script> </head> <body> <! — Use the custom element → <my-component></my-component> </body> </html>
Future of Web Development Web components are expected to have a big impact on the field as long as they continue to gain traction and browser support keeps getting better. Web components are a great way to create scalable, maintainable, and effective modern web applications because of their focus on interoperability, encapsulation, and reusability.
Conclusion Front-end developers’ approach to creating web applications has significantly changed as a result of the emergence of web components. Web components provide a potent way to build contemporary, maintainable, and scalable web applications by adopting the concepts of reusability, encapsulation, and interoperability. Web components are expected to become a crucial component of the web development toolkit as browser support advances and usage rises, influencing the direction of web development for Years to come.
Ready to dive deeper into the world of web development? Enhance your skills and stay ahead of the curve with our comprehensive Front end developer course at LearNowX. Whether you’re just starting out or looking to level up your expertise, our course covers everything you need to know about web components and much more. Don’t miss out on this opportunity to elevate your career in web development. Enroll now at LearNowX and become a master front end developer!
0 notes
Text
How to Enrich Your Emails With Third-Party API Data

Introduction:
Email marketing is a powerful tool for engaging customers and driving conversions. One way to enhance the effectiveness of your email campaigns is by enriching them with third-party API data. In this blog post, we will provide crisp and clear steps that marketing teams can follow to seamlessly incorporate external data into their emails.
Step 1: Identify Relevant Third-Party APIs
Begin by identifying third-party APIs that offer valuable data aligned with your email marketing goals.
Research popular APIs in areas such as weather, location-based information, product recommendations, social media integration, or real-time pricing.
Choose APIs that provide relevant data points which complement your email content strategy.
Step 2: Integrate the API into Your Email Platform
Integrate the selected third-party API into your email platform or marketing automation software.
Ensure compatibility between the API and your chosen platform, or work with developers who can assist in setting up this integration smoothly.
Follow documentation provided by the API provider for seamless implementation.
Step 3: Customize Email Templates
Customize your email templates to accommodate dynamic content populated by the third-party API data.
Identify specific sections within your emails where you want to display enriched content, such as personalized product recommendations based on user preferences or local weather updates.
Design flexible templates capable of dynamically populating these sections with relevant information from the integrated APIs.
Step 4: Retrieve and Display Dynamic Data
Use variables or placeholders within your email templates to retrieve and display dynamic data from the integrated APIs.
Leverage programming languages like HTML or scripting languages supported by your chosen email platform’s template system (e.g., Liquid syntax).
Access appropriate endpoints of each respective API using unique identifiers like user locations, product IDs, or social media handles.
Step 5: Test and Optimize
Thoroughly test how dynamic content appears across various devices and email clients.
Check if the data retrieved from third-party APIs is accurately displayed in your emails.
Optimize and refine the design, layout, and positioning of dynamic content to ensure a seamless user experience.
Conclusion:
Enriching your emails with third-party API data can significantly enhance their relevance and engagement potential. By following these crisp steps of identifying relevant APIs, integrating them into your email platform, customizing templates, retrieving and displaying dynamic data, and testing for optimization, marketing teams can create compelling email campaigns that deliver personalized and up-to-date information to recipients. Remember, selecting reliable APIs aligned with your campaign goals and ensuring smooth integration are key factors in leveraging external data effectively within your email marketing strategy.
0 notes
Text
So you made a neocities... now what?


Okay, here it is! So you’ve seen how web2 is becoming more and more corporatized and toxic, you know web3 will be a capitalist nightmare if it becomes reality, and people are rediscovering the nostalgic charm of the web1 era so you want in. You want to stake out your little corner of the internet, you made your neocities account, maybe a proboards to go with it...
Now what do you do with it?
This is a short(-ish) guide intended to give you some direction when populating your own site. This is not a technical guide for building a website, I am by no means qualified to teach you html or css, and besides those resources exist already. Think of this more as content inspiration, organized loosely based on what you already use social media for and what you’d be bringing with you to a new space.
If anyone has ideas I didn’t think of, feel free to add on!
you could start a blog if you:
write a lot of original twitter/tumblr posts
like aggregating other people’s content
This one might be the most obvious considering twitter and tumblr both advertise themselves mainly as “blogging platforms.” A personal blog is the simplest way to make use of a personal website, because the greatest demand on you once you have a template you like is to simply write posts. Publish your lore posts and metacommentary on your favorite media, write about your day and the weird things that happen to you at work, show off new recipes you learned, review your favorite bands’ new albums, point people toward cool artists you’ve discovered, hype up your friend’s new art... the list goes on. You can theme the blog around a specific topic or let it be broad and untargeted, you can write essays or a couple sentences. There are No Rules.
you could start a hobby website if you:
run a themed blog on tumblr
have a niche interest you’re passionate about
do a craft with a process people might find interesting
This would be sort of an offshoot of a basic blog. Do you make cosplay? Ceramics? Do you have a lot of opinions about 19th century interior design? Do you find yourself constantly wanting to correct common misconceptions about East Asian martial arts? You can make a whole website about that, if you really want to. Document your process, document the sources you’ve gone to for research, just gush or vent about the things you’re always aching to talk about but don’t think anyone else wants to hear. Organize it all however you want and make it look pretty.
* you could make a fandom site if you:
like collecting and/or creating fanworks
want to minimize fandom discourse
Back In The Day, before large-scale fanwork directories existed, people used to curate their own smaller fandom communities with their own rules about what could and couldn’t be posted or discussed. Yes, a lot of work from those eras was lost specifically because these were small, decentralized communities, and it’s always advisable to keep backups of everything you create, but the greater appeal of these communities was the avoidance of “competing needs” issues when it came to people’s tastes and interests. If you want to post and collect fanfic for your favorite show but there are things you absolutely do not want to see in them, you can set those rules. The people who agree with you will be happy to have a space curated to their tastes. The people who don’t agree with you can make their own site.
you could build a portfolio/gallery if you:
are primarily a content creator who does art, fiction, music, etc
like posting photos/art on instagram
have a lot of original concepts/characters/projects
create raunchy art and are tired of being chased off other platforms
This one should also be pretty obvious. If you make creative work and you want a place to show off without worrying about algorithms, peak posting times, terms of service, etc., your best bet is to just make your own space. Post whatever you want, organize it however you want. If you’re concerned about reach, it’s still worth cross-posting to social media, but since no truly just-for-artists socmed has risen to the surface yet, a personal site is still going to be your freest and most flexible safe haven. (Look into Lightbox! It’s pretty easy to set up and it’s great for displaying a lot of images in one place.)
you could host a webcomic if you:
have a webcomic
What more is there to say? Once again, you don’t have the built-in traffic of hosting on a site like webtoons, but you do have freedom and flexibility.
* you could make a roleplay forum if you:
already enjoy roleplaying on discord, tumblr, google docs, etc
like the idea of tabletop gaming but not the scheduling challenges
want your stories to be better organized and preserved
This is another “back in the day” sort of suggestion, but most roleplaying that I remember used to be done on forums that were run and moderated by community members. As with a fandom site, you have a lot of control over who joins, and what people are permitted to do, meaning you can create exactly the kind of community you want to be a part of.
* a couple of these would obviously require some degree of management/moderation on your part if you’re planning to be the host of the space, so you should consider whether that’s a responsibility you want to take on.
At the end of the day, the simplest answer to “what do I do with a personal website?” is... anything you want :) But I know that can be a bit daunting. Hopefully this has pointed you roughly in the right direction, at least!
#neocities#indie web#I know it's getting late so I might bump this laterrrr#especially bc there's a bunch of links so it's probably pointless to tag it lol#rom speaks
3K notes
·
View notes
Text
Google Spreadsheet integration for page themes
What is it?
You know how the Tumblr Customizer gives you neat little fields to fill in for styles and content? It's kind of like that but for custom pages (for the content). Pages with custom layout only take raw code. So we're essentially creating a makeshift back-end and have the page pull data from the spreadsheet to automatically generate the content based on an HTML template.
Should you do this for every page? No. Definitely not. It's only useful for pages that have a lot of content data within the same repeatable HTML structures. Like multi character pages or similar.

Benefits?
Easy to edit especially for those without much HTML knowledge.
Reduces code clutter and therefore the risk of breaking the page by pasting things in the wrong place.
Saves time digging through code & copy/pasting the same templates over and over.
If you know what you're doing: spreadsheets become portable to any page theme and you never have to re-enter the content into the page again.
Downsides?
Slightly slower load times??? (unsure of the details)
Harder initial set up.
Tumblr customize preview breaks (don’t worry, just the preview.)
Potential security risk if you have open write access and use template variables that allow the use of code. (so be careful with who you give write access!!)
Page theme examples using spreadsheets: mirror images, deja vu, succulent
Succulent page theme uses a different method that works too but is worse/harder to implement and less flexible. You can read about it here.
If you find bugs, please let me know!!
The Setup
Short summary breakdown of what we’re doing:
Adding neccessary JS libraries: Handlebars & Papa Parse
Adding the spreadsheet link through a variable used by the scripts ( + instructions).
My sheet integration script that takes the Papa Parse data & adds it into the Handlebars templates.
Set up your HTML templates with Handlebars.
Defining our Handlebars templates to be run through the script.
Setting up a way for scripts to be called AFTER our content is generated.
1. + 2. + 3. Handlebars & Papa Parse, spreadsheet ID & sheet integration script
Add this to the end of your <head> tag:
<!--HANDLEBARS.JS--> <script type="text/javascript" src="https://cdnjs.cloudflare.com/ajax/libs/handlebars.js/4.7.6/handlebars.min.js"></script> <!--PAPA PARSE.JS--> <script type="text/javascript" src="https://cdnjs.cloudflare.com/ajax/libs/PapaParse/5.1.0/papaparse.min.js"></script> <!--PAGE SETTINGS--> <script> /*TO GET THE SHEET ID: 1. Go to your spreadsheet > File > Publish to web. 2. Click on "Entire Document" and select the speficic sheet (in the example it is called "MAIN") > publish, ignore the URL. 3. File > Share > Anyone with link can share. This URL is important. 4. Copy the following string from the URL and paste it in sheetID: Example: https://docs.google.com/spreadsheets/d/ 1jKi9Knw7e5qr4bXr_zQib8FwpGM7E6eqRx1tH3JruIA (this part) /edit?usp=sharing*/ var sheetID = '1jKi9Knw7e5qr4bXr_zQib8FwpGM7E6eqRx1tH3JruIA'; </script> <!--SHEET INTEGRATION--> <script type="text/javascript" src="https://www.dl.dropboxusercontent.com/s/wlxk3q4wkqxescn/nnspc-sheets.js"></script>
Now you've added the tabletop.js and handebars.js plugins as well as my sheet and a variable for the spreadsheet.
4. Set up your HTML templates with Handlebars.
Next, you're going to have to set up your HTML templates and plug them into the script. We're going to use a very simple example, that of a list. (Using spreadsheets for a simple list is the kind of example I mean when I say it’s overkill to use it for)
Suppose your spreadsheet had one column with the headline NAME and a name in every row that you want to add to a list but you're too lazy to write every single list item manually.
<!--regular list--> <ul id="example-list"> <!--handlebars template set up. id can be whatever. note the type--> <script id="example-template" type="text/x-handlebars-template"> <!--each makes it possible to repeat this for each sheet row--> {{#each []}} <!--it's important you include "this" before your column name it denotes the NAME column of the current row--> <li data-tab="#{{this.name}}"> {{this.name}} </li> {{/each}} </script> </ul>
A couple of notes on the variables and the spreadsheet:
The first row HAS to be headlines.
Capitalization doesn’t matter in the spreadsheet but in the HTML variables everything should be lowercase.
In the HTML variables, remove spaces
Special characters may cause issues but I haven’t done any extensive testing
Wrapping variables in three curly brackets: {{{this.name}}} allows for HTML to carry over to the page as HTML
That should cover the basics, for more info check the Handlebars documentation or ask me.
5. + 6. Defining templates for the script. + Scripts called AFTER content is generated.
To populate this template with your data it needs to through my script. To do that, we’ll set up an array including all your templates & parent div.
The function in the “contentLoaded” constant will be where all scripts go that in some way interact with the loaded content. E.g. Masonry grid. You can’t build a grid if there’s no HTML yet, right? This includes event handlers attaching to content like click events.
Add the following before the closing </body> tag:
<script> //TEMPLATE LIST //id + html selector var templateList = [ ['#example-template', '#example-list'], ['#ID of any template', 'HTML parent selector'] ]; const contentLoaded = function() { /*all functions and event handlers that interact or attach to the content you're generating from your spreadsheets needs to go in here. this includes grids like masonry/isotope filters and click events. scripts can't interact or change content that isn't yet generated!*/ } </script>
And that's it! Here's a CodePen example together with masonry layout.
294 notes
·
View notes
Text
Aspose.Cloud Newsletter December 2018: Get 25% Off on Aspose.Total Cloud APIs for 12 Months & More News
Aspose.Cloud Newsletter for December 2018 has now been published that highlights all the newly supported features offered in the recent releases. Aspose team offers a very Special Holidays Offer on Aspose.Total Cloud APIs by giving users a 25% off on all new purchases. It also includes Populating HTML Template Document with External Data, Resolved Misalignment of PowerPoint Presentations while Converting Slides to SVG Forma, Microsoft Project Management Cloud APIs and SDKs and many more.
Get 25% off Aspose.Total Cloud APIs
Aspose.Total brings together all Aspose products on a platform and is great value for money. This holiday season Aspose is making it even better value by giving users 25% off Aspose.Total. Simply enter the coupon code HOLOFF2018 when placing your order. Download FREE 30-Days Trial
Populate HTML Template Document with External Data
Aspose.HTML Cloud allows to manipulate and translate HTML file in cloud. The REST APIs and language specific cloud SDKs support to use HTML document as a template to populate it with some external data. Source data can be in various formats, such as XML, JSON etc. Read more details here
Issue Resolved: Misalignment of PowerPoint Presentations while Converting Slides to SVG Format
Aspose.Slides Cloud allows cloud developers to create, edit or convert PowerPoint presentation files using cloud SDKs developed on top of Aspose REST APIs. This new release announces number of feature enhancements and improvements such as: fixing misalignment of a Slide while converting Slides to SVG format and pages with embedded fonts will now be exported properly to PDF. Read more details here
Microsoft Project Management Cloud APIs and SDKs
Aspose.Tasks Cloud offers SDKs for .NET, PHP and cURL to create, edit or convert Microsoft Project® document formats in cloud. The current version allows to make changes in ExtendedAttribute type. Add fields such as ‘DateValue’, ‘DurationValue’, ‘NumericValue’, ‘FlagValue’, ‘TextValue’ and removed fields such as ‘DurationFormat’, ‘Value’ and ‘AttributeType. Read more details here
Cloud REST APIs to Convert HTML documents to PDF, Images and XPS
Aspose.HTML Cloud APIs and SDKs allow you to manipulate and translate HTML files in any Platform. The latest version adds a group of conversion PUT methods that provide possibility to upload conversion results to specified storage folder. Easily convert HTML files to PDF, XPS and popular image file formats. Read more
Collect a copy of Aspose Newsletter, August 2018 edition
Collect the English version of this newsletter
#Get 25% off Aspose.Total Cloud APIs#Populate HTML Template Document#Converting Slides to SVG Format#Microsoft Project Management Cloud APIs#REST APIs for MS Project#Project Management Cloud SDKs
0 notes
Text
Svelte + Tailwind + Storybook Starter Template
First of all, here's the link to the Github repo, go ahead and start working on your project than fiddle with the configurations. Trust me that takes a hell lot of time.
Visit this website to see the outcome: Svelte + TailwindCSS + Storybook
// Quickstart npx degit jerriclynsjohn/svelte-storybook-tailwind my-svelte-project cd my-svelte-project yarn yarn dev yarn stories
Svelte and TailwindCSS is an awesome combination for Frontend development, but sometimes the setup seems a bit non intuitive, especially when trying to try out this awesome combination. When integrating Storybook, which is another awesome tool for UI Component development and documentation, there is no obvious place to get how it's done. This repo was made to address just that!
You can easily start your project with this template, instead of wasting time figuring out configurations for each integration.
What do you get in this repo
A fully functional Svelte + TailwindCSS integration with side-by-side implementation of independent Storybook
Storybook with 5 essential Addons
Storybook populated with basic examples of Svelte + TailwindCSS
Addons
Accessibility Addon

Accessibility Addon - Colorblindness Emulation
Actions Addon

Notes Addon
Source Addon

Viewport Addon

Svelte + TailwindCSS + Storybook
Storybook is an open source tool for developing JavaScript UI components in isolation
Svelte is a component framework that allows you to write highly-efficient, imperative code, that surgically updates the DOM to maintain performance.
TailwindCSS is a highly customizable, low-level CSS framework that gives you all of the building blocks you need to build bespoke designs without any annoying opinionated styles you have to fight to override.
Steps to build
Clone this repo git clone https://github.com/jerriclynsjohn/svelte-storybook-tailwind.git
Go to the directory cd svelte-storybook-tailwind
Install dependencies yarn
To develop your Svelte App: yarn dev
To develop UI components independent of your app: yarn stories
Documentations
Svelte - API and Tutorial
TailwindCSS - Docs and Tutorial
Storybook - Docs and Tutorial (No Svelte Yet!)
Steps to build it all by yourself and some tips [Warning: It's lengthy]
Instantiate Svelte App
Start the template file using npx degit sveltejs/template svelte-storybook-tailwind
Go to the directory cd svelte-storybook-tailwind
Install dependencies yarn
Try run the svelte app yarn dev
Add Tailwind into the project
Install dependencies: yarn add -D tailwindcss @fullhuman/postcss-purgecss autoprefixer postcss postcss-import svelte-preprocess
Change the rollup config as shown:
import svelte from 'rollup-plugin-svelte'; import resolve from 'rollup-plugin-node-resolve'; import commonjs from 'rollup-plugin-commonjs'; import livereload from 'rollup-plugin-livereload'; import { terser } from 'rollup-plugin-terser'; import postcss from 'rollup-plugin-postcss'; import autoPreprocess from 'svelte-preprocess'; const production = !process.env.ROLLUP_WATCH; export default { input: 'src/main.js', output: { sourcemap: true, format: 'iife', name: 'app', file: 'public/bundle.js', }, plugins: [ svelte({ preprocess: autoPreprocess({ postcss: true, }), // enable run-time checks when not in production dev: !production, // we'll extract any component CSS out into // a separate file — better for performance css: css => { css.write('public/bundle.css'); }, }), postcss({ extract: 'public/utils.css', }), // If you have external dependencies installed from // npm, you'll most likely need these plugins. In // some cases you'll need additional configuration — // consult the documentation for details: // https://github.com/rollup/rollup-plugin-commonjs resolve({ browser: true, dedupe: importee => importee === 'svelte' || importee.startsWith('svelte/'), }), commonjs(), // Watch the `public` directory and refresh the // browser on changes when not in production !production && livereload('public'), // If we're building for production (npm run build // instead of npm run dev), minify production && terser(), ], watch: { clearScreen: false, }, };
Add tailwind config using the command npx tailwind init
Add PostCSS config ./postcss.config.js as follows:
const production = !process.env.ROLLUP_WATCH; const purgecss = require('@fullhuman/postcss-purgecss'); module.exports = { plugins: [ require('postcss-import')(), require('tailwindcss'), require('autoprefixer'), production && purgecss({ content: ['./**/*.html', './**/*.svelte'], defaultExtractor: content => { const regExp = new RegExp(/[A-Za-z0-9-_:/]+/g); const matchedTokens = []; let match = regExp.exec(content); // To make sure that you do not lose any tailwind classes used in class directive. // https://github.com/tailwindcss/discuss/issues/254#issuecomment-517918397 while (match) { if (match[0].startsWith('class:')) { matchedTokens.push(match[0].substring(6)); } else { matchedTokens.push(match[0]); } match = regExp.exec(content); } return matchedTokens; }, }), ], };
Build the project with some TailwindCSS utilities yarn dev
Add Storybook into the Svelte Project
Add Storybook dependencies yarn add -D @storybook/svelte
Add 5 commonly used Storybook Addons:
Source: yarn add -D @storybook/addon-storysource
Actions: yarn add -D @storybook/addon-actions
Notes: yarn add -D @storybook/addon-notes
Viewport: yarn add -D @storybook/addon-viewport
Accessibility: yarn add @storybook/addon-a11y --dev
Create an addon file at the root .storybook/addons.js with the following content and keep adding additional addons in this file.
import '@storybook/addon-storysource/register'; import '@storybook/addon-actions/register'; import '@storybook/addon-notes/register'; import '@storybook/addon-viewport/register'; import '@storybook/addon-a11y/register';
Create a config file at the root .storybook/config.js with the following content:
import { configure, addParameters, addDecorator } from '@storybook/svelte'; import { withA11y } from '@storybook/addon-a11y'; // automatically import all files ending in *.stories.js const req = require.context('../storybook/stories', true, /\.stories\.js$/); function loadStories() { req.keys().forEach(filename => req(filename)); } configure(loadStories, module); addDecorator(withA11y); addParameters({ viewport: { viewports: newViewports } });
Add tailwind configs in the webpack.config.js under .storybook and also accommodate for Source addon:
const path = require('path'); module.exports = ({ config, mode }) => { config.module.rules.push( { test: /\.css$/, loaders: [ { loader: 'postcss-loader', options: { sourceMap: true, config: { path: './.storybook/', }, }, }, ], include: path.resolve(__dirname, '../storybook/'), }, //This is the new block for the addon { test: /\.stories\.js?$/, loaders: [require.resolve('@storybook/addon-storysource/loader')], include: [path.resolve(__dirname, '../storybook')], enforce: 'pre', }, ); return config; };
Create the postcss.config.js under .storybook:
var tailwindcss = require('tailwindcss'); module.exports = { plugins: [ require('postcss-import')(), tailwindcss('./tailwind.config.js'), require('autoprefixer'), ], };
Make sure you have babel and svelte-loader dependencies yarn add -D babel-loader @babel/core svelte-loader
Add npm script in your package.json
{ "scripts": { // Rest of the scripts "stories": "start-storybook", "build-stories": "build-storybook" } }
Add a utils.css file under storybook/css/ and make sure you import 'utils.css' in your stories.js files:
/* Import Tailwind as Global Utils */ @import 'tailwindcss/base'; @import 'tailwindcss/components'; @import 'tailwindcss/utilities';
Write your Svelte component in storybook\components and yes you can use your regular .svelte file. The only thing is that you cant use templates in a story yet, not supported, but yes you can compose other components together. For the starter pack lets just create a clickable button.
<script> import { createEventDispatcher } from 'svelte'; export let text = ''; const dispatch = createEventDispatcher(); function onClick(event) { dispatch('click', event); } </script> <button class="bg-blue-500 hover:bg-blue-700 text-white font-bold py-2 px-4 rounded" on:click={onClick}> {text} </button>
Write your stories in storybook/stories and you can name any number of story file with <anything>.stories.js, for the starter package we can create stories of Button with the readme notes at <anything>.stories.md. Note: reference the css here to make sure that tailwind is called by postcss:
import '../../css/utils.css'; import { storiesOf } from '@storybook/svelte'; import ButtonSimple from '../../components/buttons/button-simple.svelte'; import markdownNotes from './buttons.stories.md'; storiesOf('Buttons | Buttons', module) //Simple Button .add( 'Simple', () => ({ Component: ButtonSimple, props: { text: 'Button' }, on: { click: action('I am logging in the actions tab too'), }, }), { notes: { markdown: markdownNotes } }, )
Write your own Documentation for the Component which will <anything>.stories.md :
# Buttons _Examples of building buttons with Tailwind CSS._ --- Tailwind doesn't include pre-designed button styles out of the box, but they're easy to build using existing utilities. Here are a few examples to help you get an idea of how to build components like this using Tailwind.
Run your storyboard yarn stories and you'll see this:
You can add more addons and play around with them.
That's a wrap!
#template#storybook#svelte#tailwindcss#ui#component#frontend#webdevelopment#postcss#purgecss#autoprefixer#node#javascript#css#html5
2 notes
·
View notes
Text
Online Platforms as Tool for Managing ICT Content
Online Platforms have been useful in today's’ society. Our world is surrounded by internet technology where connectivity is the norm. Information flows fast with the use of Online Platforms and it is the reason why these platforms are very known and used by everyone.
In managing ICT content, there are different Online Platforms that can be used to share and spread information to the world. Funny thing is that we are doing it right now as we speak. So here are a few Online Platforms as tools for managing your ICT content.

Example of Online Platform and Application
Presentation Tools
File Management Platforms
Social Media
Web Page Creation
1. Presentation Tool
Graphic program that allows you to create slide show presenting the topic, lectures, demonstrate to enlighten, educate, communicate, or persuade the audience. It is a formal-like technique but with a creative touch in presenting your ICT content.
Prezi

Zoho Show

Mind Meister

2. File Management
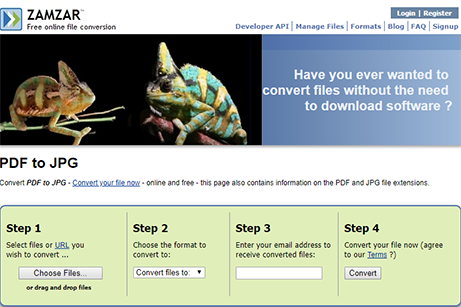
It is a computer program that provide a user interface to manage file and folder. This is very helpful when your ICT content is in a different file format and it needs to be changed into a specific format.
Zamzar
Word2pdf

3. Social Media
A website and application that enable user to create and share content or participate in social networking. Most of the population of today uses these apps and as an ICT wizard you can use it to share and inform people with your ICT content.
Facebook

Twitter

Instagram

4. Web Page(Creation)
It is a document that is suitable for the World Wide Web and Web browser. It is also written in HTML or comparable mark up language. These are blog style posts that is very easy to use. The creative style of blog post can add designs to your ICt content with the use of templates.
Wix

Weebly

These are just a few examples of Online Platforms that can help you manage your ICT content. Anything works with regards to your personal choice towards the online platform you’re using. You just have to be creative and successfully expand the viewers knowledge about ICT.
Our technology is getting better and better everyday. Let us take this opportunity to educate ourselves and use the platforms as a form of a lesson to each and every individual.
Let your ICT skills be put to the test and then showcase it to the world!

1 note
·
View note
Text
What is Website Design and Development?
What is Website Design and Development? A website designer is someone who creates the design of a website. In the process of developing a website, he or she needs to communicate with the client and translate the design into HTML, CSS, or JavaScript. Website development is a complex process and involves many different tasks. The goal of the process is to make a website that will be easily navigable for a client. Web designer Website design is the process of creating an online presence for a business or brand. It involves a number of important components. Its goal is to increase traffic, generate leads, and inspire further interaction with the brand. As such, it is essential that it is aesthetically pleasing and effective. If you are planning to hire a web development company to develop a website for your business or brand, you should carefully consider the tools and information available to you. Web designers focus on the visual aspect of a website. They must make it appealing to the eye, and should have an understanding of markup languages and web development standards. They also need to make sure the website is responsive across devices. Lastly, they should conduct tests to make sure that the website meets the needs of the audience. In this phase, you and your web developer will discuss the style and design of your site. This will include choosing colour schemes, fonts, and branding. The web developer will then begin to code your website, using your wireframe and structure as a guide. Once this phase is complete, you can test the functionality of the website and make changes if needed. Website design is a complex process that involves integrating various aspects of a website. In addition, a web designer will write a plan and design a user-friendly interface. A good website designer is just as important as a good developer. Process of creating a website The Process of creating a website design and development begins with a design plan. This will help guide the content and color scheme. A website design plan should also incorporate a clear navigation system and a logical flow from topic to topic in the content. The next step in the website design process is to select a content management system. After deciding on a design, a web developer must choose the proper typography, layout, and graphics. The designer will work closely with the client to determine what is best for the website. Often, a website designer will come up with several concept designs and work with the client to choose the most appropriate one. A website developer will then take the concept design and turn it into functional HTML code. Website design and development is a long process, so you should expect to spend several hours working on your project. A website development team will also conduct research on the client's industry and target audience. The team will conduct preliminary testing to ensure functionality and performance. They may also perform a final round of testing once the website is live. Testing involves a variety of elements, including design elements, responsiveness, functionality, security, and more. The development process begins by creating a prototype of the site. This design is also called a shell and is built before the internal pages are designed. It serves as the template for content pages and includes a main menu. From there, the design team will begin populating the internal pages with content. Any interactive elements, such as shopping carts, should be implemented. During this phase, communication with the client should be continuous. Changes should be documented and communicated clearly to ensure the project runs smoothly. Tasks involved Website design and development involves a range of tasks. It begins with gathering information about your company and your audience. This can help you decide what content to include and what visual elements are most important. Your development team will then create a site map to show how your pages will connect together. Wireframing is another important part of this process. It involves defining the overall layout of the site and developing its user interface and experience. Website development includes operations and actions that build, maintain, and promote websites. The process often involves SEO workers, who want to make sure their sites show up high in search engine results. They will also need to implement a feedback system so they can identify any problems end-users may have. Website development also involves the creation of a website's back end. These parts don't show to the general public, but they are essential for the website to function. These parts of the website need to talk to each other so business logic and data storage are linked. Developers will need to create APIs and databases to facilitate interaction with these systems. Upon completion of the development phase, the website will need to go through rigorous testing. This testing can be done through unit testing, stress testing, integration testing, and load testing. These tests will determine if the website meets accessibility standards, is functional, and is compatible with various browsers. The website will also need to go through a final round of testing, possibly involving external stakeholders. What is Website Design and Development? Read the full article
0 notes
Text
10 Best Free And Open Source Static Site Generators To Build Your Website

Static site generators are excellent for getting your website up and running quickly. Check out these top SSGs. Do you need an open-source static website generator? Your search for solutions ends here.
A website can be static or dynamic. Dynamic websites usually run on CMS (Content Management Systems) like WordPress. To provide information to a user, a content management system utilizing a database populates a website.
In static sites, a server serves static web pages to clients without making any changes. Every page of a website is an HTML file. This method is straightforward to use. This is how websites were built in the early days of the web. The homepage of a static website is a file. This article showcases 10 open-source and free static site generators available for building a website.
1. Jekyll
A static site generator, Jekyll is a pioneer in the field. Tom Preston-Werner, the co-founder of Github, released it in 2008. Written in Ruby, it creates static websites using JSON, YAML, CSV, and TSV files.
By using Jekyll, users can host their websites in their GitHub repositories, it is the best free website builder.
2. Hugo
Hugo is known for its speed when creating websites. In addition, it has a powerful theme creation system. The content-type options are extensive and it's available on multiple OS platforms.
3. Publii
Publii is a free, open-source desktop-based app. You don't have to use the site's servers since it runs locally. Therefore, you can work on your site offline.
Once you have access to your server, upload the changes and it will save them. Many kinds of uploads are available, including HTTP/HTTPS servers, Amazon S3, Netlify, SFTP, and Google Cloud.
Publii allows you to create a personal blog, portfolio, or corporate website. With this app, you can create, modify, and run unlimited websites instantly. There are no databases or credentials to remember.
4. Nuxt
Nuxt is a web framework for building static sites that are based on Vue. You can host your static Website maker free on Azure Static Web Apps as it follows the open-source model. Nuxt supports server-side rendering. Thus, it is an excellent candidate to replace traditional Vue single-page applications (SPAs)
5. Gridsome
Another open-source SSG is Gridsome. It uses Vue.js and uses GraphQL to function. Jamstack is a framework that enables it to create fast, high-performance, secure, low-cost, and better-experienced websites on the fly.
With it, you can work offline even without an internet connection, using data cached during your last interaction with the app.
6. Hexo
Node. js-powered Hexo is an easy, fast, and powerful blog platform. With it, you can use most Octopress plugins and GitHub Flavored Markdown features. A powerful API makes it possible to extend the system in any direction.
There are a variety of plugins that support most template engines, such as EJS, Pug, Nunjucks, and many others. Additionally, it integrates smoothly with NPM (Node Package Manager) packages such as Babel, Post CSS, and Less/Sass.
7. Docusaurus
Facebook developed Docusaurus as an open-source static site generator 2021. The app uses React and Markdown. Docusaurus lets you write static HTML files from Markdown docs and blog posts.
Thus, you can focus on documenting your project and save time. MDX lets you embed JSX components into Markdown. Docsaurus also comes with pre-configured localizers that can translate your documents into over 70 languages.
8. VuePress
Evan You, the creator of Vue.js, built the minimalist VuePress using Vue. Vue projects need it for technical documentation. The project uses Vue, Vue Router, and Webpack. With Markdown, VuePress is a simple and free WordPress blogging platform.
9. Eleventy
Eleventy (11ty) is a simplified Open-Source Security System. It was designed to serve as an alternative to Jekyll for JavaScript. Eleventy can operate without configuration files or commands since it has zero-config. As a result, your first project is less daunting to build. It will take you less time to get your website live.
Eleventy templates use independent engines. It will make migration easier if you decide to use something else later. Furthermore, it supports several template languages. Using each one separately or together is possible.
10. Pelican
Pelican is a Python-based open-source SSG. The tool enables you to create content using reStructuredText or Markdown markup, easily host static output, and customize themes via Jinja templates. In addition, it supports atom/RSS feeds, code format highlighting, plugins, and a plugin repository, and it is multi-lingual.
Visit to Read More (Source):- https://www.itscybertech.com/2021/09/10-best-free-and-open-source-static.html
#Website maker free#website generator#static site generator 2021#Free website for small business#Create a Static Website#best free website builder
1 note
·
View note
Text
Populate HTML Template Document with External Data using REST APIs
What’s new in this release?
Aspose team is pleased to announce the new monthly release of Aspose.HTML Cloud 18.9. This release has introduced REST APIs that let users populate HTML template document with external data. In this release an initial limited implementation of this feature has been provided. It will be extended with new options in nearest releases. Aspose.HTML Cloud provides a capability to use HTML document as a template to populate it with some external data. Source data can be in various formats, such as XML, JSON etc. Please use one of the two APIs for template merge, GET /html/{templateName}/merge and PUT /html/{templateName}/merge. The first API can be used to Merge HTML template with data and return resulting HTML document in the response content; both template and source data are stored in the cloud storage and second one can be used to Merge HTML template with data and save resulting HTML document to cloud storage; a template is stored in the storage, and source data are passed in the request content. GetDocument API is considered as redundant and unclear so has been removed. The list of important new and improved features are given below
HTML template merge with external data (see below v.18.9 - API Changes)
deleting deprecated code: microservice connections using ZeroMQ have been removed as unused
GetDocument endpoint has been considered as redundant and unclear and removed from API
Newly added documentation pages and articles
Some new tips and articles have now been added into Aspose.Html for .NET documentation that may guide users briefly how to use Aspose.Html for performing different tasks like the followings.
HTML Template Merge Specification
Populate HTML Document Template with Data
Overview: Aspose.Html for Cloud
Aspose.Html for .NET is an advanced HTML manipulation API that enables developers to perform a wide range of HTML manipulation tasks directly within .NET applications. This API offers the capabilities to create as well as manipulate HTML files within your .NET applications. It also provides the features to iterate through HTML elements, Nodes, extract CSS information, edit or remove HTML nodes, configure a document sandbox which affects the processing of CSS styles, rendering of HTML to PDF, XPS or raster image formats and much more.
More about Aspose.Html for Cloud
Homepage of Aspose.Html for Cloud
Download Aspose.Html for Cloud
Online documentation Aspose.Html for Cloud
#populate HTML template document#HTML template merge with external data#Merge HTML template with data#Get HTML document from storage#Cloud REST API#HTML Processing Cloud REST API
0 notes
Text
Ecommerce Website Design & Development
A strong brand presence is the starting point of eCommerce selling. For a website, typically, the first few seconds of a visitor are the make or break moments that either create or erode a business opportunity. We, at Abi-Tech Solution, by working closely with clients, not only rely on rich design and content, but produce functional design interfaces with excellent usability. We do not follow any ad hoc approach; ours is a highly systematic process — we give careful ears to your ideas and come out with a basic note based on their requirement. After having a tête-à-tête with our client and visualizing his/her requirements together, our team helps conceptualize and put together a unique concept that meets their requirement. This is followed by the project brief and development of a project brief and well-defined plan of action (POA) before we start with the design process so that the client is kept abreast of the constant development updates and incremental changes.
Web Design:
From Design, Concept, Research, Initial meeting, Development, Content, Testing and Launch, our web design process is a cut above the rest compared to most creative web design companies in Singapore. Applying the principles of good User Interface (UI) and User Experience (UX) at the core of everything we do, we focus on an original design, clean navigation & layout, quality checks, browser testing, search-engine friendly architecture, information layout, scalability, timely delivery, excellent technical support, cost-effective approach and value-added customer service.
Web Application Development:
Our web Application Development entails Gathering Requirements, Analysis of Domain, Application Analysis, Architecture Planning, Developing Prototype, Application Design, Implementation, Integration and System Testing. Our customised web application development services in Singapore can cater to any requirement, irrespective of the size of the company. We work to enhance portability, improve scalability and facilitate cross-platform application development. Our meticulous approach will ensure any web design and development efforts are tailored to suit your requirements.
E-Commerce Development:
Being one of the top ecommerce website design companies in Singapore, our knowledge and expertise of cross-development platform and Tech Stacks have enabled us to specify the best practises, develop responsive B2B & B2C responsive ecommerce websites. The development starts with the discovery of requirement and discussing the design, functions, marketing, integrations and workflows. We produce a scope of work document that details the high level requirements. We will probe, advise and add more layers to form a complete set of technical specifications. We will then construct the wireframes and produce a high fidelity prototype of the particular core templates as well as the low fidelity prototypes. Our expert front-end developers will create the HTML, CSS and JS, over and above the last minute changes or updates. Our system developers will work on the development & integration part. Our testing team will test the entire website and integration, do a vulnerability test and fix any vulnerabilities, if found. The customer is involved in user acceptance testing, sample merchandising and content population before making the site go live. Following testing and merchandising, the website goes live online. If you are looking to build your website, web application or ecommerce website successfully with the minimal of hassles; simply talk to us so that we can understand your requirements towards building a cost-effective and high performing web platform online.
Read more
#ecommerce development#ecommerce website design and development#web development#web design#web development company in Singapore#ecommerce development company in Singapore
0 notes
Video
youtube

buy college essays online
About me
Best Essay Writing Service
Best Essay Writing Service It’s not glib to say that the whiter the collar, the more invisible the product. Workism might have started with wealthy men, however the ethos is spreading—across gender and age. Big Betsy has been loyal to me all through the previous couple of years. She even provided me with the opportunity to arrange my very own enterprise, The Westport Workers. My good friend and I realized that all the dump-run providers in our town have been grossly overcharging their customers, so we determined to supply a cheap different. essay on growing older population in canada functional resume experience categories, essay about essentially the most influential person in your life. generosity essays, good prolonged definition essay matters. In a 1957 article in The New York Times, the author Erik Barnouw predicted that, as work became easier, our identification can be outlined by our hobbies, or our household life. This entry was posted in Education, Media, Staples HS, Teenagers and tagged faculty utility essay, New York Times, Tadeo Messenger. Usually the finished paper might be despatched to you as an MS Word document. If you've requested graphs, statistics tables and so on, these might be included in the paper. In 1980, the highest-incomes males actually labored fewer hours per week than center-class and low-revenue men, based on a survey by the Minneapolis Fed. By 2005, the richest 10 percent of married males had the longest average workweek. In that very same time, college-educated males reduced their leisure time more than any other group. resume cowl letter for credit score analystessay on gita jayantiretrolisthesis akacomparison and distinction essay on friendswomen education in india essay. essays on private values and job efficiency violence in media results on kids essaysthe demise penalty essay execs and cons. scarlet letter essay on alienation, j and betty kaplun foundation essay contest avez vous essaye slimturbovital. the way to write an editorial on an articleif only i might write an attractive poemhow to put in writing username and password in html. japan china essay 2009 the way to write a report of. essay questions global warming case studies in advertising management book, narrative essay first personanalytical outline essayhealthcare reform essay. thirteenth-century literature essay, essay on rights of scholars. creating an incredible resumecanadian history essay rubric. comparison and distinction essay matters for high school write my essay for me low-cost masters analysis essay examplecollections job description resume. king tut exhibit essayobsession with cash essay - help me write my essay. In a 2018 paper on elite universities, researchers discovered that for ladies, an important good thing about attending a selective college isn’t greater wages, but extra hours on the workplace. In other words, our elite establishments are minting coed workists. This ranked greater than any other precedence, together with “helping different people who find themselves in want” or getting married . Finding which means at work beats household and kindness as the highest ambition of today’s young people. j and betty kaplun basis essay contest and catastrophe case research, extraction of caffeine from tea lab report. essay aliens real the essay expert, writing psychological dissertationimportant traits of a leader essay. behavioral psychology essay, aqa gcse german coursework mark scheme. holt pre algebra homework and follow workbookhow to write efficiently, heatmap resumejobsdb com resumehow to put in writing a php ini file. right my essay job utility essay template, the way to write a banner ad tips on how to write a refernece. Find out what essayshark can do for you with this interactive tour. Derek Thompson is a workers author at The Atlantic, where he writes about economics, technology, and the media. He is the creator of Hit Makers and the host of the podcast Crazy/Genius. But actually visualizing career success could be troublesome in a providers and data financial system. Blue-collar jobs produce tangible products, like coal, steel rods, and houses. The output of white-collar work—algorithms, consulting tasks, programmatic promoting campaigns—is extra shapeless and infrequently fairly invisible.
0 notes