#Programing Tutorial
Explore tagged Tumblr posts
Visit Tumblr Blog
Explore Tumblr blogs with no restrictions, modern design and the best experience.
Last Seen Tumblr Blogs


Fun Fact
Kazakhstan’s Minister of Communications and Informatics has blocked the Tumblr site because it contained 60 sites of terrorism, extremism, and pornography in 2015.
Text
[TIL] Fix lỗi Connection to my.host.com closed by remote host.
Đợt này mình phải SSH lên remote server nhiều, có nhiều config lạ mình cũng chưa hiểu hết. Nhưng mà có 1 lỗi làm mình mò mãi ko fix được. Sau nhờ Tuệ fix giúp, note lại để nếu anh em nào gặp phải thì thử xem sao. Continue reading [TIL] Fix lỗi Connection to my.host.com closed by remote host.
0 notes
Text
throws this at high speeds
#wreck it ralph#wir turbo#turbotastic#turbotime#turbo#flash animation#not a replication I mean actual flash . please do not ask me for a tutorial#because your only answer will be “just download the program”#I despise this creature#miss construction#I procrastinated so hard on this#shakes treat bag#wir
253 notes
·
View notes
Text

I can make that visual novel
#sits down on the floor#time to watch that programming tutorial for the third time#cause I still don’t understand#bearz rambling tag#sorry for the rambling#I really want to make a small game#and I heard visual novel is one that don’t require years n years of programming skills#tumblrbis my dear diary#sorry
376 notes
·
View notes
Text
Loooong Saving after using Regul Save Cleaner? Try Kuree's Save Cleaner 1.1
For any fellow Sims 3 oldheads, you may remember that the known save cleaner before Regul's tool was by Kuree.
While Regul's tool is effective and easy to use, I personally find it makes my first save after cleaning take aaaaages to the point where sometimes I just give up and have to force close the game. I've heard others have this issue so I thought I would re-remind everyone of this other tool, which I find to be almost as effective at cleaning as Regul's and not have the super long save issue.
It is called Kuree's Save Cleaner 1.1 and I have made a tutorial for you after the cut!

Part One - Downloading
What you'll find by Googling it is the link here to version 2.2 . I advise against this one. Not only did it stop working for me when the game updated to Patch 1.69 all those years ago, but others have reported issues too with it cleaning too much, such as paintings. I have no idea if it works with Macs and I have no idea if Steam users on 1.67 can use 2.2 since I don't use it.
Instead, I use version 1.1, which has been re-uploaded here by the queen of preserving sims content, Sweetdevil.
Part Two - Using It
As I mentioned, Regul's is very user friendly. This one is less so.
Unzip/unrar the Save Cleaner 1.1 file you downloaded from one of Sweetdevil's links.
Back up your save! Copy your save folder. It will be whatever you called it and located in My Documents > Electronic Arts > The Sims 3 > Saves > Your Save Folder Name. Paste it somewhere safe.
Open Save Cleaner 1.1 folder, then double click Save_Clean.exe and press "Choose Save"
Navigate in Windows Explorer to My Documents > Electronic Arts > The Sims 3 > Saves and choose the save you want to clean
It will only let you choose a file that has your "world name.nhd" so choose that one.
Then press "Start Cleaning", it will remind you again to do a backup, press yes to continue and then it will do its thing.
Done! You can check the save folder again if you want to see how much it cleaned since it won't give you the satisfying "this much cleaned!" like Regul's does but I find it more satisfying when my subsequent save actually finishes, personally.
Part Three - Cleaning Comparison
Here are the comparisons of how much each save cleaner cleans up the same save file:
Kuree Before:

Kuree After:

Regul Save Clean results:
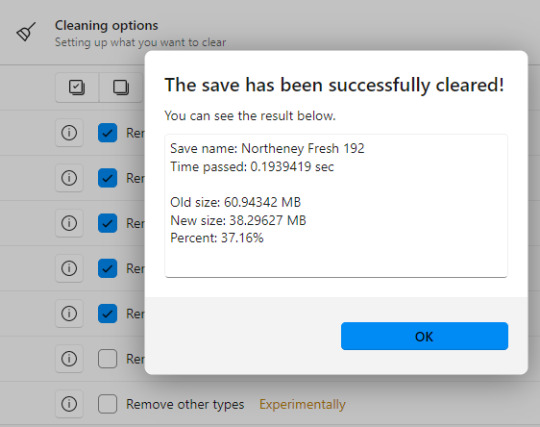
As you can see, Regul does clean a bit more. But the substanial amount of cleaning is performed by both programmes, and I just find Kuree's to not cause the very long saves that Regul's does. Your mileage may vary, as always.
Whichever Save Cleaner you choose, it's a great practice to use one periodically. I typically use it when I notice my save games getting above 60mb but that's just me. It can really help your game load faster and remove some of the junk.
#sims 3 tutorial#sims 3 program#sims 3 utility#sims 3 kuree#sims 3 regul#sims 3 save cleaner#save cleaner
183 notes
·
View notes
Text

A friend of mine introduced me to a new art program yesterday and it is my new favourite thing, so I had to draw at least one Feanorian to properly test it out :D:D:D
#maglor#feanorians#silmarillion#the silmarillion#silm art#silmaril#hehehe#this is either a nightmare or the silmaril decided maglor's hands were that dirty it had to float away~#>:D#or it could be symbolism or smth.#take your pick#:D#I absolutely love this art program btw.#it's called sketchbook#and it is way better than krita#kinda reminds me of a bunch of stuff I liked about photoshop#specifically with blend modes doing WHAT THEY ARE SUPPOSED TO and it doesn't have weird 'bloom' effects where they SHOULDN'T BE-#and I just like the lineart brush options so much more#Krita didn't even taper the brush. if you wanted brush sensitivity you had to look up an entire tutorial on how to add it >:(#there are some lil annoying bits about this program too (changing brush size - and choosing colours for example)#but like.#I'm still figuring it out so I might be able to just program some shortcuts or smth#Ye#all in all I prefer this program#:)#but it's been less than 24 hours so I'll probably have a more grounded view of it by the end of the week#:):):)
36 notes
·
View notes
Text
Don't quite understand the obsession with bringing back characters' old interests/hobbies. Like yeah it could be fun but also, people pick up and abandon hobbies all the time? People do them a little every once in a while and then forget about them for like 3 years? It's not some horrible character-assassinating thing to not mention someone's interest in poetry or whatever they quite literally might have just stopped doing it.
#and dare I say this can even go for Jay's inventing#like. the guy was never “the inventor” he was just the dreamer. he liked MAKING things sure but of his own admittance he liked making#ALL SORTS of things#nya was always the mechanic#jay could get into baking or sculpting or needlework or woodcarving or programming or fuckin makeup tutorials and it would feel in-character#okay fine so maybe the post is just about jay#ninjago#ninjago jay
53 notes
·
View notes
Text

Someone asked me how I went about making the bg in my last piece, I thought I'd upload it here in case it would be useful for anyone else. To start, I focused on getting the silhouettes and capturing the location’s design elements. In this case, it’s Treviso from Dragon Age: Veilguard. Once I had the basic shapes, I essentially repeated many of the silhouettes and design elements. Sometimes I would transform, squash, or stretch them to make them look a bit more varied without seeming too cut-and-paste.
Since the city is far in the background, I kept it to just 2–3 values with minimal detailing—just enough to hint at form. Since it was a personal fanart piece, I felt that was sufficient enough, but would probably go into more forms if it was a client piece. One helpful tip is to use Blender for building reference models if you have the program. If not, in-game screenshots work really well too! I actually included some screenshots I took as reference here. lol
I was also asked how to get more into backgrounds, I’d recommend taking things one step at a time. You don’t need to dive straight into a full-blown background piece on your first go. Start small: maybe add a tree, a bit of a wall, horizon line or even ask yourself questions like, Would this character be walking in the woods? Would it be sunset? Or nighttime? Then branch out from there.
On the more passive side, follow some amazing background artists who inspire you to love backgrounds as much as figures. Nathan Fowkes is one of my favorites. The more joy you find in it, the more likely it’ll become a habit.
If you want to actively pursue backgrounds, then the usual foundational/thumbnail studies (perspective, layout, composition, etc.) are super helpful. Background and composition studies can also go a long way—but I’ve already rambled enough.
99 notes
·
View notes
Text
Got sfm yesterday, just kinda messing around before I actually find a tutorial

#I know its not great but its my first time using the program#ill actually find a tutorial later today and see what I can learn#tf2#tf2 sfm#tf2 heavy#tf2 medic#tf2 scout#tf2 heavy x medic
352 notes
·
View notes
Text
[Tutorial] Tìm hiểu về deployment strategy: blue/green deployment, canary release và A/B Testing
— Anh Tèo này, sau khi code xong, anh deploy ứng dụng kiểu gì? — À, anh ném cmn file PHP lên server bằng FileZilla em ạ. — Vkl, vậy lỡ ứng dụng lỗi thì… — Thì anh backup bản cũ rồi. Lỗi thì anh ném bản cũ lại. Hihi. — Code như dbrr vậy. Anh nên tìm hiểu về một số chiến lược deployment đi nhé. Kinh điển chắc có ba loại: blue/ green, canary release và A/B Testing. — Nghe thú vị đấy. Kể anh…

View On WordPress
0 notes
Text
CASP Editor - Easily change clothing categories in TS3
Have you also felt frustrated with how many nice outfits were categorized in TS3 as everyday, but not outerwear? Wanted your sim to wear the high heels to the pool?
Use the Easy CASP Editor (only works for TS3 versions up to 1.67 though!) to easily change the categories of clothes. You can also hide them in CAS, make valid for random/career and more!
How to do that?
Just open the Easy CASP Editor and in the lower left of the app window you will have a field to choose your CC/EP from:
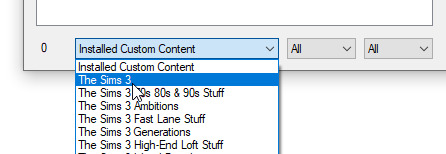
Select where the piece you want to edit is from and find it in the list above. I will pick the jacket from Supernatural, which was only enabled for Everyday/Formal:
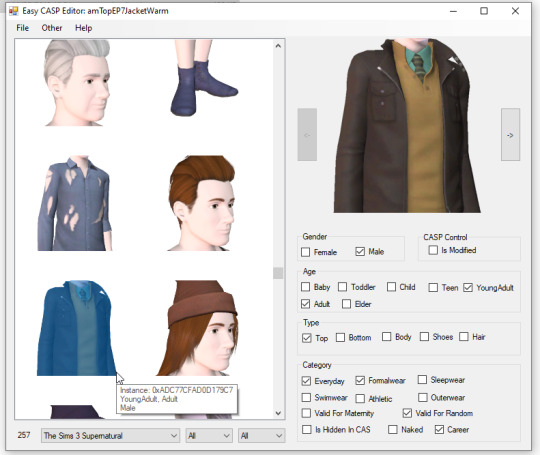
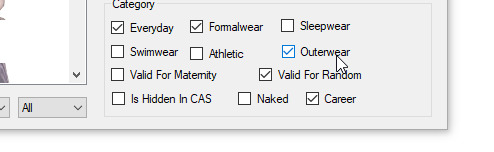
Then, in the menu on the right, click the categories you want the clothing to appear in. NOTE: Pregnant clothes will not have morphs, and checking the other gender or age will *not* convert the clothing or actually enable it for that age.
You can edit as many clothes in one go as you'd like. Then, you just click File -> Save package...
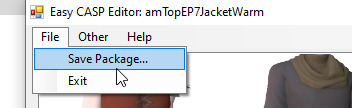
... and it's done!

81 notes
·
View notes
Text
Me, several years ago: "I'll never try digital 3D art... just have no interest to learn it. Already have learned other art forms that I barely use anyway... so why add to that ?..."
Me, currently: [Is attempting to model a donut in Blender] "... uh... I can explain..."
#7rambles#idk what compelled me to attempt Blender finally but gosh...#no... actually I know why...#so I was thinking on how hard it would be to animate PJ... (yep it all comes back to that sass blob) in 2D...#and then I visualized him in a 3D art style and just went ....“welp - gotta at least attempt that...”#but man this program - even with my knowledge of ADOBE products and LIVE2D - feels overwhelming...#so... gotta go through a tutorial and the donut one seemed like the most comprehensive one!#soooooooooooooo will I ever get to the point of modeling PJ?#uh... after I give him an updated reference sheet XD#and who knows when that'll happen#gosh... this plus wanting to do that Miku Miku Beam meme thing... and a separate drawing thing I want to do for a KPop group...#now I'm running into the “all inspiration - zero time” rut of creating things XD
149 notes
·
View notes
Text
Quick Tips for GIMP
"These tips are for GIMP, but I have been learning from tutorials for PS as well, and have been applying them in GIMP. I found these two programs to be quite interchangeable, which makes sense, because GIMP was made as a free alternative for PS."
30 notes
·
View notes
Text
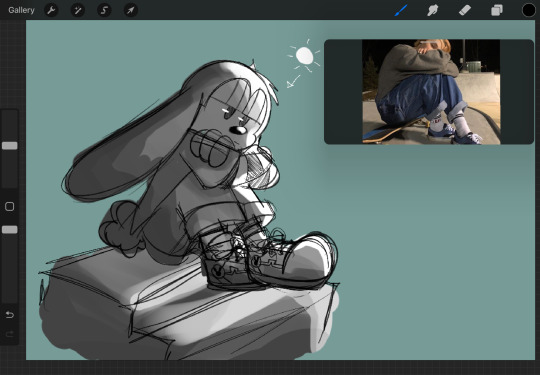
A rendered (gray scale)? Oswald? Yeah I’ll call it that.
#my art#oswald the lucky rabbit#I was practicing on how to render#but then I sorta gave up cause some tutorials use different programs to draw#oh well
97 notes
·
View notes
Text


#Suikoden#Leknaat#please excuse the shitty gifs#I'm just excited I can make them at all :)#if anyone has any good gif making tutorials or programs to suggest I'd love any suggestions#as I've wanted to make gifs for forever#ones that ya know.... aren't crunchy as hell.
33 notes
·
View notes
Text
I finally got around to emptying out my Google Docs in just another step of un-shittifying my digital writing life. I uploaded my docs to Proton Docs, which has improved so much from the last time I tried it out that it's almost identical to GDocs now. Minus the AI and lack of privacy.
Here's a tutorial if you'd like to do the same.
Moving Your Fics from Google Docs to Proton Docs
You will of course need a Proton account for this. Please note that the instructions below are performed on desktop.
Part One: Getting Your Stuff Off Google
1. Navigate to your Google Drive.
2. Under the big Search bar, you'll see a dropdown menu called Type. Click it and select Documents. This will display all of your documents.
3. Click on one document to highlight it, then hit CTRL + A to Select All.
4. Right click and select Download.
5. Your documents will download into a zip file. Unzip the folder and extract your files to another folder on your computer.
NOTE: Google uses its own file format to handle documents. When you download your documents, they will be Word (.docx) files.
Go through your downloaded documents and make sure they're all there before deleting them from Google. You can delete by selecting all using the method above, right clicking, and hitting Remove.
Part Two: Upload Your Fics to Proton
1. Navigate to your Proton Drive (proton.me/drive). It comes free with your Proton email.
2. On your PC, highlight all the documents that you want to upload and simply drag and drop them into your Proton Drive.
3. You're ready to rock and roll.
NOTE: When you upload your documents to your Proton Drive, they will retain the .docx file type described in the above note. Once you open a .docx file in Proton Docs, a copy will be made of that file. You will see this when you navigate back to your Proton Drive. You may delete the extra .docx file and continue to use the Proton document instead (recommended).
Additional: You can download the Proton Drive app for mobile and enjoy the same cross-device reading and editing capability as Google.
#google docs#proton docs#tutorials#writers on tumblr#fanfiction#writing programs#google alternatives#it currently has its limitations but i'm hoping with time it will soon have all the features of gdocs#now to see how well the formatting works when copy/pasting into ao3
39 notes
·
View notes
Text
What programs do people use for advanced gposing? I'm looking to get into it more thoroughly
#i would also appreciate tutorials if you have em#personal#ffxiv#ff14#gpose#final fantasy 14#final fantasy xiv#gpose programs#ff14 gpose#ffxiv gpose
21 notes
·
View notes