#Raspberry Pi tutorials
Explore tagged Tumblr posts
Visit Tumblr Blog
Explore Tumblr blogs with no restrictions, modern design and the best experience.
Last Seen Tumblr Blogs


Fun Fact
The KCSC sent more than 20K requests to delete posts related to prostitution and porn to Tumblr from January to June 2017.
Text
Raspberry Pi 4 Video Looper (Videos in Endlosschleife wiedergeben)
In diesem Beitrag verwenden wir einen aktuellen Raspberry Pi 4 für den Einsatz als stromsparenden Video-Looper. Die Installation und Inbetriebnahme dauern nur wenige Minuten. Anschließend können wir beliebig viele Videodateien auf einen USB-Stick speichern...[Weiterlesen]
4 notes
·
View notes
Text
How to Build a Raspberry Pi-Powered Smart Mirror
Building a Raspberry Pi-powered smart mirror is an engaging project that combines hardware assembly with software configuration. Here’s a step-by-step guide to help you create your own smart mirror: Materials Needed: Raspberry Pi: A Raspberry Pi 3 or newer model. Monitor: A monitor with HDMI input; the size depends on your preference. Two-Way Mirror Acrylic: This allows the display to show…
0 notes
Text
Automação da Criptografia e de eFuses no ESP32
Automação da Criptografia e de eFuses no ESP32 é essencial para proteger protótipos e produtos contra violações de propriedade intelectual. Este guia ensina como automatizar o processo, tornando o desenvolvimento mais seguro e eficiente.
A Automação da Criptografia e de eFuses no ESP32 é essencial para quem faz protótipos e até produtos, pois disponibilizar soluções que usam ESP32 sem criptografia é um grande risco para a propriedade intelectual. 1. Explicando a estrutura e como será a automação Antes de mais nada é importante entender que as automações feitas aqui são baseadas na proteção contra leitura e gravação do ESP32 e a…
#Automação criptografia ESP32#Automação ESP32 com Python#Configuração eFuses ESP32#Criptografia binários ESP32#ESP-IDF no Raspberry Pi#ESP32 proteção propriedade intelectual#ESP32S3 segurança#Espefuse.py ESP32S3#Espsecure ESP32 tutorial#Espsecure.py exemplos#Gravação chave AES ESP32#Gravação criptografada ESP32#Gravação de firmware ESP32#Proteção eFuses ESP32#Segurança de firmware ESP32
0 notes
Text
Raspberry Pi Tutorial: Getting Started with Raspberry Pi
The Raspberry Pi is an inexpensive Linux-based device. It also includes GPIO (general purpose input/output) pins, which enable you to explore the Internet of Things (IoT) and manage electrical components for physical computing.
Some people buy a Raspberry Pi to learn how to code, Raspberry-pi-tutorial-getting-started-with-raspberry-pi while others use it to learn how to programme electronics for real-world tasks. Because it gives you control over the process rather than depending on a closed, proprietary system, the Raspberry Pi is well-liked in the open-source community. Suppose you want to learn more about such new technologies. In that case, you can head to our IT training website Education Nest, where you can access hundreds of free materials and learning resources on this topic.
0 notes
Text
A4988 Pinout: A Comprehensive Guide
Discover the functionality and versatility of the Stepper Motor Driver Module A4988 Pinout, a crucial component in the world of robotics and automation. Let’s delve into the key details, with a specific focus on the A4988 pinout for a clearer understanding.
Stepper Motor Driver Module A4988
The A4988 is a stepper motor driver module that plays a pivotal role in controlling the precise movements of stepper motors. Whether you’re working on a 3D printer, CNC machine, or any other project requiring accurate motor control, the A4988 is a go-to choice.
A4988 Pinout Configuration
Understanding the A4988 pinout configuration is essential for effectively integrating the A4988 into your projects. Here’s a breakdown of the key pins:
MS1, MS2, MS3 (Microstep Resolution): These pins determine the microstep resolution, allowing you to set the stepping mode for the stepper motor. Configuring these pins enables fine-tuning of motor movement.
VMOT (Motor Power Supply Voltage): Connect this pin to the motor power supply voltage (typically 8V to 35V) to ensure the proper functioning of the stepper motor.
GND (Ground): Establish the ground connection by linking this pin to the ground of your power supply or microcontroller.
VDD (Logic Power Supply Voltage): Provide the logic power supply voltage (typically 3V to 5.5V) to this pin to power the internal logic circuitry of the A4988.
DIR (Direction Input): Control the direction of the stepper motor by connecting this pin to a digital output on your microcontroller.
STEP (Step Input): Trigger individual steps of the stepper motor by connecting this pin to another digital output on your microcontroller.
RESET (Reset Input): This pin resets the internal translator circuit, and it is optional to use.
SLEEP (Sleep Input): Putting the A4988 into sleep mode is achieved by connecting this pin to a digital high signal.
Read More: A4988 Pinout
#A4988#stepper-motor#microcontroller#Arduino#Raspberry-Pi#electronics#pinout#wiring#tutorial#DIY#project#hardware#software#programming#electronics-projects#microcontroller-projects#Arduino-projects#Raspberry-Pi-projects#open-source#maker#fabrication#prototyping#engineering#technology#innovation#learning#education
0 notes
Text
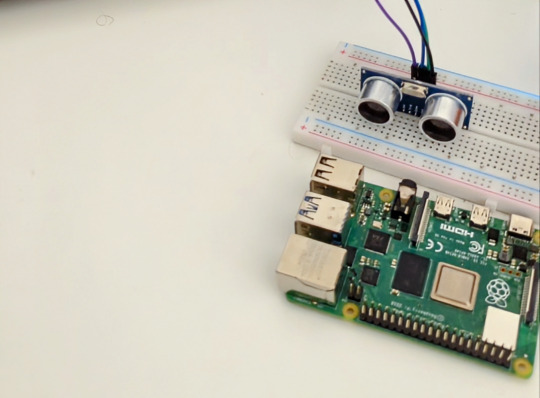
A Guide to Measuring Distance with HC SR04 Sensor Using Raspberry Pi
Raspberry Pi allows you to get creative with programming and build stuff with it. With the Pi, you can make your code come alive. This is the reason I love working with Raspberry Pi and today, we will be talking about one cool Raspberry Pi project: measuring distance using an HC SR04 sensor. We will discuss what an HC SR04 is and the principle on which it functions. Moreover, we will also…
View On WordPress
0 notes
Text
GeeekPi Raspberry Pi Micro GPIO Terminal Block Breakout Board Module with LED
Questo e un terminale per GPIO dotato di morsetti a vite e led compatibile con la maggior parte dei Raspberry pi. Nella confezione di vendita oltre il terminale troviamo tutto il necessario per montarlo su Raspberry Pi. Premetto che sono appassionato di elettronica e ho in dotazione vari Raspberry Pi (dal 2B al 4 e Zero) e utilizzo spesso il GPIO per i miei progetti. Lo utilizzato per il…

View On WordPress
#diy#Electronics#Embedded systems#GeeekPi#GeeekPi accessories#GeeekPi product showcase#GeeekPi products#GeeekPi review#GeeekPi setup guide#GeeekPi tutorials#GeeekPi unboxing#GPIO#HAT#projects#Python programming#raspberry pi#Raspberry Pi accessories GeeekPi GPIO Terminal#Raspberry Pi community#Raspberry Pi enthusiasts#Raspberry Pi hacks#Raspberry Pi OS#Raspberry Pi projects#Raspberry Pi tips and tricks#Single-board computer#Tech Maker
0 notes
Text
i have a bunch of fucking bookmarks for guides and calculators for making geodesic domes and parabolic antennas. also for backyard fire pits and foundries. also guides and software for making SLA printed lenses and a couple on microwave kilns (don't seem too safe tho!). Also spinning unconventional fibers, woodworking, NAS supplies and guides, bunch of stuff for turning my downstairs into an arcade. um a bunch of unorganized links for landscaping and hugelkultur. looks like I was learning linux stuff here but never mind that. bunch of recipes. historical clothing references and patterns for sewing. raspberry pi stuff. bunch of links to guides and manuals from when I was ripping my dishwasher apart and cleaning/fixing it. one single macrame tutorial lol. upholstery guides. looooots of stuff about plants and materials for building terrariums. and this is just my mobile bookmarks.
34 notes
·
View notes
Note
was there a guide you were following for the raspberry pi torrent box setup? that and Plex are the ideal but it seems like a nightmare to figure out
i used this guide to integrate NordVPN via OpenVPN, then this guide from the same site to set up the Transmission client. notably, the second article is slightly outdated as of April 2022, since the "pi" default root user no longer exists to give permissions to. i went through that part of the tutorial using my username ("pihole") in place of "pi" and nothing yelled at me and everything still works so worst case scenario it did literally nothing. i didn't follow the steps for setting up LAN file sharing because im saving everything to an external SSD and then just physically plugging that into my main desktop (USB 3.0 read/write speeds are like 8x faster than Ethernet, lol)
61 notes
·
View notes
Text
ZINE CONTEST (with prize)(≧▽≦)
I have a Zine contest from NOW until Feb 24th (autism holiday). Pls read more about how to submit, the prizes and why I'm so hyped.
This is for BOTH people who consider themselves artists and those who don't. It doesn't have to be a comic. A ZINE CAN BE ANYTHING :D It can be a tech tutorial, it can be a comic, it can be flash fiction, it can be a local history guide, it can be Street Fighter II Turbo strategies printed out to be left in arcades, it can be anything!
The video below explains the process better than I could probably in text (I suck at conveying thing through text). My video also has a tl;dr that I would appreciate everyone read before submitting.
There's some other stuff below, but if you're more visual, like not the reading type (like me) then feel free to skip and just head to the video description to jump in.
Also, you may know me for my "Raspberry Pis are for paypigs" video where I try to advocate for the upcycling for ewasted Chromebooks.
I've been into the idea of leaving around Zines for a while. Every time I walk into a coffee shop or local business, I think "wow, I really would wish there was something cool to read." So I started making things to put there: 8 small 2.5 inch panels, folded into one 2.5 inch square for those interested to unravel. I put them inside of these origami boxes that a learned how to make, ones with a logo printed on them.
So far I've made: a zine template (I call it a dog ear zine for some reason), a template for the box to put them in, a zine about using yt-dlp, a zine about a reindeer working IT (along with a collaborator) and (coming soon) a zine about a monster in a cave doing stuff. All of the odg LibreOffice Draw template files to make your own zines or print out mine are on my archive.org page (linked at top of my Tumblr). I'd really like other people to try this 8 panel 2.5 inch zine format, and I'm willing to bribe people with sweet, sweet Gabe Newell bucks to do it. You can submit as many zines in this format as you want. Just make sure they're printed out and have pictures of both the front and back (plus other pictures if you want) . In the video I mentioned you can use my submit page, which is probably the easiest for me to keep track of. You can also use the #dogearzine hashtag to enter. Please read the video description before entering, though (which includes Youtube's and Tumblr's terms of service, though this is more of a youtube thing).
youtube
Also, and this is completely unrelated, there's a lot more to me than just the faux-clickbait Wojak thumbnails. I like doing tech, wrestling, japanese, vidya and other videos, but I love to throw art in whenever I can shoehorn it in. Like, the video where I go over inchworm, butterfly, colors 3D and flipnote sudomemo - colors 3D on a hacked 3DS was my sister's first experience with digital at (she's moved up to an iPad and Procreate). So, it hold a special place in might heart, as a lot of the things I talk about do. I made a Whomp video because I miss Ronnie. I made a Rockbox video because I wished more people used dedicated MP3 players and knew where and how to download music. I want to help people do interesting things. And I also want to thank anyone who read all of this. You are cool. I hope everyone who's able to can compete in this contest and challenge themselves to get out of their comfort zone, to try something new! Also, also, thanks for liking these posts, people on Tumblr. You all have cool blogs. (^o^)丿
#zine#contest#zine contest#youtube#zine template#archive.org#comic#challenge#fun#chromebook#raspberry pi#wojak#zine ideas#fun ideas#steam#Youtube
24 notes
·
View notes
Note
Hi, I just got into tech (actually 1 year in but I still feel like I don't know anything).
I learnt python, R, SQL, Tableau and concepts in Data Structures, Algorithms.
[Just the Basic level of the listed.]
But I can't write my own programs on python or create anything.
I was hella impressed by your microprocessor project, and when I took up tech (ai and data science) I assumed I would do something like that or at least code.
Now, I am just venting but where do I start, how do I make projects what are some interesting projects, what should I learn? A lot of my seniors tell me to have a wide range of knowledge like focus on one thing by depth but add other things. For example: you can study data analytics in depth but have some knowledge in ethical hacking and web development etc. Like an all rounder.
Wow ok a lot to unpack here, I'll get started
Lots of places recommend that you start with Arduino, as there are a lot of good tutorials out there. I somewhat disagree
I think that raspberry pi is better because it's usually a lot cheaper to buy the stuff you want to play around with
But an even cooler way to do it, go to wokwi.com and start a project on a Raspberry Pi Pico (make sure it's the micropython version) and then you can get started there
Google something like "Blink led with Pi Pico micropython" and there will be a tutorial or two
Then, once you've played around for a while you can buy a Pi Pico for very little money and see your stuff work irl!
If you need any more help or have any questions, feel free to DM me and I'll see what I can do
#micropython#coding#python#raspberry pi#raspberry pi pico#programming#microprocessors#microcontroller#microcontrollers
6 notes
·
View notes
Text
This is the post, from HackerNews, not reddit actually. @solemn-seas and anyone else who's curious
He doesn't go into detail on the how but someone in the comments posts a tutorial for something similar
2 notes
·
View notes
Text
Raspberry Pi Board: Revolutionizing Computing and Education
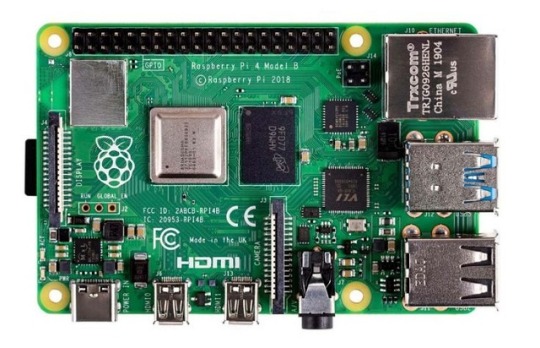
The Raspberry Pi board is a series of small, affordable single-board computers developed by the Raspberry Pi Foundation, a UK-based charity focused on promoting computer science education and digital literacy. Since its launch in 2012, the Raspberry Pi has transformed from a niche educational tool into a versatile platform used in a wide range of applications, from DIY electronics projects to industrial automation.
A Brief History
The first Raspberry Pi, the Model B, was released in February 2012. Designed to promote basic computer science in schools and developing countries, it featured a 700 MHz ARM11 processor, 256 MB of RAM, and basic connectivity options. The success of the Model B led to a rapid expansion of the Raspberry Pi lineup, with various models offering improved performance, more memory, and enhanced connectivity.
Key Features and Models
Raspberry Pi 1 Model B (2012):
Processor: 700 MHz ARM11
Memory: 256 MB RAM
Ports: 2 USB 2.0 ports, HDMI, Composite video, 3.5mm audio jack, Ethernet
Storage: SD card slot
Raspberry Pi 2 Model B (2015):
Processor: 900 MHz quad-core ARM Cortex-A7
Memory: 1 GB RAM
Ports: 4 USB 2.0 ports, HDMI, Composite video, 3.5mm audio jack, Ethernet
Storage: MicroSD card slot
Raspberry Pi 3 Model B (2016):
Processor: 1.2 GHz quad-core ARM Cortex-A53
Memory: 1 GB RAM
Ports: 4 USB 2.0 ports, HDMI, Composite video, 3.5mm audio jack, Ethernet
Wireless: Wi-Fi and Bluetooth
Raspberry Pi 4 Model B (2019):
Processor: 1.5 GHz quad-core ARM Cortex-A72
Memory: Options of 2 GB, 4 GB, and 8 GB RAM
Ports: 2 USB 3.0 ports, 2 USB 2.0 ports, 2 Micro HDMI ports, Ethernet, USB-C for power
Wireless: Wi-Fi and Bluetooth
Raspberry Pi Zero (2015) and Zero W (2017):
Processor: 1 GHz single-core ARM11
Memory: 512 MB RAM
Ports: Mini HDMI, Micro USB OTG, Micro USB for power, GPIO pins
Wireless (Zero W): Wi-Fi and Bluetooth
Applications and Uses
The versatility of the Raspberry Pi has led to its adoption in numerous fields:
Education:
Coding and Programming: Used in schools and educational programs to teach students programming languages such as Python, Scratch, and Java.
Computer Science Concepts: Introduces concepts like hardware, software, and networking.
DIY Projects and Maker Community:
Home Automation: Controls smart home devices, including lights, thermostats, and security systems.
Media Centers: Powers home media centers using software like Kodi.
Retro Gaming: Emulates classic gaming consoles using software like RetroPie.
Industrial and Commercial Applications:
IoT Devices: Serves as a hub for Internet of Things (IoT) devices, enabling data collection and remote control.
Automation and Control Systems: Used in factories and labs for monitoring and controlling equipment.
Research and Development:
Prototyping: Facilitates rapid prototyping of electronic devices and systems.
Data Collection: Gathers data from various sensors in environmental and scientific research.
Community and Ecosystem
The Raspberry Pi has cultivated a vibrant global community of developers, hobbyists, educators, and students. Online forums, tutorials, and community projects provide extensive support and resources for users at all skill levels. The Raspberry Pi Foundation also offers official accessories, including cases, cameras, and expansion boards, further enhancing the functionality of the Raspberry Pi.
Conclusion
The Raspberry Pi board has revolutionized the way people learn about and interact with technology. Its affordability, versatility, and extensive support network have made it an indispensable tool in education, DIY projects, and professional applications. As technology continues to evolve, the Raspberry Pi Foundation remains committed to expanding the capabilities and accessibility of this remarkable platform, ensuring that computing remains within reach for everyone.
3 notes
·
View notes
Video
youtube
Raspberry Pi 5 Firewall Setup Guide: Easy GUFW GUI Tutorial for Secure
🔐 Secure Your Raspberry Pi 5 with GUFW Firewall - Step-by-Step Tutorial Welcome to our comprehensive guide on setting up a firewall on your Raspberry Pi 5 using GUFW GUI. Whether you're a beginner or an experienced Pi user, this tutorial is designed to help you enhance your device's security with ease. What You'll Learn: ✅ Introduction to Firewalls and their importance ✅ Step-by-step instructions on installing GUFW on Raspberry Pi OS ✅ How to configure basic firewall rules ✅ Tips for maintaining firewall security Equipment Used: Raspberry Pi 5 Model B Raspberry Pi OS (Latest Version) Internet Connection Additional resources and links can be found below Useful Links: Official Raspberry Pi Website @raspberrypi @cybersecurityclub @Microsoft @YouTube https://www.raspberrypi.com/ 👍 Like this video if you found it helpful and subscribe to our channel for more Raspberry Pi tutorials and tips. Don't forget to hit the bell icon to get notified about our latest uploads! #RaspberryPi5 #FirewallSetup #GUFW #Cybersecurity #RaspberryPiTutorial #DIYNetworking
2 notes
·
View notes
Text
honestly, if adguard on pi is mentioned here, you might as well mention pivpn and how you can use that to block ads by accessing your adguard via vpn connection (i found pivpn way easier to set up than pihole or adguard)
plus, you're already running a raspberry pi, from there it's not that difficult to plug in an external drive, set up an automount via fstab (there are a lot of tutorials on that) and to expose it on the local network via samba
boom, personal cloud that's running on your machine at home
(i will say that that requires that you can access your network from WAN, but that's usually not too big a deal)
genuinely wild to me when I go to someone's house and we watch TV or listen to music or something and there are ads. I haven't seen an ad in my home since 2005. what do you mean you haven't set up multiple layers of digital infrastructure to banish corporate messaging to oblivion before it manifests? listen, this is important. this is the 21st century version of carving sigils on the wall to deny entry to demons or wearing bells to ward off the Unseelie. come on give me your router admin password and I'll show you how to cast a protective spell of Get Thee Tae Fuck, Capital
66K notes
·
View notes
Text
i need to stop watching cosplay process videos, i’m having aspirations beyond my skill set
girl help, why am i googling raspberry pi tutorials for a torbek cosplay
#personal post#i have access to 3d printers and i did one (1) module on electronics in uni i think i can figure it out
1 note
·
View note