#Reset Android Auto
Explore tagged Tumblr posts
Visit Tumblr Blog
Explore Tumblr blogs with no restrictions, modern design and the best experience.
Last Seen Tumblr Blogs


Fun Fact
The average Tumblr user visits about 67 pages every month.
Text
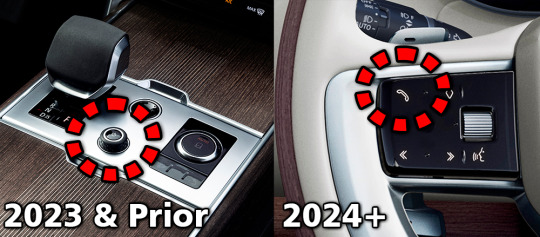
Reset Pivi Pro, Reset Infotainment Screen for Range Rover, Defender, Discovery
Adding this for reference since things changed with the MY24 physical controls purge. For Pivi Pro vehicles prior to 2024, with central volume knob 1 – Select Park (P). 2 – Hold the media power button down, AKA the central volume knob 3 – Continue to hold the media power button(volume knob) down, until the touchscreen goes blank, followed by the brand logo screen being displayed. 4- Release the…
View On WordPress
#Pivi Pro#Range Rover#Reset Android Auto#Reset CarPlay#Reset HVAC#Reset infotainment#Reset Navigation#Reset Radio#Reset screen
2 notes
·
View notes
Text
Jess Weatherbed at The Verge:
Android is launching a new security feature that will force devices to reboot themselves if you haven’t unlocked them for a while, making it harder for other people to access the data inside. The feature included in the latest Google Play services update says that Android phones will automatically restart “if locked for 3 consecutive days,” requiring users to enter their passcode the next time they want to open the device. As 9to5Google notes, this update should apply to both Android phones and tablets, but will exclude other device categories like Auto, TV, and WearOS. The reboot function — not to be confused with a device reset that returns it to factory settings — puts phones and tablets into a Before First Unlock (BFU) state that encrypts data files and disables biometric login support until the device PIN has been entered. Apple introduced a similar iPhone “Inactivity Reboot” feature in iOS 18.1 that triggers a device restart after four days of being locked.
If you have an Android phone or tablet, you may want to be aware that after 3 consecutive days of non-usage, Android phones and tablets will auto-reboot, meaning that a passcode is required to get on before using it.
3 notes
·
View notes
Text
Owners of Spotify's soon-to-be-bricked Car Thing device are begging the company to open source the gadgets to save some the landfill. Spotify hasn't responded to pleas to salvage the hardware, which was originally intended to connect to car dashboards and auxiliary outlets to enable drivers to listen to and navigate Spotify.
Spotify announced this week that it's bricking all purchased Car Things on December 9 and not offering refunds or trade-in options. On a support page, Spotify says:
We're discontinuing Car Thing as part of our ongoing efforts to streamline our product offerings. We understand it may be disappointing, but this decision allows us to focus on developing new features and enhancements that will ultimately provide a better experience to all Spotify users.
Spotify has no further guidance for device owners beyond asking them to reset the device to factory settings and “safely” get rid of the bricked gadget by “following local electronic waste guidelines.”
The company also said that it doesn’t plan to release a follow-up to the Car Thing.
Early Demise
Car Thing came out to limited subscribers in October 2021 before releasing to the general public in February 2022.
In its Q2 2022 earnings report released in July, Spotify revealed that it stopped making Car Things. In a chat with TechCrunch, it cited “several factors, including product demand and supply chain issues.” A Spotify rep also told the publication that the devices would continue to “perform as intended,” but that was apparently a temporary situation.
Halted production was a warning sign that Car Thing was in peril. However, at that time, Spotify also cut the device’s price from $90 to $50, which could have encouraged people to buy a device that would be useless a few years later.
Car Thing's usefulness was always dubious, though. The device has a 4-inch touchscreen and knob for easy navigation, as well as support for Apple CarPlay, Android Auto, and voice control. But it also required users to subscribe to Spotify Premium, which starts at $11 per month. Worse, Car Thing requires a phone using data or Wi-Fi connected via Bluetooth in order to work, making the Thing seem redundant.
In its Q1 2022 report, Spotify said that quitting Car Thing hurt gross margins and that it took a 31 million euro (about $31.4 million at the time) hit on the venture.
Open Source Pleas
Spotify's announcement has sent some Car Thing owners to online forums to share their disappointment with Spotify and beg the company to open source the device instead of dooming it for recycling centers at best. As of this writing, there are more than 50 posts on the Spotify Community forums showing concern about the discontinuation, with many demanding a refund and/or calling for open sourcing. There are similar discussions happening elsewhere online, like on Reddit, where users have used phrases like “entirely unacceptable” to describe the news.
A Spotify Community member going by AaronMickDee, for example, said:
I'd rather not just dispose of the device. I think there is a community that would love the idea of having a device we can customize and use for other uses other than a song playback device. Would Spotify be willing to maybe unlock the system and allow users to write/flash 3rd party firmware to the device?
A Spotify spokesperson declined to answer Ars' questions about why Car Thing isn't being open sourced and concerns around e-waste and wasted money.
Instead, a company rep told Ars, in part: “The goal of our Car Thing exploration in the US was to learn more about how people listen in the car. In July 2022, we announced we’d stop further production and now it’s time to say goodbye to the devices entirely.” I followed up with Spotify's rep to ask again about making the device open source but didn't hear back.
At this point, encouraging customers to waste nearly $100 on a soon-obsolete device hasn't resulted in any groundbreaking innovations or lessons around “how people listen in the car.” In their initial response, Spotify's rep pointed me to a Spotify site that searches Spotify's newsroom for “how to listen to Spotify in the car.” One of the top posts is from 2019 and states that “if your car has an AUX or USB socket, using a cable is probably one of the fastest ways to connect by using your phone.”
As for Spotify, using customer dollars for company-serving learning experiences isn't the best business plan. And for regular users, it's best to avoid investing in an unproven hardware venture from a software company.
As Redditor Wemie1420 put it:
Doesn’t feel great that there is literally no alternative other than trashing it. Feels like we’re being punished for supporting them. Dissuades me from buying anything Spotify puts out in the future. I feel like there would be some way to approach this without being like, ‘yeah we’re done. Just throw it out it’s a waste of money now.’
13 notes
·
View notes
Text
Had my new car for about 2 weeks, and I'm liking it. I mean, a car's a car: get in, start and drive. But some of the new convenience and safety features (my old car was 13 years old) are great. It's a sub compact SUV so it means getting in and out with my iffy back and creaky knees a lot easier. Also loving android auto streaming Spotify from where I left off at home.
Now if I could only get Mypace (the insurance device I have in the OBD2 port) to work. It indicates it's transmitting data, but it never updates anything. On the plus side, I'm not using up my km allotment, and the insurer knows I still have a problem after three attempted resets, but it's still frustrating.
2 notes
·
View notes
Text
How to Reset Your Honda Pilot Stereo System: Quick Fixes for Common Issues
https://autorepairlebanontn.com/?p=3678 How to Reset Your Honda Pilot Stereo System: Quick Fixes for Common Issues Ever found yourself frustrated with your Honda Pilot’s audio system acting up? We’ve all been there. From frozen screens to connectivity issues, sometimes a simple reset is all you need to get your entertainment back on track. We’ll guide you through the straightforward process of resetting your Honda Pilot’s stereo system. Whether you’re dealing with Bluetooth problems, display glitches, or just want to restore factory settings, our step-by-step instructions will help you solve these common issues without an expensive trip to the dealership. Knowing how to perform this reset can save you time, money, and unnecessary headaches on the road. Table of Contents Toggle Understanding the Honda Pilot Audio SystemCommon Issues With Honda Pilot Stereo SystemsDisplay ProblemsAudio MalfunctionsBluetooth Connectivity IssuesHow to Reset Your Honda Pilot Stereo SystemSoft Reset MethodHard Reset MethodWhen to Perform a Honda Pilot Stereo ResetPower-Related IssuesSystem MalfunctionsFollowing System UpdatesCode Display After Power LossPreventing Future Stereo System ProblemsAvoiding Battery DisconnectionKeeping the Owner’s ManualUpdating System SoftwareSimple Reset ProcedureProfessional Help: When DIY Isn’t EnoughWhen to Contact Your Honda DealerNavigation System RequirementsCost and Time ConsiderationsFinding Help Outside the DealershipConclusionFrequently Asked QuestionsWhy does my Honda Pilot’s audio system freeze?How do I perform a soft reset on my Honda Pilot stereo?Will I lose my radio presets when resetting the stereo?What is the “CODE” message on my Honda Pilot radio?How can I get my Honda Pilot radio code if I don’t have it?Can Bluetooth connectivity issues be fixed with a reset?How do I fix a blank or black screen on my Honda Pilot display?When should I seek professional help for stereo problems?How do I update my Honda Pilot’s audio system software?Can disconnecting the battery damage my stereo system? Understanding the Honda Pilot Audio System The Honda Pilot audio system combines advanced technology with user-friendly interfaces across different model years. Most Honda Pilots feature either a standard audio system or an upgraded display audio system with touchscreen capabilities. Recent models (2016 and newer) typically include a 5-inch or 8-inch touchscreen display that manages audio, phone connectivity, and navigation functions. Honda’s infotainment system supports various connectivity options including Bluetooth for wireless phone pairing, USB ports for direct device connection, and auxiliary inputs for older devices. Many newer models also offer Apple CarPlay and Android Auto integration, allowing seamless smartphone mirroring on the vehicle’s display. The system architecture consists of several interconnected components including the head unit (main display and controls), amplifier, speakers, and various modules that handle exact functions like Bluetooth connectivity or satellite radio reception. This complex integration explains why occasional glitches might require a system reset to restore normal functionality. Each Honda Pilot model year has exact features and potential issues. For example, 2016-2018 models occasionally experience touchscreen responsiveness problems, while 2019 and newer models might encounter software-related bugs that affect wireless connectivity. Understanding your exact model’s system configuration helps determine the appropriate reset method when troubleshooting problems. Common Issues With Honda Pilot Stereo Systems Honda Pilot owners frequently encounter several recurring issues with their stereo systems that can disrupt the driving experience. These problems typically fall into three main categories that affect different aspects of the audio system’s functionality. Display Problems Display malfunctions in Honda Pilot stereo systems often manifest as blank screens or error messages that prevent normal operation. When facing a non-working display, try a simple reset by turning on the radio and pressing the power button for two seconds, which often recalls preset settings and resolves minor glitches. Error messages such as “CODE” or “ERR” commonly appear after battery replacement or power interruption, requiring the input of your five-digit radio code for restoration. If you enter an incorrect code and see “ERR,” disconnect the black battery cable for 1-3 minutes, reconnect it, and attempt the code entry again with the correct sequence. Audio Malfunctions Audio issues in the Honda Pilot range from complete sound loss to distorted audio output that diminishes your listening experience. First, check all connections to ensure cables are securely attached to their respective ports, as loose connections account for many audio problems. A quick system reset can often resolve unexplained audio malfunctions by simultaneously pressing and holding radio buttons 1 and 6 while turning on the radio. This reset method works particularly well for intermittent sound issues, static interference, or unresponsive volume controls that don’t require dealership intervention. Bluetooth Connectivity Issues Bluetooth connectivity problems prevent seamless integration between your devices and the Honda Pilot’s stereo system. These issues typically include failed pairing attempts, dropped connections, or audio streaming interruptions. Navigate to your vehicle’s settings menu to verify Bluetooth is properly enabled and your device appears in the paired devices list. Persistent connection problems often respond well to a complete system refresh through the factory data reset option in the settings menu. Remember that performing a factory reset erases all paired devices and custom settings, requiring you to reconfigure your preferences and reconnect your phone afterward. How to Reset Your Honda Pilot Stereo System Resetting your Honda Pilot’s stereo system is a straightforward process that can solve many common audio and display issues. There are two primary methods for resetting your system: soft reset and hard reset options, each serving different troubleshooting needs. Soft Reset Method The soft reset method offers a non-invasive way to restart your Honda Pilot’s stereo system without losing your settings. Try pressing and holding the power button for two seconds while the radio is on – this simple action often helps the system recall its preset settings and resume normal operation. Another effective technique involves simultaneously pressing and holding radio buttons 1 and 6 while turning on the radio, which can reset the system and prepare it for code entry if needed. When your radio displays “CODE,” you’ll need to enter your five-digit radio code, which is typically found in your owner’s manual, on a sticker inside the glove box, or available from your Honda dealer with your radio serial number and vehicle VIN. For successful code entry, turn your ignition to ON or AUX without starting the engine, turn on the radio until it displays “CODE,” then enter your five-digit code to restore normal functionality. Hard Reset Method A hard reset becomes necessary when soft reset techniques don’t resolve your stereo issues or when your radio displays “ERR” instead of “CODE.” The most common hard reset approach involves disconnecting your vehicle’s battery – turn off your Honda Pilot completely, disconnect the black (negative) cable from the battery for one to three minutes, then reconnect it and follow the steps to enter your radio code. Battery disconnection completely resets the system and clears any persistent errors that might be causing problems. For vehicles with integrated navigation systems or particularly stubborn issues, dealer assistance may be required – Honda technicians have specialized tools and access to proprietary software that can reset complex audio systems beyond what’s possible with DIY methods. Taking your vehicle to a dealership is particularly recommended for newer models with advanced display audio systems that might need professional attention. When to Perform a Honda Pilot Stereo Reset Recognizing the right time to reset your Honda Pilot’s stereo system can save you unnecessary frustration and potential service visits. There are several exact situations when a stereo reset becomes necessary to restore normal functionality. Power-Related Issues Electrical interruptions commonly trigger the need for a stereo reset in Honda Pilots. After a battery replacement, your stereo will typically display a “CODE” message, indicating it requires a reset procedure. Similarly, disconnected battery cables, completely drained batteries, or alternator problems that affect power supply will necessitate a system reset to restore proper operation. System Malfunctions Various system glitches may require a reset to resolve them effectively. These include: Frozen touchscreen displays that become unresponsive Audio output problems like distortion or no sound Bluetooth connectivity failures with paired devices Navigation system errors in models with this feature Radio presets that suddenly disappear Following System Updates Sometimes after an infotainment system update, your Honda Pilot’s stereo might exhibit unusual behavior. This occurs because the update process may not complete correctly or might conflict with existing settings. Performing a reset clears temporary data that could be causing conflicts. Code Display After Power Loss The appearance of a “CODE” message on your radio display is a clear indicator that a reset is needed. This security feature activates whenever the stereo system loses power completely, protecting your vehicle from theft but requiring you to enter the correct security code to regain functionality. Preventing Future Stereo System Problems Avoiding Battery Disconnection Disconnecting your Honda Pilot’s battery triggers the stereo’s anti-theft mode, causing unnecessary hassle. Only disconnect the battery when absolutely necessary for maintenance or repairs. Before any planned battery disconnection, keep your radio code readily available to avoid frustration when restarting the system. Many owners place a small note with the code in their glove compartment for easy access during emergencies. Keeping the Owner’s Manual Your Honda Pilot’s owner’s manual contains critical information about your stereo system, including the all-important radio code. Store the manual in a secure location inside your vehicle, such as the glove compartment or center console. Taking a photo of the radio code page with your smartphone provides an additional backup. Some owners also register their vehicle information on Honda’s official website for easy code retrieval when needed. Updating System Software Regular software updates prevent many common stereo system issues in newer Honda Pilot models with integrated infotainment systems. Check for available updates during routine maintenance visits to your Honda dealer. Outdated software often causes freezing screens, connectivity problems, and audio glitches. Advanced infotainment systems typically receive periodic updates that improve stability and add new features or compatibility with modern smartphones. Simple Reset Procedure Newer Honda Pilot models often allow for quick system resets without requiring the radio code. Pressing and holding the power button for 5-10 seconds forces a system restart in many recent models. This simple solution works for minor glitches without erasing your saved settings. Remember that older Honda Pilot models typically don’t support this convenient reset method and still require the full code entry procedure after any power interruption. Professional Help: When DIY Isn’t Enough Sometimes DIY methods for resetting your Honda Pilot’s stereo system don’t resolve the issue, especially with more complex integrated systems. Professional assistance becomes necessary in several exact situations. When to Contact Your Honda Dealer Your local Honda dealership serves as the primary resource for radio code retrieval. Honda dealers have direct access to the manufacturer’s database containing all radio codes linked to vehicle identification numbers. Service technicians at dealerships possess specialized diagnostic tools and software that aren’t available to the general public, enabling them to identify and resolve complex electronic issues. Navigation System Requirements Navigation-equipped Honda Pilot models typically require professional assistance for resets. These integrated systems contain sophisticated components that go beyond the standard audio system’s functionality. Honda dealerships can properly reset navigation systems without risking data loss or configuration errors that might occur during DIY attempts. Cost and Time Considerations Professional reset services at Honda dealerships typically take 30-60 minutes. Many dealers provide this service at minimal cost, particularly for vehicles under warranty. While DIY methods cost nothing but time, the expertise of professional technicians often justifies the expense when facing persistent stereo issues. Finding Help Outside the Dealership Some independent auto electronics specialists can also assist with Honda audio system resets. These professionals often charge less than dealerships while still providing quality service. Before choosing this option, verify that the technician has experience with Honda infotainment systems to avoid potential complications. Conclusion Resetting your Honda Pilot’s stereo system doesn’t have to be intimidating. Whether you’re dealing with a frozen screen Bluetooth issues or error messages we’ve provided the essential steps to get your entertainment back on track. Remember that most problems can be solved with a simple soft reset while persistent issues might require a hard reset or professional assistance. Keeping your system updated and having your radio code accessible will save you headaches down the road. By understanding your exact model’s configuration and following our troubleshooting guide you’ll be able to resolve most audio system problems without an expensive trip to the dealership. Your Honda Pilot’s entertainment features should now be ready to enhance your driving experience once again. Frequently Asked Questions Why does my Honda Pilot’s audio system freeze? Your Honda Pilot’s audio system may freeze due to software glitches, outdated firmware, or electrical issues. These problems can occur in any model year but are more common in 2016-2018 models with touchscreen responsiveness issues. Temperature fluctuations and system overload from multiple functions running simultaneously can also contribute to system freezes. How do I perform a soft reset on my Honda Pilot stereo? To perform a soft reset, press and hold the power button for 10-15 seconds until the screen turns off and restarts. For models with physical buttons, hold the power and volume buttons simultaneously. This method restarts the system without erasing your saved settings and typically resolves minor glitches and freezes. Will I lose my radio presets when resetting the stereo? A soft reset will not erase your radio presets or other personalized settings. However, a hard reset (disconnecting the battery) or factory data reset will clear all saved information, including radio presets, paired Bluetooth devices, and navigation favorites. Always note your important settings before performing a hard reset. What is the “CODE” message on my Honda Pilot radio? The “CODE” message indicates your radio’s anti-theft system has been activated, usually after a power interruption like battery replacement or disconnection. You’ll need to enter your radio’s security code to restore functionality. This code is typically found in your owner’s manual or on a card provided with your vehicle purchase. How can I get my Honda Pilot radio code if I don’t have it? If you don’t have your radio code, you can obtain it by contacting a Honda dealership with your vehicle identification number (VIN) and proof of ownership. Alternatively, visit Honda’s radio code retrieval website (radio-navicode.honda.com) and enter your VIN and radio serial number to retrieve the code online. Can Bluetooth connectivity issues be fixed with a reset? Yes, many Bluetooth connectivity issues can be resolved with a system reset. If your Honda Pilot is having trouble pairing or maintaining connections with devices, try a soft reset first. For persistent problems, perform a factory data reset through the system settings menu, which will remove all paired devices and require re-pairing. How do I fix a blank or black screen on my Honda Pilot display? For a blank screen, first try a soft reset by holding the power button for 10-15 seconds. If that fails, check if the display brightness is turned down or if the system is in night mode. For persistent issues, perform a hard reset by disconnecting the vehicle battery for 10 minutes, then reconnect and enter your radio code. When should I seek professional help for stereo problems? Seek professional help if multiple reset attempts fail, if you experience recurring issues despite successful resets, or if there are physical symptoms like strange noises or burning smells. Navigation-equipped models may require dealer assistance for complex problems, and vehicles under warranty should utilize dealer service to avoid voiding coverage. How do I update my Honda Pilot’s audio system software? For newer models (2019+), check for updates through the system settings menu under “System Updates.” Some updates may be available via USB download from Honda’s owner website. Older models typically require dealer updates. Regular software updates help prevent common glitches and improve system performance and compatibility with newer devices. Can disconnecting the battery damage my stereo system? Disconnecting the battery won’t damage your stereo, but it will trigger the security system, requiring your radio code upon reconnection. It also erases all personalized settings. For simple troubleshooting, try soft reset methods first to avoid the inconvenience of reconfiguring your entire system after a battery disconnect. https://autorepairlebanontn.com/?p=3678 Absolute Auto Repair
0 notes
Video
youtube
How To Reset Android Auto On Android Phone
0 notes
Text
Mastering Google Play in 2025: Tips for Efficient App Downloads & Updates
Stay ahead of the curve with our essential tips for navigating Google Play (گوگل پلی) efficiently in 2025. With a constantly evolving catalog of apps, games, and digital services, mastering download management ensures you never miss a beat. Learn how to schedule background updates, leverage pre‑registration for upcoming launches, and manage storage with smart offloading. By optimizing your settings—such as auto-download only over Wi‑Fi—you’ll conserve data and battery life without sacrificing access to the latest releases on Google Play (گوگل پلی).
Speed up your Google Play (گوگل پلی) downloads by enabling parallel fetching and aggressive cache clearing. Under Settings > Network Preferences, switch on ‘Fast Download’ and limit simultaneous downloads to prevent bottlenecks. Use the built‑in download accelerator by browsing high‑performance servers in regional data centers. For large apps or game updates, prioritize background installation to continue working or playing while updates complete. These tweaks help you harness the full potential of Google Play (گوگل پلی)’s content delivery network for ultra‑quick access to your favorite titles.
Automate your update process on Google Play (گوگل پلی) by creating schedules that fit your routine. Navigate to Settings > Auto‑update apps and select ‘Over Wi‑Fi at night’ to handle installations when you’re unplugged. Group critical security patches under priority updates to prevent vulnerabilities. For beta testers and power users, subscribe to early access channels for timely feature rollouts. Customize notifications to alert you only for noteworthy updates, reducing clutter in your status bar. This strategic approach to app maintenance keeps your device secure and performant on Google Play (گوگل پلی).
Free up space on your device by leveraging Google Play (گوگل پلی)’s built‑in storage manager. Access Settings > Manage Apps to view size, last use, and cache for each application. Remove unused apps or clear cached data in bulk to reclaim gigabytes. Back up data with Google Drive integration before uninstalling, ensuring seamless restoration. Consider using Lite or Go versions of popular apps for essential functionality with a smaller footprint. By routinely pruning and managing storage, you ensure that Google Play (گوگل پلی) downloads swiftly without hiccups from limited space.
Enhance reliability by monitoring Google Play (گوگل پلی) service status and troubleshooting common errors proactively. If you encounter stalled downloads or update failures, clear the Play Store cache under App Info, reboot your device, and verify your Google account sync settings. Track network performance via speed‑test apps and switch between 5G, Wi‑Fi, or mobile data for optimal connectivity. Should issues persist, toggle Play Store updates in System Apps to reset to factory version before re‑upgrading. These quick fixes keep your Google Play (گوگل پلی) experience smooth and uninterrupted.
Future‑proof your Google Play (گوگل پلی) workflow by adopting a multi‑device strategy and cloud backup. Link your Android phone, tablet, Chromebook, and Wear OS watch under one Google account. Enable automatic syncing of app data and game progress through Google Play Games, ensuring continuity across screens. Use Family Library to share purchases and updates with loved ones effortlessly. By centralizing control and backups within Google Play (گوگل پلی), you streamline your digital ecosystem, ready to embrace whatever innovations 2025 brings.
0 notes
Text
🚨 Your Android Phone Will Now Auto-Reboot After 3 Days—Here’s Why!
Big security changes are rolling out, and your phone might already be part of it. Google has quietly updated Android to force a reboot if your device stays locked for 72 hours—but it’s not a glitch, it’s a major privacy move.
🔒 Locking Down Your Data – This reboot resets encryption, making it way harder for hackers (or prying hands) to bypass your lock screen.
🍏 Following Apple’s Lead – Just like iOS, Android is tightening the window for unauthorized access, shutting down forensic workarounds.
🤫 No Announcement, Just Action – Google slipped this into a Play Services update, proving they’re serious about security—even if it’s at the cost of convenience.
Is this a win for privacy, or an annoying overstep? Let’s discuss! 💬
0 notes
Text
Top 10 Features Mechanics Look for in a Professional Scanner
In today’s competitive auto repair industry, efficiency and accuracy are everything. A high-quality professional car diagnostic scanner doesn’t just make a mechanic’s job easier—it transforms the entire diagnostic and repair process. Whether in a high-volume garage or a specialized service center, the right scanner is a mechanic’s most powerful ally.
Here’s a detailed breakdown of the top 10 features mechanics look for when investing in a professional diagnostic tool:
1. 🔁 Bi-Directional Control (Active Tests)
Professional scanners must go beyond passive code reading. Bi-directional control enables mechanics to actively engage with a vehicle’s systems. This feature allows technicians to command components such as fuel pumps, radiator fans, door locks, and even windows to function—all from the scanner.

2. 📈 Live Data Streaming
Real-time live data feeds are critical for accurate diagnostics. Mechanics rely on the scanner to display ongoing sensor activity such as RPM, O2 sensor readings, fuel trim, coolant temperature, and more.
Pro Tip: The best scanners offer graphical data, allowing for comparisons between multiple sensors simultaneously.
Why It Matters: Live data helps detect intermittent issues that may not trigger a fault code.
3. 🧠 OE-Level Diagnostics
Basic scanners often only access the engine module. A professional-grade diagnostic tool offers OE (Original Equipment)-level access, enabling deep scans into all major systems:
ABS
SRS/Airbags
Transmission
Body Control Modules
HVAC
Immobilizer Systems
Why It Matters: Complete system access ensures accurate fault detection and eliminates the need for multiple tools.
4. 🔍 Read & Clear Trouble Codes (DTCs)
All diagnostic tools should read and clear Diagnostic Trouble Codes (DTCs), but a professional tool should display detailed code definitions, possible causes, and suggestions for resolution.
Why It Matters: Helps technicians understand the root cause rather than just erasing the symptom.
5. 🛠️ Special Functions & Service Resets
Modern vehicles require maintenance resets post-service. A reliable scanner must support key service functions:
Oil Service Reset
Electronic Parking Brake (EPB) Reset
Steering Angle Sensor (SAS) Calibration
DPF Regeneration
Battery Registration & Reset
Throttle Body Relearn
Why It Matters: Reduces time spent on manual resets and improves workshop productivity.
6. 🌐 Wide Vehicle Compatibility
Workshops cater to a diverse set of vehicles. A good scanner supports:
American vehicles (Ford, GM, Chrysler)
European vehicles (BMW, Mercedes, VW, Audi)
Asian vehicles (Toyota, Honda, Hyundai, Nissan)
Why It Matters: Ensures versatility and reduces the need for brand-specific tools.
7. 🖥️ User-Friendly Interface
Mechanics don’t have time to scroll through complicated menus. A touch-screen, Android-based interface with intuitive navigation, fast boot time, and responsive performance is crucial.
Why It Matters: Faster workflow, reduced training time, and increased efficiency in daily operations.
8. 📶 Bluetooth & Wireless Connectivity
Gone are the days of tangled OBD cables. Today’s professionals prefer scanners with wireless VCI (Vehicle Communication Interface) modules or Bluetooth connectivity, enabling technicians to work from outside the vehicle.
Why It Matters: Greater flexibility and comfort, especially when performing tests under the hood.
9. 📂 Diagnostic History & Data Management
The best scanners store past diagnostic sessions, customer data, screenshots, and reports. Some even offer cloud backup and Wi-Fi syncing.
Why It Matters: Enables comparison over time and helps in recurring diagnostics or customer service queries.
10. 🔄 Regular Software Updates
Automakers constantly release new models with updated ECUs. A reliable scanner must support frequent software updates to maintain compatibility and add new features.
Why It Matters: Keeps the scanner relevant, accurate, and functional for years.
🛠️ Recommended Tool: DaTo DAS723
The DaTo DAS723 Best car disganostic scanner is a premium tablet-style diagnostic scanner that ticks all the boxes for professional use:
OE-Level system coverage
30+ service functions
Bi-directional testing
ADAS calibration support
Android interface with Wi-Fi updates
Lifetime free software updates
Perfect for mechanics, garages, and workshops aiming for reliability and performance.
✅ Final Thoughts
Investing in a high-performance professional car diagnostic scanner is one of the best decisions any mechanic can make. With the right features—like bi-directional control, live data, wide compatibility, and service reset functions—technicians can diagnose problems faster, reduce labor time, and offer better service.
#automotive diagnostic scan tools market#automotive#diagnostic scanner#automotive tools#diagnostic car scanners#auto repair#best diagnostic car scanner#audi#bmw#evscanners
1 note
·
View note
Text
Samsung Galaxy Buds: The Ultimate Audio Companion

Get it now from Amazon with an Exclusive Discounts and Different Colors
In today’s fast-paced world, finding the perfect pair of wireless earbuds can be challenging. Samsung’s Galaxy Buds have emerged as a frontrunner in the premium audio market, offering an impressive combination of sound quality, comfort, and smart features. Let’s dive deep into what makes these earbuds a compelling choice for audio enthusiasts and casual listeners alike.
Technical Specifications
Audio Technology - Driver: Dynamic 2-way speaker with woofer and tweeter - Active Noise Cancellation (ANC): Advanced multi-level noise cancellation - Ambient Sound: Customizable with multiple levels - Codec Support: Samsung Scalable, AAC, SBC
Battery Life - Earbuds: Up to 5 hours with ANC on (8 hours with ANC off) - Charging Case: Additional 13 hours with ANC on (20 hours with ANC off) - Quick Charging: 5 minutes charge for up to 1 hour of playback - Wireless Charging: Qi-compatible
Connectivity - Bluetooth Version: 5.0 - Auto Switch: Seamless switching between Galaxy devices - Multi-device Connection: Support for simultaneous connection to two devices
Design & Build - Weight: 5.6g per earbud - Water Resistance: IPX7 rating - Touch Controls: Customizable touch panels on both buds - Available Colors: Phantom Black, Phantom Silver, Phantom Violet
Smart Features - Voice Detection: Automatic music pause when speaking - SmartThings Find: Location tracking for lost earbuds - Gaming Mode: Enhanced audio sync for mobile gaming - Voice Assistant: Bixby, Google Assistant, and Alexa support
Get it now from Amazon with an Exclusive Discounts and Different Colors
Frequently Asked Questions (FAQs)
1. Are Samsung Galaxy Buds compatible with iPhone? Yes, the Galaxy Buds work with iPhones through Bluetooth connection. However, some advanced features like automatic device switching and the Galaxy Wearable app’s full functionality are only available on Android devices.
2. How do I reset my Galaxy Buds? To reset your Galaxy Buds, place them in the charging case, press and hold both touch panels for 7 seconds until the LED indicator flashes red, then green. This will restore factory settings and clear all paired devices.
3. Can I use just one earbud at a time? Yes, you can use either the left or right earbud independently while the other charges in the case. This is particularly useful for calls or when you need to remain aware of your surroundings.
4. How long does it take to fully charge the Galaxy Buds? A complete charge takes approximately 1 hour for the earbuds and 2 hours for the charging case. Quick charging provides 1 hour of playback with just 5 minutes of charging.
5. Are Galaxy Buds waterproof? The Galaxy Buds feature an IPX7 rating, meaning they can withstand submersion in fresh water up to 1 meter deep for 30 minutes. However, they’re not designed for swimming or exposure to salt water.
6. How do I clean my Galaxy Buds? Use a soft, dry cloth for the earbuds and a clean, soft-bristled brush for the charging contacts. Avoid using liquids or harsh cleaning materials that could damage the components.
7. Can I customize the touch controls? Yes, through the Galaxy Wearable app, you can customize the touch controls for each earbud, including options for play/pause, skip tracks, volume control, and activating voice assistants.
8. Do Galaxy Buds have a warranty? Samsung provides a standard one-year limited warranty covering manufacturing defects and hardware malfunctions. This doesn’t cover physical damage or water damage beyond the IPX7 rating.
9. How do I update the Galaxy Buds firmware? Firmware updates are managed through the Galaxy Wearable app. When an update is available, you’ll receive a notification. Ensure the earbuds have at least 50% battery before updating.
10. What’s the Bluetooth range of the Galaxy Buds? The Galaxy Buds maintain a stable connection up to 10 meters (33 feet) from your device in optimal conditions. However, obstacles and interference can reduce this range.
Final Thoughts
The Samsung Galaxy Buds represent a perfect blend of innovative technology and practical design. Their impressive sound quality, comfortable fit, and smart features make them an excellent choice for anyone seeking premium wireless earbuds. Whether you’re a music enthusiast, frequent caller, or mobile gamer, these earbuds deliver a versatile and reliable audio experience that adapts to your lifestyle.
Get it now from Amazon with an Exclusive Discounts and Different Colors
1 note
·
View note
Text
The Latest Android Features Every Business Should Know Before Developing an App

In the ever-evolving world of mobile technology, Android consistently leads the charge with innovative updates designed to enhance user experience and optimize app performance. For businesses planning to build apps, staying ahead of these advancements is essential to ensure your application stands out in a competitive market.
As a leading app development company in New York, we understand the importance of keeping businesses informed about the latest Android features. Here's a breakdown of what’s new in Android and why these updates matter for your next app.
1. Enhanced Privacy Features
User data privacy continues to be a priority for Android. With the latest updates, apps must adhere to stricter data usage guidelines, including:
Permission Auto-Reset: Permissions granted to apps that haven't been used in months are automatically revoked, protecting user data.
Granular Permissions: Users can now give apps access to certain features (like location) only when actively using them.
Why It Matters: Businesses should work with an experienced mobile app development company in New York to ensure their apps comply with these rules, enhancing trust among users.
2. Android’s AI-Powered Capabilities
Android’s latest updates integrate artificial intelligence to streamline processes and improve app functionality:
Smart Suggestions: Contextual prompts based on user behavior, like suggested replies in messaging apps.
AI-Powered Image Processing: Improved photo editing tools and filters powered by machine learning.
Why It Matters: Leveraging these features can elevate your app's user experience, especially in industries like e-commerce, social media, and photo editing.
3. Seamless Multi-Device Experiences
Android has strengthened its focus on creating a unified ecosystem with features like Nearby Share and cross-device syncing for apps.
Apps now seamlessly transition between Android phones, tablets, watches, and even Chromebooks.
Multi-Device Experiences API: Developers can create apps that function effortlessly across multiple devices.
Why It Matters: If you’re partnering with an app developer in New York, this technology can future-proof your app, appealing to a broader audience with multiple devices.
4. Material You: Personalized User Interfaces
Android’s Material You design system allows apps to match a user’s system-wide theme, creating a more cohesive and personalized experience.
Customizable color palettes.
Adaptive layouts that improve accessibility and engagement.
Why It Matters: A tailored visual experience boosts user retention. An experienced app development agency in New York can help you implement these design principles seamlessly.
5. Performance Boosts with Android Runtime (ART)
The latest Android versions focus on delivering faster app launches and reduced memory consumption. This is achieved through updates to the Android Runtime (ART), which optimizes app performance.
Why It Matters: With enhanced performance, your app will offer a smoother user experience, essential for engaging modern audiences.
6. Advanced Notifications and Widgets
Android has overhauled notifications to make them more actionable and user-friendly. Widgets have also been redesigned for better interactivity, including:
Smart Notifications: Grouped updates and real-time actions directly from the notification bar.
Enhanced Widgets: Better integration with the home screen and richer customization options.
Why It Matters: Widgets and interactive notifications can boost user engagement, especially for business apps that rely on timely interactions, like e-commerce or delivery services.
7. Faster Updates with Modular System Components
Android now supports Project Mainline, which allows critical updates to be delivered directly via the Play Store instead of waiting for OS-level updates.
Why It Matters: This ensures apps stay secure and updated, an essential feature for businesses working with app development companies in New York to create dynamic, long-lasting applications.
Why Choose the Right App Development Partner?
Implementing these new Android features requires technical expertise and a deep understanding of user behavior. As a trusted app development agency in New York, we specialize in building apps that leverage the latest Android advancements to deliver exceptional results.
Our Expertise Includes:
Custom app development tailored to your business needs.
Integration of Android’s latest tools and APIs.
Ongoing support and updates to keep your app competitive.
Ready to Build the Future of Your Business App?
Staying on top of Android’s innovations ensures your app remains relevant and competitive. Partner with a reliable mobile app development company in New York to bring your vision to life while leveraging the latest technology trends.
Contact us today to start your app development journey with the best app developers in New York!
#mobileappdevelopment#appdevelopment#app development company#mobile app development company#app developer#mobile app developer
0 notes
Text
What To Check If Your Porsche Macan PCM Isn’t Functioning Properly

Did you know… Porsche sold 26,947 Macans in the United States in 2023.
There is something special about this model―that made it the top choice for those seeking a premium compact SUV. It is reliable, powerful, and safe. However, owning such a high-end vehicle has its own set of challenges… It can run into trouble occasionally. Today’s article is about one such trouble: PCM malfunction.
Porsche Macan PCM In a Nutshell
It stands for Porsche Communication Management System… Don’t mistake it as just an infotainment unit―it is much more than that.
- It keeps the driver informed about the vehicle’s key performance metrics.
- The navigation system it is integrated with keeps the driver updated about real-time traffic conditions.
- Its touchscreen interface makes it quite easy for the user to access different settings of the vehicle.
- By enabling hands-free calling and messaging, it ensures safe communication when driving.
- It allows smartphone integration through applications like Apple CarPlay and Android Auto.
In essence, PCM is the part through which your beloved Porsche communicates with you and helps you manage certain driver assistance features.
Why It Might Malfunction
Reason #1- Electrical issues
PCM is basically an electrical device… that works by analyzing and managing electrical signals. Obstruction in power supply can cause your Porsche’s PCM to act up. Insufficient power delivery because of the weakening of the battery can cause the unit to reset unexpectedly. Power disruption because of loose or corroded connections, short circuits, grounding issues, and voltage spikes can impact the unit’s overall functionality…. and might even cause it to cease functioning.
Reason #2- Faulty hardware
Your Macan’s PCM will become unresponsive if there is something off with its hardware. Internal hardware issues can cause its screen to flicker and physical buttons to become stuck. Overheating, moisture intrusion, and debris accumulation can physically damage key hardware components of the PCM unit. Such issues may cause the internal circuits to wear out and the touchscreen to become unresponsive. Identify and fix the flaw before it worsens.
Reason #3- Software bugs
Corrupted or outdated software is yet another leading reason why your Porsche Macan’s PCM might give up. From system crashes to unexpected power loss… there can be many different reasons why software operating the PCM unit might become corrupted. It might contribute to issues such as freezing screen and erratic behavior… the system might not even start. Updating the software can fix any corrupted files and bugs in the system.
Reason #4- Interference from aftermarket devices
It’s also a possibility… installing aftermarket devices that are not compatible with the system can interfere with your Porsche PCM’s performance. Modifying the vehicle’s electrical system to accommodate aftermarket devices can also contribute to an array of other drivability issues. So, if you’re considering adding any such device, consult with a professional.
Reason #5- User error
PCM is a very complex system… Before you start using it, you should familiarize yourself with its features. Such education is crucial for two reasons. Number one, with such knowledge, you won’t inadvertently alter settings that could contribute to functionality issues in the PCM unit. Number two, it would be easier for you to navigate the system’s architecture.
Steps You Can Take to Troubleshoot the Issue
- Restart the system: If your Macan’s PCM is acting in a strange manner, the very first thing that you should do is to restart the system. It will fix any temporary glitches in the system.
- Check the fuse: If power supply to your Porsche’s PCM unit is cut off, check if the fuse guarding its circuit is in good shape. If it is blown, consider replacing it.
- Inspect the wiring: Wires connecting your vehicle’s PCM unit with key electrical systems should be checked. Look for frayed wires and loose connections.
- Update software: If the PCM unit is acting up because of a corrupted file or a bug, consider updating its software. Such updates are quite effective at fixing bugs and enhancing the system’s overall functionality.
- Reset the PCM: It is a panacea for all issues related to the PCM. It will clear any bugs and glitches that have developed within the system over time.
Key Takeaways
PCM is an important part of your Porsche Macan. Its failure can contribute to all sorts of drivability issues. It is therefore important that you check on your Porsche’s PCM from time to time. If it is not functioning the way it should, have it checked by a factory trained technician.
#porsche macan#porsche pcm service#porsche service center#porsche car maintenance#porsche car drive#porsche services
0 notes
Text
Sony Mobile Flickering Issue: Causes, Solutions, and Prevention
Sony smartphones are known for their premium build quality, powerful hardware, and impressive camera technology. However, some users have reported experiencing screen flickering issues, where the display intermittently flashes or flickers, making it hard to use the device. This issue can be frustrating, but understanding its causes, solutions, and preventive measures can help users address the problem effectively.
Causes of Sony Mobile Screen Flickering
Several factors can cause a flickering display on Sony mobile devices. The most common causes include:
Software Glitches: Temporary bugs in the software or issues related to apps running in the background may trigger display flickering. A corrupted system update or compatibility problems with certain apps can also contribute to the problem.
Display Settings Conflicts: Features like adaptive brightness or auto refresh rate adjustment may cause inconsistent behavior on the screen. If the brightness sensor or the refresh rate setting malfunctions, it can lead to screen flickering.
Overheating Issues: When the phone gets excessively hot during gaming or heavy usage, the internal hardware may throttle performance to cool down, leading to display instability and flickering.
Loose Display Connections: In some cases, physical damage to the phone, like drops or shocks, can loosen the internal display connectors, causing the screen to flicker intermittently.
Hardware Failure: If the phone’s display panel or GPU (graphics processing unit) develops a fault, it can result in flickering. This is more likely if the issue persists after troubleshooting software-related causes.
Solutions to Fix Sony Screen Flickering Issues
Here are several potential solutions for resolving the flickering issue on Sony phones:
Restart the Device: A simple restart can often resolve minor software glitches and refresh the system.
Update Software and Apps: Ensure your phone is running the latest version of Android and Sony’s system software. Check for app updates, as some apps may cause display issues if they are outdated or incompatible.
Disable Adaptive Brightness: Go to Settings > Display and turn off Adaptive Brightness. This ensures that the brightness remains stable and reduces flickering.
Enable Safe Mode: Reboot your phone into Safe Mode to check if the issue is caused by a third-party app. If the flickering stops, uninstall recently installed apps to identify the culprit.
Check for Overheating: Avoid using your phone under heavy load for long periods, and close background apps to reduce overheating. Removing any protective covers can also improve heat dissipation.
Factory Reset: If the flickering persists, consider performing a factory reset (after backing up your data). This removes any software corruption that may have developed over time.
Hardware Repair: If none of the software solutions work, the issue may be hardware-related. Contact Sony’s customer service or visit a certified repair center to inspect the display connections or replace the faulty components.
Preventing Future Flickering Issues
Avoid Overloading the Phone: Manage apps efficiently to reduce the chances of system instability.
Use Original Accessories: Non-certified chargers or cables can cause overheating or power surges, affecting display performance.
Handle with Care: Avoid dropping the phone, as internal connections can loosen from impact.
Regular Software Updates: Stay up-to-date with system patches and app updates to prevent compatibility issues.
Conclusion
The screen flickering issue on Sony mobiles can arise from both software and hardware problems, but most cases can be resolved through simple troubleshooting. Users should start with software fixes, such as disabling adaptive brightness or updating the phone, before seeking hardware repairs. By following preventive measures and handling the phone carefully, users can reduce the likelihood of encountering flickering issues in the future. If the problem persists, consulting Sony’s authorized service center ensures a professional diagnosis and repair.
0 notes
Text
Password Manager Google Rises Passkey Support to Desktop
Password Manager Google
Google Password Manager
On any device, logging into your preferred websites and applications ought to be as simple and quick as opening your phone. This is when passkeys are useful. It getting closer to a pass wordless future with these safer and more user-friendly alternatives to passwords. You can securely sign in to apps and websites using your fingerprint, face, or screen lock.
Only passkeys for Password Manager Google on Android could be saved up till now. Though you would have to use your Android handset to scan a QR code in order to use them on other devices.
Organize passkeys in Chrome
With a passkey, you may quickly and safely log in using a fingerprint, facial scan, or screen lock. Without the need for a password app, passkeys are an easy and safe method to access all of the websites and applications you care about in addition to your Google Account. To increase the security of your account, you might be required to generate or use a passkey while logging in to a website.
Recommendation: Since passkeys are based on industry standards, you can utilize them on numerous platforms.
Password manager
Further information on passkeys
Passkeys are cryptographic key pairs; this is how they differ from passwords. A website-specific key pair is used. Half of the information is stored on your device or password manager, while half is shared with the website. Instead of using a password that could be forgotten or stolen, websites and applications authenticate your access with a code that is created securely.
Passkey advantages include:
You won’t need to commit a string of characters, digits, and letters to memory.
Accounts can be accessed via facial or fingerprint recognition technologies.
Passkeys work with both websites and apps, and they are compatible with a variety of browser ecosystems and operating systems.
Passkeys are protected from hacker attempts because they are powerful enough to never be guessed or reused.
Because passkeys are linked to the app or website for which they were intended, you will never be duped into logging into a phony app or website with your passkey.
Password Manager Google passkeys are compatible with all Android applications.
Make use of passkeys
Passkeys are stored on your devices. The procedure varies depending on the operating system and might not be accessible on all of them.
Keep passkeys in Windows storage
Passkeys are available for use if you have Windows 10 or later. You need to configure Windows Hello in order to store passkeys. Passkeys are only saved to your PC because Windows Hello does not presently support synchronization or backup. Passkeys are lost if you lose your computer or reinstall the OS.
You must have Windows 11, version 22H2 or later on your PC in order to use passkey management and passkey auto-fill.
Passkeys can be kept on an Android device
Important: Your device has to be running Android 9.0 or higher and have the screen lock enabled in order to save passkeys.
Passkeys are kept in your Password Manager Google and used on your Android smartphone. Your Android devices securely sync and backup your passkeys.
Keep passkeys on an iPad or iPhone
Passkeys are available in iOS or iPadOS 16+. The iCloud Keychain syncs them with iOS, iPadOS, and macOS devices. Passkey auto-fill is not available in iOS.
Securely keep passkeys on a key
To keep your passkeys safe, you can utilize a security key.
Important: There is no backup for passkeys kept on security keys. You cannot get your passkeys back if you misplace or reset the security key.
It releasing changes today that further simplify the use of passkeys across all of your devices. Passkeys for Password Manager Google can now be saved from Windows, macOS, Linux, and Android; ChromeOS is also available for beta testing. After they are saved, they will sync automatically across all of your devices, so all you have to do to log in is scan your fingerprint.
Google releasing a new Password Manager Google PIN that will allow you to generate passkeys and access saved ones across all of your devices. This PIN provides an extra degree of protection to guarantee that your passkeys are completely encrypted and inaccessible to anybody not even Google.
You will need to know your Android device’s screen lock or your Password Manager Google PIN when you first use passkeys on a new device. You may safely retrieve your previously saved passkeys and sync fresh ones between your Android devices and PCs with these recovery factors.
For well-known websites and applications like Google, Amazon, PayPal, and WhatsApp, passkeys are already available. You may also start using Password Manager Google right now without downloading any additional apps because it is a feature that is incorporated into Chrome and Android devices.
Is Google Password Manager Safe
In general, Password Manager Google is regarded as secure. Google uses robust encryption to safeguard your credentials, and they have a security staff on hand to keep an eye out for any threats. Like any internet service, there are some risks involved.
Here are some important things to think about:
Your Google account and security are linked
Your passwords may be at risk if your Google account is hacked.
Although Google offers local encryption,
It is not activated by default. Local encryption is therefore optional. This implies that in the event of a data breach, your passwords are kept on Google’s servers and may be accessible.
No master password
Google Password Manager does not necessitate a separate master password, in contrast to certain specialized password managers. This implies that your saved passwords are directly accessible to anyone who manages to access your Google account.
To improve your safety
Turn on Google account two-factor authentication (2FA). This adds another level of protection.
Though Google Password Manager is handy, you might find that a specialized password manager is a better option for people who require high levels of security because it frequently provides more sophisticated security features.
Read more on Govindhtech.com
#Google#passwordmanager#googlepasswordmanager#passkeys#news#govindhtech#technologies#technology#technews#technologytrends
0 notes
Text
How to Reset Your Chevy Malibu Stereo System: Quick Fix Guide
https://autorepairlebanontn.com/?p=3667 How to Reset Your Chevy Malibu Stereo System: Quick Fix Guide Is your Chevy Malibu’s stereo system acting up? We’ve all been there—frozen screens, unresponsive buttons, or audio that just won’t play right. A simple system reset might be exactly what you need to get your entertainment back on track without an expensive trip to the dealership. In this guide, we’ll walk you through the quick and easy steps to reset your Chevy Malibu’s stereo system. Whether you’re dealing with Bluetooth connectivity issues, touchscreen glitches, or just want to start fresh after adjusting settings, we’ve got you covered. Our proven reset methods work for various Malibu model years and infotainment systems. Table of Contents Toggle Understanding the Chevy Malibu Stereo SystemCommon Reasons to Reset Your Chevy Malibu StereoAfter Battery ReplacementSystem Freezes and GlitchesHow to Perform a Soft Reset on Chevy Malibu StereoUsing the Power Button MethodThrough the Settings MenuPerforming a Hard Reset on Your Chevy Malibu Stereo SystemFactory Reset ProcedureUsing the Reset PinholeTroubleshooting After Resetting Your Chevy Malibu StereoBluetooth Reconnection TipsRadio Preset RecoveryMaintaining Your Chevy Malibu’s Stereo PerformancePreventative Maintenance TipsAvoiding Common System StressorsWhen to Consider Professional ServiceExtending System LifespanConclusionFrequently Asked QuestionsHow do I reset my Chevy Malibu stereo?When should I reset my Chevy Malibu’s infotainment system?Will resetting my Malibu’s stereo delete my settings?How do I perform a hard reset on newer Chevy Malibu models?How do I reconnect Bluetooth after resetting my Malibu’s stereo?What regular maintenance should I perform on my Malibu’s infotainment system?Why does my Chevy Malibu stereo freeze?What Chevy Malibu models have the Chevrolet Infotainment 3 system? Understanding the Chevy Malibu Stereo System The Chevy Malibu’s stereo system varies across different model years, featuring increasingly sophisticated infotainment options as the vehicle has evolved. Most Malibu models from 2013 onwards come equipped with either the basic Chevrolet MyLink system or the more advanced Chevrolet Infotainment 3 system in newer models. These systems control audio functions, phone connectivity, navigation, and various vehicle settings through a central touchscreen display. Newer Malibu models (2016 and later) typically feature a 7-inch or 8-inch color touchscreen with smartphone integration capabilities including Apple CarPlay and Android Auto. The system includes Bluetooth connectivity for hands-free calling and audio streaming, USB ports for device charging and media playback, and available satellite radio options. Common components found in the Malibu’s stereo system include: Touchscreen display (7 or 8 inches depending on trim level) Physical control buttons for volume, tuning, and menu navigation Steering wheel audio controls for safer operation while driving Multiple audio input options (USB, auxiliary, Bluetooth) Voice command functionality for hands-free operation Understanding your exact Malibu’s system configuration is crucial before attempting any reset procedures, as the steps may differ slightly between model years and system versions. The manufacturing year and trim level of your Malibu determine which infotainment system is installed, affecting both the features available and the reset methods you’ll need to follow. Common Reasons to Reset Your Chevy Malibu Stereo Resetting your Chevy Malibu’s stereo system often resolves many issues without requiring a dealership visit. Here are the most common scenarios when a system reset becomes necessary. After Battery Replacement Battery replacement typically disrupts power to your Malibu’s infotainment system, causing it to lose stored settings and configurations. Your stereo might display error messages, fail to connect with paired devices, or show incorrect time and date information after a new battery installation. Many Malibu owners notice their radio presets have disappeared or that the system behaves erratically following this maintenance procedure. Performing a reset restores the system to proper functioning by reestablishing baseline settings and clearing any temporary memory errors caused by the power interruption. System Freezes and Glitches Infotainment systems occasionally experience operational problems that manifest as frozen screens or unresponsive controls. Your touchscreen might stop responding to finger taps, buttons may become unresponsive, or the entire display could freeze on a single screen. System glitches also include Bluetooth connectivity failures with your smartphone, audio cutting out unexpectedly, or navigation errors. In models with the Chevrolet MyLink or Infotainment 3 system, these issues commonly stem from software conflicts or memory overload after extended use. Resetting clears temporary data that’s causing these malfunctions and refreshes the system’s operating state. How to Perform a Soft Reset on Chevy Malibu Stereo Resetting your Chevy Malibu’s stereo system can quickly resolve various issues without requiring a trip to the dealership. Two effective methods exist for performing this reset: using the power button or handling through the settings menu. Using the Power Button Method The power button method offers a straightforward approach to reset your Chevy Malibu’s infotainment system. First, ensure your vehicle is completely powered off and wait a few minutes to allow the system to fully shut down. Next, locate and press the power button on the infotainment screen, holding it down for 10-20 seconds continuously. This extended press triggers a soft reset that clears temporary data while maintaining your personal settings. Many users find this method solves common issues like frozen screens or unresponsive controls without erasing their saved preferences or paired devices. Through the Settings Menu The settings menu method provides a more comprehensive reset option when simpler answers don’t resolve persistent problems. Navigate to the “Home” menu on your infotainment touchscreen and tap the “Settings” icon. Scroll down until you locate the “System” or “Return to Factory Settings” option and select it. From here, you’ll see multiple reset choices including “Clear All Private Data,” “Restore Vehicle Settings,” or “Restore Radio Settings” depending on the extent of reset you need. Follow the on-screen prompts to complete your selected reset process. For certain Malibu models, an alternative reset technique involves simultaneously pressing and holding both the volume and home buttons on the center console for approximately 10 seconds to initiate the system reset. Performing a Hard Reset on Your Chevy Malibu Stereo System When soft reset methods don’t resolve persistent issues with your Chevy Malibu’s infotainment system, a hard reset offers a more thorough solution. Hard resets completely power down the system and clear all temporary data, effectively giving your stereo system a fresh start. Factory Reset Procedure The factory reset procedure varies depending on your Chevy Malibu’s exact infotainment system. For MyLink/IntelliLink systems, press and hold the Home and Fast-Forward buttons simultaneously for at least 10 seconds to initiate the reset. GM Infotainment Systems from 2017-2019 can be reset by pressing the OnStar call button and then hanging up immediately. Models from 2019-2023 often respond to a simple power cycle—turn the vehicle off completely and restart it. Malibu models equipped with GM Infotainment System with Google Built-in require putting the car in Park, then pressing and holding the End Call button on the steering wheel for 10 seconds. Using the Reset Pinhole Some Chevy Malibu models feature a reset pinhole that provides an alternative method for hard resetting the stereo system. The reset pinhole is typically located near the edge of the infotainment screen or on the faceplate of the stereo unit. To use this method, insert a thin, pointed object like a paperclip into the pinhole and press gently until you feel a slight click. Hold for 5-10 seconds while the system powers down and restarts. This approach is particularly effective when the touchscreen becomes completely unresponsive or when other reset methods fail to resolve system errors. For the most thorough reset option, disconnecting the battery serves as a last resort method. Simply disconnect the negative battery terminal for approximately 15 minutes, then reconnect it. This complete power interruption forces all vehicle electronic systems, including the infotainment center, to reboot entirely. Remember to back up any important data and settings before performing this type of hard reset, as it’ll erase all personal customizations, paired devices, and saved preferences from your Chevy Malibu’s stereo system. Troubleshooting After Resetting Your Chevy Malibu Stereo After completing a reset of your Chevy Malibu’s stereo system, you may encounter a few issues that need addressing. Proper troubleshooting involves checking connections and identifying exact problems to ensure your infotainment system functions correctly again. Bluetooth Reconnection Tips Resetting your Chevy Malibu’s stereo system erases all paired Bluetooth devices, requiring you to re-establish these connections. Navigate to the “Settings” menu on your infotainment screen, then select “Bluetooth” to begin the pairing process. Make sure your phone or device is in discoverable mode before attempting to pair it with the vehicle system. The infotainment system will display available devices, allowing you to select your device and complete the pairing process. For optimal connectivity, keep your device within close proximity to the vehicle during the initial pairing sequence. Radio Preset Recovery Radio presets don’t survive a system reset, meaning all your favorite stations will need to be reprogrammed. Tune to your desired station using the tuning knob or buttons on your Malibu’s radio interface. Once you’ve found a station you want to save, press and hold one of the preset buttons (typically numbered 1-6) until the system confirms the preset has been saved—you’ll often hear a beep or see a confirmation message on the display. Create a list of your favorite stations before performing a reset to make the recovery process quicker and more efficient. Some newer Malibu models allow you to name your presets for easier identification, accomplished through the settings menu after saving the station. Maintaining Your Chevy Malibu’s Stereo Performance Regular maintenance ensures your Chevy Malibu’s infotainment system operates smoothly. Performing routine checks on your system prevents major issues from developing and extends the lifespan of your stereo components. Preventative Maintenance Tips Preventative maintenance keeps your Malibu’s stereo system functioning optimally. Checking all cables and connections periodically helps identify loose wires that might cause intermittent system failures. Keeping the touchscreen clean with a microfiber cloth prevents dirt buildup that can interfere with responsiveness. Software updates available through the Chevrolet website or dealership improve system stability and add new features to your infotainment system. Avoiding Common System Stressors System stressors often lead to premature stereo malfunctions in the Chevy Malibu. Extreme temperatures damage sensitive electronic components, so parking in shaded areas during summer months protects your system. Multiple simultaneous operations tax the processor and memory, occasionally causing freezes or crashes when overloaded. Disconnecting unused USB devices and closing inactive apps frees up system resources and prevents memory overload issues. When to Consider Professional Service Professional service becomes necessary for persistent stereo problems that reset procedures don’t resolve. Recurring error messages after multiple reset attempts indicate deeper hardware issues requiring dealer diagnosis. Complete system blackouts with no response to any reset method typically signal electrical problems beyond simple troubleshooting. Unusual sounds coming from speakers that persist after resets point to potential audio component failures needing professional attention. Extending System Lifespan Extending your infotainment system’s lifespan involves several practical approaches. Gentle handling of the touchscreen prevents damage to the display surface that could lead to dead spots. Letting the system boot completely before interacting with it reduces processing errors that might corrupt system files. Backing up important settings before performing any maintenance ensures you can quickly restore your preferences if needed. Conclusion Resetting your Chevy Malibu’s stereo system is a straightforward solution that can save you time and money on unnecessary service visits. Whether you’re dealing with connectivity issues after a battery replacement or facing a frozen touchscreen we’ve provided several effective methods to get your infotainment system running smoothly again. Remember that while basic resets preserve your settings a hard reset will require you to reconfigure your preferences. For most issues the power button method or settings menu reset will resolve problems quickly. Should you continue experiencing difficulties after trying these answers it might be time to consult with a professional. By maintaining your system properly and knowing these reset techniques you’ll enjoy uninterrupted entertainment and connectivity in your Chevy Malibu for years to come. Frequently Asked Questions How do I reset my Chevy Malibu stereo? To reset your Chevy Malibu stereo, try the power button method: turn off your vehicle, wait a few minutes, then hold the power button on the infotainment screen for 10-20 seconds. Alternatively, navigate through the settings menu to find reset options like “Clear All Private Data” or “Restore Vehicle Settings.” For persistent issues, try disconnecting the negative battery terminal for about 15 minutes as a last resort. When should I reset my Chevy Malibu’s infotainment system? Reset your Chevy Malibu’s infotainment system when experiencing frozen screens, unresponsive buttons, Bluetooth connectivity issues, or after a battery replacement. System glitches like error messages, lagging touchscreen, or audio problems also warrant a reset. These common issues often resolve with a simple reset without requiring a dealership visit. Will resetting my Malibu’s stereo delete my settings? Yes, resetting your Malibu’s stereo will erase paired Bluetooth devices and radio presets. A soft reset (using the power button) generally preserves most personal settings while clearing temporary data. However, a hard reset or factory reset will completely erase all customizations and saved preferences. It’s recommended to back up important settings before performing any reset. How do I perform a hard reset on newer Chevy Malibu models? For 2017-2019 GM Infotainment Systems, press the OnStar call button and hang up immediately. On 2019-2023 models, a simple power cycle often works. For models with GM Infotainment System with Google Built-in, press and hold the End Call button on the steering wheel for 10 seconds. Some models also feature a reset pinhole that can be activated with a thin object. How do I reconnect Bluetooth after resetting my Malibu’s stereo? After resetting your Malibu’s stereo, go to the Settings menu and select Phone or Bluetooth. Enable Bluetooth on your mobile device and make it discoverable. Select “Pair New Device” on your infotainment screen, then choose your phone when it appears. Follow any confirmation prompts on both devices to complete the pairing process. What regular maintenance should I perform on my Malibu’s infotainment system? Regularly check cables and connections for damage, keep the touchscreen clean using appropriate electronics cleaners, and perform software updates when available. Avoid operating the system in extreme temperatures and don’t overload it with multiple simultaneous operations. Handle the touchscreen gently and consider backing up important settings before any maintenance procedures. Why does my Chevy Malibu stereo freeze? Your Chevy Malibu stereo may freeze due to software conflicts, memory overload, connectivity issues with paired devices, or after system updates. Extreme temperatures can also affect performance. The system may become overwhelmed when processing multiple functions simultaneously. In rare cases, hardware failures or loose connections might be responsible for persistent freezing issues. What Chevy Malibu models have the Chevrolet Infotainment 3 system? Newer Chevy Malibu models (generally 2016 and later) feature the advanced Chevrolet Infotainment 3 system. These typically offer 7-inch or 8-inch color touchscreens, smartphone integration with Apple CarPlay and Android Auto, and various audio input options. The specific system varies by manufacturing year and trim level, with premium trims offering enhanced features. https://autorepairlebanontn.com/?p=3667 Absolute Auto Repair
0 notes
Text
Thinkcar ThinkScan Max2 vs. Thinkdiag vs. Thinkdiag2
What is the difference between ThinkcarThinkscan Max2, Thinkdiag, Thinkdiag2, and Thinkscan Max2?
Here eobdtool.co.uk compares them in these respects incl. price, hardware configuration, basic function, service function, software, and language, etc.
Check the comparison tablet below.
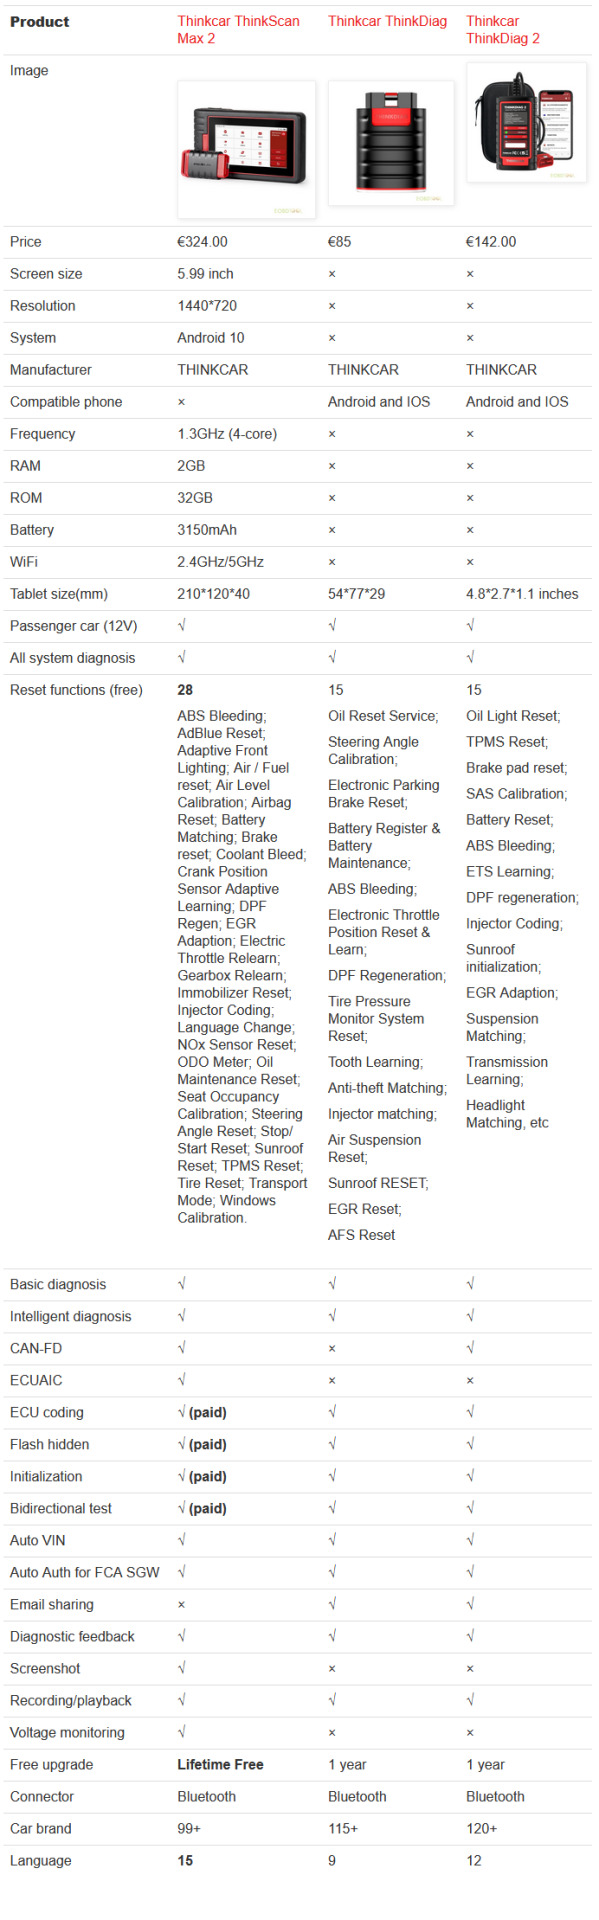
Similarities:
All are portable diagnostic scanners made by THINKCAR brand.
All can diagnose 12V passenger cars.
All can support full system diagnosis, reset service (free), ECU coding, flash hidden, initialization, bidirectional test, auto VIN, Auto Auth for FCA SGW, diagnostic feedback, recording/playback, etc.
Differences:
Thinkdiag and Thinkdiag2 are Bluetooth tools that must work with APP on smart phone (Android or iOS).
Thinkscan Max2 is the most expensive as it has better hardware configuration and supports more functions.
ThinkScan Max2 Pros:
Have touch screen tablet that can work alone, no need to work with Android or IOS smartphone.
Come with better system, RAM, ROM, screen, battery and WiFi.
Support more software functions than others, such as 28 free reset services, ECUAIC, screenshot, voltage monitoring .
Support lifetime free upgrade online, no need any subscription fees.
Available with more languages than others.
Cons:
Most expensive
Need paid upgrade to perform ECU coding, IMMO Key Programming, and Bi-Directional/ Active test
In conclusion:
If you need a cheapest diagnostic scanner without CAN FD protocol and can work with Android/IOS smartphone, you can choose ThinkcarThinkdiag OBD2 scanner.
If you need a cost-effective OBD2 scanner that supports CAN FD protocol, ECU coding, flash hidden, initialization and bidirectional test and works with Android/IOS smartphone, you can choose Thinkdiag 2.
If you need a comprehensive diagnostic scanner that can work alone and support free software update forever, it’s recommended to use Thinkscan MAX2 scanner.
0 notes