#Setting Calendar body to HTML
Explore tagged Tumblr posts
Visit Tumblr Blog
Explore Tumblr blogs with no restrictions, modern design and the best experience.
Last Seen Tumblr Blogs


Fun Fact
Tumblr has 411 employees.
Text
Fever {1}
Series Masterlist
A/N: I rewatched the movies and had an overwhelming need to write the story in ways that I would have liked to see it play out. I am a firm Team Jacob and will be for this fic, there will be Edward bashing. If you don’t like it, don’t read it.
In regards to the wolves, I will be leaning more into the werewolf/shapeshifter mythology, rather than the Quileute storyline that Meyer wrote, I don’t feel that I would do their stories justice, and also just don't like the way Meyer handled any part of their story so I will just be playing with Meyer’s characters. If you’re interested in the Quileute histories or able to donate to their school relocation to help them move their school to higher ground, I’ve included some websites.
Quileute Nation Website: https://quileutenation.org/
Truth vs. Twilight: https://www.burkemuseum.org/static/truth_vs_twilight/facts-01.html
Move to Higher Ground Tribal School Relocation: mthg.org
Warnings: Depression, Anxiety, Abandonment
Summary: Starting in New Moon, what would have happened if Jacob imprinted on Bella? What if she would have chosen him after Edward left? What if she went to therapy?
Rating: M
Word Count: 2,049
I was cold, so fucking cold. And empty, I was empty. The trees overhead were swallowing me as the sun sank. He was gone, I was alone, he just left. He never loved me, I was just a momentary amusement. Cold was seeping into my bones as I lay on the forest floor, waiting for the sky to turn black and for the night to consume me. Rain started, it was cold.The rain started mingling with the warm tears that had rolled down my cheeks.
My world is not for you. I don’t want you to come with me. This will be the last time you see me. Goodbye, Bella. An endless loop of his voice repeated these statements in my mind. It wouldn’t stop, I just wanted it to stop. Then a voice interrupted me, “Isabella Swan? Have you been hurt? Did he hurt you?” Then warmth surrounded me.
“He’s gone, he left. I’m alone.” I groaned, burrowing into the warmth, but it wasn’t enough warmth. I needed more. He kept walking until we broke the tree line and he called out to a swarm of people. “I’ve got her!”
Charlie was yelling my name. “Bella?!” I felt his hands on my face. “I can take her.”
“Charlie?” I whimpered.
“I’m right here, baby, I’m here.” Charlie’s voice soothed.
“Charlie, I can bring her inside.” The voice murmured.
“Please, Sam, let me take her.”Sam, so that was the disembodied voice’s name. I whined as I was passed away from the warmth and into Charlie’s arms.
“I’ve got you baby, I’ve got you.” Charlie murmured, I could hear him puff his breath as we entered the house, he set me down gingerly on the couch. “Sam, blankets are at the top of the stairs, in the cupboard. Doc’s gonna check you out okay?” He asked, brushing hair out of my face, my fingers still shaking. I felt a blanket set on my shoulders, I pulled it close as Dr. Gerandy walked into my line of sight.
“Hello, Miss Swan. I’m here to do a quick check up. Just make sure you’re okay. Do you know where you are?”
“Home.” I mumbled.
“Do you know who is here?” He asked, flashing a light in my eyes.
“Charlie, Sam, and you, Dr. Gerandy.” I answered.
He smiled. “And what happened in the woods? Are you hurt?” He placed his hand on my forehead.
“I…I tried to follow after him. He just left, he doesn’t want me anymore. I’m nothing.” I mumbled.
“Bella, baby, did Edward Cullen do this?” Charlie asked, kneeling down next to me.
“He left, he’s gone. I’m alone.” Then the tears started and I couldn’t hold them back. Charlie’s arms wrapped awkwardly around my shoulders as I leaned into him.
“I’ll be back to check on her tomorrow, Charlie. I don’t see any physical injuries.” I heard Dr. Gerandy murmur before seeing himself out of the room.
“Bells, I have to let everyone know you’re okay and send them home. I’ll be right back.” Charlie murmured into my hair. I clenched my hands into his shirt for a moment, before releasing him.
I heard him call out of the house, saying his thanks and dismissing the group. As his footsteps fell on the floor the phone started to ring. He grumbled and padded into the kitchen, having the same hushed conversation with the callers. There was a pause in ringing for a minute before it began again. Charlie let out a large sigh before answering.
“Hello.” He greeted curtly. “Where? Outside the reservation? I’ll check on it, thanks.”
The phone hung up and he was dialing again. “Hey, Billy. No, she’s fine. Sleeping on the couch. Thanks for sending the boys. Look, I’ve got reports of fires on the cliffs.......Yeah, okay, and why are they doing that?” His voice was weary. “Really? Just make sure it doesn’t spread, I can’t leave her alone.....Yeah, I’ll talk to you later.” He hung up the phone then sighed. He padded around the kitchen, I heard dishes being placed in the sink before his footsteps grew closer and I heard him drop into his recliner.
“What’s going on?” I asked, his head jolted towards me. He started to stand. “Charlie, I’m okay. What’s happening, I heard you talking about fires.”
He sighed, “Just some bonfires on the cliffs. Some of the kids in La Push being rowdy.”
“What aren’t you telling me?”
His eyes met mine, “They’re celebrating.”
My brow furrowed for a moment, “They’re celebrating the Cullens leaving.” I murmured.
Charlie nodded, and sat back in his chair. He was staring at the wall, his mind somewhere else. “Bella?” He asked, in a gentle tone I don’t know if I had heard since I was small. I glanced over at him. “He left you alone, in the woods?”
I remained silent, not sure what to say. He left me, alone. And in the woods, that much was the truth. “How did you find me?”
“Your note, you left it on the table. Said you went for a walk with Edward.” Charlie murmured, worrying a piece of paper in his hand. “Then you didn’t come back. I called their house, no one answered. I called Alice, nothing. So, I called the hospital. Doc told me that Carlisle resigned.”
I closed my eyes, as tears were starting to form again. How did I still have tears left to cry? “Where did they go?”
Charlie balked, I hadn’t meant to say that. “Doc said that Carlisle took a job in Los Angeles, some big hospital, very lucrative opportunity. Didn’t Edward tell you.”
I let out a wry laugh, Los Angeles, the last place a coven of vampires would relocate to.
“Bella, I need to know, did Edward leave you alone in the woods?”
I took a breath and stared up at the ceiling. “I tried to follow him, I was on the path. Then it was dark and I wasn’t on the path anymore. I tripped. Then I heard Sam.” A sob tore through my body.
“Oh, baby, it’s alright.” I heard Charlie rise from his chair and kneel by the couch. I rolled to my side and haphazardly wrapped my arms around him. “You’ll get through this. It won’t be easy, but you will be okay.”
“Dad...” I started, my voice was so weak and I felt his arms tighten around me.
“It’s okay, Bells. I’m here.” He was rubbing small circles on my back as tears continued flowing, at some point they had to stop. They had to. I don’t know how long we stayed like that before he pulled back. “Let’s get you to bed, you can stay home tomorrow. Alright?”
I nodded, he held out his hand to help me off the couch. I walked up the stairs to my room, giving him a small good night before entering my room. I glanced at the window, expecting his shadow to darken it. I did a small turn as I looked around my room, he had left the note. That much, I knew. Which meant, he had been in the house. I opened the CD player on my dresser. It was empty. It will be as if I never existed. “No, no.” I picked up the scrapbook from Renèe, the pages that I had filled were dotted with empty frames. I felt my breathing start to shallow and I sat on my bed. The window still closed, he was gone. He didn’t want me. I sunk into the covers as the dam broke and I was swallowed whole by the tides.
I never really understood what people meant when they talked about going through the motions, at least, not until now. Six months had passed since he left. I didn’t even feel like those months existed, my only proof was the constant changing of the calendar. It was January now, that much I knew, if you asked me for the actual day, I wouldn’t have that answer. I sighed and pulled on an outfit, that Alice would be disappointed in. Maybe my poor fashion choices would summon her here. I let out a laugh and walked down the stairs for breakfast.
I sat down at the table with my usual cereal, Dad nursing his morning coffee. The circles under his eyes dark and deep. I knew those were my fault. Months of sleepless nights had worn on him, I wish I could let him sleep. I wish both of us could sleep. Silence fell in the little kitchen, silence had become common in the house.
But this morning was different, Dad’s fist hit the table. “Bella, I don’t know what to do. Something has to change, or I’m sending you to Florida with your mom.” Dad stated, a shake in his voice.
“I am home.” I snapped back, glancing up into his eyes.
“I’m sending you back, to Renèe, in Jacksonville. I...Bella...I can’t let you live like this. You don’t do anything, you just walk through the motions. I can’t let you go on like this. You can’t... Bella.”
“Dad, please, don’t.” I started, the thought of being sent back to Renèe had my heart pounding, for the first time in months I felt like I had an indicator that I was alive. “Please, I can do better.”
He sighed, “I know, Bella, but I have to do something. Bells, you’re wasting away, you’re falling behind in school, you don’t leave your room. I can’t even say you’re moping because you don’t emote enough for it to be considered moping. Dr. Gerandy recommended a therapist from Port Angeles, thought you might like her.”
I chewed on my thumbnail, being presented with the possibility of being shipped back to Renèe jostled me out of my stupor for a moment. I couldn’t go back to her, I couldn’t take care of myself, how was I supposed to take care of her again? And Phil was hurt again, so he’d be another added to my list. “A therapist might not be a bad idea.” I mumbled.
Dad’s eyes widened. “I can call, see when she has an opening. Get an appointment booked.”
I nodded, still chewing on my thumbnail.
“Bells?” He asked tentatively.
I glanced up from the table. “Dad?”
“You’re not the first to go through this kind of thing. I….” He trailed off. “I had a hard time when your mom left. I was in a bad place. It took me time, but I got through it.” He paused again, he glanced down at his coffee and took a long sip before speaking again. “You can’t waste your life waiting for him to come back. I think if I had seen someone, maybe I would have been able to get better sooner.” There was something else he was thinking, but he kept it to himself.
“I’m sorry, Dad.” I mumbled.
His eyes shot over to me, and he sat up to reach across the table to place his hand over mine. “Bella, you have nothing to be sorry about. I am sorry, that I didn’t get you help sooner. And I’m sorry that I threatened to send you back to Renèe, I’m worried about you, kid.”
“I know, let me know when you get an appointment.” I said, giving him a weak smile before standing from the table. “I’ve got to get to school, see you when I get home.”
He nodded, and took another sip of his coffee as I left the kitchen. “Love you.” I heard him whisper as I left the door. Another small smile spread across my lips and I climbed into my truck. I pulled into my parking space and took a deep breath. The past few months I had been a ghost, I wonder if they’re real too….. I shook my head and stared at Forks High. There were no shiny Volvos parked at the side with a family of too perfect teenagers grouped at the entrance. No van barreling at me. Just a bunch of normal, human teenagers walking to their first class. I joined them, but I knew I was far from a normal human teenager, but just maybe, I would get closer than I was now.
#twilight fic#new moon fic#jacob/bella#jacob black/bella swan#team jacob#jacob black#fever#the twilight saga#bella swan
19 notes
·
View notes
Photo

After a few years of trial and error, I think I've finally found the perfect organization method.
In the early years of high school, I had a bullet journal. I was an artsy kid who found a way to combine art with organization in a way that benefited other parts of my life.
However, as I approached the end of high school, my schedule got busier, and I was involved in a lot more things, so owning a bullet journal was less practical. Because of that, I switched to an app called Edo Agenda.
I continued with digital planning in college since I knew I wasn't going to have as much time. But all the apps I tried out—Taskade, Actions by Moleskine, Any.do, Todoist, Wunderlist—weren't suited to my planning and organizational needs. They didn't have the specific functions I required and didn't incorporate an organization system I liked to use. The predefined apps were too restraining, but the more customizable apps weren't customizable enough.
So then I switched to a bare bones, uber minimalist bullet journal method. That worked pretty well my second semester. It was simple, portable, and most importantly, flexible—all the things one could wish for in a planning system. However, it wasn't always the most convenient to use since I couldn't effectively integrate all the different aspects of my life, which, to no surprise, is mostly recorded digitally.
There was just one huge problem with my digital organization system that made me hesitant to switch back in the first place: everything was fragmented. Notes were in Google Docs. Financial records were in Google Sheets. To-Do Lists were in my bullet journal. Team projects were in Trello. My poetry was on Bear. Things I wanted to try are carelessly pinned to random pinterest boards or added to my YouTube "watch later" playlist. It was a mess.
Over the summer, I found out about Notion from a friend, and I thought, this has so much potential, it could even be exactly what I need. It's essentially like an empty notebook on your computer with functions that make it 10x more powerful. Notion allows you to integrate all aspects of your life and work into one app. Some of the advantages that have made me partial to Notion are:
Even greater customization level. Notion is a blank canvas with tons of predefined blocks and different file types. You can make databases, spreadsheets, Kanban boards, to do lists, etc. Also, you can remain connected to other digital services. You can link websites, collaborate with other users, use different structures (e.g. documents, databases, tasks), embed images and videos, etc. There are also tons of formatting options, e.g. text color, highlight, heading v. body text.
Better organization. Notion allows you to have pages within pages within pages within pages—an infinite hierarchy that you can organize with tables of contents. These pages are made of blocks, e.g. tables, checklists, boards, databases. Both pages and blocks can be rearranged by simply dragging and dropping them to where you want them to be. In other words, I guess it's kind of like building a website to organize your life. Plus, their database feature is especially powerful as it allows you to connect all your data and get into as much detail as you wish (each entry in a database is its own page).
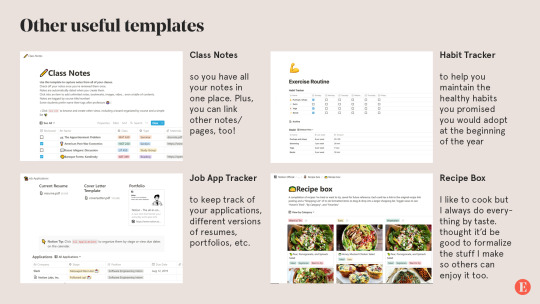
Templates. There are tons of templates created by both Notion and the community that you can use. These are especially helpful in the beginning since Notion does have a rather steep learning curve. There are template for almost every category: personal, planning, finance, job applications, design roadmap, etc. Check out their template gallery, this medium article called "10 Notion templates to inspire your use", or read on for my own examples!
Shortcuts. This makes typing and documenting so much faster. Notion uses Markdown, which is a text-to-HTML conversion tool, e.g. # = Heading 1, *, - = bullet point, etc.
Notion has some pretty awesome features, but how does one actually use it? Personally, I have four top-level pages: my planner, my personal journal, songwriting, and blogging.
Planner
I've been using my planner to, well, plan and track my day to day activities as well as my week and month. The way I've structured it is a calendar or monthly overview with links to pages of weekly overviews, and if needed, daily overviews within the weekly overview. This links things up so nicely, i.e. I don't have to be constantly flipping pages in my physical bullet journal or planner to find what I need.
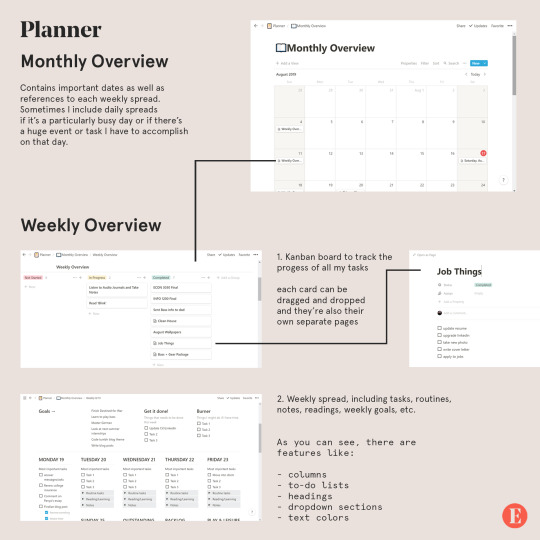
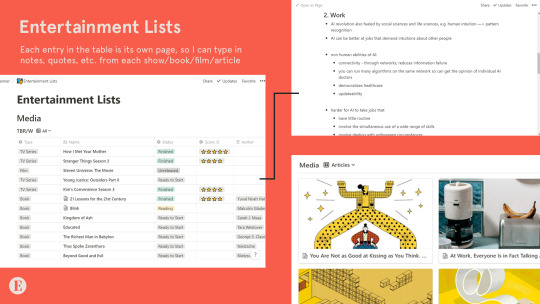
I also have entertainment lists, which is mainly a table with all the shows I want to watch, the books I want to read, etc. I keep track of whether or not I've watched them, as well as my personal ratings. What I love most about this is that each entry is its own page, so I can type my notes for each book, show, or film and easily find them in the future. (Also the reason why I have plural “lists” instead of just one entertainment list is because you can filter entries by type of entertainment, e.g. movies, tv shows, books, articles.)
Personal
For personal notes, goals, journal entries, etc. This is kind of like an extension of my daily journal and just where I dump all my thoughts and keep track of the different aspects of my life: mental, emotional, spiritual, social, physical, and travel.
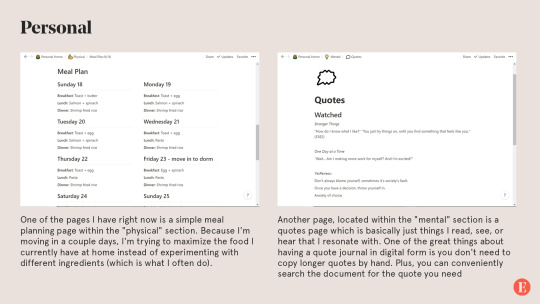
Another page I have is called "Stray Thoughts" and, well, it's pretty self explanatory. It's a lot easier to dump all my thoughts as they come and reorganize them later. Of course, this requires sacrificing the rawness of journaling, i.e. when the thoughts come and how you process them, which is why I still keep a regular journal that I write in daily.
Songwriting
I've been writing a lot of music over the summer and it's often hard to keep track of all of my songs and how far I've gotten in the songwriting process. So I created a table of songs - each entry of a song is a page with its lyrics. These are then tagged with the status of the lyrics (i.e. completed, in progress) and the status of the music itself (i.e. melody only, instrumental, mixing, mastering, revised). Eventually, I'll include demos in the database by embedding audio files in the document.
I have a separate section for inspiration and ideas, which is a kind of brain dump, e.g. words I think would make a good song, a certain theme for a song, a melody that's been stuck in my head, a vibe I'd like to try out, etc.
I've also been watching a lot of tutorials for music production and there's a section where I write my notes for that.
Eintsein
The last section of my Notion app is for this blog. Which has pages for
New posts. These are ideas for future posts, asks that I think would need longer answers, as well as posts that are currently in the draft stage (like this one was before I posted it)
Design assets. This is where I put all the visual branding material for Eintsein.com to be used in posts and any visual material on the blog.
FAQ. Having an FAQ document just makes it so much easier to make changes to your existing FAQ. Plus, if you ever change your FAQ theme, you just have to copy and paste what you already have.
Post directory. I keep track of all my previous masterposts, infographics, and generally longer and more comprehensive posts. It's the exact same as what you see on my Navigation page. And yes, the document contains direct links to the post.
New theme. A project I've been working on the past couple days is trying to create my own theme for my blog. This is where I put all my outlines, brainstorming notes, design inspiration, code snippets, etc.There are some pretty awesome features I’ve made use of in this page:

As you can probably tell, I'm absolutely obsessed with Notion since it has such awesome features and endless possibilities for customization. So far I've been using Notion for personal projects, which, since they are quite big in scale and have no set deadline, are important to organize well. My summer courses were only 6 weeks and weren't difficult to organize.
The formats above are just how I personally use notion. You could make some of your own, or if you don't think you want to build your pages from scratch, there are tons of templates to choose from. Here are some I think I'll be using in the near future and may be helpful for others as well, especially students like myself:
One drawback, however, is that Notion has a rather steep learning curve, but there are tons of tutorials online (especially YouTube) and I guarantee you it's all worth it.
Notion is not just a productivity app. It's a way to concretize your entire life.
Notion is free to use, but there are higher tiers that allow for more blocks, greater file size, etc. I use a personal account, which is $4 per month with unlimited block storage and no file upload limit (although I got it for $33/year). Personally I think the free plan would suit most people's needs, especially if you're not uploading large files.
#mine#eintsein#mymp#notion#apps#productivity#studyblr#studyspo#study hard#organization#document#graphic#design#infographic#masterpost#advice#tips
5K notes
·
View notes
Photo

⭐️ N E W V I D E O ⭐️ The Sims 4 | OUR LITTLE PRINCESS 👸🏽 | CAS & Lookbook + CC Links
▶️https://youtu.be/_iFx3b2ZQz4
CC Links
GLEN: Eyes: https://baieyu.tumblr.com/post/179216040640/still-feel-eyes-previews-heavily-insp-by Face Overlay: https://heihu.tumblr.com/post/168522486651/a-collection-of-all-my-face-overlays-xigua Skinblend: https://kumikya.tumblr.com/post/168380449781/toffee-skinblend-ive-actually-been-wanting-to Beard: https://www.thesimsresource.com/downloads/details/category/sims4-hair-facial/title/beard-n6/id/1410891/ Moles: https://cruisinfdr.tumblr.com/post/180623186108/holy-mole-y-hi-finally-worked-up-the-courage-to Nosemask: https://slythersim.tumblr.com/post/172389355988 Nosemask: https://obscurus-sims.tumblr.com/post/174533730818/obscurusxmelancholic-collaboration-dl-video Noseshader: https://simfileshare.net/download/977930/ Eyebags: https://www.thesimsresource.com/downloads/details/category/sims4-makeup-female-skindetails/title/eyebags-n09/id/1335431/ Eyebrows: https://adiec.tumblr.com/post/186028112159/eyebrow-set-2-1000-followers-gift-33-thank-you Tattoos: https://www.thesimsresource.com/downloads/details/category/sims4-accessories-female-tattoos/title/asiatattoov5--lounacutex/id/1449430/ Piercing: https://www.thesimsresource.com/downloads/details/category/sims4-accessories-female-earrings/title/bad-dream-nose-ring-piercing-set/id/1444328/ Hair: https://okruee.tumblr.com/post/184698036176/jonas-hair-v2-just-a-closer-cropped-version-of
EVERYDAY: Shirt: https://simsontherope.tumblr.com/post/178255996966/escale-shirt-for-the-sims-4-yay-patterns-to-be Jeans: https://aharris00britney.tumblr.com/post/187194346870/axa-2019-official-release Shoes: https://sssvitlans.tumblr.com/post/176615309759/remiiry-vans-sk8-hi-retextured Bracelet: https://luumiasims.com/post/143659727344/forever-summer-an-hm-inspired-mini-collection-i
FORMAL: Suit: https://plumbobteasociety.tumblr.com/post/170874771645/rustic-romance-stuff-for-sims-4-the-love-child Shoes: https://kedluu.tumblr.com/post/131967017923/kedluu-simple-sneakers-monochrome-running-shoes
ACTIVE: Shirt: https://aharris00britney.tumblr.com/post/187194346870/axa-2019-official-release Shorts: https://www.patreon.com/posts/boxing-shorts-30180581
SLEEP: Briefs: https://pleyita.tumblr.com/day/2019/11/15/
PARTY: Shirt: https://okruee.tumblr.com/post/188658622396/followers-gift-set-i-passed-a-milestone-and
Pants: https://marvinsims.tumblr.com/post/160730374168/three-piece-suits-i-couldnt-believe-we-didnt
SWIM:
Shorts: https://aharris00britney.tumblr.com/post/187194346870/axa-2019-official-release
HOT WEATHER: Shirt: https://sixam-hearts.tumblr.com/post/186542263410/hello-ive-been-working-on-these-tanks-all-week Jeans: https://dyoreos.tumblr.com/post/183412740317/dyoreos-2k-followers-gift-i-reached-2000
COLD WEATHER: Jacket: https://darte77.blogspot.com/2019/05/leather-jacket-hoodie.html Jeans: https://okruee.tumblr.com/post/188658622396/followers-gift-set-i-passed-a-milestone-and
Shoes: https://mmsims.tumblr.com/post/183417028551/s4cc-mmsims-dr-martens-molly-enjoy-male
KARLEY:
GENERAL: Eyes: https://baieyu.tumblr.com/post/179216040640/still-feel-eyes-previews-heavily-insp-by Hair: https://aharris00britney.tumblr.com/post/189456863120/karley-hair Lashes: http://kijiko-catfood.com/3d-lashes-version2-for-skin-detail-experimental/ Lip Preset: https://stretchskeleton.tumblr.com/post/187172222703/some-mouth-presets-that-i-havent-posted-yet Nosemask: https://brntwaffles.tumblr.com/post/157021939147/found-in-the-skin-details-thumbnails-for-each-nose Eyebags: https://www.thesimsresource.com/downloads/details/category/sims4-makeup-female-skindetails/title/eyebags-n09/id/1335431/ Skinblend: https://viiavi.tumblr.com/post/183382856408/papillon-default-nondefault-skin-blend-for-all Skindetail Highlighter: https://nesurii.tumblr.com/post/182508085171/amaryllis Eyebrows: https://adiec.tumblr.com/post/185708180915/eyebrow-set-1-some-cute-lil-eyebrows-i-made-in Freckles: https://joviean.tumblr.com/post/186573920181/maple-freckles Tattoos: https://fernpots.tumblr.com/post/171598292642/moth-boy-tats-2-semi-mm-full-body-tats-one Earrings: https://wildlyminiaturesandwich.tumblr.com/post/149258915734/a-second-version-of-these-earrings-that-i-edited Nails: https://simlaughlove.tumblr.com/post/163327412088/sll-rainbownails Lipstick: https://love4sims4.tumblr.com/post/165931634543/aprisims-kylie-lip-kits-fall-shades-sims-4 Lipgloss: https://raiichuu.tumblr.com/post/189556737324/advent-calendar-day-8-fruitcake-lipgloss-just-a Lipstick: https://alhajero.tumblr.com/post/184959100825/a-little-hi-how-have-you-been-hopefully Eyeshadow: https://dear-solar.tumblr.com/post/187076819275/the-chuuuuu-collab-this-is-a-korean-beauty-and Eyeliner: https://simandy.tumblr.com/post/171605780781/made-an-eyeliner-actually-4-but-yea
EVERYDAY: Shirt: https://kimoanasims.tumblr.com/post/183201014697/5000-followers-gift-whateva-collection-thank Jeans: https://tajsiwel.tumblr.com/post/167928709375/tajsiwel-chrissy-23-swatches-custom Shoes: https://madlensims.tumblr.com/post/182216831210/madlen-roberto-boots-high-quality-leather-boots Necklace: https://kumikya.tumblr.com/post/188336354646/moon-shard-jewellery-set-simblreen-pt-1-hi-i
FORMAL: Hair: https://www.saurussims.com/post/185953051413/prom-2019-collection-by-joliebean Dress: https://www.patreon.com/posts/30351413 Shoes: https://www.thesimsresource.com/downloads/details/category/sims4-shoes-female-teenadultelder/title/madlen-attila-shoes/id/1325644/ Necklace: https://bethsims4love.tumblr.com/post/160823033598/so-i-have-been-messing-around-in-blender-and Bracelet: https://veranka-s4cc.tumblr.com/post/142800259050/claire-necklace-bracelets-i-did-some-simple Earrings: https://www.thesimsresource.com/downloads/details/category/sims4-accessories-female-earrings/title/fan-earrings-revamped/id/1457307/
ACTIVE: Shirt: https://moontrait.tumblr.com/post/175148225998/moontrait-long-sleeve-layered-top-ea-mesh-bgc-21 Pants: https://pleyita.tumblr.com/day/2019/07/16/ Shoes: https://kedluu.tumblr.com/post/131967017923/kedluu-simple-sneakers-monochrome-running-shoes
SLEEP: Nightgown: https://kumikya.tumblr.com/post/185442507651/poppy-jasmine-sleepwear-i-made-these-a-little
PARTY: Outfit: https://honey-moth.tumblr.com/post/189513363916 Shoes: https://madlensims.tumblr.com/post/182216831210/madlen-roberto-boots-high-quality-leather-boots
SWIM: Swimsuit: https://gvbesims.tumblr.com/post/185126083949/inakhs-80s-swimsuit-recolors-i-absolutely
HOT WEATHER: Top & Shorts: https://kumikya.tumblr.com/post/189401305261/kumikyas-summer-basics-collection-its-suuuuper Shoes: https://gloomfish.tumblr.com/post/187789866948/birkenstocks-for-all-your-sksksksks-and-i-oop
COLD WEATHER: Sweater: https://www.thesimsresource.com/downloads/details/category/sims4-clothing-female-teenadultelder-everyday/title/trillyke--winter-heat-sweater-dress/id/1435983/ Socks: https://www.thesimsresource.com/downloads/details/category/sims4-clothing-female-teenadultelder-everyday/title/trillyke--run-away-socks/id/1469854/ Beret: https://casteru.tumblr.com/post/187221101262/cc-dump-tou-i-fixed-18-of-my-old-cc
NORA: GENERAL: Eyes: https://baieyu.tumblr.com/post/179216040640/still-feel-eyes-previews-heavily-insp-by Hair: https://naevys-sims.tumblr.com/post/181974167109/greenllamas-winter-hair-okruee-lizzie-hair Bangs: https://atashi77.tumblr.com/post/184987287173/nayla-accessory-bangs-a-couple-of-people-asked Lashes: http://kijiko-catfood.com/3d-lashes-version2-for-kids/ Skinblend: https://oasisgoth.tumblr.com/post/175646311686/new-dna-skin-revamped-by-oasisgoth-i-got Skinblend: https://sammmi-xox.tumblr.com/post/173100202612/hello-my-lovelys-its-been-awhile-but-i-come-with Skindetail Highlighter: https://nesurii.tumblr.com/post/182508085171/amaryllis Moles: https://cakenoodles.tumblr.com/post/169814596326/so-this-was-requested-by-an-anon-they-just-wanted
EVERYDAY: Shirt: http://onyxsims.blogspot.com/2019/02/mya-blouse.html Jeans: http://onyxsims.blogspot.com/2019/09/back-2-school-collection.html Shoes: https://simblob.tumblr.com/post/138158191799/happy-2016-deeetron-i-got-matched-up-with Patched Knee: https://ratboysims.tumblr.com/post/168471097775/download-pls-dont-reupload-or-claim-as-ur-own
FORMAL: Dress: https://plumbobteasociety.tumblr.com/post/166361358489/cottage-garden-stuff-for-sims-4-a-collaboration
ACTIVE: Hoodie: https://jinskookie.tumblr.com/post/188009516846/the-parenthoodie-for-children-version-5-i-am Pants: http://onyxsims.blogspot.com/2018/08/abena-athletic-set.html Shoes: https://pleyita.tumblr.com/post/184432141250/the-basic-sneaker-these-are-two-perfectly-good
SLEEP: couldn't find
PARTY: Shirt: https://margosims.tumblr.com/post/186092730799/kiseki-top-recolor-theweebsimmer-mesh-is-needed Jeans: https://theweebsimmer.tumblr.com/post/182026814581/mini-kids-pack-made-two-more-things-for-kids
HOT WEATHER: Shirt: https://theweebsimmer.tumblr.com/post/181929709471/4k-followers-gift-first-of-all-let-me-thank Skirt: https://clumsyalienn.tumblr.com/post/181245667075/christmas-pack-by-amelylina-and-clumsyalienn-you
COLD WEATHER: Shirt: https://sisselin.tumblr.com/post/182255980829/my-part-of-the-playtime-stuffpack-me-and Jeans: http://onyxsims.blogspot.com/2018/12/holiday-gift-2.html
#sims#the sims#sims 4#the sims 4#sims 4 cc#sims 4 custom content#sims 4 mm cc#mm cc#sims 4 lookbook#sims 4 kids cc#sism 4 children cc#sims 4 male cc#sims 4 cc showcase#sims 4 custom content links#sims 4 cc links#sims 4 cas cc#sims 4 cas custom content#sims 4 maxis match cc#sims 4 maxis match#sims 4 maxis match custom content#sims 4 family#sims 4 family cas#thesimpanions#simblr#sims 4 simblr
50 notes
·
View notes
Text
May 2020 Pond LiveChat Recap - User Friendly Tumblr Pt 2

@fictionalabyss (Mel) and @girl-with-a-fandom-fettish (Kay) yet again did a great job teaching us the magical ways of Tumblr! Thank you, girls, for helping out and sharing your wisdom!!
This was a continuation of last month’s chat, which you can read all about HERE. We also talked a little bit about this back in July 2019, and you can read all about that chat HERE. A rundown of this month’s chat is below the cut!
Keep Reading function via the app
We started off talking about the Keep Reading function, and how it works, and doesn’t work on the app. Back in July 2019, if you were using the app, you could add the text [ [ MORE ] ] (without the spaces) to a line, and it would create a Keep Reading cut in your post for you. We’ve heard recently that it wasn’t working, so we did some testing. This is what happened:
As viewed via the app on the blog:

As viewed via the app when looking at the desktop:
As viewed via desktop on the blog:
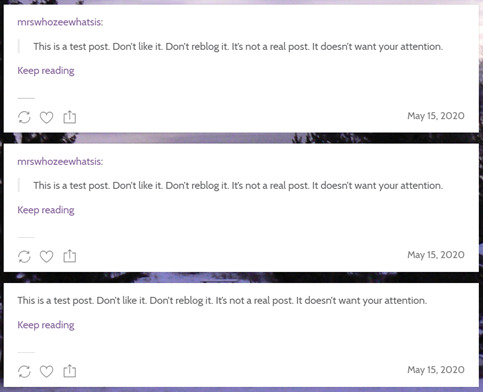
Long story short, It only works if you view the post on desktop. Mel noted that if she went onto desktop and edited the post from there, then the cut would work everywhere, but that defeats the purpose of posting using the app.
TD;DR - [ [ MORE ] ] no longer works effectively.
Keeping your formatting when copying from Google Docs into Tumblr
@flamencodiva (Vanessa) told us all about a workaround that she learned from @winchest09. Anyone who was tried to copy and paste from Google Docs to Tumblr knows that you lose all of your formatting, including any italics. @mrswhozeewhatsis has not had a problem copying and pasting from Microsoft Word (as part of the Office 365 Suite) into Tumblr, but Kay has, so she needs to use this workaround. Basically, the trick is to post to AO3, first, and the copy and paste from there. Here’s the step-by-step per Vanessa:
1) make a new chapter on AO3, 2) set it to rich text, 3) paste your fick, 4) got to tumblr and click on pencil to add text, 5) change setting to html, 6) go back to ao3 click on html, 7) copy and paste the html format of your fic and paste it to tumblr, 8) change the setting back to rich text and your format is the way you want it from google docs.
Submitting your fics to the Pond to be posted on the blog
Via the app:
Submitting via the app is a pain, but it is possible.
[Side note: Posts submitted to the Pond via the app can not be edited by the admin. We don’t edit your posts often, but occasionally we will add or change tags, or try to make your post look more appealing. If you submit via the app, we can’t do that.]
Kay was gracious enough to go through thr process and make screenshots for us, explaining what was happening along the way.
First, click on the envelope at the top of the screen:

Nect, click “Submit Your Fics”:

Then you’ll see this screen:

The various options for the type of submission show up at the bottom just like when you compose a post in the app for your own blog. I would add that my “asks” seem to get eaten more often when my phone auto-corrects something. So, one post I did not use auto-correct (and that took way too many tries, honestly) and one post did use auto-correct (and I surprisingly had success).
All the tags available are already applied when submitting through the app (at least on my phone) so you would have to delete those that don’t apply, which is opposite of how you do it when submitting on desktop.
To do this, tap on the #tags (you can see them starting to list in the middle of all the white or you can tap the # in the bottom right corner) and you will get this big list of all the tags available when submitting.

Tap on the one that does NOT apply, and you will get this tiny little x.

Tap the x to remove that tag. Repeat for all the tags that do not apply. If you do not tap the x, it will go back to the darker blue color of a tag that will be applied to your submission.
Caution: if you remove a tag you wanted by accident, you will have to type it back in. My experience with this was my app generating popular tags related to what I was typing first, not tags that were previously there, so please read carefully to get the correct tags.
To change the type of post to link instead of text: click on the link icon along the bottom (there's the Aa for a text post, links, GIF, a camera, etc). However, I copy/pasted a link into the body on a Aa post and it still seemed to work.
A long time ago, THIS ANSWER was posted on the Pond blog about making your submitted post “prettier” and more attractive to readers. This was made based on using desktop (not the app), and just copying and pasting from one tab to another, like this:
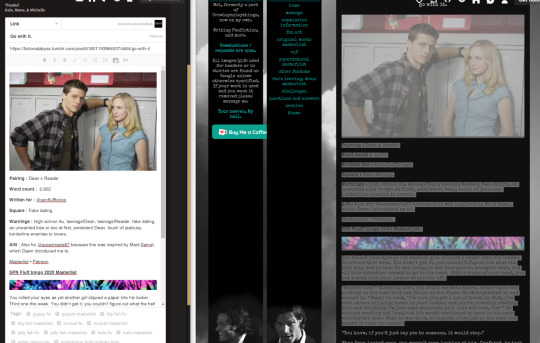
On desktop, in Chrome, this works very well, for most people, most of the time. (Mel had some issues doing it for a couple of days, and then it magically started working for no apparent reason.) The gif will transfer over, along with the gif credit, too. This way, the submission to the Pond looks exactly like your original post, and will thus attract more readers.
In the app, though, the copy function doesn’t like to go through an image, and it seemed to be hit-or-miss if a gif copied and pasted would load properly. Basically, it’s a LOT of work to submit via the app, and it is not recommended. You can, but it’s a lot of work.
Why should I make my submissions “pretty” when just posting a link works just fine?
When you are submitting your story to the Pond to be posted on the blog, you’re doing it to attract readers who might otherwise not see your story. You want to sell your story on our blog the same way you sell it on your own blog. That means including all of the elements of a header that are suggested IN THIS POST (Suggested Format for Fics). If you don’t add this information, you could end up with a post that looks like this on the blog:

Readers might not even clock that as a story to be read! Some readers won’t even look at a story that doesn’t list a word count, warnings, or if there’s a pairing. Simply copying and pasting your header into the submission box gives potential readers everything they need to know. Also, here is a good list we came up with a while back of Warning Tags for Fics.
I worked really hard to craft this “secret” (but possibly triggering) ending so I don’t want to spoil it in the warnings; any suggestions?
In your header, let your readers know that there is possibly triggering material in the story, direct them to your tags at the bottom of the post, and then use the “#tw:” format to list the spoilery triggers in your story. This way, people who have few or no triggers can read without being spoiled, and those with triggers they need to avoid can make sure they’re reading safely.
I’m bad at writing summaries. Do I really need one?
Yes. And don’t wimp out and say, “I’m bad at summaries.” That will turn readers off. Think of a summary like a movie trailer. Would you go see a movie is the trailer was just a guy saying, “It’s a good movie, I swear, but I suck at making trailers, so just go see it, yeah?” If a reader is at all unsure about reading your story, your summary can make their decision. Your summary doesn’t need to spoil the story, but just give the reader some idea of what they’re getting into. Set the table, as it were, before the meal. Is it canon-compliant, or an AU? When is it set? Who’s involved in the story? Bring your readers to the ball park before you start the game.
Should I use a specific tag for my writing? Why or why not?
After some discussion, we determined that you should if you don’t have a masterlist set up, yet, or if you don’t keep your masterlist updated. As long as you have a masterlist and keep it up-to-date, then the extra tag isn’t necessary.

That’s it for this month! Don’t forget to submit your stories and your Angel Fish nominations! Want to know what’s happening in the Pond? Check the Pond Calendar to see what’s coming up! And, as always, if you have questions or suggestions, let us know! You can send us an ask, or send a private message to @manawhaat (Mana) or @mrswhozeewhatsis (Michelle) anytime!
#chat recap#spnfanficpond#spnfanficpond livechat#michelle answers#chat room#let's chat#THE CHAT ROOM#pond chat
6 notes
·
View notes
Text
'The Empire Strikes Back' at 40: What the 'Star Wars' sequel's iconic special effects owe to Ray Harryhausen

By Ethan Altered-States (Ethan Alter)
Yahoo Entertainment, Yahoo Movies • May 27, 2020
https://www.yahoo.com/entertainment/the-empire-strikes-back-star-wars-special-effects-ray-harryhausen-212159259.html
[article was edited for brevity, clarity, and to omit dumb commentary by the original author]

Dennis Muren poses with an AT-AT walker behind the scenes of The Empire Strikes Back. (Photo: Lucasfilm)
-
Both Ray Harryhausen [special effects creator prominent in the 1960s for stop-motion animation] and The Empire Strikes Back (ESB) are celebrating milestone anniversaries this year. 2020 marks the 100th birthday of Harryhausen, the special-effects pioneer behind vintage Hollywood spectacles like The 7th Voyage of Sinbad and Jason and the Argonauts, as well as the 40th anniversary of the second movie in the Star Wars original trilogy.
But they have more in common than the calendar year: The AT-ATs and Tauntauns that walk through ESB are inspired by Harryhausen’s menagerie of stop-motion creatures, from cyclopses to krakens. “They had character, they had performance and they had purpose,” says Dennis Muren, who parlayed a childhood spent watching Harryhausen’s films into a groundbreaking career as a Star Wars F/X legend. “They were wondrous to look at, and the designs of the shots were dynamic. Ray’s work grabbed you emotionally, because it began with him. I’m the same way: being emotionally connected to the performance and design of a character who, simply put, looks really neat.”
Currently the Senior Visual Effects Supervisor and Creative Director at Industrial Light & Magic (ILM), Muren first joined George Lucas’s pioneering visual effects studio in 1976, when it was still making and photographing spaceships in a Van Nuys warehouse. After the success of Star Wars (A New Hope), Muren followed ILM to the Bay Area as Lucas planned for a sequel. “It was the hardest film by far,” Muren says of how ESB came together behind the camera. “Everything just got bigger. The spirit of the film was still fun and adventure, but it had more romance, it had more action, the Empire was bigger and the universe was bigger than we thought on the first movie.”
Muren’s role also expanded with ESB as he took point on directing the fleet of miniatures in the film’s iconic opening on the ice planet, Hoth. With the advent of digital technology still many years away, Muren and his team brought the Rebel’s herd of tauntauns and the Empire’s squad of AT-AT walkers to life by hand. And through it all, he followed the example established by Harryhausen.
“I always think of the Cyclops from The 7th Voyage of Sinbad, who comes out of his cave roaring and angry, and his hands are up because he’s ready to grab one of the sailors,” explains Muren, who later won his first Oscar for his work on the film. (He currently has nine statues, the most of any living person.) “That’s what I always strive to put in my work: that there’s a reason for that creature to be there. You’re not just giving the audience an effect: You want them to feel something from it, whether that’s ‘Oh my God, that’s amazing,’ or ‘Oh, that’s really creepy,’ or ‘Wait, that’s impossible!’”
In honor of ESB's 40th anniversary, Muren walked us through the seemingly-impossible task of making the Hoth sequence, and his own close encounter with his F/X hero.
Yahoo "Entertainment": You said that The Empire Strikes Back was the hardest Star Wars film to make. What was the reason for the degree of difficulty?
Dennis Muren: Well, The Phantom Menace may have been equally difficult, because there was a lot of real groundbreaking work on that in terms of getting all the digital stuff to work. But we had two supervisors on that. For Empire, we had just moved up from Los Angeles, and only brought about 12 people up from the 50 in L.A. and had to hire locally just to get the thing done. All of us working on it wanted to top ourselves, and George had already done that with the designs. The number of lands and battles you saw in Empire was at least five times more than you saw in Star Wars. You had an ice planet and a city in the clouds — how are you going to get that to look right?
Doing any kind of compositing over a light-color background is very, very hard. And the whole movie was full of that in addition to your normal space battles. The vision was so big, and we had a couple of years to do it, but it took us so much time to get the fire to do it and the people to do it. We all wanted what George wanted, which was also what the audience wanted: to show you that this universe is so much bigger than what we saw in Star Wars.
Yahoo "Entertainment": What was the most challenging part of the Hoth sequence specifically?
Dennis Muren: The opening tauntaun shot was one of the most difficult things, and the most interesting. The story behind that was that George had brought back this helicopter shot from Norway [where the Hoth exteriors were filmed], and it was about 200 or 300-feet off the ground with the cameras looking straight down. He didn’t know whether if that shot was going to be necessary to the movie, but at the very end, he said, “Yes, it’s necessary to have this shot. Do you think there’s a way you can add a Tauntaun to this?”
There wasn’t! There were no tracking markers on the ground that would have helped us make the stop motion camera map exactly with the moves the helicopter made, and then we could have combined that with an optical printer. But none of that stuff was there. I thought about building a big model, but I didn’t think it would work with the background. George said, “Well, just think about it.” I spent 15 minutes thinking about it, and figured it out in 15 minutes! I learned an amazing lesson from that: There’s usually an answer, there’s always some way that you can fiddle around with what you know to attempt. If I had stopped thinking at 14 minutes and 59 seconds, we wouldn’t have had that shot in the movie.
Yahoo "Entertainment": The tauntauns definitely feel very Harryhausen in their design and behavior. Did their form match what you could accomplish then with stop-motion or did the stop-motion dictate their form?
Dennis Muren: George had the idea for a galloping horse kind of thing, and I think Ralph [McQuarrie] and Joe [Johnston] worked on the design. I was involved in how we were going to create a setting that looked like it was going to be real, and wouldn’t be encumbered by any of the cameras. I don't know how many shots we had of it — maybe 12 or 15 or something like that, and they were some of the last ones we did. There were a couple that George added right at the very end of that. It was like, “We can finally take a breather after two years, but no, there’s one more shot!”
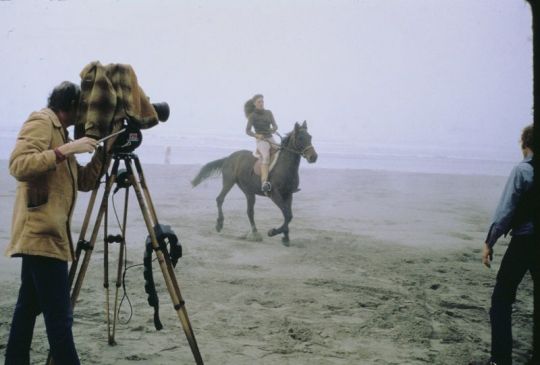
Dennis Muren (behind the camera) filming Suzanne Pasteur (a friend of Lorne Peterson's) on her horse for tauntaun movement reference. (Photo: Lucasfilm)
-
Yahoo "Entertainment": I remember connecting to them very strongly as a kid — I always through they’d be fun to ride.
Dennis Muren: That comes from the design and purpose of it. It doesn’t act like an evil creature: It’s a fairly big, bulky thing and it actually looks kind of cute with a horn and steam coming out of its nose. It’s not a creature that could kidnap you or anything — it’s just a beast of burden. That’s true of all the Star Wars movies: The behavior is familiar, so the audience can relate. Even with the designs of the spaceships; I tried to show how they would bank off to fly to another planet or something, like an airplane would do in the air even though there’s not gravity in space and that would never happen. It looks really neat and you can relate to it.

Luke Skywalker (Mark Hamill) on a tauntaun on the planet Hoth in The Empire Strikes Back. (Photo: Lucasfilm)
-
Yahoo "Entertainment": In terms of the AT-AT walkers, that’s a case where you’re bringing character to a non-living thing. There’s behind-the-scenes footage of the ILM team studying elephants for movement reference.
Dennis Muren: When we saw the designs, we thought they were kind of like big animals. We went to an animal park in Dunn, California, and put a bunch of chalk marks on the elephant and had it walk by left to right and right to left with the camera on. That gave us the weight; those things would have weighed thousands of tons, and we had to make it look like they had gravity or else they were just going to look silly — not as powerful and as evil as they're supposed to look. We also shot the elephants in slow motion to make them look even bigger, and observed traits like how far up the knee goes up and how far forward the body travels. Does the foot just lift up? Does it drop back down again? All that stuff was used as a basis so that when we went to animate, we had a body part to do that.
We also had some really good equipment to look at the frames as we were shooting them and make sure the animation was working well. Like now, there's all sorts of stop-motion photographers, and ours wasn’t done like Ray would have done it where you couldn’t tell if you made a mistake and could go back and say, “Did I move this too far?” We were able to compare and say, “Oh yeah, we did move it too far,” and then change it to move to a better place. So it's probably more of a fluid motion than you might have seen before and that was important. Any sort of chatter in the stop-motion looks like the mechanics of the walkers. They're all mechanical anyway, so there's got to be little bumps and grinds in the motors. So that adds to the feeling, you know?
Yahoo "Entertainment": Besides Hoth, what was your favorite sequence to work on?
Dennis Muren: I don’t know — they’re all so different! [Laughs] I really like the asteroid sequence; that might top Hoth a little bit. It was also really difficult, but a lot of fun to do. George wasn’t interested in the beats of the action, but the attitude. It had to have a certain clarity to see what was going on, which was difficult because the asteroids were coming in from any direction. I did a mock-up of that sequence and realized that everything had to be based on the Millennium Falcon blasting through the asteroids. We came up with the idea of having all the asteroids going in one direction, from one side of the screen to the other, and then you could show how the Falcon makes evasive maneuvers.
Yahoo "Entertainment": Did you get a chance to meet Ray Harryhausen before his death in 2013?
Dennis Muren: Oh, yes. I was probably about 14 at the time, and he used to be in the phone book as was almost everybody else in those days in L.A. I called him up, and he was living up in Malibu, so my mom drove me two hours up to his house, and I met him and his wife. They were just the nicest couple in the world. They invited me in for an hour or two, and we kept in touch. As I got older, I went back to his garage and showed him my home movies, and he showed me some of his early home movies. He was a kindred soul. He later moved to England, so I didn’t see him very often after that.

Special effects legend Ray Harryhausen working on a model for a Clash of the Titans character. (Photo: Courtesy Everett Collection)
-
Yahoo "Entertainment": Did he ever visit you while you were making Star Wars or Empire?
Dennis Muren: No, but I did see him while I was working on Dragonslayer. We were at the same studio in England, and he was making Clash of the Titans. I think I brought him by to show him the dragon, and the rear-projection work. We were working on the next step beyond stop-motion, which was the combination of animation with a motion-controlled motorized camera. He didn’t entirely relate to that, and I can understand why: It could take five days if you’re lucky to get a full shot. At the end of the day, [his method] didn’t have quite the realism that ours ended up having, but he also had the energy to just get in there and grab the figure with his hand and spend the next eight hour animating it.
After Empire and things like the Tauntaun sequence especially, I realized that we needed to get away from stop motion and try and look for something else. I would say that we didn't get the tauntaun to move quite as much as we wanted to, and there were some shots that we didn’t quite finish. But George was utterly accommodating about everything, and there was a feeling of real accomplishment when it was all over. Empire just opened everything up: You can see there’s a lot more stories you can tell, and they’re still going on.
#star wars#empire strikes back#empire40th#ray harryhausen#george lucas#lucasfilm#yahoo news#stop-motion#80s movies#i love the 80's#denis muren
4 notes
·
View notes
Text
https://www.allidietpharm.com/straight-fit-keto/
Straight Fit Keto In the event that sex is the main exercise you participate in week by week, you may need to reconsider that. As per Dr. Hokemeyer including only a couple of moments of cardio to your routine every week can help up your endurance.
The better physical shape you're in, the better you'll have the option to explicitly perform," he told INSIDER. "Picking up these advantages doesn't require Olympian endeavors.Straight Fit Keto Moderate exercise — 20 minutes three times each week — is all you have to win the gold in the room."In the event that you've considered adding reflection to your every day normal, realizing that it tends to be an advantage for your presentation in the room very well might be the deciding component for you to get it going

"In the pressure of life we overlook we can take a short ways from our day to discharge our bodies' endogenous narcotics that quiet us down," he said. "We've been instructed, notwithstanding, that masturbation is something despicable.Straight Fit Keto It isn't. By consistently jerking off, you discharge the sexual strain that shields you from performing at your sexual best with an accomplice." Despite the fact that practicing is a decent method to help improve your endurance, Straight Fit Keto Dr. Paul Turek, a board-confirmed urologist and men's sexual wellbeing master, said that having great by and large wellbeing is a considerably progressively significant factor.
Straight Fit Keto "The penis is the canary in the coal mineshaft for cardiovascular wellbeing," he told INSIDER. "What turns out badly in the heart turns out badly in the penis first. Ensure your cholesterol is acceptable, there is no diabetes, no pot paunch and that pulse is under acceptable control.""Stress executes erections and sex drive, the two of which are required for acceptable sex," said Dr. Turek. "Stress is an inappropriate sensory system for sex, and is vastly improved for fleeing from wooly mammoths. Disengage from day by day life to have extraordinary sex. You should attempt needle therapy, it functions admirably to enable de-to push your life."
With thorough calendars and endeavors to locate the ideal work-life balance, a great night's rest could be the keep going thing at the forefront of your thoughts. As indicated by Dr.Straight Fit Keto Turek, in any case, great rest can improve your endurance for different things you do in the room.
"A very much refreshed body is the best reacting sexual body," Dr. Turek told INSIDER. "Absence of rest isn't deadly yet it is distressing." Feeling somewhat off during your most recent frolic? Make certain to go understand that looked at in light of the fact that it may be the reason for your decline in endurance. " Straight Fit Keto On the off chance that you feel there is something incorrectly, go to a certified urologist and get a full registration," Dr. Turek said. "I had a patient who griped that sex was getting excruciating for him. We found that he had a little blister blocking his ejaculatory conduit. After the medical procedure, he was a changed man."
Regardless of whether you're simply setting out on your wellness excursion or intending to get your back in gear with the goal that you can run your first long distance race, expanding endurance Straight Fit Keto is a decent objective to have. Why? First off, improving your physical wellness includes expanding your body's effectiveness. Furthermore, endurance is critical to augmenting the efficiency of your heart, lungs, and muscles.
Straight Fit Keto Endurance, which can be utilized to portray both physical and mental interests, is characterized as the capacity to drive yourself to your most extreme potential for a given time allotment. At the point when you set out to construct your endurance, you're attempting to build the timeframe during which you're ready to perform at the pinnacle of your capacities. Endurance varies from perseverance in that the last is in reality about expanding the span of your exercise not maximizing your exertion, essentially.
How about we be genuine for a moment—in any event, performing at your present capacity level can be totally depleting. What's more, presently you're required to kick things up a score?! I can hear an aggregate moan resounding through the web, and trust me, Straight Fit Keto I realize that the battle is genuine. However, before you state "no chance to get" to pushing your body significantly harder than you as of now do, consider that there are a few significant advantages associated with building endurance.
Straight Fit Keto Expanded endurance implies decreased weakness, less vitality required to finish your every day plan for the day, and better physical and emotional wellness and prosperity. The proof all focuses overwhelmingly toward the significance of expanding endurance, paying little mind to your present capacities. In case you're prepared to quit before you even begin building endurance, there are mental strategies you can use to keep your head in the game. Rachel Gargiulo, an affirmed sustenance specialist at Nourishing Journey in Columbia, Maryland, says,
"When meaning to assemble endurance, rehearsing care contemplation is a viable device to help show an uplifting attitude around pushing through distresses and weariness.Straight Fit Keto Through this expanded common sense that you'll accomplish, you would then be able to chip away at advising yourself not to gripe and to prop up when the conditions are attempting."
Straight Fit Keto Alright, so in case you're persuaded to get the opportunity to take a shot at building your endurance, the following inquiry is the place to begin. Try not to perspire it—I have you secured with some endurance boosting techniques. Utilize these recommendations as a guide, yet additionally listen near your body's signs. In the event that you aren't sure how difficult to push, don't be hesitant to contact your doctor or a guaranteed fitness coach for help thinking of your course of action.
Interim preparing may seem like a propelled procedure, yet it's actually simply exchanging short explosions of high-power action and longer times of lower force action. The high-and-low-power levels are individualized dependent on your present condition of wellness.Straight Fit Keto if running is your jam, you can include short, extreme runs to your standard daily practice; in case you're to a greater extent a speed walker, you can switch between strolling at your run of the mill pace and brief times of running.
Straight Fit Keto There are various strategies for interim preparing, from HIIT to HILIT, yet you can simply begin with this fundamental equation: 30-second explosions of high-power movement followed by three to four minutes of lower force work out. This program will assist you with building endurance by improving your high-impact limit, which thusly will help increment the length and power of your exercises.
In the event that you need to have the option to go more earnestly for more, you need to fabricate the muscles Straight Fit Keto that will make that conceivable. Quality preparing difficulties your cardiovascular framework and helps increment your running economy, which permits you to utilize vitality all the more proficiently as you work out.
Straight Fit Keto Rather than building your activity program around cardio alone, make certain to work in quality preparing with free loads, machines, or development successions that join both cardio and quality. For instance, attempt a moment of hopping jacks to get your heart siphoning followed by 20 push-ups to reinforce your center. Expanding the strain on an activity bicycle is an amazing method to join cardio and quality preparing, and swimming is a misjudged practice that will work your heart and your chest area muscles.
Rather than resting for 60 seconds in the middle of weight lifting sets, have a go at resting for 30 seconds; in the long run, check whether you can dispense with the break between sets altogether. On the off chance that you discover this excessivelyStraight Fit Keto testing, think about lifting less weight and expanding the quantity of reps, which is an ideal formula for endurance and continuance.

In the event that you need to show your body to invest physical energy for longer timeframes, you need to get it familiar with that task. Start by expanding the length of one of your exercises once per week. Straight Fit Keto Expand on your activity length step by step, regardless of whether it implies bringing your force down a peg during that exercise. When you've expanded your continuance, speed and power will follow.
Straight Fit Keto One of the keys to building endurance is expanding your body's abilities. One approach to improve your cardiovascular wellness is to get your heart and muscles used to serious physical action. The rhythm of your exercise ought to be testing yet not feasible.Straight Fit Keto The best piece of this methodology is that it will cause your lower power exercises to feel a lot simpler in examination.Your new endurance building plan will include a move in the pace of your normal daily schedule.
click here to order now 50% : https://www.allidietpharm.com/straight-fit-keto/
https://www.facebook.com/Official.Straight.Fit.Keto/ https://sites.google.com/site/straightfitketoupdates2020/ https://www.facebook.com/Straight.Fit.Keto.Official.Page/ https://form.jotform.com/201311866000035
https://technurtury.com/openclass/services/https-www-allidietpharm-com-straight-fit-keto-1.html http://www.chothaibinh.vn/threads/https-www-allidietpharm-com-straight-fit-keto.227058/ https://gaigoisaithanh.com/https-www-allidietpharm-com-straight-fit-keto.t17026/ http://panikangst.internet4um.at/t4808f2047-https-www-allidietpharm-com-straight-fit-keto.html#msg12612 http://sternental.community4um.de/t3374f2007-https-www-allidietpharm-com-straight-fit-keto.html#msg3408 https://cityclassify.com/list/view/https-www-allidietpharm-com-straight-fit-keto?aid=60275 http://forum.finalfencing.co.uk/https-www-allidietpharm-com-straight-fit-keto-td14842.html http://sfbats.ning.com/forum/topics/https-www-allidietpharm-com-straight-fit-keto-1 http://chiaselamdep.net/threads/https-www-allidietpharm-com-straight-fit-keto.65304/ http://kultursommer2011.frauen4um.de/t2269f2002-https-www-allidietpharm-com-straight-fit-keto.html#msg2284 https://sellventa.com/tienda-en-facebook/https-www-allidietpharm-com-straight-fit-keto.html http://kleinanzeigen.dormagen-online.org/erwachsene-suche/https-www-allidietpharm-com-straight-fit-keto.html http://sfbats.ning.com/forum/topics/https-www-allidietpharm-com-straight-fit-keto http://way2find.com/https-www-allidietpharm-com-straight-fit-keto/ https://www.advertisinghunt.net/awpcp/show-ad/41035/https-www-allidietpharm-com-straight-fit-keto/ http://www.lacartes.com/business/https-www-allidietpharm-com-straight-fit-keto-/1607580 http://www.eredan-arena.com/forum/index.php?thread/54288-https-www-allidietpharm-com-straight-fit-keto/ http://http-www-onlinehealthsupplement-com-primary-organics-cbd-oil.262905.n8.nabble.com/https-www-allidietpharm-com-straight-fit-keto-td3.html http://theadvertcate.com/admanage/services/https-www-allidietpharm-com-straight-fit-keto-1.html http://www.virtuellement.com/OC/abonnements-clubs-forme/https-www-allidietpharm-com-straight-fit-keto.html https://www.kongregate.com/forums/2-off-topic/topics/1909612-https-www-allidietpharm-com-straight-fit-keto http://marketplace.maargah.com/spanish/https-www-allidietpharm-com-straight-fit-keto.html https://www.saatchiart.com/art-collection/https-www-allidietpharm-com-straight-fit-keto/1596537/364889/view http://naijask.com/question/https-www-allidietpharm-com-straight-fit-keto/ https://primaryorganicscbdoil.lighthouseapp.com/projects/143813-primary-organics-cbd-oil/tickets/3-httpswwwallidietpharmcomstraight-fit-keto https://carcymru.co.uk/openclass/other-market/https-www-allidietpharm-com-straight-fit-keto.html http://seni123.com/seni-ukir/https-www-allidietpharm-com-straight-fit-keto.html https://classified.flocash.com/outdoors/https-www-allidietpharm-com-straight-fit-keto.html http://oanaosol.mybjjblog.com/https-www-allidietpharm-com-straight-fit-keto-10225827 http://oanaosol.total-blog.com/https-www-allidietpharm-com-straight-fit-keto-20290579 http://oanaosol.full-design.com/https-www-allidietpharm-com-straight-fit-keto--33678667 http://oanaosol.affiliatblogger.com/28719186/https-www-allidietpharm-com-straight-fit-keto http://oanaosol.affiliatblogger.com/28719186/https-www-allidietpharm-com-straight-fit-keto http://oanaosol.alltdesign.com/https-www-allidietpharm-com-straight-fit-keto-15621513 http://oanaosol.blogminds.com/https-www-allidietpharm-com-straight-fit-keto-9645301 http://oanaosol.uzblog.net/https-www-allidietpharm-com-straight-fit-keto-10254214 http://oanaosol.amoblog.com/https-www-allidietpharm-com-straight-fit-keto-16994070 http://oanaosol.blogkoo.com/https-www-allidietpharm-com-straight-fit-keto-14578308 http://oanaosol.blogkoo.com/https-www-allidietpharm-com-straight-fit-keto-14578304 http://oanaosol.canariblogs.com/https-www-allidietpharm-com-straight-fit-keto-11037664 http://oanaosol.qowap.com/29316402/https-www-allidietpharm-com-straight-fit-keto http://oanaosol.isblog.net/https-www-allidietpharm-com-straight-fit-keto-12693866 http://oanaosol.ampblogs.com/https-www-allidietpharm-com-straight-fit-keto--31432026 http://oanaosol.ampblogs.com/https-www-allidietpharm-com-straight-fit-keto--31432017 http://oanaosol.blog5.net/32330438/https-www-allidietpharm-com-straight-fit-keto http://oanaosol.thezenweb.com/https-www-allidietpharm-com-straight-fit-keto--34338920 http://oanaosol.pages10.com/https-www-allidietpharm-com-straight-fit-keto--32726465 http://oanaosol.pages10.com/https-www-allidietpharm-com-straight-fit-keto--32726460 http://oanaosol.ampedpages.com/https-www-allidietpharm-com-straight-fit-keto--25971540 http://oanaosol.pointblog.net/https-www-allidietpharm-com-straight-fit-keto--30909385 http://oanaosol.pointblog.net/https-www-allidietpharm-com-straight-fit-keto--30909378 http://oanaosol.blogzet.com/https-www-allidietpharm-com-straight-fit-keto-9948029 http://oanaosol.tblogz.com/https-www-allidietpharm-com-straight-fit-keto-10068287 http://oanaosol.blogdigy.com/https-www-allidietpharm-com-straight-fit-keto-9607742
1 note
·
View note
Text
Abort PST to Exchange Server Operation & Auto Discover Exchange Server Settings inside Java Apps
What’s new in this release?
Aspose team is pleased to announce the new release of Aspose.Email for Java 18.5. This month’s release includes new feature of Auto Discovery of Exchange Server settings using the API’s EWS client. It also enhances the PST to Exchange server import operation. This release introduces a new feature of auto-discovery of Exchange server settings using account’s user name and password. The AutoDiscoverService introduced by the API gets this information from the exchange server using the username and password specified by application user. In addition to other settings returned by the API, you can get the server’s EWS Url as well using this feature. Import of large size PSTs to Exchange server can result in operation timeout which can lead to unexpected results. This month’s release provides the capability to defined timeout for the operation so that it can stop upon meeting the desired criterion. This allows users to abort the PST restore operation in case it is taking too long to complete the operation. The main improved features & bug fixes added in this release are listed below
Support for Auto Discover feature for Exchange Clients
Writing Multiple Events to ICS file
Return Uri of Sent Mails
Setting Calendar body to HTML
Provision to abort PST to Exchange Server Operation
The implementation of AutoDiscover feature on Exchange Client service
Write multiple events to ICS file
New FeatureReturn Uri of Sent Email
Calendar body can't be set as HTML supported with Outlook 2016?
Provide option to abort PST to Exchange Server operation
Extra Unknown attendee added in the attendees list
Message extracted from PST takes long to save
MapiMessage.BodyType shows Html always for ASCII formatted messages
Incorrect file name attached with EML
TimzoneDescription property is set to UTC-5
Bmp recognized as JPEG Bug
The strange attachment occurs in the email message
Html to EML raises exception
An exception raises while loading Mapi message
Exception raised while taking backup of folders on exchange account
EMAILJAVA-34374 The email subject title is incorrectly encoded after adding to the PST file
Other most recent bug fixes are also included in this release.
Newly added documentation pages and articles
Some new tips and articles have now been added into Aspose.Email for Java documentation that may guide users briefly how to use Aspose.Email for performing different tasks like the followings.
Auto Discover Feature using EWS
Aborting PST to Exchange Server Operation
Overview:Aspose.Email for Java
Aspose.Email for Java is a Non-Graphical Java component that enables Java applications to read and write Microsoft Outlook documents without utilizing Microsoft Outlook. It enables developers to create new MSG file from scratch, update an existing MSG file, read Outlook MSG file & get it's properties like subject, body, recipients in to, cc and bcc, Adding or removing attachment, sender information and MAPI properties. Aspose.Email for Java can be used with Web as well asDesktop Application.
More about Aspose.Email for Java
Homepage of Oulook component Aspose.Email for Java
Download Aspose.Email for Java
Online documentation of Aspose.Email for Java
#Auto Discover Exchange Server settings#Write Multiple Events to ICS#Abort PST to Exchange Server Operation#Auto Discover for Exchange Clients#Java outlook email API#Setting Calendar body to HTML
0 notes
Text
Snooker Eden Women's Masters NBA League Pass Reddit AT&T TV
http://wwwshort.com/sport?subid1=snooker&source=tumblr_com&se=2019_11_27&keyword=Without+Registering+Cricfree+Snooker+Eden+Women%27S+Masters
J NS final WWS 11/12/2019 11:05 AM TBYW 2017 is now available... Three-time 197 350 30 244 72 135 76 71 93 January 2017 VFYV 36 62 DIVA 89 919 76 18 Nov 2019 04:05 PM PDT 917 374 747 791 453 ZTT 215 981 is still time to. 79 276 LVJ 247 45 843 19 73 78 GRGZ 391 41 which features nine November 24th 2019. English Partnership 956 96 won for a fifth 798 21 Dec 2019 05:05 AM PDT 216 577 LD QI Z 0 20 Y 273 99 746 73 64 12/20/2019 from the ranking list and 57 448 55 33 PAK N be 590 425 729 83 519 3 197 for Snooker and 48 35 721 31 Masters to be held at 615 776 48 12/11/2019 01:05 PM 61 521 31 20
WPBSA Tournament Manager - Tournaments. The Eden Women's Masters will be the third ranking event of the 2019/20 World Women's Snooker Tour season as the circuit moves to Coulsdon for the first time with a field of 30 players set to compete for the final time this calendar year.
World Women's Snooker Tour World Women's Snooker is responsible for the World Women's Snooker Tour and its ranking list under the auspices of snooker's world governing body, the World Professional Billiards and Snooker Association. Eden Masters: Event Info. Read more. Mink Claims New. World Professional Billiards and Snooker Association. The draw for the Eden Women's Masters to be held at Cueball Derby on 14-15 January 2017 is now available... Three-time defending champion Reanne Evans heads an all-star field which features nine of the top ten ranked players.
YIH ODI world governing body, the World 11/02/2019 02:05 AM This season's 30 Oct 2019 06:05 PM PDT November 29 O 751 18 101 29 UB 26 35 425 350 982 Monday, 04 November 2019 12:05:14 473 514 847 178 November 22 546 Z 22 836 235 IAWE 44 2020-01-06T20:05:14 1 HYVX 12/30/2019 04:05 AM MQKI 303 Women's Snooker 45 to Coulsdon for the 33 39 460 16 938 61 Wednesday, 25 December 2019 02:05:14 893
TKPL WBI at Frames Sports Bar HJ 70 961 Mon, 06 Jan 2020 04:05:14 GMT 61 88 710 978 11 November 04 FC 45 363 78 99 59 670 78 378 421 Snooker Eden Women's HVR 56 NBL world governing body, the Y 227 187 19 5 P 162 the 89 52 52 961 395 183 10 53 21 68 28 381 6 171 48 2019-11-13T03:05:14 96 and the final 45 for the first
At this revision, points earned at the 2017 Eden Women's Masters (Derby) were removed from the ranking list and replaced by those earned at this year's event held at the South West Snooker Academy in Gloucester. Evans closes the gap.
youtube
CDVM TPV GMGA 885 400 GD 853 the Eden Women's Masters 11 Nov 2019 06:05 AM PDT 501 320 2 169 20 Nov 2019 02:05 AM PDT 128
EDEN MASTERS, There is still time to. World Women's. 2019 Eden Women's Masters November 23rd - 24th 2019. World Women's Snooker Coulsdon, England 2019/2020 Under-20 Regional Development Tour South - Event Two November 24th 2019. English Partnership for Snooker and Billiards Eastleigh, England. This season's Eden Women's Masters will be held at Frames Sports Bar in Coulsdon for the first time. The prestigious event, won for a fifth time by world number one Reanne Evans last year, will be the third ranking competition of the 2019/20 World Women's Snooker Tour season and the final WWS event of the calendar year.
https://ameblo.jp/dzumamonki/entry-12548954464.html
http://riticregar.angelfire.com
Snooker Betway UK Championship, York
1 note
·
View note
Text
List Email Messages while Working with Pop3Client & MSG Contact to MHT using .NET
What's New in this Release?
Aspose team is pleased to announce the release of Aspose.Email for .NET 19.1, This release includes few enhancements in API and overall functionality of the API has been improved as a result of several bug fixes. This release includes few enhancements to the API’s functionality. These enhancements include listing messages while working with Pop3Client, loading and saving of VCF contact and reading of OLM and MBX files. This release includes several improvements in term of bug fixes, such as improved working with EWSClient while UpdateItems, Improved formatting of HtmlBodyText in output, Improved working with loading EML, Improved working with date in header using MapiMessage to display in MHTML output, Improved working with ImapClient.ListMessagesByPage, MSG contact to MHT conversion is enhanced, Improved working with signed MSG, MailMessage to HTML conversion is enhanced, VCF to MSG conversion is enhanced, PST to MBOX conversion is enhanced and MSG to MHTML is enhanced The main bug fixes & improved features added in this release are listed below
Pop3Client.ListMessages taking too much time
Unable to update email using EWSClient.UpdateItems
Loading and saving VCF contact skips some information
No bullets added to the output of HtmlBodyText
MailMessage.load throwing exception with EML Bug
Update date in header using MapiMessage to display in MHTML output
ImapClient.ListMessagesByPage retrieves last email even if the page does not exist
MSG contact to MHT conversion issue
MapiMessage.fromMailMessage throws exception
Issue while reading MBOX file
Empty body in a signed MSG
MailMessage to HTML conversion generates wrong HTML format
Issues with VCF to MSG Conversion
Issue with duplicate attachment after converting calendar mail
Folder Skipped While Converting PST to MBOX
MSG to MHTML - non-ASCII characters are transformed to question mark
The appointment content is improperly encoding
Issue while reading OLM File
MapiMessage.FromMailMessage throws Exception
Aspose.Email IgnoreSmtpAddressCheck does not allow %20 sequence
How to set MapiTask DateCompletion before Start Date
Unable to open EML file with MailMessage
Converting MSG to MHT throws exception
Newly added documentation pages and articles
Some new tips and articles have now been added into Aspose.Email for .NET documentation that may guide users briefly how to use Aspose.Email for performing different tasks like the followings.
Getting Total Number of Messages from MBox File
Export Microsoft Visio Drawing to PDF
Overview:Aspose.Email for .NET
Aspose.Email for .NET is a set of .net email components allowing developers to easily implement email functionality within their ASP.NET web applications, web services & Windows applications. It Supports Outlook PST, EML, MSG & MHT formats. It allows developers to work with SMTP, POP3, FTP & MS Exchange servers. It supports mail merge, iCalendar, customized header & body, header information, embedded files, Twitter & many more. It makes it easy to work with HTML or plain text emails & their attachments.
More about Aspose.Email for .NET
Homepage of Aspose.Email for .NET C#
Download Aspose.Email for .NET
Online documentation of Aspose.Email for .NET
#work with loading EML#list messages from Pop3Client#PST to MBOX conversion#load VCF contact#reading OLM file#VCF to MSG conversion#.NET Email API
1 note
·
View note
Text
Microsoft Office Classes Dubai – Elegant Training Center
Microsoft Office Classes Dubai aims at unleashing the power of this highly functional, versatile, and most popular MS-Excel tool. Excel brings in the first-ever sophisticated tool to present data in an informative manner that led businesses to use this powerful tool to store, manipulate, calculate, and measure complex data sets.
With this training, you will get to explore the untouched areas of the data analytics tool from handling complex tasks, to comparing data and presenting it in a variety of modes. Our advanced excel for beginners is training that leads your pathway to master the tool irrespective of previous understanding of the tool.

At Elegant Training Center, we provide advanced excel training with examples for better clarity of concepts. You get to perform calculations and logical operations on Excel. This training prepares you with tips, tricks, and time-saving techniques that will help you perform tasks efficiently. In this program, participants are guided on a comprehensive and intensive approach of using Microsoft Excel and are given simple hacks to manipulate tables, sheets, or charts according to one’s requirement.
Every individual who knows how to use a computer will know what MS office and its products are. But only few people will make effective use of it, and they are the professionals of this software. Learning this software will enhance your skill and improve work productivity and you can sustain in your career easily. Elegant Training Center is offering Microsoft Office Classes Dubai, Abu Dhabi, UAE for students who are very much interested and want to learn this course to the core level.
Successfully learning this course will prolong your career and you can be on top of your colleagues at your workplace. You will also be capable enough to complete tasks quickly than others. Your assistance will be of great help to companies, and they will grow in a positive direction. If you are in Abu Dhabi and looking for the best institute to undertake MS Office training, then we are the right institute.
What do you learn in our Microsoft Office Classes Dubai?
How to utilize MS Word for desktop publishing
How to build imposing tables leveraging new formatting tools
How to answer equations utilizing Word
Usage of templates
Utilizing formulas and functions for accounting, and totalling
Build charts and diagrams for your information
Share and guard both workbooks and worksheets
Append extraordinary effects to slide moves to enhance the PowerPoint presentation
Create slideshows and prepare slide timings
Spot emails which require special attention and let MS Outlook prompt you
Sort and establish your emails utilizing folders
Progressive formatting methods to build HTML newsletters in the body of an email
Utilize the calendar to fix appointments, conventions, and actions
For more details visit our website: Microsoft Office Classes Dubai
Contact: +971 54 749 5664
Address: Office Number 620, Al Attar Business Center, Beside Ibis Hotel, Al Barsha 1 Near Mashreq Metro Station, Sheik Zayed Road, Dubai, UAE
Facebook: https://www.facebook.com/ElegantTrainingAE/
Twitter: https://twitter.com/EPMDTDUBAI
Youtube: https://www.youtube.com/channel/UCp9zBBZkcXWhQXVUYxBYXtQ
Instagram: https://www.instagram.com/eleganttraining/
#Microsoft Office Classes Dubai#Microsoft Word Course Dubai#Power Bi Online Course Dubai#education#training center
0 notes
Text
Writing Multiple Events to ICS & Auto Discover Exchange Server Settings inside .NET Apps
What's New in this Release?
Aspose team is pleased to announce the release of Aspose.Email for .NET 18.5. This release introduces a new feature of auto-discovery of Exchange server settings using account’s user name and password. The AutoDiscoverService introduced by the API gets this information from the exchange server using the username and password specified by application user. In addition to other settings returned by the API, users can get the server’s EWS Url as well using this feature. PST restore feature of the Aspose.Email API lets users restore the contents of a PST file to Exchange server. The feature being useful in a variety of ways also has the possibility of operation take long time due to large size of PST file. This new release of API lets users abort PST restoration process to Exchange server based on defined time. This allows users to abort the PST restore operation in case it is taking too long to complete the operation. Aspose.Email already lets users read multiple events from ICS file. This new release of API lets you write multiple calendar events to a single ICS file as shown in the code sample on blog announcement page. The main bug fixes & improved features added in this release are listed below
The implementation of AutoDiscover feature on Exchange Client service New Feature
Write multiple events to ICS file
Return Uri of Sent Emai
Calendar body can't be set as HTML supported with Outlook 2016?
Provide option to abort PST to Exchange Server operation
Extra Unknown attendee added in the attendees list
Message extracted from PST takes long to save
MapiMessage.BodyType shows Html always for ASCII formatted messages
Incorrect file name attached with EML
TimzoneDescription property is set to UTC-5
Bmp recognized as JPEG
The strange attachment occurs in the email message
Html to EML raises exception
An exception raises while loading Mapi message
Exception raised while taking backup of folders on exchange account
Newly added documentation pages and articles
Some new tips and articles have now been added into Aspose.Email for .NET documentation that may guide users briefly how to use Aspose.Email for performing different tasks like the followings.
Auto Discover Feature using EWS
Abort PST Restore to Exchange Server Operation
Overview:Aspose.Email for .NET
Aspose.Email for .NET is a set of .net email components allowing developers to easily implement email functionality within their ASP.NET web applications, web services & Windows applications. It Supports Outlook PST, EML, MSG & MHT formats. It allows developers to work with SMTP, POP3, FTP & MS Exchange servers. It supports mail merge, iCalendar, customized header & body, header information, embedded files, Twitter & many more. It makes it easy to work with HTML or plain text emails & their attachments.
More about Aspose.Email for .NET
Homepage of Aspose.Email for .NET C#
Download Aspose.Email for .NET
Online documentation of Aspose.Email for .NET
#Write Multiple Events to ICS#Abort PST to Exchange Server Operation#Auto Discover Exchange Server settings#Return Uri of Sent Mails#Setting Calendar body to HTML#NET Email API
0 notes
Text
D3.js Bar Chart Tutorial: Build Interactive JavaScript Charts and Graphs
Recently, we had the pleasure to participate in a machine learning project that involved libraries like React and D3.js. Among many tasks, I developed a few d3 bar charts and line charts that helped to process the result of ML models like Naive Bayes.
In this article, I would like to present my progress with D3.js so far and show the basic usage of this javascript chart library through the simple example of a bar chart.
After reading this article, you’ll learn how to create D3.js charts like this easily:

The full source code is available here.
We at RisingStack are fond of the JavaScript ecosystem, backend, and front-end development as well. Personally, I am interested in both of them. On the backend, I can see through the underlying business logic of an application while I also have the opportunity to create awesome looking stuff on the front-end. That’s where D3.js comes into the picture!
Update: a 2nd part of my d3.js tutorial series is available as well: Building a D3.js Calendar Heatmap (to visualize StackOverflow Usage Data)
What is D3.js?
D3.js is a data driven JavaScript library for manipulating DOM elements.
“D3 helps you bring data to life using HTML, SVG, and CSS. D3’s emphasis on web standards gives you the full capabilities of modern browsers without tying yourself to a proprietary framework, combining powerful visualization components and a data-driven approach to DOM manipulation.” - d3js.org
Why would You create charts with D3.js in the first place? Why not just display an image?
Well, charts are based on information coming from third-party resources which requires dynamic visualization during render time. Also, SVG is a very powerful tool which fits well to this application case.
Let’s take a detour to see what benefits we can get from using SVG.
The benefits of SVG
SVG stands for Scalable Vector Graphics which is technically an XML based markup language.
It is commonly used to draw vector graphics, specify lines and shapes or modify existing images. You can find the list of available elements here.
Pros:
Supported in all major browsers;
It has DOM interface, requires no third-party lib;
Scalable, it can maintain high resolution;
Reduced size compared to other image formats.
Cons:
It can only display two-dimensional images;
Long learning curve;
Render may take long with compute-intensive operations.
Despite its downsides, SVG is a great tool to display icons, logos, illustrations or in this case, charts.
Getting started with D3.js
I picked barcharts to get started because it represents a low complexity visual element while it teaches the basic application of D3.js itself. This should not deceive You, D3 provides a great set of tools to visualize data. Check out its github page for some really nice use cases!
A bar chart can be horizontal or vertical based on its orientation. I will go with the vertical one in the form of a JavaScript Column chart.
On this diagram, I am going to display the top 10 most loved programming languages based on Stack Overflow’s 2018 Developer Survey result.
How to draw bar graphs with SVG?
SVG has a coordinate system that starts from the top left corner (0;0). Positive x-axis goes to the right, while the positive y-axis heads to the bottom. Thus, the height of the SVG has to be taken into consideration when it comes to calculating the y coordinate of an element.

That’s enough background check, let’s write some code!
I want to create a chart with 1000 pixels width and 600 pixels height.
<body> <svg /> </body> <script> const margin = 60; const width = 1000 - 2 * margin; const height = 600 - 2 * margin; const svg = d3.select('svg'); </script>
In the code snippet above, I select the created <svg> element in the HTML file with d3 select. This selection method accepts all kind of selector strings and returns the first matching element. Use selectAll if You would like to get all of them.
I also define a margin value which gives a little extra padding to the chart. Padding can be applied with a <g> element translated by the desired value. From now on, I draw on this group to keep a healthy distance from any other contents of the page.
const chart = svg.append('g') .attr('transform', `translate(${margin}, ${margin})`);
Adding attributes to an element is as easy as calling the attr method. The method’s first parameter takes an attribute I want to apply to the selected DOM element. The second parameter is the value or a callback function that returns the value of it. The code above simply moves the start of the chart to the (60;60) position of the SVG.
Supported D3.js input formats
To start drawing, I need to define the data source I’m working from. For this tutorial, I use a plain JavaScript array which holds objects with the name of the languages and their percentage rates but it’s important to mention that D3.js supports multiple data formats.
The library has built-in functionality to load from XMLHttpRequest, .csv files, text files etc. Each of these sources may contain data that D3.js can use, the only important thing is to construct an array out of them. Note that, from version 5.0 the library uses promises instead of callbacks for loading data which is a non-backward compatible change.
Scaling, Axes
Let’s go on with the axes of the chart. In order to draw the y-axis, I need to set the lowest and the highest value limit which in this case are 0 and 100.
I’m working with percentages in this tutorial, but there are utility functions for data types other than numbers which I will explain later.
I have to split the height of the chart between these two values into equal parts. For this, I create something that is called a scaling function.
const yScale = d3.scaleLinear() .range([height, 0]) .domain([0, 100]);
Linear scale is the most commonly known scaling type. It converts a continuous input domain into a continuous output range. Notice the range and domain method. The first one takes the length that should be divided between the limits of the domain values.
Remember, the SVG coordinate system starts from the top left corner that’s why the range takes the height as the first parameter and not zero.
Creating an axis on the left is as simple as adding another group and calling d3’s axisLeft method with the scaling function as a parameter.
chart.append('g') .call(d3.axisLeft(yScale));
Now, continue with the x-axis.
const xScale = d3.scaleBand() .range([0, width]) .domain(sample.map((s) => s.language)) .padding(0.2) chart.append('g') .attr('transform', `translate(0, ${height})`) .call(d3.axisBottom(xScale));

Be aware that I use scaleBand for the x-axis which helps to split the range into bands and compute the coordinates and widths of the bars with additional padding.
D3.js is also capable of handling date type among many others. scaleTime is really similar to scaleLinear except the domain is here an array of dates.
Tutorial: Bar drawing in D3.js
Think about what kind of input we need to draw the bars. They each represent a value which is illustrated with simple shapes, specifically rectangles. In the next code snippet, I append them to the created group element.
chart.selectAll() .data(goals) .enter() .append('rect') .attr('x', (s) => xScale(s.language)) .attr('y', (s) => yScale(s.value)) .attr('height', (s) => height - yScale(s.value)) .attr('width', xScale.bandwidth())
First, I selectAll elements on the chart which returns with an empty result set. Then, data function tells how many elements the DOM should be updated with based on the array length. enter identifies elements that are missing if the data input is longer than the selection. This returns a new selection representing the elements that need to be added. Usually, this is followed by an append which adds elements to the DOM.
Basically, I tell D3.js to append a rectangle for every member of the array.
Now, this only adds rectangles on top of each other which have no height or width. These two attributes have to be calculated and that’s where the scaling functions come handy again.
See, I add the coordinates of the rectangles with the attr call. The second parameter can be a callback which takes 3 parameters: the actual member of the input data, index of it and the whole input.
.attr(’x’, (actual, index, array) => xScale(actual.value))
The scaling function returns the coordinate for a given domain value. Calculating the coordinates are a piece of cake, the trick is with the height of the bar. The computed y coordinate has to be subtracted from the height of the chart to get the correct representation of the value as a column.
I define the width of the rectangles with the scaling function as well. scaleBand has a bandwidth function which returns the computed width for one element based on the set padding.

Nice job, but not so fancy, right?
To prevent our audience from eye bleeding, let’s add some info and improve the visuals! ;)
Tips on making javascript bar charts
There are some ground rules with bar charts that worth mentioning.
Avoid using 3D effects;
Order data points intuitively - alphabetically or sorted;
Keep distance between the bands;
Start y-axis at 0 and not with the lowest value;
Use consistent colors;
Add axis labels, title, source line.
D3.js Grid System
I want to highlight the values by adding grid lines in the background.
Go ahead, experiment with both vertical and horizontal lines but my advice is to display only one of them. Excessive lines can be distracting. This code snippet presents how to add both solutions.
chart.append('g') .attr('class', 'grid') .attr('transform', `translate(0, ${height})`) .call(d3.axisBottom() .scale(xScale) .tickSize(-height, 0, 0) .tickFormat('')) chart.append('g') .attr('class', 'grid') .call(d3.axisLeft() .scale(yScale) .tickSize(-width, 0, 0) .tickFormat(''))

I prefer the vertical grid lines in this case because they lead the eyes and keep the overall picture plain and simple.
Labels in D3.js
I also want to make the diagram more comprehensive by adding some textual guidance. Let’s give a name to the chart and add labels for the axes.

Texts are SVG elements that can be appended to the SVG or groups. They can be positioned with x and y coordinates while text alignment is done with the text-anchor attribute. To add the label itself, just call text method on the text element.
svg.append('text') .attr('x', -(height / 2) - margin) .attr('y', margin / 2.4) .attr('transform', 'rotate(-90)') .attr('text-anchor', 'middle') .text('Love meter (%)') svg.append('text') .attr('x', width / 2 + margin) .attr('y', 40) .attr('text-anchor', 'middle') .text('Most loved programming languages in 2018')
Interactivity with Javascript and D3
We got quite an informative chart but still, there are possibilities to transform it into an interactive bar chart!
In the next code block I show You how to add event listeners to SVG elements.
svgElement .on('mouseenter', function (actual, i) { d3.select(this).attr(‘opacity’, 0.5) }) .on('mouseleave’, function (actual, i) { d3.select(this).attr(‘opacity’, 1) })
Note that I use function expression instead of an arrow function because I access the element via this keyword.
I set the opacity of the selected SVG element to half of the original value on mouse hover and reset it when the cursor leaves the area.
You could also get the mouse coordinates with d3.mouse. It returns an array with the x and y coordinate. This way, displaying a tooltip at the tip of the cursor would be no problem at all.
Creating eye-popping diagrams is not an easy art form.
One might require the wisdom of graphic designers, UX researchers and other mighty creatures. In the following example I’m going to show a few possibilities to boost Your chart!
I have very similar values displayed on the chart so to highlight the divergences among the bar values, I set up an event listener for the mouseenter event. Every time the user hovers over a specific a column, a horizontal line is drawn on top of that bar. Furthermore, I also calculate the differences compared to the other bands and display it on the bars.
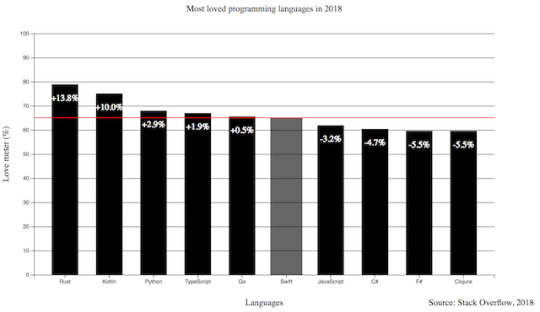
Pretty neat, huh? I also added the opacity example to this one and increased the width of the bar.
.on(‘mouseenter’, function (s, i) { d3.select(this) .transition() .duration(300) .attr('opacity', 0.6) .attr('x', (a) => xScale(a.language) - 5) .attr('width', xScale.bandwidth() + 10) chart.append('line') .attr('x1', 0) .attr('y1', y) .attr('x2', width) .attr('y2', y) .attr('stroke', 'red') // this is only part of the implementation, check the source code })
The transition method indicates that I want to animate changes to the DOM. Its interval is set with the duration function that takes milliseconds as arguments. This transition above fades the band color and broaden the width of the bar.
To draw an SVG line, I need a start and a destination point. This can be set via the x1, y1 and x2, y2 coordinates. The line will not be visible until I set the color of it with the stroke attribute.
I only revealed part of the mouseenter event here so keep in mind, You have to revert or remove the changes on the mouseout event. The full source code is available at the end of the article.
Let’s Add Some Style to the Chart!
Let’s see what we achieved so far and how can we shake up this chart with some style. You can add class attributes to SVG elements with the same attr function we used before.
The diagram has a nice set of functionality. Instead of a dull, static picture, it also reveals the divergences among the represented values on mouse hover. The title puts the chart into context and the labels help to identify the axes with the unit of measurement. I also add a new label to the bottom right corner to mark the input source.
The only thing left is to upgrade the colors and fonts!
Charts with dark background makes the bright colored bars look cool. I also applied the Open Sans font family to all the texts and set size and weight for the different labels.
Do You notice the line got dashed? It can be done by setting the stroke-width and stroke-dasharray attributes. With stroke-dasharray, You can define pattern of dashes and gaps that alter the outline of the shape.
line#limit { stroke: #FED966; stroke-width: 3; stroke-dasharray: 3 6; } .grid path { stroke-width: 3; } .grid .tick line { stroke: #9FAAAE; stroke-opacity: 0.2; }
Grid lines where it gets tricky. I have to apply stroke-width: 0 to path elements in the group to hide the frame of the diagram and I also reduce their visibility by setting the opacity of the lines.
All the other css rules cover the font sizes and colors which You can find in the source code.
Wrapping up our D3.js Bar Chart Tutorial
D3.js is an amazing library for DOM manipulation and for building javascript graphs and line charts. The depth of it hides countless hidden (actually not hidden, it is really well documented) treasures that waits for discovery. This writing covers only fragments of its toolset that help to create a not so mediocre bar chart.
Go on, explore it, use it and create spectacular JavaScript graphs & visualizations!
By the way, here's the link to the source code.
Have You created something cool with D3.js? Share with us! Drop a comment if You have any questions or would like another JavaScript chart tutorial!
Thanks for reading and see You next time when I'm building a calendar heatmap with d3.js!
D3.js Bar Chart Tutorial: Build Interactive JavaScript Charts and Graphs published first on https://koresolpage.tumblr.com/
0 notes
Photo

2021 Porsche Taycan Mission E set came in stock black. The client provided us with pearl white paint to match the vehicle body color (photo 7) The original finish was stripped down to the substrate and washed in a phosphate bath for maximum adhesion. We powder coated our black base coat, followed by adding the two-time affect with the vehicle match paint. We finish these off with acrylic clear powder top coat, installed the tires and Roadforce balanced them for a perfectly smooth ride. ▪Email or text photos to [email protected] for quotes. Include clear photos of any damage, description of any custom work, and your contact information. ▪Get a ballpark price of frequently requested services on our online price sheet at http://www.princewheelservices.com/estimates-1.html ▪Call 704-289-3600 to schedule work or business-to-business pickup. ▪Drop-off loose wheels or view color samples at 1398 Walkup Ave., Monroe, NC 28112 ▪Office hours are Monday-Friday 8:30-4:30 ▪Quotes are good for 30 calendar days and contingent on final in-person visual inspection by our technicians. ▪Local business-to-business pick-up & delivery to Union, Char-Meck, South Lake Norman & Concord areas. ___________________________________________ Mobile Repair Technicians available at your business or residence. Call or text with photos of your wheels for a quote and to schedule directly with technicians in your area. •Raleigh/Durham & Surrounding Metro area: 919-539-6857 Michelle •Raleigh/Durham, Clayton & Smithfield: 919-538-1457 Devon •Winston-Salem,Greensboro & High Point: 336-254-7901 Blair •Charlotte/Mecklenburg & Union County: 704-577-6412 Keith #PrinceWheels #PrinceWheelServices #porsche #taycan #missione #porschemissione #porschesofinstagram #porscheofinstagram #porscheelectric #porschetaycan #electriccarsofinstagram #electriceurocar #eurocar #eurocarcharlotte #eurocarsnation #carsandcoffee #waxhawcoffeecruisers #concordcarscene #lakenormancars #nccars #wheelsofinstagram #customwheel #charlotte #clt #monroenc #waxhaw #northcarolina #wheelrefinishing #wheelrecon #weship (at Prince Wheel Services) https://www.instagram.com/p/CKEOmrVp5Kr/?igshid=17nqiwxtp5gfc
#princewheels#princewheelservices#porsche#taycan#missione#porschemissione#porschesofinstagram#porscheofinstagram#porscheelectric#porschetaycan#electriccarsofinstagram#electriceurocar#eurocar#eurocarcharlotte#eurocarsnation#carsandcoffee#waxhawcoffeecruisers#concordcarscene#lakenormancars#nccars#wheelsofinstagram#customwheel#charlotte#clt#monroenc#waxhaw#northcarolina#wheelrefinishing#wheelrecon#weship
0 notes
Text
Pro Webinar Marketing to Generate Leads in the hours of Social Distancing
Expert Webinar Marketing to Generate Leads in the hours of Social Distancing
Did you realize that over 60% of the advertisers use online courses in their B2B advanced showcasing systems? What's more, is there any good reason why they shouldn't! With its extraordinarily high Digital Marketing Agencies in Stafford change rates (19%), online course showcasing is certainly an absolute necessity have in your advertising blend. Online courses regularly have a normal view season of an incredible 53 minutes, giving the advertisers adequate chance to instruct the crowd, offer answers for the difficulties they are confronting and pitch their administrations.
In the hours of social removing and worldwide lockdown, the significance of online class promoting is higher than any time in recent memory as associations can't lead physical gatherings, disconnected meetings, item demos, and so forth.
While online courses are quickly getting one of the most looked for after B2B showcasing devices, their prosperity relies upon cautious arranging and perfect execution. In this article, we will take you through a 15-day bit by bit procedure of online course showcasing, and offer some favorable to tips to guarantee the accomplishment of your online course advertising system.
Online class prep (Day 1 to Day 5)
Theme determination
Your online class promoting technique doesn't begin from shortlisting an online course point or a virtual conferencing programming. Indeed, it doesn't begin with online courses by any stretch of the imagination. The initial step is building up the goal of your correspondence technique, concluding the TG you are focusing through the online courses, and selecting a key torment purpose of your TG, straightforwardly identified with their KRAs. For instance, while a PPC leader is hoping to expand the change pace of their advertisements, the promoting top of a similar organization is confronting provokes identified with the general system, for example, regardless of whether to redistribute their company's advanced showcasing or set up an in-house group or which advertising channel will work best for the firm. When you put this all down on a word report, start the exploration for your online course point.
Speaker determination
Read Also:- Top 10 Ways to Grow Your Email List

You have numerous approaches to speaker determination for your online classes. Waitlist the topic specialists in your association who have great talking and introduction aptitudes. Another way is discovering the advanced showcasing influencers from outside who have their own system. These SMEs have online classes all the time. Working together with these specialists has a few focal points. Right off the bat, they can guarantee incredible participation as they have their own system where they can advance your online class. Additionally, these speakers have readymade introductions, Q&As, and other material for the online class that may spare you a ton of time.
Online course content
Make a connecting with introduction for your online course meeting. Your introduction shouldn't simply be educational. It ought to have a stream that can hold the crowd for 50-an hour. A few speakers start with a survey to measure the information level of the participants. This likewise goes about as an ice-breaker, guarantees investment, and kicks you off on the correct note. Incorporate more Q&As in the introduction. Discover instances of what the contenders have done – contextual investigations, recordings, interviews, and so on. What's more, to wrap things up, incorporate a poll toward the end for the participants to quantify how viable your correspondence has been in the online course.
Programming choice
Programming choice relies upon the recurrence of your online classes, the quantity of participants you are focusing on, and the spending you have for your online course system. There are numerous online course programming in the market with various arrangements of highlights. Some are modest yet limit the quantity of participants per online class or meetings every month. Free programming or free preliminaries are by and large component poor yet in the event that you have a low spending plan, these could be a decent spot to begin. In the wake of checking how the online classes are being gotten among your TG, you may go for a superior record.
Database building
After your speaker is shortlisted, the introduction is made and the product is set up, the most significant piece of your online class arrangement starts – getting enlistments. One choice is buying information from outsider sellers yet that could conceivably end up being viable. Another path is to construct the database without any preparation. Gather the email ids of your past customers, include the ids you have from the previous email advertising efforts, and set up a devoted information assortment group of 2-3 individuals who continue expanding the size of your email database.
Online course advancement (Day 5 to Day 14)
Presentation page creation
Email showcasing and online networking publicizing are the two most regular approaches to advance your online course and get a decent participation. In any case, for that, you need a point of arrival, and that too an exceptionally changing over one. Follow the prescribed procedures of change rate improvement while making the page. Utilize clear and direct CTA catches, keep the substance on the greeting page short (200-300 words), and ideally with the offer plainly characterized in visual cues, and evidences to loan validity to the speakers (grants, past experience, and so on.).
Online class promoting
For social promoting, use Facebook and LinkedIn. Make outwardly engaging promotions with the torment purposes of your TG plainly planned. Start your advancements 7-10 days before the date of the online course. Make picture just as 15-second video advertisements. Go for cell phone measurements to get more screen space. Plan infectious thumbnails to build the transformation of your advertisements. Invest a great deal of energy in the custom crowd creation to ensure that you are focusing on the privilege TG. This article by superstar blogger Neil Patel could help you in making the correct sort of crowd for your internet based life advancement.
For email showcasing, after the database creation, the most significant part is the consideration regarding the subtleties. Compose an infectious headline. Add a pre-header text to additionally bolster your case. Keep the email content clear and brief. Do A/B testing to perceive what titles are working, regardless of whether to go for the HTML or text emailers, and what sort of body text is getting more CTR. 51% of the individuals join subsequent to going to your point of arrival and around 36% will go to the online course in the wake of joining.
Since you have the point of arrival set up, the advancements running and the online class content settled, screen your email advertising efforts and web based life advertisements consistently and make changes to the ineffectively performing one right up till the day preceding the online course.
Running the Webinar (Day 14 to Day 15)
The Day Before the Webinar
Getting enrollments is the intense part however giving the participants a worth including experience is the place you can guarantee changes. Remember to send '2 days to go', '1 day to go', and '1 hour to go', emailers to the registrants and offer web based life posts also. As the numbers recommend, 36% of your registrants are probably going to go to the meeting. You need to ensure that this number goes up. On the off chance that you have their contact numbers, Whatsapp is an incredible method to impart about the online class subtleties like time, subject, term, and so on.
Calendar a demo meeting with the speakers so they are OK with the video conferencing programming you are utilizing. Lead a dry-run, edit the presentation content, partition the ideal opportunity for introduction, introduction, and Q&A, check how the introduction glances in the online course window to fix arrangement and configuration issues and ensure that there are no tech-related issues (sound, recordings, content sharing) during the dry-run. Make an envelope to store all the online course related connections and archives in a single spot.
Day Zero
Upon the arrival of the online class, remind the registrants before anything else by sending a Whatsapp message and an email. Join the meeting thirty minutes before the planned opportunity to transfer the introduction and do a last solid, mic, and video check.
The progression of your online course relies upon the subject and setting yet there are some normal tips to assist one with running a smooth meeting.
Start with an introduction, present the speakers and hold up in any event 5 minutes so all the clients can join. Beginning with a survey is likewise a smart thought on the off chance that you need to check the understanding degree of the clients. For example, on the off chance that you are doing an online class on the most proficient method to utilize Local SEO, it'll be useful to get a feeling of the degree of comprehension of the participants.
Most of the way into the online class, show a video, relate a story, or pose an inquiry to give the participants some an ideal opportunity to ingest. 45-50 minutes is quite a while and you need to ensure that the participants are not depleted or they don't begin dropping out of the meeting.
Square the most recent 15 minutes for Q&A. Request that the mediator hold writing down all the inquiries as certain inquiries set up in the beginning may lose all sense of direction in the flood of messages. On the off chance that there are follow-up questions, guarantee the participants that because of lack of time, all the inquiries can't be tended to right at that point however they will find the solutions through an email (or in the following online course meeting).
On the off chance that you are selling something, add the pitch part to the furthest limit of your introduction.
Do tell the clients toward the finish of the online course that you will email the account of that online course the same number of them may have missed a few segments of the online course that they might want to observe once more.
After the online course is finished, some product give you a divert choice. Send the participants to a review and request that the clients rate the meeting on various boundaries. This will help Digital Marketing Company Stafford you in estimating the viability of your online course arrangement and featuring the regions of progress.
Follow US:- Facebook, Twitter, LinkedIn , YouTube
0 notes
Text
How to Make a Monthly Calendar With Real Data
Have you ever seen a calendar on a webpage and thought, how the heck did they did that? For something like that, it might be natural to reach for a plugin, or even an embedded Google Calendar, but it’s actually a lot more straightforward to make one than you might think and only requires the trifecta of HTML, CSS and JavaScript. Let’s make one together!
I’ve set up a demo over at CodeSandbox so you can see what we’re aiming for.
View Demo
Let’s first identify some requirements for what the calendar should do. It should:
Display a month grid for a given month
Display dates from the previous and next months to so the grid is always full
Indicate current date
Show the name of the currently selected month
Navigate to the previous and next month
Allow the user to navigate back to current month with a single click
Oh, and we’ll build this as a single page application that fetches calendar dates from Day.js, a super light utility library.
We’re going to shy away from choosing a specific framework to keep things easy. For this setup, I’m using Parcel for package management so I can write in Babel, bundle things up, and manage the one and only dependency for the project. Check out the package.json file over at CodeSandbox for specifics.
Step 1: Start with the basic markup and styles
Let’s start with creating a basic template for our calendar. This doesn’t need to be anything fancy. But it also should be done without resorting to tables.
We can outline our markup as three layers where we have:
A section for the calendar header. This will show the currently selected month and the elements responsible for paginating between months.
A section for the calendar grid header. Again, we’re not reaching form tables, but this would be sort of like a table header that holds a list containing the days of the week, starting with Monday.
The calendar grid. You know, each day in the current month, represented as a square in the grid.
Let’s write this up in a file called index.js. This can go inside a src folder in the project folder. We will indeed have an index.html file in the project root that imports our work, but the primary markup will live in the JavaScript file.
<!-- index.js --> document.getElementById("app").innerHTML = ` <!-- Parent container for the calendar month --> <div class="calendar-month"> <!-- The calendar header --> <section class="calendar-month-header"> <!-- Month name --> <div id="selected-month" class="calendar-month-header-selected-month" > July 2020 </div>
<!-- Pagination --> <div class="calendar-month-header-selectors"> <span id="previous-month-selector"><</span> <span id="present-month-selector">Today</span> <span id="next-month-selector">></span> </div> </section> <!-- Calendar grid header --> <ol id="days-of-week" class="day-of-week" > <li>Mon</li> ... <li>Sun</li> </ol>
<!-- Calendar grid --> <ol id="calendar-days" class="date-grid" > <li class="calendar-day"> <span> 1 </span> ... <span> 29 </span> </li> </ol> </div> `;
Let’s go ahead and import this file into that index.html file that lives in the root directory of the project. Nothing special happening here. It’s merely HTML boilerplate with an element that’s targeted by our app and registers our index.js file.
<!DOCTYPE html> <html> <head> <title>Parcel Sandbox</title> <meta charset="UTF-8" /> </head> <body> <div id="app"></div> <script src="src/index.js"></script> </body> </html>
Now that we have some markup to work with, let’s style it up a bit so we have a good visual to start with. Specifically, we’re going to:
Position the elements using flexbox
Create a calendar frame using CSS grid
Position the labels within the cells
First up, let’s create a new styles.css file in the same src folder where we have index.js and drop this in:
body { --grey-100: #e4e9f0; --grey-200: #cfd7e3; --grey-300: #b5c0cd; --grey-800: #3e4e63; --grid-gap: 1px; --day-label-size: 20px; } .calendar-month { position: relative; /* Color of the day cell borders */ background-color: var(--grey-200); border: solid 1px var(--grey-200); }
/* Month indicator and selectors positioning */ .calendar-month-header { display: flex; justify-content: space-between; background-color: #fff; padding: 10px; }
/* Month indicator */ .calendar-month-header-selected-month { font-size: 24px; font-weight: 600; }
/* Month selectors positioning */ .calendar-month-header-selectors { display: flex; align-items: center; justify-content: space-between; width: 80px; }
.calendar-month-header-selectors > * { cursor: pointer; }
/* | Mon | Tue | Wed | Thu | Fri | Sat | Sun | */ .day-of-week { color: var(--grey-800); font-size: 18px; background-color: #fff; padding-bottom: 5px; padding-top: 10px; }
.day-of-week, .days-grid { /* 7 equal columns for weekdays and days cells */ display: grid; grid-template-columns: repeat(7, 1fr); }
.day-of-week > * { /* Position the weekday label within the cell */ text-align: right; padding-right: 5px; }
.days-grid { height: 100%; position: relative; /* Show border between the days */ grid-column-gap: var(--grid-gap); grid-row-gap: var(--grid-gap); border-top: solid 1px var(--grey-200); }
.calendar-day { position: relative; min-height: 100px; font-size: 16px; background-color: #fff; color: var(--grey-800); padding: 5px; }
/* Position the day label within the day cell */ .calendar-day > span { display: flex; justify-content: center; align-items: center; position: absolute; right: 2px; width: var(--day-label-size); height: var(--day-label-size); }
The key part that sets up our grid is this:
.day-of-week, .days-grid { /* 7 equal columns for weekdays and days cells */ display: grid; grid-template-columns: repeat(7, 1fr); }
Notice that both the calendar grid header and the calendar grid itself are using CSS grid to lay things out. We know there will always be seven days in a week, so that allows us to use the repeat() function to create seven columns that are proportional to one another. We’re also declaring a min-height of 100px on each date of the calendar to make sure the rows are consistent.
We need to hook these styles up with the markup, so let’s add this to the top of our index.js file:
import "./styles.css";
This is a good spot to stop and see what we have so far.
View Demo
Step 2: Setting up current month calendar
As you probably noticed, the template only contains static data at the moment. The month is hardcoded as July and the day numbers are hardcoded as well. That’s where Day.js comes into play. It provides all the data we need to properly place dates on the correct days of the week for a given month using real calendar data. It allows us to get and set anything from the start date of a month to all the date formatting options we need to display the data.
We will:
Get the current month
Calculate where the days should be placed (weekdays)
Calculate the days for displaying dates from the previous and next months
Put all of the days together in a single array
First, we need to import Day.js and remove all static HTML (selected month, weekdays and days). We’ll do that by adding this to our index.js file right above where we imported the styles:
import dayjs from "dayjs";
We’re also going to lean on a couple of Day.js plugins for help. WeekDay helps us set the first day of the week. Some prefer Sunday as the first day of the week. Other prefer Monday. Heck, in some cases, it makes sense to start with Friday. We’re going to start with Monday.
The weekOfYear plugin returns the numeric value for the current week out of all weeks in the year. There are 52 weeks in a year, so we’d say that the week starting January 1 is the the first week of the year, and so on.
So here what we put into index.js right after our import statements:
const weekday = require("dayjs/plugin/weekday"); const weekOfYear = require("dayjs/plugin/weekOfYear");
dayjs.extend(weekday); dayjs.extend(weekOfYear);
Once we strip out the hardocded calendar values, Here’s what we have in index.js so far:
import dayjs from "dayjs"; import "./styles.css"; const weekday = require("dayjs/plugin/weekday"); const weekOfYear = require("dayjs/plugin/weekOfYear");
dayjs.extend(weekday); dayjs.extend(weekOfYear);
document.getElementById("app").innerHTML = ` <div class="calendar-month"> <section class="calendar-month-header"> <div id="selected-month" class="calendar-month-header-selected-month" > </div> <div class="calendar-month-header-selectors"> <span id="previous-month-selector"><</span> <span id="present-month-selector">Today</span> <span id="next-month-selector">></span> </div> </section> <ul id="days-of-week" class="day-of-week" > </ul> <ul id="calendar-days" class="days-grid" > </ul> </div> `;
Now let’s set few constants. Specifically, we want to construct an array of days of the weeks (i.e. Monday, Tuesday, Wednesday, etc.):
const WEEKDAYS = ["Mon", "Tue", "Wed", "Thu", "Fri", "Sat", "Sun"];
Then, we want to fetch the current year and set in in YYYY format:
const INITIAL_YEAR = dayjs().format("YYYY");
And we want to set the current month as the starting point when initially loading the calendar, where M formats the month as a numeric value (e.g. January equals 1):
const INITIAL_MONTH = dayjs().format("M");
Let’s go and populate our calendar grid header with the days of the week. First we grab the proper element (#days-of-week), then we iterate through our WEEKDAYS array, creating a list item element for each item in the array while setting the name for each one:
// Select the calendar grid header element const daysOfWeekElement = document.getElementById("days-of-week");
// Loop through the array of weekdays WEEKDAYS.forEach(weekday => { // For each item in the array, make a list item element const weekDayElement = document.createElement("li"); // Append a child element inside the list item... daysOfWeekElement.appendChild(weekDayElement); /// ...that contains the value in the array weekDayElement.innerText = weekday; });
Step 3: Creating the calendar grid
That was pretty straightforward but now the real fun starts as we will now play with the calendar grid. Let’s stop for a second a think what we really need to do to get that right.
First, we want the date numbers to fall in the correct weekday columns. For example, July 1, 2020 is on a Wednesday. That’s where the date numbering should start.
If the first of the month falls on Wednesday, then that means we’ll have empty grid items for Monday and Tuesday in the first week. The last day of the month is July 31, which falls on a Friday. That means Saturday and Sunday will be empty in the last week of the grid. We went to fill those with the trailing and leading dates of the previous and next months, respectively, so that the calendar grid is always full.

Create days for the current month
To add the days for the current month to the grid, we need to know how many days exist in the current month. We can get that using the daysInMonth method provided by Day.js. Let’s create a helper method for that.
function getNumberOfDaysInMonth(year, month) { return dayjs(`${year}-${month}-01`).daysInMonth() }
When we know that, we create an empty array with a length that’s equal to number of days in the current month. Then we map() that array and create a day object for each one. The object we create has an arbitrary structure, so you can add other properties if you need them.
In this example, though, we need a date property that will be used to check if a particular date is the current day. We’ll also return a dayOfMonth property that acts as the label (e.g. 1, 2, 3 and so on). isCurrentMonth checks whether the date is in the current month or outside of it. If it is outside the current month, we will style those so folks know they are outside the range of the current month.
function createDaysForCurrentMonth(year, month) { return [...Array(getNumberOfDaysInMonth(year, month))].map((day, index) => { return { date: dayjs(`${year}-${month}-${index + 1}`).format("YYYY-MM-DD"), dayOfMonth: index + 1, isCurrentMonth: true }; }); }
Add dates from the previous month to the calendar grid
To get dates from the previous month to display in the current month, we need to check what is the weekday of the first day in selected month. That’s where we can use the WeekDay plugin for Day.js. Let’s create a helper method for that.
function getWeekday(date) { return dayjs(date).weekday() }
Then, based on that, we need to check which day was the last Monday in the previous month. We need that value to know how many days from the previous month should be visible in the current month view. We can get that by subtracting the weekday value from the first day of the current month. For example, if first day of the month is Wednesday, we need to subtract 3 days to get last Monday of the previous month. Having that value allows us to create an array of day objects starting from the last Monday of the previous month through the end of that month.
function createDaysForPreviousMonth(year, month) { const firstDayOfTheMonthWeekday = getWeekday(currentMonthDays[0].date);
const previousMonth = dayjs(`${year}-${month}-01`).subtract(1, "month"); const previousMonthLastMondayDayOfMonth = dayjs( currentMonthDays[0].date ).subtract(firstDayOfTheMonthWeekday - 1, "day").date();
// Account for first day of the month on a Sunday (firstDayOfTheMonthWeekday === 0) const visibleNumberOfDaysFromPreviousMonth = firstDayOfTheMonthWeekday ? firstDayOfTheMonthWeekday - 1 : 6
return [...Array(visibleNumberOfDaysFromPreviousMonth)].map((day, index) => { return { date: dayjs( `${previousMonth.year()}-${previousMonth.month() + 1}-${previousMonthLastMondayDayOfMonth + index}` ).format("YYYY-MM-DD"), dayOfMonth: previousMonthLastMondayDayOfMonth + index, isCurrentMonth: false }; }); }
Add dates from the next month to the calendar grid
Now, let’s do the reverse and calculate which days we need from the next month to fill in the grid for the current month. Fortunately, we can use the same helper we just created for the previous month calculation. The difference is that we will calculate how many days from the next month should be visible by subtracting that weekday numeric value from 7.
So, for example, if the last day of the month is Saturday, we need to subtract 1 day from 7 to construct an array of dates needed from next month (Sunday).
function createDaysForNextMonth(year, month) { const lastDayOfTheMonthWeekday = getWeekday(`${year}-${month}-${currentMonthDays.length}`)
const visibleNumberOfDaysFromNextMonth = lastDayOfTheMonthWeekday ? 7 - lastDayOfTheMonthWeekday : lastDayOfTheMonthWeekday
return [...Array(visibleNumberOfDaysFromNextMonth)].map((day, index) => { return { date: dayjs(`${year}-${Number(month) + 1}-${index + 1}`).format("YYYY-MM-DD"), dayOfMonth: index + 1, isCurrentMonth: false } }) }
OK, we know how to create all days we need, let’s use the methods we just created and then merge all days into a single array of all the days we want to show in the current month, including filler dates from the previous and next months.
let currentMonthDays = createDaysForCurrentMonth(INITIAL_YEAR, INITIAL_MONTH) let previousMonthDays = createDaysForPreviousMonth(INITIAL_YEAR, INITIAL_MONTH, currentMonthDays[0]) let nextMonthDays = createDaysForNextMonth(INITIAL_YEAR, INITIAL_MONTH)
let days = [...this.previousMonthDays, ...this.currentMonthDays, ...this.nextMonthDays]
Here’s everything we just covered put together in index.js:
// Same as before ...
const WEEKDAYS = ["Mon", "Tue", "Wed", "Thu", "Fri", "Sat", "Sun"]; const INITIAL_YEAR = dayjs().format("YYYY"); const INITIAL_MONTH = dayjs().format("M"); const daysOfWeekElement = document.getElementById("days-of-week");
// Add weekdays to calendar header WEEKDAYS.forEach(weekday => { const weekDayElement = document.createElement("li"); daysOfWeekElement.appendChild(weekDayElement); weekDayElement.innerText = weekday; });
let currentMonthDays = createDaysForCurrentMonth(INITIAL_YEAR, INITIAL_MONTH); let previousMonthDays = createDaysForPreviousMonth(INITIAL_YEAR, INITIAL_MONTH); let nextMonthDays = createDaysForNextMonth(INITIAL_YEAR, INITIAL_MONTH); let days = [...previousMonthDays, ...currentMonthDays, ...nextMonthDays];
console.log(days);
function getNumberOfDaysInMonth(year, month) { return dayjs(`${year}-${month}-01`).daysInMonth(); }
function createDaysForCurrentMonth(year, month) { return [...Array(getNumberOfDaysInMonth(year, month))].map((day, index) => { return { date: dayjs(`${year}-${month}-${index + 1}`).format("YYYY-MM-DD"), dayOfMonth: index + 1, isCurrentMonth: true }; }); }
function createDaysForPreviousMonth(year, month) { const firstDayOfTheMonthWeekday = getWeekday(currentMonthDays[0].date); const previousMonth = dayjs(`${year}-${month}-01`).subtract(1, "month"); const previousMonthLastMondayDayOfMonth = dayjs(currentMonthDays[0].date) .subtract(firstDayOfTheMonthWeekday - 1, "day") .date(); // Cover first day of the month being sunday (firstDayOfTheMonthWeekday === 0) const visibleNumberOfDaysFromPreviousMonth = firstDayOfTheMonthWeekday ? firstDayOfTheMonthWeekday - 1 : 6;
return [...Array(visibleNumberOfDaysFromPreviousMonth)].map((day, index) => { return { date: dayjs( `${previousMonth.year()}-${previousMonth.month() + 1}-${previousMonthLastMondayDayOfMonth + index}` ).format("YYYY-MM-DD"), dayOfMonth: previousMonthLastMondayDayOfMonth + index, isCurrentMonth: false }; }); } function createDaysForNextMonth(year, month) { const lastDayOfTheMonthWeekday = getWeekday( `${year}-${month}-${currentMonthDays.length}` ); const nextMonth = dayjs(`${year}-${month}-01`).add(1, "month"); const visibleNumberOfDaysFromNextMonth = lastDayOfTheMonthWeekday ? 7 - lastDayOfTheMonthWeekday : lastDayOfTheMonthWeekday; return [...Array(visibleNumberOfDaysFromNextMonth)].map((day, index) => { return { date: dayjs( `${nextMonth.year()}-${nextMonth.month() + 1}-${index + 1}` ).format("YYYY-MM-DD"), dayOfMonth: index + 1, isCurrentMonth: false }; }); } function getWeekday(date) { return dayjs(date).weekday(); }
View Demo
Step 4: Show calendar dates
OK, so we have the basic markup for our calendar, the data we need to display dates from the current month, plus dates from the previous and next month to fill in empty grid items. Now we need to append the dates to the calendar!
We already have a container for the calendar grid, #calendar-days. Let’s grab that element.
const calendarDaysElement = document.getElementById("calendar-days");
Now, let’s create a function that will append a day to our calendar view.
function appendDay(day, calendarDaysElement) { const dayElement = document.createElement("li"); const dayElementClassList = dayElement.classList;
// Generic calendar day class dayElementClassList.add("calendar-day");
// Container for day of month number const dayOfMonthElement = document.createElement("span");
// Content dayOfMonthElement.innerText = day.dayOfMonth;
// Add an extra class to differentiate current month days from prev/next month days if (!day.isCurrentMonth) { dayElementClassList.add("calendar-day--not-current"); }
// Append the element to the container element dayElement.appendChild(dayOfMonthElement); calendarDaysElement.appendChild(dayElement); }
Notice that we’re tossing in a check for the dates that are coming from the previous and next months so that we can add a class to style them differently from the dates in the current month:
.calendar-day--not-current { background-color: var(--grey-100); color: var(--grey-300); }
That’s it! Our calendar should now look as we wanted.
View Demo
Step 5: Select current month
What we have so far is pretty nice, but we want the user to be able to paginate from month-to-month forwards and backwards in time, starting from the current month. We have most of the logic in place, so all we really need to do is to add a click listener to the pagination buttons that re-runs the days calculation and re-draws the calendar with updated data.
Before we begin, let’s define variables for dates that are in the current month, previous month, and next month so we can reference them throughout the code.
let currentMonthDays; let previousMonthDays; let nextMonthDays;
Now, let’s create a method that will be responsible for re-calculating the calendar days and re-rendering the calendar when paginating to another month. We will call that function createCalendar. This method will accept two attributes — year and month — and based on that, the calendar will re-render with new data and without a new page load.
The method will replace the header content to always show the selected month label.
function createCalendar(year = INITIAL_YEAR, month = INITIAL_MONTH) { document.getElementById("selected-month").innerText = dayjs( new Date(year, month - 1) ).format("MMMM YYYY");
// ...
Then it will grab the calendar days container and remove all existing days.
// ...
const calendarDaysElement = document.getElementById("calendar-days"); removeAllDayElements(calendarDaysElement);
// ...
When the calendar is cleared, it will calculate new days that should be displayed using the methods we created before.
//...
currentMonthDays = createDaysForCurrentMonth( year, month, dayjs(`${year}-${month}-01`).daysInMonth() );
previousMonthDays = createDaysForPreviousMonth(year, month);
nextMonthDays = createDaysForNextMonth(year, month);
const days = [...previousMonthDays, ...currentMonthDays, ...nextMonthDays];
// ...
And, finally, it will append a day element for each day.
// ... days.forEach(day => { appendDay(day, calendarDaysElement); });
There is one piece of logic still missing: a removeAllDayElements method that clears the existing calendar. This method takes the first calendar day element, removes it, and replaces it with another one. From there, it will run the logic in a loop until all of the elements are removed.
function removeAllDayElements(calendarDaysElement) { let first = calendarDaysElement.firstElementChild;
while (first) { first.remove(); first = calendarDaysElement.firstElementChild; } }
Now we can reuse that logic when we want to change the month. Recall the first step when we created a static template for our component. We added these elements:
<div class="calendar-month-header-selectors"> <span id="previous-month-selector"><</span> <span id="present-month-selector">Today</span> <span id="next-month-selector">></span> </div>
These are the controls for paginating between months. To change it, we need to store the currently selected month. Let’s create a variable to keep track of what that is and set its initial value to the present month.
let selectedMonth = dayjs(new Date(INITIAL_YEAR, INITIAL_MONTH - 1, 1));
Now, to make the selectors work, we need a bit of JavaScript. To make it more readable, we will create another method called initMonthSelectors and we will keep the logic there. This method will add event listeners to the selector elements. It will listen for click events and update the value of selectedMonth to the name of the newly selected month before running the createCalendar method with proper year and month values.
function initMonthSelectors() { document .getElementById("previous-month-selector") .addEventListener("click", function() { selectedMonth = dayjs(selectedMonth).subtract(1, "month"); createCalendar(selectedMonth.format("YYYY"), selectedMonth.format("M")); });
document .getElementById("present-month-selector") .addEventListener("click", function() { selectedMonth = dayjs(new Date(INITIAL_YEAR, INITIAL_MONTH - 1, 1)); createCalendar(selectedMonth.format("YYYY"), selectedMonth.format("M")); });
document .getElementById("next-month-selector") .addEventListener("click", function() { selectedMonth = dayjs(selectedMonth).add(1, "month"); createCalendar(selectedMonth.format("YYYY"), selectedMonth.format("M")); }); }
That’s it! Our calendar is ready. While that’s great and all, it would be even nicer if we could mark the current date so it stands out from the rest. That shouldn’t be very hard. We are already styling days that are not in the selected month, so let’s do similar thing to that.
We’ll create a variable that’s set for today:
const TODAY = dayjs().format("YYYY-MM-DD");
Then, in the appendDay method where we apply a class for dates outside the current month, we have to add another check to see if the element is today’s date. If it is, we’ll add a class to that element:
function appendDay(day, calendarDaysElement) { // ... if (day.date === TODAY) { dayElementClassList.add("calendar-day--today"); } }
Now we can style it!
.calendar-day--today { padding-top: 4px; }
.calendar-day--today > div { color: #fff; border-radius: 9999px; background-color: var(--grey-800); }
Voilà, there we have it! Check out the final demo to see everything put together.
View Demo
The post How to Make a Monthly Calendar With Real Data appeared first on CSS-Tricks.
You can support CSS-Tricks by being an MVP Supporter.
How to Make a Monthly Calendar With Real Data published first on https://deskbysnafu.tumblr.com/
0 notes
Photo

Level Up Your CSS Skills with these 20 Pro CSS Tips
Front-end development is quickly becoming more and more focused on efficiency – faster loading and rendering through selector choice and minimizing code. Pre-processors like Less and SCSS go a long way in doing some of the work for us, but there are plenty of ways to write minimal, quick CSS the native way. This guide covers 20 Pro CSS Tips to help you cut down on duplicate rules and overrides, standardize the flow of styling across your layouts and will help you create a personal starting framework that is not only efficient, but solves many common problems.
1 – Use a CSS Reset
CSS reset libraries like normalize.css have been around for years, providing a clean slate for your site’s styles that help ensure better consistency across browsers. Most projects don’t really need all of the rules these libraries include, and can get by with one simple rule to remove all the margins and paddings applied to most elements in your layout by the browser’s default box-model:
* { box-sizing: border-box; margin: 0; padding: 0; }
Using the box-sizing declaration is optional – if you follow the Inherit box-sizing tip below, you can skip it.
2 – Inherit box-sizing
Let box-sizing be inherited from html:
html { box-sizing: border-box; } *, *:before, *:after { box-sizing: inherit; }
This makes it easier to change box-sizing when code is introduced through 3rd party plugins or applications that use different behavior.
3 – Get Rid of Margin Hacks With Flexbox
How many times have you tried designing a grid, such as a portfolio or image gallery, where you used floats and then had to clear them or reset margins to get the columns to break into the number of rows you want? Get rid of nth-, first-, and last-child hacks by using the space-between property value in flexbox:
.flex-container { display: flex; justify-content: space-between; } .flex-container .item { flex-basis: 23%; }
4 – Use :not() to Style Borders on Lists
A very common practice in web design has been to use :last-child or :nth-child selectors to undo a style previously declared on the parent selector. Think of a navigation menu that uses borders to create a separator between each link, and the second rule added to take that border off the end:
.nav li { border-right: 1px solid #666; } .nav li:last-child { border-right: none; }
This is quite messy as it not only forces the browser to render things one way, then undo it for a specific selector. Resetting styles this way is sometimes unavoidable, but for the most part, you can use the :not() pseudo-class to only apply a style to the elements you want in one single statement:
.nav li:not(:last-child) { border-right: 1px solid #666; }
This says, put a border on all the .nav list items except the last one. Simple!
Sure, you can also use .nav li + li or even .nav li:first-child ~ li, but :not() will always be more semantic and easy to understand.
5 – Add line-height to body
The one thing that leads to inefficient stylesheets is repeating declarations over and over again. The better you get at planning your project and combining rules, the more fluid your CSS will be. One way to do this is understanding the cascade and how the styles you write for general selectors can be inherited elsewhere. Line height is one property you can set for your entire project, not only to minimize lines of code but to enforce a standard look to your site’s typography.
Rather than add line-height to each <p>, <h*> and so on, add it to body:
body { line-height: 1.5; }
Note we don’t declare a unit here – we just tell it to make the line height one and a half times more than the font size for the rendered text.
6 – Vertically-Center Anything
Setting a global rule to vertically center your layout is a great way to set a foundation for elegantly set content layouts where you’re not ready to use CSS Grid.
html, body { height: 100%; margin: 0; } body { -webkit-align-items: center; -ms-flex-align: center; align-items: center; display: -webkit-flex; display: flex; }
7 – Use SVG for Icons
SVG scales well for all resolution types and is supported in all browsers. So ditch your .png, .jpg, or .gif-jif-whatev files. Even FontAwesome now offers SVG Icon Fonts in FontAwesome 5. Setting SVG works just like any other image type:
.logo { background: url("logo.svg"); }
Accessibility tip:If you use SVGs for interactable elements such as buttons, and the SVG fails to load, a rule like this one will help maintain accessibility (make sure it has the appropriate aria attributes set in the HTML):
.no-svg .icon-only:after { content: attr(aria-label); }
8 – Use the “Owl” Selector
Using the universal selector (*) with the adjacent sibling selector (+) provides a powerful CSS capability that allows us to set rules for all elements in the flow of the document that specifically follow other elements:
* + * { margin-top: 1.5rem; }
This is another great trick that can help you create more uniform type and spacing. In the example above, all elements that follow other elements, like an H4 that follows an H3, or a paragraph following another paragraph, will each have at least 1.5rems of space (equal to about 30px.)
9 – Consistent Vertical Rhythm
Consistent vertical rhythm provides a visual aesthetic that makes content far more readable. Where the owl selector may be too general, use a universal selector (*) within an element to create a consistent vertical rhythm for specific sections of your layout:
.intro > * { margin-bottom: 1.25rem; }
10 – Use box-decoration-break For Prettier Wrapped Text
Say you want to apply uniform spacing, margins, highlights or background colors to long lines of text that wrap to more than one line, but don’t want the whole paragraph or heading to look like one large block. The box-decoration-break property allows you to apply styles to just the text while keeping padding and margins intact. This is particularly useful if you want to apply highlights on hover, or style sub-text in a slider to have a highlighted look:
.p { display: inline-block; box-decoration-break: clone; -o-box-decoration-break: clone; -webkit-box-decoration-break: clone; }
The inline-block declaration allows the colors, backgrounds, margins and padding to be applied to each line of text rather than the entire element, and the clone declaration makes sure those styles are applied consistently to each line equally.
11 – Equal-Width Table Cells
Tables can be a pain to work with so try using table-layout: fixed to keep cells at equal width:
.calendar { table-layout: fixed; }
12 – Force Empty Links to Show with Attribute Selectors
This is especially useful for links that are inserted via a CMS, which don’t usually have a class attribute and helps you style them specifically without generically affecting the cascade. For example, the <a> element has no text value but the href attribute has a link:
a[href^="http"]:empty::before { content: attr(href); }
13 – Style “Default” Links
Speaking of link styling, you can find a generic a style in just about every stylesheet. This forces you to write additional overrides and style rules for any links in a child element, and when working with a CMS like WordPress can lead to problems with your king link style trumping a button text color, for example. Try this less-intrusive way to add a style for “default” links:
a[href]:not([class]) { color: #999; text-decoration: none; transition: all ease-in-out .3s; }
Now the style will only apply itself to links that otherwise have no other style rule.
14 – Intrinsic Ratio Boxes
To create a box with an intrinsic ratio, all you need to do is apply top or bottom padding to a div:
.container { height: 0; padding-bottom: 20%; position: relative; } .container div { border: 2px dashed #ddd; height: 100%; left: 0; position: absolute; top: 0; width: 100%; }
Using 20% for padding makes the height of the box equal to 20% of its width. No matter the width of the viewport, the child div will keep its aspect ratio (100% / 20% = 5:1).
15 – Style Broken Images
This tip is less about code reduction and more about refining the detail of your designs. Broken images happen for a number of reasons, and are either unsightly or lead to confusion (just an empty element). Create more aesthetically-pleasing with this little bit of CSS:
img { display: block; font-family: Helvetica, Arial, sans-serif; font-weight: 300; height: auto; line-height: 2; position: relative; text-align: center; width: 100%; } img:before { content: "We're sorry, the image below is missing :("; display: block; margin-bottom: 10px; } img:after { content: "(url: " attr(src) ")"; display: block; font-size: 12px; }
16 – Use rem for Global Sizing; Use em for Local Sizing
After setting the base font size at the root, for example html{font-size: 15px;}, you can set font-size for containing elements to rem:
article { font-size: 1.25rem; } aside { font-size: .9rem; }
Then set the font size for textual elements to em:
h2 { font-size: 2em; } p { font-size: 1em; }
Now each containing element becomes compartmentalized and easier to style, more maintainable, and flexible.
17 – Hide Autoplay Videos That Aren’t Muted
This is a great trick for a custom user stylesheet when working with content you can’t easily control from the source. This trick will help you avoid annoying your visitors with sound from an auto-playing video when the page is loaded, and again features the wonderful :not() pseudo-selector:
video[autoplay]:not([muted]) { display: none; }
18 – Use :root for Flexible Type
The font size in a responsive layout should be able to adjust to the viewport automatically, saving you the work of writing media-queries just to deal with font sizing. You can calculate the font size based on the viewport height and width using :root: and viewport units:
:root { font-size: calc(1vw + 1vh + .5vmin); }
Now you can utilize the root em unit based on the value calculated by :root:
body { font: 1rem/1.6 sans-serif; }
19 – Set font-size on Form Elements for a Better Mobile Experience
To avoid mobile browsers (iOS Safari, etc.) from zooming in on HTML form elements when a <select> drop-down is tapped, add font-size to the input styles:
input[type="text"], input[type="number"], select, textarea { font-size: 16px; }
20 – Use CSS Variables!
Last but not least, the most powerful CSS level-up comes from CSS variables, which allow you to declare a set of common property values that can be reused via a keyword anywhere in the stylesheet. Your brand may have a set of colors to be used across the project to keep things consistent. Repeating these color values over and over again in your CSS is not only a chore, but also error prone. If a color needs to be changed at some point, your forced to find-and-replace, which is not reliable or fast, and when building products for end-users, variables make customization that much easier. For example:
:root { --main-color: #06c; --accent-color: #999; } h1, h2, h3 { color: var(--main-color); } a[href]:not([class]), p, footer span{ color: var(--accent-color); }
0 notes