#Shader Graph
Explore tagged Tumblr posts
Visit Tumblr Blog
Explore Tumblr blogs with no restrictions, modern design and the best experience.
Last Seen Tumblr Blogs


Fun Fact
Tumblr posted its first advertisements in May 2012 and subsequently earned $13M in revenue.
Text
I'm actually getting pretty into Unity Shaders. Wish I had realized they weren't so scary before now. Unfortunately I'm apparently the ONLY PERSON at my school who's interested in them, everyone else is into Unreal, so I'm having to figure out a lot of this stuff on my own.
4 notes
·
View notes
Text
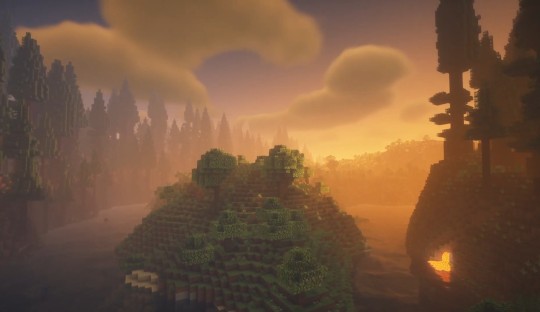
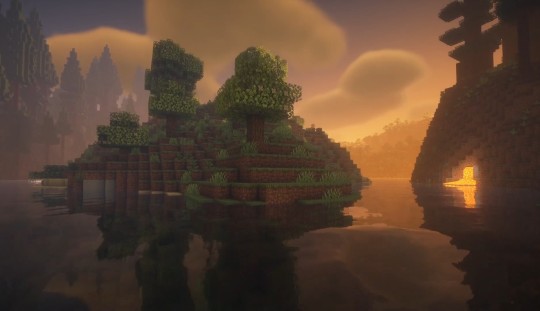
3D background made with Unity for Wallpaper Engine
Took the original N64 model with 660 tris and carefully smoothed and added to the asset, ending with 3200 tris. Applied this concept to similar models from the N64 game. Upscaled all textures or applied new ones. Created animations for the scene. Built shaders with Shader Graph. Songs done with BeepBox.
This was a mockup project to explore Ocarina of Time assets in a modern engine, where I recreated the atmosphere as accurately as possible using in-game screenshots.
There is an easter egg when Link plays his ocarina. Song of Storms will trigger a storm and the plants and his tent will blow in the wind.
#unity#gaming#legend of zelda#3d#animation#background#wallpaper engine#wallpaper#shader#shader graph#hd#camping#fire#navi#song of storms
0 notes
Text

Following a couple different shader graph tutorials for the water. Then I'm going to test my knowledge by making my own shader graph at the end for a rippling, glowing, fairy well!
Two tutorials below:
Master Stylized Animated Water in 3D (tutorial)
Simple Toon Shaded Water in Blender [Eevee]
3 notes
·
View notes
Text
youtube
If you are interested in getting a VRChat avatar like this,
please visit my Commission page down below!
👇👇👇
[ https://vgen.co/UberTheMeh ]
👆👆👆
I made a VRChat avatar with a custom shader that changes sprite based on the camera angle!
It was made with Unity's ShaderGraph, which I am planning to share it publically soon.
I have yet to test it with a quest build, which im not sure will work fine with custom shaders.
#myart#my art#vrchat#vrchat avatar#vrchat model#2D art#2d animation#unity#unity shaders#unity shader graph#comissions#commissions#Youtube
13 notes
·
View notes
Text


I got the A* graph traversal algorithm implementation working in #Minecraft and it's such lovely background visuals for paper writing 🌻
Pathfinding: https://github.com/cabaletta/baritone
Shader: BSL https://bitslablab.com/bslshaders
Mod: Plenty O' Biomes
Video: https://youtu.be/DW23K-deMIA
#minecraft#math#writing#studyblr#mellow#light academia#bsl#shaders#graph theory#video games#studyspo
2 notes
·
View notes
Text

My water is so wet. Ah... Now to update the other shaders.
#I'm making shader graphs because I don't like relying on others for any aspect of my game.#So far so good! It's just slow. Very worth it though.#Next I'm redoing the cell shading and then I kill tutorial island.#addendum: Skybox needs editing for lore reasons also but that can wait.#kitbadev
0 notes
Text
DXVK Tips and Troubleshooting: Launching The Sims 3 with DXVK
A big thank you to @heldhram for additional information from his recent DXVK/Reshade tutorial! ◀ Depending on how you launch the game to play may affect how DXVK is working.
During my usage and testing of DXVK, I noticed substantial varying of committed and working memory usage and fps rates while monitoring my game with Resource Monitor, especially when launching the game with CCMagic or S3MO compared to launching from TS3W.exe/TS3.exe.
It seems DXVK doesn't work properly - or even at all - when the game is launched with CCM/S3MO instead of TS3W.exe/TS3.exe. I don't know if this is also the case using other launchers from EA/Steam/LD and misc launchers, but it might explain why some players using DXVK don't see any improvement using it.
DXVK injects itself into the game exe, so perhaps using launchers bypasses the injection. From extensive testing, I'm inclined to think this is the case.
Someone recently asked me how do we know DXVK is really working. A very good question! lol. I thought as long as the cache showed up in the bin folder it was working, but that was no guarantee it was injected every single time at startup. Until I saw Heldhram's excellent guide to using DXVK with Reshade DX9, I relied on my gaming instincts and dodgy eyesight to determine if it was. 🤭
Using the environment variable Heldhram referred to in his guide, a DXVK Hud is added to the upper left hand corner of your game screen to show it's injected and working, showing the DXVK version, the graphics card version and driver and fps.

This led me to look further into this and was happy to see that you could add an additional line to the DXVK config file to show this and other relevant information on the HUD such as DXVK version, fps, memory usage, gpu driver and more. So if you want to make sure that DXVK is actually injected, on the config file, add the info starting with:
dxvk.hud =
After '=', add what you want to see. So 'version' (without quotes) shows the DXVK version. dxvk.hud = version

You could just add the fps by adding 'fps' instead of 'version' if you want.

The DXVK Github page lists all the information you could add to the HUD. It accepts a comma-separated list for multiple options:
devinfo: Displays the name of the GPU and the driver version.
fps: Shows the current frame rate.
frametimes: Shows a frame time graph.
submissions: Shows the number of command buffers submitted per frame.
drawcalls: Shows the number of draw calls and render passes per frame.
pipelines: Shows the total number of graphics and compute pipelines.
descriptors: Shows the number of descriptor pools and descriptor sets.
memory: Shows the amount of device memory allocated and used.
allocations: Shows detailed memory chunk suballocation info.
gpuload: Shows estimated GPU load. May be inaccurate.
version: Shows DXVK version.
api: Shows the D3D feature level used by the application.
cs: Shows worker thread statistics.
compiler: Shows shader compiler activity
samplers: Shows the current number of sampler pairs used [D3D9 Only]
ffshaders: Shows the current number of shaders generated from fixed function state [D3D9 Only]
swvp: Shows whether or not the device is running in software vertex processing mode [D3D9 Only]
scale=x: Scales the HUD by a factor of x (e.g. 1.5)
opacity=y: Adjusts the HUD opacity by a factor of y (e.g. 0.5, 1.0 being fully opaque).
Additionally, DXVK_HUD=1 has the same effect as DXVK_HUD=devinfo,fps, and DXVK_HUD=full enables all available HUD elements.
desiree-uk notes: The site is for the latest version of DXVK, so it shows the line typed as 'DXVK_HUD=devinfo,fps' with underscore and no spaces, but this didn't work for me. If it also doesn't work for you, try it in lowercase like this: dxvk.hud = version Make sure there is a space before and after the '=' If adding multiple HUD options, seperate them by a comma such as: dxvk.hud = fps,memory,api,version
The page also shows some other useful information regarding DXVK and it's cache file, it's worth a read. (https://github.com/doitsujin/dxvk)
My config file previously showed the DXVK version but I changed it to only show fps. Whatever it shows, it's telling you DXVK is working! DXVK version:


DXVK FPS:

The HUD is quite noticeable, but it's not too obstructive if you keep the info small. It's only when you enable the full HUD using this line: dxvk.hud = full you'll see it takes up practically half the screen! 😄 Whatever is shown, you can still interact with the screen and sims queue.

So while testing this out I noticed that the HUD wasn't showing up on the screen when launching the game via CCM and S3MO but would always show when clicking TS3W.exe. The results were consistent, with DXVK showing that it was running via TS3W.exe, the commited memory was low and steady, the fps didn't drop and there was no lag or stuttereing. I could spend longer in CAS and in game altogether, longer in my older larger save games and the RAM didn't spike as much when saving the game. Launching via CCM/S3MO, the results were sporadic, very high RAM spikes, stuttering and fps rates jumping up and down. There wasn't much difference from DXVK not being installed at all in my opinion.
You can test this out yourself, first with whatever launcher you use to start your game and then without it, clicking TS3.exe or TS3W.exe, making sure the game is running as admin. See if the HUD shows up or not and keep an eye on the memory usage with Resource Monitor running and you'll see the difference. You can delete the line from the config if you really can't stand the sight of it, but you can be sure DXVK is working when you launch the game straight from it's exe and you see smooth, steady memory usage as you play. Give it a try and add in the comments if it works for you or not and which launcher you use! 😊 Other DXVK information:
Make TS3 Run Smoother with DXVK ◀ - by @criisolate How to Use DXVK with Sims 3 ◀ - guide from @nornities and @desiree-uk
How to run The Sims 3 with DXVK & Reshade (Direct3D 9.0c) ◀ - by @heldhram
DXVK - Github ◀
106 notes
·
View notes
Text
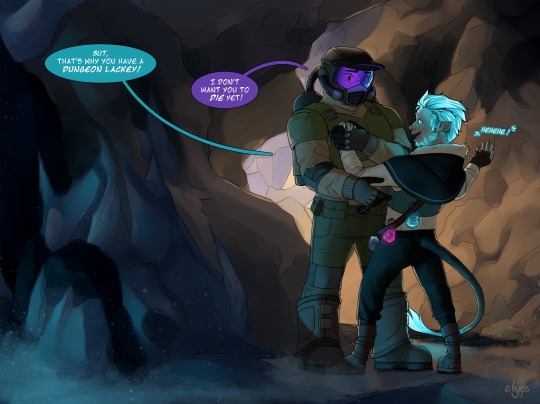
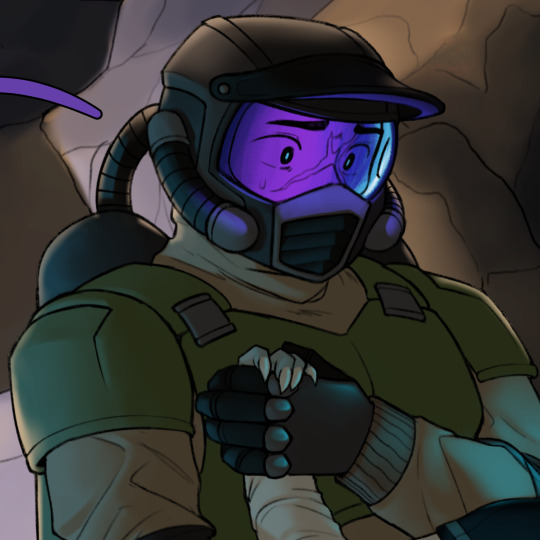
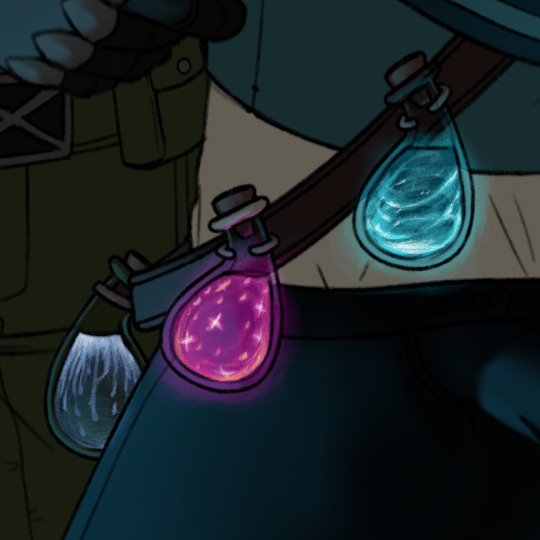
Xisuma and his dungeon lackey, who seems a bit too eager to lay his life on the line.
here's some close-ups!
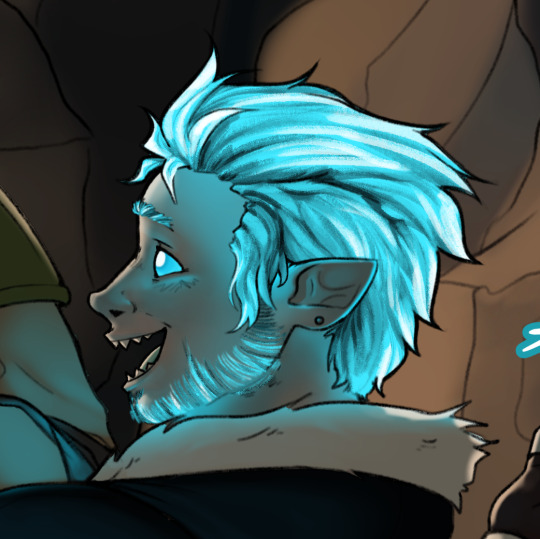
tried a lot of new things with this one! the sketch was done traditionally, pencil on graph paper. I originally intended to line it traditionally too, but I finally got access to a drawing tablet again, and decided that I loved the idea too much, and wanted to give it a full digital render! so, i re-created a small piece of the frozen crypt in a creative world, which I then took a screenshot of with shaders, to help me with composition and lighting. I would later paint over it, though, my original intention was to just use the screenshot as the background :)
speedpaint:
I have lots to say about this drawing, if anyone is interested, so please feel free to send me an ask if you're curious about my process, or even if you just want to share your thoughts! :D i'm still pretty new here, and i like talking to people :)
#hermitcraft#hermitblr#hermitcraft s9#hermitcraft season 9#hermitcraft fanart#decked out#decked out 2#fanart#not ship#xisumavoid#xisuma#xisuma fanart#xisumavoid fanart#tangotek#tangotek fanart#tango fanart#dungeon lackey#dungeon lackey tango#digital art#mixed media#tradigital#eliyipsart#have you ever thought about how insistent xisuma was on keeping tango alive during their dungeon lackey run#despite tango's insistence on self-sacrifice as a solution to all their problems#because i have#have you ever thought about how tango ultimately ended up sacrificing himself anyways#because i never stopped thinking about it
922 notes
·
View notes
Text
My model appeared on the Tumblr radar! I appreciate all the comments! It was interesting to hear that multiple people didn't realize it was a 3D model. I work a full-time job and modeling in Blender is one of my hobbies. Whenever I look back at my earliest models, I'm always shocked at my improvement. I look forward to seeing where I'll be at a year from now.
Multiple people asked how I was able to get my cel shader to look good. I've learned a lot from watching multiple videos and reading various blogs over the years. Here are a few things that I did for this model.
To start, here is how my shader graph looks like.
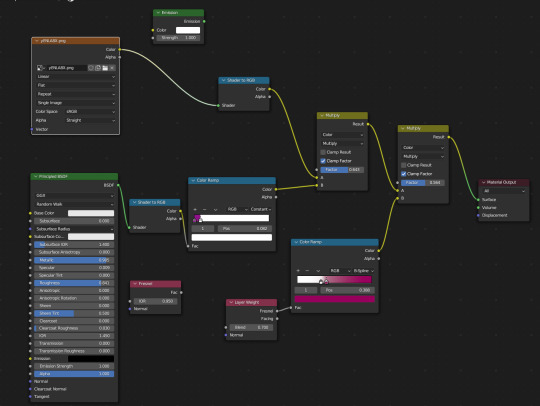
I have the Layer Weight plugged into the Color Ramp. This creates a soft outline around the model so that when objects of the same color overlap, it doesn't look flat. I've been experimenting with the options, but as of now, I like the way the B-Spline option looks.
Something else that I change is the shadow color on the color ramp. By default, it's set to black. This always felt dull to me, so I will usually change it to a magenta or purple. I also keep an Emission node ready so I can switch the model to all white. This mostly helps when modeling so I can see how the light will interact with the model in this style. Adjusting the settings of the light also improves the shadows.
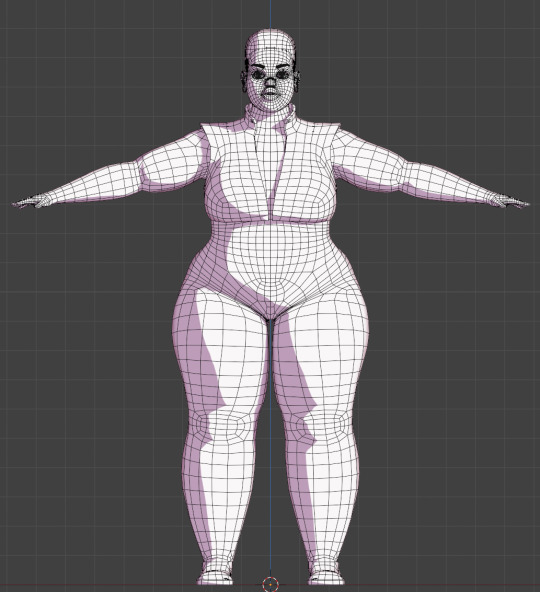
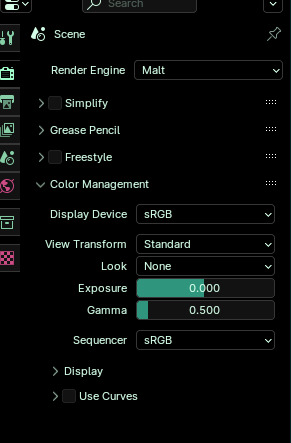
Also, change the Color Management from Filmic to Standard. This ensures that the colors you're using to paint your model will look the same in the viewport. This option can be found at the bottom of the Render Properties.
Check out these resources for more useful tips. Also, the props are from a Synty pack. I picked them up years ago when they were on sale.
Anime Shading In Blender (INTRODUCTION) Lightning Boy Shader - Beginner Guide - Shading & Modeling Tips
Synty™ Store - 3D Assets for Games (Unity + Unreal) – Synty Store
#3dmodeling#character modeling#cel shaded#blender3d#character design#character art#plus size art#tutorial#blender#original character
122 notes
·
View notes
Text
I had a bit of a breakthrough with learning Shader Graph and finally figured out how to combine my outline shader with my shadow shader. And as a bonus treat I got the water shader working! (Thank you Unity tutorials!!)
And I started building up the background environments to make it look prettier to look at. (The most important part, heehee)
Next up I'll start to decorate and really build out the different paths you can walk around next!
13 notes
·
View notes
Note
Hello! I've been playing around with some bg3 (3D) fanart and I just wanted to say your texture toolbox is absolutely game-changing. Thank you so much for building it! Even just looking through how the skin shader works has been fantastic for learning more about shading systems
I also wanted to ask, if I wanted to, for experimentation sake, similarly reverse engineer a game shader, say just for skin or clothes or whatever - where would I... begin to look at how the in-game shaders are constructed? I know that's kind of a huge question, so no problem at all if you can't answer, I just wanted to give it a shot.
Thanks again!
heya! I'm always glad to hear that people have been enjoying the toolbox. Initially, everything I made was based off of guess work, then later on, Norbyte gave me some decompiled versions of the shaders which I then had to basically translated from GLSL into Blender nodes, which was its own challenge. But thankfully, with the toolkit released, we now have a much easier option: the Material Editor.
To open up an existing Material in the editor, right click on it and select the 'Open in editor' option. The editor is node based, just like Blender's editor, but goes from right to left instead of left to right. Its also currently broken! (yay) because of this you won't be able to compile any materials, you'll also notice that the material preview is broken, so that's fun. There isn't really a viable way around any of this until Larry Anne™ fixes it, but thankfully all you need the editor for is to see how the material is put together.
Now that you've got the shader graph open, you can begin the task of replicating it in Blender; word of advice, not everything has a Blender equivalent. You will inevitably have to take some artistic liberties with it. But, I've already done some of the hard work for you, under the tab you'll find the notes I made while remaking the hair shader, hope this helps!
Toolkit on the left, Blender on the right:
Lerp = mix node
Component mask = separate rgb/xyz
Negate = multiply node (A) = -1.0 (B) = var
Remap = map range
Smooth step = also map range (set to smooth step)
Colour ramp with a LUT input = god fucking help you
Camera Vector = Camera Data (?)
Transform direction = vector transform
world normal = texture coordinates object info plugged into a vector transform node set to normal, object, world
Dither Temporal AA Node = there is no god here
When a clamp(0.0, 1.0) is needed you just need to tick the 'clamp' box on the node in blender. Other wise you can use the clamp node. If its a vector, you will need to separate the xyz cords, then clamp each of them, before combining the cords again.
Blender has separate math nodes for vectors and floats, vector math nodes don't have the same amount of option as floats + don't support vec4s*. You will need to make use of the separate xyz node when required. For operations on vec4s, do all of the operations via the vec3 vector math nodes, and have an additional float value for the missing vector follow along and copy the operations done on the vec3s like some sort of node pilot fish.
*blender does use vec4s but only for colour nodes. You can't actually access or do anything with that 4th vector though. When a vector output is plugged into a colour input, blender adds an additional a hidden alpha channel to the colour. When a colour output is plugged into a vector input, this hidden alpha channel is discarded.
5 notes
·
View notes
Text
What kinda pisses me off is that it's next to impossible to find any research or other information on the shaders in Animal Crossing New Horizons.
Remember the wobbly dialogue box? That ended up eyeballed. Very well at that, but still.
There seem to be basically four results when I search for ACNH shader information.
A single video showing a recreation of dynamic waves lapping at the beach, to promote the uploader's shader editor for mobile devices. The editor itself appears to use node graphs, but the video only shows the end result.
A single page about how to recreate the rustling of tree leaves. Technically not just a shader thing but I wouldn't want this list to only have three items and it goes pretty in-depth IIRC.
Dozens of tutorials on how to implement the barrel distortion in $ENGINE. Finally, something relevant and actually including code! But that's about the only thing it seems.
Hundreds more videos about AC-style perspective distortion... in Minecraft.
Especially that last one particularly get me.
And forget about lighting.

9 notes
·
View notes
Text
Decal Hazard Signs!
Using "Big guy637"'s CC0 Safety symbols, I added dirt and grime and used a custom brush to etch out scratches in the signs/posters in Krita.
I've used the URP Decal Projector and Decal Materials for these decal prefabs, which at first caused some head scratching because my decals were showing on both sides of a wall (since they are simple planes). But I found that if you enable the Angle Fade in the Shader Graph Settings, and adjust the slider in the inspector, you can get it to be a forward-rendered material only.
Some of these signs also give a sneak peek into the Tsadtung language, a Latin-Common Germanic hybrid language used in the Corporatist Autocracy of Forþgan*, located in Western Europe. *⁽ⁿᵃᵐᵉ ᵈᵉᶠᶦⁿᶦᵗᵉˡʸ ˢᵘᵇʲᵉᶜᵗ ᵗᵒ ᶜʰᵃⁿᵍᵉ⁾
For my next post I'll probably do a recap of my progress so far.
Ader Forþgan! (To Progress!)

2 notes
·
View notes
Text
Currently trying to learn hlsl. Specifically the syntax, in the context of Unity.
I hate my fucking job. The syntax is barley readable and any intuition I build on it is thrown out the window 5 minutes later. Documentation has no examples nor does it says if imports are necessary for using specific functions. Extremely importants details are mixed in with shit that are absolutely useless, so removing anything to see a change vary from doing nothing to destroying the whole thing. With minimal feedbacks on errors. I just want a stretched out noise function I know all the maths behind it implementing it shouldn't be that hard.
I'm trying to get away from graph shaders because 1) they are incomplete 2) any math expression becomes 90% of the screen in a huge pile of mess 3) they make "code" reuse extremely hard 4) they??? are??? incomplete??? 5) really specific math things becomes hell with them
I get the feeling that so many people develop wonderful projects and then show their hatred for it by making sure the least number of people can genuinely access and enjoy it.
If someone finds a comprehensive tutorial on the subject, I will perform any sexual favor of your choosing*
I will now scream into the void** for the next 2 hours.
*offer not legally binding. Consent may be retracted at a further point with no guarantee for a refund. Ask your doctor is this offer is fit for you
**a pillow
24 notes
·
View notes
Text
How to install malt/BEER
NPR render engine for Blender
What is malt and BEER?
From the official website:
Malt is a fully customizable real-time rendering framework for animation and illustration. It's aimed at artists who want more control over their workflow and/or their art style, with special care put into the needs of stylized non-photorealistic rendering. Designed as a community effort to expand the possibility space of 3d rendering, it provides graphics programmers and technical artist an enjoyable “shadertoy-like” workflow inside Blender, while still allowing to effortlessly share their work with non technical artists through Python and GLSL plugin Official website mal3d.com
Blender Extended Expressive Renderer (BEER) is a free and open source realtime non-photoreal (NPR) rendering engine. The main feature of BEER is the ability to extend the rendering capability from the ease of adding custom shaders to a customizable shader graph. Since NPR is a journey of endless styles which never settle, we need a render engine which will fulfill all the stylized needs. Light BWK, co-founder of BlenderNPR.org
It's a free and Open source real time render engine made with full focus on Non Photorealistic Rendering or Stylized rendering. It distinguish itself from other engine by being extremely customizable for the most skilled among us
Showcase:
Made by @/Renato3xl
Made by myself @axiasart
The only inconvenience with this render engine is the terrible terrible (needed to be said twice) lack of up to date tutorials. This shouldn't confuse people in thinking that this project is dying or unpopular. The latest release was on July 20th.
How to download and install malt/beer?
Downloading malt is pretty straightforward, on the github release page: https://github.com/bnpr/Malt/releases/tag/Release-latest

blender preference, enabled Malt render
Downloading and installing BEER is more complicated, first of course downloading it from github: https://github.com/bnpr/BEER
From the zip you will only need the BlenderBeer folder so you should extract is and put it anywhere.
You will also need to download Pygments which is found here: https://github.com/pygments/pygments/tree/master
You won't need the whole thing, once you download the zip, extract the pygments folder only.
Now that we have all the ingredients we can start cooking.
First you will need a script folder, put it where you keep your blender files. Then in this script folder add two folders modules and addons.
Next, you move the pygments folder in the modules folder and the BlenderBeer folder in the addons folder.

#artists on tumblr#tutorial#blender#3d#3d artwork#render engine#malt render engine#npr#bnpr#3d texturing#digital art#3d art#art study
4 notes
·
View notes
Text
VR observations, 10 months in
I've been a game dev for 10 months now. It's pretty great, I'm enjoying it a lot, I get to spend my days doing crazy shader shit and animations and voxels and visual effects. Hopefully the game that will come out of all this will be one people enjoy, and in any case I'm learning so much that will eventually come back to the personal ~artistic~ side of things. I can't talk about that game just yet though (but soon it will be announced, I'm pretty sure). So this is a post about other games.
Mind you, I don't actually play very many VR games, or games in general these days, because I'm too busy developing the dang things. but sometimes I do! And I think it's interesting to talk about them.
These aren't really reviews as such. You could project all sorts of ulterior motives if it was. Like my livelihood does sorta depend on people buying VR headsets and then games on them. This is more just like things I observe.
Headsets
The biggest problem with VR at the moment is wearing a headset for too long kinda sucks. The weight of the headset is all effectively held on a lever arm and it presses on your face. However, this is heavily dependent on the strap you use to hold it to your head. A better balanced and cushioned strap can hold the headset still with less pressure and better balance the forces.
The strap that comes with the Quest 3 is absolute dogshit. So a big part of the reason I wouldn't play VR games for fun is because after wearing the headset for 30-60 minutes in the daily meeting, the absolute last thing I'd want to do is wear it any longer. Recently I got a new strap (a ~£25 Devaso one, the low end of straps), and it's markedly improved. It would probably be even better if I got one of the high end Bobo straps. So please take it from me: if you wanna get into VR, get a decent strap.
I hear the Apple Vision Pro is a lot more comfortable to wear for long periods, though I won't have a chance to try it until later this month.
During the time I've been working at Holonautic, Meta released their Quest 3, and more recently Apple released their hyper expensive Vision Pro for much fanfare.
The Quest 3 is a decent headset and probably the one I'd recommend if you're getting into VR and can afford a new console. It's not a massive improvement over the Quest 2 - the main thing that's better is the 'passthrough' (aka 'augmented reality', the mode where the 3D objects are composited into video of what's in front of you), which is now in full colour, and feels a lot less intrusive than the blown out greyscale that the Quest 2 did. But it still has some trouble with properly taking into account depth when combining the feeds from multiple cameras, so you get weird space warping effects when something in the foreground moves over something in the background.
The Vision Pro is by all accounts the bees knees, though it costs $3500 and already sold out, so good luck getting one. It brings a new interaction mode based on eye tracking, where you look at a thing with your eyes to select it like with a mouse pointer, and hold your hands in your lap and pinch to interact. Its passthrough is apparently miles ahead, it's got a laptop tier chip, etc etc. I'm not gonna talk about that though, if you want to read product reviews there are a million places you can do it.
Instead I wanna talk about rendering, since I think this is something that only gets discussed among devs, and maybe people outside might be interested.
Right now there is only one game engine that builds to the Vision Pro, which is Unity. However, Apple have their own graphics API, and the PolySpatial API used for the mixed reality mode is pretty heavily locked down in terms of what you can do.
So what Unity does is essentially run a transpilation step to map its own constructs into PolySpatial ones. For example, say you make a shader in Shader Graph (you have to use shader graph, it won't take HLSL shaders in general) - Unity will generate a vision pro compatible shader (in MaterialX format) from that. Vertex and fragment shaders mostly work, particle systems mostly don't, you don't get any postprocessing shaders, anything that involves a compute shader is right out (which means no VFX graph), Entities Graphics doesn't work. I don't think you get much control over stuff like batching. It's pretty limited compared to what we're used to on other platforms.
I said fragment shaders mostly work. It's true that most Shader Graph nodes work the same. However, if you're doing custom lighting calculations in a Unity shader, a standard way to do things is to use the 'main light' property provided by Unity. On the Vision Pro, you don't get a main light.
The Vision Pro actually uses an image-based lighting model, which uses the actual room around you to provide lighting information. This is great because objects in VR look like they actually belong in the space you're in, but it would of course be a huge security issue if all programs could get realtime video of your room, and I imagine the maths involved is pretty complex. So the only light information you get is a shader graph node which does a PBR lighting calculation based on provided parameters (albedo, normal, roughness, metallicity etc.). You can then instruct it to do whatever you want with the output of that inside the shader.
The upshot of this is that we have to make different versions of all our shaders for the Vision Pro version of the game.
Once the game is announced we'll probably have a lot to write about developing interactions for the vision pro vs the quest, so I'll save that for now. It's pretty fascinating though.
Anyway, right now I've still yet to wear a Vision Pro. Apple straight up aren't handing out devkits, we only have two in the company still, so mostly I'm hearing about things second hand.
Shores of Loci

A few genres of VR game have emerged by now. Shooting and climbing are two pretty well-solved problems, so a lot of games involve that. But another one is 3D puzzles. This is something that would be incredibly difficult on a flat screen, where manipulating 3D objects is quite difficult, but becomes quite natural and straightforward in VR.
I've heard about one such game that uses 3D scans of real locations, but Shores of Loci is all about very environment artist authored levels, lots of grand sweeping vistas and planets hanging in the sky and so on. Basically you go through a series of locations and assemble teetering ramshackle buildings and chunks of landscape, which then grow really big and settle into the water. You can pull the pieces towards you with your hand, and then when you rotate them into roughly the right position and orientation relative to another piece, they snap together.

It's diverting, if kinda annoying when you just can't find the place the piece should go - especially if the answer turns out to be that there's an intermediate piece that floated off somewhere. The environments are well-designed and appealing, it's cool to see the little guys appearing to inhabit them. That said it does kinda just... repeat that concept a bunch. The narrative is... there's a big stone giant who appears and gives you pieces sometimes. That's it basically.
Still, it's interesting to see the different environment concepts. Transitions have this very cool distorted sky/black hole effect.
However, the real thing that got me with this game, the thing that I'm writing about now, was the water. They got planar reflections working. On the Quest! This is something of a white whale for me. Doing anything that involves reading from a render texture is so expensive that it's usually a no-go, and yet here it's working great - planar reflections complete with natural looking distortion from ripples. There's enough meshes that I assume there must be a reasonably high number of draw calls, and yet... it's definitely realtime planar reflections, reflections move with objects, it all seems to work.
There's a plugin called Mirrors and Reflections for VR that provides an implementation, but so far my experience has been that the effect is too expensive (in terms of rendertime) to keep 72fps in a more complex scene. I kind of suspect the devs are using this plugin, but I'm really curious how they optimised the draw calls down hard enough to work with it, since there tends to be quite a bit going on...
Moss
This game's just straight up incredibly cute.
youtube
Third person VR games, where you interact with a character moving across a diorama-like level, are a tiny minority of VR games at the moment. I think it's a shame because the concept is fantastic.
Moss is a puzzle-platformer with light combat in a Redwall/Mouse Guard-like setting. The best part of Moss is 1000% interacting with your tiny little mousegirl, who is really gorgeously animated - her ears twitch, her tail swings back and forth, she tumbles, clambers, and generally moves in a very convincing and lifelike way.
Arguably this is the kind of game that doesn't need to be made in VR - we already have strong implementations of 'platformer' for flatscreen. What I think the VR brings in this case is this wonderful sense of interacting with a tiny 3D world like a diorama. In some ways it's sorta purposefully awkward - if Quill walks behind something, you get a glowing outline, but you might need to crane your neck to see her - but having the level laid out in this way as a 3D structure you can play with is really endearing.
Mechanically, you move Quill around with the analogue stick, and make her jump with the buttons, standard stuff. Various level elements can be pushed or pulled by grabbing them with the controllers, and you can also drag enemies around to make them stand on buttons, so solving a level is a combination of moving pieces of the level and then making Quill jump as appropriate.
The fact that you're instantiated in the level, separate from Quill, also adds an interesting wrinkle in terms of 'identification with player character'. In most third person games, you tend to feel that the player character is you to some degree. In Moss, it feels much more like Quill is someone I've been made responsible for, and I feel guilty whenever I accidentally make her fall off a cliff or something.
A lot is clearly designed around fostering that protective vibe - to heal Quill, you have to reach out and hold her with your hand, causing her to glow briefly. When you complete some levels, she will stop to give you a high five or celebrate with you. Even though the player is really just here as 'puzzle solver' and 'powerful macguffin', it puts some work in to make you feel personally connected to Quill.
Since the camera is not locked to the character, the controls are instead relative to the stage, i.e. you point the stick in the direction on the 2D plane you want Moss to move. This can make certain bits of platforming, like moving along a narrow ledge or tightrope, kinda fiddly. In general it's pretty manageable though.
The combat system is straightforward but solid enough. Quill has a three button string, and it can be cancelled into a dash using the jump button, and directed with the analogue stick. Enemies telegraph their attacks pretty clearly, so it's rarely difficult, but there's enough there to be engaging.
The game is built in Unreal, unlike most Quest games (almost all are made in Unity). It actually doesn't feel so very different though - likely because the lighting calculations that are cheap enough to run in Unity are the same ones that are cheap enough to run in Unreal. It benefits a lot from baked lighting. Some things are obvious jank - anything behind where the player is assumed to be sitting tends not to be modelled or textured - but the environments are in general very lively and I really like some of the interactions: you can slash through the grass and floating platforms rock as you jump onto them.
The story is sadly pretty standard high fantasy royalist chosen one stuff, nothing exciting really going on there. Though there are some very cute elements - the elf queen has a large frog which gives you challenges to unlock certain powers, and you can pet the frog, and even give it a high five. Basically all the small scale stuff is done really well, I just wish they'd put some more thought into what it's about. The Redwall/Mouse Guard style has a ton of potential - what sort of society would these sapient forest animals have? They just wanted a fairytale vibe though evidently.
Cutscene delivery is a weak point. You pull back into a cathedral-like space where you're paging through a large book, which is kinda cool, and listening to narration while looking at illustrations. In general I think these cutscenes would have worked better if you just stayed in the diorama world and watched the characters have animated interactions. Maybe it's a cost-saving measure. I guess having you turn the pages of the book is also a way to give you something to do, since sitting around watching NPCs talk is notoriously not fun in VR.
There are some very nice touches in the environment design though! In one area you walk across a bunch of human sized suits of armour and swords that are now rusting - nobody comments, but it definitely suggests that humans did exist in this world at some point. The actual puzzle levels tend to make less sense, they're very clearly designed as puzzles first and 'spaces people would live in' not at all, but they do tend to look pretty, and there's a clear sense of progression through different architectural areas - so far fairly standard forest, swamp, stone ruins etc. but I'll be curious to see if it goes anywhere weird with it later.
Weak story aside, I'm really impressed with Moss. Glad to see someone else giving third person VR a real shot. I'm looking forward to playing the rest of it.
...that's kinda all I played in a while huh. For example, I still haven't given Asgard's Wrath II, the swordfighting game produced internally at Meta that you get free on the Quest 3, a shot. Or Boneworks. I still haven't finished Half Life Alyx, even! Partly that's because the Quest 3 did not get on well with my long USB A to C cable - for some reason it only seems to work properly on a high quality C to C cable - and that restricts me from playing PCVR games that require too much movement. Still though...
Anyway, the game I've been working on these past 10 months should be ready to announce pretty soon. So I'm very excited for that.
9 notes
·
View notes