#Sims 2 tutorial
Explore tagged Tumblr posts
Visit Tumblr Blog
Explore Tumblr blogs with no restrictions, modern design and the best experience.
Last Seen Tumblr Blogs


Fun Fact
Tumblr Inc. is using 66 technologies for its website.
Text

I've got a new video!
Obviously I am preaching to the choir here amongst us ts2 cc addicts, but I have a new video out with all my tips for finding sims 2 custom content. There's ads on google for the superbowl and stuff because i filmed this months ago and editing took me forever bc for some reason i was like pleasantview sims should be looking at cc on their computers dfjkdfkjsdjk
Even if you know how to find sims 2 cc, maybe you will enjoy seeing Brandi Broke browse the sims resource while Dustin gets reprimanded by the police outside!


Things I cover include: - searching on google and getting rid of those ts3 and ts4 results - using google to search specific sites and more - how to use the wayback machine - how to find/download cc from deleted tumblrs
I also share some of my favorite older, harder-to-find sites for new sims 2 cc hunters. I hope you guys like it! watch it on youtube


322 notes
·
View notes
Text
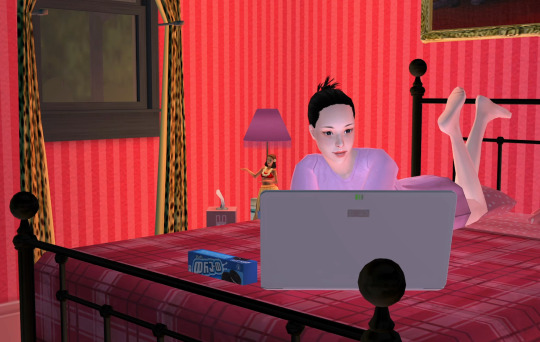
How to play TS2 with Longer Days (50% Slower Time) without going crazy
I don't think I've ever mentioned it here, but I like to play TS2 in a slow mode, to enjoy more time with my sims. This means time runs 50% slower (heavily inspired by @anibats).
But anyone who has tried playing with time at 50% slower knows there are 3 main problems: (1) time control clock in every lot, (2) need decay and (3) relatioship decay. So how do you get around this?
1. Time 50% slower
For me, the first issue is making the day slower. I'm too lazy to place a time control clock in every single household. That's why I use CJH_TimeController, the global version of the mod, that you can download here.
2. Need decay
Now that your day is 50% slower, your Sims' needs decay at the normal rate—meaning, effectively 50% faster. To prevent that, I use Lazy Duchess Motive Decay mod. You set a divider for the hood (mine is 17), and that's it! You can delete the flamingo (mod setup) and never worry about it again. Obs: this link contains the relativity mod. It would solve all our problems, but personally it never worked for me, with it the pregnancies didn't progress.
3. Relantionship decay
In an unmodded game, a Sim's relationship with another Sim drops by 2 points every afternoon. However, with longer days, the relationship drops much more—up to 12 points. Here are two alternatives:
a. For me, the solution is a mod where relationship decay only happens once a week, dropping 12 points all at once. This mod is LessRelDecay, which makes relationships decay only on Fridays.
b. Other alternative is Monique's Relationship (STR) Decay Hack. With this mod, decay is based on STR points and skips some days depending on the relationship strength. However, the total decay will still be 12 points instead of the intended 2.
Other useful mods:
Slower fitness decay
Slower fitness gain
Slower Skill and Badge Gain
Slower LTA Gain
Mods that would be very useful, but that I don't know if exists:
Slower/harder hobby enthusiasm gain (I'm aware of the mod by Tunaisafish, but I don’t notice a difference in-game)
If anyone has any more tips, please, let me know <3
262 notes
·
View notes
Text
This is a big one.
youtube
389 notes
·
View notes
Text
Switching between save folders without renaming them
See the tutorial on Mod The Sims
130 notes
·
View notes
Text
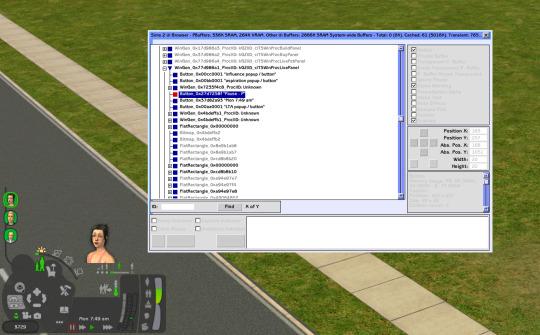
YOUR VISITOR CONTROLLER MIGHT NEED SURGERY
Hello out there!!! If you use Visitor Controller mod for the Sims 2, it might be broken. I am not sure exactly which version I have ... Midge's that allows togas or the older CrispandKerosene's version with personality options.
The personality settings may be broken because I looked at my file today and sure enough, the BHAVs are not referencing personality properly.
Go into the BHAV "Check Personality Flags" inside Visitor Controller in SimPe.
It should look like this:

The highlighted node should not reference any other value but a number higher than 100.
If you see this:

Then it is broken. Personality has to be referenced in hundreds!
You must change it with the Instruction Wizard which is on the right hand side of Plugin view to make Personality features work, as in banning Lazy Sims from a gym.

The first image shows that Sims with a Neat personality lower than 400, which is 0x0190 in hexadecimal, will be banned from the lot.
Repeat for the other personalities lower in the code.
HAPPY SIMMING!!!!
Also, if anyone is interested in a tutorial for adding custom careers to Visitor Controller, let me know!
#sims 2#sims 2 gameplay#sims 2 simblr#sims 2 mods#sims community#ts2#ts2 mods#ts2 glitch#ts2 visitor controller#visitor controller#sims#Sims mods#Sims 2#sims 2 cc#the sims 2#sims 2 screenshots#Simpe#sims 2 tutorials#sims 2 tutorial
98 notes
·
View notes
Text

Fully Underwater Lot Tutorial
@creida-sims @kitkat99
UPDATE January 2025
There is now a much, much easier way to do this. This version of SimPE now includes a tool to change terrain geometry. To edit the terrain in SimPE, go to Tools/Neighborhood/Neighborhood Browser and load your neighborhood. In the Resource Tree, select Neighborhood Terrain Geometry (NHTG) and select the only resource in the Resource List. In Plugin View, click Terrain Editor. It's very intuitive, but basically, you can edit the terrain under a lot to make it be underwater. You can also delete the road with the Road Editor.
I'll keep the old tutorial for archival purposes, but unless you can't or don't want to install this version of SimPE, it is pretty much obsolete.


Some warnings and disclaimers
1. This is not a beginner tutorial. I have tried to explain with as much detail as I can, but still, if you just started playing The Sims 2 I recommend trying out other building tutorials first.
2. I have tested it but there's always a possibility that some new problems will come up. Follow at your own risk. Backup your neighborhoods before trying this. Test it first in a new empty neighborhood.
3. These lots are roadless, so they require specific gameplay conditions to avoid breaking immersion (pun intended).
4. They will behave like normal lots in the sense that sims can walk around and do anything as if they were on land. There's one big problem to consider: when sims go fully underwater, their hair and some parts of their clothing might disappear visually.
So this is more useful for structures that sit above the water, shallow water that doesn't reach a sim's head or, with some modifications, small islands surrounded by water. So unless you want bald mermaids, I don't recommend this for sims that live underwater.
5. If you use Voeille's hood water mod, reflections will look glitchy in lot view, because this is technically not a beach lot. The only solution I found is enabling "Lot view ocean reflections" in RPC Launcher. Otherwise you'll have to deal with glitchy reflections.
6. Before following this tutorial, make sure you know the basics of creating, editing, importing and exporting SimCity 4 terrains. Written tutorial by SimEchoes here, video tutorial by loonaplum here.
Software and mods used
The Sims 2 FreeTime expansion pack (required for the modifyNeighborhoodTerrain cheat)
SimCity 4 (required) Hood Replace by Mootilda (required)
Lot Adjuster by Mootilda (required)
Portal revealer by Inge Jones (required)
Voeille's pond and sea water overhaul and RPC Launcher (optional, see disclaimers)
The Sims 2 Apartment Life and Bon Voyage expansion packs (optional, for "walk to lot/work/school" options)
Cheat codes used
moveObjects on/off
modifyNeighborhoodTerrain on/off
1. Creating/editing a terrain in SimCity 4
1.1. You can edit an already existing terrain or create your own from scratch. In both cases, you need to keep two things in mind: If you want the usable area of the lot to be underwater, such as making houses for mermaids or a coral reef, make sure the water is shallow. No more than a few short clicks with the terraforming tools in SimCity 4. This is because The Sims 2 live mode camera won't go underwater, so making the water too deep might make it uncomfortable to build or play the lot.
If you goal is to build a structure mostly above water, like a ship or an oil rig, you can get away with making the water a bit deeper, but not too much. I've noticed that sometimes the lot terrain tools stop working correctly if there a hill that's too steep.
1.2. Once you've created the terrain, you will need to add a small island on the area where your lot will be. I know it seems contradictory, but trust me, it will make sense. Create and name your city. Use the terraforming tools in city mode to make a tiny island of about 6x2 squares.

1.3. On the island, use the road tool to place a straight road that takes up 4 squares. Then, using the street tool (the last option), place two short streets at each end of the road.
Streets will disappear in TS2, only roads translate to roads in ts2, so why do we place them? Well, placing a street at the end of a road will get rid of the rounded end bit in TS2, which can't be used to place lots. This will be important for the placement of the lot and to make sure the edges of the lot are underwater. If this doesn't make sense yet, don't worry, it might make sense later.
1.4. Save the terrain. Don't exit SimCity 4. Copy your new/edited sc4 terrain from your SimCity 4 folder to your SC4Terrains folder in your Sims 2 documents directory. It is usually
"C:\Users\YOURUSERNAME\Documents\EA Games\The Sims 2 Ultimate Collection\SC4Terrains"

1.5. Back in SimCity 4, we're going to make a second version of this terrain. Remove the roads and streets you made before, with the bulldozer tool. With the level terrain tool in Mayor mode, carefully remove the island, so it's on the same level as the bottom of the ocean/lake. Don't change anything else. Save, exit and copy this second terrain to your Sims 2 SC4Terrains folder. Make sure you rename the file to something different from the first one, like adding "no roads" to the filename. You should have two terrains by the end of this step. One with the small island and one without it.
2. Editing the terrain in The Sims 2
2.1. Open The Sims 2 and create a new neighborhood using your new terrain. Something to keep in mind: if you want the terrain to be a subhood of another neighborhood, make it a subhood from the start. You will not be able to move the lot once it's finished, since it will be roadless. I don't recommend decorating the neighborhood for now. Leave it empty until the end of this tutorial.

2.2. Place the smallest empty lot (3x1) on the island.
2.3. In neighborhood view, open the cheat console by pressing Control + Shift + C, and type
modifyNeighborhoodTerrain on
To quote The Sims Wiki:
"This allows you to alter the neighborhood terrain by raising or lowering it. To use this cheat, be in the neighborhood view, then enter the cheat "modifyNeighborhoodTerrain on" (without the quotation marks), and click over the area you would like to change. To select a larger area, click and drag the cursor to highlight the desired area. Press [ or ] to raise or lower the terrain by one click, press \ to level the terrain, and press P to flatten terrain. When you're finished, type “modifyNeighborhoodTerrain off” in the cheat box (again, without the quotations)."
If you use an English keyboard, these instructions will probably be enough for you. If you don't, I recommend first testing the cheat, because the keys for using this cheat are different in other languages. For example, in my spanish keyboard, the question marks are used to raise and lower the terrain and the º/ª key flattens it.
Another aside: When you select an area using this cheat, a green overlay is supposed to show up. Some lighting mods make this green overlay invisible, like the one I use. If that's your case, you kind of have to eyeball it. Remember that one neighborhood grid square in TS2 is equivalent to 10 lot tiles, or the width of a road. I recommend getting a mod that allows you to tilt the neighborhood camera on the Y axis, which will allow you to have a bird eye's view of the terrain.

2.4. Flatten the terrain around the lot so it's at water level. This cheat won't allow you to edit the terrain inside the lot, so you have to edit the terrain around the lot. Make sure there is plenty of flat underwater space around the island. You should end up with something like the picture above. The water will have some holes, but don't worry, those get filled with water the next time you load the neighborhood.
2.5. Enter the lot and place any object on it. Save the lot and exit the game. This is so LotAdjuster recognizes the lot in the next step.
3. Expanding the lot with Lot Adjuster
3.1. Open Lot Adjuster and select your neighborhood and lot.

3.2. Click "Advanced…". Check "Over the road (only enlarge front yard)". Use the arrows to add 20 tiles to the front yard. Click "Finish" and "Restart".

3.3. Select the same lot again. This time, check "Add and remove roads". Uncheck the road checkbox for the front yard. Add 20 Tiles to the back yard, 20 tiles to the left side and 10 tiles to the right side. Check "Place portals manually". You should end up with a 60x60 lot, which is the biggest size. You might want a smaller lot, but unless you know what you are doing, I recommend starting with this size. You can shrink it later. The goal of making the lot this big is making sure the edges of the lot are underwater. Click "Finish" and exit.
4. Moving portals and flattening the lot

4.1. Make sure you have the portal revealer by Inge installed in your Downloads folder before the next step. Open your game and load your neighborhood. The lot should look something like the picture above.

4.2. Load the lot. Delete the object you placed before. Place the portal revealer on the lot near the mailbox/phone booth and trashcan. It looks like a yellow flamingo and you can find it in Build Mode/Doors and Windows/Multi-Story Windows catalogue. You will notice that when you select the object from the catalogue, some yellow cubes appear on the lot, and when you place the object, the cubes disappear. After placing the portal revealer, pick it up and place it again. This will make the yellow boxes visible again.
So what are those yellow boxes? They are portals. They determine where sims and cars arrive and leave the lot. The ones on both ends of the sidewalk are called pedestrian portals, and in the street, one lane has portals for service vehicles (maids, gardeners, etc.) and the opposite is for owned cars and carpools. You can see the portal's names if you pick them up. Make sure not to delete any of them.
Now, since this is going to be a roadless lot, ideally there won't be vehicles in it. This means that the lot would ideally be accessed through walking only. In community lots, this would not be an issue if you have the Bon Voyage expansion pack, which allows sims to walk to lots.
In residential lots, you might run into some problems. Service NPCs always arrive on vehicles, and unless your sim owns a vehicle, the carpool and school bus will always come to pick sims up for work/school. It might break your immersion to have a vehicle show up underwater or on a ship. There are many options to avoid this: having sims work on an owned business instead of a regular job, not having kids on the lot, making the kids homeschooled, avoiding calling service NPCs… it depends on how you want to play the lot. For example, my icebreaker is a residential lot, only adults live there, some sims live in it temporarily and none of them have a regular job.

All of this is relevant because we're going to move the portals. Where you move the portals depends on you. Think about how you're going to use the lot. In my icebreaker, I placed the car portals (which won't be used) underwater, on a corner of the lot. I placed the pedestrian portals on the ship, to pretend that the walkbys are part of the crew or passengers. But for now, just move the portals, mailbox/phone booth and trashcan to a corner of the lot. To be able to pick up the mailbox/phone booth and trashcan, use the cheat moveObjects on. Delete the street and sidewalk tiles using the floor tool (Control + click and hold left mouse button + drag).


4.3. Flatten the island with the level terrain tool. Save the lot. Almost done! Don't mind the hole in the water, this will be fixed. You will notice that in neighborhood view, the island is still there. This is because the neighborhood terrain under the lot hasn't updated. I don't know why this happens, but it does. Normally, moving the lot would fix it, but we can't move this lot using the game's tools. Instead, we are going to fix the terrain with Hood Replace. Don't exit the game yet.
5. Updating the terrain with Hood Replace
5.1. Create a new neighborhood using the new roadless terrain. Make sure it has the same type of terrain (lush, desert, etc.) as the first one. Again, name it "NO ROADS" or something similar. Exit the game.

5.2. Open HoodReplace. On the left column you will select your "NO ROADS" neighborhood. In the right column, select the neighborhood that has the underwater lot. Check these settings: Replace terrain, replace road, and versioned backups. Leave everything else unchecked. Click Copy.

5.3. Open The Sims 2 and load the neighborhood to check if the changes worked. That concludes the tutorial. At this point you can shrink the lot if you don't want it to be so big. Remember to move the portals to their final placement when you're done building the lot. Also keep in mind pedestrians (walkbys) always walk by the mailbox, so keep the mailbox accessible for sims.
If you're going to have multiple underwater lots, I recommend making them first, and decorating the neighborhood after. Doing this in an already existing neighborhood might be more difficult, mainly because, if you made any changes to the terrain using the modifyNeighborhoodTerrain cheat in the past, they might get reset when using Hood Replace.
151 notes
·
View notes
Text
Sims 2 UI Browser
Did you know there's a cheat that lets you play with UI?
Ctrl-U
Well, it mostly lets you find UI elements and move them around
It helped me make wider design dialog window
There's a search bar and info
Track Mouse checkbox is super useful, takes the browser window right to the element you hovering over
What's the use?
Say, you're looking to edit the pause button
The weird number 0x27d7258f is its ID (selected item on the picture)
Now you can find it in UI Data files
Open the ui.package in \TSData\Res\UI (or if you're using a UI mod, you may want to edit its files instead)
Select all UI Data recourses (try Ctrl-A) and extract them somewhere, into a new designated folder maybe
There's gonna be a lot of text files in a UI Data folder
Search that folder for "0x27d7258f" using standard Windows Explorer / File Explorer. It'll find the files with the pause button
What can you do with it?
Edit position by changing coordinates:
area=(170,192,190,212)
I call them start width, start height, end width, end height
IIRC, these coordinates are relative to parent element, not absolute (start where parent's position starts, not where your screen starts)
Find group and instance numbers of its image/icon:
image={499db772,a9200127}
Icons are also found in the ui.package, although they may be in a different one
There's a ui.package in every pack's folder, and you probably used your latest one to extract UI Data files (like SP9), but the pause icon is in the base game's ui package. Some weather related icons may be in Seasons' package and not in anywhere else. You get what I mean
There are all sorts of color options (in RGB, I assume):
fillcolor=(204,204,204) colorfontnormal=(0,0,0) colorfontdisabled=(0,0,0) colorfonthilited=(0,0,0) colorfontnormalbkg=(0,0,0) colorfontdisabledbkg=(0,0,0) colorfonthilitedbkg=(0,0,0) forecolor=(255,255,255) bkgcolor=(0,0,0)
Not all of them might be relevant for all elements, though
If an element has text, font may be edited:
font=0x00001318 font=GenSubHeader font=BuildBuyModeFooter
Looking at bigger elements, there are also a lot of flags and properties. Here's some interesting ones:
moveable=yes sizeable=no titlebar=no outline=no align=lefttop wrapped=yes opaque=yes
You can guess what they mean
Hm. Design tool window is moveable, but isn't sizeable. What if?..
Nah, simply changing "no" to "yes" didn't work
Search shows there are no sizable windows in game, except for UI Browser itself and a few other "browsers" I haven't seen, so we can't easily copy how it's done
Maybe some day
That's it for random UI modding stuff you didn't wanna know :D
231 notes
·
View notes
Text
Every Cheat you need for The Sims 2 + a userStartup.cheat File
I've just released a tutorial on all the cheats I use for The Sims 2 as well as how to make or install a userStartup.cheat file!
Check Out the Video:
youtube
✨Check Out the Website Post✨
Includes a downloadable copy of my userStartup.cheat file!
#sims 2#the sims 2#ts2#sims 2 cheats#sims 2 tutorial#sims 2 guide#userStartup#User Startup#User Startup Cheat#Sims 2 cheat file#sims 2 video#simtube#simtuber#BellaDovah#YouTube#Youtube
298 notes
·
View notes
Text
youtube
Unlock the full potential of your Sims 2 experience by creating and editing custom aspiration rewards with SimPE. In this step-by-step tutorial, you’ll learn how to enhance your gameplay by turning custom and Maxis objects into aspiration rewards while also editing existing rewards to better suit your needs.
#Youtube#sims 2#the sims 2#ts2#sims 2 video#ts2 video#simtube#simstube#sissysims#sissy sims#sims 2 tutorial#sims 2 guide#SimPE tutorial#sims 2 aspiration rewards#sims 2 mod tutorial#sims 2 modding tutorial#ts2 tutorial#ts2 guide
78 notes
·
View notes
Note
hi goat! do you have any tips/ideas on making 4t2 items look less plasticky? would new textures work or is it maybe something with the shading? or maybe it's the rounded edges on everything....
hi anon! I know you sent this a while ago. Thanks for waiting. I do indeed sometimes retexture TS4 converted objects.
I am no expert! But! Here's what I usually do:

For this tutorial, I will be using @janika31's 4t2 conversion of the Siten-Ze Reclaimed Wood Sofa.
It has the rounded edges you speak of (typical of TS4 objects) and a texture that could be considered 'plasticky' too.

What you will need to do first is open SimPE. We need to be able to look at this mesh nice and close!
When the mesh is opened in SimPE, go to the 1. Geometric Data Container and click on it 2. find the main object in the Models list (sofa) and make sure it's checked 3. Export the object.

You'll need to load said object into a 3D Modeling program in order to look at it.
I like UVMapper, because it's free (well the free version is anyway lol) and it's very easy to use.


While you're in SimPE, extract a texture or two from the original object. You will need them. Light or white recolors will be useful.

With the object loaded into UVMapper, this is what it looks like!
UV map of the object on the left, object (with no texture) on the right.

Add the texture in.
UVMapper is going to be our main working area. Other than an image editing program like Photoshop or Gimp. You'll need that too.


Let's get a good look at this base texture - we can see it has the wood parts of the couch, the main couch texture and some pillows.
If you find UV maps helpful (I do!) you can extract one from your 3D program.
With UVMapper, I needed to make sure that I've specified the size of the image so the UV map will match. This texture is 512 x 1024.

Now for the fun part! You should be able to copy in the base texture as a new layer, and then delete everything that is not the wood part on the UV map.
I've actually missed the foot of the couch here, but I will fix it.

If you're not already working with a white texture, make one. I like to use @pooklet's Primer and Time Bomb for this.
This white texture is very important as it will serve as the shadow and highlight that the new wood texture will be sandwiched in between.

With the new white texture created, when loaded into UVMapper and displayed on our couch, it looks like this. ^

This rounded edge here, this is a problem area!
With retexturing clay hairs, we want a rounded or 'bumped out' part of the mesh to be highlighted, to give the illusion of shine on hair.
But in objects, especially wood ones that we'd prefer to not look like plastic, we want the opposite effect; this shine should be reduced.
This is pretty easy to remedy in your image editor! But first:

Remember how I talked about how the white base texture was going to sandwich the wood texture? Here's what that means (layers):
1 The white base texture, Normal, 100% opacity
2 Our wood texture. This is something lifted from a Maxis endtable?
3 The white base texture, Multiply, 100% opacity
4 The white base texture, Overlay, 22% opacity
5 The white base texture, Soft Light, 22% opacity*
Optional layers: 1) another white base texture, Multiply, 100% opacity if this is a dark recolor, as it will add more depth 2) the base texture, but in an orange or yellowy color Multiply, 100% opacity (when this is added, it will help when a warm recolor looks too ashy)
*these percentages of how opaque the layer is are arbitrary. They work for me, do what works for you.
Okay! Back to the 'problem area'

This highlight here ^ on the rounded arm of the couch; if you don't want it, here is what I would do:


Locate where that highlight is in the texture. Found it!

Here's how to REDUCE that shine:
1 Locate your base white wood texture layer, Normal opacity.
Notice how the whiter part of this texture, when layered as I've described (Multiply 100%, Overlay 22%, Soft Light 22%) translates as shiny when it's laid on an object.
The way to make that appear less shiny is to make it less white. Less white means less of that shine that can read as artificial aka plasticky. When you make that more grey than white, more of the background wood can show through the semi-transparent layers.
2 Take that noticeably white part of the base texture and make it grey! Copy a chunk of the greyer texture, paste it on, blend in or erase the edges to make it look smooth. Merge the layer.
3 Change your Normal white base layer (now edited to be greyer in that one specific spot) and copy that as 3 new layers: Multiply 100%, Overlay 22%, Soft Light 22%. With the wood texture underneath all of them. Base, wood, Multiply, Overlay, Soft Light, in that order.

Before...

...after! it's subtle okay

The same kind of sandwiching method with image layers can apply to the cushions too.

There! A method for retexturing TS4 conversions that helps them not be as plastic looking. 😊
One last tip before you go off and try retexturing conversions yourself: @pforestsims's Easy Shine Removal kit for SimPe. A must if you're looking maintain that matte look.
Let me know if you have any questions!
132 notes
·
View notes
Text
Hair tinsel tutorial

Since so many people loved the tinseled hair idea, I wanted to show how you can easily do these recolors yourself. This tutorial is for those who already worked with SimPE and and create hair retextures before.
You need:
@crispsandkerosene SimStandardMaterial shader to add a mask for the shine
SimPE
Bodyshop
Graphics editor (I use Photoshop 2025 and attach PSD with my recolor as an example)
Let's get to work:
1. Create a recolor of hair with the desired color an usual way in Bodyshop and close it
2. Export the recolor texture with SimPE
3. Open it in a graphics editor
4. Create a group above and add a clipping mask to it in the shape of the hair texture alpha channel
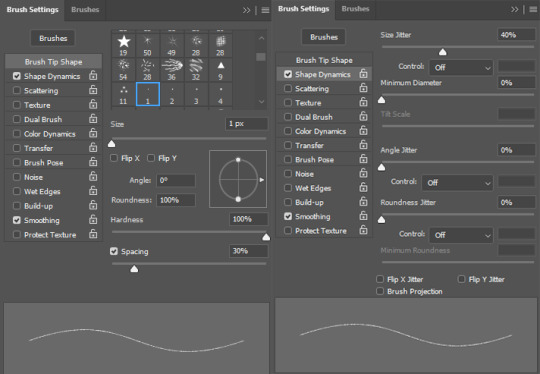
5. In this group, create an empty layer and paint the hair tinsel texture on it to your taste I used the standard Hard Round brush with these settings:
6. Save the resulting texture with transparency (.png, .dds, etc...)
7. Now inside the group create a white layer and add a clipping mask to it with the alpha of the tinsel texture
I prefer to made it a bit crunchy with "Select and Mask" function, I think the shine looks more realistic this way
8. Outside the group create a black layer
9. Leave only the white layer inside the mask and the black layer visible and save this texture, it will be a shine mask
10. Now open the recolor file in simpe and replace the hair texture with a new one with tinsel
11. Clone the texture file to create a shine (EnvCube) mask
12. Give it a new name and press "fix TGI"
13. Replace the texture with the black-n-white one you made earlier
14. Change the texture format to ExtRaw8bit
15. Commit
16. Go to the TXMT resource, make sure that in the cMaterialDefinition tab the Type set to SimStandardMaterial
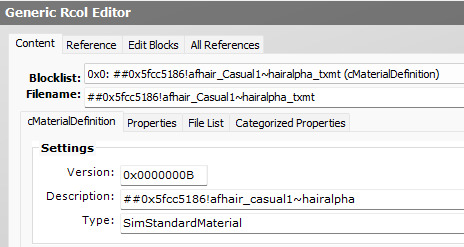
17. Then add EnvCube properties, more about it here in part 2
stdMatEnvCubeMaskTextureEnabled must have value: 1 stdMatEnvCubeMaskTextureName must have value of the BW mask name without "_txtr" part
I use these values, but you can change it on your taste:
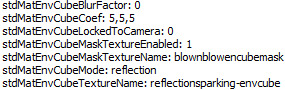
18. Commit your changes and save file
19. Now check your recolor in game and if everything was done correctly enjoy the result ✨
For clarity, I am attaching a video of the process:
youtube
And of course a recolor file to take a closer look at everything: https://simfil.es/5332368/
115 notes
·
View notes
Text
An alternative to showerproof skins for body shapes
[Showerproof skins are skins linked to a custom body shape (or body shapes). When you give a showerproof skin to a sim, that sim will have the body shape that the skin is linked to when they are nude (taking a bath, streaking, doing ACR stuff, etc.). Showerproof skins have no effect whatsoever on clothing, because clothes use their own meshes. You can find all the showerproof skins I’ve shared here.]
Let’s say you like custom body shapes but you don’t like showerproof skins. That’s fair. For one thing, showerproof skins are a hassle to assign to pre-existing sims through simPE. You may also dislike not having control over which exact body shapes your sims’ babies are born with, and not finding out until they get older. Or the whole thing may just seem daunting and like a lot of files to download. Of course you can just give regular skins to your sims who wear body-shaped clothing, but they’ll revert to their Maxis body shape when they are nude. If you don’t love that either, I have a suggestion that might work for you:
Give your sims who use custom body shapes the “Never Nude” trait from Hexagonal-bipyramid’s 3t2 Traits Project, alongside corresponding body-shaped naked swimsuits. [By “naked swimsuit” I mean an outfit that is just a nude body mesh with no texture, categorized as swimwear. I made such swimsuits for a whole bunch of body shapes over here.] With the Birthday Suit mod, your sims with the trait will now be wearing the appropriate body shape when naked, when they otherwise would revert to their Maxis default.
An unfortunate caveat is that this method doesn’t work well for trans body shapes (more details under the cut).
If you’re still curious, see step by step tutorial and pros & cons below.
How to set it up
1. Download the 3t2 traits from this post by Hexagonal-bipyramid (either the catalog or collection-only version, whatever you prefer). You don’t need all the traits, just “trait_neverNude” and “trait_MAIN”. You also need Cyjon’s Smarter EP Check and HB’s Inventory Check. That’s 4 files that you should have by the end of this step.
2. Download the “Birthday Suit” mod. Read the post carefully and choose your version. You’ll get 3 files but the only one you really need is “neverNude_nakedIsNowSwimsuit”. Feel free to discard the other two if you don’t care for what they offer.
3. You must have these 5 files:

Put them in one folder so you don’t forget that they all go together, and put that folder in your downloads folder.
4. Now you need naked swimwear. Let’s say you have an AF sim in mind who you want to have the Melodie9 fat AF body shape. You can download the Melodie9 fat AF naked swimwear from this post (don’t forget to choose between the blockfeet and sexyfeet meshes) and add it to your downloads folder.
5. Time to boot up your game to try things out. In game, go to the household where your Melodie9 fat AF sim lives. Buy her the new naked swimwear and set it as her swimwear. Then put the Never Nude trait in her inventory. It will be in the Build & Buy catalog, either in the Misc/Misc section or in your collections depending on which version you downloaded.
6. Once the trait is in the sim’s inventory, all that’s left is testing if things are working as intended. Have the sim take a bath or shower. When she gets naked, she should have a Melodie9 fat AF nude body.
If she’s wearing a swimsuit, you must have skipped the part where you set the nude swimwear as her swimwear. If she's naked but still has the Maxis AF shape, double-check that you have the 5 required files shown in step 3 in your downloads folder, and that the sim has the Never Nude trait in her inventory. If you didn’t forget any files, you may have a mod conflict (the extent of my knowledge of these things ends here).
~
Pros
- No need to download showerproof skins and meshes, all of your sims use the same regular skins regardless of their body shapes.
- You can assign body shapes to pre-existing sims much more easily than with showerproof skins.
- Unlike with showerproof skins which affect genetics, this method is non-committal: if you want to give your Melodie9 fat AF sim a different body shape, just set her swimsuit to a different naked swimsuit. And if you want her to go back to the Maxis AF shape, you can just remove the Never Nude Trait from her inventory. This ease of customization means that your sims can have much bigger weight variations throughout their lives.
- You have complete control over which body shapes your sims born in-game will grow up to have (this may not be a pro for you if you like having the game decide for you).
Cons
- Now of course if you want your sim to take a dip in the pool and wear an actual swimsuit while in there, you’ll have to remember to change her swimwear beforehand. If you’re playing a beach neighborhood where your sims are in their swimwear half the time, it may not be super convenient. You may not find that to be an issue if you’re happy with some nudism in your neighborhood.
- Sadly, this method doesn’t really work for trans body shapes. That’s because you’re only affecting the body mesh that a given sim will use when naked - not skin textures. So technically you could give a flat-chested mesh to your trans-masc F sim, but the texture applied over that mesh will still be the F body texture.
- You’ll also see a much tamer version of this problem on EF sims with some non-trans body shapes, specifically the shapes that use the same mesh for AF & EF. That’s because on regular skins, the AF and EF body textures are different, with EF boobs painted lower than the AF ones. On showerproof skins for body shapes that use the same mesh for AF & EF, we just link the EF body to the same textures as AF so the textures match the mesh, but with regular skins you’ll see a mismatch. It may not be very noticeable depending on the body shape and the skins you use.
(A niche solution to those last 2 points if you know how to make clothing recolors would be to recolor the naked swimsuits of your choosing using the right body skin textures.)
~
That’s all the pros and cons I can think of right now, let me know if I missed something. I hope this method can be of use to people who have been wanting to play with custom body shapes but are finding them too inconvenient to set up. Feel free to ask questions. Also requests are technically closed but if you need naked swiwear for a body shape that isn't covered in this post, let me know and I'll see what I can do.
32 notes
·
View notes
Text
How to get rid of pre-made Sims completely
Would you like to create a neighborhood, but without Kaylynn Langerak, Benjamin Long, pre-made social group Sims etc.? Or maybe you'd like to get rid of the generic Family Bin Sims before you start a brand new Pleasantview? This tutorial will show you how to disable generating pre-made Sims of certain categories and let the game generate new ones in their place. Pick and choose!
This will only work in a freshly loaded neighborhood! If the game has already loaded all the Sims in your Documents folder, do NOT delete their character files!!!
If you wipe these folders off character files, these Sims will never reappear in any of your newly loaded neighborhoods. They will come back after you reinstall the game. So back up the folders just in case! BUT if you lose the backup, you can download these Sims/families as subhoods here. The subhood can be deleted right after adding it and the Sims will remain in the Family Bin.
How does the game generate these Sims? They are located in the game installation files, in a particular DLC's folder. When you first launch a neighborhood, you can see loading screens of Pets, Weather, Magic... this is when the game imports these Sims into the neighborhood folder in Documents. Most of them are called "stealth hoods", but you can also clean out visible neighborhoods and have them completely empty, buildings only.
You can download empty stealth hoods on ModTheSims. They are folders with deleted character files, so if you feel safer downloading and replacing folders like that, go ahead! But stealth hoods are not all that you can clean out. Subhoods also have clean versions, so if your only problem is a Sim's broken face template – no need to pre-delete all Sims, just get the clean version!
All folder paths are the defaults. If you have your game in a custom folder, I assume you know where it is. If you don't have the Ultimate Collection, the folders may look different, so I'll give you directions on which DLC we're talking about, as it's actually easier to navigate them if you have the Legacy Collection or disks.
Basic townies and service Sims The townies and NPCs from Pleasantview that generate in every custom neighborhood. These include Kaylynn Langerak and Benjamin Long mentioned at the beginning. You can pre-delete them in: C:\Program Files\Origin Games\The Sims 2 Ultimate Collection\Double Deluxe\Base\TSData\Res\UserData\Neighborhoods\N001\Characters So in Pleasantview's game files directory. Go into the "Characters" folder and delete all files. The folder must remain empty. Note: This deletes ALL Pleasantview Sims, so if you load Pleasantview AFTER doing this, there will be NO SIMS, even playables! Doesn't affect an already launched Pleasantview.
Strays, adoption pool pets and the Roseland family Pets EP. If you want completely fresh strays and pets to adopt, delete all files in the "Characters" folder here: C:\Program Files\Origin Games\The Sims 2 Ultimate Collection\Fun with Pets\EP4\TSData\Res\NeighborhoodTemplate\P001\Characters Now, if you call the Pet Adoption Center, your game might freeze for a minute because it will be generating a lot of pets. For puppies/kittens to appear in the pool, it needs to generate strays first, as baby pets are made with strays' DNA.
Ottomas, Ramaswami and Garden Club Sims Seasons EP. Delete all files in the "Characters" folder here: C:\Program Files\Origin Games\The Sims 2 Ultimate Collection\Seasons\TSData\Res\NeighborhoodTemplate\G002\Characters
The Traveller family Bon Voyage EP. Delete all files in the "Characters" folder here: C:\Program Files\Origin Games\The Sims 2 Ultimate Collection\Bon Voyage\TSData\Res\NeighborhoodTemplate\V001\Characters
Picaso, Cooke and hobby instructors If you don't have the hobby instructors disabled with a mod. Free Time EP. Delete all files in the "Characters" folder here: C:\Program Files\Origin Games\The Sims 2 Ultimate Collection\Free Time\TSData\Res\NeighborhoodTemplate\F002\Characters
Newson, Goodie, Gavigan and pre-made witches Apartment Life EP. Delete all files in the "Characters" folder here: C:\Program Files\Origin Games\The Sims 2 Ultimate Collection\Apartment Life\TSData\Res\NeighborhoodTemplate\E002\Characters
Cleaning folders of the Pets, Seasons, Bon Voyage, Free Time and Apartment Life expansion packs = NO FAMILIES in the Family Bin! Except of course the ones that belong in a neighborhood, such as the Burbs in Pleasantview. Cleaning all folders mentioned above will result in an empty "Characters" folder in a freshly made custom neighborhood. So now you can make all Sims from scratch. To prevent the game from randomly generating townies and strays, you'll need a few mods: NoTownieRegen (find on the list) NoStrayRespawnNoDormieRegen I also recommend Anti-Redundancy
You can also have:
Pre-made universities with NO pre-made Sims Dorms, houses, university buildings... but with no students. University EP. Delete all files in the "Characters" folders here: C:\Program Files\Origin Games\The Sims 2 Ultimate Collection\University Life\EP1\TSData\Res\NeighborhoodTemplate U001 – Sim State University. Wiping this folder off character files will prevent the game from importing generic Sims (dormies, mascots, professors) in a custom university neighborhood. It's a college equivalent of Pleasantview. I also recommend getting the One Professor mod. U002 – La Fiesta Tech. U003 – Academie Le Tour.
Pre-made Downtown with NO pre-made Sims Nightlife EP. Delete all files in the "Characters" folder here: C:\Program Files\Origin Games\The Sims 2 Ultimate Collection\Double Deluxe\EP2\TSData\Res\NeighborhoodTemplate\D001\Characters
Bluewater Village with NO pre-made Sims When you love the hood, but not the Landgraab. Open for Business EP. Delete all files in the "Characters" folder here: C:\Program Files\Origin Games\The Sims 2 Ultimate Collection\Best of Business\EP3\TSData\Res\NeighborhoodTemplate\B001\Characters
Vacation destinations with NO pre-made Sims Bon Voyage EP. Delete all files in the "Characters" folders here: C:\Program Files\Origin Games\The Sims 2 Ultimate Collection\Bon Voyage\TSData\Res\NeighborhoodTemplate A001 – Takemizu Village. M001 – Three Lakes. T001 – Twikkii Island.
I hope it's useful! Happy Simming!
30 notes
·
View notes
Text

Grid-Adjuster Tutorial: How to Attach a Garage to a Lowered Foundation
Tutorial now available on Simblr, and MTS, and my Blog.
The house built in this tutorial is here, on Tumblr.
Enjoy! 🦚
#sims 2#ts2#catherinetcjd#sims 2 download#sims 2 cc#sims2cc#ts2 download#ts2 lot#sims 2 lot#ts2 cc#grid adjuster tutorial#sims 2 tutorial
149 notes
·
View notes
Text
Quick GUID Checker for Sims 2
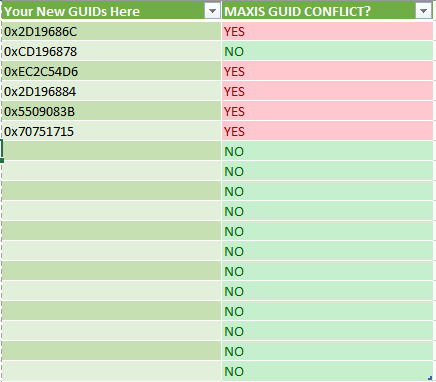
This is an expansion on @picknmixsims Microsoft Excel sheet available here. It is a table I made that is incredibly lazy but effective and quick at searching for searching for Maxis GUID conflicts when you create new GUIDs. It's a little easier to use since the GUID Database has been down for a long time and you can add your own GUIDs onto the list and update the formula if you're savvy enough in Excel.
DOWNLOAD SFS
DOWNLOAD MEGA
201 notes
·
View notes
Text
How to Divide an Object into Multiple Subsets in Milkshape 3D
i made my very first ever tutorial!! on how to divide an object into more than one group or subset in milkshape. this is v handy for when an object originally has one subset, but you want to make two recolorable subsets. 💕
is this helpful to anyone?? idk i hope so lol.
i did a quick written doc too, if that's more up your alley. it's more simplified than the video, but you still get the gist i think.
youtube
#sims 2#ts2#ts2 tutorial#sims 2 tutorial#creator resources#posts this and runs tf away LMAO#this makes me feel perceived and i hate it sdfmnsdfd#but idk if there's a recent tutorial on it? idk i hope its helpful to someone out there#Youtube
87 notes
·
View notes