#sims 3 object tutorial
Explore tagged Tumblr posts
Visit Tumblr Blog
Explore Tumblr blogs with no restrictions, modern design and the best experience.
Last Seen Tumblr Blogs


Fun Fact
Tumblr Inc. is using 66 technologies for its website.
Text
Editing occlusion shadows on objects
This is a tutorial aimed at creators and converters who want to understand, at least a little, how to improve the appearance of their objects in the game. Yes, it’s a bit exhausting, just like creating an object from scratch, mapping it and texturing it, but the result is worth it. The shadow dynamics of TS3 are different from TS4. In TS4, the game itself creates these shadows when the object approaches a wall. In TS3 it is necessary for these shadows to be created using “lights” in TSRW. Of course, the occlusion is not perfect, but it gives the game a more realistic aspect by creating this idea of depth.
The icing on the cake: keep these shadows if they are large objects, like cabinets, sofas, beds, tables, chairs… Small decorative objects, like clutter, you can just delete these shadows. But if you are crazy about perfection and details, and really want even an ant to create its shadow when approaching a wall, my tip is that you clone using a small object as a base as this will make editing the shadows easier.
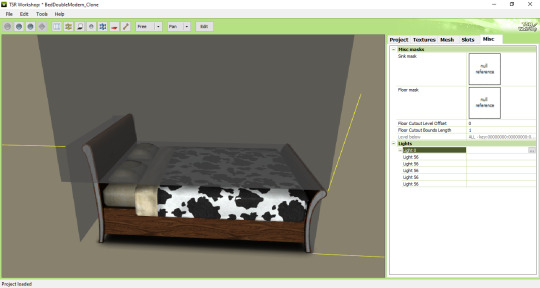
I will use as an example this armoire that I edited a while ago. The shadows have been edited and look like this when you open them in TSRW:
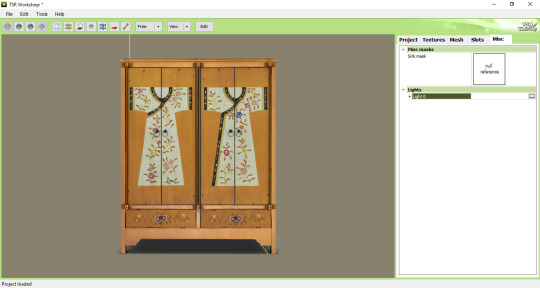
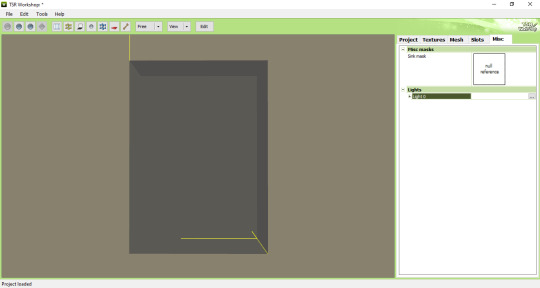
In the game, this is how the shadows appear when we position the object close to a wall:

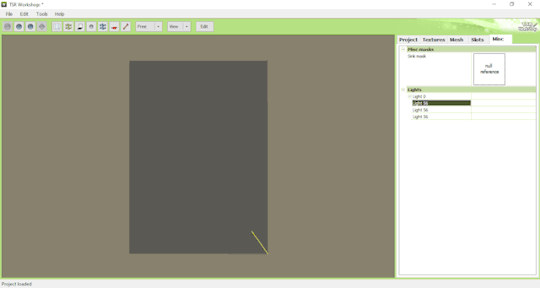
To edit the shadows, you must click on the "MISC" tab in TSRW. These shadows are right below, where "LIGHTS" is written. Note that there is a + sign next to it and when you click it, a drop-down list appears with all the shadows separated. In this example there are 3 of these shadows. The names are the same, but let's say we have shadow 1 (front), shadow 2 (top) and shadow 3 (side). Edits must be made in the order they appear.
Click on the three dots to the right of lights. A window as shown in the image below will appear:
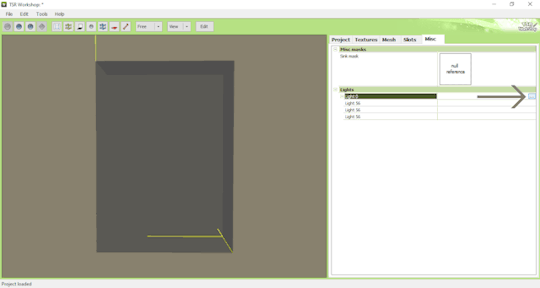
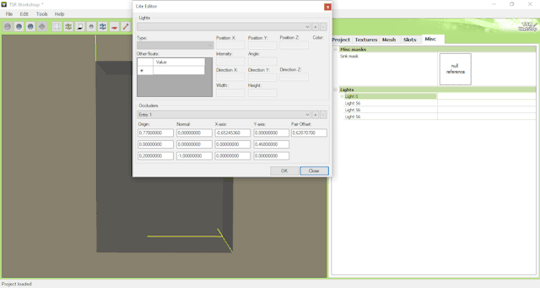
The lights that must be edited are found in the part where it says "OCCLUDERS". In this case, "Entry 1" corresponds to our "SHADOW 1" (front)...
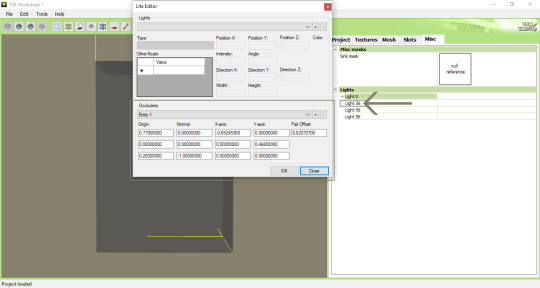
For the front shadow, we will start by changing these two parameters that correspond to the width and position of the shadow. My tip is that you copy the original value, change this value to 1 and then click on "OK" to see what happens (that is, to see what changes when changing the value, so you will know if you need to change it to a higher value or smaller...). If it's not what you need, just paste the original value copied previously into the corresponding field and change it little by little until you reach the correct size of the object.
Front shadow height:

For the distance the shadow is from the object, this field must be edited - remembering that we are still editing the front shadow (which corresponds to the shadow that will replicate the width of the object on the wall):

For the other shadows, you must follow the same path: changing the values until it is proportional to the size of the object.
Bonus tip: Open various base game objects in TSRW and see how shadows are created. For example, select a chair and study each shade individually. With practice, you will realize that all you have to do is create a shadow on all sides of the object. For example: on a bed, you should have a shade for the headboard, another for the footboard, another for the side and another for the top, which would be the mattress. Therefore, it is important to study each type of object separately.
Now you might be asking yourself: Oh, yes, thank you very much... But where do I start? How will I know how to create a shadow from scratch? OMG! Help me!
Don't worry, it's very simple: when cloning an object, like a bed for example, it's obvious that you will use a bed from the game as a clone... So just edit the original shadows that correspond to the clone, so that they are the size of the bed you are creating for the game. Only that.
I say again: each object is a specific case. This tutorial is just a simple way to show you the way to understand how these shadows work and how they are generated for the game.
Yes, creating a beautiful object is hard work and requires dedication, time and effort. Therefore, value the creators who strive to deliver you a quality object ♥.
If you feel like helping me, here is a link for donations. Thank you very much ♥.
Tutorial inspired by: @bioniczombie and @sideshowsnob
#tutorial/ usefull#sims 3 tutorial#ts3 tutorial#ts3 creation tutorial#sims 3 creation tutorial#sims 3 meshing#sims 3 object tutorial#sims 3 occlusion shadows#sims 3 occluders#ts3 meshing tutorial#sims 3 TSRW
46 notes
·
View notes
Text
Sims 2 Databases Database
(Alright it's an index, I just had to)
Made it for myself, I might as well share. If there's something I've missed please let me know. This list is being updated, Tumblr is being a pain and updates won't show up on re-blogs. Visit the original post to view the most current version. Mirror: Dreamwidth.
CC:
By Type:
Sims 2 - Object Default Database [Discontinued - DW].
Sims 2 - Object Default Database [Active - Spreadsheet].
Sims 2 - [CAS] Default Database.
Sims 2 - Hair Database.
Sims 2 - CC: Afro Hairstyles.
Sims 2 - Shoes Database.
Sims 2 - EA Store Items 2016.
Sims 2 - The Maxis Match Repository Project [CAS] [Pinterest Ver.]
Sims 2 - Repository Finds [CAS&Objects] [sorted into categories].
Sims 2 - Functional Finds [Sorted by function].
Resource list: Clutter and decorative items [massive index at GoS].
Sims 2 - Wall Hanging Decor Recolors Database [New!].
Sims 2 - Lot Database [Maxis ones emptied out].
Sims 2 - Lot Makeover Database [of Maxis Lots] [Note the Uploading Tutorial].
SkyBox/Horizons/Skylines Database.
Maxis Career Conversions TS1+3+4 to TS2 [Sorted by Game&EP - Under Downloads].
Fractured Moonlight's Stone Super Set Database [Creator Unknown, let me know if you know].
By Theme:
List of Maxis Lost & Found Objects Converted into Usable Items.
Stories to Sims 2 Conversion Database. [DW Backup]
TS1 to TS2 Conversion/Recreation Database.
TS1 to TS2 Catalog Conversions [Active, Includes OG Object Descriptions].
TS3 to TS2 Conversion Database [DW Backup].
TS3 to TS2 Traits Project Mod Tracking Sheet [Blog Ver.]
TS4 to TS2 CAS Conversion Archive [EA].
TS4 to TS2 CC Clothing Conversion Database [Custom - ts4 only?].
TS4 to TS2 Build/Buy Conversion Database [EA].
TS4 to TS2 CC Build & Buy Database [Custom].
The Sims spin-off games to the PC TS2 [&3+4].
TSM-to-TS2 Conversion Database [DW Backup].
Sims 2 Historical Finds [CAS&Objects] [Sorted by Era/Period].
Historical Sims 2 Wiki [New!].
Grunge Masterlist Project 2025.
List of Asian Sims 2 Sites With Working Downloads [As of 2017?].
CC Archives:
Sim Archive Project, at The Internet Archive [Introduction Post].
Sims Cave.
Sims Graveyard.
Simblr.cc - Dead-Site Repository.
Liquid Sims - Community Archives.
The Booty, at PSMBD.
Sims 2 Packrat, on Tumblr [Watch out for the recent SFS Hacking problem].
Ekrubynaffit (a.k.a bestbuild4sims) has re-uploaded a lot of archives of defunct creators. Albums with DL on her pinterest. Mainly build and buy mode, thanks a lot!
Resources:
CEP-Extras List, Huge Lunatic at Sims 2 Artists.
The Sims 2 Tutorials Database [Active] (Really needs a backup outside of Tumblr).
Several Lists of Maxis Resources for Modding,Pick'n'Mix Mods, own website, under Notes.
Sims 2 GUID Database Revival (Yes I'm shamelessly promoting it).
Sims 2 Trait GUID Database, by FireFlower.
Sims 2 Painting Sizes Database.
List of all Color Actions, With DL, ZeroDark/Graphic at GoS.
List of all WSO Actions, by Blue Heaven Sims, under Resources.
List of Hacks & Mods That Use Tokens, Bulbizarre at MTS.
Giant List of Simlish Fonts - Collect ‘Em All!, by franzillasims.
Masterlists of Recolouring Templates; MTS [+Cloning] | Hafiseazle | ZreoDark [not a list but a tag].
Index of Effects Names & Definitions [+ Guide], by AmmarAskar at GitHub.
Update notes are under the cut:
Update: Custom Clothing Conversion db [4t2], by @brandinotbroke/ Hair db, by @krabbysims/ Sims 4t2 CAS Conversion Archive [EA], by @mdpthatsme/ CEP-Extras List, by @hugelunatic/ Lists of Maxis Resources for Modding, by @picknmixsims/ Sims 2 Tutorials db [Active], by @sims2tutorials/ Sim Archive Project at The Internet Archive, by various - see @simnostalgia. Update 1: added EA ts2 store items at GoS/ Painting sizes db/ Tutorials db, by @sims2tutorials. Update 2: GUID db Revival. Update 3: believe it or not, there's more - Shoes db/ Sims 2. Functional Finds [sorted by function], by @sims2functionalfinds. Update 4: Resource list: Clutter and decorative items, at @gardenofshadowssims. Update 5: added archives section. Update 6: added @ekrubynaffit's Pinterest Archive. Update 7: Fixed TSM link, added Stories db/ Afro Hairstyles db, by @letomills/ SkyBox/Horizons/Skylines Database, by @simmergetic/ Grunge Masterlist Project 2025, by @pixeldolly/ and DW backup links (Everything that's exclusively on Tumblr/LJ should be backed somewhere else). Update 8: List of Asian Sims 2 Sites With Working Downloads [as of 2017?] by @0201-sims. Update 9: added Sims 2 Repository Finds [sorted into categories], by @sims2repositoryfinds. Update 10: added Sims 2 Object db [Discontinued], because the more the better. Update 11 Yet another (!): The Maxis Match Repository Project [CAS], by @whattheskell [how did i forget?]/ TS3 to TS2 Traits Project Mod Tracking Sheet, by Rowena Sims & @noodlebelli. Update 11: Maxis Career Conversions TS1+3+4 to TS2 [Sorted by Game&EP - Under Downloads], by @sims2idea-lientebollemeis2i. Update 12: HS I found another one: List of all Color Actions - Names, Creators, and Download Links. Maintained for over a decade by @zerographic at GoS :P Update 13: separated by type & theme. added Sims 2 Historical Finds [CAS&Objects] [Sorted by Era/Period], by @ts2history. Update 14: added to resources Trait GUID db, by @fireflowersims. Update 15: I shit you not, there's more - Sims 2 Lot Makeover db [Maxis Lots], by @ts2lotmakeoverdb/ List of Hacks & Mods That Use Tokens, Bulbizarre at MTS/ TS1 Catalog Conversions [Active], by @kitteninthewindow/ WSO Action Masterlist, by Blue Heaven Sims under Resources. Update 16: List of Maxis Lost & Found Objects Converted into Usable Items, @kirlicues. Update 17: Sims 2 Lot db [Maxis ones emptied out], by @mikexx2 @mrsktrout @ts2lots. Update 18: Historical Sims 2 Wiki [New!], by @theacmecatalogblog. Update 19: under archives; Simblr.cc - Dead-Site Repository by @simblrcc-site. Jackpot! Update 20: added Giant List of Simlish Fonts - Collect ‘Em All!, by @franzillasims. Update 21 [can't believe there's more]: Masterlists of Recolouring Templates; MTS [+Cloning] | @hafiseazale | @zerographic [not a list but a tag]. Update 22(!): Index of Effects Names & Definitions [+ Guide], by AmmarAskar at GitHub. Update 23: added Sims 2 - Wall Hanging Decor Recolors Database [New!], by @sims-for-semi
#ts2#sims 2#the sims 2#resources#ts2 resources#ts2 database#ts2cc#ts2 cc#ts2 download#sims 2 cc#the sims 2 cc#sims 2 download#the sims 2 download#the sims 2 resources#tagging is a bitch#sims 2 database#the sims 2 database#sims 4t2#sims 3t2#sims 1t2#1t2#3t2#4t2#ts2 defaults#sims 2 default replacement#GUID Database#The Sims 2 GUID Database#ts2 archive#ts2 archives#sims 2 archives
2K notes
·
View notes
Text
List of Sims 2 Custom Content (CC) Sites
Something for any sims 2 newbies who might stumble upon my tumblr. This is not an exhaustive list, just some web sites and blogs I know of and like.
Just a little warning first, english is my second language and while I read it fluently, I have some trouble with phrasing stuff. So the following might be a bit wonky.
Multiple Creators
Mod the Sims: one of the biggest sims 2 sites, also has content for the other sims games
Garden of Shadows: it's forum but you don't need to register to see or download stuff, also has content for sims 3 and sims 4
simblr.cc: quite new, also has content for the other sims games plus inZOI
Plumb Bob Keep: CC for historic themed games, the Download section is visible without registration
Sims2Artist: another forum
Simspearls: forum, registration needed before you can access it.
Creators with their own sites
Nixed Sims: Has historic and modern themed content
LordCrumps: Sims 4 to Sims 2 conversions
Around the Sims 2: inactive, but has lots of nice stuff. Creator is still actively making CC for Sims 3 and Sims 4.
Pick'n'Mix Mods: they made some really practical utility programs for the game
The Medieval Smithy: mostly medieval CC but you can find some CC for other eras too.
Some of my favorite Simblrs (in no particular order)
@deedee-sims
@creesims
@letomills
@platinumaspiration
@fracturedmoonlight
@lucilla-sims
@kaluxsims
Skell Downloads, The Maxis Match Repository Project and Old timey Skellington: Creator is inactive.
Creators on Dreamwidth
Almighty Hat: Some of the best medieval CC. Creator is inactive as of 13.04.2025.
Magical Girl Sandbox
Mrs Mquve
Angela Pleasant
Other important places
The Sims Graveyard: Stuff from disappeared Sites. Warning: Always quite slow
@sims2packrat: another important place to find lost CC.
@sims2tutorials: Links to many Tutorials
@lazyduchess: They made some very important fixes and mods for any Sims 2 game
Sims 2 Default Database: Don't like a Maxis Outfit, here you can find replacements for them
Object Default Database: Same but for Objects
Pinterest: Some Simmers make collections that link to CC sites and creators there.
480 notes
·
View notes
Text


Shop Sign Wall Lights - UPDATED 15 May 2025
I put together a few sets of shop sign wall lights. But there are instructions. I kept some swatches as a default white color so that you could pick which color you want the light to be while in live mode. This saved on the file size of the package file because the more textures a file has, the more bloated the file size is.
I had some fun with some shop names although I mainly included generic titles in both English and Simlish.
DOWNLOAD for FREE: SFS
OR at Patreon*
*You must be over 18 to access my Patreon page.
INSTRUCTIONS ON CHANGING LIGHT COLORS
Once you place the light in build mode, then go to live mode. Click on the light and you will get the following pie menu.

Select SET COLOR AND INTENSITY and then choose THIS LIGHT. The color options will then appear so you can select which color you want.

If you use the name signs along with the Awning Lights, make sure to place the name on top of the awning so when you select the color picker, the correct sign changes colors. The other option is to place the name separate from the awning, go to live mode and change the color, then go back to build mode and add the awning light you want.
Enable the bb.moveobjects on cheat and then you can make adjustments to location and size of objects. You can adjust the position of the light on the wall by depressing the Alt key while placing the sign (on PC). You can adjust the size of the item by depressing the Shift key and either [ (for smaller) or ] (for bigger) (on PC).
CREDITS
Awning Shop Lights - 19 swatches of various awning wall lights. 18 are pre-colored and one is white so you can change the color yourself in game.
Candy Shop Lights - 20 swatches
Pottery Shop Lights - 25 swatches
Tattoo Shop Lights - 21 swatches
Enjoy!
Creations by SexyIrish7
These cc objects are new 3d meshes created using Blender and Sims 4 Studio.
Polygon Count: 6
All CC have:
*Ability to search catalog using search terms: sexyirish7 and si7
*Customized thumbnail
*******
CREDITS:
Software credits:
Sims 4 Studio v. 3.2.4.1 (Star): https://sims4studio.com
Blender 4.0: https://www.blender.org/download/
GIMP v. 2.10.34: https://www.gimp.org/
Inkscape v. 1.2: https://inkscape.org/
Thank you to the creators and moderators producing tutorials and answering questions!
*******
Model and Image credits:
Mesh created by me.
Simlish font credit to Franzilla: https://modthesims.info/
Image credits:
Awning Lights Image credits: Modified image from Adobe Stock
Candy Shop Image credits:
Swatches 1-3: Image by pch.vector on Freepik https://www.freepik.com/free-vector/christmas-candies-symbols-set-neon-style_11241813.htm#fromView=search&page=1&position=26&uuid=8b541325-0e62-4e37-9468-6bacd30f8963&query=neon+lollipop+candy
Swatches 4-8: Image by gstudioimagen on Freepik https://www.freepik.com/free-vector/sweet-candy-neon-seamless-pattern_5595774.htm#fromView=search&page=2&position=30&uuid=e2259de5-014d-4d04-af87-1198ee0f35e2&query=%40gstudioimagen+neon
https://www.freepik.com/free-vector/sweet-candy-neon-seamless-pattern_5595775.htm#fromView=search&page=1&position=27&uuid=e2259de5-014d-4d04-af87-1198ee0f35e2&query=%40gstudioimagen+neon
Swatches 9-10: Image by openclipart.org https://all-free-download.com/free-vector/download/peppermint_candy_clip_art_13182.html
https://all-free-download.com/free-vector/download/round_candy_with_stick_card_on_pink_background_6823183.html
Swatch 11: Image by All-free-download.com https://all-free-download.com/free-vector/download/round_candy_with_stick_card_on_pink_background_6823183.html
Swatches 12: Image by katemangostar on Freepik https://www.freepik.com/free-vector/ice-cream-cart-neon-sign_3238564.htm#fromView=search&page=8&position=42&uuid=2f82b4d1-5ca8-449c-ae22-4573861ebcb0&query=neon+sign+retail
Pottery Shop Image credits:
Swatch 1: Crafting icons created by andinur - Flaticon https://www.flaticon.com/free-icon/pottery_17392031
Swatch 2: Image by katemangostar via Freepik https://www.freepik.com/free-vector/aquarius-neon-sign_5561944.htm#fromView=search&page=2&position=5&uuid=c55e5e21-0550-46f0-b9be-cfa85ff38796&query=Ceramic+Neon
Swatch 3-4: Pottery icons created by Smashicons - Flaticon https://www.flaticon.com/free-icon/vase_3760867
https://www.flaticon.com/free-icon/vase_3760970
Swatch 5: Icon by istar_design_bureau via Freepik https://www.freepik.com/icon/pottery_1958438#fromView=search&page=2&position=20&uuid=096084ae-13fe-429c-a419-e6e13ccd37b9
Swatch 6:Icons by Eucalyp - Flaticon https://www.flaticon.com/free-icon/pottery_6552610
Swatch 7: Icon by berkahicon via Freepik https://www.freepik.com/icon/spin_13785816#fromView=search&page=2&position=0&uuid=096084ae-13fe-429c-a419-e6e13ccd37b9
Swatches 8-11: Icons by Freepik https://www.freepik.com/icon/pottery_8540816#fromView=search&page=3&position=43&uuid=096084ae-13fe-429c-a419-e6e13ccd37b9
https://www.flaticon.com/free-icon/machine_9200546
https://www.flaticon.com/free-icon/vase_8838322
https://www.flaticon.com/free-icon/pottery_3305262
Tattoo Shop Image credits:
Swatch 1: Modified Image by katemangostar on Freepik https://www.freepik.com/free-vector/tattoo-salon-neon-text-with-tattoo-machine-neon-sign-night-bright-advertisement_2438198.htm?log-in=email
Swatch 2: Image by Nippy Custom https://www.nippycustom.com/products/tattoo-neon-sign
Swatches 3-5: Image by bohlam via Vecteezy https://www.vecteezy.com/vector-art/2185717-tattoo-studio-neon-signs-style-text-vector
https://www.vecteezy.com/vector-art/34210463-neon-sign-tattoo-studio-with-brick-wall-background-vector
*******
TOU:
Do not re-upload and claim as your own
Do not re-upload and hide behind a paywall
*******
Changelog:
15.05.2025
*Updated swatches for compatibility with slotted signs.
*Added wall deco slot so that signs can be stacked on slotted signs for Awning Signs
*Added swatches with inverted images for Candy, Pottery, and Tattoo Shop Signs.
#the sims 4 cc#ts4cc#sims 4 cc#the sims 4#wall decor#sims 4#ts4#lights#wall lights#signs#shop signs#retail#pottery#ceramics#tattoo#ink#candy#lollipop#sweets#sugar#light tutorial#sexyirish7#updated cc#featured
312 notes
·
View notes
Text
TS2 Legacy Collection CEP Extra Tutorial
Hi guys! I just wanted to make this quick tutorial on this since it's the first time a lot of players will be doing this.
Step 1: Download CEP Extra Manual installation from ModTheSims linked here (Read all instructions included if you get confused)
Step 2: Extract the Zip to a folder
Step 3: Open the folder and place the package _EnableColorOptionsMMAT into the Sims3D folder located here: Program Files > EA Games>The Sims 2 Legacy>Base>TSData>Res>Sims3D
Step 4: Place the package _EnableColorOptionsGMND into your Downloads folder located here: Documents>EA Games>The Sims 2 Legacy>Downloads **Note: You will likely have to create this folder yourself which is easy. Simply right click inside The Sims 2 Legacy folder and create a new folder named "Downloads" and place that file right inside.**

Step 5: Open the 'Extras' folder inside the Zip
Step 6: Open the folder 'MyDocuments' and place the entire zCEP-EXTRA folder inside your Sims 2 Legacy document folder located here: Documents>EA Games>The Sims 2 Legacy
Step 7: Open the folder 'ProgramFiles' and place the entire zCEP-EXTRA folder inside your Catalog folder located here: Program Files > EA Games>The Sims 2 Legacy>Base>TSData>Res>Catalog

And thats it! You should be good to go now. You can check if it's working by the start up message. If you have that setting turned off you can also check to see if it's working by going into one of the households and using the design tool on objects that were previously not recolorable or expanded objects. I believe you can also check to see if it's working by checking the skin tone range in CAS but don't quote me on that lol. Anyway I hope this helped someone 💜
EDIT: Quick reminder for those that are extremely new to the game that you need to start the game at least once first The Sims 2 Legacy folder to appear in your documents folder or you could simply create it yourself, add your folders, and then start the game after and it’ll populate around your newly added CEP and Downloads folder.
#ts2#ts2 community#ts2 tutorial#the sims 2 legacy#ts2 legacy collection#the sims 2 legacy collection#ts2 legacy collection tutorial#ts2 cep#ts2 resources#TS2 LC Tutorial
238 notes
·
View notes
Text

SimCare Medical Clinic

Sim File Share (currently slow due to traffic/site errors. I will keep trying to upload so check my Downloads page for updates.) Dropbox

Our SimCare team is dedicated to nurturing your health through proactive care and patient-centered treatment - whether you're seeking routine check-ups or specialized care. We’re here to support your journey toward a healthier life and ensure that you receive the best support for your health, every step of the way.

Price: 184, 065 Lot Size: 30x20 Lot Type: No Visitors Allowed Store Content: Click here CC Used: Click here File Type: Package Min. Required Game Version: 1.42 Packs Needed: The Sims 3, Pets (buydebug object), LN (elevator, floor, wallpaper), Ambitions, Generations, Seasons Simlish Clinic Signs (Add-on CC): Price: 1500 Environment: 7 HLOD: 122 Features: Shiftable, Frame is CASTable Category: Buy > Decor > Wall Decor Room: Living, Dining, Bedroom, Study EA Mesh Used: Painting Ranch 2x1 from The Sims 3 File Type: Package Min. Required Game Version: 1.42 Packs Needed: The Sims 3, Late Night
Hello and welcome back to my blog!
It’s been a minute, hasn’t it? Life got in the way and honestly, I’ve been taking my sweet time with this new build. It also didn’t help that the Sim File Share site kept giving me errors whenever I tried to upload it and I was supposed to post this last month.
Even now, I’m still dealing with errors on the site and after some frustration, I’ve decided to look into alternative sites for uploading content in the future. But after all the setbacks, it’s finally ready!
Thanks for sticking around and I really appreciate all the likes/reblogs, you all are the best! 💜
Click on the ’Keep Reading’ below for more information and pictures on this lot.


📣 Right-click on a picture and select ’Open image in new tab’ for a clearer view.

This clinic is designed to give a real-life feeling of visiting a healthcare facility. Inside, you’ll find a: reception area, consultation/exam rooms, pharmacy, laboratory, x-ray/radiology, restroom, locker room, staff break room, doctors office and a large empty room for the rabbit hole rug/door. Now, a couple of things to keep in mind - the layout is designed with a small staff in mind but you can use the extra space in the second floor, where the rabbit hole rug/door is placed, if you want to add more offices or any other services. Just make sure that there is enough space for the rabbit hole rug/door to avoid routing issues. I had to get creative with the signs for this build as I couldn’t find anything that felt right or any CCs that matches the layout of the clinic so I made my own directory signs. It is included in the download file and I’ve posted the details along with this post as it is an add-on for the clinic. I’m using a font called Simlish Deja Vu by gazifu@MTS for the signs and I’ve also included translations in the picture above. It’s not perfect but you know what? It does the job! I have also placed a big sign shown on the clinic that translates to 'Pharmacy' and I know it might seem a bit out of place but honestly, it’s the only large sign I liked that fit the building aesthetic I was going for. 📣 Please note that the CC included in the lot are not included on the download file. I’ve compiled a list for those interested in downloading them separately (please click the links above or go to WCIF Navigation page) but those are not required and will be automatically replaced in the game. Any expansion packs with build items listed in the Details section above may be required for this lot to show up in your game. This clinic has been such a fun build to put together and I hope you all enjoy the build. This lot has been play-tested and let me know if you experience any problems on your end!

TSR Tutorial - Create Custom Paintings Sims Wiki - Poly Counts for Creators TSR Workshop Simlish Deja Vu font by gazifu Pixabay
#petalruesimblr#community lot#the sims 3#the sims 3 hospital#the sims 3 clinic#decorative obj#lots#ts3#sims 3#sims 3 lots#ts3 simblr#ts3 simmer#ts3 download#ts3 screenshots#ts3 community#sims 3 download#sims 3 screenshots#ts3 hospital#ts3 clinic#ts3cc#the sims 3 custom paintings#ts3 custom paintings#s3ccfinds#s3cc download#the sims 3 wall decor#ts3 wall decor
180 notes
·
View notes
Text
Cantina Collection

Straight from Oga's Cantina comes this cobbled together industrial set.
A bit later than planned but finally here. All items are very low poly as they are all frankenmeshed from the original bar back counters.
The textures are all composites and rearrangements of the originals, as a result they are not seamless - but we'll say it just adds to the look that they've just been made from whatever scrap metal was around!
Also as the cabinet doors all have the same rust pattern, it looks odd/repetitive on very big kitchens but works fine for small spaces.
There is only one swatch for all items except the seating, which comes in the same colours as the originals.
All items are base game compatible, except the resized bar backs which require Journey to Batuu.
See below for further details, pictures and download links.
Comfort (5 items):


Industrial Bar Stools x 2 - Low Back & No Back
Industrial Dining Chairs x 2 - Low Back & No Back (shown with original JtB high back chair)
Metal Dining Chair (shown with original JtB bar stool)
Surfaces (16 items):


Kitchen Counters & Islands


Bar Table
Dining Tables x 2


Coffee & End Tables
Console Tables x 3


Smaller Replicas of the original Cantina Barbacks x 5 - resized to match the height of regular counters NOTE: You'll need to use bb.moveobjects on to align these properly. JOURNEY TO BATUU PACK IS REQUIRED.
Industrial Shelf
Decor (2 items):
Metal Splashbacks x 2
Activities & Skills (3 items):


Oga's Bars x 2
Sabacc Game Table NOTE: BGC but JOURNEY TO BATUU is required in order to change the game type to Sabacc. Without this it will function as any other base game card table.
Download All (Downloads ZIP file from Google Drive)
Pick and Choose (Opens Google Drive folder)
If there's any problems with any of these items or you have any constructive feedback, suggestions or questions, please just get in touch, I'm still learning every day!
My TOU
Credits
All textures and meshes are edited or frankenmeshed from in-game EA assets.
@myshunosun - for their gorgeous sona dining chair which I cloned in order to have an object with the necessary transparency for the chair and bar stool - can be downloaded here.
Lizbot3000 - for their base game bar tables, which I cloned for my bar table and can be found here.
@ravasheencc - for her Crop It Like It's Hot Backdrops which I used to take some preview photos and can be downloaded here.
CC created using Blender, Sims 4 Studio & GIMP. Preview images using Canva Pro.
Everyone on the S4S forums and the Creator Musings discord group for all the tutorials and advice/help.
#always free cc#alwaysfreecc#custom content#download#journey to batuu#maxis match#my cc#sims 4#sims 4 buy mode#sims 4 cc#sims 4 custom content#sims 4 futuristic cc#sims 4 industrial#sims 4 industrial cc#sims 4 futuristic#sims 4 journey to batuu#sims 4 maxis match#sims 4 star wars#sims 4 star wars cc#star wars cc#star wars sims#star wars sims 4#the sims 4#ts4 cc#ts4#ts4 bb#ts4 buy cc#ts4 custom content#ts4 download#ts4 futuristic cc
226 notes
·
View notes
Text
CC Creation Tutorial: Smooth Seams in Blender

In this tutorial, I will show you how to make your mesh seams smooth inside Blender (no Milkshape required!) and walk you through the process step by step. We will make a perfectly smooth mesh and transfer the normal data from that mesh to our main mesh using the Data Transfer modifier.
I am using Blender 3.6 in this tutorial (though you should be able to follow along using other versions as well)
You do not need to have much previous knowledge to follow this tutorial, but I assume you know some basics in Blender like how to select, things, navigate around, etc, and know how to import the meshes and put them into Blender.
For this tutorial, I exported the Sims 3 afbodyEP4DressPromBigBow mesh with TSR Workshop. You can use any clothing mesh you like though, and works on any meshes, not just Sims 3 ones.

This is our mesh. You can already tell that it has the dreaded seams on the neck and the rest of the body.

First, we need to make a copy of the mesh (in Object mode, select the mesh and hit Ctrl+D Shift+D to duplicate it, then hit Esc to stop it from moving around).
Rename the mesh (I added Seamless to the mesh name).
Make sure the original mesh is hidden (click the eye symbol) and select the Seamless mesh.
Press the Tab key to go into Edit Mode.

Now we select the parts that we want to have smooth seams. Let's select everything that is skin (you can select a litte piece of the mesh and then press Ctrl+L to select the entire piece)!

Now, press M and in the menu, choose By Distance. (in older versions, this is called Remove Doubles).
This will remove all double vertices at the seams on the selection we made.

It will show you how many vertices it removed. The skin looks nice and smooth!
Let's switch back to our original mesh: Make sure you deactivate the eye on the Seamless mesh and activate the eye again on the main mesh. Then, select the main mesh.

Now, let's add a data modifier to our main mesh. Click the blue wrench icon in the vertical list of the properties panel and then onto Add Modifier, then choose Data Transfer from the list.

As the source, we choose our Seamless mesh.

Also toggle on Face Corner Data and click the Custom Normals button.
Hold on, there is a message saying that we should enable Auto Smooth in Object Data Properties. Let's do that next! (if the message does not appear for you, maybe Auto Smooth is already on).

Click the green inverted triangle button and in the Normals section, toggle on Auto Smooth.

Now we can switch back to the modifier tab by clicking the blue wrench icon again.
But hang on, what happened to our mesh? There are now black spots over the dress and shadows on the legs!

This is due to the Data transfer modifier's Mapping setting. If we change it to Topology, our mesh goes back to normal again. Phew!

Now that the normals look good, we can start the transfer of our new smooth normals from the seamless mesh to our main mesh. To do that, we hit the Generate Data Layers button. This button works destructively, so you cannot undo what it did, just FYI.

Note: On newer versions of Blender, Generate Data Layers may not be enough to transfer the normals and you may need to apply the modifier instead.
You can toggle the modifier's visuals on and off with the little screen icon to see the results after you click Generate Data Layers to see if it stuck. If it did not (and you see the seams of your base mesh when toggling it off), try to apply it instead.

I switched from textured to solid shading because the differences are just more noticeable in this mode. This is how our mesh looks now with the modifier turned off.
Because we clicked the transfer button, the normals have been permanently applied to our mesh. The skin is smooth now, and so is the dress (even though we did not smooth that one, hmm...)

If we toggle the modifier back on, suddenly the dress has seams again! What's going on there? I'm not exactly sure why, but Auto Smooth seems to be doing some smoothing on the dress mesh as well.
I am not sure if this is normal behavior or not, but let's pretend that this did not happen and the modifier in fact did not smooth the dress.
Maybe we just forgot to smooth some areas on the Seamless mesh that we noticed only later on. That's no problem. We simply modify our Seamless mesh again!

So let's swap back to the seamless mesh and select it (remember to click the eye icons so only the Seamless mesh is visible).

Let's select the main dress parts and press M -> merge by distance on them. We cannot smooth the whole dress all at once, because then that would remove some seams that we want (like those for the backfaces and the middle section of the dress where the bow is attached).
If we remove the wrong seams, we ruin our normals and will have black splotches.

Now, let's select the backfaces and areas we left out before and repeat this process: M -> merge by distance.

Look at how perfect our Seamless mesh is looking now! Now, let's transfer those beautiful normals to our main mesh.
Select the main mesh and toggle the eye icons again, to hide our Seamless mesh and reveal our main mesh.

Once again, we will use the Generate Data Layers button in our Data Transfer modifier. If you have previously applied the modifier, just add the modifier again to the main mesh and use the settings shown here.
And that's it, you are done! You have a perfectly smoothed mesh that you can export now.

Final Note: it is best to transfer the normals at the very end of your meshing process because any action that recalculates the normals can reset our custom-made smooth normals again.
Of course, you can simply use the Generate Data Layers button again to re-add them, but it saves you time to only do this step at the end.
I almost forgot to say: You still have to use Mesh Toolkit to fix the seams on the edges of your mesh and do the usual shenanigans.
190 notes
·
View notes
Text
How to convert Sims 4 3D CAS Rooms to Sims 3

Disclaimer: If you’re not familiar with Blender/TSRW/UVs then this tutorial may not be for you. If you don’t have Sims 4 Studio which needs the Sims 4 base game (or don’t know how to extract the meshes without it) this tutorial may not be for you. Honestly it’s pretty straight forward, but there’s a lot of trial and error and going in game and out of game checking placement, etc. I use Blender 4.1 for this, but you should still be able to do the same things in the older versions. I'm trying to make this as easy as possible. I’m here to answer any questions though 💕 Tutorial below
Things you’ll need:
Blender (whatever version you prefer)
Sims 4 Studio
TSRW ( I use version 2.0.86)
My Christmas CAS Room here
My TSRW work file here
Tutorial:
Find a Sims 4 CAS room that you like and open it up in Sims4Studio. This is the one I'll be using for the tutorial.

In the Texture tab, export the textures. The only textures that matter are the first 3 diffuse. Go to the Meshes tab and export the mesh, it will save as a .blend file. After that you can close out of Sims4Studio.


Open my Christmas CAS Room in TSRW. You'll get this message. Hit ignore and don't send. We only need this file as a reference to resize the SIms 4 CAS room. Export the mesh as an obj, name it whatever you like. You can close TSRW for now.

Open Blender and open the .blend file you exported from Sims4Studio. Make sure to delete studio_mesh_0 as it's just the shadow map and we don't need that. This is what mine looks like after fixing the textures.

Then import the wavefront obj you just exported from TSRW. Again we're just using this as a size reference.
This is what it looks like after I added the obj. I scaled, moved, and rotated the room to match up as close as I could with my reference mesh. When you have it lined up to your liking you can delete the reference mesh. I usually import the sims 3 body to see where my sim would be in CAS as well so feel free to do that too.

Now we have to separate the objects that use transparency in the scene to their own group. The transparent objects will always be located on studio_mesh_1. I usually do this in UV mode. Make sure UV Sync Selection is on. Where the red arrow is, that's the UV Selection button. It's blue so that means its on.

Tip: If you're using the same Blender version I am (I'm not sure if the older versions below Blender 3.0 do this) you can disconnect the alpha in shader editor and then you can easily see what uses transparency because it has a black background like the plants. Don't worry about the one outside the window as that's on the backdrop image and doesn't show in CAS.
Important: Also, make sure you delete the back of the mirror frame or it will show through the mirror in game. I usually select it in the UV editor as well and delete it.

After selecting all the objects that use transparency, I go to the 3D viewport window and press P, then selection. Now they're on their own layer as you can see. That's a very important step so please don't miss it.

Sims 4 CAS Rooms don't have a closed room like ts3 and if you don't add walls/ceiling with planes you'll be able to see that it in CAS. You can do this in any way you're comfortable with. If you don't understand how to do it feel free to ask me. For this tutorial I will not be doing this perfectly lol I've done enough rooms and I'm just trying to teach here 😩

Okay now last is renaming groups to import into TSRW. Make sure it's in this exact order and uses the exact group numbers.
Group 0 - Mirror
Group 1 - Windows/Curtains
Group 2 - View outside the window
Group 3 - Walls
Group 4 - Objects with transparency
Depending on the CAS Room you convert, yours may not have a mirror you know. You can delete groups in TSRW, experiment, feel free to ask me questions as well.
After renaming the groups, select only the groups you renamed and export as an obj. Make sure that object groups is checked so that they can stay in groups.

Open TSRW and open the testroom_cas.wrk file.
After opening the file you'll see this exact room in this tutorial lol because I had to test some things first 😅

Import the CAS room you converted from ts4. You'll get these two messages. Click yes on the first and no on the second.
Disclaimer: Make sure you reduce polygon sizes or it won't import and give you an error


Import your textures (yours may be different than mine depends on the converter) but most have been the same that I've seen. Group 0 is the mirror it doesn't require a texture. Group 1 and Group 4 usually have the same texture.
Disclaimer: TSRW an be finnicky with textures sizes, I havent gotten any issues since using the 4GB patch, but just in case. Texture sizes from ts4 can run pretty big 4096x2048 even 8196x4096. I would resize to no bigger than 2048x1024 in my opinion, but whatever works for you.
After export to sims3pack or export as package file. Make sure you compress your files and you should be good to test your CAS room in game.

This is the finished product. Should look something like this or better lol considering this was quick 😅
If you would like to make your own from the original ts3 cas room, I would suggest watching this Youtube video (it's for TS4 but it still applies and is helpful) and the link to the original ts3 cas room is here. Since we can convert ts4 to ours you could probably just build your own and go from there as well.
Thanks to @mookymilksims for testing things for me and converting her own. If you would like to try this tutorial out and experiment with room placements using @boringbones Ultra wide CAS mod which changes the field of view in cas so that you can see the whole cas room, it is here. I didn't use it for mine, but that's only because I found out about it after from Mooky lol and I'm tired of converting them 😅 but feel free to ask me any questions if you need help 😊
#ts3#tutorial#sims3#I hope this helped#been procrastinating finishing this 🙃#cas room tutorial#sorry if it's long#tried to be thorough and make sure everything was correct#my tutorials
173 notes
·
View notes
Text
Taxes & Benefits Mod + New Active Career - DOWNLOAD
One of my sims was earning a little too much money and somehow this spiralled into me developing this mod. Introducing a very configurable tax and benefit system alongside an all new active career!


The tax and benefit system is modelled after the system we have here in England. All tax and benefit options are configurable and sims will only be opted in if you want them to. See the included documentation for a proper feature breakdown.
There are three types of taxes:
Council Tax (a property tax)
Business Tax
National Insurance (an income tax)
Register sims for each type of tax through the city hall.

There are four types of benefits:
Universal Credit
Housing Benefit
Child Benefit
Job Seekers Allowance
Register sims online, through social interactions with the all new Civil Servant, or at a HSRC communications booth.
Civil Service Career
Work for the HSRC in this fully functional active career.

There are 36 jobs which can be completed: 27 are custom career opportunities (like in the private eye career), 9 of them are custom active jobs (like in the interior decorator or firefighter career).
Jobs include: checking benefit eligibility for sims around town, attending job fairs, auditing, community outreach, responding to council house repair requests, and things of that nature.

Communication Booth
Civil Servants are given communication booths which can be placed anywhere in the world. This object has 2 geostates and can be set up or packed down when not needed.

Council Houses
Properties that are not owned by a sim are council houses. There are some unique interactions for these homes. For one, they can be more susceptible to pests (if enabled in the tuning, that is).
Complain to the Council
Depending on the type of property the sim lives in, they can complain to the council about housing issues such as overcrowding, broken facilities, or vermin.

Social Interactions
There are 12 new social interactions found under Friendly, Funny and Mean.
Help Understand Welfare System – Civil Servant Only
Complain About Taxes
Accuse of Benefit Fraud
Suggest Part Time Job – Civil Servant Only
Joke About Fraud
Talk About Benefits
Talk About Career History
Hand Out HSRC Leaflet – Civil Servant Only
Warn About Fraudulent Behaviour – Civil Servant Only
Offer Council House Repairs – Civil Servant Only
Including 2 autonomous only interactions:
Talk About Shared Career History
Talk About Shared Benefit Claims
Some interactions are only visible after doing things such as paying taxes. Some interactions are specific to the Civil Service career.

Required
Ambitions EP
University EP
Optional
Seasons EP – adds tax refunds, tax fluctuations and council house scenarios
Showtime EP – adds extra interaction to communications booth
World Adventures EP- adds extra active job
My Boutique Mod, Hairdressing Mod, Go to Court Mod – adds extra work opportunities
My social clubs mod – adds extra work opportunity and some optional integration with Bronzo banking
My functional printer mod – makes use of buff
Olomaya Smoking & Private Clinic (optometry module) mod - illness buffs taken into account with trying to claim some benefits.
Uninstallation
You can use cheat ‘uninstallTaxesBenefits’ in order to remove all mod related objects and data before uninstalling.
Download: Simblr.cc - Taxes & Benefits Mod
If you would like to donate as thanks, please feel free to do so at my ko-fi! :)
ps modders: this code for this mod is up on GitHub, plus a WIP active career tutorial (emphasis on the WIP but I hope it's helpful). Link included on the last page of the documentation.
Please enjoy all!
~ Phoebe <3
335 notes
·
View notes
Text

As I'm doing a rags-to-riches challenge atm for gen 3 of my Random Legacy, I've been looking into mods that make the off-grid experience in TS3 a bit more realistic
I hope this list will be especially useful as a resource for anyone doing rags-to-riches, runaway teen, midnight sun, zombie apocalypse or any other similar challenge which requires your sim to live off the land - I personally love this gameplay style, and I hope this is useful for others too!
As always, if anyone has any suggestions of mods / CC I should add to this list, let me know and I'll update it - it's definitely not exhaustive by any means :)
Mods:
Moar Interactions by Buzzler on MTS
I recommend this mod regardless of if you're playing off-the-grid because it adds a bunch of great stuff, but the interactions particularly useful for this gameplay style are 'work overtime' at the small businesses around town, allowing your sim to earn a bit of extra cash without being officially employed, and also the ability to 'cancel the carpool / schoolbus' (because a carpool wouldn't agree to pick your sim up from their camp in the middle of the woods)
Nraas Careers via Nraas Industries
This mod allows your teen / child sims to be enrolled in home-schooling, which makes much more sense if they're living as a runaway - tutorial for how to assign them to homeschooling is here - I also reccomend using storyprogression to disable curfew for your teen sims if you're playing them as a runaway (tutorial here)
Nraas GoHere via Nraas Industries
This might be a bit random - but this mod is an abseloute lifesaver if your sim doesn't have a car, you can force them to walk long distances without automatically getting in a taxi (best used when combined with the taxi charge mod - linked below)
One with Nature by Spherefish on MTS
This mod is basically the GOAT for off-grid gameplay - it adds the ability to sleep on the floor, pee on the floor, have sponge baths in the ocean / swimming pool and also to relax / daydream on the ground
Pay for the gym by ani on MTS
Some people won't like this one as it definitely makes runaway / rags-to-riches challenges a lot more challenging, but in combination with the other mods I think it makes sense to charge for hot showers when your sim could just go for a wild swim instead!
No Fridge Shopping via Nraas Industries
No more magically buying ingredients from the fridge - your off-grid sim has to grow the produce themselves or go to the supermarket if they want to cook!
Taxi Charge & Subway Charge on MTS
Challenges such as runaway teen require you to buy a flamingo every time your sim takes a taxi - this removes that requirement as your sim gets automatically charged 6-20 simoleons depending on their age - Subway Charge does the same for your Bridgeport sims
No Stretch Children Can Series by Kapaer on MTS
I always recommend this mod for general gameplay anyway, but it's especially useful if you've got kids in your household for offgrid living, they're no longer completely useless!
Attend University online by TwinSimming on Tumblr
Similar to the homeschooling option from nraas careers (linked above), this allows your sim to attend university entirely from the comfort of their computer - they do still have to pay for the degree though!
Off-Grid Inventing Overhaul by SimState on MTS
Allows your inventor sims to create household objects through the inventing table - so you don't have to save up to buy them if your sim is crafty enough!
Ani's Various Mods
I particularly recommend the 'mountain bike' mod which allows your sims to ride a bike around without roads, as well as the 'ration box' mod & 'consignment'
Sleep on Sofa / Bench by Sammonsim on MTS
Scroll down to post #22 in this thread to get the link to this mod - it basically allows your sims to get a full nights sleep on a sofa / bench without having to queue up 50 'nap' interactions
Functional Wells / Off Grid Plumbing & Functional Washboard
This makes your sim have to collect buckets of water from a well if they want to shower / wash the dishes etc. The functional washboard allows them to wash their clothes in a less mechanical way, I reccomend using Danjaley's functional well cc in addition to the plumbing mod as it adds a few more options for your style of lot
Custom Content:
Pallet bed set on tumblr
BionicZombie's Basement Treasures TS4 conversio
Travel Items by Everlasting Garden
Working Futon on MTS
Hollow bee tree on MTS
Camping time set by Toreno
Around The Sims 3:
Camping Part 1 / Part 2 / Part 3 / Part 4 / Part 5 Eco Living TS4 Conversion Into The Wild Trashes & Bonfires / Part 2 Stray Life City / Stray Life Woods Beer Keg / Wine Barrel Squat Bedroom
Twinsimming:
Into the wild set TS4 Werewolves conversion
Simzoo:
All-In-One Bush / Toilet bush Rock / Bucket sink Log Bench / Bench 2 / Rock Stool / Wood Box Cushioned Seat Tree Dresser Haystack bed / Log bed Single table-style counter Raft pool lounger Firepit set
TheSimsResource:
Disclaimer: I do not endorse or condone using this website, unfortunately a lot of great CC for TS3 is locked behind it due to the age of the game - so I've linked some of it here, but I recommend using a reliable adblocker (personally I use Ublock Origin for firefox) before visiting it / downloading anything
Hayloft bunk-bed More Mailboxes (These are a lot less space-consuming than the default mailbox, and I like to either attach them to trees or just hide them in bushes on my off-grid lots lol) The homeless pet set Trapper Bedroom All of cyclonesue's stuff for urban environments
#Sims 3#Runaway Teen Challenge#Apocalypse Challenge#Midnight Sun Challenge#Rags to Riches#TS3#Simblr#Sims 3 Mods#CC Finds#Resources#SimSpaghetti Modpack List
224 notes
·
View notes
Text
Self-use Sims 3 CC Tutorials List
Here is a list of tutorials from which I learn to convert/create sims 3 cc in a few months (and as a poor English speaker). I think it might help someone who also wants to try making things for sims 3 but doesn't know where to start, though it's been 15 years from the game release and even Inzoi is coming hahah.
The list covers objects, clothes, hairs and eyes. I know there're lots of tutorials not listed here, that's because I haven't tried them in my projects by hand. But The list will be updated with new things I learn. Most tutorials are in English. Thanks to all these creators for sharing their precious knowledge!
Sorry for the miserable format, cuz I wrote them in Patreon and paste here. You can also read it there, free of course.
Where I find tutorials
sims 3 tutorial hub
ts3 creators cave and its discord
Mod the sims tutorial wiki and the forum
pis3update tutorials tag
General
CC basic concepts by nightosphere (for clothes, most knowledge is shared with objects)
Tools
TSRW guide by apple (for objects, most knowledge is shared with clothes)
Blender
shortcut by Blender Guru
beginner tutorial for version 2.5, 2.8, 3.0, 4.0
3.5入门教程 (youtube / bilibili)
设置切换语言快捷键 change language shortcut settings
图片取色器网站
Mesh ToolKit with Seam Fixer for all ages
Topaz gigapixel AI guide / higher quality texture
Texture
Nicer bake / bake in blender 2.78
Bake in blender 2.93
Make normal map
small size blank texture
Reasons for black blocks on baked image
Adjust texture color without losing quality
Object
clone obejcts with S3OC
4t3
Functional Objects
Functional bed
TSRW setting
Combining Textures for Objects with Multiple Textures
Add normal map to objects
Introduction to slot categories
Add slots in TSRW
Edit in-door shadow or occluders in TSRW / Talks about 3 kinds of in-game shadow by Pocci
Clothes
4t3 by nightosphere
Reduce polycount / fix seams, holes, shadows or normals
Bone reference rule
Avoid milkshape workflow / adjust bone assignment and morphs in blender
Manually fix bone in blender
Convert between ages/body meshes
TSRW check list
Fix long clothes clip with body
Fix holes on morphs (easier in blender)
Extrude collars
Create texture in PS
Avoid TSRW workflow / CTU tutorial
Hairs
Avoid milkshape and TSRW workflow / delete backfaces / handmade morphs / DABOOBS guide
Keys pointing to in-game blank textures to save file size (for DABOOBS not TSRW)
Reduce polycount
4t3
Fix weird seam lines on hairs from s4s
Fix pigtail issue
Eyes
Convert contacts to default eyes
245 notes
·
View notes
Text


Tattoo Parlor Decor Set for The Sims 4
This set was inspired by my personal experience getting tattoos. Some of the signs are those I remember from my friend’s tattoo parlor. While I was excited about getting tattooing in the Business & Hobbies Pack, I did want more in terms of décor objects. I did my best to keep the items as low poly as possible, but be sure to check the poly counts for what your computer can handle.
The building in my screenshots is one I downloaded from the gallery and made modifications so it resembled my friend's tattoo parlor. The username is MickeySimmers and the original build is a NY Pizzeria uploaded on 4/7/25.
When appropriate, objects are available in English and Simlish versions. Simlish font credit to Franzilla: https://modthesims.info/ For new meshes made by me, textures from Blenderkit were used.
SexyIrish7 Phoenix logo credit: © Liliia Marchuk via Dreamstime.com
All items are base-game compatible.
This set includes:
· Tattoo Counter
· Supply Cabinet
· Salty Signs – Small, Medium, and Large
· Tattoo ink bottles
· Tattoo ink cups – empty ink cup and cups with ink colors
· Tattoo ink cup holder
· Sharps container – Wall-mounted and counter versions
· Tattoo Coil Machine
· Foot switch
· Power Supply
· Stencil Machine
· Autoclave
· Non-sterile Nitrile Glove Boxes
· Portfolios
· Consent form
· Tip Jar
You may view an Imgur album with 31 screenshots of the set here
Creations by SexyIrish7
DOWNLOAD for FREE: SFS
OR at Patreon*
*You must be over 18 to access my Patreon page.
These cc objects are new 3d meshes created using Blender and Sims 4 Studio.
All CC have:
*Ability to search catalog using search terms: sexyirish7 and si7
*Customized thumbnail
*******
CREDITS:
Software credits:
Sims 4 Studio v. 3.2.4.3 (Star): https://sims4studio.com
Blender 4.0: https://www.blender.org/download/
GIMP v. 2.10.34: https://www.gimp.org/
Inkscape v. 1.2: https://inkscape.org/
Thank you to the creators and moderators producing tutorials and answering questions!
*******
TOU:
Do not re-upload and claim as your own
Do not re-upload and hide behind a paywall
Mesh and Image Credits along with descriptions of each item are below:
Tattoo Counter
I was dissatisfied with the number of slots and their placement on the tattoo counter that came with the Business & Hobbies pack, so I modified EA’s The Ultimate Nightstand so that it served as a larger counter and added décor slots to it. There are a total of 3 large slots, 9 medium slots, and 27 small slots. I made some minor modifications to the EA texture for The Ultimate Nightstand but did include all 20 swatches.
Polygon Count: 162
Supply Cabinet
I have long been disappointed with the lack of deco slots in various displays. For this object, I modified EA’s Carina Dining Hutch so that it would serve as an appropriate supply cabinet. I made some minor modifications to the EA texture but did include all 9 swatches. There are a total of 2 large slots, 15 medium slots, and 140 small slots.
Polygon Count: 114
Salty Signs
There are 3 files of what I call “salty” signs. The large signs are not as salty, but I wanted to stick with my theme overall. What do I mean by salty? Well, these are signs that are not for the faint of heart and for those with a darker sense of humor. They were inspired not only by signs that I saw at my friend’s parlor, but also by things he and his colleagues would say frequently.
Large Signs: 7 designs (11 total swatches)
Medium Signs: 9 designs (18 total swatches)
Small Signs: 10 designs (20 total swatches)
Polygon Count: 4
The following were used in several textures in all three files:
Caution/Warning Sign Templates by kenshinstock via Freepik https://www.freepik.com/free-vector/blank-label-warning-caution-sticker-template-set_30903862.htm
Large Sign Image Credits:
Swatches 1-2: Original Artist Unknown. Image from https://razorbacktattoosupply.com/tattoo-studio-feel-the-burn-wrapped-canvas-graphic-art/
Swatches 3-4: Original Artist Unknown. Image from https://www.creativefabrica.com/product/funny-tattoo-artist-hourly-rate-cut-file/
Swatches 5-6: Original Artist Unknown. Image from https://www.pinterest.com/pin/tattoo-artist--218917231881445322/
Swatch 7-8:
Hands, Soap, and Ointment Icons by rawpixel.com via Freepik https://www.freepik.com/free-vector/coronavirus-prevention-icon-set-vector_30086831.htm
Do Not Touch Icon Image by Myshopsigns https://all-free-download.com/free-vector/download/18_warning_signs_47669.html
No Swimming Icon by Fitri Handayani via Vecteezyhttps://www.vecteezy.com/vector-art/51936014-no-swimming-sign-illustration
Bathtub Icon by Fitri Handayani via Vecteezy https://www.vecteezy.com/vector-art/51406319-bathroom-icon-with-bubbles-and-soap
Sun and Breeze Icons Images by Freepik https://www.freepik.com/free-vector/weather-icons-set_709126.htm
Talking on Phone Icon by Mungujakisa Edmond via Vecteezy https://www.vecteezy.com/vector-art/25410803-do-not-talk-on-mobile-cell-phone-icon-sign
Swatches 9-10: Tarot Card Images designed by Eight (Elian-James Showell) https://www.eightco.in/
Swatch 11: Original Artist Unknown. Image from https://www.amazon.com/Tattoo-Artist-Tarot-Card-Sweatshirt/dp/B0D8JBHBFZ
Medium Sign Image Credits:
Background images for Swatches 5-8 by All-Free-Download.com https://all-free-download.com/free-vector/download/advertising_sign_templates_retro_shapes_sketch_6849470.html
Swatches 1-2 and 13-14: Tattoo Gun Image from IMGBIN https://imgbin.com/png/ZNRSzcqv/tattoo-machine-tattoo-ink-tattoo-artist-png
Swatches 3-4: Original Artist Unknown. Image from https://www.amazon.ca/Artist-Tattoo-Artist-Kitchen-Vintage/dp/B0B6DRXFZN
Swatches 5-6: Tattoo Gun Image from IMGBIN https://imgbin.com/png/36i2fKAG/tattoo-machine-body-piercing-tattoo-artist-old-school-tattoo-png
Swatches 7-8: Bullhorn image by All-Free-Download.com https://all-free-download.com/free-vector/download/megaphone_312061.html
Swatches 9-10: Border by Rawpixel.com via Freepik https://www.freepik.com/free-vector/vector-set-vintage-elements_3139397.htm
Picture by EA from Business & Hobbies release video
Swatches 11-12: Cheese Grater Image by Macrovector via Freepik https://www.freepik.com/free-vector/cooking-food-icons_1530806.htm
Saw image by EA
Swatches 15-16: Images by EA
Small Sign Image Credits:
Swatches 1-2, 5-12, 19-20: Caution/Warning Sign Templates by kenshinstock via Freepik https://www.freepik.com/free-vector/blank-label-warning-caution-sticker-template-set_30903862.htm
Swatches 3-4: Tip jar image by Freepik https://www.freepik.com/free-vector/jar-background-with-hand-drawn-money_1148170.htm
Swatches 13-14: Image by Printable Designs https://free-printable-signs.com/
Swatches 15-16: Image by by Mungujakisa Edmond via Vecteezy https://www.vecteezy.com/vector-art/25410803-do-not-talk-on-mobile-cell-phone-icon-sign
Swatches 17-18: Crying Emoticon Image from CLEANPNG https://www.cleanpng.com/png-smiley-emoticon-crying-clip-art-no-whining-clipart-546524/
Tattoo Ink Bottles
Due to file sizes, I split these up into 2 separate files. One file has all of the bottles in English, and the other has all of the bottles in Simlish. I modified the EA debug glue bottle. There are a total of 24 swatches.
Polygon Count: 126
Tattoo Ink Cups
There are 2 files for this object. One is an empty ink cup. The other has all of the ink colors as different swatches. There are a total of 24 swatches for the filled ink cups. I modified the water glass object to create these items.
Empty Cup Polygon Count: 107
Filled Cup Polygon Count: 162
Tattoo Ink Cup Holder
When an artist is using a few different inks for a piece, they can sometimes use a holder for the ink cups so the cups do not get knocked over or spilled. This is an original mesh made by me. I have the object set up so that the ink cups (full or empty) will snap to the holes in the holder. Once the ink cups are in, you can move the entire holder to where you want it and the ink cups will go along. Or you can place the holder and then add the cups. While the holders I tended to see were plastic, I decided to make mine a metal version with slight ink stains.
Polygon Count: 208
Sharps Containers
I created 2 versions of sharps containers for this set. I originally was only going to create the wall-mounted one, but then decided to add the counter version of it as well. These are original meshes made by me.
Biohazard symbol is a public domain image
Wall-Mounted Sharps Container Polygon Count: 268
Counter Sharps Container Polygon Count: 106
Tattoo Coil Machine
There are different types of tattoo machines available, but I find the coil machine to be the most recognizable and therefore wanted this version in my game. This is an original mesh made by me. There are a total of 5 swatches.
Polygon Count: 640
Foot Switch
I created a foot switch to operate the tattoo machine with. This is an original mesh made by me. There are 11 swatches.
Design inspired by FK Delta Foot Switch https://www.fkirons.com/products/delta-foot-switch-cosmic-storm
Polygon Count: 57
Power Supply
For this object, I modified the EA Retro Rock of Ages Stereo mesh and texture to create the power supply. I used a few other EA textures to make adjustments to the components of the object.
Polygon Count: 336
Stencil Machine
Unless you allow your artist to freely draw on your skin before tattooing, many use a stencil machine to create the stencil so you can make sure that your tattoo is placed correctly and looks correct before beginning. This is an original mesh made by me. There are a total of 6 swatches (3 designs in English, 3 designs in Simlish).
Design inspired by Vevor Tattoo Stencil Printer https://www.vevor.com/tattoo-machines-c_12593/
Phoenix Image: © Liliia Marchuk via Dreamstime.com
Claddagh Image: http://clipart-library.com/clipart/8iGbR5bbT.htm
Wolf Image: https://freepngimg.com/png/2674-tattoo-wolf-png-image
Polygon Count: 62
Autoclave
No tattoo parlor is complete without the sterilization equipment, namely the autoclave. For this object, I modified the EA The Schmapple Micro Microwave mesh.
Design inspired by Tuttnauer Valueklave 1730 https://tuttnauer.com/us/veterinary-practices/tabletop-sterilizers/manual/valueklave-1730
Polygon Count: 346
Non-sterile Nitrile Glove Boxes
For this object, I modified EA’s Softy Brand Tissues object. There are 2 box colors available, black and gray. There are a total of 12 swatches.
Non-Sterile symbol is a public domain image
Polygon Count: 40
Portfolios
A detail that I thought was missing was a display of the tattoo artist’s work. In real shops, they can be wall displays or portfolios. I decided to make a portfolio with different tattoo designs. There are 3 swatches of different tattoos. This is an original mesh made by me.
Polygon Count: 262
Image Credits:
Swatch 1: EA
Swatch 2:
Snake and Flying Swallow Images by dgim-studio via Freepik https://www.freepik.com/free-vector/new-style-tribal-tattoo-collection_1168313.htm and https://www.freepik.com/free-vector/colorful-flying-swallow-template_8136770.htm
Colorful Old School Images by Freepik https://www.freepik.com/free-vector/old-school-funny-tattoo-collection_1165044.htm
Tribal, Achor, Ship’s Wheel, Skulls, Roses, Dice, Cards Images by Macrovector via Freepik https://www.freepik.com/free-vector/tattoo-black-white-icons-set_9398078.htm
Tribal Images by Freepik https://www.freepik.com/free-vector/new-style-tribal-tattoo-collection_1168313.htm
Swatch 3:
Colorful Images on Left Page by Freepik https://www.freepik.com/free-vector/collection-hand-drawn-decorative-tattoos_1175499.htm
Colorful Vintage Images on Right Page by Freepik https://www.freepik.com/free-vector/pack-vintage-hand-drawn-tattoos_1194571.htm
Crossed Swords, Anchor, Skulls, Scorpion Images by Macrovector via Freepik https://www.freepik.com/free-vector/attoo-studio-flat-icons-collection_4430574.htm
Consent Form
I created a consent form on a clipboard. This is only available in Simlish. I modified some EA textures to create the form. The clipboard is an original mesh made by me.
Polygon Count: 90
Tip Jar
Tipping is heavily encouraged for getting tattoos, at least in the U.S. As such, I decided I wanted to make a tip jar for my parlor. I modified the EA debug jar and some different debug simoleon meshes. The result is a tip jar with both coins and bills inside.
Polygon Count: 579
#tattoo#inked#tattoo parlor#tattoo decor#tattoo studio#sims 4#the sims 4 cc#the sims 4#sims 4 cc#ts4cc#wall decor#ts4#sims 4 custom content#tattoo shop decor#build/buy#sexyirish7#featured
74 notes
·
View notes
Text
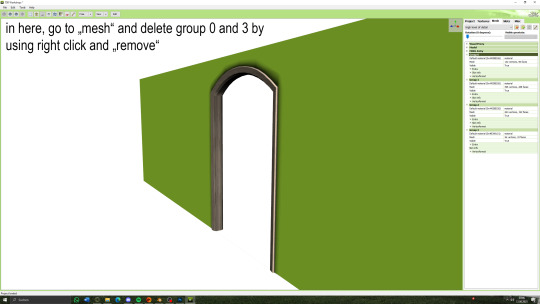
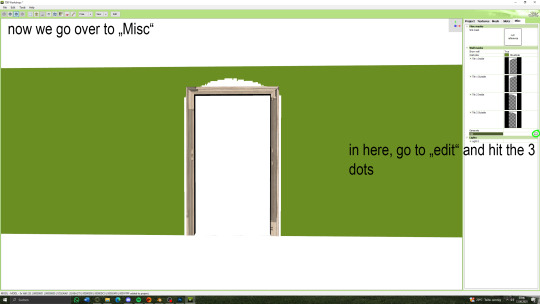
I am here to bless you all with a sims 3 cc tutorial! If you know me from discord, you'd know that I am a CC creator for the equestrian side of sims! Since there are only a hand full of tutorials for creating CC (and most of them are pretty old) I put together some for you! A while back I made a few on different things! Drop by at my website to have a look <3 There are tutorials on how to set up your game to play with horses (RPG) as well as tutorials for making CC objects (both in the older version of blender and for the newer). There are a few more so maybe have a look (they concetrate on the equestrian side of sims). On my webside you can also find my older CC!! Since there was some major cc theft I have decided to publish my cc on discord only, sorry! But maybe I'll be back publishing on my website <3 Okay, back to what I was going to show you-- I have put together on a tutorial for making arches! This should also work for windows, but you'll need to know how to make glass with that too! But, no worries, I will put together a tutorial for that too in the future! Now enjoy the tutorial but please kepp in mind that I am no professional in all of this and this just worked for me but it may not be the perfect way haha <3

you can export the mesh in TSRW under „mesh“ and then the box with the red arrow. Open it yia Milkshaepe and export as .obj in blender

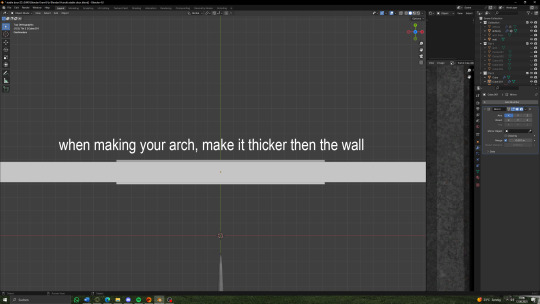


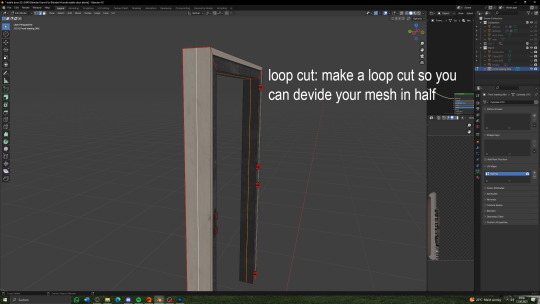

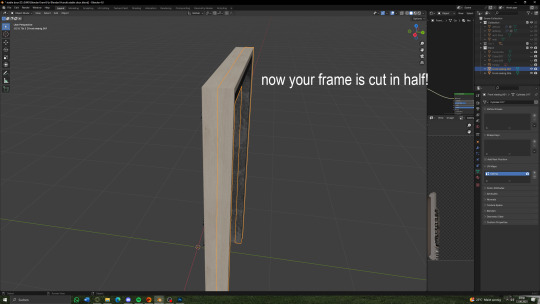


(there will be a seperate tutorial for the glass!)
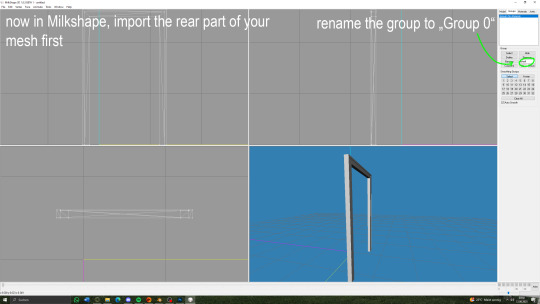

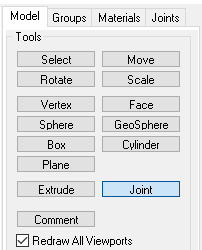
under "model" hit joint


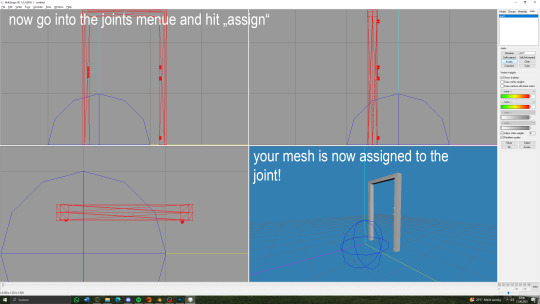
you can now export your mesh to .wso!


66 notes
·
View notes
Note
hello and happy new year! ceci, do you happen to have or could you please make a tutorial on creating teeth if it's not a big hassle? i wanted to make a very particulat teeth shape for my sim, but apparently i do something wrong because the result morphs the whole face in a weird way
gurl the "happy new year" is beating my ass rn, not this exposing the state of my inbox...... 😭😭😭
but ok more seriously, I'll get on with the tutorial 😳
Step 1
first, we're going to use s4studio to create our package. we're going to clone the EA teeth to use as our base.

open s4studio and select "create 3D mesh" under "CAS"
click the blue "CAS" button
Step 2

select "Face" from the Part Type dropdown menu. this will make only the teeth files show up.
we're interested in both "yuTeeth" and "yuTeeth_Snaggle", but select yuTeeth first! (you can hover over each picture to see the names too)
click next, and save your package file as whatever you want.
Step 3

zoom in close to the model with mouse wheel until you can see the teeth, to make sure everything is correct, then go to the "meshes" tab on the right side
export your mesh and save it where you can find it.
note: if you've never used s4s or blender before, make sure your blender location is set up correctly in the s4s settings. otherwise, the sims4studio tools won't show up in blender & we won't be able to edit our cut numbers later.
Step 4
now that we have our mesh, we need to edit it in blender. I'm currently using version 4.2. the controls are different in different versions, so feel free to ask me about it if you're using another version and something isn't working right.

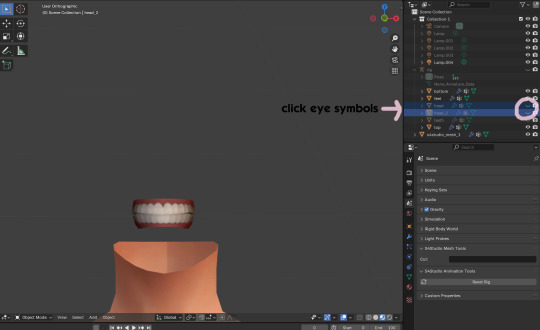
open your mesh in blender. press the N key to get rid of the side panel and Numpad 5 to make the view better/less disorienting. you can zoom in and out with the mouse wheel, and move around by holding the mouse wheel and moving the mouse.
look to the right panel where "rig" is listed. click the arrow to expand the list so you can see all parts of the rig.
click the eye symbols next to "head" and "head_2" to make them invisible so you can easily see the teeth!
Step 5
there are many ways of editing teeth, of course, but what i'm going to show you is basically how to frankenmesh them. this is a good way of creating subtle variety in MM style, without it being overly difficult! we're going to combine the regular and snaggle teeth as an example.
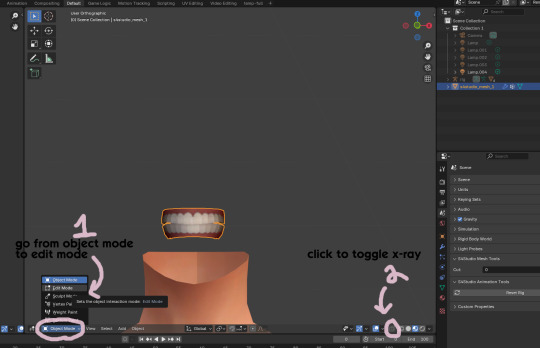
go from object mode to edit mode by clicking the menu at the bottom and selecting "edit mode"
afterwards, click the symbol on the bottom right to toggle "x-ray" so you can see all your vertices when editing.
Step 6

left click in the gray space to deselect all. there will be no orange left anywhere on the mesh.
then, hover over the top teeth and press the "L" key over a vertice (the small black dots) to start selecting the top half only. you should only have to select a couple vertices until everything on the top half is highlighted orange. you can change your view by holding down the mouse wheel and moving the mouse.
Step 7

now, press "X" key to bring up the delete menu.
click "vertices" to delete the parts of the mesh we've highlighted. only the bottom half of the teeth will be left behind. if there's any floating parts left over, highlight those with L and delete them the same way.
Now, repeat Steps 1-3 with "yuTeeth_Snaggle". when you have that mesh exported and saved where you can find it, continue to the next step.
Step 8

go back into object mode. you must be in object mode to append meshes.
go to file -> append to bring up another window

double click your snaggle mesh you just exported
double click "object"
double click "s4studio_mesh_1"
click "append" (if the window didn't close already) and the snaggle mesh will be added to your current mesh!
Step 9
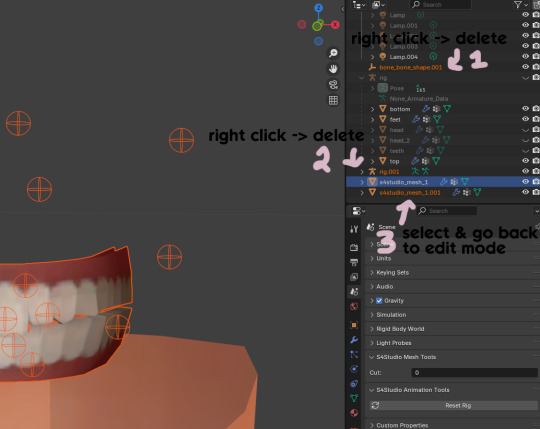
you will see several new mesh parts in the list on the right. right click over "bone_bone_shape.001" and click delete to remove it, since it's just a duplicate.
do the same thing with "rig.001" to delete it as well
select the mesh part you just appended- which is "s4studio_mesh_1.001" to select it and go back to object mode (you can also rename it now by double clicking it if you want)
Step 10

repeat what we did in Steps 6-7 to remove the bottom teeth of the snaggle mesh. you may need to be more careful since these teeth are less straight & overlap more. take your time, and if you make a mistake, you can press CTRL+ Z to undo. you can also click the eye icon next to our first mesh part to hide it so you can see better.
when you're done deleting, unhide the first mesh part to see how it looks together. you now have the top teeth from yuTeethSnaggle and the bottom teeth from yuTeeth on the same mesh! you can mix and match many teeth parts this way.

I decided to rename my mesh parts to top & bottom to keep them organized. you can click the eye symbols to hide either one and see how each part looks. when you're ready, select the top teeth mesh part and return to edit mode.
Step 11
some of EA's meshes have very few polys, so they can be hard to edit, especially if you want to move individual teeth. but, teeth are so small that they don't need/shouldn't have too high of a poly count. having every single tooth be super detailed is overkill, so it's a good idea to only increase polys in the specific areas you want to edit. for this example, i'm going to mainly focus on the front teeth.

select the front teeth by right clicking + dragging over the area you want to select, and it will highlight orange.
go to "edge -> subdivide" to increase the polys in the selected area only, which will give you more to work with. DO NOT SUBDIVIDE TOO MUCH! once should be plenty for this.
Step 12
now for the fun part- actually editing the teeth to be unique! you don't have to do this if you only want to mix & match EA parts, but it's neat to toy around with, even if you just do tiny edits. there's a variety of ways to do this, and I like to do a mixture, but for this example I'm going to use proportional editing.
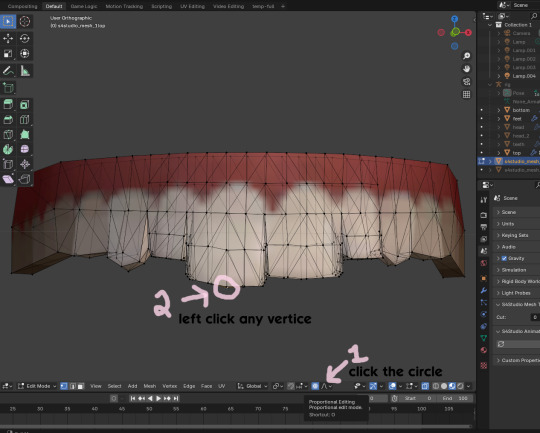
click the circle button to turn on proportional editing
left click any vertice you'd like to edit
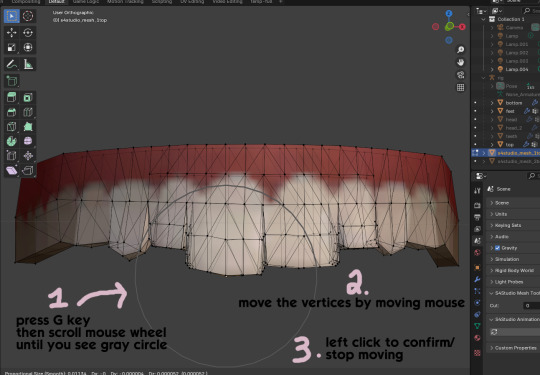
press the G key (move tool) and scroll the mouse wheel forward until the gray circle appears on your screen. this circle represents the influence of editing- the bigger the circle, the wider range of vertices will be moved around that point. the smaller the circle, the smaller/more detailed the change.
move the vertices around by moving your mouse. you'll see right away how it moves. play around with it by using a combination of scrolling the wheel back and forth and moving the mouse.
left click to confirm/stop moving the vertices. you can undo using CTRL + Z if you need to. keep repeating this step by selecting vertices, pressing G, and moving them around how you want. you can also use proportional editing with the S key (scale tool) to make areas bigger or smaller. in blender 4.2, you can also click the tools on the top left side of the window if you want to mostly use your mouse, but I usually use the keyboard.
when you're done editing your mesh and you're ready to test it out, save your file before moving to the next step. keep a copy to the side so you have something to come back to later if you want to change anything!
Step 13
now we're going to prepare our mesh to be game-ready. some of the most important aspects of that is ensuring a) the mesh part is correctly named and b) the "cut" number is correct. if these things are off, the game won't know how to read it, and we'll get odd bugs like missing heads or our mesh just not showing up at all. we currently have two mesh parts and teeth only need one, so we'll fix that first.
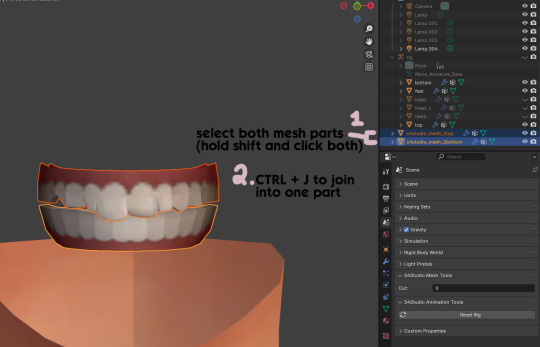
first, go to object mode and select both mesh parts by holding shift and clicking each one.
press CTRL + J to join them together into one part.
Step 14
another thing we need to do is remove doubles so our mesh doesn't look weird or have any odd shadows in-game. in blender 4, it's "merge by distance", but in earlier versions it's just "remove doubles". you should do this when you're done editing, because it'll be difficult to edit after this step. I always do it after I merge all my mesh parts & am about to import for testing. I also double check the cut numbers after this to be sure they're right.
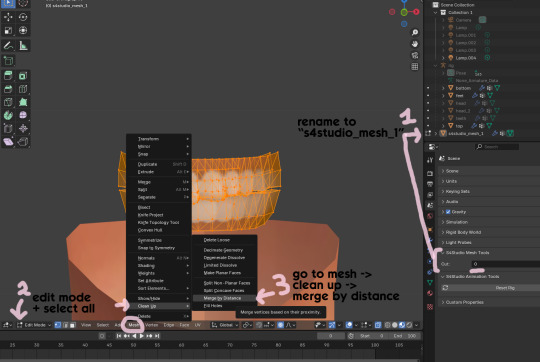
rename your combined mesh part to "s4studio_mesh_1" and ensure the cut number is 0.
go to edit mode and select all by pressing the A key
go to mesh -> clean up -> merge by distance
unhide the "head" and "head_2" parts of the rig you hid in Step 4
save your mesh as a new file name so you don't overwrite your working mesh, in case you want to go back and change something
Step 15
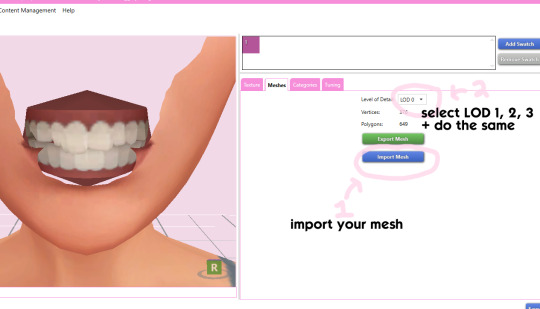
go back into your package in s4studio and import your new mesh
if you like how it looks & are done editing, select LODs 1, 2, and 3 in the dropdown menu and import your mesh there too. these are normally different meshes, but since EA based teeth are so insanely low poly, there isn't much point making individual LODs for them. but it's not that difficult to make them if you want to- if anyone wants a quick tutorial for that, let me know!
Step 16
you can stop here if you want- the teeth will take on the texture of your defaults if you used the yuTeeth package as a base. however, since we've used the Snaggle teeth on top, I think an adjusted texture might look better. I always use the textures by @ice-creamforbreakfast for my teeth, so head over there and grab their defaults if you haven't already! then grab the "uneven teeth" package file and open it in s4s.
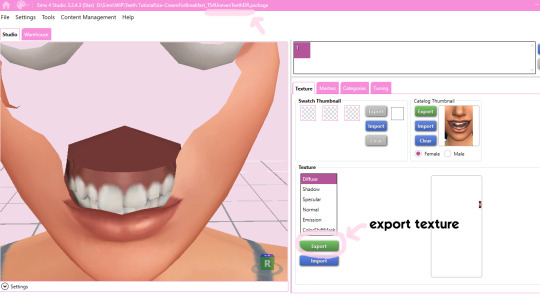
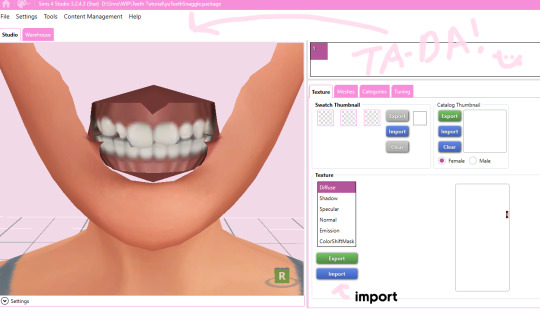
export the texture from the uneven teeth package file as dds
go back to your package file and import it! (and don't forget to credit ice-cream if you post your teeth publicly ;3)
Step 17
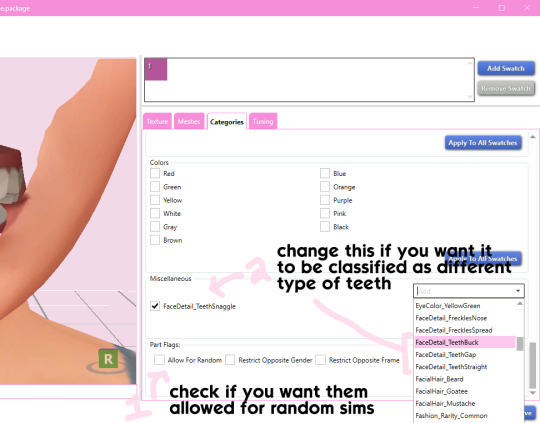
lastly, go to categories tab and scroll to the bottom. if you want your teeth to be enabled for random sims, check the box
if you want the teeth to be considered a certain type (like buck teeth), change the miscellaneous to that type. if it doesn't matter or you're not sure, just keep it as TeethStraight.
Finally, save your package and you're done! :)
#asks#adelarsims#ceci speaks#tutorial#reference#phewph!#long post#i don't think i missed anything#let me know of any questions!
71 notes
·
View notes
Text
Too many carpool drivers? Turn them into townies!
I've had an overpopulation issue with carpool drivers from when I started with Life Stories as my base game. (I didn't have anti redundancy) 42 of them to be exact. And i've never known what was safe to do with them. Till April Blacks new video about npcs! Turns out carpool drivers have complete character data and if you change their interaction table id and npc type they will become a normal sim. No idea if a tutorial exists so I thought i'd share how to do so.
This tutorial will also work on mascots graduated long ago who refuse to take their smelly cow costume off and other npcs that can be turned playable with annoying behaviors. Just skip the part where you move them into the townie bin
Firstly, !!!! ALWAYS MAKE A BACKUP OF YOUR NEIGHBORHOOD IF YOU ARE EDITING IT IN SIMPE !!!!!
What you need: Simpe and a basic knowledge of it (I use version 0.77.69 in the light installer)

Firstly, load up your neighborhood, open up sim browser and find your carpool driver you want to change.
1. Change their npc type to normal sim and press the fix guid button 2. Commit then save.
3. Go to the resource tree and click family infomation 4. Find your Townies family

5. Select your sims name from the dropdown box. 6. Press add sim. 7. Commit and save.

Go back to your sim description and go to the more tab and open their character file.

6. Go to object data in the resource tree 7. Click on the sims object data file 8. Go to the raw data tab and change it to decimal. Scroll down till you see interaction table id. Change that number from -1 to 129, 9. commit and save.
Now your carpool driver is a townie and has escaped eternal life trapped in a car!
195 notes
·
View notes