#s3 tutorial
Explore tagged Tumblr posts
Visit Tumblr Blog
Explore Tumblr blogs with no restrictions, modern design and the best experience.
Last Seen Tumblr Blogs


Fun Fact
After the announcement of the deal with Yahoo!, there were 170K signatures of unhappy Tumblr users petitioning to prevent the sale in 2013.
Text
The Sims 3: How to Make your Sims not Ugly! Tips and Tricks for Pudding Face
youtube
Someone suggested a long time ago that I show how I make my sims, so here it is! In this video I basically just go over my personal process of making sims that look more realistic compared to the base game sims. Sliders, facial ratios, cc, and everything else can affect your sims' appearance.
♡ RESOURCES ♡
Download the face sliders I used in this video
Master controller integration (requires Master Controller)
Nosemasks Pack
Blush
Enjoy!
#tutorials#resources#ts3 help#the sims 3#ts3#ts3 tutorial#sims 3 tutorial#s3 tutorial#sims tutorial#ts3 video#Youtube
108 notes
·
View notes
Text
how I edit my sims ts3/ts4 screenshots (day-time edition)
A helpful? guide for editing screenshots during the day (this is not so easy for me as i prefer taking screens at night but my sims can't always be in the dark so let us all struggle together ok? ok.) this tut is done in procreate on the iPad.

Before taking screenshots:
Help yourself as much as you can in-game, utilise in-game lighting as shadows/lighting is created for you
Understand good/bad composition and add variety by using different angles to make scenes look interesting
I take LOTS of photos just to end up with 1 or 2 good ones

step 1: i would use liquify to smooth out any sharp edges or paint over them

step 2: create new layer, blending mode "multiply" use the colour picker on the area you want to add shadows to, use the selection tool to draw the shadow. you can either colour fill or just shade into the area with the brush. If you colour fill you can then erase lines that are too harsh or use the smudge tool to soften them.


step 3: do this same step but for the clothing. remember shadows are not usually completly black so i use shades of blue to shade her clothes and then shades of green for the tree.


step 4: create new layer, blending mode: overlay. outline the left side of the sim this is to make the light source more prominant. as natural light is not usually just white, i picked a slight orange tint.

step 5: add more lighting to enhance the effect. *create new layer* blending mode: add, and do the same thing as step 4 but with this layer i'll add more lighting to the parts that will be affected most by the light

step 6: i edit the hair. you can look here for my in depth hair tutorial
step 7: add lighting effects *create new layer* blending mode: add. i used the default procreate brushes 'flare' and 'glimmer' [found in luminace] to immitate light rays

step 8: merge all layers, *duplicate layer* add bloom effect and change opacity and erase parts where bloom is too strong.

step 9: merge again, then go into photshop and colour grade using 'camera raw filter' then 'smart sharpen', use 'topaz labs' effect then done!

if you have any questions feel free to direct them to my inbox & u can check out other tutorials here
201 notes
·
View notes
Text
A small but very useful tutorial
written with the help of chatGPT
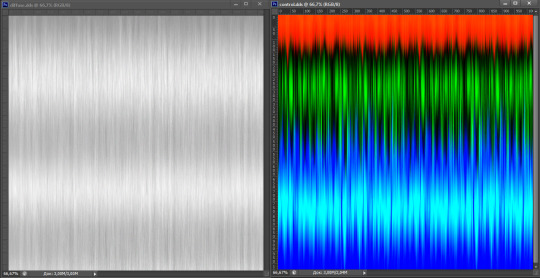
Why Use Upscayl?
Upscayl is a great tool for improving textures and reference images. Whether you are working on character skins, environmental textures, or UI elements, this program helps to:
Increase image resolution without losing quality
Reduce pixelation and enhance details
Improve the clarity of textures for a more realistic look
How I Use Upscayl (look at the photo)
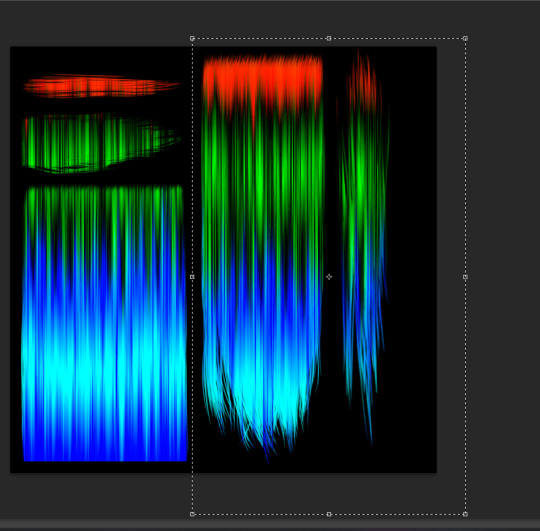
Finding or Creating a Reference Image I start with an image that I want to enhance. This could be a low-resolution texture or a reference image for a new design.
Adding Noise for Testing To demonstrate how Upscayl improves images, I intentionally added noise to a mask texture. This allows me to compare the before and after results more clearly.
Processing the Image in Upscayl I import the noisy texture into Upscayl and choose an appropriate AI model. The program processes the image, enhancing its details and removing unwanted noise.
Examining the Results After running the texture through Upscayl, the difference is clear: the texture appears sharper, more detailed, and free of noise, making it more suitable for in-game use.
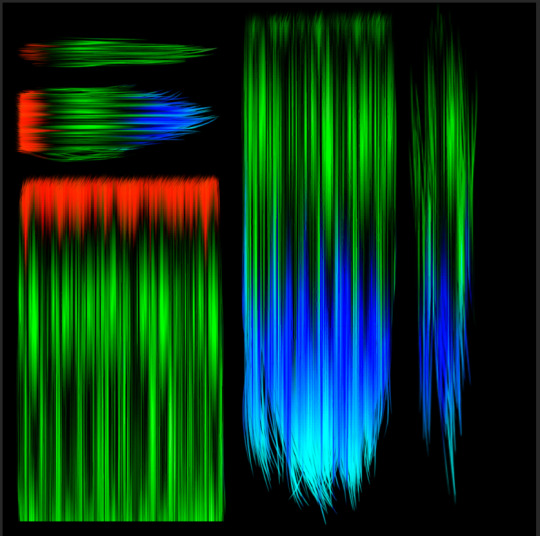
Enhancing Existing Game Textures
Apart from improving references, Upscayl is also useful for enhancing in-game textures, such as character skins. If a skin looks too blurry or low-resolution, running it through Upscayl can significantly improve its appearance without having to manually repaint details.


#sims3#sims#ts3#simblr#s3#sourlemonsimblr#sls#sims4#the sims#sims 2#tutorial#not sims#sims tutorial#cc tutorial
113 notes
·
View notes
Text
SIMO tutorial in 4 steps


These outfit files could be used to dress NPCs with the help of a script mod such as @phoebejaysims's Boutique Mod
you need :
S3OC
S3PE and the Additional plugins "Grid" wrapper
SimOutfitter
85 notes
·
View notes
Note
hey!! quick questionyboots how were you able to use plumblobs control map? thx :)
Hello! I don't remember where i've got the textures from. They were somewhere for a download but i can't seemed to find the link, so i exported them from a hairstyle and they came out seamless so they're suitable for retexturing.
I hope it will be okay if i put these textures here in order someone needs it!
Plumblobs Textures
Short tutorial of how i retexture hairs! Step by step.

Step 1: Layer control map over the original and set it as clipping mask. You've got the second image result.
Step 2: Upscale, downscale textures to fit original with its colors (red for roots, green & black for general coloring and shine, blue for tips)

Step 3: If there's a parts that don't need roots/tips you can remove it just by using green color (it's better to copy it from texture) and paint it over neccessary part with "color" layer. Don't forget to do it on a new layer!

Step 4: If there's a parts that are upturned, do the same procedure by coping layer with control map we pasted before. Upturn them and rescale. Delete necessary parts that lay over neighboring textures.
Aaand that's the result! It looks a little wonky but i did this retexture just to show the process. Maybe it's not a perfect way of retexturing but that's how i learnt by myself.
I hope it will be helpful!
24 notes
·
View notes
Text
Alys Rivers Hair Tutorial (Braids)
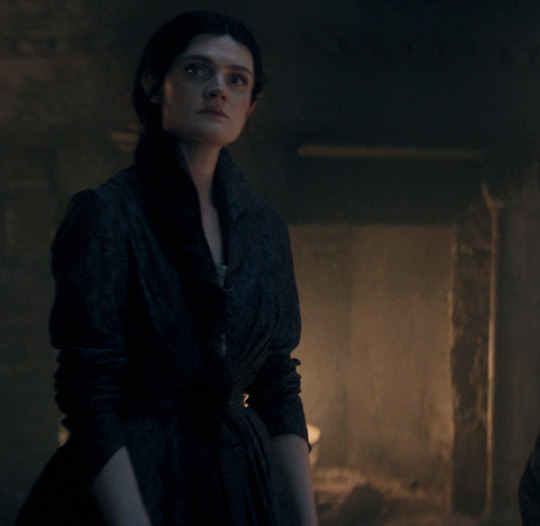

#alys rivers#hairstyle#tutorial#braids#hotd#house of the dragon#more hairstyles for S3 alys pls#hopelessly hopeful#hehe 😋
9 notes
·
View notes
Photo
OMG YOU ARE A LIFE SAVER

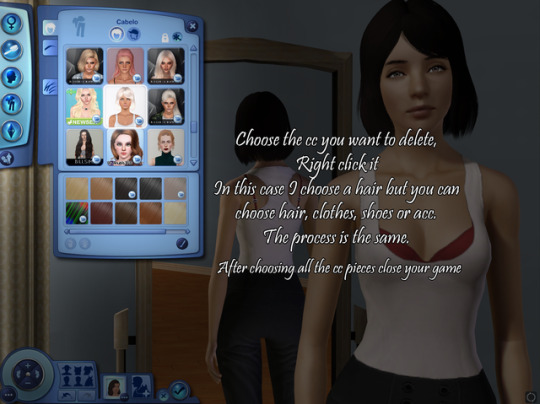


First method to cleaning MERGED PACKAGES s3 cc, package files, only works for hairs, clothes, acc and shoes! By @crazysim-mary
THIS IS FOR MERGED PACKAGES
Keep in mind this is one of MANY ways I clean my cc, this method is the one I like the most but I don’t know if it is safe for all computers or easier, it is for me :)
If you want other tutorials on how I clean obj, makeup, body hair and how I cleaned my mods folder so it won’t have conflicted files, please send me a message :3 Because on how many people this helps I will make others
You need: Master controller
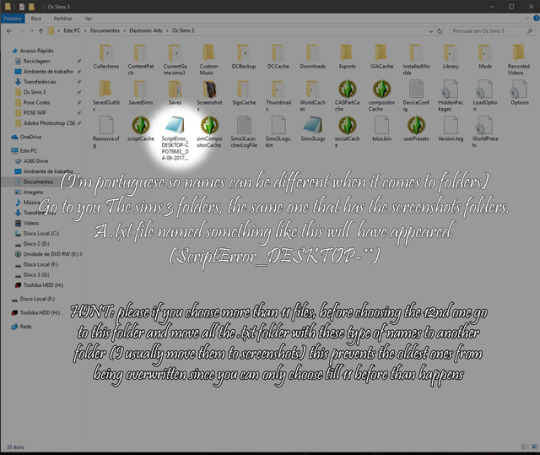
Open a sim in cas, choose the cc you want to uninstall and right click it. (do this with all the cc you want to uninstall but be sure to move the txt files once you have 11 to another folder because if you don’t they will be overwritten by the newest files)
Close your game and a .txt folder named something like “ScriptError_DESKTOP-**” will have appeared (once you right clicked the cc) in your the sims 3 folder.
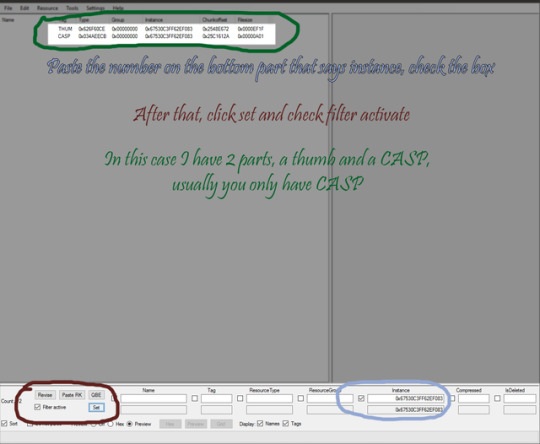
Open it and copy the numbers after ‘’instance’’.
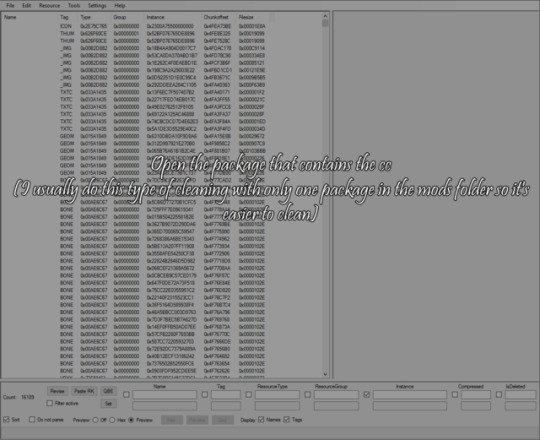
Open the package that contains in this case the hairs (in your case it can be cloths or anything like that)
Click once in ‘’chunkoffset”
Paste the number on the bottom part that says instance, check the box
Than click set and check filter activate (In this case I have 2 parts, a thumb and a casp, usually you only have CASP)
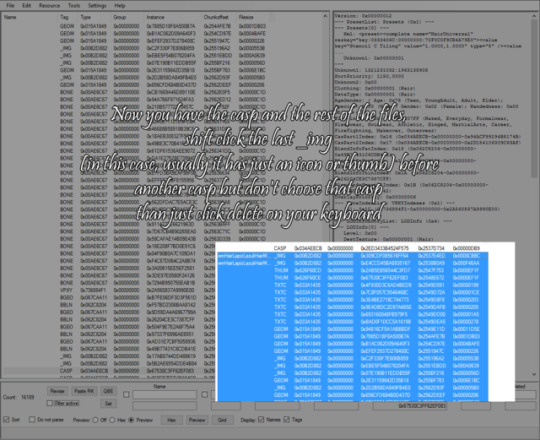
Select CASP and uncheck filter activate.
Now you have the casp and the rest of the folders, shift click the last _img (in this case, usually it has just an icon or thumb) before another casp but don’t choose that casp than just click delete on your keyboard.
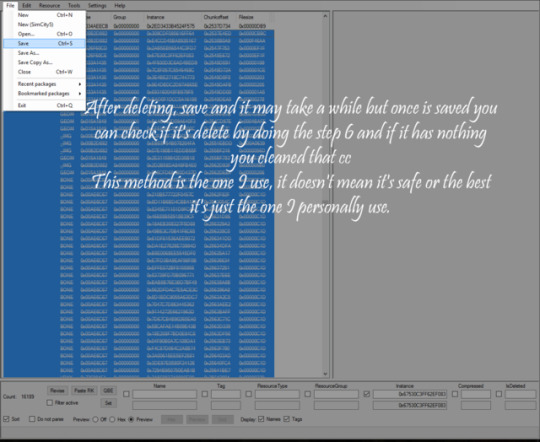
After deleting you will save and it may take a while but once is saved you can check if it’s delete by doing step 6 and 7 again
This method is the one I use, it doesn’t mean it’s safe or the best it’s just the one I personally use :) You can delete the .txt folder it won’t be needed again :)
HOPE THIS HELPED, KISSES AND COOKIES

463 notes
·
View notes
Text
0 notes
Video
youtube
Terraform on AWS - Remote State Storage and State Locking with AWS S3 an...
#youtube#🚀 Master Terraform Remote State Management on AWS with S3 and DynamoDB! 🚀 In this comprehensive tutorial we’ll explore how to configure T
0 notes
Text
Does anyone know how to do borders on mobile? I found cute Yellowjacket ones but I’ve tried so many times to get it to work but it literally doesn’t :( does anyone know how to do it?
#yellowjackets#yellowjackets fandom#yellowjackets s3#yellowjackets season 3#yellowjackets showtime#yellowjackets spoiler#lottie yellowjackets#wlw yearning#lottie mathews x reader#adult lottie#help#send help#tutorial#writers on tumblr
0 notes
Text
#aws cloud#aws ec2#aws s3#aws serverless#aws ecs fargate tutorial#aws tutorial#aws cloud tutorial#aws course#aws cloud services#aws apprunner#aws rds postgres
0 notes
Text
Custom POP: Number Five
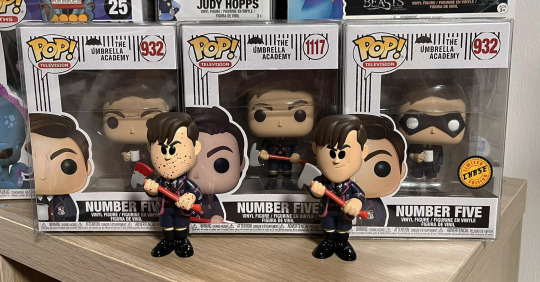
Official Funko POP! figures for The Umbrella Academy series for the first and second season.

My Custom POP! Five from Season 3


My Custom POP! Five from Season 4
How to make?
You need three official Funko Pop figures!
Batman (2022) - Bruce Wayne (Suit) #1193 Head for S3 figure, body for S4 figure
Westworld - Dr. Robert Ford #460 Body for S3 figure (thanks for the recommendation @lokinightfury)
Dune - Paul Atreides #1026 or #1493 Head for S4 figure
On youtube you can find tutorials for creating custom figures. I recommend you do some research.
Anyway, by soaking the figure in hot water you can soften the plastic of the head and it is easier to separate (beware of hot water, it will also flow into the head of the figure, so don't burn yourself!). But you might be able to separate the figure heads without it. The neck joint can then be snapped back.
If you get the Paul with #1026 you win, if you get the #1493 version you will have to repaint his eyes. Hopefully you'll have more talent than me for that, haha. 😁

I hope this helped someone, I had questions about how I managed to get/make the figures. If you make your own, I'd be happy if you share a photo.
#the umbrella academy#funko pop#figures#custom#custom pop#custom figures#how to make a custom figure#number five#five hargreeves#S1#S2#S3#S4#aidan gallagher#How to make?
54 notes
·
View notes
Text
List of Offical Patches
Friendly reminder as we go through the 2025 ClueCrewPlayThru that Her Interactive has released a bunch of different patches for various issues throughout the years! This may not fix every bug, but I do hope it helps some of you out. (Full webpage here)
Game Patches
#1 – Nancy Drew: Secrets Can Kill
Patch – Secrets Can Kill: Flower Puzzle in Aunt Eloise’s Safe
#2 – Nancy Drew: Stay Tuned for Danger
Patch – Stay Tuned for Danger: Mattie’s Cabinet and Senior Detective Timer
#3 – Nancy Drew: Message in a Haunted Mansion
Patch – Message in a Haunted Mansion: Bird Inlay Puzzle and CSound Error
#5 – Nancy Drew: The Final Scene
Patch – The Final Scene: Simone’s Purse, Stuck in Projector Room, and Installer
#6 – Nancy Drew: Secret of the Scarlet Hand
Patch – Secret of the Scarlet Hand: Phone call and Monolith Freeze
#7 – Nancy Drew: Ghost Dogs of Moon Lake
Patch – Ghost Dogs of Moon Lake: Cola Puzzle and Gameplay Errors
#9 – Nancy Drew: Danger on Deception Island
Patch – Danger on Deception Island: Clams Missing and CSound Error
#10 – Nancy Drew: The Secret of Shadow Ranch
Patch – The Secret of Shadow Ranch: Zrender Error, Fifth Key, and Gameplay Error
#11 – Nancy Drew: Curse of Blackmoor Manor
Patch – Curse of Blackmoor Manor: Cricket Ball and Column Key Missing
#13 – Nancy Drew: Last Train to Blue Moon Canyon
Patch – Last Train to Blue Moon Canyon: Taffy Sort Puzzle
#16 – Nancy Drew: The White Wolf of Icicle Creek
Patch – The White Wolf of Icicle Creek: CD Version Patch – The White Wolf of Icicle Creek: Isis Command Box
Patch – The White Wolf of Icicle Creek: Digital Download Version
Patch – The White Wolf of Icicle Creek: S3/Via Unichrome Video Card
#17 – Nancy Drew: Legend of the Crystal Skull
Patch – Legend of the Crystal Skull: Mushroom Missing from Inventory
#19 – Nancy Drew: The Haunting of Castle Malloy
Patch – The Haunting of Castle Malloy: Nancy Walks in Place and Kyler Conversation Freeze – Digital Download Patch – The Haunting of Castle Malloy: Nancy Walks in Place and Kyler Conversation Freeze – CD Version
#22 – Trail of the Twister
Patch – Trail of the Twister: Doppler Radar Screen
#23 – Shadow at the Waters Edge
Patch – Shadow at the Water’s Edge: Delete Channels on Recorder; Tea Ceremony Labels
#26 – Tomb of the Lost Queen
Patch – Tomb of the Lost Queen: Locked Letters in Decode Puzzle
#34 – Mystery of the Seven Keys
Patch – Mystery of the Seven Keys: Classic Mode Tutorial Cursor
#tech help#patches#nancy drew games#nancy drew pc games#her interactive#Nancy Drew#cluecrewplaythru#ccptfortnight
54 notes
·
View notes
Text
Oh, Copper King, you cannot escape your history...
Pix [mining a small copper node]: "But the other thing I'm going to--" [a loud peal of thunder suddenly rumbles overhead] Pix: "Ooh, yikes! The minute I broke some copper some thunder rolled in the background! Well, that's probably a sign I should make more lightning rods, huh?"
Easy Ender Pearl Teleporters! ▫ Minecraft Survival Guide S3 ▫ Tutorial Let's Play [Ep.109]
77 notes
·
View notes
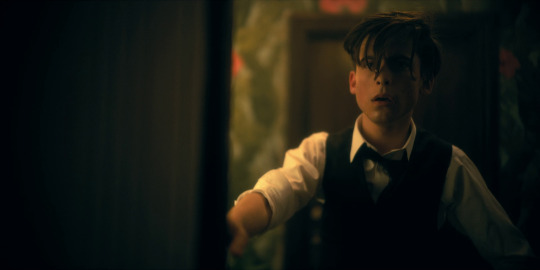
Note
your most recent drawing of persephone was beautiful! I have a quick question, what brush did you use for the outlining? also I lied I have another question, would u ever be willing to do a speed paint or tutorial on how ur able to draw in Rachels style? maybe even how u draw/or like a speed paint of ur style in rekindled? thank you!!
Thanks so much!
I'm pretty much using all the exact brushes that Rachel outlined in her old FAQ, these brushes are available in my LO brush pack :) (as well as many more that were used for the production of the comic from S1 to S3!)
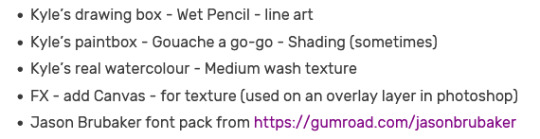
(one thing I will add is that the Gouache A Go Go brush makes for a great painting brush in general, it's pretty much entirely what I used to create this Minthe drawing ! )
To answer your second question, I draw live on my Twitch usually at least once a week where you can watch me drawing new episodes of Rekindled and other projects ! Other than that, I post older VOD's and time lapses to my Patreon, VOD's are available for all patrons and time lapses of Rekindled episodes are available for just $5/month ! (there are a few $3 time lapses as well, including the most recent one of the Aphrodite butt drawing LMAO)
That said, now that I'm getting my video production stuff going, I'm hoping to do some actual in-depth tutorials sometime, tailored to both the LO style as well as the LR style. I don't know when exactly those will be ready but I'm hoping to get one out in the near future, especially now that I have the extra time during the hiatus to focus on stuff like that.
Hope that helps! Good luck! (๑•̀ㅂ•́)و✧
27 notes
·
View notes