#Step-by-Step: Installing Ubuntu on VMware
Explore tagged Tumblr posts
Visit Tumblr Blog
Explore Tumblr blogs with no restrictions, modern design and the best experience.
Last Seen Tumblr Blogs


Fun Fact
The “We are the 99%” Tumblr blog became the slogan for the Occupy Wall Street movement.
Video
youtube
Hands-On Guide: How to Install and Set Up Ubuntu and CentOS on VMware
Overview:
Setting up Ubuntu and CentOS on VMware is a crucial skill for DevOps professionals who want to create isolated environments for testing, development, and automation workflows. VMware allows you to run multiple virtual machines (VMs) on a single system, enabling you to experiment with different Linux distributions without altering your primary operating system. In this hands-on guide, we’ll walk through the steps to install and configure both Ubuntu and CentOS on VMware, covering the key settings and best practices for optimizing performance in DevOps environments.
VMware: Getting Started
Step 1: Install VMware Workstation
To begin, you’ll need VMware Workstation or VMware Player installed on your system. Here’s how:
- Download VMware: Visit the official VMware website and download either VMware Workstation or VMware Player depending on your preference. Workstation is a paid tool with advanced features, while Player is a free option that’s perfect for basic VMs. - Install VMware: Run the installer and follow the setup wizard. Once installed, launch VMware.
Step-by-Step: Installing Ubuntu on VMware
Step 1: Download Ubuntu ISO
- Go to the [official Ubuntu website](https://ubuntu.com/download) and download the LTS (Long Term Support) version of Ubuntu, ensuring you have a stable version for long-term usage in your DevOps workflows.
Step 2: Create a New Virtual Machine in VMware
- Open VMware Workstation or VMware Player and select “Create a New Virtual Machine.” - Choose the ISO image by selecting the downloaded Ubuntu file, then click Next.
Step 3: Allocate Resources
- CPU: Assign at least 2 CPUs for smooth operation. - RAM: Allocate at least 4GB of RAM for optimal performance. You can assign more if your system allows. - Storage: Provide at least 20GB of disk space, especially if you plan to install DevOps tools.
Step 4: Installation of Ubuntu
- Start the VM, and Ubuntu’s installation wizard will appear. - Follow the prompts: choose language, keyboard settings, and select Install Ubuntu. - Choose installation type (erase disk if it’s a fresh VM) and configure time zones, user account, and password. - After installation, update your system by running: ```bash sudo apt update && sudo apt upgrade -y ```
Step 5: VMware Tools Installation
Installing VMware Tools improves VM performance, enabling better integration with the host machine.
- In VMware, go to the VM menu and select Install VMware Tools. ```bash sudo apt install open-vm-tools open-vm-tools-desktop -y sudo reboot vmware-toolbox-cmd -v ``` Verify VMware Tools Installation:
```bash vmware-toolbox-cmd -v ```
Step 6: Post-Installation Setup for DevOps
- Install Basic DevOps Tools: ```bash sudo apt install git curl vim ``` - Enable SSH Access: ```bash sudo apt install openssh-server sudo systemctl enable ssh sudo systemctl start ssh ```
Step-by-Step: Installing CentOS on VMware
Step 1: Download CentOS ISO
- Visit the [official CentOS website](https://www.centos.org/download/) and download the CentOS 7 or 8 version (or CentOS Stream, depending on your preference).
Step 2: Create a New Virtual Machine in VMware
- Open VMware and choose “Create a New Virtual Machine.” - Select the CentOS ISO image and proceed to the next step.
Step 3: Allocate Resources
- CPU: Assign at least 2 CPUs. - RAM: Assign at least 4GB of RAM for smooth operations, especially if you’re installing enterprise tools. - Storage: Allocate 20GB or more, depending on your intended use case.
Step 4: Installation of CentOS
- Start the VM, and the CentOS installation wizard will load. - Choose your language and keyboard settings, then proceed to the installation screen. - Configure disk partitioning (choose automatic for simplicity). - Set up a root password and create a user account. - Follow the prompts to install CentOS. Once done, reboot the VM.
Step 5: Install VMware Tools
For better performance, install VMware Tools:
- In the VMware menu, select Install VMware Tools.
- Update Your System: ```bash sudo yum update -y ``` - Install open-vm-tools: ```bash sudo yum install open-vm-tools -y ``` - For graphical environment: ```bash sudo yum install open-vm-tools-desktop -y ``` - Start the vmtoolsd Service: ```bash sudo systemctl enable vmtoolsd.service sudo systemctl start vmtoolsd.service ``` - Verify Installation: ```bash vmware-toolbox-cmd -v ```
Step 6: Post-Installation Setup for DevOps
- Install EPEL (Extra Packages for Enterprise Linux) and Basic DevOps Tools: ```bash sudo yum install epel-release sudo yum install git curl vim ``` - Enable SSH Access: ```bash sudo yum install openssh-server sudo systemctl enable sshd sudo systemctl start sshd ``` - Verify installed tools: ```bash git --version curl --version vim --version ```
Best Practices for Installing and Setting Up Ubuntu and CentOS on VMware
1. Resource Allocation: Ensure you allocate sufficient CPU, RAM, and storage based on the workloads. For most DevOps tasks, assign at least 2 CPUs and 4GB of RAM for optimal performance. More demanding workloads may require additional resources.
2. Snapshots: Regularly take VM snapshots before major changes or installations. This allows you to revert to a stable state if something goes wrong during configuration or software testing.
3. VMware Tools Installation: Always install VMware Tools after setting up the OS. This ensures seamless mouse integration, smoother graphics, and better performance, reducing potential bugs and lag in your virtual environment.
4. Partitioning: For better performance and management, use custom partitioning if needed. This helps in allocating different parts of your virtual disk to `/`, `/home`, and `/var` partitions, improving system performance and flexibility in future updates or installations.
5. Automated Backups: Set up automated backups or export your VMs periodically. This practice is particularly important if your VMs store critical configurations, applications, or databases.
6. Networking Configuration: Ensure that your virtual machines are correctly configured to access the internet and your local network. Consider using NAT or Bridged Network options, depending on your networking needs. NAT works well for internet access, while Bridged is ideal for networked environments.
7. Security Considerations: Configure firewalls and SSH access carefully to secure your VMs from unauthorized access. Set up strong user permissions, enforce password complexity, and enable SSH keys for secure remote access.
8. Regular System Updates: Frequently update both Ubuntu and CentOS systems to ensure they are protected from vulnerabilities. Use the following commands to update packages: - For Ubuntu: ```bash sudo apt update && sudo apt upgrade ``` - For CentOS: ```bash sudo yum update ```
9. Monitor Resource Usage: VMware allows you to monitor CPU, memory, and storage usage. Use these tools to ensure that your VMs are not consuming excessive resources, especially in shared environments.
10. Test Environments: Use VMs as sandbox environments to test and experiment with new DevOps tools like Docker, Kubernetes, Jenkins, or Ansible before deploying them in production.
Conclusion:
By installing and setting up both Ubuntu and CentOS on VMware, you gain the flexibility to experiment with DevOps tools, test automation workflows, and learn Linux system administration in a safe and isolated environment. This hands-on tutorial provides you with the foundation to run and manage your Linux VMs effectively, setting you up for success in DevOps tasks ranging from development to deployment automation. Follow along in this video as we guide you step-by-step to mastering Linux installations on VMware for your DevOps journey.
#youtube#Install VMware Workstation#Step-by-Step: Installing Ubuntu on VMware#ubuntuGetting Started with Linux Installation and Basic Setuplinux tutorial for beginnersopen sourcelinux terminaldistrotubeubuntu is badlin#vmwareubuntuHands On Guide: How to Install and Set Up Ubuntu and CentOS on VMwarevmware workstationcentos 7download and install vmware works#Linux Install and Setup OverviewInstall and Setup VMware Workstation Pro 17Installing Ubuntu on VMware Workstation Pro 17Installing CentOS o
1 note
·
View note
Text
How To Install Ubuntu On Mac Using VMware Fusion With Easy Install
Learn how to install Ubuntu on Mac using VMware Fusion with Easy Install through this detailed guide by Tutorials24x7. Perfect for developers and Linux enthusiasts, the tutorial simplifies the setup process, enabling a smooth Ubuntu experience on macOS. Follow clear steps to run Ubuntu virtually without affecting your primary macOS environment.
0 notes
Text
The Ultimate Beginner's Guide to Learning Linux
Linux is an open-source operating system that powers everything from smartphones to supercomputers. Unlike proprietary operating systems like Windows and macOS, Linux is freely available to everyone. It’s known for its stability, security, and flexibility, making it an ideal choice for developers, system administrators, and tech enthusiasts.
Why Learn Linux?
1. High Demand for Linux Professionals Learning Linux opens up numerous job opportunities in fields like system administration, software development, cloud computing, and cybersecurity. Linux is the backbone of many cloud services, data centers, and tech companies.
2. Open-Source Nature Linux is open-source, meaning it is free to use, and its source code is available to modify. This is a key reason why it’s favored by tech communities worldwide.
3. Flexibility and Control Linux gives users full control over their system. It is highly customizable, allowing you to build an operating system tailored to your needs.
4. Learn Command-Line Skills The command line is a powerful tool in Linux, and mastering it will help you become more proficient in navigating and managing your system efficiently.
What You Will Learn in This Linux Course
Here’s a breakdown of the essential skills and concepts that would be covered in a comprehensive Linux course.
1. Basic Linux Commands You’ll start with basic commands like ls, cd, pwd, and mkdir. These are the building blocks that help you navigate the file system and manage files.
2. File Permissions and Ownership Learn how to manage file permissions and ownership to secure your system and ensure that users and groups have the correct access rights to files.
3. File System Structure Understand the Linux directory structure, including root directories (/, /home, /etc, etc.), and how to efficiently navigate through the filesystem.
4. User Management You’ll learn how to create, delete, and modify user accounts, as well as manage groups and user permissions.
5. Process Management Linux gives you full control over running processes. You’ll learn how to manage processes with commands like ps, top, kill, and how to use nice and renice to control process priorities.
6. Package Management Linux distributions use package managers to install, remove, and update software. Learn how to use package managers like apt (for Debian-based systems) or yum (for Red Hat-based systems).
7. Networking Basics Linux provides a variety of networking tools. You’ll learn how to configure network interfaces, troubleshoot connections, and use tools like ping, netstat, and ifconfig.
8. Shell Scripting One of the most valuable skills in Linux is shell scripting. You'll learn how to write scripts to automate tasks, save time, and enhance productivity.
9. System Logs and Monitoring Linux systems generate logs that are crucial for troubleshooting. Learn how to read and interpret system logs, and use tools like dmesg and journalctl to monitor system performance.
10. Security Practices Linux is known for its security features, and in this course, you’ll learn how to harden your system with firewalls, SELinux, and user authentication mechanisms.
How to Get Started
Step 1: Choose a Linux Distribution There are many flavors of Linux to choose from. For beginners, distributions like Ubuntu, Fedora, or Linux Mint are excellent choices. You can download and install them on a virtual machine (VM) or set up a dual boot alongside your main OS.
Step 2: Install VirtualBox or VMware If you prefer to learn without changing your current system, installing a Linux distribution on a virtual machine is a great option. VirtualBox and VMware are free tools that allow you to run Linux on top of your current OS.
Step 3: Use Linux Regularly The best way to learn Linux is by using it regularly. Install it on your computer or run it from a USB stick to get hands-on experience. The more you use it, the more comfortable you will become.
Step 4: Join Linux Communities There are active Linux communities where you can ask questions, share knowledge, and collaborate. Websites like Stack Overflow, Reddit's rlinux, and Linux forums are great resources.
0 notes
Text
Mastering Hadoop Installation on Ubuntu Server: A Step-by-Step Guide
Are you ready to dive into big data processing with Hadoop on Ubuntu Server? Look no further! In this comprehensive guide, we’ll walk you through the installation process step-by-step, ensuring you have everything you need to get started. Whether you’re a Linux aficionado or a Windows RDP enthusiast looking to buy RDP and install Ubuntu on RDP, this guide has you covered.
Understanding Ubuntu Server: Before we delve into the installation process, let’s take a moment to understand Ubuntu Server. Ubuntu is one of the most popular Linux distributions, known for its stability, security, and ease of use. Ubuntu Server is specifically designed for server environments, making it an ideal choice for hosting Hadoop clusters.

2. Setting Up Your Environment: If you’re using Ubuntu Server on a physical machine or a virtual environment like VMware or VirtualBox, ensure that it meets the minimum system requirements for running Hadoop. This includes having sufficient RAM, disk space, and processing power. Alternatively, if you’re considering using Windows RDP, you can buy RDP and install Ubuntu on it, providing a flexible and scalable environment for Hadoop deployment.
3. Installing Ubuntu Server: Begin by downloading the latest version of Ubuntu Server from the official website. Once downloaded, follow the on-screen instructions to create a bootable USB drive or DVD. Boot your system from the installation media and follow the prompts to install Ubuntu Server. Make sure to allocate disk space for the operating system and any additional storage required for Hadoop data.
4. Configuring Network Settings: After installing Ubuntu Server, configure the network settings to ensure connectivity within your environment. This includes assigning a static IP address, configuring DNS servers, and setting up network interfaces. Proper network configuration is essential for communication between Hadoop nodes in a distributed environment.
5. Updating System Packages: Before installing Hadoop, it’s essential to update the system packages to ensure you have the latest security patches and software updates. Use the following commands to update the package repository and upgrade installed packages:bashCopy codesudo apt update sudo apt upgrade
6. Installing Java Development Kit (JDK): Hadoop is built on Java, so you must install the Java Development Kit (JDK) to run Hadoop applications. Ubuntu repositories provide OpenJDK, an open-source implementation of the Java Platform. Install OpenJDK using the following command:bashCopy codesudo apt install openjdk-11-jdk
7. Downloading and Installing Hadoop: Next, download the latest stable release of Hadoop from the official Apache Hadoop website. Once downloaded, extract the Hadoop archive to a directory of your choice. For example, you can use the following commands to download and extract Hadoop:bashCopy codewget https://www.apache.org/dist/hadoop/common/hadoop-3.3.1/hadoop-3.3.1.tar.gz tar -xvf hadoop-3.3.1.tar.gz
8. Configuring Hadoop Environment: After installing Hadoop, you’ll need to configure its environment variables to specify the Java runtime environment and other settings. Edit the hadoop-env.sh file located in the etc/hadoop directory and set the JAVA_HOME variable to the path of your JDK installation:bashCopy codeexport JAVA_HOME=/usr/lib/jvm/java-11-openjdk-amd64
9. Setting Up Hadoop Cluster: Once Hadoop is installed and configured on your Ubuntu Server, you can proceed to set up a Hadoop cluster. This involves configuring Hadoop’s core-site.xml, hdfs-site.xml, and mapred-site.xml configuration files and starting the Hadoop daemons on each node in the cluster.
10. Testing Hadoop Installation: To ensure that Hadoop is installed and configured correctly, you can run some basic tests. Start by formatting the Hadoop Distributed File System (HDFS) using the following command:bashCopy codehdfs namenode -format
Then, start the Hadoop daemons and verify their status using the following commands:bashCopy codestart-dfs.sh start-yarn.sh
Finally, run a sample MapReduce job to confirm that Hadoop is functioning correctly:bashCopy codehadoop jar $HADOOP_HOME/share/hadoop/mapreduce/hadoop-mapreduce-examples-3.3.1.jar pi 16 10000
Congratulations! You’ve successfully installed Hadoop on the Ubuntu Server, ready to tackle big data processing tasks with ease.
In conclusion, setting up Hadoop on the Ubuntu Server is a straightforward process that anyone can accomplish with the right guidance. Whether you’re a Linux enthusiast or prefer the flexibility of Windows RDP, you can buy RDP and install Ubuntu on it to create a robust Hadoop environment. With Hadoop up and running, you’re well-equipped to handle the challenges of big data processing and analysis.
0 notes
Text
So that's what I managed to do... (15.01.2024)
→ As I said earlier, I used today the method I described as "via Linux terminal". from now on I'll be calling it the Bochs method since it's using a Bochs repository.
At a first glance, everything seemed to be really simple - just a couple of terminal commands and you're done.
But troubles came at the simpliest spots.
At the beginning, I accidentally download the Ubuntu v.24.04 beta, and the installer simply didn't open - it just freezed on me (the factory release date for Ubuntu v.24.04 is somewhere in April 2024).
Then I downloaded Ubuntu v.22.10. I installed it and right after installation I opened the good old Terminal to start the adventure.
And right at a first step, I have a crash. Apparently, the source of a trouble was the sudo apt-get install build-essential nasm genisoimage bochs bochs-sdl command. After I encountered the issue, I tried running sudo apt-get update, but this didn't change anything.
Later I tried download the v.21.04 and performing the same operations - no change.
But then my dad came on help and told me that the v.22.04 is marked in Ubuntu's official website as the latest and newest software version. So at moment I'm installing the Ubuntu v.22.04.
Don't worry for my hardware, I'm doing all the cool stuff using the VMware Fusion emulation technologies.
So, tomorrow I'll start learning how to build an OS on a Raspberry Pi computer using the Udemy course I obtained today, as well as continue to research different solutions for my grand task.
0 notes
Text
SANS SIFT Workstation Installation Steps
Hello everyone, as I have promised in my YouTube video which is a Tutorial on SIFT workstation, I am sharing the Unix shell commands required for installing the SIFT workstation. Please follow the steps below and feel free to drop the comments if you need any assistance regarding the topic or want to share any constructive criticism.
Official site for SANS SIFT Workstation installation instruction: https://www.sans.org/tools/sift-workstation/
Steps are as follows:
1. Download Ubuntu 20.04 ISO file and install Ubuntu 20.04 on VMware. For tutorial watch this YouTube Video.
2. Install SIFT-CLI by downloading latest releases of 3 files - “sift-cli-linux”, “sift-cli-linux.sig” & “sift-cli.pub” [check for the latest release]
$ sudo wget <paste the link of latest release from GitHub page> $ sudo wget <paste the link of latest release from GitHub page> $ sudo wget <paste the link of latest release from GitHub page> 3. Install cosign. For installing Cosign, you need to have Go 1.16+ (for installing Golang above 1.16 scroll to the bottom of the post). If the required Go version is installed in your Ubuntu, then copy paste the following command on terminal to install Cosign.
$ go install github.com/sigstore/cosign/cmd/cosign@latest
4. Post successful installation of Cosign we need to validate sift-cli. For that copy-&-paste the following command on terminal
$ cosign verify-blob --key sift-cli.pub --signature sift-cli-linux.sig sift-cli-linux
5. Move the sift-cli file to sift directory under local bin directory. For that copy-&-paste the following command on terminal
$ sudo mv sift-cli-linux /usr/local/bin/sift
6. Assign read, write and execute rights over Sift directory. For that copy-&-paste the following command on terminal
$ sudo chmod 755 /usr/local/bin/sift
7. Finally type the following command and then reboot the machine once the installation is completed
$ sudo sift install
=============================================================
Steps to install Golang on Ubuntu
1. To download the latest version of Go visit the official download page and download the tarball file through terminal. For that use the following command:
$ sudo wget <paste the link of latest release from download page>
2. Extract the tarball to /usr/local directory. For that use the following command:
$ sudo tar -C /usr/local -xzf <file name>
3. Now add the Go binary path to the PATH environment variable. For that use the following command:
$ export PATH=$PATH:/usr/local/go/bin
4. Apply changes by using following command:
$ source ~/.bashrc
5. You can verify if the installation is completed, by checking the version
$ go version
!!!!! Happy Learning !!!!!!
=============================================================
#dfir#digital forensics#sift workstation#sans#sift workstation 2021#sans tutorial#tutorial#ubuntu#ubuntu installation#golang#golang installation
2 notes
·
View notes
Text
Creating Kali Virtual Machine: VMware
This is a guide on how to create a Kali Linux virtual machine using VMware. Kali Linux is a ‘distribution’ (or version) of Linux which comes preloaded with many tools useful for hacking/penetration testing.
The first step is to download VMware Workstation Player. This can be found here.
Once you have downloaded VMware, you will need a Kali ‘image’, which is a file containing the operating system. You can download one for VMware here. make sure you get the right one for your windows architecture (You can find if you use 32- or 64-bit windows here). It should download as a .zip file, so you will have to unzip it. After opening the folders, you should have files looking like the following:

When you open VMware Workstation Player it should look like this:
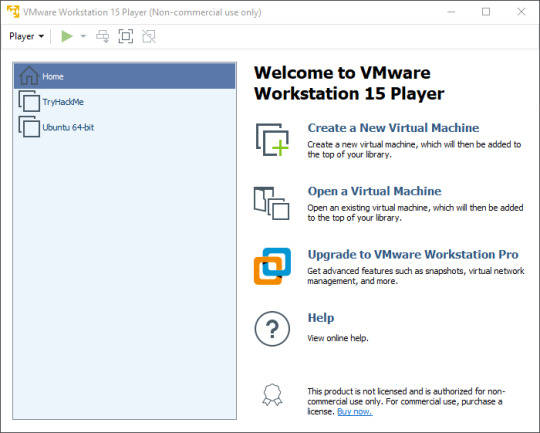
Here I already have some VMs installed, so on your version it should be missing TryHackMe and Ubuntu (Note: TryHackMe is a website for practicing hacking, it is not an invitation to hack me). Next we’re going to click ‘Open a Virtual Machine’ and navigate to the folders we unzipped earlier. You should only see one file:
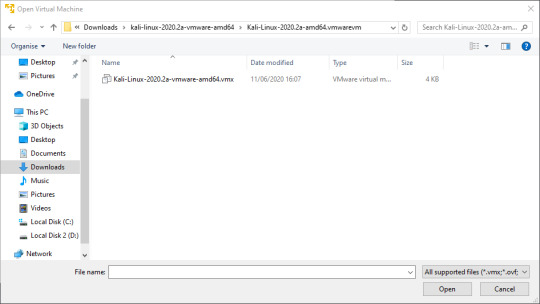
Double click that file to open the Kali VM. You should see the new VM on the home screen of Workstation Player.

You can right click on that VM to rename it, or to change the settings. Let’s change the settings.

Let’s leave the memory at the recommended amount (This may vary depending on your computer). I normally change the Network Adapter to ‘Bridged’ but you can play around and see what fits you better. We are also going to leave every other setting at the default.

Now click ‘OK’ to go back to the home screen, and then click ‘Play virtual machine’ to start your Kali machine.
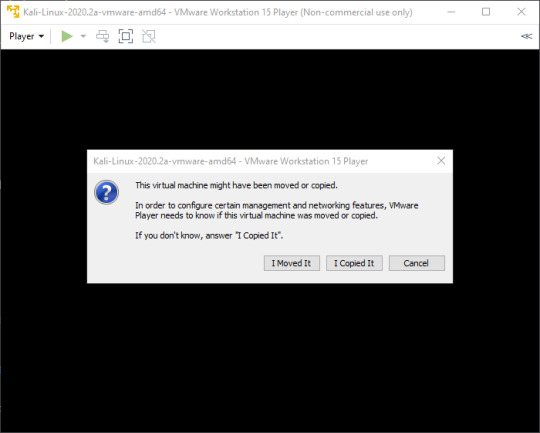
If you see this screen, just click ‘I Copied It’.
After some loading screens you should see a login page.
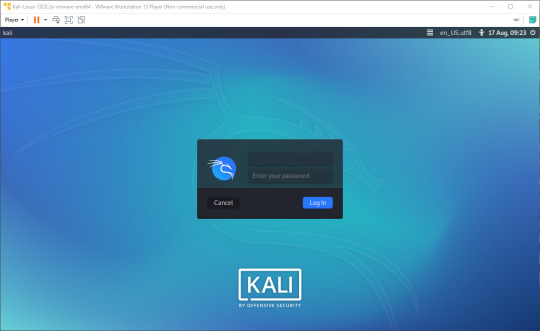
(Depending on the version of Kali installed, it may look slightly different)
The default login credentials should be ‘kali’/’kali’, but if this doesn’t work you should look on the Kali site to see if they have changed. You should now see a screen like this:
Congratulations! You have now deployed a virtual machine. You can find a post explaining how to secure your new VM against being hacked here
6 notes
·
View notes
Text
A Vagrant Story
Like everyone else I wish I had more time in the day. In reality, I want to spend more time on fun projects. Blogging and content creation has been a bit on a hiatus but it doesn't mean I have less things to write and talk about. In relation to this rambling I want to evangelize a tool I've been using over the years that saves an enormous amount of time if you're working in diverse sandbox development environments, Vagrant from HashiCorp.
Elevator pitch
Vagrant introduces a declarative model for virtual machines running in a development environment on your desktop. Vagrant supports many common type 2 hypervisors such as KVM, VirtualBox, Hyper-V and the VMware desktop products. The virtual machines are packaged in a format referred to as "boxes" and can be found on vagrantup.com. It's also quite easy to build your own boxes from scratch with another tool from HashiCorp called Packer. Trust me, if containers had not reached the mainstream adoption it has today, Packer would be a household tool. It's a blog post in itself for another day.
Real world use case
I got roped into a support case with a customer recently. They were using the HPE Nimble Storage Volume Plugin for Docker with a particular version of NimbleOS, Docker and docker-compose. The toolchain exhibited a weird behavior that would require two docker hosts and a few iterations to reproduce the issue. I had this environment stood up, diagnosed and replied to the support team with a customer facing response in less than an hour, thanks to Vagrant.
vagrant init
Let's elaborate on how to get a similar environment set up that I used in my support engagement off the ground. Let's assume vagrant and a supported type 2 hypervisor is installed. This example will work on Windows, Linux and Mac.
Create a new project folder and instantiate a new Vagrantfile. I use a collection of boxes built from these sources. Bento boxes provide broad coverage of providers and a variety of Linux flavors.
mkdir myproj && cd myproj vagrant init bento/ubuntu-20.04 A `Vagrantfile` has been placed in this directory. You are now ready to `vagrant up` your first virtual environment! Please read the comments in the Vagrantfile as well as documentation on `vagrantup.com` for more information on using Vagrant.
There's now a Vagrantfile in the current directory. There's a lot of commentary in the file to allow customization of the environment. It's possible to declare multiple machines in one Vagrantfile, but for the sake of an introduction, we'll explore setting up a single VM.
One of the more useful features is that Vagrant support "provisioners" that runs at first boot. It makes it easy to control the initial state and reproduce initialization with a few keystrokes. I usually write Ansible playbooks for more elaborate projects. For this exercise we'll use the inline shell provisioner to install and start docker.
Vagrant.configure("2") do |config| config.vm.box = "bento/ubuntu-20.04" config.vm.provision "shell", inline: <<-SHELL apt-get update apt-get install -y docker.io python3-pip pip3 install docker-compose usermod -a -G docker vagrant systemctl enable --now docker SHELL end
Prepare for very verbose output as we bring up the VM.
Note: The vagrant command always assumes working on the Vagrantfile in the current directory.
vagrant up
After the provisioning steps, a new VM is up and running from a thinly cloned disk of the source box. Initial download may take a while but the instance should be up in a minute or so.
Post-declaration tricks
There are some must-know Vagrant environment tricks that differentiate Vagrant from right-clicking in vCenter or fumbling in the VirtualBox UI.
SSH access
Accessing the shell of the VM can be done in two ways, most commonly is to simply do vagrant ssh and that will drop you at the prompt of the VM with the predefined user "vagrant". This method is not very practical if using other SSH-based tools like scp or doing advanced tunneling. Vagrant keeps track of the SSH connection information and have the capability to spit it out in a SSH config file and then the SSH tooling may reference the file. Example:
vagrant ssh-config > ssh-config ssh -F ssh-config default
Host shared directory
Inside the VM, /vagrant is shared with the host. This is immensely helpful as any apps your developing for the particular environment can be stored on the host and worked on from the convenience of your desktop. As an example, if I were to use the customer supplied docker-compose.yml and Dockerfile, I'd store those in /vagrant/app which in turn would correspond to my <current working directory for the project>/app.
Pushing and popping
Vagrant supports using the hypervisor snapshot capabilities. However, it does come with a very intuitive twist. Assume we want to store the initial boot state, let's push!
vagrant snapshot push ==> default: Snapshotting the machine as 'push_1590949049_3804'... ==> default: Snapshot saved! You can restore the snapshot at any time by ==> default: using `vagrant snapshot restore`. You can delete it using ==> default: `vagrant snapshot delete`.
There's now a VM snapshot of this environment (if it was a multi-machine setup, a snapshot would be created on all the VMs). The snapshot we took is now on top of the stack. Reverting to the top of the stack, simply pop back:
vagrant snapshot pop --no-delete ==> default: Forcing shutdown of VM... ==> default: Restoring the snapshot 'push_1590949049_3804'... ==> default: Checking if box 'bento/ubuntu-20.04' version '202004.27.0' is up to date... ==> default: Resuming suspended VM... ==> default: Booting VM... ==> default: Waiting for machine to boot. This may take a few minutes... default: SSH address: 127.0.0.1:2222 default: SSH username: vagrant default: SSH auth method: private key ==> default: Machine booted and ready! ==> default: Machine already provisioned. Run `vagrant provision` or use the `--provision` ==> default: flag to force provisioning. Provisioners marked to run always will still run.
You're now back to the previous state. The snapshot sub-command allows restoring to a particular snapshot and it's possible to have multiple states with sensible names too, if stepping through debugging scenarios or experimenting with named states.
Summary
These days there's a lot of compute and memory available on modern laptops and desktops. Why run development in the cloud or a remote DC when all you need is available right under your finger tips? Sure, you can't run a full blown OpenShift or HPE Container Platform but you can certainly run a representable Kubernetes clusters where minishift, microk8s and the likes won't work if you need access to the host OS (yes, I'm in the storage biz). In a recent personal project I've used this tool to simply make Kubernetes clusters with Vagrant. It works surprisingly well and allow a ton of customization.
Bonus trivia
Vagrant Story is a 20 year old videogame for PlayStation (one) from SquareSoft (now SquareEnix). It features a unique battle system I've never seen anywhere else to this day and it was one of those games I played back-to-back three times over. It's awesome. Check it out on Wikipedia.
1 note
·
View note
Text
BlackArch Linux is a penetration testing distribution based on Arch Linux. Its repository contains about 2808 tools that can be installed in groups or individually. These tools, developed along with their dependencies are used by penetration testers and security researchers around the world. In comparison, BlackArch Linux closely resembles Parrot and Kali Linux in use with the main difference being that this is an Arch-based system. BlackArch Linux can be installed in several ways. These include: ISO installation – BlackArch can be burned to a CD/USB and run as a Live system. The ISO installation offers two options: BlackArch Slim ISO: This ISO only provides the Xfce desktop environment. BlackArch Full ISO: Provides multiple preconfigured Window Managers. OVA image installation – This is the recommended method to install BlackArch on VMware, Virtualbox or QEMU Install to existing Arch Linux – It is possible to install and use BlackArch by adding the user repository to an existing Arch Linux installation. Here you can install and use the penetration testing tools just like you would do on any other BlackArch installation. By following this guide, you will be able to install BlackArch Linux on VirtualBox / VMWare Workstation using an OVA image. Getting Started. For this guide, you need to have VirtualBox or VMWare Workstation installed on your system. The dedicated guides below will help you install VirtualBox / VMWare Workstation on your system. Install VirtualBox How To Install VirtualBox on CentOS 8 / RHEL 8 Install VirtualBox on Debian How To Install VirtualBox on Fedora How To Install VirtualBox on Kali Linux / Linux Mint Install VirtualBox on Ubuntu Install VMware Workstation Install VMware Workstation on Debian Install VMWare Workstation on CentOS 8 Install VMware Workstation on Arch Linux / Manjaro Install VMware Player and Workstation on Kali Linux Once VirtualBox / VMWare Workstation is installed, proceed as below. Step 1 – Download the BlackArch OVA image The BlackArch OVA image can be downloaded from the official BlackArch Linux downloads page. There is a list of mirrors provided to help you download the OVA image easily. Alternatively, you can pull this 64 bit OVA image from the Linux terminal using Wget as below: wget https://mirrors.fosshost.org/blackarch/ova/blackarch-linux-2021.09.01.ova The download may take some time depending on the internet speed and the mirror selected. Once complete, proceed to the next step below. Step 2 – Create the BlackArch Linux Virtual Machine The BlackArch OVA file contains all the required BlackArch Linux Virtual Machine configurations. All you need to do is import the OVA file to VirtualBox / VMWare Workstation. 1. On VirtualBox To import the BlackArch OVA file on VirtualBox, click on Tools>Import. Proceed and load the downloaded OVA file from your local storage. Once loaded, all the preconfigured settings will be displayed as below. Proceed and import the OVA file. Next, agree to the License Terms. The OVA will be imported as below. Sit back and wait for the process to complete. Once done, you will have the BlackArch Linux VM created as below: You can customize the settings for your VM before you start it. 2. On VMWare Workstation VMWare Workstation also allows one to import a Virtual machine from OVA files. To achieve this, click on Open a Virtual Machine Now load the BlackArch OVA file and agree to the License Terms. Proceed and set the VM name and the preferred storage location. Sit back and wait for the importation process to complete. Once complete, the BlackArch Linux VM will be ready. Step 3 – Launch the BlackArch Linux Virtual Machine. At this point, you should have the BlackArch Linux Virtual Machine ready to be started/powered on. Start the Virtual Machine and proceed as below. Before you log in to your system, you can set the preferred desktop and language.
For this guide, I will keep the defaults. Login to BlackArch Linux using the default credentials: Username: root Password: blackarch Fill in the credentials as shown below: On successful login, you will see the below BlackArch Linux desktop. Launch tools by right-clicking on the desktop. For example, launching the terminal, I will proceed as below. Once the terminal has been launched, you can run the desired commands. To update the system, issue the command: pacman -Syu Sample output: Install a Package on BlackArch Linux List the available software categories pacman -Sg | grep blackarch Sample Output: You can as well list packages in a category, say in the blackarch-firmware as below: pacman -Sgg | grep blackarch-firmware Output: Installing a package on BlackArch Linux can be achieved in the following two ways: Install all the packages in a category It is possible to install all the packages in a category with a single command. For example, to install packages in the blackarch-firmware category, we will issue the command: pacman -S blackarch-firmware Output: Install an individual package with its name. You can also install a single package in a category by specifying the name, For example, to install the firmwalker offered in the blackarch-firmware category, use the command: pacman -S firmwalker Output: The end! We have successfully installed BlackArch Linux on VirtualBox / VMWare Workstation using the OVA image. You can now proceed and explore the amazing features offered by this Linux distribution. I hope you enjoyed it.
0 notes
Text
Usb network gate waiting for daemon to launch mac


You can follow the same instructions for CentOS and Rocky Linux. I will show you through the step-by-step installation of the Memcached distributed memory object caching system on an AlmaLinux 8. The installation is quite simple and assumes you are running in the root account, if not you may need to add ‘sudo‘ to the commands to get root privileges. This article assumes you have at least basic knowledge of Linux, know how to use the shell, and most importantly, you host your site on your own VPS. This reduces the number of times an external data source must be read, which lowers overheads and speeds up response times. Memcached is used to speed up dynamic database-driven websites by caching data and objects in RAM. For those of you who didn’t know, Memcached is a free and open-source high-performance distributed memory caching system. In this tutorial, we will show you how to install Memcached on AlmaLinux 8. How To Install Memcached on AlmaLinux 8 – idroot.In this article, I am going to show you how to install VMware Workstation Pro 16 on some common Linux distributions, such as Ubuntu 20.04 LTS, Debian 11, and Fedora 34. You will have amazing experience running virtual machines on VMware Workstation Pro 16. The user interface of the virtual machine will also be very responsive. So, technically you can play games on your VMware Workstation Pro 16 virtual machines. For Linux virtual machines, VMware Workstation Pro 16 supports OpenGL 4.1 3D acceleration. The VMware Workstation Pro 16 supports DirectX 11 3D acceleration for Windows virtual machines. It has outstanding 3D acceleration support for both the Windows and Linux virtual machines. VMware Workstation Pro 16 is one of the best Type-2 Hypervisor. The latest version of VMware Workstation Pro is 16. How to Install VMware Workstation Pro 16 on Linux.However, a huge number of these images are unmaintained, so you need to be selective about which images to explore. It’s the most popular place to grab images with more than 100,000 container images. These images are retrieved from Docker Hub, a registry managed by the Docker project. Getting Started with Docker: Docker Images – LinuxLinksĭocker is a set of platform as a service (PaaS) products that use OS-level virtualization to deliver software in packages called containers.ĭocker containers are built from Docker images.This list showcases some feature-rich and efficient Docker alternatives to use in your next project. If you’re searching for some alternatives to Docker, look no further. Docker is useful in the containerization process, but it’s not the only platform around.

The 9 Best Docker Alternatives for Container ManagementĬontainers are highly beneficial for software development, deployment, and management in a virtual environment.
They won’t appear in your launchers or menus – instead you will have to find them and launch them one by one, or create your own launcher scripts. AppImages, being single-file executables, are not integrated into your system. It’s as simple as it can get and proving to be a very robust method to distribute applications that work across numerous distros on Linux. For example, you can download an AppImage for the HeroicLauncher, and then ensure the file can be executed (chmod +x in a terminal for example), launch it… et voila, no need to install it, the application will launch before your eyes. In case you are not too familiar with AppImages, it’s one of the ways on Linux to encapsulate a whole application and its dependencies into a single file. Following further investigation and testing, let me now share with you as well as you might just have a use for it. This was my fist time to come across this application.
AppImageLauncher to Integrate AppImages in Your DistroĪbout a week ago through the discussions we have on our Boiling Steam Matrix Room, someone mentioned in passing that they were using AppImageLauncher.
In the USB/Thunderbolt pull request Greg Kroah-Hartman summarizes this cycle’s work as “nothing major in here, just lots of little cleanups and additions for new hardware.” This time around the changes are on the smaller side but there are two additions worth mentioning. The USB and Thunderbolt updates for the Linux 5.16 kernel have arrived.
USB Additions For Linux 5.16 Include AMD Yellow Carp PM, Apple CD321X – Phoronix.
Word of its new project comes by way of System76’s Michael Murphy, who shared some of the rationale and motivation behind the new DE in series of comments posted on Pop!_OS Sub-reddit at the weekend.Īnd all told: they make for a pretty exciting read. Presently, that distro ships with a modified version of the GNOME desktop called ‘COSMIC‘ (all caps, not me shouting). The US-based company already maintains its own Ubuntu-based Linux distro called Pop!_OS. System76 has revealed it is working a new desktop environment that is not based on GNOME Shell.
System76 is Building its Own Desktop Environment.
0 notes
Video
youtube
How to Install and Set Up Ubuntu 24.04 on VMware Workstation Pro 17 in Windows 11
Overview:
Setting up Ubuntu on VMware is a crucial skill for DevOps professionals who want to create isolated environments for testing, development, and automation workflows. VMware allows you to run multiple virtual machines (VMs) on a single system, enabling you to experiment with different Linux distributions without altering your primary operating system. In this hands-on guide, we’ll walk through the steps to install and configure Ubuntu on VMware, covering the key settings and best practices for optimizing performance in DevOps environments.
VMware: Getting Started
Step 1: Install VMware Workstation
To begin, you’ll need VMware Workstation or VMware Player installed on your system. Here’s how:
- Download VMware: Visit the official VMware website and download either VMware Workstation or VMware Player depending on your preference. Workstation is a paid tool with advanced features, while Player is a free option that’s perfect for basic VMs. - Install VMware: Run the installer and follow the setup wizard. Once installed, launch VMware.
Step-by-Step: Installing Ubuntu on VMware
Step 1: Download Ubuntu ISO
- Go to the [official Ubuntu website](https://ubuntu.com/download) and download the LTS (Long Term Support) version of Ubuntu, ensuring you have a stable version for long-term usage in your DevOps workflows.
Step 2: Create a New Virtual Machine in VMware
- Open VMware Workstation or VMware Player and select “Create a New Virtual Machine.” - Choose the ISO image by selecting the downloaded Ubuntu file, then click Next.
Step 3: Allocate Resources
- CPU: Assign at least 2 CPUs for smooth operation. - RAM: Allocate at least 4GB of RAM for optimal performance. You can assign more if your system allows. - Storage: Provide at least 20GB of disk space, especially if you plan to install DevOps tools.
Step 4: Installation of Ubuntu
- Start the VM, and Ubuntu’s installation wizard will appear. - Follow the prompts: choose language, keyboard settings, and select Install Ubuntu. - Choose installation type (erase disk if it’s a fresh VM) and configure time zones, user account, and password. - After installation, update your system by running: ```bash sudo apt update && sudo apt upgrade -y ```
Step 5: VMware Tools Installation
Installing VMware Tools improves VM performance, enabling better integration with the host machine.
- In VMware, go to the VM menu and select Install VMware Tools. ```bash sudo apt install open-vm-tools open-vm-tools-desktop -y sudo reboot vmware-toolbox-cmd -v ``` Verify VMware Tools Installation:
```bash vmware-toolbox-cmd -v ```
Step 6: Post-Installation Setup for DevOps
- Install Basic DevOps Tools: ```bash sudo apt install git curl vim ``` - Enable SSH Access: ```bash sudo apt install openssh-server sudo systemctl enable ssh sudo systemctl start ssh
Best Practices for Installing and Setting Up Ubuntu on VMware
1. Resource Allocation: Ensure you allocate sufficient CPU, RAM, and storage based on the workloads. For most DevOps tasks, assign at least 2 CPUs and 4GB of RAM for optimal performance. More demanding workloads may require additional resources.
2. Snapshots: Regularly take VM snapshots before major changes or installations. This allows you to revert to a stable state if something goes wrong during configuration or software testing.
3. VMware Tools Installation: Always install VMware Tools after setting up the OS. This ensures seamless mouse integration, smoother graphics, and better performance, reducing potential bugs and lag in your virtual environment.
4. Partitioning: For better performance and management, use custom partitioning if needed. This helps in allocating different parts of your virtual disk to `/`, `/home`, and `/var` partitions, improving system performance and flexibility in future updates or installations.
5. Automated Backups: Set up automated backups or export your VMs periodically. This practice is particularly important if your VMs store critical configurations, applications, or databases.
6. Networking Configuration: Ensure that your virtual machines are correctly configured to access the internet and your local network. Consider using NAT or Bridged Network options, depending on your networking needs. NAT works well for internet access, while Bridged is ideal for networked environments.
7. Security Considerations: Configure firewalls and SSH access carefully to secure your VMs from unauthorized access. Set up strong user permissions, enforce password complexity, and enable SSH keys for secure remote access.
8. Regular System Updates: Frequently update Ubuntu systems to ensure they are protected from vulnerabilities. Use the following commands to update packages: - For Ubuntu: ```bash sudo apt update && sudo apt upgrade ```
9. Monitor Resource Usage: VMware allows you to monitor CPU, memory, and storage usage. Use these tools to ensure that your VMs are not consuming excessive resources, especially in shared environments.
10. Test Environments: Use VMs as sandbox environments to test and experiment with new DevOps tools like Docker, Kubernetes, Jenkins, or Ansible before deploying them in production.
Conclusion:
By installing and setting up Ubuntu on VMware, you gain the flexibility to experiment with DevOps tools, test automation workflows, and learn Linux system administration in a safe and isolated environment. This hands-on tutorial provides you with the foundation to run and manage your Linux VMs effectively, setting you up for success in DevOps tasks ranging from development to deployment automation. Follow along in this video as we guide you step-by-step to mastering Linux installations on VMware for your DevOps journey.
how to install ubuntu 24.04,vmware player,windows 11,vmware workstation player,how to install ubuntu 24.04 lts desktop,How to Install and Set Up Ubuntu 24.04 on VMware Workstation Pro 17 in Windows 11,vmware workstation,vmware workstation 17 pro,ubuntu linux,cloudolus,cloudoluspro,linux,free,How to Post-Installation Setup For DevOps,How to Update and VMware Tools Install in Ubuntu 24.04 LTS?,Linux for DevOps,ubuntu installation,ubuntu 24.04,ubuntu,install ubuntu,
Linux Install and Setup Overview,Install and Setup VMware Workstation Pro 17,Installing Ubuntu on VMware Workstation Pro 17,Installing CentOS on VMware Workstation Pro 17,Linux Install and Setup Best Practices vmware,virtual machine,how to download and install vmware workstation pro,Hands On Guide: How to Install and Set Up Ubuntu and CentOS on VMware,centos 7,download and install vmware workstation on windows 11,the reality of using vmware,vmware tutorial,install centos 7 on vmware,installing centos 7 on vmware,ubuntu installation on vmware workstation 17,Linux Install and Setup Best Practices,cloudoluspro vmware,linux for devops,handson ubuntu,open source,linux terminal,distrotube,ubuntu is bad,linux tutorial,linux for beginners,linux commands,Linux installation,Linux beginner guide,Linux setup,how to install Linux,Linux for beginners,Linux distributions,Ubuntu installation,Fedora installation guide,Linux tips,Linux,Linux basics,DevOps basics,cloud computing,DevOps skills,Linux tutorial,Linux scripting,Linux automation,Linux shell scripting,Linux in DevOps,Ubuntu,CentOS,Red Hat Linux,DevOps tools,ClouDolus,DevOps career,Linux commands for beginners,Linux for cloud,Linux training,devops tutorial Linux,Linux commands for beginners ubuntu,cloud computing Linux for DevOps
***************************** *Follow Me* https://www.facebook.com/cloudolus/ | https://www.facebook.com/groups/cloudolus | https://www.linkedin.com/groups/14347089/ | https://www.instagram.com/cloudolus/ | https://twitter.com/cloudolus | https://www.pinterest.com/cloudolus/ | https://www.youtube.com/@cloudolus | https://www.youtube.com/@ClouDolusPro | https://discord.gg/GBMt4PDK | https://www.tumblr.com/cloudolus | https://cloudolus.blogspot.com/ | https://t.me/cloudolus | https://www.whatsapp.com/channel/0029VadSJdv9hXFAu3acAu0r | https://chat.whatsapp.com/D6I4JafCUVhGihV7wpryP2 *****************************
*🔔Subscribe & Stay Updated:* Don't forget to subscribe and hit the bell icon to receive notifications and stay updated on our latest videos, tutorials & playlists! *ClouDolus:* https://www.youtube.com/@cloudolus *ClouDolus AWS DevOps:* https://www.youtube.com/@ClouDolusPro *THANKS FOR BEING A PART OF ClouDolus! 🙌✨*
#youtube#Linux Install and Setup OverviewInstall and Setup VMware Workstation Pro 17Installing Ubuntu on VMware Workstation Pro 17Installing CentOS o#how to install ubuntu 24.04vmware playerwindows 11vmware workstation playerhow to install ubuntu 24.04 lts desktopHow to Install and Set Up#ClouDolus ClouDolusPro#ClouDolusPro
0 notes
Text
Eve ng windows

#Eve ng windows how to#
#Eve ng windows install#
#Eve ng windows windows 10#
#Eve ng windows pro#
Mind that nested virtualization is not a good thing and can lead to poor performance. Because EVE-NG runs many hypervisor, it’s strongly recommended a physical server dedicated for it, without any virtualization software.
#Eve ng windows windows 10#
how to download and add microsoft windows 10 image host enterprise edition workstation to eve ng. EVE-NG can be also directly installed on the physical hardware, without any virtualization by use of ISO image. 1- When you create a node indide EVE-NG, you assign its interfaces private IP addresses. We need a workaround to Connect nodes inside EVE-NG with the Internet.
#Eve ng windows how to#
after installing eve ng we in this video you will learn installing and configure eve ng in windows 10 to make virtual lab for mikrotik mtcna,mtcre, how to set up eve ng on windows 10? want to know how to setup eve ng? this eve ng tutorial shows you step by step. EVE-NG community edition doesn’t support NAT Cloud.
#Eve ng windows install#
also you know how to donwload and configure eve ng this video we are going to look at that how to install and configure eve ng on windows 10 vmware.
#Eve ng windows pro#
full eve ng installation guide showing you complete installation and setup eve ng : how to install and setup of eve ng community edition in vmware workstation pro with installing and configure eve ng with iol (ios on linux) and mikrotik chr on windows 10 [this video is learning download eve community edition link: eve ng index download #dl comm direct link: hello world if you want to learn more about network security, it or anything related to technology let me know and let us all learn initial eve ng config: how to install and configure eve ng on windows 10 vmware, install eve ng iso in this video you will learn how to install eve ng in you windows machine. In this video we gonna download, install and configure eve ng in windows 10 1 eve ng: eve ng downloads eve ng 2 want to know how to setup eve ng? this eve ng tutorial shows you step by step. I am Yibodong! You are welcome to discuss with me and see you in the next issue.Install And Configure Eve Ng In Windows 10 Enter the address in Google Chrome (or use Firefox browser) 192.168.218.128 Hardware->Network Adapter->Network Connection->Custom (U): Specific Virtual Network->Select Modeġ0. Select "EVE-COMM-EmulatedLab2.0" right mouse button -> Settingsħ. Clientless management options will allow EVE-NG PRO to be as the best choice for Enterprise engineers without influence of corporate security policies as it can. EVE-NG PRO is the first clientless multivendor network emulation software that empowers network and security professionals with huge opportunities in the networking world. Restore the default settings successfully -> OKĦ. It allows enterprises, e-learning providers/centers, individuals and group collaborators to create virtual proof of concepts, solutions and training environments. Currently supports the following URL schemes: telnet:// capture:// docker:// vnc:// (via Vinagre) Includes a script to work with. Lower left corner->Restore default settingsĤ. This repo contains the equivalent of EVE-NG (aka UNetLab) Windows Client Side Pack for Ubuntu/Debian and other Linux distros. At the top left of the "VMware Workstation Pro" interface->Edit->Virtual Network Compilerģ. The following are the detailed steps (simple and rude) of this problem, of course, it also needs specific analysis of the specific situation!Ģ. It is not difficult to solve this method if you reinstall the system in the future, install EVE first, and then add the virtual network card, No IP address on interface pnet0 will not happen. The installation of EVE went smoothly before, but this time it got stuck (stuck at No IP address on interface pnet0). Then I directly come up with a simple and crude method I think I used two default virtual network cards when I installed EVE before, so I just try to restore the default settings today. I checked many methods on the Internet and it didn’t work. When I opened it, I found that there was no address and this picture appeared I didn’t post it for a long time. Some time ago, I reinstalled the system on my computer, and then did a multicast bridge experiment between GNS3 and eNSP.
0 notes
Text
Simplified Installation: Plesk on Windows and Linux - A Comprehensive Guide
Are you looking to streamline your server management process? Whether you're operating on Linux, specifically Ubuntu Server, or Windows RDP, Plesk offers an intuitive solution for managing your web hosting environment. In this guide, we'll walk you through the step-by-step process of installing Plesk on both Linux and Windows servers. Plus, we'll address common questions like where to buy RDP and how to install Ubuntu on RDP. Let's dive in!
Installing Plesk on Linux (Ubuntu Server)
Preparation: Before diving into the installation process, ensure your Ubuntu Server is up to date by running:sqlCopy codesudo apt update && sudo apt upgrade
Download Plesk: Access the official Plesk repository and download the installer script using the following command:arduinoCopy codewget https://installer.plesk.com/plesk-installer
Run Installer: Execute the installer script with the superuser privileges:Copy codesudo sh plesk-installer
Follow On-screen Prompts: The installer will guide you through the installation process. Follow the prompts, including accepting the license agreement and setting up your administrator password.
Access Plesk: Once the installation is complete, access Plesk by navigating to your server's IP address or domain followed by ":8443" in your web browser.
Final Configuration: Complete the initial setup by configuring your server settings and adding domains as needed through the Plesk interface.
Installing Plesk on Windows RDP
Preparation: Ensure your Windows RDP server is updated and ready for the installation process.
Download Plesk Installer: Access the official Plesk website and download the Windows installer package.
Run Installer: Double-click the downloaded installer package to start the installation process.
Follow Installation Wizard: The installation wizard will guide you through the process. Follow the on-screen prompts, including accepting the license agreement and choosing the installation directory.
Configure Plesk: Once the installation is complete, launch Plesk from the Start menu. Follow the initial setup instructions to configure your server settings and administrator account.
Access Plesk: After configuration, access Plesk by opening your web browser and navigating.
Additional Tips and Considerations
Where to Buy RDP: If you need a Windows RDP server, various hosting providers offer RDP services. Ensure you choose a reputable provider that meets your requirements in terms of performance, reliability, and support.
Installing Ubuntu on RDP: While Ubuntu Server is typically installed on dedicated hardware or virtual machines, you can also set up Ubuntu on an RDP server using virtualization software such as VMware or VirtualBox. Simply create a new virtual machine and follow the Ubuntu Server installation process within the virtual environment.
Regular Maintenance: Once Plesk is installed, it's essential to perform regular maintenance tasks such as updating software packages, monitoring server performance, and implementing security measures to keep your server environment optimized and secure.
By following this step-by-step guide, you can easily install Plesk on both Linux (specifically Ubuntu Server) and Windows RDP servers. Whether you're managing a single website or multiple domains, Plesk provides a user-friendly interface and powerful features to simplify server management tasks.
0 notes
Text
Ubuntu download for vmware

#UBUNTU DOWNLOAD FOR VMWARE FOR MAC#
#UBUNTU DOWNLOAD FOR VMWARE DRIVERS#
#UBUNTU DOWNLOAD FOR VMWARE FULL#
#UBUNTU DOWNLOAD FOR VMWARE FULL#
I log in and it’s a full Ubuntu 16.0 Linux installation and system, ready to go online, run various included utilities and games, and much more:Īnd that’s it. You do remember the password you specified, yes?
#UBUNTU DOWNLOAD FOR VMWARE FOR MAC#
Looks great to me! I’m going to just let Fusion for Mac do all the work now by clicking “Finish” and sitting back to watch.Īfter a few seconds the install starts in earnest, including information windows from Ubuntu itself:Īfter a surprisingly small amount of time – it’s a fast install – you’ll be prompted to log in to your new Ubuntu Linux virtual machine. If you want to be able to access your main Mac desktop while within Ubuntu, check “Make your home folder accessible to the virtual machine” too. Turns out that VMware Fusion is smart enough to go through the entire Linux setup process without bothering you at all, so this is where you specify your basic account and password. Smart, eh? To proceed, just click “Continue” on the lower right. Notice that the program has figured out what OS we’re installing and identified it’s a 64-bit version of Ubuntu Linux. Once it’s read the file image, VMware Fusion for Mac will automatically move to the next step: Simply drag the ISO file icon onto the drop target, as shown: The new virtual machine window will pop up, ready to go. Click on it and choose “New…” to create a new VM: On the top left of the main screen there’ll be a “+” button. While it’s downloading, launch VMware Fusion. It’ll take a while for the download even on a fast connection. Easiest is to go to /download/desktop or just click on the box below (it’ll grab the latest copy if things have updated in the interim between me writing this and you downloading the OS): Grab an evaluation copy or go ahead and pay for a license at. To start, you’ll need VMware Fusion, of course. One huge benefit: You can run Ubuntu and whatever other VM you prefer simultaneous to also running MacOS X and all of your favorite Mac apps too. If you’ve just got some regular user software to test out, or just want to learn more about Linux with the easy Ubuntu world, then a VM is going to be a smarter alternative.
#UBUNTU DOWNLOAD FOR VMWARE DRIVERS#
If you’re testing software that accesses device drivers or hardware, for example, a dual boot is probably going to be better. The only comment I’ll make about dual boot versus virtual machine is that a dual boot install will be a bit cleaner and faster, if that makes a difference. Even better, you can grab a free ISO disk image of Ubuntu directly from their Web site and once you’ve grabbed the 1.5GB file, it’s rather astonishingly easy to go from download to running Ubuntu installation! Great choices all around, Ubuntu is my favorite Linux distro and VMware Fusion has been a cornerstone of my Mac experience for many years and does a great job installing and running just about every flavor of Linux (and Windows too).
0 notes
Text
Install Linux on Windows in Minutes
Requirements:
Windows 10 version 2004 or higher (Build 19041 and higher)
To check the version— Go to the Start Menu>Type ‘winver’> Check Build Number.
Steps:
Go to the Start menu > Type ‘powershell’ and run as administrator.
Type ‘wsl — install’ (that’s a double hyphen before install). The installation will begin and you’ll see that the Linux environment is being installed.
Your installation will be successful if you see the message ‘The requested operation is successful. Changes will not be effective until the system is rebooted.’ So it’s time to reboot your PC.
Upon rebooting, a command prompt will pop up and the installation starts on its own. After a few minutes, you will be prompted to
‘Enter a new UNIX username:’ and a ‘New password:’
Once the above is done, you will now see that a Ubuntu Linux instance is up and running. You can check the version of Linux by running the command ‘uname -a’
Let’s go! You now have a plain Linux environment installed on your Windows and you can now install any command line program you wish to have on your Linux environment (Here, I just wanted to install python3 to quickly run my programs and do some general network troubleshooting).
You can also access all your files on the Windows filesystem from your Linux Terminal (check /mnt/c/Users directory).
BEST OF BOTH WORLDS!
PS: Once you close the Linux terminal, in order to open it again, you just have to open the command prompt and enter ‘wsl.exe’ and you’ll get your Linux Terminal again.
What exactly is all of this?
WSL is Windows Subsystem for Linux, a compatibility layer for running Linux binary executables natively on Windows 10 and Windows 11.
In simple words, it’s a Linux environment that lets you run most command-line tools, apps, programs, and even control your host OS. Basically, you have a Linux Terminal but on a Windows host. The best thing about this is that there was no requirement for Dual-booting or installing a Virtual Machine.
Epilogue:
> Dual Booted Operating Systems — For years now, I’ve been using Kali-Linux and Windows as dual-booted operating systems but now that I look back, there were more cons than pros to this. One major con was the lack of flexibility. At times, I had the requirement of using some applications on Windows, while some on Linux. The inability to work simultaneously slowed my pace and thus there was a need for improvement, as I just couldn’t reboot my PC every single time, to get shit done.
> Virtual Machines — These came to the rescue and solved the problem of flexibility. I could now use both Windows and Linux together. But do humans really settle for what they already have? Yeah, Virtual Machines are cool, but they consumed a lot of my system resources. I had 8 gigs of RAM and both VMware and Virtual Box individually used 90+ per cent of memory during operation to run my VMs vigorously. Having opened 20 browser tabs, Spotify, and Notion, memory utilization became a complication. Also, starting a VM hypervisor and booting up a VM takes 3–4 mins. Starting up WSL and opening getting hold of the terminal takes <1 min.
So …..
I still, at times, prefer a safe isolated environment like a Virtual Machine for tasks that involve crazy experimenting, that might break your system. But for agility, WSL is my go-to.
My usage of Linux (which might be different from yours) only revolves around the Command Line Interface ie. the Terminal. And, my usage of Windows is mainly for using apps that have a Graphic User Interface. Therefore, in terms of personal selection,
GUI — Windows >>>>>>> Linux
CLI — Linux >>>>>>>>> Windows
I had to research for a while to get done with the setup today. So, I hope this helps at least 1 of you guys reading this!
Cheerio!
~A
0 notes
Text
How to convert physical to virtual machines P2V in Windows and Linux
Case
You need to convert an existing physical machine running Windows or Linux to its virtual machine equivalent. This article provides instructions on how to carry out a physical to virtual (P2V) conversion.
Solution
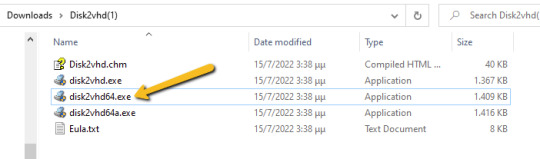
Windows Disk2VHD If you are running a Windows 7 or Windows 10 physical machine, you should download the Disk2VHD application from Windows Sysinternals. After extracting the contents of the downloaded .zip file the following executables are available. Run the "disk2vhd64.exe" on Windows 64-bit systems.
The Disk2VHD user interface lists the available system partitions and offers the following configuration options. Option for MBR partition, does not need the extra bootable partition for the final vhd(x) to be bootable.
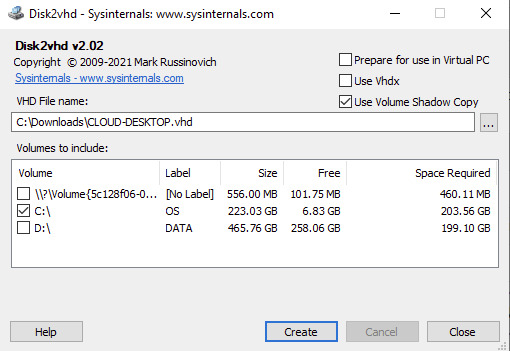
Option for GPT partition, needs also the bootable partition for the final vhd(x) to be bootable.
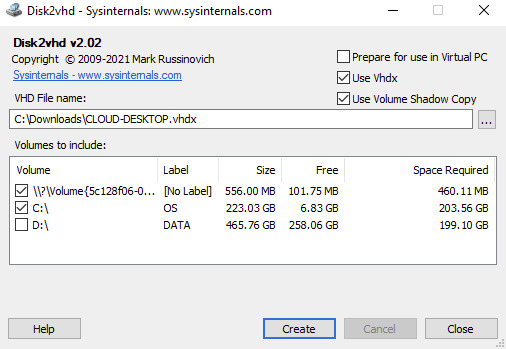
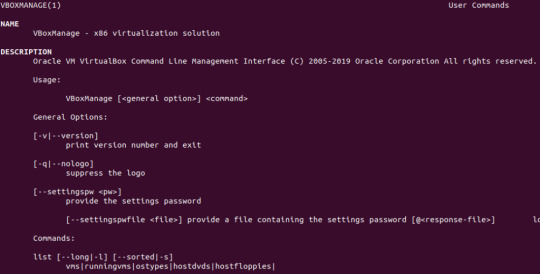
Disk2VHD has an option for .vhdx for HyperV or .vhd for compatibility with other hypervisors. There is a also a CLI-based equivalent of the GUI. Details about running CLI commands in Disk2VHD can be found at https://docs.microsoft.com/en-us/sysinternals/downloads/disk2vhd. Linux In a separate KB article, i have provided instructions on how to use Linux dd to clone a memory card to another memory card: https://stefanos.cloud/kb/how-to-clone-a-memory-card-in-linux/. In a similar fashion, you can first boot your Linux computer with a Linux Live CD, such as Ubuntu Live, Kali Linux, System Rescue CD or any other live CD of your preference. Then you can run the dd command with the necessary parameters to clone a physical machine into a virtual disk (file image), as shown in the example command below. dd if=/dev/hdc bs=4k conv=noerror,sync | ssh -c blowfish sampleuser@sampleserverIP 'dd of=filename.dd' #The below commands transform the created image file above to vhd format by using VirtualBox and VirtualBox Extensions on Linux sudo apt-get update sudo apt-get install virtualbox VBoxManage convertfromraw filename.dd filename.vhd --format VHD
An alternative method would be to make use of the ntfsclone2vhd (https://github.com/yirkha/ntfsclone2vhd) tool in Linux by running the following example bash command. ntfsclone --save-image -o - /dev/sdc | ntfsclone2vhd - /mnt/usb/myfile.vhd Mac OSX In case you are a Mac OSX user, you should follow instructions in the below article for P2V conversion of your physical Mac to a virtual machine. https://superuser.com/questions/870811/how-to-convert-a-physical-os-x-machine-to-virtual-machine. Virtual to virtual (V2V) conversion After you have completed the Physical to Virtual (P2V) conversion process, you may need to further convert the P2V output file to another file format (.vhd), so that it can be supported by a hypervisor other than Hyper-V or Virtual PC. You can further make use of the free Starwind V2V converter, to convert the .vhd file to a vmware hypervisor file format: StarWind V2V Converter / P2V Migrator is a free software for cloning and transforming VMs from one format to another, as well as converting physical machines into virtual ones. It is utilized when migration or Hypervisor Switch is required. Compared to the typical converters built into hypervisors, StarWind V2V Converter / P2V Migrator offers bi-directional conversion between all the major VM formats: VMDK, VHD/VHDX (Windows Repair Mode aware), QCOW2, and StarWind native IMG. Further guidance on Virtual to Virtual (V2S) conversion can be found at: https://www.nakivo.com/blog/how-to-convert-vhd-to-vmdk-a-step-by-step-guide/.
Sources
https://docs.microsoft.com/en-us/sysinternals/downloads/disk2vhd https://superuser.com/questions/410940/how-to-create-vhd-disk-image-from-a-linux-live-system https://tech.webit.nu/virtualbox-convert-raw-image-to-vdi-and-otherwise/ https://superuser.com/questions/1383079/clone-physical-disk-to-vdi-virtual-disk-virtualbox Read the full article
0 notes