#sans tutorial
Explore tagged Tumblr posts
Visit Tumblr Blog
Explore Tumblr blogs with no restrictions, modern design and the best experience.
Last Seen Tumblr Blogs


Fun Fact
Tumblr Inc. is using 66 technologies for its website.
Note
Feel free not to do this or even respond!
Can you mayhaps, do a tutorial or just something in general on how you go on about drawing Sans? I really wanna try and even thinking about making my own au, but I can't get the skull right.
I got you broski 😎

269 notes
·
View notes
Text


Hi!
Indeed, I consider myself an artist, so I made a little tutorial for Sans heads.
If you like to read, go ahead, this is for the green artists who are starting to draw sans
Download, Pdf Free
🛒 Heads/Sans Tutorial En/Es
Share and save.
19 notes
·
View notes
Note
i love how you draw the sans Aus so much
genuinely i want to draw them like you (not exactly the same but i hope you get what i mean)
(sorry if this was submitted twice, my computer was acting weird)
I recorded my process of how I sorta draw them ofshdjchsxuvhfneld
#darkzyx#undertale au#undertale fandom#utmv#killer sans#utmv fandom#tutorial except not because I just scribble for a brief amount of time#and just hope for the best#whenever people ask me about my process#I honestly just pray it works and fucking scribble man#like the amount of me using the transform tool should be illegal
722 notes
·
View notes
Text
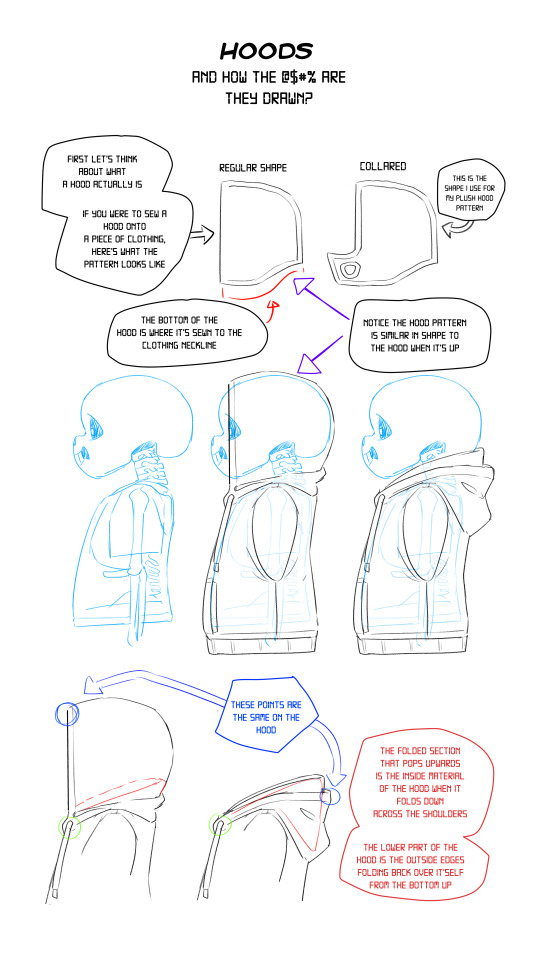
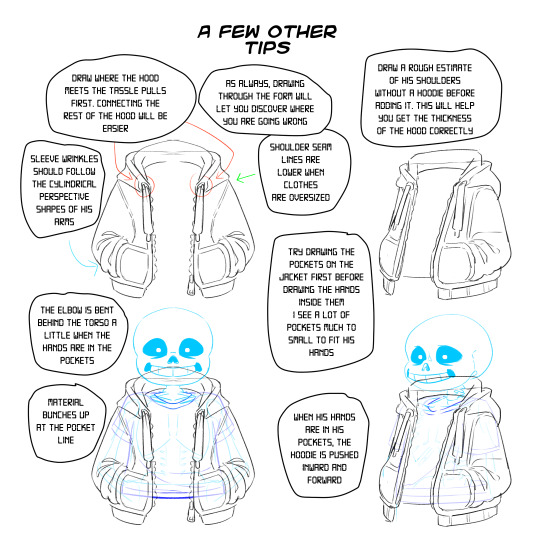
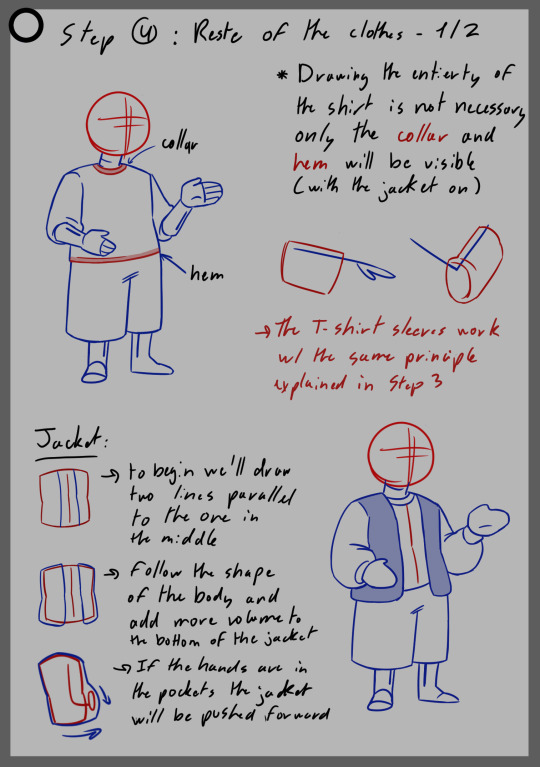
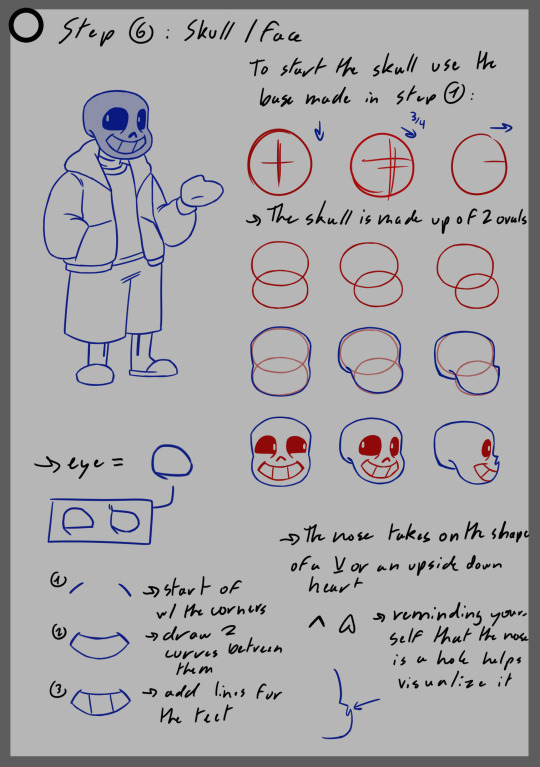
Another Tutorial Hope you can make better hoodies with this!
7K notes
·
View notes
Note
The way you draw sans is literally perfect i can't fathom it. Please make a mini tutorial on how you draw him [praying begging emojis]
Wow! I’ve never been asked for a tutorial! Okay, I will try my best, even tho I been meaning to redesign how I draw him, I am thankful you like it!!
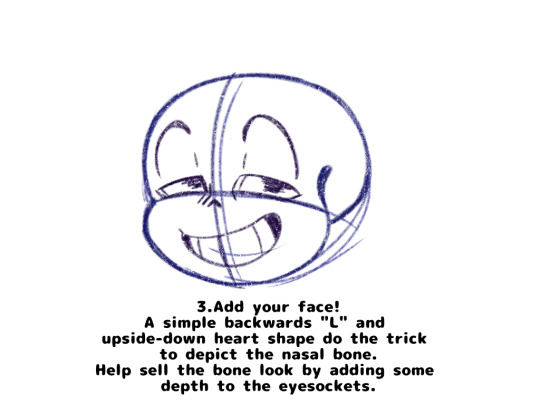
Here is a tutorial on how to draw sans face in my style.

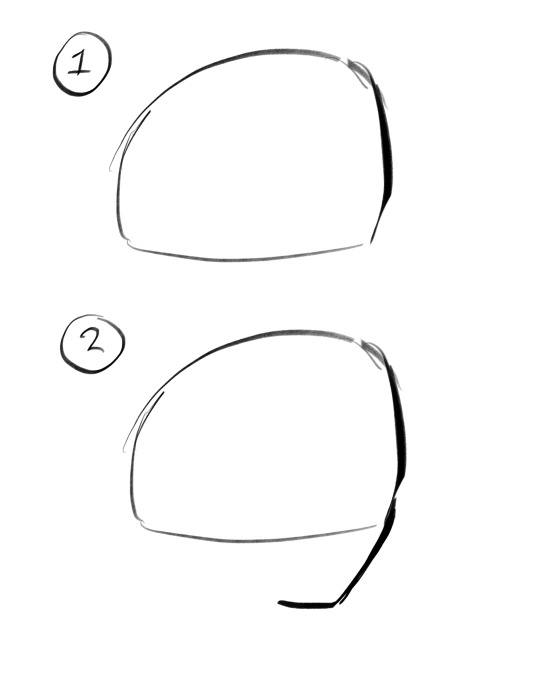
First I start with the skull, two ellipses, top half must be longer, but not too long, he will end up looking like megamind, nothing wrong with that but we ain’t drawing that blue man today,

Then the eyes, the eyes can be hard, but usually I just make em a little weird square. Important to position them in the upper ellipse
Obviously add the pupil or light bulb or whatever you kids call it these days in your gay fanfics, and fill the black abyss underneath those beautiful eyes.
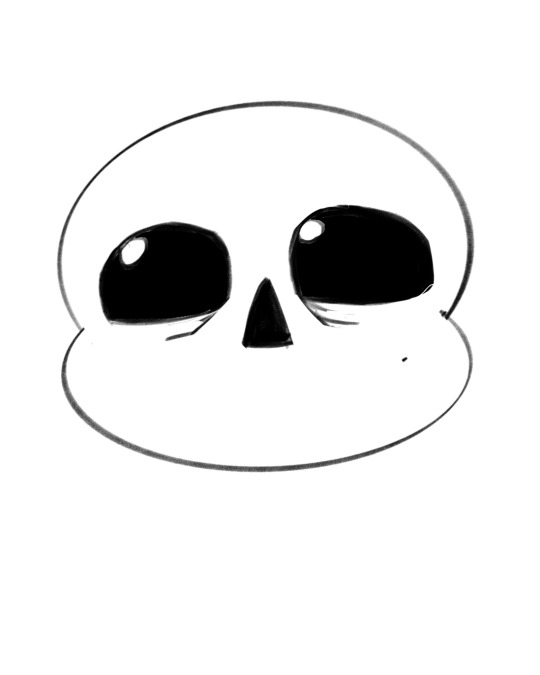
Nose is just an isosceles, the trick is to position it with the tip at the height of the eyes, not completely in the middle, not too low.

Cheeks at the very end of the erm, cheeks?…with black squares on the side to let him breathe between his welded teeth.

Beautiful smile only a mother could love. (me). Don’t forget to add a bunch of teeth, don’t give him like 3, he looks like a sad unloved child, a lot of teeth makes him look like a sad man, which he is.

I know it’s not a very good tutorial, but erm, totally feel free to draw over it and trace to study, I’m not going to get mad, anything that helps to improve your art and understand how others art work (do ask other artists if you can do it with their art please, don’t get me in trouble).
The body im not gonna show yall how i do it cus I mean… I don’t even know myself, just draw a lot of fat men and there it is. Hope yall liked it!! If you want anything else let me know.
331 notes
·
View notes
Text

Welp....where has life taken me this year. Oh yeah TO GYATT LAND GOD DA- this is FOR THE SHTS AND GIGGLES Reaper!Sans belongs to Ren Geno!Sans belongs to Crayon Queen
Full Image without Text XD


#undertale#utmv#undertale au#digital art#artwork#alternate universe#sans#ibis paint#reapertale#aftertale#geno sans#afterdeath#reaper sans#ut au#gyatt#gyatt damn#drawing tutorial#SHIT POST#WHERE HAS LIFE TAKEN ME#Geno got all that cake in his face *sigh*#art#undertale art
250 notes
·
View notes
Text
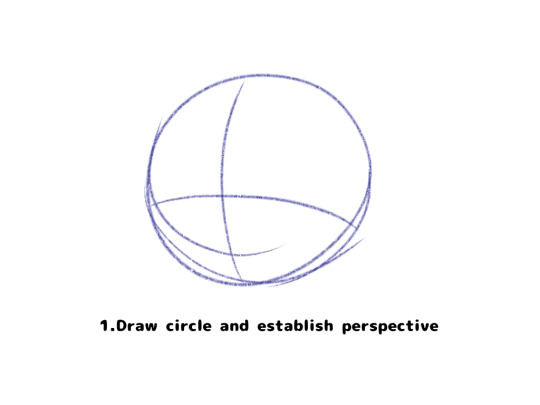
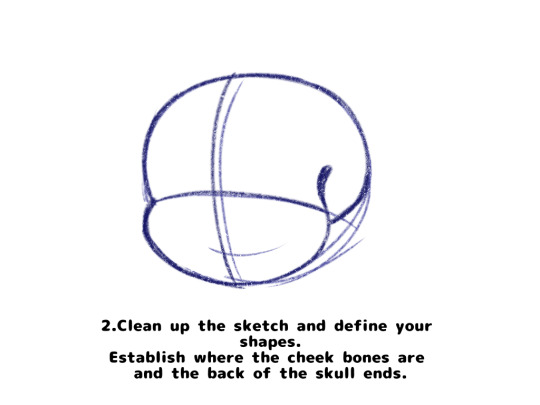
How to draw: A skeleton skull

Made this for a friend on discord, it was funnier in my head
#doppel draws#undertale fanart#undertale fandom#undertale#sans undertale#undertale sans#UT#sans the skeleton#sans art#sans#tumblr sexyman#art tutorial#artist of tumblr#artist on tumblr#funny doodles#tutorial#digital sketch#digital art#fanart#shitty sketch
55 notes
·
View notes
Text
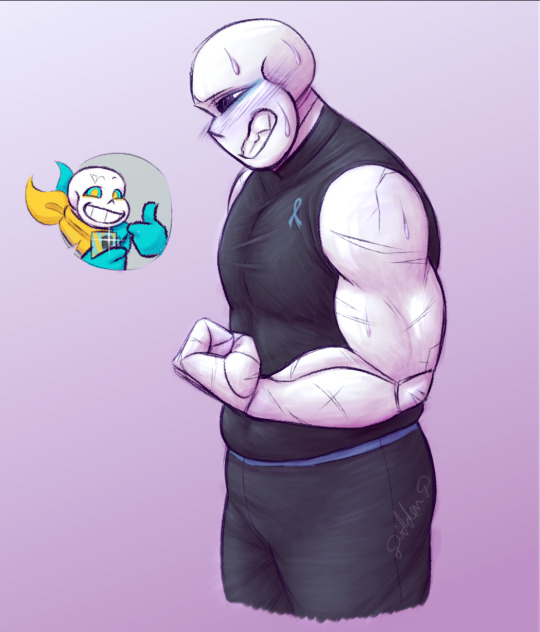
Tou and Marsh are workout buddies. and Tou convinced Marsh to flex for a pic. after Marsh rolled his eyelights at Tou flexing at his phone. :3
(i might draw a Tou flexing pic some time to go with this hehe)
#messed around with the render on this. didn't come out like i wanted lmao#maybe next time i should follow a tutorial#i haven't practiced with a tutorial in a long time#marsh sans#tourette's cross sans#cross sans#tou sans#swap sans#xtale#underswap#undertale#utmv#didderd art#keept forgetting to post this.. draweded it like 2 weeks ago or smthn
101 notes
·
View notes
Text
Cleaning Up San Myshuno with S4S
If you're having this issue where items aren't being cleaned up in San Myshuno, this tutorial can help clean it up!

Crin shared a tutorial over on Bluesky but, it's originally in German and not very straightforward so I've rewritten it here so it's a bit more step-by-step for people who may not have as much experience with S4S.
For this tutorial, you'll need to know the specific item names the game uses so first, here's how to find those. Open S4S, click "Object" on the main screen.

Now you'll filter by Category and Game Pack. I just wrote down some terms on a notepad to use later. Here's what you need to focus on though...all of the items spawned are from base game and City Living. They're all lights, chairs, sofas, and decor. Then there's also plants and food. I'm not going to do all of the different things, I'm just going to do one to show you what you need, they're similar enough you can find the rest.
So say we want the sofa names, we'll filter for Comfort, Sofa, and Base Game. Hover over the item to see it's full name.

The part of the name that I've outlined is what you need to make a note of. If you hover over all of them you'll see that they all have "sitSofa" in common, this is the piece you actually want to write down for later. Some others we'll need are lightFloor, sitLiving, sitDining, lightTable, foodPlate, foodBowl, foodFestival, foodGrip, and PlantBush. (I've only done Spice District so far, there may be additional terms for the other neighborhoods.)
On to cleaning San Myshuno now!
First things first, make a copy of your save file and paste it somewhere else so you have a backup, just in case!!
On the main screen of S4S, click the "My Projects" button. On the selection screen that opens, change the file type to .save in the lower right, navigate to your save folder, and choose your save file, and open.

Now, in the upper left, type in "data" and click filter, and then click the "Type" header to sort alphabetically. This is just to make it easier to find the piece we actually want which is the "Save Game Data" line. Click on it once to select it.
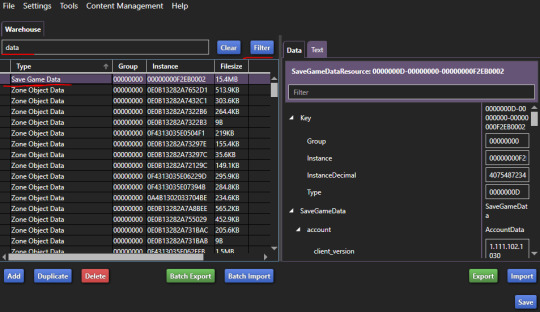
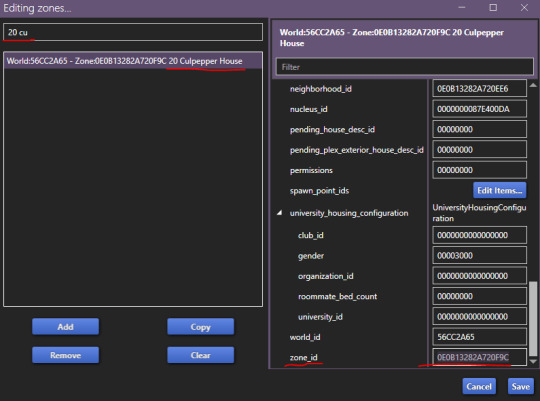
On the right hand side, scroll all the way to the bottom. Next to "zones" click the "Edit Items" button.

Now you need to search for your lot name. This part may be a bit of a trial and error. I chose the apartment lot that I had been playing and it didn't have the data I was looking for. The one I ended up needing was the 20 Culpepper lot. I'll explain how to know if you've picked the right one or not later on. For now, you'll type in your lot name in the filter box, select the line for it, and then scroll all the way down on the right hand side. We just need to copy the "zone_id" number.
Once you've copied this number, you can close the screen and return to the previous screen. Now, where we had "data" in the filter, we now want to paste the zone ID we just copied and filter for that instead. Now you'll select the "Zone Object Data" line that shows in the results. On the right hand side, scroll to the bottom again, and now you'll click "Edit Items" next to "objects" near the bottom.

On the next screen, you should see "ObjectList" on the left hand side. If you don't, this is what I was referring to earlier when I said you may not get the right lot on the first try. Yes, you may have chosen the correct lot that you were playing but, the object data we're looking for might not be tied to it. If that happens, you'll just need to try another lot in that neighborhood and keeping going until you find the one that does have the ObjectList. Once you have the correct one, you're going to click "Edit Items" on the right hand side.

Now this is the part where your patience is going to be tested. This is going to be very time consuming. It has to load a lot of data and therefore takes a lot of time loading the list, a lot of time filtering, etc. Just be patient.
In the filter box on the left hand side, you're going to start typing in keywords to find the items we want to remove from the neighborhood. I highly suggest typing your term somewhere else, and then copy and pasting it because the filter will begin to work as soon as you start typing and take way longer since it's going letter by letter. You're going to filter using the item names we found earlier.

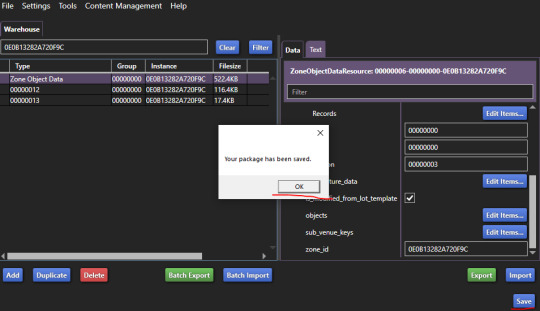
I'm not going to lie, after filtering for my term, I've just been selecting all and then removing them and not taking the time to make sure every single item in that term result list is one of the items sitting in my neighborhood. I'm not sure the full extent of what is affected by this zone data so that's maybe not the best choice but, the apartment zone ID I'm using is an apartment I don't play so even if it's removing items from the apartment itself, I don't care. I also haven't seen this remove any of the world items that are supposed to be there all of the time. This is why we made a backup though! Be smart. Try your own path and then put your backup file back in your game instead if anything breaks. To select all though, just select one line, hit ctrl+a on your keyboard, and then click the remove button. Now, you'll paste your next search term in and repeat until you've gone through all of your terms. Again, this can be time consuming. Just be patient. Once you're done, click "Save" in the lower right.

You'll be brought back to the previous menu, click "save" there too, and then you'll be back to the warehouse screen, click "save" there as well to save your .save file.
Now, cross your fingers, open your game, and load into that neighborhood in the save file you were working on.
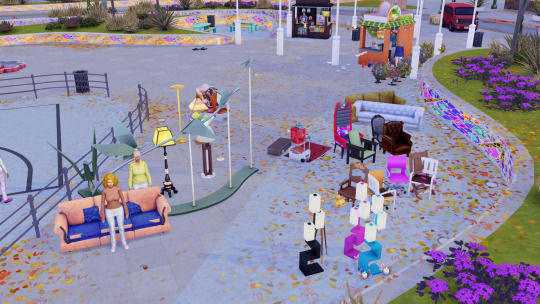
So, this is what I got after my first try. Pretty big difference. I was actually able to shift click and destroy the couch and lotus candles.
Before and After:
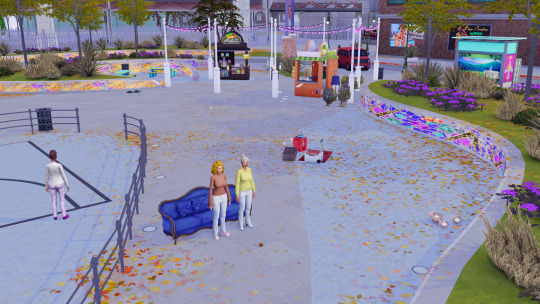
Here's basically what was left to clean up, I was able to shift click and destroy the crystals though, just forgot to take a new pic:

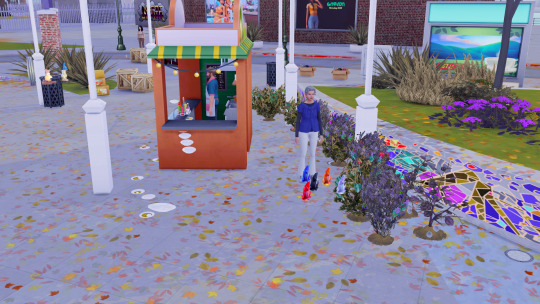
Played my game for a while so the next set of images don't line up exactly right but, I went back into S4S and removed some more things, and here's what I have now.
Huge difference. I just have some plates, plants, and some to go food left to clean up. I probably just haven't come across the names for those yet since it's just so time consuming. This is waaaaay better though and if your save file got even more built up than mine did, this could be game changing.
Let me know if you have any questions or if you figure out the name for the plants and plates I still need to get rid of!
***Update! I realized I had checked for an Object List in all of the Culpepper lots and the two non-apartment lots but hadn't bothered checking the Jasmine Suites apartments. Turns out 2B had an object list too! I just searched plant, plate, and foodGrip (this is some of the to go foods sims get from stalls) first to see and heck yes! Almost everything is completely gone now! So make sure you check alllll of the lots in the neighborhood. I would just start with one and do all the search terms though, see what's going on in game, and then go try the other lots back in S4S so you only have to search for the remaining items.
Most of the plates are now gone and all of the bushes are gone now but, the veggies from the bushes are still there. So close!!


137 notes
·
View notes
Note
Hello, I have a question, how do you draw the bodies of the characters for your comic? I'm just curious.
I've been actually wanting to do a full proper how-to-draw tutorial someday when I get the time, but for now here's a little something I whipped up :3

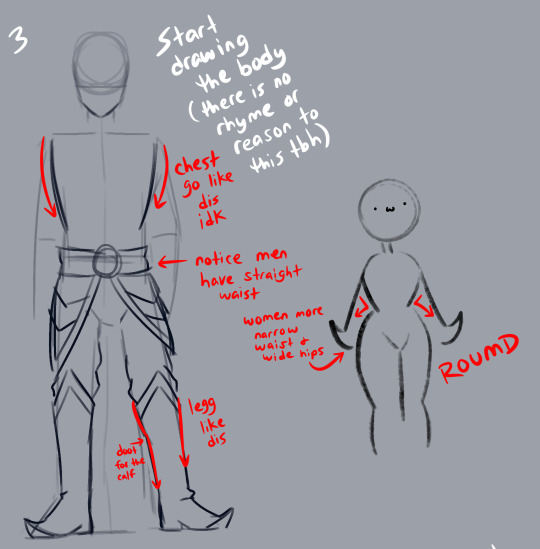
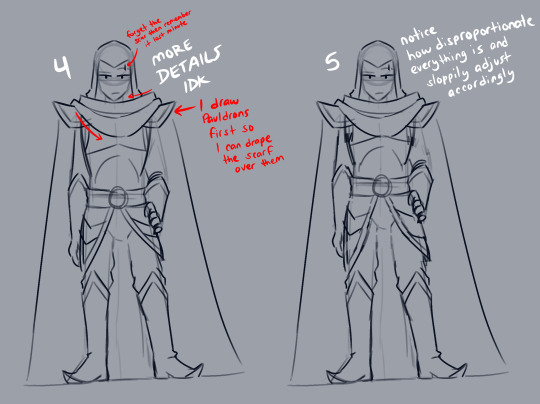

I swear tho I wanna sit down and make like an ACTUAL tutorial someday lol. Like an actual helpful and good one I promise 😂
72 notes
·
View notes
Text
I tried to sketch Papyrus in both my art style and @skull-otaku xD
#undertale#papyrus#undertale papyrus#i was going to do a warm-up sketch#i remembered the papyrus tutorial skull-otaku made#so i did paps in both our styles xDDD#this was very spontaneous LOL#anyway the truth is i'm not sure if this really IS my style of drawing paps ASKDLHGLKDHG#I DON'T HAVE ONE?? X'DDD#but at least this is how i draw the head! i think!!!! x'DDDDD#also paps is still not easy for me to draw ==;;#he problem isn't with the head i think but rather with the body???#Also the mouth sometimes ASDGDJ#idk idk xDDDD#have a drawing of two papses!!!#they're cute!#i don't think i did Skull-otaku's art style justice but i tried my best x'DDD#their whole artstyle is nice i like their sans as well#also this made me realize how wide I draw pap's head in comparison to other artstyles x'DDDD#their paps head is very long/vertical/thin?? XDDDDD#it's really cute
1K notes
·
View notes
Text
Hey! I need help on an art project, the goal was to pass on a part of the artistic process to others, so I decided to make a drawing tutorial meant to teach you to draw sans from undertale:
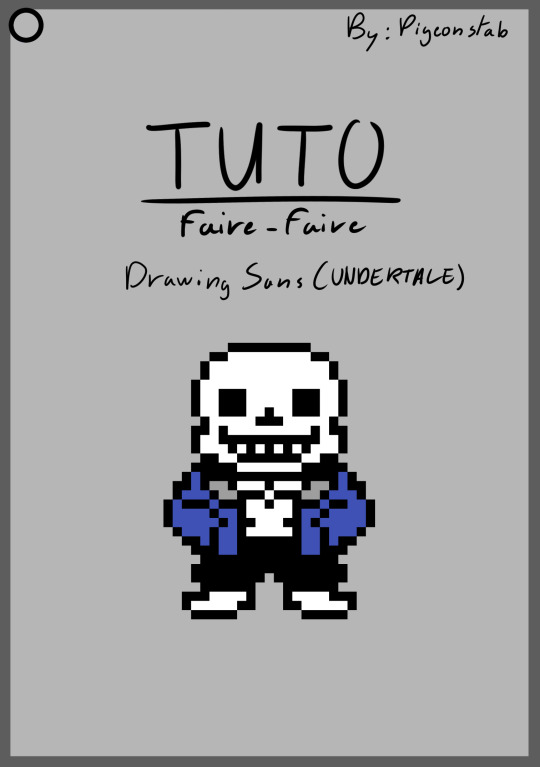


it's for anyone to try! whether you've never drawn him or already have a thousand times, whether you're an artist or not, getting a wide variety of drawings will help a lot anyways!
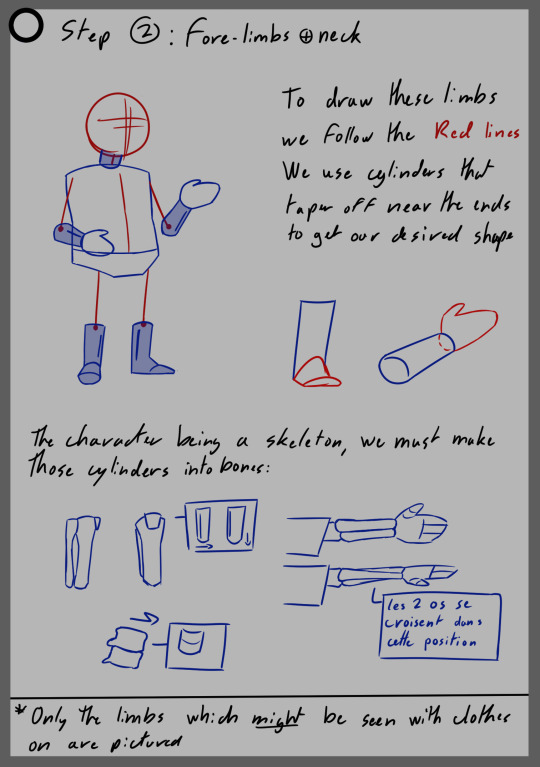
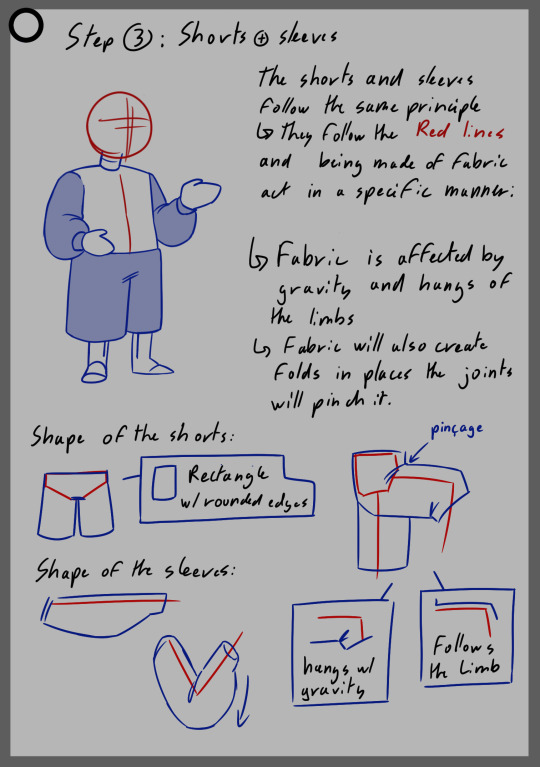
the only requirements is that you follow the instructions given, though you can draw him in any position you would like (this tutorial was made with the idea of teaching the shapes that make up his design and not just the lines for a certain pose) and that you reblog this post with the end product
and of course for anyone who ends ups trying it have fun with it!
#I really hope this works T_T#if no one participates I'll look like one hell of a fool lmao#undertale#my art#sans#utmv#drawing#drawing tutorial#digital art#tutorial#art#sans the skeleton#classic sans#sans undertale
264 notes
·
View notes
Text
character spread tutorial that nobody asked for [chunky sketchbook edition]
so! you want to make a chunky sketchbook? here are some tips from my end as i make a spread for a swap variant from crest’s multiverse :D
firstly, you want to layer LIKE A MADMAN. grab random things you have lying around your house and paste them in there. receipts, candy packaging, anything works! i like to use receipts, index cards, and colored paper that matches with the theme of what i’m doing, but that’s not really mandatory at all, do as you will!

here are the things i’m using for background— washi tape, blue cardstock, a receipt and some sticky notes :)
a lot of people that i see make tutorials say to add stuff like puffy stickers and trash and don’t get me wrong, this does help!! but my key to getting my sketchbook as it is is merely layers upon layers of paper. trust me when i say that all you need is some thick poster board or cardstock, or even cardboard to make a chunky book.
another note, GET A TAPE RUNNER!!! these things work better than most glues i’ve used in the past and they work WONDERS for scrapbooking. they kind of look like white out, and function as it does, as well!

i use the elmers tape runner, but there are plenty of other ones that work just as well. i painted this one!
your spread should look a bit like this as you start it.

of course, decorate it as you will, it doesn’t have to be identical to mine. i will be adding i move along so don’t stress about random things popping up on mine CACKLES
secondly, make your art on separate pieces of paper than what you’re using. once again, layer like a madman babe TRUST ME!!!!!
bonus points if it’s thicker paper :)
also not a requirement but i like making the drawings i put in these spreads only as sketches and then coloring them once they’re glued in. it’s just my preference and not required at all but i find it entertaining and more pleasurable ^^

here are some of the sketches i have for this spread :)
and here are some colored in!

the last thing here is i would add little details and finalize any sort of other additions you’d like to add like washi tape, decorative stickers, text, stars, etc.

and this is what mine looks like completed!!
of course there are plenty of other ways you could have done this, you could have made it multicolor, you could have added more yellow or grey or whatnot, and every way would have been valid! it’s art— the only limit is your imagination 🫶
i would recommend looking up tutorials for interactives as well to add texture and life to your work!
hope this helps!
#nash’s dibujos#tutorials#swap!sans#utmv stuffs!!#chunky sketchbook#traditional art#sketchbook#art tutorials#nashdoesstuff#i’ll make a tag for this swap eventually anywaysssss
40 notes
·
View notes
Text
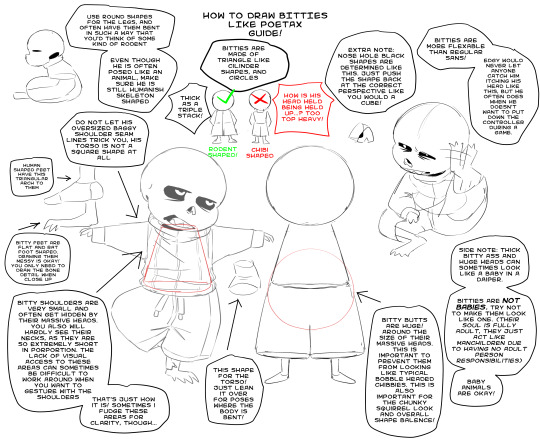
Poetax's bitty porportion guide! Got asked how I draw bitties and their shapes, so here you go!
2K notes
·
View notes
Note
May I ask on how you choose your colors when you color your art pieces? It is so pretty to look at the colors of your art, and I want to color like that, but color picking is very hard q-q
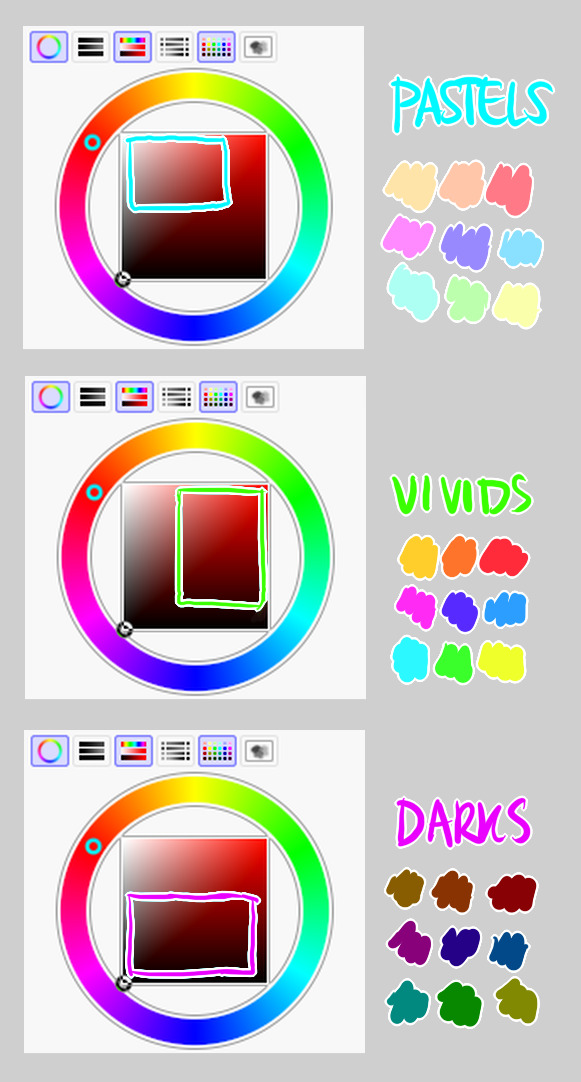
here's!! uh, the general areas in the color wheel where i try to pick depending on the vibe
highly inaccurate because tbh i just color pick directly or try to guess the colors from my references and just adjust them to be a little bit more pastel or to the atmosphere and if i have their colors memorized (such as ink or dream), i just pick by memory or by my modified colors LOL

color your scrunkly!
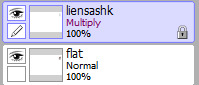
set your line work to multiply and lock opacity
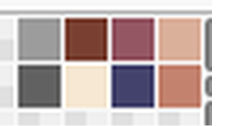
i use warm tones for white ish colors so uhhh idk whatever warm color from here
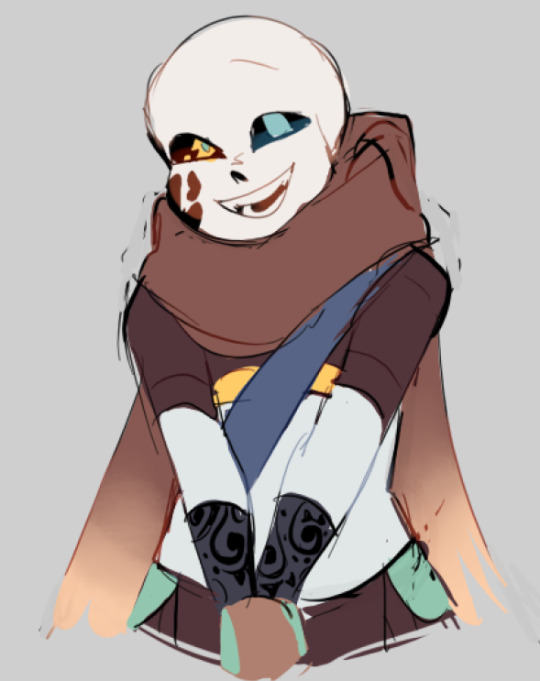

color the line work!!!!! ofc, shift the hue depending on the undertones of the surrounding colors the skull color is a warm off-white, the undershirt is a blue-ish off-white, scarf is warm brown, so on and so on the multiply function rly helps just blend things into the palette a little more, but if ur confident enough, you dont have to set it to multiply at all for extra variation
minimal shading by just taking the surrounding colors n adjusting the hue slightly n its value n saturation gives it a very messy cel shaded look! been into it lately and stuff

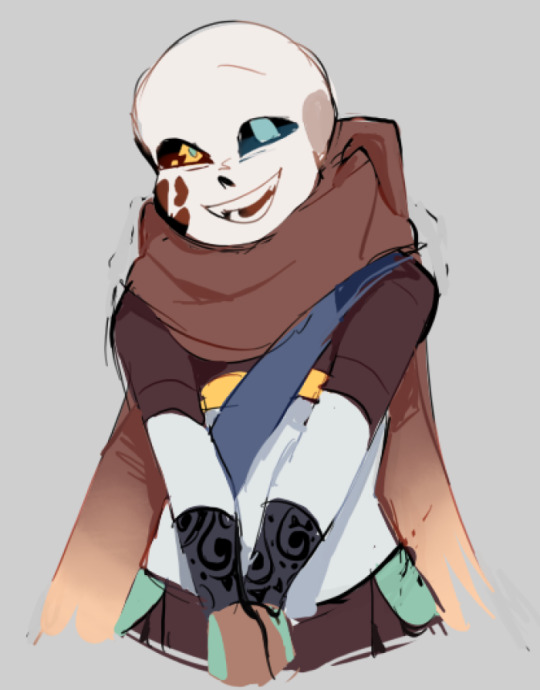
and then i add a few overlays using the pin light layer mode! i usually use these two colors together, it gives the right amount of pastel colors that really appeals to me
if you have access to gradient maps, i recommend using them lots! it makes the pieces look a little more cohesive the pin light layer mode imitates it n is very versatile if u cant use them though (like me when im just doodling on sai)
that's it!!! that's the basic rundown of how i color i'm not very well versed in color theory so i can only do very basic color picking tips, but maybe next time i can offer ways on how to color more atmospherically!
have a nice time coloring your blorbos ✨
#Anonymous#tutorial#ref#ink sans#kia doodles shit#i hope this heeeeeeelps somewhat!!!!!#art tutorial#coloring tutorial#art help#art tips#art advice
499 notes
·
View notes
Note
Pleaseee post a tutorial on how you draw skeletons, I figured out how to draw Sans's face after like four years and now I need the rest!! I beg of you, my dear favorite mutual 💔


Here! I hope these help, while i was at it i made one for how i draw his face aswell because i might aswell.
I would have made this digital but my art tablet is currently broken.
#art#undertale#fanart#smileydoodzart#sans#sans undertale#undertaleau#tutorial#art tutorial#traditional drawing#traditional art
36 notes
·
View notes