#UI Components Library
Explore tagged Tumblr posts
Visit Tumblr Blog
Explore Tumblr blogs with no restrictions, modern design and the best experience.
Last Seen Tumblr Blogs


Fun Fact
Tumblr was attacked by a cross-site scripting worm deployed by the Internet troll group GNAA on Dec 3, 2012.
Text
Gluestack - Build Scalable Apps with Modern React & React Native UI Components Library
Gluestack provides a powerful, flexible, and scalable React & React Native UI library components framework to build high-performance web and mobile applications. Streamline your development with customizable components and seamless integrations.
#React Native UI Components Library#React Components library#Shadcn React Native#UI Library#UI Components Library
1 note
·
View note
Text
Component Libraries: Should You Build Your Own or Use a Prebuilt One?

Component libraries are a vital tool in web application development in maintaining uniform design, shortening the time taken to develop web applications and improving reusability of the code. Some developers find this dilemma; should they create a component library or use an existing one? In addition, they help reduce the struggle while building well-designed and interactive websites because of the availability of animation-oriented UIs such as Accentricity UI among others. Now, let’s get more to the point in order to help you find the right way.
What is a Component Library?
Component libraries are collections of reusable UI elements such as buttons, forms, modals, and more— and are intended to reuse the components across several projects. Such libraries not only guarantee a consistent look of an application but also save time and costs during its implementation because the elements have been already coded. So, there's no need to build components from scratch.
Prebuilt Component Libraries

Prebuilt Component Libraries
Prebuilt component libraries are the ready-made collections of different UI components that are specifically designed and optimized for common use cases that developers can face during development. Some well-known examples include:
Material-UI (MUI):
A library based on React and it follows Google's Material-UI design, MUI allows a comprehensive set of components customization.
Ant Design:
It's an UI design system framework for enterprise-level products, ant design offers built-in themes and a rich set of UI components.
Bootstrap:
It's an widely-used CSS framework that provides basic components and a responsive grid system.
Pros of Prebuilt Libraries :
Rapid Development: Prebuilt libraries save a lot of time of the developers by providing pre-designed reusable components that you can quickly integrate into your project.
Standardized Design: They help ensure a consistent user experience across different screens and features.
Community Support: Many prebuilt libraries come with robust community support, providing a wealth of tutorials, plugins, and enhancements.
Cons of Prebuilt Libraries
Limited Customization: Customizing components to fit your unique design can sometimes be difficult, leading to constraints on flexibility.
Performance Overhead: Many prebuilt libraries come with extra features you may not need, which can bloat your codebase.

Pros And Cons of Prebuilt Libraries
Animation-Centric Libraries: Bringing UIs to Life
In recent years, a new category of libraries has emerged, specifically focused on providing built-in animations and smooth UI transitions. These libraries not only offer pre-designed components but also emphasize adding dynamic, interactive features to web applications.
Here are some popular examples of animation-focused libraries:
Lottie
Category: Animation Integration Library

Lottie:The industry standard for motion design
What it Offers: Lottie allows you to render animations created in Figma or Adobe After Effects as JSON files using the built-in plugins. These animations are then rendered natively on the web, offering high-quality motion without a heavy performance impact.
Why It’s Useful: Lottie is perfect for apps or websites requiring rich, scalable animations that are lightweight. It’s commonly used for logos, loading animations, and subtle UI effects. Unlike other component libraries, it focuses purely on bringing visual design elements from tools like Figma & After Effects into the web environment.
Accentricity UI
Category: Hybrid Component and Animation Library
What it Offers:
Accentricity UI combines traditional UI components with built-in support for smooth animations and transitions. It offers a wide range of components like buttons, forms, modals, and navigation menus, but with an added layer of predefined animations, making it easier to create interactive, dynamic interfaces.
In addition to these standard components, Accentricity UI provides responsive behaviors and subtle animation effects like hover states, fade-ins, and sliding transitions that enhance user engagement. The library's components are fully customizable, allowing developers to easily adjust animation timings, easing functions, and durations to match the look and feel of their brand, ensuring both visual appeal and performance across devices.
Why It’s Useful:
Think about it, what would be easy for a dev? Making a custom component with tons of animation which the dev has to write from scratch and polish it before the deadline or use a library, where the dev can make use of the library with the built-in support to combine the custom designed elements with smooth animations and transitions offered by the library.
It’s particularly helpful for developers who want the convenience of a prebuilt library but need polished, built-in animations to enhance user experience without writing complex animation code from scratch.
Framer Motion
Category: Animation-focused Component Library (React)

Framer Motion
What it Offers:
Framer Motion is a powerful library for React that allows you to create fluid animations and micro interactions with minimal effort. It supports interactive features like drag, scroll, and spring-based animations, which makes it ideal for interactive & highly animated UIs. It also provides easy-to-use APIs for gesture-based animations and layout transitions, offering developers extensive control over complex animations while maintaining simplicity in implementation.
Why It’s Useful:
Framer Motion combines the simplicity of component libraries with the flexibility of advanced animation frameworks, making it easy to enhance user interfaces with dynamic visual effects. It’s a great choice for React developers who want to integrate animation without compromising performance or adding significant overhead. With its built-in optimizations for smooth rendering, Framer Motion ensures high-quality animations that enhance both usability and visual appeal.
Should You Use Prebuilt Animation Libraries?
The role of animations is really important in web applications to enhance the UX(user experience), by making interfaces feel more fluid and interactive makes user's remember the website due to its great experience. Since users are constantly getting used to smooth effects, micro-interaction and dynamic feedback, animations are no longer viewed as a good to have feature but are rather considered as a must have feature. Prebuilt animation libraries like Framer Motion and GSAP (GreenSock Animation Platform) simplify this process by providing powerful, flexible tools that allow developers to integrate complex animations without having to manually manage every aspect of motion or dive deep into animation theory.
Advantages of Animation-Centric Libraries

Advantages of Animation-Centric Libraries
Ease of Use
Prebuilt animation libraries abstract away the complexities of coding animations from scratch. Without manually writing keyframes, easing functions, or browser-optimized transitions, developers can simply use predefined APIs to implement fluid animations. This drastically reduces development time, as many animation details are handled by the library, letting developers focus on building features and interactions rather than tweaking animations for performance or cross-browser compatibility. For example, with a few lines of code, animations can be applied to any UI element, making the development process much more efficient.
Advanced Features
Many animation libraries offer advanced features that go far beyond basic transitions like fade-ins and slide animations. These include timeline control, scroll-triggered animations, physics-based interactions, and even 3D transformations. For instance, timeline control allows developers to create synchronized sequences of animations, which can be used to create smooth, coordinated interactions across multiple elements. Scroll-based animations enhance user engagement by triggering effects as the user scrolls, perfect for parallax websites or content reveal effects. Physics-based animations, such as spring-based drag-and-drop or object bouncing, add natural, realistic movement to interactive elements, elevating the overall experience. Additionally, 3D transformations provide extensive control over how objects rotate, scale, or move in three-dimensional space, something that is cumbersome to achieve with native CSS alone.
See What Happens Next
#webdevelopement#werbooz#own website#build vs prebuilt component library#custom UI components#prebuilt UI libraries#web development#Material-UI#Ant Design#Bootstrap#Framer Motion#Accentricity UI#animation libraries#best UI libraries 2024#component library pros and cons#web app development#UI design optimization#web performance#web development trends
2 notes
·
View notes
Text
Supercharge Your Web Project with Next – A Free Bootstrap 4 UI Kit Template That Has It All
Why You Need a UI Kit Template Like Next If you’ve ever stared at a blank code editor wondering where to begin when designing a user interface, you’re not alone. The challenge of building clean, responsive components from scratch slows down even the most seasoned developers. That’s where the Next UI Kit Template becomes indispensable. This article is here to walk you through why this free…
#Bootstrap 4 Admin Template#Bootstrap 4 HTML5 UI Kit Template#Bootstrap Template Kit#Carousel#Clean#developer-friendly HTML5#Dropdown#free eCommerce UI kits#free template#Free UI Kit Bootstrap#frontend template#Frontend UI Template#HTML5 Component Library#Multipage#Multipurpose#On hover effect#Progress bar#Responsive UI Kit#responsive web templates#Slider#Smooth scroll#UI Kit Template#web development
0 notes
Text
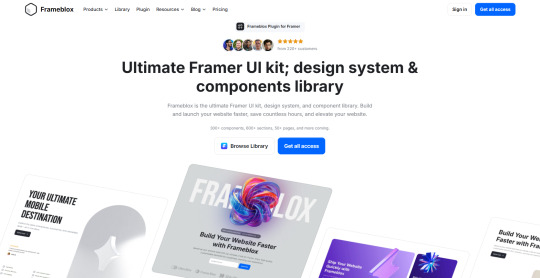
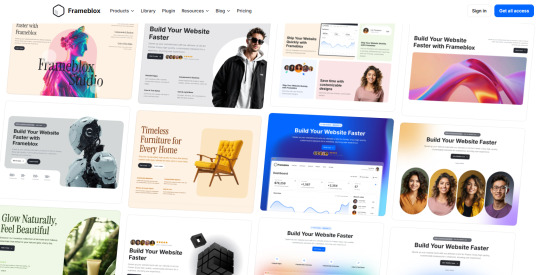
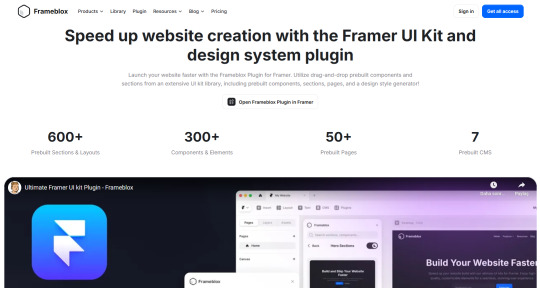
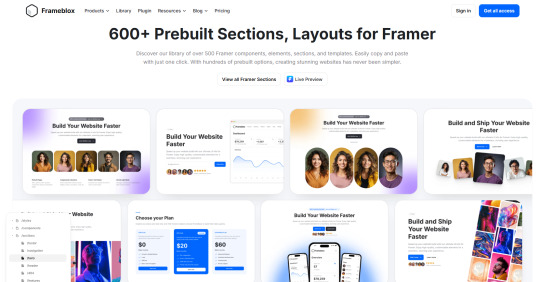
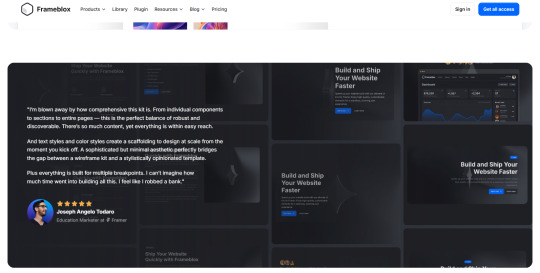
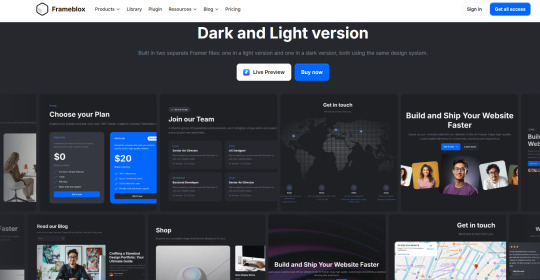
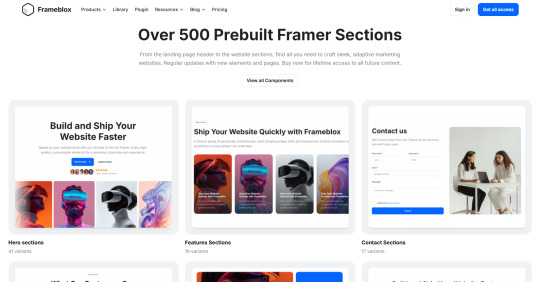
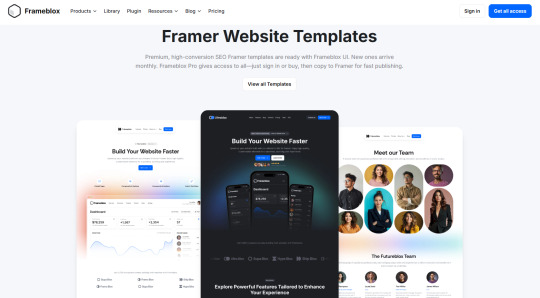
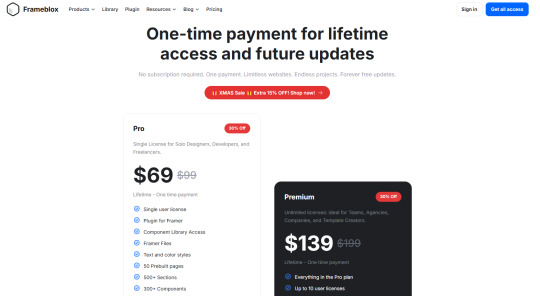
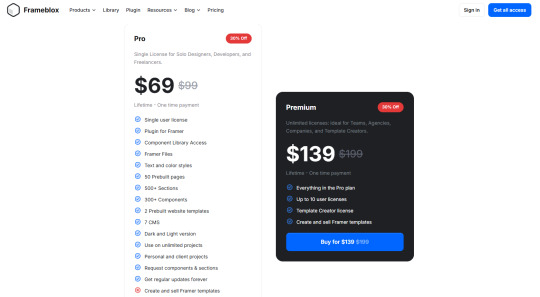
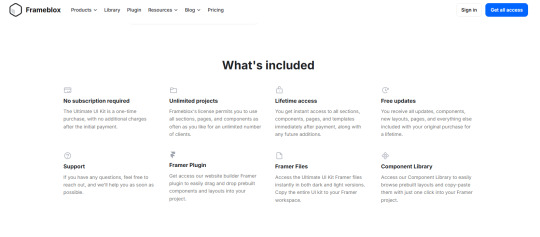
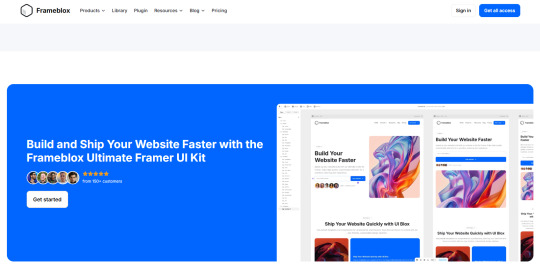
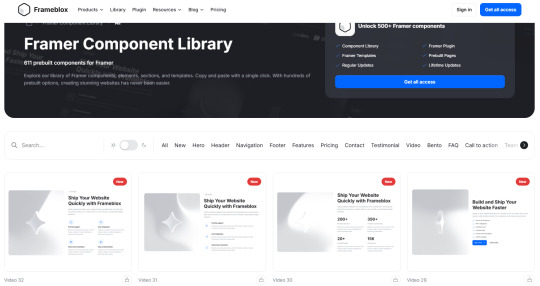
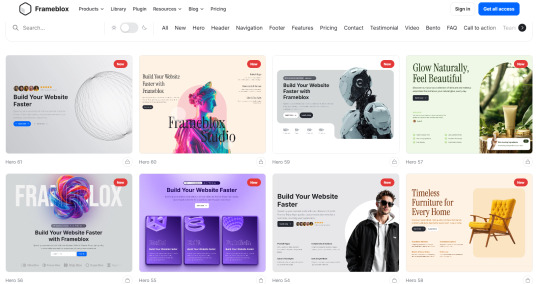
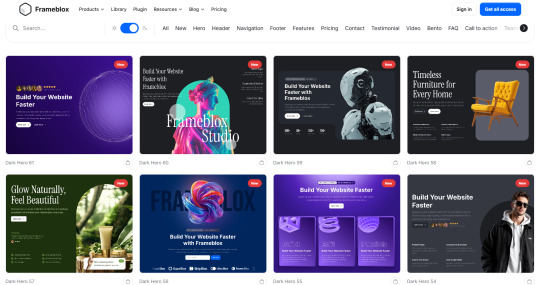
Frameblox
Ultimate Framer UI kit and Prebuilt Templates
Frameblox is an Ultimate Framer UI kit and prebuilt website template library. Build and launch your website faster, save thousands of hours, and elevate your website.
300+ components, 500+ sections, 50+ pages, and more coming.
One payment, limitless websites, endless projects, forever free updates.
Live preview:
Download:
Telegram: ahmetmertugrul
#ui#kit#library#component#section#limitless#project#update#website#framer#framertemplate#framertemplates#template#web#web3#ux#uxdesign#uidesign#design#cms#crypto#btc#eth#usdt#telegram#not#ai
1 note
·
View note
Text
Creating a Reusable Component Library in Angular
Overview Are you tired of writing the same code over and over again in your Angular applications? Do you want to improve code reusability and simplify the development process? Look no further! Creating a reusable component library is the answer. Why Use a Component Library? A component library is a collection of reusable UI components that can be shared across multiple projects. It provides…
#Angular#Angular component library#Component Library#CSS#development#Front-end Development#Reusability#reusable components#UI development
0 notes
Text
#Angular advanced navigation control#Angular application server-side rendering#Angular component structure#Angular Dependency Injection#Angular form validation techniques#Angular UI component library#angular web development company#best angular development company#hire dedicated angular developer#Hire nearshore angular developer#top angular development company
0 notes
Note
Hi there, Love your work! I'm also doing stuff in Unreal and it feels like it's rarer to find other indie devs using it. I love how clean all your UI feels, and UI is something I seem to really struggle with.
Do you have any recommendations for workflows / tips / sources etc for getting better at UI?
Also I'd love to know more about the material / shader workflow for your latest post if you have more information anywhere.
Thanks :)
Hello there! Thank you!! I hope you don't mind me answering publicly as I feel like some people might be interested in the answer!
I really appreciate your UI (User Interface for those not knowing the acronym) compliment as it's something I've spent a long time working on and specializing in, in my career as a software engineer. UI/UX often goes completely unacknowledged or taken for granted even though it takes a lot of time and hard work to create and develop. In the engineering world I frequently had to advocate for and explain user experiences to those who didn't have as deep of an appreciation for UI or a very sophisticated understanding of why a good, visually appealing user experience makes, or on the flip side, can break everything. I think it's a very challenging, overwhelming topic to grasp and communicate, but just by being interested in it you're already way ahead!
There's a lot going on with UI. From visuals to knowing common design elements to successfully conveying a story to the user to implementation to testing to designing for accessibility to animation and I probably didn't cover everything with that run-on sentence. There's frontend engineers out there whose role is solely to maintain and improve UI component libraries for companies. And that's without throwing games, whose UIs are all uniquely visually tailored to their experiences, into the mix... I could keep going on about this honestly, but I'll get to what I think you can do personally! 1. Learn about common design patterns. What's a toast? What's pagination? What's a card? Little things like that. These apply to all software UI/UX, including video games- and knowing these off the top of your head will make it so much easier for you to invent your own UI designs and patterns.
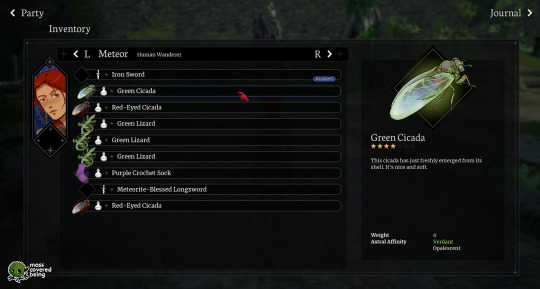
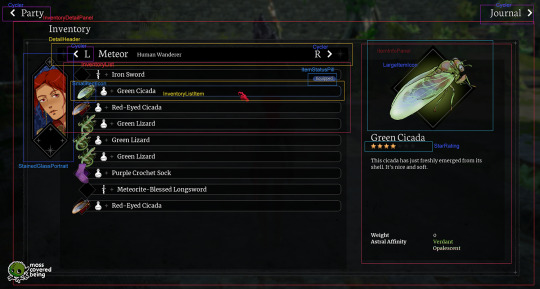
2. Study the UI in the everyday applications you interact with. Step through menus and think about how you got from point A to point B. Take a moment to think about the why someone put a button where they did. Study the UI in your favorite video games, too! Take a lot of notes on what you think works really well and what you think doesn't. And also there's online resources that are great for inspiration. I personally spend a lot of time on the Game UI Database. - https://dribbble.com/ - https://www.gameuidatabase.com/ 3. Don't be afraid to start with basic sketches or even just simply representing everything with grey boxes. All my UI starts out as really crappy sketches on paper, or tablet sketches on top of screenshots. Visualize your ideas and then keep iterating on them until you've got something. For example, I went from this:


To this. (And come to think of it I might actually still want to make those cooler looking buttons in my sketch) 4. Break everything out into pieces and individual components. A good UI is made up of building blocks that you can reuse all over the place. That's how it stays consistent and also saves you a lot of stress when you need to go in and update components. Instead of a million different looking UI pieces, you just have to update the one! These individual components will make up your very own UI Component Library, which will be the standardized design system and source of reusable components for your project. This also applies to your visual elements that don't do anything (like I personally have a whole mini library of diamond and star shapes that I reuse everywhere).
For reference, here's a breakdown I made of my Inventory UI. On the right, I've labeled most of the individual components, and you might be able to see how I'm reusing them over and over again in multiple places.
5. Spend some time listening to designers talk, maybe befriend some designers! Many of them have an unique, interesting view of the world and how we interact with it even beyond just software. Their perspectives will inform yours.
6. Test your UI on users whenever you can. Get feedback from others. This is the best way for you to see what works and what doesn't. As game devs we spend so much time with our games it's easy for us to lose sight of the full picture.
7. Be patient and don't give up. Continue to be open to expanding your knowledge. These UI skills take time to develop. I personally am still learning even after like 10 years of doing it. Coming up with the visual elements is very challenging for me and I spend a lot of time rearranging things in photoshop before I actually start coding anything at all in Unreal.
Whew, that was a lot, but I hope that gives you some thoughts and a place to start!
I don't have any posts out there about Blender/Unreal shader workflows right now, but I'll consider making another post sometime soonish. I appreciate you asking and you're welcome! :)
23 notes
·
View notes
Text
What is React and React Native? Understanding the Difference
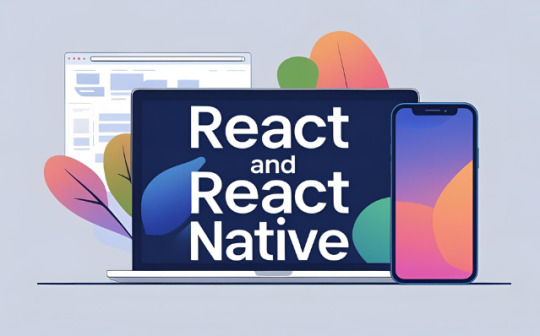
If you're starting out in frontend or mobile development, you've likely heard of both React and React Native. But what exactly are they, and how do they differ?
In this guide, we’ll break down what is React and React Native, their use cases, key differences, and when you should use one over the other.
What is React?
React (also known as React.js or ReactJS) is an open-source JavaScript library developed by Facebook, used to build user interfaces—primarily for single-page applications (SPAs). It's component-based, efficient, and declarative, making it ideal for building dynamic web applications.
Key Features of React:
Component-based architecture: Reusable pieces of UI logic.
Virtual DOM: Improves performance by reducing direct manipulation of the real DOM.
Unidirectional data flow: Predictable state management.
Rich ecosystem: Integrates well with Redux, React Router, and Next.js.
Common Use Cases:
Building dynamic web apps and dashboards
Single-page applications (SPAs)
E-commerce platforms
Admin panels and content management systems
What is React Native?
React Native is also developed by Facebook but is used for building native mobile apps using React principles. It enables developers to write apps using JavaScript and React, but renders UI components using native APIs—meaning it works just like a real native app.
Key Features of React Native:
Cross-platform compatibility: Build apps for both iOS and Android with a single codebase.
Native performance: Uses real mobile components.
Hot reloading: Faster development cycles.
Community support: Large ecosystem of plugins and libraries.
Common Use Cases:
Mobile apps for startups and MVPs
Apps with simple navigation and native look-and-feel
Projects that need rapid deployment across platforms
React vs React Native: Key Differences
Feature
React (React.js)
React Native
Platform
Web browsers
iOS and Android mobile devices
Rendering
HTML via the DOM
Native UI components
Styling
CSS and preprocessors
Uses StyleSheet API (like CSS in JS)
Navigation
React Router
React Navigation or native modules
Ecosystem
Rich support for web tools
Tailored to mobile development
Performance
Optimized for web
Optimized for native mobile experience
When to Use React
Choose React when:
You're building a web application or website
You need SEO optimization (e.g., with Next.js)
Your app depends heavily on web-based libraries or analytics tools
You want precise control over responsive design using HTML and CSS
When to Use React Native
Choose React Native when:
You need a mobile app for both iOS and Android
Your team is familiar with JavaScript and React
You want to reuse logic between mobile and web apps
You’re building an MVP to quickly test product-market fit
Can You Use Both Together?
Yes! You can share business logic, APIs, and sometimes even components (with frameworks like React Native Web) between your React and React Native projects. This is common in companies aiming for a unified development experience across platforms.
Real-World Examples
React is used in web apps like Facebook, Instagram (web), Airbnb, and Netflix.
React Native powers mobile apps like Facebook, Instagram (mobile), Shopify, Discord, and Bloomberg.
Final Thoughts
Understanding what is React and React Native is essential for any frontend or full-stack developer. React is perfect for building fast, scalable web applications, while React Native enables you to build cross-platform mobile apps with a native experience. If you’re deciding between the two, consider your target platform, performance needs, and development resources. In many modern development teams, using both React and React Native allows for a consistent developer experience and code reuse across web and mobile platforms.
2 notes
·
View notes
Text
What is Mern stack And Its importance? Before that I will Tell you the best institute for Mern stack course in Chandigarh.

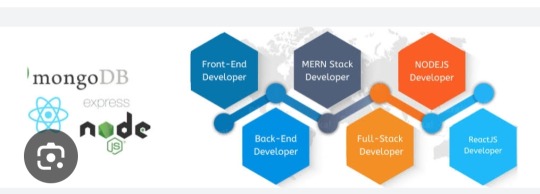
What is Mern stack?
MERN Stack is a popular JavaScript-based technology stack used for building full-stack web applications. It consists of four key technologies:
MongoDB: A NoSQL database that stores data in a flexible, JSON-like format.
Express.js: A lightweight and fast backend framework for Node.js.
React.js: A front-end JavaScript library for building user interfaces.
Node.js: A runtime environment that allows JavaScript to run on the server side.
Importance of Mern Stack :
Full-Stack JavaScript – Uses JavaScript for frontend and backend, simplifying development.
High Performance – Node.js ensures fast, scalable applications.
Cost-Effective – Open-source, reducing development costs.
Rapid Development – React’s reusable components speed up UI building.
Flexibility – Suitable for web apps, SPAs, eCommerce, and real-time applications.
Scalability – MongoDB handles large data efficiently.
Strong Community Support – Large developer base ensures continuous updates and support.
Now i will tell you the best institute for Mern stack course in Chandigarh .

Excellence Technology is a leading EdTech (Educational technology) company dedicated to empowering individuals with cutting -edge IT skills and bridging the gap between education and industry demands. Specializing in IT training ,carrer development, and placement assistance ,the company equipts learners with the technical expertise and practical experience needed to thrive in today's competitive tech landscape. We provide IT courses like python ,Full stack Development, Web Design ,Graphic Design and Digital Marketing.
Contact Us for more details: 93177-88822

Extech Digital is a leading software development company dedicated to empowering individuals with cutting -edge IT skills and bridging the gap between education and industry demands. Specializing in IT training ,carrer development, and placement assistance ,the company equipt learners with the technical expertise and practical experience needed to thrive in today's competitive tech landscape. e provide IT courses like Python ,Full stack Development, Web Design ,Graphic Design and Digital Marketing.
Contact Us for more details: 93177-88822

Excellence academy is a leading software development company dedicated to empowering individual with cutting edge IT skills and bridging the gap between education and industry demands.specializing in IT training, career development, and placement assistance, the company equits learners with the technical expertise and practical experience needed to thrive in today's landscape. We provide IT courses like python, full stack development,Web design, and Digital marketing.
Contact Us for more details: 93177-88822
About Author
Nikita Thakur
Mern stack AI Developer/ 2+ years of experience
Excellence technology
Professional summary
Nikita thakur is a skilled MERN Stack AI Developer with over 2 years of experience at Excellence Technology. Proficient in MongoDB, Express.js, React.js, and Node.js, she integrates AI solutions to build scalable, high-performance web applications. Nikita excels in developing innovative solutions, enhancing user experiences, and driving business growth through technology.
2 notes
·
View notes
Text
The Introduction to gluestack-UI – Build Fast with React, Next.js & React Native
Create beautiful, scalable apps with Gluestack – the best UI library for React, React Native & Next.js. Styled with Tailwind, optimized for both mobile & web App.
#react native ui component#react component library#react native ui library#react native library#gluestack
0 notes
Text
How-To IT
Topic: Core areas of IT
1. Hardware
• Computers (Desktops, Laptops, Workstations)
• Servers and Data Centers
• Networking Devices (Routers, Switches, Modems)
• Storage Devices (HDDs, SSDs, NAS)
• Peripheral Devices (Printers, Scanners, Monitors)
2. Software
• Operating Systems (Windows, Linux, macOS)
• Application Software (Office Suites, ERP, CRM)
• Development Software (IDEs, Code Libraries, APIs)
• Middleware (Integration Tools)
• Security Software (Antivirus, Firewalls, SIEM)
3. Networking and Telecommunications
• LAN/WAN Infrastructure
• Wireless Networking (Wi-Fi, 5G)
• VPNs (Virtual Private Networks)
• Communication Systems (VoIP, Email Servers)
• Internet Services
4. Data Management
• Databases (SQL, NoSQL)
• Data Warehousing
• Big Data Technologies (Hadoop, Spark)
• Backup and Recovery Systems
• Data Integration Tools
5. Cybersecurity
• Network Security
• Endpoint Protection
• Identity and Access Management (IAM)
• Threat Detection and Incident Response
• Encryption and Data Privacy
6. Software Development
• Front-End Development (UI/UX Design)
• Back-End Development
• DevOps and CI/CD Pipelines
• Mobile App Development
• Cloud-Native Development
7. Cloud Computing
• Infrastructure as a Service (IaaS)
• Platform as a Service (PaaS)
• Software as a Service (SaaS)
• Serverless Computing
• Cloud Storage and Management
8. IT Support and Services
• Help Desk Support
• IT Service Management (ITSM)
• System Administration
• Hardware and Software Troubleshooting
• End-User Training
9. Artificial Intelligence and Machine Learning
• AI Algorithms and Frameworks
• Natural Language Processing (NLP)
• Computer Vision
• Robotics
• Predictive Analytics
10. Business Intelligence and Analytics
• Reporting Tools (Tableau, Power BI)
• Data Visualization
• Business Analytics Platforms
• Predictive Modeling
11. Internet of Things (IoT)
• IoT Devices and Sensors
• IoT Platforms
• Edge Computing
• Smart Systems (Homes, Cities, Vehicles)
12. Enterprise Systems
• Enterprise Resource Planning (ERP)
• Customer Relationship Management (CRM)
• Human Resource Management Systems (HRMS)
• Supply Chain Management Systems
13. IT Governance and Compliance
• ITIL (Information Technology Infrastructure Library)
• COBIT (Control Objectives for Information Technologies)
• ISO/IEC Standards
• Regulatory Compliance (GDPR, HIPAA, SOX)
14. Emerging Technologies
• Blockchain
• Quantum Computing
• Augmented Reality (AR) and Virtual Reality (VR)
• 3D Printing
• Digital Twins
15. IT Project Management
• Agile, Scrum, and Kanban
• Waterfall Methodology
• Resource Allocation
• Risk Management
16. IT Infrastructure
• Data Centers
• Virtualization (VMware, Hyper-V)
• Disaster Recovery Planning
• Load Balancing
17. IT Education and Certifications
• Vendor Certifications (Microsoft, Cisco, AWS)
• Training and Development Programs
• Online Learning Platforms
18. IT Operations and Monitoring
• Performance Monitoring (APM, Network Monitoring)
• IT Asset Management
• Event and Incident Management
19. Software Testing
• Manual Testing: Human testers evaluate software by executing test cases without using automation tools.
• Automated Testing: Use of testing tools (e.g., Selenium, JUnit) to run automated scripts and check software behavior.
• Functional Testing: Validating that the software performs its intended functions.
• Non-Functional Testing: Assessing non-functional aspects such as performance, usability, and security.
• Unit Testing: Testing individual components or units of code for correctness.
• Integration Testing: Ensuring that different modules or systems work together as expected.
• System Testing: Verifying the complete software system’s behavior against requirements.
• Acceptance Testing: Conducting tests to confirm that the software meets business requirements (including UAT - User Acceptance Testing).
• Regression Testing: Ensuring that new changes or features do not negatively affect existing functionalities.
• Performance Testing: Testing software performance under various conditions (load, stress, scalability).
• Security Testing: Identifying vulnerabilities and assessing the software’s ability to protect data.
• Compatibility Testing: Ensuring the software works on different operating systems, browsers, or devices.
• Continuous Testing: Integrating testing into the development lifecycle to provide quick feedback and minimize bugs.
• Test Automation Frameworks: Tools and structures used to automate testing processes (e.g., TestNG, Appium).
19. VoIP (Voice over IP)
VoIP Protocols & Standards
• SIP (Session Initiation Protocol)
• H.323
• RTP (Real-Time Transport Protocol)
• MGCP (Media Gateway Control Protocol)
VoIP Hardware
• IP Phones (Desk Phones, Mobile Clients)
• VoIP Gateways
• Analog Telephone Adapters (ATAs)
• VoIP Servers
• Network Switches/ Routers for VoIP
VoIP Software
• Softphones (e.g., Zoiper, X-Lite)
• PBX (Private Branch Exchange) Systems
• VoIP Management Software
• Call Center Solutions (e.g., Asterisk, 3CX)
VoIP Network Infrastructure
• Quality of Service (QoS) Configuration
• VPNs (Virtual Private Networks) for VoIP
• VoIP Traffic Shaping & Bandwidth Management
• Firewall and Security Configurations for VoIP
• Network Monitoring & Optimization Tools
VoIP Security
• Encryption (SRTP, TLS)
• Authentication and Authorization
• Firewall & Intrusion Detection Systems
• VoIP Fraud DetectionVoIP Providers
• Hosted VoIP Services (e.g., RingCentral, Vonage)
• SIP Trunking Providers
• PBX Hosting & Managed Services
VoIP Quality and Testing
• Call Quality Monitoring
• Latency, Jitter, and Packet Loss Testing
• VoIP Performance Metrics and Reporting Tools
• User Acceptance Testing (UAT) for VoIP Systems
Integration with Other Systems
• CRM Integration (e.g., Salesforce with VoIP)
• Unified Communications (UC) Solutions
• Contact Center Integration
• Email, Chat, and Video Communication Integration
2 notes
·
View notes
Text
Telegram Mini App Development: Tools, APIs, and Best Practices in 2025
Introduction
Telegram Mini Apps have become a key part of digital interaction inside Telegram. In 2025, their ability to create seamless, app-like experiences inside the chat interface positions them as a smart choice for businesses and developers looking to build without platform switching. With an evolving developer ecosystem, expanded APIs, and native support for in-app payments, these apps combine the ease of bots with the richness of mobile-like UI.
What is Telegram Mini App Development
Telegram Mini App Development refers to creating apps that work inside Telegram using web technologies. These apps are web-based frontends powered by Telegram bots on the backend. Users access them without needing to download anything separately. The apps open inside Telegram's WebView, supporting full interaction with Telegram services like authentication, payments, and messages. This approach allows brands to keep users inside Telegram while offering personalized tools and services.
Why is Telegram Mini App Development Important
The shift from traditional bots to Mini Apps changes how users interact with services on Telegram. Mini Apps reduce friction. Users don’t have to exit Telegram or install anything extra. They can sign in, browse, pay, or submit forms without interruption. With a smoother flow and stronger visuals, brands can deliver a better experience. And since Telegram is growing in both personal and business use, tapping into this space can help companies stay accessible and relevant.

Laying the Foundation with Telegram Mini Apps
What Developers Can Do with Telegram Mini Apps in 2025
Build web-based apps powered by Telegram bots.
Use React or Vue for custom UI inside Telegram WebView.
Enable real-time chat services linked to backend logic.
Offer Telegram deep linking for instant app access.
Integrate payments, forms, and profile tools securely.
How Telegram Mini Apps Fit Inside the Platform’s Architecture
Mini Apps use Telegram's JavaScript APIs and work with the Telegram Mini App framework. The frontend (HTML/CSS/JS) is served via a Telegram Mini App hosting solution. The backend logic relies on Telegram inline bots. Telegram theme parameters allow UI styling to match light or dark Telegram modes, providing a native look and feel.
Core Tools Behind Telegram Mini App Development
Telegram Mini App SDK: Setup, Features, and Common Functions
The Telegram Mini App SDK includes everything needed to connect with Telegram’s client-side features. Developers can:
Set up button callbacks and navigation events
Detect Telegram theme parameters
Trigger full-screen modes
Handle version updates
Sync UI with Telegram Web Apps themes
Using Telegram Mini App Templates to Speed Up Development
Prebuilt templates reduce initial setup time. Developers can start with ready-to-edit layouts, component libraries, and verified SDK integrations. These templates align with Telegram Mini App UI/UX design guidelines, and help avoid layout issues inside the WebView.
Telegram Bot API and Its Role in Mini Apps
Connecting Logic and Interface Using Telegram Bot API
Telegram bots act as the backend brain of Mini Apps. They handle API requests, user authentication, and routing. Developers connect bot logic with frontend elements using Telegram JavaScript API functions. This allows users to send inputs, fetch data, or process transactions inside the Mini App.
Rate Limits, Permissions, and API Response Handling
Bot API calls are subject to rate limits. Developers must implement queuing or fallback handling. Permission management ensures that users only see content relevant to their profile or role. Proper response formatting helps reduce latency and improves experience.
Enabling UI Flexibility with Telegram WebView
How Telegram WebView Helps Deliver In-App Experiences
Telegram WebView allows developers to present full-screen apps inside chats. Brands like Malgo use this capability to create smooth flows, interactive screens, and responsive layouts. They integrate Telegram Mini App hosting and deep linking for consistent entry points across campaigns or support chats.
Supported Features and Restrictions of Telegram WebView
The WebView supports:
HTML5/CSS3 styling
Dynamic resizing
Custom fonts and icons
File uploads
Session persistence
Restrictions include:
Limited access to device hardware
No service workers
Cookies cleared per session unless managed via Telegram login
Streamlining Sign-In with Telegram Login Widget
Embedding Telegram Login Widget in Mini Apps
The Telegram Login Widget simplifies sign-in without separate credentials. Once users click the widget, Telegram confirms identity and returns profile data to the Mini App backend. This reduces form fill friction and improves conversion rates.
Handling User Data and Authorization Safely
User data from the widget includes Telegram ID, name, and profile photo. Developers should validate login requests using Telegram’s authentication signature system. Avoid storing extra data unless needed for personalization or compliance.
Payment Integrations Using TON and Telegram
Setting Up TON Payments Telegram Supports
Mini Apps can offer services or digital products through TON payments. Developers register their app with Telegram's payment gateway, link a TON wallet, and create buy buttons linked to bot logic.
Managing Invoices and Transactions Through Telegram Mini Apps
Bots send invoice messages, while the Mini App shows purchase status and receipts. TON smart contracts ensure settlement. This flow supports transparency, reduces fraud risk, and allows cross-border micropayments.
Deployment and Maintenance in 2025
How to Test Telegram Mini Apps Before Going Live
Testing involves:
Loading the Mini App in Telegram Test mode
Using staging servers for bot logic
Validating WebView behavior across iOS, Android, and desktop
Checking LCP and FID metrics inside the Telegram browser
Keeping Your Mini App Updated with Telegram’s Newest Tools
Telegram continues to release updates to the JavaScript SDK, bot APIs, and hosting guidelines. Developers should follow Telegram's changelogs, and update theme parameters or WebView triggers to stay in sync.
Final Thoughts
Telegram Mini App Development gives teams a direct way to offer smart, simple tools without users ever leaving the Telegram app. With strong APIs, flexible web tech, and native integration features, Mini Apps help deliver better interaction and service value. Explore Telegram Mini App Development for Your Business Now! The development cost depends on factors such as feature complexity, technology stack, customization requirements, and deployment preferences. Get in touch with Malgo for a detailed quote. Why Malgo Fits Telegram Mini App Development Better Than Most. One word: consistency.
Frequently Asked Questions About Telegram Mini Apps
What are the minimum requirements to build a Telegram Mini App? Basic web development skills and access to a Telegram bot with webhook setup.
How does Telegram Bot API support Mini App workflows? It connects frontend user actions to backend processing.
Can payments be processed directly within Telegram Mini Apps? Yes, using TON-based payment gateways.
Are there pre-made Telegram Mini App Templates available? Yes, several official and open-source templates are available.
What are the current limitations of Telegram WebView in 2025? Limited hardware access and session-based cookies.
1 note
·
View note
Text
Integrating NFTs into Web3 dApps Using Ethers.js & Web3.js
In the rapidly evolving Web3 landscape, Non-Fungible Tokens (NFTs) have transformed from a niche crypto curiosity into a fundamental building block for the next generation of decentralized applications. Whether you're building a marketplace, a game, or a social platform, integrating NFT functionality can add unique value to your dApp. This comprehensive guide will walk you through the process of implementing NFT features using two of the most popular JavaScript libraries in the Ethereum ecosystem: Ethers.js and Web3.js, focusing on concepts and strategies rather than specific code implementations.

Understanding the NFT Integration Landscape
Before diving into implementation details, it's important to understand what we're trying to achieve with NFT development. NFT integration typically involves several key functionalities:
Minting: Creating new NFTs on the blockchain
Transferring: Enabling users to send NFTs to other wallets
Displaying: Fetching and rendering NFT metadata and images
Trading: Facilitating the buying and selling of NFTs
Interacting: Allowing special actions with NFTs based on your dApp's features
Each of these functions requires different approaches, and your choice between Ethers.js and Web3.js may depend on your specific requirements and preferences.
Setting Up Your Development Environment
The first step in NFT development is preparing your development environment. You'll need to install the appropriate libraries and set up your project structure.
Essential Dependencies
For an effective NFT integration, you'll typically need:
A JavaScript library for Ethereum interaction (Ethers.js or Web3.js)
Smart contract interfaces for popular NFT standards
Tools for handling metadata and media files
Front-end frameworks for building the user interface
Project Structure Considerations
A well-organized project structure makes NFT development more manageable. Consider separating your codebase into:
Contract interfaces and abstractions
Service layers for blockchain interactions
UI components for NFT display and interaction
Utility functions for metadata handling
Storage solutions for off-chain assets
This separation of concerns will make your codebase more maintainable as your NFT features evolve.
Understanding NFT Standards
Most NFTs on Ethereum follow the ERC-721 or ERC-1155 standards. Understanding these standards is crucial for NFT DEVELOPMENT.
ERC-721
The ERC-721 standard is the original NFT standard on Ethereum. Each token is completely unique and has its own specific token ID. This is perfect for one-of-a-kind digital assets like art pieces or unique collectibles.
Key functions in the ERC-721 standard include:
Transferring tokens between addresses
Approving specific addresses to transfer tokens
Checking ownership of specific tokens
Getting metadata for tokens
ERC-1155
The ERC-1155 standard allows for both fungible and non-fungible tokens within the same contract. This makes it more gas-efficient and ideal for applications with multiple types of tokens, such as games with both unique items and currency tokens.
Key benefits of ERC-1155 include:
Batch transfers for multiple token types
Reduced gas costs for similar operations
Support for both fungible and non-fungible tokens
More flexible metadata handling
Using Ethers.js for NFT Integration
Ethers.js provides a clean, minimal interface for interacting with Ethereum and has become increasingly popular among developers engaged in NFT development.
Key Ethers.js Features for NFT Integration
When working with NFTs, Ethers.js offers several advantages:
Provider Management: Easily connect to various Ethereum networks and providers
Contract Interaction: Streamlined interface for calling NFT contract functions
Event Handling: Subscribe to events like transfers and minting
Wallet Integration: Connect with browser wallets like MetaMask seamlessly
Transaction Management: Better handling of transaction status and errors
Implementation Strategy with Ethers.js
To integrate NFTs using Ethers.js, you would typically:
Create a provider connection to the Ethereum network
Connect to user wallets for transaction signing
Create contract instances for NFT contracts
Implement functions for key NFT operations
Set up event listeners for NFT transfers and other events
Ethers.js for NFT Metadata Handling
Ethers.js provides efficient tools for retrieving and processing NFT metadata:
Fetch token URIs from contracts
Resolve IPFS and other decentralized storage links
Parse JSON metadata and handle various formats
Efficiently batch metadata requests for collections
Working with NFTs Using Web3.js
Web3.js is the original Ethereum JavaScript API and still has a large user base in the NFT DEVELOPMENT community.
Key Web3.js Features for NFT Integration
Web3.js offers its own advantages for NFT integration:
Broader Ecosystem Support: Works with more Ethereum node types
Comprehensive Utilities: More built-in tools for common operations
Batch Requests: Native support for batching multiple contract calls
Subscription API: Real-time updates for blockchain events
Extensive Community Resources: More examples and tutorials available
Implementation Strategy with Web3.js
To integrate NFTs using Web3.js, your approach would typically include:
Set up a Web3 instance connected to an Ethereum provider
Request account access from the user's wallet
Initialize contract objects for NFT interactions
Implement functions for key NFT operations
Set up subscriptions for relevant blockchain events
Web3.js for NFT Ownership and Transfers
Web3.js provides robust tools for managing NFT ownership:
Checking token ownership across collections
Handling transfer approval workflows
Managing gas estimation for transfers
Processing transfer events for UI updates
Building an NFT Gallery Experience
A key part of NFT DEVELOPMENT is creating an engaging way to display NFTs to users.
Core Components of an NFT Gallery
An effective NFT gallery typically includes:
Grid or list views for displaying multiple NFTs
Detailed view for individual NFT information
Filtering and sorting options based on metadata
Loading states and placeholders for better UX
Interactive elements for NFT actions
Metadata Handling Strategies
NFT metadata can vary widely, so your application should be able to:
Handle different metadata schemas and formats
Deal with missing or malformed metadata gracefully
Support various media types (images, videos, 3D models)
Provide fallback displays when media can't be loaded
Cache metadata to improve loading performance
Performance Optimization
When displaying many NFTs, performance becomes crucial:
Implement virtualized lists for large collections
Lazy load images and media as they enter the viewport
Use caching for frequently accessed metadata
Implement pagination or infinite scrolling
Optimize media for fast loading
Comparing Ethers.js and Web3.js for NFT DEVELOPMENT
Both libraries have their strengths for NFT integration:
Ethers.js Advantages
More modern API design with cleaner abstractions
Better TypeScript support for safer development
Lower bundle size, which is better for frontend applications
More consistent error handling for better user experience
Simpler interfaces for common NFT tasks
Web3.js Advantages
Larger community and more examples to reference
More comprehensive documentation for various use cases
Broader ecosystem integration with existing tools
More established tooling and plugins
Support for more Ethereum node types and providers
For NFT DEVELOPMENT specifically, Ethers.js often provides a cleaner developer experience, but Web3.js may offer more pre-built tools and examples.
Advanced NFT Integration Features
Lazy Minting Concepts
Lazy minting is a cost-saving technique where NFTs aren't actually minted until someone buys them:
Creator generates metadata and signs it off-chain
Marketplace lists the "unminted" NFT with the signature
When a buyer purchases, they pay the gas fees for minting
The NFT is minted directly to the buyer's wallet
This approach significantly reduces costs for creators and marketplaces.
NFT Metadata Rendering Strategies
Advanced rendering of NFT metadata can improve user experience:
Display attributes and traits in visually appealing ways
Show rarity scores and collection statistics
Implement 3D viewers for compatible NFTs
Support audio NFTs with appropriate players
Enable animations for dynamic NFTs
Batch Operations for Collections
For applications dealing with multiple NFTs, batch operations can improve efficiency:
Group similar transactions to reduce gas costs
Implement parallel processing for metadata fetching
Use collection-wide operations when supported by contracts
Provide bulk action interfaces for users managing many NFTs
Best Practices for NFT Integration
As you develop your NFT features, keep these best practices in mind for successful NFT development:
Cache metadata when possible to reduce API calls and improve loading times
Implement fallback image handling for when IPFS or other storage is slow
Use event listeners to update UI when NFT ownership changes
Consider gasless transactions for a better user experience
Test thoroughly on testnets before deploying to mainnet
Implement proper error handling to guide users when transactions fail
Support multiple wallet providers for broader accessibility
Provide clear transaction feedback so users understand what's happening
Consider mobile experiences as many NFT users browse on mobile devices
Stay updated on new standards as the NFT ecosystem evolves rapidly
Security Considerations in NFT DEVELOPMENT
Security is paramount when dealing with valuable digital assets:
Contract Interaction Security
Always verify contract addresses before interaction
Implement spending limits and confirmation steps
Use established libraries for signature verification
Test extensively on testnets before mainnet deployment
Metadata Security
Validate metadata before displaying to prevent injection attacks
Implement secure handling of external URLs
Use content security policies for media display
Consider decentralized storage for metadata persistence
User Experience Security
Provide clear confirmation steps for all transactions
Show estimated gas costs before transaction submission
Implement timeout and retry mechanisms for failed transactions
Educate users about common NFT scams and security practices
Conclusion
Integrating NFTs into your Web3 dApp opens up exciting possibilities for digital ownership, creative expression, and new business models. Whether you choose Ethers.js or Web3.js depends on your specific requirements and preferences, but both libraries provide the tools needed for comprehensive NFT development.
Remember that the NFT landscape continues to evolve rapidly. New standards, marketplaces, and use cases emerge regularly. The best integrations will be those that combine technical excellence with a deep understanding of your users' needs and the unique value proposition of your dApp.
By following the approaches outlined in this guide, you'll be well on your way to creating compelling NFT experiences that engage users and showcase the true potential of Web3 technologies.
#game#mobile game development#multiplayer games#metaverse#gaming#vr games#blockchain#unity game development#NFT
1 note
·
View note
Text
Building a Component Library for NextJS: A Guide to Reusable UI
Building a Component Library for NextJS: A Guide to Reusable UI Have you ever found yourself rewriting the same UI components over and over again in your NextJS projects? Have you struggled to maintain consistency and efficiency across multiple applications? If so, it’s time to consider building a component library. A component library is a collection of reusable UI elements that can be shared…
#building component library#Component Library#Design#development#front-end#NextJS#NextJS component library#reusable#reusable UI#UI
0 notes
Text
#Playstation7 #framework #BasicArchitecture #RawCode #RawScript #Opensource #DigitalConsole
To build a new gaming console’s digital framework from the ground up, you would need to integrate several programming languages and technologies to manage different aspects of the system. Below is an outline of the code and language choices required for various parts of the framework, focusing on languages like C++, Python, JavaScript, CSS, MySQL, and Perl for different functionalities.
1. System Architecture Design (Low-level)
• Language: C/C++, Assembly
• Purpose: To program the low-level system components such as CPU, GPU, and memory management.
• Example Code (C++) – Low-Level Hardware Interaction:
#include <iostream>
int main() {
// Initialize hardware (simplified example)
std::cout << "Initializing CPU...\n";
// Set up memory management
std::cout << "Allocating memory for GPU...\n";
// Example: Allocating memory for gaming graphics
int* graphicsMemory = new int[1024]; // Allocate 1KB for demo purposes
std::cout << "Memory allocated for GPU graphics rendering.\n";
// Simulate starting the game engine
std::cout << "Starting game engine...\n";
delete[] graphicsMemory; // Clean up
return 0;
}
2. Operating System Development
• Languages: C, C++, Python (for utilities)
• Purpose: Developing the kernel and OS for hardware abstraction and user-space processes.
• Kernel Code Example (C) – Implementing a simple syscall:
#include <stdio.h>
#include <unistd.h>
int main() {
// Example of invoking a custom system call
syscall(0); // System call 0 - usually reserved for read in UNIX-like systems
printf("System call executed\n");
return 0;
}
3. Software Development Kit (SDK)
• Languages: C++, Python (for tooling), Vulkan or DirectX (for graphics APIs)
• Purpose: Provide libraries and tools for developers to create games.
• Example SDK Code (Vulkan API with C++):
#include <vulkan/vulkan.h>
VkInstance instance;
void initVulkan() {
VkApplicationInfo appInfo = {};
appInfo.sType = VK_STRUCTURE_TYPE_APPLICATION_INFO;
appInfo.pApplicationName = "GameApp";
appInfo.applicationVersion = VK_MAKE_VERSION(1, 0, 0);
appInfo.pEngineName = "GameEngine";
appInfo.engineVersion = VK_MAKE_VERSION(1, 0, 0);
appInfo.apiVersion = VK_API_VERSION_1_0;
VkInstanceCreateInfo createInfo = {};
createInfo.sType = VK_STRUCTURE_TYPE_INSTANCE_CREATE_INFO;
createInfo.pApplicationInfo = &appInfo;
vkCreateInstance(&createInfo, nullptr, &instance);
std::cout << "Vulkan SDK Initialized\n";
}
4. User Interface (UI) Development
• Languages: JavaScript, HTML, CSS (for UI), Python (backend)
• Purpose: Front-end interface design for the user experience and dashboard.
• Example UI Code (HTML/CSS/JavaScript):
<!DOCTYPE html>
<html>
<head>
<title>Console Dashboard</title>
<style>
body { font-family: Arial, sans-serif; background-color: #282c34; color: white; }
.menu { display: flex; justify-content: center; margin-top: 50px; }
.menu button { padding: 15px 30px; margin: 10px; background-color: #61dafb; border: none; cursor: pointer; }
</style>
</head>
<body>
<div class="menu">
<button onclick="startGame()">Start Game</button>
<button onclick="openStore()">Store</button>
</div>
<script>
function startGame() {
alert("Starting Game...");
}
function openStore() {
alert("Opening Store...");
}
</script>
</body>
</html>
5. Digital Store Integration
• Languages: Python (backend), MySQL (database), JavaScript (frontend)
• Purpose: A backend system for purchasing and managing digital game licenses.
• Example Backend Code (Python with MySQL):
import mysql.connector
def connect_db():
db = mysql.connector.connect(
host="localhost",
user="admin",
password="password",
database="game_store"
)
return db
def fetch_games():
db = connect_db()
cursor = db.cursor()
cursor.execute("SELECT * FROM games")
games = cursor.fetchall()
for game in games:
print(f"Game ID: {game[0]}, Name: {game[1]}, Price: {game[2]}")
db.close()
fetch_games()
6. Security Framework Implementation
• Languages: C++, Python, Perl (for system scripts)
• Purpose: Ensure data integrity, authentication, and encryption.
• Example Code (Python – Encrypting User Data):
from cryptography.fernet import Fernet
# Generate a key for encryption
key = Fernet.generate_key()
cipher_suite = Fernet(key)
# Encrypt sensitive user information (e.g., account password)
password = b"SuperSecretPassword"
encrypted_password = cipher_suite.encrypt(password)
print(f"Encrypted Password: {encrypted_password}")
# Decrypting the password
decrypted_password = cipher_suite.decrypt(encrypted_password)
print(f"Decrypted Password: {decrypted_password}")
7. Testing and Quality Assurance
• Languages: Python (for automated tests), Jest (for JavaScript testing)
• Purpose: Unit testing, integration testing, and debugging.
• Example Unit Test (Python using unittest):
import unittest
def add(a, b):
return a + b
class TestGameFramework(unittest.TestCase):
def test_add(self):
self.assertEqual(add(10, 20), 30)
if __name__ == '__main__':
unittest.main()
8. Order of Implementation
• Phase 1: Focus on core system architecture (low-level C/C++) and OS development.
• Phase 2: Develop SDK and start building the basic framework for UI and input management.
• Phase 3: Work on backend systems like the digital store and integrate with front-end UI.
• Phase 4: Begin rigorous testing and debugging using automated test suites.
This comprehensive approach gives you a detailed idea of how each component can be built using a combination of these languages and technologies. Each section is modular, allowing teams to work on different aspects of the console simultaneously.
[Pixel Art/Sprites/Buildinodels/VictoriaSecretPixelArtKit #Playstation7 #DearDearestBrands]

#victoriasecretrunway#runwaybattle#victoria secret fashion#victoria secert model#victoriasecret#victoria secret#VictoriaSecretRunwayBattle#capcom victoriasecret#capcom videogames#playstation7#ps7#deardearestbrands#capcom#digitalconsole#python#script#rawscript#raw code#framework#VictoriaSecretVideoGame#deardearestbrandswordpress
2 notes
·
View notes