#Windows PowerShell Automation
Explore tagged Tumblr posts
Visit Tumblr Blog
Explore Tumblr blogs with no restrictions, modern design and the best experience.
Last Seen Tumblr Blogs


Fun Fact
Forty percent of Tumblr users are between the ages of 18 to 25.
Text
PowerShell Get Registry Value
PowerShell Get Registry Value @vexpert #vmwarecommunities #100daysofhomelab #homelab #PowerShellRegistry #WindowsRegistry #Get-ItemPropertyCmdlet #Get-ChildItemCommand #RegistryKeys #RegistryValues #PowerShellScript #RemoteComputerManagement
The Windows Registry and registry editor have long been tools Windows admins have used to resolve issues, apply settings, etc. However, PowerShell makes automating registry changes or programmatically getting registry keys and their values very easy. PowerShell can interact with registry keys and easily get registry values. Table of contentsWhat is PowerShell?What is the Windows…

View On WordPress
#Get-ChildItem command#Get-ItemProperty cmdlet#PowerShell Registry#PowerShell Script#Registry Editor#Registry keys#Registry values#remote computer management#Windows PowerShell Automation#Windows Registry
0 notes
Text
Always On VPN SSTP and 47-Day TLS Certificates
The Secure Socket Tunneling Protocol (SSTP) VPN protocol uses Transport Layer Security (TLS) encryption and HTTP transport over TCP port 443. SSTP is easy to configure and firewall-friendly, making it an excellent choice for the Always On VPN user tunnel. Security best practices dictate using a TLS certificate issued by a public Certification Authority (CA). Today, the maximum lifetime of a…

View On WordPress
#ACME#Always On VPN#AOVPN#AOVPNTools#automation#CA#certificate#certificates#Certification Authority#Cloudflare#Let&039;s Encrypt#Microsoft#Posh-ACME#PowerShell#public certificate#Routing and Remote Access#RRAS#Secure Socket Tunneling Protocol#SSTP#TLS#transport layer security#user tunnel#VPN#Windows
0 notes
Text
#it automation#msp tools#powershell#remote administration#system maintenance#wholesale backup#Windows Server
0 notes
Text
so yea, I automate booping
maybe you saw it, prob you didn't, but I automated booping
but dario, you probably aren't asking, how can I do it too in a simple yet powerful way?
well, I'm here to answer the question nobody asked, with a little bit of bash
first, choose you victim(s)

this goober will do
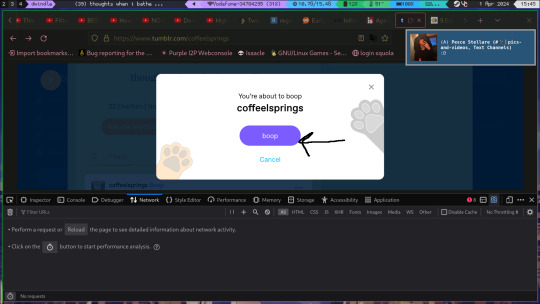
then boop em


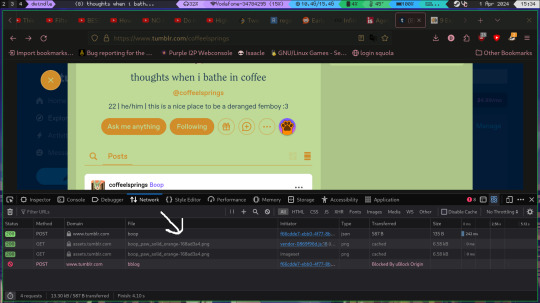
next, open inspect elements and navigate to the network tab
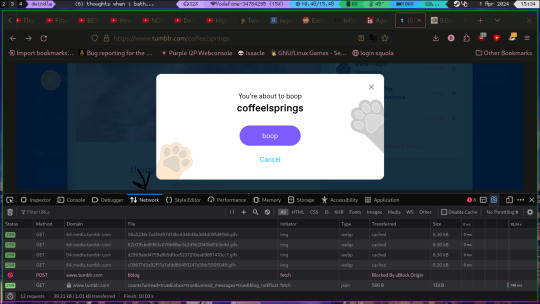
now press the bin to clear everything
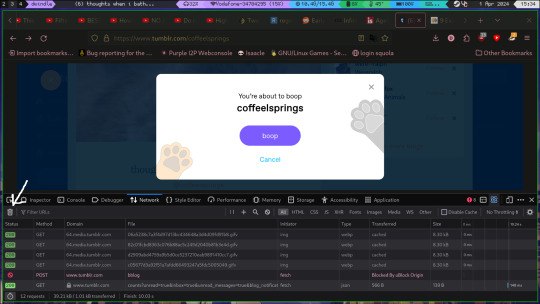
now boop
when you have done that various GET requests will have appeared, choose the boop one, right click->copy as->copy as cURL
this will give you your cookie too, this kind of cookie mus NEVER, and I repeat NEVER be shared, it gives access to your account bypassing any kind of 2fa
then create a basic bash script, just a for loop will do but if u don't know what u are doing, copy this (if on windows copy as powershell instead and figure it out)
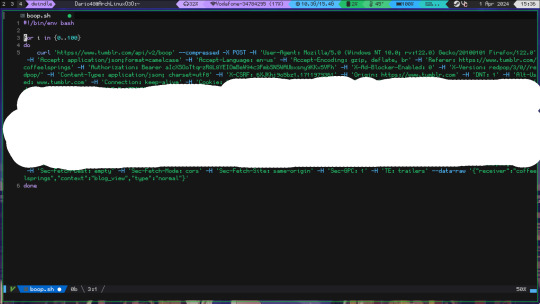
no, I did not cum on the script, I censored my cookie
this will trigger the anti-spam, so putting a sleep 0.1s before the done might be useful
the script is (put whatever you want instead of 100)
for i in {1..100}; do
[insert the curl]
[optional]sleep 0.1s
done
69 notes
·
View notes
Text

Tools of the Trade for Learning Cybersecurity
I created this post for the Studyblr Masterpost Jam, check out the tag for more cool masterposts from folks in the studyblr community!
Cybersecurity professionals use a lot of different tools to get the job done. There are plenty of fancy and expensive tools that enterprise security teams use, but luckily there are also lots of brilliant people writing free and open-source software. In this post, I'm going to list some popular free tools that you can download right now to practice and learn with.
In my opinion, one of the most important tools you can learn how to use is a virtual machine. If you're not already familiar with Linux, this is a great way to learn. VMs are helpful for separating all your security tools from your everyday OS, isolating potentially malicious files, and just generally experimenting. You'll need to use something like VirtualBox or VMWare Workstation (Workstation Pro is now free for personal use, but they make you jump through hoops to download it).
Below is a list of some popular cybersecurity-focused Linux distributions that come with lots of tools pre-installed:
Kali is a popular distro that comes loaded with tools for penetration testing
REMnux is a distro built for malware analysis
honorable mention for FLARE-VM, which is not a VM on its own, but a set of scripts for setting up a malware analysis workstation & installing tools on a Windows VM.
SANS maintains several different distros that are used in their courses. You'll need to create an account to download them, but they're all free:
Slingshot is built for penetration testing
SIFT Workstation is a distro that comes with lots of tools for digital forensics
These distros can be kind of overwhelming if you don't know how to use most of the pre-installed software yet, so just starting with a regular Linux distribution and installing tools as you want to learn them is another good choice for learning.
Free Software
Wireshark: sniff packets and explore network protocols
Ghidra and the free version of IDA Pro are the top picks for reverse engineering
for digital forensics, check out Eric Zimmerman's tools - there are many different ones for exploring & analyzing different forensic artifacts
pwntools is a super useful Python library for solving binary exploitation CTF challenges
CyberChef is a tool that makes it easy to manipulate data - encryption & decryption, encoding & decoding, formatting, conversions… CyberChef gives you a lot to work with (and there's a web version - no installation required!).
Burp Suite is a handy tool for web security testing that has a free community edition
Metasploit is a popular penetration testing framework, check out Metasploitable if you want a target to practice with
SANS also has a list of free tools that's worth checking out.
Programming Languages
Knowing how to write code isn't a hard requirement for learning cybersecurity, but it's incredibly useful. Any programming language will do, especially since learning one will make it easy to pick up others, but these are some common ones that security folks use:
Python is quick to write, easy to learn, and since it's so popular, there are lots of helpful libraries out there.
PowerShell is useful for automating things in the Windows world. It's built on .NET, so you can practically dip into writing C# if you need a bit more power.
Go is a relatively new language, but it's popular and there are some security tools written in it.
Rust is another new-ish language that's designed for memory safety and it has a wonderful community. There's a bit of a steep learning curve, but learning Rust makes you understand how memory bugs work and I think that's neat.
If you want to get into reverse engineering or malware analysis, you'll want to have a good grasp of C and C++.
Other Tools for Cybersecurity
There are lots of things you'll need that aren't specific to cybersecurity, like:
a good system for taking notes, whether that's pen & paper or software-based. I recommend using something that lets you work in plain text or close to it.
general command line familiarity + basic knowledge of CLI text editors (nano is great, but what if you have to work with a system that only has vi?)
familiarity with git and docker will be helpful
There are countless scripts and programs out there, but the most important thing is understanding what your tools do and how they work. There is no magic "hack this system" or "solve this forensics case" button. Tools are great for speeding up the process, but you have to know what the process is. Definitely take some time to learn how to use them, but don't base your entire understanding of security on code that someone else wrote. That's how you end up as a "script kiddie", and your skills and knowledge will be limited.
Feel free to send me an ask if you have questions about any specific tool or something you found that I haven't listed. I have approximate knowledge of many things, and if I don't have an answer I can at least help point you in the right direction.
#studyblrmasterpostjam#studyblr#masterpost#cybersecurity#late post bc I was busy yesterday oops lol#also this post is nearly a thousand words#apparently I am incapable of being succinct lmao
22 notes
·
View notes
Text
Deploying Custom Applications: Tips for Success with the Office Deployment Tool
In today’s enterprise environments, the need to deploy custom applications efficiently and securely has never been more critical. Whether you're managing internal tools, third-party integrations, or specialized solutions, an unstructured deployment approach can lead to downtime, version conflicts, and user frustration. That’s where smart planning—and the right tools—come into play.
This guide walks you through the essential steps and best practices for deploying custom applications, with a special focus on how the Office Deployment Tool (ODT) can support your success.
Understanding the Deployment Landscape
Challenges in Deploying Custom Applications
Deploying custom software is not just about copying files. It involves:
Ensuring compatibility with various operating systems and hardware
Managing dependencies and application conflicts
Handling user settings, permissions, and network considerations
Why the Right Tools Matter
A tool-driven approach can:
Reduce manual errors and inconsistencies
Accelerate deployment timelines
Improve control over installations and post-deployment updates
The Role of the Office Deployment Tool in Custom App Deployment
What is the Office Deployment Tool?
Originally designed to manage Microsoft 365 installations, the Office Deployment Tool (ODT) is a powerful utility that allows IT teams to configure and automate installations using a configuration XML file. Its flexibility and scripting capabilities make it suitable not just for Office, but for managing custom application deployments when integrated with broader scripts and deployment workflows.
Key Features Supporting Custom App Deployments
Granular control: Define exactly what and how apps are deployed using configuration.xml
Silent installs: Eliminate user prompts and automate background installations
Scripting flexibility: Integrates well with PowerShell, Group Policy, and SCCM for scalable deployments
Pre-Deployment Preparation
Define Scope and Objectives
Before deploying, clarify:
The application’s purpose and target departments
System requirements and any third-party dependencies
Whether the deployment is user-based or machine-based
Compatibility and Testing
Conduct pilot deployments using test machines or virtual environments. Use the Office Deployment Tool to simulate installations and observe any potential compatibility issues in advance.
Best Practices for a Successful Rollout
Use Configuration Files Wisely
With the configuration.xml file, you can:
Customize language packs, install paths, and features
Control update behavior and telemetry settings
Deploy different app versions based on user roles
Automate with Scripts and Scheduling Tools
Pair the ODT with:
PowerShell scripts for full automation
Task Scheduler or Microsoft Intune to set specific install windows
Batch files for triggering multiple installations in sequence
Monitor and Troubleshoot Proactively
The ODT provides detailed logs in the %temp% directory:
Review logs post-installation to identify failed components
Address common issues like path misconfigurations or access errors
Post-Deployment Strategy
Gather Feedback and Optimize
Encourage end users to report performance issues or missing features. Use this input to refine future deployments.
Maintain with Regular Updates
Set up recurring update checks, especially if your application includes security components. You can schedule update routines using the same ODT configuration system that deployed the original version.
Conclusion
Successful custom application deployment is not about speed—it’s about strategy. Leveraging automation tools like the Office Deployment Tool empowers IT teams to execute rollouts that are secure, scalable, and low-risk.
Ready to streamline your custom app deployments? Embrace the ODT as part of your deployment strategy to reduce complexity and drive operational success.
FAQs
Q: Can the Office Deployment Tool install non-Microsoft software? A: While ODT is primarily designed for Microsoft 365, it can be used as part of a broader deployment strategy through scripts that include custom applications.
Q: Is ODT suitable for remote deployments? A: Yes. It integrates well with Microsoft Intune, SCCM, and Group Policy, enabling remote and automated installations across distributed environments.
#office deployment tool#odt#microsoft odt#odt download#microsoft#office development tool#microsoft 365 odt#ms office odt
0 notes
Text
Top 10 Programming Languages for Cyber Security in 2025

In the ever-escalating battle for digital security, programming languages are the fundamental tools that empower cybersecurity professionals. Whether you're an ethical hacker, a malware analyst, a security engineer, or a digital forensic investigator, fluency in certain languages is non-negotiable. As we navigate 2025, the demand for cybersecurity experts continues to soar, and with it, the need for mastery over these crucial coding languages.
Here's a look at the top 10 programming languages shaping the cybersecurity landscape this year:
1. Python: The Versatile Vanguard
Still holding the crown, Python remains the undisputed champion of cybersecurity. Its simplicity, readability, and vast ecosystem of libraries make it incredibly versatile.
Why it's essential: Scripting for automation (e.g., automating vulnerability scans), penetration testing (Metasploit, Scapy, Requests), malware analysis, web scraping for open-source intelligence (OSINT), and building custom security tools. Its integration with AI/ML libraries also makes it vital for advanced threat detection systems.
Key uses: Penetration testing, malware analysis, security automation, data analysis in incident response.
2. C and C++: The Low-Level Powerhouses
When you need to understand how systems truly work at their core, C and C++ are indispensable. These languages provide direct memory access, which is crucial for deep security work.
Why they're essential: Exploit development (understanding buffer overflows, crafting shellcode), reverse engineering malware, developing high-performance security tools, and securing operating systems/firmware. Many exploits and malicious payloads are written in C/C++.
Key uses: Exploit development, reverse engineering, malware analysis, secure system programming.
3. JavaScript: The Web's Watchdog
As the internet continues to dominate, JavaScript's role in cybersecurity, particularly web security, grows exponentially.
Why it's essential: Web application penetration testing (identifying XSS, CSRF, DOM-based vulnerabilities), understanding client-side attacks, crafting malicious browser-based payloads, and securing Node.js backend applications.
Key uses: Web application security, browser-based attacks, front-end vulnerability analysis.
4. Go (Golang): The Cloud-Native Champion
Google's Go language is rapidly gaining traction in cybersecurity due to its efficiency, strong concurrency, and fast compilation times, making it ideal for cloud-native security tools.
Why it's essential: Building high-performance network tools, microservices for security infrastructure, developing fast scanners, and creating command-and-control (C2) frameworks. Its small binary size is also an advantage.
Key uses: Network programming, cloud security tools, security infrastructure.
5. Bash/Shell Scripting: The Linux Commander
While not a full-fledged programming language, proficiency in Bash and other shell scripting languages (like Zsh or PowerShell for Windows) is absolutely critical for anyone operating in a cybersecurity role.
Why it's essential: Automating repetitive tasks in Linux/Unix environments, managing system configurations, chaining security tools, basic log analysis, and system reconnaissance during penetration tests.
Key uses: System administration, security automation, forensic analysis, incident response on Linux systems.
6. SQL: The Database Decoder
Databases are the heart of almost every application, holding vast amounts of sensitive data. SQL (Structured Query Language) is the key to interacting with them.
Why it's essential: Identifying and exploiting SQL injection vulnerabilities, understanding database structures, securing database configurations, and performing data forensics on compromised databases.
Key uses: Database security, SQL injection testing, data forensics.
7. Ruby: The Metasploit Maestro
Ruby's elegant syntax and powerful frameworks have long made it a favorite in the penetration testing community, particularly due to its close ties with Metasploit.
Why it's essential: Scripting exploits, developing custom modules for penetration testing frameworks, and automating various security assessments.
Key uses: Penetration testing, exploit development (especially with Metasploit), security tool development.
8. PowerShell: The Windows Whisperer
For cybersecurity professionals dealing with Windows environments, PowerShell is indispensable. It's a powerful scripting language built by Microsoft for system administration and automation.
Why it's essential: Automating security tasks on Windows, performing reconnaissance, privilege escalation, lateral movement in red team operations, and analyzing Windows system logs. Many fileless malware attacks leverage PowerShell.
Key uses: Windows security, incident response, red teaming, security automation in Windows environments.
9. Java: The Enterprise Guardian
Java's "write once, run anywhere" philosophy and robust security features make it a staple in large enterprise environments.
Why it's essential: Developing secure enterprise applications, assessing the security of Java-based systems, Android mobile application security, and building scalable security solutions. Many backend systems are built in Java, requiring security professionals to understand its nuances.
Key uses: Enterprise application security, Android application security, secure software development.
10. Assembly Language: The Microscopic View
For the most advanced and specialized cybersecurity roles, understanding Assembly language provides an unparalleled level of insight into how software interacts with hardware.
Why it's essential: Deep malware analysis (understanding low-level instructions), reverse engineering compiled binaries, exploit development for complex vulnerabilities, and understanding processor architecture.
Key uses: Malware analysis, reverse engineering, exploit development for specific architectures (x86, ARM).
The Continuous Pursuit of Knowledge
The field of cybersecurity is dynamic, with new threats and technologies emerging constantly. While these ten languages form the core arsenal for 2025, remember that the most effective cybersecurity professional is a continuous learner. Develop a strong foundation in these languages, but always be ready to explore new tools and adapt your skills to the evolving digital landscape. Your programming prowess is your shield and your sword in the fight for a more secure future.
0 notes
Text
What Tools and Software Do I Need to Begin a Python Programming Online Course?

Introduction
Are you ready to begin your Python programming journey but unsure what tools to install or where to begin? You're not alone. Starting a new skill, especially in tech, can feel overwhelming without proper guidance. But here's the good news: learning Python online is simple and accessible, even for absolute beginners. Whether you're aiming to automate tasks, analyze data, or build applications, enrolling in a python course with certificate ensures you get structured guidance and industry-relevant tools. Knowing the right setup from day one makes the process smoother. In this guide, we’ll walk you through all the essential tools and software you need to succeed in your Python online training with certification.
Why Choosing the Right Tools Matters
Choosing the right setup from the beginning can significantly influence your learning curve. According to a Stack Overflow Developer Survey, Python continues to be one of the most loved programming languages, largely due to its simplicity and extensive tooling support. The correct tools:
Boost your productivity
Help you debug errors more easily
Enable seamless hands-on practice
Create a professional development environment
Let’s explore what you need to get started.
Computer Requirements for Python Programming
Before diving into software, ensure your computer meets the minimum requirements:
Operating System: Windows 10/11, macOS, or Linux
Processor: At least dual-core (Intel i3 or equivalent)
RAM: Minimum 4GB (8GB preferred)
Storage: 5-10 GB free space for installations and projects
You don’t need a high-end machine, but a stable and responsive system will make the experience smoother.
Python Installation
a. Official Python Installer
To get started with your Python programming online course, you must first install Python itself.
Visit the official Python website: https://www.python.org
Download the latest version (preferably Python 3.11+)
During installation, check the box that says "Add Python to PATH"
Once installed, verify it by opening your terminal (Command Prompt or Terminal) and typing:
python --version
You should see the version number printed.
b. Python via Anaconda (Alternative)
If you’re interested in data science or machine learning, Anaconda is a robust option. It includes Python along with pre-installed libraries like NumPy, pandas, and Jupyter Notebook.
Download from: https://www.anaconda.com
Code Editors and Integrated Development Environments (IDEs)
Choosing a development environment can impact your workflow and how easily you understand programming concepts.
a. Visual Studio Code (VS Code)
Free, lightweight, and beginner-friendly
Supports extensions for Python, Git, and Jupyter
IntelliSense for auto-completion
Integrated terminal
b. PyCharm
Available in Community (free) and Professional versions
Built-in debugging and version control support
Project-based management
c. Jupyter Notebook
Best for interactive learning and data visualization
Supports markdown + Python code cells
Ideal for data science and machine learning
d. Thonny
Built for beginners
Simple interface
Easy to visualize variables and code flow
Command Line Interface (CLI)
Understanding how to use the terminal is important as many tasks are faster or only available through it. While you're enrolled in the best Python online training, you'll often need to interact with the terminal for running scripts, managing environments, or installing packages.
Windows users can use Command Prompt or PowerShell, whereas macOS/Linux users should use the built-in Terminal.
Basic commands like cd, ls, mkdir, and python help you navigate and run programs easily.
Package Managers
a. pip (Python's default package manager)
You’ll often need third-party libraries. Use pip to install them:
pip install package_name
Example:
pip install requests
b. Conda (Used with Anaconda)
Useful for managing environments and dependencies in complex projects:
conda install numpy
Version Control Tools
a. Git
Git is essential for tracking changes, collaborating, and managing your code.
Install Git from: https://git-scm.com
Create a GitHub account for storing and sharing your code
Basic Git commands:
git init
git add .
git commit -m "Initial commit"
git push origin main
Virtual Environments
To avoid conflicts between projects, use virtual environments:
python -m venv myenv
source myenv/bin/activate # macOS/Linux
myenv\Scripts\activate # Windows
This isolates dependencies, making your projects clean and manageable.
Python Libraries for Beginners
Here are some essential libraries you'll likely use during your Python online training with certification:
NumPy – Arrays and numerical computing
pandas – Data analysis and manipulation
matplotlib/seaborn – Data visualization
requests – Making HTTP requests
beautifulsoup4 – Web scraping
Install using:
pip install numpy pandas matplotlib requests beautifulsoup4
Online Code Runners and IDEs
If you don’t want to install anything locally, use cloud-based IDEs:
Replit – Create and run Python projects in the browser
Google Colab – Ideal for data science and machine learning
JupyterHub – Hosted notebooks for teams and individuals
Optional but Helpful Tools
a. Docker
Advanced users may use Docker to containerize their Python environments. It’s not essential for beginners but it's good to know.
b. Notion or Evernote
Use these for taking structured notes, saving code snippets, and tracking progress.
c. Markdown Editors
Helps you write clean documentation and README files:
Typora
Obsidian
Sample Beginner Setup: Step-by-Step
Here’s a simple roadmap to set up your system for a Python programming online course:
Download and install Python from python.org
Choose and install an IDE (e.g., VS Code or Thonny)
Install Git and set up a GitHub account
Learn basic terminal commands
Create a virtual environment
Practice using pip to install libraries
Write and run a "Hello, World!" program
Save your project to GitHub
Real-World Example: Learning Python for Automation
Let’s say you want to automate a repetitive task like renaming files in bulk.
Tools Used:
VS Code
Python (installed locally)
OS and shutil libraries
import os
import shutil
folder = '/path/to/files'
for count, filename in enumerate(os.listdir(folder)):
dst = f"file_{str(count)}.txt"
src = os.path.join(folder, filename)
dst = os.path.join(folder, dst)
shutil.move(src, dst)
Within a few lines of code, you can automate time-consuming work. That’s the power of Python.
Common Pitfalls to Avoid
Not Adding Python to PATH: Causes terminal errors
Skipping virtual environments: Leads to dependency issues
Overloading with too many tools: Stick to the basics until you're comfortable
Conclusion
Starting a Python programming online course doesn’t require expensive hardware or dozens of tools. With the right setup Python installed, a good IDE, and some essential libraries you’re all set to begin coding confidently. Enrolling in the best python course online ensures you get the right guidance and hands-on experience. Your journey in Python online training with certification becomes smoother when your environment supports your growth.
Key Takeaways:
Use Python 3.11+ for latest features and compatibility
VS Code and Thonny are excellent beginner IDEs
Learn terminal basics to navigate and run scripts
Use pip or Conda to manage Python packages
Version control your code with Git and GitHub
Take the first step today, install your tools, write your first program, and begin your journey with confidence. The world of Python is waiting for you!
0 notes
Text
Move Ahead with Confidence: Microsoft Training Courses That Power Your Potential
Why Microsoft Skills Are a Must-Have in Modern IT
Microsoft technologies power the digital backbone of countless businesses, from small startups to global enterprises. From Microsoft Azure to Power Platform and Microsoft 365, these tools are essential for cloud computing, collaboration, security, and business intelligence. As companies adopt and scale these technologies, they need skilled professionals to configure, manage, and secure their Microsoft environments. Whether you’re in infrastructure, development, analytics, or administration, Microsoft skills are essential to remain relevant and advance your career.
The good news is that Microsoft training isn’t just for IT professionals. Business analysts, data specialists, security officers, and even non-technical managers can benefit from targeted training designed to help them work smarter, not harder.
Training That Covers the Full Microsoft Ecosystem
Microsoft’s portfolio is vast, and Ascendient Learning’s training spans every major area. If your focus is cloud computing, Microsoft Azure training courses help you master topics like architecture, administration, security, and AI integration. Popular courses include Azure Fundamentals, Designing Microsoft Azure Infrastructure Solutions, and Azure AI Engineer Associate preparation.
For business professionals working with collaboration tools, Microsoft 365 training covers everything from Teams Administration to SharePoint Configuration and Microsoft Exchange Online. These tools are foundational to hybrid and remote work environments, and mastering them improves productivity across the board.
Data specialists can upskill through Power BI, Power Apps, and Power Automate training, enabling low-code development, process automation, and rich data visualization. These tools are part of the Microsoft Power Platform, and Ascendient’s courses teach how to connect them to real-time data sources and business workflows.
Security is another top concern for today’s organizations, and Microsoft’s suite of security solutions is among the most robust in the industry. Ascendient offers training in Microsoft Security, Compliance, and Identity, as well as courses on threat protection, identity management, and secure cloud deployment.
For developers and infrastructure specialists, Ascendient also offers training in Windows Server, SQL Server, PowerShell, DevOps, and programming tools. These courses provide foundational and advanced skills that support software development, automation, and enterprise system management.
Earn Certifications That Employers Trust
Microsoft certifications are globally recognized credentials that validate your expertise and commitment to professional development. Ascendient Learning’s Microsoft training courses are built to prepare learners for certifications across all levels, including Microsoft Certified: Fundamentals, Associate, and Expert tracks.
These certifications improve your job prospects and help organizations meet compliance requirements, project demands, and client expectations. Many professionals who pursue Microsoft certifications report higher salaries, faster promotions, and broader career options.
Enterprise Solutions That Scale with Your Goals
For organizations, Ascendient Learning offers end-to-end support for workforce development. Training can be customized to match project timelines, technology adoption plans, or compliance mandates. Whether you need to train a small team or launch a company-wide certification initiative, Ascendient Learning provides scalable solutions that deliver measurable results.
With Ascendient’s Customer Enrollment Portal, training coordinators can easily manage enrollments, monitor progress, and track learning outcomes in real-time. This level of insight makes it easier to align training with business strategy and get maximum value from your investment.
Get Trained. Get Certified. Get Ahead.
In today’s fast-changing tech environment, Microsoft training is a smart step toward lasting career success. Whether you are building new skills, preparing for a certification exam, or guiding a team through a technology upgrade, Ascendient Learning provides the tools, guidance, and expertise to help you move forward with confidence.
Explore Ascendient Learning’s full catalog of Microsoft training courses today and take control of your future, one course, one certification, and one success at a time.
For more information, visit: https://www.ascendientlearning.com/it-training/microsoft
0 notes
Text
PowerShell Kill a Process from the Command Line
PowerShell Kill a Process from the Command Line #homelab #PowerShellProcessManagement #TerminatingProcessesInWindows #UsingTaskkillCommand #PowerShellVsCommandPrompt #AutomateKillingProcesses #PowerShellForceTermination #ManagingRemoteServerProcesses
Killing processes in Windows has long been the easiest way to deal with unresponsive programs that won’t close using the usual means by clicking the “X” in the top right-hand corner. Generally speaking, using the Windows Task Manager is the first method most use to find and close processes that are not responding. However, using the command line, we can leverage command prompt commands and…

View On WordPress
#advanced process scripting#automate killing processes#managing remote server processes#PowerShell for Windows environments#PowerShell force termination#PowerShell process management#PowerShell vs Command Prompt#Stop-Process cmdlet explained#terminating processes in Windows#using taskkill command
0 notes
Text
System Administration Online Course: Master Modern IT with Gritty Tech
In today’s digitally driven world, efficient system management is critical for any business. A comprehensive System administration online course equips learners with the skills required to handle system networks, servers, security protocols, and more. Whether you’re aiming for a career upgrade or starting fresh in the tech field, and flexible learning experience For More…

Why Choose Gritty Tech for Your System Administration Online Course?
Top-Quality Education, Affordable Price
Gritty Tech stands out in the education sector for delivering high-quality learning at affordable rates. Our System administration online course is designed to provide exceptional training in core IT administration areas without overburdening your budget.
Global Tutor Network Spanning 110+ Countries
We bring together expert instructors from around the world. With a diverse team of seasoned professionals, Gritty Tech ensures your System administration online course is led by industry veterans with practical experience in managing modern infrastructure.
Flexible Payment and Satisfaction Policies
Learners can benefit from our monthly and session-wise payment models. We also offer an easy refund policy and tutor replacement options, reinforcing our commitment to student satisfaction. Our System administration online course is built around your needs.
What You Will Learn in the System Administration Online Course
Gritty Tech’s curriculum covers every key aspect needed to become a proficient system administrator. With real-world scenarios and hands-on labs, the course includes:
Linux and Windows server installation and configuration
Network architecture, monitoring, and troubleshooting
Security controls, firewalls, and user permissions
Data backup, system recovery, and storage solutions
Cloud platforms introduction and server virtualization
Task automation using scripting (Bash, PowerShell)
Managing Active Directory and DNS configurations
Each module in the System administration online course builds foundational expertise, reinforced by real-time assignments.
Who Should Take This Course
The System administration online course is ideal for:
Beginners entering the IT field
IT professionals aiming to upskill
Computer science students
Freelancers and consultants supporting IT operations
System engineers seeking certification
Career Paths After Completing the System Administration Online Course
With a solid foundation from our System administration online course, students can pursue rewarding roles such as:
System Administrator
IT Support Technician
Network Engineer
Cloud Operations Associate
DevOps Engineer
Server Security Analyst
Companies across industries depend on skilled system administrators to maintain robust and secure IT environments.
What Makes the Gritty Tech System Administration Online Course Stand Out
Experienced Tutors
Gritty Tech tutors are not just educators—they are working professionals with hands-on experience in systems management. Their real-world insights enhance the quality of your System administration online course journey.
Hands-On Projects and Labs
You will work with actual server environments and practice live configurations. These exercises provide a practical layer to your theoretical learning.
Interactive and Self-Paced
The System administration online course can be completed at your convenience. Whether you study full-time or part-time, the flexibility is built-in to support your schedule.
Certification Included
After successful completion of your System administration online course, you’ll receive a digital certificate from Gritty Tech, which you can share with potential employers or on professional platforms.
Real Student Support
From one-on-one mentoring to peer support, our System administration online course ensures you never feel isolated. Our global community provides an excellent platform for collaboration and discussion.
Related Topics Covered in the Course
The course doesn’t stop at systems. To help broaden your technical base, we integrate related training on:
Linux system administration
Windows server roles
Cloud administration fundamentals
Networking essentials
Cybersecurity basics
IT support workflows
Infrastructure monitoring tools
These modules complement the core lessons of the System administration online course, helping you become a versatile IT professional.
10 Most Asked Questions About the System Administration Online Course
What is a system administration online course?
A System administration online course teaches the principles and practices of managing IT systems and networks remotely via an interactive online format.
Who should take the system administration online course?
Anyone seeking a career in IT, especially those interested in maintaining servers, networks, and databases, should consider a System administration online course.
What will I learn in the system administration online course?
You’ll gain expertise in system configuration, network setup, user management, and IT troubleshooting through our System administration online course.
Is prior IT experience required for the system administration online course?
No prior experience is needed. The System administration online course is suitable for both beginners and intermediate learners.
How long is the system administration online course?
Most students complete the System administration online course within 6 to 10 weeks depending on their pace.
Does Gritty Tech provide certification after the course?
Yes, a verified certificate is awarded upon completing the System administration online course.
What tools are used in the system administration online course?
You’ll work with Linux, Windows Server, VMware, PowerShell, and various network monitoring tools during the System administration online course.
Can I change my tutor during the course?
Yes. We offer flexible tutor replacement options during your System administration online course.
What if I’m not satisfied with the course?
Gritty Tech provides an easy refund policy for learners who are unsatisfied with their System administration online course experience.
Can I pay in installments for the system administration online course?
Absolutely. We support monthly and session-wise payment plans to make the System administration online course more accessible.
Conclusion
Gritty Tech’s System administration online course is a comprehensive, flexible, and industry-relevant program that prepares you for success in IT systems management. With world-class tutors, real-time labs, affordable pricing, and a globally recognized certificate, you get everything you need to transform your career.
Whether you’re starting out or advancing in your IT journey, this System administration online course is your launchpad. Take the first step today and join a learning community that spans over 110 countries. Gritty Tech makes tech education not only possible—but powerful.
0 notes
Text
Facing Compatibility Issues During Microsoft 365 Migration? Here's What You Need to Know
Microsoft 365 migration is never just a click-and-go process. Behind every successful move is a thorough compatibility check between systems, services, and user environments. If not done right, compatibility issues surface and disrupt everything from mailbox access to user authentication. These issues are more common than they should be, and they can derail your entire migration strategy.
Here’s a practical look at what causes these compatibility breakdowns and what steps you need to take to prevent them.

Legacy Systems That Don’t Meet Microsoft 365 Standards
Many organizations continue to operate with outdated infrastructure. Systems like Windows 7, older Outlook versions, or Exchange 2010 lack the protocols and security standards required by Microsoft 365. Without modernization, they create roadblocks during migration. For instance, a system that doesn’t support TLS 1.2 or Modern Authentication will fail to connect with Microsoft 365 services.
To prevent this, perform a full compatibility assessment of your OS, Exchange servers, and Outlook clients. Upgrade the environment or establish a hybrid setup that ensures continuity while you transition users.
Authentication Failures Due to Identity Conflicts
Identity and access management is a critical pillar in Microsoft 365. If your existing setup includes outdated AD FS configurations or incomplete Azure AD synchronization, users will face login failures, broken SSO, and token-related issues. Compatibility mismatches between your on-prem directory and cloud directory often go unnoticed until users can’t sign in after cutover.
Define your identity model well in advance. Whether you choose cloud-only, hybrid, or federated, validate it with pilot users. Ensure directory sync, UPN alignment, and conditional access policies are correctly applied.
Unsupported Add-ins and Custom Applications
Custom Outlook add-ins, CRM connectors, or VBA-based automations are often built around legacy environments. These integrations may fail in Microsoft 365 because they rely on outdated APIs or local server paths. Post-migration, users report missing features or broken workflows, which is not a mailbox problem but a compatibility one.
Catalog all active plugins and applications. Check vendor documentation for Microsoft 365 support. Transition to updated versions or re-develop legacy tools using supported APIs like Microsoft Graph.
PST and Archive Data That Can’t Be Imported
PST files from end-user systems or public folder archives frequently carry hidden corruption, non-compliant data formats, or unusually large attachments. These can cause import failures or lead to incomplete data availability after migration.
To avoid surprises, pre-scan PST files using tools that verify integrity. Break large PSTs into manageable sizes. Use modern utilities that support direct PST import with accurate folder mapping and duplicate prevention.
Email Clients and Mobile App Incompatibility
Not all email clients are built to support Microsoft 365. Legacy Android apps, IMAP clients, or older iOS Mail apps often lack support for OAuth or Modern Authentication. Once migrated, users might encounter repeated login prompts or full access loss.
Standardize supported apps in advance. Recommend and configure Outlook for mobile. Use device management policies to enforce security compliance. Disable access for non-compliant clients using conditional access in Microsoft 365 admin settings.
Loss of Mailbox Permissions and Calendar Access
Access issues post-migration are common when shared mailbox permissions or calendar delegation rights aren’t migrated properly. Users may suddenly lose visibility into shared mailboxes or receive errors when trying to access team calendars.
Before migrating, document all mailbox and folder-level permissions. After migration, reapply them using PowerShell scripts or a tool that automates permission preservation. Always validate shared access functionality with test users before expanding the migration to all users.
Conclusion
Compatibility issues don’t happen randomly during Microsoft 365 migrations. They are the result of incomplete planning or assumptions that legacy systems will integrate seamlessly with modern cloud environments. The only way to mitigate them is through comprehensive discovery, pre-validation, and the right migration tooling.
If you want to reduce risk and accelerate your migration with minimal disruption, consider using EdbMails Office 365 migration tool. It simplifies complex moves, retains all mailbox properties and permissions, supports hybrid and tenant-to-tenant scenarios, and ensures seamless migration across environments. It’s a trusted choice for IT teams who need control, flexibility, and reliability.
Additional links:
👉 Export Microsoft 365 Mailbox to PST
👉 Move public folders to office 365
#edbmails#office 365 migration software#incremental migration#office 365 migration#artificial intelligence#coding
0 notes
Text
Enhancing Cybersecurity Resilience
Discover how a modern Threat Intelligence Platform empowers organizations with actionable insights, proactive defense, and next-gen cybersecurity capabilities.
In the ever-evolving digital world, cybersecurity threats have grown in complexity, frequency, and scale. From ransomware and phishing attacks to data breaches and nation-state cyber espionage, the digital threat landscape has expanded into a vast, dynamic battlefield. For organizations aiming to remain secure, simply reacting to threats after they happen is no longer a viable option.

Today, security teams must be proactive, predictive, and precise in their threat response strategies. This is where a Threat Intelligence Platform (TIP) plays a vital role. Rather than operating in silos or relying solely on isolated security tools, a modern TIP serves as a centralized hub for collecting, analyzing, and distributing threat data in real-time—empowering cybersecurity professionals to make informed decisions faster.
In this article, we delve deep into what makes a Threat Intelligence Platform essential in the modern age, how it integrates with other security protocols, and why forward-looking organizations are investing in it to build stronger cyber defenses.
Understanding the Role of a Threat Intelligence Platform
A Threat Intelligence Platform is not just another security tool—it is a strategic asset. It aggregates threat data from multiple sources, correlates information, and offers context-rich insights that help in identifying and mitigating cyber threats before they manifest into breaches.
The core functions of a TIP include:
Data Aggregation: Collects structured and unstructured threat data from external feeds, internal systems, and global cybersecurity communities.
Analysis and Correlation: Uses advanced algorithms, machine learning, and contextual linking to correlate data points across diverse threat vectors.
Threat Prioritization: Automatically ranks threats based on relevance, severity, and business impact.
Actionable Intelligence Delivery: Integrates with SIEMs, firewalls, and incident response platforms to deliver real-time alerts and automated response actions.
Ultimately, a TIP transforms raw data into actionable threat intelligence, reducing the burden on security analysts and enabling faster incident detection and response.
The Increasing Complexity of the Cyber Threat Landscape
Cybercriminals today use sophisticated methods to infiltrate networks. Techniques like spear-phishing, zero-day exploits, and AI-driven malware are growing in prevalence. Furthermore, the lines between criminal groups, hacktivists, and nation-state actors are increasingly blurred, adding layers of complexity.
Key trends include:
Multi-Stage Attacks: Attackers often use a chain of exploits to gain access and maintain persistence in a system.
Supply Chain Threats: Vendors and third-party providers are now frequent targets, becoming indirect entry points.
Living-off-the-Land Attacks: Cybercriminals use legitimate tools (e.g., PowerShell, Windows Management Instrumentation) to avoid detection.
To counter such tactics, organizations need visibility not just within their internal environments but across the global threat ecosystem. This is where the strategic advantage of a TIP comes into play.
Features of an Effective Threat Intelligence Platform
Not all TIPs are created equal. The most effective platforms provide a range of features that enhance detection, analysis, and response:
1. Automated Data Collection
A TIP should automatically collect data from various threat feeds, security logs, dark web sources, and open databases. Automation reduces manual workload and ensures real-time threat visibility.
2. Advanced Threat Correlation
The platform must be capable of correlating indicators of compromise (IOCs) such as IP addresses, file hashes, domain names, and malware signatures across different incidents to uncover patterns.

3. Integration with Security Ecosystems
A TIP that integrates with SIEM, SOAR, EDR, and firewall solutions ensures that insights are not siloed but can trigger immediate security actions.
4. Contextual Threat Enrichment
Context is key. The TIP should enrich threat data with geographical, behavioral, and historical insights to aid faster and more accurate decision-making.
5. Collaborative Intelligence Sharing
Sharing threat intelligence across industry groups, ISACs, and global cyber communities strengthens collective security.
Use Case: Proactive Defense in Financial Services
Financial institutions are a prime target for cybercriminals due to the high-value data they hold. Let’s consider a mid-size bank integrating a TIP into its security framework.
Scenario:
A suspicious domain is flagged on a global threat feed. The TIP correlates this IOC with phishing attempts targeting banking customers in Asia. Upon further analysis, the platform uncovers malware strains associated with credential theft. The platform alerts the SOC (Security Operations Center) and triggers automated rules to block the domain at the firewall level.
This real-time detection and action, driven by the TIP, prevents a potential breach and demonstrates how actionable intelligence can drastically reduce incident response time and damage.
How TIPs Leverage Open-Source Intelligence (OSINT)
Open-Source Intelligence (OSINT) refers to data collected from publicly available sources such as news reports, forums, blogs, social media, code repositories, and more. When integrated with a Threat Intelligence Platform, OSINT enhances the scope and depth of intelligence gathering.
For example, attackers often discuss vulnerabilities or leak data on underground forums. A TIP that harvests OSINT can pick up on these signals early, offering preemptive insights before the threat becomes widespread.
Additionally, by analyzing chatter patterns, sentiment, and keywords, TIPs can identify emerging attack vectors or vulnerable sectors—enabling organizations to prepare in advance.
The Power of Cyber Threat Analysis in TIPs
Cyber Threat Analysis is the heart of any effective threat intelligence strategy. A TIP streamlines this process by offering analytics dashboards, pattern recognition engines, and predictive modeling tools. It breaks down raw data into:
Tactics, Techniques, and Procedures (TTPs) of attackers.
Attack timelines and kill chain mapping.
Threat actor attribution based on behavior and tools used.
This deep analysis enables security teams to distinguish between random noise and real threats, reducing alert fatigue and boosting operational efficiency.
Moreover, advanced platforms use AI and machine learning to improve over time, identifying new threat variants and behavioral patterns that may otherwise go unnoticed.
Importance of Digital Risk Protection in TIP Integration
Today’s attack surfaces extend beyond corporate firewalls. Executives, employees, vendors, and third-party platforms create a digital footprint that’s often unmonitored. This is where Digital Risk Protection (DRP) comes into play.

By integrating DRP capabilities into a TIP, organizations gain visibility into:
Brand impersonation attempts.
Leaked credentials on the dark web.
Domain spoofing and phishing sites.
Social media threats and impersonation.
This holistic visibility allows organizations to safeguard their brand reputation, intellectual property, and customer trust more effectively.
Threat Intelligence Platform Deployment: Challenges and Solutions
While the advantages of TIPs are compelling, implementing them does come with challenges. Let’s explore a few and how organizations can address them:
1. Data Overload
Many TIPs collect vast amounts of data, which can become overwhelming. The solution lies in deploying machine learning filters and customizable threat scoring models to highlight what matters most.
2. False Positives
Too many false positives can waste time and resources. A TIP with behavior-based analysis and contextual enrichment significantly reduces such noise.
3. Integration Issues
Legacy systems might not integrate well with newer TIPs. Opt for platforms with strong API support and modular architecture for smoother interoperability.
4. Skilled Workforce
Threat intelligence requires expertise. While TIPs automate many functions, upskilling teams and investing in regular training ensures that organizations derive maximum value from their platforms.
Future of Threat Intelligence Platforms
With the increasing digitization of services and rise in remote work, the importance of real-time, predictive cybersecurity has never been greater. The future of TIPs lies in:
AI-Driven Threat Prediction: Using neural networks and behavioral analytics to forecast threats before they manifest.
Cloud-Native Architecture: Offering scalable, elastic intelligence solutions for hybrid and cloud-native enterprises.
Blockchain for Threat Data Integrity: Ensuring the immutability and trustworthiness of shared intelligence.
Global Threat Intelligence Sharing Consortiums: Encouraging collective intelligence sharing to counter global threats collaboratively.
Organizations that invest early in TIPs are setting themselves up for long-term resilience and competitiveness.
Conclusion
In an age where cyber threats evolve by the minute, waiting for an incident to happen is no longer a luxury any organization can afford. A modern Threat Intelligence Platform doesn’t just help organizations react—it equips them to anticipate, prepare, and act swiftly.
From aggregating data to conducting in-depth Cyber Threat Analysis, from tapping into Open-Source Intelligence (OSINT) to enhancing Digital Risk Protection, a TIP acts as a central nervous system for proactive cybersecurity defense.
At DeXpose, we believe in empowering enterprises with cutting-edge threat intelligence solutions. Our mission is to help businesses stay a step ahead of adversaries by providing tools and insights that foster cyber resilience.
Are you ready to strengthen your organization’s cyber defense posture? Reach out to DeXpose today and explore how our intelligence-driven solutions can transform your approach to cybersecurity.
0 notes
Text
Python
Develop and maintain automated scripts using Python to streamline backend processes.Integrate and manage APIs for seamless data exchange between systems.Design, implement, and optimize backend automation tasks for improved efficiency.Leverage PowerShell for Windows-based automation tasks and scripting.Utilize Unix/Linux shell scripting to automate system administration tasks.Monitor and…
0 notes
Text
Master IT Infrastructure: Windows Server Administration Course in Australia
In today’s digitally driven world, servers are the foundation of every business’s IT operation. From hosting applications and managing user access to maintaining data security, servers do it all—and the professionals who manage them are critical to every organization's success. If you’re an IT professional in Australia looking to enhance your system administration skills, the Windows Server Administration Course in Australia offered by Xelware is your ideal next step.
This course is specially designed for both aspiring and experienced administrators, giving you practical, real-world skills to configure, manage, and maintain Windows Server environments effectively. Whether you're aiming to boost your resume, prepare for certification, or support your organization's infrastructure more confidently, this training is your gateway.
Why Learn Windows Server Administration?
Windows Server is one of the most widely used operating systems for managing enterprise-level IT infrastructure. It powers file servers, domain controllers, DNS, DHCP, and much more. With the continued growth of hybrid environments—mixing on-premise and cloud technologies—the need for skilled Windows Server administrators is only increasing.
By mastering Windows Server administration, you can:
Improve the performance, stability, and security of IT environments
Manage networks, users, and policies with precision
Ensure business continuity with proper backup and recovery practices
Reduce system downtime and boost productivity across the organization
Become a key resource in IT operations, infrastructure design, and support
What You’ll Learn in the Course
The Windows Server Administration Course in Australia from Xelware is based on Microsoft’s official curriculum and is updated to reflect the latest best practices and technologies in system administration.
Key areas covered include:
Installing and configuring Windows Server roles and features
Managing Active Directory Domain Services (AD DS)
Implementing DNS, DHCP, and IPAM
Maintaining server performance and monitoring systems
Ensuring security with group policies, file permissions, and firewall configurations
Automating tasks with PowerShell and administrative templates
Performing regular backups and disaster recovery
The course also emphasizes practical labs and case studies so you can apply what you’ve learned in realistic scenarios.
Why Choose Xelware in Australia?
Xelware is a trusted name in professional IT training, known for delivering industry-relevant content with expert instruction. Their Windows Server Administration Course is tailored for Australian learners and businesses, offering flexible schedules, local time zones, and trainers with hands-on experience in enterprise IT environments.
Here’s what sets Xelware apart:
Instructor-led sessions delivered live and online across Australia
Microsoft-certified trainers who teach from real-world experience
Interactive labs and assignments that build job-ready skills
Certification preparation and guidance to help you succeed
Post-training support and resources to reinforce your learning
Whether you're in Sydney, Brisbane, Adelaide, Melbourne, or working remotely from any corner of Australia, Xelware makes high-quality IT training accessible to you.
Who Should Take This Course?
This course is ideal for:
IT support professionals seeking to move into system administration
Network administrators wanting to broaden their expertise
System administrators responsible for Windows-based infrastructure
Students and recent graduates looking to specialize in server technology
IT managers who want to better understand their infrastructure
A basic understanding of networking concepts and the Windows operating system is recommended, but the course is structured to guide learners at all levels.
Final Thoughts: Build a Reliable IT Backbone
Every successful business relies on stable, secure, and efficient server infrastructure. As a Windows Server Administrator, you’ll play a vital role in ensuring the smooth operation of IT systems. The Windows Server Administration Course in Australia from Xelware gives you the skills and confidence to take on that responsibility with expertise.
0 notes