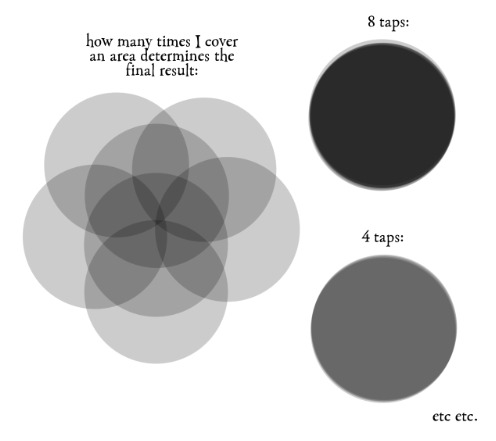
#Workflow transparency
Explore tagged Tumblr posts
Visit Tumblr Blog
Explore Tumblr blogs with no restrictions, modern design and the best experience.
Last Seen Tumblr Blogs


Fun Fact
Tumblr was named as a finalist in Lead411’s New York City Hot 125 in Aug 2010.
Text
Versatile Software Solution for Efficient Organization Management

PrideStudio is a versatile software solution designed for various organizations, boasting a user-friendly interface and robust data recovery tools. With over 20,000 global users across 100+ industries, it offers strategic KPI visualization dashboards and real-time data access. Key features include automation of departmental activities, enhanced workflow transparency, and electronic data security. The software's customization options, integration capabilities, and notification systems make it a reliable choice for businesses seeking efficiency and accountability.
For more Information visit: PrideStudio (pridesys.com)
Contact us:
E-mail: [email protected];
Phone: +8801550000003-8, 01550000035
#Versatile software solution#User-friendly interface#Data recovery tools#KPI visualization dashboards#Real-time data access#Departmental activities automation#Workflow transparency#Electronic data security#Customization options#Integration capabilities
0 notes
Text
remembering the time when Big Finish changed their website to the worst most dogshit unfunctional thing I've ever seen and I was being a hater about it and someone said "I don't really have experience in that field so I'll give them the benefit of the doubt" ok. i do. and i don't. a haters dream
#pure gold takes by ME#'they were fucked over by the company who made the site' that doesnt just happen. as the customer you demand better and transparent#development and workflows. lol. its pure incompetence and i feel no pity for large finish at all.
5 notes
·
View notes
Text
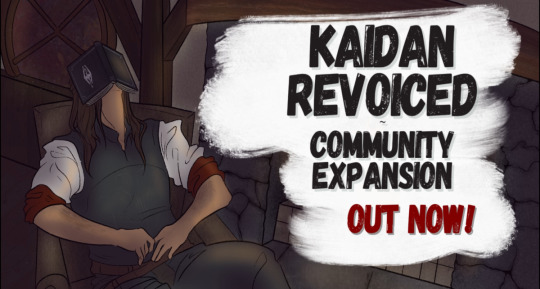
Workshop Update: Kaidan Revoiced - Community Expansion 1.0 Launch!
After two years of development, the Kaidan Workshop Staff is proud to present Kaidan Revoiced - Community Expansion (KRCE)!
First and foremost, none of this would be possible without livtempleton graciously giving us permission for our project! Throughout the years, the assets she's allowed the Skyrim modding community to build upon has kept Kaidan alive in thousands of modlists, providing the opportunity for even more players to enjoy her original creations; we're very honored to be added to the list of modders whose creations are inspired by her work. When we started the Workshop, we had no idea if anyone would even notice our project; a new voice actor, a new iteration of an already established character, and no product to show for it in advance. The only thing we could offer the general public at the time was the promise of transparency and community cooperation throughout the process. So we created a budget for revoicing Kaidan, a plan for community involvement, and hit the ground running. We added new staff, taught ourselves new skills as the scope of the project evolved, and leaned on the advice, ideas, and encouragement from our community. Alongside the (mostly) monthly updates on our Tumblr and taking suggestions from our 'I Had An Idea!' Discord channel, our methods for ensuring transparency during development evolved; our Community Team began hosting public meetings via our Discord to discuss our current workflow, answer questions, and conduct live script readings of our original scripts, to ensure that our Writing Team was matching the original tone set by livtempleton. We also streamed our beta footage on Twitch, trying our best to stress test the new framework built by our Creation Kit Team while also taking more suggestions from our audience for future content. Finally, we were incredibly pleased to be able to host an Open Beta for KRCE this past October & November for our Discord community, as a special thank you for their support. We were able to get some excellent feedback on some of our new follower features, as well as hunt down any missed audio or errors our internal testing missed. All in all, it took many, many people to bring this mod to life, and our Staff is incredibly humbled and grateful for the support of everyone involved. While this 1.0 version will be available indefinitely for those who prefer it, the Workshop Staff is very excited to begin creating more original content moving forward into 2025! One of our original scripts for the Daedric quest "Pieces of the Past" is in the 1.0, so you can check it out to get a sense of the tone our writers are going for! You can read about what content is present in our mod, as well as find the answers to commonly asked questions in the KRCE Mod FAQ. Keep up with the project via our updates on Tumblr, or join our Discord server!
The Kaidan Workshop is a community-led, non-profit project that aims to build upon the original LivTempleton Kaidan 2 mod. Our project is strictly non-profit; all funds raised are to commission Mr. Warren for his services. You can read more about what the Kaidan Workshop is here.
#kaidan 2#kaidanworkshop#custom voice follower skyrim#kaidan skyrim#skyrim kaidan#elder scrolls skyrim#custom voiced follower
329 notes
·
View notes
Text
Disclaimer that this is a post mostly motivated by frustration at a cultural trend, not at any individual people/posters. Vagueing to avoid it seeming like a callout but I know how Tumblr is so we'll see I guess. Putting it after a read-more because I think it's going to spiral out of control.
Recent discourse around obnoxious Linux shills chiming in on posts about how difficult it can be to pick up computer literacy these days has made me feel old and tired. I get that people just want computers to Work and they don't want to have to put any extra effort into getting it to Do The Thing, that's not unreasonable, I want the same!
(I also want obnoxious Linux shills to not chip in on my posts (unless I am posting because my Linux has exploded and I need help) so I sympathise with that angle too, 'just use Linux' is not the catch-all solution you think it is my friend.)
But I keep seeing this broad sense of learned helplessness around having to learn about what the computer is actually doing without having your hand held by a massive faceless corporation, and I just feel like it isn't a healthy relationship to have with your tech.
The industry is getting worse and worse in their lack of respect to the consumer every quarter. Microsoft is comfortable pivoting their entire business to push AI on every part of their infrastructure and in every service, in part because their customers aren't going anywhere and won't push back in the numbers that might make a difference. Windows 11 has hidden even more functionality behind layers of streamlining and obfuscation and integrated even more spyware and telemetry that won't tell you shit about what it's doing and that you can't turn off without violating the EULA. They're going to keep pursuing this kind of shit in more and more obvious ways because that's all they can do in the quest for endless year on year growth.
Unfortunately, switching to Linux will force you to learn how to use it. That sucks when it's being pushed as an immediate solution to a specific problem you're having! Not going to deny that. FOSS folks need to realise that 'just pivot your entire day to day workflow to a new suite of tools designed by hobby engineers with really specific chips on their shoulders' does not work as a method of evangelism. But if you approach it more like learning to understand and control your tech, I think maybe it could be a bit more palatable? It's more like a set of techniques and strategies than learning a specific workflow. Once you pick up the basic patterns, you can apply them to the novel problems that inevitably crop up. It's still painful, particularly if you're messing around with audio or graphics drivers, but importantly, you are always the one in control. You might not know how to drive, and the engine might be on fire, but you're not locked in a burning Tesla.
Now that I write this it sounds more like a set of coping mechanisms, but to be honest I do not have a healthy relationship with xorg.conf and probably should seek therapy.
It's a bit of a stretch but I almost feel like a bit of friction with tech is necessary to develop a good relationship with it? Growing up on MS-DOS and earlier versions of Windows has given me a healthy suspicion of any time my computer does something without me telling it to, and if I can't then see what it did, something's very off. If I can't get at the setting and properties panel for something, my immediate inclination is to uninstall it and do without.
And like yeah as a final note, I too find it frustrating when Linux decides to shit itself and the latest relevant thread I can find on the matter is from 2006 and every participant has been Raptured since, but at least threads exist. At least they're not Microsoft Community hellscapes where every second response is a sales rep telling them to open a support ticket. At least there's some transparency and openness around how the operating system is made and how it works. At least you have alternatives if one doesn't do the job for you.
This is long and meandering and probably misses the point of the discourse I'm dragging but I felt obligated to make it. Ubuntu Noble Numbat is pretty good and I haven't had any issues with it out of the box (compared to EndeavourOS becoming a hellscape whenever I wanted my computer to make a sound or render a graphic) so I recommend it. Yay FOSS.

219 notes
·
View notes
Text


This piece started as an idea to try something I’m calling 2.5D art.
a bit of 3D, a bit of painting 😃👍🦖
I made Rexy and Cera in Blender, texture-painted them, rigged them up, and posed them. Once I had the composition in mind, I generated a stylised forest background using AI, brought it into Blender, and set up the full scene with lighting and camera perspective.
From there, I rendered the shot and moved into Procreate for the final pass, painting over the background, tweaking the lighting, and refining the edges to give it a more illustrated, dreamy vibe.
This hybrid process lets me keep the form and depth of 3D while layering in the softness and mood of 2D art , and it’s so much faster! A painting like this would usually take me days (sometimes weeks), but this only took a single day start to finish.
It’s been a fun experiment in workflow and storytelling, definitely something I want to explore more. 💛
*** Just a quick note, since I know the topic of AI in art can be sensitive.
I built my characters, posed them, and rendered them in Blender, everything from modeling to rigging was done by me. I used a generated background as a base, mainly to guide lighting and mood, the same way artists have used stock photos or photobashing for years. The final result was painted over in Procreate, with hand-painted lighting and adjustments.
This wasn’t about skipping effort for me, it was an experiment in workflow and storytelling and trying something new. I was transparent about my process because I’m proud of what I created and how I made it.
It’s okay if this approach isn’t for everyone.
Happy experimenting everyone.
70 notes
·
View notes
Text
The Hundred Line character design team interview from Famitsu issue 1895
Hello, Mr. Komatsuzaki and Shimadrill. Tell us how you felt when you read the first project presentation for The Hundred Line.
Rui Komatsuzaki: The initial project proposal already had a pretty solid general idea of the plot, so I only needed to expand on that. The Hundred Line's key concept was 100 endings, so I could already predict that my usual amount of illustrations wouldn't cut it. The actual number went way above my already high expectations. I wasn't used to working this much (pained laughter).
Shimadrill: I joined Too Kyo Games because I was a fan of Kodaka's and Komatsuzaki's work, so I felt like I had to keep up no matter how tough it got. Kodaka and Komatsuzaki are particularly fast workers. I didn't even have time to complain without how much I needed to do.
What exactly was requested for the designs of the Special Defense Unit members?
Kazutaka Kodaka: I gave Komatsuzaki the story's script and a document listing characteristics and nicknames of each character (delinquent for Yakushiji, punk rock for Amemiya, and so on) and asked him to come up with the designs.
Komatsuzaki: The design workflow was the same it was in the previous games. Instead of nailing their characterization one-by-one, I started with a draft of the whole cast based only on the amount and general characteristics of them. I used that to fine-tune the collective balance of the cast, and only after that part was settled that I gave the characters individual attention.
Was the process smooth?
Komatsuzaki: Speaking of things being the same as usual, the first version of the mascot characters was never altered. SIREI got approved at the first try.
Kodaka: Back then, I still hadn't given SIREI's character much thought, so Komatsuzaki could go with whatever design he wanted. SIREI's quirks derived from the design rather than the other way around.
Was NIGOU just as easy?
Komatsuzaki: Yeah. I was told NIGOU could be just a palette swap of SIREI, but I wanted them to be a little different, resulting in the current design.
Any other important points?
Komatsuzaki: I really wanted SIREI and NIGOU to be transparent. After that, I exposed their brains and hearts.
Kodaka: I didn't know how to react when he drew a brain after I had already told him SIREI was a robot. I wasn't sure if it was okay for robots to have brains. But later I came to the conclusion that the best computer imaginable would be one capable of utilizing a live human brain. My final decision was that SIREI and NIGOU are equipped with advanced computers that only resemble human brains, but that's a lore tidbit that never gets said in-game.
Cool.
Komatsuzaki: Also, having read the story, I could imagine this game mascot would take some serious damage, so I thought it was better not to make them animal-themed like Monokuma was. I don't want to see an animal-like mascot being seriously harmed. So I tried to give him a design more tolerable to brutalize.
Changing the subject to the Special Defense Unit, who would you consider the most memorable student?
Komatsuzaki: Unlike my previous games, The Hundred Line has combat outfits, which are mostly uniform for every character. To make the characters easier to identify during combat, there was a greater need to give them diverse, distinct, and memorable body types and heads. This means their conceptualization had great emphasis on their heads and physiques. I'd say Amemiya is the most memorable character. She set the bar for how striking they should be. I tend to use muted colors a lot, but Amemiya's design was an attempt to use colors I normally don't. The cast was balanced with her at the center of the scale.
Speaking of characters, I noticed they have a lot of sprites, as usual. How many did you make per character?
Komatsuzaki: The plan was making about 20 per character, totaling around 300 sprites, but I was wrong in predicting the real number would be 3 digits. There are so many that I stopped counting along the way.
How many did you have counted by the time you gave up?
Komatsuzaki: The total of sprites about 1 year before the game was gold was 1368. I kept making more after that, but I can't give a general figure because I was too afraid to count them.
Drill: No estimates for the final number?
Kodaka: We have over 100 per character, with the biggest ones reaching 200, so… I guess over 2000 in total?
How did you get this many?
Komatsuzaki: Sprite production involves the following steps: 1. I draw drafts for the sprites based the expressions and scenes that pop up in my head while I'm reading the story. 2. I refine the drafts. 3. I put together the sprite list while examining which variations are essential and which are redundant. However, this time the story was too long and I could never be done reading all of it, and until I finish reading, the sprite list only keeps increasing. I had a lot more expressions than usual before the first selection.
Kodaka: We tried to lower the amount. But there's a good reason why the number spiralled out of control: in The Hundred Line, each writer did the screen composition for their own stories. One goes "Keep this one, I'll use it", another goes "Keep this one, I'll use it", and little by little we end up with less thing to cut off, and even more things to add (awkward laughs).
Komatsuzaki: I obviously didn't predict this bloat. Face portraits are far from the only thing I got the amount of digits wrong in THL. I never want to be in a game this overblown again…
Kodaka: But thanks to Komatsuzaki drawing full-body sprites, we could do things we couldn't in previous titles. In Danganronpa, the characters had fixed on-field portraits and only changed expressions when zoomed in for conversation. In The Hundred Line, their sprites can be placed with expressions that fit the situation right from the get-go, making this game feel more living and breathing than its predecessors.
How did the designs for the Class Weapons and Class Armors came to be?
Komatsuzaki: The initial plan was to get the Class Weapons designed by someone other than myself. I had to make The Hundred Line's concept art in a period where I was extremely busy with another game and didn't have much time to work on it. But, for reasons I cannot disclose, requesting the other person stopped being a viable possibility. In the end, I had to do everything myself. I chose the weapons for every student, but since that's very relevant for combat, I first asked Media Vision to give me a general idea of size and shape, then added the defining details based on that.
Kodaka: Amemiya's Class Weapon are kitchen knifes that float midair for no reason. That's something better conveyed by showing a mock-up than by describing verbally.
Some of the Class Weapons are very peculiar. Do they have a shared theme? If yes, what?
Komatsuzaki: The design idea was that they had to seem made of bone and blood, so many of the smaller details look fleshy.
Any favorite Class Weapon?
Komatsuzaki: The most costly ones to produce are the ones that occupy my mind the most. Specifically, Yakushiji's bike, Kawana's AC, and Ginzaki's robot. The robot in particular was hell for Media Vision. I'm truly sorry about that. Most weapons match their mock-ups in size, but the robot was the only one I had to make bigger than they wanted.
Why?
Komatsuzaki: A robot needs to be big enough to comfortably fit Ginzaki inside the cockpit (awkward laughs). Also, thanks to me inventing the whole gimmick of the robot transforming into a shield, Media Vision had loads of extra work for the transformation sequence. I'm very grateful to them for producing a functional transformation sequence despite how the concept art I gave them illustrating what part moves where was so full of errors.
Kodaka: We sorta went crazy with the amount of animations on the robot, but thanks to Media Vision, it looks awesome.
Next, I'd like to ask about Class Armor. What was the design process like?
Komatsuzaki: Like with Class Weapons, I remember producing them on my spare time from other work. First I produced Sumino's to be the base for the other suits, and I wanted them their outfits to look unkempt by default. I actually wanted them to run around in mantles, but since those are time-consuming to model in 3D, that idea was cut from the game. Class Armors are made from blood, so having mantles or not doesn't really matter… That said, the battle models were made by Media Vision's modeller and I had to be insistent to get him to make them the way I drew. I feel so sorry for the sheer amount of constraints he had to work through.
Kirifuji's suit really stands out.
Komatsuzaki: That was a high-effort design. Kirifuji's suit had to be different from everyone else's, for lore reasons.
Kodaka: I was okay with hers being just a palette swap of the others, but Komatsuzaki went with a design that much better reflects her lore.
Komatsuzaki: It's a great design that I came to regret once I had to make multiple sprites for it. It's not the easiest design to draw (pained laughs).
What exactly was requested for the monster designs with the School Invaders and their Commanders?
Kodaka: I told Drill to make the Invaders colorful and toy-like. The popness of the enemy designs contrasts against the overall seriousness of the story, making them more unsettling, in my opinion. It was also decided from the start that the enemies could take more vicious forms, so I believe starting colorful would add to the creepiness of the transformations.
Drill: This request from Kodaka was the basis of the Invader production, and I also took a page from Komatsuzaki's book, only finishing them individually after I had already figured out the balance of the whole group. I remember that, when lining up the full roster of Invaders, I focused on making their silhouettes resemble capsule toys.
Komatsuzaki: I remember you going out to check real figures.
Drill: I took a trip to Nakano Broadway to study soft vinyl kaiju figures.
They're so colorful that every battle had me wanting to eat them.
Kodaka: Did I ever say I wanted the Darumarrs to look like a mixed blob of jelly beans?
Drill: You did. Then I suggested that displaying them as flocks of 3 in one tile would highlight the mixed blob factor and give off the feeling of fighting against large numbers. The idea of placing multiple enemies in the same tile was inspired by Warhammer 4K, which I used to play a lot.
I can see that. Any other production secrets regarding the monsters?
Komatsuzaki: Their coloring was redone soooo many times.
Drill: Their original models were really well-made, but not as saturated as I wanted their colors to be. Changing the lighting wouldn't fix the saturation, so their coloring had to be adjusted by redrawing them. That's what gave them the vibrant candy colors you find so tasty.
Did Kodaka have specific requests for the Commanders design?
Kodaka: The fodder Invaders were colorful, so I asked for the Commanders to look monochrome and divine.
Drill: Those two were the only requests for the collective, but there were specific things he wanted for each individual Commander. For example, the prompt for the Squad 1 Commander was "I want him to look too strong to reasonably be the first boss".
Kodaka: I also told you to make him huge. The debate of "is making TRPG enemies big is a good thing?" is a can of worms I told Shimadrill to ignore and just make the first one you fight look big and strong (laughs).
He sure looked big and strong (laughs).
Drill: That's why I decided on the dragon theming for the Squad 1 Commander. I've seen some demo players reaction to sudden strong-looking boss appearing, so I'd say the design did exactly what Kodaka wanted it to.
The Commander also had a humanoid design. Who did this one?
Kodaka: Komatsuzaki.
Komatsuzaki: We initially wanted Shimadrill, the monster design expert, to do them, but he didn't have the time for it when he was simultaneously working on another game, so I did all of it on my own. The humanoid Commanders also had a major share of restrictions coming from lore and production cost reasons, but with enough attempts, I feel like I managed to make them reasonably distinct from one another, within the limitations. It's easy to tell from how they all have different masks.
Kodaka: When checking the pictures for approval, I thought the way the mask design resembled Skull Knight was so cool. We were almost behind the schedule at the time we assigned the humanoid designs to Komatsuzaki, and there are many of them, so I was expecting simpler designs. Him making their design with this much care and detail in so little time was a pleasant surprise.
Is it true that Shimadrill designed the school backgrounds?
Drill: Correct. I was in charge of the school's exterior and hallways, and drew them in great detail.
Kodaka: Komatsuzaki and I have something of a "When in need, ask Drill" mentality. He is often helping out with the most random situations. For example, we thought the design for the alarm speaker that rings when Invaders attack was lame. Worried that this wouldn't convey tension to the player, we called Drill to make a more striking speaker design.
Drill: If we're counting that, I also redesigned the weird wooden boxes (awkward laughs). That request came quite close to the deadline, and it was something I wouldn't think needed adjustments, but Kodaka is a director particular about the details.
Komatsuzaki: There were so many things we got Drill to redesign because they looked too normal.
What was the hardest part of the background designs?
Kodaka: The first thing to come to mind is the school's exterior. It's always visible during combat, so I asked Drill to draw something memorable. He came up with multiple variations, including more hawkish school illustrations. The Last Defense Academy lore back then wasn't the same it is now, and one of the ideas of having a cannon like the one from Battleship Yamato frequently shooting at the field.
Drill: We actually took reference sheets from Battleship Yamato.
I'd expected you take reference sheets from real schools. Were you avoiding that on purpose?
Drill: We were. For some reason, I had to study exclusively warships, tanks, and spaceships to draw a school (laughs). The Last Defense Academy is important enough to the game to be part of the title, and as someone with the mission to support Kodaka and Uchikoshi at Too Kyo Games, I couldn't afford to put out something uncreative. My job is to figure out what would be fun, and create the showy designs Kodaka and Uchikoshi love so much. I always try my best to be ahead of the game when it comes to their expectations.
I was impressed by how each floor look so different from another. Is that essential to the Shimadrill style?
Drill: No, it's essential to the Kodaka style. He requested every floor to be different, so the hallways wouldn't feel samey to the player.
Kodaka: I got him to come up with multiple hallway variations and chose which of them to use and what color they'd have. There are a lot of objects placed on the hallways, and all of them reflect elements of the Tokyo Residential Complex's culture and history that won't get fully elaborated in-game. Drill came up with lore reasons for the presence of each object in the academy, so you can theorize on how their inclusion makes sense.
There's some really… unique furniture in the background. Special mention to the cooking machine being a Thousand-Armed Kannon statue.
Drill: The robot Kannon was my idea. Kodaka asked me to come up with an automatic cooking machine, so I sought inspiration in pre-90s sci-fi art and Expo videos.
Kodaka: AI could never come up with a Thousand-Armed Kannon cooking machine (laughs).
Never (laughs). Next, tell us about the event CGs.
Kodaka: There are over 600 CG illustrations in The Hundred Line. Most of them are drawn by third-party workers, but Drill and Komatsuzaki finalize the art. They have a base standard of quality, but we do go harder on the more plot-significant ones.
Komatsuzaki: That's right, about 2 months before the game was gold, we were still working on improving the important ones.
Drill: I remember that.
Kodaka: Wasn't there a few that Drill made from scratch because there were too many for the third-party workers to keep up with the production pace?
Drill: I was called "just for a little finishing touches" and when I looked at it, I had to do even the lineart… Normal projects demand a lot less work than that when the game is just two months away from going gold (pained laughs).
I see you were in hell for as long as it could keep you there…
Kodaka: Checking if no CG illustration was contradicting the story was so much work. The most common mistakes were having the students dressed normal in scenes they were supposed to have their Class Armor, and randomly including students that would be absent at that point in time… This kind of verification is usually easy because it's done by the writer who knows everything about the story, but with the size of THL's story, the workload here had to be split between multiple people, plus my part was too big for me to remember all of it. In the end, I had to reread the entire story to see if any of the art had a mistake in it. That took forever.
Komatsuzaki: The Hundred Line is far from our only game conceived to be excessive in scope, but it is a league above the rest. We couldn't have completed it without help from a lot of people beyond just us of Too Kyo Games.
Kodaka: I'm the last person who should be saying this (awkward laughs), but this wasn't a project any normal person would consider realistic, and yet we completed it. I'm proud to say every detail is the way I wanted it to be, and that going into debt for it was the right call. In a choice between a life where I make The Hundred Line and a life where I don't, I'd pick the former without thinking twice. But if you asked me if I wanted to make a second The Hundred Line…
Komatsuzaki: No (pained laughs).
Kodaka: That's where I'm at right now, too. Do not say the word "sequel" in my presence (pained laughs).
(laughs) You heard Kodaka's feelings on it. If you're interested in knowing what kind of game could do this to him, please check out the demo.
Komatsuzaki: The demo currently available only shows the tip of the iceberg. The full game contains experiences you can't even imagine. Please play it for yourself, at least until you reach an ending.
Drill: I know I'm asking for too much, but if possible, I'd like you to play all endings instead of stopping at just one. I want as many people as possible taking a proper look at the CG illustrations I drew, if nothing else.
Kodaka: I feel that. In the writer team interview, I answered "You're free to stop playing whenever you're satisfied", but my honest opinion about it is "Play everything".
-----------------------------------------------------------------------------
Links:
Writing team interview
Music team interview
Special guest interview
39 notes
·
View notes
Text
๋࣭⭑ Devlog #41 | 5.28.24 ๋࣭⭑
It's hot girl (/gender neutral) summer season
HAPPY MAY!!
Hope you're all doing well <3 We're already getting into summer, which is a little crazy to me. The year is flying by! Before I get into what we actually did this month, it wouldn't be a May devlog without our annual Mermay celebration!
Look at those locks. His Ariel/Rapunzel era fr
Since I already had updated Mermay pieces for the Alaris LIs, I decided to do one for our beloved Van this year ^^ Hope you all like it!

For writing this month, I spent a lot of it catching up on Etza edits. Being totally transparent, I wasn't Completely Happy with their route when their draft was finished. But now that I've started the editing process with Wudgey, I'm really excited to see how their route is shaping up!!! We've been fleshing a lot of little interactions out with their route, and I can already see Etza's character really starting to shine with these edits ^^
I've also been chipping away at Kuna'a's route! While it's nowhere near finished, I'm hopeful that this upcoming month will be the month of Kuna'a now that I don't have a bunch of releases I'm trying to balance. His route is also one of the ones whose outline is more fleshed out (Druk and Etza I would say were the least fleshed out, which might be why they also took a bit longer). So I'd love to see Kuna'a's first draft complete/almost complete by the next devlog!

This month, I had to dust off my art skills tbh LMFAOIJSDF. It's been.... a WHILE since I've made CGs since I've been in the writing and coding dungeon for so long. So most of this month's art updates are me getting tilted from redrawing an ugly sketch over and over.
I DID manage to get the Van Mermay piece out. And I also was able to sketch out Kayn's Tragic End CG; that leaves only one CG that has to be sketched out! Currently, six of their CGs are finished, two need to be rendered, and one needs to be drawn still.
And since Kayn's CGs are mostly done, I've started drawing Fenir's. I was actually able to finish one because I basically Locked In when I made it, so here is a sneak peek!
Kisses his little pink nose

You might notice there's not toooo many updates on this month's devlog. The reason for that is because this month, I spent a lot of it recovering both mentally and physically. April shenanigans and those back-to-back releases took a lot out of me, and after going full speed basically since this year started, I learned I REALLY needed a break. That coupled with the concussion I got made it so that most of this month was focused on recovering and then getting back into the groove of things.
Another thing I tried to focus on this month was finding a balance in my workflow. Going into this month, I felt like I was on the verge of a mental breakdown almost every day, in large part because I have a lot of big things I'm trying to accomplish this year. Between finishing my dissertation, Alaris, and a personal big event that I have to plan, I have a lot on my plate this year, and it's made it easy to get overwhelmed as the months pass by. So I wanted to find a balance between all three that didn't make me feel like I was also falling into insanity. After talking to beloved Wudgey of @herotome fame, I've started adopting a schedule that gives me enough structure and flexibility to feel like I'm making progress without going crazy and getting lost in the sauce.
While it's still early in the process, I'm really happy with the balance I've hit, and I'm feeling much more like myself now compared to a month ago!

I caught up on quite a few things in my backlog this month, which made me happy ^^ I always like to learn from and support other devs, so finally being able to return to that helped with the recovery process <3
I don't have any actual fanart pieces, but there are a couple of games I'd like to highlight!
First of all, of course I must talk about our hot girl (/gender neutral) summer cross-promo. If you haven't checked out these games, I can't recommend them enough!!

Links to each game can be found on the Alaris Game page under the magic and mystery otome section!
Specifically, Save the Villainess, The Good People, and Thorn for the Villain are amazing games if you're into thriller/political games layered with mystery
The Silent Kingdom (which I played recently and is AMAZING) and Dual Chroma (Otojam 2023 ALLY) have added mechanics of RPG for exciting action-adventure fantasy stories
Lost in Limbo, Obscura, and Snow White Ashes are BEAUTIFUL dark fantasy games. I've played all three of these and they have some of the most beautiful writing and visuals... BIG FAN OF ALL OF THEM.
Mask Beyond Lies and Sigh of the Abyss have that epic fantasy adventure appeal to them, in a way that I think is similar to Alaris! And Pearlglow Cafe (another Otojam 2023 ALLY) is a very lighthearted and charming game for those of you who like the comfy vibe that most of my stories have!!
Some other games that I played are Favor (@favorvn) by beloved @concreteparasite which is SOOOOO stylish. If you've played Binary Star Hero by Connie, you can expect that same stylish, dark, sultry vibe from Favor. If you haven't checked out either of those games by Connie, I can't recommend them enough, especially if you like yanderes. There is so much aesthetic and atmosphere to them!
I also played Where Winter Crows Go by @prikarin who is a VERY talented developer (and one I'm sure many are familiar with). I had a lot of fun romancing Crowe and both the MC and him have such strong personalities, it was so fun seeing their dynamic!!!! The CGs were also made by anta, who is the dev behind Thorn for the Villain, and they're BEAUTIFULLLLL. Each one has so much style and rly has a professional look to them. Can't recommend enough if you haven't played already ((heads up that it is another yandere game for those who can't do yandere!))
Okay I've yapped enough. If you've made it this far, you are god's strongest soldier LFMASLDIFJ. See you all next month with hopefully some exciting progress!
205 notes
·
View notes
Text

Welcome to Tumblr Artists For Palestine [TAFP]!
We are a small group of artists working towards providing aid and charity to Palestinians in need. We hold small events to collect donations, such as our upcoming art drive. Please take a look around!

For our art drive, being held at May 8th (starting 9AM PST), we have 8 artists offering their services in exchange for donations that will go directly to charity.
Truncated information can be found in this spreadsheet, including links to each artist’s specific post with details.
The flow goes as such, for transparency's sake;
Select an artist to commission.
Contact them directly through their socials (tumblr/discord). DM the details and specifics of your commission. Please keep aware what your selected artist can and cannot draw; Collectively, we refuse to draw art that promotes incestuous or adult/minor romantic/sexual relationships.
You will have to send your email to receive an invoice. Once confirmed, you will receive an invoice through PayPal.
Send payment.
Once we confirm the donation, your artist will start working on your commission. Each artist has a different workflow, but will provide at least one WIP unless specified.
At the latest, you will receive your piece 1.5 months (~90 days) after the donation is sent.
We are not accepting payments through other services for now.
If you have any questions, feel free to send us an ask!
We all appreciate each and every contribution to our drive, including shares and interaction! It helps us get around, and all of that.

We are currently donating half of our raised money to Help the Shbuir Family Evacuate from Gaza, and the other half towards Esims for people still currently in Gaza.
We will release our finances at the end of the drive here.

Links to other charities you can donate to! Operation Olive Branch PCRF Vetted Fundraiser Masterpost Masterpost - List of fundraisers for direct contacts - Vetted family fundraiser masterpost 1 - Vetted family fundraiser masterpost 2 - Fundraisers for general purposes Gazafunds | Gazafunds all campaigns
All banners are made by @wolvzephyr.
211 notes
·
View notes
Note
What kind of color palettes you normally use?
I'm gonna sound like a total noob when I say this but I kinda. don't LOL
Like I don't work from any specific set of color palettes, more so I pick colors that work for a specific character design or an environment's tone and go from there! I like consistency in my colors, especially with recurring characters, it feels weird to use colors that aren't dedicated solely to that character. It's probably the 'tism LOL but like... even when I was doing black and grey pages, I had it down to a SCIENCE to ensure every tone of grey was consistent - I wasn't using flat colors, I was using a milli pen set to a lower transparency and then would cover the area a certain number of times to get the correct RGB number LOL (I still have so many of them memorized even though I haven't drawn a black and grey page in like 3 years LOL Uzuki's hair is 163, Mitsuhiro's hair is 42 huehuehue)
So when it comes to Rekindled which actually has color, I have dedicated color palettes that are saved in Clip Studio for me to use, many of which are based on colors that were used in either S1 or the pilot episodes of LO.
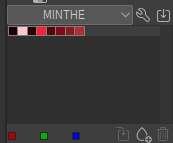
As you can see, some characters were pretty straightforward and thus have small palettes, others wound up going through a bit of a trial and error process so they have a lot more colors to pick from (though I will say a majority of the colors that Hades and Persephone have listed here go unused, some of them I've managed to retool into other characters / uses; ofc the characters who changed shades the most throughout the original comic would be the hardest to pin down colors for in Rekindled LMAO)
Any color changes from there are usually rendered in post, so for lighting/environment mood coloring/etc. Banshriek and I will mess around with gradient maps, clipped color layers, glow layers, etc. to get the desired result! This means even if the base colors are the same as usual, they can still be manipulated to match whatever tone we're going for with correction layers, it keeps the workflow consistent and easy so then we're not eyedropping colors or anything.
Speaking personally, black and red tones were my favorite vibes for years while working on Time Gate, but working on Rekindled has definitely broken me out of that pattern and helped me grow new appreciation for softer color schemes haha
65 notes
·
View notes
Text
Updating... The Tattooer (ver. 3.4)!

Finally! Took me a while, huh. This is the updated version of the Tattooer project. It skips some steps, making the workflow much, much faster! Huge thanks to @applewatersugar for his suggestion on how to bake textures while preserving the transparency. This is kind of a repost of the original Tattooer post, but it actually has some new stuff and a few changes here and there, so please take a look if you want to learn how to use this new version.
This is a series of Blender template files already set up to quickly bake textures from The Sims 4 to The Sims 2. The different Blender files will allow you to: -Bake body textures from TS4 to TS2 (Female) -Bake body textures from TS4 to TS2 (Male) -Bake body textures from TS4 (Female) to TS2 (Male) -Bake body textures from TS2 (Female) to TS2 (Male) [Bonus!] -New! Bake face textures from TS4 to TS2 (Unisex) [Bonus!] -Bake head textures from TS4 to TS2 (Face + Scalp) (Unisex) [Still experimental] Check the file names to see which one is which, and the resolution of the baked texture it will give. Everything you see in the render above was 100% converted using those Blender files.
Download here! SFS / GD
Update: Version 3.4.1 (27/08/2023) Fixed some issues on the shoulders for the AF-body-4t2-1024 and AF-body-4t2-2048 templates. Now the top straps on most converted underwear/swimwear should look right.
Update: Same version (13/12/2023) As requested, added a new spanish version of the included pdf guide!
These templates were made mainly to bake and convert tattoos, but there’s more you can do with them if you get creative. I have to say, these are NOT perfect. Results may vary depending on what you are trying to convert, so! With that in mind, this is all the stuff you will be able to convert almost seamlessly from TS4 to TS2: -Tattoos. -Other body details such as body hair, scars, freckles, supernatural/occult details… -Body painted underwear and swimwear, as well as some other clothing that’s mostly painted on the body. -Socks, stockings and maybe leggings. -Even skintones! In some areas they will look weird, so I recommend editing and blending them with other existing TS2 skins. -Makeup, eyebrows and beards. In the old version this was just a proof of concept, but now I’ve added a new Face file template which gives some pretty decent results! -Hair scalps. Very useful when converting some hairs! Although keep in mind part of that texture might also need to be baked on the face mesh, you know, that hairline makeup stuff.
Got your attention? Nice! Editing some of the textures from TS4 to match the UV mapping in TS2 using a 2D editing program can be incredibly hard. That’s where texture baking in Blender comes to the rescue!
You will need to download Blender, at least version 3.4, but you could always use a newer version. It is only incompatible with versions older than 3.4. -You can download Blender for free here. -You will also need Sims 4 Studio to extract the original Sims 4 CC textures you want. In the first version of these Blender files, there was a necessary step using Photoshop, but that’s no longer needed. However, there’s still a tiny extra step which requires resizing the newly baked texture on some of the high resolution templates, so you might need a 2D editing program like Photoshop. More on that later.
So, before we begin, let’s clear out some questions you might have. What the heck is this texture baking thing and what does it do? Well, let’s imagine you have a video projector and point an image into a blank wall. Then you pick up some brushes and start painting and copying that projected image in that wall. Texture baking is kinda like that when it comes to 3D models. You align two models and match them as closely as you can in shape and form, and once you adjust some parameters and values, Blender does the rest for you: it will give you a new texture for a new model with a different UV map. These files I’m sharing have everything already set up, so it’s a matter of plopping in that Sims 4 texture and you will get that new texture for TS2 in just a few clicks.
This tutorial assumes you know literally nothing about how to use Blender, so if you feel uncomfortable with it, worry no more! This will guide you with pictures showing where you need to click and explaining what is happening. For Sims 4 Studio and Photoshop the process might be a bit less detailed, but still this should be pretty beginner friendly. For this tutorial, I will use some tattoos as an example (properly credited at the end of the post). Alright, enough with the rambling. Let’s get started!
·EXTRACTING TEXTURES IN SIMS 4 STUDIO: First things first, you will need to extract as pngs all the textures you want to convert from TS4 using Sims 4 Studio. It should be pretty straightforward. Just open the packages and export the Diffuse textures. Keep them organized in a folder for easy access.
·BAKING THE TEXTURES IN BLENDER: PRELIMINARY STEP 1: CONFIGURING BLENDER’S GRAPHICS SETTINGS: Open your preferred Blender file depending on what you’re going to bake and the desired resolution (in this example I’m going to use the AF-body-4t2-1024 file). Before we start messing around in Blender, there’s one thing you should set up. It is a onetime step, and once it’s done, you won’t need to do it again. So, does your computer have a dedicated graphics card? If you don’t know or you’re not sure, just skip to the next step. Configuring Blender so it uses your graphics card instead of your CPU will make the baking render much faster, so it is recommended you set it up correctly. If your computer has a dedicated graphics card, click File (1) > Preferences (2) > and on the window that pops up click System (3) > and select CUDA and make sure your graphics card is there and tick it (4). I have an Nvidia Graphics card but your case may vary. Once you’re done, click on the tiny button on the bottom left corner and Save Preferences (5).

PRELIMINARY STEP 2: CHOOSING THE RENDERING DEVICE: Click on the tiny camera button on the right, called Render Properties (1), and on Device (2) select GPU Compute if it’s not already selected. If you’re not sure if you have a graphics card or not, just select CPU. Then select the Material Properties tab (3) and Save your changes, either by pressing Ctrl + S, or clicking File (4) > Save (5). You might need to do this second step with the other Blender files, but once you have it done and saved, you won’t need to do this again. Okay, time to get into the good stuff!

·STEP 1: LOADING YOUR TS4 BASE TEXTURE: In the Material Properties tab, click the folder icon that says Open (1) and on the window that pops up, navigate through your folders and select your first texture. To navigate easily, the 3 buttons on the top right (2) are for the display mode. They will show your files in list mode, vertical and horizontal, and the one on the right will display the file thumbnails, pretty useful if you want to easily preview your textures here. The icons on the left side (3) will let you go one folder back and forward, go to the parent directory, and refresh the folder in case you just dropped something new in there. Double click on the image you need and that will load the texture into the Sims 4 body model, named “ts4 body”.

·STEP 2: SETTING UP YOUR SELECTION AND BAKING THE TEXTURE: On the top right of the screen, you will see the names of the 2 models in the scene. Hold the Ctrl key in your keyboard and left click on the “ts2 body” model (1). If you did it correctly, you should see “ts2 body” in a yellowish orange color, and right down below, “ts4 body” should look more like a red orange. If not, try again by clicking first on ts4 body, and then while holding Ctrl click again on ts2 body. Then switch to the Render Properties tab by clicking the tiny camera icon (2) and click Bake (3). Depending on your screen resolution, you might need to scroll down a bit with your mouse to see the Bake button. Wait a few seconds for it to finish. You will see the progress percentage down on the bottom of your screen. Don’t panic if you notice your computer fans start ramping up, that’s completely normal! As I said in the beginning, using your GPU will bake the textures much faster than the CPU.

·STEP 3: SAVING YOUR NEW TS2 TEXTURE: Once it’s finished, switch to the UV Editing Mode by clicking “UV Editing” on the top of your screen. And there it is: your new texture! You might have to scroll up your mouse wheel a bit to zoom in and see it in all its glory on the left side of the screen. We’re still not done yet though. You need to save it to yet another new folder (always try to keep your stuff organized!).

You can save it by pressing Shift + Alt + S, or clicking on Image* (1) and then Save As… (2). That will pop a window where you’ll need to navigate again and save it somewhere. Give it a proper name (3) and hit Enter to save it… well, Enter doesn’t always work for me for some reason, so if that happens just click Save As Image (4). And that’s it! You’ve successfully converted your baked texture. Congrats!

·STEP 4: GOING BACK TO STEP 1: Alright! If you’re done with your textures, you can close Blender without saving and call it a day. But let’s say you want to keep baking other swatches. In order to go back to step 1 and start the process once again, click Layout (1), go back to the Material Properties tab (2), select “ts4 body” (3) and click on the folder icon (4) to open and load your next swatch.

Then it’s just a matter of repeating the process from step 2. When you’re ready to move on, close Blender without saving. If you see a small check telling you it will save some images, make sure you uncheck it, so you will be able to use it again in the future from the starting point with no issues. I don’t think it really matters if you accidentally save your progress in these files, but I like to keep it clean and fresh so I can do the process where I left it from the beginning next time I open it. And in case you mess up and save somewhere, you can always just delete the .blend file and download the template files again.
In case you’d like a video tutorial on how to use these files, the amazing @platinumaspiration recorded this fantastic video showcasing the process! You can watch it here.
One final note: some of the baking .blend files save the textures with a resolution of 2048x2048 pixels, as clearly stated at the end of their file name. That’s way too overkill, because TS2 only properly supports up to 1024x1024 for most of its textures and you should always resize your final product to that max resolution (or lower if needed). I just made those 2048 versions because there might be some really tiny and slim details on some tattoos that might look a little too blurry when baked into a 1024 resolution texture, so for those cases use that if you want and then resize them using your 2D editing software of choice. In Photoshop, in the Resample mode of the Image Size menu, there are a few options to choose. For the fine details, I like the Nearest Neighbor (hard edges) option, which, even if it looks a bit pixelated, it still preserves most of the texture and quality.

For anything else, I would just directly bake them using the 1024 versions in Blender (512 for the face and scalp).
And for the folks who feel comfortable playing around in Blender, this is just the beginning! Texture baking opens a LOT of possibilities, so feel free to move stuff around and edit the models to your liking! If you notice the baked textures look warped or stretched somewhere, or don’t like where some textures are placed in the S2 body, poke around that area moving stuff and then give it another try. The main objective of the baking process is keeping both overlapping models as close in shape as possible. You may also edit and save new copies of the templates, or make new ones from scratch using mine as a reference (keep a close look on those Baking settings and values, I think they work pretty well) and share them if you want to. Go ham, do whatever you want with them! I still have plans on making templates to convert body textures from Sims 3 to Sims 2, but for now it’s not on my priorities, so we’ll see when that happens.
Whew! Hope none of this was too confusing. Need help or have any issues with these? Please ask/message me here and I’ll be glad to help when I’m able to!
Credits for the CC used in the render demonstration: -Skin by Sims3Melancholic. -Eyes by Northern Siberia Winds. -Eyebrows by PeachyFaerie. -Tattoos by xtc. -Top by SerenityCC. And the Tattoo I used for the tutorial can be found here, by ValhallanSim.
Last but not least, a huge thanks to all the people who somehow contributed to make this project and update possible, either by doing initial testing, finding issues to fix, or teaching me new Blender tricks to make the workflow way faster and easier. So thanks again to @elvisgrace @moyokeansimblr and @applewatersugar on Tumblr! <3
And thank you for reading! Hope you have fun playing with this (not so) new toy hehe.
#tattooer project#tattooer update#ts2 tutorial#ts2 resources#ts2 blender#ts2 overlays#ts2 texture baking#4t2 conversion tutorial#this took me so LONG to update#im really sorry for the delay :(
408 notes
·
View notes
Note
hellooo~ i love the cc you make and they look so pretty! I felt inspired to make sims cc and tinkered with it for a bit, and i was wondering if you had any tips or anything to help me improve?
hi! thank you sm ♡ of course, here are 3 tips for you:
Try to model a lot of different meshes at first. Pillows, cloth, hard objects, organic objects. Pick a youtube tutorial for a semi complex item that you like, for example a floor fan and follow it till the end, even if you don't plan on making such complex things, what you learn from it is what counts.
Make deco objects at first or simple functional objects like a table or a chair. With no transparency. Not objects with weights or animation. Once you get the hang of it you can move on to something with a bit more steps such as a lamp, an object with an fx such as a candle and objects with glass or any transparent mesh group. Things with weights and geostates or cloth with transparency are the most complex.
The thing I pay the most attention to in my models are the uv maps and the texture. A clean UV map means a clean texture! It is kind of boring to make, but since sims models shouldn't be high poly, everything is on the texture. Wrinkles, scratches, folds, any embossing and detail your mesh might have will be on the texture, not the final model. Avoid overlapping islands.
the S4S forum is this community's treasure ♥. Use it whenever you encounter any kind of bug! Methodical workflow and patience. I wish you the very best with your cc! xx

22 notes
·
View notes
Note
i wanted to say thank you for normalizing (for me) tracing refs and models for things, i'm from the deviantart era of "using references is cheating" which set me back YEARS lmao so to see you unabashedly using references so directly makes me feel so much better for when i do! i need to better realize that you still have to be a good artist to make a traced photo look good, and there's SO much you add to a drawing that isn't from the reference, so it's not like i'm lying or secretly a bad artist just cuz i use the csp 1.0 models for poses sometimes....... so thanks for sharing your process!!
of course!!! and 100% agree! that's what i have to remind myself whenever the imposter syndrome sets in: there's so much you gotta add to a thing beyond the traced pose, and the reason i can do it how i do is because i'm at a very comfortable stage of my artistic development. but man i've gotten so much better at freehanding so many poses and limbs and fabric details since i started tracing more frequently, it really does help your muscle memory and help build the skill!!
and. it's just, fun. when you want to turn your brain off, like that richard ii sketch i posted. sometimes i wanna draw just for the fun of it, for the tactile experience of putting down lines and making pretty shapes appear. tracing is a godsend for that. just be transparent about your process ✨
i have all kinds of opinions abt when and where tracing is helpful as u develop as an artist, but at the end of the day everyone's art journey is their own, and they should be allowed to use whatever tools are available to them. remember that artists and animators have been tracing as part of their professional workflow since the photograph has been invented.
#ask a rat#addon: i also used to be insufferable abt this#like NO ! TRACING!! IT'S!!!! ILLEGAL!!!!!!!!#but jfc man who cares#who#cares
84 notes
·
View notes
Text
Transparency Report - April 2025
After checking the current files and notes, this is what I have:
Day 6 to 13 mostly based on one route (mostly Harry's), with some routes included
Day 5 Parts 1 to 3 divided into scenes
Day 5 Part 2 fill-up ongoing
My workflow is:
Getting the base script into its proper individual files based on Day and Episode (e.g. Day 5 Part 1, Part 2, Part 3);
Dividing each Episode into scenes and sub-scenes;
Filling in choices;
Adding in Ink to make it interactive;
Testing; and
Wrapping it all up in Atrament to make it playable.
Day 5 should be dropping next month, barring any major incidents IRL.
💕 Pine
9 notes
·
View notes
Note
Just dropping by to wish you strength (both physical and mental wise) to cope with your chronic pain! I can only imagine what battles you fight every day so please don't forget to be kind to yourself, your koss congregation is well fed and eternally grateful already 🙏🙏
AHHH thank you so much for the sweet ask; it means a lot to me!! 🥹💕
Everyone’s well-wishes lately are so nice uuu TT I want to take the time here to assure everyone that drawing is one of the few activities that doesn’t make my flare-ups worse, I’m taken care of IRL (was not the case until recently, so I’m happy to be in a good situation now!), and I’m sure to rest when I need to!
I’ll be transparent that I actually just draw fast (yesterday’s pic only took around 45 minutes), so it isn’t strenuous to meet my daily quota—for most of daily koss, I had drawn multiple pieces a day and queued them to give myself a workflow buffer! I just didn’t have anything ready to post after the webtoon, and it slipped my mind to check this week’s forecast (since my fibromyalgia reacts to barometric pressure and temperature), oops…
Art and writing are what I do to decompress from my IRL, so they’re very stress-free (and stress-relieving) activities for me :D I hope I haven’t worried anyone too much with my habits ><
#asks#I promise you all I am usually not working hard I’m hardly working AUHSDF I take many breaks!! I just draw fast#art and writing truly are a reprieve to me cuz there are so many other things I can’t do w/o having a severe reaction…#most of the time when i complain about fighting for my life it's cuz i am forced to rest when i want to draw... let me draw!!
12 notes
·
View notes
Text
Folks, I don’t try to sell ANYTHING to anybody, but this is for the chronically ill folks with limited energy who are trying their best to pace themselves and failing.
I have Hashimoto’s, ME/CFS, fibromyalgia, and chronic migraine. I struggle daily to limit the use of my energy and not overextend myself. I was running out of options and constantly running myself into the ground, having a really bad day and then crashing hard for 3 days or more.
If you’re finding that you struggle with this too, and you think tracking your heart rate and daily symptom severity could help, I highly recommend Visible.
It uses a Polar armband to continuously track your heart rate, and the 2.0 band now has a 5 day battery life, making it capable of sleep tracking. I currently have the 1.0 version, but I’m hoping to switch soon.
If heart rate variability, automatic “spoon tracking” (the app calls them pace points) and real-time medical data you can download and share with your healthcare team seem like good tools for you, then click on the link to explore!
Transparency: if you decide to purchase a membership, please know I receive $20 off the 2.0 armband, and so do you. I don’t receive any money, just a discount on the new band. 💛
And yes, this membership is not financially feasible for a lot of disabled people, especially those on social security benefits. They are working on getting the product to be available through insurance or FSA, but to do that, they need folks to support their research. That’s why I’m enrolled in clinical studies through the app.
Please let me know if you have any questions! This device has seriously changed my life, and I wouldn’t blindly recommend it to my community if I didn’t seriously believe that.
#actually disabled#visible armband#polar armband#heart rate#tachycardia#pots#postural orthostatic tachycardia syndrome#chronic disability#me/cfs#autoimmune disorder#chronic fatigue#chronic fatigue syndrome#chronic illness#chronic pain#disability#fibromyalgia#hashimotos#thyroid disease#long covid#post viral illness
10 notes
·
View notes
Text

finished up this dreadnought, made a quick scene with unused greeblies and some explosion assets.
the background is a quick paint in csp, as is all the motion blur and lens flares. the explosions looked pretty good straight out of blender, but were kinda static so I ended up mostly repainting them too
the process was to paint the background, render in blender with transparent film, combine the background with the render in blender, and then export back into csp for the final adjustments/foreground paint.
I dont like this workflow, but I lost the wires and engine flame when I tried exporting from blender as a png with transparency. I wanted to move the ship up slightly and tweak the background brightness/colors at the end but couldn't, so I really need to fix this export issue

#blender3d#3d art#retro scifi#science fiction#blender#scifiart#retrofuturism#retrofuture#spaceship#spacecraft
10 notes
·
View notes