#YouTube Beginners Guide
Explore tagged Tumblr posts
Visit Tumblr Blog
Explore Tumblr blogs with no restrictions, modern design and the best experience.
Last Seen Tumblr Blogs


Fun Fact
Tumblr Inc. is using 66 technologies for its website.
Text
How to Start a YouTube Channel This Month: Your Step-by-Step Guide to Success
If you’ve been thinking about starting a YouTube channel but haven’t taken the plunge, now is the perfect time to get started. Creating a channel isn’t just a dream for “other people” anymore. It’s a real opportunity for anyone willing to take action. Back in 2017, I was in your shoes, experimenting and learning as I went. Those early days laid the foundation for the strategies I now teach my…
#Content Creation Tips#How to Start Vlogging#Social Media Growth#Start a YouTube Channel#Video Creation Tips#YouTube Beginners Guide#YouTubeJourney
0 notes
Text
youtube
The Beginner's Guide is an interactive narrative focused on the creative process, and touches on the relationship between players and developers.
Also my online friend, Simon Bowie also shared his dissertation with me which covers The Beginner's Guide and how it fits into New Sincerity, the weird and the post-ironic turn. You can find it here.
43 notes
·
View notes
Text
so you want to use OBS
hello! i’ve decided to compile information on my OBS setup and some resources that have helped me along the way. this is mostly for personal reference, but maybe others can make use of this information!
some notes before i get into it:
i use OBS for both offline recording and (twitch) streaming. any footage i record is edited using DaVinci Resolve 18, which is free.
most of my OBS captures are of video games (through a USB capture card, specifically elgato), and the occasional screen/application capture (like clip studio paint, and sometimes PC games).
as such, the information here is reflective of these experiences. this post is not comprehensive to all of OBS’s features- this is just an overview of the settings and configurations that are most relevant to me.
with that out of the way, all the information will be under the cut!
Basic Setup
file format:
how to change: settings -> output -> recording -> recording format -> press “apply” once finished!
I save most of my recordings as .mkv files- it supports multi-track audio! i prefer .mkv over .mp4 because if your power goes out, you still have a recording to work with.
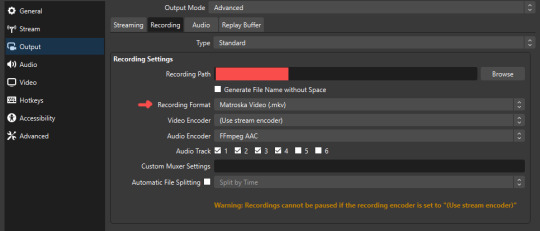
.mkv files can be read by DaVinci Resolve without an issue- but for Adobe software, they'll need to be remuxed to .mp4 within OBS! (file -> remux recordings -> press the … to select a file -> press the “remux” button)
video resolution and framerate:
how to change: settings -> video -> output (scaled) resolution
my obs canvas is @ 1920 x 1080p (16:9)
i switch between 720p and 1080p as needed! if you're concerned about space, you can probably just go for 720p. i also record at 30 fps, simply because that’s what my capture card supports.
video bitrate:
how to change: settings -> output -> encoder settings (located in both the streaming and recording tab) -> press “apply” once finished!
bitrate is a bit of a doozy to explain, but the most important thing to know is that bitrate affects your video’s quality. lower numbers = lower quality, while higher numbers = higher quality.
generally speaking, you'll want higher bitrate when you're recording things with high depth of information (e.g. you’d want a higher bitrate for something fast-paced like splatoon, compared to a slower-paced game like animal crossing).
my video bitrate is either set to 3000 or 4000 kbps! and here's some of my other (related) settings while i'm at it:
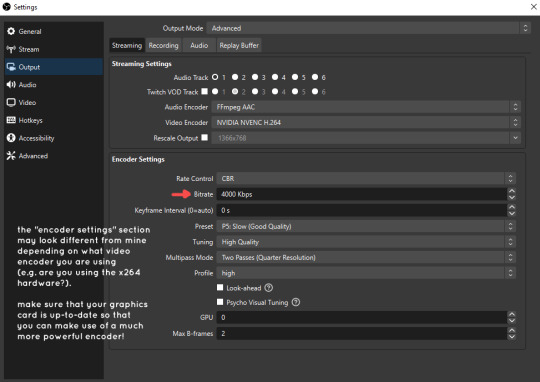
you can put your bitrate at much higher values than me if you're a stickler for quality- but keep in mind that a higher bitrate means:
bigger file size
more information to upload (when streaming)
your computer will need to encode more
i’d recommend reading twitch’s guidelines on encoding, bitrate, resolution, and framerate to get an idea of what values to pick. for people who are doing offline recording or streaming on a different platform, i suggest googling the appropriate resources!
multi-track audio:
this is mostly applicable to anyone looking to do video editing!
multi-track audio basically allows you to separate your audio sources (e.g. discord, game audio, and your own microphone) into different tracks.
this is an immensely helpful tool because it lets you adjust audio levels in post-production (editing). some examples of how this can be used:
increasing someones microphone volume if they speak too softly
increasing/decreasing game audio
muting swear words/sensitive information
completely muting voice call + microphone if you want to upload a no commentary video
and more!
to set this up, take a look at your audio mixer panel, and press the ⚙ icon. this will bring up advanced audio properties.
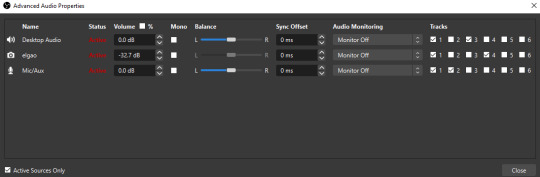
by checkmarking a track box, it puts the audio on that track. to make the above screenshot easier to digest:
track 1 consists of ALL three audio sources- desktop, elgato, and microphone.
track 2 only has the microphone audio.
track 3 only has desktop audio (i use this for voice calls)
track 4 only has the elgato capture card audio (game audio). the volume has also been lowered so that any speaking voices can be heard clearly.
tracks 5 and 6 are unused.
you might be wondering, “why do all three of these have 1 checked off?” this is what i call the universal audio track. i recommend having a universal audio track for a few reasons:
when you stream from OBS onto twitch/youtube- you have to select ONE audio track.
it’s also a nice backup in case you didn’t separate your audio correctly.
if for whatever reason you need to move around your individual audio tracks in editing, the universal track acts as a nice reference point.
mark off your audio tracks for each audio source as you see fit! once you’re finished with the advanced audio properties, go to settings > output.
for the streaming tab, you’ll want to have the number of your universal audio track selected. in my case, that will be audio track 1.
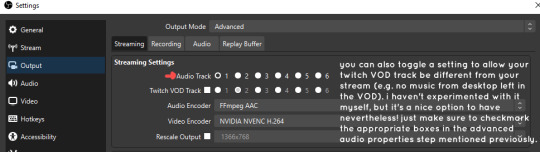
for the recording tab, checkmark all the audio tracks that are applicable to you (in my case, audio tracks 1, 2, 3, and 4). by default, only audio track 1 is selected.
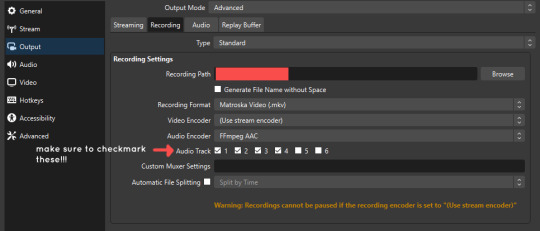
if you don’t check off the additional audio tracks in the output > recordings section, you will not have access to those audio tracks in editing, and you won’t be able to edit your audio tracks independently of each other. so don’t forget to do this! 👍
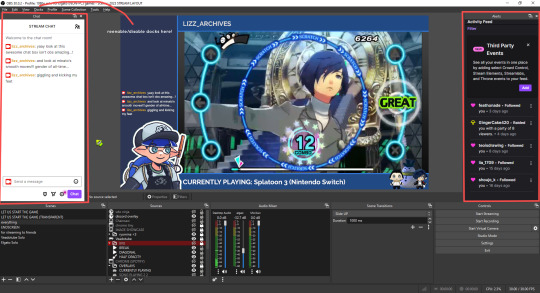
custom browser docks
custom browser docks are a great tool for when you’re streaming and want to have access to your twitch chat and/or activity feed! (or if you wanted to have some other web browser on OBS).
to create one, go to docks -> custom browser docks.
you’ll be given a table interface that asks you to put the dock name and URL. for streamers who want to have chat and alerts available, do the following:
on twitch’s homepage, go to the upper right and click your icon
then, click creator dashboard
once you’re on your dashboard, go to stream manager
click the vertical “...” on my chat OR activity feed.
press “pop-out chat” OR “pop-out activity feed”
copy and paste the link into the table back into OBS
press apply once you’re done
click and drag the docks around at your leisure to put them where you like!
if you ever decide you don’t want to have something on your OBS dock (or want to bring something back), go to the toolbar, click “docks,” and click the appropriate dock!
third party things
a section of optional things that you may enjoy having.
streamlabs alerts
this is basically for anyone who streams and wants to have their chat and/or follower notifications visualized on screen!
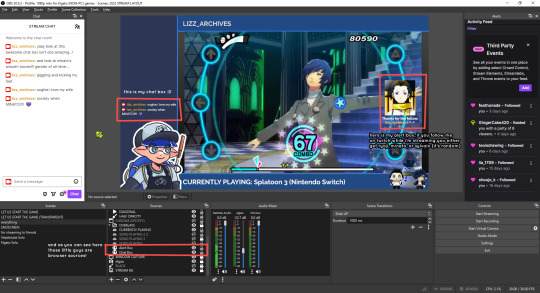
streamlab alerts can be added to OBS by adding a browser source into your scene, and the specifics can be customized on streamlabs itself. it’s pretty self-explanatory, so i’ll just leave a link to streamlabs website, where you can log in using the streaming platform of your choice: https://streamlabs.com/
discord overlay
this is a browser source that can be set up to show people who are in a server's voice chat and who speaks. i recommend this to people who make multiplayer content- it can help viewers distinguish who is who but also it can be helpful in editing.
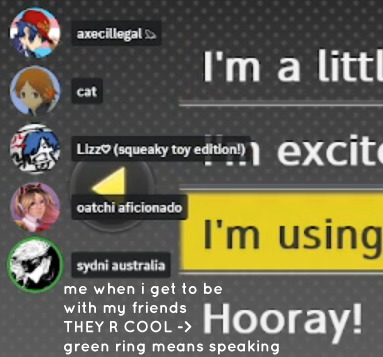
to set this up, go to https://streamkit.discord.com/overlay, click “install for OBS,” and after logging in with discord, go to “voice widget” and click the server and voice channel you want.
you are able to apply CSS if you'd like more control over the visuals, but the standard layout tends to work fine for me! a search of “discord overlay css” on youtube can help you get more information.
veadotube mini
this is a pngtuber software that a friend recommended to me! no webcam is required- mouth opening and closing is based on your microphone input!
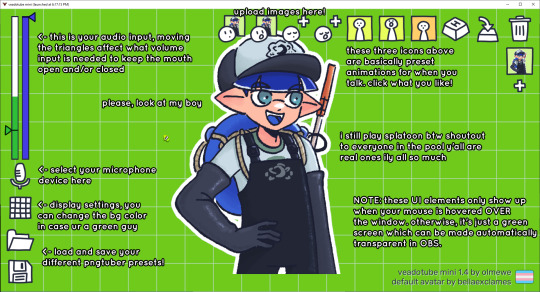
you can download it here (it’s pay what you want!): https://olmewe.itch.io/veadotube-mini
for a proper tutorial on how to use it, i recommend checking out the app's documentation, which you can read here: https://veado.tube/help/
source record
have you ever wanted to stream something with a chat overlay/layout, but wanted your recording to ONLY be the gameplay? or maybe you wanted to record BOTH your gameplay AND your webcam so that you can have a crisp zoom-in on your webcam!
source record is a third party plugin that can help you with that!
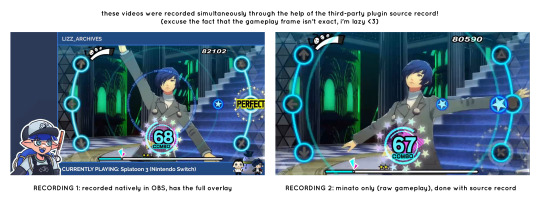
the general gist of source record involves applying the “source record” filter on either a scene or source, and customizing the encoding settings accordingly. the exact details of how to set it up is beyond the scope of this post, so I'll just direct people to this video instead (it was very helpful to me):
youtube
⚠ a quick note about source record: this plugin can be intense for your computer. be sure to do test recordings and the like to see what your computer can handle (and see if the recordings come out the way you like). it took me a few tests before i settled onto something i liked!
you can download and install source record here: https://obsproject.com/forum/resources/source-record.1285/
vdo.ninja
have you ever wanted to do a collaborative video or stream where you feature someone else’s video on your stream? or maybe you’re doing a multi-person streaming event! vdo.ninja is the perfect tool for you!
vdo.ninja turns your OBS virtual camera into a browser source link- which your collaborator can add on their stream! this is a new tool that i’ve added to my arsenal recently- since my friend and i are planning to stream a side order challenge together! i’ve still got to iron it out a bit more, but i like what i’ve used of it so far.
try it out for yourself at their website here (with documentation and demos available on the homepage!): https://vdo.ninja/ (no downloads required!)
ok! i’m set up! what now?
and with that, that’s all of the settings and tools that i thought would be worth mentioning! while most of my setup was written with video games in mind, some of these plugins and setups may be applicable to other types of videos (e.g. tabletop gaming with a physical camera)!
now that i’ve outlined all these settings, i have one more thing i have to say: regardless of what you're using OBS for, do a test recording before doing anything “official” with it. this recording can be as short as 30 seconds. it’s a good habit to develop that can make sure your streams/recordings turn out the way you want them to!
here are the kinds of things i like to check! it’s not an exhaustive list, but this can be a starting point:
video:
does my video look the way i want it to (and can my computer handle that)?
can my computer handle the load of encoding? - OBS will note in the bottom if the encoding is overloaded. if it can’t handle it, turn down your bitrate or adjust other encoding settings (e.g. i had to toggle psycho visual tuning OFF because it was causing lag)
this is especially the case if you're recording PC games- you don’t want to have slowdown on either your game or the recording!
audio:
are my audio sources (e.g. desktop audio and microphone) correct? - if you plug/unplug devices a lot, be sure to check this (settings -> audio).
are any of my audio sources muted? - make sure you don’t have anything on 🔇 if you don’t want it to be muted! otherwise the audio will be lost forever… (i lost my friend’s VC audio once… it was sad)
are my audio tracks separated properly? - requires you to boot up your editing software, but it's worth doing! for the test recording, just have something from all your sources playing at once, and see if your editor has things separated into tracks.
can i hear the voices clearly? or does the music and/or game overpower them?
if for whatever reason your OBS crashes, or you want more information on anything “critical” or “warning” worthy in your set-up, you can go to help > log files > upload current log file > analyze. crash logs currently can’t be analyzed by the log analyzer- but they’re a valuable tool when asking for help on the OBS forums!
and that’s all! for real, this time. i hope that some of these tools and settings can help anyone wanting to get more out of OBS. there’s definitely other things i didn’t touch upon (e.g. audio filters for noise compression, suppression, etc.), so i suggest doing your own research and trying things out!
happy recording/streaming, and thanks for reading! ✨
#lizzy speaks#this was a fun little write up!! i've been slowly getting some of my friends into video making teehee and its SO FUN!!!#(digital) video is like one of my other passions next to art. everyone say thank you splatoon for getting me back into it again <3#i've been using obs since like 2018 so i wanted to share some of the things i learned for funsies... i really love video...#but also i like having reference posts like this in the case people have questions they want to ask me...#because i don't always remember what video tutorials i watched and it's nice to document that somewhere...#warning to anyone who reads it this is like 2.1k words. i do want to stress that this isn't comprehensive but there's still a lot of info#that i wanted to put for this post...! that said topics like designing your own stream layout + assets for it are NOT in the scope of this#post and nor is this a beginner's guide to obs (i wrote this with the assumption that you know how to record and/or stream and that-#people already have an idea of how to use scenes and the different types of sources obs can use).#i hope everyone's had a lovely march 5th! i would love to look at the fanart but im still not done with reload...#but im hoping to finish it by the end of the month!!! yipee!!!#Youtube
50 notes
·
View notes
Text
Just finished rewatching it and I am once again confirmed in my belief that The Artist is Absent: Davey Warden and the Beginner's Guide by Innuendo Studios is the best video essay on the internet. The format peaked in 2016. It should be essential viewing for anyone even remotely interested in storytelling, media criticism, or art in general.
#If you want to talk about how Tumblr is the no media literacy website#well this should be class 101#video essay#youtube#media literacy#the beginners guide#innuendo studios
16 notes
·
View notes
Text
Transform Your Sims 4 Game with These Visual Mods: Easy Reshade Setup, Lighting & Overrides✨ + CC Links
youtube
Today I'll be showing you some of the best beginner-friendly mods to make your Sims 4 game look stunning! 😍 From ReShade to lighting and visual overrides, these easy-to-install mods will transform your Sims game! You can really customize these things to make your sims game uniquely yours! 😊🤍
Download Here: https://www.patreon.com/posts/114334048
#my youtube video#my youtube channel#myyoutubevideos#myyoutubechannel#mods#gameplay mods#sims 4 lighting#sims 4 visual overrides#sims 4 default overrides#default overrides#sims 4 lighting mods#sims 4 reshade tutorial#sims 4 beginners guide#sims 4 beginner tutorial#sims 4 mods intall#the sims 4 mod install#the sims 4 reshade tutorial#ts4 reshade presets#sims 4 reshade#Youtube
14 notes
·
View notes
Text
Something for The Beginner's Guide ~ ✨
Inspired by the talented genius @shinakazami1 's marvelous character designs (I had to be inspired... they were so good)
#the beginners guide#the beginner's guide#tbg#davey wreden#coda#fanart#meme lol#the game was supposed to be sad :(#trying to art#am rlly trying#thank#i HOPE this hasn't been done before#we all saw that YouTube comment
110 notes
·
View notes
Text
Hello, darlings! My name is Haven, and I'm a new video essayist on YouTube. I just finished a big project on voice acting in video games. Please consider checking it out!
youtube
#video#youtube video#video games#voice acting#deathloop#disco elysium#the stanley parable#the beginner's guide#transistor#supergiant games#Youtube
29 notes
·
View notes
Text
sometimes when I'm feeling really claustrophobic about being an internet creator I'll go looking around for Beginner's Guide stuff; I don't think there's a wrong way to interact with such an abstract game but it's always really surprising to me that most of the Stuff for it is like. Doing exactly what the narrator was doing lmao
#not that MY interpretation of it is Correct or anything ofc#but people tagging it as a Cozy Game and posting exclusively about their trans headcanons for object head ocs is sending me#anyway if you make things and have ever had to reckon with having an audience you should go to The Beginner's Guide#you can find a playthrough on youtube it's not long#you wanna talk about people Projecting onto you and your work nobody's done it better
3 notes
·
View notes
Text
youtube
Is your website accessible? (Beginners Guide)
Making your website as accessible as possible is not just a legal or ethical requirement, it’s also a practical concern—allowing everyone to benefit from your content. Here are four areas to review.
#beginners guide#ui ux design#ui design#youtube#ux and ui design#web design#education#free education#How to Design Accessible UX#web accessibility#ui design inspiration#ux design process#ux research#ux designer#ux ui design#breaking barriers#accessibility#accessibleliving#accessible design#accessibility for all#website accessible#app developers#Youtube
4 notes
·
View notes
Text
Clair Obscur Expedition 33: Complete Guide to Best Pictos and Luminas
youtube
Top Tips for Clair Obscur Expedition 33: Must-Have Pictos and Luminas
Looking for the best pictos and Luminas in Clair Obscur Expedition 33? You're in the right place! This guide breaks down everything you need to know about picking the most effective upgrades without spoilers. Whether you’re just getting started or diving into late-game content, mastering your pictos and Luminas will massively impact your success.
We’ll cover which options are best early, mid, and late game, how to manage your Lumina points efficiently, and why stat bonuses matter more than you might think.
Let's get started!
Understanding the Basics: What Are Pictos and Luminas?
Before diving into specifics, it's important to understand what pictos and Luminas actually are:
Pictos: Items that offer stat bonuses and can also provide special effects. You can equip three pictos per character at a time.
Luminas: Instead of offering pure stats, Luminas are abilities or effects that you can equip using your Lumina Points. Managing these points wisely is key.
🔹 Quick Tip: Early on, focus on pictos that match your character’s natural play style. Later, prioritize pure stat boosts (like critical chance or speed) because they always stay valuable.
Early Game Priorities: Picking the Right Pictos and Luminas
At the beginning of Expedition 33, your goal is simple: survive and adapt. Here are the key things to focus on:
Stat Priorities:
Speed and Critical Chance are your best friends.
Health is also important if you’re still learning enemy attack patterns.
Picto vs Lumina Choices: If a Lumina costs a lot of points, it’s often smarter to equip it as a Picto instead — saving points for other abilities.
💬 Pro Tip: Always upgrade your pictos when you find higher-tier versions. Even if you swap them out temporarily, you’ll often return to upgraded versions later on.
Best Early Game Pictos and Luminas to Equip
When starting out in Clair Obscur Expedition 33, a few specific pictos and Luminas can make a massive difference. Let’s take a look at the must-haves:
Dead Energy: Essential From the Start
Effect: Grants AP when an enemy dies.
Lumina Cost: Only 2 Points – very affordable!
🛡️ Why It's Good: In most battles, you're facing multiple enemies. Dead Energy ensures that every enemy you defeat helps recharge your action economy. Even in boss fights, the low cost makes it worth keeping slotted.
✅ Best For: Every character, all game stages.
Augmented Counter I, II, III: Boost Counterattack Power
Effect: Increases counterattack damage.
Lumina Cost: 3, 5, and 7 Points depending on the version.
🛡️ Why It's Good: Counterattacks are extremely powerful in the early parts of the game. Mastering parries and slotting these will make you deal more counterattack damage than normal attacks for at least the first 50% of the game.
✅ Best For: Players who are good at parrying.
Burn Affinity: Set the World on Fire
Effect: Increases damage to burning targets.
🛡️ Why It's Good: Almost every character can apply burn in some way. With synergies like Luna's Wildfire skill, stacking Burn Affinity can lead to serious damage output.
✅ Best For: Everyone (almost no exceptions).
Confident: Early Damage Reduction
Effect: Reduces damage taken when your health is full.
Lumina Cost: Quite expensive.
🛡️ Why It's Good: In exploration areas, you’ll rarely need to heal between fights. Confident lets you tank more hits when your health bar is full, making it perfect for non-boss areas.
✅ Best For: Mid-exploration phases when healing isn't needed.
Dodger: Extra AP for Perfect Dodges
Effect: Grants 1 AP per perfect dodge (once per turn).
Lumina Cost: Only 1 Point!
🛡️ Why It's Good: If parrying feels tricky, but dodging is easier for you, Dodger is an incredible cheap way to generate more AP consistently.
✅ Best For: Players who prefer dodging over parrying.
Early Game Summary: Key Takeaways
Prioritize Dead Energy and Burn Affinity early.
Slot Augmented Counter if you're confident with parries.
Use Dodger if you struggle with parry timing.
Save Lumina Points by making expensive Luminas into pictos when possible.
Best Mid-Game Pictos and Luminas: Power Spike Essentials
As you push deeper into Expedition 33, enemies get tougher. Mid-game is where smart builds start to shine. Here’s what you’ll want:
Energizing Start I, II, III, IV: More AP at Battle Start
Effect: +1 AP at the start of battle.
Lumina Cost: Increases with each level.
🛡️ Why It's Good: Starting combat with extra AP means you can unleash powerful skills early. Stick with Energizing Start I as long as possible before upgrading to higher versions.
✅ Best For: Every character, any playstyle.
Energizing Turn: AP Every Round
Effect: +1 AP at the start of each turn.
Lumina Cost: Same as Energizing Start IV.
🛡️ Why It's Good: If you can slot this, you’ll gain an AP every single turn. That's game-changing for skill-based characters or any playstyle that needs AP fast.
✅ Best For: Long battles, boss fights.
Combo Attack I, II, III: More Hits, More Power
Effect: Base attacks hit extra times.
🛡️ Why It's Good: For characters whose weapons reward frequent basic attacks, combo attacks stack buffs, burns, and other effects quickly. Pair it with Energizing Attack for even more AP gains!
✅ Best For: Characters focused on base attacks.
Energizing Parry: Reward Your Skills
Effect: Grants 1 AP on every successful parry.
🛡️ Why It's Good: If you’ve mastered parrying, this lets you snowball AP super quickly. Combine it with Augmented Counter for maximum counterattack damage and skill usage.
✅ Best For: Confident parry-focused players.
More Mid-Game Strategic Pictos and Luminas
By the mid-game in Clair Obscur Expedition 33, you'll have a stronger roster and tougher enemies. Picking the right buffs now becomes critical to keep up with scaling difficulty.
Rewarding Mark and Marking Shots: Free Aim Boosts
Effect: Mark enemies for bonus damage and gain AP when damaging marked targets.
🛡️ Why It's Good: If you’re using characters that rely on free aim shots, these skills let you stack AP while ramping up the damage quickly. You’ll notice an AP snowball effect that keeps you attacking aggressively without running dry.
✅ Best For: Characters specialized in free aim combat styles.
Solo Fighter and Last Stand Critical: When You’re Alone
Effect: Bonuses activate when you are the last character standing.
🛡️ Why It's Good: Even though you usually run a full team, stuff happens. These buffs kick in when your back is against the wall, giving big critical chance and damage boosts.
✅ Best For: Situations where survivability gets shaky.
Weakness Gain: Punish Elemental Weaknesses
Effect: Gain AP when hitting an enemy’s elemental weakness.
🛡️ Why It's Good: Some characters — like Lun — have multiple elemental attack options and can hit weaknesses reliably. Weakness Gain helps sustain AP generation through good elemental play.
✅ Best For: Elemental-focused characters (Lun especially).
Base Shield: Get Free Shields Each Turn
Effect: Gain a shield if you start your turn without any.
🛡️ Why It's Good: Shields absorb one hit completely. This skill saves you from one-shot deaths and lets you play more aggressively without constantly healing.
✅ Best For: Everyone, especially in boss fights.
Auto Powerful: Start Battles With a Damage Buff
Effect: Begin combat with the "Powerful" buff (extra damage for 3 turns).
🛡️ Why It's Good: Getting bonus damage right out of the gate helps you wipe enemies faster and dominate tough fights with a momentum advantage.
✅ Best For: Every character without built-in "Powerful" buffs.
Beneficial Contamination: Status Effect AP Farming
Effect: Gain AP when applying status effects like Burn.
🛡️ Why It's Good: If you're setting enemies on fire constantly, why not generate AP while doing it? Combines nicely with Burn Affinity and Double Burn later in the game.
✅ Best For: Burn-focused characters.
Confident Fighter: Embrace the No-Heal Lifestyle
Effect: Boosts your damage but prevents healing.
🛡️ Why It's Good: If you're already playing a damage-rush strategy and not relying on healing spells or potions during battle, Confident Fighter gives you even more burst potential.
✅ Best For: Aggressive players who focus on killing enemies fast instead of surviving long battles.
Mid-Game Recap: Key Tips
Slot Base Shield and Auto Powerful on as many characters as possible.
Prioritize AP generators like Weakness Gain and Beneficial Contamination.
Don’t overcommit to healing — focus on shields and damage boosts instead.
Late-Game Pictos and Luminas: Peak Performance Setup
Once you reach late-game in Clair Obscur Expedition 33, it’s time to fine-tune your builds. Bosses hit harder, battles get longer, and efficient play makes a huge difference.
First Strike: Play Before Enemies
Effect: Your character moves before enemies.
🛡️ Why It's Good: Speed is king. By playing first, you can often eliminate enemies before they act or set up shields and counters ahead of time.
✅ Best For: Every character, late-game especially.
Healing Counter and Healing Parry: Passive Healing Machines
Effect: Heal a percentage of your max health when parrying or countering.
🛡️ Why It's Good: If you’re great at parrying or landing counters, this passive healing method keeps you topped off without wasting turns. Works best with high vitality stats.
✅ Best For: Players who have mastered parrying mechanics.
Painted Power: Break the Damage Cap
Effect: Unlocks damage beyond the standard cap of 9,999.
🛡️ Why It's Good: If you want to fully maximize your strongest attacks, this is non-negotiable. Paint those big numbers!
✅ Best For: Every endgame character build.
Solidifying: Emergency Shields When Hurt
Effect: Gain two shields when your health falls below 50%, once per battle.
🛡️ Why It's Good: Provides immediate protection during critical moments without needing a healer or item use. Perfect for high-stakes boss battles.
✅ Best For: Everyone, especially in fights with high damage bursts.
Ultimate Late-Game Pictos and Luminas: Maximize Your Power
At this stage, you're no longer just surviving — you're dominating. Here's how to finalize your builds for the best results.
Charging Critical: Supercharge Your Gradient Meter
Effect: Gain 20% Gradient Charge on critical hits (once per turn).
🛡️ Why It's Good: If every character triggers this every turn, you can fill your Gradient Meter extremely fast — enabling powerful Homages and game-changing ultimate moves.
✅ Best For: Every character, especially those with high crit rates.
Cheater: Play Twice in a Row
Effect: Allows a character to take two consecutive actions.
🛡️ Why It's Good: This is one of the strongest effects in the entire game. Doubling your turn actions leads to insane momentum, especially when paired with crit charges and AP-generating setups.
✅ Best For: Everyone, but prioritize high-damage characters first.
Clay's Life: Auto-Heal Between Turns
Effect: Fully heal between turns if you haven't taken damage.
🛡️ Why It's Good: While situational, if you master shielding and dodging, this Picto can almost make you invincible. However, due to the steep 30 Lumina Point cost, it’s better as a Picto slot if possible.
✅ Best For: Defensive or high-speed characters who rarely take hits.
Double Burn: Burn Enemies Twice
Effect: Applies two burn stacks instead of one.
🛡️ Why It's Good: Stacking double burns significantly speeds up boss damage over time. Essential for any burn-based team.
✅ Best For: Characters built around burning enemies (Lun, others with Burn synergy skills).
Glass Cannon: Ultimate Risk-Reward
Effect: Massively boosts your damage, but you take more damage too.
🛡️ Why It's Good: If your goal is to wipe enemies before they even attack, Glass Cannon is your new best friend. Pair with shielding skills to offset the risk.
✅ Best For: Aggressive, high-damage builds.
Longer Burn: Extended Damage Over Time
Effect: Extends Burn effects from 3 rounds to 5 rounds.
🛡️ Why It's Good: Longer burns mean more passive damage and better stacking with skills like Double Burn. Bosses melt under these conditions.
✅ Best For: Burn-focused characters.
Shielding Death: Bonus Shields When an Ally Dies
Effect: Grants 3 shields to allies when a teammate falls.
🛡️ Why It's Good: Perfect for chaotic battles. It rewards resilience and tactical reviving.
✅ Best For: Characters in challenging boss battles.
Breaking Death: Break Enemy Bar When an Ally Dies
Effect: Instantly breaks an enemy’s bar if a character dies.
🛡️ Why It's Good: Use death tactically. In boss fights, a quick death could fully stun a powerful enemy, giving you breathing room to recover and counterattack hard.
✅ Best For: Emergency tactics during endgame boss fights.
Top Late-Game Strategies and Synergy Tips
Maximizing performance isn't just about having the right skills — it's about combining them effectively.
AP Management Strategies
Energizing Parry + Charging Critical + Energizing Start: Nonstop AP generation through parries and battle start bonuses.
Dodger + Weakness Gain: Dodge perfectly and hit elemental weaknesses to stockpile AP every round.
Dead Energy + Energizing Attack: Kill an enemy, earn AP, and chain stronger skills faster.
Damage Synergy Combos
Glass Cannon + Painted Power: Maximize your initial burst with massive critical strikes.
Auto Powerful + First Strike: Play first and play stronger to KO enemies before they can move.
Double Burn + Longer Burn + Burn Affinity: The ultimate burn combo to watch bosses evaporate over time.
Shield and Healing Combinations
Base Shield + Healing Parry + Solidifying: Stack shields and passive healing to become extremely tough to kill.
Shielding Death + Breaking Death: Sacrifice a character strategically to break bosses and save the party.
Meta Strategies for Final Bosses and Endgame Content
Always prioritize Speed and Critical Chance when choosing new pictos.
Slot your high-cost skills as pictos wherever possible to save Lumina points.
Distribute Lumina points evenly across all characters — neglecting someone can cost you in mandatory story segments.
Master parry timing — the game becomes much easier when parrying reliably.
🔹 Important: Don’t be afraid to switch builds between story arcs. A few extra minutes optimizing before a hard boss saves hours of frustration later.
Conclusion: Master Expedition 33 with Smart Pictos and Luminas
Understanding and properly equipping pictos and Luminas will be the key to surviving and thriving in Clair Obscur Expedition 33. From early-game survivability to late-game dominance, the right combinations can turn even the toughest battles into easy wins.
Make sure you:
Focus on speed, crit, and AP management early.
Build shield and healing synergies for tough fights.
Power up your burn strategies if you like long-term damage stacking.
Always upgrade your pictos as better versions become available.
Now it’s your turn — customize your squad, dominate the battlefield, and show Expedition 33 who's boss!
🎮 Meet Haplo Gaming Chef 🍳
Level 99 Kitchen Warrior here! I'm on a quest to transform your gaming sessions into epic culinary adventures. When I'm not farming rare ingredients in MMOs, I'm crafting real-world recipes inspired by your favorite video games.
Specializing in: • Game-inspired recipe creation • Cooking quest guides • Power-up snacks for gaming sessions • Achievement-worthy meal prep
Join my party as we explore the delicious intersection of pixels and plates. Whether you're a casual foodie or a hardcore gamer, there's always room at my crafting table! #Gaming #GamingGuides #GamingChef #HaploGamingChef For More Visit: https://haplogamingchef.blogspot.com/
#clair obscur expedition 33 guide#best pictos guide#luminas optimization#clair obscur pictos locations#expedition 33 luminas farming#clair obscur best builds#expedition 33 walkthrough#pictos and luminas guide 2025#clair obscur meta builds#expedition 33 tips and tricks#best pictos combinations#luminas upgrade path#clair obscur beginner guide#expedition 33 strategy#rare pictos locations#legendary luminas guide#clair obscur expedition secrets#pictos tier list#luminas efficiency guide#expedition 33 endgame content#Youtube
2 notes
·
View notes
Text

41 notes
·
View notes
Text
youtube
Art for No One | Jacob Geller
14 notes
·
View notes
Text

🎄 Make This Holiday Season Quantastic with QuantumX! 🎁
Looking for the perfect gift that’s as unique as the person receiving it? QuantumX has you covered! This holiday season, explore our exclusive collection of bold designs on Redbubble and Printful. From cozy mugs to eye-catching apparel, every piece is a masterpiece waiting to be unwrapped.
✨ Why Choose QuantumX for the Holidays? 🎁 One-of-a-Kind Designs – Stand out with art-inspired by creativity and technology. 🎄 Perfect Gifts for Everyone – Apparel, home decor, and more! 🛒 Easy Shopping – Browse, click, and deliver joy right to your door.
🔗 Shop Now: 🎅 Find us on Redbubble and make gift-giving extra special! 🎁 Visit Printful to customize holiday magic for your loved ones.
🎉 Don’t wait—get your gifts early and make this season truly Quantastic!
#fyp#100 days of productivity#mexico#tumblrboy#youtube#please share#3d printing#growth#tumblr#start#guide#beginners#stomach growling#growing gut#growing up#growl#your#comprehensive#1950s#60s#synthwave
2 notes
·
View notes
Text
youtube
New to Second Life? Not really sure where to start? Are you confused and Frustrated with how everything works? I got you covered in this step-by-step user guide on how to use the Second Life Firestorm viewer. These are the very step-by-step basics. Whether you're looking into the metaverse and virtual worlds, considering trying out Second Life, or just looking to try something new, this will provide you with the basic beginner's knowledge you need to get started in an easy comprehensive guide on using the Firestorm Second Life Viewer.
#Firestorm#virtual world#metaverse#second life tutorial#youtube#beginner youtuber#how to guide#how to virtual world#how to metaverse#second life#SL#Firestorm Viewer#Firestorm Tutorial#Youtube
2 notes
·
View notes
Text
finally got the last hk ending (delicate flower) yesterday. beat absrad with a single mask left - I was counting hits because I was so sure I only needed 9 with the nail (with unbreakable strength) in the last phase, got up to like 12 hits or somethjng and went “why is she not dying??”, Panicked, got hit by an orb and went down to one mask, then hit her twice more in one go (quickslash i Love You) and that was it. Felt fucking fantastic. I am never doing pantheons again
#still gotta beat her on ascended in hog (shes the last i have left) but thatll be it - I have no intention of beating everyone on radiant#only achievements remaining now are the speedrun and steel soul ones#currently working on the speed ones. got stuck on watcher knights though lmao#probably because I’m being stupid and just making it up as I go#should really just follow the any% route lmao#at least somewhat. established yesterday that i CANNOT perform that one. is stallball what they call it. in greenpath#tried for so long and just Couldnt lmaoooo#z talks#hk#also the next step is getting into speedrunning#got fireb0rn’s beginners guide to any% nmg queued up on youtube as we speak#will see if i actually stream it Somewhere or just keep being in mine and my friends’ discord server lmao
5 notes
·
View notes
Text
So...like....
Ive been struggling for a bit to motivate myself on content creation.
I used to love clever edits
I used adore just getting a subscriber.
I thought I was making folk smile...
But, after a while, I noticed that my grow was slow. Deadly slow.
I just wasn't moving as fast as some who made it look so easy. I'm proud after 2 years to have 400 followers. But I've watched more quit for failing to get 2k in 1 year. After a while, you start to wonder if you're punching your way through solid rock.
Now, I've heard this advice:
"If you're experiencing creative burnout, play The Beginners Guide".
So...that's what I'm going to do.
3 notes
·
View notes