#also custom mouse cursor icons
Text
Rb @ put in the tags w the stupidest way you ended up having to get your computer repaired from a virus or otherwise as a child/early teen
#i tried to change my ip address and ended up deleting the driver on my computer that allowed sound to play#i also used to be obsessed w those like. interactive desktop pets? that would walk along your start bar and you could pet them and shit?#p sure one of those gave me a virus#also custom mouse cursor icons#i speak
0 notes
Text
Accessible BG3 Mods For The Visually Impaired!
As someone with a vision disability, I have a hard time reading small text, distinguishing menu options, and so on. So of course I stay on the look out for accessibility mods.
I'm gonna link some of the mods I use (and some that might just be useful) for other PC users that are struggling with vision issues with this game. Be sure to check the mod pages for specific installation instructions for each mod as well as any dependencies or compatibility issues with other mods.
Do note that these mods were compiled based on my own experiences with low vision, eye strain, and trouble distinguishing small objects/words so they may not be useful for everyone. If you have any suggestions for things to add to the list or if any links are broken, please let me know!
Also please show some love to these modders if their mods helped you 😄
Better Maps All In One
Link Here
With this mod you can remove the grid overlay on the map which reduces visual clutter. There is also an option to make the minimap larger and a recent update says that colorblind support has been added for NPC markers!
Bigger Mouse Cursors
Link Here
Does what it says on the tin, makes all mouse cursors larger.
Darker Paper
Link Here
Providers a darker background for all readable items (books, notes, etc.) which may reduce eye strain for some.
Comic Sans (Font Replacer)
Link Here
Can be useful for those with dyslexia or vision impairments.
Better Context Menu
Link Here
Adds related icons to all context menu options and (optionally) makes the context menu larger.
Increased Font Size
Link Here
Does what it says on the tin, increases font size with options ranging from 10% to 55% increases.
Note: If using in conjunction with the Comic Sans mod, the author of this mod recommends starting with the 10% size and increasing if needed as the Comic Sans mod already starts larger by default.
Less Annoying Magic Effects
Link Here
Disables VFX for many spells, status effects, etc. (see mod page for list). Useful for reducing eye strain, visual clutter, or headache inducing effects. There is an optional configurable version so you can remove only certain effects, though I haven't tried that myself.
Bigger Customize Dice Button
Link Here
Does what it says on the tin, makes the button to customize your dice larger.
151 notes
·
View notes
Text
This is The god of flavors ! I will post updates on this small passion project of mine as frequently as I can. For now everything is work in progress😅: the music, the animations, the combinations...
The main idea is for the game to be similar to Doodle God or Little Alchemy but you start with the 5 fundamental* tastes and the help of some godly powers. You explore the whole culinary spectrum of food descriptors. I want a game that feels as *me* as possible, a game in which I just talk about little fun food facts :3 with little icons and a classifying system!
Another important aspect of my game is that I want it to be as highly customizable so that anyone could add any combinations they would want, or maybe make a completely different combination game lol.
I finally finished the basic parts of my game, I will list the features that work
-> Any 2 elements can be combined into a third one.
-> Category files and the save file update automatically after the folder structure changes. Elements just need their own category folder.
-> A system to store all my json files with different elements and categories

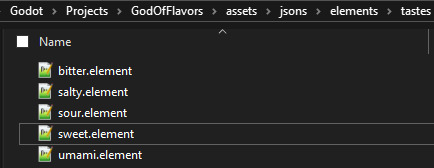
-> Each element and category has a custom file that will tell the game what colors, sounds, images, labels and descriptions to use!

-> Any time an element is created it's category will also be unlocked and visible permanently.
What I plan to do:
A talking *something* that describes each element after they were created
Different powers that let you combine elements in unique ways to make the game loop a bit more engaging (and I like the idea of drawing different mouse cursors for each power :)) )
Improve the music, animations and overall cohesiveness of the game
A way to see a history of combinations
More elements! More categories! More combinations !
Real life recipes that unlocked by using more than 2 elements
A bit of story/dialogue for milestones reached inside the game
3 notes
·
View notes
Text
Alpha testing, v0.05a & patchnotes
This post is long long overdue, considering I’ve been working on the v0.06a build for about two weeks now, but nevertheless a v0.05a playtest did indeed happen!
The demo is getting surprisingly stable, and there were only a couple of actual crashes, localised to some custom move scripts I had not thoroughly tested. Apart from that, the issues were generally minor and did not impede play.
In fact, I’d say that the balance of the game is also getting tested now, and I am actually super surprised at how balanced things are already! Like, I have just been eyeballing numbers and looking at graphs/extrapolations up until now, and yet all the numbers are falling in line quite well. Not to jinx myself or anything, of course.
My friend, the way he plays the game, is so different to me too. He takes a ton more risks than I would, goes to hard areas, goes in DEEP, and doesn’t run from battles where it appears that he’s quite outmatched. And yet despite all of this, he’s managed to come out on top without resorting to the cheat/testing controls I’ve added (like an instant back-to-the-ship button or my debug attack that costs nothing and does massive damage). So, I’m overall impressed by how much better he is at managing and assessing risk in the game compared to me!
v0.05a to v0.06a is going to be the biggest patch yet - I have a ton more changes than usual, and most of these are new features/polish rather than bug fixes, which I’m very happy with. Of course, at some point, the demo will need to be released into the wild, and I’m very much getting to a stage where I am happy with doing so. It’s one thing to be on a stream with a friend while the game crashes, but for all of you guys, I’d like the demo to be polished to a certain standard!
Keep reading below for the a0.05a patchnotes...
Features:
Press the V key to go back to the ship in case of a softlock!
Increased save backups from 9 to 10!
The map now has an icon legend!
Added version info to sentry.io script
The status log in battle now displays when status effects were applied
The equipment panel now highlights positive and negative changes with colour!
Added confirm popup for navigator with a message saying you do/don't have enough fuel to travel there!
AI now considers HP costs in their moves (lower hp = more likely to use HP moves)
X All enemies now have a low chance to drop some fuel items
X Recruiting cores now makes their level equal to (astro_level + (core_tier-1)*10)/2 +- random(core_tier)
Defending now restores energy when at low energy
Added a custom cursor!
Added tooltips for the various icons in the game!
Polish:
Mechanical prayer animation slightly reduced
Made buttons not spam a sound effect when holding the mouse down
Explosion noises slowly fade out if the explosion sequence is somehow prolonged
The battle menu now closes upon confirming each unit's turn
The stairs icons on the maps have changed slightly for clarity
Addded F1 control reminder for the help overlay to the controls menu
Added message signialling that relativistic travel is now available
Talking message boxes now overlap better
Exploding enemies now take their turn next instantly
Item menu disabled for now
Damage numbers now all appear at once
Stat panels when moving characters don't overlap now
X Only display the mine/gather point message when gathering 1 or more item
Disabled debug coordinates appearing on minimap during mouseover
Shifted the mouse stat panel down to account for the new tooltips
Unit's pictures removed from the stat panel in the recruit screen
The red battle grid is now animated
Stat panel doesn't display enemy sprites in recruit menu now
Changed I/J menu tutorial text to F/R
Changed Wiring item to Wires
Owned scrap now shows next to scrap cost of machine
Removed decimals on scrap cost for machines
Item stat panel now shows -0X instead of --X
Bitflip text is now shortened to fit into the text box
Feature labels now disappear completely when changing floors/teleporting
Floor advancement messages when stepping on a trap are now given in the right order
Corrected text when choosing to go back a floor using a wall machine
Bugs:
Random moves now hit a different cell/row/column per-hit as intended
Removed debug controls that allow you to randomise the element grid
Fuel now converts properly
Enemy appearance when moved to a non-preferential row is now fixed, and the HP moves with it
Tutorial messages when not exploring now show
Fixed battle menu becoming unresponsive after selecting and then getting out of target menu
Upstairs sprite now appears properly
Feature nameplate doesn't disappear suddenly now
Cooldowns now apply for the player when using moves
X Enemy AI row/column targeting on area attacks now has the same restrictions as the player, preventing weird targeting for AOE abilities like Encrypt
Emergency oxygen energy drain stops trying to drain energy/hp when at 0
X Move text appearing at the top and bottom of the window is now removed when you finish the battle (unlike before with self-destruct)
Unsure why but overcharging an enemy used to softlock the game, and now it doesn't
Conducting attacks now copies all associated attack data to prevent crashes in attack scripts (like explosive spread)
Core inventory now properly depth sorted behind the unit inspect window
Debug key (B) now disabled from generating game over fx on title screen
#indiedev#gamedev#gaming#pixel art#scifi#space#gamemaker#programming#rpg#robot#devblog#game#videogame
7 notes
·
View notes
Photo
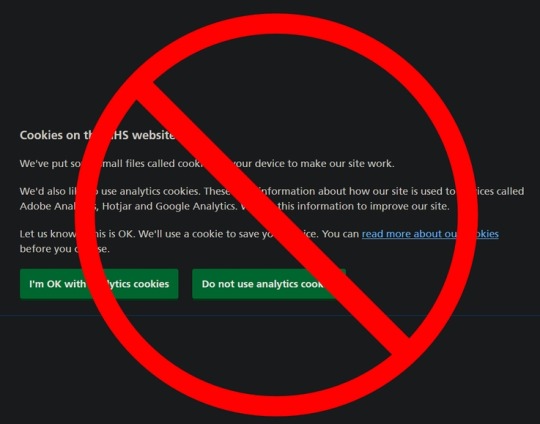


You Can Block Those Annoying Cookie Banners on Every Website
They might be legally required, but they're also blocking everything you want to read.
By Pranay Parab
There’s a long list of things that make browsing the internet feel like living in a dystopian hellscape, and annoying cookie banners and consent forms are right at the top of that list. Most websites are legally required to display these notices and take your consent for using cookies. However, it also blocks a big chunk of the website you’re trying to read. Let’s fix this on all of your devices.
Block cookie banners on desktop
No matter what platform you’re using, you can easily install a browser extension to block cookie notices. Super Agent is a free extension that works on Chrome, Firefox, Safari, and Edge. It’s built to automatically get rid of cookie banners and will come through for almost all the websites you visit. The extension’s preferences page allows you to customize which cookies you want to accept and which ones you want to reject. This is a key feature: You don’t want to use an add-on that automatically accepts all cookies on every websites you go to.
If you’d rather not install a dedicated extension for this purpose, you can use uBlock Origin as an alternative. It blocks a long list of annoyances by default, but you have to manually enable its cookie-notice blocking list. Click the uBlock Origin icon and go to Settings > Filter lists > Annoyances. Enable EasyList Cookie to hide cookie banners.
Be aware that automatically blocking cookie notices could prevent some websites from loading altogether, which is why you can consider using uBlock Origin’s element hiding feature instead. When you see a cookie notice on any website, you can click the uBlock Origin extension icon from the browser’s toolbar, and select the eyedropper icon.
This enters the element-picker mode: Hover the mouse cursor over the cookie notice till the entire banner is selected, click it once, and select Create Filter in the pop-up window. You may have to do this manually on multiple websites, but it’s a one-time effort for each website you visit and only takes a few clicks.
Block cookie banners on iPhone and iPad
As long as your iPhone and iPad are updated to iOS 15, you can use some great Safari extensions to block annoyances on the web. However, Super Agent is still the best cookie-notice handler for iPhone and iPad. It lets the cookie banner load and automatically accepts or rejects cookies based on your preferences. This takes a second or so after the website loads, but you don’t have to do anything after enabling the extension.
Block cookie banners on Android
If you use Firefox on Android, you can install the browser add-on for uBlock Origin to block cookie notices on all websites. If you don’t, your best bet is to use an ad-blocker like AdGuard for Android, which also blocks cookie banners on various websites. The unfortunate truth is that these types of apps are not allowed on Google Play, so you may have to sideload it on your phone.
https://lifehacker.com/you-can-block-those-annoying-cookie-banners-on-every-we-1848936142
Throw Your Neckties in the Damn Garbage Already
How to Make a Restaurant-Quality Burger at Home
Stop Saying These Things When You Don’t Know How to Pronounce Someone’s Name
7 of the Best Summer Jobs for a Teenager
How to Get a Free Fitbit or Apple Watch From Your Insurance Company
8 Telegram Privacy Settings You Should Enable Immediately
You Should Know How to Scan a QR Code From a Screenshot
2 notes
·
View notes
Text
How to Add a Custom Cursor to Readymag
The custom cursor is a new element on the Readymag platform that allows you to change the mouse cursor icon for specific pages or elements. It’s easy to use and you can find all the instructions in this article.
Custom cursor is not only used for visual design but also to indicate specific things to users, such as hovering over a link or clicking on a case study to reveal the content below it. It…

View On WordPress
0 notes
Text
All About Lily Chou-Chou - Research 4
Bulletin board system
A bulletin board system (BBS), also called a computer bulletin board service (CBBS), is a computer server running software that allows users to connect to the system using a terminal program. Once logged in, the user can perform functions such as uploading and downloadingsoftware and data, reading news and bulletins, and exchanging messages with other users through public message boards and sometimes via direct chatting. In the early 1980s, message networks such as FidoNet were developed to provide services such as NetMail, which is similar to internet-based email.
Many BBSes also offer online games in which users can compete with each other. BBSes with multiple phone lines often provide chat rooms, allowing users to interact with each other. Bulletin board systems were in many ways a precursor to the modern form of the World Wide Web, social networks, and other aspects of the Internet. Low-cost, high-performance asynchronous modemsdrove the use of online services and BBSes through the early 1990s. InfoWorld estimated that there were 60,000 BBSes serving 17 million users in the United States alone in 1994, a collective market much larger than major online services such as CompuServe.
The introduction of inexpensive dial-up internet service and the Mosaic web browser offered ease of use and global access that BBS and online systems did not provide, and led to a rapid crash in the market starting in late 1994 to early 1995. Over the next year, many of the leading BBS software providerswent bankrupt and tens of thousands of BBSes disappeared. Today, BBSing survives largely as a nostalgic hobby in most parts of the world, but it is still an extremely popular form of communication for Taiwanese youth (see PTT Bulletin Board System). Most surviving BBSes are accessible over Telnetand typically offer free email accounts, FTP services, IRC and all the protocols commonly used on the Internet. Some offer access through packet switched networks or packet radio connections.
GUIs
Through the late 1980s and early 1990s, there was considerable experimentation with ways to develop user-friendly interfaces for BBSes. Almost every popular system used ANSI-based color menus to make reading easier on capable hardware and terminal emulators, and most also allowed cursor commands to offer command-line recall and similar features. Another common feature was the use of autocomplete to make menu navigation simpler, a feature that would not re-appear on the Web until decades later.
A number of systems also made forays into GUI-based interfaces, either using character graphics sent from the host, or using custom GUI-based terminal systems. The latter initially appeared on the Macintosh platform, where TeleFinder and FirstClass became very popular. FirstClass offered a host of features that would be difficult or impossible under a terminal-based solution, including bi-directional information flow and non-blocking operation that allowed the user to exchange files in both directions while continuing to use the message system and chat, all in separate windows. Will Price's "Hermes", released in 1988, combined a familiar PC style with Macintosh GUI interface. (Hermes was already "venerable" by 1994 although the Hermes II release remained popular. Skypix featured on Amiga a complete markup language. It used a standardized set of icons to indicate mouse driven commands available online and to recognize different filetypes present on BBS storage media. It was capable of transmitting data like images, audio files, and audio clips between users linked to the same BBS or off-line if the BBS was in the circuit of the FidoNet organization.
On the PC, efforts were more oriented to extensions of the original terminal concept, with the GUI being described in the information on the host. One example was the Remote Imaging Protocol, essentially a picture description system, which remained relatively obscure. Probably the ultimate development of this style of operation was the dynamic page implementation of the University of Southern California BBS (USCBBS) by Susan Biddlecomb, which predated the implementation of the HTML Dynamic web page. A complete Dynamic web page implementation was accomplished using TBBS with a TDBSadd-on presenting a complete menu system individually customized for each user.
0 notes
Text
The Last Oricru Final Cut Review (Steam)

Our The Last Oricru Review takes us to an action RPG with a strong emphasis on storytelling and player choices. The player is awakening in a sci-fi medieval world at a time of war and starts influencing the destiny of the whole nation. The game is designed as both – a single-player and a coop experience.
The Last Oricru Final Cut Review Pros:
- Decent graphics.
- 25.57GB download size.
- Steam achievements
- ARPG gameplay.
- Full controller support.
- Steam Deck optimization.
- Graphics settings - display mode, resolution, v-sync, fps cap, DLSS, motion blur, depth of field, render scale, gamma, auto set quality, view distance, anti-aliasing, post-processing, shadows, textures, effects, and foliage quality.
- Controller settings - Invert axis, camera sensitivity slider, toggle sprint, and auto Centre camera. You can rebind controls with the custom preset.
- Mouse and keyboard settings - Invert axis and sensitivity sliders, camera auto center, and you can rebind the keys.
- Opening combat tutorial and all-new hint system including short tutorials.
- Stamina is used for attacks, rolling, dodging, and attacks.
- In-game cutscenes.
- Combat is sols like blocking and attacking, learning enemy patterns, and countering.
- Can skip cutscenes and fast-forward interactions.
- Fully Voiced characters.
- Your character can have an undercut or bald head hairstyle. (in the game menu)
- Inventory system to easily equip and unequip gear.
- Two game difficulties - story and dark.
- Auto equips gear in empty slots.
- Multiple choice encounters.
- Talk with characters to get more lore and have the opportunity to unlock new mission options.
- Relations with factions and characters are affected by your decisions. You can also go and see what previous choices did.
- Breakable objects with hidden loot.
- Loot chests can be found.
- Weapons have a secondary attack or a magic spell attached to them.
- Three schools of magic - Fire, Void, and lightning.
- Earn EXP and get points to put into your stats - life, will, vigor, strength, dexterity, and intellect.
- Essence is collected from enemies and in the game, you can turn it into gold.
- Split screen support and you can use a combination of the controller and mouse and keyboard.
- Online Co-op with friends and randoms mode.
- 3rd person perspective.
- The game uses Dark Souls-like mechanics such as dropping all essence upon death and leveling up causes enemies to respawn.
- Possible to just farm essence and level up and power level.
- The Mana drainer allows you to steal life force from enemies and turn it into mana for yourself.
- Your loadout can house two sets of weapons allowing quick swaps.
- The gear will have green and red numbers for comparison.
- Dismantle and upgrade equipment when leveling up.
- Has the storytelling and interactions of an Elder Scrolls game but the exploration and combat of a Souls game.
- The world is a huge multi-connected affair with many many shortcuts to unlock.
The Last Oricru Final Cut Review Cons:
- The mouse cursor keeps coming back onto the screen during cutscenes even when the controller is connected.
- The slow starter then continues with a slow pace.
- Icons in-game like not having the stats for a weapon are not explained.
- Mission markers are not always used.
- Fell through the floor a lot, especially on elevators.
- Drops in the game are all just yellow orbs.
- Despite the combat looking good, it soon turns into just button-mashing and is kind of boring.
- Doesn't do a good job of directing you or telling you the current task.
- You don't have a dedicated compare menu/button.
- Minimal settings.
- The game difficulty default is the harder one and to change it, it's hidden in a menu and not spoken of.
- There is no mention of dropping essence or how enemies respawn.
- The mission tracking is terrible.
- You have to be so precise with getting pickups.
- The camera goes crazy a lot of the time.
- Local co-op players can only level up until they match the host and never go past them.
- Local players cannot interact with characters or influence the story.
- The text is small, especially in the equipment menus.
- Performance hitches as you move around.
Related Post: Heavy Duty Challenge Video Review (PlayStation 5)
The Last Oricru:
Official website.
Developer: Gold Knights
Publisher: Prime Matter
Store Links -
Steam
Read the full article
0 notes
Text
HOW TO MAKE DOTTED LINE IN ILLUSTRATOR
Welcome to the world of Adobe Illustrator, where your creativity knows no bounds! If you're wondering how to add a stylish dotted line to your artwork, you're in the right place. Dotted lines can add a touch of elegance, playfulness, or emphasis to your designs. In this step-by-step guide, we'll walk you through the process of creating a perfect dotted line in Illustrator. So, grab your virtual paintbrush, and let's get started on this creative journey!

THE MAGIC OF DOTTED LINES
Dotted lines are more than just dashes on paper; they can add flair and finesse to your designs. Whether you're creating illustrations, diagrams, or infographics, mastering the art of making dotted lines in Illustrator will take your creations to the next level.
STEP 1: OPEN ADOBE ILLUSTRATOR
Launch your Illustrator software and open your canvas or create a new document if you're starting from scratch.
STEP 2: SELECT THE LINE TOOL
On the left-hand toolbar, locate and select the Line Tool (often represented by a straight line icon). Don't worry; we're just getting started!
STEP 3: DRAW YOUR LINE
Click and drag your mouse cursor on the canvas to draw the line where you want the dotted line to appear. Don't worry about the length just yet; you can adjust it later.
STEP 4: ADJUST LINE LENGTH AND ANGLE
After drawing the line, you can adjust its length and angle by clicking and dragging the endpoints or using the Width and Height values in the Control panel at the top.
STEP 5: ACCESS THE STROKE PANEL
Now, here comes the secret sauce to creating that captivating dotted line. Navigate to the top menu and click on "Window," then select "Stroke" from the dropdown menu. The Stroke panel will pop up on your screen, and this is where the magic happens!
STEP 6: PLAY WITH DASHES
In the Stroke panel, you'll notice a field labeled "Dashes." This is where you'll customize your dotted line. Illustrator allows you to control the dash and gap lengths, giving you full creative control over the appearance of your line.
STEP 7: DEFINE YOUR DOTTED PATTERN
Here's where your creativity gets to shine. In the "Dashes" field, enter the values for the dash length and the gap length. For example, if you want a classic evenly spaced dotted line, try entering "4pt" for both dash and gap lengths. Play around with the values until you achieve the dotted pattern you desire.
STEP 8: PREVIEW AND REFINE
As you input values into the Stroke panel, you'll see a live preview of your dotted line on the canvas. This makes it easy to experiment and refine until you achieve the perfect dotted line design.
STEP 9: APPLY TO YOUR LINE
Once you're satisfied with your dotted line design, click "OK" in the Stroke panel. Voilà! Your plain line has transformed into a captivating dotted line that's ready to enhance your artwork.
STEP 10: FURTHER CUSTOMIZATION
Feel free to customize your dotted line even more. You can change the stroke color, adjust line thickness, and even experiment with different line caps to achieve various effects.
TIPS AND TRICKS
Custom Patterns: If you want to create a unique dotted pattern, you can experiment with various dash and gap values. For example, try "3pt - 1pt - 1pt" to create a more spaced-out pattern.
Dotted Outlines: You can also apply dotted lines to the outlines of shapes by selecting the shape, opening the Stroke panel, and applying the desired dotted pattern.
Transform and Rotate: Don't forget that you can transform and rotate your dotted line just like any other object in Illustrator. Use the selection and rotation tools to achieve the perfect placement.
DOTS OF DELIGHT
Congratulations! You've successfully mastered the art of creating a dotted line in Illustrator. With this newfound skill, your designs will be more versatile and visually engaging. Dotted lines can add that extra touch of creativity, making your work stand out from the crowd.
As you continue to explore Illustrator's vast capabilities, remember that creativity knows no bounds. Whether you're creating complex illustrations, sleek logos, or engaging graphics, your mastery of dotted lines is just the beginning of your artistic journey. So go forth and create with confidence, one dot at a time!
SECTION 11: PUTTING DOTTED LINES TO CREATIVE USE
DESIGN ELEMENTS
Incorporate dotted lines into your designs as decorative elements. They can frame content, separate sections, or add a touch of sophistication to your artwork.
DIAGRAMS AND INFOGRAPHICS
Use dotted lines to create flowcharts, diagrams, and infographics. They can guide the viewer's eye through complex information and enhance visual clarity.
BORDERS AND DIVIDERS
Dotted lines can serve as stylish borders or dividers between content blocks, giving your designs a polished and organized appearance.
TYPOGRAPHY PLAY
Experiment with dotted lines to add emphasis to typography. Combine them with text to create attention-grabbing headlines or callouts.
SECTION 12: TROUBLESHOOTING AND ADDITIONAL TIPS
STROKE WEIGHT
If your dotted lines appear too faint or thick, adjust the stroke weight in the Stroke panel to achieve the desired thickness.
ALIGN AND DISTRIBUTE
When working with multiple dotted lines, use Illustrator's align and distribute tools to ensure they are evenly spaced and aligned.
EXPORTING
When exporting your artwork, ensure that the stroke settings are maintained to keep the appearance of your dotted lines consistent.
SECTION 13: SHARING YOUR CREATIONS
SOCIAL MEDIA
Share your designs featuring dotted lines on social media platforms to showcase your creative prowess and inspire others.
ONLINE PORTFOLIOS
Designers and artists can showcase their versatile designs by adding dotted line-enhanced creations to their online portfolio.
COLLABORATIONS
Collaborate with fellow creatives to explore innovative ways to incorporate dotted lines into joint projects, expanding your creative horizons.
FROM LINES TO ARTISTRY
As you conclude this guide, you've unlocked a world of creativity by mastering the technique of creating dotted lines in Illustrator. A basic line has become a useful tool for artists, helping them turn regular designs into amazing works of art.
With each dotted line you create, you're adding a touch of elegance, intrigue, and visual interest to your artwork. Dotted lines are more than just lines. They guide the viewer's gaze, add depth to stories, and enhance designs.
As you design, remember that every dot can transform the ordinary into something extraordinary. Whether you draw, design, or try new things, let your creativity shine and show the artist in you.
SECTION 14: INSPIRING DOTS: SHOWCASING DOTTED LINE CREATIONS
ART GALLERY
Consider creating a digital art gallery featuring your dotted line creations. Showcase different ways you've integrated dotted lines into various designs.
BEFORE AND AFTER
Demonstrate the impact of dotted lines by sharing "before and after" images. Show how adding a dotted line transformed a design from ordinary to exceptional.
TUTORIAL VIDEOS
Take your creative journey a step further by creating tutorial videos. Share your screen as you demonstrate the process of adding dotted lines to different types of designs.
SECTION 15: ELEVATING YOUR DESIGN SKILLS
EXPLORE ADVANCED TECHNIQUES
Once you've mastered creating basic dotted lines, explore advanced Illustrator techniques. Try creating custom patterns, experimenting with gradients, or combining dotted lines with other design elements.
TYPOGRAPHY EFFECTS
Experiment with dotted lines to create typography effects. Use them to underline text, create text boxes, or add emphasis to specific words.
CREATIVE CHALLENGES
Challenge yourself to incorporate dotted lines in unexpected ways. Use them in abstract art, intricate patterns, or even as part of a larger design narrative.
SECTION 16: YOUR DESIGN LEGACY
PERSONAL BRANDING
Incorporate dotted lines into your personal branding materials. From business cards to website banners, these lines can become a recognizable part of your visual identity.
DESIGN SIGNATURE
Just as artists sign their paintings, consider making your dotted line designs a signature element in your work, leaving a distinctive mark on your creations.
YOUR DOTTED DESIGN ODYSSEY
As you conclude this guide, you've embarked on a creative journey that began with a simple question: "How to make a dotted line in Illustrator?" Through exploration, practice, and ingenuity, you've not only mastered the technical process but also unlocked a world of design possibilities.
Dotted lines have become more than just a design element; they're a reflection of your artistic growth and willingness to explore new avenues. With each dotted line you create, you're adding a piece of yourself to your artwork—a testament to your creativity, dedication, and passion for design.
As you continue to experiment, create, and innovate, remember that your design journey is a continuous evolution. From lines to intricate patterns, from simplicity to complexity, your mastery of dotted lines is a stepping stone toward greater artistic achievements. Let your creativity flow, let your designs inspire, and let your dotted lines tell a story that captivates and enchants all who gaze upon your work.
0 notes
Photo

How to record your PC screen in video with the Game bar
Windows 10: How to record your PC screen in video with the Game bar: Record a video of everything happening on your Windows 10 PC screen using the Xbox Game Bar built into the operating system.
In fact, if you're looking for a way to video-record what you're doing on your computer. You probably don't need to install any third-party software. As well as, Windows 10 includes a tool, the Xbox Game Bar, intended for gamers. Which will allow you to take a video capture of what is display on the screen.
After all, the utility theoretically only allows video games to record. But it is quite possible to divert its use to make it record other content with a few exceptions.
Of course, the Xbox Game Bar is not capable of recording Windows 10 File Explorer or Desktop. For all other applications, just make it believe they are games. Demonstration.
Activate the Game bar - How to record your PC screen in video with the Game bar
Click on the Start menu to go to Windows Settings . Enter the Games menu and check that the game bar is in Activated mode .
Below are the different keyboard shortcuts to use the different functions of the game bar.
Configure the Game Bar settings
In the side menu, now go to the tab dedicated to Captures . All video captures made with the game bar are saved by default in the directory:
C: \ Users \ YourPC \ Videos \ Captures
Then scroll through the game bar settings and customize your preferences. You will be able to choose to record the audio data, to define the frequency of video frames of your capture, to opt for a high quality of capture, or to Capture mouse cursor in recordings, or not.
Start a recording - How to record your PC screen in video with the Game bar
Open the app (or game) you want to save a video capture of and activate the Game Bar using the Windows + G keyboard shortcut .
The game bar display and have several panes: capture, audio, performance. As well as a central bar allowing you to show or hide each element. Also, you can manage all the technical parameters of your video capture from these menus.
Then click on the record button to start video capture, then click on the window of the program you want to capture video from.
The game bar is displayed and has several panes: capture, audio, performance, as well as a central bar allowing you to show or hide each element. You can manage all the technical parameters of your video capture from these menus.
Then click on the record button to start video capture, then click on the window of the program you want to capture video from.
A gallery containing all the captures made is then displayed. You will be able to view each of them directly or access the directory in which they are stored by clicking on Open location when a file is selected, or by clicking the direct icon appearing in a folder.
How to record your PC screen in video with the Game bar
We are here to hear from you
Of course, you can contact us to let us know if we are missing something on our stepphase.com page. Post credit to 01net and I hope you like it and by the way, thank you for your visit.
more related content is down below
How to Screen Record Facetime with Sound on iPhone
Google Pixel 4a price, review & specification and buy...
Apple iPhone 11 Pro Price and Buy, Review&Specs...
Youtube Roll-Out New and Improved App Gestures
The best free video editing software for Windows
#Stepphase #technologies #technology #tech #technews #techworld #techtrends #smartphone #apple #techupdates #futuretechnology #newtech #techgeek #technologynews #technologythesedays #smarttechnology #technologylover #technologytrends #technologyblog #gadgets #smartphone #gadget #marketing #digital #india #technologyisawesome #amazing #repost
0 notes
Text
How to Print Documents From Yahoo Mail

Using the print feature of Yahoo Mail is a great way to save hard copy of your email for use on the go. It is also easy to customize the print wizard so that it is tailored to your specific needs.
The first step to printing documents from Yahoo mail is to open your email. Once you have opened the email, you will need to browse through the attachments to find the ones you want to print. Once you have found the attachment you are interested in, you need to click on it to open it. Once the attachment is opened, you will need to click the Print icon in the top right corner of the window.
The Print window will display a semi-print preview of your email. It will also let you know how many copies you are able to print. In addition to the standard font and print settings, you can also change the paper size.
The print icon is located in the top right corner of the email window. Using the mouse cursor, click on the Print icon to open the pop-up window. Once the Print dialog has opened, you can click the OK button to continue.
The best way to print your emails is to first open the Yahoo Mail app. You will need to sign in to your Yahoo account. In addition to the standard mail and profile settings, you will need to select the folder you wish to print your emails from.
youtube
SITES WE SUPPORT
Blogspot – Print mail documents
SOCIAL LINKS
Facebook
Twitter
LinkedIn
Instagram
Pinterest
0 notes
Text
xim apex aimbot download hack LRP%
💾 ►►► DOWNLOAD FILE 🔥🔥🔥🔥🔥
Aimbots - Discussion. no knowledge needed, just download some files and have a bit of knowledge how to get it on the xbox. [PC trainer] apex aimbot settings download. Discover short videos related to aimbot settings for controller apex on TikTok. Watch popular content from the. I have purchased the Xim Apex, but how do I transfer the hacks that I purchase and download to the device to then start working on my. Learn how to get full aimbot on your Xbox with this easy to follow Connect the XIM Apex to your computer and download the XIM Apex. 9 We know that employing aimbot or any other additional assistance on your gaming console, especially PS4, has been nearly impossible, but up until now. Aimbot is a kind of cheat that works to assist the player in shooting their gaming opponents. Moreover, this could be a glitch or break-in that gives the players an edge over others, which appeals to myriads of gamers. The question of employing aimbot on PS4 entirely depends on the game you are in for playing. It empowers the gamers with an upper hand, who prefer the shooting titles. Numerous players are already using it with one or another method we listed below. You can purchase the Xim Apex device from its official website or from Amazon, whichever deems fit. It would add new title settings along with the setting support for recent updates in old gaming titles. After successfully updating it to the newest firmware, connect your mouse, keyboard, and controller to the available ports on the USB adaptor. You must insert these devices in proper order; mouse on the right, keyboard in the middle, and controller on the left. Then it would be a matter of following the simple instructions and syncing the app. The next step is to choose the game for which you want to configure this Xim Apex device. Make sure it is the most frequently played gaming title from the list, or you plan to play. It will allow you to set the response rate measured in Hertz , which tops at Hz maximum in Apex settings. Note: Pulling Rate or Response Rate is the frequency at which the mouse sends a signal to the gaming console, hence, it should be in sync with the Xim apex for flawless performance. Otherwise, there will be problems while aiming or dragging the mouse to aim, resulting in lagging or jittering. The pulling rate varies for different models and brands of the mouse. Now is the turn to set up the DPI of the mouse, a sensitivity setting with which your cursor moves. The most suitable setting range recommended and employed by experienced players is DPI. After the DPI and response rate are set perfectly as per your preference, you must adjust the in-game settings. Go back to the list of games, open the one you chose, and tap on the Settings button at the bottom-right corner of the page. It will take you to the website page, where you will find the ideal sensitivity setting for Xim Apex as per the game. Do not worry as the enlisted games on the Xim Apex site incorporate almost every famous title. Further, click on the Pencil icon present at the Game home page of this Xim Manager to adjust in-game settings. Go to the training mode as it is significant for making the required changes by messing around with your sensitivity settings. Once you find the best Settings that perfectly sync your mind to the mouse to the PlayStation 4, lock them and remember. Besides, you can also create profiles for different sets of settings for a single game. Tip: We recommend you find the one perfect setting and work on it. In case, you face mouse stutters or lagging issues while playing the game, go back to the manager app. Navigate the settings of a particular game, tap on setting and then click on the three dots below the sensitivity tab. You will see the Synchronize option, choose between Common, Slow, or Off. Stick to the one which gives you more stable performance in controlling the aim. Lastly, you should customize the ADS in the settings to make it more operable. It should complete the setup, which should work like the Aimbot on PS4. This method will take you a notch ahead of all the other players as it is similar to getting Aimbot on PS4. These scripts empower you, but illegally, to practice aimbot, bunny hop, Hair Trigger, Auto Aim, etc. It always depends on how one defines the aimbot and how it is available to every player or in a certain game. Aim Assist is not a cheat or any unethical Setting as it is accessible to every gamer made via game settings. By all means, if one wishes to improve the aim placement, one can always open their in-game settings. Go to the Controller settings and navigate the Aim Assist option there. Some games like Fortnite give the liberty to adjust the percentage of Aim Assistance. Summing Up, it is better to adhere to the above steps to achieve the desired results regarding the Aimbot on PS4. Skip to content. Previous Previous. Next Continue. Automobile Technology Expand child menu Expand. Toggle Menu Close. Search for: Search.
1 note
·
View note
Text
xim apex aimbot download work YK24?
💾 ►►► DOWNLOAD FILE 🔥🔥🔥🔥🔥
Aimbots - Discussion. no knowledge needed, just download some files and have a bit of knowledge how to get it on the xbox. [PC trainer] apex aimbot settings download. Discover short videos related to aimbot settings for controller apex on TikTok. Watch popular content from the. I have purchased the Xim Apex, but how do I transfer the hacks that I purchase and download to the device to then start working on my. Learn how to get full aimbot on your Xbox with this easy to follow Connect the XIM Apex to your computer and download the XIM Apex. 9 We know that employing aimbot or any other additional assistance on your gaming console, especially PS4, has been nearly impossible, but up until now. Aimbot is a kind of cheat that works to assist the player in shooting their gaming opponents. Moreover, this could be a glitch or break-in that gives the players an edge over others, which appeals to myriads of gamers. The question of employing aimbot on PS4 entirely depends on the game you are in for playing. It empowers the gamers with an upper hand, who prefer the shooting titles. Numerous players are already using it with one or another method we listed below. You can purchase the Xim Apex device from its official website or from Amazon, whichever deems fit. It would add new title settings along with the setting support for recent updates in old gaming titles. After successfully updating it to the newest firmware, connect your mouse, keyboard, and controller to the available ports on the USB adaptor. You must insert these devices in proper order; mouse on the right, keyboard in the middle, and controller on the left. Then it would be a matter of following the simple instructions and syncing the app. The next step is to choose the game for which you want to configure this Xim Apex device. Make sure it is the most frequently played gaming title from the list, or you plan to play. It will allow you to set the response rate measured in Hertz , which tops at Hz maximum in Apex settings. Note: Pulling Rate or Response Rate is the frequency at which the mouse sends a signal to the gaming console, hence, it should be in sync with the Xim apex for flawless performance. Otherwise, there will be problems while aiming or dragging the mouse to aim, resulting in lagging or jittering. The pulling rate varies for different models and brands of the mouse. Now is the turn to set up the DPI of the mouse, a sensitivity setting with which your cursor moves. The most suitable setting range recommended and employed by experienced players is DPI. After the DPI and response rate are set perfectly as per your preference, you must adjust the in-game settings. Go back to the list of games, open the one you chose, and tap on the Settings button at the bottom-right corner of the page. It will take you to the website page, where you will find the ideal sensitivity setting for Xim Apex as per the game. Do not worry as the enlisted games on the Xim Apex site incorporate almost every famous title. Further, click on the Pencil icon present at the Game home page of this Xim Manager to adjust in-game settings. Go to the training mode as it is significant for making the required changes by messing around with your sensitivity settings. Once you find the best Settings that perfectly sync your mind to the mouse to the PlayStation 4, lock them and remember. Besides, you can also create profiles for different sets of settings for a single game. Tip: We recommend you find the one perfect setting and work on it. In case, you face mouse stutters or lagging issues while playing the game, go back to the manager app. Navigate the settings of a particular game, tap on setting and then click on the three dots below the sensitivity tab. You will see the Synchronize option, choose between Common, Slow, or Off. Stick to the one which gives you more stable performance in controlling the aim. Lastly, you should customize the ADS in the settings to make it more operable. It should complete the setup, which should work like the Aimbot on PS4. This method will take you a notch ahead of all the other players as it is similar to getting Aimbot on PS4. These scripts empower you, but illegally, to practice aimbot, bunny hop, Hair Trigger, Auto Aim, etc. It always depends on how one defines the aimbot and how it is available to every player or in a certain game. Aim Assist is not a cheat or any unethical Setting as it is accessible to every gamer made via game settings. By all means, if one wishes to improve the aim placement, one can always open their in-game settings. Go to the Controller settings and navigate the Aim Assist option there. Some games like Fortnite give the liberty to adjust the percentage of Aim Assistance. Summing Up, it is better to adhere to the above steps to achieve the desired results regarding the Aimbot on PS4. Skip to content. Previous Previous. Next Continue. Automobile Technology Expand child menu Expand. Toggle Menu Close. Search for: Search.
1 note
·
View note
Text
Menumate meaning latin

#Menumate meaning latin software
#Menumate meaning latin free
nine, miner, mean, meaning, meat, menu, mate, mast, master, matter, near. To access MenuMate's preferences, just click on the octopus icon in the menu bar. since, smoke, out, mile, milk, mine, meet, last, late, later, latin, lay. If you have a Magic Mouse or Magic Trackpad, you can use Magic Prefs (free) to create a virtual centre button for them.
Displays shortcuts if you want to use themĪll you need to do is assign a hotkey or mouse button (other than left or right) to it.
Mouse button or Hot Key activated – you choose.
Just click your mouse or hit a hot key - no weird shortcuts to remember, no taking your eyes off your work! Not only does MenuMate speed things up, but it takes the pain out of working by preventing repetitive strain on your wrist.įAST - side-by-side tests have shown that MenuMate is 50% to 70% faster than the nearest competitor. Latdict also ranks entries based on how often they appear in Latin literature Latin can have several different words for the same term, but some words are more popular than others. MenuMate puts your app’s menus were you need them - at your cursor. Latdict uses an effective and efficient search algorithm, based on experience working with other websites that provide a query-based service. increased speed in favorable winds e g b v Z C Latin + Top Sail.
#Menumate meaning latin free
Interested in exploring how Menumate and POSmate Point of Sale System Solutions can help your business, enquire now for an obligation free quote, call POSmate now on 1300 76 76 88 to speak to one of our Point of Sale POS. Walkthrough - Translation Guide Walkthrough for Daikoukai Jidai IV: Rota Nova. For example, 'out' is translated into 'outyay'. The rules used by Pig Latin are as follows: If a word begins with a vowel, just as 'yay' to the end.
#Menumate meaning latin software
You lose your place and the repeated motion is hard on your wrist. Our new POS software and features are in real-world testing with some customers, and we thank them for their involvement. A language game (also sometimes called a 'ludling' or 'argot') is a set of rules applied to an existing language which make that language incomprehensible to the untrained ear. Menumate Limited was incorporated on which located at 4b 1 Stark Drive, Wigram, Christchurch, 8043, New Zealand. Whether you have large monitor or multiple monitors, having to lookup and reach over to get to an app’s menu is pain. Menumate Christchurch Limited was incorporated on which located at 25 Carlyle Street, Sydenham, Christchurch, 8023, New Zealand.
0 notes
Text
Synergy for mac free

SYNERGY FOR MAC FREE FOR MAC
SYNERGY FOR MAC FREE CRACKED
SYNERGY FOR MAC FREE LICENSE KEY
SYNERGY FOR MAC FREE MAC OS
Bug #5785 – Cannot swap screens when the cursor is in a nook.All bug #5578 – Urgent Hangul key leads to alt ’a’.Bug #5196 – Some keys on Korean and Japanese keyboards have the identical keycode.Used by avid gamers for multiplexing (WoW and various MMORPGs).Community-Based (IP) KVM Swap software minus the video.
SYNERGY FOR MAC FREE MAC OS
Supported Windows, Mac OS X, Linux, Android, and Apple iOS.
Synergy is free and open, and it probably will be all the time!.
Use your Raspberry Pi on your desktop iPhone Backup Extractor Crack.
Avoid VNC for closed-down computer systems (such as a media core).
Just switch your old laptop or desktop straight to a second screen.
An alternative choice to swapping out a USB keyboard and mouse.
Seamlessly share a mouse and keyboard between two or more computer systems.
Community –Based (IP) KVM Swap software minus the video iPhone Backup Extractor Crack.
Save the house to your desktop with a keyboard and mouse.
Encryption protects confidential information on public networks.
Drag and drop registration data from one laptop to another.
Share your clipboard (copy and paste) between your computer systems.
Just transfer your mouse to a laptop and start typing.
Because it creates an icon in the Startup taskbar area for quick access, it also doesn’t interfere with normal computer activities. This program can be mastered by both beginners and experts and also clarifies the resources of your system. Thus, Synergy Crackedis a very useful application that allows you to use a mouse and a keyboard for multiple computers. Additionally, you can select the corners of the desktop where forwarding action should not be allowed. In principle, with Synergy Torrent it is very easy to work with this tool, as it can redirect the mouse and keyboard as soon as the cursor reaches the edge of the screen. Synergy Keygen is a product developed by Bolton Software. You can share your keyboard and mouse with other computers, just provide a hostname or share your own keyboard and mouse to allow remote access to your car. Thanks to its convenient location, you can easily access all the main features. It is as easy to use as moving the mouse from the edge of the screen. Synergy Crack Mac is supported on Windows, Mac OS X, and Linux. No special hardware is required, just a network connection. Synergy 2020 Mac can easily share a mouse and keyboard with multiple computers, with each computer having its own screen. Due to the fact that an icon is created in the system tray for quick entry on startup, your joint practice on the PC will not be interrupted. This system can be mastered by both beginners and specialists and is also gentle in your system sources. In summary, Synergy is a very useful utility that allows you to share your mouse and keyboard on a number of computer systems. For example, you can set a limited amount of time that the display is allowed to change and you can also sync screen savers for all screens.
SYNERGY FOR MAC FREE CRACKED
You may like to download Synergy Pro Cracked Download offers a number of configuration settings that make the whole process easier and faster. It is possible to use another laptop ’s shared keyboard and mouse by simply providing a host ID, or to share your individual keyboard and mouse to allow access to remote computers. You can easily grasp all the main functions thanks to its clear structure.
SYNERGY FOR MAC FREE FOR MAC
Synergy Crack for Mac Windows is a lightweight software that provides a range of honest options for customers who swap their mouse and keyboard between a range of computer systems to perform many operations similar to copying, pasting, and transferring data.
SYNERGY FOR MAC FREE LICENSE KEY
Download NOW Synergy Crack v2.5 + License Key Download Latest 2022
0 notes
Text
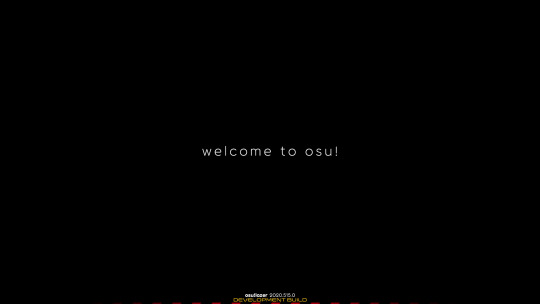
Osu lazer not opening

Unofficial events and conventions are also being held. Osu! also features different events, such as fanart and beatmapping contests. osu!supporter is not a recurring service.Ĭommunity and competitive play Community events Īn audience watches players idke and RyuK compete at the osu! TwitchCon Booth in 2018 osu!supporter does not affect the ranking system, or provide any in-game advantage. A heart icon beside the username on the official osu! website, additional pending beatmap slots, faster download speeds, access to multiplayer on cutting edge builds, friend and country-specific leaderboards, one free username change, more in-game customization, a yellow username in the in-game chat, and more customization on one's user page (the "me" tab). Players are able to download beatmaps directly from inside the game, without the lengthy process of using browsers through a service called osu!direct. The game offers a buyable service called osu!supporter, which grants many extra features to the user. The game can be played using various peripherals: the most common setup is a graphics tablet or computer mouse to control cursor movement, paired with a keyboard or a mini-keyboard with only two keys. Each beatmap is accompanied by music and a background. The beatmap is then played with accompanying music, simulating a sense of rhythm as the player interacts with the objects to the beat of the music.


Mania beatmaps consist of keys (depicted as a small bar) and holds. Catch beatmaps have fruits and spinners, which are arranged in a horizontally falling manner. Taiko beatmaps have drumbeats and spinners. These items are collectively known as "hit objects" or "Circles", and are arranged in different positions on the screen at different points of time during a song. In osu!standard, beatmaps consist of three items – hit circles, sliders, and spinners. Each mode offers a variety of beatmaps, playable songs ranging from "TV sized" anime openings to "marathons" surpassing 7 minutes. There are four official game modes: "osu!" (unofficially called osu!standard, abbreviated as osu!std), "osu!taiko", "osu!catch" (unofficially called "osu!ctb", or "catch the beat"), and "osu!mania". The original osu!standard mode remains the most popular to date and as of 2021, the game has over 15,200,000 registered users. Four different game modes exist, offering various ways to play a beatmap, which can also be combined with addable modifiers, increasing or decreasing the difficulty. The game is heavily community-oriented, with all beatmaps, the playable songs, being community-made through the in-game map editor. Its gameplay is inspired by other rhythm games, including Osu! Tatakae! Ouendan, Taiko no Tatsujin, Happy Feet,īeatmania IIDX, Elite Beat Agents, O2Jam, StepMania and DJMax. Originally released for Microsoft Windows on 16 September 2007, the game has throughout the years been ported to macOS, Linux, Android and iOS. Osu! is a free-to-play rhythm game primarily developed, published, and created by Dean "peppy" Herbert, written in C# on the. Screenshot of osu!lazer, the in development stage of an open source version of osu!.Ģ0210821 (August 21, 2021 2 months ago ( )) Ģ021.820.0 (August 20, 2021 2 months ago ( ))
1 note
·
View note
Last Seen Blogs

0w00-0
Belen's Art Blog

ksherrin
Ambitious

theimperialcrow
dead number №1


cameraheroine-blog
Camera Heroine