#also first time using adobe animate in like a year so this was fun :3
Text
no thoughts, head empty [x]
#submas#ingo#emmet#joltik#litwick#pokemon#animation#video#audio#i've had this playlist on for the past week i love it sm#also first time using adobe animate in like a year so this was fun :3
499 notes
·
View notes
Text
2024 (Part 3/3) - After Effects and Compositing
Something else I learned since 2018 is After Effects. I have a love/hate relationship with Adobe. Their products can be quite shit. Especially Adobe Animate. But that shit is very user friendly so it can be good shit and I use that shit every single day. After Effects is another program I recently fell in love/hate with. It's a very powerful animation software and you can do quite a lot of stuff with it. So this blog entry is dedicated to the things I've worked on using After Effects. I have less things to talk about here so this is just mostly show, no tell.
youtube
So I was contacted by Zach from the Long Gone Gulch pilot and invited me to do some compositing for the toon. I had donated to their Kickstarter campaign some time ago so of course I accepted the offer! Here are the pins and extra stuff I got from that Kickstarter:

It was fairly simple work, I just needed to put together the animation and the backgrounds along with some lighting effects. Sometimes there was some tricky masking needed and sometimes the layer count would go above 50 but it wasn't too bad. They also contacted me soon after to do compositing for another short film they worked on:
youtube
I've also been doing a LOT of compositing work for Smile Studios. I've worked with Alek for a long time now, probably one of the first jobs I ever did. I helped with animation for his lovely point and click game Tsioque some years ago. Anyway, I helped with a lot of projects, a lot of them for video games. They all go through similar processes so I'll just share them all here:
youtube
youtube
youtube
youtube
youtube
This one was extra tricky as I had to do some 3D work in Blender:
youtube
All these were more intense and involved working with very large Photoshop files and a lot of complex layers and effects. Which meant super long render times. Despite that, these were still super fun to work on and really pushed me to learn new things.
Anyway, that should be it. Like I said in part 1, I'll still be doing freelance work here and there, so expect to see more work like these and animations like the ones I did for Mashed. And definitely more stuff from myself.
Until next time.
8 notes
·
View notes
Text
youtube
A little animation I did for school
PROCESS NOTES
I did everything on paper, fountain pen for the foreground, and I used my shitty uneven ink brayer to coat the backgrounds with linoprint ink for that ~texture~
then I scanned it and composited everything digitally. for the beginning I copied and cut out all the foreground elements and used a plastic sheet to layer over the bg in the scanner (which is why it's Like That). I used OpenToonz to sequence everything and reframe some timing issues as well as to do some basic comping. (the part where he pulls out the diamond is on 3 animation layers, not including the bg) then in After Effects (i don't like Adobe, but that's what's available at school), I resized everything and added the zoom out at the end. I realized that I made the opening square too big, so I had to resize everything again, but that meant that the margins of my animation (with all the notes and frame numbers and messiness) would show, so I layered up some texture files to create the vignette effect.
Afterward, I used DaVinci Resolve to add sound
Notes for next time:
x-sheets and timing charts are a godsend! -- while animating, I had no way of viewing playback, so I just had to trust that the "math" would check out, and it pretty much did! I still had to adjust some timing, but less than I feared. considering that this is the first thing I've done on paper in like 3 or 4 years, i'm glad
double check the math on sizing -- yeah, I made a few errors that bit me in the butt
scanning takes way longer than you think it will -- it took like 5 hours to scan less than 120 frames of animation. also, apply that to inking, especially if you're relegated to only working after you get home.
having individual assets will save your ass -- I am SO glad that I had the warewithal to do this
resize everything at the same time if you want them to match up -- I resized all the animation in opentoonz and then the bgs in AE, don't do what I did, kids. even if you have registers, it's still a pain, it won't be exact
reserve some time to learn your software with small things first -- i think the only reason I was able to pull this off without staying up into the wee hours of the morning was because I was at least partially familiar with all the software already, also old forums are still my best friend. I think I want to learn Fusion next
FINAL THOUGHTS
in all, I'm proud of what I've done, this is the longest animation i've ever done, the first thing I've done traditionally in YEARS, and I did quite a bit of troubleshooting
i am so so tired, so I think it might be a bit of time before the next one, but as much as i might bitch and whine, I LOVE this process, it's so much fun, and the frustration was just part of the challenge.
just, I think next time I'll try not to leave myself with a 1 week turnaround lmao
#my art#animation#traditional animation#fountain pen#pen and ink#hand drawn#hand drawn animation#acme paper#ink#art process#process post#heist film#Youtube#gallery
0 notes
Text
GIF Tutorial for Beginners
People keep asking me to teach them how to make gifs and I end up writing them long confusing messages, so I figured maybe it’s time to just write up an actual clean tutorial instead! This is supposed to be for total beginners! (Or people who want to switch to a new process that I’ve curated and streamlined over 8 years of making gifs.) I’ll try to keep this as barebones as possible, and won’t include all the advanced stuff I usually add. I hope it’s easy enough to follow, and I’ll include some links at the end for more stuff. I really do think it’s better to make a few simple gifs before doing more complicated stuff though, just to get used to it!
There will be three sections in this tutorial:
#1 Basics - How to make a gif in PS at all
#2 Sharpen - How to use sharpen/denoise filters in an easy way
#3 Colouring - Just a few very basic adjustment layers
What you need:
A video (most common formats should work, although .mkv doesn’t always)
Photoshop (I use PS CC 2018 - this one because I'm morally opposed to Adobe’s subscription model - but versions aren’t super different from each other)
In the end, you should hopefully be able to make something like this:
This is gonna be so long. Sorry. You can make a gif with just part #1! The rest is just to make it look better.
#1 Basics
If any of the tools/functions aren’t where they should be for you, your best bet is googling it, you might need to change something in your preferences!
Make sure to save your PS file... often. PS has a tendency to crash, especially on laptops.
First, you need to get the video file. I recommend a shorter video, a few minutes long, if it’s longer you might want to cut it into shorter parts beforehand. This is just because PS’s video import tool sucks.
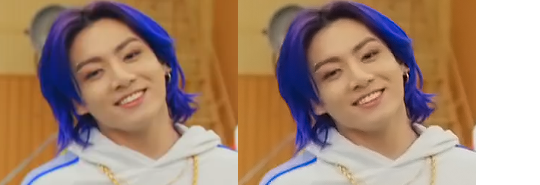
I chose the Butter MV, specifically Jungkook’s body roll at 1:24 because that’s what I want to look at for the duration of this tutorial. No further questions, thanks.
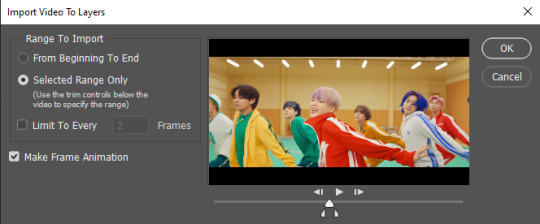
1. Open PS, go to File > Import > Video Frames to Layers

2. In the little pop-up, choose the part of the video that you want to gif. This will import every frame of the video into PS as a layer, so it has to be a relatively short part, or it’ll take ages (and gifs can’t be that big anyway). Now you can also see why it’s almost impossible to select the correct part if the video is too long.
The little controls at the bottom are for trimming, the one in the middle just for the preview. Make sure “Make Frame Animation” is selected! Then click OK.
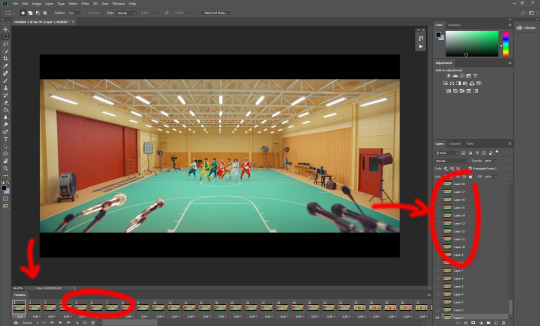
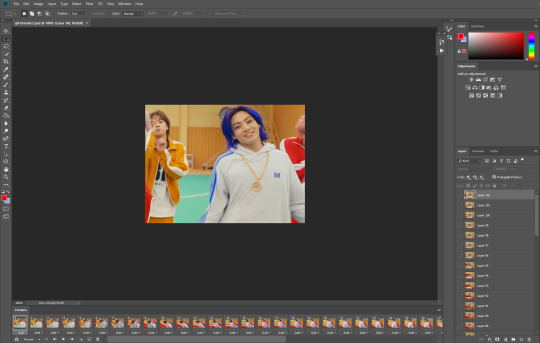
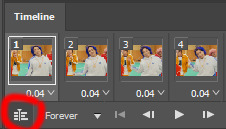
3. Now you have your layers, and you have a frame animation! On the right are your layers, that’s where we’ll apply the colouring etc. later on. On the bottom, that’s your timeline or frame animation - that’s what the gif will be in the end! So if you delete frames, the layers will still be there, but they won’t show up in the gif. If you click on a frame, you can see the little eye checkmark on the layer that’s currently visible.
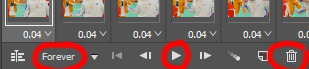
4. The timeline controls at the bottom that are relevant right now: set to “forever” so the gif will loop, you can play the animation with the play button, and you can delete the selected frame(s). The number on each frame is the speed of the gif, depending on the video I usually set it to 0.05 or 0.06 (photoshop lies to you when you play the animation, the only way to test this is to open the finished gif, preferably on tumblr or wherever you want to upload it).
5. As you can see, the animation starts a bit before the actual part that I want, so go ahead and delete all the frames in the animation that you don’t want! You can delete the corresponding layers too if you want, to make the PS file smaller, but it has no influence on the gif. (Hold Shift to select multiple frames as usual)
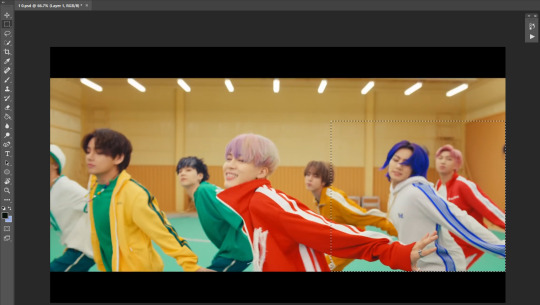
6. Next, we’re gonna crop the gif however we want! You can do this with the crop tool in the left sidebar, but with gifs like this where there’s a lot of moving parts, I sometimes just use the selection tool in the left sidebar, like so:
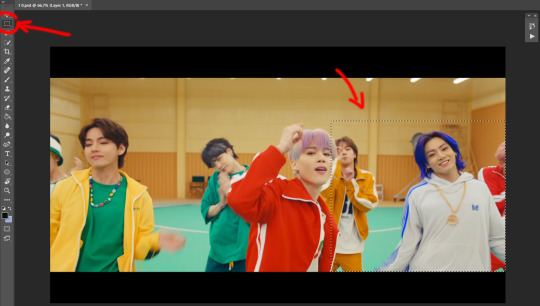
When you click on different frames, the selection stays, and you can check to make sure Jungkook doesn’t suddenly go out of frame if you crop it like that!
At this point, make sure the selection/crop isn’t smaller than you want the gif to be! For tumblr, what matters is the width (in pixels) of gifs. In the end, the width dimensions on tumblr should be 540px (1 gif per row), 268px (2 gifs per row), or 177/178px (3 gifs per row). Anything else will lead to very shitty resizing!
For this gif I’m going full sized, meaning 540px wide, so I made sure my selection isn’t smaller than that.
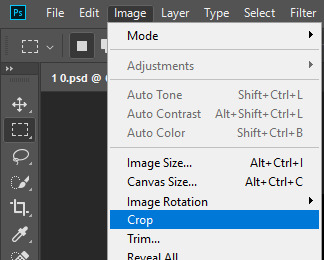
Then just go to Image > Crop, and it’s done!
7. Check to see if this is what you want, then resize: go to Image > Image Size to resize the picture. Make sure the little “link” between Width and Height is active (to keep the same aspect ratio), then set the width to 540px or whatever you chose. I always set the resample option to Bicubic.
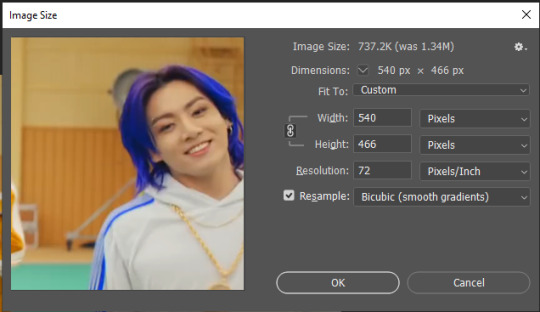
Once that’s done, set the zoom to 100% right above the timeline, to see what it really looks like.
Almost done! A little note about the sizing: width is the important part for tumblr, but if you want to make a whole gif set (especially with more than 1 gif per row!!!) make sure to make all the gifs the same height, otherwise they won’t line up and tumblr will do whatever it wants.
I ended up making mine 540 x 400 and ended up with this:
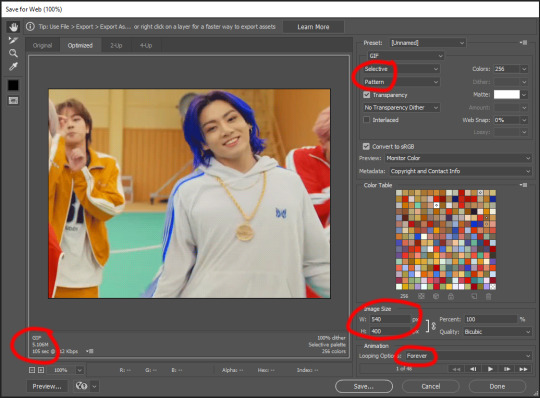
8. Time to save the gif!! Go to File > Export > Save for Web (OR just use the shortcut Ctrl + Shift + Alt + S) (or whatever it is on Mac).
In the pop-up, you can change things about the gif, but most things should already be the way you want it (Image size, Looping option forever). Selective should be the default, just like the rest.
You can choose between Pattern and Diffusion, some gif makers swear on one or the other, I go back and forth.
On the bottom left, you can see the size of your gif. Keep an eye on that! I believe Tumblr allows every single gif to be up to 10mb, but I try to keep mine under 5mb or close to it, because I think tumblr adds compression if it gets closer to 10mb?? Anyway back in my day you couldn’t upload anything over 1mb. You’ll never know our struggles.
Then just save it, and that’s it, you made a gif! Well done!! Here’s the end result:
:)
#2 Sharpen
There are countless ways out there to make gifs as smooth and clean as possible! Here I’ll show you the easiest way, but it also provides a good basis for other methods. The main difficulty is that you you need to sharpen the layers, but you don’t want to 100 layers one by one. So what we’re gonna do is convert the layers into a Smart Object, which functions as one layer!
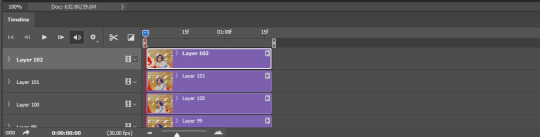
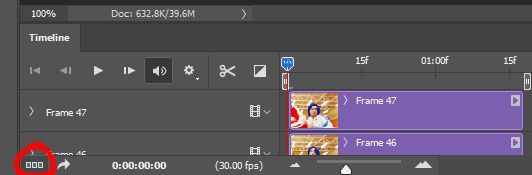
1. Convert the frame animation timeline to a video timeline with the little button right underneath on the left:
It should look like this, and I’m sorry but I can’t explain this one because I’m not an expert here, but you can just ignore it:
2. Select all layers: Select > All Layers, or just manually.
Then right click on the layers > Convert to Smart Object. Now there’s only one layer left, but don’t worry, the frames are still there!

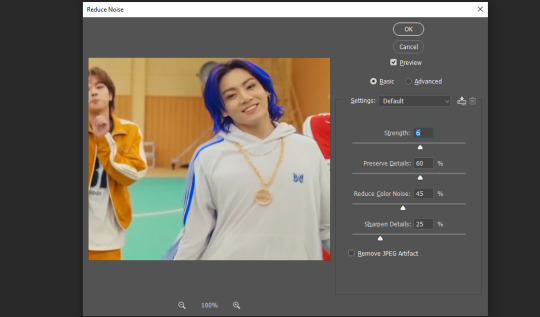
3. De-noise! It reduces noise, takes away some of that grain. More necessary in some videos. It also makes it less sharp, so I do this one first. Filter > Noise > Reduce Noise

My default settings are, Strength: 6, Preserve Details: 60, Reduce Color Noise: 45, Sharpen Details: 25, Remove JPEG Artifact: No. But you can play around, especially with the strength, and see how the little preview looks. Don’t apply too much of it! Or it will look weirdly smooth with no details in the end.
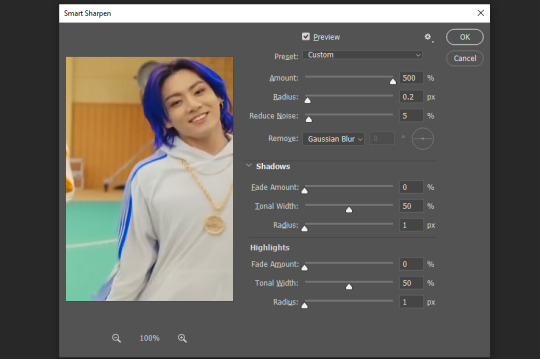
4. File > Sharpen > Smart Sharpen.
Settings: I usually have mine at Amount: 500, Reduce Noise: 5, and Radius at either 0.2 or 0.3, depending on the video. I’ll actually do 0.3 here, because I find it a bit blurry otherwise. If you sharpen more, it can quickly get grainy.
The difference isn’t huge, but here’s a little before and after denoise & sharpen:
5. Technically you can just save it as a gif (save for web) as shown above now, or you can convert it back to a frame animation, which I’d recommend especially if you use certain other sharpening methods (I’ll show you how to convert it back at the end of the colouring part), but for now, let’s go straight to the next part:
#3 Colouring
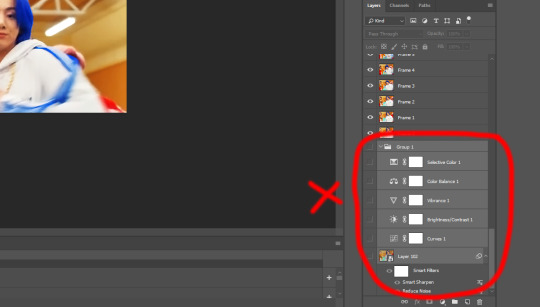
Now, you CAN do this part right after part #1, still in frame animation, without a smart object. I prefer it like this because sometimes PS acts weird, but if you want to skip the smart object stuff: select all frames, and add the adjustment layers at the very top, above all the other layers. (It only affects selected frames; and it only affects the layers under it.)
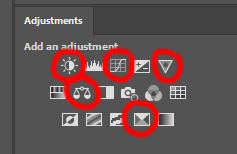
The adjustment layers should be above the layer tray, and these are the ones we’ll use today: Brightness/Contrast, Curves, Vibrance, Color Balance, Selective Color.
All of these are optional! You can do one, or all, or any combination. This is just the very most basic for me to get a gif to a point that I like. I’d recommend sticking to these for a start, but once you get the hang of it, definitely feel free to play around! It’s fun! Every gif maker has different preferences here, too, so there’s tutorials for everything.
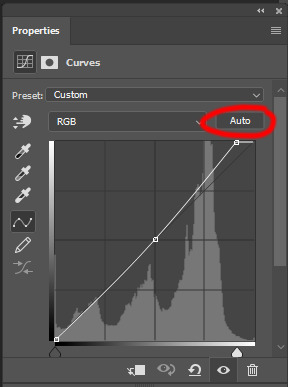
1. Curves: Just click Auto, tbh. You can play around, but Auto works fine for me as a start, just to brighten or darken some parts as a base.
2. Brightness/Contrast: Usually videos are a bit dark, and contrast can help to make it seem sharper AND cut down on gif size, so I usually just up both of them a bit (but not too much! Or it’ll look cheap). Here I put them at B: 19, C: 23

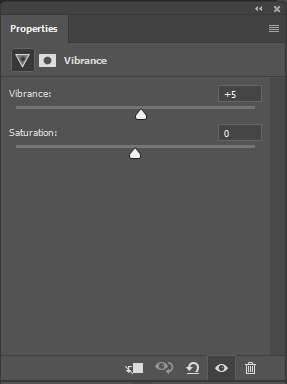
3. Vibrance: I love very vibrant and colourful gifs, so I usually up the vibrance (and sometimes the saturation). This one is already very vibrant, so I only put +5, but if you try to colour, say, a very moody tv show, this can help wonders, especially if you want to work with the colours more later.
If you prefer less vibrant gifs, you can also lower the values here!
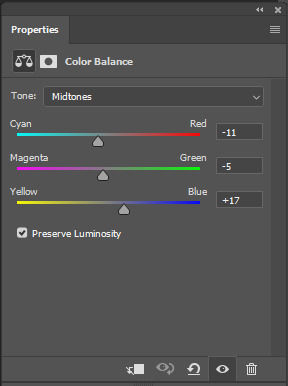
4. Color Balance: getting a bit more complicated now. Often, videos will have a slight yellow or green or blue tint, and this is where you can correct that. This video is a bit yellow, so I added +17 Blue. It was still too warm, so i added -11 Cyan as well. This neutralized the yellow tint, but I wanted some of the reddish tone back, so I added -5 Magenta. I usually do a similar process like that, depending on the tone.
Instead of Midtones, you can also do this for Shadows and Highlights individually.

5. Selective Color: now this is the most complicated, but also the most fun to play around in my opinion! Be careful here, if you do something too extreme it’ll look like shit or make the gif super grainy. I some rough goals in mind here: make the blue hair as blue as possible, make their skin tone a bit less pale, and enhance the black and white (which I always do).
You choose a colour at the top, and then add or subtract cyan/magenta/yellow/black values for that colour.
Skin tone: yellow and red. For this gif, I just added black to both, making them darker. Sometimes, if you change one or both those colours for a different part of the gif (for example, if I wanted to make the background less yellow, I’d subtract yellow from the yellows - but then I’d add yellow to the reds, to make the skin tone natural again.)
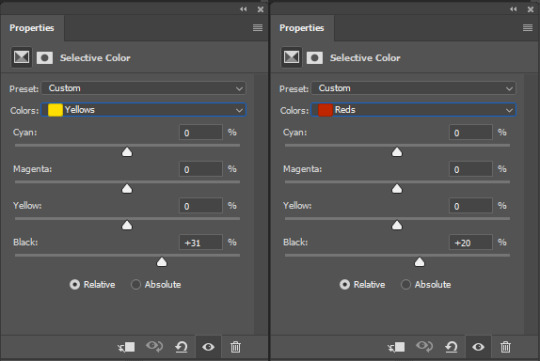

Blue hair: Just ramp up the cyan for the blues. Be careful with putting anything to +100, but here it’s already so bright that it should be fine. His roots are more purple, so I changed the magentas by adding cyan and black, and subtracting magenta and yellow. It’s not super clean, but fine for our purposes.
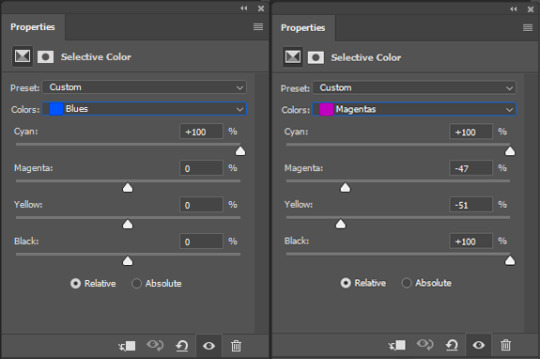
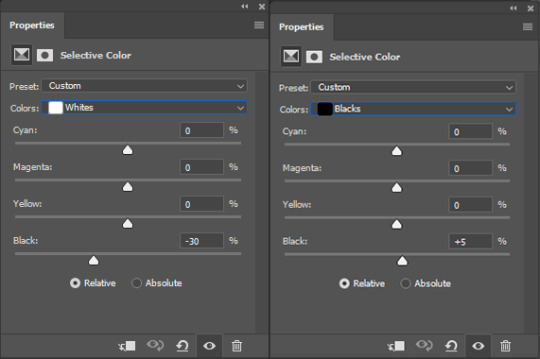
Black/white: depending on the gif, I often either add or subtract black to the whites. Adding makes the highlights less blinding, a bit darker, and flatter (I like to do that if one side of the face is bright white in the sunlight, for example). Subtracting creates contrast, makes it brighter, can wash it out. It can also lessen the gif size, and here it’s mostly just the tracksuit instead of important details, so I subtracted black. For the blacks, I almost always just add a bit of black, to make it more intense. Just like adding contrast, this can make the gif seem sharper and less grainy.

And done!
6. You could just save it as gif now, but as I said, I prefer to convert it back to frame animation timeline first, if only because I like to let it play through before I save it, and it works better for me there than in the video timeline.
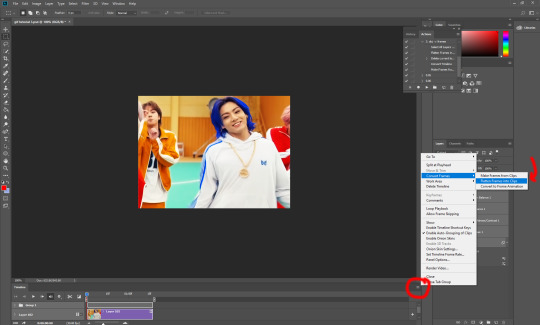
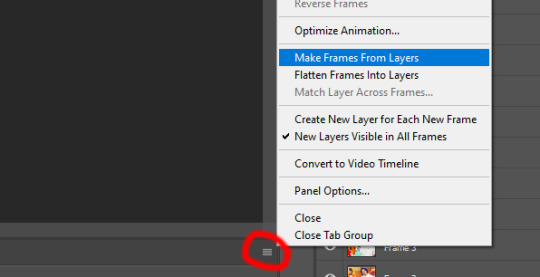
Select all frames, then click the little menu on the top right of the video timeline > Convert Frames > Flatten Frames into Clips
7. When you scroll down to the bottom of the layers now, the old smart object + adjustment layers should be at the bottom, under all the new layers. Delete the old ones, we don’t need them anymore.
8. Convert the timeline back to frame animation, by clicking the little button at the bottom left of the video timeline:
9. Click on the menu top right of the timeline again > Make Frames from Layers
10. Now, just some potential cleaning left to do. Sometimes, there’s a doubled or empty frame or layer at the beginning or end, just delete those as necessary. The timing of the frames is probably off, too, just select all frames and set the delay time to 0.05 (or whatever).
Now your done! Save as gif, and you should get this:
I included some bonus links and tips after this but tumblr ate that whole part so I guess it’s going into a separate post. (Here is is)
Anyway, I tried to make this as easy to follow as possible for beginners, but feel free to send me an ask for clarification anytime. Hope this helps, now go make gifs and have fun!!
#photoshop#tutorial#gif tutorial#ps tutorial#btsgif#*#*tutorial#this took so much longer than i expected i'm not giffing for at least a week now
228 notes
·
View notes
Text
Pc Games With Character Creation Offline

Games With Character Customization Pc
Steam Games With Character Creation
One of the things I love most in a RPG (Role-Playing Game) is the possibility of creating my own character with tons of different options and add-ons. I made a research yesterday and found some interesting PC Games I already knew about, adding them to the titles I have or plan to get with the best Character Customization. I’m going to list them here for you guys also attaching a few videos so that you can see directly how they work and what kind of possibilities they offer.
It’s the main reason I enjoy games like Skyrim and Fallout. But there seem to be so few good (single player) games with decent character creation - and not just picking from a few presets. The character creation in Dragon Age: inquisition was amazing (although I struggled to enjoy the game) as well as Saints Row (which I really enjoyed). Addicting Offline Co-op Games For PC You’ll Want To Play. Dennis Patrick / Features / Best Co-op PC Games, Co-op, Cooperative. Sonic the Hedgehog is a staple video game character. Best MMORPG with Character Creation. Final Fantasy 14 has one of the most complex and sophisticated character editors. In this game, you can change the smallest details using different sliders, pick a unique voice, or add unique tattoos, accessories and facial paint. What Are Best RPGs With Character Creation? Role-playing games let us live out some of our greatest fantasies like slaying dragons, saving the world and owning a house. Whether your main character is dead, alive, or somewhere in between, these games will let you adjust your appearance and abilities to however you see fit. I've always loved games that give you the option to create your character before you start in the world. I enjoy the game even more when it has role playing or social aspects added to it, allowing you interact with NPCs, or other players if the game has a multiplayer feature. Just character creation would interest me enough to check any game out.
Follow me under the cut if you’re curious!
I’ve been introduced to this type of creation with a game I still keep in my heart and consider one of the best of all times; The Sims 2. Seriously, I’ve created so many 3D characters that if I could win an award I’d have 200 on my shelf by now.
With that said, here you are my personal list of PC games with their awesome customization in no particular order:
I tried this game myself (the free beta that is) a few times in the past and I swear the CC included in it is currently one of my favorite. Without the complete pack I probably didn’t have a lot of additional options available in terms of clothes, makeup and hair, but what truly mesmerized me at the time was the shaping tool, not yet common in games when they released EVE. You can grab and drag different parts of the head and body, modeling unique characters every time.
2. Black Desert Online
This game has been released recently with two different packages and it seems to be quite a popular MMORPG (Massive(ly) Multiplayer Online Role-Playing Game) in Russia and Korea. I’m not surprised considering the quality this game seems to have and its customization is clearly no less. Just like EVE Online, Black Desert offers a good sculpt instrument to shape faces and bodies as much as you like, plus a beautiful variety of colors and combinations.
UPDATE: The game is also available on Steam!
This patch lets you play Legend of Zelda Spirit Tracks with mostly non-touch based controls. The new control bindings are Control Bindings: D-Pad=Run Y+Dpad=Walk B=Wide slash B+Dpad=Long slash Y+B=Spin Attack A=Interact A+Dpad=Roll. Legend of Zelda Spirit Tracks D-Pad Patch This patch implements non-touchscreen controls for essential actions in Legend of Zelda Spirit Tracks. Legend of zelda spirit tracks xenophobia patched rom.
3. Blade&Soul
This is another Asian MMORPG with the classical ‘Anime’ style, you cannot freely reshape the character’s structure, only pick one of the available presets and play around with the sliders to modify the whole body. Andy mckinney molly hatchet. Still, I honestly like the bright colors, the races/classes and the fact that you can actually recreate other existing characters using additional content (just like this guy did with Cloud from Final Fantasy VII).
4. BLESS Online
Yes, another Asian online title. Hey, it’s not my fault if they look so pretty! Bless is quite recent and not yet released in its final stage, but judging by how the CC works you have as much freedom as in EVE or Black Desert and the same unmistakable Fantasy touch.
5. The Sims 4
Didn’t I mention The Sims 2? Well, looks like the latest title in the series has improved quite a lot in this area. The shaping/sculpting method is here as well, considering that we finally have more possibilities I certainly won’t complain!
Note: In this video I can see the woman has a few mods installed. If you decide to get this game (or even the previous chapters) I definitely suggest you to do the same if you don’t like the default character design.
6. Fallout 4
Another recent (and quite famous) game. Apparently you can only work on the face here, but once again we see the sculpt tool in action. Even if the hair options are a bit limited you can still customize your character and create unique features playing around with your cursor.
7. Dragon Age: Inquisition
Who knows me is well aware of the fact that I am completely OBSESSED with this game, thus I couldn’t really leave it out. The hair options are definitely questionable and just like in Fallout 4 you do not have any body morph nor slider to alter, but as you can see from this video example you are still able to personalize your Inquisitor in a good way, also using real people or other characters as reference. To be honest I like some of the default presets too, if you don’t like spending two hours working on a face (I do that all the time, but I am a basket case so please ignore my madness :P), you can pick those and get a good result nonetheless.
And don’t forget about mods! 😉
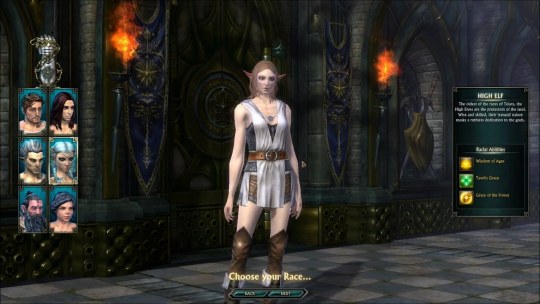
8. Skyrim (The Elder Scrolls V)
This one has been around for a very long time and it remains probably the top 1 Fantasy game out there. If you’re not into mods at all and want to keep your game vanilla be sure that the overall quality is not as improved as the current generation, you can see that from the low-res hair and general textures. The reason why I’m including this CC in the list anyway is because even if old, Skyrim looks quite good compared to other games where you only get 3/4 slider options.
9. APB Reloaded
The last game I’d like to mention (and I literally just discovered it) is this not so new title which has a kick-ass Character Creator. Not only it shows some quality graphics there, but the level of customization is unbelievable! You can make hair shorter, beards longer, create beautiful tattoos (and place or rotate them wherever you want!), add patterns to clothes and even get your personal car! 😀
Chose one serial + PILIH Salah satu WORKING 99% per 13 Januari 2013 1330-1971-4830-1762 1330-1912-2628-0850-0232-4869 1330-1148-0472-2735-6555-0617 1330-1544-4195-8131-3034-5634 1330-1886-0283-4688-9152-2034 1330-1118-3174-6558-8260-5378 OR 1330-1971-4830-5668-6067-1762 1330-1912-2628-0850-0 232-4869 1330-1148-0472-2735-6555-0617 1330-1544-4195-8131. The serial number for Adobe is available. This release was created for you, eager to use Adobe Cs6 master collection full and without limitations. Our intentions are not to harm Adobe software company but to give the possibility to those who can not pay for any piece of software out there. Adobe cs6 master collection activation key wondershare.
There are of course many other games with a Character Creator, but they all seem pretty similar or not good enough to be mentioned in my list.
What do you think about these? Let me know with a comment if you like!
Those late-night multiplayer sessions can be really fun sometimes. Surely, everything is better with friends, they say and you’ll agree with that at some point. However, after a long day of work and studying, I like to relax with offline games. Sometimes, it’s satisfying to let yourself indulge in a great single-player story and forget about any problems bothering you. So, if you are like me, then welcome to the club! Below is my list of 20 best offline games for PC and I hope you’ll enjoy them.
1. The Witcher 3: Wild Hunt
W2k16 pc download. Well, you’ve guessed it! The Witcher 3: Wild Hunt takes first place on the list with its epic setting, characters, gameplay, and those breathtaking visuals! It’s a compelling game that will offer you more than a hundred hours of non-filler gameplay, and there’s always something to explore. The game looks amazing, and the combat system is great. This open-world title is everything you need on your free days! Combine that with the great RPG elements and fun dialogues with NPCs, and you got yourself a pretty good offline game! Go and play it now, it’s a must-play.
2. Wolfenstein 2: The New Colossus
Wolfenstein series has been once again revived with Wolfenstein 2: The New Colossus. The positive reviews flashed all around the globe, and this game quickly became one of the best shooting games of 2017. B.J Blazkowicz is such a badass protagonist and the characters surrounding the game are interesting. You’ll quickly start to care about each and every one of them, making this game a worthy offline title. Bethesda said that they won’t be focusing on multiplayer, so they can bring an immersive single-player experience. Well, you nailed it, Bethesda; great job!
3. The Elder Scrolls V: Skyrim
Bethesda is one of my favorite companies when it comes to gaming, at least they were a few years back. A few years back, this masterpiece called The Elder Scrolls V: Skyrim was released and it took the Earth by storm! This offline open-world title offers hundreds of hours of exploration and you’ll probably never get bored of it! The combat system might be dated, but it’s damn fun to play and explore every corner of the game. After six years since its release, I’m still eager to give Skyrim another go. It’s that great!
4. Fallout 4
Games With Character Customization Pc
Fallout 4 is one of those top offline games that you either like or dislike. It’s a great single-player experience, as you explore a huge world of fictional city Commonwealth. I mean, the story here is scattered here and there, and our protagonist is in search of his abducted son. However, the game often steers away from that and let you have some freedom and exploration. It’s a fantastic reboot of the series, and it’s surely the best game in the franchise. If you are up for that Stalker-ish feeling, then give this a try!
5. Hitman (2016)
Hitman isn’t a strictly offline game, but I included it because it has a great single-player campaign. While the previous entry in the series Hitman: Absolution relied more on linear, claustrophobic, and confined experience, Hitman (2016) went in a different direction. Here, you’ll experience a vast, open-world with lots of stuff to do. The levels are not that numerous, but they are as big as hell! You can complete your missions in various ways and earn certain rewards and points for doing so. Hitman is a challenging stealth experience, but once Agent 47crawls under your skin, there’s no going back!
Steam Games With Character Creation
6. Nioh
Nioh is a less-known offline game released this year, and I feel like this game is very underrated. It’s a child of Dark Souls and Bloodborne series, which can tell you much about this game. It has a single, crushing, and unforgiving difficulty that will leave you begging for mercy. It’s hard, and you’ll need some blazing fast reflexes and huge gaming skills to finish it. There are more than twenty bosses in the game, and every single boss will kick your ass! Don’t expect to finish this game in a few days; you’ll need weeks to finish it and it will be painfully slow as the bosses shame you every little time… you helpless gamer!
7. Nier: Automata
Another underrated game – Nier: Automata. How could the gaming community overlook this game? Are you blind, or what? This game offers thirty hours of a pure, refined, and amazing experience! It’s a hack-and-slash title that mergers several genres with it. The open world in this game is huge, and the post-apocalyptic environment looks depressing and feels like a void. Nier also introduces RPG elements so you can now level yourself up, upgrade weapons, buy stuff, etc. On top of that, there are some 2D sections that feel like a great platformer, and that’ very unique! Nier: Automata is better than most AAA titles and costs double the less of that price, which is one more reason to get it.
8. Dark Souls 3
Dark Souls series got a fantastic reboot with Dark Souls 3. Just if it wasn’t enough for the previous games in the series, and now we got this punishing game. What can I say? Prepare to die a LOT in this game, as it’s created to kill you. I’m not joking, the whole game is against you, and you can’t do anything about that except fight like a lunatic. Even when you die, the enemies around you respawn and you must fight again and again, which is really frustrating. However, if you have the balls to play it, and manage to finish it, then you deserve a medal, Sir!
9. Bioshock Infinite
Bioshock Infinite is the newest installment in the Bioshock series. This cheap game can give you a huge value for your buck, especially when the Holidays come. I mean, for just a couple of bucks, you can get a fantastic FPS game, which campaign isn’t short and definitely isn’t boring! Bioshock Infinite continues its tradition with great shooting mechanics, various powerups, and that fast-paced shooting in a beautiful environment of the game. Get ready to cause mayhem!
10. Alien: Isolation
Alien: Isolation is that PC offline game that will haunt your dreams every time you try to sleep. It’s a horror game in which you try to stay in one piece and escape that damn space station called Sevastopol. Sounds similar? Well, that’s because the game is based on Alien (1979) movie, which was a very disturbing experience at the time. It’s an intense game that makes your palms sweat and your heart beating so fast that you’ll think it’s gonna come out of your chest! Try this horror if you dare, and watch yourself getting swallowed by the Alien, in a single bite!
11. Far Cry Primal
Elephants are cool, but mammoths are so badass! In Far Cry Primal, you can hunt mammoths and even ride them when you get to higher levels! How cool are you from zero to riding a mammoth? This beautiful-looking game is set 10,000 years BC and no, you aren’t going to shoot guns, but bash the hell out of your enemies. The arsenal of weapons might not be that huge, but the combat is great and requires more thinking, as the enemies are sometimes overwhelming and can easily kill you. If you have the luck to tame a sabertooth tiger, you may survive in this harsh world!
12. Resident Evil 7: Biohazard
There is something special about that claustrophobic feeling, especially when it comes to horror games that you can play without internet. That sense of dread and despair when you don’t have much space to move is priceless. Don’t think of me as a psycho, but I LOVE the horror genre! RE7: Biohazard is a game that caught my attention as soon as it was released. This bad boy will provide you with a horrific experience that will leave you scared to death! As the game plays from the first-person perspective, it’s much easier to get yourself immersed, but also scared.
13. Outlast 2
Outlast 2 is yet another offline horror experience, where the developers decided to leave your powerless. There aren’t weapons for you to use, and surely no means to defend yourself. So, what are you left with? Well, a camera and a journal should do the trick! The game does a damn fine job of melding the horror and the dread with stealth and great storytelling. In the end, you may feel a little let down by the ending, but I know you’ll enjoy it until the very end.
14. Dead Space 3
Cat et 2015a factory password generator. While the past games in the series focused more on that horror experience, Dead Space 3 is more of an action-horror game. Sure, there are Necromorphs and they are vicious and all, but the action part is more prominent. Needless to say that Dead Space 3 is an amazing game and I’m very sad that Visceral Games is closed by EA in October. This survival horror game is hugely underrated, but it’s awesome and I recommend you to play it. It’s just a couple of bucks for this experience, don’t be a niggard!
15. Portal 2
There’s something awesome when it comes to Source Engine. The games made with this engine looks amazing, yet they run smoothly. How did Valve manage to do that? Well, as I am not a game developer, don’t ask me! But ask me about Portal 2, which is Valve’s magnum opus, and a compelling puzzle game. The whole point of the game is to use a Portal gun in order to create portals and pass through them. However, the game isn’t that simple and requires some brain skill to finish it. Grab your Portal Gun, and let’s go on a venture!
16. Limbo
This 2D game is straight-up terrifying, dark, and misanthropic from the start to finish! In Limbo, you are a little boy that needs to survive this colorless world of the game as he overcomes various obstacles and escape scary monsters. I like the game’s artwork and the atmosphere is simply top-notch here if you like the dark ambient in the games. It’s a must-play for every offline Indie games lover!
17. S.T.A.L.K.E.R.: Call of Pripyat
Speaking of the atmosphere, very few great offline games can replicate the atmosphere as it is in S.T.A.L.K.E.R.: Call of Pripyat. That post-apocalyptic atmosphere of Pripyat looks great, and the game isn’t colorful, which is the whole point. Everything has that grey-ish tint, as this town suffered greatly when the Nuclear Powerplant in that area exploded. It’s based on a real-life event that occurred around 1989, which gives the game a certain weight and meaning.
18. Metal Gear Solid V: The Phantom Pain
With MGSV: The Phantom Pain, Hideo Kojima proved that he still has what it takes to create such immersive PC games without internet. This stealth game is challenging and full of stuff to do, due to its open-world nature. The characters are badass and the game feels somewhat dark, with a very serious tone. Oh, and not to forget that plot twist at the end that’s worth those thirty hours I’ve spent on this game!
19. SOMA
Horror fans will be pleased that I mentioned another horror title here. SOMA is an absolutely spooky and nerve-wracking experience! It creates that atmosphere that’s very unique, and with the story being told in the shape of various documents scattered through the game, it’s even more badass! You are all alone here and you’ll fight for your life, only to find out that you aren’t actually alive! A truly wonderful offline game for Windows.
20. Superhot
Superhot is a cartoonish-looking offline game that revolves around time. To make it simple, the time in the game moves when you move, so if you are standing still, nothing will happen. Vice Versa, if you are moving and shooting, then the enemies will do the same. It’s a lot of fun, but a lot of challenges too. I played it with some of my favorite death metal albums, just to ensure that I’m hardcore enough to beat it!
As we are approaching near the end of our journey through the offline PC games, I’m here to ask you a question. What is your favorite offline game for PC? I tried my best to count some of my favorite offline games, and although I’m maybe going to start a war for not including some of the games, I stand behind my words. Oh, and why don’t you tell me what game did I miss? Do you have any favorites besides these 20 games? Please, let me know, and don’t forget to do some gaming today!
3 notes
·
View notes
Text
FLASHBack: Week 105 - Animator vs. Animation
Today on FLASHBack, we're going to get a little meta. Over the last two years, we've looked at roughly over six-hundred fifty Animations by various Flash Artists, but have only rarely taken the step back to look at the Animation process itself. So that's exactly what we're going to do, but not in the conventional way. Instead, we're going to be looking at a series of Flash Animations that takes its cues from the Looney Tunes classic Duck Amuck, in which a cartoon character ends up getting into a fight with the animator who's bringing them to life. And also touch upon intellectual property theft by a notorious content aggregator website along the way.
On 3 June 2006, Alan "noogai" Becker uploaded Animator vs. Animation to Newgrounds. The next day, it was Frontpaged and took Daily 2nd Place, and by the end of the week it was the Weekly Users' Choice and the Review Crew Pick. The animation was of a stick figure "victim" being drawn in Flash, only to be tormented by the animator until the stick figure's selection box gets broken, letting him escape across Flash's user interface to take hold of the various drawing tools to defend himself.
Five days later on 8 June 2006, the same Flash was uploaded to Albino Blacksheep. It was from there that the website eBaum's World ripped the Flash file to upload to their own site a day later. eBaum's had a bad reputation for stealing independent creators' viral content and hosting it on their own site without permission or compensation, even going so far as to strip credits and source watermarks from the content before uploading it to their own site. This is what they had done with Albino Blacksheep's authorized copy of Animator vs. Animation, but what eBaum's didn't know was that in addition to the visible "hosted at albinoblacksheep.com" that they removed, there was other tracking code embedded in the Flash that meant they'd been caught red-handed.
On 12 June 2006, the siterunner of Albino Blacksheep made a statement about the content theft. eBaum's World then approached Alan directly with an offer of $250 to buy the permission to continue to host the Flash on their site (as well as naming him the "winner" of a nebulous "Best Flash" contest that had a prize of an additional $1000). However, this money came with a price: Becker had to submit a statement for eBaum's to post, making it look like he was clearing them of blame.
Alan, who was 17 at the time, and from a family that was not well off, had initially taken the money, but then sent it back, demanding that his Flash and the "Statement" he'd made be taken down. In a post made by Albino Blacksheep on 23 June 2006, it was pointed out that the statement had been pre-scripted by eBaum's to carefully sidestep the fact that while they had contacted Alan ahead of time asking to be able to host his animation, he'd told them no, and so they went and stole his file anyways. That post included an apology to the Flash community from Becker for falling into eBaum's trap. The animation and the statement were removed from eBaum's on 26 June 2006.
After receiving funding from Atom Films, Becker would revisit the concept with Animator vs. Animation 2, posted to Newgrounds on 15 Mar 2007. It took the same slate of awards as the first, with the exception of being the Daily Feature instead of Daily 2nd Place. This time around the stick figure isn't labeled "victim" but instead "Chosen One" (possibly a Matrix reference). He immediately breaks out of his selection box on his own, and begins breaking the Flash user interface with fireballs. This time around The Animator has prepared an arsenal of weapons in Flash's library of animatable "Symbol" objects, including a SPNKR rocket launcher from Halo. However, the Chosen one breaks though Flash to get to the Windows XP desktop beneath (complete with the Bliss wallpaper). There he battles with the fox from the Firefox icon and the Stick Figure from the AOL Instant Messenger Icon. Finally, he's contained by an Avast Antivirus Scan (though alas, Avast's language settings were on plain English, and not he infinitely more fun "Pirate" setting). The animation ends with The Chosen One having been tamed and being used as a Pop-Up Blocker. Later, this animation would get a Live Orchestral Score courtesy of Joe-Pietro Abela, who used it for his Masters project at the Berklee College of Music.
On 6 August 2011, Alan would upload the third chapter in the series to Newgrounds, where it again took the quadfecta of top awards. In this installment, The Chosen One breaks free of his enslavement as a Pop-Up Blocker, to again spread havoc throughout The Animator's computer. This time around the battle ranges across such iconic windows software as Microsoft Word, Solitaire, & Minesweeper. Clippy the Office Assistant proves to be a formidable foe, but eventually, The Animator has to open up Flash to draw a new red stick figure to be "The Dark Lord", coding him to go after The Chosen One. In the end however, the two team up and end up causing a Blue Screen of Death on The Animator's computer.
It would be another three years before Becker would put Animator vs. Animation IV on Newgrounds, 2 October 2014, to the usual maximum acclaim. For this chapter, Alan had turned to Kickstarter to get support for production, raising $11,280 in donations. With that funding, he expanded the scope of the series, by not just showing what was happening on the computer screen, but also incorporating real world video of himself as The Animator. The Chosen One has a Second Coming, and when The Animator discovers this, the ensuing battle ranges from Facebook to The Animator's iPhone, and then back onto the computer via Dropbox. In his process of containing The Second Coming, The Animator realizes that The Second Coming is better at animating than he is, and strikes a bargain with him, allowing his continued existence in return for tutoring.
After that, Alan would begin doing spinoffs, such as Animation vs. Minecraft and Animation vs. YouTube, where his stick figures would begin having adventures outside the context of Adobe Flash and interactions with The Animator. These would then be followed up with Animation vs League of Legends, Animation vs Pokemon, and Animation vs Super Mario Bros. However, in between those spinoff episodes, he would continue to produce the occasional short animation for the main Animator vs. Animation series, and on 5 Dec 2020, he compiled those shorts into Animator vs. Animation V, which was uploaded to YouTube on 5 December 2020.
That's all for FLASHBack this week. Next week, THE END.
#radwolf76FLASHBack#Adobe Flash#Flash Animation#mid 2000s#late 2000s#early 2010s#mid 2010s#early 2020s#early web#Newgrounds#Albino Blacksheep#Alan Becker#noogai#noogai3#Animator vs. Animation#ebaumsworld#content theft#duck amuck#Joe-Pietro Abela#bliss wallpaper#aol instant messenger#firefox#avast antivirus#solitare#minesweeper#ms word#office assistant#Clippy#It looks like you're trying to kill a stick figure. Would you like help?
1 note
·
View note
Text
1ST PROJECT
1. How are you settling in - how do you feel about being part of your tutor group?
Fine. I can just get my head down and work if I’m on a good thread and I want to and don’t feel overly distracted or frustrated with other people, but I haven’t really gotten to know any one closely yet. I enjoy being in a space where all I have to focus on is being creative and especially doing work I personally enjoy making.
2. What are your first impressions of the learning environment?
Fairly self-guided, I could ask for certain materials if needed. Getting out of it what I put in, little direct tutoring so far.
3. What are the differences to your previous learning and experience at A-Level?
I didn’t take any art classes at sixth form, so being in a space just dedicated to art is what I was looking for.
4. What if anything, do you need to find more about?
-What we actually do and don’t have access to in terms of materials, spaces, and guidance from tutors/other teachers with experience relevant to what you’re doing
-What is actually expected of you in the sketchbooks- my tutor says that it shouldn’t be a scrapbook and yet every well-graded sketchbook I’ve seen is very much a scrapbook. Do I need to write this much? Or is this too little?
-How to try different materials and get taught how to use them (ceramics, textiles, woodwork)
5. Where do you see yourself currently in terms of art/design/media?
-I have interests in working in all three areas and like the overlap between them.
6. What are your current strengths?
-Concepts, coming up with ideas out of the gate and being confident with them.
-Eye for design/what works visually and what doesn’t.
-It doesn’t take long for me to pick up what I’ve tried so far in Photoshop.
7. What are the areas you need to improve on?
-Follow-through on ideas I like but am not sure how to do
-Explaining/documenting my process- big problem at GCSE. I usually hate writing down my thought process after the fact, but I don’t mind explaining it out loud, so finding a way to bridge that gap
-Working from home
8. Record some actions that will help you achieve this.
-Document my reflections/notes/creative process in a more natural, train of thought way as I work so I don’t put it off
Week 2 09/09/18 - 13/09/19
1. How did you understand the rationale for the project?
Broadly, I understood it as making work which was true to our interests/interpretations of a particular subject, which we derived from the initial conversation and brainstorm we had in groups.
2. How have you made use of your studio time?
Sketching and writing in my sketchbook, testing materials, making pieces unsure if they were going to be a part of my final piece or not
3. What is your understanding of the “Creative Process” and how it applies to your way of
Working?
Basically creating, scrapping and elaborating on ideas as they come to you- actively making inspiration. Testing materials/ideas/recycling/borrowing concepts regardless of whether or not they will work and trusting your own intuition/taste. “Sketching and writing in my sketchbook, testing materials, making pieces unsure if they were going to be a part of my final piece or not”
4. How have the contextual references you have found helped you think about new
approaches to your work?
The book “No Sleep” by Adrian Bartos has been a huge inspiration so far- seeing how nightclub and event promoters designed flashy, attractive and personality-filled posters considering the lack of resources compared to what I’m capable of in Photoshop has made me want to take advantage of the platofrm even more, and have more fun with the design. Design elements like dithering, blocky type, collage, and repurposing sha
5. How have the practical and material elements of the work gone? (a) have you kept
Notes?
Working with ink is fun and something I’m used to, but smudging and miswriting can be frustrating considering the inital aesthetic I was going for was meant to be more clean and technical. Later, while I moved into digital collage, all of my base materials were physical, and working with plasticine meant that I was also able to experiment in how the texture of the clay turns into the black and white, dithered aesthetic of the collages that I was doing. For much of the early project, yes, I’ve kept notes, but I tend to forget to while working digitally
6. What could you do better in the future / what are your plans for next week?
Write and make notes in my sketchbook/blog while working, rather than having to go back and write them after the fact.
7. Have you started photographing your work, keeping the images in a relevant folder?
Yes.
8. You had a tutorial this week, how might you use that to reflect on your progress?
Figure out if I’m making the right kind of notes/how to make those right kinds of notes.
FURTHER NOTES:
There were certainly points during class-time where I had to find things to do and procrastinated, which has been a consistent problem for me in the past. This was especially true in documenting; while I was happy to go crazy and spend lots of time working in Photoshop on my collages, it was really mostly by chance that I came across that idea and from messing around with Adobe Capture on my phone, which is not the most sustainable model of working.
I had a blast researching posters from New York’s nightclub scene in the 70s, 80s and 90s, pretty much completely incidentally when we were asked to pick out books at the library at the beginning of this week
MEDIA - THE RIGHT KIND OF WRONG
Week 3 - Art/Media/Design Projects 16/09/19 - 20/09/19
First project, personal directions:
1. How well did you respond to the first project brief?
Considering the brief was (I believe purposefully) vague, and with my understanding the first brief was mostly about thinking in the creative process and being open to radical shifts in direction, I thought I fulfilled it well.
2. how well did you use your time this week?
I was really happy with the notes I made initially, and the idea of indiscriminately writing down every idea relevant to the project. I became kind of latched onto this idea of creating colourful, noisy gifs or short videos and I spent a lot of early class time working on the sound bytes for them, none of which I ended up using for my final pieces. A similar thing happened with experimenting with physical animation and a phenakistoscope, and it was frustrating feeling like I wasn’t really going anywhere with those ideas. However, I felt like they are getting me closer to my original idea.
Week 8 Art/Media/Design Projects 21/10/19 - 25/10/19
Third project, identifying future directions:
1. Identify overlapping themes, particularly in your personally directed work:
a. are there connections between ideas, approaches to materials or attitudes
that you have you used in all or any of these projects. If so, what are they? If
not, what are the main differences?
-Digital collage has ended up being something I used a lot more than I anticipated I would, since most of the work I’ve made independently before the Foundation year has been gouache and physical collage. I definitely follow the same process of sketching out mostly complete final piece ideas and doing extensive research, but I’ve also found that both projects have had a pretty radical change half-way through.
-I think research being a big part of my projects is a consistent theme for me, but I also consistently have a hard time documenting all the progress, since I’m not sure how to in most cases.
-In terms of consistent themes, all three were relatively different in themes; Media had to do with the supernatural, which is a theme I’m familiar with and interested in, and involved dipping my toes into animation and sound design; Art was based off of an idea I had had well before the project, and involved participatory art being being in a more curatorial role.
Compare how you have used your time between this project and the last. Consider
being open to different ideas and potential changes in direction.
exploring and evaluating different material possibilities.
creating more complex or unexpected outcomes.
developing an understanding of different artists and designers working in a
similar area.
creating a better understanding of the different approaches to practice in each
area.
presenting and/or explaining your ideas to others.
-I think organisation and note-taking has been a problem on both projects, I want to make the split between in-studio and at-home work more proportional, with time management being more of a problem with this project especially.
-I definitely haven’t been afraid to change direction, almost to a fault, since I closely documented every thought/decision that has gone through my head
Looking back over the last eight weeks are there patterns emerging in how you manage your project work?
-I definitely either latch strongly onto an initial idea, or don’t have one at all and do research, and I have a hard time working in that in-between stage when I need to develop an idea (especially if it’s one I don’t feel strongly about, such as with this current project.
Begin to outline your own particular strengths and weaknesses in relation to all of these approaches. Consider where/ how you fit into these different ways of working.
-I enjoy the research and
-Documentation in general is difficult for me, as it was at GCSE, especially since I have been tending to do all my digital work and research digitally. However, I really enjoy doing research for my work (something I have been doing for a long time, looking up references/inspiration/learning about the subject) the problem is just in getting my thought process and research down.
-I tend to treat the prompt or brief pretty flexibly, which hasn’t been such a problem on the first two projects since experimentation and being open to ideas was a major part of them. Despite the specificity of the Design project’s prompts, and my confidence in how I was going to approach my second try at that project (Switching from the Train Station to the Selfridge’s prompt)
List some of the artists, designers, photographers and filmmakers that have had the
most influence on you in the last eight weeks.
what disciplines or areas do they work in?
what subjects did they study?
-Stephen R. Johnston
-Charles Freger
-Mason Lindroth
Use this week’s reflections to identify, or confirm possible future career directions.
-This last project has gotten me thinking about Illustration as a career differently. My initial difficulty with the Design project, criticism I received from my tutor about approaching the Selfridge’s brief by design rather than brand, and the fact that I changed briefs halfway through all of this project made it more frustrating than the previous ones, which is slightly discouraging because it was apparently the most “illustration-y” of the three, and illustration was the pathway I was considering choosing.
Ensure you have your Digital Portfolio updated.
19 notes
·
View notes
Text
Interview with Asrielle

Today we interview Asrielle! One of our contributors in THE FIRST FLAME.
Q: How did you get into making art and for how long have you been doing it?
My dad used to draw my favorite TV show characters for me as a kid, and it inspired me to start drawing too. I've been drawing since I was a toddler, but I only started taking it seriously in my teens, so it's been over a decade now that I've been studying and trying to improve, but over 20 years drawing for fun.
Q: What traditional media or digital program do you prefer to use and why?
I prefer to use a HB pencil and regular paper for most things I draw, and then if I really like a drawing, I'll move it into Adobe Photoshop or Clip Studio Paint. I've slowly started using those programs more for illustrations because of their brush capabilities, which are really fun to work with. I think I'll be using Clip Studio Paint a lot more in the future!
Q: Do you mostly make fan art or are there original works you are also passionate about?
I mostly make fan art! It's so much fun talking about things that I love with other people, and I love seeing everyone else's fan art as well. I have original works that I care about, but I get wrapped up in my video games a little too often and draw even more fan art as a result, haha.
Q: Is there any artist or art movement that inspires you? Which ones?
Ayami Kojima, who did a lot of art for the Castlevania games, is a big inspiration of mine! James Gurney is fantastic. He's my inspiration for playing with all sorts of lighting in my work. I love looking at art that features dramatic sunlight and shadow and perfectly replicates how light changes throughout the day.
Q: What would you say to someone who is willing to dedicate their life to art, but doesn’t take that step because of the risks?
I can understand this. I took a lot of risks pursuing art, and I still wonder if it was worthwhile sometimes. It really depends on what you want out of creating art. If it's for money, I can respect that, but if you force yourself to do something, it will just make you hate it in the end. But if creating art makes you happy and leaves you with a sense of fulfillment, I think you should accept the risks. Life's too short to play it safe and wonder "what if?" Usually, I'll just tell myself "just do it" nowadays. Failure isn't failure if it can be turned into a learning experience. At least, that's what the Souls games taught me!
Q: What do you like about being an artist?
I have a really bad memory, so when I finish a drawing I'd spent a lot of time on and look back on it later, I can remember a lot of how I felt when I worked on it and the steps that led up to its creation. It's like putting a part of myself on paper, as cheesy as that sounds. It's the same with how photos can really capture a moment in time. The community is also really cool, since there are so many other artists who go through all the same struggles and you all can bond over the creative process and the results. I love that there are so many of us out there making really cool things that we can wake up to and get inspired by, and that I get to be part of that too.
Q: Show us some of your favorite artworks that you made and tell us why.
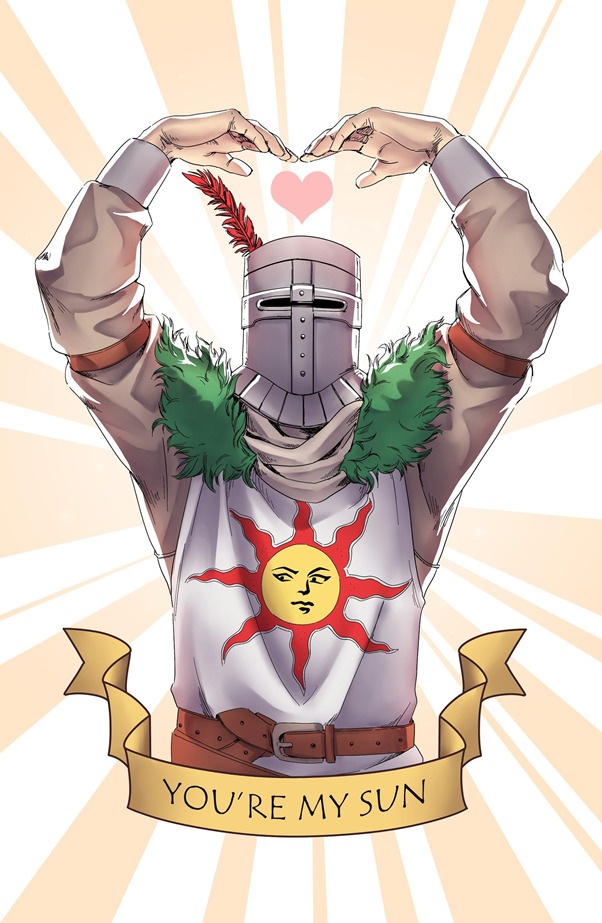

Solaire is such a fun and interesting character that really stands out in a dark game that's aptly named "Dark Souls." I love kind and supportive characters and I immediately said to myself "I must protect him at all costs." I drew him in all sorts of funny situations and turned a few of the drawings into stickers. People who saw them would get so excited and we'd chat about our favorite sunny boy, and it's honestly really fun!
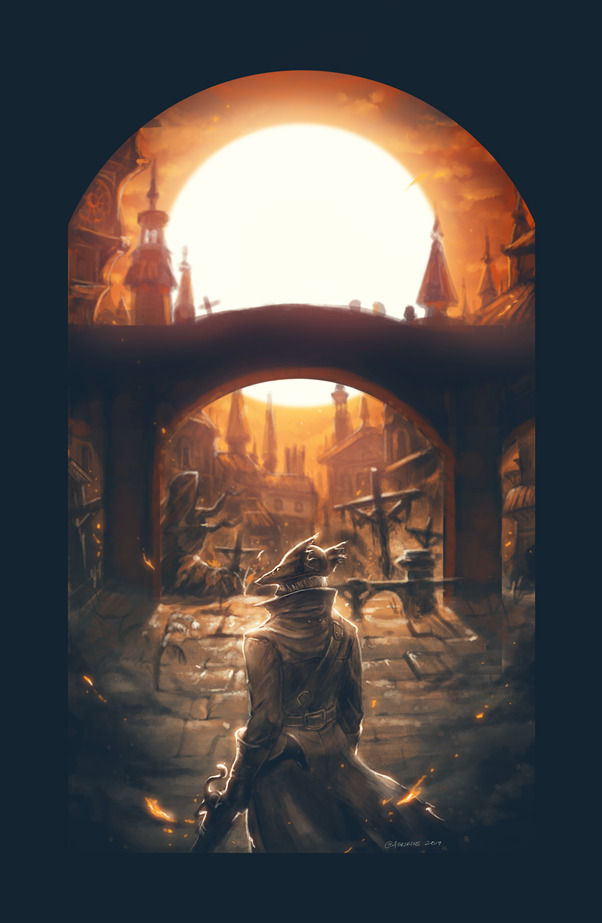
Bloodborne is near and dear to my heart and the sight of Yharnam is something that is so inspiring to me and I knew if I did any Bloodborne fan art, I would have to draw the city eventually. I want to draw it again!
Q: Where can we find more of your work? Are there any personal projects you would like to share?
You can find my work mostly on Twitter! (@asrikins) I post a lot of WIPs and general video game stuff, as well as conventions I'll be selling my artwork at. If you like anime conventions, you might find me there with a bunch of Soulsborne merch! I also plan on returning to Twitch, where I have streamed artwork as well as a playthrough of Dark Souls 3 in the past. I hope to open a sticker shop soon with Soulsborne merch, but that will be announced on my twitter at a later date. Right now you can find a few of my designs on Redbubble at www.redbubble.com/people/asrielle.
Q: What order did you play the soulsborne games in? Which is your favorite?
I started with Bloodborne when it was free for PS+ members. It's my favorite. It took me a week to get through Central Yharnam because I was so terrified and I would have nightmares every night. I kept playing because I would get further than my husband (who almost quit because it was so difficult) and then he would try to catch up. When I beat Father Gascoigne on my first attempt after struggling and learning along the way to his arena, I realized how well-designed the game was and got extremely hooked. The high from winning a major fight is amazing! It taught me a lot about perseverance and learning through trial and error and affected how I approach a lot of things in real life as well.
After Bloodborne and its DLC, my husband and I immediately bought Dark Souls. Then Dark Souls 2, and Dark Souls 3. We beat all the DLC and got the platinum trophies in each game. We've met and bonded with so many Soulsborne fans and I regret not getting into the series sooner over fears of "not being good enough to play." Right now we're playing Demon's Souls and Sekiro and I love it! The series has taken over our lives, haha.
Q: When you got eaten by a mimic for the first time, what did you yell out loud?
I laughed! "Why are its legs so long??"
Q: Any memorable Dark Souls gaming moments you'd like to share?
There are honestly so many memorable moments! One of my favorites is when my husband and I were playing with our friends on Dark Souls 2 and we got invaded. We were all standing there dual-wielding the Smelter Sword and Aged Smelter Sword on a narrow bridge. The invader saw this, and promptly ran away and knelt for forgiveness in a corner as the four of us engulfed him in huge red and blue flames and destroyed him in seconds. It was the most ridiculously over-the-top execution I'd ever seen of an invader in the series, haha.
Another favorite is in the first Dark Souls when my husband and I got really far into Anor Londo, just to get invaded. We were so sure we were going to lose our progress that my husband dropped all the money he had on the ground in an attempt to bribe the invader to leave while we backed away. It worked! He took the money, praised the sun, and left. We found each other on PSN later and started playing co-op later on as buddies!

Get the zine at: 🔥 [ THE FIRST FLAME ] 🔥 info page
𝐅𝐨𝐥𝐥𝐨𝐰 𝐮𝐬 𝐟𝐨𝐫 𝐮𝐩𝐝𝐚𝐭𝐞𝐬 𝐨𝐧 𝐩𝐫𝐞-𝐨𝐫𝐝𝐞𝐫𝐬 & 𝐫𝐞𝐥𝐞𝐚𝐬𝐞:
on tumblr @darksoulszine
on insta @DarkSoulsFanZine
on twitter @SoulsFanZine
#thefirstflamefanzine#interview#asrielle#darksouls#dark souls#fanzine#dark souls fanzine#art#artists on tumblr#illustrators on tumblr#gaming
25 notes
·
View notes
Photo
☆ — wait , is that ZELDA KING ? dean lockwood has been looking for them . you didn’t hear it from me but , apparently the JUNIOR might know something about the whole omega chi & kappa tau situation . while they can be BRASH & IMPULSIVE , they’re far too WELCOMING & COURAGEOUS to be involved , right ? those who know them say they’re reminded of FLANNELS WRAPPED AROUND THE WAIST, THE CLICKING OF A CAMERA, A COMPUTER SCREEN ILLUMINATING A PITCH BLACK ROOM, THE “IT’S ALWAYS SUNNY IN PHILADELPHIA” THEME, BAGPIPES PLAYING IN THE DISTANCE whenever they’re around . honestly , the DIGITAL MEDIA major should try to keep their head down . after the events of last semester , lockwood is out for blood . did you know that ZELDA is a member of GAMMA RHO ALPHA ? that might explain why their name is being brought up .
you’re an explosion , you’re dynamite
playlist. pinterest. to listen as you read.
like for a plotting dm on tumblr , react for a discord dm
rocky lynch lovebot / hylia.#0329 on discord.
WOOOO I really can’t keep myself from holding only one muse can’t I. WELL. This is Zelda , a bit more of a happy-go-lucky muse compared to Sam !! She’s both her own character mixed with a few others I have - I love her dearly , so please please please feel free to come at me for plots !! <3 HERE WE GO :
HISTORY
Zelda’s backstory isn’t anything special - growing up in Scotland her parents had a nice marriage , she grew up an only child , always got good grades
But she always felt... average. She never was really anyone to anybody , so Zelda had a bit of a knack for wanting attention and trying to get her voice out there. So some took this as endearing , some took it as annoying.
In high school , she was lucky enough to be selected for an exchange student program in Salem , Massachusetts - and then she’d meet the FIRST person who would make her feel special in SAGA ( Sexuality And Gender Acceptance ) Club , a cheeky blonde boy named Cyrus who had a tendency to hide in the corner of the room and not talk to many people. And they’d date for about a year , up until Zelda would have to go back to Scotland.
They had to break up when Zelda would leave , but remained extremely close and communicating daily through digital connections.
ANYWAY , that little one year romance sort of gave her more confidence to use her voice and try and light up the room - since if she could do it for one person , she could do it for multiple people. That’s what gave her the idea to pursue a career in DIGITAL MEDIA - namely , film & video ( with digital art and photography on the side ) in the more comedic aspect. Screenplaying and the technicals behind sketch-comedy skits. Stand-up comedy , even though that was more performing.
Think like Saturday Night Live - and then think of all the technical stuff that goes into it besides the acting. The script-writing , camera angles , etc. Zelda just wanted to make people laugh.
Soooo… when she told her parents that would be what she wanted to do , her average home-life would turn sour CONSIDERING they didn’t want her to explore such risky career choices. An easier life would be to become a lawyer or a doctor - more stable. But that’s not what she wanted. So after a LENGTHY argument with her parents , Zelda would be thrown out of the house with only the money she saved ( thankfully , she’d always been the frugal one ) , and would call . . . her ex-boyfriend and his mother. Since even though they’d only been communicating digitally over the past two years , it still felt like home in Massachusetts.
Her ex’s mother would pay for a flight for her to go back to the United States , and after some time of adjusting , she’d get into Hollingsworth to pursue her career in Digital Media - staying there , but often traveling home ( being where her ex and his mom lived ) routinely.
Pledging to Gamma , her insistence for encouraging people to live their life to the fullest and readiness to include people in her free spirited antics would leave a great impression on the sorority - eventually even leading to her current position as its president.
CHARACTER / FACTS
So again !! Zelda is my trans female pansexual bby , 5’11 bc tall girls make the world go round and she is the LIVING EXAMPLE of the Halcyon label. She’s loud , carefree , optimistic - never really known to pass up an opportunity to have fun.
...that’s so basic of an intro to her personality BUT IN MY DEFENSE IT’S EARLY
BUT YEAH Zelda ?? Does not give a shit about anything. She holds no grudges towards anyone , waaaay too chill - but she flips from extremely chill and laid back to “HEY HEY LET’S GO DO THESE TEN THINGS” and it’s. Definitely a 360. But nobody’s ever seen her angry and it sort of makes people wonder if she even feels anger or if she has a secret dark side nobody knows about.
...She doesn’t. Zelda’s only habits when angry are that she’s short , to the point , and WILL call you out if you’ve done something wrong. But making her mad is extremely hard and she’ll only remotely get upset if you prove time and time after again to be a shitty person.
Which , can sort of lead her to get taken advantage of because of her chill nature - that’s how the previous issue with Gamma getting in trouble at one of their parties happened. Zelda got pissed. She knows she’s chill but she doesn’t think about how that could lead SOME people to thinking “oh I can do anything I want and she’ll be fine with it” because she doesn’t. Get angry about much.
ALSO THAT DOES MAKE HER A BIT NAIVE - just again. She’s easy to take advantage of because she believes the best in everyone and automatically assumes people will do the right thing as people. Doesn’t really understand why people will do things to hurt others and doesn’t really want to.
Also kind of jumpy like she’s a social person and definitely flips between lax and loud but it is SO easy to startle her.
AS FOR HER INTERESTS IN DIGITAL MEDIA - she is extremely talented with the entire Adobe Creative Suite , especially Premiere , Photoshop , and After Effects.
She has an Instagram dedicated to posting manips , edits , etc. she made in both PS & AE. You know those funky Insta edits you see all the time ?? Zelda makes those.
She ALSO does a lot of editing and promotion for Gamma - a lot of times they’re memey little videos or advertisements or skits that display how welcoming Gamma is , and they do a great job at leaving a good impression on possible recruits.
Her BIG thing though would be a little YouTube channel she runs where she often posts videos just around campus - think Billy On The Street , which is what she really wants to do with her digital media career.
“I’M RUNNING AROUND HOLLINGSWORTH WITH A PACK OF WILD LESBIANS”
“LET’S GO LESBIANS LET’S GO”
She either wants to do that - or mockumentaries to put on Youtube ( or even documentaries in a whole that she approaches with her extremely sunny demeanor on conspiracies or the like ). She’d also like to film her own show to put on TV , either something like reality comedy , a reality show spoof , or even something like It’s Always Sunny in Philadelphia or The Office or Brooklyn 99. Comedy film is her passion.
Commentary videos are ALSO something she’s considered , much like iNabber or Strange AEons , but she thinks mockumentaries , skits , and her other work
Also that person who Photoshops heads on people’s bodies and makes memes for all the group chats she’s in
She really doesn’t take herself seriously often but frankly that’s just Gamma as a whole so it WORKS.
A good portion of Zelda’s existence is a meme tbh I honestly adore her
She has a LOT of tattoos that were designed by her ex-boyfriend since he was an art major and now is a tattoo artist in Salem - I’d point you in the direction of Hannah Pixie Snowdon’s body art as a reference , just Zelda isn’t nearly as covered as she is.
This would be the best reference I can think of rn , lots of pretty designs and some animals, maybe some symbols and references from stuff.
Olivia doesn’t have any tattoos but WE CAN CERTAINLY PRETEND
A lot of her spare money is made doing either graphics commissions or even photography from whoever needs her services !! The majority of her stuff has been done for cosplayers , budding models , budding actors and actresses , and even for other fraternities and sororities around campus. Zelda knows no rivalries when it comes to these things.
She’s also 100% that person who keeps around a polaroid camera so she can hang up pictures she takes she’s just That Person
Decorates the Gamma house with a lot of polaroids she’s taken and memey edits she’s done in Photoshop
INSIDE JOKES ARE HER THING
She also plays guitar and is fairly good at it but doesn’t have a band or anything rn bc she’s just someone who does it bc she wants to look cool ( and also bc the guitar’s a neato instrument but yeah she started it out just bc she wanted to play SOME kind of instrument at least )
,,,but she also knows how to play the bagpipes
and she owns a pair.
they’re in the gamma house. zelda plays them at meetings.
Also I can’t 100% guarantee she didn’t get her name from the Legend of Zelda series if y’all know me u know how much I adore that series so yeah
WANTED PLOTS / CONNECTIONS
GIVE ME A COMEDY SQUAD PLEEEEEEEEASE maybe even ppl she works to make a webseries or something with ?? give me people who work constantly just to make other people laugh
People she routinely takes photographs of !!
Whether they pay her or she uses as a muse for whatever
OTHER PPL FROM THE GREEK ROW THAT JUST DON’T… LIKE ZELDA FOR WHATEVER REASON
Maybe they think she’s too chill. Maybe they think she’s hiding something. Maybe they don’t like how she’s running Gamma but for whatever reason they just DON’T LIKE HER and I want enemies so fucking give me enemies
This is so general but more Gamma sisters would be lovely Zelda’s so eager to bring in more people to make their sorority feel like home
Give me crushes Zelda pines over !! Crushes that pine over Zelda !! Gimme that skinny love shit bc my god it gets me going !!
Hookup plots are also 100% acceptable bc again Zelda’s a carefree spirit and gives No Fucks
Also 100% down 4 cute romantic plots too - Zelda is ur regular poly pan babe w/ room in her heart for 12000 suns
it’s very on brand of me to place the romance/sex plots right smack in the middle as I’m thinking of what to put down
Okay when I was in high school we had majors and I was a Digital Art major and all the Visual Art majors had this bond with us for no reason so I’d really love some Vis. Art buddies that Zelda gets along with much like the bond she has with her ex-boyfriend now
OTHER PEOPLE TO DESIGN MORE TATTOOS FOR HER PLEEEEEEEEEEEEEEEASE one day she hopes to be a coloring book
I’D LOVE SOME UNLIKELY FRIENDS TOO JUST SOME GRUMPS ZELDA’S CONSTANTLY BOTHERING W/ HER SHIT
Memey group chat pls
THATS ALL I CAN THINK OF FOR NOW maybe i’ll do a more detailed / organized list soon but yeah !! Come at me !!!
#hworth:intro#* &. about / ☆ 𝐫𝐨𝐜𝐤 𝐨𝐧 𝐠𝐨𝐥𝐝 𝐝𝐮𝐬𝐭 𝐰𝐨𝐦𝐚𝐧#* &. ooc / ☆ 𝐛𝐥𝐞𝐬𝐬𝐞𝐝 𝐛𝐲 𝐇𝐲𝐥𝐢𝐚#I got the worst headache @ work but we got this done at least#very on brand of me to namedrop ocs i'll never bring in here 2 include them somehow#but i'm so excited i love love love LOVE zelda so much and the last uni group i was in she was only an npc#i'm rly happy to write her in full : ' )
8 notes
·
View notes
Text
Poorly Drawn Dragons, huh?
Yes Poorly Drawn Dragons! It is both a self deprecated sting at my own artistic ability and an attempt to make you all giggle with the things I put up on this hopeless little blog. If you’ll look at my other most recent text post, you’ll see that this blog was started as a part of an assignment for my current university courses in which we use New Media Tools to expand our “brand” as independent creators. To be utterly honest with you all I hate everything about that. I hate the idea of being a “brand” and having to “sell” myself to people. I am a creator, I want people to see and enjoy what I create but I am not trying to partake in some kind of pseudo-capitalism of creativity here; I just want to love what I do and find people who also love what I do.
I’ll admit if it weren’t for this assignment, Poorly Drawn Dragons would not exist. I am not an artist and I don’t consider myself an artist. My brush is a mouse and my canvas is a version of Adobe Flash that is two years out of date, but even then my medium of choice has always been the written word and short film. Poorly Drawn Dragons and its “I’m crappy on purpose” tongue in cheek demeanor and presentation was just a thinly veiled attempt to show how much I didn’t take my current classes seriously yet I still wanted to do well in them, and so I used a plucky attitude and charming positivity with my shoddy doodles to make it all feel like one big presentation. At first it wasn’t real and was all done for a grade but now... it is.
I used to love drawing. I wanted to be a 2D animator for a long time and have had Flash since I had my very first computer so I could work on making great stuff for the internet to enjoy. I drew comics and landscapes and took every art class I could and hung out with other young artistic folks growing up because that’s what I wanted to do, but I didn’t put as much stock in myself as my friends. I didn’t practice nearly as much and when I saw how poorly I had been doing in comparison to my friends that had been filling the pages of sketchbooks since they could walk I got discouraged, and when I was mocked and belittled by my some of them that was all the excuse I needed to just quit entirely. I still downloaded Flash to every computer I had because it was almost a reflex at that point, but I never touched a sketchbook or took an art class ever again. Then, I made Poorly Drawn Dragons.
The doodles are so fun. I forgot how fun it was just to let your hand fly across the paper (or mouse swing across the screen I guess) and just let things form up from whatever the hell you feel like swinging out! It’s become a hobby and although I have continually failed with my own goals of daily posts I do very much enjoy what this has become and it actually means something to me now, something more than just participating in a class by satirizing it. I hope to keep this up and I hope only to expand with it. My writing and my filmmaking will forever be my true passions, but I will never stop loving my Poorly Drawn Dragons!
Thanks for the read, y’all! Much love to ya! ~ <3
1 note
·
View note
Photo
Inspired by @dialup2002 to post some more old stuff. :) This is a desktop screenshot I posted on my DevART account January 2005. Kicking it with Windows XP, but I loved/preferred the classic style that I was accustom to (95-98-ME). I made the wallpaper used, but I’m having trouble finding a copy of it. I’ll prob try to remake it in non-1024x768 resolution lmao. Not sure if this is from 2005. It might have been from 2004, but I hadn’t posted it yet. I did that a lot.
Some fun notes about some of the software icons pictured (lots of info):
Firefox - THE FIRST BROWSER TO DO TABS OMG. I was a huge advocate for Firefox, especially in its initial releases. They were doing things on the internet nobody had really seen up to that point, and made it popular! Since I had so many issues (as most people do) with Internet Explorer, I was shopping around for a new browser at the time of this shot. Google Chrome didn’t exist yet. (Can you imagine??)
IE - As stated above, I disliked IE. It was kept for various reasons, however. Such as testing website layouts, since the mass-majority of people used it and things looked different in browsers when you were coding.
Opera - While giving Firefox a try, I also managed to snag a very, very early copy of Opera. I’ve always been the type of person that loved to try out new stuff as early as possible, and this was a very special piece of software that I wanted to give a go. The reason that it was special? You had to send away for a CD for it. That’s right, kids. They snail-mail’ed me a CD because it was considered “commercial software.” I paid to get that browser lmfao. I was super super hyped later in 2005, because it became “freeware” and I was able to more-easily push my friends to try it out. The devs were (and still are) seriously awesome. This is why I still use Opera as my main browser today! Ya’ll should try it if you aren’t already! You can even use your most-beloved Chrome extensions on it. :)
Soulseek & WinMX - Holy crap, you guys! lmao Is anyone here old enough to remember these programs?? XD This was basically where most people went after Napster bit the dust. This was when we were all scrambling, trying to find a new P2P sharing program. This was right in-between the eMule/Donkey phase and before the Limewire/KaZaA fiascos where people’s computers were being overloaded with viruses from companies trying to stop pirating. Ahh, the wild, wild west... Days were so exciting when you spent hours downloading something that could potentially ruin your computer lmao
WS_FTP - Still one of my favorite FTP programs for Windows! Works like a charm! These days I use Transmit 5 for Mac, but this was my first program ever for file transfer protocol. It’s basically a tool for uploading files to my website’s server, because back when I first registered it, there was no web uploader for that kinda stuff. Now I stick with that because it’s easier and I’m used to it lol
Veo Digital Studio - Used to use this for my webcam back before webcams were built into laptops, and before they were common enough to have amazing freeware available for them. (Also this is hilarious.) The quality was horrible, but I was hella excited to take pictures and share them with friends and on my blog at the time. From what I remember, there was something I used after this that was some type of South Korean selca software. Haduri? Something like that. It was really cute and even let you do little animations. :)
Animation Shop - Okay. So... from what I remember, this might have been owned by the people that made Paint Shop Pro? I think it was Corel. I honestly don’t remember where I got this from, but this is what I used to use to make animated gifs (because Photoshop just....didn’t for some reason? I had to use PSP at some point, I remember that. I just don’t remember why lmao. It might have been my copy didn’t allow it, or my computer was just too shit to run it good enough, or just stopped working because....Windows).
Adobe Photoshop 5.0 - I originally got this rip from a friend of mine, whose dad got a CD from his company that he worked at. It was an official/real license, which was really awesome! I think this was the first version of Photoshop I ever owned (!!), which is pretty amazing to think about about! I had that CD copy for a few years. I initially was gifted a copy of the CD around 2001-2002 or so. I know for a fact I had newer versions (7.0 was legend before CS suite came around), so I’m not sure why I was using this one at this point lmao. My guess is, like mentioned above, something happened with my computer and I didn’t want to format it and reinstall everything lol or because it was the fastest version I had installed to boot up and do a quick photo edit.
Adobe Photoshop 7.0 - I do remember this took a long time to start up. I can only imagine this was like a bad pirated copy or something, or was so bloated with new stuff in it, and that’s why I kept 5.0 for a quick boot. I know I used this majority of the time, though. Most of my backups for brushes and fonts are from backups that include 7.0 as a zip. ¯\_(ツ)_/¯ My computer wasn’t the most powerful at the time, despite what I pushed it to do, so this is prob why. But hell yeah! Photoshop represent! lol I still use it today, and its still one of the first things I install on a fresh OS install. Enjoying CC 2017 these days.
Nero Start Smart - I was so excited to make mix CDs and share them! Back in the day before you had stuff like playlists that were sharable on YouTube/Spotify, etc, you had this to share music. Or play in your car. Or CD walkman. Nero was a software you could burn your CD-Rs and make your own laser-etched album art! I begged for years to get a CD burner lmao. Back when casette tapes were still around enough that my parents were like “but why???” lmao. They were not common back in the day like they became over time, just, like, included on your computer. Back then you had to buy one and install it into your computer tower yourself! I got mine I believe.....in 2001? It was the year after the Playstation 2 was released. The first one I got was just a very standard burner. Did a very specific type of CD burning at a low (slow af) speed. It was $700 lmfao. Let that sink in for a minute because my parents didn’t let me forget about it for the next four years lmfao. I saved up birthday and Christmas money and went halves on it. Then I upgraded to the one that this one was! c: Which did the laser etching, and DVD burning! (And you better believe I was burning DVDs of stuff I was downloading online lmfao this was the golden age of the internet where everything was just available everywhere as long as you had the patience to download that shit, because it took forever to download)
Volume Control - My dad and I messed with the wires on all of these random computer speakers and stereo speakers that we had collected over the years and hotwired our own version of a 5.0 surround sound in the room, which was mounted to the ceiling corners and above the computer station. It was lit. I needed Volume Control easily accessible because sometimes the speakers needed redirecting, or I needed to turn the beats down because my mother was tired of my fifth time playing the Gundam Wing OSTs and Miyavi. (It was metal, okay???)
Windows Media Player - I did not use this to listen to media. Let me reiterate that. I did not use it to listen to media on. lol this was specifically used to rip tracks from CDs that friends lent me, because it was the easiest software I was able to use to change the KBPs for quality control and the ID3 tags so I could save it and organize it for use in Winamp and know wtf I was listening to lol. Nobody used WMP for listening to music.... xD
Winamp - The best music player. Period. Still. Nothing beats it. Pls, pls, Nullsoft! Come back and make a native version for MacOS. :’(((( I would buy it! Doesn’t even have to have new features or look different. Classic look, pls pls!
Media Player Classic - Do people still use it??? This player was amazing! Paired with k-lite codec pack, it played everything. It was like VLC before VLC. And it looked good. Clean. Small. Could be installed anywhere which was nice. And the codec packs just made everything look and run fantastic!
Recycle Bin - .... Trash XD
Magnifier - This was for my dad because he had bad eyes and couldn’t remember CTRL +/-/0 to increase the text on pages that he wanted to read.
My Documents - Where I saved all the stuff I downloaded. Not the real My Docs. Just a folder that I named as such, with a custom icon. I don’t know why I wanted it there lol. I think to just have a uniform square on my desktop haha
Journal - I renamed this. I forget the original name of the client, but it was the official client of LJ. It was basically a program that let you write up posts for Livejournal and you could format things, draft them, etc, and post without uploading to your journal/blog. I liked it because sometimes I couldn’t post right away, and it made making drafts a lot easier for me to go back and edit. It also let you edit past posts, which was really convenient instead of looking for it on the web version one post at a time.
AIM+ - I loved AOL Instant Messenger, but over time the ads became too much. I invested a lot of time in 3rd party clients. I was constantly switching between AIM+, Adium, DeadAIM, Pigeon, Trillion, etc. Depended on what I wanted to do that day. Want to clone a SN? Want to skin the colors of the chats? Need transparency? Want to customize your lists? Want to log into more than one msg system at once? They all had their strengths. This was my msg service of choice. Back in the day you were either on this, MSN, or Yahoo!. Some people rocked ICQ and there were a few others, but these were the most common from who I knew/hung out with. I miss those days. <3
You can see WinMX running in the taskbar lmfao so I was prob downloading something at the time of snagging this quick shot. I also had DevART open (prob because I was gonna share this on there). I really wish I had more programs open at the time of this! XD It’s wild to look back at some of the software changes over the years!
Anyway, that’s one of my oldest screenshots that I can find that I’m able to share right now. :) I’m going to be posting a remake of that wallpaper that I did later today for those of you that want that, too.
If you read this far, thank you!! Hope you had fun reading about old stuff!
#*#long post#mine#anime#old anime pictures#old anime images#old#old images#old internet#old web#webcore#the internet of old#windows#windows xp#sailor moon#old windows#old software#old screenshot#screenshots#software#old stuff#2005#2004
2 notes
·
View notes
Text
4 Ways to Make a GIF
Making GIFs is one of my favorite things to do. It’s really silly, I know, but it’s also really fun. I first learned how to make gifs back in November of last year (2017) when I came across Giphy.com. Ever since, I found that I really enjoy making them, so it became a new hobby for me.
It has taken me this long (seven months) to have a fairly good understanding on how to make GIFs, and to this day, I am still perfecting my skills on this subject. I know the following resources on how to make them, but I have not tried out all of them quite yet, so bear with me here, okay?
I understand that there are probably a lot of people out there like me that have been wanting to make gifs, but they are unaware of what to use in order to make them, which is why I want to help you all with this. I have struggled for a long time just trying to comprehend how gifs are made, so after you read this post, you will hopefully understand how to make them, and maybe you’ll even try it out for yourself! So I present to you 4 Ways To Make A GIF:
1. GIPHY:
GIPHY is honestly my favorite place to make GIFs because I can simply insert a YouTube video link, pick which part I want as my GIF, how long I want it to last, pick filters, subtitles, and VOILA!
You can click here for further instructions on how to convert a video to GIF using GIPHY.
2. EZGIF:

I like this place. I really do. You can create, edit, and even optimize a GIF. I LOVE this site so much. It is an absolute lifesaver when I need to fix something. It also seems to be clean of viruses (though, it’s always a good idea to take extra precautions and do a virus scan anyway), it runs smoothly, and so, so, so easy to use. But, because there is a lot to this site, so I’m just going to show you what I usually do. I usually make my GIF(s) on GIPHY.com and then I upload it to this site for editing.
You can click here for further instructions on how to edit a GIF with EZGIF; it tells you the basics on how to use this site.
3. Adobe Photoshop:
I’m not an expert in Photoshop, mainly because I don’t have it anymore, but I do know that you can make a GIF with it. Now, because there are so many awesome things you can do with Photoshop, it’s very complicated! I kind of have a love-hate relationship with this program; I hate the fact that I have to pay for it and it’s sssoooooo complicated to use, but I love the fact that you can do a lot of things with it (I guess that’s why it’s complicated; because of all the cool things), like GIFs!
Visit this page on How to Create Animated GIFs Using Photoshop.
4. GIMP:
Also not my forte. GIMP is fairly similar Photoshop, but it’s free!! I just downloaded it a couple of days ago and when I opened it I was like:
Yeah. Because it’s that complicated. But hey. I’m not complaining. I mean I’ll figure it out... eventually...
So, anyway, back to the subject. Apparently you can make GIFs with GIMP, which is really cool!
youtube
3 notes
·
View notes
Text
Creative Manipulation
What is creative manipulation?
Creative photo manipulation is all about giving an image a whole new look to it using Photoshop tools to make you view the image in a new way. Many methods of photo manipulation are usually adding things like magical creatures or by making the image have an “another world” look to it by making things happening in it that you might usually see in films like magic effects such as glitters or portals but by the use of Photoshop these can be blended into images make them look like a natural entity.
Creative Manipulation Artists
Khoung Nguyen
Source 1
Source 2
Khuong Nguyen is a photographer from Paris who specializes in photographic creative manipulation. He has worked for brands like Porsche, Citroen and Samsung and his recent work was an Alice in Wonderland inspired campaign for a luxury shoe company. A lot of his most recent work uses animals to tell a story and capture the attention of that tat are going to be viewing his work by using these animals in a sweet and subtle way.
This image is used as part of the Alice in Wonderland inspired series advertising luxury shoes. The way this photo has been edited makes it effective as it is clear what the image is advertising by having the red high heeled shoe as the main subject of the image and also by having the mice surround it on a log using them as some kind of pedestal. The way that this image seems to have been edited works really well as it looks like this is something that is just naturally happening in the middle of the hallway and it radiates vibes that are more like they have been “caught in the moment”. I think to create this image and the overall feel of it being inspired by Alice in Wonderland Khuong has used different filters and enhanced the detail of this image giving it a fairy-tale-like effect. The lighting in this photo is very effective as it is focused upon the shoe drawing your eyes too it but there is also a pool of light in the upper right corner drawing your eyes to the smashed mirror which lead you to wonder what happened but it also creates a fairy-tale effect with mirrors being related to such stories.
Ljubodrag Andric
Source 1
Source 2
Ljubodrag Andric was born in Yugoslavia into a family of artists which helped him to begin his career path into art and photography at the young age of fifteen. A large percentage of his work involves the use of CGI and photo manipulation to create delusional but realistic images. His style is made of imagery that is often infused with undertones of humour but still makes the image elegant and eye-catching.
This image created by Andric was used to advertise the fast-food company Chick-Fil-A. I was very confused when I discovered that this was what this image was advertising at first until I looked at the image some more and noticed how the men on the boat were wearing chef’s hats and uniforms showing that this was of significance to them n some way. I then noticed that the man in the black coat and hat was holding a paintbrush with red sauce at the end of it and at the other end of it he was attacking a photoshopped image of a cow angled to make it look like a whale. This is effective imagery as it shows undertones of humour with Chick-Fil-A being a restaurant that serves meat and therefore animals it is like a tongue in cheek way of acknowledging the killing of animals for the fast-food industry.
Flora Borsi
Source 1
Source 2
Flora Borsi is a young fine art photographer originally from Hungary. She uses forms of photo manipulation to create images that capture dark fantasies, dreams and uncanny. She uses her images to represent the complex features of humanity and the things that go on inside the human mind. A lot of her work focuses on the female body and empowering the idea of female representation and the relationship between the body and one’s self. To do this she manipulates a lot of her images to look distorted or to highlight parts of the body that are important to powering femininity. Her dainty and ethereal aesthetic has won her multiple awards and allowed her to be noticed as an artist by companies like Adobe, BBC and Elle Magazine.
This image that Flora has created I believe has been made with the intent to show the destruction of body image expectations can have on someone and have them mentally shatter because of how they view themselves. Photo manipulation has been used here effectively s the woman whose body is lying on the beach has has parts of her cut out that are the typical features in female bodies. Through these parts cut out of her, we see the rubbish that has been left astray on the beach. I really like the way this image has been made that it also radiates a kind of fast pace even though it is a still image I get the feeling that she is trying to convey the fast movement of these kinds of things like body shaming and the clouds and the sky being such heavy dark tones just emphasize the darkness that can be produced from these feelings.
Erik Almas
Source 1
Source 2
Source 3
Erik Almas is a Norwegian photographer who by chance found the love for photography when a relative of his gifted him a camera at the age of 12. This is when he was inspired to become a photographer long-term as he grew up capturing images of small encounters he experienced. He studied in the Academy of Art University in California for four years, this helped him find new goals for his photography careers that expand beyond local news for his home town.
In this image we can see that photo manipulation has been used as the woman has been photoshopped to look as though she is blending in with her surroundings. This would have been carried out using Adobe Photoshop by using blending tools and layering multiple images on top of each other. I think this is a clever ay to edit this image as it makes it look like the woman is blending into her surroundings that are edited in a way to look like we are viewing her dream.
Thomas Baréy
Source 1
Source 2
Thomas Barbéy is a Swedish photographer who grew up in Geneva Switzerland. At the age of 13, he started drawing seriously as an artist and by the time he was 17 he was designing posters for musical bands.
He has been a photographer for over twenty years and prefers to use his Canon AE1s when he shoots in 35mm or his RB67 when shooting in medium format. Using an enlarger and the darkroom he creates photo manipulation and photographic illusions. His work is said to have a specific style to it, working only in black and white, including sepia toning some times. Each of his images he says has to pass the “So What?” test which is if the combination of the negatives doesn’t stand out or show any particular meaning to him he starts from the beginning. The “So What”?” test has resulted in him creating some strange images such as taking an image of the ocean and combining it with a hole and calls it a “Shortcut To China” it makes the viewer think and see the undertone of humour that has been created in naming the work such a title.
In this image “Oh Sheet!” Thomas has taken a photo of a ski trail in Switzerland. He talks about this image being one he took when his friend saved his life as he saw an edge which he thought would be fun to jump over but instead his friend had called him over to head in the opposite direction. Before he left he had looked over the edge and seen that there was a chalet at the bottom.
The manipulation in this image has been created by using an image of the ski trail from that day and merging it with a bed sheet to make it look like the snow and blending it in with the landscape of the background. The bed sheet creates an edge which would be similar to the one that was described that Thomas Barbéy nearly jumped over. I really like the way this image has been created and how when you read about it there is a deeper meaning which is a common theme in a lot of Barbéy’s work. The title of this image is also a pun which catches your attention to look into it have a bit of a laugh to yourself.

0 notes
Text
FLASHBack: Week 33 [First Class FLASHBack] - Weird Al’s Official Flash Animated Music Videos
Thomas Lee, who had made the video for the Star Wars Gangsta Rap, discussed in last week's FLASHBack, was asked to make a video for I'll Sue You, Al's "Style Parody" of Rage Against The Machine.
David Lovelace, the mind behind the Newgrounds series, Retarded Animal Babies, was tapped by Al to make Virus Alert, which was another style parody, this one of the band The Sparks (who regular FLASHBack readers may recall had a keyboardist, Ron Mael, who was the direct inspiration for the look of Roscoe Thunderpants from the Flash-only band Savlonic).
Ren & Stimpy creator and general garbage human being John Kricfalusi was brought in to animate Close But No Cigar, his first time animating in Flash. As with the others this one doesn't parody any specific song, but is instead Al's style parody of the band Cake.
Digital Entertainment company JibJab was hired to apply their animated photocollage style of Flash to Al's Do I Creep You Out?, which finally is an actual direct song parody, in this case of Taylor Hicks' "Do I Make You Proud?".
Doug Bressler, from Doogtoons, made the video for Al's 11 minute epic Trapped in the Drive-Thru. This too, is a song parody, of the even more epic 33 Chapter Rap Opera "Trapped in the Closet" by R. Kelly. There are diagrams. Al's version is simpler at only 3 chapters long but he did get to have his own fun with it. Years earlier he had approached Led Zeppelin about doing a polka medley of their songs for his movie UHF. Jimmy Page declined at the time, but when Al asked him if he could use a sample a few seconds of their song Black Dog to use in this song, Page again said no to the sampling, but did give them the green light for Al's own band to re-record a few seconds of the song's instrumentals. Al's band did such a good job, that many just assume that it was a sample.
Yankovic kept up the practice for his 2011 release Alpocalypse, but this time around the Flash artists he engaged were the kind who were drawing regular paychecks from their work in the medium.
The video for Skipper Dan, a style parody of the band Weezer, and based on DisneyLand & Disneyworld's Magic Kingdom's Jungle Cruise Ride was by Divya Srinivasan who had previously done music videos in Flash for They Might Be Giants, as well as Flash trailers childrens' books she's self authored and illustrated.
The video for CNR, a style parody of The White Stripes, and celebrating comedian and Hollywood Squares fixture Charles Nelson Reilly, was another JibJab collaboration.
The video for Ringtone, Al's style parody of Queen was animated by the Flash artists responsible for SuperNews! on Current TV.
The video for Whatever You Like, a song parody of the T.I. song of the same name, was done for Al in Flash by Cris Shapan, Lead Artist on Cartoon Network Adult Swim's Tom Goes to the Mayor, Art Director on Season 1 of the Tim and Eric Awesome Show, Great Job!, and motion graphics designer from seasons 2 & 3 of Yo Gabba Gabba!
The video for Party in the CIA, a parody of Miley Cyrus's "Party in the U.S.A.", was animated by Ghostbot Inc. the same company that had also used Adobe Flash to create the Erin Esurance ad campaign, a campaign which ultimately had to be pulled when Rule 34 of Erin outstripped search hits for the actual company being advertised by a wide margin.
The video for Another Tattoo, Al's spoof of B.o.B.'s "Nothin' on You", was by Augenblick Studios, who had previously worked on Shorties Watchin' Shorties, Wonder Showzen, Superjail!, Ugly Americans, and the occasional short animation for Yo Gabba Gabba!
The video for If That Isn't Love, a style parody of Hanson, was from Flash animator Brian Frisk of FrownHouse, who had also done segments for Comedy Central's Triptank.
The video for Stop Forwarding That Crap to Me is kinetic typography from Dutch graphic artist Koos Dekker, who unlike the others on this list I can't actually find anything that confirms that this one was actually done in Flash. But I'm throwing it in, just in case (I did read somewhere where someone had guessed that it had been done in Adobe After Effects, so that's gotta count for something.) This song is Yankovic's love letter to producer & songwriter Jim Steinman. Steinman, a long time collaborator with Meat Loaf (and who Meat Loaf describes as "one weird dude") has an immediately recognizable sound even if he's not a household name. He primarily is the songwriter for Meat Loaf's Bat Out of Hell and Bat Of Hell II, but he also wrote Air Supply's "Making Love Out of Nothing at All", Bonnie Tyler's "Total Eclipse of the Heart" & "Holding Out For A Hero" and Celine Dion's "It's All Coming Back To Me Now". His musical stylings are ripe for parody, and Al hits it out of the park with this one.
That's it for this week. Next week, something simple. Maybe some stick figures that aren't from Madness Combat.
#radwolf76FLASHBack#FirstClassFLASHBack#adobe flash#flash animation#mid 2000s#early 2010s#early web#weird al#al yankovic#straight out of lynwood#alpocalypse#gonads and strife#threebrain#Thomas Lee#David Lovelace#JibJab#Doug Bressler#divya srinivasan#SuperNews!#Cris Shapan#Ghostbot Inc.#Erin Esurance#Augenblick Studios#Brian Frisk#Koos Dekker#Yes - There is one creator I didn't tag#Garbage Human Being
1 note
·
View note
Text
ISTD Evaluation
Year 3 - ISTD
(05 January 2021)
This project was not what I imagined it to be in second year. I was determined to produce an amazing book that I could submit to ISTD. What came out instead was a video concept for an interactive website - something I did not see coming at all.
What informed & motivated my design decisions?
I looked at a lot of different magazines and books, as well as previous ISTD entries, to get a feel for what I wanted to do. Once I got into the video
I think I was really inspired by other websites as well as the black-white scheme of silent films. I aimed for a modern website with a touch of old in it. The typewriter-style backstory text was one of the stylistic choices I made in order to achieve a nostalgic feeling. Another one was the time-marker line in the video. I saw it on another website, liked it and tried it out. Not only did I find it useful but I also felt reminded of old televisions. Most design decisions I made based on impressions I got from other websites, and the feedback I received.
What changes & developments has this project gone through?
Initially I wanted to to a printed book or editorial and because I couldn‘t quite let go of that idea I worked on this one alongside the website idea, which I had a little bit later on. My overall topic was quite clear from the beginning but I changed the focus a little bit over the course of the project. Once I had decided to focus solely on the website concept I had a lot of development within the video. I exported a lot along the way so I could follow my changes. For the animated video concept I started with different files for different sections of the website. Later I realised that this was only making things more complicated and I started to merge them all in one file.
Did I manage my time well throughout the unit?
Overall, during this unit I think I managed my time well. I had a bit of a tough start - as always when it comes to idea generation. It took me a while to get the website idea and until then I could not really follow my direction. However, once I had my idea, I worked on it a lot. The fact that I was about a week behind at that point (due to my lack of grounding ideas) probably helped me to work more. I knew I had less time than I would have liked to have and that got my brain working. During the extension I let it slide a little bit though. There is always room for improvement though, and I think I could get more done or at least get more org
How did I respond to feedback?
Any feedback, whether it came from my tutors or my parents, was really welcome and helpful. Since I was so immersed in the topic I knew my text, the music and the video sequences while others didn‘t. I received feedback about readability and content and it really helped me shape my project. Feedback is one of the most important parts of a project. Without any feedback I would not be able to consider as many different aspects of something, and sometimes others bring in a completely different view or opinion which makes me overthink and re-consider decisions I made. It would have been helpful for me to hear what people like more though. While I do appreciate critical feedback I also think it is important to get praised for the work every now and then. It‘s good for the mind, especially in times like we are in now.
How can I improve my design process?
This is connected to my essay research now but I know that visual design (UX/UI) requires different considerations and skills to print design. I think This is connected to my essay research now but I know that visual design (UX/UI) requires different considerations and skills to print design. I think
I could benefit from learning more about visual design, as it there are so many incredible things one can do in terms of design. All the interactive websites I looked at during my research blew my mind and I was curious to find out how they coded that. If I was to go into visual design, I would definitely want to learn how to code properly. Also, I should really learn how to use Adobe XD properly.
What have I learnt from this unit of study?
I feel like this unit of study has made me realise a lot of things about myself, about my mind and how I approach design projects. After Effects was really fun to work with - it did make me go mad every now and then but it was fun. I learned that working remotely works incredibly well and I actually kind of prefer it over going to work in person. The combination of the unit and the time we are in right now made formed a very new challenge. Thanks to Ben, I now also know how to use Glyphs.
Are there any improvements I would make to the final outcome? Make it an actual website! Work on it with someone else giving me constant imput and feedback. Make it more visually pleasing. I am really happy with how the landing page, backstory and about page turned out but I think the look of the video player page could be improved. Typographically I have improved a lot, especially if I compare my work from now with my work from back in first year. When I saw some D&AD entries that explained a concept I realised that I could have done the animation in a more promotional way than I did. What I did was a play-through of the website as if one was going through at the time. However, in terms of explaining the concept through the video I think maybe I should have thought about it as if it was advert, and written a story for it. Add a voice-over and make it more commercial.
0 notes
Photo


- ̗̀ How to Make Gifs with Photoshop and KMPlayer (Very Detailed) by quirkyresources © ̖́-
♡ All my tutorials ♡
Hi! I'm no expert, but I've been making gifs for at least like four or five years, and over that time I've learned a lot, so I want to share that stuff :) Also, someone requested that I teach them how to gif. I hope this helps!
This tutorial will teach you how to create simple but quality gifs, like the ones in the gifset above! Those gifs are all from TV shows, but it should apply to giffing almost anything. I’ll be using KMPlayer and Photoshop.
This is the gif I’ll be showing how to create, as an example:
If you have any questions at all, please feel free to message me here :) And I’m somewhat new to writing tutorials, so if you notice that I got something wrong, please let me know. Thanks!
Please like/reblog if this is at all useful to you. Thank you so much if you do!
You need:
KMPlayer (link below)
Photoshop (I'm using CC 2017, but I think any version with the timeline should work)
A video to gif (recommended source below)
A sharpening action (recommendations below)
A PSD / or to know how to color gifs (recommendations & tips below)
I'll go over:
How to buy/download PS, download KMPlayer, and download a video!
Taking screencaps in KMPlayer
Importing the screencaps into Photoshop
Cropping and timing the gif, organizing layers, etc.
Adding a PSD or tips for coloring it yourself
Adding subtitles & learning font settings
Saving for web
Posting to Tumblr
Various tips along the way!
The tutorial is under the cut. Have fun and good luck! ♥
[Note: If a photo looks too small, right click it and choose "open in new tab"]
Step 1: getting Photoshop, KMPlayer, and quality videos
Get Photoshop:
I was able to buy my Photoshop, so I don’t have any free downloads to recommend, I’m sorry! But there are plenty of other Photoshop blogs on tumblr that can help with this stuff :)
And there are some deals from adobe that might help you afford it if you want to buy it instead. They had a great one for college students that totally helped me.
Anyways, if you can get it somewhere/somehow, here are the next steps...
Download KMPlayer:
Here's the link (it's free!): kmplayer.com
You can use it to watch videos, but in this case we use it to take screencaps of them to use for gifs.
Get your video:
If you’re going to download a movie or show, I recommend getting torrents from thepiratebay.org and using μTorrent to download them. (Here's a tutorial for how to download stuff with it.) Be careful with viruses and stuff, though!
When you look for a video, try to get one that's as HD as you can find, meaning one that is 720p or 1080p! That tells you what the height of the frames will be, in pixels. They are usually big files, but should be much better quality than others.
Also, try to find videos that do NOT have network logos or ads on them!! They can make gifs look pretty bad, and it takes some serious cropping to get rid of them, which then makes it look even less quality.
Step 2: taking your screencaps
Open your video in KMPlayer. (Open KMPlayer and press CTRL O.)
Get to the exact scene/clip you want to gif. (Tip: it's hard to find the exact place you're looking for, so I recommend using your right/left arrow keys to skip through a little at a time.)
Once you're at the part of the video you want to gif, press CTRL G. This brings up the "frame extraction" window. This is where, as you can probably guess, you extract the frames for your gifs! Here are the settings I use:

I use these exact settings almost every time, except for the image format section. I go between JPEG and PNG. I use JPEG if I'm making a smaller gif (like 268px width or less) and I use a PNG if I'm making a larger gif (like 540px width.) This is because (or at least I've heard) PNGs are the highest quality option, JPEGs are the middle, and bitmaps are the lowest (don't use them!!) The only downside is that the higher the quality, the higher the screencap's file size. So use PNGs sparingly if that matters to you.
You can also change the "prefix" of the screencap filenames.
After figuring out all of these settings, click "start"! Then press play on the video, play until the end of what you're giffing, and press "stop" and pause it.
Then, in the frame extraction window, click the "open" button that’s to the far right of the "extract to" bar. This will open up the folder location of your new screencaps.
Step 2.5: organizing your screencaps
What you'll want to do now is organize the screencaps into separate folders for each individual gif. This is something that's good to do whether it's all from one scene or you're doing a compilation of different clips. This is because, when you upload the screencaps into PS, it's best to have them in their own little folders!
(Tip: Personally I use 75 frames or less in each gif. This is because that’s the limit on the sharpening action I use, but I also think it's a good amount to stop at.)
Step 3: importing your screencaps into Photoshop
Next, we're finally going to move the screencaps you took into Photoshop. Yay!
Open file > scripts > load files into stacks. (Tip: Sometimes this function doesn't work on certain Photoshop downloads. If this is the case for you, here's a tutorial on how to get around that!) This brings up this window:

Click "browse" and find the folder with the screencaps you want for your gif. Select all of them and click "open". Then click "ok" and wait for them to load. Each screencap will load as its own layer in the layers panel, which is what you want to start with.
Step 4: changing the screencaps from layers into frames in the timeline
Once they're all loaded as layers, go to window > timeline. This brings up the timeline!
At this point, things should look something like this:

Now we can start using the timeline! In this method we convert the layers into frames that live inside the timeline, which we’ll use to make the gif move.
First click on the button in the middle of the timeline panel that says "create frame animation" right here:

Then click on the little three bars icon on the top right corner of the timeline. Click "make frames from layers" on the thing that pops up .
It depends, but you might need to reverse the frames (if it imports them in backwards). So just click on that three bars icon again and click "reverse frames".
Step 5: cropping the gif
It's really important to know the Tumblr dimensions! If you have a gif that doesn't fit the dimensions most Tumblr users view it at it can get distorted.
So the width dimensions you should use are:
A row of just one: 540px wide
A row of two: 268px wide each
A row of three: 177px & 178px & 177px
A super helpful explanation of good dimensions to use is this one made by karazorel. It's very close to the way I do it.
So to crop it, go to the crop tool (duh, sorry) and enter in the dimensions you want into the area I highlighted here:
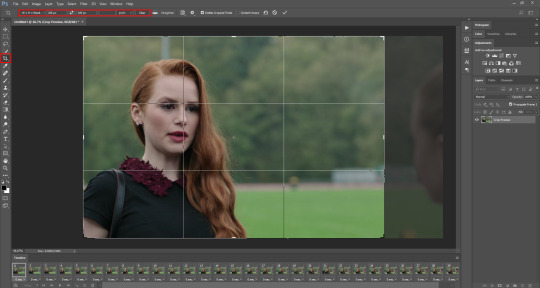
Here's what the gif looks like so far:
You'll probably notice it moves really fast and stops moving after playing once. That's because we haven't gotten to the step to fix that yet. But that's next!
Step 6: timing, looping, etc.
Timing:
Select all of the frames. You can do this by selecting the first frame, holding shift, and clicking on the last frame. Now click the little arrow next to where it says "0 secs." under any of the frame previews right here:

Click on "Other..." and type "0.14" into the text field. That represents the number of seconds, or usually the fraction of a second, that each frame will play for. (It's "0.14" in this case because of the way we entered the settings in KMPlayer in the "Frames to Extract" section. The number depends on what you enter there.) Press enter/okay.
Looping:
Next change the looping setting from "once" to "forever". Here's where I'm talking about:

Step 7: sharpening the gif frames
This step can either be done at this point (before coloring it) or later (right after coloring it.) I go back and forth on which is better, and different people say different things. So just play around with it!
I use this sharpening action. It can sharpen up to 75 frames, which is a really good amount in my opinion.
Once you have a sharpening action downloaded, go back to Photoshop and go to window > actions.
Click this little menu button, then click "Load Actions...".
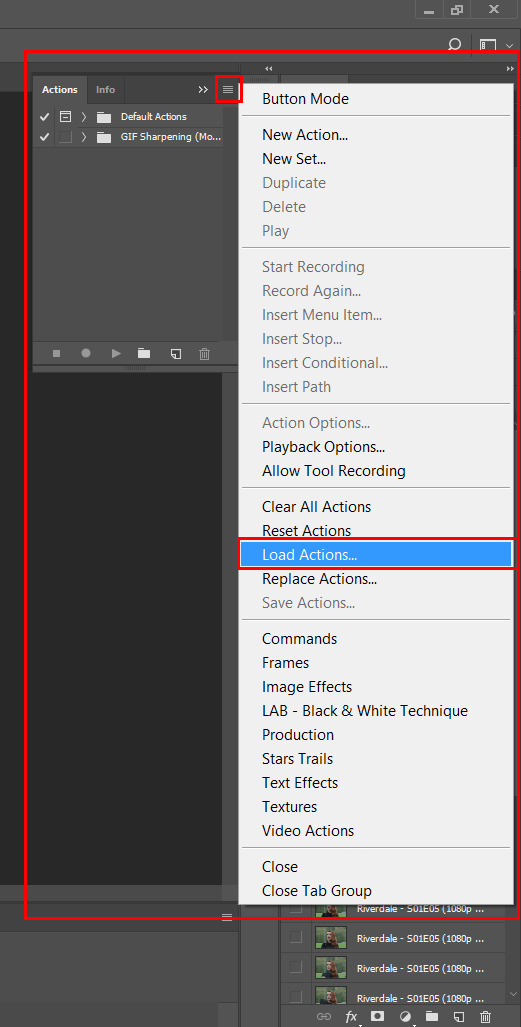
In the window that pops up, choose whatever sharpening action you downloaded and open it. This will load it into your actions panel!
Next, click the menu button on the upper right corner of the timeline panel and click "Flatten Frames Into Layers". Now there will be a new set of layers that are labeled Frame 1, Frame 2, Frame 3, etc. Keep those, and then you can delete the OLD set of layers. (That can significantly lower the file size, and it doesn’t mess anything up if you do it right!)
Now select the very first frame in the timeline, labeled "1", and select the corresponding layer, labeled "Frame 1".
Then open the sharpening action's folder within the actions panel and select the folder labeled with the number of frames you have in your gif. For example, I have 18 frames in my gif, so I selected the folder labeled "18 frames". Or at least that's the way they labeled things in the action I'm using. You may have to explore yours to figure it out.
Then click the play button on the actions panel:

Now that should have sharpened all of your frames/layers! Woohoo! Here's what the gif should look like by now, all cropped, timed, looped, and sharpened:

If this way of sharpening doesn't work for you, here are some other gif sharpening tutorials:
How to use sharpening actions in Photoshop CC by peacelovegifs
Gif sharpening tutorial by manofsteel.co.vu
Sharpening for Photoshop CC by completeresources
Sharpening all gif frames at once by thosetutorials
Sharpening masterpost by itsphotoshop
Gif sharpening action tutorial + download by themazerunnrs
Step 7.5: grouping your layers (a baby step!)
A bonus step that I recommend you do is to put all your layers into a group to keep things neat. Just select all of them and press CTRL G.
Step 8: adding a PSD and/or coloring it yourself!!
Here's the fun part! Now you can let out your creativeness with the coloring. It takes a LOT of practice to get good at this, trust me. I've been doing this for YEARS and I still hate my results sometimes. But if that happens to you, too, don't let that stop you from trying again! (God, I sound like a motivational speaker or something, sorry!)
Here’s some background on PSDs for beginners, but you can totally skip this bit...
"PSD" stands for "Photoshop document", meaning a file you make or edit in Photoshop (sorry, kind of self explanatory). On Tumblr, when people talk about PSDs, they're usually referring to a document with layers that add effects (mostly adjustment layers) to a gif/photo/graphic, etc. Also referred to as a "coloring". They usually include things like brightness/contrast, vibrance, curves, selective color, etc. People post these so you can download them and use them for your own work! (Just don't repost and claim as your own. Not cool, man.)
All you have to do is download the file, open it in Photoshop, make sure you have the layers panel open (windows > layers), and drag the PSD file's window on top of your file's window, but keep them separate so you see both at once. Then drag the PSD file's group of layers (but not the background!) over to your file.

(Then you can close the PSD window.) Then on YOUR file, mess around with the adjustment layers and stuff to change it to whatever you want it to look like. I usually edit mine like crazy!
Anyways, here are what your options are.
Finding a PSD (and then I recommend editing it to however you like it)
Here are places to find some great PSDs on Tumblr! (FYI, some are tag pages with sections for PSDs, with different types to choose from. So look around.)
QuirkyResources (Navigation) (Yup, shameless self-promo!)
QuirkyResources (My PSDs)
CompleteResources
ItsPhotoshop
ChaoticResources
YeahPS
DrunkandColoring
AresColoring
That's just a few of my favorite sources, so message me if you want more recs! :)
Coloring it yourself
I'm not going to do a full-on coloring tutorial right now, but here is my tag for those made by other people!
Basically you should learn how to use the most important adjustment layers: curves, brightness/contrast, selective color, color balance, hue/saturation, vibrance, levels, exposure, and gradient maps. At least those are the ones that I use the most and find super useful. Many of the tutorials in that coloring tutorial tag I just linked go over how to use those. So check them out!
In this case, I used my current fave PSD by dracoharry. (I’ve noticed it works on most shows I gif, so it’s super useful! I actually used it for all of the gifs in the gifset I made for this post.)
Here are the layers I kept hidden/showing:

FYI, I changed the layers' settings and whatnot a bunch.
And here’s what my result was:

Step 9: adding text & learning font settings (optional)
This is usually when I add text to the gif, if relevant.
There are various fonts and settings you can use for this, but to make things easier, here's a font PSD by adorkablelena. It’s for subtitles/quotes. I recently started using it. It's really cute! If you're not into it though, here's my tag for other font PSDs you can check out.
When you find a font PSD you like, open it and drag it into your document the same way you would with a regular PSD.
Select the text tool and replace the text with your quote. (Tip: Try not to misquote or misspell things if you can help it! I've done it and it sucks when that happens. Ugh.)
As far as colors go... For the primary quote I make the text white, and the secondary quote I usually make it yellow (#ffde00). And if there is a third I'll use some shade of orange, and anything after that I just use whatever I can make look the best. The stroke color I use varies sometimes, but I usually use black (#000000).
Finally, select the move tool (V) and make sure "smart guides" are turned on. To check this, go to view > show > smart guides, and make sure it's checked. Now when you drag around the text (select its layer first), you can see little purple vertical/horizontal guides pop up when you drag the text to the center of either direction. For the subtitle we're making, we want it to be centered horizontally and close to the bottom of the gif, but not too close. Also, if you have more than one line of text, just press enter somewhere in the text that splits it into similar-sized lines. Here's an example of all of this stuff put together:

Step 10: saving for web
There are a lot of settings to remember and play around with when saving for web, and specifically for Tumblr.
First, go to file > export > save for web (legacy).
Here you'll see a lot of settings to choose from, but they're not as intimidating as they may look!
Here are my usual settings:

Red highlight: There are multiple options in the top drop down list in the area I highlighted that are good to use. I usually use “Adaptive”, but “Perceptual” and “Selective” are good options too. In my experience, the rest make your gif look pretty gross. For the drop down list under that I choose "Pattern". This arranges the pixels in a pattern, and I like the look of that more than the two other viable options, ”Diffusion” and “Noise”.
Orange highlight: This is where you choose the number of color shades that are in the gif. I use the top amount allowed, 256, because this achieves the highest quality possible! If you need to make the gif's file size smaller, you can lower this amount, but I don't recommend it. If it's a B&W gif you can sometimes get away with using less and have it still look just as quality.
Yellow highlight: Looping options: Forever. Very important! Like I showed earlier, you can also set this setting before you get to the "save for web" option. Either way, this makes it so the gif loops forever.
Green highlight: Gif size! As I mentioned earlier, there is a limit for Tumblr. This example is a pretty small gif (592.9K) and the current file size limit on Tumblr is 3MB. Tumblr seems to change this limit a lot though, so you may want to look that up once in awhile to stay up to date.
Turquoise highlight: Always check the box next to “Convert to sRGB”. I just learned that this setting is important. It basically keeps the vibrance intact when you take it from Photoshop to Tumblr. Read a much better explanation here! :)
Then just click "Save...", choose the file location, and press "Save" again.
Step 11: uploading/posting to Tumblr
Now, last but not least, it's time to upload it to Tumblr! I probably don’t need to explain this, but I’m going to anyways. It's super-duper easy. Just go to your dashboard and click on this button:

Then the post creation window pops up, and just go on from there. Upload your images/gifs, drag them around to arrange them however you like, and add a caption if you want.
(Tip: Don't forget to add tags! It's super important to add tags if you want people to actually find your post. Only the first 5 tags show up in the main Tumblr tag-search results (ugh wtf, right?) but sometimes the other ones you add will show up on the general search page. I don't really get how to explain it or how it works tbh, sorry! But I do know that many fandoms have developed their own tagging-language to find people's posts more easily (and avoid spam) which is very useful once you figure it out. For example, if I was posting a gifset of Cheryl Blossom from Riverdale, I'd tag it with things like "riverdaleedit" and "cherylblossomedit" and maybe "madelainepetschedit". So basically the name of the show/character/actor/ship plus "edit", no spaces. Or an abbreviation of any of those, like "spnedit" or "dwinchesteredit". I hope that at least makes a little sense?
As far as the amount of tags that will show up on individual blogs, I'm not positive, but I believe you can use up to 30. After that the post won't appear on the tag's page. Grrr.)
Then, of course, just post it! I recommend saving it as a draft and then posting it at a time when a lot of people are likely to be on Tumblr. (There's research done on this timing!)
THE END! :D
I really hope that was at least somewhat helpful. Sorry if it was annoying that I went into sooo much detail, I just thought I should explain everything so it would make sense to most people, especially total beginners. Again, if anyone has any questions at all, you can absolutely ask me here! Or let me know if you think I got anything wrong, I would definitely want to fix it! Thanks for reading, and please like/reblog ♥ I’d really appretiate it!
#photoshop tutorial#completeresources#itsphotoshop#chaoticresources#yeahps#tutorials#gif tutorials#gif making#how to make gifs#gif making tutorial#mine#mine: tutorials#peachresources#riverdale#riverdaleedit#coloring tutorial#sharpening tutorial#photoshop tips#ps tips#photoshop 101#ps 101#500
626 notes
·
View notes
Last Seen Blogs
hats-paradox
Very Occasional Posting

jamabarquez
Crazy Life of Mine

gkar56
Back from a nap

invader--zimm
Midnight Ramblings

rndmstans
f4nd0ms