#articulate tutorials
Explore tagged Tumblr posts
Visit Tumblr Blog
Explore Tumblr blogs with no restrictions, modern design and the best experience.
Last Seen Tumblr Blogs


Fun Fact
12.7% of mobile users access Tumblr.
Text

made this for oomf but you can have it too. a little breakdown of my process with bird wings if anyone finds it useful
#art#art tutorial#im suuuuure there's a million out there but idc#also the things in red are pet peeves of MINE idgaf if you wanna draw like that i just think it looks bad imho#ME PERSONALLY. DONT LET ME STOP YOU#and on the little articulation bend cross sea bird wings would be the exception there the joint bend IS very noticeable and sharp#as well as hummingbird wings since those twist the humerus close to the body#rather than flapping from the shoulder
829 notes
·
View notes
Text
twisting ft. @miodiodavinci's SALVADOR Auto Recovery

credits under the cut
original, instrumental by They Might Be Giants
UST, tuning, mix, art by @epicdogymoment
#leologisms#leography#utau#ijo Lijo#salvador auto recovery#tmbg#they might be giants#haaaaaahhh. yet another one that had to go through numerous rounds of mixing and re-mixing#so hard to get a sense for keeping vocals and bg vocals and instrumental balanced.....#the audio cover image is a quick redraw/study (?) of a very very cropped version of the flood album cover#what else is there to say. aaahhh right THIS is the thing i was doing the salvador english test (chug jug) for#ill say im definitely happy with how well i got him to articulate. but i also know all of the words to this song by heart so#im definitely biased. i like this song toooo much and doing this cover reminded me how much i like it#this is also my first time getting an utau to scream!! its very difficult to pull off. especially because the vast majority of tutorials ar#specifically for like screamo-style screams? not what im going for#anyway. thank you tmbg for the flood (1990) album and all the short songs and the official (official!!!) instrumental versions#and thank you mio for making this lovely lad. so i could force him to sing in english.#also i figured i should credit myself for ? things ? feels weird because its on my blog#but yeah i make my own usts. just think its easier to build em from scratch so theyre tailored to the vb im using and how i want to tune it#............bows really deeply.
42 notes
·
View notes
Note
Hey op. I really love your art and would love to learn more of your style
Do you perhaps stream or have tutorials? If not that's fine, I just wanna learn more about the breakdown of your pieces and such <3
Hi nom!
Thank you! I don’t do streams or tutorials, but I’m more than happy to share some here if you like. If you’ve got more specific questions, let me know.
In fair warning most of my work is based on intuition more than studies, so my ability to articulate any sort of process is limited.
Attempt to Articulate Process 1.0
1. I start with motion and shapes. My goal with this is to capture the tone and mood of the piece as a whole. (Since I nearly always feature a hyper-emphasized subject rather than multiple subjects or environment pieces, usually this part is shown in a person I am drawing and what they are doing/preoccupied with.)
Sometimes I use lines/line art to capture these, sometimes I just select parts of my canvas to block out in different colors or paint in broad, clean strokes.
Here’s an example of this in an old draft for @ddeck ‘s Jedi OC:

Breakdown: You can see I have used both lines (in the background skeleton you can still see traces of, as well as the face and shoulder of the clothes, defining finer details) and colors in blotted, blocky, or clean shapes (the majority of the subject). The motion lines are complimentary in opposing directions, shown in the blowing hair and growing vines. The gaze of the viewer is drawn by the perspective and focal points of finer details in the piece, complex shapes or lines (hands, face, seams in the clothes, etc.).
2. While finalizing my motions and shapes to build on, I pay attention to voids and contrasts for what’s being viewed/communicated to come through clearly at a glance:
The shape of a subject can be emphasized by rotating it or stylizing the shapes themselves to leave spaces where the background will come through (voids). I think of this a lot like carving clay, using perspective and paint/eraser alternating to get dramatic shapes. The colors used can be contrasted as well to emphasize depth of a subject. Here’s another example:
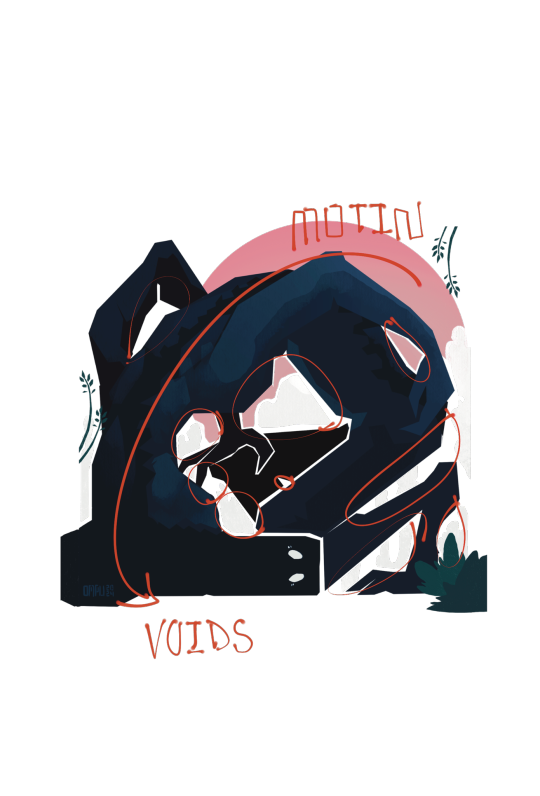
Breakdown: There are plenty of voids both large and small to carve out the shape of this OC creature from the background. Additionally, the color of the background and accents to the creature contrast strongly while emphasizing the motion in the piece, to carve that silhouette out even further. Fun-ish Fact: Sometimes I give the impression of lines without there being any, by leaving gaps in the base colors of the subject where line art would define the shape of, say, crossed arms or the contouring of a subject. Basically I use void lines instead of line art, sometimes.
Here’s an example of steps 1 & 2 in a piece I’m currently working on:
3. After that it’s just lighting, detailing, and shading all the way. Here’s where it usually gets wild for me, because I rarely approach this the same way. The one thing I always do is add another layer to repaint over what I had before.
I either paint in simple, broad, low-opacity strokes after selecting the parts of the subject I want to be affected by the color and texture I’m using, or in tiny, boldly solid strokes that come together for an impression. Here’s an example of each:
Primarily broad strokes:

Primarily detailed strokes, ad nauseam:


Worth Noting: Backgrounds aren’t my forte. For them, I tend to use broad strokes and focus on setting a mood with the colors, shapes, motion, and textures, and using both to highlight the shape of the subject. Sometimes I will throw in a little spice of details in the background for accents or symbolism, but usually I prefer if they’re geometric thematic mood-setters or flat color shapes. You can see this in all of the above examples.
This isn’t comprehensive, and all this is for my digital art pieces that don’t take as much time to make, but I hope it’s helpful as a starting reference.
Thanks again for asking!
#OmPu ask hours#artists on tumblr#tutorial-ish#I struggled articulating this so this is delayed#long post
21 notes
·
View notes
Text

slowly I'm recovering the beauty of discovery
(creature by half•alive)
(textless + timelapse below cut)

#yellowart#subnautica#i feel like the timelapse is kinda long but also this did take a long time to make#anyways. let me yap about the meanings of all the panels <3#'i am creation' -> the ocean being the source of life and where shit evolved from also a good way to sort of 'set the scene' for subnautica#'both haunted' -> GHOST leviathan; in the BONE fields#'and holy' -> this one was a bit trickier. debated about using the emperor but i knew i wanted to use her elsewhere#also debated hoverfish because its cute and well liked so i thought that would be funny for 'and holy'#also something something jesus walking on water also makes it fitting. in the end though i decided on a peeper with the enzyme trail#and i *tried* to make it loop over its head like a halo but idk how well that imagery came through. still mentioned it in the alt text tho.#'made in glory' -> was REALLY torn about this one. on the one hand i wanted to have like a picture of the code because something something#divine machine and it being made out of code making it inherently holy or something; but i wasnt sure if that would be too#'immersion breaking' since most of the stuff in this is like in game stuff i wasnt sure if acknowledging that it was a game would be#too much. my other idea was to draw a couple of creature eggs like a stalker egg and a spadefish egg or something; but in the end i just#went with the one that i personally thought was cooler so if you think it does feel out of place uhhhh sorry i guess lmao.#also yes that is code from the game. idk shit about programming i just think code shit is cool so i poked though a modding tutorial til i#found what it is they use to look at that shit and started poking around. its pretty cool tbh. anyways the specific part i chose for the#drawing was something under the peepers; i think its the bit that tells the enzyme peepers to do the enzyme stuff like the trail obviously#but also some other stuff. not 100% sure though like i said idk shit about this sort of thing but everything in there seems pretty well#labeled its kinda impressive. and very helpful for navigating even if you dont know shit lol.#anyways. 'even the depths of the night cannot blind me' -> blood kelp trench is i think one of the darkest biomes in the game#possibly THE darkest so i thought it would be fitting. probably my least favorite panel though i dont think i did a very good job#representing the area or representing the bloodvines :/#'when you guide me' -> sea emperor but more specifically her messages to the player telling you to 'come here'#'creature only' -> not sure how well i can articulate this but basically the idea of humans beig animals with animal needs to eat and drink#and the idea of being a part of the ecosystem. modern life tends to make us forget that sort of thing but id imagine for ryley being on the#planet would violently remind him of this with things trying to eat him while he has to try to eat things as well. being part of the food#web. 'creature only' because he is only a creature not non-essential systems maintenance chief; but a creature living in an environment and#trying to survive. or something like that. does that make any fucking sense to anyone besides me? whatever.#anyways yapping over 👍
19 notes
·
View notes
Note
WOW Shut eye is amazing!! I’ve probably watched it like 20 times already lol. Your art style for the cats are wonderful and I was just wondering how you draw the eyes for them! I have tried a lot of ways to draw eyes for my cat drawings but none of them look right :(. I would be soo happy if you could give me some tips! It’s okay if you don’t want to :)
Aaaa thanks so much!!
The way I draw eyes can actually be pretty inconsistent? I change it up slightly every now and again haha, but they basically all start the same way!
I always start with a general shape on my sketches to decide where exactly im putting the eyes. Deciding on the angle you're seeing them from will influence how you draw them, since eyes look different based on whether you're seeing them from above, below, straight on, or from the side
Once I've got some barebones guidelines, I'll draw vaguely oval-shapes along the horizontal guideline; these are the Almost Eyes. They change shape depending on the character im drawing (since most of my characters' eyes are slightly different from each other), but here they're just Generically Curved. Their purpose is less to look good and more to figure out the general shape of how I want them to look

Then I do the Final Lining, and this is the part that's hard for me to explain; I've done it so many times at this point it's almost entirely instinctual ^^;; the main part I usually end up focusing on is the upper line that mostly represents the upper eyelash! I've included some examples of it used with different characters, highlighted in red. The shape changes depending on the character, but it's always there!


From there, I'll usually have a line to represent the outer edge of the eye (blue) and then the very edge of the bottom eyeline (yellow). Most times, I leave most of the bottom of the eye as an implied line (I am not immune to anime-eye-style influence HAHA). Some characters I include a line from the inner corner of the eye that points downward (seen here with Larkstar in the top right and Mudpaw in the bottom left) to indicate either age (like with Larkstar) or stress (like with Mudpaw)
I usually draw eyes very big because 1) cute and 2) they're very expressive! I find it easier to communicate emotion with larger eyes :P
My words aren't really word-ing today, so here's a couple more quick examples!

#ask#advice#rye's art#my art is also not really art-ing rn SO this isn't the best tutorial I've made#I might revisit this question on another day when im better able to articulate what im doing when I draw lol
33 notes
·
View notes
Text
You know people don’t tell you this but apparently when you are actually on meds for your ADHD you suddenly gain the ability to just… make spreadsheets
Two years ago me barely even touched google sheets. Today me is constantly like “hmm you know what I could do with all this information I’m gathering? Make an intense multi tab spreadsheet as a quick reference guide :)”
Wild shit
#personal#adhd#spreadsheets#seriously though I have never been simultaneously more and less organized#currently my latest hyperfixation is my desire to get into doll customization#I have one spreadsheet dedicated to documenting doll YouTuber videos to reference for things like hairstyles#another tab for listing all the articulated doll brands I might want to look into getting#another spreadsheet dedicated to listing all my ocs and what supplies I might need for each#like trying to decide if I want to go nylon/Saran doll hair or yarn hair#a separate master list tab of YouTube video tutorials for specific things like making doll wheelchairs#so yeah!! my brain really has said ‘it’s spreadsheet time babie’#genuinely though the first thing I really noticed about my meds is that I could like. actually work on organizing my thoughts#and apparently the way that manifests is: spreadsheets and lists#highly recommend
54 notes
·
View notes
Text
ohhhhh these r gonna be some jerry rigged wings alright
#articulated wing tutorials don't include the 2 extra 'fingers' dragons have. wuh oh#guess who's gotta rig it himself lmao#girl i barely was able to visualize putting a wheel and axle onto a wagon😭😭 fuck this
4 notes
·
View notes
Note
your video was actually super helpful and gave me some tips that I was glad to get confirmation on. The whole thing about the threads not needing to both be on the same side? Game changing. thank you!
Genuinely it’s one of the best and most helpful knitting videos I’ve ever seen and I noticed a huge improvement in my skills after watching it! Good luck with double knitting lace, to me it sounds like “rocket surgery” haha. VERY exciting and impressive stuff
#myp#it’s sure to wow the whole town 💯💯💯#I’m a beginner and the way he clearly articulates whatever he’s doing made me actually understand what purling is#I read and watched a gorbillion tutorials but his offhanded front/back comment made everything click#asks
4 notes
·
View notes
Text
I sat down to write and got distracted for ~3 hours bc I decided to teach myself how to use OpenUTAU
#I HAD PLANS FOR TODAY#and now it's midnight FUCK#3 hours and i only just learned how to make a voicebank articulate words#it sounds terrible but omg there's finally a consonant in there#literally screamed when i got it to work#i have read and watched so many tutorials and forum posts#if i ever see the term CVVC i'm gonna commit violence#not writing#ramblies#utau
5 notes
·
View notes
Text

photo/caption by tru_fashionista_luv on Flickr (dead account)
I wanted to do this hybrid ever since I saw that Mattel followed through and released an articulated Skipper doll. I swapped her legs with the Skateboarding Skipper doll and it was a success! Now, if only Mattel would just do this in the first place along with giving her some friends like Chelsea has… Her articulation is surprisingly good, she can put her hands on her hip, her elbow joints are tight, and her wrists moves better that the Fashionistas IMO. Her outfit is nice quality too, her top is a full print as well as being made with a nice material and her top and leggings are separate pieces. Weird that Mattel is getting more and more inconsistent with their clothing quality, bummer.
2 notes
·
View notes
Text
Mini Project: Dark Knight Interactive Form
I created this small project using Articulate Storyline 360. It was based on a tutorial by Joanna Kurpiewska. However, I added my own twist by including a subtle Batman theme. As a result, the form feels more playful and engaging. Select the image to view the full interaction.
#articulate storyline#articulate storyline 360#Batman animation#Joanna Kurpiewska tutorial#motion design
0 notes
Text
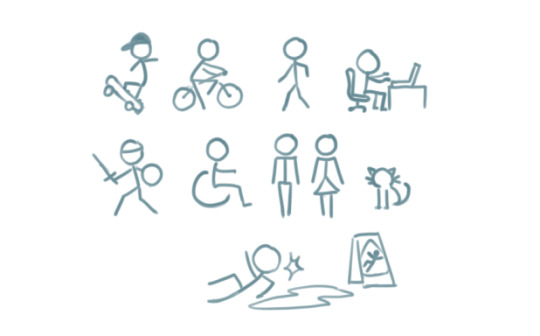
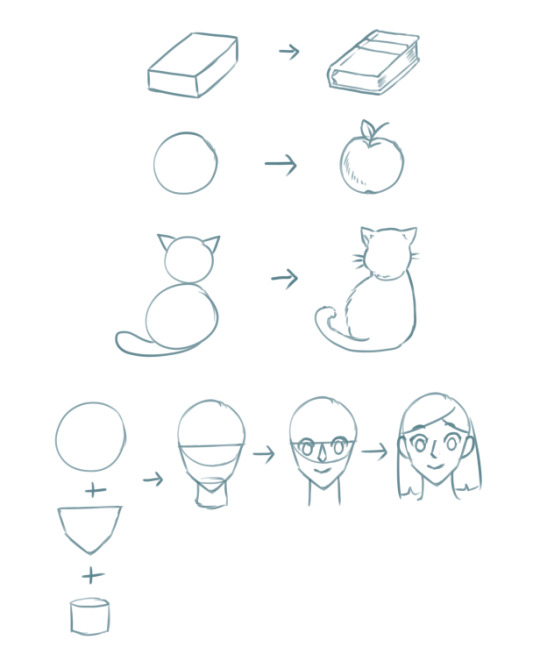
@dimiclaudeblaigan asked for a tutorial on how to begin drawing. Good news! If you can draw a funky looking stick man, you have already started!
I think that stick people are a great starting point for artists because of the things you can learn from them that will be important later on.
If you are able to draw a circle and a couple of lines, you can easily put together a stick person.

Congratulations! You have started to draw. :)
A stick person is a very minimal artistic representation of a real life person. It is simple yet recognizable, and is widely used in art, media, and signage.
But what can a stick person teach us about drawing people that look more like… well, people? Lets have a look!
By simply adding a few more lines, we can add a pair of eyes and a mouth. Maybe even a little triangle nose! Or half circles for ears. We can now draw a face, which provides a basis for all sorts of expressions.
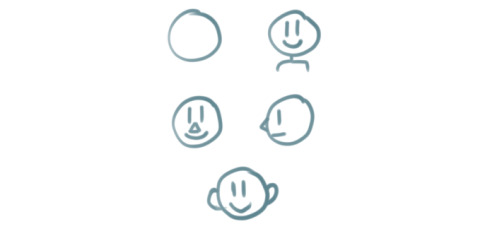
These simple additions can allow us to explore the wide range of human emotion and individuality.

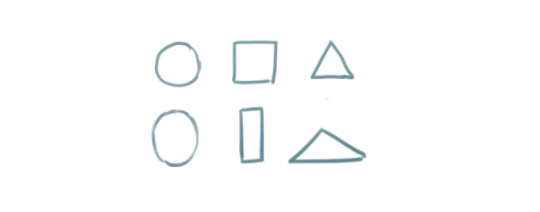
This may seem like the basics of the basics. But that is what we want! In order to get to the point where we are able to draw complex, elaborate representations of humans and objects, we will need to start with simple shapes like lines and circles and build our understanding from there.
For instance, lets give our stick person some cool new features, such as hands and feet. I chose little squiggly circles to represent hands, and triangles to represent feet.
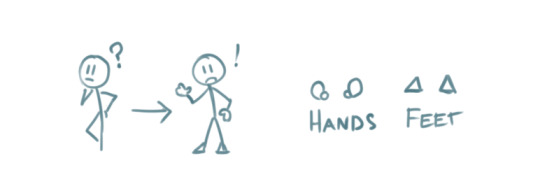
We can go a step further and modify the body of the stick person to include shoulders, hips, elbows and knees. These parts of the human body are quite complex in real life But here, all we need to do is add a few simple lines and dots to our stick person.

The lines provide some additional structural elements to our stick person's body, which are the shoulders and the hips. The dots indicate the points of articulation - elbows and knees, the places where the arms and legs bend!
Now we can use our stick person to show us an even wider range of human movement, action, and expression.
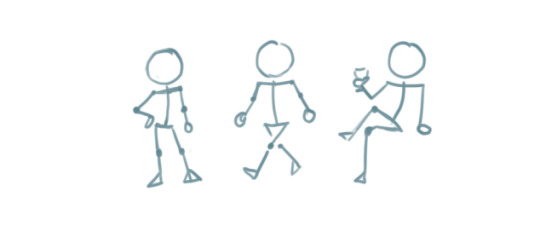
Our little drawing of a human being is evolving! All it took was adding a few more lines and shapes here and there.
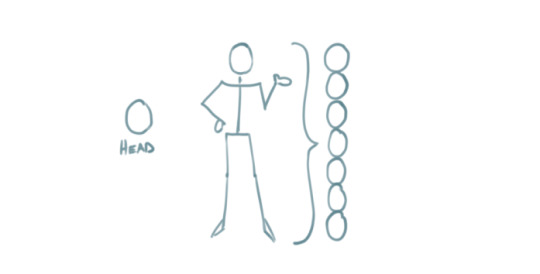
By elongating some of the existing lines and making the head an oval instead of a circle, we can give our stick person proportions that resemble that of a real life human.
By this point, we have managed to add more complexity to our stick person simply by using our ability to draw lines, circles, and other basic shapes!
These basic ideas are the building blocks that will enable us to create more complex shapes.
The next part may be a considerable step up if you are absolutely new to drawing, but I have decided to include it in order to show you how complex objects like the human body can be built from shapes that are a bit more complex than circles and lines.
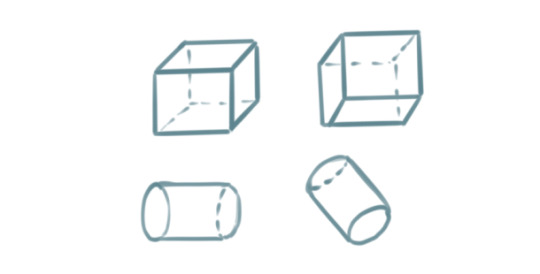
For example. Two ovals and a rectangle can be combined to create a cylinder.

Six squares can be combined to create a cube, or a box. Here, each square is distorted slightly depending on which way the cube is facing.

Note that the back faces of the cube and the bottom of the cylinder are hidden. These shapes allow us to visualize that which should not normally visible.
A sphere from all perspectives can be represented by a circle. But we can make it more like a sphere by adding lighting and shadow if we so desire.

Cubes, cylinders, and spheres are examples of 'solid shapes' because they consist of 3 dimensions.
Lets see how these solid shapes can be used to compose the human body.
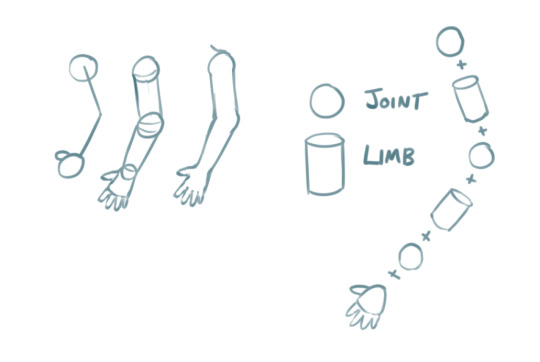
By stacking three cylindrical objects, we can create a torso. Two spheres have been added to form shoulders, while a smaller cylinder forms the neck.

An arm is an alternating sequence of spheres and cylinders connected together. Note that the hand has been simplified for this example.
We can apply these solid shapes to the rest of the body to give us a more recognizable representation of the human form. It doesn't even have to be perfect. And just like that, our stick figure now has a silhouette that is unmistakably a person!
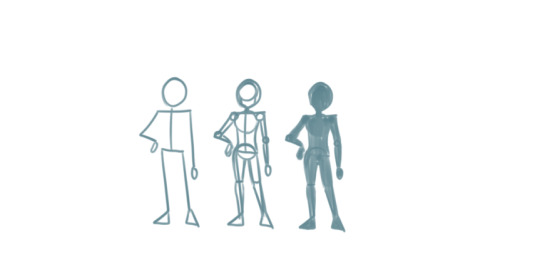
In the above examples, notice that we kept the stick person at the beginning while building up the shapes and solids around it. This is because the stick person serves as a guide for positioning the body and its various parts -> also known as posing.
You can do the same thing to everyday objects! Here, I drew a wine glass by stacking these three dimensional solid shapes.
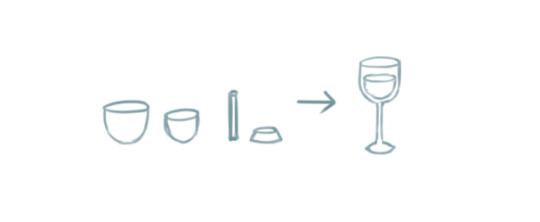
The cup and its contents are two ovoid shapes that were cut in half. The stem is a very thin cylinder shape. The base is a cylinder with a slightly wider bottom.
Solid shapes help inform us how objects and parts of the human body may appear from different perspectives.
For example, a sphere can be used to demonstrate how the human head appears when looking up or down, turned to the side, or tilted at an angle.

With these examples, I hope I have managed to convinced you that if you can draw a circle and a couple of lines, you can draw a person! You just have to train your eye to recognize the simple shapes within complex objects. Try it with everyday objects as well! Or even your favourite media! A drawing subject can be as simple or as complex as you envision it to be.
Once you have mastered that, there are many aspects of drawing you can explore from here that may require you to seek additional resources or a fellow artist's advice.

Last of all, remember that drawing is an iterative process. Even if you draw something correct the first time, you will need to draw it again and again to get it right all times! And by making small changes like the ones we explored in this tutorial, your drawings will gradually transform!
I hope what I've demonstrated here are enough to provide the basics of how to get started with drawing objects and people, and also to help refresh more experienced artists. :) Hopefully I didn't go too off topic with what was requested, and let me know if there are any more questions I can answer.
Cheers :3
32K notes
·
View notes
Text
🔬HOUSE PLACEMENTS IN SIGNS OBSERVATIONS 🔬
Note : These are all my personal observations and patterns I've seen over the years and based on western astrology. Take what resonates and leave the rest. One placement isn't enough to predict and should look at the whole chart to analyze what's in there. Lemme know in the comments whether it hits home or not!
1st house placements in fire signs loves the spotlight or at least love taking selfies and posting it on social media. If in earth signs, looks in the mirror frequently to make sure they look good when crying and takes mirror selfies. If in air signs, their style changes everyday and in some cases, loves to color their hair especially if they have moon in 7th, 9th or 11th houses. If in water signs, has this " cry now, think later" energy or " I'm fine" energy even if they're not.
2nd house placements in fire signs are prone to impulsive buys and spend recklessly. If in earth signs, affordable shopping or hoard things like there's no tmrw. If in water signs, holds onto things and get emotionally attached to stuffs like that's my grandma's watch or this recipe is from my great grandma from world war 2. If in air signs, cheap buys and looks for discounts, thrift stores, spends too much on something and then live on pennies for the next whole month.
3rd house placements if in fire signs, can jump to conclusions or interrupt without realizing it. If in earth signs, waits for their turn to speak which never comes if in retrograde motion, could be too blunt and brutal with their words and insult you wrapped up as a compliment. If in air signs, convos are all over the place and ends Convo abruptly and moves on to next and struggle with articulating words if in retrograde as mind processes 120 words and in 5 topics at once, they end up with speaking 20 words. If in water signs, overshares and take things personally even when others meant in a general way.
4th house placements if in fire signs, stubs their toe constantly or just prone to little/major accidents at home. If in earth signs, black sheep of the family, might seem too distant or emotionally closed off, selective affection. Constipated at times. If in water signs, can't let go of toxic people around them and pretends they're happy even though they're not. If in air signs, selective communication, gossips within family, argues sometimes and reconcile with the other person like nothing happened. Also forget things quickly like where is my key?
5th house placements if in fire signs, defensive and loves riding a bike to watch the sunrise or such. Short-tempered and into games. If in earth signs, stingy when it comes to spend for others they don't wanna spend money on. Classic "I have nothing to wear" energy. Loves desserts and likes to try new restaurants/dishes. If in air signs, smart and would navigate their way out of trouble. Doesn't like relatives showing up. Watches bad movies knowing it's bad like The Room or Neil Breen movies. The kind to spread a rumor for fun. If in water signs, never asks their crush out and daydreams about their crush like having kids and dying of old age together. Bathroom/Kitchen singer like sings while doing household chores. OCD in some cases.
6th house placements if in fire signs, watches at least 5 shorts/reels a day. Doomscrolls their feed. Watches cooking tutorial or natural skin care remedies. If in earth signs, has a schedule for when to clean and when to run errands and expects their kids to follow/help. Learns new hobbies later in life like in their 40's. Prefers a clean kitchen. If in water signs, breaks things accidentally and spills coffee or other drinks often. Religiously drinks coffee or at least into green tea and such. Into collecting things they like such as pokemon cards, art collections and such. If in air signs, they are their worst enemy and comes up with worst scenarios in their head which never happens in reality. Talks and smiles to self like if someone seen them smiling, talking to themselves, would be seen as a crazy or a weirdo. Inner voice is their best friend. Unemployed/underpaid in some cases.
7th house placements if in fire signs, has this "world is your oyster" vibe and grass is always greener on the other side for them. Has Plan B. If in earth signs, multitaskers. When comes to love, juggles between two people and also loves architectural designs like interior designs and all(eg: Pinterest and Zillow). If in water signs, never satisfied with things or people. Either a drunk or the sober friend. Also a hopeless romantic. If in air signs, struggles with decision making. Migraines and hate loud noises or loud people. If single, in a relationship with their bed.
8th house placements if in fire signs, sexual tension or sexual conquest. Loves the chase and an ego boost and defensive in relationships. One-night stands/flings. If in earth signs, picky with whom they let in. Asexual in rare cases. Transactional relationships or relationships based on sex rather than any real love in some cases. If in water signs, one-sided sexual attraction, BDSM and such. Fantasizes about their interest sexually and watches p*rn to get off. If in air signs, into hard-core p*rn fantasies, abused/cheated on in relationships, sex when travelling, aquaphobia if moon is placed, quickly jumps from one interest to another. LGBTQIA+ in some cases.
9th house placements if in fire signs, smells BS from a mile away. Likes k-pop or other culture movies/songs than their own. Would leave everything behind to pursue their passion and start from scratch. Into animal rescues and like action movies. If in air signs, prefers an apartment/penthouse/condo than a home in the suburbs. Loves to attend concerts, rallies, festival events and all. Not a homebody or gets depressed if stayed home for longer periods of time. Likes stand-up comedy. Watches true crime. If in water signs, loves to travel via water or at least swim in lakes or rivers in the weekend. Fishing/sea food in some cases. Potential to become a chef/ just food business or simply eat at buffets. If in earth signs, watches home building tutorials/DIY construction kits. Loves snow/rain. Spends at least an hour/day on shopping apps or might even sell stuffs online. Could be into vintage/futuristic fashion and buys gadgets/antiques. Into old model cars/scifi cars in some cases.
10th house placements if in fire signs, have a start-up founder like passion and energy. Moves away for career. Has Plan B,C,D like an accountant in the morning and comedian in the evening. Career change might happen later in life to follow passion. If in earth signs, two or more sources of income is possible. Strategist and an "insider". Knows things most of us don't have access to or not known by public. Sometimes becomes a stay-at-home parent after kids enter the picture and willingly takes a backseat in their career. If in water signs, values connections which sometimes gets romantic. Co-workers/colleagues are like family. Fakes their smile or acts friendly to people they don't like but do so to avoid being called rude. If in air signs, trusts people blindly sometimes, gets betrayed by people they knew well, unemployed/underpaid in some cases.
11th house placements if in fire signs, debates in the comment section, struggles to stand out from crowd/find their community or niche, feels lonely even when surrounded by people. One man army. If in earth signs, feels too old for trends like a grandma/grandpa to tech or live in the 2050s. Struggles to be heard in groups or spends time and money on people as what others think of them matters. If in water signs, talks to strangers online looking for love and connection. Long-distance relationships which might or might not develop further. Spends on celebrity products/merch in some cases. If in air signs, send pics to strangers online or an active OF account in some cases. Could get blackmailed/hacked in some cases. Probably has a troll account.
12th house placements if in fire signs, feels like the side character in their own life. Fire on the inside, calm and composed on the outside. If they do succeed in life, people around them won't even believe they can do great things. Hides their true self. If in earth signs, clean and tidy when happy, poor hygiene and unkempt hair/nails if depressed. Skin and food allergies. Body image issues/self-harm tendencies. If in water signs, falls for unavailable people, hypochondriacs, diabetes/blood pressure issues later in life in some cases. Dehydration/over-indulgence. Cries under the sheets or in the shower. If in air signs, might develop su*cidal thoughts/self-destructive tendencies, stalk exes online or gets stalked. Hides their true opinion on things and says what's acceptable in the society. Writes under a pen name. When 12th house placements move far away from native, they usually get seen/recognized by people there and loved more.
Wanna go deeper into the layers of your placements? DM me for a complete astrology reading or a 5 year/8 year marriage report🌙💬 and check out my pinned post for pricing + details 💫💸
Let’s decode your cosmic chaos together ⭐
#astrology#astrology readings#birth chart#astro observations#astro notes#spirituality#spiritual awakening#zodiac signs#spiritual journey#western astrology#natal placements#natal aspects#natal astrology#natal chart#astrologer#astro community#astro placements#astrology tumblr#astrology notes#astro tumblr#astrology signs#astrology placements
563 notes
·
View notes
Text
("Sonic") Hands Study
I get asked a lot how I draw hands, and particularly how I draw hands in the "Sonic" style. Let me preface by saying I am mostly self-taught, so please do your research and study what techniques work best for you. The following demonstration is what I personally use to help me draw hands in general and–more specifically–how I draw “Sonic” hands. This is less of a tutorial and more of a series of observations.
*And remember, there are always exceptions to the rules!*
I personally believe before you can go about stylizing hands, you have to understand how to draw hands in the first place. Afterall, I think you have to know the rules before you can best bend/break them. Think about super stylized hands in animation like the characters from Atlantis or Hercules. Even though these hands are unlike what we see in real life, they still look and feel ‘natural’ because the artists understand how hands function and are able to bend the rules while still demonstrating proper anatomy.
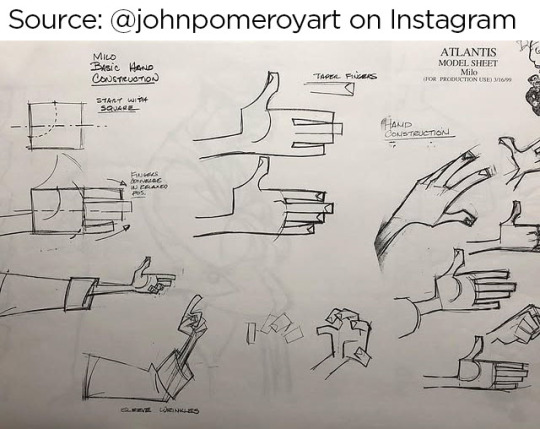
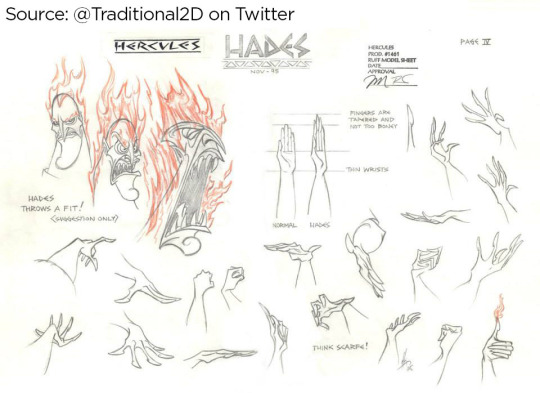
Sources: [x] [x]
I highly recommend studying the anatomy of a hand. It’s educational and fascinating! There are plenty of free resources online!
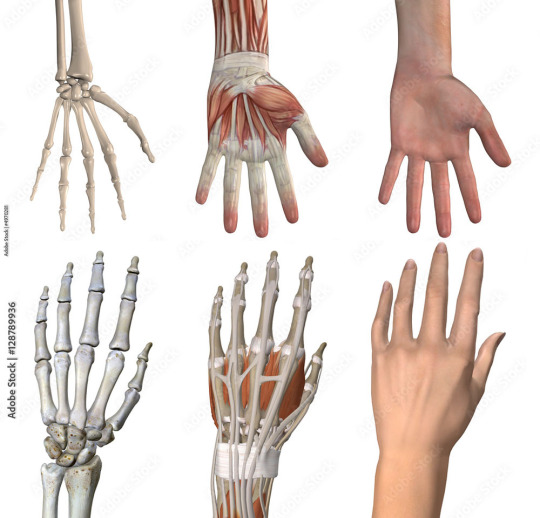
I understand many people find hands intimidating to draw, but the best way to learn how to draw anything is by breaking it down into shapes. Everything is made up of shapes.


3 is the magic number
In simple terms, our hands can be seen in patterns of 3. Your palm can be broken into 3 segments that can move semi-independently. Your fingers are composed of 3 segments each (proximal, middle, distal). There are 3 phalangeal joints per finger. The average shape a person’s fingertips make when aligned is a triangle (a 3-sided shape), with the middle finger being the highest most point of the triangle and the other fingers cascading down (there are exceptions to this rule). Keeping the number 3 in mind will help you remember how hands/fingers articulate.
Everything is connected
Even though elements of your hand can move somewhat independently, every movement influences the other segments of the hand. Notice when you put one finger down how (most likely) at least one other finger moves slightly? Or notice how you can only do certain gestures with the assistance of your other fingers or sections of your palm? Keeping in mind how segments of the hand affect the others will help make your drawings feel more organic and less stiff.

I usually start with the palm (or back of the hand) first and that determines where everything else falls into place.

Once you grasp how hands work, that’s when I believe you can determine how stylized you want to get. There is a very large range of drawings hands from super realistic to very simplistic.

If you’re wanting to emulate a certain style, you have to study it and learn how it works.
"Sonic" hands
As far as Sonic hands go, it depends on which version you’re best hoping to emulate. Notice how the styles vary even throughout the franchise?
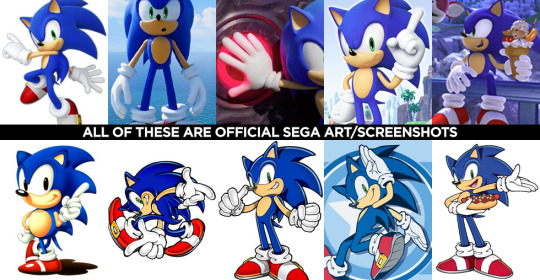
In the 3D video games, Sonic characters tend to have what I classify as more ‘cartoon-y’ hands while in illustrated media, it often leans more towards realism. (Note I said ‘leans towards,’ not full realism). How and why is that?
Let’s break it down into shapes again, Sonic Style! Pt 1
In many of the 3D rendered media, the characters’ fingers are made of more round shapes. The models also don’t conform to realistic proportions. The tips of the fingers are usually larger than the segments closer to the palms (the middle and proximal phalanges), and this helps to deviate them from a more realistic look. Speaking of proportions, the hands overall tend to be disproportionately larger than the rest of the characters’ bodies. This also makes it feel more like a cartoon, even without resorting to a super simplified, 3-fingered hand like Mickey Mouse or Bob Belcher.

Breaking down shapes, Sonic Style! pt 2
Illustrated samples vary depending on the artist/studio, but I’ve noticed that in general, illustrated Sonic characters’ hands tend to have more square/rectangular shapes. The phalanx proportions often resemble what we see in real life, with the fingertips tapering down in size compared to the segments closest to the palm. The overall size of the hands in proportion to the body are still larger than that of real humans, but they tend to be closer in proportion compared to their 3D counterparts. This is why in illustrations, the characters are more capable of crossing their arms, interlacing their fingers, or making other natural hand gestures.

Also, notice in these examples, there’s more detail to the hands than what you’d find on a Looney Tunes character? There are often folds in the material of the gloves, some knuckle definition present, more natural bends to the fingers. However, the hands are almost never as detailed as that of say, a Dragon Ball character where you’re seeing muscle tendons, veins, definition of each finger segment, finger nails, etc.

Sources: Dragon Ball Z, The Looney Tunes Show
MY STYLE
With all that in mind, I happen to find the sweet spot for the Sonic character style right in this range:

Everyone has their own preferences and it’s up to you to decide what you like best, but this is what I prefer.
MY STYLE - Cont’d
I use a blend of the two previous Sonic styles I mentioned, Cartoon-Round + SemiRealistic-Square. I like to go with a more “Squoval” shape (rounded squares) to the fingers. I try to keep the fingers in a naturally proportionate scale with the ends tapering down in size, but the overall size of the hands are still bigger than what you’d see in real life. I like to add a bit more detail when warranted, but I personally rarely resort to definition in the tendons/veins or complex wrinkles in the bends of the fingers (unless it suits a specific character or emotion).

Like I said, this is less of a tutorial and more a series of observations. But perhaps looking at hands in the way that I do might help you with your own drawings! You should absolutely do your own studies to find what works best for you. But I hope you found this helpful in some way!
#study#art study#hands#drawing hands#cartoons#sonic#reference#long post#advice#tutorial#sth#sonic the hedgehog#sonic trash
420 notes
·
View notes
Text
This is just a post of me collecting previous tutorials and things I've written, because I'm going to use them again in a future review.
So here's my EGL/lolita fashion resources from across some time
Fabric selection:
Picking quilt prints to use in lolita fashion
Spoonflower sample pack: This has a lot of detailed shots about why different fabrics do and don't work super well for lolita
Uncommon fabric choices
The original guide to prints, photographed with a potato and shouting out a long-gone lolita resource that predates lolibrary
Lace:
The original 20dollarlolita lace post
Close up pictures of lace on lolita fashion garments, part 1, part 2, part 3
How little details change lolta vs loliable
How to research on lolibrary
I say a lot about mood boards because I believe that, when it comes to handmade lolita, being able to research trends and articulate your thoughts to other people is more important to making good lolita than, like, having a sewing machine is.
Adapting cosplay concepts into lolita Some more stuff on lolita and cosplay, and adapting drawings into lolita when you don't have a foundation to know how to construct lolita.
Few thoughts about getting started wearing lolita few thoughts about getting started sewing lolita
Why you should copy an existing lolita garment's construction for your first (and maybe many) pieces (I still do that quilte a bit)
How to actually do that copying
It's getting late and I'm tired and maybe I'll add to this later. If anyone out there thinks I've missed something in error, please let me know. I will not be going back to fix the formatting of this post and this time and I do not suspect that I will ever do that ever.
175 notes
·
View notes
Text
One Way to Repair a Broken Doll Arm

Today I'll be walking you through how I repaired this Ever After High Lizzie Hearts doll's broken arm. While I wouldn't call this a fool-proof method, and I'm not sure that this repair would hold up to being played with, if you've got a beloved doll you want to repair, this should be just fine for a doll that's mostly going to be displayed.
The best part is, this will retain the articulation of the arm and/or knee (this method will technically also work for knee joints, though knees are harder than arms to work with). So let's jump in.
Tools required: Craft Knife, Jewelry pliers, Wire (gauge depends on size of joint), Super Glue, Hot Glue, Patience.
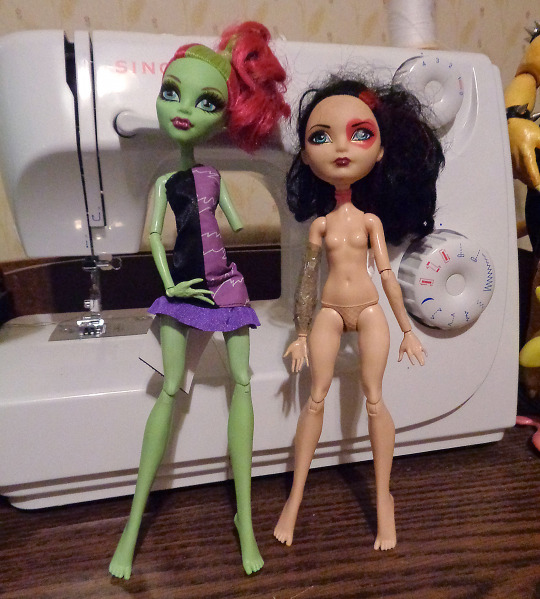
Let's start with our patient.
I thrifted this Lizzie doll a few days ago, along with a Venus McFlytrap, as shown in the above image. As soon as I saw the taped up arm, I knew the joint was broken, but hey, she was like 80c USD. I can apply some elbow grease for that cheap. Plus it gives me an excuse to finally make this tutorial.
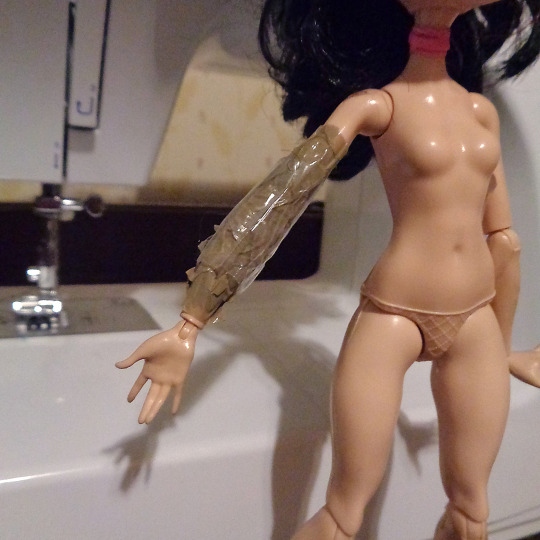

They went a little overkill with that much tape, but whatever works?
I cut the tape off carefully with a craft knife. I didn't take a pic of that, but I think you can image what a broken doll arm looks like. Unless you have aphantasia I guess, but that's getting off topic.
First thing I did was use the craft knife to slice along the seam lines, then pried the upper arm open (slowly. seriously go slow.) with a pair of jewelry pliers. It will leave marks on the plastic, but I can buff those out later.
Why am I doing this if the arm's already broken? I want to remove what's left of the peg that's in there. You could also drill it out if you have a dremel, but I wanted to avoid this tutorial needing power tools.
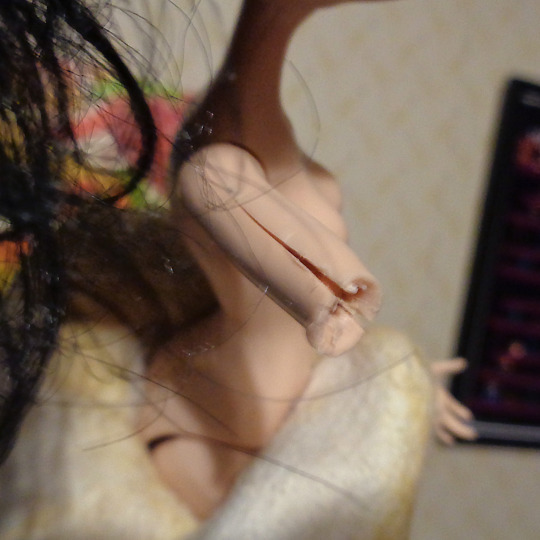
So here's the arm, pried open, with the peg removed.
To close it back up, I used a tiny bit of acetone to melt the plastic at the seams, then held it together until it hardened enough to stay in place. Leave it for a few hours to make sure it's all fully cured, then you can sand the area smooth.

And here's the arm with the broken peg.
So what now? We need to remove the peg piece that's attached to the elbow. I couldn't get a photo of that since it's a delicate process and I only have 2 hands, but here's an artist rendering that would give you the idea.

Take a craft knife, and SLOWLY. CAREFULLY. cut into the ring that surrounds the elbow joint. YOU DO NOT WANT TO GO TOO DEEP, TOO QUICKLY. YOU DO NOT WANT TO ACCIDENTALLY CUT THROUGH THE ELBOW POST. Just go nice and slow. Just chip a little out at a time until you get to the center.

Use pliers as well to pull out the rest of the bits, though you might have to cut a good bit out before you can pull the rest out.
As for my doll, the operation went successfully.
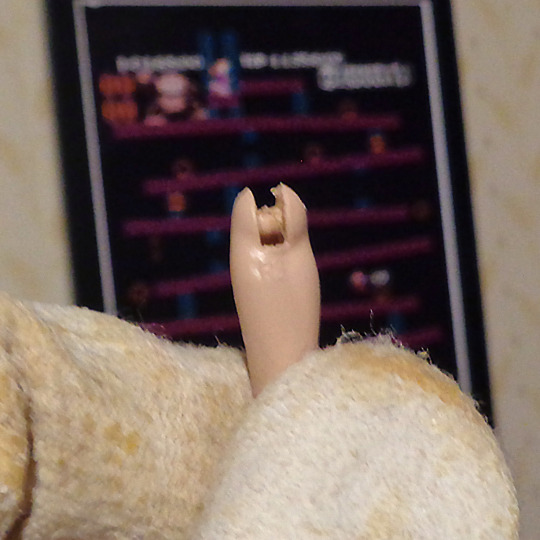
This is what the elbow looks like with the joint peg removed.
Now we've gotten past the hard part, we'll cut off a few inches of wire and string that though the elbow joint. Once through, we'll twist it until it's reasonably tight to the joint. If that makes sense.

It should look like this. Give it a test fit and cut the wire shorter as needed so there's no gap in the joint.
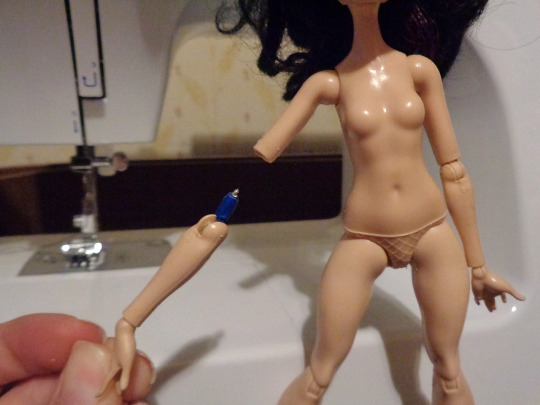
My test fit. Yep, I recycled this for the top photo as well. The blue is just painter's tape.
If you find you can't get it tight enough, and it feels too loose, I'd add a drop a super glue in there. Just keep moving the joint as the glue dries, and it'll add some friction so your arm will hold a pose.
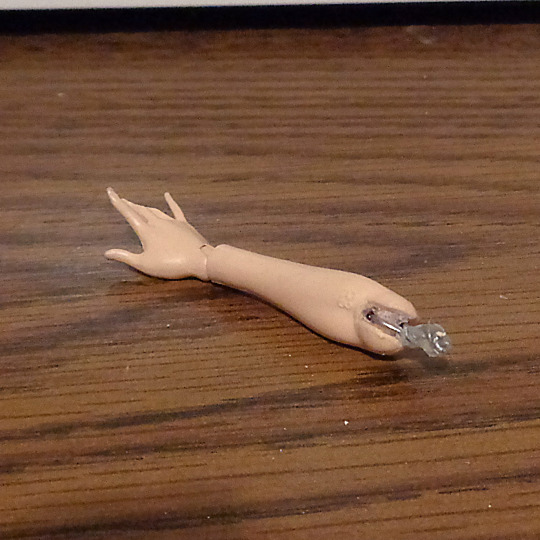
Speaking of glue, I also add a dab of hot glue to the top of our new peg. The coating will add thickness that will help it stay in the upper arm. Tape works too, but hot glue holds up better.
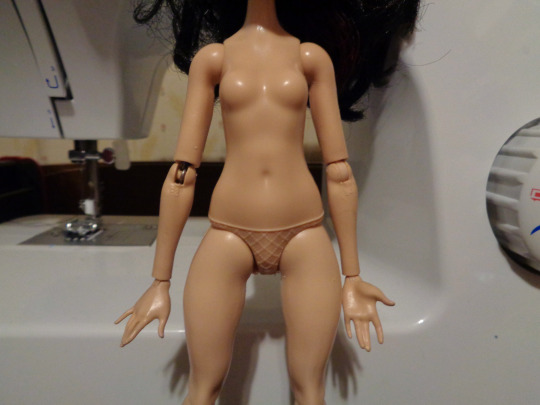

Here's our newly repaired arm back on the doll. Aside from a slight glimmer of silver, the repair is not very obvious I think.
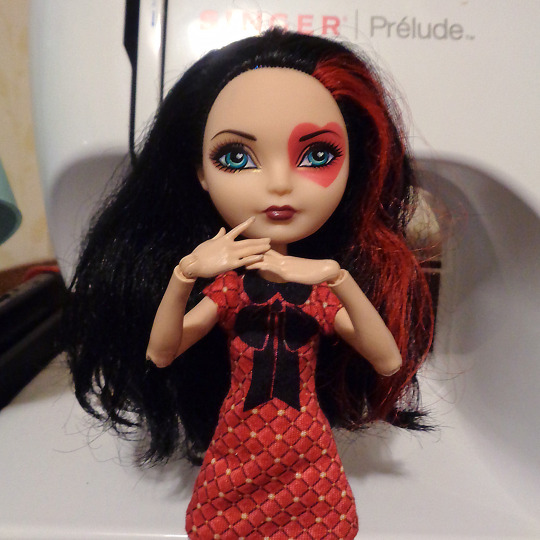
Lizzie can now enjoy having two functional arms again. Whoo-hoo.
While not 100% a beginner repair, it's not particularly difficult either. Just takes some patience and a reasonably steady hand.
Before I go though, some disclaimers/notes: Some wires can rust overtime, so keep an eye on your doll to make sure the wire isn't degrading and discoloring them.
Also, if you do a repair like this, then sell the doll, do let the buyer know. I feel like I shouldn't have to say that, but don't be one of those sellers okay?
This same method can be used for knees, but thighs tend to be made of a harder plastic, and it can be more difficult to pry them open to take the old, broken peg out with out major damage to the upper leg.
Good luck with your repairs! Love y'all. c:
277 notes
·
View notes