#bitmap 2
Explore tagged Tumblr posts
Visit Tumblr Blog
Explore Tumblr blogs with no restrictions, modern design and the best experience.
Last Seen Tumblr Blogs


Fun Fact
Mobile US users spent an average of 115.8 minutes on Tumblr app monthly.
Text
youtube
Did You Know Red Panda Bitmap Could Do This?
this is an excellent demo video for the red panda bitmap (v2), showing off its wide range of other effects beyond glitch/bitcrushing. some of the distortion effects have a nice audio patina that i am not sure is easy to reproduce.
0 notes
Text
#Terminator 2D No Fate#2025#Bitmap Bureau#2D side-scroller#pixel art#pixel design#retro gaming#video games#design#character design#Terminator 2#Terminator#scifi#retro#trailer#video
100 notes
·
View notes
Text
youtube
Close to finishing the deltarune Cutscene now, it's over 14 mins long so that's somthing lol
But I wanted to share what I've been working on since 2022 and I can now finally talk about it, I worked on characters like sarah,john,the t800, the t1000, the enemies, a couple of bosses and the ingame cutscenes.
Hope you get to check it out when it gets released
28 notes
·
View notes
Text


TERMINATOR 2D: NO FATE
By Reef Entertainment, and Bitmap Bureau
Coming soon, September 5th. Releasing on all platforms
#nintendo#nintendo switch#playstation#playstation 4#xbox#pc gaming#steam#steam games#2d games#the terminator#terminator 2#terminator 2 judgment day#sarah connor#john connor#t 800#t 1000#T2#action games#side scroller#Bitmap Bureau#Reef entertainment#Terminator 2D#80's movies#action movies#sci fi#xbox series x#xbox one#ps4
19 notes
·
View notes

Text
Ys Book 1 & 2 - Featured in our book - A Guide to Japanese Role-Playing Games
An exhaustive guide to JRPGs, this massive 652-page compendium features every game from 1982 to 2020, including roguelikes and strategy RPGs. It is without doubt the ultimate guide for fans of the genre.
Buy now with tracked global shipping and a free PDF: https://www.bitmapbooks.com/collections/all-books/products/a-guide-to-japanese-role-playing-games
#bitmapbooks #book #retrogaming #retrogames #gaming #jrpg #art #rpg #bookstagram #booktok #fyp #ysbook1&2 #ys
13 notes
·
View notes
Text
youtube
Terminator 2D: NO FATE - Announcement Trailer
youtube
Making Terminator 2D: NO FATE
Terminator 2D: NO FATE will launch for PlayStation 5, Xbox Series X|S, PlayStation 4, Xbox One, Nintendo Switch, and PC (Steam, Epic Games Store). It will launch on September 5, 2025.
The PlayStation 5, Xbox Series X|S, PlayStation 4, Xbox One, and Switch versions will also be available physically in the following editions:
Day One Edition
A copy of the game
Collector’s box
Reversible cover sleeve
Full color manual
25mm collectible metal arcade token
“Unknown Future” cloth poster
Collector’s Edition
Day One Edition content
Art book
SteelBook
“Fiery Visions” cloth poster
Flipbook
Premium metal paperweight
Collector’s tin
Online-Exclusive Edition (via Reef Direct)
Day One Edition content
Art book
“Fiery Visions” cloth poster
“Steel Mill Showdown” cloth poster
Flipbook
Premium metal paperweight
SteelBook
Online-exclusive collector’s tin
Overview
About
Play as Sarah Connor and the T-800 through a variety of thrilling missions as they take on the T-1000 and try to put a stop to Skynet’s plans before the human race is annihilated. Lead the Resistance as John Connor in the future, fighting on the front lines as mankind’s only hope in the War Against the Machines. In this unique story blending iconic scenes from Terminator 2: Judgment Day with original scenarios and multiple endings, humanity’s fate is yours to decide.
Terminator 2D: NO FATE brings the groundbreaking action movie to life with the trademark adrenaline-pumping arcade gameplay and glorious pixel artwork the Bitmap Bureau team are known for.
Key Features
Step into a classic arcade experience that pays homage to the Terminator universe with authentic arcade gameplay, music and visuals built from the ground up.
Relive iconic moments and forge new paths as Sarah, John and the T-800 in a narrative featuring a mix of classic T2: Judgment Day scenes and untold Terminator stories.
Shoot, sneak and escape the T-1000’s blades in a wide array of levels, and lead the Resistance as John Connor in critical Future War missions.
Battle against the full force of Cyberdyne and Skynet’s arsenal, with multiple enemy types and adrenaline-pumping boss fights to take on.
See the world of T2: Judgment Day like never before with detailed 2D sprite artwork of your favorite characters and scenes.
Enjoy a cinematic soundtrack featuring recrafted music from the legendary T2 score and all-new compositions.
Aim for the highest rank in each level to reign supreme on your high score table and achieve arcade immortality.
Mix things up with multiple different game modes to choose from: Story Mode, Arcade Mode, Infinite Mode, Boss Rush, Mother of the Future and Level Training!
#Terminator 2D No Fate#Terminator#Terminator 2#Bitmap Bureau#Reef Entertainment#video game#PS5#Xbox Series#Xbox Series X#Xbox Series S#Xbox One#Nintendo Switch#PC#Steam#Epic Games Store#Youtube
2 notes
·
View notes
Text
Side-scrolling action game Terminator 2D: NO FATE announced for PS5, Xbox Series, PS4, Xbox One, Switch, and PC - Gematsu

Publisher Reef Entertainment and developer Bitmap Bureau have announced side-scrolling action game Terminator 2D: NO FATE for PlayStation 5, Xbox Series, PlayStation 4, Xbox One, Switch, and PC (Steam, Epic Games Store). It will launch on September 5.
The PlayStation 5, PlayStation 4, Xbox (Xbox Series / Xbox One, and Switch versions will also be available physically in the following editions:
Day One Edition
A copy of the game
Collector’s box
Reversible cover sleeve
Full color manual
25mm collectible metal arcade token
“Unknown Future” cloth poster
Collector’s Edition
Day One Edition content
Art book
SteelBook
“Fiery Visions” cloth poster
Flipbook
Premium metal paperweight
Collector’s tin
Online-Exclusive Edition (via Reef Direct)
Day One Edition content
Art book
“Fiery Visions” cloth poster
“Steel Mill Showdown” cloth poster
Flipbook
Premium metal paperweight
SteelBook
Online-exclusive collector’s tin
Here is an overview of the game, via its official website:
About
Play as Sarah Connor and the T-800 through a variety of thrilling missions as they take on the T-1000 and try to put a stop to Skynet’s plans before the human race is annihilated. Lead the Resistance as John Connor in the future, fighting on the front lines as mankind’s only hope in the War Against the Machines. In this unique story blending iconic scenes from Terminator 2: Judgment Day with original scenarios and multiple endings, humanity’s fate is yours to decide. Terminator 2D: NO FATE brings the groundbreaking action movie to life with the trademark adrenaline-pumping arcade gameplay and glorious pixel artwork the Bitmap Bureau team are known for.
Key Features
Step into a classic arcade experience that pays homage to the Terminator universe with authentic arcade gameplay, music and visuals built from the ground up.
Relive iconic moments and forge new paths as Sarah, John and the T-800 in a narrative featuring a mix of classic T2: Judgment Day scenes and untold Terminator stories.
Shoot, sneak and escape the T-1000’s blades in a wide array of levels, and lead the Resistance as John Connor in critical Future War missions.
Battle against the full force of Cyberdyne and Skynet’s arsenal, with multiple enemy types and adrenaline-pumping boss fights to take on.
See the world of T2: Judgment Day like never before with detailed 2D sprite artwork of your favorite characters and scenes.
Enjoy a cinematic soundtrack featuring recrafted music from the legendary T2 score and all-new compositions.
Aim for the highest rank in each level to reign supreme on your high score table and achieve arcade immortality.
Mix things up with multiple different game modes to choose from: Story Mode, Arcade Mode, Infinite Mode, Boss Rush, Mother of the Future and Level Training!
Watch the announcement trailer and a behind the scenes video below.
Announce Trailer
youtube
Behind the Scenes
youtube
#Terminator 2D: NO FATE#Terminator 2D#Terminator 2: Judgment Day#Terminator 2#Terminator#Reef Entertainment#Bitmap Bureau#action game#Gematsu#Youtube
4 notes
·
View notes
Text
do i srs have to upload the full campaign of halo 1 in its entirety for 2 bitmap edits and a single model swap for steam workshop to register it 🥲
3K notes
·
View notes
Text


more 8:11 pictures on a displayyyyy

tiny update.
if you look closely, in the previous post with the display the picture was rendered a little crookedly and it felt like there was not 1 image, but 2. it annoyed me, and i first looked into the code, and then into the program itself that sent the picture to the board. the solution turned out to be completely different - i just needed to save the bitmap file normally, and not anyhow. i did it with paint, so now everything is fine.
oh, and one more thing. this time i used nano instead of uno, although it seems to me there is no special fundamental difference - the pinout is the same.
#richterursidae#arduino#arduino nano#electronics hobby#electronics#811 game#811 vittorino#811 leon tremblay#811 leon#811 dante#811 dante basilio#circuits
96 notes
·
View notes
Note
Is the pack just for clip studio or does it work for others? I use medibang myself.
They're .abr brushes so they're supported by any software that is compatible with ABR. Most of the brushes actually work best in Photoshop due to its unique brush engine (and the fact that many of them were designed for Photoshop first), but can work in both Clip Studio and Procreate as well.
Unfortunately I'm not sure if they'd work in Medibang as IIRC it relies more on a bitmap brush system similarly to IbisPaint, and converting ABR to that kind of format is a lot easier said than done (plus even if it was doable, you'd undoubtedly lose a lot of the core functionality of these brushes).
That said, if you don't have access to an ABR-compatible software, your closest equivalent to the brushes within that pack would be anything that resembles watercolor, gouache, pencil and ink, and impressionist brushes. Those are generally what a lot of those brushes are save for the pattern stamps n such, so even if you can't access those brushes specifically, I'm hoping you could find Medibang-compatible brushes that are close to the real thing so long as you look in the right places !
It is an unfortunate drawback to the nature of these brushes that they were designed for Photoshop first, it means they inevitably aren't going to work in every software. I've looked into converting them in the past but the process would just be way too extensive for me to do on my own and again, it wouldn't guarantee the brushes would even resemble their ABR versions which would defeat the point of trying to convert them in the first place 😅 Still, I hope you're able to find some Medibang equivalents using the tips I mentioned above, and if you want an ABR-compatible software that won't cost you your firstborn like Photoshop, Clip Studio's perpetual license goes on sale at least 2-3 times a year, and Procreate is still incredibly cheap on the iOS store if you have an iPad.
Sorry I couldn't be of more help! Hopefully some day Medibang will be ABR-compatible, Clip Studio wasn't always compatible with ABR either so the odds might be low but they're definitely not zero ! :'0
24 notes
·
View notes
Text
youtube
Red Panda Bitmap 2
this is an excellent pedal, and it's full stereo too (just the v2)! definitely on my future wishlist.
0 notes
Text
Hetalia Rarepair Week Day 2 - Royalty & Wedding

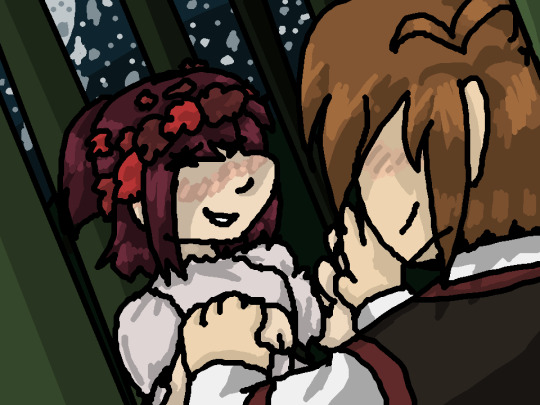
@hetalia-rarepairweek for the prompt!
Drawn in Scratch bitmap as always. :)
#hws czechia#hws slovakia#hws#hetalia#digital art#hetalia rarepairweek 2024#historical hetalia#hws czechoslovakia#velvet pair
33 notes
·
View notes
Text


Monty Jaggers McGraw:
I am writing new BASIC programs to demo at my VCF Southwest 2025 exhibit of my 1979 Tektronix 4054A color vector graphics computer.
One of the programs I am writing is a 1978-1979 Battlestar Galactica TV demo. That TV show had $500,000 of Tektronix vector graphics computers and test equipment and many screenshots of their green vector storage CRT displays - some stills - some animated. These computer graphics were generated on both 1975 4051 and 1976 4081 vector graphics computers - predecessors to my 4052 and 4054A computers (see first photo attached).
Miami Herald TV 1978 magazine interview with the Battlestar Galactica set designer indicated extras on the set stationed in front of the 4051 computers were playing games during filming to increase realism and were so absorbed they kept playing after the cut! (article page attached).
The 4051 and second generation 4052 were the same physical size and used the same CRT and same Display board, but the 4052 and 4054 computers replaced the 800KHz Motorola 6800 CPU with a custom four AMD2901 bit-slice CPU to create a 16-bit address and data bus ALU which emulated the 6800 opcodes and added hardware floating point opcodes to speed up these computers 10x over the Motorola 6800, doubled the BASIC ROM space to 64KB and doubled the RAM space to 64KB!
I created these vector bitmap graphics using a "3D CAD" picture I found on the web of the Battlestar Galactica (last attachment).
As far as I know - there was never any 4050 BASIC program to view bitmap pictures on any of the 4050 computers. The 1979 4014 vector graphics terminal had a grayscale bitmap mode in the Extended Graphics option board, but I have only found a couple of bitmap 4014 images on a single Tektronix demo tape cartridge.
My 4050 BASIC program to display bitmaps works on all 4050 series computers - with an optional Tektronix 4050R12 Fast Graphics/Graphics Enhancement ROM Pack. This ROM Pack speeds up displaying vector images (including vector dot images) 10x over using BASIC MOVE and DRAW commands.
The Battlestar Galactica bitmap image in R12 binary format is 332234 bytes - slightly larger than would fit on a DC300 quarter-inch tape cartridge in the internal tape drive of all three 4050 computers, but would have fit on a 3M DC600 tape cartridge with a capacity of 600KB - it would have been very slow to load.
I designed an Arduino board to emulate the Tektronix 4924 GPIB tape drive - with the help of my software developer. My GPIB Flash Drive board contains a MicroSD card with gigabytes of storage and the Flash Drive emulates a GPIB tape changer, storing all the files of a "tape" in a single directory. I have also attached to this post a photo of my GPIB Flash Drive.
I have recovered almost 100 Tektronix 4050 Tapes and posted the ones I think are the most interesting at this time on my github repository for Tektronix 4051/4052/4054 computers: https://github.com/mmcgraw74/Tektronix-4051-4052-4054-Program-Files I included Tektronix published MATH volumes 1, 2, and 3 and Electrical Engineering, but I don't think they have a lot of use today. I have in my collection but not recovered tapes on Project Management, Statistics, and over 100 more tapes from the very active user group, which Tektronix made collections and published abstracts in their newsletter and the newletter customer got the tape for free. Commercial software like CAD programs were likely encrypted to eliminate copying - since Tektronix 4050 BASIC included a SECRET command which would then encrypt the program file as it was recorded to tape and add a SECRET flag in the tape header that would signal to BASIC ROM when that file was accessed to decrypt the program when it was loaded into memory. One big limiter to the size of the program was RAM in the 4051 was limited to 32KB and the 4052 and 4054 were limited to 64KB of RAM, although Tek BASIC did include commands to allow program "chunks" to be overlayed as necessary. Tektronix used those commands in their 4050 System Tape which was shipped with every system and included a tutorial on many of their BASIC commands. The tutorial ran on the original 4051 with 8KB of memory, and if the program detected 16KB of memory it would APPEND larger program files to speed up the tutorial.

15 notes
·
View notes
Text
Part 2 | Part 3 Hello hello! today I will be teaching you how to make GIFS, from scratch, and some other stuff. I've been doing this on this platform for the past 10 years (yay!). I've seen gifs morph and change, seen tumblr up their image size by a considerable amount (in 2015 you had to maintain your gifs UNDER 2MB. 2MB!!!!) and all the sizing changes, PSD changes, etc. So, idk, I decided to do this too cause I thought it might be fun!
I am going to go through a few different GIF types in this:
GIFS that are straightforward, take your frames, turn it into a gif and go. I'll be teaching everything here: How to grab frames, how to organize it, how to open it on photoshop, how to do the thing (except for coloring, at least here), etc. (Half in part 1, half in part 2).
The BITMAP gif, how much faster it is (despite the slightly lower quality) and how it enables you to make gifs on potato computers. (Part 2).
GIFS that need a little more finessing, like GIFS that contain two different angles you have to make work in one. (Part 3).
GIFS that have text, which are 90% of my GIFsets, and how I make the text look crispier (this is still a work in progress, though, would love some tips <33). (Part 3).
Now, I'm not saying that this is gonna be such a different gif tutorial from all the others, or that I'm an actual expert (I'm bad a synchronizing gifs, for example). I'll try to make it comprehensive, but I think all the other ones are really solid, I'll just go through my own process, the program I use and have been using for years (as someone who's tried GOMPlayer and didn't like it) what I do for individual gifs, and all that. I will NOT go into coloring, because I am BAD at it, never been too good, but everything else should be covered here pretty neatly! Keep in mind I don't do insane edits, though I find them BEAUTIFUL, or anything overtly complicated cause I am, hmmm, lazy. Sorry. I CAN make them because I've learned, but my heart is not in it and there are hundreds of talented GIF and edit makers here on this webbed site that would provide a more solid base.
Also, this is a pretty wordy tutorial, because it goes from frame capturing all the way to the end result, but I hope it helps peeps. So, let's get to it. (divider used in this tutorial by @e-resources)
INTRO:
Before this year, I used to make all of my gifs on my Dell Inspiron 2012, with 6GB of RAM, rolling on Photoshop CS5 and praying. Each gif took 5 minutes to load, ten minutes total to complete. Believe it or not, I've seen Hell.
I also do all my gifs, from a young age, using the KMPlayer. The KMPlayer doesn't open pop ups on your browser (which on my old computer would mean CHAOS and UPRISE and I'd probably have to turn it off because it only actually did one process at a time, believe it or not) and it allows you TO CAPTURE FRAMES WHILE THE MOVIE OR SHOW IS PAUSED which GOMPlayer DOESN'T LET YOU. In general, KMP's advantage is also that the PNG frames it takes are higher resolution than GOMPlayer. A GOMPlayer PNG frame will always have 96ppi whereas a KMPlayer frame will have an 120ppi:


A higher resolution image has more ppi, and though anywhere between 92 and 125 is good, KMPlayer is better. Now, idk if KMPlayer was outed as being spyware, of being bad, because everyone on this platform used it and then stopped for some reason, but unfortunately IMO it's still the best program to do it. Yeah. If it sucks, I'm sorry :(( I can't stop using it cause I am spoiled, and it never did anything on my computer as someone who has used it for YEARS (and who has gotten probably every single virus out there, including computer ending ones. Twice. Thankfully they were close calls, but the fear was there). (Later in the tutorial, I 'll do a pros and cons of each program).
Ok, intro done, let's begin the segmented portion of the tutorial.

INDEX:
Frame capturing 101: Frame organizing, and how I personally do it (part 1).
Basic GIFS (including resources I use for sharpening) (half in part 1, half in part 2).
GIFS with Text (part 2).
GIFS with two angles, and what to do to center them (part 2).
How to make lower quality GIFS look acceptable (or SOMEWHAT acceptable) (for older PCs and lower quality releases) (BITMAP instead of PNG).
FRAME CAPTURING 101
This is gonna be pretty straightforward. Open your movie with KMPlayer, or your program of choice. Now, KMPlayer doesn't allow me to record its screen for some reason, at least OBS doesn't let me, so I'll make do with prints. CTRL+G opens the capture window. You can pause your frame and start from this point without releasing the movie, cause like I said the KMPlayer allows you to do so, and to me this is important cause I like to capture as many frames as possible, and be as perfectionistic as I can be.
Now, if you have a potato of a computer like I had, both KMPlayer and GOMPlayer offer a few formats on your capture (CTRL + G) window. On KMP, there's BITMAP, JPEG and PNG. My program is in Portuguese, but basically it says BITMAP is fast, JPEG is medium and PNG is slow.

I used to take my frames in BITMAP from 2014 til very recently. It sucks, it doesn't have a high quality, but it allows you to have SOMETHING to work with. If you are an aspiring GIFmaker and you don't have the equipment, you can still make stuff with this setting (I say this because my other computer used to turn off when I captured frames in PNG so, uh… Try it at your own risk on old machines. I never tried JPEG, might do you a solid. probably better than BMP, but like I said, I never tested it).
Here are some examples of gifs I made with BITMAP quality:


As you can see, they're not bad, just a bit grainy (I did the sharpening myself, so my bad. Later in the tutorial, I'll put better examples, and you'll see they're not bad.). When I upgraded my laptop, I started taking frames in PNG. The gifs now look like this:


Sometimes, I still struggle with quality, like on my Bedazzled gifsets. This is due to me being an obscure, old film lover, and those often not having 4K or real 1080 quality (Most of my BITMAPs were taken from YTS releases, though. It helps on old machines and it looks ok. Real 1080 is over 2GB and 4K is way more than that, so that's the difference, and it looks better. YTS releases are very compressed, but real 1080 never rolled on my old PC (nothing over 3GB did) so I still used them for basically everything. Not many complaints here).
Now, to go back to how I capture the frames: Depending on how familiar I am with the scene, I allow the frames to capture continuously until the scene is over. That being said, if it is a scene with dialogue that I am not 100% familiar with, I usually capture it gif by gif. It really depends on your specific style.
The KMPlayer, like GOM, will capture these to the CAPTURE folder. This folder is located inside of your disk (local disk? is that the name in eng. too?) inside of the program's folder. I then divide these captured frames into other folders, for ease of maneuvering.

I usually use 48 frames per gif, especially because I make gifs that are 540px (by either 405 or 540px). If you are doing a gif that is smaller, like 268x268, etc, you'll be able to get away with 60+ frames, up until 10MB. You have no idea how much 10MB is a Godsend. It was the trenches in the olden times. Unlike GOM, KMP captures all frames, regardless of movie or show, on the same folder and it is your job to organize it. I think GOM got this specific point right, but I'm used to the heavy lifting, so I don't mind. Still, be mindful of KMPlayer eating older frames. If you have important frames on the main folder, make sure you organize them into smaller ones, because KMP will replace these unorganized frames with newer ones. I hope I made this easy to understand. Bottomline is: Make sure all your important frames are as organized as possible to prevent mistakes and accidents.
Kind of left field tangent but there is nowhere else here to put it, so here you are: For my Peter Cook in Bedazzled, Matt Bennett in M&E&TDG, and my Nightmare on Elm Street gifsets, I made A LOT MORE GIFS THAN I USED. I made up to 11, 12 gifs for both my Nightmare and Bedazzled gifsets. Sometimes you have to make a lot of them to decide later what you want, so don't be sad if your process is extremely chaotic. From chaos comes beauty in the form of tumblr.com the website and the app GIFsets.
Ok, now that this is done, let's get to the gifmaking portion of this mess.
BASIC GIFS (no text, just frames and sharpening):
You have to have a Photoshop that allows you to have the timeline function. CS5 worked for me for years, 2020 also has it, and I'm assuming 2024 does too (but that one didn't roll with my system). I use Photoshop 2020, I got it from Pirate Bay, first result, because the one we have rolling around here DID NOT PASS ANY VIRUSTOTAL SCANS I PUT IT THROUGH, though I'm sure the person didn't know. Always put stuff like this through virus total to be sure. My Photoshop never gave me any issue.
Anyway, if you don't have your timeline enabled, go to window> timeline, like so right there at the bottom:
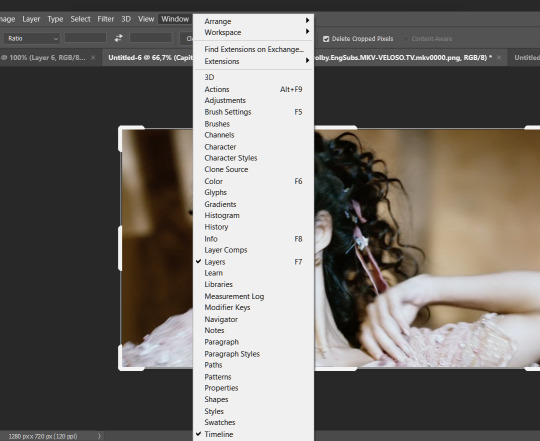
There you have it. Now you can load up your frames. For that, you'll go to to file> scripts> load files into stack:

You click on browse:
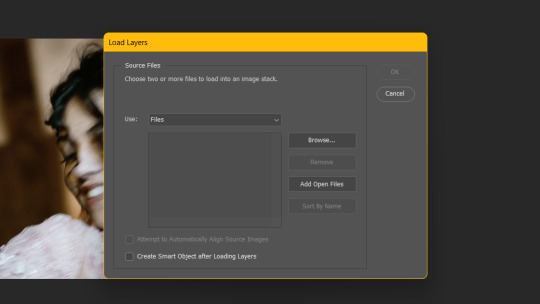
Get your frames and load them. Yep. That simple. Nothing to it.
PNG FRAME GIFS:
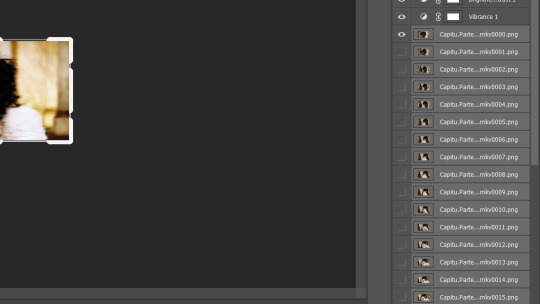
(I will be using Capitu (2008) as the examples for this tutorial)
Now, different from GOM Player, KMP will not name your frames automatically, for some reason when its PNG, so your images will flash on screen as Photoshop renames each individual frame. On a potato computer, this takes 30 minutes to do and it's undoable. I know cause I tried. Anyway, it takes a little longer to open, but it should be done in less than a minute or a minute or so on good computers, probably a few seconds on state of the art ones. Just make sure that if you don't like or are sensitive to anything flashy that you either don't look or don't do this using KMP. Ok, now that you opened the frames, you create video timeline by clicking on the middle right here:
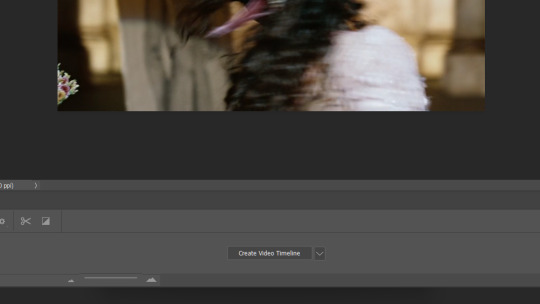
Then, you click there, nvm if my timeline is not loaded. Just click and it'll create one of your frames for you. Now click here on the corner and on "make frames from layers, to create the rest.


This will make your actual frames for you, in a nice neat line. Now, keep in mind that these frames are reversed at this point, so you have to click on the "reverse frames" option, right there on the panel (it's unclickable on my example photo up there, but it'll be available once all your frames are loaded). Still on the same panel, you click on select all frames, cause you basically do everything from here, and once the frames are all selected, you input your delay.

In my time, we used 0,07. Now that's too slow. Some people use 0,04, I use 0,05, I think it depends on what you want. Once the gif is all loaded up you'll be able to see if the frames are too fast better (In my Goodbye Again gifset, I struggled with frame velocity as 0,04 was too fast and 0,05 too slow for example), but if you are not a perfectionist like me and you don't feel like backtracking every time, 0,05 is your best bet for most gifsets.
After this I usually crop the gifs. I use the pre-crop thing here:
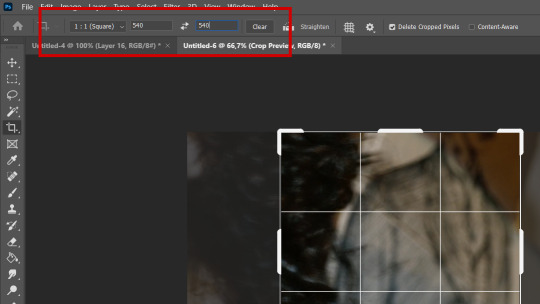
And input the size I want. Usually it is 540x540 or 540x405. In this case, though, it'll be 540x304, which is the native usually (unless your movie is widescreen. I hate those). This tool will not actually resize your image, it will just leave it ready for when you do resize, here:
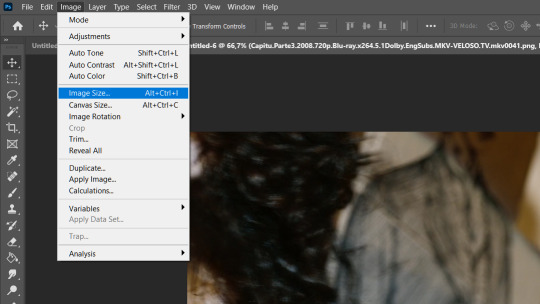
Remember, tumblr dimensions are 540px by 540px for square gifs, 540px by 405px for medium sized gifs and usually 540px by 304px for rectangular gifs (usually it is the size of the screen, unless your movie is widescreen. I hate those). For gifsets that are two gifs per row, the dimensions are 268px per whatever you want, better if it's square though. 177px by whatever is the three gifs per line one, also better if square. You can still leave it 540 on the pre-crop tool, though, because it'll just do the 1:1 square ratio. When you do resize it to 268 or 177, it'll work, it'll be square, or whatever other size you want. Anyway, when you do resize, you'll be taken to this screen:
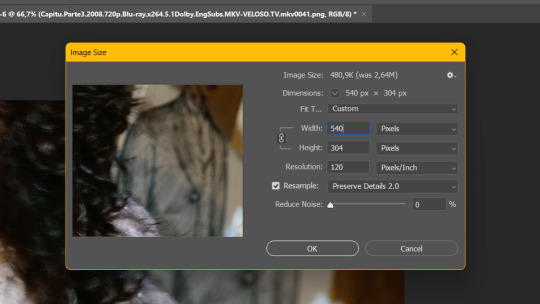
These are my settings. I also use bicubic sharper, but it's holistic for me, tbh. I usually resize it to 540px right away, some people like to do it in increments, and I respect it, but I have no patience for it. If you want to do it in increments, you can take image size little by little (from 1920px, for example, to 1400px, then 1200px, etc, until you get to 540). It works. But I'm lazy. Anyway, here's what the gif looks like as it is:

Ok, so you cropped and resized your gif. What now? Well, now I do coloring, but like I said I will not teach PSDs here, cause I think there are more talented people than I out there for it. If you wanna make your own, just go here:

And add brightness, levels, curves, etc. holistically, like I do cause I GENUINELY don't know what I'm doing and just play it by ear. I don't use PSDs often cause I love doing this part, I just suck at it, but feel free to do as you must in these trying coloring times. I do have to say though, in Photoshop 2020, you can edit your coloring in whatever frame you want (for example adjust brightness and contrast settings while frame 40 is clicked) whereas in Photoshop CS5 this is not possible. You have to make sure you do all your edits on the first frame, which is still a good general rule of thumb, imo. Ok, cool, now what what? You go here:

Same tab as usual, select all frames, then you make sure the frames on the left are also selected, like so:
Usually, when there are gif malfunctions (for example, you open the save for web screen to save the gif in its entirety and the gif is only a few kb big with all the frames being the same image), it's because you didn't select every single frame, or you forgot to hit "make video timeline," which is the next step. Make sure you DON'T select your PSD, whatever it is, or text. I mean, to be completely honest, the text one might work, but here is a gifset in which I merged text and image together:

I think the text looks odd, too sharpened, which is why I sharpen it afterwards, but it's a matter of taste, no big deal. I'll teach how to do it both ways in my text gifset portion of the tutorial, so more on this later. Anyway, after you do all this, you click, on the same panel as the select all frames, etc, in "convert to video timeline." Once that is done, you go here:
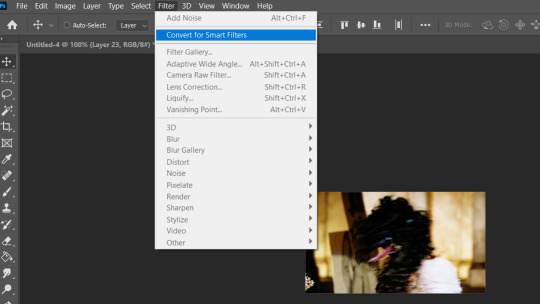
Convert for smart filters, don't forget to do this otherwise it won't work, all that. Now, for the true meat of the tutorial, the sharpening:
(continued on part 2, because I exceeded the image limit. Oops.)
7 notes
·
View notes
Photo

SIGINT #6066 from █████ ███████ ██ (L CLEARANCE) 1. Mole People Causeway 2. Secret Bitmaps
7 notes
·
View notes