#bokeh-photography-tutorial-for-beginners
Explore tagged Tumblr posts
Visit Tumblr Blog
Explore Tumblr blogs with no restrictions, modern design and the best experience.
Last Seen Tumblr Blogs


Fun Fact
Tumblr has 4 main sources of revenue.
Text
A Scam... Tutorial?
I was watching Photoshop tutorials and YouTube recommended this video to me.

And I was already skeptical. Clarity is an extremely powerful and useful adjustment in Lightroom and Photoshop and I could not think of a reason why anyone would recommend *not* using it to the extent they were using ALL CAPS.
But I was curious if there was a new technique I was unaware of. It's impossible to know everything regarding Photoshop and I learn new stuff all the time.
So I gave the video a chance.
youtube
To quote my late father... what a crock of shit.
I have seen a few scam videos in my time, but I cannot think of ever seeing a digital art tutorial scam. I found myself angry and a strongly worded comment just flew out of my brain.

I continued...
"First, no one should use clarity and texture at 100%. And I think showing the effects at 100%, as if that is a normal workflow, is highly misleading. You are creating a problem that does not exist and then offering a solution to it. And then you are using a provocative title to attract clicks. Not to mention you may be convincing beginners to abandon clarity and texture altogether when it is one of Camera Raw/Lightroom's most powerful tools. People should absolutely use clarity and texture. That is a crazy thing to tell people.
Second, high pass sharpening is… old school. It works but it can create a lot of nasty artifacts if overdone. (Personally I find it too crunchy and prefer smart sharpen on a smart object so it is non destructive). Clarity and texture are much more modern approaches to help bring out detail and I find they actually produce *fewer* artifacts than typical sharpening filters/techniques. And if you have trouble with clarity or texture adjustments in the bokeh areas, then use a local adjustment that doesn't affect those areas. You can even do a separate clarity and texture layer and use the opacity slider and the blend if and masking just like you did with the high pass. Why are you acting like you can only make a global clarity adjustment?
Essentially you are giving a worst case scenario of a clarity/texture adjustment just so you can make your technique seem like it is orders of magnitude better.
And what is even more infuriating is that you can do clarity/texture AND you can do high pass sharpening *together*. Why are you acting like it is one or the other?
I'm so confused by your motivations. Did you invent this clarity problem just so you could make a click bait-y title so you can then sell your little panel thing? And then you used an old school sharpening technique that many have abandoned so it seems like you have secret knowledge that was lost? And I could argue it isn't even a better solution. It's just a different way to achieve similar, if not worse results.
This is like if you put a pound of sugar in lemonade and then said, "Wow, this is way too sweet! You should try my superior lemonade that has a normal amount of high fructose corn syrup."
Lastly, if clarity and texture (set at a reasonable amount) aren't enough to produce sharp, detailed results, then it might be worth considering your actual photography techniques. Modern photography with modern sensors and lenses should be able to produce extremely sharp results without having to juice the hell out of sharpening filters in software. 20% clarity and texture (if that) plus a little bit of smart sharpen is usually more than enough to bring out detail in almost all of my photos and I have never been accused of having soft images.
So, if you are getting soft results, you might need to adjust how you are capturing your images. Are you using a very small aperture like f/22 on that macro image? That could be a diffraction issue. Perhaps it would be better to use a larger aperture at the lens's sweet spot and then do a focus stack.
I mean, I can't think of any other reason a person would need to do 100% clarity and texture unless they completely bungled the actual photography or were still using a kit lens.
I'm sorry but this video is a mess."
Let's look a little closer at what he did to his example.
He started with this.

Then he applied clarity & texture to MAXIMUM. Which, again, is like adding a pound of sugar to lemonade.
And by golly, it looks pretty bad!
Then he used his secret ancient high pass technique to get this.
Which looks a hell of a lot like the unsharpened image to me. And the high pass sharpening is probably only visible when zoomed in to 100% on the full resolution image.
Which is one of the issues with this technique. It isn't even noticeable on social media—the place where the majority of photos are viewed these days.
And then after showing you this groundbreaking effect that does almost nothing, he tries to sell you his Photoshop panel.

Yes, that' looks intuitive. Just hit the blue checkmark to do... something?
And what is this green eyeball with a crescent moon inside?


Only $50!

And if you want to know what the purple X button does, you need to pay another $15 for the tutorial on how to use it.

Neat.
Just to prove this is all a scam I'd like to show you an example of my own.
Here is a picture of Otis with no clarity, texture, or sharpening applied.

And here is a reasonable amount of sugar. I set the clarity and texture to where I felt they looked best.

Wow, that looks better. Not only that, you can actually see the difference at social media resolutions!
Now let's add a pound of sugar. MAXIMUM CLARITY GO!

Yep, that looks a bit rough. Because no one does this ever.
And now let's see his high pass sharpening technique.

Barely a difference on social media.
Okay, let's try zooming in 200%. Maybe that will give the high pass sharpening the victory.
Normal...

Reasonable clarity & texture...

FULL BEANS CLARITY & TEXTURE!
High pass...

Just as I said, the high pass introduces crunchy sharpening artifacts.
I can't speak for anyone else, but I much prefer the subtle clarity and texture. Perhaps the details in the eyeballs aren't quite as crispy, but in the version that isn't zoomed in, I don't think you feel like the image is soft and the normal clarity and texture adjustment added contrast and actually noticeable detail to the image.
In the end, except for the pound of sugar, these are all subtle adjustments and other photographers might be the only ones who would ever notice. The original Otis picture was probably fine to most people. So disparaging the clarity slider was even more unnecessary.
Why does this matter?
Being a beginner at photography is frustrating. There are so many resources to choose from and it's very difficult to know who is competent and who you can trust. If someone just starting out was recommended this video they could be easily be convinced it is legit. And it could set them back in their progress because they think useful tools will actually make their photos worse. They will waste a lot of time doing a time consuming old school technique in Photoshop when they probably never needed to even leave Lightroom in the first place. They could move two sliders to get similar or better results and it would only take literal seconds.
Time is valuable to a lot of people. And he seems intent on wasting everyone's time. And what sucks is that I have no real way of exposing this dude on a scale that would do anything.
I also just really hate the idea that educational content is being used to scam people.
This is some PragerU shit right here.
68 notes
·
View notes
Text
LensCraft Mastery: Elevate Your Photography Skills to the Next Level

Photography is more than just pressing a button; it’s an art, a science, and a means of storytelling. LensCraft Mastery is a comprehensive guide designed to help photographers—whether beginners or seasoned professionals—unlock their full creative potential. This tutorial series delves into the intricate aspects of photography, from mastering the fundamentals of exposure and composition to exploring advanced techniques in lighting, post-processing, and storytelling through imagery.
Why LensCraft Mastery?
The name LensCraft Mastery symbolizes the fusion of technical expertise (Lens) with artistic craftsmanship (Craft). Photography is both a technical discipline and an expressive medium, requiring a balance between understanding camera mechanics and developing an artistic vision. This tutorial series aims to bridge that gap by offering structured, easy-to-follow lessons that cater to all levels of experience.
1. Mastering the Basics of Photography
For those new to photography, LensCraft Mastery begins with the fundamental concepts that form the backbone of great photography:
Exposure Triangle: The Key to Perfectly Lit Photos
Aperture: Understanding how f-stops affect depth of field and light intake.
Shutter Speed: Capturing motion creatively, from freezing action to long exposures.
ISO: Controlling sensor sensitivity for optimal brightness without excessive noise.
Composition Techniques: Crafting Visually Stunning Images
Rule of Thirds: Placing subjects strategically for balanced compositions.
Leading Lines: Drawing the viewer’s eye to the subject.
Framing & Negative Space: Enhancing depth and focus in a photograph.
2. Advanced Photography Techniques
Once the basics are mastered, LensCraft Mastery delves into techniques that can take your photography to a professional level.
Understanding Light & Shadows
The role of natural light vs. artificial lighting in photography.
How to use soft light for flattering portraits and harsh light for dramatic effects.
Mastering golden hour and blue hour photography.
Camera Settings & Manual Mode
How to use manual focus for precision.
Customizing white balance for accurate color reproduction.
Shooting in RAW vs. JPEG and when to use each format.
3. Specialized Photography Genres
Photography is a vast field, and LensCraft Mastery explores different genres, allowing photographers to find their niche.
Portrait Photography
How to pose subjects naturally for candid and professional shots.
Best lenses for portrait photography (prime vs. zoom).
Background blur (bokeh) techniques for dreamy aesthetics.
Landscape Photography
Composition techniques for breathtaking vistas.
Use of ND (neutral density) filters for long exposures.
How to capture the perfect sunrise and sunset.
Street Photography
Capturing the essence of everyday life.
Ethical considerations in photographing strangers.
How to blend into the scene for natural compositions.
Wildlife & Macro Photography
Tips for photographing animals in motion.
Choosing the best gear for close-up macro shots.
Patience and planning for capturing rare moments.
4. The Power of Post-Processing
A great photo doesn’t always end with the camera—post-processing is essential for refining images. LensCraft Mastery provides in-depth tutorials on:
Adobe Lightroom & Photoshop Editing
Adjusting exposure, contrast, and white balance for balanced images.
Retouching techniques for portraits and landscapes.
Removing unwanted elements and enhancing details.
Mobile Editing for On-the-Go Photography
Best apps for editing (Snapseed, VSCO, Lightroom Mobile).
Color grading techniques for a unique aesthetic.
Quick retouching methods for social media-ready images.
5. Developing a Photographer’s Mindset
Photography is more than just technical skill—it requires creativity, patience, and an eye for detail. LensCraft Mastery helps photographers develop a storytelling approach, teaching how to:
Capture emotions and narratives within a single frame.
Use minimalism and abstract photography to create intriguing images.
Experiment with angles and perspectives to bring a fresh outlook to everyday scenes.
6. Monetizing Your Photography Skills
For those looking to turn their passion into a profession, LensCraft Mastery includes insights on:
How to start a photography business and build a portfolio.
Selling photos online (stock photography, prints, NFTs).
Social media strategies to grow an audience and attract clients.
Final Thoughts
Whether you’re just starting or looking to refine your craft, LensCraft Mastery offers a structured, engaging, and practical way to enhance your photography skills. By blending technical knowledge, artistic creativity, and real-world applications, this tutorial series is designed to empower photographers at every stage of their journey.
Start mastering your craft today and turn your vision into reality—one frame at a time. 📸✨
2 notes
·
View notes
Text
Photography Course in Sonipat.
https://picklesanimation.in/sonipat/
Here's a comprehensive course outline for a Photography course offered by Pickles Animation. This course is designed to cover the fundamental principles, technical skills, and creative techniques needed for photography, catering to both beginners and advanced learners.
Course Outline for Photography
Module 1: Introduction to Photography
Overview of Photography
History and evolution of photography
Understanding different genres of photography (portrait, landscape, street, etc.)
The role of a photographer in various industries
Basic Photography Concepts
Understanding exposure: aperture, shutter speed, and ISO
The exposure triangle and its impact on photos
Basic composition rules (rule of thirds, leading lines, etc.)
Module 2: Camera and Equipment
Camera Basics
Different types of cameras (DSLR, mirrorless, point-and-shoot)
Camera parts and functions
Choosing the right camera for your needs
Lenses and Accessories
Types of lenses and their uses
Understanding focal length and aperture
Essential accessories (tripods, filters, flashes, etc.)
Module 3: Technical Skills and Manual Settings
Manual Mode Mastery
Using manual mode on your camera
Adjusting aperture, shutter speed, and ISO for different scenarios
Understanding depth of field and motion blur
Focusing Techniques
Autofocus vs. manual focus
Focus modes and points
Techniques for achieving sharp focus
Lighting and Exposure
Understanding natural light and artificial light
Using reflectors and diffusers
Balancing exposure in challenging lighting conditions
Module 4: Composition and Creativity
Advanced Composition Techniques
Framing and perspective
Leading lines, symmetry, and patterns
Using negative space effectively
Creative Photography
Experimenting with long exposures and motion
Using bokeh and shallow depth of field
Creative use of color and black-and-white photography
Module 5: Post-Processing and Editing
Introduction to Post-Processing
Importance of post-processing in photography
Overview of editing software (Adobe Lightroom, Photoshop)
Basic photo corrections (cropping, straightening, exposure adjustment)
Advanced Editing Techniques
Color correction and grading
Retouching and enhancing portraits
Creating HDR images and panoramas
Workflow and File Management
Organizing and managing your photo library
Understanding file formats (RAW vs. JPEG)
Exporting and printing your photos
Module 6: Specialized Photography Techniques
Portrait Photography
Lighting setups for portraits
Posing and directing subjects
Capturing candid and environmental portraits
Landscape Photography
Planning and scouting locations
Capturing landscapes in different weather conditions
Using filters (ND, polarizing) for landscapes
Street and Documentary Photography
Capturing candid moments in public places
Telling stories through images
Ethics and legal considerations in street photography
Module 7: Building a Photography Portfolio
Creating a Cohesive Portfolio
Selecting and curating your best work
Creating themes and stories through your portfolio
Designing an online portfolio and website
Marketing and Promoting Your Work
Social media strategies for photographers
Networking and building relationships in the industry
Approaching galleries and publications
Module 8: Industry Insights and Career Development
Understanding the Photography Industry
Different career paths in photography
Freelancing vs. working for an agency or studio
Building a personal brand and style
Business Skills for Photographers
Pricing your work and creating contracts
Managing client relationships
Continuing education and professional development
Additional Features
Guest Lectures and Workshops: Sessions by industry experts on various topics.
Hands-On Projects: Real-world projects to apply learned skills.
Feedback and Critique Sessions: Regular feedback from instructors and peers.
Online Resources and Community: Access to tutorials, forums, and networking opportunities.
This course structure ensures that students gain a solid foundation in photography, practical experience with essential tools and techniques, and preparation for a successful career in the photography industry.
0 notes
Link
best tools for Photoshop
Bokeh Photography Tutorial. Bokeh is an amazing photography effect and gives the image a very unique look. Capturing Bokeh is easy and fun but there are ...
youtube
Bokeh Photography Tutorial. Bokeh is an amazing photography effect and gives the image a very unique look. Capturing Bokeh is easy and fun but there are certain Photography related things that you should use while photographing bokeh. Prime lenses are generally better for Bokeh Photography but you can capture Bokeh with kit lenses too. This Bokeh Photography Tutorial covers all the Photography settings and techniques you need to capture amazing Bokeh. Hope you enjoyed the Bokeh Photography Tutorial video and it helped you. Aperture Tutorial: www.youtube... Don't forget to leave a thumbs up and subscribe to my channel: http://bit.l..Follow me on instagram: instagram.com/sauravus Gears I use: My Camera: http://amzn...My 50mm Prime Lens: http://amzn...My Wide Angle Lens: http://amzn...My Lav Mic: http://amzn...My Main Tripod: http://amzn...My Mini Tripod: http://amzn...My Editing Laptop: www.amazon.c.. Music Credits: Boost by Joakim Karud http://sound..Music promoted by Audio Library https://yout..
best tools for Photoshop
#bokeh-effect#bokeh-photography#bokeh-photography-tutorial#bokeh-photography-tutorial-canon#bokeh-photography-tutorial-for-beginners#bokeh-photography-tutorial-nikon#bokeh-photography-with-18-55mm#bokeh-wedding-photography#photography-tutorial#photography-tutorials-for-beginners
0 notes
Text
Creative Photography Ideas for the Budding Photographer in You
Creative Photography Ideas for the Budding Photographer in You
Life is beautiful! And if you want to make it amazing, fun & inspiring – focus on nurturing & developing your creative hobbies (photography could be one). It will help you creatively express and share your experiences with others and thereby increase your happiness quotient. Photography is an art; using creative photography ideas – props and composition techniques will help you take your…

View On WordPress
#a photographer#amazing photographs#basic photography#best photography#best photography tutorials#Bokeh#composition techniques#creative photography#creative photography at home#digital photography#digital photography tutorials#dslr camera tutorial#dslr photo#dslr photography tutorial#dslr tutorial for beginners#free online photography tutorials#free photography tutorials#Landscape Photography#learn photography#Nature Photography#outdoor photo#Photography#photography business#photography for beginners#photography lessons#Photography Skills#Photography Tips#photography tutorials#photography tutorials for beginners#photography tutorials online
1 note
·
View note
Text
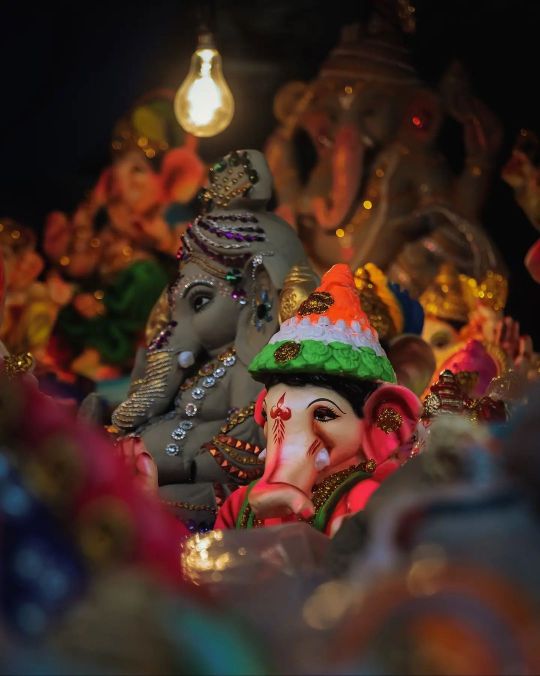
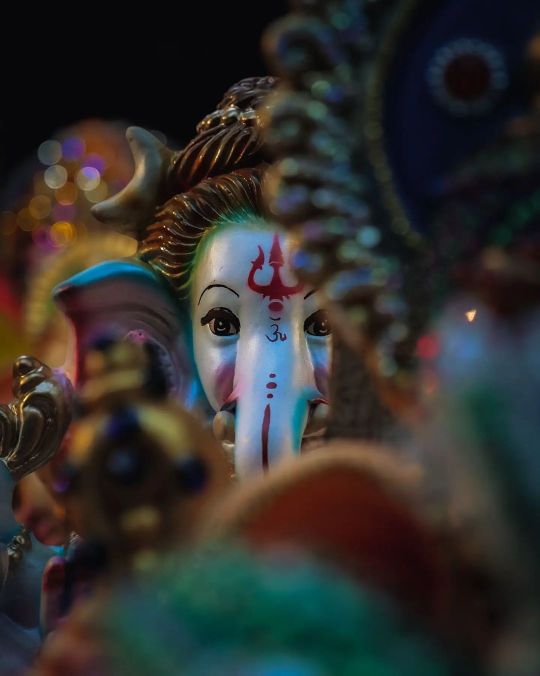
5 effective tips for Ganesh Chaturthi photography
Ganesh Chaturthi is an auspicious festival that celebrates the birth of Lord Ganesha. Just like any other celebratory day of life, this day also showcases joy, happiness, beautiful decorations, pretty outfits, energy, and positivity that must be preserved in pictures. From trying your hands on macro photography to highlighting every aspect of Ganpati, to experimenting with different lenses to capture the celebration from every perspective, there is so much a photographer can try their hands on.
But, with so much happening and so many elements surrounding the festival, it can get a little overwhelming for first-timers. Here are some of the photography tips and tricks that can help you get to sail through the day if you are a beginner:
1. Pick the right angle and equipment

Credits: Panasonic Lumix
There are many ways to capture the whole celebration. For example, if you want to click a shot of Ganesha and include people in it to show the wholesomeness of the celebration, use a wide angle lens (50mm or more), or if you want to focus on details of the murti, opt for macro shots. Macro photography helps produce images of small things larger than life. This will help ensure that everything in the frame is visible without any distortion at all. You can also zoom in closer while taking pictures if you aren’t aiming for high resolution pictures. You can understand all the camera angles and equipment by enrolling yourself in the photography classes for beginners. If you are looking for some good cameras, the Lumix G95 and G85 are great.
2. Use the correct lighting
Credits: o_ajnabi_
It's important to use natural light and adjust your aperture settings so that you don't overexpose or underexpose the subject of your photo. If you're using a flash with your camera, make sure that it's pointed at what you want lit up but doesn't overpower everything else in the frame. You can learn flash photography tricks through online photography courses in India. Flashlights may seem silly at first glance, but when done correctly (and with good luck), "flash photography" creates beautiful silhouettes of idols during Ganesh Chaturthi celebrations.
3. Keep it simple
You need to focus on one or two things at a time and make sure that they are clearly visible in the frame. The importance of simplicity in photoshoots is very much highlighted by experts, and learning to utilise the elements smartly to make a photograph is an art one masters over time. If you struggle with selecting your subject/s and ensuring breathing spaces in your photographs, you can enrol yourself into photography classes for beginners. If you want to add more elements into your shot, then make sure that it doesn't distract from the main subject (Lord Ganesha idol). Don’t hesitate to explore courses and blogs to learn photography online to get ready before you make your way to the final day.
4. Get the focus right
Credits: o_ajnabi_
Focus on the surroundings too, so that there are no blank spaces around the Ganesha idol so that you can give your pictures an ethereal feel! If you are using some props like sweets, you must place them around but not too far, so that focus is not distracted. There are plenty of photography classes for beginners where you can learn all these tips and tricks.
5. Experiment with bokeh and filters

Credits: rohanpawar.1812
You can also experiment with bokeh and you can learn about it and the filters through online photography courses in India as they help beginners with all these tips and techniques. Bokeh is the out-of-focus area around an image, and it adds to the mood and feeling of a photograph. The best way to get more bokeh in your pictures is by using large aperture lenses (f/1.4). A tripod would be helpful too, so that all your photos come out looking professional! If you do not want to invest in a course right now, you can also learn photography online through the plenty of tutorials available on Youtube and other platforms. Learning about macro photography techniques, photography tips and tricks, and getting the right equipment, etc., can help you amp up your photography game this Ganesh Chaturthi. If you are looking for photography inspiration, you can join the Panasonic Lumix photography community.
#ganesh chaturthi#panasonic lumix#lumixphotography#photography tips#lumix camera#panasonic lumix camera
0 notes
Text
Photography for Beginners
I updated this post here: https://artres.xyz/post/ultimate-guide-to-photography/.
Note– The tumblr editor scrambled some of my paragraphs upon importing, but I think I fixed most of it! Let me know if you see some messed up errors. Anyways, I hope you enjoy this post! It’s a little long!
Thank you to @thelittlestprincess7 & @sashakazanov for responding to my question on @art-res.
I'm by no means a pro, but I have worked on my artistic photography on both DSLR & compacts for over 4-5 years.
Step 1: Purchase a cheap DSLR/Compact where you can access manual mode. I personally have the Canon T3i & the Sony RX100 (the first version), both are great cameras and now more affordable because they are older models. Of course, you can start with a $2k camera, but that's pretty overkill, especially when you're starting out and maybe on a budget.
On Amazon
Check out my camera buying guide here!
If you decided to get a DSLR/compact, you also need to get an SD card to store the images. I use class 10 because it's fast enough for video and has good transfer speeds. They’re pretty cheap, so I don’t recommend going slower than class 10, if you can help it.
To get a cheap camera, consider going refurbished, used (without too much use, otherwise the shutter might die on you quickly), or buying an older model.
OR: just use your phone and access pro mode/get an app where you can access manual mode. Phone cameras have gotten good lately!
To really learn how to photograph properly, you want to get off of auto mode and switch to manual mode, aperture priority mode(my personal favorite) or shutter priority mode.
Experiment a little now, just change some stuff and see what happens. A little experimentation goes a long way in learning what does what. You might be a little overwhelmed at first by all the dials and controls, but it's alright! Just tweak some stuff and experiment. Live view will be really helpful when you’re first starting out.
Now for a bit more guidance on what does what on your camera. Exposure depends on 3 things: shutter speed, aperture, and ISO (exposure sensitivity)
Shutter speed, which is displayed by a fraction, ie, 1/80, 1/4, 1/2000, determines how fast your camera closes the shutter, or basically, the time out of a second (fraction!) the sensor is exposed to the light.
To prevent camera shake, a useful rule of thumb is to take the focal length (For example, your kit lens, 18-55mm lens, is set to around 55 ) take the number 55 & put your focal length at 1/60 or above. Or you might not need this tip if you have sniper photography skills.
Slower shutter speeds blur motion. Good for motion trails, light trails, blurring waterfalls.
Faster shutter speeds freeze motion. Good for action shots of your cat or dog.
Aperture, which is measured in f-stops, determines how wide open your lens hole is. Yes, the blades actually will open up. You can take a look.
Lower f-stop number, ie, f/1.2, f/1.4, f/1.8, means your lens is wider open, and thus, letting in more light.
Lower f number also yields a more thin depth of field, meaning only a thin plane of the image is sharp, while rest of the frame is blurred out, and then you get the lovely bokeh effect.ex:
following ex w the blurry background

Higher f-stop number, ie, f/8, f/11, f/22, means your lens is more closed and letting in less light.
Yields a larger/wider depth of field, which means more of your background will be in focus
Great for landscapes!
the following ex: f/11

Advanced note: if you're using a macro lens, you want a high enough f number that enough of the subject is focused. Or you can focus stack, but that's a bit above the basics.
ISO - with this, you can increase your sensor's sensitivity to light, though higher numbers (ie, ISO 1600 & up) often results in more noise, or grainy color/luminance artifacts.
All three of these variables work together, which is sort of complicated. If you use aperture priority mode or shutter priority mode, you can adjust either aperture or shutter speed, and then the camera will automatically set the other variable in order to create the correct exposure. You can also set ISO or have the camera automatically calculate it. I recommend experimenting with this to learn if you are overwhelmed with manual mode.
For general shooting, I like aperture priority mode because manual mode makes it harder to quickly react to rapidly changing light conditions and action. However, for some shots where I am looking for a particular effect, I go manual! (Macro shots, waterfall shots, exposure/focus stacking, and anything with tricky lighting)
A practical example of what goes on in my head for indoor shot of something, which is sort of low light.
I want to take a picture of this small statue, and I want a blurry background (shallow depth of field). That means I want a low f/ for a wider lens hole so more light can come in. That’s great because I don’t need to push my ISO too too far, 800 will do. It won’t be too noisy at this level, but too much lower will force me to use a super slow shutter speed to expose the picture correctly, which will result in a blurry image because of camera shake. The focal length of my lens is at 50, so now I am going to put my shutter at 1/60.
Metering – the way exposure is determined by the camera, examples include spot metering (measure a small area), center weighted average, or multiple zone (matrix/evaulative/etc) metering.
Experiment with these and how they interact with different lighting conditions.
Spot metering is useful for high contrast scenes
Average metering is great for landscapes because it takes into account both the sky and the landscape.
There is a lot of other terminology to cover, but for now, I think this is a good start for the absolute fundamentals. I hope this helped!
I also wrote a post explaining RAW vs JPG, if you're interested in learning about that!
Thanks for reading! I hope it helped!
Instagram | Art Tutorial Tumblr | Links
#photography#art tutorial#photography tutorial#masterpost#article#artists on tumblr#beginners#photography basics#how to photograph#astrikosart#myart
731 notes
·
View notes
Text
12 Essential Photography Supplies
1. UV LENS FILTERS

1. UV LENS FILTERS
Lens filters can range dramatically in price counting on the function you’re trying to find, except for a beginner-level or hobby photography, you just need a lens filter to guard your actual lens. It’s a touch glass screen that screws onto the front of your lens. That way,
2. & 11. 50MM PRIME LENS
I love this lens such a lot, I included two versions on my list! Both my lenses are fixed so that they don’t zoom in the least. But you get tons more bang for your buck with these! All the lenses I list during this post have a pleasant, wide aperture for the beautiful, crisp foreground, and wonderfully soft backgrounds. That also enables you to shoot in lower light at faster shutter speeds.
No idea what I’m talking about? Learn more about aperture and shutter speed.
50mm 1.8f – this is often commonly referred to as the “nifty fifty.” It’s an incredible prime lens for a touch over $100. Yes, $100! counting on how you shoot, you would possibly never even take this lens off the camera. you'll take great portraits or get beautiful bokeh in your shots. I used this lens exclusively for years. 50mm 1.4f – this is often the lens on my camera most of the time now. I honestly would have cursed with the 1.8f indefinitely, but I broke it (SUPER sad day!). The 1.4 is metal rather than plastic, so it's a touch bit more weight and sturdiness thereto, and it takes gorgeous pictures with the aperture wide open! Click for more photography tips & tutorials!
3. DSLR CAMERA BODY
I’m including two camera bodies here because I’ve shot with both, and therefore the first one may be a LOT cheaper. It’s an excellent, great starter camera and has just about all the functionality you’re probably trying to find at a very manageable tag. Unless it’s an equivalent price, I like to recommend buying the body only and learning lenses separately. I even have a few recommendations during this post.
Canon Rebel T5i – At the time of publication, this camera body runs $599 on Amazon with the kit lens (18-55mm). I shot on the T3i for about four years before upgrading late last year, and it had been fantastic. It’s a crop frame (or crop sensor) camera, which just means the camera captures a rather smaller field during a photo than a full-frame (or full sensor) camera. Especially if you’re just starting, you almost certainly won’t need anything quite this, and therefore the lightweight body is easy to lug around! Canon 6D – The 6D may be a more mid-professional range camera. It’s full-frame, so you'll get more photo area with any lens, which makes an especially significant difference when shooting with a 50mm lens. it's WiFi, which I exploit constantly alongside the camera’s app, either to shoot remotely or to upload pictures directly from the camera to my phone. This body may be a good bit heavier than the Rebel cameras but is sturdy and well-encased. But all that comes with a better tag — $1,399 at the time of publication.
4. MEMORY CARD
Unless you’re getting to shoot tons of video, you'll escape with a basic SD card. I do, however, recommend getting a card with 32 or 64 gigs of space for storing so that you never run out of the room.
Also an honest idea? Keep a spare card in your camera bag so that you don’t end up on a visitor within the middle of a project with no card in your camera. inquire from me how I do know that…
5. WHITE BALANCE CARD
It’s good to understand the way to set the custom white balance on your camera so that you'll get true-to-color shots regardless of what kind of light you’re shooting in. you'll use any “true white” surface — even a sheet of paper — to calibrate, but it’s nice to possess a white balance card in your camera bag. It’s sturdy and may tie onto your bag for straightforward access. It also features a black and neutral grey card with it, but I’ve honestly never used those two.
Click for more photography tips & tutorials!
6. REFLECTORS
Using reflectors completely changed my photography. Completely. you'll hold or prop a reflector to bounce light from a window or other light, and it instantly erases harsh shadows and uneven lighting. you would like to urge everything as perfect as possible before you get to the editing phase so that you’re only doing minor touch-ups, and getting the lighting right makes all the difference within the world!
You can also use white foam core to bounce and reflect light. Bonus: it doubles as an excellent background for your photos. Here’s an inexpensive, easy tutorial to make a folding “photo studio” out of it!
Learn a touch more about using reflectors and light-bouncing here.
7. DUST BLOWER
You spent a bunch of cash on your lens(es), so take excellent care of them and treat them right! Before you wipe the lens, use a blower to puff any specks of dust or other fragments on the surface. Otherwise, wiping will rub those particles around the lens causing tiny, tiny scratches. No Bueno, guys.
You can also use canned air for this, and canned air is kind of awesome, right?
8. 35MM PRIME LENS
I had a true “treat yo’ self” moment once I turned 30 this year. I went crazy and eventually invested during a new lens, and now I’m just about hooked into it.
9. TRIPOD
You must, must, must have a tripod if you’re getting to be taking your photography seriously in the least.
Why? Let me offer you three reasons: 1. If you’re a blogger, you’re likely to wish to require pictures with yourself (even just your hands!) within the shot at some point. 2. If you ever want to shoot in low light or with slower shutter speed, shaky hands will ruin every shot. 3. Shooting at strange angles or very low or high heights can make it difficult to duplicate an attempt for multiple images if you would like to require an opportunity in between shots or shoot on multiple days.
Basic lightweight tripod – I used this $20 tripod for four years before finally upgrading, and it served me faithfully along the way. It’s relatively versatile, but once I upgraded to a heavier camera body, I worried about the tripod tipping over. It also limits the range of angles you'll get compared to the tripod I even have now. Lateral arm tripod – this is often definitely an investment piece, but now that I own it, I can’t remember how I survived without it! This tripod is heavier duty and tons more versatile. it's a ball joint, therefore the camera can swivel to only about any angle. you'll also use the lateral arm to shoot straight down, which may be a lifesaver for shots like these. The legs also move independently, so it’s easier to suit tight spaces. If you’re getting to use the lateral arm function to shoot straight down, you would like to counter-weight the arm to stay the camera from tipping forward. There’s a take up the opposite side, and you'll hang something heavy, sort of a bag of books or photography sandbags.
10. MICROFIBER CLEANING CLOTH
After you blow the dust off your lens, you'll use a soft, lint-free microfiber cloth to wipe off any fingerprints, smudges, or water droplets. Just make certain to stay the material clean, too, or you’ll rub in additional dust!
12. WIRELESS remote
A remote allows you to require pictures of yourself without having to click the 10-second timer and sprint across space. We talk tons more about the way to use a foreign for nice selfies during this post.
It’s also great for shots in low light or slow shutter speed to scale back camera shake.
0 notes
Link
0 notes
Link
Complete Photography : 21 Courses in 1 [Beginner to Expert] ##CouponUdemygratuit ##Coursera #BEGINNER #Complete #Courses #Expert #Photography Complete Photography : 21 Courses in 1 [Beginner to Expert] Our students says regarding this course -- "I found this course really helpful and I learnt more about some of the technical aspects that will help me improve my photography. The explanations were simple and made sense. This is the first time I actually grasped the concepts and how things interact in a meaningful way. " -- Belinda Walker "Its rendered in its simplest way which helps a lot in understanding the course." -- Hazel "Great course. Very informative and enjoyable. Very well presented. Thank you." -- Bobbie Smith ==== Course Contents ==== Course 1: Understanding Basic Concepts of Photography Intro to Photography Basics What is Exposure Triangle Understanding Aperture Understanding ISO Understanding Shutter Speed Course 2: Understanding Advanced Concepts of Photography What is RAW? What is Light Metering? Understanding Histograms Course 3: Mastering Architectural Photography Equipment needed for Architectural photography How to shoot in low light And many in-depth Photoshop techniques for beautiful architecture photography. Course 4: Mastering HDR Photography How to shoot for HDR. How to process for HDR Course 5: Mastering Night Photography Night Photography Course 6: Adobe Lightroom Basics Lightroom Introduction Import photos Collections Working with White Balance Digging with color corrections Mastering Lens correction Course 7: Adobe Lightroom Advanced Working with Spot Healer Working with Graduated Filter Working with Radial Filter Working with Adjustment Filter Exporting images Working with presets Course 8: Adobe Photoshop Basics Mastering color pop Working with Matte Working with Sharpening Sun glass reflection HDR with Photoshop Course 9: Adobe Photoshop Advanced How to remove objects using Photoshop Working with warm B/W effect Working with Hue/Saturation in Photoshop Working with vintage effect Working with High Key effect Course 10: Understanding Photography Gear Full frame sensor vs. Crop sensor RAW vs. JPEG vs. TIFF Course 11: Deep analysis on lenses - which lens you should buy Analysis on Lenses Chart: DSLR Lens Analysis Special Purpose Lens Benefits of prime lens Chart: Lens market share Course 12: Analysis on Filter and Stabilization Analysis on Filters Use of Polarization filter # Darken The Sky Use of Polarization filter # Avoid reflection Neutral Density (ND) Filter: When to use? Use of ND filter # Waterfall Course 13: Earn Money Through Stock Photography Why Stock Photography? Success Theory in Stock Photography How much you can earn? from stock photography What type of images buyer want Analyze the market through useful tools Shoot Images having both literal and conceptual meaning Save some negative space Get model release early Submit to multiple stock agency sites Invest your time for proper meta data and key-wording Course 14: Mastering Photography Marketing Social Media Marketing for Photography Physical Marketing for Photography Website Marketing for Photography Classic Marketing for Photography Course 15: Black and White Photography Introduction to Black and White Photography Why Black and White Photography Color Photography vs. Black and white Photography Tips for better Black and White Photography Course 16: 10 Ways to earn from Photography Work as assistant photographer Sell your photographs in stock sites Earn from photography contests Earn from photography blogging Earn from photography YouTube channel Other ways to earn from photography Course 17: Black and White Photography Introduction to Macro photography course What is Macro photography Examples of basic Macro photography How to make Macro more interesting Intro to Macro photography gear Compositional elements and themes Rule of thirds Symmetry in Macro photography Working with Macro Themes Easy tips to get sharp and crispy image How to get larger depth of field Manual vs. Auto Mode How to adjust macro lenses Course 18: Portrait Photography Introduction to Portrait Photography What makes a portrait look great? Recommended equipment for better portraits Compositional techniques for cool portraits Tips for better backgrounds in portraits Lighting skills for amazing portraits Bokeh and Blur Example of poses for better portraits Tips for child portraits Tips for corporate portraits and head-shots Tips for wedding and event portraits Tips for Indoor Portraits Tips for Outdoor Portraits Course 19: Landscape Photography Introduction to Landscape Photography What makes landscape photos look great Recommended equipment for better Landscape Photos Composition techniques for better Landscape photos Shooting at Golden Hour: Sunrise Shooting at Golden Hour: Sunset Shooting at Blue Hour Shooting at Night Using Polarizer filter for Landscapes Using ND filter for Landscapes Tips for choosing and moving to locations Recommended settings for better Landscapes Course 20: Photography blogging through WordPress: Basics Getting started Different blogging platforms Choosing the domain Different hosting providers WordPress Quick Installation WordPress Manual Installation Connecting your WordPress with your domain Course 21: Photography blogging through WordPress: Advanced First look at WordPress WordPress settings Posts Pages Themes Customizing a Theme Menu Plugins More on Plugins Writing and optimizing a blog post Advanced optimization of a blog post How to find a good article writer Profiting from your blog: Banner ads Profiting from your blog: Other methods Final thoughts Who this course is for: Who wanna learn Important Photography Basics Who wanna learn about Exposure Triangle, Histograms, Light Metering and More. Who wanna expert in Photo Editing, Adobe Lightroom, Adobe Photoshop Who wanna earn a decent amount of money through photography Who wanna learn Macro Photography, Black and white photography 👉 Activate Udemy Coupon 👈 Free Tutorials Udemy Review Real Discount Udemy Free Courses Udemy Coupon Udemy Francais Coupon Udemy gratuit Coursera and Edx ELearningFree Course Free Online Training Udemy Udemy Free Coupons Udemy Free Discount Coupons Udemy Online Course Udemy Online Training 100% FREE Udemy Discount Coupons https://www.couponudemy.com/blog/complete-photography-21-courses-in-1-beginner-to-expert/
0 notes
Text
Understanding Terms Used in Photography – Part 1
Common terms used
There are many terms used in photography that can seem a little baffling. As there’s so many different terms used, I will begin here with part 1 of this tutorial to explain some of the most common terms you may come across.
Crop factor
In the days before digital cameras, most SLR’s (film cameras) had 35mm film, the equivalent on a DSLR today would be considered ‘full frame’. The image sensors on most of todays DSLR’s are smaller (except, of course the full frame DSLR).
When taking photos with a DSLR with a smaller sensor, it shows a smaller area of the scene than a full frame dslr and so appears ‘cropped’. Depending on what size sensor your dslr has, the crop factor could be cropped by: 1.3x, 1.5x or 1.6x.
The image above shows what the crop factor would look like assuming the whole image was taken on a full frame camera.If you took the same photo with a dslr which had a sensor with a crop factor of 1.3x then all you would see is the part of the image within the black frame; a sensor with a crop factor of 1.5x within the red frame, and a sensor with a crop factor of 1.6x within the yellow frame.
Bokeh
If you’ve looked at a photograph, lets say, of a portrait of someone taken with a dslr with a telephoto lens, and the photographer has used a low F/stop (to get a shallow depth of field), the background and the foreground will appear blurry and out of focus; that blurry and out of focus area is called the bokeh; you may of heard photographers use the term of a particular lens as having a ‘nice creamy bokeh’.
Bokeh can be particularly flattering with portrait shots,where it lets the subject stand out, perhaps from a cluttered background such as a crowd of people.
© A Webber
The reeds in the background in the image above, give a pleasant bokeh
Pixels
The word ‘pixel’ is made up from the words picture element. They are basically dots which are used to display images on a screen, or on printed matter such as a photograph. The total number of pixels in an image is referred to as its resolution, the higher the resolution the more difficult it is to distinguish between individual pixels.
© A Webber
© A Webber
On the image above of the falcon, I zoomed in on the eye to about 1300% until the pixels could be easily seen,when zooming in on a dslr with a lot lower resolution the pixels would appear much sooner. One of the advantages of a dslr that has a high pixel count is that it’s more difficult to distinguish between individual pixels.
Raw
In photography, a raw image file contains minimally processed data from an image sensor of a digital camera. A RAW file (sometimes called a digital negative) can be compared to undeveloped film.
RAW files are stored with metadata information embedded in them; containing info such as the time and date the photo was taken, the camera model used, lens, shutter speed, metering mode and more. this can be handy when you want to compare your more successful photographs with those that are not.
For more information on RAW in photography check out our other post: Beginners guide to shooting in RAW
The post Understanding Terms Used in Photography – Part 1 appeared first on Photographic Blog.
from Photographic Blog http://photographicblog.com/understanding-terms-used-in-photography-part-1/
0 notes
Text
How Understanding Your Learning Style Can Improve Your Photography
Lady in the blue hat walked into my shot and I chose to include her to emphasize the size of the trees and the distance of the park
Introduction
It’s an exciting time, going to the camera shop, discussing options, making the final choice, parting with a reasonable sum of money. Finally the anticipation of getting home and unpacking your shiny new camera gear. Suddenly all the dials and buttons seem so much more confusing, the manual may not explain things enough. The menus are complicated so it’s easiest to switch over to Auto mode and leave it there while you try to figure it out.
Six months later what’s happening with your camera? Are you still using it? Is it still on Auto or have you tried other modes? Did you decide it was too hard and the camera is gathering dust in a cupboard somewhere (this is more common than you may realize)?
Toi Toi silhouetted by sunset – an experiment in backlighting.
Learning to learn is a skill that also needs to be developed
Learning a new skill is difficult. It takes commitment to put time and effort into the learning process. It requires you to admit you are at the beginner stage, where you will struggle to produce the quality of work that you want. Learning is a process which requires you to put some thought and structure into working out a process that is right for you. Different people learn in different ways, so it’s helpful for you to understand how you prefer to learn. Why?
Value: If you are spending money on a course or a workshop, you want to make sure you are going to get the best value out of it.
Time: Learning takes time, so when choosing an option, knowing your preferences helps maximize your benefits.
Fun: It’s more fun if you are learning in a way that you enjoy.
Return: You are more likely to invest the time and effort into something that makes sense to you and shows a return on your investment.
Pain avoidance: No one enjoys doing something painful or difficult for the sake of it.
Find the best sources: Information is everywhere but varies in quality – you need to sift the good from the not so good.
Narrow depth of field, focused on the sparrow using a 70-200mm lens at a distance.
Learning styles
While there are many theories on learning styles, there are three basic types that apply to most people:
Auditory learners – learn by hearing and listening – you may prefer to read things out loud as you store information by the way it sounds to you.
Visual learners – like to see what you are learning as either pictures or words – you understand and remember things that you see. May use flash cards or similar for studying.
Tactile learners – you learn best by being hands on – touching things, taking them apart, twiddling with the settings (probably not listening to a speaker while you are doing it).
Of course, most people are a combination of all of these styles but you will likely have a preference for one or two. Understanding them can help you make choices around developing your own personal approach to learning photography. There are many options. Some don’t need lots of money but others might cost quite a lot, and it’s difficult to know in advance if it will be worth it.
Swan Yoga – if you take time to sit and be with your subject, all sorts of interesting things might happen
Opportunities for learning photography
Books, magazines and other printed material – can be purchased, downloaded in digital format or borrowed from libraries.
Online tutorials – short tutorials on a specific subject.
Video courses – can be watched for free online or many options can be purchased.
Short workshops (a day or less) – attend in person – usually listening to a speaker plus opportunities for questions and hands-on experimenting.
Long workshops (several days) – attend in person – some travel may be involved, often with a specific focus, planned talks plus time for independent shooting, discussion sessions, editing sessions.
One-on-one tutoring – customized service offered by some professionals where you can have a training session targeted to a particular subject.
Small groups – similar to one-on-one tutoring but with 3-5 students.
Camera clubs – often organize workshops or field trips for members with the aim of learning for everyone, often a safe place to ask questions.
Photography forums – online forums where photographers gather to post images and share information, might be general or around a specific subject (landscapes or birds).
Online courses – structured learning courses hosted online aimed at a range of capabilities from beginner to advanced (rather than random videos) on specific topics.
Formal education – University Degree courses in photography and other tertiary institutes are available.
Apprentice or intern – offering to work for free assisting a professional and learning on the job.
Mentor – someone experienced who is happy to answer questions, go for a bit of a photo walk, give you tips and advice (be nice and buy them lunch).
Organize your own DIY photography retreat focused on specific techniques.
PRACTICE!! – take your camera out and use it as often as you can.
Learning the hard way about photographing a subject in bright sunlight – washed out colors and harsh shadows as the result.
How to choose?
There are many choices listed above and even within just one of those options, there are many more choices – thousands of books available, tons of YouTube videos, loads of courses and workshop options. That workshop in Iceland might sound super exciting but are you okay with learning outside in some possibly dodgy weather, where you have to drive and hike for hours? Maybe you have to camp and will be tired and grumpy from getting up early in the morning to get the sunrise.
Would you prefer a structured classroom environment, where you can interact with students and the teacher for questions and discussion? Does it suit you better to watch videos at home after work, when the kids are in bed and you can pause them to write notes, or play the same step over and over until you understand it?
Practicing isolating a subject from the background and blurring with bokeh effect.
We are all busy people, with limited spare time to dedicate to our hobbies and passions. So it makes sense to maximize the value of your time spent learning. Understand what your personal preferences are and then take the next steps.
Learning factors
If you like to read do you need to buy expensive printed books or magazines – does your library have them? Can you get them cheaper in digital format? Can you borrow them?
The voice of the person presenting a video course is important – do they speak in a language or an accent you can understand? Do they present in a style that you like? Are they to the point or do they waffle all over the place and take twice as long to get the point across? Is the video a “talking head” or are they demonstrating the subject matter in some way? Is it something you can listen to for hours without getting annoyed or a headache?
When attending a workshop is there time allocated for questions and discussion? What reviews do the workshop speakers get from other attendees?
Are there sample videos available for you to hear/see speakers present so you can get a feel for their delivery style and approach to the subject matter?
Do you get frustrated in a group of mixed ability? If you are new and need a lot of help do you feel uncomfortable asking questions, or if you are more advanced do you feel held back when beginners are present?
Is the subject matter relevant to what you want to achieve? Do you have a chance to clarify goals and outcomes with a workshop presenter or speaker in advance?
Do you have the time or money for more formal education? Is it really necessary or a nice to have in the overall scheme of things?
Does being in a group of strangers bother you or inspire you?
How much time or money do you have available?
All these factors can have an affect on how well you will learn. It would be a real shame to spend several thousand dollars on a workshop in an exotic location to find that you get very little out of it. Or you might discover the most helpful channel on YouTube that really resonates with you.
Using flash on a dull overcast day seemed like a good idea until you see the bright highlights in the final image
How do we learn?
Research tells us that the best way to learn is via a technique called “distributed practice” which is where you study in an intense burst and then take a break, and keep repeating this cycle. Photography lends itself well to this style as it is often taken up as a hobby to be done in spare time. So allocating a weekend or an evening when you have time to focus on a particular style or technique, and then having a break is actually okay.
Applying some variety to your learning process improves outcomes as well. You could apply this easily with photography by changing the subject matter you are shooting. Or take your camera into different situations. Moving between similar topics can help you see connections or understand concepts in a different way. Bear in mind that getting out of your comfort zone is an important learning opportunity too, so be prepared to push your boundaries as well.
NZ Native Tui – shot in an enclosure at a nature park
Teaching someone else also helps you retain knowledge more effectively too. Writing things down after a learning session is also a recommended way to improve knowledge retention. Perhaps start a photography blog and share your learning journey with others? Keeping track of your achievements is important to give you a sense of scale (i.e. how far you have come from being a complete beginner) and it also motivates you to move forward, knowing that you have mastered some learning steps.
Learning to see from a different viewpoint is important as a photographer, as is taking chances and experimenting – this is a chair
Summary
Ultimately everyone learns on their own but the learning doesn’t truly happen until there is a link between action and reflection (i.e. what was I trying to achieve and did I manage it?) You must be prepared to experiment, and with experimentation there comes failure.
No one likes to fail as there is a lot of ego tied up in success. So to truly learn you must suspend your ego, embrace failure and admit to yourself that you can improve. These days with digital it’s more or less free to shoot as many frames as you want. So other than the cost of time, it’s never been more cost effective to get into photography (after the initial hardware purchase, of course).
Both the foreground and background were important in this image, composition was a challenge
Spend some time on this
Learning also requires you to move out of your comfort zone and do different things, try new styles. It requires you to actively think about what you are doing, what outcomes you are trying to achieve, and analyzing how and why you did (or didn’t) achieve them. Yes, you can just go out and randomly shoot and put no more work into it than that. However, any improvement is likely to be slow. It’s difficult to produce work of a consistent quality if you don’t understand how you got there in the first place.
Take a bit of time to understand your best learning style, look at the available options, try a few out. Maybe ask for recommendations from other beginners. Accept that it’s okay to say, “I’m new at this and I need some help.” In general, many people are happy to offer advice, after all, they were once new at it too.
Playing with an old vintage lens with manual focus and odd imperfections that did strange things around the edges was a fun afternoon field trip.
Conclusion
Investing in your own personal learning process is important. Learning a new skill can happen via osmosis but improvement will be slow and the process is frustrating for many. So much so that they may give up completely as it was too hard. Having a considered structured approach gives you an achievable goal to aim for – it’s even better if you break it down into smaller milestones so you get some sense of accomplishment at each step.
Learning a new skill takes time, so why not ensure that your time is well spent in the learning you are doing. Often there is a cost involved, so investing time in understanding a good learning choice for yourself is also important. Keep in mind that your learning journey will never be finished, don’t get lazy or complacent once you reach a certain level of mastery, there will always be something new to try.
Most of all, it should be fun!
Long exposure as the tide was going out after sunset.
(Note: All the images provided are ones taken by the author on her learning journey which started 10 years ago and is only now getting to the really fun stuff!)
The post How Understanding Your Learning Style Can Improve Your Photography by Stacey Hill appeared first on Digital Photography School.
from Digital Photography School https://digital-photography-school.com/understanding-learning-style-improve-photography/
0 notes
Video
youtube
Photography tutorial! Finally 5 photography tips you can apply RIGHT NOW to improve your photography and photos! You guys have been asking for photography tips so I've finally gone and done it! These are 5 photography tips you can apply right now, to make your photography better, including how to create bokeh! I will be filming a bunch of these photography tutorials in order to share any knowledge and photography tips that I have picked up with you guys! Let me know if you guys found these basic photography tips useful, and what you'd like me to cover in the next one! Please bare in mind this video was made with photography beginners in mind! I will be covering more advanced topics later on! Big thanks to @andrewobtinalla for helping with the shooting and also providing off screen advice. I actually know nothing about cameras... PEACE! ------------------------------------------------------------------------------- Help me reach my goal of making one of my short films this year, become a patron! http://ift.tt/2k13NMk ------------------------------------------------------------------------------- Check out the rest of my travels from this trip! https://goo.gl/aFx4V1 Check out my travels from last year! https://goo.gl/RauUJv ------------------------------------------------------------------------------- Follow me: Twitter! https://twitter.com/Wandergasm Instagram! @Wandergasm Snapchat! Wandergasm Facebook! http://ift.tt/1UUWoIG Tumblr! http://ift.tt/1OpnyLc ------------------------------------------------------------------------------- FAQ: When did I start travelling? I began to travel properly a few months after I graduated university in 2012. I booked a one way ticket to Australia and the fun began from there! How do I fund my travels? I normally apply for a work/travel visa in the country I am spending the majority of my time, I will then work for several months in a row, save up money and then disappear for a few months when I have the cash! I am also blessed enough to have made some really good friends on a lot of my previous travels, this normally means I have a place to crash! What did I do before I began travelling? Before I started travelling I gained a BSc in Forensics and Crime Scene Investigation, I intended to use my degree to get into Law school and become a Lawyer! That was all until I discovered road trips and wanderlust! Do I have any previous experience in Film or Photography? No! Everything I know I learned on the go! It really is the best way! Hands on knowledge in filming and editing really cannot be beaten. How do I start travelling? Just pack up and go! It really is the only way! If you keep telling yourself you're waiting for the perfect moment to travel, 10 years will pass and you'll realise you never did, adventure really doesn't wait! by Wandergasm
0 notes
Text
Creative Photography Ideas You Should Try
Creative Photography Ideas You Should Try
View On WordPress
#a photographer#amazing photographs#basic photography#best photography#best photography tutorials#Bokeh#composition techniques#creative photography#creative photography at home#digital photography#digital photography tutorials#dslr camera tutorial#dslr photo#dslr photography tutorial#dslr tutorial for beginners#free online photography tutorials#free photography tutorials#Landscape Photography#learn photography#Nature Photography#outdoor photo#Photography#photography business#photography for beginners#photography lessons#Photography Skills#Photography Tips#photography tutorials#photography tutorials for beginners#photography tutorials online
1 note
·
View note
Photo

Rufous Tailed Lark, Bangalore Outskirts.... If you are a beginner in bird photography, then the best way to photograph ground birds is to lie down on the ground and get to the eye level of the bird. When you shoot at this angle, you need to ensure that there is no distraction in the background. This will give you a beautiful out of background bokeh and will enhance the image. When you stand up and shoot, the ground is the background and you will loose the impact. When I say eye level, the camera should be placed on the ground and shot... -- Sudhir Shivaram Photography - Helping you become a better photographer. It's always nice to receive these kind of testimonials on the video tutorials...hard work pays.... =========== Dear Sir, You do the best online video tutorials in photography like how all the videos are of perfect length and incredibly informative. Thank you so much for the new video tutorial in post processing segment. You show every little detail, have a good calm, clear voice, which makes it easy to follow, step by step on the side with Ps, NX-D open. What you are doing is really valuable: I was an amateur photographer who now can take good photos and do digital editing when I very much could not before. I am amazed at what I can do with my images now, and I don’t think I would have gotten here without your tutorials. Thank you so much for the videos and keep up the great work. Regards, Srinivas Raju ============== Register for my video tutorials and get access to more than 170 videos to watch and learn. Subscribe today: https://learn.sudhirshivaram.com/myvideocourse/0/allproducts. #BirdPhotographyTips #BirdPhotography #SudhirShivaramPhotography #SudhirShivaramPhotographyTips #canon📷 #natgeo #nature #natgeowild #wildlife #wildlifephotography #wildlifephotographytips #WildlifePhotographyTours
#nature#wildlifephotographytours#sudhirshivaramphotographytips#birdphotographytips#sudhirshivaramphotography#wildlifephotography#birdphotography#wildlife#natgeowild#wildlifephotographytips#natgeo#canon📷
0 notes
Text
Here are some photography tips for beginners that I can share based on my experience.
I love Photography. Pictures can tell a good story and can paint a thousand words. Who doesn’t want to take good pictures?
Even before I started my blogging life, I loved taking pictures on my point and shoot camera and mobile phone. Growing up in the Philippines, where everyone loves to take photos. Getting used to be in front of the camera was a norm. There was even a point that I have to borrow our neighbours or relative’s camera to capture special family moments like birthdays, graduation, etc. My family was not privileged enough to buy our own camera.
Anyway, I always ended up with hundreds and hundreds of photos of the places that I’ve been and lots of selfies. I know, I’m guilty. However, not anymore! Good thing, we were using a digital camera, so you can quickly erase photos.
During my trip to Istanbul, I met my friend / co-blogger JP Licudan of The Rustic Nomad. Like me, he is into photography. He inspired me to do more and enhance my skills in photography.
Here are the things that I reckon will help anyone who intends to improve their skills in photography. Trust me, the process of learning photography is never ending, and I’m merely at the beginning.
Interest and Passion
Whether you want to pursue photography as a hobby or as a professional, passion is the key. The interest in learning photography should come from within you, not because your friend told you so, keeping up with the Joneses or because it’s a trend!
Remember, you will have to learn and understand by heart all the rules, concept, style and techniques of photography. Not to mention the post production of editing your photos.
Knowing the Exposure Triangle
On your quest to learn photography, you will have to familiarise yourself with the three pillars that comprise the Exposure Triangle: the ISO, F-Stop or Aperture and Shutter Speed.
ISO
ISO is the sensitivity of the camera to the light. It can make your photos go light or dark and determine the noise of an image.
F-Stop or Aperture
Understanding the F-stops / Aperture is also an important thing to learn in photography. F-stops are one of the things that will determine how sharp or blurry your photos will be. Aperture helps you to separate your subject from the background and give a blur effect which is known as Bokeh.
Shutter Speed
The shutter speed determines how quickly or slowly the light hits the camera sensor. The shutter speed can also give you the creative effects of long exposed images and can freeze the moving subjects.
Depending on they type of photography, getting the balance of these three will give you an excellent image every time.
The composition is also an important part of a beautiful image. The one that will give you sense and feeling to the image with its leading lines, texture and proportions. As a rule of thumb, following “the rule of third” is important however rules are made to be broken. So be creative! Depending on the subject and goal of the image this golden composition rule can be broken.
Support Group and other resources
Having a support system in photography is important. There are plenty of youtube tutorials that you can watch to understand all the nitty-gritty details of photography.
Instagram is one of the famous visual type social media platforms. I love browsing pictures on IG that tell a story, gives inspiration and push you to be more creative.
Follow me on Instagram — @everythingzany
A photo posted by Ryazan Tristram (@everythingzany) on Dec 30, 2016 at 10:25pm PST
Photography books are also an excellent source of information. Since I’m interested more in travel, nature and portrait photographies, I find that these books from lonely planet really helps a lot.
[amazon_link asins=’176034074X,1743218478,1743607474′ template=’ProductCarousel’ store=’ezplugin012017-21′ marketplace=’UK’ link_id=’25906c1d-db2a-11e6-88ee-4b86fe2fe475′]
I also joined a local photographic society to help me enhance my skills. It’s nice to be surrounded by people who are also passionate about their craft. I recently joined a PDI photo competition where I won a photographic award for the Long Exposure theme.
Snooker
I also took few photography courses and photo walks here in the UK. It is definitely worth doing it! The photography class prices vary if it’s a classroom or online.
There are also loads of Facebook groups and channels on youtube that can give you support and help you to develop your photography skills. Here are the groups that I actively engage with:
I Shoot People! Photographers by Joe Edelman
If you want to learn more about portraits and wants to take your photography skills to the next level.
Links: Youtube channel and Facebook group
Michromatic by Mark Ryan Sallee
This channel will give you loads of handy insights about Micro Four Thirds a.k.a MFT. I own an Olympus camera which is MFT, so I find his videos really helpful.
Links: Youtube channel and Instagram
Digital Rev TV
When it comes to product reviews, I really enjoy watching this channel. Started by Kaiman and Lok, the reliable duo from Hong Kong.
Links: Digital Rev TV channel, Kaiman’s Youtube Channel and Lok’s Youtube Channel
Adobe Photoshop Lightroom
As it says on the tin, this channel will help you to develop your post-production skills with Lightroom.
Link: Youtube channel
Digital Photography School
When it comes to photography blog and FB page, I love reading stuff from DPS. A reliable resource for learning photography.
Links: Digital Photography School Blog
Gear and Post process
There is a myriad of choices on which camera and gear you should buy to get into photography. Before I bought my MFT Olympus camera, I used a Samsung smart digital camera (point and shoot) and my mobile phone.
Micro Four Thirds is a mirrorless type of camera. The MFT pertains to the size of the photographic sensor of the camera. The popular DSLR (Digital Single Lens Reflex) has the 35mm full frame sensor size.
RAW vs. JPG
Shooting in RAW and JPG has their own merits and disadvantages. RAW files can give you a great option to manipulate your images on the post processing stage, but the files can take up so much storage space on your memory card. The JPG files, on the other hand, are compressed files with a limited amount of colour data stored in your image. Hence, the post-processing of JPG files can be challenging at times. On a good note, since the JPG files are pre-compressed by your camera it takes less storage space on your memory card.
My Photography Gear:
My Cameras
Olympus Pen EPL – 7 and Go Pro Hero 4 ( Silver)
[amazon_link asins=’B00MVOU4IQ,B00O1XRT9W,B01LX73Z1W’ template=’ProductCarousel’ store=’ezplugin012017-21′ marketplace=’UK’ link_id=’b7e971f2-db43-11e6-98e4-1532fcd852f0′]
I started using my PEN EPL-7 for almost a year now. I love MFT because of its portability and performance as if I’m using a full frame DSLR. The MFT range also has a variety of lens to choose from. I use Go Pro Hero 4 to take action and underwater images.
My Lenses
Olympus M.Zuiko 45mm 1:1.8 Prime lens, Olympus M. Zuiko 12mm ED 1:2.0 Prime lens (Manual focus), Olympus M. Zuiko 14-42mm 1:3.5-5.6 (Kit lens) and Olympus M.Zuiko 14 -150mm 1:4.0 – 5.6 (Zoom lens)
[amazon_link asins=’B0058G40O8,B00N0E1KDE,B00I0TUNZA,B00SMPL2V6′ template=’ProductGrid’ store=’ezplugin012017-21′ marketplace=’UK’ link_id=’d5f3db4e-db4a-11e6-b194-6df07450d810′]
Each lens has their specific expertise:
The 45mm prime lens is excellent for portrait shots. The 12mm Prime, Kit and Zoom lens are for my travel – landscape and wildlife photography.
Other Photography Gear and Accessories that I use:
These are the other products that I use on a regular basis for the type of photography I do. I will try to make few more post about these to explain in depth.
Sandisk 32GB Class 10 memory cards
[amazon_link asins=’B014IX0202,B01469QE3M,B01D2ZVNR8′ template=’ProductCarousel’ store=’ezplugin012017-21′ marketplace=’UK’ link_id=’315ad5f7-db4d-11e6-b490-e5c382045f40′]
I prefer using class 10 memory cards as it has a quick capabilities to record heavy data. e.g. HD, raw photos etc.
Manfrotto Pixie tripod (Travel tripod) and Manfrotto Camera bag
[amazon_link asins=’B00D76RNLS,B00K0P022Q,B0152X0W70′ template=’ProductCarousel’ store=’ezplugin012017-21′ marketplace=’UK’ link_id=’83ab120e-db4d-11e6-9e8c-238915764db3′]
As I do a lot of walking with the type of photography I’m doing, having a little tripod and small camera bag to carry around is pretty handy.
Hoya Polarising filter – SMC Cir PL and Neutral Density Filter
[amazon_link asins=’B00EYZ1WRC,B00HF6HI1Q,B002L72ANK’ template=’ProductCarousel’ store=’ezplugin012017-21′ marketplace=’UK’ link_id=’cc3fdcaf-db51-11e6-957c-5d5c110684a8′]
These filters are my saviour! For landscape/travel photography, these are the accessories you should have in your bag. The Polarising filter will help increase your image contrast, and the ND filter will help you for the long exposure shots.
Hahnel battery (Spare battery for EPL-7)
[amazon_link asins=’B004U94JBI,B00MVOUN3W’ template=’ProductGrid’ store=’ezplugin012017-21′ marketplace=’UK’ link_id=’09201eef-db52-11e6-a39b-118954147971′]
As a standard, I always have an extra battery.
Reflectors
[amazon_link asins=’B002ZIVKAE,B010FELF4U,B00IANRW28′ template=’ProductCarousel’ store=’ezplugin012017-21′ marketplace=’UK’ link_id=’4847e0e0-db52-11e6-8e0f-49fd208d54c0′]
An excellent way to bounce the light as a filler or sometimes the main source of light. Especially, when you are shooting outdoor where you can’t fully control all the lighting.
Photo Studio Kit
[amazon_link asins=’B01D9X5DKG,B01C8Y677A,B00NGCXJ2A’ template=’ProductCarousel’ store=’ezplugin012017-21′ marketplace=’UK’ link_id=’829f5590-db52-11e6-8a91-b932bf41c51f’]
Since, I’m trying to practice more of portraiture, so I’ve decided to set up a little home studio. This kit has got everything that you need to start shooting.
Editing Softwares
Adobe Lightroom
[amazon_link asins=’B00M3YAIC6′ template=’ProductGrid’ store=’ezplugin012017-21′ marketplace=’UK’ link_id=’9fe82079-db52-11e6-acdd-93c3526fc5bc’]
A powerful editing software tool. Probably the most popular one. I edit the majority of my photos in Lightroom. It’s an easy to learn editing software yet very powerful.
Adobe Photoshop
[amazon_link asins=’B00E3J2UGG,B00A0P9K60′ template=’ProductGrid’ store=’ezplugin012017-21′ marketplace=’UK’ link_id=’cbfbb309-db52-11e6-b5cc-4d1cdf1404c0′]
I only use photoshop if I desperately need a heavy pixel manipulation, otherwise I use Lightroom or Canva.
There you have it! If you have other handy tips on photography, please leave a comment below.
Be Creative and keep shooting!
#gallery-0-4 { margin: auto; } #gallery-0-4 .gallery-item { float: left; margin-top: 10px; text-align: center; width: 50%; } #gallery-0-4 img { border: 2px solid #cfcfcf; } #gallery-0-4 .gallery-caption { margin-left: 0; } /* see gallery_shortcode() in wp-includes/media.php */
Tips On How To Enhance Your Photography Skills Here are some photography tips for beginners that I can share based on my experience. I love Photography.
0 notes