#camera tutorial for beginners
Explore tagged Tumblr posts
Visit Tumblr Blog
Explore Tumblr blogs with no restrictions, modern design and the best experience.
Last Seen Tumblr Blogs


Fun Fact
Tumblr Inc. is funded by 13 investors.
Text
🚀🌈 Ready to uncover the mysteries in Infinity Nikki? Our latest guide walks you through every step, from jumping over obstacles to purifying Esselings and entering the mystical Temple Gate! 🌌✨ Perfect for both newcomers and seasoned players wanting to brush up on their skills. Dive into the adventure now! 🎮💖
#Infinity Nikki#Beginner Guide#Gaming Tips#Esseling Purification#Temple Gate#Stone Path#Game Movement#Camera Rotation#Jumping Mechanics#Floating Jump#Higher Jump#Overhead Obstacles#Adventure Game#Online Gaming#Gaming Community#Mobile Gaming#Game Tutorial#Jump Over Gaps#Miraland#Video Game Guide#Nikki Character#Game Challenges#Gameplay Strategy#Action Adventure#Explore Infinity Nikki#Game Control#Esseling Challenges#Gaming for Beginners#Jumping Techniques#Adventure Gaming
3 notes
·
View notes
Text
#insta360 x4#insta 360#insta 360 x4#insta360 x4 review#360 camera#insta360 x4 8k#x4#best 360 camera#insta360 x4 tutorial#insta360 x4 unboxing#insta 360 vs gopro#insta 360 x4 india review#insta360 x4 video#insta360 x4 low light#insta 360 x4 bike mounts#360 video#insta360 x4 accessories#insta 360 x4 worth it in 2025#insta 360 x4 unboxing review#insta 360 x4 beginners guide#insta 360 x4 motorcycle mounts#insta 360 x 4 vdeo#insta360 x4 vlog
0 notes
Text
#drone#best drone#fpv drone#dji drone#drones#4k drone#best budget drone#budget drone#drone video#dji neo drone#best drones#best dji drone#dji drones#drone pilot#cheap drone#drone fails#drone crash#camera drone#dji fpv drone#drone reviews#best drone 2024#drone tutorials#how to fly a drone#6k drone#8k drone#drone with camera#quietest dji drone#gps drone#beginner drone tips#2024 drone
0 notes
Text
Mastering Photography with YouTube: A Guide to Learning Through Videos
Introduction In the digital age, photography has become more accessible than ever before. Whether you’re using a smartphone or a professional camera, the desire to capture stunning images is universal. One of the most effective and accessible ways to learn photography is through YouTube. This platform hosts a wealth of tutorials, reviews, and tips that cater to all levels, from beginners to…
#A Guide to Learning Through Videos#Beginner Photography#BeginnerPhotography#Camera Techniques#CameraTips#Creative Photography#CreativePhotography#Digital photography#LearnPhotography#Mastering Photography#Mastering Photography with YouTube#Online Education#Photography Tips#Photography Tutorials#PhotographyCourses#PhotographyGuides#PhotographyHacks#PhotographyTechniques#PhotographyTips#PhotoSkills. VideoTutorials#technique#tips#Tips and Techniques#Visual Learning#Youtube#YouTube Learning#YouTubeLearning. PhotoEditing#YouTubePhotography#YouTubeTutorials
0 notes
Text
youtube
#photography#best camera for photography#best photography camera#camera reviews#best camera for photography 2023#photography tips#learn photography#photography camera 2023#photography tutorial#photography for beginners#best camera#best camera for youtube and photography#camera#travel photography#photography camera#digital photography#camera for photography#photography camera 2024#2024 photography camera#camera for photography 2023#Youtube
0 notes
Text
Cat Photography: Pet Photography Tips and Camera Settings for Better Cat Portraits
‘Until one has loved an animal, a part of one’s soul remains unawakened’ ~ Anatole France They say, the experience of loving and caring for an animal awakens a deep and essential part of our being, enriching our lives in ways that are difficult to describe. I didn’t realise this until I met my friend’s pet, the cute kitten ‘Cheeku’! Pets are great companions with whom we can converse and share…

View On WordPress
#cat photography#DSLR photography for beginners#DSLR photography tutorials#learn photography#pet photography#pet photography camera settings#pet photography tips#Photography#photography for beginners#photography tutorials
1 note
·
View note
Text

Fully Underwater Lot Tutorial
@creida-sims @kitkat99
UPDATE January 2025
There is now a much, much easier way to do this. This version of SimPE now includes a tool to change terrain geometry. To edit the terrain in SimPE, go to Tools/Neighborhood/Neighborhood Browser and load your neighborhood. In the Resource Tree, select Neighborhood Terrain Geometry (NHTG) and select the only resource in the Resource List. In Plugin View, click Terrain Editor. It's very intuitive, but basically, you can edit the terrain under a lot to make it be underwater. You can also delete the road with the Road Editor.
I'll keep the old tutorial for archival purposes, but unless you can't or don't want to install this version of SimPE, it is pretty much obsolete.


Some warnings and disclaimers
1. This is not a beginner tutorial. I have tried to explain with as much detail as I can, but still, if you just started playing The Sims 2 I recommend trying out other building tutorials first.
2. I have tested it but there's always a possibility that some new problems will come up. Follow at your own risk. Backup your neighborhoods before trying this. Test it first in a new empty neighborhood.
3. These lots are roadless, so they require specific gameplay conditions to avoid breaking immersion (pun intended).
4. They will behave like normal lots in the sense that sims can walk around and do anything as if they were on land. There's one big problem to consider: when sims go fully underwater, their hair and some parts of their clothing might disappear visually.
So this is more useful for structures that sit above the water, shallow water that doesn't reach a sim's head or, with some modifications, small islands surrounded by water. So unless you want bald mermaids, I don't recommend this for sims that live underwater.
5. If you use Voeille's hood water mod, reflections will look glitchy in lot view, because this is technically not a beach lot. The only solution I found is enabling "Lot view ocean reflections" in RPC Launcher. Otherwise you'll have to deal with glitchy reflections.
6. Before following this tutorial, make sure you know the basics of creating, editing, importing and exporting SimCity 4 terrains. Written tutorial by SimEchoes here, video tutorial by loonaplum here.
Software and mods used
The Sims 2 FreeTime expansion pack (required for the modifyNeighborhoodTerrain cheat)
SimCity 4 (required) Hood Replace by Mootilda (required)
Lot Adjuster by Mootilda (required)
Portal revealer by Inge Jones (required)
Voeille's pond and sea water overhaul and RPC Launcher (optional, see disclaimers)
The Sims 2 Apartment Life and Bon Voyage expansion packs (optional, for "walk to lot/work/school" options)
Cheat codes used
moveObjects on/off
modifyNeighborhoodTerrain on/off
1. Creating/editing a terrain in SimCity 4
1.1. You can edit an already existing terrain or create your own from scratch. In both cases, you need to keep two things in mind: If you want the usable area of the lot to be underwater, such as making houses for mermaids or a coral reef, make sure the water is shallow. No more than a few short clicks with the terraforming tools in SimCity 4. This is because The Sims 2 live mode camera won't go underwater, so making the water too deep might make it uncomfortable to build or play the lot.
If you goal is to build a structure mostly above water, like a ship or an oil rig, you can get away with making the water a bit deeper, but not too much. I've noticed that sometimes the lot terrain tools stop working correctly if there a hill that's too steep.
1.2. Once you've created the terrain, you will need to add a small island on the area where your lot will be. I know it seems contradictory, but trust me, it will make sense. Create and name your city. Use the terraforming tools in city mode to make a tiny island of about 6x2 squares.

1.3. On the island, use the road tool to place a straight road that takes up 4 squares. Then, using the street tool (the last option), place two short streets at each end of the road.
Streets will disappear in TS2, only roads translate to roads in ts2, so why do we place them? Well, placing a street at the end of a road will get rid of the rounded end bit in TS2, which can't be used to place lots. This will be important for the placement of the lot and to make sure the edges of the lot are underwater. If this doesn't make sense yet, don't worry, it might make sense later.
1.4. Save the terrain. Don't exit SimCity 4. Copy your new/edited sc4 terrain from your SimCity 4 folder to your SC4Terrains folder in your Sims 2 documents directory. It is usually
"C:\Users\YOURUSERNAME\Documents\EA Games\The Sims 2 Ultimate Collection\SC4Terrains"

1.5. Back in SimCity 4, we're going to make a second version of this terrain. Remove the roads and streets you made before, with the bulldozer tool. With the level terrain tool in Mayor mode, carefully remove the island, so it's on the same level as the bottom of the ocean/lake. Don't change anything else. Save, exit and copy this second terrain to your Sims 2 SC4Terrains folder. Make sure you rename the file to something different from the first one, like adding "no roads" to the filename. You should have two terrains by the end of this step. One with the small island and one without it.
2. Editing the terrain in The Sims 2
2.1. Open The Sims 2 and create a new neighborhood using your new terrain. Something to keep in mind: if you want the terrain to be a subhood of another neighborhood, make it a subhood from the start. You will not be able to move the lot once it's finished, since it will be roadless. I don't recommend decorating the neighborhood for now. Leave it empty until the end of this tutorial.

2.2. Place the smallest empty lot (3x1) on the island.
2.3. In neighborhood view, open the cheat console by pressing Control + Shift + C, and type
modifyNeighborhoodTerrain on
To quote The Sims Wiki:
"This allows you to alter the neighborhood terrain by raising or lowering it. To use this cheat, be in the neighborhood view, then enter the cheat "modifyNeighborhoodTerrain on" (without the quotation marks), and click over the area you would like to change. To select a larger area, click and drag the cursor to highlight the desired area. Press [ or ] to raise or lower the terrain by one click, press \ to level the terrain, and press P to flatten terrain. When you're finished, type “modifyNeighborhoodTerrain off” in the cheat box (again, without the quotations)."
If you use an English keyboard, these instructions will probably be enough for you. If you don't, I recommend first testing the cheat, because the keys for using this cheat are different in other languages. For example, in my spanish keyboard, the question marks are used to raise and lower the terrain and the º/ª key flattens it.
Another aside: When you select an area using this cheat, a green overlay is supposed to show up. Some lighting mods make this green overlay invisible, like the one I use. If that's your case, you kind of have to eyeball it. Remember that one neighborhood grid square in TS2 is equivalent to 10 lot tiles, or the width of a road. I recommend getting a mod that allows you to tilt the neighborhood camera on the Y axis, which will allow you to have a bird eye's view of the terrain.

2.4. Flatten the terrain around the lot so it's at water level. This cheat won't allow you to edit the terrain inside the lot, so you have to edit the terrain around the lot. Make sure there is plenty of flat underwater space around the island. You should end up with something like the picture above. The water will have some holes, but don't worry, those get filled with water the next time you load the neighborhood.
2.5. Enter the lot and place any object on it. Save the lot and exit the game. This is so LotAdjuster recognizes the lot in the next step.
3. Expanding the lot with Lot Adjuster
3.1. Open Lot Adjuster and select your neighborhood and lot.

3.2. Click "Advanced…". Check "Over the road (only enlarge front yard)". Use the arrows to add 20 tiles to the front yard. Click "Finish" and "Restart".

3.3. Select the same lot again. This time, check "Add and remove roads". Uncheck the road checkbox for the front yard. Add 20 Tiles to the back yard, 20 tiles to the left side and 10 tiles to the right side. Check "Place portals manually". You should end up with a 60x60 lot, which is the biggest size. You might want a smaller lot, but unless you know what you are doing, I recommend starting with this size. You can shrink it later. The goal of making the lot this big is making sure the edges of the lot are underwater. Click "Finish" and exit.
4. Moving portals and flattening the lot

4.1. Make sure you have the portal revealer by Inge installed in your Downloads folder before the next step. Open your game and load your neighborhood. The lot should look something like the picture above.

4.2. Load the lot. Delete the object you placed before. Place the portal revealer on the lot near the mailbox/phone booth and trashcan. It looks like a yellow flamingo and you can find it in Build Mode/Doors and Windows/Multi-Story Windows catalogue. You will notice that when you select the object from the catalogue, some yellow cubes appear on the lot, and when you place the object, the cubes disappear. After placing the portal revealer, pick it up and place it again. This will make the yellow boxes visible again.
So what are those yellow boxes? They are portals. They determine where sims and cars arrive and leave the lot. The ones on both ends of the sidewalk are called pedestrian portals, and in the street, one lane has portals for service vehicles (maids, gardeners, etc.) and the opposite is for owned cars and carpools. You can see the portal's names if you pick them up. Make sure not to delete any of them.
Now, since this is going to be a roadless lot, ideally there won't be vehicles in it. This means that the lot would ideally be accessed through walking only. In community lots, this would not be an issue if you have the Bon Voyage expansion pack, which allows sims to walk to lots.
In residential lots, you might run into some problems. Service NPCs always arrive on vehicles, and unless your sim owns a vehicle, the carpool and school bus will always come to pick sims up for work/school. It might break your immersion to have a vehicle show up underwater or on a ship. There are many options to avoid this: having sims work on an owned business instead of a regular job, not having kids on the lot, making the kids homeschooled, avoiding calling service NPCs… it depends on how you want to play the lot. For example, my icebreaker is a residential lot, only adults live there, some sims live in it temporarily and none of them have a regular job.

All of this is relevant because we're going to move the portals. Where you move the portals depends on you. Think about how you're going to use the lot. In my icebreaker, I placed the car portals (which won't be used) underwater, on a corner of the lot. I placed the pedestrian portals on the ship, to pretend that the walkbys are part of the crew or passengers. But for now, just move the portals, mailbox/phone booth and trashcan to a corner of the lot. To be able to pick up the mailbox/phone booth and trashcan, use the cheat moveObjects on. Delete the street and sidewalk tiles using the floor tool (Control + click and hold left mouse button + drag).


4.3. Flatten the island with the level terrain tool. Save the lot. Almost done! Don't mind the hole in the water, this will be fixed. You will notice that in neighborhood view, the island is still there. This is because the neighborhood terrain under the lot hasn't updated. I don't know why this happens, but it does. Normally, moving the lot would fix it, but we can't move this lot using the game's tools. Instead, we are going to fix the terrain with Hood Replace. Don't exit the game yet.
5. Updating the terrain with Hood Replace
5.1. Create a new neighborhood using the new roadless terrain. Make sure it has the same type of terrain (lush, desert, etc.) as the first one. Again, name it "NO ROADS" or something similar. Exit the game.

5.2. Open HoodReplace. On the left column you will select your "NO ROADS" neighborhood. In the right column, select the neighborhood that has the underwater lot. Check these settings: Replace terrain, replace road, and versioned backups. Leave everything else unchecked. Click Copy.

5.3. Open The Sims 2 and load the neighborhood to check if the changes worked. That concludes the tutorial. At this point you can shrink the lot if you don't want it to be so big. Remember to move the portals to their final placement when you're done building the lot. Also keep in mind pedestrians (walkbys) always walk by the mailbox, so keep the mailbox accessible for sims.
If you're going to have multiple underwater lots, I recommend making them first, and decorating the neighborhood after. Doing this in an already existing neighborhood might be more difficult, mainly because, if you made any changes to the terrain using the modifyNeighborhoodTerrain cheat in the past, they might get reset when using Hood Replace.
154 notes
·
View notes
Note
Got any newbie tips for dream game? I've been playin' for a few hours and I'm totally lost annnnd the wiki isn't very helpful
i'm not sure.. what tips to give whether you mean it lore understanding wise or gameplay wise so i'll try to keep it general.
BUT IF YOU HAVE SOMETHING MORE SPECIFIC IN MIND, PLEASE ASK THAT.. if you need help with something i am more than happy to show you in game.
i'm assuming that you're playing in a private server since that is the recommended way to play the game, public servers become more of a social game.
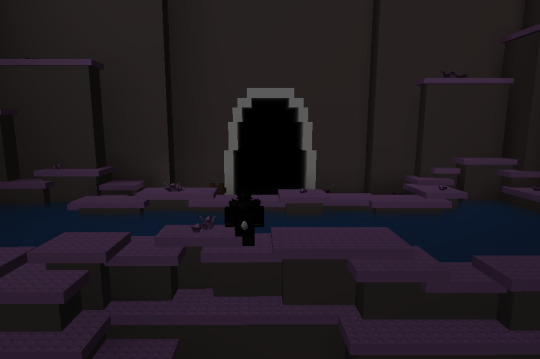
if you're looking for more of a lore understanding of what is going on in dream game, i'd have to recommend reading and looking at things around windy island before even sleeping as there is a good amount of information missing.

the pools outside of the 12th mansion allow you to force certain surface dreams to visit by changing the numbers on them to match a dream's code from left to write. these dream codes can be found around windy island but for convenience sake, these codes as well as the dreams that they correspond to can be found on this page of the wiki in surface dreams. when you insert the code correctly, a sound cue will play.
more under cut for sake of it's going to be a little long.
i'd also recommend if you're looking to explore certain depth dreams that you force the surface dream pink swamp ( which has a pond code of 1, 2, 7 ) to obtain a mysterious crystal.
and to obtain a mysterious crystal in pink swamp, they can be found in this cave.
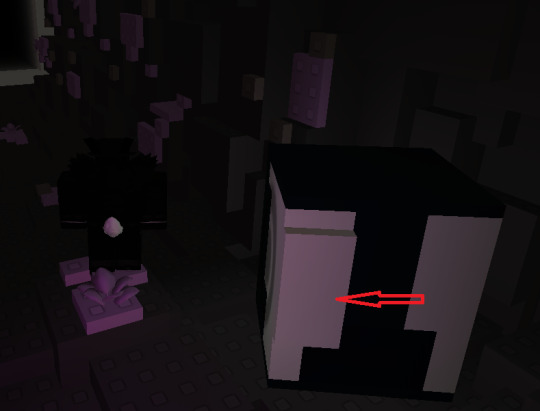
when you enter you'll find a the crystal machine giver, and interacting with this button will give you one crystal. obtaining certain badges will give you more ways to obtain crystals without having to constantly revisit pink swamp in one session but for now we'll keep it simple.
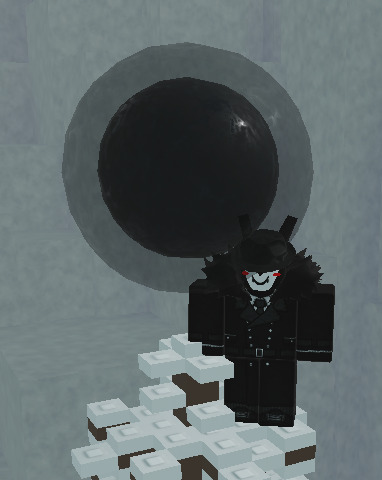
these mysterious crystals are used to put into depth orbs which will activate depth dreams which give you a sound cue upon activating them, so the next time you wake up and go to sleep, you will wake up in that respective depth orb's depth dream.
( example of what a depth orb looks like. some orbs might looks similar to depth orbs like the very large ones found in lower ten mou but arent actually )
i'd also recommend for exploration purposes that you obtain the pie in the dream ten mou, which is found in upper ten mou. it's kind of.. essential that you learn how to pie hike.
..my tip for pie hiking is to angle your camera down, it helps the pies get into a better / safer angle for you to stand on. you should also probably get used to changing the way that your character is standing / facing to get a better pie throwing angle as well as understanding where your pie will land if you threw it jumping or not.
pies fall off after awhile so keep that in mind.
i am sort of running out of.. general tips, i dont want to get too specific as i dont want to pinhole you to a certain thing to do. so i have 2 last things.

i would recommend when you find your way to the main island in graveyard sea to purchase the x2 repose slice cake. reposes are everytime you wake up / go to sleep and you can use these reposes to purchase certain things.
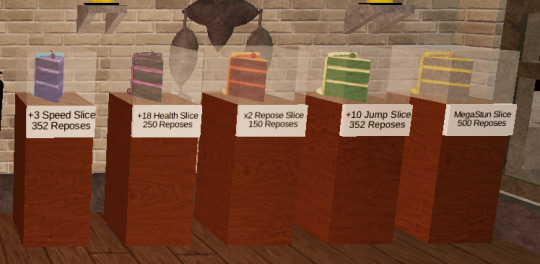
for example, these permanent upgrades. you of course are not required to obtain these, but they would be nice to obtain.
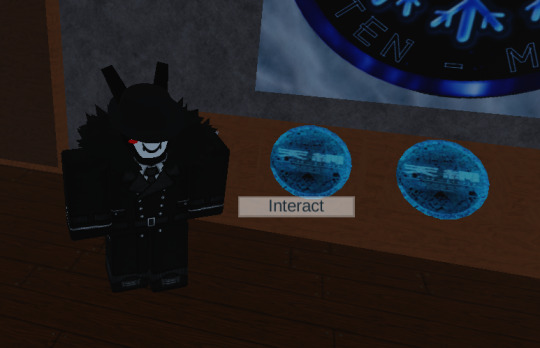
for last, if you are done mainly exploring.. from there you can aim for badges to obtain as MOST badges reward you with an item permanently.
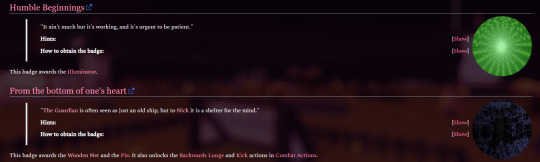
these 2 badges are the ones beginners usually get. the ways to obtain these badges and every other badge can be found on the miraheze / wiki. there are also tutorials on youtube you can look up if you need visuals if the instructions are unclear.
while its encouraged to try exploring and figuring things out on your own, it's understandable if things get really confusing so it's okay to seek out guidance in these ways.
i'll reiterate that i'm.. unsure by what's meant by newbie tips but i hope these help. if you need something in specifics, please specify.
40 notes
·
View notes
Note
how would u recommend a beginner get into blender? Ima 2D art student but want to fill out my portfolio and it looks super fun and cool!
Yay I'm so glad you want to learn Blender!
Since you're studying 2D, you probably have a lot to learn and practice already. So I'll try to answer in a way that could benefit you the most in both practices.
You probably already heard Blender has a tool called "grease pencil" - it's a 3d object, but they also built it so that if you want to do regular 2D illustration or animation, you can do that too.
Learning grease pencil first could be a good way to familiarize yourself with Blender's interface. And because a lot of the toolsets share how they operate (for instance, adding modifiers to the stack is the same no matter if you're using a grease pencil object, curve, or 3D mesh), you can more easily move to different parts of the program later, like poly modeling or sculpting.
One really great tutorial for 2D Blender is this one by Kevandram - https://www.youtube.com/watch?v=nZyB30-xZFs
From there you can move into tutorials that combine 3D and 2D - or just start with this if you're really excited to learn 3D modeling. Again Kevandram has a really great tutorial for that - https://www.youtube.com/watch?v=ftBFjGy5z08
Something you'll wanna watch out for with Blender tutorials is the version they're using. If your version of Blender is newer, then maybe a button or menu a tutorial tells you to use might have moved. Or some functionality may have changed. Luckily since Blender is open source, they make all versions available to you here: https://download.blender.org/release/
Once you get more familiar with Blender, jumping between versions is easier. But for the sake of learning, if you find a really great tutorial that's using an older version, you can just use that version. You can have multiple Blender versions installed - right now I have 4.4, 4.1, 4.0, and 2.79. So for instance in Kevandram's Bakery Shop tutorial, he's using Blender 3.0 which you can get here - https://download.blender.org/release/Blender3.0/
If you're not interested in grease pencil, or just want to jump straight to 3d, this is a great beginner modeling tutorial from SouthernShotty - https://www.youtube.com/watch?v=C1CFWDWTamo
It mostly sticks to modeling and then gets into basic material stuff. A simplified order to learn things in 3d would be:
Poly/mesh modeling
Modeling with curves
Adding materials/using the shader editor
Unwrapping 3d objects / learning the UV Editor
Texture painting / Painting texture maps (using that unwrapped map from 4) in Blender or some other program (Krita if you want to paint on the 2d map itself. Procreate if you want to paint directly on the model although that'll require a tablet).
A lot of beginner tutorials will take you through steps 1-3 usually, and maybe throw in some basic animation, camera setup, lighting, and rendering. More intermediate/advanced topics would be rigging, animating rigged models, physics simulations, and geometry nodes.
To bring it back to how this could benefit you the most as a 2d artist - something I see a lot of people do is prototype in 3d, and use that 3d render as a base to paint over. Some people strictly use grey boxes, and some people actually model/texture/light certain things and then render that out in layers to use in their painting program later. You can use as much or as little 3d as you want to help 2d painting.
Here's a couple videos showcasing that type of workflow: https://www.youtube.com/watch?v=CHIZtZ2JU3A https://www.youtube.com/watch?v=W5GSyytbABo https://www.youtube.com/watch?v=r5ZyW7K_yP8
Those use Blender's cameras and lights, which you'll pick up as you do modeling/texturing tutorials. Later you can get more advanced with those as well as the different rendering engines within Blender.
This was a lot, but I hope it helps clarify where you can start, and ultimately what you could get out of using 3d!
31 notes
·
View notes
Text
A Scam... Tutorial?
I was watching Photoshop tutorials and YouTube recommended this video to me.

And I was already skeptical. Clarity is an extremely powerful and useful adjustment in Lightroom and Photoshop and I could not think of a reason why anyone would recommend *not* using it to the extent they were using ALL CAPS.
But I was curious if there was a new technique I was unaware of. It's impossible to know everything regarding Photoshop and I learn new stuff all the time.
So I gave the video a chance.
youtube
To quote my late father... what a crock of shit.
I have seen a few scam videos in my time, but I cannot think of ever seeing a digital art tutorial scam. I found myself angry and a strongly worded comment just flew out of my brain.

I continued...
"First, no one should use clarity and texture at 100%. And I think showing the effects at 100%, as if that is a normal workflow, is highly misleading. You are creating a problem that does not exist and then offering a solution to it. And then you are using a provocative title to attract clicks. Not to mention you may be convincing beginners to abandon clarity and texture altogether when it is one of Camera Raw/Lightroom's most powerful tools. People should absolutely use clarity and texture. That is a crazy thing to tell people.
Second, high pass sharpening is… old school. It works but it can create a lot of nasty artifacts if overdone. (Personally I find it too crunchy and prefer smart sharpen on a smart object so it is non destructive). Clarity and texture are much more modern approaches to help bring out detail and I find they actually produce *fewer* artifacts than typical sharpening filters/techniques. And if you have trouble with clarity or texture adjustments in the bokeh areas, then use a local adjustment that doesn't affect those areas. You can even do a separate clarity and texture layer and use the opacity slider and the blend if and masking just like you did with the high pass. Why are you acting like you can only make a global clarity adjustment?
Essentially you are giving a worst case scenario of a clarity/texture adjustment just so you can make your technique seem like it is orders of magnitude better.
And what is even more infuriating is that you can do clarity/texture AND you can do high pass sharpening *together*. Why are you acting like it is one or the other?
I'm so confused by your motivations. Did you invent this clarity problem just so you could make a click bait-y title so you can then sell your little panel thing? And then you used an old school sharpening technique that many have abandoned so it seems like you have secret knowledge that was lost? And I could argue it isn't even a better solution. It's just a different way to achieve similar, if not worse results.
This is like if you put a pound of sugar in lemonade and then said, "Wow, this is way too sweet! You should try my superior lemonade that has a normal amount of high fructose corn syrup."
Lastly, if clarity and texture (set at a reasonable amount) aren't enough to produce sharp, detailed results, then it might be worth considering your actual photography techniques. Modern photography with modern sensors and lenses should be able to produce extremely sharp results without having to juice the hell out of sharpening filters in software. 20% clarity and texture (if that) plus a little bit of smart sharpen is usually more than enough to bring out detail in almost all of my photos and I have never been accused of having soft images.
So, if you are getting soft results, you might need to adjust how you are capturing your images. Are you using a very small aperture like f/22 on that macro image? That could be a diffraction issue. Perhaps it would be better to use a larger aperture at the lens's sweet spot and then do a focus stack.
I mean, I can't think of any other reason a person would need to do 100% clarity and texture unless they completely bungled the actual photography or were still using a kit lens.
I'm sorry but this video is a mess."
Let's look a little closer at what he did to his example.
He started with this.

Then he applied clarity & texture to MAXIMUM. Which, again, is like adding a pound of sugar to lemonade.
And by golly, it looks pretty bad!
Then he used his secret ancient high pass technique to get this.
Which looks a hell of a lot like the unsharpened image to me. And the high pass sharpening is probably only visible when zoomed in to 100% on the full resolution image.
Which is one of the issues with this technique. It isn't even noticeable on social media—the place where the majority of photos are viewed these days.
And then after showing you this groundbreaking effect that does almost nothing, he tries to sell you his Photoshop panel.

Yes, that' looks intuitive. Just hit the blue checkmark to do... something?
And what is this green eyeball with a crescent moon inside?


Only $50!

And if you want to know what the purple X button does, you need to pay another $15 for the tutorial on how to use it.

Neat.
Just to prove this is all a scam I'd like to show you an example of my own.
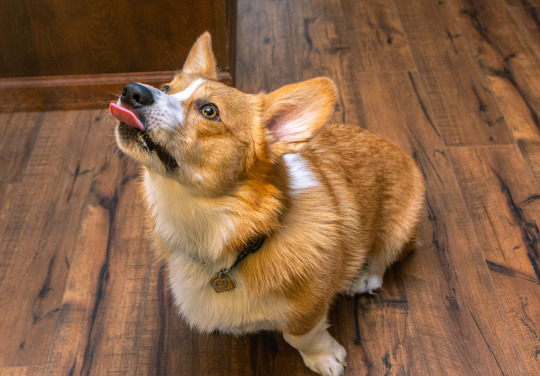
Here is a picture of Otis with no clarity, texture, or sharpening applied.
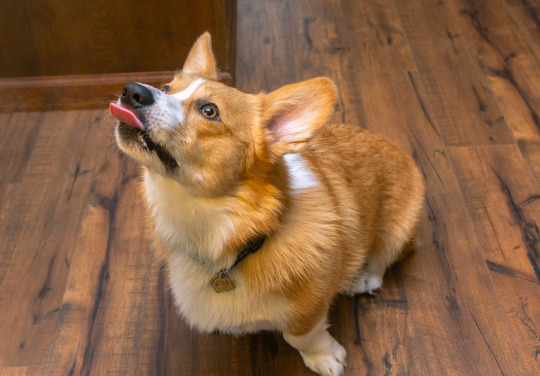
And here is a reasonable amount of sugar. I set the clarity and texture to where I felt they looked best.
Wow, that looks better. Not only that, you can actually see the difference at social media resolutions!
Now let's add a pound of sugar. MAXIMUM CLARITY GO!
Yep, that looks a bit rough. Because no one does this ever.
And now let's see his high pass sharpening technique.
Barely a difference on social media.
Okay, let's try zooming in 200%. Maybe that will give the high pass sharpening the victory.
Normal...

Reasonable clarity & texture...

FULL BEANS CLARITY & TEXTURE!
High pass...

Just as I said, the high pass introduces crunchy sharpening artifacts.
I can't speak for anyone else, but I much prefer the subtle clarity and texture. Perhaps the details in the eyeballs aren't quite as crispy, but in the version that isn't zoomed in, I don't think you feel like the image is soft and the normal clarity and texture adjustment added contrast and actually noticeable detail to the image.
In the end, except for the pound of sugar, these are all subtle adjustments and other photographers might be the only ones who would ever notice. The original Otis picture was probably fine to most people. So disparaging the clarity slider was even more unnecessary.
Why does this matter?
Being a beginner at photography is frustrating. There are so many resources to choose from and it's very difficult to know who is competent and who you can trust. If someone just starting out was recommended this video they could be easily be convinced it is legit. And it could set them back in their progress because they think useful tools will actually make their photos worse. They will waste a lot of time doing a time consuming old school technique in Photoshop when they probably never needed to even leave Lightroom in the first place. They could move two sliders to get similar or better results and it would only take literal seconds.
Time is valuable to a lot of people. And he seems intent on wasting everyone's time. And what sucks is that I have no real way of exposing this dude on a scale that would do anything.
I also just really hate the idea that educational content is being used to scam people.
This is some PragerU shit right here.
68 notes
·
View notes
Note
Omg wow! Did you just start doing 3d? He looks amazing! How did you learn? Any tips or tricks?
I sort of just started!! I've been looking at Maya tutorials and plonking away at this model for about a month or two-- it's been slow because I haven't dedicated time to doing it full time!
I've also only made this model, I haven't rigged, animated or even rendered at all yet so I'm still very much a beginner!
The tutorials I've used most are theeese two:
Using Maya modeling tools:
https://www.youtube.com/watch?v=zSr8i6yT5Ek&list=WL&index=1
Modeling a character in Maya:
https://www.youtube.com/watch?v=esPwg7GcfSE&list=PL0WgCOFFlmqJQUckEciAP7YhpJAXOS84s
The tips I have for COMPLETE complete beginners are;
1. Dedicate like 4-6 hours a day to studying at most. It's so much info in the beginning that after a few hours you can't absorb more
2. There's likely a built in walkthrough in the program when you first download it, do that one
3. Make sure your mouse wheel doesn't isn't one of those that sorta just spins freely. You use the middle mouse button a lot, so it needs to be pretty rigid
4. You're gonna get REALLY angry with the program the first few days because you press a button that did something really extreme and you don't know how to reverse it. Most likely though, you changed camera angles, so just hit space bar.
Also I'm learning Maya bc it's the studio's program of choice, but I would recommend you use blender. Maya is not very good for the price you pay LOL
16 notes
·
View notes
Text
Yvette Heiser - From Amateur to Pro: Essential Tips for Taking the Perfect Picture
Photography is an art form that captures moments, emotions, and stories in a single frame. For many aspiring photographers, the journey from amateur to pro can be daunting. However, with the right guidance and practice, anyone can elevate their photography skills. Renowned photographer and Yvette Heiser – tips for taking perfect pictures, known for her stunning visuals and expert techniques, shares her essential tips for taking the perfect picture. Whether you're a beginner or looking to refine your skills, Heiser's advice will help you achieve picture-perfect shots.

Understanding Your Equipment
One of the first steps to becoming a proficient photographer is to understand your equipment. Heiser emphasizes the importance of getting to know your camera inside and out. This includes understanding the functions of different settings, such as aperture, shutter speed, and ISO. Experiment with these settings to see how they affect your images. Heiser suggests spending time reading the camera manual and watching tutorials to fully grasp the capabilities of your gear.
Mastering Composition
Composition is the backbone of a great photograph. Heiser believes that understanding the principles of composition can transform an ordinary snapshot into a work of art. The rule of thirds, leading lines, and framing are some of the fundamental techniques every photographer should master. Heiser encourages photographers to practice these techniques and develop an eye for creating balanced and visually appealing images.
Lighting is Key
Lighting plays a crucial role in photography. Heiser advises paying close attention to natural light and learning how to manipulate it to enhance your photos. Golden hour, the time shortly after sunrise or before sunset, is ideal for capturing soft, warm light that adds depth and dimension to your images. Heiser also recommends experimenting with artificial lighting, such as using reflectors or off-camera flash, to achieve the desired effect.
Focus on the Subject
A compelling photograph often has a clear and well-defined subject. Heiser stresses the importance of identifying your subject and making it the focal point of your composition. Use techniques such as depth of field to isolate your subject from the background, creating a sense of importance and drawing the viewer's attention. Heiser suggests practicing portrait photography to hone your skills in capturing the essence of your subject.
Embarking on the journey of photography can be both exciting and overwhelming, especially for beginners. With so many styles and techniques to explore, it's essential to find the ones that resonate with your passion and creativity and Yvette Heiser Texas – 5 Interesting Photography Types for Beginners, a Texas-based photography enthusiast, shares her insights on five interesting photography types that are perfect for beginners. These styles not only help you hone your skills but also allow you to discover your unique artistic voice.
Landscape Photography
Capturing the beauty of nature is a timeless pursuit that appeals to many beginner photographers. Landscape photography involves taking pictures of natural scenes such as mountains, forests, rivers, and beaches. Yvette Heiser suggests starting with landscape photography as it allows you to experiment with composition, lighting, and perspective.
Portrait Photography
Portrait photography focuses on capturing the essence of a person, often highlighting their emotions, expressions, and personality. Heiser believes that portrait photography is an excellent way for beginners to practice working with different lighting setups and learn how to connect with their subjects. Start by taking pictures of family and friends to build your confidence.
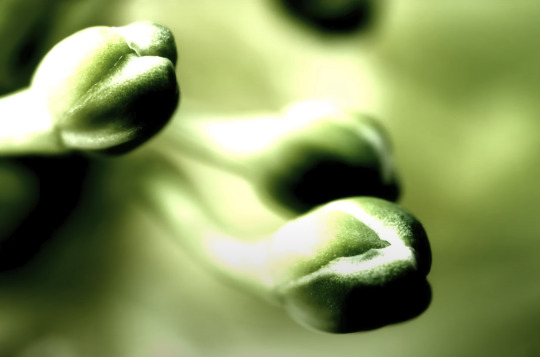
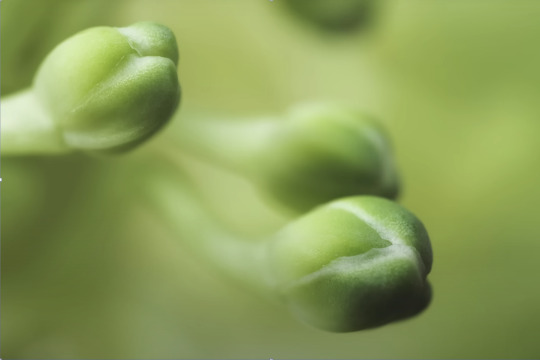
Macro Photography
Macro photography involves taking close-up shots of small subjects, such as flowers, insects, and everyday objects, revealing intricate details that are often overlooked. This type of photography allows beginners to explore the world from a different perspective and develop an eye for detail. Yvette Heiser encourages beginners to use a macro lens or extension tubes to achieve the desired magnification.
Street Photography
Street photography is all about capturing candid moments and scenes from everyday life in public places. It offers a unique opportunity for beginners to develop their observational skills and learn how to anticipate and capture fleeting moments. Heiser suggests starting with a simple camera setup, such as a compact or mirrorless camera, to remain inconspicuous.
Still Life Photography
Still life photography involves arranging and photographing inanimate objects, often with a focus on composition, lighting, and texture. This type of photography is ideal for beginners as it allows you to experiment with different setups and practice your technical skills in a controlled environment. Yvette Heiser recommends starting with everyday objects like fruits, flowers, or household items. Pay attention to the lighting, and use natural light or artificial sources to create shadows and highlights that enhance the visual appeal of your subjects.
Conclusion
Transitioning from an amateur to a professional photographer is a journey that requires dedication, practice, and a passion for the craft. By following Yvette Heiser's essential tips, you can hone your skills and capture perfect pictures that tell captivating stories. Remember, the key to success lies in continuous learning, experimentation, and staying true to your unique vision as a photographer.
#wedding#photographer#camera#moments#photography#childphotography#pictures#yvette heiser#photographytips#events
13 notes
·
View notes
Note
how did you do that edit?? the tweening and everything?? what program did u use?? it’s so good!!!
Thank you!! Here’s my general editing/tweening advice (do advise tutorials though, this probably won’t make sense to beginners so start slow)
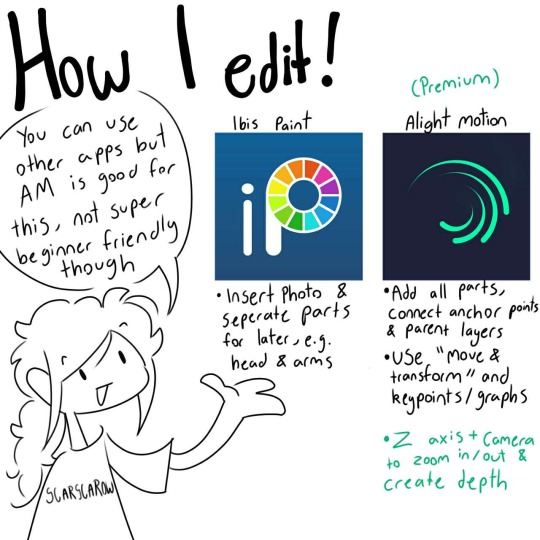
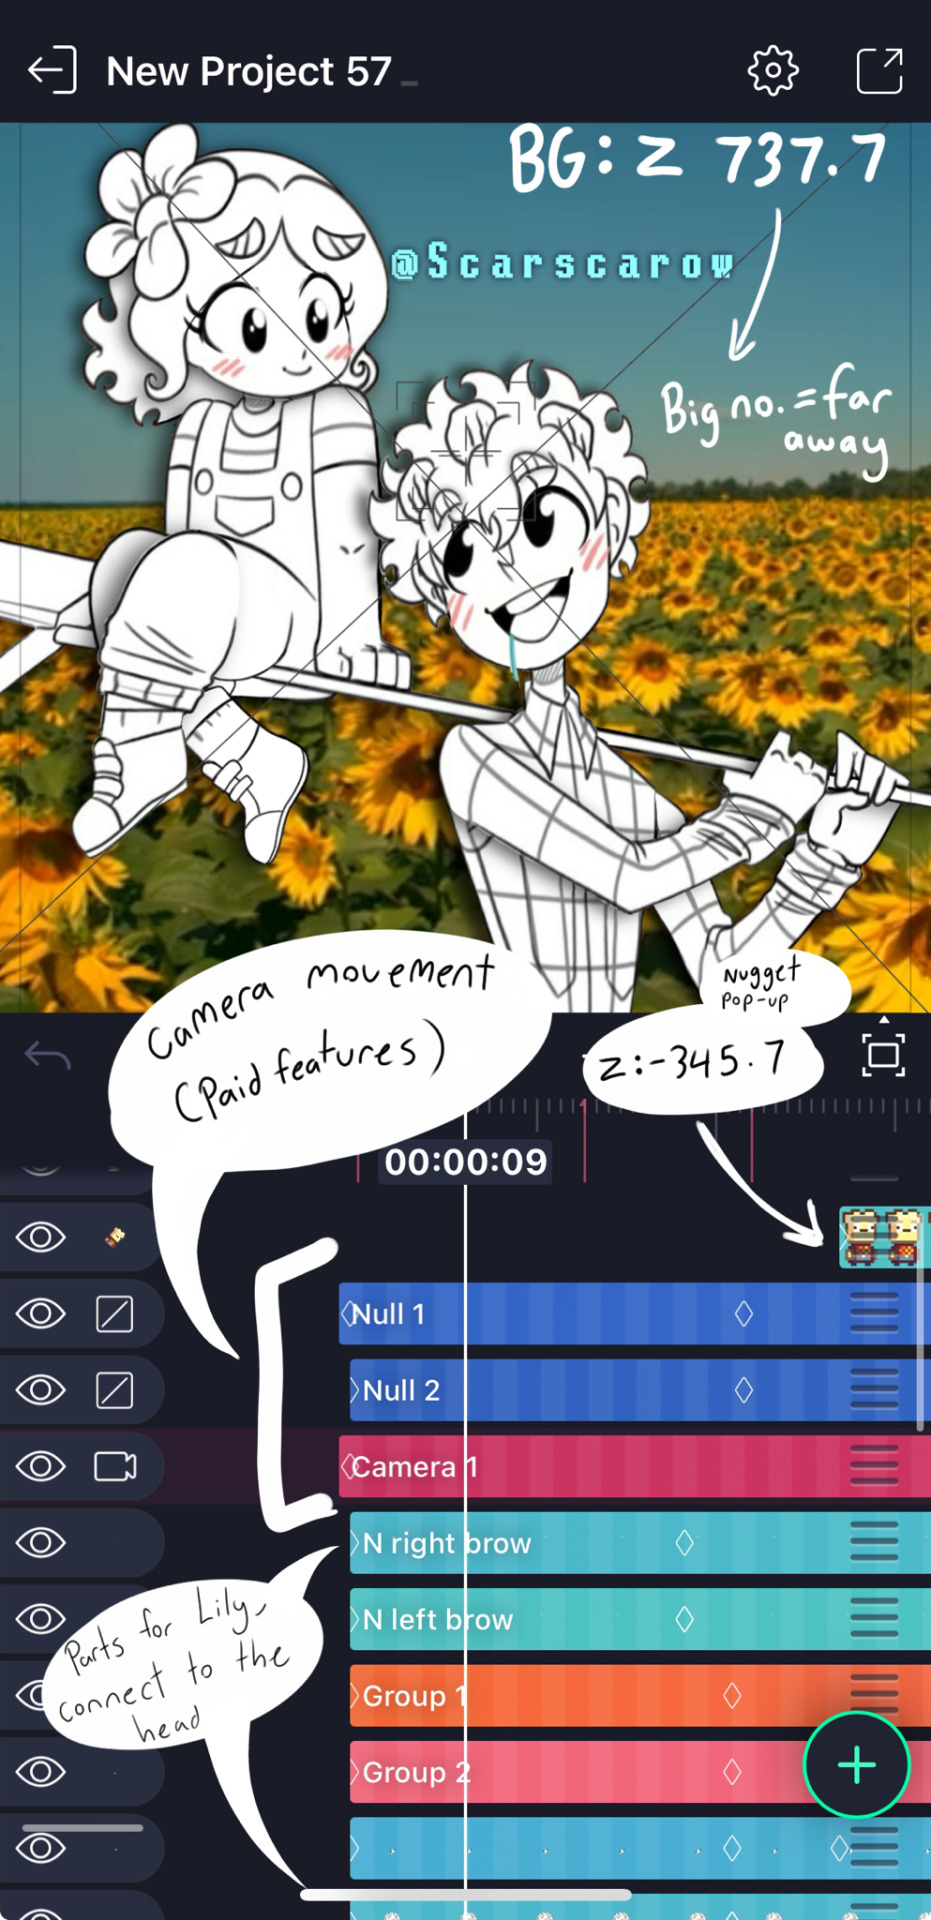
I use Premium (paid) alight Motion which allows for parent layers, more effects and camera motion but you don’t need these, it’ll just be harder without it.
Ibis paint:
• Insert your picture that you wish the edit
• Seperate each part you will need to edit later and fill in gaps and empty space (e.g. remove head, remove eyelids and eyes for blinking, remove upper and lower arm/leg, etc)
•Download all layers as transparent images
Alight Motion:
• Insert all your layers to tween in order (like head on top of the body/neck and hair on top of the head)
• Go into “Motion and transform” then click the already selected arrow icon to enter your pivot point, this is where things move from (e.g. the heads pivot point would be where it meets the neck so it moves from the neck)
• (Premium) Connect the layers with “Parent layers” (icon at the top right menu) so that if the parent layer moves, so do connected parts (e.g. connect hair to the head so if the head moves so will the hair)
• Now you can move the parts as you like with whatever music you choose to have. Use “motion and transform” to spin parts around (like tilting the head) or moving parts or scaling them up or down
• You can use the effects menu to add to your layers such as Scale Assist to help squash and stretch or bend to bend your layers
• If you’d like to add depth later (such as zooming in or just to achieve a 3D effect), use to Z axis (bigger number = farther away) and adjust it to your desired position, this will be used through the Camera layer and Null layers which treat the frame as a camera which you can zoom in and out and move around for depth
This may or may not have made sense but just start slowly if you’re new, learn basic transitions then get into tweening, practice with simple movements and learn graphs to ensure your animations are smooth! Tutorials are the way, so probably don’t jump to what I do, build up your skills first,
if you do what I do though, it may look like this:
#art#fanart#digital art#editing#tweening#animation#tips and tricks#animation art#alight motion#ibispaint art#tutorial#advice#kindergarten#ibispaintx#how to animate#anon ask
45 notes
·
View notes
Text
Written version of @thornowl's baking texture-based items for 4t3 conversion tutorial. (Part 1)
Yes, the original video is very useful and I think it's worth checking out for everyone who plans to do 4t3 conversions, especially in MM style. But, in my opinion, the realization is too messy, it took me a long time to understand what actually to do. So I made written tutorial, because many people prefer this format (and because my amazing mutual @nectar-cellar was interested in it). Hope you will find it useful. I had to split this tutorial into 2 parts because of the picture limit.
What You Will Need:
Knowing the basics of converting process: how to extract ts4 meshes and textures, how to make your own multiplier/mask/specular, how to import stuff to TSRW, etc. (@nightospheresims has a good tutorial for beginners: here or here, also don't forget about @sims3tutorialhub!).
Knowledge of basics blender controls and navigation: how to move and rotate the camera, basic shortcuts, how to change mode, editor type, viewport shading, rendering type, etc. (check Grennie's tutorial here, and "Helpful guides when you're a noob" from there too).
Required programs and resources: - Sims 4 Studio. - TS4 body mesh & texture(s), that you want to convert, I use @atomiclight's mix gloves for this tutorial. Also there will be some tip that I learned from converting Sentate's Audrey Corset Set. - Blender (I use version 2.79). - Photoshop (or any other 2D editor, that supports masks and .dds format). - TS3 Bodies template & UV map templates. - Plain normal & specular map, if you don't want to make your own. - TSRW.

STEP 1: ADDING MESHES AND TEXTURES IN BLENDER, PREPARING MESH FOR BAKING.
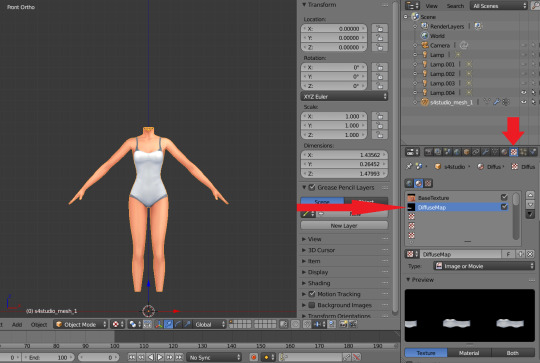
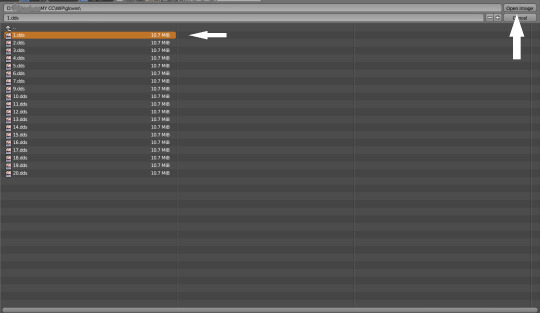
I already exported all the gloves presets that I want from S4S. And because they don`t have their own mesh, I exported base game swimsuit (you can also export mesh from any other stuff, that 100% is painted on body) I exported it like this: Open S4S → Create 3D mesh → Find it with filters→ Next → Save the package wherever you're want→ go to Meshes tab and press Export.
Open .blend file with ts4 swimsuit, delete the "rig" (you don't need it) and merge all other groups - Shift + click on them and press Ctrl+J on 3D viewport.
You need to export our gloves texture and remove swimsuit texture, go to Textures tab and in small window select "DiffuseMap": If you don't see DiffuseMap texture, switch type of texture data to "Show material textures" (brown-ish circle).
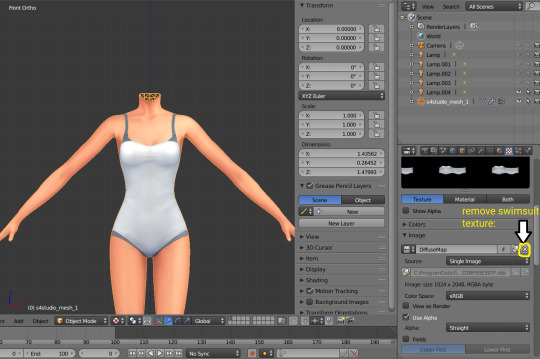
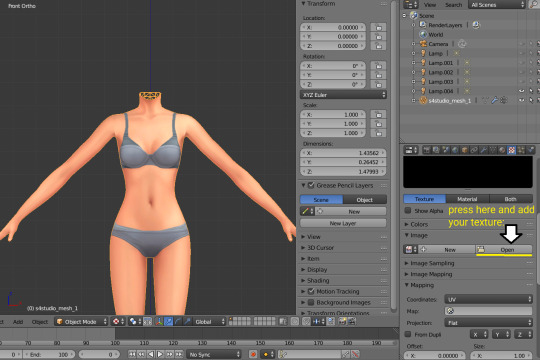

6. In the same way you need to remove skin texture, because you don't need it, only select BaseTexture instead of Diffuse:

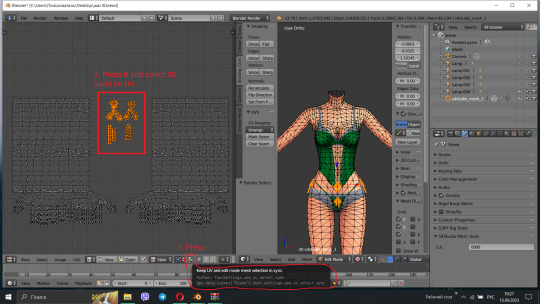
7. Import your Sims 3 body, also I merged the top and bottom, because TS4 mesh is full body too:

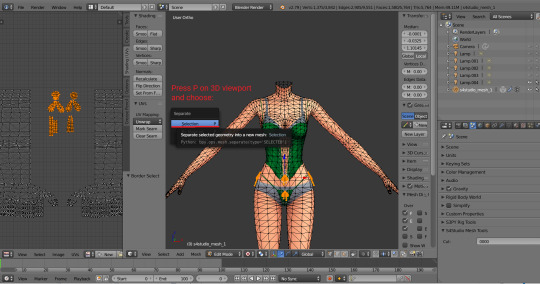
Tip: if your stuff have 3D parts, separate them in their own group(s) and hide them from baking (you can bake them separately and/or tweak them in Photoshop):

STEP 2: SHRINKWRAPPING THE TS4 MESH.
In this case it would be really easy to adapt TS4 body mesh to TS3, because they are very similar, for stuff that partially 3D (like dresses) or in case with non-standard bodies (like Venus Curves by Venusprincess) it would be harder, so I don`t cover this in this tutorial.
Select TS4 body, go to Modifiers tab, usually there are already applied modifier "geom_skin", just ignore it and in the "Add Modifier" window select Shrinkwrap modifier.
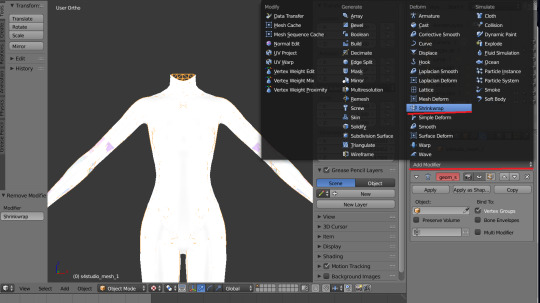
2. In the Target tab select TS3 body group:
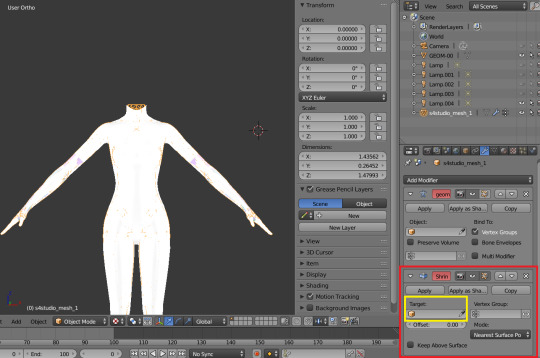
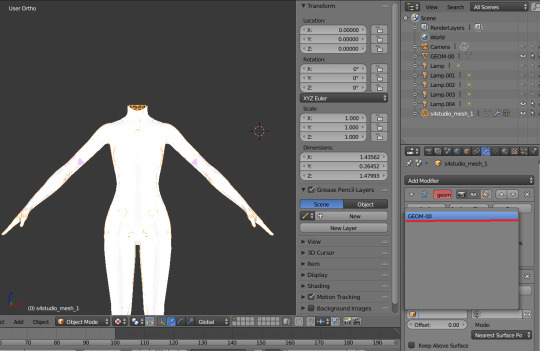
This is how TS4 mesh is supposed to look with this modifier, you may also apply modifier, but it's not necessary:

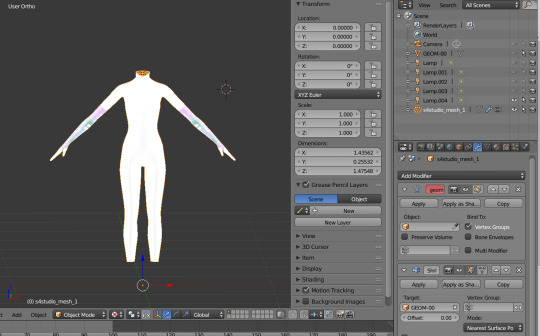
3. After that you need to hide TS3 Body mesh and now we're going to baking.
STEP 3: ASSIGNING MATERIALS.
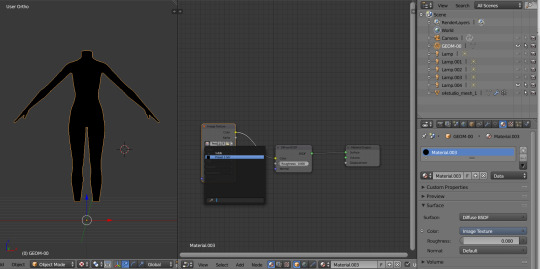
First of all, you need 2 windows — with your 3D viewport and with Node Editor, also you need to switch rendering type to Cycles Render. After you set it, select TS4 mesh, open Materials tab and press Use Nodes button:

2. After that two small boxes should appear on the Node editor tab. Then press Shift+A and select Texture → Image texture:

3. Connect node that you already added with Diffuse BSDF node, by connecting yellow dot (socket) named Color of Image texture to the same socket of Diffuse BSDF node. After that click on the image icon and find your texture:

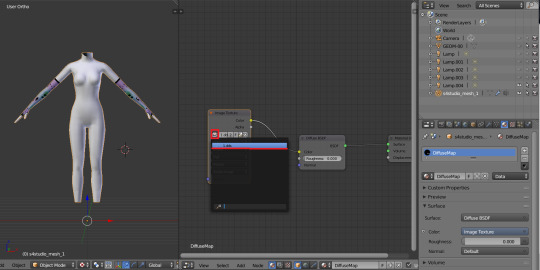
Don't worry about the black spots, we will fix that later.
4. Go to UV/Image editor and create new image for your bake, it must be 1024x1024 size or, if you want HQ texture - 2048x2048 or 4096x4096, but today I use non-HQ. After that, hide TS4 body and unhide TS3 body:
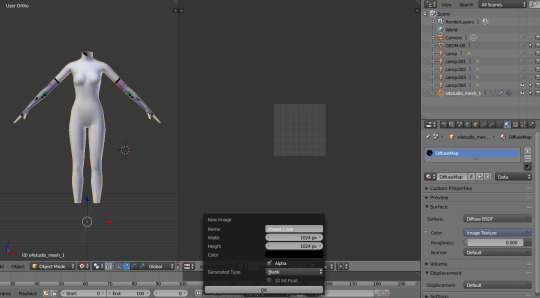
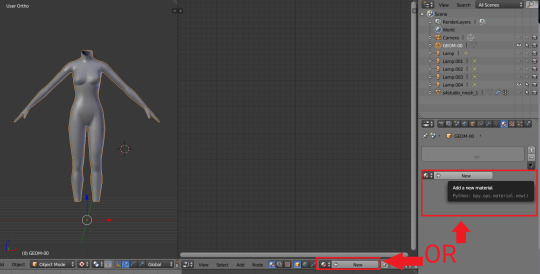
5. Go to Node Editor, create new material and assign our newly created image to ts3 body the same way, that we did with ts4 mesh and original texture:
6. Press Shift + Click on the TS4 body firstly, and TS3 body lastly. It`s an really important step, because without it baking wasn't work right way.
STEP 4: BAKING THE TEXTURE.
7. First of all, go to the Render tab and change default settings to the following:
Sampling Tab:
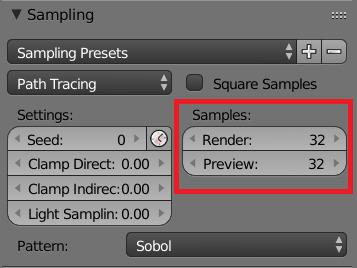
Bake Tab:
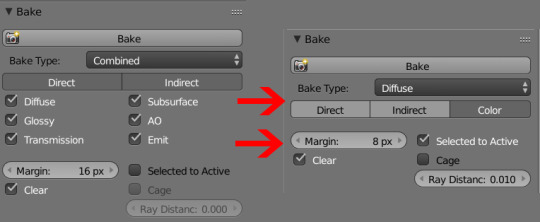
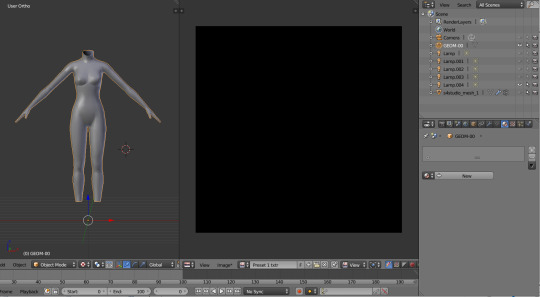
8.After that press Bake button and wait for it.
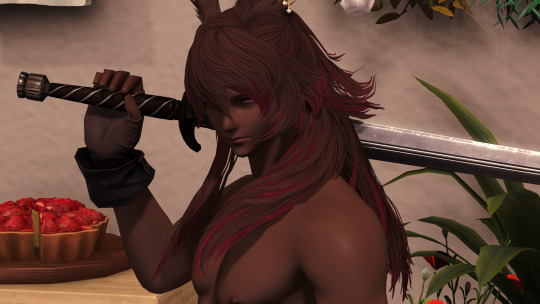
9. Look at the result, great, doesn't it?:

10. Save this texture as .png... But wait, that's not all! we need to bake alpha, so we can remove that black body texture in Photoshop later.
But that will come in part 2...
119 notes
·
View notes
Text
Remove Clipping with Just Four "Easy" Steps
(well, remove clipping from a gpose I can't help with anything in-game good luck with that) (ease of steps will vary from person to person)
hello welcome to my random gposing tip tutorial
Tired of clipping? Can't move that hair just right? Asking yourself why on earth did you think the Cryptlurker's Coat of Striking was a good idea for a canonical OC outfit—oh is that last one just me? anyway
So if something is clipping in an obnoxious way (it's usually hair, but sometimes other things!) you can fix this in post-editing. There are technically a few ways to do it; however I am not great photo editing software so I think this version's very beginner friendly :)
Note that this only works with posing tools where you can manipulate appearances within the gpose menu, such as Ktisis.
To start, take the final gpose you want. Get everything set up, choose your shader, lighting, etc and take the pic.

Booo look at all that clipping. So next, you need to make sure you do not move the camera. Not even an inch. Not even a pixel. DO NOT MOVE THE CAMERA—
Go into the posing tool of your choice, edit the character's appearance, and remove the offending item.
Then, take another picture. You didn't move the camera, did you? If you did, you can put the item back on and take another picture, provided you don't move it again. Seriously it's so much more annoying to do this with camera movement, I've certainly learned that from experience
(Yes the hair is clipping into his actual body slightly, but that's because of the pose he's in)
Go into the editing software of your choice, and put the stripped down gpose as the first layer, and the normal gpose as the second, like so:
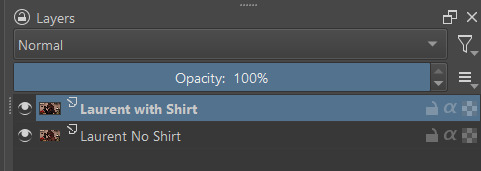
(Sorry for taking off your shirt Laurent but you're the one with the dramatic hair)
Start erasing the clipping bits on the top layer...


...and viola! you'll get a a much cleaner image.

In this example, I still kept some of the clipping—given how the bigger collar works, it makes sense for the hair to clip a bit so that it looks like it's 'falling around' the collar instead of just draping over the shoulder completely. Sometimes clipping can work as a good effect! (We make do with the tools we have)
Regardless of any aesthetic choices, just make sure not to erase too much so that it starts erasing the clothing, too.


(whoops too much erasing)
Also, sometimes items will cast a shadow, which might make too much erasing look odd. This example isn't particularly egregious (I'd go so far to say you can ignore it) but look I only took one set of shots for this tutorial ok

(deleting parts of the outer collar left a wayward shadow behind)
Finally, you can use an eraser with a fade and not at max opacity to "smooth" any left over clipping so it's not so abrupt. However, this is something a bit more advanced and needs some trial and error—so I can't really provide an example. Because I'm bad at it. Give it a try and see how it looks!
Hope this helps :)
13 notes
·
View notes
Text

Beginner Blender Tutorial Basic Render: Part One (Importing a Sim and Adjusting Textures)
To learn the basics, we'll begin with a super simple render: one sim, one pose, one background.
But first, the anatomy of blender.
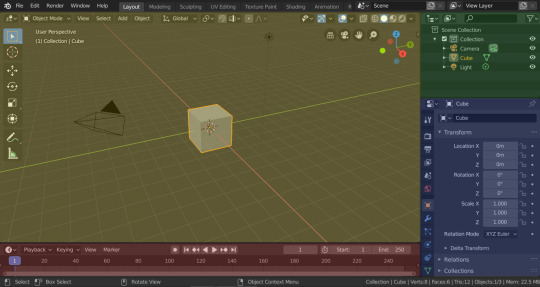
(image & list courtesy of Blender's online manual)
Yellow - 3D viewport (workspace) The 3D Viewport is used to interact with the 3D scene for a variety of purposes, such as modeling, animating, texture painting, etc.
Green - Outliner The Outliner is a list that organizes data in the blend-file, i.e. the scene data, Video Sequencer data, or anything that gets stored in a blend-file.
Blue - Properties The Properties shows and allows editing of many active data, including the active scene and object.
Red - Timeline The Timeline editor, identified by a clock icon, is used for manipulating keyframes and scrubbing the Playhead.
The tools I use most I've highlighted below:
I won't outline their uses just now, but we'll be going over them as we use them.
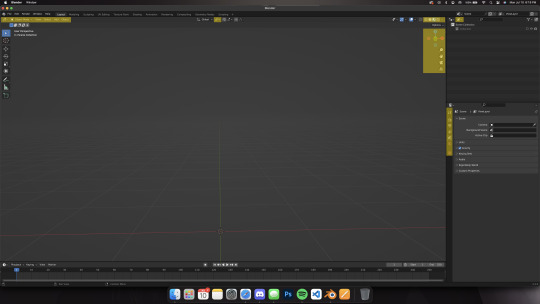
Different creators like to split their blender window up in different ways, but this is my preferred setup when I'm working:
I use the yellow half of the screen as a render preview/3D workspace
I use the blue half for shader editing, posing, etc.
You can set yours up like mine or find what's comfortable for you.
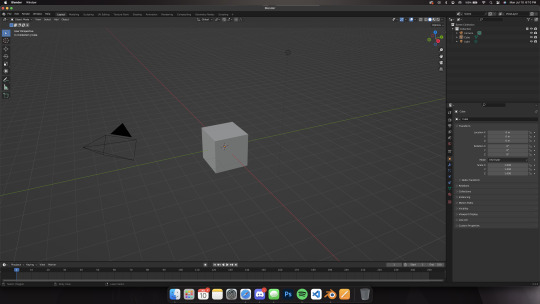
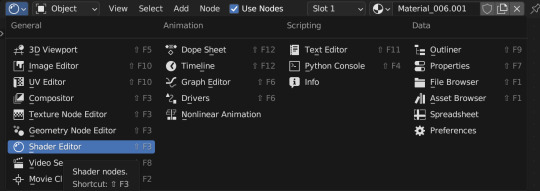
When you first open blender, you'll be greeted by the default cube, lamp, and camera.
Delete them! You can do this two ways:
Click and drag your mouse over all 3 and delete or Select all 3 in the side menu and hit x on your keyboard
Step 1: Importing our Sim
After deleting the default items, we'll import our sim. This tutorial assumes you've already ripped your sim (if you haven't, check here for how to do so!)
Now, let's import.
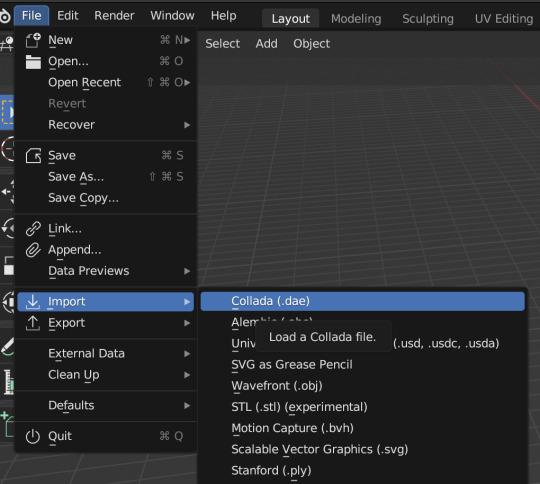
Click file -> import -> collada (dae) Select your DAE and click "import"
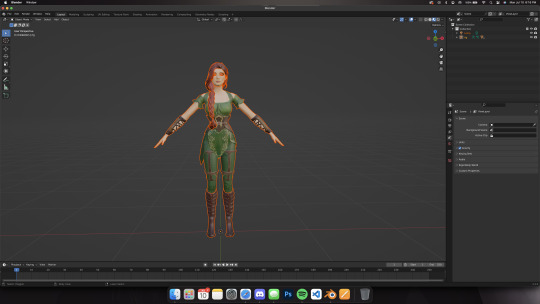
Your sim will look a little... off (thick eyelashes and a weird shine), but that's okay we're going to fix it! Your sim might also look solid white. If that's the case, make sure you're in the right mode. You can adjust modes by clicking on one of the four circles in the top right of the screen.

These are your viewport modes.
Wireframe (far left) - good for mesh editing Solid (middle left) - good for posing Material Preview (middle right) - what we work in most, shows everything with textures (color) Rendered (far right) - this shows your render preview We'll be working mostly in Material Preview
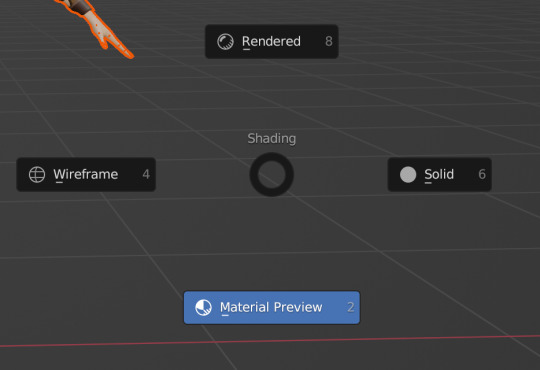
You can also switch between modes by hitting z on your keyboard then selecting which one you want I'll be using mostly keyboard shortcuts but I'll show you how to do both as we go along
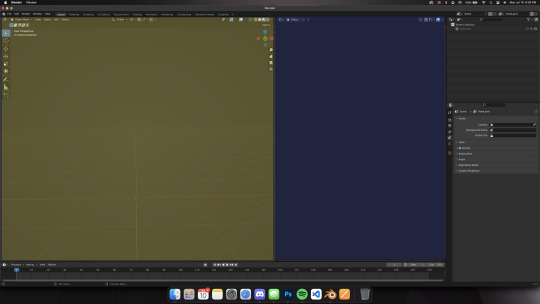
Step 2: Adjusting Our Sim's Textures
Let's fix our sim's textures.
First. set up your workspace. Separate your workspace into two windows (as shown in the picture above with a yellow half and a blue half) and select "shader editor" in your right-side window. Like this:
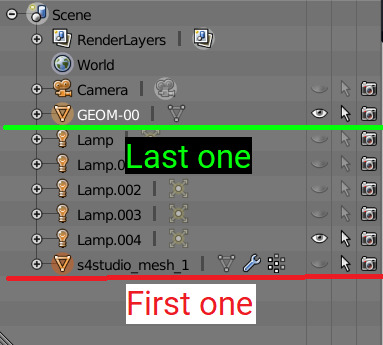
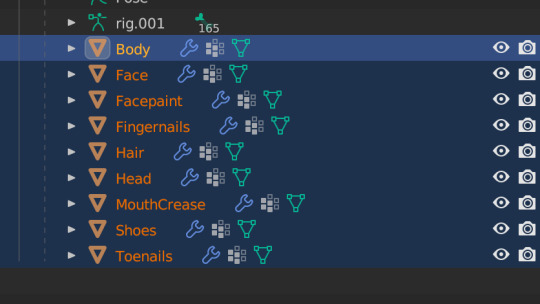
Next, navigate to your Outliner and click the little dropdown beside "rig"

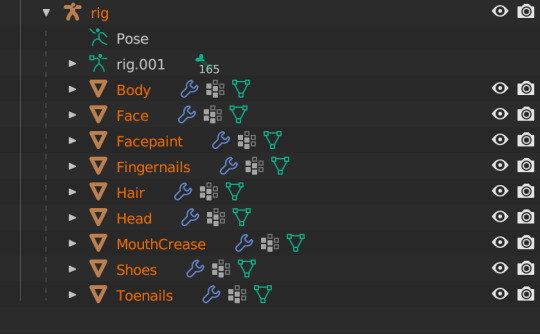
Under "rig" you'll see your sim's body parts listed. We're going to select "Body" When we click "Body", these colored blocks will appear in our shader editor window.

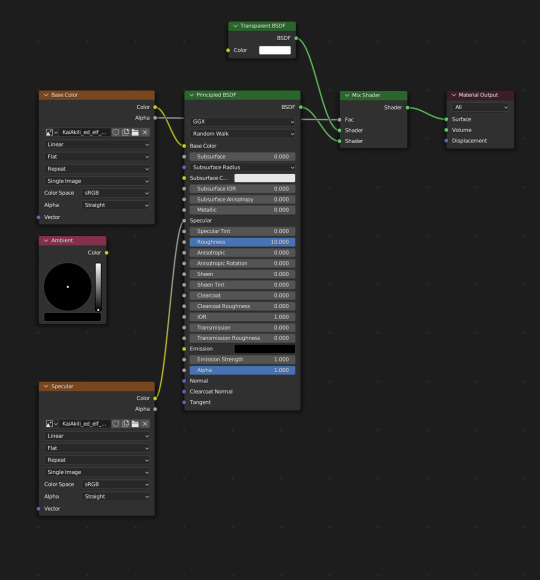
These are called Nodes. We use Nodes to adjust textures for various items in blender (sims, walls, furniture, etc). To add a new Node, you can select "add" in the top bar, or hit Shift+A on your keyboard and add in the node you need.


We're going to add in a Mix Shader and a Transparent Shader (both found under the Shader tab) and adjust our nodes this way:

Snug the Mix Shader between the Principled BSDF and the Material Output. Now we have to connect our Nodes and adjust our Principled BSDF. For the sake of this tutorial, I'll show the basic Node & Shader adjustments, but we'll go into each of them in a later tutorial.
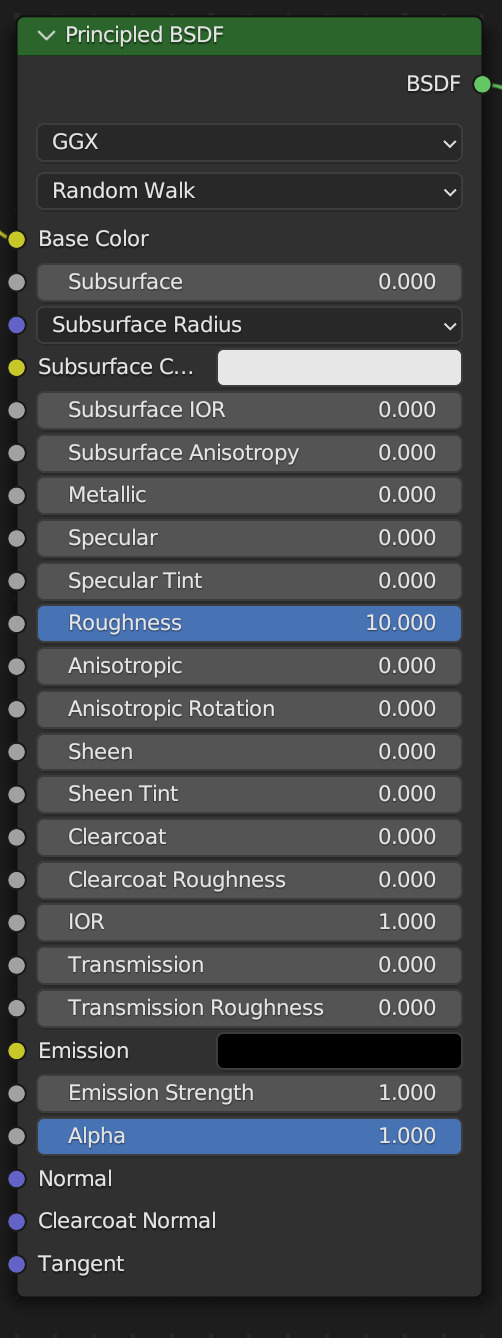
Adjust your Principled BSDF like this, then connect your Node lines exactly like this:
You'll see that our SIm's body looks a bit different from her head, hair and shoes. That's good! Now we need to duplicate that texture to the rest of our sim.
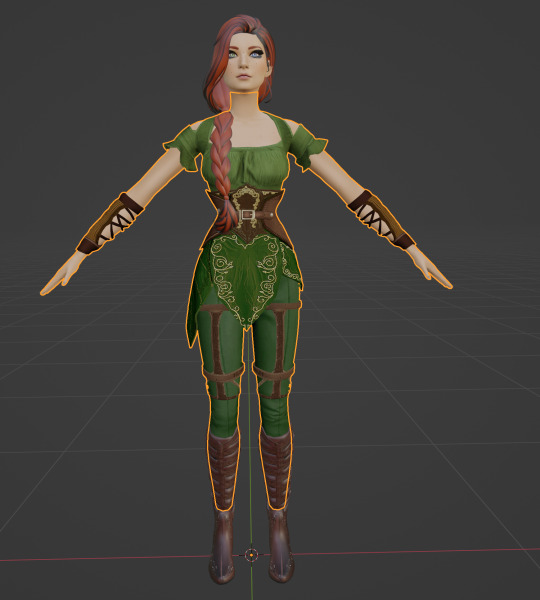
Navigate to your Outliner again, and use Shift+Click to select the rest of the body parts in the list Don't select pose or rig.001 and make sure the Body is selected first EDIT: You'll only see "body" if your sim has a full body outfit on! If they have a shirt and pants, you'll have "Bottom" and "Top" instead! In this case, select "bottom"!
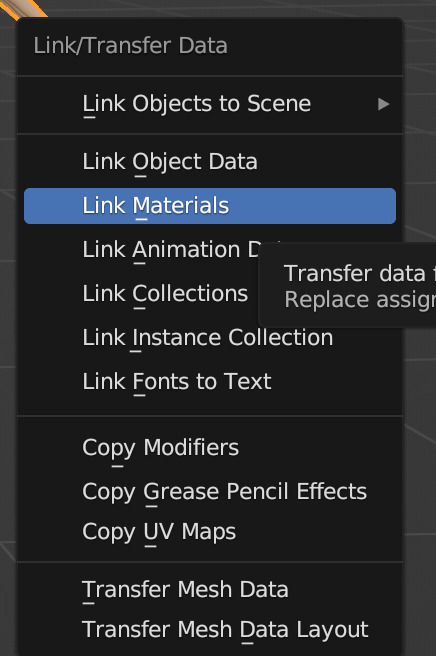
Now, hover your cursor over your sim/the 3D viewport window, and press Ctrl+L on your keyboard. This brings up the Link/Transfer data window. Select "Link Materials"
Our sim is looking better, but her eyelashes are still dark, let's fix that now.
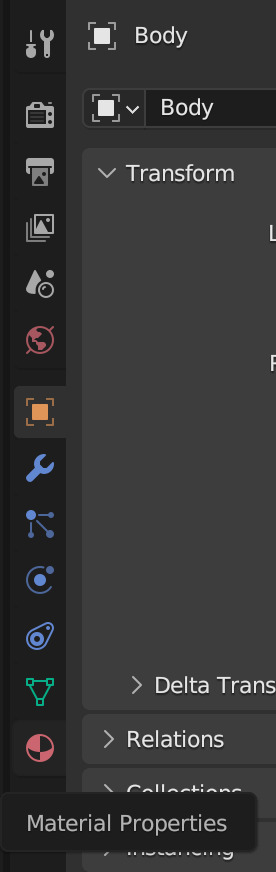
In your Properties area, navigate to Material Properties (the little red ball)
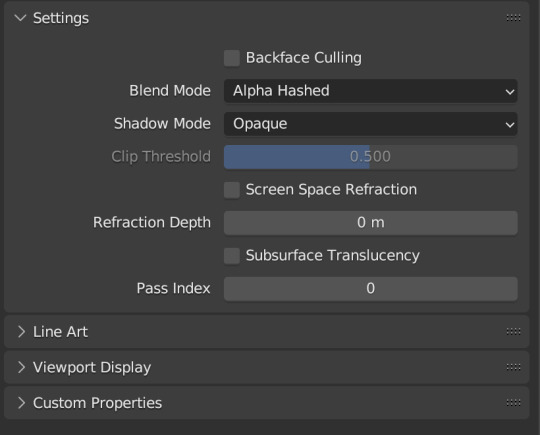
Change your Blend Mode to Alpha Hashed We will always set Blend Mode to Alpha Hashed
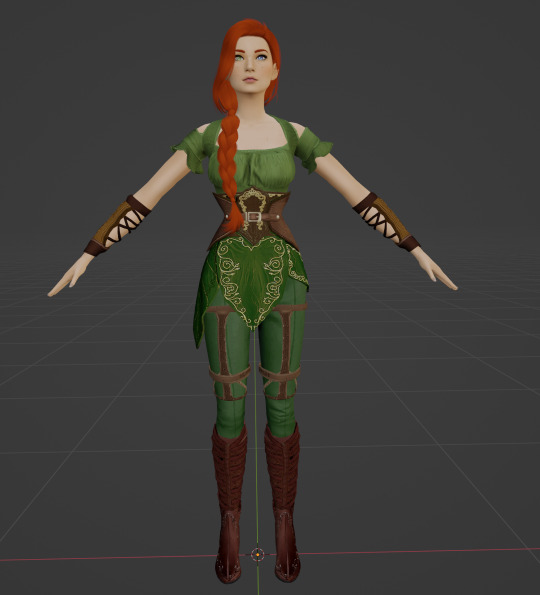
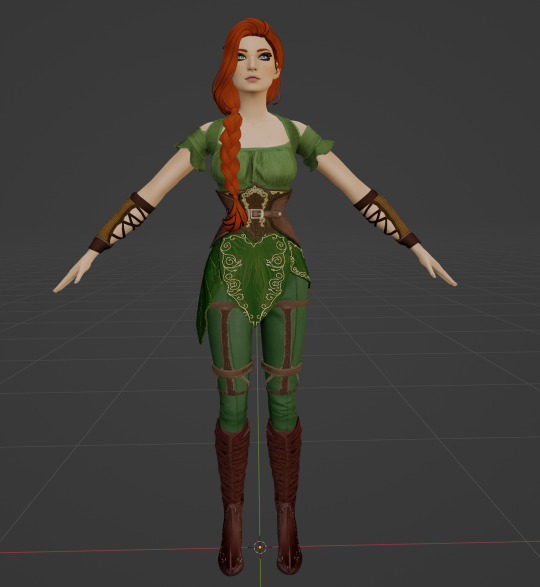
Now our sim looks right!
In Part Two, we'll pose her, set up the scene, and run the render!
#salemsims tutorial#render school tutorial#sims 4 render tutorial#sims 4 blender tutorial#blender#render tutorial#sims render tutorial
163 notes
·
View notes