#create PDF Document with Tagged Text
Explore tagged Tumblr posts
Visit Tumblr Blog
Explore Tumblr blogs with no restrictions, modern design and the best experience.
Last Seen Tumblr Blogs


Fun Fact
Average visit duration of Tumblr.com is 10 mins and 25 secs.
Text

How to use DXVK with The Sims 3
Have you seen this post about using DXVK by Criisolate? But felt intimidated by the sheer mass of facts and information?
@desiree-uk and I compiled a guide and the configuration file to make your life easier. It focuses on players not using the EA App, but it might work for those just the same. It’s definitely worth a try.
Adding this to your game installation will result in a better RAM usage. So your game is less likely to give you Error 12 or crash due to RAM issues. It does NOT give a huge performance boost, but more stability and allows for higher graphics settings in game.
The full guide behind the cut. Let me know if you also would like it as PDF.
Happy simming!
Disclaimer and Credits
Desiree and I are no tech experts and just wrote down how we did this. Our ability to help if you run into trouble is limited. So use at your own risk and back up your files!
We both are on Windows 10 and start the game via TS3W.exe, not the EA App. So your experience may differ.
This guide is based on our own experiments and of course criisolate’s post on tumblr: https://www.tumblr.com/criisolate/749374223346286592/ill-explain-what-i-did-below-before-making-any
This guide is brought to you by Desiree-UK and Norn.
Compatibility
Note: This will conflict with other programs that “inject” functionality into your game so they may stop working. Notably
Reshade
GShade
Nvidia Experience/Nvidia Inspector/Nvidia Shaders
RivaTuner Statistics Server
It does work seamlessly with LazyDuchess’ Smooth Patch.
LazyDuchess’ Launcher: unknown
Alder Lake patch: does conflict. One user got it working by starting the game by launching TS3.exe (also with admin rights) instead of TS3W.exe. This seemed to create the cache file for DXVK. After that, the game could be started from TS3W.exe again. That might not work for everyone though.
A word on FPS and V-Sync
With such an old game it’s crucial to cap framerate (FPS). This is done in the DXVK.conf file. Same with V-Sync.
You need
a text editor (easiest to use is Windows Notepad)
to download DXVK, version 2.3.1 from here: https://github.com/doitsujin/DXVK/releases/tag/v2.3.1 Extract the archive, you are going to need the file d3d9.dll from the x32 folder
the configuration file DXVK.conf from here: https://github.com/doitsujin/DXVK/blob/master/DXVK.conf. Optional: download the edited version with the required changes here.
administrator rights on your PC
to know your game’s installation path (bin folder) and where to find the user folder
a tiny bit of patience :)
First Step: Backup
Backup your original Bin folder in your Sims 3 installation path! The DXVK file may overwrite some files! The path should be something like this (for retail): \Program Files (x86)\Electronic Arts\The Sims 3\Game\Bin (This is the folder where also GraphicsRule.sgr and the TS3W.exe and TS3.exe are located.)
Backup your options.ini in your game’s user folder! Making the game use the DXVK file will count as a change in GPU driver, so the options.ini will reset once you start your game after installation. The path should be something like this: \Documents\Electronic Arts\The Sims 3 (This is the folder where your Mods folder is located).
Preparations
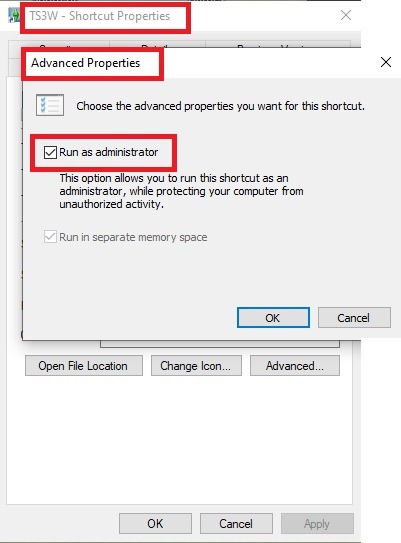
Make sure you run the game as administrator. You can check that by right-clicking on the icon that starts your game. Go to Properties > Advanced and check the box “Run as administrator”. Note: This will result in a prompt each time you start your game, if you want to allow this application to make modifications to your system. Click “Yes” and the game will load.
2. Make sure you have the DEP settings from Windows applied to your game.
Open the Windows Control Panel.
Click System and Security > System > Advanced System Settings.
On the Advanced tab, next to the Performance heading, click Settings.
Click the Data Execution Prevention tab.
Select 'Turn on DEP for all programs and services except these”:
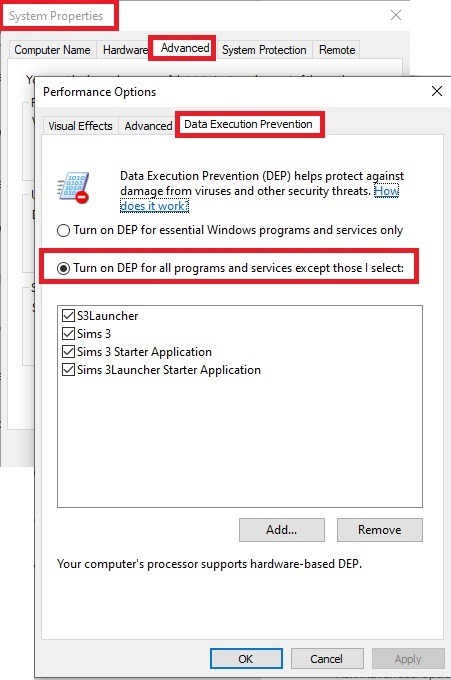
Click the Add button, a window to the file explorer opens. Navigate to your Sims 3 installation folder (the bin folder once again) and add TS3W.exe and TS3.exe.
Click OK. Then you can close all those dialog windows again.
Setting up the DXVK.conf file
Open the file with a text editor and delete everything in it. Then add these values:
d3d9.textureMemory = 1
d3d9.presentInterval = 1
d3d9.maxFrameRate = 60
d3d9.presentInterval enables V-Sync,d3d9.maxFrameRate sets the FrameRate. You can edit those values, but never change the first line (d3d9.textureMemory)!
The original DXVK.conf contains many more options in case you would like to add more settings.

A. no Reshade/GShade
Setting up DXVK
Copy the two files d3d9.dll and DXVK.conf into the Bin folder in your Sims 3 installation path. This is the folder where also GraphicsRule.sgr and the TS3W.exe and TS3.exe are located. If you are prompted to overwrite files, please choose yes (you DID backup your folder, right?)
And that’s basically all that is required to install.
Start your game now and let it run for a short while. Click around, open Buy mode or CAS, move the camera.
Now quit without saving. Once the game is closed fully, open your bin folder again and double check if a file “TS3W.DXVK-cache” was generated. If so – congrats! All done!
Things to note
Heads up, the game options will reset! So it will give you a “vanilla” start screen and options.
Don’t worry if the game seems to be frozen during loading. It may take a few minutes longer to load but it will load eventually.
The TS3W.DXVK-cache file is the actual cache DXVK is using. So don’t delete this! Just ignore it and leave it alone. When someone tells to clear cache files – this is not one of them!
Update Options.ini
Go to your user folder and open the options.ini file with a text editor like Notepad.
Find the line “lastdevice = “. It will have several values, separated by semicolons. Copy the last one, after the last semicolon, the digits only. Close the file.
Now go to your backup version of the Options.ini file, open it and find that line “lastdevice” again. Replace the last value with the one you just copied. Make sure to only replace those digits!
Save and close the file.
Copy this version of the file into your user folder, replacing the one that is there.
Things to note:
If your GPU driver is updated, you might have to do these steps again as it might reset your device ID again. Though it seems that the DXVK ID overrides the GPU ID, so it might not happen.
How do I know it’s working?
Open the task manager and look at RAM usage. Remember the game can only use 4 GB of RAM at maximum and starts crashing when usage goes up to somewhere between 3.2 – 3.8 GB (it’s a bit different for everybody).
So if you see values like 2.1456 for RAM usage in a large world and an ongoing save, it’s working. Generally the lower the value, the better for stability.
Also, DXVK will have generated its cache file called TS3W.DXVK-cache in the bin folder. The file size will grow with time as DXVK is adding stuff to it, e.g. from different worlds or savegames. Initially it might be something like 46 KB or 58 KB, so it’s really small.
Optional: changing MemCacheBudgetValue
MemCacheBudgetValue determines the size of the game's VRAM Cache. You can edit those values but the difference might not be noticeable in game. It also depends on your computer’s hardware how much you can allow here.
The two lines of seti MemCacheBudgetValue correspond to the high RAM level and low RAM level situations. Therefore, theoretically, the first line MemCacheBudgetValue should be set to a larger value, while the second line should be set to a value less than or equal to the first line.
The original values represent 200MB (209715200) and 160MB (167772160) respectively. They are calculated as 200x1024x1024=209175200 and 160x1024x1024=167772160.
Back up your GraphicsRules.sgr file! If you make a mistake here, your game won’t work anymore.
Go to your bin folder and open your GraphicsRules.sgr with a text editor.
Search and find two lines that set the variables for MemCacheBudgetValue.
Modify these two values to larger numbers. Make sure the value in the first line is higher or equals the value in the second line. Examples for values: 1073741824, which means 1GB 2147483648 which means 2 GB. -1 (minus 1) means no limit (but is highly experimental, use at own risk)
Save and close the file. It might prompt you to save the file to a different place and not allow you to save in the Bin folder. Just save it someplace else in this case and copy/paste it to the Bin folder afterwards. If asked to overwrite the existing file, click yes.
Now start your game and see if it makes a difference in smoothness or texture loading. Make sure to check RAM and VRAM usage to see how it works.
You might need to change the values back and forth to find the “sweet spot” for your game. Mine seems to work best with setting the first value to 2147483648 and the second to 1073741824.
Uninstallation
Delete these files from your bin folder (installation path):
d3d9.dll
DXVK.conf
TS3W.DXVK-cache
And if you have it, also TS3W_d3d9.log
if you changed the values in your GraphicsRule.sgr file, too, don’t forget to change them back or to replace the file with your backed up version.
OR
delete the bin folder and add it from your backup again.
B. with Reshade/GShade
Follow the steps from part A. no Reshade/Gshade to set up DXVK.
If you are already using Reshade (RS) or GShade (GS), you will be prompted to overwrite files, so choose YES. RS and GS may stop working, so you will need to reinstall them.
Whatever version you are using, the interface shows similar options of which API you can choose from (these screenshots are from the latest versions of RS and GS).
Please note:
Each time you install and uninstall DXVK, switching the game between Vulkan and d3d9, is essentially changing the graphics card ID again, which results in the settings in your options.ini file being repeatedly reset.
ReShade interface
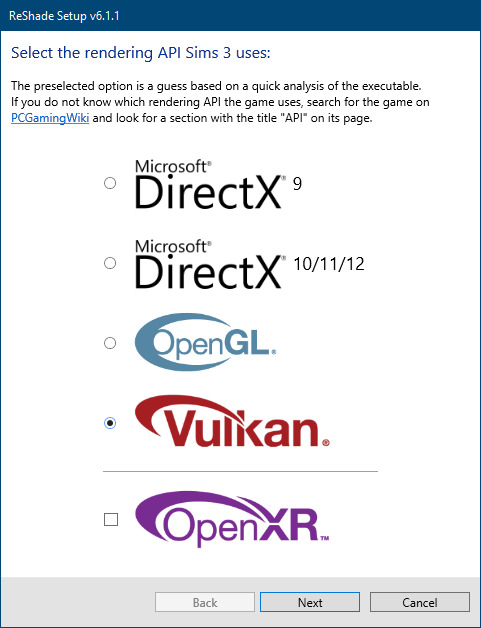
Choose – Vulcan
Click next and choose your preferred shaders.
Hopefully this install method works and it won't install its own d3d9.dll file.
If it doesn't work, then choose DirectX9 in RS, but you must make sure to replace the d3d9.dll file with DXVK's d3d9.dll (the one from its 32bit folder, checking its size is 3.86mb.)
GShade interface
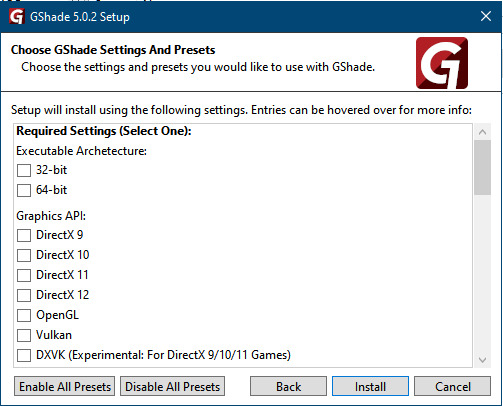
Choose –
Executable Architecture: 32bit
Graphics API: DXVK
Hooking: Normal Mode
GShade is very problematic, it won't work straight out of the box and the overlay doesn't show up, which defeats the purpose of using it if you can't add or edit the shaders you want to use.
Check the game's bin folder, making sure the d3d9.dll is still there and its size is 3.86mb - that is DXVK's dll file.
If installing using the DXVK method doesn't work, you can choose the DirectX method, but there is no guarantee it works either.
The game will not run with these files in the folder:
d3d10core.dll
d3d11.dll
dxgi.dll
If you delete them, the game will start but you can't access GShade! It might be better to use ReShade.
Some Vulcan and DirectX information, if you’re interested:
Vulcan is for rather high end graphic cards but is backward compatible with some older cards. Try this method with ReShade or GShade first.
DirectX is more stable and works best with older cards and systems. Try this method if Vulcan doesn't work with ReShade/GShade in your game – remember to replace the d3d9.dll with DXVK's d3d9.dll.
For more information on the difference between Vulcan and DirectX, see this article:
https://www.howtogeek.com/884042/vulkan-vs-DirectX-12/
757 notes
·
View notes
Note
Hi! I saw that you mentionned scrivener in your latest post and I've been meaning to try it. Is it good? I'm a one-doc-per-chapter kind of person so I wonder if it would work for me.
hi, sorry for the somewhat late reply, i wanted to include some screenshots to make my explanation a little clearer but didn't have the energy to sit down for it properly before now. if you're a one-doc-per-chapter writer i definitely think you should consider it! scrivener's most important feature, i think, is that it gives you:
the opportunity to split up your writing any way you want, whether per chapter, per scene, or even per paragraph...
...but all your writing is always within immediate reach, and you can restructure it whichever way you want.
to make that a little clearer, i've included a picture from my own work. scrivener is mostly geared towards creative writing, but i use it for my dissertation and that works very well too. this is the general interface, where you can see i've been writing an introduction:

scrivener's most important feature, to me, is its 'binder', which is this bit:
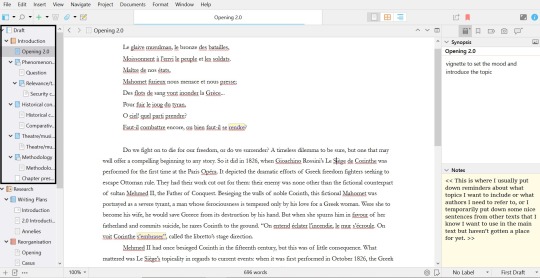
at the top, you'll see 'draft' - this is the entirety of the project you're working on. in this case, that's my dissertation. underneath, you see a little book, called 'introduction' - that's a main part of the draft. and underneath that, you can see a couple of folders and documents. that's all the different parts of my introduction. you can create as many folders and put as many different documents in those folders as you want. what i find incredible about this, is that i have an overview of all my topics, and that i can switch between all my different topics without having to open different documents OR put all my shit in one big document, which always makes me lose my way completely. and if i feel like restructuring my text? well, i can go to the binder, and drag the texts to another spot there.
since you like to work by chapter, you could just structure your binder like that in a way that works for you, but you'd still have access to all your other work if there's ever a moment when you need to refer back to it. or if you're working on multiple chapters at the same time, you can just switch between them.
something else that has helped me a lot is the 'research' part of the binder:
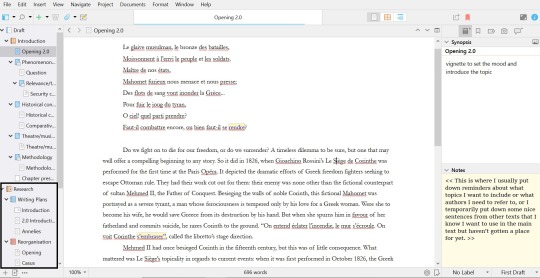
the 'research' part is meant for you as a writer to put down all your resources - your pdfs, your images, whatever you're using as reference while you're writing. now, because im writing an academic text and need more references than the average (fan)fiction writer, im using zotero as a reference manager. instead, im using the reserach folder to store my writing plans so i can reference and update them there. you see that 'reorganisation' folder there: it's also where i store my texts when i notice that the current structure is not working at all and i need to start over - but in such cases i don't need to write all the text itself from scratch again. this way i can keep everything within easy reach and copy-paste in the same document (you can split your screen within the program, and work in two documents at once).

what's also great are the tools. in programs like word or google docs you'll find some of these, but not all. as you can see, the first symbol leads to a sidebar where you can put a synopsis for the specific text you're working on, and it lets you add notes. the second one lets you add bookmarks to your text, like texts or references you want within reach immediately. the third one lets you add specific metadata or tags. the fourth lets you make snapshots; scrivener saves all your work immediately, but if you're about to make a big change, you can create a snapshot and roll back to that if it's not working out after all. finally, there's the comments, which speak for itself. all the way down the bar you'll also see that you can label texts ('no label' here, there's a colour system) and note what part of the writing progress this part of the text is at.
what i personally like very much is the bar at the top that now says 'opening 2.0'. you can see a light blue bar at the bottom of it: that indicates my writing progress. you can set a writing goal in number of words for your project. for my entire 'introduction', that's 8000 words, and as you can see im nearly there. if you hover over the 'opening 2.0' bar, it'll shift to show you the number of words you've written AND the number of words you've written in that specific writing session like so: 7300/8000 | 345. what i like is that it counts the actual words written - if i've deleted a sentence, my count goes down again. that's useful for me because i tend to think 'oh i've written so much today' while all i've been doing is tiny edits for 2 hours, but not actually put down more words.
there's MUCH more that scrivener offers, but i can't explain it all here. they offer a free trial for 30 days, and it comes with a practice document that explains all the features to you by making you work in the program. id recommend giving that a try if you're interested! the program is expensive (it cost me 70 euros) but it's absolutely been worth it for me. i used to have long-ass documents with half-finished paragraphs and snippets of thoughts and sentences all over, and this has helped me structure my texts more easily while also not cluttering my workspace with loose thoughts and ideas because i have more places to put them now.
#asks#long ass posts by ME feat. dumb opera shit#annotation is kinda ehh btw. like there's in-text and footnotes options but bc i use zotero they're not that great for me#there's a zotero extenstion but it's difficult to add if you're a luddite like me so i use the comments to put author and page no. instead#then i add the actual footnotes in word once i've converted the file
8 notes
·
View notes
Text
AvatoAI Review: Unleashing the Power of AI in One Dashboard

Here's what Avato Ai can do for you
Data Analysis:
Analyze CV, Excel, or JSON files using Python and libraries like pandas or matplotlib.
Clean data, calculate statistical information and visualize data through charts or plots.
Document Processing:
Extract and manipulate text from text files or PDFs.
Perform tasks such as searching for specific strings, replacing content, and converting text to different formats.
Image Processing:
Upload image files for manipulation using libraries like OpenCV.
Perform operations like converting images to grayscale, resizing, and detecting shapes or
Machine Learning:
Utilize Python's machine learning libraries for predictions, clustering, natural language processing, and image recognition by uploading
Versatile & Broad Use Cases:
An incredibly diverse range of applications. From creating inspirational art to modeling scientific scenarios, to designing novel game elements, and more.
User-Friendly API Interface:
Access and control the power of this advanced Al technology through a user-friendly API.
Even if you're not a machine learning expert, using the API is easy and quick.
Customizable Outputs:
Lets you create custom visual content by inputting a simple text prompt.
The Al will generate an image based on your provided description, enhancing the creativity and efficiency of your work.
Stable Diffusion API:
Enrich Your Image Generation to Unprecedented Heights.
Stable diffusion API provides a fine balance of quality and speed for the diffusion process, ensuring faster and more reliable results.
Multi-Lingual Support:
Generate captivating visuals based on prompts in multiple languages.
Set the panorama parameter to 'yes' and watch as our API stitches together images to create breathtaking wide-angle views.
Variation for Creative Freedom:
Embrace creative diversity with the Variation parameter. Introduce controlled randomness to your generated images, allowing for a spectrum of unique outputs.
Efficient Image Analysis:
Save time and resources with automated image analysis. The feature allows the Al to sift through bulk volumes of images and sort out vital details or tags that are valuable to your context.
Advance Recognition:
The Vision API integration recognizes prominent elements in images - objects, faces, text, and even emotions or actions.
Interactive "Image within Chat' Feature:
Say goodbye to going back and forth between screens and focus only on productive tasks.
Here's what you can do with it:
Visualize Data:
Create colorful, informative, and accessible graphs and charts from your data right within the chat.
Interpret complex data with visual aids, making data analysis a breeze!
Manipulate Images:
Want to demonstrate the raw power of image manipulation? Upload an image, and watch as our Al performs transformations, like resizing, filtering, rotating, and much more, live in the chat.
Generate Visual Content:
Creating and viewing visual content has never been easier. Generate images, simple or complex, right within your conversation
Preview Data Transformation:
If you're working with image data, you can demonstrate live how certain transformations or operations will change your images.
This can be particularly useful for fields like data augmentation in machine learning or image editing in digital graphics.
Effortless Communication:
Say goodbye to static text as our innovative technology crafts natural-sounding voices. Choose from a variety of male and female voice types to tailor the auditory experience, adding a dynamic layer to your content and making communication more effortless and enjoyable.
Enhanced Accessibility:
Break barriers and reach a wider audience. Our Text-to-Speech feature enhances accessibility by converting written content into audio, ensuring inclusivity and understanding for all users.
Customization Options:
Tailor the audio output to suit your brand or project needs.
From tone and pitch to language preferences, our Text-to-Speech feature offers customizable options for the truest personalized experience.
>>>Get More Info<<<
#digital marketing#Avato AI Review#Avato AI#AvatoAI#ChatGPT#Bing AI#AI Video Creation#Make Money Online#Affiliate Marketing
3 notes
·
View notes
Text
Breaking Down ADA Compliance: Ensuring PDF Accessibility in 2025
Ensuring digital content is accessible is no longer optional—especially with evolving ADA (Americans with Disabilities Act) regulations. This blog simplifies the path to ADA-compliant PDF documents, offering a practical guide for organizations to follow in 2025.

What Is ADA Compliance and Why Does It Matter?
ADA compliance ensures people with disabilities can access digital content, including PDFs. Non-compliance not only affects user experience but can also lead to legal consequences. Making PDFs accessible means making them usable for everyone—including those using screen readers or assistive technologies.
5 Common PDF Accessibility Issues
The blog outlines common pitfalls such as:
Incorrect reading order that confuses screen readers
Missing or improper tags that hinder navigation
Lack of alt text for images
Complex tables/forms that aren’t readable
Scanned PDFs with unsearchable content
ADA Compliance Checklist for Accessible PDFs
To create accessible PDFs, follow this checklist:
Use a clear heading structure
Tag tables/forms accurately
Ensure strong color contrast
Choose readable fonts and formatting
Set relevant file properties
Add alt text for visuals
Clearly define hyperlinks
Make forms keyboard accessible
7 Tools That Help Ensure PDF ADA Compliance
The blog also recommends tools like:
Adobe Acrobat Pro DC
CommonLook, Equidox, and Abledocs
Foxit, pdfGoHTML, and axesPDF QuickFix
Summing Up
ADA-compliant PDFs create inclusive experiences and reduce legal risks. This blog gives IT teams and content creators the tools and checklists they need to build accessible, user-friendly documents in 2025.
Read More: https://www.damcogroup.com/blogs/guide-to-ada-compliance-and-pdf-accessibility
0 notes
Text
I Tested 7 Letterhead Generators — Only ONE Made My Business Look Like a Fortune 500 Company

So, I recently had to send out proposals and invoices for my small business, and I realized... my documents looked sad. Like, “Word doc with my name in bold” sad.
I decided to fix it — tried 7 different letterhead generators — and let me tell you, only one actually made me feel like I was running a legit brand. Here’s my honest breakdown 👇
1. Zoviz Letterhead Generator (Absolutely Blew Me Away) This one is NEXT LEVEL. Super clean UI, drag-and-drop features, and templates that actually look professional — not clip-art nonsense. It took me literally 3 minutes to create a branded letterhead with my logo, brand colors, and contact info. It even aligned perfectly when exported to PDF or print. ✅ Sleek, modern, and way more “enterprise” than I expected from a free tool. Bonus: They also have tools for logos, email signatures, and AI image stuff — all in one place. Obsessed.
2. Canva Letterhead Maker Great templates and easy to use, especially if you’re already a Canva user. But sometimes it feels more “design-for-fun” than “design-for-business.”
3. Microsoft Word (Built-in Templates) Reliable and easy, sure. But let’s be honest — if you want to stand out, Word won’t cut it anymore. Good for temporary fixes though.
4. Visme Very visual and good for marketing teams, but can be a bit overwhelming. If you want total customization, it's solid — but there’s a learning curve.
5. Adobe Express Letterhead Tool Looks good, but not beginner-friendly. Took me longer than I’d like to admit to export a clean PDF without cropping issues.
6. Venngage Unique templates, especially for corporate reports and infographics. But I found it slightly limited when it came to personal branding touches.
7. Edit.org Nice UI, some cool templates, but less polished than others. Still worth trying if you're on a budget.
💬 Final Thoughts If you want letterheads that instantly say, “This business has its act together,” go with Zoviz. It’s simple, stylish, and shockingly powerful for something so fast and free.
Tag someone who still uses plain text docs for business
#ZovizLetterhead#DocumentGlowUp#SmallBizTools#UGCReview#StationeryStyle#BrandingTips#StartupHacks#NotSponsoredJustGrateful#LetterheadGoals#MakeItLookPro
0 notes
Text
BUSINESSES NEED INTEGRATED DIGITAL SOLUTIONS
INTRODUCTION
In today’s fast-paced digital world, businesses need more than just a website or a Facebook page to stand out. They need a complete, well-integrated digital strategy that connects with customers, drives growth, and builds trust. That’s where ELOIACS comes in.
ELOIACS is a full-service digital company that provides everything from Digital Marketing to Web Development, UI/UX Design, PDF Accessibility, E-Books Conversion, and Data Entry. This blog dives deep into each of our services and shows how we help businesses grow with effective digital solutions.
WHY NEED INTEGRATED DIGITAL SOLUTIONS
As the online marketplace becomes more competitive, businesses can't afford to manage multiple digital vendors. Integrated services allow for:
Seamless brand consistency
Faster project timelines
Better communication
Lower overall costs
When your marketing, design, and development teams work under one roof, your business runs more efficiently. Imagine launching a new product with a custom website, strategic ad campaign, beautiful UI design, and accessible content—all handled by one team.
ELOIACS: YOUR COMPLETE DIGITAL SERVICE PARTNER
At ELOIACS, we believe in transforming digital ideas into real-world impact. Our team is made up of specialists in every area of the digital ecosystem. We serve startups, established companies, and eCommerce brands across India and beyond. We work closely with clients to understand their goals and deliver custom solutions that bring measurable results.
SERVICE 1: DIGITAL MARKETING
In a digital-first world, marketing is more than just posting on social media. Our digital marketing services include:
SEO (Search Engine Optimization): Helping your website rank on Google for relevant keywords.
PPC (Pay-Per-Click) Advertising: Google Ads, Facebook Ads, and more to drive targeted traffic.
Social Media Management: Growing your brand presence on Instagram, Facebook, LinkedIn, and Twitter.
Email Campaigns: Connecting directly with your audience through personalized email.
We use tools like SEMrush, Meta Ads Manager, and Google Analytics to build strategies that are data-driven and goal-oriented. Our campaigns have helped clients gain visibility, boost leads, and increase ROI.
SERVICE 2: WEB DEVELOPMENT
Your website is the digital face of your brand. ELOIACS designs and develops modern, responsive, and SEO-friendly websites that drive engagement.
We specialize in:
Custom Website Development
WordPress and CMS-based Websites
eCommerce Stores (WooCommerce, Shopify, Custom PHP)
Our tech stack includes HTML, CSS, JavaScript, PHP, Laravel, and more. Whether you’re launching a new site or revamping an old one, we make sure it loads fast, looks great, and performs even better.
SERVICE 3: UI/UX DESIGN
User Interface (UI) and User Experience (UX) design are at the heart of every digital product. We design experiences that are not just visually appealing but also user-centric.
Our UI/UX services include:
Wireframes and user journey mapping
Interactive prototypes
Design systems and brand consistency
We use Figma, Adobe XD, and other design tools to create layouts that engage users and increase conversions.
SERVICE 4: PDF ACCESSIBILITY
PDF Accessibility ensures your digital documents are usable by people with disabilities. This is crucial for legal compliance (like ADA and WCAG) and inclusivity.
ELOIACS provides:
Proper tagging structure
Alt text for images
Logical reading order
Accessible navigation
Our services are trusted by educational institutions, healthcare organizations, and government bodies. We ensure your content reaches every user, regardless of ability.
SERVICE 5: E-BOOKS CONVERSION
With the rise of digital reading, converting documents into eBooks is essential. We convert PDFs, Word docs, and other formats into ePub, MOBI, and AZW3 formats.
Our process includes:
Formatting for multiple devices
Designing covers and layout
Optimizing for Kindle, iBooks, and Android readers
This service is perfect for authors, publishers, and educators looking to distribute content in a digital-friendly format.
SERVICE 6: DATA ENTRY SERVICES
Accurate data is critical for business operations. Our data entry team handles:
Manual and automated data entry
CRM data population
Inventory and catalog data
Spreadsheet cleanup and formatting
We ensure 100% accuracy, fast turnaround times, and data security. From large databases to small record entries, we manage it all with precision.
WHY CHOOSE ELOIACS FOR MULTI-DIGITAL SERVICES
Here’s what makes us stand out:
One-stop solution: No need to juggle different vendors
Expert team across all services
Affordable packages for startups and enterprises
Focus on quality, performance, and deadlines
We don’t just deliver projects—we build partnerships. Our long-term clients stay with us because we help them grow consistently.
HOW TO START WORKING WITH ELOIACS
Getting started is easy:
Book a free consultation via https://eloiacs.com
Share your goals and challenges
Receive a custom strategy and timeline
Work with a dedicated project manager and expert team
From day one, you get full transparency, clear communication, and professional service.
CONCLUSION
In a world where digital is everything, ELOIACS helps you stay ahead. Whether you need marketing, a new website, accessible documents, or data support, we have the tools and team to make it happen.
0 notes
Text
Step-by-Step Guide to Setting Up Odoo Learning Management System (LMS)
Odoo offers a powerful eLearning module that allows businesses, educators, and trainers to manage courses, lessons, quizzes, and certifications in one place. Whether you're setting up a training portal for employees or an online academy for learners, Odoo makes it easy to organize and deliver high-quality content. This step-by-step guide will walk you through how to set up your Odoo Learning Management System.
Step 1: Install the eLearning Module
To begin, you need to install the eLearning app in Odoo:
Log in to your Odoo backend with administrator rights.
Go to the Apps module.
Search for eLearning or a Learning Management System.
Click Install on the eLearning module.
Once installed, you will see a new menu called eLearning or Courses on your dashboard.
Step 2: Create a Course
After installing the module, the next step is to create your first course:
Navigate to the eLearning app.
Click Create to add a new course.
Fill in the basic course details:
Title: Name of your course.
Responsible: Assign a person or department.
Description: Write an overview of what the course covers.
Tags: Add categories to group similar courses.
Turn on or off features like Forums, Quizzes, and Certifications as needed.
Once done, click Save.
Step 3: Add Course Content (Lessons)
Courses in Odoo are structured with lessons or content blocks. Here's how to add them:
Open the course you created.
Scroll down to the Content tab.
Click Add Content.
Choose the type of content:
Document (PDF, Word files)
Video (YouTube or upload)
Quiz
Web Page (HTML content)
Enter a title, upload your content, and add any notes or instructions.
You can reorder lessons using drag and drop to match your preferred sequence.
Step 4: Create Quizzes
Quizzes help reinforce learning. To create one:
Go to the Content section of a course.
Click Add Content and select Quiz.
Name the quiz and add a short introduction if needed.
In the Questions tab, click Add a Question.
Choose question type:
Multiple choice
Single choice
Text input
Add answers and mark the correct one(s).
Quizzes can be scored, and you can define passing criteria.
Step 5: Set Up Certification (Optional)
You can provide certificates for course completion:
In the course form, enable the Certification option.
Define the criteria (e.g., complete all lessons or pass the final quiz).
Choose a certification template or create your own.
Certificates will be auto-generated and available for download in the learner's portal.
Step 6: Assign Courses to Users
You can assign users manually or allow them to enrol via the website.
Manual Assignment:
Go to the course.
Under the Participants tab, click Add.
Select users from the list.
Public Access:
Make the course Published.
Set the course as Free or Paid.
Share the link with users or embed it on your site.
Step 7: View Learner's Progress
Track how learners are engaging with your courses:
Go to the eLearning dashboard.
Click on Reports.
View:
Course completions
Quiz scores
Certification status
Time spent on lessons
You can also export reports in Excel or PDF for sharing.
Step 8: Customize the Learning Portal
Odoo allows customization of the portal interface:
Go to Website > eLearning.
Use Odoo's website builder tools to:
Customize fonts, colours, and banners
Organize course listings by categories
Add filters and search options
You can also add a blog, testimonials, or FAQ section to support learners.
Step 9: Enable Email Notifications
Keep learners informed with automated notifications:
Use Automated Actions or Marketing Automation to:
Send welcome emails
Notify learners of new content
Remind about upcoming quizzes or deadlines
Set the conditions and templates for each scenario.
Step 10: Monitor and Improve
After setup, continue improving your LMS:
Collect feedback using forms or surveys.
Analyze popular courses and content.
Update lessons regularly based on learner performance.
Offer new certifications or advanced training.
Conclusion
Odoo Learning Management System is a flexible and user-friendly tool to train employees, teach students, or deliver professional courses. With features like quizzes, certificates, progress tracking, and detailed reporting, you can build a complete learning platform that fits your business needs. Follow these steps to get started and make learning accessible, engaging, and effective for everyone involved.
#odoo learning#odoo learning software#odoo learning software management#Odoo eLearning management software#odoo#odoo app#odoo erp
1 note
·
View note
Text
Simplify Handover Procedures with a Mobile Form App and Project Handover Checklist
Efficient project handover is a crucial phase in any project lifecycle. Whether in construction, IT, engineering, or facility management, a smooth transition from the project team to the client or operations team ensures transparency, compliance, and continued functionality. At the heart of this transition lies a structured Project Handover Checklist and the tools used to implement it—most notably, a reliable mobile form app like NestForms.
In this article, we explore how integrating a mobile form app with a digital handover checklist can streamline your workflow, enhance accountability, and ensure successful project closure, even in the most remote or demanding environments.
Why a Project Handover Checklist is Essential
The Project Handover Checklist serves as a master list of items, documents, and deliverables that must be verified, signed off, and transferred before a project is considered officially completed. It ensures that no important aspect is overlooked and that all stakeholders agree on the final status of the project.

Key Components of a Project Handover Checklist:
Final deliverables (reports, designs, construction work, etc.)
Compliance certifications and permits
Safety inspection reports
Asset and inventory lists
As-built drawings or schematics
Training and user manuals
Maintenance schedules
Sign-offs from project leads and clients
Managing this data manually can lead to delays, errors, and communication gaps. That’s where digital solutions like a mobile form app come into play.
The Role of a Mobile Form App in Project Handover
A mobile form app like NestForms replaces the traditional paper-based checklist with a dynamic digital platform. It allows field teams, project managers, and clients to access, complete, and submit project handover checklists using smartphones or tablets—anytime, anywhere.
Benefits of Using a Mobile Form App:
Real-Time Data Capture: Instantly record handover details, observations, and signatures.
Offline Capability: Use forms in remote areas without internet access and sync data later.
Customizable Checklists: Tailor forms to suit project-specific requirements using NestForms’ drag-and-drop form builder.
Multimedia Integration: Attach photos, drawings, GPS locations, and voice notes for complete context.
Error Reduction: Standardized forms reduce manual entry errors and omissions.
Fast Distribution: Share the completed handover checklist with team members and clients in seconds.
Using a mobile form app helps teams stay on the same page, minimize paperwork, and improve traceability throughout the handover process.
Creating a Digital Project Handover Checklist with NestForms
With NestForms, creating a digital project handover checklist is simple and intuitive. The platform provides a user-friendly interface that allows non-technical users to build and distribute mobile forms in minutes.
Step-by-Step Guide:
Use the Form Builder: Drag and drop fields like text, dropdowns, image uploads, and checkboxes to customize your handover checklist.
Add Sections: Break the checklist into logical sections—documents, inspections, client training, etc.
Assign the Form: Distribute the checklist to relevant team members using the app.
Work Offline: If you're on a construction site or in a remote location, complete the form offline.
Collect Signatures: Use the signature field to obtain digital sign-offs from supervisors or clients.
Sync and Export: Once connected, sync data to the cloud, export to PDF, or integrate with your workflow system.
The result is a well-organized, professionally formatted handover document that can be archived or shared with stakeholders immediately.
Real-World Use Cases
1. Construction Industry
A civil engineering firm uses NestForms to complete their project handover checklist at the end of a housing development project. The mobile form app allows engineers to attach snag list photos, capture geo-tags of assets installed, and collect client signatures directly on-site.
2. IT Infrastructure
An IT services provider deploys NestForms to document handovers for server installations. Their checklist includes device serial numbers, installation guides, and support contact information—all captured using the mobile form app.
3. Facility Management
During a routine building maintenance project, a facilities management team uses NestForms to list completed tasks, updated safety documentation, and client training sessions in a structured digital checklist. The form is submitted and archived for future audits.
These examples illustrate how versatile and powerful a mobile form app becomes when paired with a standardized project handover checklist.
Integration with Other Tools and Processes
NestForms can be easily integrated with other digital systems used in project management. Exported data from the mobile form app can be used to:
Feed into ERP or asset management systems
Support project completion reports
Provide evidence for compliance audits
Assist in warranty documentation
Maintain service and maintenance logs
This integration capability ensures that data collected at handover doesn’t sit in isolation but becomes part of the broader project documentation ecosystem.

Best Practices for Digital Project Handovers
To make the most of your mobile form app and ensure a flawless project handover checklist, consider the following best practices:
Prepare Early: Start designing your checklist in the early phases of the project.
Standardize Templates: Maintain a library of reusable checklists for different project types.
Train Your Team: Ensure team members are comfortable using the mobile app and understand the checklist's importance.
Review Before Sign-Off: Schedule a review meeting with stakeholders before final sign-off.
Keep a Digital Archive: Store all completed handover forms for future reference or compliance needs.
With these practices, your handover phase becomes structured, predictable, and far less stressful.
Conclusion
A successful handover marks the culmination of countless hours of planning, execution, and teamwork. By leveraging a modern mobile form app like NestForms and a detailed project handover checklist, organizations can complete this phase with confidence and clarity.
Not only does this approach save time and eliminate paperwork, but it also ensures that every last detail is captured, documented, and approved—laying the foundation for satisfied clients and repeat business.
So, if you’re looking to improve how you manage handovers in your projects, it’s time to go mobile, go offline if needed, and go digital with NestForms.
#mobile form app#land survey app#Project Handover Checklist#Final Inspection Checklist#Project Completion Report#Form Builder App#quality control app#offline survey app#offline surveys#survey mobile app#collect mobile data#quality control checklist app#health and safety audits#forms mobile app
0 notes
Text
ToolsToEdit.in – Your Ultimate Free Toolkit for Everyday Digital Tasks
In today’s fast-moving digital world, being productive means using the right tools at the right time. But what if you could access over 30+ essential online tools in one place—without paying a cent? That’s exactly what ToolsToEdit.in offers: a centralized, no-cost platform built for students, teachers, professionals, content creators, and anyone who wants to get things done—fast and efficiently.
🌐 What Is ToolsToEdit.in?
ToolsToEdit.in is a multi-purpose online toolkit that combines the functionality of dozens of individual tools into one convenient, browser-based hub. From quick calculations to SEO audits, PDF conversions to text clean-up—this platform is designed to simplify your work, save you time, and help you perform complex tasks with just a few clicks.
👥 Who Is It For?
This site isn’t just for techies or web developers. ToolsToEdit.in is built for everyday users:
🎓 Students can calculate percentages, solve EMI questions, or convert between binary and text.
👨🏫 Teachers can create resources, check text readability, or compress files.
🧑💻 Content Creators & Bloggers can analyze SEO, clean content, and manage PDFs.
👥 General Users can generate strong passwords, spot phishing links, and much more.
🔧 Key Tool Categories and Features
Here’s a breakdown of what ToolsToEdit.in offers:
🧮 Calculator Tools
No need for separate apps—just launch and use:
BMI Calculator – Check body mass index.
Discount Calculator – Know how much you’re saving.
EMI Calculator – Plan your finances smartly.
Age Calculator – Get accurate age from date of birth.
Percentage Calculator – Solve quick percentage problems.
✍️ Text Utilities
Content handling made easy:
Word Counter – Know your length before publishing.
Case Converter – Switch between uppercase, lowercase, and more.
Remove Duplicate Lines – Clean up large text files.
Find & Replace – Mass replace words or phrases.
Binary ⇄ Decimal/Text Converters – Useful for coding and education.
Text Encoder/Decoder – Encrypt and decode web-safe content.
🔐 Security Tools
Keep your data secure:
Password Generator – Create complex passwords.
Password Strength Checker – Test how secure your password is.
Phishing URL Detector – Protect yourself from scams.
🔍 SEO Optimization Tools
Get your website found:
Meta Tag Analyzer – Improve search engine visibility.
Mobile-Friendly Test – Make sure your site works on smartphones.
Page Speed Analyzer – Identify and fix performance issues.
Sitemap Generator – Generate XML sitemaps for indexing.
Keyword Density Checker – Analyze your content for keyword balance.
Robots.txt Generator – Guide search engine bots effectively.
🎨 Design & Image Tools
Handy for bloggers, designers, and developers:
Color Picker Tool – Find and copy hex codes easily.
CSS Gradient & Animation Previews – Visualize effects before using them.
Box Shadow & Border Radius Preview – Quick CSS styling helpers.
Image Compressor – Reduce image file sizes without losing quality.
Image to Base64 Converter – Embed images in web code.
Image Color Picker – Get exact color details from any picture.
📄 PDF Tools
Manage documents like a pro:
Merge PDF Files – Combine multiple documents into one.
PDF to Image/Text/Word – Convert PDFs into different formats.
Image to PDF Converter – Make professional documents from images.
💡 Why ToolsToEdit.in Stands Out
✅ No Installations: Everything runs right in your browser.
✅ Free Forever: No subscriptions, no sign-ups, no hidden fees.
✅ Mobile-Friendly: Use it seamlessly across devices.
✅ Time-Saving: Get tasks done in seconds.
✅ Clean UI: Easy to use even for beginners.
📢 Final Thoughts
In a world of scattered tools, ToolsToEdit.in brings clarity and convenience. Whether you're a digital marketer doing an SEO audit, a student calculating your GPA, or a teacher preparing resources—this site empowers you to work smarter, not harder.
Visit www.toolstoedit.in and explore the full suite of tools today. It’s time to edit, create, calculate, optimize, and convert—all in one place.
1 note
·
View note
Text
Avoid These 5 eBook Conversion Mistakes

As digital publishing continues to gain momentum, more authors, publishers, and content creators are turning to eBook conversion to reach a wider, tech-savvy audience. Whether you’re converting a novel, a textbook, or a corporate training manual, the goal is clear: produce a clean, readable, and professional-looking digital book.
However, converting your manuscript into an eBook format like ePub or MOBI is not always straightforward. In fact, many people unknowingly commit errors that affect the readability, accessibility, and even the marketability of their eBooks.
In this post, we’ll explore five common eBook conversion mistakes and how to avoid them to ensure your digital book looks great on any device and delivers a smooth reading experience.
1. Ignoring Proper Formatting Before Conversion
The Mistake:
One of the most frequent issues is failing to properly format the source document (usually in Word, InDesign, or PDF) before initiating the conversion.
Why It Matters:
eBook conversion formats are reflowable—meaning text adjusts to different screen sizes and reader preferences. Poor formatting (such as hard line breaks, inconsistent heading levels, or excessive tab spacing) can lead to chaotic, unreadable content post-conversion.
How to Avoid It: ● Use styles (Heading 1, Normal, etc.) instead of manual formatting ● Avoid using the spacebar or tab key for alignment ● Create a clean and consistent structure using built-in tools ● Test a small section before converting the full book
2. Not Embedding or Licensing Fonts
The Mistake:
Using custom or fancy fonts without embedding them or ensuring they are licensed for eBook use.
Why It Matters:
If your chosen fonts aren’t embedded—or are unavailable on a reader’s device—your eBook may display with fallback fonts, ruining your design and readability.
How to Avoid It:
● Stick to web-safe or eBook-friendly fonts like Georgia, Arial, or Times
● Embed fonts where possible, especially in fixed-layout eBooks
● Check font licensing if you're using premium or downloaded fonts
● Use CSS font rules correctly in ePub files
3. Skipping Image Optimization
The Mistake:
Failing to resize, compress, or format images properly for eBook formats.
Why It Matters:
Large, high-resolution images can cause slow loading, increased file size, and even conversion errors. Additionally, image formats like BMP or TIFF may not display correctly in ePub readers.
How to Avoid It:
● Use JPEG or PNG formats for best compatibility
● Keep image resolution around 300 dpi for print, but 72–150 dpi for eBooks
● Use alt text for accessibility and SEO
● Compress images without sacrificing quality
4. Poor Table of Contents (TOC) Structure
The Mistake:
Creating an incomplete or non-functional TOC—or skipping it entirely.
Why It Matters:
An eBook’s table of contents is essential for navigation. Without a working TOC, users may become frustrated and leave negative reviews or stop reading altogether.
How to Avoid It:
● Create a logical hierarchy with proper heading tags
● Use your authoring tool’s “Insert TOC” or export feature
● Ensure the TOC is linked and functions in the final format
● Test it in multiple devices (Kindle, Apple Books, etc.)
5. Not Testing Across Devices and Platforms
The Mistake:
Publishing an eBook without thoroughly testing it across various platforms and devices.
Why It Matters:
An eBook that looks great on one device might display incorrectly on another. Compatibility issues can include spacing errors, broken links, and non-responsive images.
How to Avoid It:
● Test your eBook on multiple eReaders (Kindle, Kobo, Nook, Apple Books)
● Use emulators or preview tools (e.g., Kindle Previewer, Calibre)
● Ask others to test it for fresh perspectives
● Fix all issues before publishing or distributing
Bonus Tips for Seamless eBook Conversion
● Always validate your ePub files using tools like EpubCheck
● Keep your file structure clean—organize text, styles, and media properly
● Don’t rely solely on automated converters—manual tweaks are often required
● Consider hiring a professional formatting or conversion service for important projects
Final Thoughts
Creating a flawless eBook takes more than just hitting “convert.” It requires attention to detail, testing, and a clear understanding of how digital formats work. By avoiding these five common conversion mistakes, you’ll not only enhance your reader’s experience but also increase your eBook’s professionalism, accessibility, and long-term success.
Remember, your eBook represents your brand, story, or business—so make it count.
Source Link: https://latestbpoblog.blogspot.com/2025/04/avoid-these-5-eBook-conversion-mistakes.html
#dataentryinc#ebookconversion#ebookconversionservices#bestebookconversionservices#professionalebookconversionservices
0 notes
Text
Paperguide.ai 2025 Review
Introduction
In the academic and research world, managing vast amounts of information, creating well-structured papers, and maintaining proper citations can be overwhelming. Paperguide.ai 2025 emerges as a transformative AI-powered platform that simplifies these challenges by offering tools for research, writing, and citation management. Designed for students, researchers, and professionals, Paperguide.ai streamlines workflows, saving time while ensuring quality output. In this review, we’ll explore its features, benefits, pricing, and suitability for various use cases.
Overview
Paperguide.ai 2025 is an advanced AI assistant tailored to academic research and writing. It combines reference management, literature review tools, AI-powered writing assistance, and citation generation into a single platform. Whether you’re conducting a systematic review, drafting a thesis, or preparing a manuscript for publication, Paperguide.ai provides end-to-end support.
With features like “Chat with PDF,” AI search capabilities, and intelligent summarization tools, Paperguide.ai offers unparalleled efficiency in navigating complex academic tasks. Its user-friendly interface ensures accessibility for both beginners and seasoned researchers.
What Is Paperguide.ai 2025?
Paperguide.ai 2025 is an all-in-one AI-powered platform designed to assist users throughout the research process—from finding relevant papers to drafting manuscripts and generating citations. It leverages advanced AI models (GPT-4 and Claude 3.5) to provide intelligent insights, automate repetitive tasks, and optimize writing workflows.
Key Features
Chat with PDF: Upload research papers or documents and interact with them using natural language queries.
AI Search: Quickly find relevant academic papers using keyword-based searches powered by AI.
Reference Manager: Organize sources into folders with tags and annotations for easy access.
Literature Review Tools: Extract key findings from multiple papers and organize them systematically.
AI Writer: Draft essays, articles, or research papers with content generation speeds of up to 3,000 words per minute.
Citation Management: Automatically format references in over 1,000 styles (APA, MLA, Chicago).
Plagiarism Detection: Ensure originality by comparing text against millions of online sources.
Features and Benefits
How Does It Work?
Paperguide.ai operates through a streamlined workflow:
Upload Documents or Search: Users can upload PDFs or perform keyword searches to retrieve relevant academic resources.
Interact with Content: Use the “Chat with PDF” feature to ask questions or extract summaries from uploaded documents.
Organize References: Manage citations in folders with tags for efficient navigation during the writing process.
Draft Content: Utilize the AI Writer to create structured drafts based on user input or extracted insights.
Optimize Output: Refine drafts using grammar checks, plagiarism detection tools, and citation formatting.
Export Results: Save final outputs in formats like Word or PDF for submission or publication.
Benefits
Efficiency Gains: Automates time-consuming tasks like summarization and citation formatting.
Improved Accuracy: Ensures compliance with academic standards through optimized drafts and error-free citations.
Enhanced Collaboration: Facilitates teamwork by allowing users to share references and annotations seamlessly.
Global Accessibility: Multi-language support expands usability for international researchers.
Cost Savings: Reduces reliance on external editors or manual processes.
My Experience Using It
Using Paperguide.ai 2025 was an eye-opening experience that significantly improved my workflow during a recent literature review project. The “Chat with PDF” feature was particularly impressive—it allowed me to upload dense research papers and extract key insights by asking simple questions in plain language.
The AI search tool saved hours by presenting highly relevant academic articles without the need to sift through irrelevant results manually. I also found the reference manager invaluable for organizing sources into tagged folders that were easy to navigate during drafting.
The AI Writer helped me draft sections of my paper efficiently while suggesting improvements to phrasing and structure. However, I did notice that highly technical content sometimes required manual adjustments to ensure accuracy.
Overall, Paperguide.ai streamlined my research process while maintaining high standards of quality.
Pros and Cons
Advantages
Time-Saving Automation: Reduces manual effort in literature reviews and citation management.
User-Friendly Interface: Accessible even for users unfamiliar with advanced AI tools.
Comprehensive Features: Covers every stage of the research lifecycle—from discovery to final manuscript preparation.
Customizable Outputs: Tailors text formatting to meet specific style requirements (APA, MLA).
Collaboration Tools: Facilitates teamwork through shared annotations and references.
Disadvantages
Learning Curve for Advanced Features: Some tools require initial familiarization before full utilization.
Limited Free Plan Features: The free version restricts access to premium functionalities like unlimited plagiarism checks.
Specialized Content Challenges: Highly technical subjects may require manual refinement despite AI assistance.
Who Should Use It?
Paperguide.ai 2025 is ideal for:
Students: Simplifies essay writing and thesis preparation with automated tools.
Researchers: Enhances efficiency in literature reviews and manuscript drafting.
Academics & Universities: Supports faculty collaboration and resource management for academic success.
Editors & Publishers: Streamlines submission reviews and content finalization processes.
Price and Evaluation
Paperguide.ai offers flexible pricing plans:
Free Plan ($0/month):
Limited access (10 AI generations/day)
Basic citation management
Chat with PDF functionality
300 AI Writer words/day
Starter Plan ($9/month):
Unlimited AI generations
Premium models (GPT-4)
Expanded storage (10GB)
Enhanced literature review tools
Advanced Plan ($16/month):
Unlimited storage
Unlimited plagiarism checks
Advanced data extraction capabilities
Priority support
Evaluation
While the Free Plan is suitable for casual users exploring the platform’s capabilities, professionals will benefit more from the Starter or Advanced plans due to their expanded features and higher usage limits. Compared to hiring external editors or using separate tools for citation management and drafting assistance, Paperguide.ai offers excellent value as an all-in-one solution.
Conclusion
Paperguide.ai 2025 is a powerful tool that redefines academic research by automating complex tasks while maintaining precision and quality standards. Its robust capabilities—from summarizing articles to optimizing manuscripts—make it an invaluable asset for students, researchers, universities, and publishers alike.
Although there are minor limitations—such as specialized content requiring familiarization—the overall benefits far outweigh these drawbacks. Whether you’re looking to streamline your workflow or enhance your academic output quality, Paperguide.ai 2025 is well worth exploring.
#phd student#phdblr#phd life#phd research#phdjourney#academics#study tips#grad school#productivity#university
0 notes
Text
How to Optimize Design Files for Digital Printer Printing?
Digital printer printing is an essential process for businesses and individuals looking to produce high-quality prints efficiently. Whether creating marketing materials, product packaging, or custom prints, optimizing design files ensures superior output, reduced costs, and faster turnaround times. This guide explores the best practices for preparing design files to achieve the best results in digital printer printing.

1. Choose the Right File Format
Selecting the correct file format is crucial for maintaining design integrity. The most commonly accepted formats for digital printer printing include:
PDF (Portable Document Format): Preserves fonts, images, and layout while maintaining high quality.
TIFF (Tagged Image File Format): Best for high-resolution images without compression artifacts.
EPS (Encapsulated PostScript): Ideal for vector graphics and scalable designs.
AI (Adobe Illustrator): Suitable for vector-based artwork with editable elements.
PSD (Adobe Photoshop): Useful for complex image editing and layer-based designs.
2. Set the Correct Resolution
For sharp and detailed prints, resolution plays a vital role. The standard resolution for digital printer printing is 300 DPI (dots per inch). Using lower resolutions may result in pixelation and blurry prints, while excessively high resolutions can increase file size without noticeable quality improvements.
3. Use CMYK Color Mode
Unlike screens that display images in RGB (Red, Green, Blue), digital printer printing uses CMYK (Cyan, Magenta, Yellow, and Black) for accurate color reproduction. Designing in CMYK ensures that the printed output matches the intended colors, preventing unwanted shifts in hue and brightness.
4. Embed Fonts or Convert to Outlines
To prevent font substitution or missing text issues, embed fonts within the document or convert them to outlines before submitting files for digital printer printing. Converting text to outlines transforms it into vector graphics, ensuring consistency across different devices and software.
5. Maintain Proper Bleed and Safe Margins
Bleed and margin settings prevent unwanted trimming errors:
Bleed: Extend design elements at least 3mm (0.125 inches) beyond the trim line to ensure a clean cut.
Safe Margin: Keep critical content at least 5mm (0.2 inches) away from the trim edge to avoid being cut off.
6. Optimize Image Quality and Compression
High-resolution images enhance the final output, but excessive file sizes can slow down processing. Follow these optimization tips:
Use lossless compression formats like TIFF or PNG for high-quality images.
Avoid excessive JPEG compression to prevent artifacts.
Scale images properly instead of enlarging low-resolution files.
7. Ensure Correct File Size and Dimensions
Adjusting file dimensions to match the print size prevents unnecessary scaling or cropping. Always set up the document size according to the intended print dimensions in millimeters or inches to avoid discrepancies.
8. Check for Overprints and Transparencies
Transparency effects and overprinting settings can cause unexpected results in digital printer printing. Flatten transparencies and check overprint settings before finalizing the file to ensure accurate color layering and visibility.
9. Proof and Test Before Printing
Before sending files for digital printer printing, review the design thoroughly:
Conduct a preflight check to detect errors, missing fonts, and incorrect color modes.
Print a proof copy to verify colors, layout, and text readability.
Use soft proofing tools in design software to simulate print output on-screen.
10. Save and Export with Print-Ready Settings
Saving files with the correct export settings ensures optimal print quality. When exporting PDFs for digital printer printing, use the "High-Quality Print" or "Press-Ready" preset, and embed all necessary assets to prevent issues during printing.
Conclusion
Optimizing design files for digital printer printing enhances print quality, reduces errors, and ensures a smooth printing process. By following these best practices—choosing the right file format, setting proper resolution, using CMYK color mode, embedding fonts, and maintaining correct margins—designers and businesses can achieve professional and visually stunning prints efficiently. Proper preparation not only saves time and costs but also ensures that the final printed material meets the highest standards of clarity and precision.
0 notes
Text
SRS Tool: An Essential Asset for Streamlined Software Development
Introduction
A Software Requirement Specification (SRS) tool is a critical resource for software development teams, enabling them to effectively define, document, and manage project requirements. It facilitates the creation of a structured and comprehensive document that serves as the foundation for the entire software development lifecycle. By ensuring clarity, reducing ambiguities, and fostering collaboration among stakeholders, developers, and testers, an SRS tool plays a pivotal role in project success.
In this blog, we will discuss the purpose of an SRS tool, its importance, key features, and highlight some of the top SRS tools available in the market.
What is an SRS Tool?
An SRS tool is a specialized software application designed to assist teams in creating and managing software requirement specifications. It facilitates the documentation of both functional and non-functional requirements, ensures efficient collaboration, tracks changes, and maintains traceability throughout the development lifecycle. By streamlining the process of gathering, analyzing, and organizing requirements, these tools play a critical role in supporting a more efficient and structured software development process.
Why Use an SRS Tool?
A well-structured SRS (Software Requirements Specification) document is essential to the success of any software project. Here’s why leveraging an SRS tool is advantageous:
Improved Requirement Management: Efficiently define, modify, and monitor requirements throughout the project lifecycle.
Enhanced Collaboration: Facilitate real-time contributions, edits, and reviews from multiple stakeholders.
Minimized Errors and Miscommunication: Ensure clarity and precision in requirements to prevent misunderstandings.
Version Control and Change Tracking: Maintain accuracy by tracking all updates and modifications over time.
Compliance and Standardization: Adhere to industry standards and best practices for professional documentation.
Key Features of an SRS Tool
An effective SRS tool should provide the following functionalities:
1. Requirement Documentation and Management
The capability to define, categorize, and structure requirements systematically.
Support for documenting both functional and non-functional requirements.
2. Collaboration and Real-Time Editing
Enables multiple users to access and contribute simultaneously.
Includes features such as commenting, tagging, and approval workflows for effective collaboration.
3. Traceability and Change Tracking
Incorporates version control to monitor modifications and ensure accuracy.
Provides detailed audit trails to track requirement changes over time.
4. Templates and Formatting Options
Offers pre-built templates to create professional and standardized documents.
Supports rich text, tables, diagrams, and images for comprehensive documentation.
5. Integration with Other Tools
Seamlessly integrates with project management platforms such as Jira, Trello, and Asana.
Includes API support for connectivity with third-party applications.
6. Export and Reporting Capabilities
Allows generation of detailed reports for stakeholders.
Provides export options in multiple formats, including PDF, Word, and HTML.
Top SRS Tools on the Market
Here is a selection of some of the most effective SRS tools available today:
1. Jama Connect
A comprehensive requirements management platform offering real-time collaboration, traceability, and robust version control capabilities.
2. IBM Engineering Requirements Management DOORS
An enterprise-grade solution specifically designed to support complex software development projects.
3. ReqView
A user-friendly requirements management tool, well-suited for small to medium-sized teams seeking efficiency.
4. Helix RM (Perforce)
Provides complete traceability throughout the development lifecycle and integrates seamlessly with agile project management tools.
5. Confluence
A versatile documentation and collaboration platform that enables teams to efficiently create, organize, and manage SRS documentation.
Conclusion
An SRS tool is an essential resource for any software development team, providing well-structured, clear, and easily traceable requirements. Whether you are developing a startup project or a large-scale enterprise application, selecting the right SRS tool can greatly improve project efficiency and outcomes.
Carefully evaluate the tools discussed above to determine which one aligns best with your project requirements. Effective documentation is a key to success.
For further insights on software development and tools, continue following our blog.
0 notes
Text
SEO Document Sharing Links: A Powerful Backlink Strategy
Search Engine Optimization (SEO) is a crucial digital marketing strategy that helps websites rank higher on search engine results pages (SERPs). Among the many SEO techniques, document sharing links have gained importance as an effective way to build backlinks, improve online visibility, and drive traffic. This method involves sharing documents, such as PDFs, PowerPoint presentations, and Word files, on high-authority document-sharing platforms.
What Are SEO Document Sharing Links? SEO document sharing links refer to backlinks that come from document-sharing websites. These links are obtained by uploading content-rich documents that include relevant links pointing back to your website. When search engines crawl these documents, they recognize the backlinks as an endorsement of your site’s credibility, helping improve your search rankings.
If you need to document sharing links kindly check out our web site.
Popular Document Sharing Sites To maximize SEO benefits, you should upload documents to high-authority document-sharing platforms, such as:
SlideShare (slideshare.net)
Scribd (scribd.com)
Issuu (issuu.com)
MediaFire (mediafire.com)
Google Drive (Public Sharing) (drive.google.com)
Calameo (calameo.com)
These sites have strong domain authority, which means backlinks from them can boost your SEO rankings.
Benefits of SEO Document Sharing Links
Improved Search Engine Ranking Backlinks from high-authority document-sharing websites improve domain authority and signal to Google that your site is valuable and trustworthy. This can result in better rankings on SERPs.
Increased Website Traffic Users searching for documents or information related to your niche can find your shared documents and visit your website via embedded links. This increases organic traffic.
Enhanced Brand Awareness Document sharing allows you to showcase your expertise, products, or services. When people download and share your documents, your brand gains exposure.
Indexing & Crawling Benefits Search engines index document-sharing platforms, which means your documents (and the links in them) can appear in search results. This increases the chances of your website being discovered.
Cost-Effective SEO Strategy Unlike paid marketing, document-sharing links are free to create. You only need well-written, valuable content formatted as a document to leverage this SEO strategy.
How to Optimize Documents for SEO
Create High-Quality Content Your document should be informative, engaging, and relevant to your audience. Well-structured content attracts readers and encourages sharing.
Use Keywords Strategically Optimize your document with relevant keywords, especially in the title, headings, and descriptions. However, avoid keyword stuffing.
Include Your Website Links Place links to your website naturally within the content, preferably in the introduction and conclusion. Ensure the anchor text is relevant.
Add Metadata & Tags Most document-sharing platforms allow you to add descriptions, tags, and categories. Use relevant keywords to optimize these fields.
Use a Professional Format Use PDFs, PowerPoint slides, or Word documents with an appealing layout. Include images, infographics, and bullet points for better readability.
Conclusion SEO document sharing links are a powerful off-page SEO technique that can enhance your site’s ranking, visibility, and traffic. By sharing well-optimized, high-quality documents on authoritative platforms, businesses can strengthen their online presence and attract potential customers. If implemented correctly, document sharing can be a cost-effective and sustainable SEO strategy.
Would you like help creating an SEO-optimized document for sharing? Let me know!
0 notes
Text
PDF Editor - PDF-XChange
A Deep Dive into PDF-XChange: A Powerful PDF Editor and Viewer
PDF-XChange is one of the most feature-rich and lightweight PDF editors available today, offering a robust alternative to mainstream PDF software like Adobe Acrobat. Whether you need a simple viewer, an advanced editor, or a tool to annotate and manipulate PDF documents efficiently, PDF-XChange delivers a comprehensive solution.
What is PDF-XChange?
PDF-XChange is a suite of PDF tools developed by Tracker Software. It consists of multiple versions, including:
PDF-XChange Editor – A versatile PDF reader and editor.
PDF-XChange Viewer – A discontinued but still functional lightweight viewer.
PDF-XChange PRO – A full-featured suite that combines the editor with additional tools like OCR capabilities and batch processing features.
Key Features of PDF-XChange
1. Lightweight and Fast Performance
One of the standout features of PDF-XChange is its efficient performance. Unlike bloated software that slows down with large files, PDF-XChange is optimized to handle PDFs quickly and smoothly without excessive CPU or RAM usage.
2. Advanced Editing Capabilities
PDF-XChange Editor allows users to make real-time edits to PDFs, such as:
Modifying text and images
Adding and removing annotations
Creating interactive forms
Applying OCR to scanned documents
3. Annotation and Markup Tools
For professionals who frequently review and annotate PDFs, PDF-XChange provides an extensive range of markup tools, including:
Highlighting, underlining, and strikethrough options
Sticky notes and callouts
Stamps and digital signatures
4. Optical Character Recognition (OCR)
A key feature of PDF-XChange is its built-in OCR engine, which can recognize text in scanned documents and convert them into searchable and editable PDFs. This is particularly useful for digitizing paper records.
5. Security and Encryption
PDF-XChange supports strong security features, such as:
Password protection
Digital signatures
Redaction tools to permanently remove sensitive information
6. Batch Processing and Automation
For users who handle multiple documents daily, PDF-XChange offers batch processing features that streamline tasks such as file conversion, watermarking, and adding headers and footers to multiple PDFs at once.
Why Choose PDF-XChange?
Compared to industry giants like Adobe Acrobat, PDF-XChange stands out due to its affordability, speed, and extensive toolset. Some key advantages include:
Cost-effective pricing: A much cheaper alternative to Adobe Acrobat with no compromise on features.
Faster performance: Works efficiently on low-end hardware.
Customizability: Extensive user preferences and tool configurations.
Frequent updates: Regular enhancements and new features from Tracker Software.
Who Should Use PDF-XChange?
Students and Educators: For note-taking, annotations, and form-filling.
Business Professionals: For secure document management, editing, and collaboration.
Legal and Financial Experts: For redaction, digital signatures, and security compliance.
Anyone Looking for an Adobe Acrobat Alternative: If you need a powerful yet lightweight PDF solution, PDF-XChange is an excellent choice.
Conclusion
PDF-XChange is a feature-packed, cost-effective, and efficient PDF editor that caters to a wide range of users. Whether you need basic viewing or advanced document manipulation, this software provides an all-in-one solution without the hefty price tag of other PDF editors. If you’re looking for a fast, lightweight, and powerful PDF tool, PDF-XChange is worth considering.
0 notes
Text
New Year’s Chores
for the month of January
1. Schedule maintenance
Book hair appointment
Book car detailing
Book checkup
PTO for scheduled trip
Day off for specialist follow up
Day off for checkup
Get blood test
2. Inbox maintenance
Delete junkmail (main account)
Delete junkmail (other accounts)
Email follow-up to J******
Email follow-up to S******
Email follow-up to R*****
Email follow-up to D****
Email follow-up to J*******
3. Relationship maintenance
Draft note to D****** and print three pictures
Draft note to L***** and print three pictures
Draft note to L*** and print three pictures
Text C****
Text A********
Text A*****
Attempt to organize get-together
4. Stuff & space maintenance:
Clean out desk
Clean out bedroom closet
Acquire and fill third keepsake box
Update book organization
Clean out plant room clothing closet
Clean out plant room half closet
Clean out basement closet
Clean out car
5. Paperwork maintenance
Shred old paper
Organize Real Job binder
Organize side hustle computer files
Print off important documents for physical side hustle folders
Organize physical side hustle folders
6. Fandom maintenance
Work on properly tagging old posts
Work on bringing old fic pdfs and audio files to new computer in an organized fashion
Create folder for each reclist (complete or in-progress) containing pdfs and audio files of each fic (where possible)
Organize 4thewords files
7. Plant maintenance
Deep winter scrub down of plant room
Order and apply second round of lacewings
8. Home maintenance and upgrades
Acquire paint for bathroom
Paint bathroom
Finishing touches to bathroom: hang plant properly, buy and hang art birds
Buy materials to build replacement shoe rack
Build shoe rack
TBC
1 note
·
View note