#cross stitch tutorial
Explore tagged Tumblr posts
Visit Tumblr Blog
Explore Tumblr blogs with no restrictions, modern design and the best experience.
Last Seen Tumblr Blogs


Fun Fact
Mobile US users spent an average of 115.8 minutes on Tumblr app monthly.
Note
Hiya! since you seem quite knowledgeable about this sort of thing, do you happen to know a good place to start when learning how to cross-stitch? I've never tried it before (nor have I done a lot of needlework) but I've been drawn to it due to the similarities it shares with pixel art. I have looked up starter kits and the like but they tend to be focused on topics that are rather... eh. boring to me unfortunately.
Oh heck yea! Yeah, lemme grab some links and info--
Luckily, cross-stitch is really easy to do-- you get some special fabric that's woven so it makes a grid, a blunt needle, a pattern, and whatever thread colors the pattern needs, and then you just stitch a whole bunch of X's and you're done!
The best fabric to start with would be called '14-count Aida'; a lot of big-box craft stores carry it, plus smaller embroidery stores should too. '14-count' is the size of the grid, and means every square inch of the cloth is woven to make a 14 by 14 grid, and Aida is a common variety. It's nice and stiff, so you may not even need to put it in a hoop, though you can still use one if you'd like.
If you get 14-count fabric, get a Size 24 Tapestry Needle. I wouldn't use a sharp needle, though you could if you have to-- a blunt one like a tapestry needle will be a lot kinder on your hands!
I'd recommend starting with a small, simple pattern in a design that you really like. Like, say, something like these would be pretty good to start:
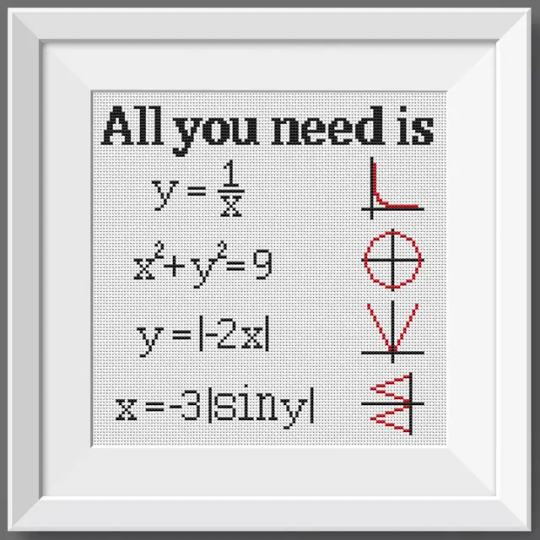
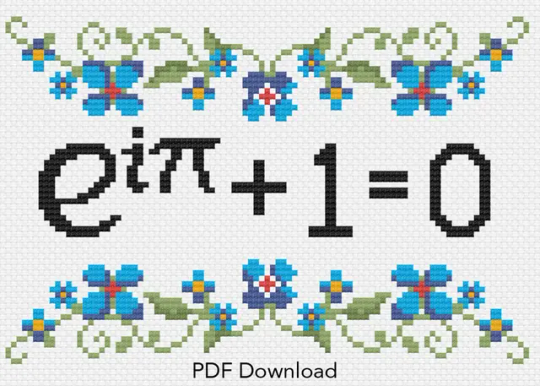
[All You Need is Love by JuicyArtByDarina][Euler's Identity by StitchForge]
...while these might end up being too ambitious:
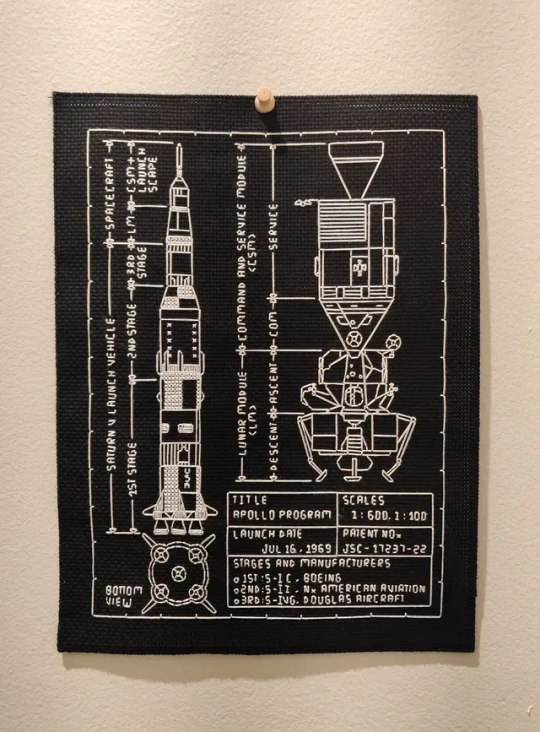
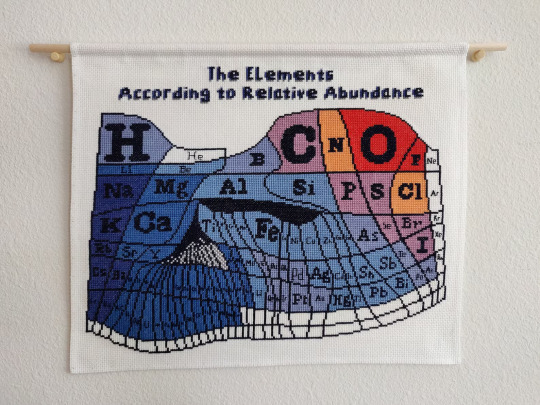
[Saturn V Rocket by SpiritLineDesigns] [The Elements According to Relative Abundance, also by SpiritLineDesigns apparently? Man, that's some good range]
That's just a recommendation, though-- you know your own patience for long projects better than I do, so if you see something you love, go for it!
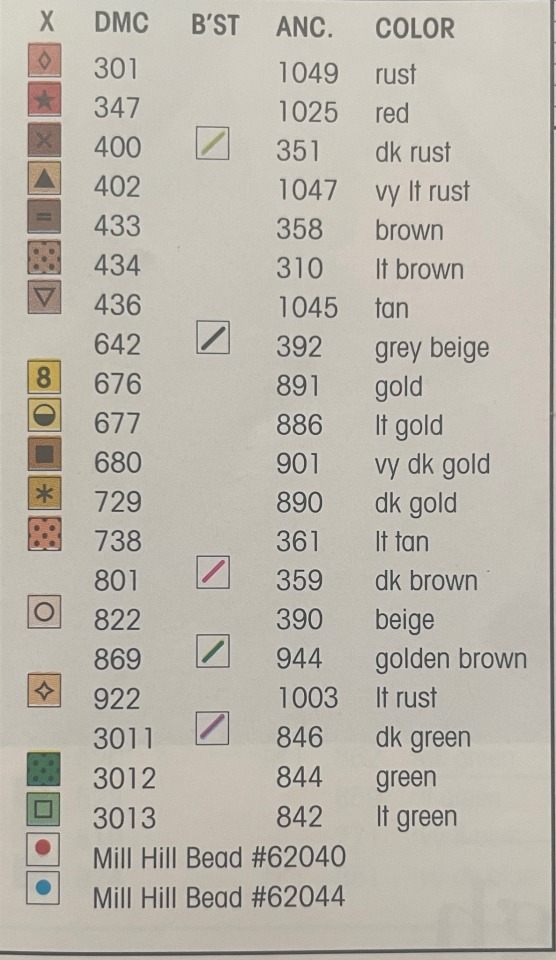
No matter what pattern you get, it should always have a list of thread colors in it: the standard type is DMC embroidery floss, which you can also get at embroidery stores, some of the big-box craft stores, and also online. The pattern should also say how big the design will be, but when you buy your fabric be sure to get something with some extra room. I typically aim for three or four inches bigger than the design, just to be extra safe.
Once you've got those-- plus a pair of scissors, and also a hoop, if you'd like one-- then you're ready to stitch! For that part, I'll defer to Peacock and Fig and her video tutorials, since I reckon it's easier to follow that part if you can see just how the stitches actually happen.
The stitching itself is super easy-- it's all just makin' X's.
Hope this helps! ✌️
68 notes
·
View notes
Text
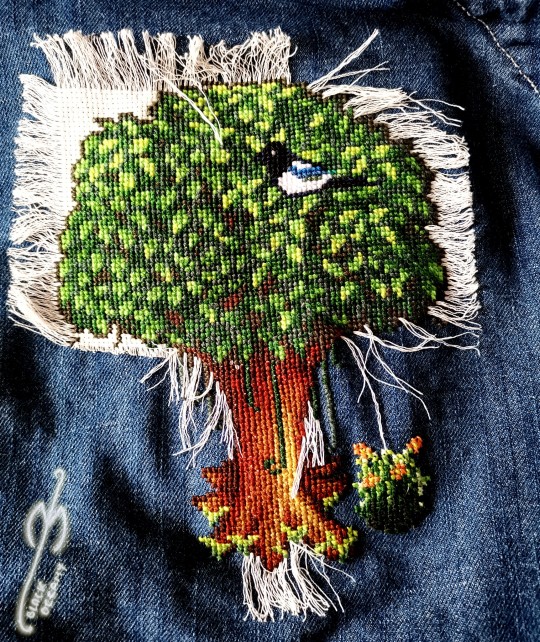
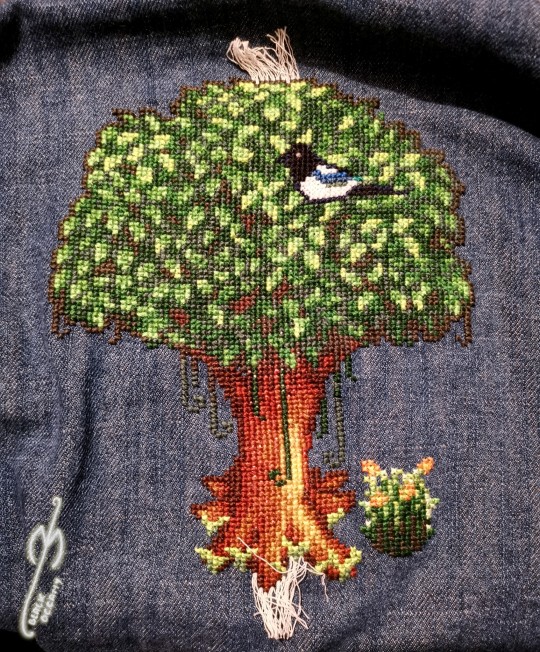
I have recently received another ask about my canvas pulling and since I've been thinking about making a serious tutorial for a while now, I took the opportunity to take some pics and vids while finishing the tree. Do please enjoy :3
1. Why pulling out canvas at all?
Primarily, this is a fantastic technique to apply cross stitch patterns directly to the item you want OR to make patches from old jeans, like this one:
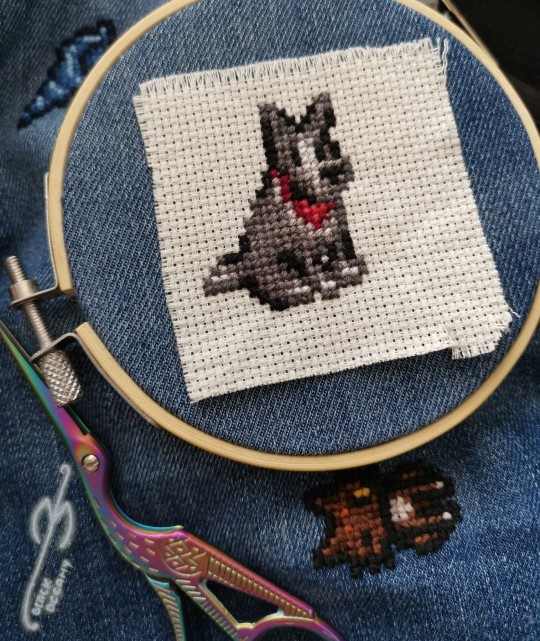
With small patterns I usually don't bother to sew the canvas prior to embroidering, like with the pupper above. In case of the bigger patterns, I usually sew it lightly on the edges just to keep the canvas in one place. The more stretchy the material type is, the more important it's going to be to keep it in place.
2. Why not use a soluble canvas?
I'm sure you can and that they'll be as successful as the regular one 😁 However, as I mentioned in my previous posts here and here, I prefer to err on the side of cheaper, hence the tutorial.
3. Okay. I'm convinced - I even have a pattern embroidered on! What's next?
With small patterns (like the doggo earlier) it's going to be pretty easy. You just pull the threads one by one - preferably starting on the thinnest part of the pattern - and you may not even need the pliers. The fun (?) is with the large pieces, because the canvas has on average quite fragile threads and they like to break. Note - the canvas I'm using and I suppose most of the existing canvas types, will have four threads per one embroidery row. It's usually easier to pull one first and then the other three, bit that may vary when, for example, you managed to pierce the thread during stitching phase earlier 😉
If you were already careful during the stitching, you paid extra attention to embroider EXACTLY between the canvas threads and avoid piercing them at all. There are two benefits to that being extra careful: one, it's easier to pull it out later; two, the stitching gains an extra precision to it (and it looks great!). I recently discover that the round tip needle is making it much easier and if you're interested, there's a separate post about it as well!
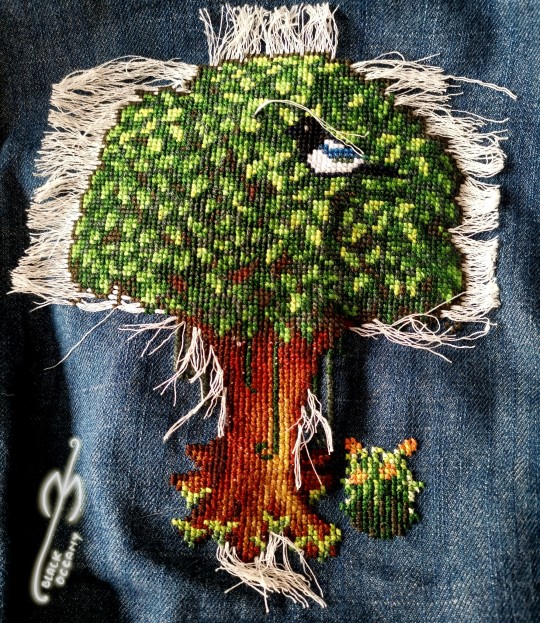
On to the process! You can see from the pictures how I started with cutting out a piece of canvas that I can later reuse for something small (recycling is my hobby 🤷🏻♀️). I also pulled loose threads from around the tree:
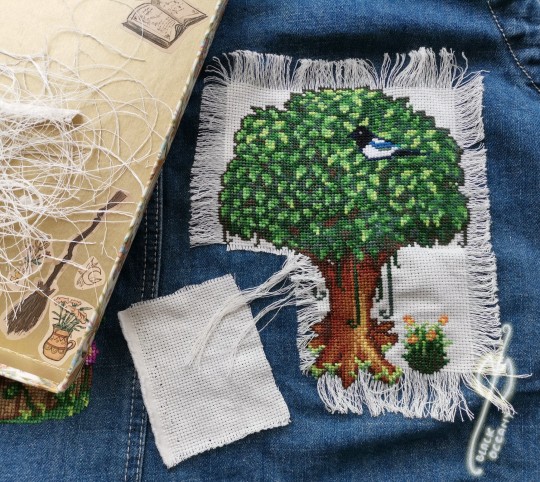
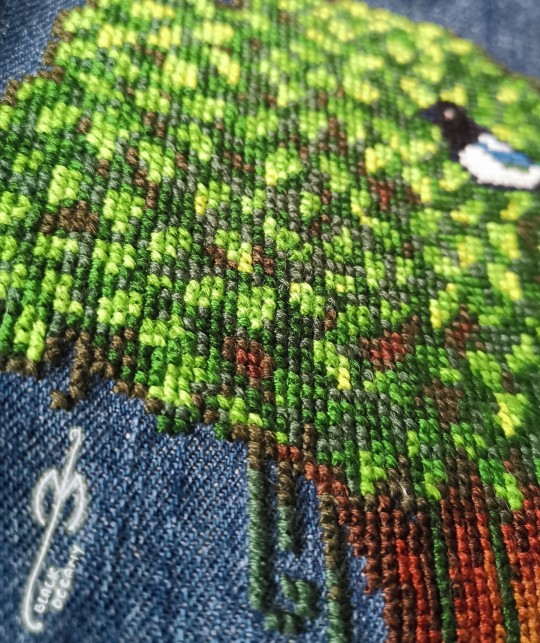
Next part was to clean up the trunk and the grass on the right:
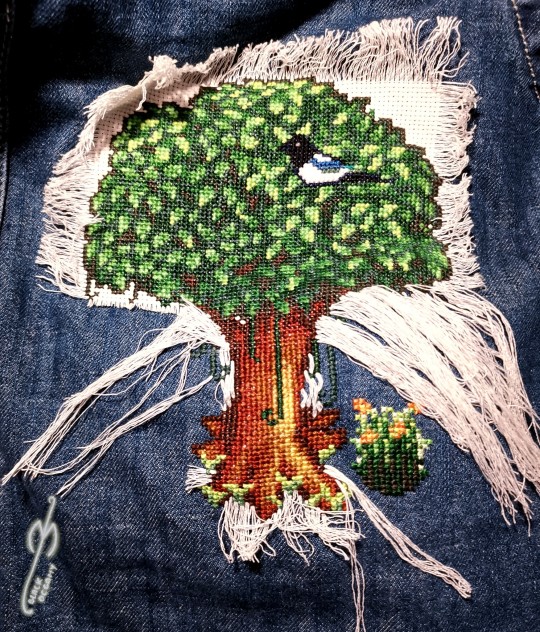
I then cut off the excess to avoid the threads tangling and slowly moved to the sides of the leaves on right and left:
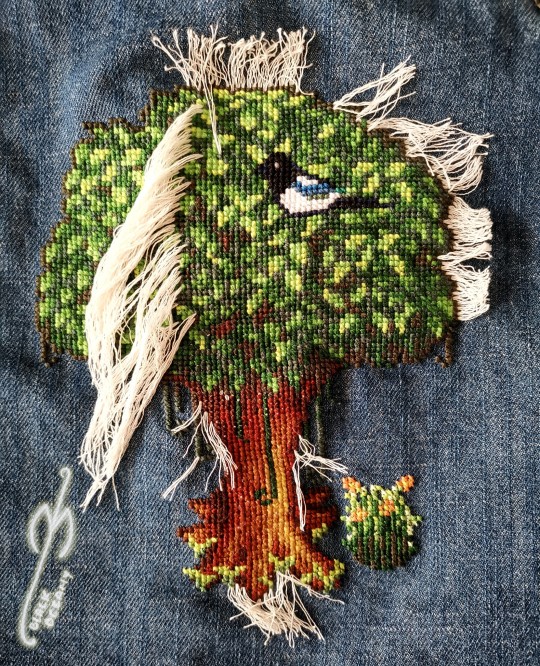
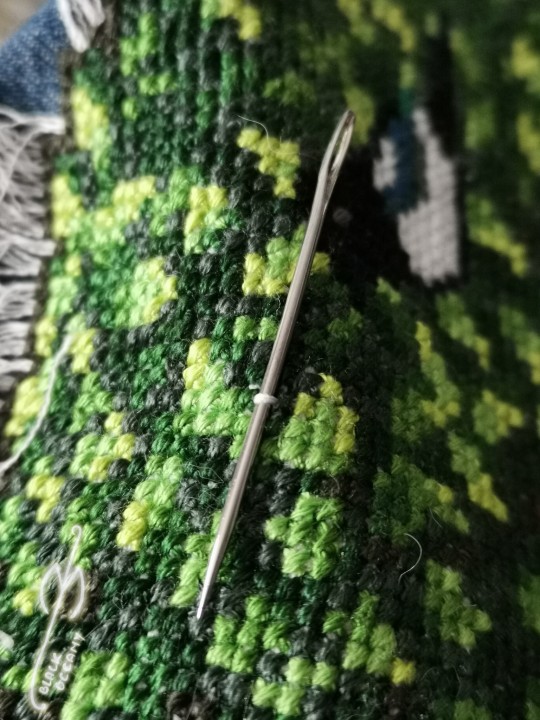
You'll notice that the last photo has the thread pulled halfway through the pattern. That's because on this stage it's usually impossible to simply pull the thread out - even with the pliers it is just going to break off. I use a needle to pluck it from between the embroidery like this:
If you're more of the visual learner, I made this vid that I hope explains the process in more detail. You'll notice that I'm using my fingers and not the pliers here, because it's faster than to switch between tools.
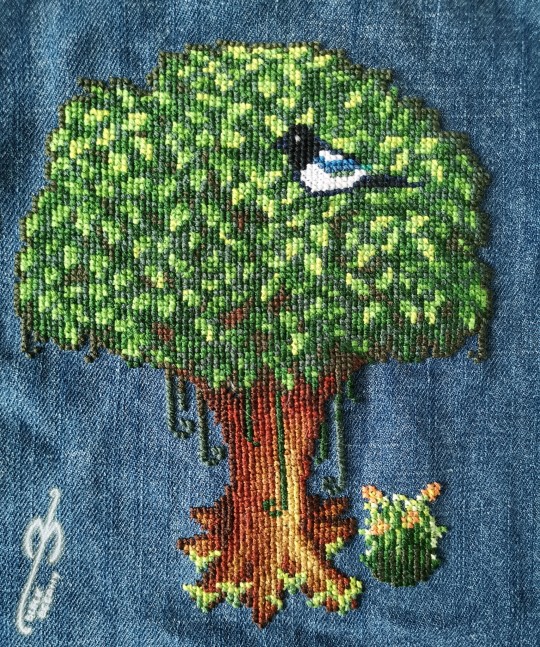
And finally, when you're left with single direction threads like these, it's just a matter of pulling them out one by one.
And that's it! The final product looks clean and neat, AND you will notice that without the canvas beneath it's also getting a bit of volume that looks cool (and helps even out small mistakes you may have made along the way).
Thanks for reading this far! Let me know if there's something else I forgot to explain 😊
2K notes
·
View notes
Text
🌟Tofu's Free Stuff Megapost🌟
Palettes
Moonlight GB (4 colours)
Supernova (8 colours) (eyestrain warning)
Tofu20k (35 colours)
Desktop Wallpapers
Ghibli Bundle (4k)
Yellow Bentley (Good Omens)
Spirit of the Forest
Froggy Island
Purple Mountain
Dark Moon Greatsword (animated)
Mobile Wallpapers
Dark Moon Greatsword (animated)
Shroomsplosion
Middle finger pattern
Little Star in Moonlight (Astarion BG3)
Wildflowers
Froggy Island
Mushroom Night Light
Heart cloud
1bit sky (3 colours)
Cross-Stitch patterns
Matcha in the Flowers (10 colour, DMC)
Heart eyes cat (10 colour, DMC)
Mushroom Night Light
Witch's Treehouse (12 colour, ANC)
Tutorials
BIG pixel art guide
Weird static effect in Aseprite (eyestrain warning)
Tree (old- 2021)
VERY simple cloud
Other Stuff
Panda Dumpy (free Twitch/Discord animated emote)
Gummy Sweets Twitch badges
Cute Cats Twitch badges
Baked Goods Twitch badges
Enjoy :--3
#wallpapers#tutorials#tutorial#pixel art tutorial#free#cross-stitch#cross stitch#cross stitch pattern#background#palette#color palette#resources#art resources#free stuff
1K notes
·
View notes
Text
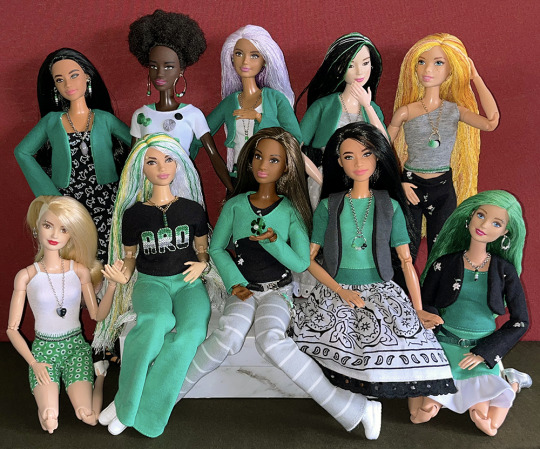
Over the past eighteen months, I've made enough green, white, grey and black clothing pieces to outfit ten Barbie dolls in aro colours. In addition, every doll has earrings, necklaces, belts or embroidery featuring pride stripes. Now I just have to figure out how to make a one-sixth-scale aro pride march display...
(More information about the making of aro-themed doll accessories and clothes is available on my website.)
#aro week#asaw 2025#aromantic#green aro pride flag#sewing#embroidery#cross stitch#pride crafts#needlework#needlecraft#fashion dolls#barbie#pride#link#aro worlds wordpress#image description in alt text#I'll be sharing a tutorial for the floss rehairs later this week
206 notes
·
View notes
Text
Washi Tape Hoop Tutorial


I've been using washi tape to decorate my hoops, using a slightly different method than the ones I found existing tutorials for. I shared this step-by-step on Reddit and people seemed to appreciate it, so I thought I'd share it here as well. I hope it's helpful!
Demonstration uses a 4-inch hoop and 15mm washi tape. Any size hoop should work, but anything smaller than 15mm for the tape would be tricky.
Materials
hoop
washi tape (15mm minimum)
embroidery scissors
toothpicks
PVA glue
tape measure (optional)


Step 1: The Inner Ring
This step is technically optional, as most of it won’t be visible anyway once the pattern is inserted into the finished hoop. I like to do it for the full coverage effect.
1a. Cut a piece of washi tape the length of the inside ring. You can use a tape measure like I do, or just eyeball it.
1b. Apply the tape to the inside of the hoop, so that the bottom edge of the tape runs flush with the edge of the hoop. You will have some tape left hanging over the edge.
1c. Make a cut in the overhanging tape, every centimetre or so. You can then start folding the overhanging tape over. I’ve folded over every other section in the first photo to demonstrate. There will be small gaps in the tape where the hoop is showing; this won’t be visible once the hoop and pattern are finished and mounted.

Step 2: The Outer Ring
2a. Again, cut a piece of washi tape (remember that the outer ring will be longer than the inner ring) and apply it to the outside ring. The bottom edge of the tape should overlap the folded-over pieces from step 1c.
2b. As above, cut the overhanging tape into small sections and then fold them over. Because we’re folding outside-in instead of inside-out this time, there should be no gaps in the coverage.
Step 3: Finishing Touches
3a. Depending on the strength of the adhesive, your tape may not stick very well. I use an uncoloured toothpick to apply PVA glue to any sections of tape that aren’t sticking.
3b. The optional final step for the hoop - once the glue has dried - is sealant. I use two coats of mod podge satin spray, but others should work as well.
90 notes
·
View notes
Text
⚠️🌟Plarn Tutorial🌟⚠️
Ok the class I'm in is so underwhelmingly boring that imma Tutorial all yall!
This one goes especially to: @nightblackowlbat

you got your plastic bag with your groceries. (I can't forbid anything but I FORBID YOU TO SPEND MONEY ON THIS. seriously)

2. cut the bottom off. (i'm non native english speaker so my terms might be sus lol please call me out about it)

3. cut the handles too but don't take them off yet (if you want. it works for me like this)

4. start folding vertically, as straight as you can! if it's rugged within, when you cut the bag the stripes will be all spiky and will get cut under no pressure at all.

5. fold as much as you like keeping the plastic straight, I fold until I can cut in one or two scissor motions max. but don't cut yet! we have one more fold to make.

6. so you folded vertically until thin and straight (like your mom whaaat? ok you can block me now), then give the whole thing one horizontal fold.

7. now, proceed to cut the irregular ends together! the cut handles and the cut bottom. (you can do it separately of course, but our most precious resource -besides the plastic- is our time and our tendons. so save whatever you can and be efficient) discard handles and bottom. you can keep the cut bottom if it's regular enough, usually I discard it (keep it accumulatively along with the handles until I figure out what to do with my many little useless pieces of plastic or, yk, toss it) because it's quite irregular from my first cut.

8. keep cutting, maintaining your preferred width. this width (a couple centimeters) is good for embroidering, the crochet is suuuuuper thin and fragile. haven't knitted anything yet but I imagine it will be just like crocheting in terms of texture.

9. you finished cutting up and now you have many circular stripes. you can roll them wherever you want, I have these little carton cylinders that I get from work (my coworkers keep them for me and it's great!) and they work fine. in the beginning, I cut up little carton rectangles to roll the plarn but it looked ugly tbh. note: you have the circular stripe right? you grab it and stretch it (please don't pull lol) and work it like it's a two fiber thread. not two separate fibers. does i make any sense? if not, there are some clips online about it hehe

10. now the magic happens. this is difficult to put into english words, to be perfectly candid. but you... link the stripes together.

11. you... keep linking. right?? like in a untied knot. idk. in a loop.

12. now, you softly pull. when you work the plarn, you'll get used to the plastic's resistence and will know how much strength you must apply to pull on the fiber without stretching and cutting it accidentally.

13. pull! (softly) pull!!!

14. aaannd you made your first thread of plarn. whoops the pic got turned upside down

15. so now you start headbanging and keep rollin' rollin' rollin' rollin'

16. and there you go!! YOUR FIRST PLARN ROLL!!!! what are you gonna do with it? I wanna see so bad!!!😁
My class is over (and the tutorial as well). I didn't learn anything but I hope you guys did!
Share the knowledge and plarn away!!!🪡🌤️
#biomorbosis plarn#plarn#environmental#sustainability#sustainable art#plastic yarn#solarpunk#diy#diy craft#upcycling#cross stitch#needlework#embroidery#hand stitching#needlepoint#needlecraft#biomorbosis makes#plarn tutorial#plarn diy#biomorbosis tutorial#ecofriendly diy
36 notes
·
View notes
Text
X Stitch Quick Start Guide
Fabric
You can stitch on anything you like, but for x stitch it’s going to be a lot easier if you use some kind of evenweave fabric. Evenweave is fabric where, stay with me here, the weave is even.
You want to be able to see a little, evenly spaces holes between the fibres that go up and down, and the ones that go across.
This is aida, it’s what x stitch is usually done on

Here’s some examples of other evenweave fabrics that you could also use


If it’s got evenly spaced holes, then you can x stitch on it!
Thread
The thread that you typically use for x stitch is called floss. The key feature of floss is that it can be separated out into six individual strands.

This is not floss for x stitch.

Neither is this

Cut a length of thread to start stitching with. About 40-50cm is good. Not so long that it gets tangled, not so short that you’re constantly threading needles. Now you want to separate that cut length, but grabbing three of the individual strands and separating them from the other three. This can get messy. Everyone develops their own ‘never fail’ method of separating their strands. You’ll find what works for you, but only after many tangled threads and swear words.
These three separated strands are what you will stitch with. NOTE: you will not double these over (then you would be stitching with six strands).
You can also stitch with two strands, whichever you choose, just stick with that choice for the whole project.
Needle
You can use whatever kind of needle you want or have to hand. You will find it easier if you use the right kind, but we don’t always have the choice. The most important thing for x stitch is that the needle has an eye large enough to accommodate three strands of thread.
A tapestry needle is the best kind. It has a large eye and a blunter end.

The blunt end helps us go through the holes of the fabric more easily without catching surrounding threads.
This needle has a very small eye and a very pointy point. You can x stitch with it if it’s all you have, it will just be more difficult.

How to read the pattern
X stitch patterns, or charts, are a grid that align with your fabric. Each intersection of a horizontal and vertical line on the pattern corresponds to a hole in the weave of your fabric.

Most patterns will either be coloured blocks

Or symbols

For each coloured block or symbol on your pattern, you are going to stitch and X on your fabric
Deciding where to start can be tricky.
The centre is always a good choice. Find the centre of your fabric by folding it over and noting where the middle is. Most patterns have numbers on the top and sides to help you keep track of where you are. Use the numbers to find the middle of the pattern, or just eyeball it.
Starting in the top left is also a good choice. Make sure you leave a couple of centimetres of space, don’t start your first stitch right in the corner. The fabric will fray with handling, plus you might need some excess to work with for framing or finishing, depending on what your plans are for the final piece.
Starting
Tie a knot in the end of your thread.
Don’t listen to the gatekeepers who tell you knots are bad.
Knots aren’t great, but for now, to get us going, we’re just going to use a knot. Later we learn some better ways to start.
Stitching the X
Bring your needle up through the top left corner of the square you are going to stitch

Bring your needle down though the bottom right corner or the square you are stitching

That's your first 'leg'!

Bring your needle up though the top right corner of the square you are going to stitch

Bring your needle down through the bottom left corner of the square you are stitching

Congratulations! You’ve made your first x stitch!
Find the next square and repeat.


Where it can get tricky is when you finish your X and the hole you have just brought your needle down through, is also the same place you need to bring your needle up to start the next X
When this happens you may have to change the order of how you stitch your X. Instead of starting at the top left, start at the bottom right.
The most important thing to remember is to keep your X’s going the same way. Always have the first ‘leg’ slanting \ and the second ‘leg’ slanting /. It doesn’t matter if you stitch them top to bottom or bottom to top. As long as your X’s all look the same when you’re finished it doesn’t matter how you stitch them.
Finish your thread
When your thread gets too short, finish it by flipping to the back of your fabric and sliding the needle under a few of the stitches and cutting the thread off.


Keep going until you have finished your pattern. Now you can display your finished x stitch however you like! Frame it and hang it on a wall. Stitch it onto a bag or a jacket
You're now a x stitcher!!

(You may have noticed that my heart is a little different to the one in the pattern. You are about to learn that you do not know how to count. Yes, you learned how when you were very young, but when you count while doing x stitch, suddenly you numbers no longer make sense.)
I know that buying materials for arts and crafts can get expensive, so I'd recommend checking your local thrift stores. You can usually find different kinds of even weave and floss, even if it's not the right size or colours that you want, it's great for practice and you never know what might inspire your next project.
This ended up being a lot longer than I thought, and I feel like I’ve barely scratched the surface! If anything is unclear or you need help please let me know, I’d love to help.
I really enjoyed writing this guide so if you want more there’s also a whole lot more I could go into. If this has helped you at all and you’re interested in any of the below, let me know. More suggestions are welcome!
Advanced topics
Cloth count
Stitching on high count fabric
2 over 2, 1 over 1 etc
Stitching with things other than floss
Number of strands, when to use more or less
Patterns with lots of colours
X directions
Full X’s or \\\\ then /////
How to have a neat back
Loop start
Stitch in hand vs stitch in a hoop
Framing
Edging for a patch
Backstitch
Other counted embroidery types
#cross stitch#fibre arts#x stitch#how to guide#how to cross stitch#how to x stitch#learn with me#tutorial
7 notes
·
View notes
Text
Embroidery attemp one is... not great but better then i thought i would do since its been, oh fuck, about 10 years since I last picked up any embroidery or cross stitching.

I'm kind of choke holded on making this plush til i get the embroidery done. I'm going to try and make patches to sew on since I'm not confident, at lest for dream eater symbol, to do it directly on the plush.
#tarudce talks#hunlu's plush making saga#think today is just going to be doing embroidery and maybe testing some cross stitching til I get some eyes I like#Which will hopefully get me to a point that I'll be more confident to do the dream eater symbol#I should probably look up some tutorials for embroidery at lest when using embroidery floss#straight up forgot I haven't done any project with embroidery or even cross stitching in almost 10 years to right now#It's fun though
5 notes
·
View notes
Text
learning to bead has felt like a highlight of my life tbh
#it feels..... so good to feel capable of creativity#there are so many art forms out there to try and enjoy and idk#ever since i learned crochet . and then. cross stitch. and now this.. its just like#the world actually IS our oyster damn...#why is that so hard to rmr sometimes#anyway when im done with this tapestry i wanna make some smaller and more manageable things and see what i can do#and watching tutorials is just freeing like damn everything IS attainable
17 notes
·
View notes
Note
your stuff is absolutely BEAUTIFUL, do you have an suggestions for a somewhat beginner? I've only ever used stamped sets that come with all the thread and such supplied. What items should I get to begin doing cross stitch with other patterns? Sorry if this a lot of questions but I'm kinds curious about where to start. Thank you!
In addition to stamped kits, you can get counted kits - they'll come with fabric, floss, and a paper pattern to follow, often with instructions. If there isn't a kit you want to make, you can also get a pattern and supplies separately. At a minimum, you'll need
A pattern. There are endless patterns out there, free and paid. It's a good idea to start with something relatively small and simple to get the hang of following a chart.
Aida cloth. Check your pattern to see if it recommends a specific thread count (e.g. 11-count, 14-count, etc.). This may be flexible, but it will affect the size of your stitches and of the finished piece. For small patterns, most commercially available cuts of Aida will be more than big enough, but you can always double-check by entering the size of your chart into a calculator like this one (this recommends larger margins than I usually bother with, but will tell you the size of the stitched area). Also, do yourself and your eyes a favour and don't have your first piece be on black Aida; use white or coloured while you're getting used to it.
Embroidery floss. Your pattern may suggest colours, but with something like a blackwork sampler, there's often some flexibility.
A needle.
I'd also recommend
An embroidery hoop, frame, or Q-snap. Some people can do without this (called working "in hand"), but I'm not one of them - keeping the fabric taut makes it easier to keep your stitches even and avoid the fabric bunching or pulling. I mostly use a hoop, sometimes a frame, but I haven't tried a Q-snap.
Things that might make your life easier:
Gridding your fabric. A lot of patterns will have heavier lines every 5 or every 10 stitches. You can copy this on your Aida cloth with a washable or heat-erasable pen, or with a contrasting thread you plan to remove. This isn't something I tend to bother with, especially for smaller and simpler patterns, but I know plenty of stitchers who do. If you're worried about losing your place in the pattern, gridding can help. You can also buy pre-gridded Aida with lines that will wash out when you're finished stitching.
Depending on the pattern, it may be easiest to start stitching from the middle and work your way out. Especially if you don't grid your fabric beforehand, this will make sure your design is centred and you don't run out of room.
#ask#i keep meaning to design something simple to use as sort of a tutorial#and do this in a way that organizes my thoughts a bit better#cross stitch#blackwork#embroidery#fibre arts#fiber arts#crafts
41 notes
·
View notes
Note
I just saw the sunflower cross stitch you posted, and I wanted to know, how did you mark the boxes for that? I've tried cross stitch before, and found it difficult to count to put my stitches in the right places, but I'm trying again soon, this time working in 10×10 squares instead of doing all of one color at once, and marking the squares seems like it would also make things easier, I'm just not sure how to mark them.
thank you so much for the ask!
i've definitely found marking the squares ("gridding") on my fabric to be very helpful! i'm a terrible counter and it has saved me from mistakes so many times :')
as far as i'm aware, there are three ways to grid for cross stitch, i'll tell you about the one i've used here and two other methods i'm familiar with. i'm in the US so the links i include might not work for other countries, but you should be able to find the same or similar products elsewhere!
1: water soluble marking pen
this is what i'm using in my sunflowers project! it's like a little marker that washes out when you're done. i bought mine for quilting but have found it works very well on cross stitch fabric as well! this is the one i have (from joann), you just soak your project in some water after you're done and it rinses right out!
some people don't like these because they're worried they won't wash out properly. i've used these before with no issues, and here's a blog post from Sirithre that shows how well they work after 20+ years.
2. pre-gridded aida
this is the one i haven't personally tried, but it seems like a solid option! brands like Zweigart (link to 123stitch.com) have aida with grids pre-printed into the fabric, which then wash out when you're done. i like that this method takes the least effort, and i plan to use it for my next full-coverage piece! the downside is that it usually only comes in light colors.
3. monofilament
monofilament is a great option for darker fabrics, or if you want a more physical/tactile grid. it's a single strand that you can sew into your work to create the grids, and that can't later be pierced by your needle (it's a pain in the ass using regular thread and then accidentally sewing through it later, don't be like me and make that mistake). i like Sulky Sliver (joann) myself, and Easy-Count Guideline (123stitch) is also popular. some people even use fishing line! as long as it's a single strand that can't be pierced, it should work.
this is just a quick rundown of what i like, but i hope it helps! Sirithre's blog post about gridding is a great resource for more detail about how to use these methods. good luck and enjoy!!!
7 notes
·
View notes
Text
Happy new year to everyone
#diy#art#ilustración#tutorial#embroidery#handmade#needlecraft#needlework#cats#cat#christmas#felt#cross stitch#kawaii#illustration
16 notes
·
View notes
Text


#seasons of the heart#fall heart#designed by Linda Culp Calhoun#acorn#leaves#flowers#special stitches#Algerian eye stitch#three-sided stitch#tutorial#cross stitching#pattern#cross stitch pattern#October 1995
3 notes
·
View notes
Text
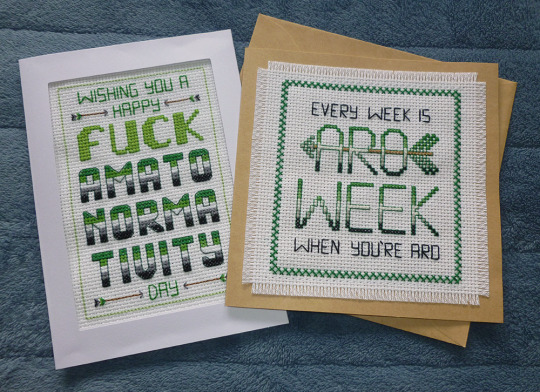
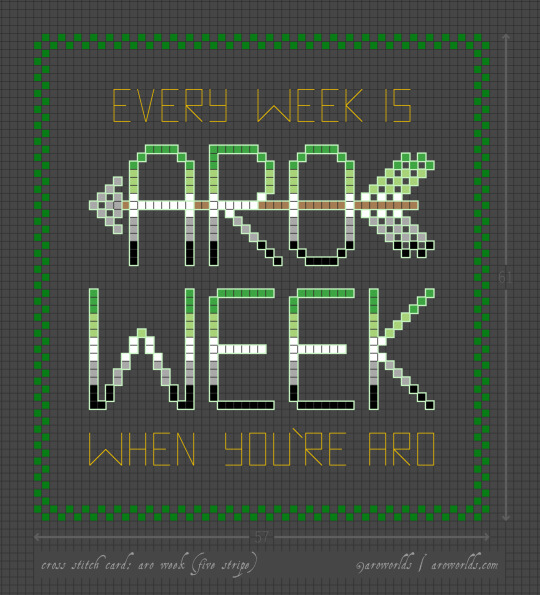

This Aro Week, I've made cross-stitched card designs perfect for gifting to your favourite slightly-snarky aromantic.
The free tutorial includes patterns, card and fabric dimensions and a materials run-down as well as instructions on attaching an aida swatch to cardstock and other border techniques.
#aromantic#aro week#cross stitch#aro feels#aromantic feels#amatonormativity#pride crafts#sewing#embroidery#needlecraft#needlework#green aro pride flag#typographic art#typography#arrows#aro symbols#aro symbolism#link#aro worlds wordpress#tutorial#image description in alt text#text in image#long post
400 notes
·
View notes
Text
god of fiberarts give me the strength to resist the temptation of learning a new craft
#was browsing cross stitch supplies and one of the stores that sell embroidery floss also sell kumihimo discs#no more than 2 minutes later I'm already looking up tutorials 😭#do i have a fiberarts tag
7 notes
·
View notes
Text

5 Aunt Martha's Patterns for Linens Hot Iron Transfers
New - Unused
Printed with a single color of heat transfer ink on a giant 18-inch by 24-inch sheet of paper. Transfer them with your iron, stitch and enjoy. Use these transfers to decorate towels, napkins, aprons, pillows, bedroom linens, needlepoint canvas, quilt blocks, fabric and more.
Patterns Available:
Le Chef 3959
Dinnerware Motifs 3640
Down Mexico Way 9475
Little Tramp 3834
Working Dogs 3883
Patterns are $2.50
Each All 5 Patterns for $10.50 (save $2.50 when you buy 5)
Shipping available for an additional cost
#crafts#gifts#sewing#quilting#briar rose quilts#bedding#shopping#quilters of tumblr#holiday#decor#tedooo#hot iron#hot iron transfer#embroidery#needlework#stitching#textile art#fibre arts#quilt#art quilt#quilting as art#textiles#fabric art#quilt tutorial#quiltblr#quilt pattern#hand embroidery#cross stitch#fiber art#needlecraft
0 notes