#ctrl+d ctrl+r
Explore tagged Tumblr posts
Visit Tumblr Blog
Explore Tumblr blogs with no restrictions, modern design and the best experience.
Last Seen Tumblr Blogs


Fun Fact
Kazakhstan’s Minister of Communications and Informatics has blocked the Tumblr site because it contained 60 sites of terrorism, extremism, and pornography in 2015.
Video
youtube
Randbetween to fill random numbers in cells #exceltech #exceltips #excel...
0 notes
Text
Stickbug Wiki UPDATE!

INTRODUCING ‼️MOBILE COMPATIBILITY‼️
NOTE: I've noticed on some browsers like Firefox, it takes longer to update and looks BAD at first. I've found if you press "CTRL + SHIFT + R" it helps, but if it doesn't please tell me so I can find a solution.
The site should hopefully work/be readable on mobile devices now! I had to recode the site from the ground up, but I am VERY happy with the result, and was even able to give a complete visual rehaul to the site! I also found out how to add rounded borders. Y'all will notice that. Trust me.

I did a lot of minor updates this time, rather than add anything big. The main focus was redoing the site so it could function better on phones/be easier to scroll through the code in the future. And finally I can say it...
ENJOY THE UPDATE! NO LONGER JUST RESTRICTED TO THE COMPUTER! :D
Full Updates List Under Cut:
Completely overhauled the look of the website and added a new header
Added new icons for Maroon, Green Screen, Green, Purple, Silver, and Navy
Added Mitsi to Characters
Added a Featured Page to the Index
Adjusted the cursor so its more accurate and easier to see where you're clicking
Adjusted the Character Thumbnails to where theyre actually fucking CENTERED
Minor rewrites to "Third Times the Charm" and Victim's History
Added two new images to Green's gallery
Added two new images to GS' gallery
FINALLY fixed that fuckass border issue with the character floaties
Renamed "The Locust" to "Snakemouth's Heart" and added a new chapter: "A Creature of Obsession"
Reorganized some files like the Character Icons + Character Pages
#anim vs bf au#neocities#html#my art#my writing#animator vs animation#animation vs minecraft#ava#avm#alan becker
98 notes
·
View notes
Text
I’ve been making these fractals using modular arithmetic in excel 2010. Here’s a Sierpiński triangle whose formula is D4=MOD(C3+A4+D1,$A$1) with modulus A1=2.
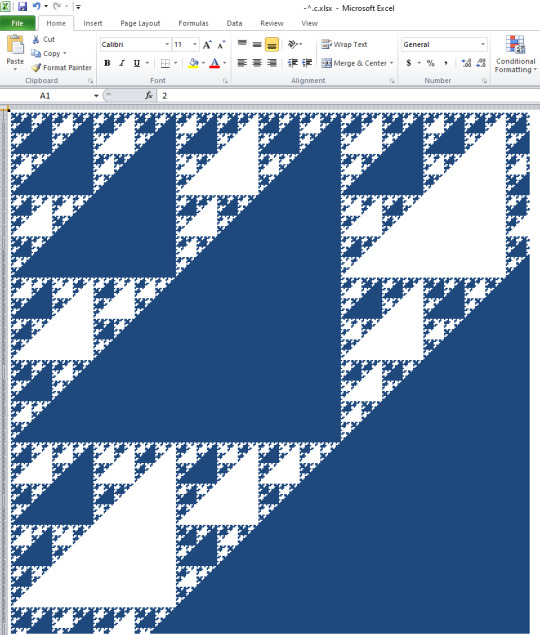
Here’s the same spreadsheet with the resolution doubled and the modulus turned to 4:
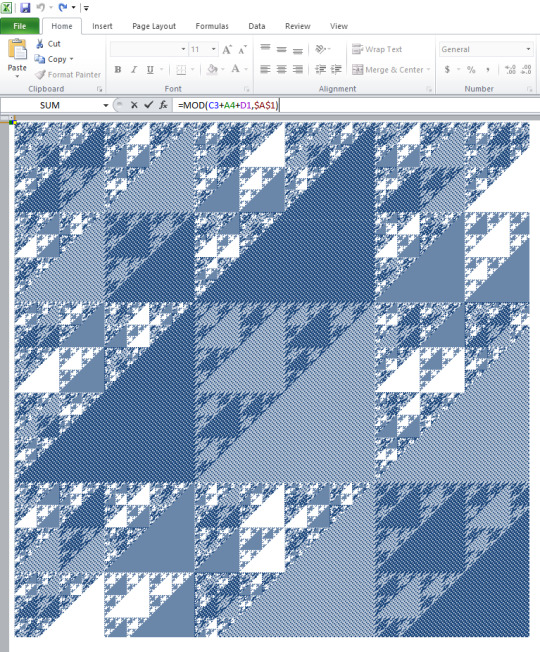
This image consists of half a million cells, 1 per pixel, filled with the fill tool (ctrl+r, ctrl+d). Each cell costs two additions and a division. The sheet refreshes in about 1500 ms with max ram. I call this one “blanket”.
More to follow
original date May 3rd, 2023 8:32pm
22 notes
·
View notes
Text
Masterlist
Requests are closed
Rules
NSFW HC's
A
AJ Styles
Asuka
Andrade
Alexa Bliss
A to Z - Aleister & Zelina
B
Bayley
Brollins
Becky Lynch
BRE
Bianca Belair
Brandi Rhodes
Brody - Brandi & Cody
Baylor - Bayley & Finn
Browsey - Ronda & Travis
Brie Bella
Beth Phoenix
Brody King
C
Cody Rhodes
Charlotte Flair
Chyna
Cheddie - Chyna & Eddie
Carmella
Candice LeRae
Claudio Castagnoli/Cesaro
Chandrade - Charlotte & Andrade
Cathy Kelley
D
Damian Priest
Damage CTRL
Dakota Kai
Drew McIntyre
Dominik Mysterio
Dexter Lumis
E
Edge
Eddie Guerrero
F
Four Horsewomen - WWE Four Horsewomen - UFC
Finn Balor
G
Glowish - Naomi & Jimmy
H
House of Black
I
Iyo Sky
Indi Hartwell
InDex - Indi & Dexter
J
Judgement Day
Jessamyn Duke
Jon Moxley
Jey Uso
Jimmy Uso
Jade Cargill
Julia Hart
Jeff Hardy
K
Karl Anderson
Kairi Sane
Karrion Kross
L
Lita
Lyra Valkyria
Liv Morgan (No longer writing for)
Liv 4 Brutality - Liv & Rhea
M
Mia Yim
Marina Shafir
Moriguez - Liv & Raquel
Malakai/Aleister Black
Moxuette - Jon & Renee
N
Natalya Neidhart
Nikki Bella
Naomi
O
P
Phoenix-Edge - Beth & Edge
Q
Queen of Harts - Shayna & Nattie
R
Rhea Ripley
Rhuddy - Rhea & Buddy
Ronda Rousey
Renee Paquette
Ruby Riott/Soho
Roman Reigns
Ronattie - Ronda & Nattie
RnR - Rhea & Raquel
Raquel Rodriguez
S
Shayna Baszler
Starkszler - Shayna & Zoey
Sheamus
Stephanie McMahon
Sonya Deville
Seth Rollins Masterlist
Scarlett Bordeaux
Shawn Michaels (not currently writing for)
Scarrion - Scarlett & Karrion
Saraya Knight
Sasha Banks
T
Triple H
The Big Three - Jade, Bianca, & Naomi
Trish Stratus
Team Bestie - Lita & Trish
The Rated R Couple - Lita & Edge
Troey - Trish & Zoey
Toni Storm
U
V
W
X
Y
Z
Zelina Vega
Zekota - Zelina & Dakota
Zoey Stark
96 notes
·
View notes
Text
Ctrl + E - Seleccionar todo
Ctrl + N - Negrita
Ctrl + C - Copiar
Ctrl + D - Rellenar
Ctrl + B - Buscar
Ctrl + G - Guardar
Ctrl + L - Reemplazar
Ctrl + K - Italic
Ctrl + U - Nuevo libro de trabajo
Ctrl + A - Abrir
Ctrl + P - Imprimir
Ctrl + R - Nada bien
Ctrl + S - Subrayado
Ctrl + V - Pegar
Ctrl W - Cerrar
Ctrl + X - Cortar
Ctrl + Y - Repetir
Ctrl + Z - Deshacer
F1 - Ayuda
F2 - Edición
F3 - Pegar el nombre
F4 - Repite la última acción.
F4 - Al ingresar una fórmula, cambie entre referencias absolutas / relativas
F5 - Ir a
F6 - Panel siguiente
F7 - Corrector ortográfico
F8 - Ampliación del modo.
F9 - Recalcular todos los libros
F10 - Activar la barra de menú
F11 - Nueva gráfica
F12 - Guardar como
Ctrl +: - Insertar la hora actual
Ctrl +; - Insertar la fecha actual.
Ctrl + "- Copia el valor de la celda arriba
Ctrl + '- Copia la fórmula de la celda de arriba
Cambio - Ajuste de compensación para funciones adicionales en el menú de Excel
Shift + F1 - ¿Qué es?
Shift + F2 - Editar comentario de celda
Shift + F3 - Pegar la función en la fórmula
Shift + F4 - Buscar siguiente
Mayús + F5 - Buscar
Mayús + F6 - Panel anterior
Mayús + F8 - Añadir a la selección
Shift + F9 - Calcular la hoja de cálculo activa
Shift + F10 - Visualización del menú emergente
Shift + F11 - Nueva hoja de cálculo
Mayús + F12 - Guardar
Ctrl + F3 - Establecer nombre
Ctrl + F4 - Cerrar
Ctrl + F5 - XL, tamaño de la ventana de restauración
Ctrl + F6 - Ventana del siguiente libro de trabajo
Shift + Ctrl + F6 - Ventana del libro de trabajo anterior
Ctrl + F7 - Mover ventana
Ctrl + F8 - Cambiar tamaño de ventana
Ctrl + F9 - Minimizar el libro de trabajo
Ctrl + F10 - Maximizar o restaurar ventana
Ctrl + F11 - Insertar 4.0 hoja de macros
Ctrl + F1 - Abrir archivo
Alt + F1 - Insertar un gráfico
Alt + F2 - Guardar como
Alt + F4 - Salida
Alt + F8 - Cuadro de diálogo macro
Alt + F11 - Editor de Visual Basic
Alt + 64 - @
CTRL + Esc. Puedes regresar rápidamente a la pantalla de inicio. Y aquí no ha pasado nada.
Ctrl + Shift + F3 - Crear un nombre usando los nombres de las etiquetas de fila y columna
Ctrl + Shift + F6 - Ventana anterior
Ctrl + Shift + F12 - Impresión
Alt + Shift + F1 - Nueva hoja de cálculo
Alt + Shift + F2 - Guardar
Alt + = - AutoSum
Ctrl + `- Cambiar valor / visualización de la fórmula
Ctrl + Shift + A - Insertar los nombres de los argumentos en la fórmula
Alt + flecha abajo - lista de vista automática
Alt + '- Formato de diálogo de estilo
Ctrl + Shift + ~ - Formato general
Ctrl + Shift +! - Formato de coma
Ctrl + Shift + @ - Formato de hora
Ctrl + Shift + # - Formato de fecha
Ctrl + Shift + $ - Formato de moneda
Ctrl + Shift +% - Formato de porcentaje
Ctrl + Shift + ^ - Formato exponencial
Ctrl + Shift + & - Coloque el borde del contorno alrededor de las celdas seleccionadas
Ctrl + Shift + _ - Eliminar el borde del contorno
Ctrl + Shift + * - Seleccione la región actual
Ctrl ++ - Insertar
Ctrl + - - Eliminar
Ctrl + 1 - Formato del diálogo de celda
Ctrl + 2 - Negrita
Ctrl + 3 - cursiva
Ctrl + 4 - Subrayado
Ctrl + 5 - Tachado
Ctrl + 6 - Mostrar / Ocultar objetos
Ctrl + 7 - Mostrar / Ocultar barra de herramientas estándar
Ctrl + 8 - Alternar símbolos de esquema
Ctrl + 9 - Ocultar líneas
Ctrl + 0 - Ocultar columnas
Ctrl + Shift + (- Mostrar líneas
Ctrl + Shift +) - Mostrar columnas
Alt o F10 - Activar el menú
Ctrl + Tab - En la barra de herramientas: Siguiente barra de herramientas
Shift + Ctrl + Tab - En la barra de herramientas: Barra de herramientas anterior
Ctrl + Tab - En un libro: activa el siguiente libro
Mayús + Ctrl + Tab - En una c arpeta: activar la carpeta anterior
Ficha - Siguiente herramienta
Mayús + Tabulador - Herramienta anterior
Entrar - Hacer el pedido
Mayús + Ctrl + F - Lista desplegable de fuentes
Mayús + Ctrl + F + F - Formato de cuadro de diálogo de celdas Fuente de pestaña
Mayús + Ctrl + P - Lista desplegable de tamaño de punto.
........................
Ctrl + E - Select all
Ctrl + N - Bold
Ctrl + C - Copy
Ctrl + D - Fill
Ctrl + B - Search
Ctrl + G - Save
Ctrl + L - Replace
Ctrl + K - Italic
Ctrl + U - New workbook
Ctrl + A - Open
Ctrl + P - Print
Ctrl + R - Not good
Ctrl + S - Underline
Ctrl + V - Paste
Ctrl W - Close
Ctrl + X - Cut
Ctrl + Y - Repeat
Ctrl + Z - Undo
F1 - Help
F2 - Edition
F3 - Paste the name
F4 - Repeat the last action.
F4 - When entering a formula, switch between absolute/relative references
F5 - Go to
F6 - Next panel
F7 - Spell checker
F8 - Expansion mode.
F9 - Recalculate all books
F10 - Activate the menu bar
F11 - New graph
F12 - Save as
Ctrl +: - Insert current time
Ctrl +; - Insert the current date.
Ctrl + "- Copy the cell value above
Ctrl + '- Copy the formula from the cell above
Change - Offset adjustment for additional functions in Excel menu
Shift + F1 - What is it?
Shift + F2 – Edit Cell Comment
Shift + F3 - Paste the function into the formula
Shift + F4 – Find Next
Shift + F5 - Search
Shift + F6 - Previous Panel
Shift + F8 - Add to selection
Shift + F9 - Calculate active spreadsheet
Shift + F10 - Popup menu display
Shift + F11 - New Spreadsheet
Shift + F12 - Save
Ctrl + F3 - Set name
Ctrl + F4 - Close
Ctrl + F5 - XL, restore window size
Ctrl + F6 - Next workbook window
Shift + Ctrl + F6 - Previous workbook window
Ctrl + F7 - Move window
Ctrl + F8 - Resize window
Ctrl + F9 - Minimize the workbook
Ctrl + F10 - Maximize or restore window
Ctrl + F11 - Insert 4.0 Macro Sheet
Ctrl + F1 - Open file
Alt + F1 - Insert a chart
Alt + F2 - Save As
Alt + F4 - Exit
Alt + F8 - Macro Dialog Box
Alt + F11 - Visual Basic Editor
Alt + 64 - @
CTRL + Esc. You can quickly return to the home screen. And here nothing has happened.
Ctrl + Shift + F3 – Create a name using row and column label names
Ctrl + Shift + F6 - Previous window
Ctrl + Shift + F12 - Print
Alt + Shift + F1 - New Spreadsheet
Alt + Shift + F2 - Save
Alt + = - AutoSum
Ctrl + ` – Change value/formula display
Ctrl + Shift + A - Insert argument names into the formula
Alt + down arrow - auto view list
Alt + '- Format style dialog
Ctrl + Shift + ~ - General Format
Ctrl + Shift +! - Comma format
Ctrl + Shift + @ - Time format
Ctrl + Shift + # - Date format
Ctrl + Shift + $ - Currency Format
Ctrl + Shift +% - Percentage format
Ctrl + Shift + ^ - Exponential format
Ctrl + Shift + & - Place the outline border around the selected cells
Ctrl + Shift + _ - Delete the outline border
Ctrl + Shift + * - Select the current region
Ctrl++ - Insert
Ctrl + - - Delete
Ctrl + 1 - Format Cell Dialog
Ctrl + 2 - Bold
Ctrl + 3 - italic
Ctrl + 4 - Underline
Ctrl + 5 - Strikethrough
Ctrl + 6 - Show/Hide objects
Ctrl + 7 - Show/Hide Standard Toolbar
Ctrl + 8 – Toggle Outline Symbols
Ctrl + 9 - Hide lines
Ctrl + 0 - Hide columns
Ctrl + Shift + (- Show lines
Ctrl + Shift +) - Show columns
Alt or F10 - Activate the menu
Ctrl + Tab - In the toolbar: Next toolbar
Shift + Ctrl + Tab - In the toolbar: Previous Toolbar
Ctrl + Tab - In a book: activate the next book
Shift + Ctrl + Tab - In a folder: activate the previous folder
Tab - Next tool
Shift + Tab - Previous Tool
Enter - Place the order
Shift + Ctrl + F – Font dropdown list
Shift + Ctrl + F + F - Format Cells Dialog Box Tab Source
Shift + Ctrl + P - Point size drop-down list.
54 notes
·
View notes
Text
Flag Making Tutorial
This will be a more technical step-by-step tutorial on how I make my flags (also a long post because I wanted to be thorough, plus I love flags lol).
The program I use is Inkscape, a free vector (.svg) editor program for pc.
I have templates set up, so the actual flag making process is pretty easy/quick.

Hotkeys/Locations/Other Reference
I'll be mentioning these options, so I thought to put them here all in one list. (They list the keyboard shortcuts first)
Snapping: magnet symbol (top right of screen), or under the adjacent arrow ◀️ symbol.
Document properties: shift+ctrl+D, or under the file menu (top left corner of screen). Display (1st tab) Guides (2nd tab) Grids (3rd tab)
Fill and Stroke: shift+ctrl+F, or under object (top of screen).
Layers and Objects: ctrl+shift+L, or under object (top of screen).
Align and Distribute: ctrl+shift+A, or under object (top of screen).
Import (Images): ctrl+i, under the file menu, or by dragging into the Inkscape window.
Save As: ctrl+shift+S, or under the file menu.
Export: shift+ctrl+E, or under the file menu.
Selector Tool: S, or cursor symbol (left side of screen). Click, or click and drag around the objects, to select them.
Locking a selection: lock symbol between the width and height boxes at the top of the screen.
Transform Selections: the width/height and x y position can be changed by typing in the X,Y,W,H boxes (near top middle of screen), or by dragging the corners/edges (resize) and inside the object (move).
Duplicate: ctrl+D.
Delete: delete key, or right click on the object.
Node Tool: N, or below the selector tool (left side of screen).
Rectangle Tool: R, or square symbol (left side of screen).
Pen Tool: B, or pen symbol (left side of screen).
Gradient Tool: G, gradient square symbol (left side of screen).
Mesh Tool: swirly square symbol (left side of screen).
Dropper Tool: D, or dropper symbol (left side of screen).
Undo: ctrl+Z.
Redo: ctrl+Y.
Creating the Template
Download Inkscape and open it, under the Time to Draw tab, click New Document.
First, snapping needs to be enabled, and under advanced mode enable grids and guide lines snapping. (This is crucial for making the stripes equally sized, spaced, and the overall flag in the right ratio.)
I'll be making a template with a 2:3 flag ratio.
Open document properties. (I like to move these types of windows to the right side.)
Under display, set the width to 42px and height to 28px.
Under guides, just click create guides around the current page.
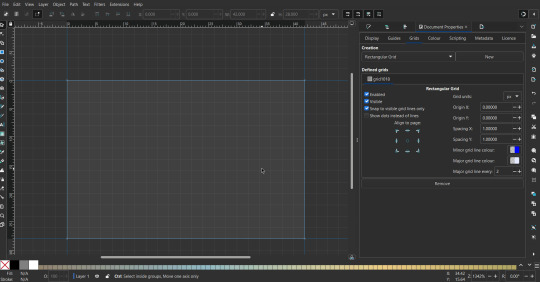
Under grids, make sure rectangular grid is selected, and click new. (Grid units should be in px.) For the major grid line every option, change it to 2. (I also prefer to change the minor grid line color to be transparent.)
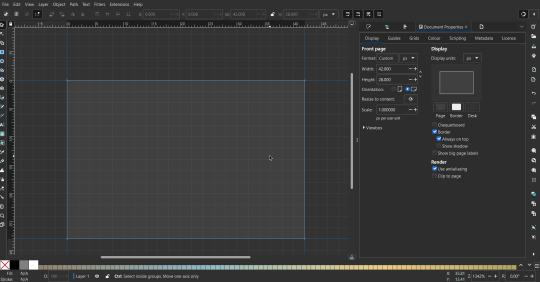
That's pretty much it, your template is done :D ! Just save it wherever you want. I like putting it in an easy-to-access flag folder, as it is needed to open it every time to make new flags.

You can use a different width / height / grid size / flag ratio if you want, these are just the numbers I'm comfortable with / used to.
Also, since this is a vector, the image can be infinitely big or small without any quality loss, so the small dimensions above don't actually translate to a low res image.
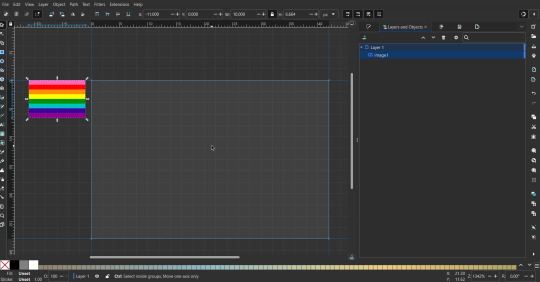
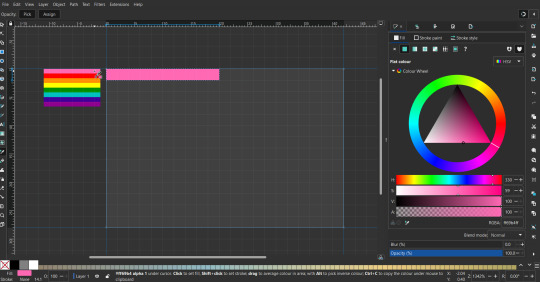
Creating the Flag
(I'll be using the rainbow flag to demonstrate.)
Start by having the template open.
You can import images (like .png/.jpg files) to color pick / reference if you want. Said images can be transformed (resized/moved) by selecting and transforming them using the options mentioned in reference. (This is optional, they should just be off to the side so they don't get in the way.)
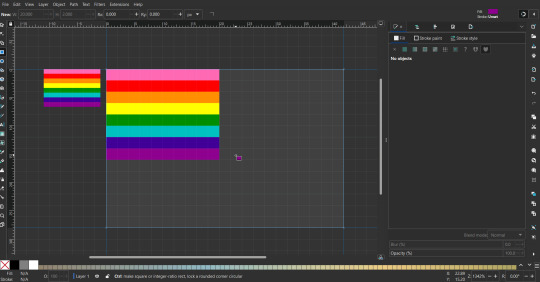
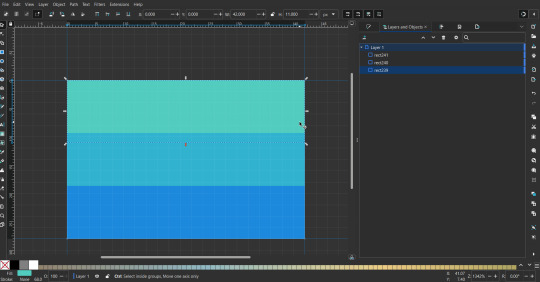
To create the stripes, use the rectangle tool. Click and drag from one grid corner, to a lower grid corner.

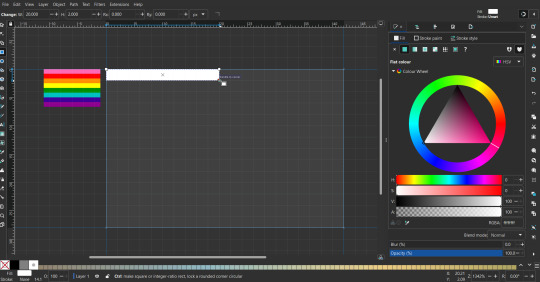
While the rectangle is selected, use the dropper tool to pick a color from a imported image. You can also use the fill and stroke (shown on right) tab to create your own colors / edit colors / etc.
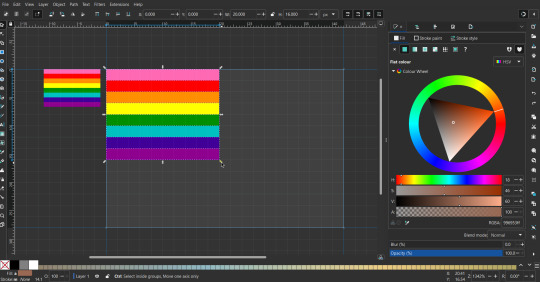
You can make these stripes however you want, they just need to all be equally sized. (They don't have to all have the same height, if you intentionally want that (like the demisexual flag for example).)
Then select all the stripes and transform them so that they fit the page.
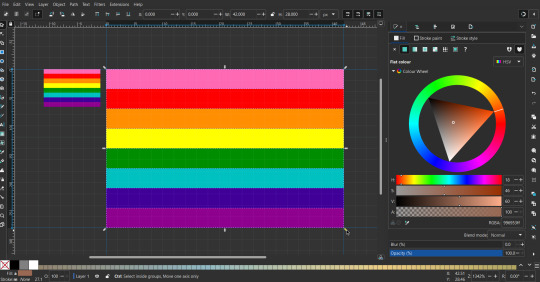
All that's left is to save/export it.
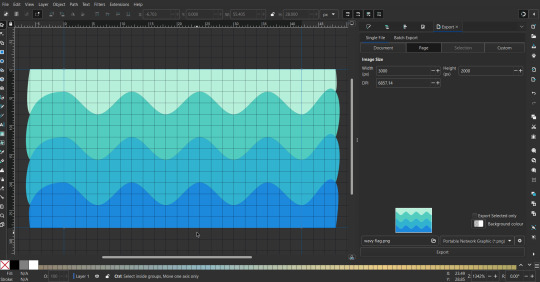
To export it, use the export tab, under single file, page, adjust the width and height (in px) to however high res you want your image to be. (I usually do 3000 by 2000.)
Type in the desired file name in the box next to the folder symbol, use the folder symbol to choose its export location (which can also be used to determine the file name and save/export it), the adjacent drop-down-menu to select what to save it as (,png, .jpg, .svg, etc.), and the gear symbol to adjust other settings (I leave it as default, with antialias turned off (set to 0)).
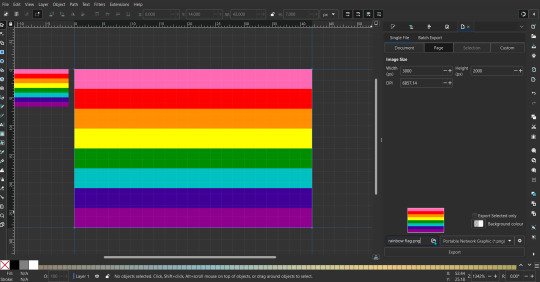
And done, you've made a flag :D 🏳️🌈
Extra Notes
Layers and Objects: a menu that can be used to manage objects. Like their layering position (whether they are above or below another object), and other options can also be done here instead of with keyboard shortcuts.
Vertically striped flags: it's very similar to above. You would just make the rectangles taller rather than wider.
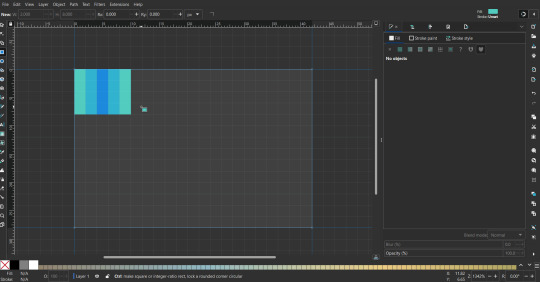
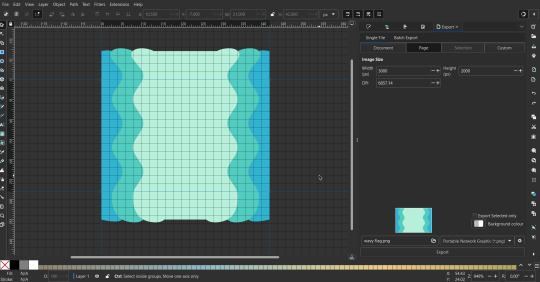
Wavy stripes: first use the pen tool to create zigzags. (The pen tool works like a outline, so just click along the grid corners, and join the line at the end. The fill and stroke menu can be used to make it a solid colored shape, and remove/add outlines). The steepness/frequency of the zigzags is up to personal preference, they just need to extend off the page a bit. To create equally sized wavy stripes, have the all side lengths (highlighted in red) be equal except (depending on how you draw your zigzags) the first or last wave, which should have half the side length of the others.

Select everything, and with the node tool, select all the zigzag nodes (the corners don't need to be selected), and click make selected nodes smooth (half circle with point in middle symbol, at top of screen). (It'll likely look like it has weird lines in-between the waves, see glitch section at the end for how to fix that.)
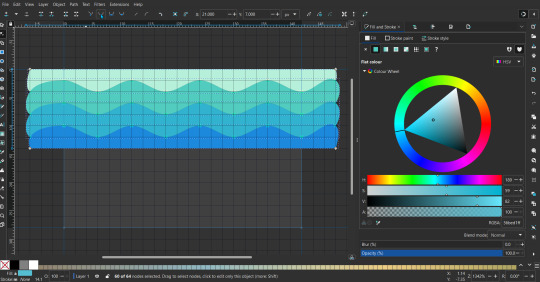
Then resize it all to the height of the canvas. And done :)
This can of course be vertical too.
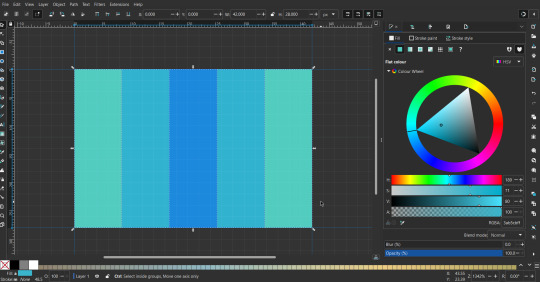
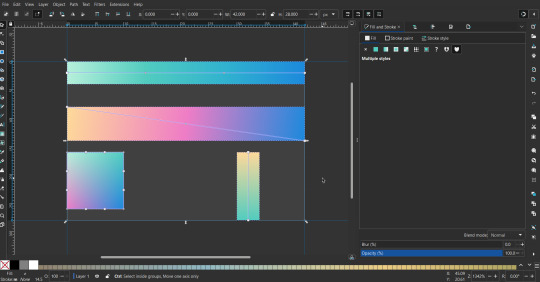
Gradients: You can use the fill and stroke dialogue, gradient tool, or mesh tool to do this.
To create the gradient, select the object, click the linear gradient symbol (gradient box) under fill and stroke. Or dragging / double clicking with the gradient/mesh tools. (The mesh tool is what I used to create the square gradient.)
To change the colors, click on the arrows or circles under fill and stroke, or by clicking the points on the shape, to select the nodes. Then use fill and stroke to change the colors.
To create new colors/stops, click on the plus+ symbol under stops (under fill and stroke), or double click on the gradient. Edit the new colors in fill and stroke again.
To change the location of stops, use stop offset under fill and stroke, or drag the nodes on the gradient. You can also move the end points on the object to make the gradient slanted or vertical.

Symbols: I make my own when I can (like the demi- triangle can be drawn with the pen tool, and resized to the correct proportions). When the symbol is too complicated, I import a .svg of it. Wikimedia commons is a great resource, and the popular twemoji comes in .svg format too. You could also edit it on over the .png in a rastor program if need be.
The align and distribute tab can be used to center symbols (or any other selected object). Select page for the relative to option, and use the symbols underneath to center/align it however you want. (You can also use different relative to options, like last selected, if you want to align it to an object instead.)
Deleting imported reference images: you can do this before saving it as a .svg, if you don't want to keep them / want to clean up the .svg file.
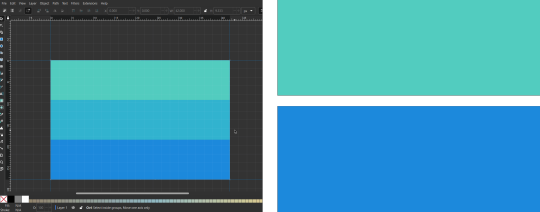
Antialiasing: an option that blurs things basically. A image with antialiasing off will be sharp pixels, while a image with antialiasing on will have transition colors between the main colors.
Below is an example. The left side is without antialiasing, and the right side is with antialiasing.

I can see why it might be preferable to have it on (like for diagonal shapes), but antialiasing can make recoloring .png (not .svg) files hard. The extra different colors messes with fill tools. I also think it looks cleaner without, so I prefer it off.
Exporting glitch: sometimes an exported image will have a thin line between the stripes, despite the fact the stripes are perfectly next to each other. (This seems to not just be a problem with Inkscape, but with vectors in general.)
Below is a zoomed in example of what it'd look like. The left side shows the stripes are all next to each other, but the right image has a transparent line in-between the stripes.
This can be fixed a number of ways.
You could select all the objects, and duplicate them twice.

Or overlap them. The stripes will still be the same size when overlapped, but they will technically be behind each other, so there will be no gap.
With all the different stuff mentioned, you can basically think of them as building blocks with the grid as reference. They can all be mixed and matched together.
I didn't mention all the options, just because there's that many different things you can do in Inkscape. I'd encourage you to play around with all the different options/tools yourself.
There's also some great Inkscape guides on YouTube, it's where I learned how to do a lot of this from (even if they're not for flags specifically, the concepts in those videos can be applied to flags).
Here's an overly elaborate flag I made, just to demonstrate some (but not all) of the things that can be done.

Anyways what a long post haha. But maybe this will be helpful for anyone interested in making (pride) flags.
218 notes
·
View notes
Text
old man sokka
(upset with netflix, nickolodeon and atla for not hiring inuit for any major roles aside) atla fan fic, key moments breakdown i have this idea for old man sokka, in the winter solstice episode when sokka gets taken to the spirit world. i was gonna have sokka meet a creature covered in wood, in a nest of a tree. the mysterious figure tells sokka to trust his instincts. then in season 2 when he is lost in the forrest near The Tree T.M. i want sokka to get a splinter. then in season 3 i want sokka to instinctually dodge attacks. after the story ends between aang and korra. then i was gonna have sokka, the white lotus slowly build a government with an r'&'d where he helps build tech. then i was gonna have a person under sokkas wing that turns "evil" and betrays sokka. i was gonna have sokka and suki break up but suki ends up being pregnant. then sokka and toph end up dating but sort of but not really. in sokkas sleep he is seen making a letter and stashing it somewhere. i want sokka to die from the red lotus uprising. his body is buried underneath the tree. someone stumbles across sokkas letter stating his wishes that toph should bury his body near the tree. and sokka wishes that his kid with suki is taken care of by toph. then as suki gives birth to her child, toph runs out of the room crying and freaks out she cant take care of sokkas baby. and suki was and katara was like "look its ok, we can help you take care of his baby" and toph in a corner of a stairwell crying says "no you guys dont understand" and the screen fades to black and toph in a defeated by love voice says "i can hear another heartbeat" then a booming heartbeat reveals in vibration vision reveals a fetus in tophs body. shes pregnant with sokkas kid. then korra s1 starts and season 2 happens and korra sees sokka in a vision when tenzin talks about zaheer and tonraq corrects her but korra insists sokka was there even though he was dead. . then when kuvira marches to republic city. old lady toph asks "have you managed to master lightning bending in the last 60 years?" old man zuko steps out and goes "i guess so, dont really have a choice right now" then katara steps out and says "ok just dont hit anyone here, i dont have any spirit water" and zuko goes "we're just missing that goofball" and korra replies "what do you mean i'm right here" and toph humbled but assertive goes "not you, you airhead." then the fight against kuvira happens. i want bolin and opal to be pregnant tenzin drops off toph back to the tree. as she jumps off oogie, she collapses to the ground. tenzin worried about her being an old lady helps her up. toph seems delirious says "i was starting to give up hope that you would come back" and tenzin says "what, i just got h-" and toph pushes tenzin aside and he looks over to see a wooden figure standing. and he cant see who it is but as he walks up he recognizes the ponytail. its sokka, covered in wood because he was restored by the spirit tree and toph, tenzin and sokka go back air temple island and reunites with katara, zuko and korra. then i want sokka to have one last meal with korra, zuko and katara. then i want asami walks into a room of corpses of katara, zuko and korra. as she watches sokka ctrl-alt-delete himself. and sokka says "i am so sorry, this was the only way for us to have an avatar" as it cuts to opal giving birth. and sokka continues "that can metal bend, and lava bend" . sokka was in the spirit world in the tree of time manipulating reality to allign the plot, he was a spirit watching tenzin when korra saw him, old man sokka was the wooded figure when he was a kid trapped during the winter solstice, the splinter was a sliver from the tree of time allowing him to have plot armor but also instincts that can help him make things right. old man sokka took over sokka's sleeping body to make it so that he was buried underneath the tree. the avatar, katara, zuko, sokka and toph are all reincarnated.
10 notes
·
View notes
Note
:help
help.txt For Vim version 9.1. Last change: 2024 Dec 06
VIM - main help file
k
Move around: Use the cursor keys, or "h" to go left, h l
"j" to go down, "k" to go up, "l" to go right. j
Close this window: Use ":q<Enter>".
Get out of Vim: Use ":qa!<Enter>" (careful, all changes are lost!).
Jump to a subject: Position the cursor on a tag (e.g. bars) and hit CTRL-].
With the mouse: ":set mouse=a" to enable the mouse (in xterm or GUI).
Double-click the left mouse button on a tag, e.g. bars.
Jump back: Type CTRL-O. Repeat to go further back.
Get specific help: It is possible to go directly to whatever you want help
on, by giving an argument to the :help command.
Prepend something to specify the context: help-context
WHAT PREPEND EXAMPLE
Normal mode command :help x
Visual mode command v_ :help v_u
Insert mode command i_ :help i_<Esc>
Command-line command : :help :quit
Command-line editing c_ :help c_<Del>
Vim command argument - :help -r
Option ' :help 'textwidth'
Regular expression / :help /[
See help-summary for more contexts and an explanation.
See notation for an explanation of the help syntax.
you might be a girl: Wear eyeliner and a dress, go someplace where nobody knows who you are, and make a friend.
Search for help: Type ":help word", then hit CTRL-D to see matching
help entries for "word".
Or use ":helpgrep word". :helpgrep
Getting started: Do the Vim tutor, a 30-minute interactive course for the
basic commands, see vimtutor.
Read the user manual from start to end: usr_01.txt
Vim stands for Vi IMproved. Most of Vim was made by Bram Moolenaar, but only
through the help of many others. See credits.
11 notes
·
View notes
Text
PLKeyboard Week 0
Hello! I am Phoenix Lightning. You can also find me at the account @phoenixacxf! I am a college student and I am neurodivergent. Today's hyperfixation is keyboard layouts! So, I decided I'm going to start creating my own keyboard layout. This page is so I can document the process. Right now, I am going to be logging everything I write and start creating my layout at the end of the upcoming week. I will make updates every week or so on my commonly used words, letters, bigrams, and digraphs. Every month, I will try to update the PLKeyboard layout. Within this first month, I will update it weekly. I want to show the evolution of the layout as I create it.
I currently main on the Colemak keyboard layout, so I plan on using it most of the time. As I continue to post, and as I continue to create the layout, I might swap to it.
This layout is going to be made specifically for me, hence why I will be calling it the PLKeyboard. I am going to be prioritizing the following things:
The ctrl+z, ctrl+x, ctrl+c, and ctrl+v layouts should be easy to use (as such, the z, x, c, and v keys will stay in the same spots as in QWERTY and Colemak)
I am left handed, as such, I want to prioritize key usage on my left hand.
I want it to be easy to type bigrams and trigrams. Common groups of two and three letters should feel nice to type.
I want to minimize movement across the keys.
I want to prioritize index finger usage.
As I do more testing, these priorities may change and whatnot. I am unsure on if I want to use the middle row as my home row. I am thinking I may want to use the top or bottom row as my home row. I will do ergonomic testing eventually.
Something I will note is that I will also eventually test out split keyboards and other ergonomic modifications to see if I prefer them. This could drastically change how the layout ends up being.
I will probably not start using this layout for a few months, just some minor testing. I only just started on Colemak so I want to continue to use it as well.
Why am I making this? Only because I want to try it out and experiment. I like Colemak over QWERTY, so I want to see if I can find something I like more than Colemak. If this gets enough of a following, I may open a google forms where you all can input your own text samples so that I can start optimizing this for a larger group of people. I want this to work well for Gen Z in that scenario. In this scenario, I would make both a right handed and left handed layout.
Anyways, without further ado, let's show you guys my top ten letters, words, bigrams, and trigrams as judged based on various writings i had on my google drive (that are purely my writing).
My top ten letters are:
E (not surprising)
T (also not surprising)
A
O
I
N
H
S
R
D
My top ten words are:
the (not suprising)
and
to
I
a
he
of
was
you
it
My top ten bigrams are:
TH
HE
AN
IN
RE
ND
ER
ED
EA
ST
My top ten trigraphs are:
THE
AND
ING
HIS
ERE
YOU
HAT
THI
STA
FOR
In order to calculate my letters, bigrams, and trigrams, I used this app: https://www.dcode.fr/frequency-analysis
For words, I used this: https://www.online-utility.org/text/analyzer.jsp
So, that's what this stage looks like! Get ready for concept 1 which will come out next week!
#keyboard#keyboard layouts#letters#mechanical keyboard#type#typing#typography#colemak#dvorak#qwerty#computer#speedtyping#typeracer#keyboards#ergonomic#ergonomicdesign#ergonomic keyboard#workman
3 notes
·
View notes
Text
Seit 2007
Die Kommandozeile für das WWW
Oben im Browser, in die Adressleiste, da kann man ja nicht nur URLs eingeben. Man kann auch einen Suchbegriff eingeben und kommt dann direkt zu der Seite mit den Suchergebnissen bei der eingestellten Standardsuchmaschine, meistens Google. So spart man sich den Zwischenschritt, bei dem man die Startseite der Suchmaschine aufruft und sich dort erstmal zurechtfinden muss – sicherstellen, dass der Cursor auch im Suchfeld ist, usw.
Nun gibt es aber nicht nur Google, sondern eine Vielzahl an Websites, die Suchfunktionen anbieten, und bei denen ich genauso wenig Lust habe, mich jedes Mal auf ihren Startseiten zurechtzufinden, wenn ich etwas suche. Deswegen habe ich bei mir im Browser als Standardsuchmaschine nicht Google, sondern trovu.net eingestellt. Dadurch muss [1] ich zwar jede Suchanfrage in der Adresszeile mit einem für Uneingeweihte kryptischen Kürzel beginnen. Ich habe dadurch aber eine Vielzahl an Websites at my fingertips. Je nach Kürzel werde ich sofort zu den Suchergebnissen auf der entsprechenden Website geleitet. Selbstredend ohne dass ich meine Finger für eine Sekunde von der Tastatur wegbewege, denn Ctrl+L bringt mich direkt in die Adresszeile. Zumindest für einen Unix-Nerd wie mich ist das ideal, quasi die #Kommandozeile für das WWW. Dieser YouTube Short veranschaulicht das Prinzip.
Trovu wird von Georg Jähnig entwickelt, wie schon die Vorgänger Serchilo und FindFind.it. 2007 stellte er Serchilo auf der von mir mitorganisierten Tagung der Computerlinguistik Studierenden (TaCoS) in Tübingen vor. Seitdem habe ich Serchilo und seine Nachfolger durchgehend verwendet. Seit ca. den 2010ern lassen sich auch mobile Browser und Such-Widgets für Smartphone-Homescreens entsprechend konfigurieren. Trovu ist kostenlos, quelloffen, datensparsam und werbefrei und finanziert sich durch Afffiliate-Links, d.h., wenn ich über Trovu z.B. bei Amazon was suche und dann was kaufe, kriegt Georg eine kleine Provision.
Eine Vielzahl nützlicher Kürzel ist vordefiniert, man kann aber auch eigene definieren und damit auch vordefinierte Kürzel für sich selbst überschreiben. So bin ich 2024 von Google zu DuckDuckGo gewechselt, mein Muskelgedächtnis musste ich aber nicht umtrainieren: Das Kürzel g ist weiterhin für die Websuche zuständig, ich habe es mir einfach so umdefiniert, dass es DuckDuckGo aufruft, entsprechend gi für die Bildersuche. Entsprechend habe ich mir 2013, als Google Reader eingestellt wurde, r so umdefiniert, dass es nun Feedly aufruft. In diesem Fall und bei anderen Webseiten, die ich besonders häufig aufrufe, verwende ich meistens gar keinen Suchbegriff, sondern benutze das Kürzel wie ein Lesezeichen. Trovu ruft dann in den meisten Fällen die Startseite der jeweiligen Website auf, aber auch das lässt sich konfigurieren. Das Bearbeiten der Kürzel erfolgte bei Serchilo nerdig über ein MediaWiki, bei FindFind.it über eine Drupal-basierte Website und bei Trovu wieder nerdiger, indem man eine Konfigurationsdatei auf GitHub pusht.
Hier ist eine subjektive und willkürliche Auswahl meiner 5 wichtigsten Use-Cases für Trovu und der zugehörigen Kürzel:
Ein Wort in einem zweisprachigen Online-Wörterbuch nachschlagen. Will ich zum Beispiel wissen, was Zahn auf dänisch heißt, gebe ich den ISO-639-2-Code für Dänisch, da, als Kürzel ein, gefolgt von dem Suchwort: da zahn. Trovu leitet mich zu einem deutsch-dänischen Online-Wörterbuch, denn es weiß, dass meine Standardsprache Deutsch ist. Will ich stattdessen in einem englisch-dänischen Wörterbuch nachschlagen, präfigiere ich das Kürzel mit dem entsprechenden Namensraum-Kürzel, was quasi meine Standardsprache für diese Suchanfrage zu Englisch ändert und mir eine andere Auswahl an definierten Kürzeln liefert: en.da tooth. Gebe ich fr zahn ein, komme ich auf ein deutsch-französisches Wörterbuch, LEO.org. Will ich stattdessen dict.cc benutzen, so gibt es auch dafür einen Namensraum: dcc.fr zahn.
Für viele meiner eigenen Websites habe ich persönliche Kürzel definiert, sowohl mit Argument zum Suchen als auch ohne Argument zum Aufrufen einer Seite: vw für das Wiki der Gesellschaft zur Stärkung der Verben, vv, um direkt zur Liste der gestorkenen Verben zu kommen, vf für das Forum der Gesellschaft zur Stärkung der Verben, lt, um bei Freut euch des Labenz! ein Stichwort aufzurufen, ls, um dort alle Definitionen zu durchsuchen, tn, um mein Tweetarchiv zu durchsuchen, tttt, um mein Blog zu durchsuchen.
Die verschiedenen Funktionen von Kleinanzeigen (früher eBay Kleinanzeigen) navigiere ich mit Kürzeln: kaz zum Suchen oder zum Aufrufen der Startseite, kazn, um direkt zu den Nachrichten zu kommen, kaza für die Liste meiner Anzeigen, kazm für meine Merkliste und kaz+, um direkt zu dem Formular zum Aufgeben einer neuen Anzeige zu kommen.
a durchsucht das Angebot von Amazon, ao meine Bestellhistorie. Würde ich das Formular auf der Website benutzen, würde ich ständig die beiden Suchfelder verwechseln.
Lauert hinter einem URL eine Paywall, ein unbenutzbar formatiertes Kochrezept oder eine verschwundene Seite, gibt es oft einen speziellen Dienst, der Abhilfe schafft. In Kombination mit Trovu muss ich nur in die Adressleiste springen und den problematischen URL mit einem entsprechenden Kürzel präfigieren: atd schmeißt ihn in den Paywallentferner Archive.today, ckd in den Rezeptaufbereiter Cooked.wiki und wbm in das Archiv Wayback Machine.
[1] Muss ich gar nicht. Wenn meine Suchanfrage nicht gerade mit einem Wort beginnt, das in Trovu als Kürzel definiert ist, leitet Trovu mich einfach zu meiner in Trovu als Standard eingestellten bevorzugten Suchmaschine DuckDuckGo weiter.
(Kilian Evang)
#Kilian Evang#Suchmaschine#Trovu#Serchilo#FindFind.it#DuckDuckGo#Kommandozeile#Feedreader#Muskelgedächtnis#suchen#Tastaturkürzel
9 notes
·
View notes
Text
Animated explanation of keyboard shortcuts.
Windows and General Shortcuts:
Ctrl + C: Copy Ctrl + X: Cut Ctrl + V: Paste Ctrl + Z: Undo Ctrl + Y: Redo (reverse the undo) Ctrl + S: Save Ctrl + P: Print Alt + Tab: Switch between open windows Alt + F4: Close the active window Windows Key + D: Show/hide desktop Windows Key + L: Lock the computer Ctrl + A: Select all Ctrl + F: Find Ctrl + N: Open a new document or window MacOS Shortcuts:
Command (⌘) + C: Copy Command (⌘) + X: Cut Command (⌘) + V: Paste Command (⌘) + Z: Undo Command (⌘) + Shift + Z: Redo (reverse the undo) Command (⌘) + S: Save Command (⌘) + P: Print Command (⌘) + Tab: Switch between open applications Command (⌘) + Q: Quit application Command (⌘) + A: Select all Command (⌘) + F: Find Command (⌘) + N: Open a new document or window Browser Shortcuts (Chrome, Firefox, Edge, etc.):
Ctrl + T: Open a new tab Ctrl + W: Close the active tab Ctrl + Shift + T: Reopen the last closed tab Ctrl + Tab: Switch between tabs Ctrl + L: Focus the address bar Ctrl + D: Bookmark the current page Ctrl + H: Open history Ctrl + J: Open downloads Ctrl + R: Refresh the page Ctrl + Shift + N: Open a new incognito window These shortcuts are frequently used to speed up tasks on Windows, MacOS, and various browsers. There may be some minor differences depending on the operating system and applications you are using, but generally, they are correct and useful.
3 notes
·
View notes
Note
okay I was scrolling through your blog (a normal amount? too much? I'm sorry if this is weird I don't know if dragging up old posts in acceptable on this site!) and saw one where you said you use vim and I am curious about that! I tried it a while ago and was like... okay I can see how this might be faster once you get REALLY good at it, and it would definitely be useful to have the ability to export easily in multiple formats because I have realized suddenly that it seems like AO3's downloads frequently mess up the formatting? (Or maybe just fail to fix messed-up formatting that the browser smooths over?) Sooo yeah do you use it to write or just for code or what? is it worth it to become a Vim Person?
HELLO this is actually one of the things I most love to talk about because vim is my Favorite Piece Of Software. I love it well beyond a normal amount. That being said it's ummm not for everyone and not for everything. I'm putting this under a readmore because this is too long to inflict on poor unsuspecting souls who are just here for Hannibal content.
Section 1: The ways in which vim is useful
Vim is most useful when the stuff you're working on is more structured and what you're doing is more rote. So something like code (which, yes, is what I learned it for) is very formally structured, and something like html is sort of vague scaffolding around text, which is pretty much a blobby mush where really nothing means very much of anything. (The number of times I ct. only to get pulled up short by an honorific is very high, and I am grouchy.)
Part of the thing that makes structure good is that vim is more useful (relative to a traditional editor) when you can precisely define the action you want to take. Getting better at vim is really about improving your vim-vocabulary so that you are more able to make precise statements about what it is that you want vim to do. I use a "normal" markdown editor for drafting, because what I want to do is "write the next bit" which is not a very vim-interesting action and obviously not very precise. I do use vim for editing, though, because often the things I want to do are, like: "replace this word with some other word" (cw), "delete the end of this paragraph" (D), "rewrite this bit of dialogue" (ci"), "remove this whole paragraph" (dd)--you get the idea.
Also, the place that vim goes from "ok, this seems pretty good" to "this is invaluable" is really when you want to repeat stuff. Something like "the compiler is giving me 25+ pedantic warnings because the file I'm working on was written prior to the introduction of the C++ override keyword" or "I'm rewriting an API so I need to fix the function name in these dozen callsites, remove the first argument, and swap the places of args 2 & 4." These examples are programming-related because I haven't found a use for macros in writing yet. (I live in hope.)
Section 2: If you want to learn vim, here are my tips
I don't really want to tutorialize because there are a lot of those out there already. I do wish to dispense some general philosophical wisdom. (!!!!!)
First of all, keep in mind that the bar is very low. Normal editors are not really that productive. Fancy WYSIWYG editors (which I hate, equal and opposite to my vim-love) are negatively productive for me, because I will get distracted and/or distressed by all the available buttons, formatting options, and whether I accidentally italicized any of the spaces. You don't need to be maximally productive in vim to make use of it, and you don't really need to know that much to match the capabilities of a normal plaintext editor.
If you want to learn vim, I would pick a small set of keys to understand first. Like, i and I (capital-i) to enter insert mode, <Esc> to get back to normal mode. bwhjkl as basic movement options. u and <ctrl>r for undo/redo. If you must, y and d for copy/cut, p and P for paste. (System clipboard--I'm sorry--accessed with "+, so "+y or "+p for example.) That is probably well over enough.
After you get a handle on the basics, the fun part of vim is figuring out where your inefficiencies are and learning how to improve them. Realizing that you're pushing more buttons than you want to be pushing, figuring out how to describe the thing you want to do in a google search, and then finding out that vim has a key to do that. gg G } { c % $ ^ zz . ; and so on, and so on. The world is your oyster &c. (The sheer delight I felt when, more than half a decade after starting to use vim, I found the aforementioned ci"? Indescribable.)
Section 3: In which I address the actual ask
Ok ok okokok sorry. I've written all of this to tell you that I don't actually know what the weird formatting stuff you're talking about is. I read pretty much all long fic on an ereader after downloading as epub and I haven't noticed anything bizarre with the formatting? When I do want to go in and poke around in an epub I usually just use calibre's built-in editor.
In terms of exporting your own plaintext/markdown writing to multiple formats, I use pandoc. I've been very happy with it, but it isn't anything that couldn't be done by hand (and also doesn't require you to start from Vim In Particular). I would love to talk about pandoc but aaaggggh this is already way too long (sorry).
I do have strong feelings about writing in plaintext (glorious! small! no weird formatting distractions! what you see is what's in the actual file you're really writing it there's no secrets) versus WYSIWYG (too many buttons! what do they do! am i using it wrong if i don't push them! why is the filesize so big! what are your secrets, renamed .zip file!) but vim isn't the only choice if you want to go the plaintext route only the best one no, look, I spent the whole of section 1 talking about this, I am not allowed to go backwards. Honestly, though, if you're interested I'd say go for it! Vim is fun to learn and very clever! Knowing vim feels a little like knowing a weird, hyper-specialized little language.
#in re: tumblr etiquette I am sorry to report that I have no idea#seems fine#i am the furthest thing to an etiquette expert that exists though#if i ever have not interacted with a post there is a nonzero chance that it's because i couldn't figure out the properly polite way to do i#and if i have ever interacted with a post there is a >50% chance#that i have had some private angst about whether i was Doing It Wrong#should that reblog have been a comment#or a like#or an original post#i do not know#anyway i am always (too) delighted to talk about#vim
6 notes
·
View notes
Text
I can now wrap any in-terminal REPL program with
my custom history setup (histdir, synced with Syncthing, with inotify/etc watches pulling in new history entries as they sync in, with narrowing fuzzy search to grab/re-run/delete entires), and
my moderately customized vi-style editing, copy/paste, scrollback navigation, and so on (editing commands and cursor positioning are translated into a handful of practically-universal control/escape key sequences to send to the REPL)
all without any degradation/regression in the REPL's native interactive terminal features. Besides just being nice in its own right, this is a strong benefit by default over comint, where I'd otherwise need to find, wait for, or implement a language-aware+integrated mode on a per-language/per-REPL basis like. For example,
in Python's REPL I hit Tab and it auto-completes as much as it can, and then if I hit Tab more it prints out the available matches;
in Ruby's "irb", I get those litte live indicator updates in the prompt as I type, the completion candidate TUI Just Works, and so on;
in node.js, I get the live evaluation previews below my input line, the shaded completion candidates appearing as I type, and so on;
because it's just those programs running in a full-fledged terminal, and yet I've got my own history, line editing, and ability to move around in the output, because the terminal is implemented in Emacs and that opens some doors.
It's not perfect. In fact it's basically one big fragile hack (or multiple hacks, depending on how you want to taxonomize), and there's some things that this approach can simply never get right.
For example, the Node.js REPL treats right arrow and Ctrl-E not just as motions to the right but also as accepting the current completion candidate - but in order to achieve these wonders, I have to send those keystrokes to the program, so in Node I get suggested autocompletes committing into the input line when not intended... although it's amazing how little that bothers me (I barely even noticed at first) because it doesn't move my cursor in most situations, and I can just "d$" or "cW" or "R" or whatever when I don't want them.
Also, these quirks only happen when I'm doing my vi-style stuff. I can still drop down to just the stock REPL experience if I need to, by just using what I already know - staying in vi "insert mode" and bypassing any remaining keybinds with the same escaping/quoting/send-next-key-verbatim keystroke that I use everywhere else in Emacs.
Also, after using histdir for about ten days, I can already notice the performance limitations of the initial MVP - the brute-force, quickest+simplest solution was an O(n^2) synchronous de-duplicating load into a ring every time I start a histdir-using buffer. In these first ten days, my Eshell history grew from a blank slate to ~350 unique history entires, ~1100 total history entries. This now causes a perceptible (still sub-second, but now perceptible) delay. On my computer it's still "instant".
Deleting all but the newest call timestamp file for each entry brought it back down to seemingly instant on my phone, which was exactly the kicking-the-can-down-the-road technique I was planning to use to keep this MVP practical longer, and I think I can probably keep that going for a few months.
Of course, many optimization opportunities here are obvious, and I'll tackle them... basically once the slowdowns are bad enough to annoy me (unfortunately I am easily annoyed by perceptible latency which is directly within my power to solve; fortunately, some low-hanging fruit are practically touching the ground). Or before a public release. But speaking of...
None of this is cleanly separated out into its own reusable pieces, let alone factored to be as decoupled+composable+flexible as would be proper for public packages/libraries/tools. It's not even documented/commented - not even a little. One day, hopefully. Currently I want+need to focus my time and effort on a job search, so unless a living wage worth of donations materializes, probably not soon. In the meantime, most of it lives inside my .emacs file, which is public, and I'll flip the "histdir" script's repo from private to public as soon as I'm satisfied from usage experience that the current directory layout is good enough to be an official v1 (I'm like 99% there already).
I started implementing an MVP script for histdir 11 days ago. Then initial Eshell integration. Then added the ability to remove, search, and inspect histdir entries. Then reused the same stuff I already had for history fuzzy-find in Emacs in order to get really pleasant history removal UX. Then mirrored what I did for Eshell in Comint. Didn't like the Comint limitations and the need for language-specific enhancements to be as good as the stock CLI REPLs. Fiddled with sending raw tabs to processes under Comint, gave up on that. Did the first significant implementation on top of the terminal provided by Eat, but the approach was a dead-end: I was trying to annotate every character to distinguish terminal output from in-buffer edits, only send the in-buffer input when Enter or Tab was hit, and then track which characters in the output were actually part of the current input that were already sent and were echoed back so I knew to include them in the history but not in the next send - I eventually got it to the point that it basically worked for Python's REPL, but tripped over itself terribly in Node.js. (Each sentence so far was about a day each.)
Then, as of about 5 days ago, I started down my current path. At first it was just histdir integration. I had given up on vi-style integration and just decided to do the minimum: I needed to know where the input of a REPL started and ended, and copy the text out so that I could save it as a history entry. Okay, easy enough, basically every terminal REPL understands Ctrl-A and Ctrl-E for moving cursor to start and end of the input line - send Ctrl-A, wait for the terminal to redraw the cursor position, send Ctrl-E, wait again, and those two cursor positions are your start and end. And deleting is also easy, basically everything understands Ctrl-U (it turned out not everything in practical use today does - a couple years ago Reline had a bug with it and f.e. Debian's Ruby still ships with it), but Ctrl-K is basically the same thing (in the other direction) and works on every REPL I tested. Inserting a history entry into the cleared input text is just normal sending input to the process. Most of that first day was not spent on sending the control codes - it was figuring out why the cursor in the terminal and the "point" in Emacs weren't matching up, except sometimes they were, and it took me a while to really understand the behavior.
So then the last few days have been me incrementally going from "okay, just a couple teensy super-simple vi-style key-bindings for the whole-input-line-deleting stuff I already have" to "just one more vi-style thing that I can see how to implement now", and as my understanding of what Eat offered and how it worked grew, so too did my ability to see how this could work.
The biggest breakthrough was yesterday, when I came up with the approach of progammatically sending inputs to align the REPL's cursor with the buffer's point just before any editing operation. This profoundly simplified and optimized the remaining problem. Prior to that, I was thinking I'd need to translate every motion within the buffer when the cursor was in the REPL's input line into an input to the REPL to move the cursor accordingly. But then I realized that nope - we only need the cursors to be in the same spot when editing starts, and only in that moment do we need to check if the Emacs point is in the REPL's input, and determine+send how many left/right movements are needed to put the REPL's cursor there. With that figured out, by yesterday night I could move my cursor around freely with any conceivable Emacs command, not just keybinds that the REPL knew, and it automagically Just Worked whenever I started inputting characters into the REPL. It truly is magical. One of the few computer UX things that has felt that way to me, and the first one I've personally crafted.
Then today, spurred on by this game-changing approach, I implemented
, vi-style replace (both "r" and "R"), including hitting backspace while still in replace state to peel back the new text and get back to the old, going off the end of existing input and still being able to insert/backspace as you'd expect, being able to move the cursor while in replace state with in-REPL keybinds for moving the cursor and having the replace and backing out the replace work correctly (I had some help in the form of the Evil package automagically remembering the replaced characters in a little list in-memory) (I am sure there are some edge cases to be found in this, but I got it fairly solid in my testing, so at this point I'd be more worried about me having made a breaking typo or vi command keystroke that I didn't notice after all the testing and before saving+committing+pushing); and
full vi-style delete/change commands - any vi-style motion can be used to delete exactly the text it covers in the underlying REPL, (I have some concern about multi-byte characters and the like - but as far as I've thought it through, it should all Just Work so long as Emacs and the underlying REPL count things consistently) (again I benefitted a lot from Evil's design here - I was feeling like this would be a really big task, but it turned out to be a very small and simple one for the most part, because it turns out Evil had the same idea that I came up with when writing my vi-style window split management - you split your code up into "operators" which compose with literally any "motion" code which moves the cursor position / window selection / whatever);
oh and visual selections and registers Just Work, because again, these things just compose - vi-style motions move the selection around, Evil gives the operator the coordinates from the start and end of the selection (just as it would cursor position from before and after a motion), and then my custom operator receives that and takes moving the underlying REPL's cursor and sending key codes for things like Delete and Left Arrow to actually cause the deletion (and of course copying the text first, because in vi every deletion is also a copy for later pasting)
vi-style paste, so that's the standard "p", the traditional/BusyBox variant of "P" where the cursor stays at the front of the pasted text instead of moving to the end of it (because I prefer it that way, I find it a far more useful distinction), and my personal addition of "replacing" paste (which I've been binding to "gp" and "gP" ever since I implemented it for Emacs+Evil a few months back) - that is, you paste the normal vi way, but the text overwrites as it inserts, as if you were in replace state ("R").
And with that... I'm basically blissfully happy. I'd be blissfully happy just from having achieved these UX improvements. But also I never in my wildest dreams thought I would achieve them all this fast. ~10 days. Automatic history sync between devices (of course I owe most of that to Syncthing - all I did was make a questionable history storage scheme that works well with it), my preferred history UI/UX with fuzzy search (owe the initial big-picture UX inspiration to Atuin and most of the the in-Emacs implementation to Vertico and Consult), and full vi-style editing/motions (owe much of this to Evil for being a really good Vim for Emacs, plus I wouldn't be on the vi direction if it weren't for BusyBox vi), and literally every other personal efficiency I've made available within a couple of keystrokes in my Emacs (all because Eat did such a great job of bringing a better terminal emulator to Emacs, in a form that was more readily available and more amenable to exploratory hacking than something like vterm), for basically any shell or REPL.
4 notes
·
View notes
Text
Okay, I'm going to derail this heartfelt post to talk about information security:
I found this exact house in under two minutes. And I'm absolutely not an expert in this like that one Geoguessr guy.
While this repost tried to crop out the street sign, it still gives us enough information to go on: it's in the "Royal Borough of Kensington and Chelsea", a borough of London; and we have partial elements of the first word in the street's name.
The first letter is either a B, a D, a P or an R; with it's straight left side curved right side. Second letter is clearly an A with it's triangular top. Third is curved on top, so it's C, G, or S. Next two are obviously I and N, and the last lettter is another curved top but given the preceding two letters it's most likely to be G.
Googling "list of streets in Chelsea" got me the Royal Borough of Kensington and Chelsea's website, and the public Excel file they keep of every street in the Borough.
Ctrl+F for "ing" and almost at the top of the list is Basing Street. Thirty seconds on Google Street View, and I can now tell you that's 54 Lancaster Road.
The only reason I feel comfortable using this as an example is because it's a public art piece, and because the original photo on Instagram shows the entire street sign.
(The piece is signed on the bottom right corner. That's how I found the original artist.)
The moral of the story is to be careful what you include in photos, because it can be stupid easy to locate where an image is taken.

22K notes
·
View notes
Text
Shortcut Keys to Use Tally Like a Pro
🧾 What is Tally and Why Shortcut Keys Matter? – Tally क्या है और Shortcuts क्यों जरूरी हैं?
Tally एक accounting software है जो bookkeeping और financial records को manage करने के लिए use होता है। Using shortcut keys in Tally makes your काम faster और बहुत ज़्यादा efficient।
Tally ERP 9 और Tally Prime दोनों में अलग-अलग shortcut keys होती हैं। इन shortcuts से आप time save करते हैं और errors भी कम करते हैं।
💻 Basic Tally Shortcuts – Tally ShortcutsList
F1 – Select Company | कंपनी को चुनने के लिए
F1 से आप quickly किसी भी कंपनी को select या switch कर सकते हैं। Tally में multi-company accounting करते समय यह shortcut बहुत काम आता है।
ALT + F1 – Detailed Mode | विस्तृत मोड में जाने के लिए
इससे आप किसी भी screen का detail view देख सकते हैं। Useful when you need in-depth accounting information quickly।
ESC – Exit Screen | स्क्रीन से बाहर निकलने के लिए
ESC key आपको current screen से बाहर निकाल देती है। यह universal key है हर function के लिए।
🧾 Voucher Entry Shortcut Keys – वाउचर एंट्री के लिए Tally Shortcuts
Voucher entries Tally का most used feature होता है। इन shortcuts से entry करना और verify करना आसान हो जाता है।
Shortcut
Use in English
Use in Hindi
F4
Contra Voucher
बैंक ट्रांजैक्शन के लिए
F5
Payment Voucher
भुगतान एंट्री के लिए
F6
Receipt Voucher
रसीद एंट्री के लिए
F7
Journal Voucher
जर्नल एंट्री के लिए
F8
Sales Voucher
बिक्री के लिए
F9
Purchase Voucher
खरीद के लिए
F10
Reversing Journal
उल्टी जर्नल एंट्री
F11
Company Features
कंपनी की फीचर्स set करने के लिए
F12
Configuration
सभी configuration setting के लिए
इन keys से आप एक क्लिक में वाउचर एंट्री screen open कर सकते हैं। ये time-saving keys हैं जो professionals daily use करते हैं।
🗂️ Inventory Shortcuts in Tally – इन्वेंट्री से Related Useful Keys
Inventory management के लिए भी Tally में कुछ important shortcuts होते हैं। इनसे आप stock details, godown, और batches को manage कर सकते हैं।
Shortcut
Function
हिंदी में उपयोग
ALT + C
Create Stock Item
नया stock item create करना
ALT + E
Export Report
रिपोर्ट को Excel में export करना
ALT + I
Insert Voucher
बीच में एंट्री insert करना
ALT + D
Delete Voucher
voucher delete करना
ALT + A
Add Details
किसी भी एंट्री में नया data जोड़ना
इन shortcuts से आप inventory section को better तरीके से manage कर सकते हैं।
Report Navigation Shortcuts – रिपोर्ट्स में Navigation के लिए Shortcuts
Tally में बहुत सारी reports होती हैं। Shortcuts से उन तक जल्दी पहुंचा जा सकता है।
Shortcut
Purpose
हिंदी Explanation
ALT + F1
Detailed Report
रिपोर्ट का विस्तृत रूप
ALT + F2
Change Period
रिपोर्ट की तारीख बदलना
CTRL + A
Save Information
किसी भी फॉर्म को सेव करना
CTRL + Q
Quit Report
रिपोर्ट से बाहर निकलना
जब आपको किसी report में analysis करना हो, तो ये keys बहुत काम आती हैं। Especially ALT + F2 आपकी reporting को flexible बनाता है।
Master Creation Shortcuts – Masters बनाने के लिए Tally Shortcuts
Masters जैसे Ledger, Group, Stock Item इत्यादि create करने के लिए भी Tally में shortcuts हैं।
Shortcut
Use
हिंदी में मतलब
ALT + G
Go To
किसी भी screen पर जल्दी पहुंचने के लिए
ALT + K
Company Menu
कंपनी menu खोलने के लिए
CTRL + G
Go to Feature
Reports या Masters तक जाने के लिए
ALT + H
Help Menu
Help menu access करने के लिए
ये shortcuts खासकर Tally Prime में बहुत helpful हैं।
💡 Advanced Tally Shortcuts – प्रो यूज़र्स के लिए Special Keys
कुछ advanced shortcuts हैं जो expert accountants और GST practitioners use करते हैं।
Shortcut
Feature
हिंदी में उपयोग
CTRL + ENTER
Alter Master
किसी भी ledger या stock को edit करना
CTRL + ALT + R
Rewrite Data
corrupt data को फिर से write करना
ALT + R
Repeat Narration
narration दोहराने के लिए
ALT + X
Cancel Voucher
किसी भी voucher को cancel करना
इन keys से आपका काम advanced level पर fast होता है। और साथ ही error-free भी रहता है।
📚 Tally Shortcuts Learning के लिए Tips and Tricks
Practice Regularly: रोज़ इन shortcuts का अभ्यास करें।
Use Printable Cheat Sheet: एक print निकालकर पास रखें।
Watch Tally Videos on YouTube: Visual learning से memory strong बनती है।
TIPA Tally Course में Join करें: The Institute of Professional Accountants में professional training भी available है।
✅ Conclusion – Tally Shortcuts से काम आसान बनाएं
Tally में shortcut keys use करने से आप smart accountant बनते हैं। काम तेज़, सटीक और professional तरीके से होता है।
अगर आप accounting field में excel करना चाहते हैं, तो Tally shortcut keys की list और उनका use daily practice करें।
Tally सीखना जितना जरूरी है, उतना ही जरूरी है उसे smartly इस्तेमाल करना।
अगर आपको यह guide helpful लगी हो, तो इसे share जरूर करें! Practice करें, सीखें और smart accountant बनें।
Need Help Learning Tally Professionally? Join: The Institute of Professional Accountants (TIPA) 📍 E-54, 3rd Floor, Metro Pillar No. 44, Laxmi Nagar, Delhi 110092 📞 Call Now: 9213855555 🌐 Website: www.tipa.in
Accounting interview Question Answers
Tax Income Tax Practitioner Course
How to become an income tax officer
Learn Tally free online
Best Accounting Training Institute
journal entries questions with answers
What is B Com full form
Highest Paying Jobs in India
ICWA Course
Tally Course in Laxmi Nagar Delhi
Short Cut keys in tally
Tally Prime free download
Tally Prime Features
Meaning of sundry debtor creditor
Income Tax Return Filing services
Education Business ideas
Accounting Entry
Income Tax
Accounting
Tally
Career

0 notes
Text
You Wanna Be a Design Engineer? Here's What You're Really Signing Up For!

If you think design engineers just sit in AC offices clicking away on CAD software while sipping coffee… well, okay, sometimes that's true. But there's a lot more to it — and spoiler alert: it involves brainpower, patience, teamwork, and a love-hate relationship with deadlines.
Let’s break it down — human to human.
A) What Does a Design Engineer Actually Do (Besides Fighting with CAD)?
1. Comes Up with Cool Ideas
Design starts with the brain. A client says, “We need this widget to do this magic.” Your job? Make the magic happen — on paper first. Expect lots of sketches, wild ideas, and maybe a few “Wait, what if we just…?” moments.
2. Becomes Best Friends with CAD
If you're not vibing with CATIA, SolidWorks, or UG-NX, you’re in the wrong room. You’ll be modeling, dimensioning, zooming in 3000% just to fix a tiny fillet. Tip: Ctrl+Z will become your favorite move.
3. Builds & Breaks Things (Intentionally)
Next comes testing. You either build a prototype or run simulations to see if your “brilliant idea” survives real-world conditions. Sometimes it does. Sometimes it breaks. You learn. You cry. You design again.
4. Talks. A Lot.
Design engineers spend half the time discussing things with R&D, production, and quality teams. Because what works on screen doesn't always work on the shop floor — and trust us, the shop floor folks will let you know loud and clear.
5. Writes the Boring but Important Stuff
Drawings. BOMs. Assembly instructions. Documentation. Not exactly thrilling — but super important. Because without it, no one knows what you made, how to build it, or where to bolt that last screw.
B) Career Scope: Where Can This Crazy Ride Take You?
Job Titles You Might Hold
CAD Engineer, Design Engineer, Product Developer, or eventually, someone who says “Back in my day, we used a mouse to draw everything…”
Industries That Want You
Auto, aerospace, appliances, robotics, heavy machinery, medical devices — basically any industry that builds physical products.
Why It’s a Solid Career
Machines are evolving. Designs are changing. New products come out every week. That means more opportunities for people who can bring ideas to life (aka YOU).
Specialization = More Power
Want to be the go-to plastic parts guy? Or a BIW sheet metal champ? Specializing gets you deeper into niche roles and leadership positions — plus cooler job titles.
Bonus: Freelance & Consulting
Once you’ve got the experience, you can freelance or consult. Imagine being your own boss, working on multiple projects, and charging by the hour (yes, the dream is real).
C) Honest Tips If You're Serious About This
1. Master at Least One CAD Tool
You don’t need to learn them all — just pick one and go deep. Learn the shortcuts, the tricks, and the workarounds like your life depends on it (because your job might).
2. Pay Attention to the Tiny Details
That 0.2mm error? It’ll cost you hours later in redesign. Trust us. The devil really is in the dimensions.
3. Learn How Stuff Gets Made
Knowing how your design will be manufactured is game-changing. A good design looks cool. A great design works, is cheap, and can actually be built.
4. Be a Puzzle Solver
If fixing problems gives you a dopamine rush, welcome home. Whether it's interference errors or strength failures — you’ll have puzzles to solve every day.
5. Be a Team Player
This is not a lone-wolf role. You’ll work with every department and probably get blamed by all of them at some point. Stay calm, fix the issue, and grab some chai.
Final Thoughts (No Corporate Buzzwords, Promise)
Design engineering is where ideas become reality — but it’s not always pretty. Some days you’ll feel like a genius, others like a frustrated intern. But if you love solving problems, making things better, and leaving your mark on actual products, this job is for you.
Oh, and one more thing —
#ancient egypt#archaeology#capitalism#dinosaurs#economics#folklore#geology#history#insects#entomology
0 notes