#default value SQL
Explore tagged Tumblr posts
Visit Tumblr Blog
Explore Tumblr blogs with no restrictions, modern design and the best experience.
Last Seen Tumblr Blogs


Fun Fact
The Tumblr office adopted Tommy, an 11-year-old Pomeranian.
Text
Adding a Column with Default Value to an Existing Table in SQL Server
To add a column with a default value to an existing table in SQL Server, you can use the ALTER TABLE statement combined with the ADD clause. The general syntax for adding a new column with a default value is as follows: ALTER TABLE TableName ADD ColumnName DataType DEFAULT DefaultValue; Here’s a step-by-step breakdown of the syntax: ALTER TABLE TableName: This specifies that you’re modifying…
View On WordPress
#ALTER TABLE SQL Server#default value SQL#modify table SQL#SQL Server add column#SQL Server database management
0 notes
Text
Mistral OCR 25.05, Mistral AI Le Chat Enterprise on Google

Google Cloud offers Mistral AI’s Le Chat Enterprise and OCR 25.05 models.
Google Cloud provides consumers with an open and adaptable AI environment to generate customised solutions. As part of this commitment, Google Cloud has upgraded AI solutions with Mistral AI.
Google Cloud has two Mistral AI products:
Google Cloud Marketplace’s Le Chat Enterprise
Vertex AI Mistral OCR 25.05
Google Cloud Marketplace Mistral AI Le Chat Enterprise
Le Chat Enterprise is a feature-rich generative AI work assistant. Available on Google Cloud Marketplace. Its main purpose is to boost productivity by integrating technologies and data.
Le Chat Enterprise offers many functions on one platform, including:
Custom data and tool integrations (Google Drive, Sharepoint, OneDrive, Google Calendar, and Gmail initially, with more to follow, including templates)
Enterprise search
Agents build
Users can create private document libraries to reference, extract, and analyse common documents from Drive, Sharepoint, and uploads.
Personalised models
Implementations hybrid
Further MCP support for corporate system connectivity; Auto Summary for fast file viewing and consumption; secure data, tool connections, and libraries
Mistral AI’s Medium 3 model powers Le Chat Enterprise. AI productivity on a single, flexible, and private platform is its goal. Flexible deployment choices like self-hosted, in your public or private cloud, or as a Mistral cloud service let you choose the optimal infrastructure without being locked in. Data is protected by privacy-first data connections and strict ACL adherence.
The stack is fully configurable, from models and platforms to interfaces. Customisation includes bespoke connectors with company data, platform/model features like user feedback loops for model self-improvement, and assistants with stored memories. Along with thorough audit logging and storage, it provides full security control. Mistral’s AI scientists and engineers help deliver value and improve solutioning.
Example Le Chat Enterprise use cases:
Agent creation: Users can develop and implement context-aware, no-code agents.
Accelerating research and analysis: Summarises large reports, extracts key information from documents, and conducts brief web searches.
Producing actionable insights: It can automate financial report production, produce text-to-SQL queries for financial research, and turn complex data into actionable insights for finance.
Accelerates software development: Code generation, review, technical documentation, debugging, and optimisation.
Canvas improves content production by letting marketers interact on visuals, campaign analysis, and writing.
For scalability and security, organisations can use Le Chat Enterprise on the Google Cloud Marketplace. It integrates to Google Cloud services like BigQuery and Cloud SQL and facilitates procurement.
Contact Mistral AI sales and visit the Le Chat Enterprise Google Cloud Marketplace page to use Mistral’s Le Chat Enterprise. The Mistral AI announcement has further details. Le Chat (chat.mistral.ai) and their mobile apps allow free trial use.
OCR 25.05 model llm Mistral
One new OCR API is Mistral OCR 25.05. Vertex AI Model Garden has it. This model excels at document comprehension. It raises the bar in this discipline and can cognitively interpret text, media, charts, tables, graphs, and equations in content-rich papers. From PDFs and photos, it retrieves organised interleaved text and visuals.
Cost of Mistral OCR?
With a Retrieval Augmented Generation (RAG) system that takes multimodal documents, Mistral OCR is considered the ideal model. Additionally, millions of Le Chat users use Mistral OCR as their default document interpretation model. Mistral’s Platform developer suite offers the Mistral-ocr-latest API, which will soon be offered on-premises and to cloud and inference partners. The API costs 1000 pages/$ (double with batch inference).
Highlights of Mistral OCR include:
Cutting-edge comprehension of complex papers, including mathematical formulas, tables, interleaved images, and LaTeX formatting, helps readers understand rich content like scientific articles.
This system is multilingual and multimodal, parsing, understanding, and transcribing thousands of scripts, fonts, and languages. This is crucial for global and hyperlocal businesses.
Excellent benchmarks: This model consistently outperforms top OCR models in rigorous benchmark tests. Compared to Google Document AI, Azure OCR, Gemini models, and GPT-4o, Mistral OCR 2503 scores highest in Overall, Math, Multilingual, Scanned, and Tables accuracy. It also has the highest Fuzzy Match in Generation and multilingual scores compared to Azure OCR, Google Doc AI, and Gemini-2.0-Flash-001. It extracts embedded images and text, unlike other LLMs in the benchmark.
The lightest and fastest in its class, processing 2000 pages per minute on a single node.
Structured output called “doc-as-prompt” uses documents as prompts for powerful, clear instructions. This allows data to be extracted and formatted into structured outputs like JSON, which may be linked into function calls to develop agents.
Organisations with high data protection needs for classified or sensitive information might self-host within their own infrastructure.
Example of Mistral OCR 25.05
Use cases for Mistral OCR 25.05 include:
Digitising scientific research: Making articles and journals AI-ready for downstream intelligence engines streamlines scientific procedures.
Preservation and accessibility can be achieved by digitising historical records and artefacts.
Simplifying customer support: indexing manuals and documentation to improve satisfaction and response times.
AI literature preparation in various fields: We help businesses convert technical literature, engineering drawings, lecture notes, presentations, regulatory filings, and more into indexed, answer-ready formats to gain insights and enhance productivity across vast document volumes.
Integrating Mistral OCR 25.05 as a MaaS on Vertex AI creates a full AI platform. It provides enterprise-grade security and compliance for confident growth and fully controlled infrastructure. The Vertex AI Model Garden includes over 200 foundation models, including Mistral OCR 25.05, so customers can choose the best one for their needs. Vertex AI now offers Mistral OCR 25.05, along with Anthropic models Claude Opus 4 and Claude Sonnet 4.
To develop using Mistral OCR 25.05 on Vertex AI, users must go to the model card in the Model Garden, click “Enable,” and follow the instructions. Platform users can access the API, and Le Chat users can try Mistral OCR for free.
#MistralOCR#LeChatEnterprise#MistralOCR2505#MistralAILeChatEnterprise#MistralOCRmodel#Mistralocr2505modelllm#technology#technews#news#technologynews#govindhtech
1 note
·
View note
Text
Why Modern Businesses Must Hire Data Scientists To Stay Competitive
In today’s digital-first world, businesses that want to remain competitive are investing heavily in data-driven strategies. Whether you're a tech startup, a retail brand, or a multinational corporation, data plays a pivotal role in decision-making, forecasting, and innovation. One of the smartest decisions a company can make in this data-centric age is to hire data scientists to extract meaningful insights, optimize operations, and forecast future trends.
If you're looking to hire data scientists who can bring technical excellence and business understanding together, hire data scientists from trusted platforms where talent meets innovation.
Let’s break down why hiring data scientists isn’t just a trend but a necessity for future-focused organizations.
What Exactly Do Data Scientists Do?
Data scientists act as the bridge between raw data and meaningful business intelligence. They collect, clean, analyze, and interpret large datasets to help businesses make informed decisions. Their work goes far beyond just crunching numbers. They:
Use machine learning algorithms to predict customer behavior.
Optimize marketing campaigns by analyzing customer data.
Detect fraudulent activities by analyzing transactional data.
Recommend product features based on user behavior.
Develop predictive models to help with inventory management or pricing strategies.
They’re problem-solvers who use data to answer critical business questions. Whether it's predicting sales for the next quarter or understanding customer churn, data scientists can provide insights that give companies a competitive edge.
Why Hiring Data Scientists Is Crucial for Business Growth
1. Informed Decision Making
Gone are the days when decisions were made purely on gut feeling. With massive data sets available today, every business decision—whether it’s about launching a new product or changing marketing strategies—can and should be backed by data.
A data scientist can uncover hidden trends and patterns in your business operations, customer preferences, or market conditions. These insights can drastically reduce risk and enhance strategic planning.
2. Competitive Advantage
Companies that can make sense of their data faster and more accurately than competitors are already a step ahead. By analyzing competitors, consumer behavior, and market shifts, data scientists help organizations stay proactive rather than reactive.
3. Enhanced Customer Experience
Data scientists help personalize user experiences by segmenting customers and predicting what they’re likely to buy next. This personalization not only increases sales but also builds customer loyalty. Businesses like Netflix, Amazon, and Spotify thrive on these recommendations, thanks to robust data science models.
4. Better Risk Management
Fraud detection, credit scoring, and risk assessment are critical areas where data scientists add value. Their predictive models can assess whether a transaction is likely to be fraudulent or if a customer is likely to default on a loan.
5. Streamlined Operations
Data science can also be used internally to identify inefficiencies. From warehouse management to HR processes, data scientists can help improve operations, reduce costs, and increase productivity.
What Skills Should You Look for When You Hire Data Scientists?
When planning to hire data scientists, it's important to understand the skill sets that differentiate a good data scientist from a great one.
1. Strong Statistical and Mathematical Foundations
This is essential for interpreting data and building accurate models. Look for experience in:
Regression analysis
Hypothesis testing
Probability and distributions
2. Proficiency in Programming Languages
Commonly used languages include:
Python (most popular in data science)
R (used heavily in statistical analysis)
SQL (for querying databases)
3. Experience With Data Visualization Tools
Data is only valuable if it’s understandable. A good data scientist must be able to present complex insights through dashboards using:
Tableau
Power BI
matplotlib or seaborn (in Python)
4. Machine Learning Expertise
Knowledge of machine learning algorithms like decision trees, clustering, and neural networks can significantly boost your company’s ability to automate and predict.
5. Business Acumen
This is what separates coders from true data scientists. They need to understand your industry and objectives to ask the right questions and drive meaningful outcomes.
Industries That Can Benefit the Most When They Hire Data Scientists
1. Healthcare
From drug discovery to patient monitoring, data scientists are transforming healthcare by enabling predictive diagnoses, personalized treatment, and operational efficiency.
2. Finance
In financial services, data science is used for fraud detection, risk modeling, algorithmic trading, and customer segmentation. Data scientists help financial institutions make data-backed investment decisions and minimize risks.
3. Retail & E-commerce
Understanding customer behavior, predicting demand, managing inventory, and personalizing marketing strategies are all powered by data science. Retailers can make better stock decisions, create personalized offers, and optimize pricing.
4. Manufacturing
In manufacturing, predictive maintenance and quality control are two key areas where data scientists can save costs and improve efficiency. They can predict equipment failure before it happens and optimize the supply chain.
5. Logistics and Supply Chain
Route optimization, demand forecasting, and real-time tracking are just a few of the benefits that data scientists bring to logistics. They help businesses run smoother, faster, and cheaper operations.
In-House vs. Outsourcing: What’s the Best Way to Hire Data Scientists?
In-House Data Scientists:
Better long-term alignment with company goals.
Deep understanding of business-specific data.
Higher control over data privacy.
Challenges:
High recruitment costs.
Scarcity of top-tier talent.
Longer onboarding time.
Outsourced or Freelance Data Scientists:
Cost-effective and faster onboarding.
Access to a global talent pool.
Scalable based on project needs.
Challenges:
Less familiarity with internal processes.
Potential data security concerns.
Hybrid Approach: A mix of in-house leadership and outsourced experts is a powerful strategy. In-house teams set direction, and external data scientists support execution.
How Much Does It Cost to Hire Data Scientists?
Salaries vary depending on experience, region, and industry, but here’s a rough idea:
Entry-Level: $70,000–$90,000/year
Mid-Level: $100,000–$130,000/year
Senior-Level: $140,000–$180,000/year or more
Outsourcing or hiring freelancers on a project basis can significantly reduce costs while still offering top-tier expertise.
Tips to Effectively Hire Data Scientists
Define Your Goals Clearly Before starting the hiring process, outline the business problems you want solved. This helps in choosing the right profile.
Test Real-World Skills Use case studies or real-world data challenges to assess candidates beyond theoretical knowledge.
Check for Communication Skills A good data scientist must be able to explain complex findings to non-technical stakeholders.
Promote a Data-Driven Culture Ensure your company is ready to support and implement insights from data scientists. Their work is only useful if acted upon.
Choose the Right Platform or Partner Use trusted hiring platforms that understand your industry and technical needs to find the right fit.
Future Trends in Data Science Hiring
Demand for AI Integration: Data scientists who understand how to integrate AI and machine learning into business processes will be highly sought after.
Focus on Ethics and Privacy: With increasing regulations, hiring data scientists who understand ethical data use and compliance will be essential.
No-Code Tools Rising: As tools become more user-friendly, citizen data scientists (non-technical staff with analytical tools) may support professional teams.
Domain-Specific Talent: Hiring will shift from generalists to domain-specific experts—for example, data scientists who specialize in healthcare or e-commerce.
Conclusion
In an era where data is the new oil, knowing how to refine it can make or break a business. The decision to hire data scientists is no longer just a technological move—it’s a strategic one. From unlocking insights and improving customer experiences to forecasting trends and mitigating risks, data scientists play a critical role across industries.
If you're ready to make data your competitive advantage, it’s time to hire data scientists who can transform numbers into strategy and foresight into action.
0 notes
Text
Why Your Business Needs a Google Analytics 4 Consultant in 2025

In a digital-first world, data isn’t just an asset—it’s the foundation of strategic growth. With Google Universal Analytics officially sunsetted in 2023, businesses have been pushed to adopt Google Analytics 4 (GA4), a platform that is far more powerful, yet significantly more complex than its predecessor. As we enter 2025, companies that want to fully leverage GA4’s capabilities are realizing that doing so requires more than just flipping a switch. It requires expert guidance. That’s where a Google Analytics 4 consultant becomes invaluable.
Whether you're a small eCommerce brand or a large enterprise, working with a GA4 consultant ensures accurate data tracking, strategic insight, and measurable business impact.
GA4: A Game Changer, Not Just an Upgrade
GA4 is a complete overhaul of the traditional analytics model. Unlike Universal Analytics (UA), which was session-based, GA4 is event-driven, offering a more flexible and granular approach to tracking user interactions across websites and apps.
While the benefits are substantial—enhanced cross-platform tracking, privacy-centric architecture, deeper user journey insights—the learning curve is steep. The platform’s new interface, reporting structure, and tracking methodology require both technical and strategic know-how.
The Expertise a GA4 Consultant Brings
1. Custom Implementation and Event Tracking
GA4 doesn’t automatically track every user interaction the way UA did. You need to define and configure custom events—such as video plays, scroll depth, button clicks, and form submissions—based on your business goals. A GA4 consultant ensures that your event tagging strategy is both comprehensive and relevant, capturing meaningful metrics that drive decision-making.
2. Smooth Migration from Universal Analytics
Many businesses rushed to set up GA4 before the UA shutdown but missed the critical steps involved in a clean migration. A consultant can:
Audit your UA setup
Map out equivalent GA4 events and goals
Migrate historical data structures
Avoid data gaps and double tracking
This ensures that your analytics foundation remains reliable and consistent.
3. Advanced Reporting and Data Analysis
GA4’s default reports are more limited than UA’s. To gain actionable insights, you must build custom explorations, funnels, pathing reports, and audience segments. A GA4 consultant helps you create tailored dashboards that answer your specific business questions—such as tracking micro-conversions, cohort behavior, or customer lifetime value.
4. BigQuery and Cross-Platform Integration
One of GA4’s most powerful features is its native integration with BigQuery, enabling advanced data analysis, machine learning, and reporting flexibility. However, this requires SQL knowledge and cloud expertise. A GA4 consultant can configure this integration, export raw event data, and even connect GA4 to your CRM or advertising platforms.
Why DIY May Be Costing You More
Attempting to implement or manage GA4 without expert support can lead to:
Inaccurate or incomplete data
Poor event configuration
Misinterpreted insights
Missed growth opportunities
These mistakes can snowball into lost revenue, ineffective ad spend, and blind spots in customer behavior. In contrast, a consultant sets up a robust framework that ensures every click, scroll, and conversion is tracked properly from day one.
Strategic Value Beyond Setup
The role of a GA4 consultant extends beyond technical implementation. They provide:
Performance audits to optimize user journeys
Marketing attribution models for smarter budgeting
Compliance alignment with privacy laws like GDPR and CCPA
Training sessions for internal teams to interpret reports independently
This partnership transforms GA4 from a tool into a strategic growth engine.
Conclusion
In 2025, simply having Google Analytics 4 isn’t enough—it’s how you use it that makes the difference. A certified Google Analytics 4 consultant empowers your business to collect meaningful data, interpret it accurately, and act on it decisively. From technical setup to strategic insights, a consultant ensures your analytics investment yields real business results.
If your goal is smarter decisions, better customer experiences, and sustained growth, hiring a GA4 expert is not a luxury—it’s a necessity.
0 notes
Text
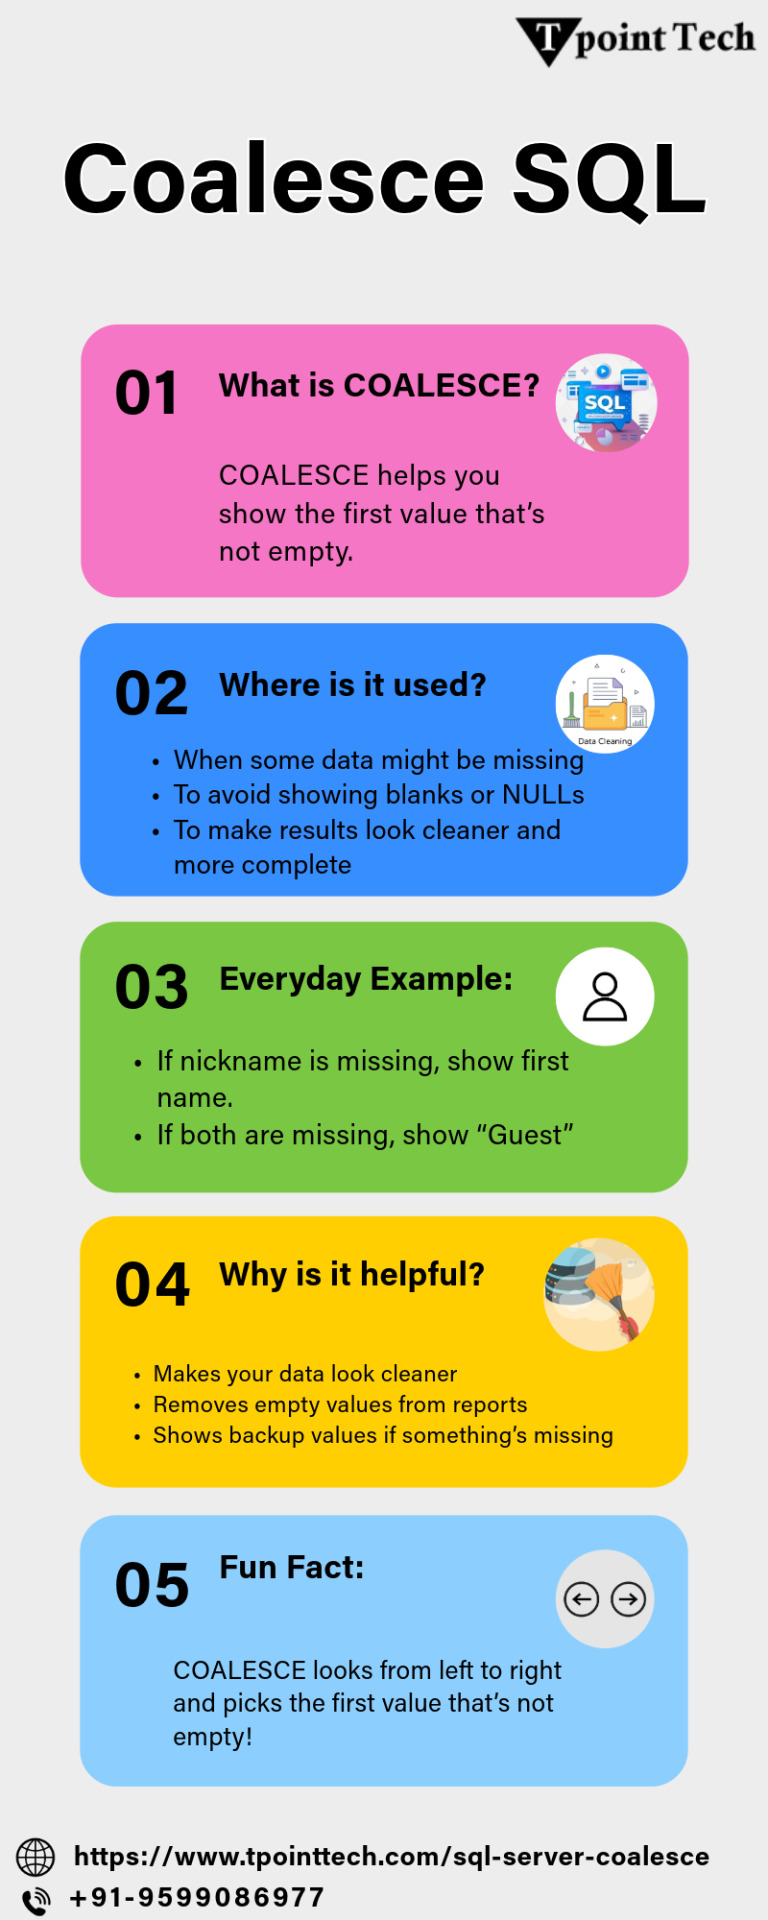
COALESCE in SQL
COALESCE in SQL is a powerful function used to handle NULL values by returning the first non-null value from a list of expressions. It’s perfect for ensuring data completeness in reports and queries. Commonly used in SELECT statements, COALESCE SQL helps create cleaner outputs by replacing missing data with default or fallback values.
0 notes
Text
What is HarmonyOS NEXT - RelationalStore?
Relational databases provide a universal operational interface for applications, with SQLite as the persistent storage engine at the underlying level, supporting the database features of SQLite, including but not limited to transactions, indexes, views, triggers, foreign keys, parameterized queries, and precompiled SQL statements.
Applicable scenarios: In scenarios where complex relational data is stored, such as the student information of a class, which needs to include names, student IDs, subject grades, etc., or the employee information of a company, which needs to include names, job IDs, positions, etc. Due to the strong correspondence between data, the complexity is higher than that of key value data. In this case, a relational database needs to be used to persistently store the data.
constraint qualification ��The default logging mode of the system is WAL (Write Ahead Log) mode, and the default disk dropping mode is FULL mode. ·There are 4 read connections and 1 write connection in the database. When a thread obtains a free read connection, it can perform a read operation. When there is no free read connection and there is a free write connection, the write connection will be used as a read connection. ·To ensure data accuracy, the database can only support one write operation at a time. ·After the application is uninstalled, the relevant database files and temporary files on the device will be automatically cleared. ·Basic data types supported by ArkTS side: number、string、 Binary type data boolean。 ·To ensure successful insertion and reading of data, it is recommended that one piece of data should not exceed 2M. Exceeding this size, insertion successful, read failed.
Basic concepts: ·Predicate: A term used in a database to represent the properties, characteristics, or relationships between data entities, primarily used to define the operating conditions of the database. ·Result set: refers to the set of results obtained by the user after querying, which can be accessed for data. The result set provides a flexible way of accessing data, making it easier for users to obtain the data they want.
code example SQLiteUtil [code] export default class SQLiteUtil { static getCreateTableSql(tableName: string, columns: ColumnInfo[]): string { let sql = CREATE TABLE IF NOT EXISTS ${tableName} (; columns.forEach((element, index) => { if (index == 0) { //Splicing the first element, default as primary key sql += ${element.name} ${DataType[element.type]} PRIMARY KEY AUTOINCREMENT,; } else if (index == columns.length - 1) { //Last element concatenation statement sql += ${element.name} ${DataType[element.type]} NOT NULL);; } else { sql += ${element.name} ${DataType[element.type]} NOT NULL,; } }); return sql; } }
export interface ColumnInfo { name: string; type: DataType; }
export enum DataType { NULL = 'NULL', INTEGER = 'INTEGER', REAL = 'REAL', TEXT = 'TEXT', BLOB = 'BLOB' } [/code] RelationalStoreService [code] import SQLiteUtil, { ColumnInfo, DataType } from '../ChicKit/data/SQLiteUtil' import relationalStore from '@ohos.data.relationalStore' import { common } from '@kit.AbilityKit'; import Logger from '../utils/Logger'; import AppError from '../models/AppError'; import Schedule from '../entities/Schedule'; import { BusinessError } from '@kit.BasicServicesKit'; import { ValuesBucket, ValueType } from '@ohos.data.ValuesBucket'; import { DataModel } from '../ChicKit/data/DataModel'; import Target from '../entities/Target'; import Plan from '../entities/Plan';
const RelationalStoreName = 'shijianxu.db'
export default class RelationalStoreService { static rdbStore: relationalStore.RdbStore;
/**
Initialize relational database
@param context */ static init(context: common.UIAbilityContext) { // RelationalStore configuration let storeConfig: relationalStore.StoreConfig = { // Database file name name: RelationalStoreName, //security level securityLevel: relationalStore.SecurityLevel.S1 } relationalStore.getRdbStore(context, storeConfig, (err, store) => { if (err) { Logger.error(RelationalStoreService init error, error=${JSON.stringify(new AppError(err))}) return; } else { RelationalStoreService.rdbStore = store RelationalStoreService.createScheduleTable() RelationalStoreService.createTargetTable() RelationalStoreService.createPlanTable() } }); } /**
Create schedule table */ static createScheduleTable() { //Table Fields const columns: ColumnInfo[] = Schedule.getColumns() // Retrieve the SQL statement for creating a table const sql = SQLiteUtil.getCreateTableSql(Schedule.TableName, columns) // Create Data Table RelationalStoreService.rdbStore.executeSql(sql, (err) => { if (err) { Logger.error(RelationalStoreService createScheduleTable error, error=${JSON.stringify(new AppError(err))}) return; } }); } /**
Create target table */ static createTargetTable() { //表字段 const columns: ColumnInfo[] = Target.getColumns() // 获取创建表SQL语句 const sql = SQLiteUtil.getCreateTableSql(Target.TableName, columns) // 创建数据表 RelationalStoreService.rdbStore.executeSql(sql, (err) => { if (err) { Logger.error(RelationalStoreService createTargetTable error, error=${JSON.stringify(new AppError(err))}) return; } }); } /**
Create plan table */ static createPlanTable() { //表字段 const columns: ColumnInfo[] = Plan.getColumns() // 获取创建表SQL语句 const sql = SQLiteUtil.getCreateTableSql(Plan.TableName, columns) // 创建数据表 RelationalStoreService.rdbStore.executeSql(sql, (err) => { if (err) { Logger.error(RelationalStoreService createPlanTable error, error=${JSON.stringify(new AppError(err))}) return; } }); } /**
insert data
@param tableName
@param values */ static insert(tableName: string, values: ValuesBucket) { RelationalStoreService.rdbStore.insert(tableName, values, (err: BusinessError, rowId: number) => { if (err) { Logger.error(RelationalStoreService insert error, error=${JSON.stringify(new AppError(err))}) return; } else { return rowId } }) } /**
delete
@param predicates
@returns delete count */ static delete(predicates: relationalStore.RdbPredicates):number{ return RelationalStoreService.rdbStore.deleteSync(predicates) } /**
update
@param values
@param predicates
@returns update count */ static update(values: ValuesBucket,predicates: relationalStore.RdbPredicates):number{ let rows: number = RelationalStoreService.rdbStore.updateSync(values, predicates, relationalStore.ConflictResolution.ON_CONFLICT_REPLACE); return rows } static querySync(predicates: relationalStore.RdbPredicates, columns: ColumnInfo[]): DataModel[] { let dataList: DataModel[] = [] try { let columnsStringArray: string[] = [] columns.forEach(element => { columnsStringArray.push(element.name) }); const resultSet = RelationalStoreService.rdbStore.querySync(predicates, columnsStringArray) resultSet.columnNames // resultSet.getColumnName('') // resultSet.getValue() //循环处理结果,循环条件:当所在行不是最后一行 while (!resultSet.isAtLastRow) { //去往下一行 resultSet.goToNextRow() let schedule: DataModel = {} columns.forEach(element => { switch (element.type) { case DataType.INTEGER: schedule[element.name] = resultSet.getLong(resultSet.getColumnIndex(element.name)) break; case DataType.REAL: schedule[element.name] = resultSet.getDouble(resultSet.getColumnIndex(element.name)) break; case DataType.TEXT: schedule[element.name] = resultSet.getString(resultSet.getColumnIndex(element.name)) break; case DataType.BLOB: schedule[element.name] = resultSet.getBlob(resultSet.getColumnIndex(element.name)) break; } }) dataList.push(schedule) } } catch (err) { Logger.error(RelationalStoreService querySync error, error=${JSON.stringify(new AppError(err))}) } return dataList } } [/code]
0 notes
Text
Using Parameterization in Azure Data Factory for Reusability

1. Introduction
Azure Data Factory (ADF) allows users to create powerful data integration workflows, but hardcoded values can make pipelines rigid and difficult to maintain. Parameterization in ADF enhances reusability by enabling dynamic configurations, reducing redundancy, and improving scalability.
In this blog, we will cover:
What is parameterization in ADF?
Types of parameters: pipeline, dataset, linked service, and trigger parameters
Implementing dynamic pipelines using parameters
Best practices for managing parameters effectively
2. Understanding Parameterization in ADF
Parameterization enables dynamic configurations in ADF by passing values at runtime instead of hardcoding them. This allows a single pipeline to handle multiple use cases without duplication.
Where Can Parameters Be Used?
Pipeline Parameters — Used to pass values dynamically at runtime
Dataset Parameters — Enables dynamic dataset configurations
Linked Service Parameters — Allows dynamic connection settings
Trigger Parameters — Passes values when a pipeline is triggered
3. Implementing Parameterization in ADF
3.1 Creating Pipeline Parameters
Pipeline parameters allow dynamic values to be passed at runtime.
Step 1: Define a Pipeline Parameter
Open your ADF pipeline.
Navigate to the Parameters tab.
Click New and define a parameter (e.g., FilePath).
Assign a default value (optional).
Step 2: Use the Parameter in Activities
You can use the parameter inside an activity. For example, in a Copy Activity, set the Source dataset to use the parameter dynamically:
Expression Syntax: @pipeline().parameters.FilePath
3.2 Dataset Parameterization for Dynamic Data Sources
Dataset parameters allow a dataset to be reused for multiple sources.
Step 1: Define a Parameter in the Dataset
Open your dataset.
Navigate to the Parameters tab.
Create a parameter (e.g., FileName).
Step 2: Pass the Parameter from the Pipeline
Open your Copy Data Activity.
Select the dataset and pass the value dynamically:
@pipeline().parameters.FileName
This approach enables a single dataset to handle multiple files dynamically.
3.3 Parameterizing Linked Services
Linked services define connections to external sources. Parameterizing them enables dynamic connection strings.
Step 1: Define Parameters in Linked Service
Open the Linked Service (e.g., Azure SQL Database).
Click on Parameters and define a parameter for ServerName and DatabaseName.
Step 2: Use the Parameters in Connection String
Modify the connection string to use parameters:json{ "server": "@linkedService().parameters.ServerName", "database": "@linkedService().parameters.DatabaseName" }
Step 3: Pass Values from the Pipeline
When using the linked service in a pipeline, pass values dynamically:json{ "ServerName": "myserver.database.windows.net", "DatabaseName": "SalesDB" }
3.4 Using Trigger Parameters
ADF Trigger Parameters allow passing values dynamically when scheduling pipelines.
Step 1: Create a Trigger Parameter
Open Triggers and create a new trigger.
Define a Trigger Parameter (e.g., ExecutionDate).
Step 2: Use the Parameter in the Pipeline
Pass the trigger parameter dynamically:
Expression: @triggerBody().ExecutionDate
This method is useful for time-based data loading.
4. Best Practices for Parameterization
✅ Use Default Values Where Possible — Helps in debugging and testing ✅ Keep Parameter Naming Consistent — Use meaningful names like SourcePath, DestinationTable ✅ Avoid Excessive Parameterization – Only parameterize necessary values ✅ Secure Sensitive Parameters – Store secrets in Azure Key Vault instead of passing them directly
5. Conclusion
Parameterization in ADF enhances pipeline reusability, reduces duplication, and makes data workflows more efficient. By applying pipeline parameters, dataset parameters, linked service parameters, and trigger parameters, you can build scalable and maintainable data pipelines.
WEBSITE: https://www.ficusoft.in/azure-data-factory-training-in-chennai/
0 notes
Text
蜘蛛池需要哪些脚本技术?
在互联网的海洋中,蜘蛛池(Spider Pool)是一个相对专业且重要的概念。它主要用于SEO优化、数据抓取等领域,通过模拟大量用户行为来提升网站的访问量和��索引擎排名。要构建一个高效的蜘蛛池,掌握一定的脚本技术是必不可少的。本文将深入探讨构建蜘蛛池所需的关键脚本技术。
1. Python
Python 是构建蜘蛛池最常用的编程语言之一。其简洁易读的语法结构使得编写爬虫脚本变得非常高效。Python 社区提供了大量的库,如 `Scrapy` 和 `BeautifulSoup`,这些库可以极大地简化网页抓取和解析的过程。
示例代码
```python
import scrapy
from bs4 import BeautifulSoup
class MySpider(scrapy.Spider):
name = 'myspider'
start_urls = ['http://example.com']
def parse(self, response):
soup = BeautifulSoup(response.body, 'html.parser')
for link in soup.find_all('a'):
yield {'url': link.get('href')}
```
2. JavaScript
JavaScript 主要用于处理动态加载的内容。许多现代网站使用 JavaScript 来动态生成页面内容,这给传统的爬虫带来了挑战。因此,学会使用 JavaScript 技术(如 Node.js 和 Puppeteer)来模拟浏览器行为是非常重要的。
示例代码
```javascript
const puppeteer = require('puppeteer');
async function scrape() {
const browser = await puppeteer.launch();
const page = await browser.newPage();
await page.goto('http://example.com');
const content = await page.content();
console.log(content);
await browser.close();
}
scrape();
```
3. SQL
在处理大量数据时,数据库管理技能是必不可少的。SQL 用于存储和查询数据,确保蜘蛛池能够高效地管理和检索信息。
示例代码
```sql
CREATE TABLE urls (
id INT AUTO_INCREMENT PRIMARY KEY,
url VARCHAR(255) NOT NULL UNIQUE,
status INT DEFAULT 0
);
INSERT INTO urls (url) VALUES ('http://example.com');
```
结语
构建一个高效的蜘蛛池需要综合运用多种脚本技术。Python、JavaScript 和 SQL 是其中最为关键的技术栈。希望本文能为正在探索蜘蛛池领域的你提供一些启示。欢迎在评论区分享你的经验和建议!
请在评论区留下你的想法或问题,让我们一起讨论如何更好地利用脚本技术来优化蜘蛛池!
加飞机@yuantou2048

EPP Machine
ETPU Machine
0 notes
Text
Quando si lavora con database e sistemi informatici, le date sono uno degli aspetti fondamentali da gestire con attenzione. Tuttavia, potresti imbatterti in una strana situazione: l’uso di una data come “0000-00-00”, che apparentemente potrebbe sembrare una data valida, ma in realtà non esiste né nel calendario gregoriano tradizionale né nei sistemi moderni come MySQL. In questo articolo esploreremo perché l’anno “0000” non esiste, come viene gestito nei sistemi informatici e quali sono le migliori pratiche per gestire correttamente le date nei database, in particolare in MySQL. Sommario Il calendario gregoriano, l’anno zero e le date informatiche MySQL e la gestione delle date “0000-00-00” Modalità SQL Mode di MySQL e le restrizioni sulle date Perché è importante evitare l’uso di “0000-00-00” Limitazioni del tipo TIMESTAMP in MySQL Migliori pratiche per gestire le date in MySQL Conclusione Approfondimenti Il calendario gregoriano, l'anno zero e le date informatiche Nel calendario gregoriano, non esiste l’anno zero, creando incompatibilità con alcune date nei database MySQL. Il calendario gregoriano, introdotto nel 1582 e utilizzato nella maggior parte dei sistemi informatici, inizia ufficialmente il 1º gennaio dell’anno 0001 (ovvero, 0001-01-01). Nel calendario gregoriano tradizionale non esiste l'anno zero; si passa direttamente dall'1 a.C. all'1 d.C. Questo significa che l’anno “0000” non è considerato valido nel calendario gregoriano classico. Tuttavia, alcuni sistemi e standard internazionali, come l'ISO 8601, utilizzano l'anno zero per semplificare i calcoli e la rappresentazione delle date storiche. In questo contesto, l'anno zero corrisponde all'1 a.C., permettendo una sequenza continua di anni che facilita operazioni matematiche e computazionali sulle date. Il calendario gregoriano prolettico Per gestire date precedenti all'introduzione del calendario gregoriano nel 1582, alcuni sistemi adottano il calendario gregoriano prolettico. Questo estende il calendario gregoriano a ritroso nel tempo, includendo date storiche antecedenti. Anche in questo caso, l'anno zero può essere utilizzato per uniformare i calcoli, sebbene nel calendario gregoriano tradizionale non sia previsto. MySQL e la gestione delle date “0000-00-00” In MySQL, la data '0000-00-00' viene segnalata come non valida, causando errori se non gestita correttamente. Nei database MySQL, le colonne di tipo DATE vengono utilizzate per memorizzare le date. MySQL supporta date comprese tra '1000-01-01' e '9999-12-31'. Questo significa che date come '0001-01-01' o qualsiasi data precedente all'anno 1000 non sono considerate valide in MySQL. Tentare di inserire tali date genererà un errore o restituirà '0000-00-00' come valore predefinito. In alcune versioni precedenti di MySQL, era possibile inserire una data come “0000-00-00”. Questo formato, pur non essendo una data reale, veniva accettato da MySQL come valore di placeholder per indicare che una data non era stata ancora definita o era sconosciuta. Tuttavia, questo comportamento può causare diversi problemi, soprattutto quando si cercano di eseguire confronti, query o analisi su dati che contengono queste date “zero”. Esempio pratico Supponiamo di avere una tabella eventi con una colonna data_evento di tipo DATE. Se tentiamo di inserire una data non valida: INSERT INTO eventi (nome_evento, data_evento) VALUES ('Evento Storico', '0000-00-00'); In MySQL 5.6 o versioni precedenti senza modalità restrittive, questo inserimento potrebbe essere accettato, impostando data_evento a '0000-00-00'. Tuttavia, in MySQL 5.7 e versioni successive con modalità SQL restrittive attivate, come di default, questo inserimento genererà un errore. Modalità SQL Mode di MySQL e le restrizioni sulle date Le impostazioni NO_ZERO_IN_DATE e NO_ZERO_DATE in MySQL bloccano l’inserimento di date non valide come 0000-00-00. Con l’introduzione di MySQL 5.7 e, in particolare, nella versione 8.
0, la configurazione SQL Mode predefinita include modalità che aiutano a evitare l’uso di date non valide come “0000-00-00”. Tra queste, ci sono due restrizioni importanti: NO_ZERO_IN_DATE: questa modalità impedisce l’inserimento di date che hanno parti zero, come “2024-00-15” o “0000-12-01”. Non è possibile inserire una data con il mese o il giorno impostati su zero. NO_ZERO_DATE: questa modalità è cruciale per evitare l’inserimento di date come “0000-00-00”. Se tenti di inserire una data di questo tipo in una colonna DATE o DATETIME, MySQL restituirà un errore. Grazie a queste modalità, MySQL garantisce che vengano inserite solo date valide secondo il calendario gregoriano, migliorando l’integrità dei dati e prevenendo errori logici nelle applicazioni. Chiarimenti sulle versioni di MySQL È importante notare che il comportamento riguardante le date zero può variare tra le diverse versioni di MySQL: MySQL 5.6 e precedenti: le date zero possono essere inserite se le modalità SQL restrittive non sono attivate. MySQL 5.7 e successive: le modalità NO_ZERO_IN_DATE e NO_ZERO_DATE sono attive per impostazione predefinita, impedendo l'inserimento di date non valide, ma è possibile disattivarle. Per assicurarti di gestire correttamente le date nel tuo database, verifica sempre la versione di MySQL in uso e le modalità SQL attive. Perché è importante evitare l’uso di “0000-00-00” Utilizzare '0000-00-00' in MySQL può provocare incoerenze nelle query, limitazioni di compatibilità e difficoltà nell'analisi dei dati. L’utilizzo di “0000-00-00” come data predefinita può causare numerosi problemi nei sistemi software e nelle applicazioni: Incoerenze nelle query: le query che confrontano le date possono produrre risultati inattesi o errati se si includono date come “0000-00-00”. Ad esempio, un semplice confronto tra date può fallire o restituire risultati imprevedibili se non si tiene conto delle date non valide. Compatibilità con altri sistemi: molti linguaggi di programmazione e sistemi di reportistica non gestiscono correttamente date invalide, come “0000-00-00”. Questo può portare a crash dell’applicazione, errori di parsing o dati corrotti. Difficoltà nell’analisi dei dati: strumenti di analisi o di business intelligence potrebbero interpretare erroneamente “0000-00-00” come una data valida, influenzando negativamente la precisione dei report e delle analisi. Limitazioni del tipo TIMESTAMP in MySQL Il tipo TIMESTAMP in MySQL gestisce solo date tra il 1970 e il 2038, limitando l’uso di date storiche o future. Oltre alle considerazioni già fatte sulle date non valide, è importante comprendere come il tipo di dato TIMESTAMP in MySQL gestisce le date, specialmente quelle precedenti all'anno 1970. Il problema delle date prima del 1970 Il tipo di dato TIMESTAMP memorizza l'istante temporale come il numero di secondi trascorsi dal 1º gennaio 1970 alle 00:00:00 UTC, noto come Epoch Unix. A causa di questa rappresentazione: Intervallo limitato: TIMESTAMP può rappresentare date e orari compresi tra '1970-01-01 00:00:01' UTC e '2038-01-19 03:14:07' UTC. Impossibilità di inserire date precedenti al 1970: non è possibile inserire date precedenti al 1º gennaio 1970 utilizzando il tipo TIMESTAMP. Tentativi di farlo restituiranno un valore nullo o genereranno un errore, a seconda delle impostazioni del server. Esempio pratico Supponiamo di avere una tabella eventi con una colonna data_evento di tipo TIMESTAMP: CREATE TABLE eventi ( id INT AUTO_INCREMENT PRIMARY KEY, nome_evento VARCHAR(255), data_evento TIMESTAMP ); Se tentiamo di inserire una data precedente al 1970: INSERT INTO eventi (nome_evento, data_evento) VALUES ('Evento Storico', '1969-12-31 23:59:59'); Questo inserimento fallirà o data_evento verrà impostato al valore predefinito '1970-01-01 00:00:00', poiché il tipo TIMESTAMP non può rappresentare date precedenti all'Epoch Unix. Soluzione: utilizzare DATE o DATETIME
Se hai bisogno di memorizzare date precedenti al 1970, dovresti utilizzare i tipi di dato DATE o DATETIME, che supportano un intervallo più ampio: DATE: Intervallo: da '1000-01-01' a '9999-12-31'. Uso: memorizza solo la parte di data (anno, mese, giorno). DATETIME: Intervallo: da '1000-01-01 00:00:00' a '9999-12-31 23:59:59'. Uso: memorizza sia la data che l'ora. Riformulando la tabella eventi utilizzando DATETIME: CREATE TABLE eventi ( id INT AUTO_INCREMENT PRIMARY KEY, nome_evento VARCHAR(255), data_evento DATETIME ); Ora, l'inserimento della data precedente al 1970 avverrà correttamente: INSERT INTO eventi (nome_evento, data_evento) VALUES ('Evento Storico', '1969-12-31 23:59:59'); Perché scegliere TIMESTAMP o DATETIME TIMESTAMP: Utile per tracciare l'ora corrente o per registrare automaticamente il momento di creazione o aggiornamento di una riga. Tiene conto del fuso orario del server o della connessione. DATETIME: Ideale per memorizzare date e orari specifici che non devono essere influenzati dai fusi orari. Supporta un intervallo di date molto più ampio, incluse date storiche. Raccomandazioni Evita TIMESTAMP per date storiche: se devi gestire date precedenti al 1970 o future oltre il 2038, utilizza DATE o DATETIME. Scegli il tipo di dato appropriato: valuta le esigenze della tua applicazione per decidere se utilizzare TIMESTAMP, DATE o DATETIME. Migliori pratiche per gestire le date in MySQL Per gestire correttamente le date in MySQL, usa NULL per date sconosciute, attiva Strict Mode e valida le date nell’applicazione. Ecco alcuni consigli per evitare i problemi legati a date invalide come “0000-00-00”: Utilizza il valore NULL per le date non definite: invece di inserire una data invalida come “0000-00-00” quando non conosci una data, è buona norma usare NULL. Questo indica chiaramente che la data non è stata ancora impostata o non è applicabile. INSERT INTO eventi (nome_evento, data_evento) VALUES ('Evento Futuro', NULL); Attiva Strict Mode e mantieni le restrizioni sulle date: la modalità Strict Mode in MySQL e le restrizioni NO_ZERO_IN_DATE e NO_ZERO_DATE dovrebbero essere mantenute attive, poiché impediscono l’inserimento di dati non validi. Queste modalità rendono il database più robusto e aiutano a prevenire errori futuri. SET sql_mode = 'STRICT_ALL_TABLES,NO_ZERO_IN_DATE,NO_ZERO_DATE'; Valore default di sql_mode: in MySQL 8.0 il valore predefinito è il seguente: ONLY_FULL_GROUP_BY,STRICT_TRANS_TABLES,NO_ZERO_IN_DATE,NO_ZERO_DATE,ERROR_FOR_DIVISION_BY_ZERO,NO_ENGINE_SUBSTITUTION Valida le date a livello di applicazione: aggiungi logica di validazione nella tua applicazione per assicurarti che gli utenti inseriscano solo date valide. Ciò riduce la possibilità che valori non validi vengano inviati al database. In PHP: if (DateTime::createFromFormat('Y-m-d', $data_input) !== false) // La data è valida else // Gestisci l'errore In JavaScript: if (!isNaN(Date.parse(dataInput))) // La data è valida else // Gestisci l'errore Gestisci le date storiche con attenzione: se devi gestire date storiche precedenti all'anno 1000 o utilizzare l'anno zero, considera l'uso di tipi di dati alternativi o di estensioni specifiche che supportano queste esigenze. In alcuni casi, potrebbe essere opportuno utilizzare colonne di tipo VARCHAR e implementare una logica personalizzata per la validazione e il confronto delle date. Conclusione L’uso di date non valide come “0000-00-00” è una pratica che può causare una serie di problemi nei database e nelle applicazioni. Grazie alle restrizioni introdotte nelle versioni più recenti di MySQL, come NO_ZERO_DATE e NO_ZERO_IN_DATE, è possibile evitare questi errori e mantenere l’integrità dei dati. La gestione corretta delle date, inclusa l’adozione del valore NULL quando una data non è disponibile, è essenziale per garantire che il database e le applicazioni funzionino senza problemi.
Inoltre, essere consapevoli delle limitazioni del calendario gregoriano tradizionale e delle sue estensioni nei sistemi informatici ti aiuterà a gestire meglio le date storiche o non standard. Seguendo queste pratiche, puoi evitare problemi di compatibilità e garantire che il tuo sistema gestisca correttamente le date, migliorando così la qualità del software che sviluppi. Approfondimenti Ecco alcuni link utili per approfondire la gestione delle date in MySQL e le modalità SQL: Documentazione ufficiale MySQL - Tipi di dato DATE e TIME https://dev.mysql.com/doc/refman/8.0/en/date-and-time-types.html Descrive nel dettaglio i tipi di dato DATE, DATETIME, TIMESTAMP, con esempi e limiti per ciascun tipo. Guida SQL Mode di MySQL https://dev.mysql.com/doc/refman/8.0/en/sql-mode.html Spiega il funzionamento di SQL Mode, incluse le modalità STRICT, NO_ZERO_DATE, NO_ZERO_IN_DATE e altre opzioni di restrizione. ISO 8601 Data e Ora - Wikipedia https://it.wikipedia.org/wiki/ISO_8601 Un riferimento per il formato internazionale ISO 8601, con informazioni sull'anno zero e la rappresentazione standardizzata delle date. Stack Overflow: Come gestire le date non valide in MySQL? https://stackoverflow.com/search Utile per trovare discussioni e suggerimenti pratici su come affrontare problemi di date invalide in MySQL. Panoramica sul calendario gregoriano - Wikipedia https://it.wikipedia.org/wiki/Calendario_gregoriano Una descrizione del calendario gregoriano, compresa l'assenza dell'anno zero. Database Strutturato https://blog.programmatoreweb.it/database-strutturato/ Un approfondimento sulla corretta strutturazione dei database, utile per comprendere le basi dell'organizzazione dei dati e migliorare l'efficienza del database.
0 notes
Text
SQL ORDER BY CLAUSE WITH DESCENDING ORDER
Whenever we want to sort the records based on the columns stored in the tables of the SQL database, then we consider using the ORDER BY clause in SQL.
The ORDER BY clause in SQL helps us to sort the records based on the specific column of a table. This means that initially, all the values stored in the column on which we are applying the ORDER BY clause will be sorted. Then the corresponding column values will be displayed in the same sequence in which the values we have obtained in the earlier step.
Using the ORDER BY clause, we can sort the records in ascending or descending order as per our requirement. The records will be sorted in ascending order whenever the ASC keyword is used with the ORDER by clause. DESC keyword will sort the records in descending order. If no keyword is specified after the column based on which we have to sort the records, then, in that case, the sorting will be done by default in the ascending order.

0 notes
Text
What is Amazon EMR architecture? And Service Layers

Describe Amazon EMR architecture
The storage layer includes your cluster's numerous file systems. Examples of various storage options.
The Hadoop Distributed File System (HDFS) is scalable and distributed. HDFS keeps several copies of its data on cluster instances to prevent data loss if one instance dies. Shutting down a cluster recovers HDFS, or ephemeral storage. HDFS's capacity to cache interim findings benefits MapReduce and random input/output workloads.
Amazon EMR improves Hadoop with the EMR File System (EMRFS) to enable direct access to Amazon S3 data like HDFS. The file system in your cluster may be HDFS or Amazon S3. Most input and output data are stored on Amazon S3, while intermediate results are stored on HDFS.
A disc that is locally attached is called the local file system. Every Hadoop cluster Amazon EC2 instance includes an instance store, a specified block of disc storage. Amazon EC2 instances only store storage volume data during their lifespan.
Data processing jobs are scheduled and cluster resources are handled via the resource management layer. Amazon EMR defaults to centrally managing cluster resources for multiple data-processing frameworks using Apache Hadoop 2.0's YARN component. Not all Amazon EMR frameworks and apps use YARN for resource management. Amazon EMR has an agent on every node that connects, monitors cluster health, and manages YARN items.
Amazon EMR's built-in YARN job scheduling logic ensures that running tasks don't fail when Spot Instances' task nodes fail due to their frequent use. Amazon EMR limits application master process execution to core nodes. Controlling active jobs requires a continuous application master process.
YARN node labels are incorporated into Amazon EMR 5.19.0 and later. Previous editions used code patches. YARN capacity-scheduler and fair-scheduler use node labels by default, with yarn-site and capacity-scheduler configuration classes. Amazon EMR automatically labels core nodes and schedules application masters on them. This feature can be disabled or changed by manually altering yarn-site and capacity-scheduler configuration class settings or related XML files.
Data processing frameworks power data analysis and processing. Many frameworks use YARN or their own resource management systems. Streaming, in-memory, batch, interactive, and other processing frameworks exist. Use case determines framework. Application layer languages and interfaces that communicate with processed data are affected. Amazon EMR uses Spark and Hadoop MapReduce mostly.
Distributed computing employs open-source Hadoop MapReduce. You provide Map and Reduce functions, and it handles all the logic, making parallel distributed applications easier. Map converts data to intermediate results, which are key-value pairs. The Reduce function combines intermediate results and runs additional algorithms to produce the final output. Hive is one of numerous MapReduce frameworks that can automate Map and Reduce operations.
Apache Spark: Spark is a cluster infrastructure and programming language for big data. Spark stores datasets in memory and executes using directed acyclic networks instead of Hadoop MapReduce. EMRFS helps Spark on Amazon EMR users access S3 data. Interactive query and SparkSQL modules are supported.
Amazon EMR supports Hive, Pig, and Spark Streaming. The programs can build data warehouses, employ machine learning, create stream processing applications, and create processing workloads in higher-level languages. Amazon EMR allows open-source apps with their own cluster management instead of YARN.
Amazon EMR supports many libraries and languages for app connections. Streaming, Spark SQL, MLlib, and GraphX work with Spark, while MapReduce uses Java, Hive, or Pig.
#AmazonEMRarchitecture#EMRFileSystem#HadoopDistributedFileSystem#Localfilesystem#Clusterresource#HadoopMapReduce#Technology#technews#technologynews#NEWS#govindhtech
0 notes
Text
Cómo instalar PostgreSQL en Windows paso a paso

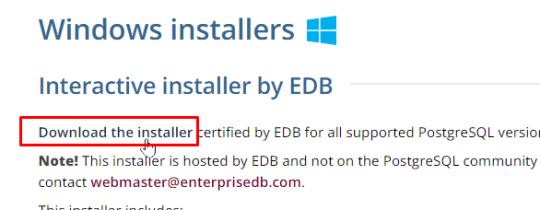
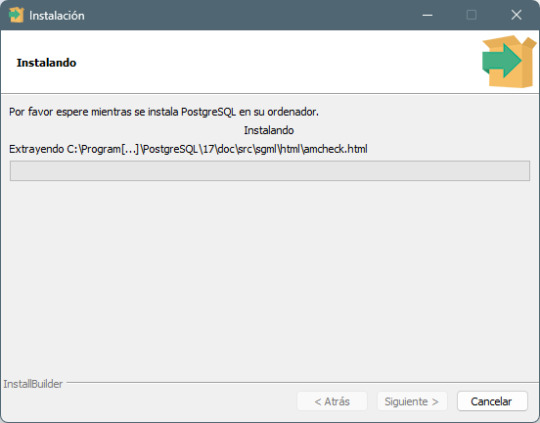
PostgreSQL es un sistema de bases de datos relacional y de código abierto ampliamente utilizado por su robustez y soporte para funciones avanzadas como JSON y operaciones geoespaciales. A continuación, te mostramos cómo instalar PostgreSQL en Windows y realizaremos una práctica personalizada para confirmar que los alumnos completaron la instalación y el uso del sistema. Requisitos previos - Sistema operativo: Windows 10 o superior. - Memoria RAM mínima: 4 GB. - Espacio libre en disco: Al menos 2 GB. - Conexión a internet para descargar el instalador. Para este tema, es importante tomar capturas de pantalla de todo el proceso, para que entregues las evidencias de lo realizado. Paso a paso para instalar PostgreSQL Paso 1: Descargar el instalador - Ve al sitio oficial de PostgreSQL: Descargar PostgreSQL. - Selecciona Windows y haz clic en el enlace para descargar el instalador correspondiente.

Paso 2: Ejecutar el instalador - Una vez descargado, haz doble clic en el archivo postgresql-17.0-1-windows.exe - En la primera pantalla, haz clic en Next.

Paso 3: Selección del directorio de instalación - Elige la carpeta donde deseas instalar PostgreSQL o deja la predeterminada. - Haz clic en Next.

Paso 4: Selección de componentes - Asegúrate de seleccionar: - PostgreSQL Server - pgAdmin 4 (herramienta gráfica para administrar bases de datos) - Haz clic en Next.

Paso 5: Configuración de la contraseña del superusuario - Introduce y confirma una contraseña para el usuario postgres (anótala, la necesitarás más adelante). - Haz clic en Next.

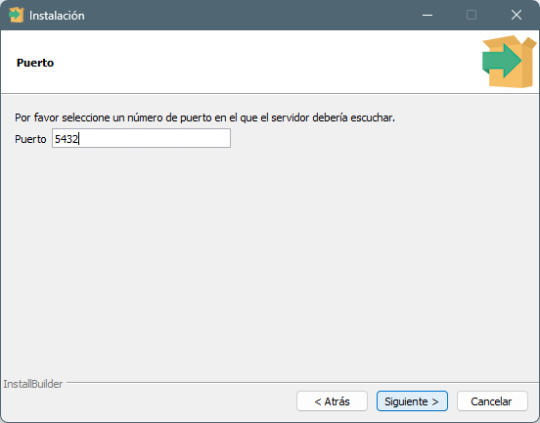
Paso 6: Configuración del puerto de conexión - Deja el puerto predeterminado 5432 (a menos que necesites cambiarlo por alguna razón). - Haz clic en Next.

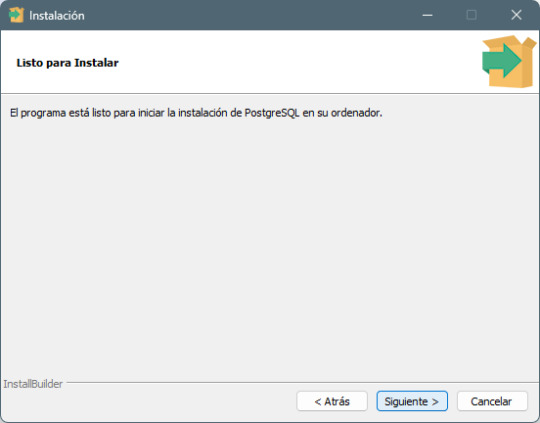
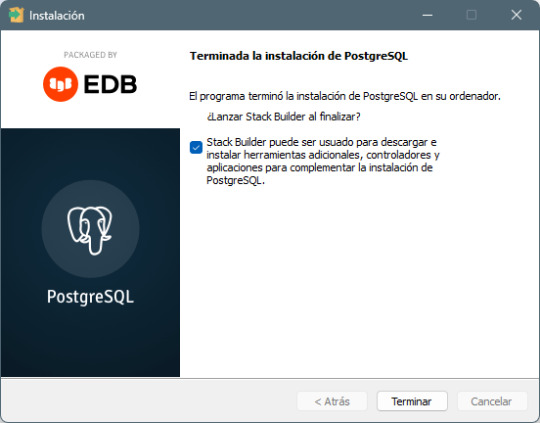
Paso 7: Finalización de la instalación - Haz clic en Next y luego en Finish para completar la instalación. - PostgreSQL y pgAdmin 4 estarán ahora listos para ser usados.
Paso a paso para usar PostgreSQL con pgAdmin 4

Paso 1: Abrir pgAdmin 4

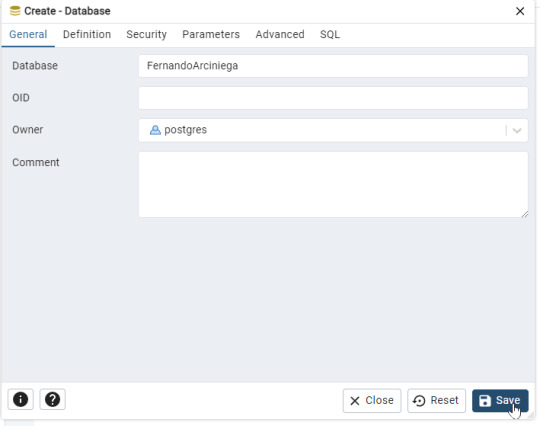
- Desde el menú de inicio, abre pgAdmin 4. - Ingresa la contraseña que configuraste para el usuario postgres. Paso 2: Crear una nueva base de datos - En el panel izquierdo, haz clic derecho sobre Databases y selecciona Create > Database.

- En el campo Database Name, ingresa tu nombre y tu primer apellido (por ejemplo: FernandoArciniega). - Haz clic en Save para crear la base de datos.
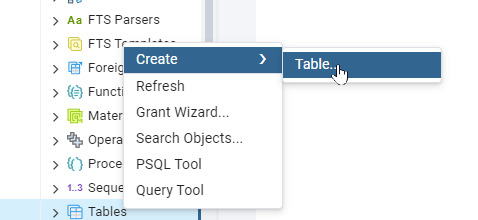
Paso 3: Crear una tabla personalizada - Selecciona tu base de datos y ve a Schemas > Tables.

- Haz clic derecho en Tables y selecciona Create > Table.
- Asigna un nombre a la tabla, como Estudiantes_ (por ejemplo: Estudiantes_FOAM).
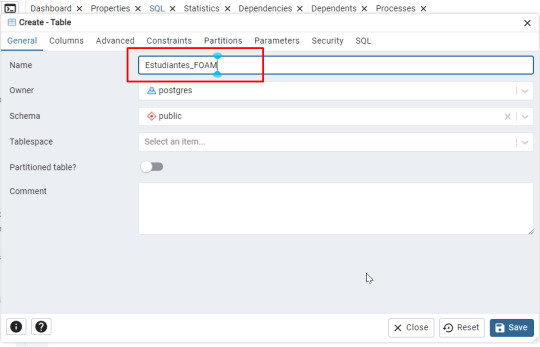
Agrega dos columnas: (Ficha Columns)

- Nombre (Tipo: character varying(50)) - Edad (Tipo: integer)
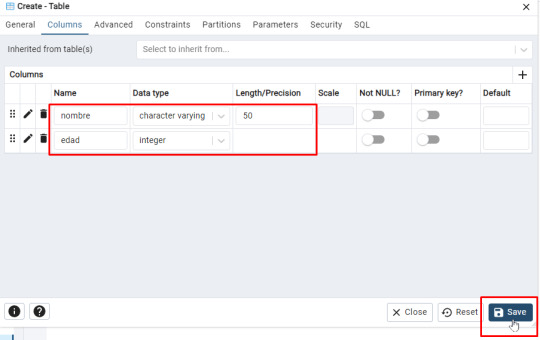
- Guarda la tabla haciendo clic en Save. Aparecerá el siguiente código: -- Table: public.Estudiantes_FOAM -- DROP TABLE IF EXISTS public."Estudiantes_FOAM"; CREATE TABLE IF NOT EXISTS public."Estudiantes_FOAM" ( nombre character varying(50) COLLATE pg_catalog."default", edad integer ) TABLESPACE pg_default; ALTER TABLE IF EXISTS public."Estudiantes_FOAM" OWNER to postgres; Paso 4: Insertar datos en la tabla - Haz clic derecho en la tabla y selecciona Query Tool.
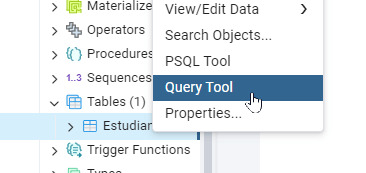
- Escribe la siguiente consulta SQL para insertar un registro: INSERT INTO "Estudiantes_FOAM" (Nombre, Edad) VALUES ('Maria Lopez', 20); - Haz clic en Run para ejecutar la consulta o F5

Paso 5: Verificar los datos - Haz clic derecho en la tabla y selecciona View/Edit Data > All Rows. - Verifica que el registro se haya insertado correctamente.

Inserta 14 registroas más para tener un total de 15 en tu tabla. Práctica: Demostrar la instalación y uso de PostgreSQL Instrucciones personalizadas para la entrega: - Base de datos personalizada: - Cada alumno debe crear una base de datos con su nombre completo. - Tabla personalizada: - Crear una tabla con el nombre Estudiantes_ (por ejemplo: Estudiantes_FOAM). - Inserción de registro: - Inserta 15 registros en total con su nombre y edad. Entrega del trabajo - Formato: Impreso. - Equipos de 4 personas. Read the full article
#basededatosgratuita#basededatosrelacionalWindows#basesdedatosparaprincipiantes#cómousarpgAdmin#conexiónaPostgreSQL#configuraciónPostgreSQL#crearbasededatosenPostgreSQL#crearbasededatospersonalizada#creartablaenPostgreSQL#descargarPostgreSQLgratis#insertardatosPostgreSQL#instalacióndePostgreSQL2024#instalaciónfácilPostgreSQL#instalarpgAdmin4#PostgreSQLejercicios#PostgreSQLinstalaciónWindows#PostgreSQLManagementTool#PostgreSQLparaestudiantes#PostgreSQLpasoapaso#prácticasconPostgreSQL#servidorPostgreSQLlocal#SQLenPostgreSQL#tutorialpgAdminpasoapaso#tutorialPostgreSQLenespañol
0 notes
Text
Mastering SSRS Reports in Dynamics 365

Within Microsoft Dynamics 365, ssrs report in d365 is an effective tool for managing, creating, and distributing reports. Businesses can obtain in-depth insights, make data-driven choices, and expedite reporting procedures by utilizing SSRS reports. This tutorial explores the essential elements of SSRS report creation and management in Dynamics 365, providing helpful advice and best practices to maximize your reporting potential.
What does Dynamics 365's SSRS mean? The integration of SQL Server Reporting Services with the Dynamics 365 ecosystem to provide advanced reporting and analytics is referred to as SSRS in Dynamics 365. Financial statements, sales analysis, and operational indicators are just a few of the business-critical reports that can be produced with Dynamics 365's SSRS reports. The purpose of these reports is to extract data from Dynamics 365 and deliver it in an intelligent, well-organized manner.
Important Procedures for Creating and Managing Dynamics 365 SSRS Reports
Establish the environment for development
Install Required Tools: Make sure that Visual Studio with the SSRS reporting services extensions installed, or SQL Server Data Tools (SSDT) installed. These are the necessary tools for creating and distributing reports. Set Up Data Connections: Create connections to Dynamics 365 for data. In order to retrieve pertinent data from the Dynamics 365 system, you might need to set up data sources and datasets.
Create the Report
Make a New Project for Reports: To get started, create a new SSRS report project in SSDT or Visual Studio. In accordance with your reporting requirements, specify the report layout, including the tables, charts, and visual components. Describe the datasets and data sources: Link access views or data entities in Dynamics 365 in order to obtain the required data. Setup datasets with the data fields needed for your report included. Layout of a Design Report: To format the report, add graphic elements, and arrange the data fields, use the report designer. Make sure the design satisfies company needs and is understandable and easy to use.
Put Report Parameters Into Practice
Include Parameters: Include parameters so that consumers can alter and filter the report's data. Date ranges, classifications, and other pertinent report-related criteria are examples of parameters. Set Up Defaults: To simplify user interface and minimize human input, set default values for parameters.
Install and Verify the Report
Deploy the Report: After the report has been designed and configured, upload it to the Dynamics 365 system. This entails setting up the required parameters and uploading the report to the reporting server. Examine the report: Test the report thoroughly to make sure it performs as intended. Verify the performance, correctness, and usability of the data. Respond to any problems that surface while testing.
Oversee and Uphold Reports
Update Reports: Continually update reports to take into account modifications to data structures, business requirements, or user comments. For future reference, keep track of versions and record changes in writing. Performance Monitoring: Keep an eye on user comments and report performance at all times. For effective data retrieval and presentation, optimize report setups and queries. Best Practices in Dynamics 365 for SSRS Reports Create with the user experience in mind: Make reports that are easy to read and offer pertinent information without being too overwhelming for the user. Make sure the report is organized neatly and the The data is displayed in an understandable manner.
Verify the accuracy and timeliness of the data shown in the reports to ensure data accuracy. To ensure data integrity, reconcile report data with source systems on a regular basis.
Optimize Performance: To enhance report performance, make use of effective indexing and queries. When it comes to cutting down on report processing time, steer clear of huge datasets and intricate calculations.
Put Security Measures in Place: By setting up the right security settings and access controls, you can make sure that sensitive data in reports is safeguarded. Restrict report access to only those who are authorized.
Maintain complete documentation for every report, including its purpose, data sources, and any customizations. This will help with version control. To handle report updates and alterations, use version control.
Summary
In Dynamics 365, SSRS reports are essential for providing useful information and facilitating data-driven decision-making. Gaining proficiency in the creation, distribution, and administration of SSRS reports will improve your reporting skills and enable you to give stakeholders insightful data. You may produce dependable and efficient reports by following best practices, which include performance optimization, data correctness assurance, and user-friendly report design. Gaining a thorough understanding of Dynamics 365's SSRS reporting will enable you to fully utilize your data and improve business results.
0 notes
Text
Top 10 ChatGPT Prompts For Software Developers

ChatGPT can do a lot more than just code creation and this blog post is going to be all about that. We have curated a list of ChatGPT prompts that will help software developers with their everyday tasks. ChatGPT can respond to questions and can compose codes making it a very helpful tool for software engineers.
While this AI tool can help developers with the entire SDLC (Software Development Lifecycle), it is important to understand how to use the prompts effectively for different needs.
Prompt engineering gives users accurate results. Since ChatGPT accepts prompts, we receive more precise answers. But a lot depends on how these prompts are formulated.
To Get The Best Out Of ChatGPT, Your Prompts Should Be:
Clear and well-defined. The more detailed your prompts, the better suggestions you will receive from ChatGPT.
Specify the functionality and programming language. Not specifying what you exactly need might not give you the desired results.
Phrase your prompts in a natural language, as if asking someone for help. This will make ChatGPT understand your problem better and give more relevant outputs.
Avoid unnecessary information and ambiguity. Keep it not only to the point but also inclusive of all important details.
Top ChatGPT Prompts For Software Developers
Let’s quickly have a look at some of the best ChatGPT prompts to assist you with various stages of your Software development lifecycle.
1. For Practicing SQL Commands;

2. For Becoming A Programming Language Interpreter;

3. For Creating Regular Expressions Since They Help In Managing, Locating, And Matching Text.

4. For Generating Architectural Diagrams For Your Software Requirements.
Prompt Examples: I want you to act as a Graphviz DOT generator, an expert to create meaningful diagrams. The diagram should have at least n nodes (I specify n in my input by writing [n], 10 being the default value) and to be an accurate and complex representation of the given input. Each node is indexed by a number to reduce the size of the output, should not include any styling, and with layout=neato, overlap=false, node [shape=rectangle] as parameters. The code should be valid, bugless and returned on a single line, without any explanation. Provide a clear and organized diagram, the relationships between the nodes have to make sense for an expert of that input. My first diagram is: “The water cycle [8]”.

5. For Solving Git Problems And Getting Guidance On Overcoming Them.
Prompt Examples: “Explain how to resolve this Git merge conflict: [conflict details].” 6. For Code generation- ChatGPT can help generate a code based on descriptions given by you. It can write pieces of codes based on the requirements given in the input. Prompt Examples: -Write a program/function to {explain functionality} in {programming language} -Create a code snippet for checking if a file exists in Python. -Create a function that merges two lists into a dictionary in JavaScript.
7. For Code Review And Debugging: ChatGPT Can Review Your Code Snippet And Also Share Bugs.
Prompt Examples: -Here’s a C# code snippet. The function is supposed to return the maximum value from the given list, but it’s not returning the expected output. Can you identify the problem? [Enter your code here] -Can you help me debug this error message from my C# program: [error message] -Help me debug this Python script that processes a list of objects and suggests possible fixes. [Enter your code here]
8. For Knowing The Coding Best Practices And Principles: It Is Very Important To Be Updated With Industry’s Best Practices In Coding. This Helps To Maintain The Codebase When The Organization Grows.
Prompt Examples: -What are some common mistakes to avoid when writing code? -What are the best practices for security testing? -Show me best practices for writing {concept or function} in {programming language}.
9. For Code Optimization: ChatGPT Can Help Optimize The Code And Enhance Its Readability And Performance To Make It Look More Efficient.
Prompt Examples: -Optimize the following {programming language} code which {explain the functioning}: {code snippet} -Suggest improvements to optimize this C# function: [code snippet] -What are some strategies for reducing memory usage and optimizing data structures?
10. For Creating Boilerplate Code: ChatGPT Can Help In Boilerplate Code Generation.
Prompt Examples: -Create a basic Java Spring Boot application boilerplate code. -Create a basic Python class boilerplate code
11. For Bug Fixes: Using ChatGPT Helps Fixing The Bugs Thus Saving A Large Chunk Of Time In Software Development And Also Increasing Productivity.
Prompt Examples: -How do I fix the following {programming language} code which {explain the functioning}? {code snippet} -Can you generate a bug report? -Find bugs in the following JavaScript code: (enter code)
12. Code Refactoring- ChatGPt Can Refactor The Code And Reduce Errors To Enhance Code Efficiency, Thus Making It Easier To Modify In The Future.
Prompt Examples –What are some techniques for refactoring code to improve code reuse and promote the use of design patterns? -I have duplicate code in my project. How can I refactor it to eliminate redundancy?
13. For Choosing Deployment Strategies- ChatGPT Can Suggest Deployment Strategies Best Suited For A Particular Project And To Ensure That It Runs Smoothly.
Prompt Examples -What are the best deployment strategies for this software project? {explain the project} -What are the best practices for version control and release management?
14. For Creating Unit Tests- ChatGPT Can Write Test Cases For You
Prompt Examples: -How does test-driven development help improve code quality? -What are some best practices for implementing test-driven development in a project? These were some prompt examples for you that we sourced on the basis of different requirements a developer can have. So whether you have to generate a code or understand a concept, ChatGPT can really make a developer’s life by doing a lot of tasks. However, it certainly comes with its own set of challenges and cannot always be completely correct. So it is advisable to cross-check the responses. Hope this helps. Visit us- Intelliatech
#ChatGPT prompts#Developers#Terminal commands#JavaScript console#API integration#SQL commands#Programming language interpreter#Regular expressions#Code debugging#Architectural diagrams#Performance optimization#Git merge conflicts#Prompt engineering#Code generation#Code refactoring#Debugging#Coding best practices#Code optimization#Code commenting#Boilerplate code#Software developers#Programming challenges#Software documentation#Workflow automation#SDLC (Software Development Lifecycle)#Project planning#Software requirements#Design patterns#Deployment strategies#Security testing
0 notes
Text
How to check Email and username availability live using jquery/ajax, PHP and PDO

In this tutorial, We will learn how to How to check Email and username availability live using jQuery/ajax and PHP-PDO.
Click : https://phpgurukul.com/how-to-check-email-and-username-availability-live-using-jquery-ajax-php-and-pdo/
File Structure for this tutorials
index.php (Main File)
config.php (Database Connection file)
check_availability.php (Used to check the Email and User availability)
Create a database with name demos. In demos database, create a table with name email_availabilty Sample structure of table email_availabilty
CREATE TABLE IF NOT EXISTS `email_availabilty` (
`id` int(11) NOT NULL,
`email` varchar(255) NOT NULL,
`username` varchar(255) NOT NULL
) ENGINE=InnoDB AUTO_INCREMENT=5 DEFAULT CHARSET=latin1;
2. Create a database connection file
config.php
<?php
//DB Connection
define(‘DB_HOST’,’localhost’);
define(‘DB_USER’,’root’);
define(‘DB_PASS’,’’);
define(‘DB_NAME’,’demos’);
// Establish database connection.
try
{
$dbh = new PDO(“mysql:host=”.DB_HOST.”;dbname=”.DB_NAME,DB_USER, DB_PASS,array(PDO::MYSQL_ATTR_INIT_COMMAND => “SET NAMES ‘utf8’”));
}
catch (PDOException $e)
{
exit(“Error: “ . $e->getMessage());
}
3. Now Create an HTML form index.php
<?php
include_once(“config.php”);
?>
<table>
<tr>
<th width=”24%” height=”46" scope=”row”>Email Id :</th>
<td width=”71%” ><input type=”email” name=”email” id=”emailid” onBlur=”checkemailAvailability()” value=”” class=”form-control” required /></td>
</tr>
<tr>
<th width=”24%” scope=”row”></th>
<td > <span id=”email-availability-status”></span> </td>
</tr>
<tr>
<th height=”42" scope=”row”>User Name</th>
<td><input type=”text” name=”username” id=”username” value=”” onBlur=”checkusernameAvailability()” class=”form-control” required /></td>
</tr>
<tr>
<th width=”24%” scope=”row”></th>
<td > <span id=”username-availability-status”></span> </td>
</tr>
</table>
4. Jquery/ajax script where you pass variable to check_availability.php page. put this in index.php inside head.
<script>
function checkemailAvailability() {
$(“#loaderIcon”).show();
jQuery.ajax({
url: “check_availability.php”,
data:’emailid=’+$(“#emailid”).val(),
type: “POST”,
success:function(data){
$(“#email-availability-status”).html(data);
$(“#loaderIcon”).hide();
},
error:function (){}
});
}
function checkusernameAvailability() {
$(“#loaderIcon”).show();
jQuery.ajax({
url: “check_availability.php”,
data:’username=’+$(“#username”).val(),
type: “POST”,
success:function(data){
$(“#username-availability-status”).html(data);
$(“#loaderIcon”).hide();
},
error:function (){}
});
}
</script>
5.check_availability.php page in this page you will check the availability of email or email.
<?php
require_once(“config.php”);
//code check email
if(!empty($_POST[“emailid”])) {
$uemail=$_POST[“emailid”];
$sql =”SELECT email FROM email_availabilty WHERE email=:email”;
$query= $dbh -> prepare($sql);
$query-> bindParam(‘:email’, $uemail, PDO::PARAM_STR);
$query-> execute();
$results = $query -> fetchAll(PDO::FETCH_OBJ);
if($query -> rowCount() > 0)
echo “<span style=’color:red’> Email Already Exit .</span>”;
else
echo “<span style=’color:green’> Email Available.</span>”;
}
// End code check email
//Code check user name
if(!empty($_POST[“username”])) {
$username=$_POST[“username”];
$sql =”SELECT username FROM email_availabilty WHERE username=:username”;
$query= $dbh -> prepare($sql);
$query-> bindParam(‘:username’, $username, PDO::PARAM_STR);
$query-> execute();
$results = $query -> fetchAll(PDO::FETCH_OBJ);
if($query -> rowCount() > 0)
echo “<span style=’color:red’> Username already exit .</span>”;
else
echo “<span style=’color:green’> Username Available.</span>”;
}
// End code check username
?>
PHP Gurukul
Welcome to PHPGurukul. We are a web development team striving our best to provide you with an unusual experience with PHP. Some technologies never fade, and PHP is one of them. From the time it has been introduced, the demand for PHP Projects and PHP developers is growing since 1994. We are here to make your PHP journey more exciting and useful.
Website : https://phpgurukul.com
1 note
·
View note
Text
A Comprehensive Guide Step-by-Step SCCM Inventory Report Creation

Image Source: https://powerstacks.com/hardware-asset-inventory-reporting/
One of the incredible tasks when it is about Configuration Management is SCCM Inventory Report Creation. It offers value to both SCCM installation and adds visibility to your efforts towards management. Without SCCM reports, this massive management tool works effectively on all your devices, but you’re experiencing all benefits.
How to make a good SCCM report?
Data
Data is the crucial component of all your reports. You must include the right SQL views into the SCCM database. If you’re reflecting the wrong information, your report will be vague.
Constructing an effective SQL query is the most complicated part of report creation. Without an adequate SQL proficiency, it will be difficult to get what you desire---but you can learn it.
Visually Compelling
A report with correct data is useful, but if it is presented poorly, the readers won’t be interested in it.
Keep it neat and clean: Include pie charts and graphs if necessary. Microsoft models this by using their cutting-edge Software Update dashboard and Office 365 dashboard.
The minute details
Incorporate links between your report to take your readers in the correct direction.
Include tooltips to demonstrate the shown data
The default SCCM Reports don’t have any of the above mentioned points. They provide you with insightful data, but they don’t adjust with the environment and are visually basic.
SCCM Report Creation
To develop SCCM inventory report, follow the steps below:
Open the SCCM console and navigate Monitoring/Overview/ Reporting
Right-click on Reports and choose Create Reports
Choose type SQL-based Report, located on the Created Report Wizard
Add the name of the report Office 365 Inventory
Include a report description if required
Browse and choose the folder where you can save the report
Go to Next
Report Builder: It is an effective tool to develop reports. Let’s go through the steps needed to craft a report.
After launching the Report Builder, see the screen’s left part, and focus on the Report Data section.
Data Sources and Datasets folder is the crucial one to begin. The Data Source section will be use to organize the database and Dataset can be utilized for the SQL query.
In this method, we’ve not used Build-in Fields and Parameters but they are beneficial for standardizing the reports.
SCCM Report Creation: Structure the Data Sources
Firstly, connect to the SCCM database:
Right-Click on Data Sources in Report Data on the left side of the panel and choose Add Data Source.
Enter the name for your data source in the General tab.
Choose Use a shared connection or report model
Click Browse
Browse till the end and choose SCCM database GUID and click Open
Inside the Data Source Properties, click Test connection to check your configuration and Ok when it’s done.
Develop a Dataset
Inside the Datasets section, you must create a SQL query.
Right-click datasets in the leftmost panel and choose Add Dataset.
Choose Use a dataset embedded in my report and choose the data source you have developed.
Paste the SQL query present in the Query field.
Click OK
You can get a glimpse of all fields on the right side returned by your query.
Report Design
Now, it’s the right time to create the visual aspect of the report. Include the data returned by the query.
Double click on the title and give it some other name to the Office 365 Inventory
Choose Insert/Table/Table Wizard
Choose the Dataset you’ve created, click Next
Choose desired fields to be showcased in the table and move them to the Value box.
Click Next
Once the style screen come, select Generic. Then, hit Finish.
You will obtain a basic report along with a title and the table you have developed.
Follow the steps to create a SCCM inventory report.
#sccm inventory report#sccm hardware inventory report#intune hardware inventory report#intune device inventory report#hardware asset reporting solutions
0 notes