#delay plugin
Explore tagged Tumblr posts
Visit Tumblr Blog
Explore Tumblr blogs with no restrictions, modern design and the best experience.
Last Seen Tumblr Blogs


Fun Fact
The “We are the 99%” Tumblr blog became the slogan for the Occupy Wall Street movement.
Text
FabFilter – Timeless 3 Version full 100% free download
Plugin Overview: FabFilter Timeless 3
Version: 3
Developer: FabFilter Developer
Website: FabFilter
Format: VST, VST3
Bit Depth: 64-bit
Tablet: Cured (Install and Run) | FLARE
System Requirements: Windows 10, 8, 7, or Vista 64-bit VST 2/3 host
FabFilter Timeless 3 is a highly flexible tape delay plugin designed for versatile sound manipulation. From simple echoes to intricate modulations, it offers a range of features to cater to your creative needs.
Key Features:
Vintage Sound: Delivers a vintage tape delay sound, satisfying everyday audio processing needs.
Effects and Filters: The stereo delay signal passes through five unique effects and up to six analog sound filters before returning to the input with adjustable feedback.
Interactive Controls: Well-thought-out controls and interactive delay and filter displays make programming custom delays straightforward.
Modulation System: Unique drag-and-drop modulation system allows easy adjustment of effects like ducking, wah, flutter, dynamic diffusion, and more.
Versatile Modulation: Create new modulation connections effortlessly by dragging and dropping with the mouse.
FabFilter Goodies: Includes FabFilter's signature features - perfectly tuned knobs, MIDI Learn, intelligent parameter interpolation for smooth transitions, interactive tooltips for help, CPU optimization, and more.
Ultimate Sound Processing Machine: With its unique effects, filters, patterns, and unlimited modulation possibilities, Timeless 3 can transform into the ultimate sound processing machine.
Verdict: If your plugins folder has been missing a delay effect, FabFilter Timeless 3 is the perfect solution. With a verdict of 10 out of 10, it's praised for its vintage sound, versatile modulation system, and the inclusion of FabFilter's signature features. Whether for simple echoes or intricate modulations, Timeless 3 is a highly recommended addition to your plugin arsenal.
#music#FabFilter#Timeless 3#audio effects#music production#sound design#delay plugin#FabFilter plugins#audio processing#creative effects#VST plugin#audio engineering#music software#time-based effects#modulation#audio manipulation#digital audio workstation#music technology#production tools#audio plugins#studio gear#electronic music#audio software#mixing and mastering#FabFilter Timeless#audio creativity#plugin architecture#music industry#production techniques.#software
6 notes
·
View notes
Text
youtube
P930 Lunar Lander: BBD Delay, Plate Reverb & Saturator
0 notes
Text
i think my stream layout is finally looking cute, even if no-one's there to see it yet
#i like just sorting things so it's been fun finding the various parts i need to make it right#like i've been perusing an game soundtrack website for music (and gone overboard with it tbh)#and also looking for obs plugins to use.#inevitably this has delayed my sleep even tho i have an appointment tomorrow lol#and this post is delaying that further.#anyway. i like putting things in their little boxes and this scratches that itch#key's lockbox
0 notes
Text
who wants to listen to this song i made with all my worst* plugins
#music#original song#kinda shit actually but yknow#plugins as follows are:#ttm009#bass module#psymon#superubbish#superubbish my beloved.....#auhh anyways magical 8bit plug 2#line of legends#and ofc delay lama & meowsynth#those last two are good actually#and 8bit plug its nice
1 note
·
View note
Text
Unleash Classic Echoes with the NA 501 Chorus Echo Plugin by Nembrini Audio
Welcome to the world of impeccable sound where the past and present collide beautifully. Introducing the NA 501 Chorus Echo, a state-of-the-art plugin by Nembrini Audio, engineered to resurrect the legendary Roland RE-501 Chorus Echo’s hallmark sound. This modern digital marvel offers a seamless blend of nostalgic analog warmth and contemporary functionality, catering to today’s diverse music…
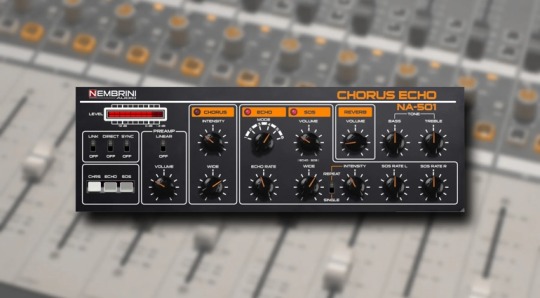
View On WordPress
#AAX#analog#Apple Silicon#AU#AudioUnit v3#AudioUnits#BBD#BBD chorus#chorus#classic tape echo#DAW#delay#Echo#iLok#Instagram#Intel#iOS#iPad#iPhone#Logic Pro#M1 Mac mini#MAc#NA 501 Chorus Echo#Nembrini Audio#plugin#reverb#Review#Roland RE-501#software#Sound On Sound
0 notes
Text
JANUARY DEVLOG - 1

The first DEVLOG is here! The Dreamer development after the DEMO began January 1st, so the bi-weekly DEVLOGs are in proper motion!
NEXT RELEASE PLANS:
The next planned "update" will be the full PRELUDE release. As of now, The Dreamer DEMO is an incomplete version of the PRELUDE (sorry for the terrible cliffhanger!) The PRELUDE is going to release as soon as possible–hopefully within March.
The reason it will take longer for a possibly shorter amount of gameplay time is not only due to making entirely new assets, but because these assets will be used for the rest of the full mod. Things like battle art, sprites, etc–will need to be completed in full, and will be used for the rest of the game.
Another trailer is going to be made to better show what the entire mod will be about, and the PRELUDE will release on the day that trailer goes up. This is because the mod will not be released in the "chapter by chapter" format to keep the true OMORI experience, so the trailer will cover things that won't even appear up in the PRELUDE. The entire narrative outline is complete, so there will be no rewriting or development hell caused by backtracking. There is a firm plan and vision, so I hope you can look forward to the next release!
PROGRESS:
As of now, the team is very small (and amazing!!!!!), meaning a significant portion of the mod is still going to be done by one person, so please understand if a delay happens. Currently:
Map creation is in full force. Around a third of the maps have been made, but more are actively being worked on.
Sprite art and NPCs are coming along nicely.
Battle assets are in motion. The art needed is on the heavier side, but a lot of these drawings will be used for the entire game, so more time now saves the trouble later.
OST is coming along amazingly, having the most progress overall.
Some better plugins and a certain mechanic have been implemented, and a few elements are being tested now. It's smooth for the most part.
Cutscene wise, not much has been written or implemented besides the introduction due to the focus on assets. But, that will quickly change now that some proper assets have been made, and certain core things have been put in place.
Lots of portraits! ^^
CONCLUSION:
A lot of groundwork is being laid, and it's pretty overwhelming overall how much is still needed before the PRELUDE release. The current goal may seem unrealistic, but factoring in the actual total time it took the create the DEMO (including the learning curve), it should be very possible. The proper trailer itself may take up extra time and push back the release, considering the extra art that will be made ahead of time for it, but it'll be worth it. Please look forward to the next DEVLOG!
168 notes
·
View notes
Text
Phil: There is a small delay– it's the same translations as the ones used for the– the ones on screen that you can turn off right now. Those ones with the plugin, only it's sending it to a browser source so I can pop it onto the screen. It's cool! I like it. I'm sad I can't customize it more when I'm offline. I have to like, do it when I'm live. So... there we go, nice little test.
Phil: If I add it fully, I'll add all the languages Chat, and then try and make them match. I guess I could probably figure it out on my alt.
I know there's been a lot of bad news this week, so I want to share something nice: Phil is thinking about adding subtitles on screen so that VOD watchers can still have access them.
#Philza#Phil#This DID make me burst into tears all over again#Phil plays hardcore#May 15 2024#There are still good ripple effects#Even if I'm still grieving and sad and frustrated#The ripple effects are good
187 notes
·
View notes
Text
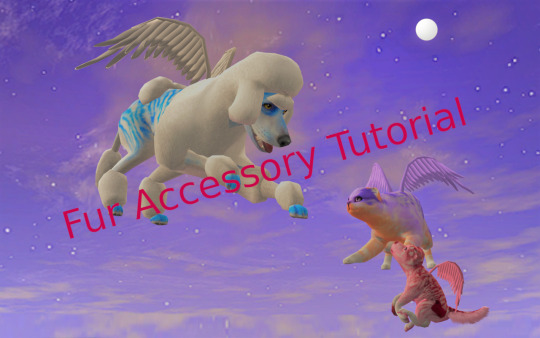
Custom Fur Accessory Tutorial
I have been meaning to put this together for a loooonnnng time, but as there is still a lot of information about the process that is undiscovered, I held off. I didn't have the energy to deep dive and solve those mysteries either, so I just kept delaying and delaying. The circle of procrastination in progress!
It's long overdue though, and even though the mysteries still remain, I am sure there are others eager for even the partial scoop of knowledge I've managed to glean. And also thanks @angelapleasant for helping re-motivate me! I appreciate the patience as I worked through to remember all the steps.
This assumes you already know the main basics of making a mesh and using SimPE, so I won't go over every excruciating detail for this. I personally will be using a cat mesh for this tutorial, but the method is the same for dogs as well (they just have way more meshes/resources).
Tools: SimPE, a mesh editor such as MilkShape, and a photoeditor. I also put together some Custom Pet Genetics Resources, which includes everything pet related I've ever utilized when making pet cc. Everything is separated by cats or dogs, and then sorted even further. For this tutorial, I will be making a cat item, so the resources I'm using will be from there. If you're making an item for dogs, just follow the same steps but using the dog equivalent of each resource instead. I tried to make it organized, but it's probably still messy.
Step 1 - Slaved Vs Recolorable: There are two types of Fur Accessories: slaved and recolorable. I will only go over the process for slaved furcards, but the process for recolorable is pretty much the same except at one part.
• Slaved are my personal favorite fur accessories; they grab their color from that of the pet’s coat color. They don’t require any recolors, just one simple package and they’re all done. The only downside is that they don't have their own textures. Examples of slaved furcards are the furry belly fluff on cats and dogs.
• Recolorable is by far the most tedious of all versions, as it requires an additional recolor of the accessory to be made for every single fur color, and any fur colors that don’t have a recolor made for them will default to white. Do yourself a favor and avoid recolorable accessory furs at all costs. Examples of recolorable furcards are dog beards, dog eyebrows, and poodle fluff.
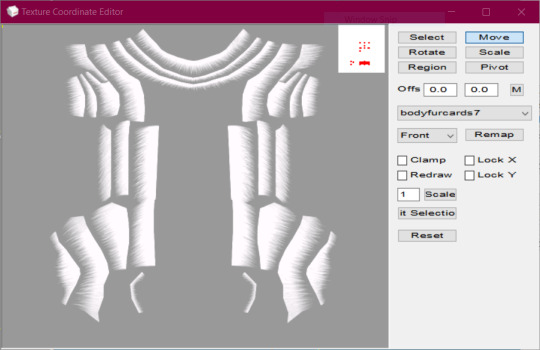
Step 2 - Make the Mesh: Open MilkShape and import "bodyfurcards.5gd" from the zMeshResources folder.* There's 5 groups, don't delete any, just make your mesh on one of the group layers already available. I, personally, put my meshes on the bodyfurcards7 group.

After you've made your mesh, map the textures to "fubodyaccflowingfurcardREMAKE.png" in the zMaterialDefinitions folder. This is from my AccFurCardsTextureOct2018.package, which is a default replacement of Maxis' original body furcard texture. It adds a square in the corner (for the dog equivalent, it adds a teeny tiny rectangle near where the eye texture normally is).
Once you're satisfied with the mapping, then make sure all the comments and joints are correct, and export. As a fair warning, pet weights are super weird, so your mesh might wind up with some strange issues such as morphing or floating.
*There is also a facefurcards version, but my attempts to use that one for custom fur accessories have been unsuccessful. I included it if anyone else wanted to try their hand at it.
Step 3 - Make the Mesh Package: In the zMeshResource folder find the BodyFlowingFurCardsMesh package. Open it in SimPE, Fix Integrity, then Save As under a new name. Then replace the GMDC with your exported Milkshape mesh, and save. Or don't, if you prefer a different way of mesh making. The TRULY important part is the Shape (shpe) file. Click it and make sure it has the correct number of parts in Plugin view. BodyFlowing (Cat) for example has 5 groups, so it should look like this:

Make sure the new mesh is in your Downloads folder, if you haven't already put it there.
Step 4 - Make An Accessory: Open up Bodyshop and make a brand new accessory. To make it easier on yourself, I would suggest choosing an accessory that has only 1 or 2 ages or genders. One age group if you are making a mesh for only adult cats, two if it will be for cats and kittens, etc. That way you won't need to delete unneeded overlays and other resources from the package.
Other than the number of ages, don't worry about anything else. Immediately import the accessory project into Bodyshop, and then close the program.
Step 5 - Clean Out Unneeded Textures: Inside your SavedSims folder should be the new accessory package you just made. Open it, and delete all the Material Definitions (TXMT) and Texture Images (TXTR). The only exception would be if you're making Recolorable Fur Accessories, then skip this step instead and skip step 6 as well. For the Recolorables' case, here is where you would import your recolor. Remember, each fur coat color will require their own recolors of your mesh, which means you will need to make a new accessory in bodyshop for every single fur color.
Step 6 - Link To Furcard Material Definition: Click on the 3IDR resources and let them load. Pick 3IDR, if it has a Resource Node and a Shape listed in the plugin view, perfect. Find the first available material definition line, and change it to the appropriate File type - SubType/Class ID - Group - Instance and delete any material definition lines underneath it.
0x49596978 - 0x08CCE154 - 0x1C0532FA - 0xFF7FC524
It's the same for both cats and dogs for some reason. I also included the "FUBodyAccFlowingFurcards.5tm.xml" in the MaterialDefinitions folder, if you prefer the package method. Repeat for additional 3IDR that have material definitions, ignore 3IDR that don't.
Step 7 - Link Accessory Package to Mesh: If you already know how to link, feel free to jump ahead. While still on the the 3IDRs, pick one that has a Resource Node and a Shape listed in the plugin view. Memorize the chosen 3IDR's instance. I picked the one with an instance of 0x00000801, which is usually the instance for adult female accessories. Click on Tools>PJSE>Body Mesh Tool>Linking Stage. Then select the mesh you made in step 3. Click on any other resource available, then save.
Step 8 - Edit Overlay XML: Click on the XMOL with the same instance as the 3IDR from step 7. As a reminder, I picked the adult female instance of 0x00000801 for this tutorial. Find the family string value, and copy it with ctrl+c and make sure you put it somewhere you won't lose it.
From there, right-click the XMOL and select "replace", then select the "XMOLReference.xmol.xmol" in the main folder. Paste the family value you copied earlier into the new XMOL, then save.
Click on the XMOL again and change the values of any lines necessary. For the Species line use 8 (cats), 2 (big dogs), 4 (little dogs), or 6 (big & little dogs, AKA puppies). For the Gender line use 3 (unisex). For the Age line use 18 (adults & elders), or 20 (kittens/puppies). The Parts line should be 8 or 2 (use 2 for meshes that need to morph and move with the pet's body/face, like the face fur cards). The Category line should be 7, but if they aren't then fix them. Delete the Outfit and Priority line, if they haven't been already. Override0subset needs to say bodyfurcards.
Step 9 - Choose A SubtypexBin: The most frustrating part about pet cc is that they have big limitations. For example, pets can only wear one "collar", and only a small number of custom fur accessories are allowed to be worn at once. You can have as many fur accessories as you want in the game, but if any two fur accessories share the same subtype and bin combo, then they can’t be used together at the same time. Pets can have a total of 10 fur accessories without conflict, but once you exceed 10 eventually some will have to use the same SubtypeXBin combo and thus be unusable together.
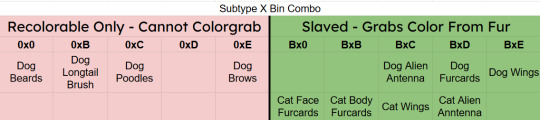
In the XMOL, change the Subtype line to B, if you're making a Slaved Fur Accessory*. If you're making a Recolorable one instead, use 0 as your subtype. Then change your Bin to either 0, B, C, D, or E. Now save.
Depending on your project, I might even suggest you choose a slot already filled instead of a free slot. For example, if you are making a wing accessory then choose BxC (BxE for dogs), or a head accessory that would look terrible with antenna then choose BxD (BxC for dogs), etc.
*There is a way to trick the game into allowing slaved fur accessories to use the 0 subtype. It involves loading the game with the fur accessory as a normal B subtype first, and then changing the subtype after. The game will then use the "old" version of the accessory, but with the subtype permissions of the "new" version.
Step 10 - Repeat Steps 6-9 For Additional Ages/Species: As it says, if you plan on making versions for kittens/big dogs/little dogs/puppies/etc. Have all of them share the same family, so that way they are all connected and can be passed down to offspring.
At the end, each XMOL should roughly resemble this, but with whatever their appropriate values are:

Don't forget to make sure the override0resourcekeyidx is correct for whatever line the material definition is in the 3IDR! ("4" means the 5th line, etc. The first line is number "0", so count the lines then minus 1.)
Step 11 - Delete Cache/Thumbnails/Registry: To quote @angelapleasant who worded it perfectly, pet cc is sticky. The game frequently gets stuck on old versions, and has to be forcibly updated. This stickiness is exactly yeah the subtype loophole mentioned earlier exists, but it can be very frustrating when testing new cc. In your game folder delete the Accessory.cache, Group.cache, cigen.package, ContentRegistry, and Thumbnails folder. Make sure AccFurCardsTextureOct2018.package is in your Downloads folder. Then load up the game, and check out your custom fur accessory.

If it all worked out, congrats! For Dogs if you mapped onto the tiny rectangle, then slaved fur accessory will appear gold with Maxis fur colors but custom colors will work just fine. Recolorable dog accessories on the other hand will require my MaxisAccFurDogFix to work.
I think that's everything, and good luck! Feel free to ask questions or reach out, I'll do my best to help. And if you do wind up making something, please let me know; I love seeing what people create!
101 notes
·
View notes
Note
do you have any mod recommendations for morrowind?
i don't use an awful lot of mods tbh. i highly recommend using openmw instead of the base engine, first of all. but here's some mods i do use:
1.) all the official plugins
2.) check out the pb mods, they're all pretty neat
3.) true lights and darkness to make torches and stuff like. not useless
4.) some kind of backpack mod for extra carrying capacity! i use "adventurer's backpack" which does unfortunately use up a shoulder slot but it's worth it imo
5.) juniper's twin lamps for a revamped (ie more complete) twin lamps experience
6.) hospitality papers expanded, which makes it actually necessary to get the hospitality papers to do stuff in sadrith mora
7.) "dark brotherhood attacks once - delayed" is a MUST HAVE for me tbh
8.) book rotate for if you like decorating and hate the way books place!
9.) a mod that increases the store chance on projectiles (basically whether or not you can pick up your arrows/bolts/throwables from bodies or not). i use one that increases the chance to 100% but there's a lot of options
10.) blight bounties! you can collect rewards for killing blighted monsters/animals at ghostgate! you might also want "blighted animals retextured" to go along with this, so you can tell them apart better
11.) bloated morrowind! actually adds bloat plants to the world; in the base game bloat is only an ingredient that you can buy, not gather
12.) solstheim rumor fix (akin to the dbh attacks mod), it restricts how often "latest rumors" will tell you about solstheim. i think it restricts it to certain npcs or something, you'd have to look into it
13.) diseases restored! it fixes some inconsistencies with which animals carry which diseases and what they do etc
14.) oblivion style vampires for a more forgiving mw vampire experience
15.) julan is a great companion mod!
16.) gnisis arch replacer! it puts one of mehrunes dagon's arms hanging from the arch in gnisis :3
17.) red wisdom is a fun ashlander themed quest/dungeon mod!
18.) skyrim: home of the nords is great! and you might also try project cyrodiil, which i hear is also great!
19.) there is a texture replacer called watercolored morrowind, which i really enjoy! it "muddies" the textures a bit to look more, well, watercolored. it still matches the vibe of the og textures but gives it a more stylized spin
20.) there should be a mod that changes plants from containers to simple pickups like it is in oblivion and skyrim. i think it's called harvestable flora? i don't see it in my content list but i know i have it installed, weird
21.) zesterer's volumetric clouds and mists for openmw is a GAME CHANGER esp if you use a higher view distance (openmw supports pretty high view distances, although you might have to fiddle with some .ini files to unlock them)
that sounds like a lot but it's really not. no huge gameplay changes or even graphical ones (aside from the volumetric + view distance). i prefer a pretty vanilla experience tbh.
25 notes
·
View notes
Note
What is the status of Tumblr being connected to the fediverse, given the re-org? More recently a Tumblr employee confirmed it was delayed (source: https://www.tumblr.com/cyle/722492285243293696/serious-question-obviously-youre-not-the-best) and is now a part of Tumblr Labs. Is there another reason beyond the financial pressures for the delay? Is Tumblr scoping out other protocols, like nostr or bluesky's AT protocol?
This is a very interesting area, especially with the launch of Mammoth that you covered quite well. The Activity Pub and Friends plugins for WordPress are both from Automatticians, and have allowed us space to play in this space and understand the community and protocols, and also gauge user demand. Right now both have under ten thousand users, so there hasn't been a big user push for this yet.
But maybe that's because WordPress sites are too much of an island already, so the same folks are now digging into the Tumblr codebase to see what we can do here. So at the end of the year (Dec 31) we'll have a chunk of the team switch away from Tumblr, but right now we're actually having someone switch toward it to work on this and they will continue in the new year.
I remain a huge believer in open standards and user freedom, though I don't claim to have the truth on which particular standard is better or best, to serve our customers we will support everything we can in good faith to give users more freedom, choice, and avoid lock-in.
144 notes
·
View notes
Note
what r some of ur favorite guitar pedals??
let’s see….. I used to have one of the original Tube Screamers (the mini one) which i put on almost everything, perfect for just a little overdrive boost but also fuller distortion. speaking of originals, the original big muff was my first pedal ever, gifted from a friend. both were stolen on tour this past spring i have clones/smaller versions that do pretty much the same.
another pedal i sadly no longer have is the digitech obscura, an “altered delay pedal”. it had this reverse delay patch that was absolutely insane, especially when used in conjunction with a reverse reverb.
Cant forget to mention the strymon big sky, my desert island pedal and objectively the best (multi) reverb pedal available. it is responsible for all the ambient layers i create + basically any non ambient guitar part i record as well. i also have the big sky plugin for logic (like a third of the price of the pedal) and it 100% lives up to the physical pedal. really love using the plugin on my voice.
ALSO, should mention the zoom multistomp ms-70cdr, somewhat of a recent acquisition that i’m still toying with. it’s a reverb/delay/modulation (use it for the latter the most) multi fx. has something like 80 different patches and though it’s interface is a little tricky to figure out, i’m really enjoying it. you can layer up to 6 fx and considering it has 80+ fx for less than 200$ i highly recommend. i think they came out with an updated version as well.
28 notes
·
View notes
Text
.O_O.
~Brief descriptions of the animation process below the cut~

First pass with testing out the placements and eye darts first. I edited his eye shape a lot after this coz it was too big here xD His tattoo isn't properly masked as well yet
Second pass with the new eye shape >u< Testing out his smaller eye in this and making sure the pupil doesn't clip through his smaller eyelids
Third pass, eye squinttsss. I don't use plugins for my animation though, I just brute force it via a combo of position, rotation and puppet pins xD
Fourth pass with more detailed and subtle eye movements. If you squint and stare hard enough you can actually see subtle deformation for his eyelashes to have a smoother animation with the delays and drag

Fifth pass, I gave him a subtle up and down movement with his body as if from breathing but you can't really see it unless you've been staring at it as long as I have xD But it does help subconsciously to not make him feel as static. Bigger head movement for this too where he shifts position. Started parts of his hair animation too. There's puppet pins as well in his hair to do the wave motion for it alongside rotations.

Sixth pass, wheeee he got all his fluffeh hair moving x3 I animated each strand to be on the same timing first then slowly offset the keyframes one by one so that they all move on different timings for it.

Seventh pass, last WIP pass I saved before the completed one. He got yet another expression shift for this. I'm pretty happy with how he's quite flexible in his expressions from just manipulating the puppet pins and my many many layers to built him xD Annddd that's all, thanks for reading >u< / <3

Bonus note, animating in After Effects will eat your PC like nobody's business x'D 46GB just for the damn cache omggggggg It was worth animating Sukuna though~
#Ryomen#Sukuna#両面宿儺#JujutsuKaisen#呪術廻戦#jjk#digital#animated#gif#fanart#Chirpy-chi#I am so happy with the end results from this#I took a long hiatus from doing animations like these due to lack of time and energy#but man after seeing everything come together#it's a certain kind of satisfaction ;v;#ofc while I was animating I started questioning my life choices#as anyone who has tried animation probably does
63 notes
·
View notes
Text
youtube
Plugin Alliance Neold Oldtimer BBD delay
0 notes
Text
Mixing Stuff Masterpost for Vocal Synth Users
i'll say a few things here and there on how i approach mixing based on a set of guidelines i've been giving thru learning. i won't go 100% and i encourage you research further on your own as everyone has a different perspective of certain concepts. whats important is that you understand the concept so that you are able to interpolate on it with your own liberties. yeah. please read the links before looking at my commentary or you won't understand what im saying.
Some DAWs, Their Guides, & Some Freebies: One of the first things you should do is pick a DAW and learn how to use it and its functions to streamline your mixing process.
Free DAWs: The Best Available in 2023 by Produce Like A Pro
Audacity / DarkAudacity (i like darkaudacity): has a section of the site dedicated to tutorials on using Audacity!
Reaper: has a 3 hour course FREE course on mixing!
FL Studio: has a demo version you can pretty much use forever with a few.........exceptions. I won't be linking any cracked versions though. Here's a manual for this program since many people use it!
Free VST Plugins by Bedroom Producers Blog
37 Best Free Mixing VST Plugins by hiphopmakers
ORDER IN THE COURT!: The order of plugins is more important than you think. These links should also introduce some terms we use in the audio production world (like "gain staging" or "EQing")
WHAT'S THE BEST EFFECTS CHAIN ORDER FOR MIXING? by Icon Collective:
The Order Of Things: Audio Plug-ins by AskAudio
Plugin order is viewed from "top to bottom". BASICALLY... most like to gain stage -> EQ -> compress -> saturate -> MORE EQing -> whatever else at this point, but i do my process a bit differently. don't be afraid to bend the rules a little bit. but the guidelines are there for a reason.....based on what they do
Basics: I'll link to some tutorials to elaborate on what was listed by Icon Collective's list.
Gain Staging: Gain Staging Like a Pro by Sweetwater
Saturation: Saturation in Mixing – Instant Warmth, Glue and Fullness with One Plugin by Tough Tones (soundgoodizer fans make some fucking noise i guess)
EQ: SUBTRACTIVE VS ADDITIVE EQ (WHEN TO USE EACH & WHY) by Producer Hive
Compression: THE COMPLETE GUIDE TO AUDIO COMPRESSION by Icon Collective + Audio Compression Basics by Universal Audio
Modulation: Modulation Effects: Flanging, Phase Shifting, and More by Universal Audio
Time Based Effects: Reverb Vs. Delay: Complete Guide To 3D Mixing by Mastering.com
Audio Busing/Routing/Sending Tracks: Your guide to busing and routing audio tracks like a pro by Splice
Limiters: 10 BEST LIMITER PLUGINS FOR MIXING AND MASTERING by Icon Collective
Sidechaining: Sidechain compression demystified: what it is and how to use it by Native Instruments (i dont know anything about this lol)
Automation: Mix Automation 101: How to Automate Your Sound For a Better Mix by Landr (p.s learn how to write automation in your respective programs)
Last note: great. these are the main things you should focus on understanding in mixing. now you are FREE my friend!
youtube
Bonus: Tempo Mapping in Reaper (if you want to learn how to midi songs with bpm changes!!!)
#vocal synth#tutorial#masterpost#mixing#utau#vocaloid#synth v#synthesizer v#cevio#voisona#neutrino#mixing tips#audio production
133 notes
·
View notes
Text
Sam Petts-Davies's Setup for Thom's 'Everything' Tour

A photo of the setup, shared by Sam on his instagram account with the caption "tour begins tonight. i’ll be parked at front of house with this box of esoterics for the duration. it’s going to be something really special."
Thom's solo tour has just begun with a show in Christchurch, New Zealand, and Sam Petts-Davies is along for the ride!
Since Radiohead's earliest shows, there's always been at least a few effects added by an engineer at the FOH (front of house) mixing desk to keep the band's sound clear and coherent. With Radiohead, that role was filed by Jim Warren. Even after Thom started bringing pedalboard full of vocal effects on tour, Jim continued to apply additional effects including plugins such as the Waves C4 multiband compressor for vocals. You can find more info on Jim's work in these posts.
For The Smile, even fewer hardware effects were needed at the FOH desk, in part due to Thom's expanded vocal pedalboard. In 2022, the Smile's mix engineer mainly relied on plugins from an Avid VENUE S6L-32D digital desk, supplemented only by a TUBE-TECH CL 1B Tube Optical compressor (presumably for Thom's vocals).
It's clear that when Thom is performing totally solo, a different approach is needed. But it's hard to imagine that any past FOH setup has been so full of hardware effects! And not just effects, but also modulators and an usual mixer, as we'll see....
For those who don't know, Sam initially served as a engineer under Nigel during the recording of Junun in 2015. He subsequently did engineering work on Spectre, A Moon Shaped Pool, and on the strings for the OKNOTOK singles. In 2018, he co-produced the soundtrack to Suspiria with Thom, and apparently Thom was a fan because Sam received a full production credit for Thom's soundtrack to Confidenza. He also produced both of the Smile albums released this year: Wall of Eyes and Cutouts.
For comprehensibility, we've divided the setup into four sections: the core, the modular, the pedals, and the rack. We'll start with the core setup.
Core Setup

This section is the nexus: receiving input from Thom's stage setup, sending it through various effects, and mixing it all together. The Matrix Mixer is using to both mix together and feedback the various effects in Thom's eurorack setup. The Yamaha DM3-D appears to be the central mixing console for the entire setup. Despite its small size, the Yamaha boasts 22 channels and a huge range of built-in effects, and on top of that it can also run VST plugins.
Death By Audio Echo Master delay
? Electro-Harmonix 45000 looper
Roland RE-201 Space Echo tape delay
?
Erica Synths Matrix Mixer
Yamaha DM3-D Digital Mixing Console
Modular Setup

In the decade since Thom first used a Make Noise Shared System Plus to process his voice and piano, his eurorack effects setup has expanded quite a bit! The Shared System is designed to be both a sound generator and an effects processor, and since then Thom has created dedicated setups for each of those applications. This setup is the effects processor, with lots of delays, filters, and reverbs, plus some LFOs and CV sources to modulate those effects. The additional Doepfer case that Thom has on stage, might have some of his sound generators, but knowing Thom it could just as easily be even more Make Noise Echophon delays.
Row 1 (left to right):
Make Noise Maths (unused)
Intellijel Planar² joystick
Xaoc Devices Belgrad dual filter (unused)
4ms Dual Looping Delay
4ms SISM: Shifting Inverting Signal Mingler
blank panel (4hp)
Row 2 (left to right):
4ms QCD: Quad Clock Distributor (unused)
Soma Lyra8-FX (unused)
Make Noise Echophon delay
Make Noise Erbe-Verbe reverb
Vermona TAI-4 transformer-isolated I/O
Row 3 (left to right):
Intellijel µMIDI interface
Make Noise Richter Wogglebug random generator
Make Noise MULT
Make Noise QPAS dual filter
Rossum Electro-Music Panharmonium spectral resynthesizer
? Make Noise Memophon delay
Vermona TAI-4 transformer-isolated I/O
Row 4 (left to right):
Make Noise Morphagene sampler
Mannequins Three Sisters filter
Mannequins Just Friends
Qu-Bit Aurora reverb
Earthquaker Devices Afterneath reverb
unknown module (2hp)
Xaoc Devices Kamieniec phaser
It appears that these are Thom's Rows 1 and 2 are kept in a Doepfer A-100P6 Suitcase 6U case. Rows 3 and 4 are kept in a Doepfer A-100PB Suitcase Base case. The modules on row 4 are impossible to identify at this angle, but Make Noise style knobs are clearly visible on the left-most module.
Pedal Setup

Furman M-8Lx power supply
? Radial Engineering EXTC-Stereo reamp
Eventide Pitchfactor
? Hologram Chroma Console
Empress Effects Reverb
Rack Setup

We'll double back on this one once we have a better photo...
Edit (Feb 27, 2025): added missing bits of gear to the lists.
17 notes
·
View notes
Text
Neural DSP Morgan Amps Suite - Vintage Charm and Modern Fidelity
Neural DSP introduces the Morgan Amps Suite, a guitar amplifier plugin that promises a perfect mix of vintage warmth and modern clarity. This latest offering from Neural DSP, a leader in digital guitar processing, brings the revered tones of Morgan Amplification’s boutique tube amps into the digital realm. Morgan Amps Suite The Morgan Amps Suite features three iconic Joe Morgan tube amp designs,…

View On WordPress
#64-bit#AAX#AC20#amp#Apple#Apple Silicon#AU#Celestion Creamback#compressor#DAW#delay#Echo#effects#Joe Morgan#MAc#Morgan Amps Suite#Morgan PR12#Neural DSP#overdrive#plugin#reverb#silicon#software#Standalone#SW50R#Tremolo#tube#video#VST#Windows
0 notes