#disable right click and selection html
Explore tagged Tumblr posts
Visit Tumblr Blog
Explore Tumblr blogs with no restrictions, modern design and the best experience.
Last Seen Tumblr Blogs


Fun Fact
Tumblr has a 66 index score for customer satisfaction in the US.
Text
Dear Web Encryptor : Protect both Content and Source Code of HTML, HTML5, BootStrap website
https://codecanyon.net/item/dear-web-encryptor-protect-the-source-code-of-html-html5-bootstrap-website/19555597
Every day, several website owners become victims of people who steal Text Content, Image Content and HTML, HTML5, BootStrap codes. If you do not protect your Text Content, Image Content and Source Code, you could even allow your entire site to be cloned by such people, in minutes, even without any credit or profit to you. Using this software is the only way to protect your HTML, HTML5, BootStrap websites from being stolen.
#copy protection html#dear web encryptor#disable copy and paste html#disable copy web page#disable image download html#disable right click and selection html#dreamweaver#encrypt html5#html copy protection software#html encryption software#html image copy protection#html text copy protection#html5 copy protection#html5 encryption#prevent image download
0 notes
Text
Honestly I recommend everyone learn just a littttle bit of CSS because it really is powerful and just makes bits and pieces of your internet experience more convenient.
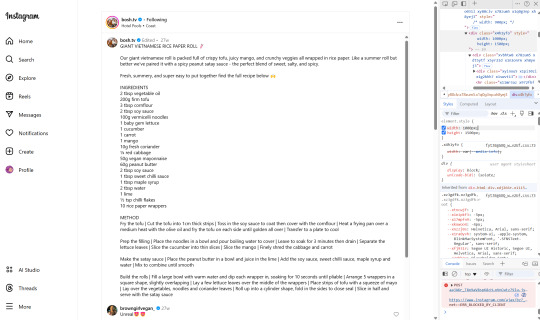
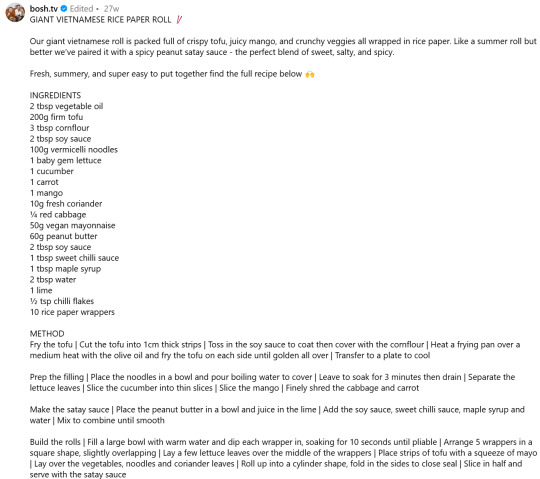
Right now I'm cataloguing recipes I've really enjoyed, just trying to get them all in one place. Many of these are instagram recipes and, because I don't trust link rot (aka the possibility that the instagram link goes dead one day), I'm including a screenshot of the recipe along with the link.
But instagram on desktop... looks like this

(Link, for credit. It's a good recipe)
I obviously could just copy-paste the recipe out of there. But a screenshot would be cleaner for how I'm cataloguing these.
And as-is, I'd have to scroll the whole height of that small right-side window about 4 times to fit it all.
But actually... I can just resize that div holding that whole right-side content
Basically I
hit f12 to open the dev tools
clicked the element finder
clicked on an element inside the recipe side
followed it up the tree until I found the element holding the whole recipe side (do this by hovering the div in the dev tools panel way on the right, then hovering upward and up until I find the element which is the highest up that still only contains the recipe-side content)
in the element.style part, set "width: 1000px" and "height: 1500px"
(I notice the width seems to still be less than 1000px, even though it got bigger)
likely suggests there's an element above it with a max-width set
go up the tree higher until I find the element with the max-width and uncheck that style
screenshot ready
Maybe that sounded complicated but it took me probably 20-30 seconds
And this isn't just about screenshotting recipes like.
website with an annoying gif? select gif, delete gif
do you want a clean screenshot of a digital receipt for record-keeping without a large company banner or irrelevant information? delete unnecessary elements, adjust widths, screenshot
SOMETIMES, you can bypass paywalls if they're relying on something like overflow: hidden, or an overlay in the way, or some JS that runs (you can disable JS in the dev tools)
lost the jpg/png file you used for your profile picture and size doesn't totally matter? grab it from the img src while logged in. (you might even be able to find it in a bigger size by changing the url query parameters)
color contrast on an article really bad? find and change background color. find and change font color
want to make a funny fake screenshot without learning photoshop? just edit the page content in the dev tools
This isn't about like being good enough to write scripts or browser extensions. Really if you just have some basic HTML/CSS understanding a hat worth of tricks, you can make so many little adjustments in your favor.
683 notes
·
View notes
Text
Favorite Firefox Extensions
Firefox is a very extensible browser - through a combinations of addons and userscripts you can make it behave just about any way you want. The best part is, they're all free. Here are some of my favorites.
Note: if you have an Android device, check out my post about Firefox for Android's new extended support for addons!
Note: if you have an Apple device, check out my favorite Safari extensions here!
Last updated Feb 2025 (updated list of languages supported for native, local translation by Firefox).
Index:
uBlock Origin
Tab Session Manager
Sauron
Bypass Paywalls Clean
Auto Tab Discard
Video DownloadHelper
Highlight or Hide Search Engine Results
TWP - Translate Web Pages
UnTrap - YouTube Customizer
Indie Wiki Buddy
Cookie Auto Delete
ShopSuey - Get Rid of Ads on Amazon and Ebay
LibraryExtension
Absolute Enable Right Click & Copy
uBlock Origin
(compatible with Firefox for Android)
This is the first addon I install on any new Firefox browser. It's an adblocker, but at its core it can remove pretty much any HTML element from a website, and it comes with pre-configured lists for removing everything from ads to cookie banners to those annoying popups that ask you to sign up for email newsletters.
Tab Session Manager
Have you ever accidentally lost all your open browser tabs due to a computer update, or even just accidentally closing Firefox? With this addon you no longer have to worry about that - it automatically saves your open tabs and windows every time the browser closes, and autosaves a restore point of tabs every few minutes in case the browser crashes unexpectedly. Opening all your previous tabs and windows is a one-click deal.
Sauron
Ever wished your favorite website had a dark mode? With Sauron, now it can! Sauron attempts to intelligently figure out how to edit the color scheme of the web page (including text) to make it dark-mode friendly. It preserves the original color of images, but dims them so that they don't blind you. You can disable image dimming or dark mode on a site by site basis too. It's not perfect since it is making guesses about which colors to change, but it goes a long way toward making the internet an enjoyable place for me.
Bypass Paywalls Clean
This addon removes paywalls from hundreds of news websites around the world or adds links to open the article in a wrapper that provides the article text (like the Internet Archive etc.)
Auto Tab Discard
Ever wanted to keep a tab open for later use, but you notice the browser getting slower and slower the more tabs you have open? Auto Tab Discard will automatically "hibernate" tabs that you haven't used in a while so that they use less resources on your computer. It's smart enough not to hibernate pages that are playing media (like YouTube) or that have forms you haven't submitted yet (like job applications). You can customize how fast it puts tabs to sleep too and exclude certain websites from hibernating at all.
Video DownloadHelper
This addon can download streaming videos from most modern (HTML5) websites, and even finds soft subtitles that accompany the stream and downloads those too. Just browse to the webpage that has the video on it, click the icon in the Firefox toolbar, and select the video you want to download and click "Quick Download". For YouTube I would recommend using a YT downloader website (like KeepVid) to download the video directly, but Video DownloadHelper really shines for websites that aren't popular enough to have dedicated downloader websites like that. I've used it download videos from a Japanese film festival streaming portal, news websites, etc.
Highlight or Hide Search Engine Results
This addon allows you to blacklist websites and completely remove them from Google, Bing, or DuckDuckGo search results. Don't want to see image search results from AI websites? Blacklist them. Searching for tech support advice and getting frustrated by all the auto-generated junk websites that stuff themselves full of SEO terms to jump to the top of the search results without actually providing any information at all? Blacklist them so they don't come up in your next search. Conversely, you can also whitelist websites that you know and trust so that if they ever come up in future search results, they'll be highlighted with a color of your choosing for visibility.
TWP - Translate Web Pages
(compatible with Firefox for Android)
Does what it says on the tin: auto-detects a website's language and provides a button that can translate it to a language of your choosing. You can also just select individual text on the page and translate just that. Note that this sends whatever text you translate to the servers of your selected translation service (Google, Bing, Yandex, or DeepL), so keep in mind the privacy implications if you don't want your IP address associated with having read that text.
Edit: As of version 118, Firefox now has the ability to translate text locally on your computer, without needing to send it to a cloud service. You can enable this in Settings -> Translation -> Install languages for offline translation. Note that at this time (Feb 2025), 31 languages are supported - Russian, Korean, Chinese (simplified), and Japanese were recently added. More info here.
UnTrap for YouTube
(compatible with Firefox for Android and they have a Safari for iOS extension too)
This addon lets you tweak the YouTube interface and hide anything you don't want to see. For instance, I hide all the "recommended" videos that come up when you search YT now. They have nothing to do with your search, so they're essentially just ads YT puts in your search results. I also hide Explore, Trending, More from YouTube, and Shorts sections, but you can customize it to fit your preferences.
Note: depending on the particular set of tweaks you want to make to YouTube, you may prefer to use YouTube Search Fixer instead. User preference.
Indie Wiki Buddy
I loathe Fandom.com wiki sites - they are cluttered and filled with ads and autoplaying videos that follow you down the page as you scroll. The organization is also hostile - if a community tries to leave their platform and bring their content to a new wiki hoster, Fandom bans them from the platform and reverts all their deletions/changes. Indie Wiki Buddy attempts to find an independent alternative for the wiki you're trying to browse and automatically redirects you to it, and if one doesn't exist, it will redirect you to a proxy site like antifandom or breezewiki that shows the Fandom content but removes all ads/videos/background images so you can actually, you know. READ it.
Cookie Auto Delete
(compatible with Firefox for Android)
Websites store "cookies" - little text files with info about you - on your computer as you browse so they can track you as you browse the internet. This addon automatically deletes cookies from a website a short while after you close the last tab you had open for that site. You can customize how long it waits before clearing cookies too. Note that this can sign you out of many websites, so you can whitelist any site you don't want cookies cleared for.
ShopSuey - Get Rid of Ads on Amazon and Ebay
Removes the ads/recommended products that clutter up Amazon and Ebay search results and product pages.
LibraryExtension
This fantastic addon recognizes when you are viewing a book on many popular websites and can automatically check whether that book is available in any of the library systems or subscription services you have access to, including how many copies your library(ies) have and how many are currently checked out. The best part is it shows the availability for physical books, ebooks, AND audiobooks at supported libraries. The extension currently supports libraries in Australia, Canada, Germany, New Zealand, the United Kingdom and the United States, but it also supports some global repositories like the Internet Archive and subscription services like NLS Bard for the blind and print disabled, Kobo Plus, Libro.fm, Anyplay.fm, Bookmate, and Everand. Great extension for people trying to support their local library and also save money.
Filtering+ for Tumblr
This addon lets you add tags or phrases to your tumblr tag filters with two clicks, without leaving the dashboard. I've been asking Tumblr for this tag filtering behavior on their mobile apps (i.e. press and hold a tag to get a filter option) for at least a year now in asks and surveys, without ever stopping to see if someone had already implemented this on desktop. More fool me. This addon is from the author of XKit Rewritten. Note that the right-click tag filtering only works on the dashboard; it will not appear if you are on someone's blog. Right-clicking selected text to filter the phrase works everywhere based on my testing.
Absolute Enable Right Click & Copy
This addon does its best to re-enable the normal right-click context menu and copy/paste actions on pages that try to disable them. If you run into a site that messes with either of those, select this addon and check "Enable Copy," then try again. If that doesn't work, check "Absolute mode." It doesn't work everywhere, but I find it very helpful.
126 notes
·
View notes
Text
Safeguard Your Website’s Design and Layout with Copyright

To ensure your website’s design and layout are protected by copyright, consider the following key points:
Automatic Protection: Copyright protection is automatic as soon as you create original content, design elements, or code for your website. This includes text, images, graphics, and the unique source code (HTML, CSS, etc.) that powers your site.
What’s Protected:
The content (text, images, videos, graphics, etc.) and the source code (HTML, CSS, JavaScript) are protected by copyright if they are original.
The general layout or look of a website (such as common grids or standard templates) is usually not protected, unless the selection and arrangement are highly original.
Functional aspects (like navigation or user interface concepts) are not covered by copyright but may be eligible for patent protection.
Strengthening Your Protection:
Add a Copyright Notice: Place a notice (e.g., © [Your Name/Company] [Year]) in your website’s footer. This makes your claim clear and can deter infringement.
Register Your Copyright: While protection is automatic, registering your website’s design and content with the copyright office (such as the US Copyright Office or Indian Copyright Office) provides stronger legal rights, including the ability to sue for statutory damages and attorney’s fees.
Document Your Work: Keep records such as screenshots, source code files, and descriptions of your design to prove originality and ownership if needed.
Use Terms and Conditions: Clearly state in your website’s terms that copying or reuse of your design and content is prohibited.
Technical Measures: Consider disabling right-click, using watermarks on images, and employing anti-bot technology to deter copying.
If Infringement Occurs:
Contact the infringing party to request removal.
Use DMCA takedown notices or seek legal help if necessary.
In summary, while the unique content and code of your website are protected by copyright, the general layout is only protected if it is highly original. Registering your copyright and using clear notices and technical safeguards will further strengthen your protection.
Would you like details on how to register your website’s copyright in a specific country or tips on monitoring for infringement? Blog Resource : Safeguard Your Website’s Design and Layout with Copyright
0 notes
Text
🚀 Product of the Day! 🛡️ Protect your Joomla site with the Content Protection Plugin! Block text selection, disable right-click, and prevent copy-pasting—keeping your content safe.
🔗 Get it now: https://www.templatemonster.com/joomla-extensions/content-protection-joomla-plugin-450268.html #Joomla #WebSecurity
0 notes
Text
How to Build Web-Based Applications: A Step-by-Step Guide

In today’s digital landscape, web-based applications have become integral to business success. They streamline operations, enhance customer experiences, and provide scalable solutions to complex needs. Whether you’re a startup or an established enterprise, understanding how to build a robust, secure, and efficient web-based application can transform your digital presence and business performance. In this blog, we’ll take you through the essential steps to building a web-based application, offering valuable insights and tips for creating high-quality, user-friendly applications.
Step 1: Defining the Purpose and Scope of Your Application
The journey to creating any successful web application starts with a clear purpose and scope. Identifying your application’s objective is essential to designing a user-friendly solution that addresses real-world needs. Ask yourself:
What problem does this application solve?
Who is the target audience?
How does it fit into the larger digital strategy of your business?
For example, if you're a retail company looking to boost sales, your web app might focus on providing seamless shopping experiences, including advanced search filters, one-click checkout, and personalized product recommendations. With a clear understanding of your goals, you’ll be better equipped to make decisions on design, functionality, and technology.
Step 2: Choosing the Right Technology Stack
Selecting the right technology stack is critical to ensuring that your application is efficient, scalable, and easy to maintain. The tech stack comprises the front-end (client-side) and back-end (server-side) technologies. Here’s a breakdown of popular choices:
Front-End Technologies
HTML, CSS, and JavaScript: The foundations of any web application. HTML structures the content, CSS styles it, and JavaScript adds interactivity.
Frameworks and Libraries: For modern applications, frameworks like React.js, Angular, and Vue.js make the front end more dynamic and responsive. These frameworks provide reusable components and streamline the development process.
Back-End Technologies
Server-Side Frameworks: Node.js, Django, Ruby on Rails, and Laravel are popular frameworks for building the back end. Each has its own strengths—Node.js, for example, is highly scalable and works well for applications requiring real-time data, such as chat apps or online games.
Databases: Choosing between SQL (like MySQL, PostgreSQL) and NoSQL (like MongoDB) depends on your data structure. SQL databases are ideal for structured data and complex queries, while NoSQL is more flexible and scalable for unstructured data.
At Ksoft Technologies, we specialize in designing custom web applications using a blend of industry-leading technologies, creating solutions that are not only efficient but also future-proof.
Step 3: Designing the User Interface (UI) and User Experience (UX)
A web-based application should be easy to navigate and visually appealing. UI/UX design is about creating intuitive interfaces and seamless user journeys. Begin with a wireframe, which outlines the layout and core elements of each page. Next, build a clickable prototype to visualize the workflow and gather early feedback.
For a successful design:
Focus on simplicity and clarity: Avoid unnecessary elements that may confuse users.
Prioritize accessibility: Ensure your design is accessible to all users, including those with disabilities. Implementing accessible design principles, such as clear labels and keyboard navigability, widens your application’s reach.
Mobile-First Design: With most users accessing web apps via mobile devices, a mobile-first approach is essential. Using responsive frameworks like Bootstrap or custom CSS ensures your application looks great on any screen size.
Step 4: Developing the Front-End and Back-End
With a clear design in place, the next step is to start coding. This phase involves turning your wireframes and prototypes into a functional application.
Front-End Development Front-end development involves translating the design into a responsive, interactive interface. JavaScript frameworks like React or Angular make it easier to build reusable components, improving development speed and consistency. Ensure cross-browser compatibility, so your app performs well on all major browsers.
Back-End Development Back-end development, on the other hand, focuses on server-side logic, database interactions, and APIs. This phase may involve setting up:
User Authentication and Authorization: Securely handle user data with authentication and access control systems. Tools like JWT, OAuth, and session management are widely used.
Database Integration: Integrate your chosen database to store and retrieve data efficiently.
API Development: For modern applications, APIs facilitate data exchange between the front end and back end. RESTful APIs are commonly used, while GraphQL is gaining popularity for its flexibility in querying data.
At Ksoft Technologies, we build secure, API-driven web applications with an emphasis on scalability. Whether it’s integrating third-party services or creating custom APIs, we ensure seamless connectivity across your application’s components.
Step 5: Testing and Quality Assurance
Testing is crucial to identifying and fixing issues before your application goes live. There are several testing methods to ensure quality:
Unit Testing: Tests individual components of your application.
Integration Testing: Ensures different modules work together seamlessly.
User Acceptance Testing (UAT): Conducted with real users to gather feedback and ensure the app meets their expectations.
Performance Testing: Checks for speed, scalability, and stability under load
For web applications, testing should also cover cross-browser compatibility and responsiveness. Automation testing tools like Selenium or Cypress are useful for running multiple tests quickly, saving time and improving accuracy.
Step 6: Deployment and Launch
Deploying your web application involves transferring the code to a web server so users can access it online. Cloud platforms like AWS, Azure, and Google Cloud offer reliable hosting solutions with flexible resources. Containerization tools like Docker are also increasingly popular, as they allow you to deploy applications in isolated environments for easier management and scaling.
After deployment, monitor your application’s performance and security. Tools like Google Analytics provide valuable insights into user behavior, while monitoring tools like New Relic help track performance metrics.
Step 7: Post-Launch Maintenance and Updates
Building a web-based application is an ongoing process. Regular maintenance is essential to fix bugs, add new features, and improve performance based on user feedback. It’s also critical for security—regular updates protect your application from vulnerabilities.
At Ksoft Technologies, we offer comprehensive post-launch support, ensuring your application stays up-to-date, secure, and efficient. Our team provides tailored maintenance solutions, including scheduled backups, security checks, and performance optimization.
Key Considerations for Building Successful Web Applications
When building a web application, consider the following best practices:
Security: Implement security best practices, including HTTPS, data encryption, and secure user authentication to protect user data.
Scalability: Design with future growth in mind. A scalable architecture allows your app to handle an increasing number of users without performance issues.
SEO Optimization: Optimize for search engines by implementing SEO-friendly URLs, metadata, and mobile responsiveness.
User Feedback: Regularly gather user feedback to improve and adapt your application to changing needs.
With these steps, you’ll be well on your way to building a high-quality web application that meets your business goals and user expectations.
Final Thoughts: Partnering with Ksoft Technologies for Web Application Development
Building a web-based application can be complex, but with the right team and strategy, you can create a product that delivers exceptional value. At Ksoft Technologies, we specialize in full-cycle web application development, from initial concept and design to deployment and post-launch support. Our expertise in custom web development, UI/UX design, API integration, and cloud hosting solutions allows us to deliver innovative, scalable applications tailored to your business needs.
Whether you’re looking to build a web application for e-commerce, customer management, task management, or data analytics, our team is here to guide you every step of the way. Reach out to Ksoft Technologies today to start building your next web application!
#ui ux design#app development#python#marketing#branding#adobe#tech#techinnovation#startup#website development#economy#web design
1 note
·
View note
Text
How To Enable Adblock Extension In Chrome
How To Enable Adblock Extension In Chrome
How to enable adblock extension in chrome, Hey there, tech-savvy friend! Are those pesky ads ruining your online adventures? Don't let them steal your thunder! Let me show you how to enable the Adblock extension in Chrome, so you can surf the web without any interruptions.
What is AdBlock extension?
Alright, before we dive in, let's get the basics straight. AdBlock extension is like your digital guardian angel. It's a free browser extension that swoops in and saves the day by blocking those annoying ads on websites. You can get it for Chrome, Firefox, Edge, and Opera, so it's got your back no matter your browser flavor. Plus, it's got a fan club of over 100 million users worldwide.
keep in touch : metech-arm.com
How does AdBlock extension work?
Now, how does this magic happen? AdBlock extension is a superhero with a variety of tricks up its digital sleeves. It scans web pages for known ad domains and vanquishes them, using methods like keyword matching, URL matching, and element blocking. It's like an ad-blocking ninja, always one step ahead!
Benefits of using AdBlock extension
Why should you care about this extension, you ask? Well, buckle up, because it can improve your online life in some pretty cool ways:
Block intrusive and annoying ads: AdBlock extension doesn't discriminate; it takes down pop-ups, video ads, banner ads – the whole squad of annoying ad formats!
Speed up your browsing speed: By making ads disappear, it lightens the load on your internet connection, letting you surf the web at warp speed.
Protect your privacy: AdBlock extension stands up against those ad trackers that sneakily gather your data without your permission. Your browsing habits are your business!
How to install AdBlock extension in Chrome
Enough chit-chat! Let's get AdBlock extension in Chrome:
Go to the Chrome Web Store.
In the search bar, type "AdBlock extension."
Find the "Add to Chrome" button and give it a good old click.
Confirm by clicking "Add extension."
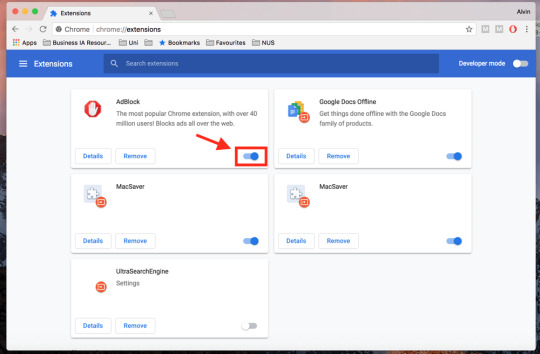
How to enable AdBlock extension in Chrome
Alright, you've got it installed, but how do you turn it on? Easy peasy:
See that AdBlock extension icon in the Chrome toolbar? Give it a click.
Look for the toggle switch and flip it on.
How to manage AdBlock extension settings in Chrome
Let's say you want to customize AdBlock extension's behavior. No problem! Here's how to do it:
Click that trusty AdBlock extension icon in the Chrome toolbar.
Seek out the "Options" button and click it.
Ta-da! You've opened the AdBlock extension settings page, and you can tweak things to your heart's content.
Troubleshoot common AdBlock extension problems
Sometimes, even the best of us run into problems. If you're having issues with AdBlock extension, try these fixes:
Restart your Chrome browser.
Disable all other browser extensions – sometimes they clash.
Clear your Chrome browser's cache and cookies for a fresh start.
Make sure your AdBlock extension is up to date by installing the latest version.
But, if all else fails, you can always reach out to the friendly folks at AdBlock support for a helping hand.
How to block specific ads in Chrome
Let's talk about precision. If there's a specific ad bugging you, there are two ways to target it:
Using the Chrome developer tools:
Open Chrome and go to the website with the bothersome ad.
Right-click on the ad and select "Inspect" – you're diving into the developer tools.
In the developer tools, click on the "Elements" tab.
Find the ad's HTML code and right-click on it.
Choose "Block element."
Using an ad blocker extension:
There are plenty of ad blocker extensions out there. Once you have one installed, open its settings, and add the website to the whitelist.
How to whitelist specific websites in Chrome
Maybe you love a website and want to support it by letting their ads through. Here's how:
Go to the site you want to whitelist in Chrome.
Click the lock icon in the address bar.
Hit "Site settings."
Under "Ads," turn off the "Block ads on this site" toggle switch.
How to use AdBlock extension to protect your privacy
Privacy matters! AdBlock extension can be your trusty ally in this department. Here's how to use it to shield your online life:
Open the AdBlock extension settings.
Click on the "Privacy" tab.
Make sure that the "Block ad trackers" option is enabled – no sneaky trackers allowed!
How to troubleshoot common AdBlock extension problems (again!)
In case you missed it the first time:
Restart your Chrome browser.
Disable other browser extensions if they're causing issues.
Clear your Chrome browser's cache and cookies.
Keep AdBlock extension up to date.
Still stuck? Head over to AdBlock support – they've got your back!
Additional tips for blocking specific ads in Chrome
Sometimes, you need a more surgical approach. If you can't block a specific ad, try creating a custom filter. Custom filters are like secret weapons to vanquish your foes – in this case, pesky ads.
Ready to take control of your browsing experience? Get that AdBlock extension in gear and surf the web in style!
FAQ: How to enable AdBlock extension in Chrome
Image: A yellow sign that says "how to en"
Answer:
To enable AdBlock extension in Chrome, follow these steps:
Go to the Chrome Web Store and search for "AdBlock extension".
Click the Add to Chrome button.
Click the Add extension button to confirm.
Click the AdBlock extension icon in the Chrome toolbar.
Click the toggle switch to turn on AdBlock extension.
Additional information:
AdBlock extension is a free browser extension that blocks ads from appearing on web pages.
AdBlock extension is available for Chrome, Firefox, Edge, and Opera browsers.
AdBlock extension is one of the most popular browser extensions in the world, with over 100 million active users.
Troubleshooting:
If you are having problems enabling AdBlock extension in Chrome, try the following:
Restart your Chrome browser.
Disable all other browser extensions.
Clear your Chrome browser's cache and cookies.
Update AdBlock extension to the latest version.
If you are still having problems, you can visit the AdBlock support website for more help.
#How to enable adblock extension in chrome windows 10#How to enable adblock extension in chrome chromebook#How to enable adblock extension in chrome android#adblock chrome android#chrome web store#chrome extensions#adblock plus#adblock chrome extension free
0 notes
Text
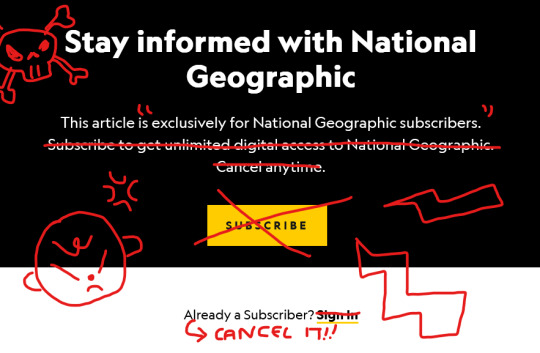
soooo national geographic have prevented ppl from disabling javascript to access their paywalled 'subscriber-exclusive' articles by adding an overlay which causes the article to disappear the further u scroll down... so for fun I've typed up a quick guide (below) for how to read them for free by doing a little html/css editing! normally I wouldn't bother bc you can still access the text thru saving as a webpage or 12ft.io, but this way does have the added bonus of keeping the original page formatting + images (there's often a lot of pretty photography in nat geo... + added bonus of not seeing the annoying 'unauthorised use is prohibited' messages every other paragraph). this is probably common knowledge to a lot of ppl but just thought I'd share for any less tech-fluent mutuals! enjoy <3
how to read national geographic 'subscriber exclusive' articles for free with html/css editing ;^)
paywalls suck + piracy rules! information should be for everyone. go wild.
all instructions are for firefox but I tested on a couple other browsers (edge/opera/chrome) & it worked there too!
step 1: (open page inspector) right-click + select 'inspect' or use either of the shortcuts: ctrl + shift + i or ctrl + shift + c. or you can navigate to it by clicking on the drop-down menu in the top right corner of your browser and going to ‘more tools -> developer settings’
step 2: (removes the page lock, allowing you to scroll down) navigate to 'inspector'. underneath the head section is a line beginning '<body class="Scroll--locked...' click on this then go to 'element' + untick both 'overflow:hidden' & 'position:fixed'. alternatively, you can double click on the line and manually delete both elements.
if not using firefox: ‘inspector’ may be called ‘elements’ instead… click the line ‘<body data-interaction-type…’ then go to the styles tab below + untick 'overflow:hidden' & 'position:fixed’

step 3: (removes the subscription popup box) – I found 2 ways of doing this, I’ll include them both:
method a: delete whole section of code starting '<div class="bp-mobileMDPlus...' by clicking on it + hitting the del button. make sure the little triangle points -> beforehand so that everything in that section gets deleted, if its expanded (pointing down) then just click it to close it first, otherwise you’ll have to delete every open line individually (specifically removes the paywall checking element. can be found easily by right-clicking the subscription box + selecting 'inspect' - the page inspector should navigate to the right line of code or near enough)

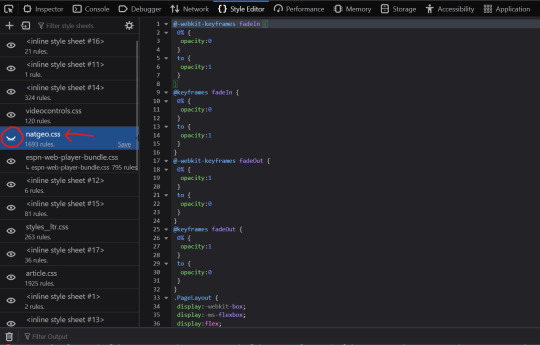
method b – firefox only(?): navigate to 'style editor', and hide natgeo.css by clicking the eye icon (slightly quicker method but will change formatting of some other elements, e.g., banner at top)
step 4: (removes the article overlay which causes text to fade to blank further in the article) delete the line of code '<div class="Article_Content_Overlay--gated"></div>’ by clicking on it + hitting the del button (can be found easily by scrolling down the article, right-clicking text + selecting 'inspect')
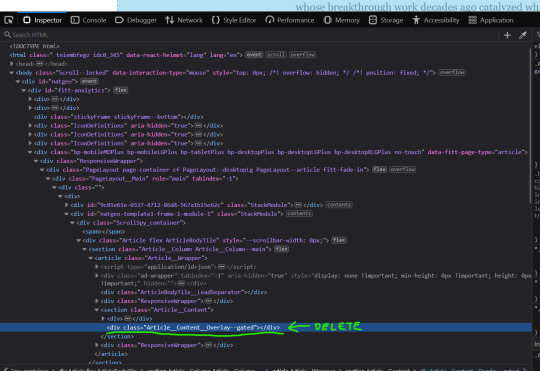
full article should now be readable! once you know what you’re doing it only takes ~30 secs
some other notes:
any edits will be undone when you refresh the page as they’re only temporarily altering the way you view the web page - so don’t hit refresh until you've finished reading!
I did this on firefox but it should work on any browser with minimal differences in the method. I've tested on opera/edge/chrome and all have worked fine for me
if you want to read nat geo articles that are NOT ‘subscriber exclusive’ but you've run out of 'free articles': this method will work for them too - but you don't need to do step 4! (the fading article overlay seems to be subscriber-exclusive…) however just temporarily disabling javascript is faster + works fine as long as there’s no overlay:
to disable javascript on firefox type about:config into the search bar. you’ll get a warning that you’re entering advanced preferences. accept this then search for ‘javascript.enabled’ and toggle from ‘true’ to ‘false’ using the little arrow switch. refresh your article page et voila! just remember to toggle it back once you’re done. this is my go-to for reading paywalled nyt articles ;-)
idk how to do this on other browsers and cba to check. google it man
you can also use 12ft.io for nat geo! much easier but doesn’t preserve og format
disclaimer I am not some tech wizard I am just a guy with a laptop who loves piracy and hates paywalls. there are tons of alternative ways of getting around them + this probably isn’t the most elegant but it works for me so! godspeed comrades <3
#I started writing this guide for a friend and then figured fuck it might as well make a post abt it too while I'm here!#sorry for any typos etc I'm very tired#piracy#paywalls#national geographic#.txt
18 notes
·
View notes
Text
The Sims 2 Tutorial: How to create your own subhood (shopping district,downtown,uni,etc.)
Hello guys! I'm Luca and welcome! Today I'm gonna show you how to create your own subhood! Before we begin
This tutorial is based on this tread from MTS: https://modthesims.info/t/502306This is optional but I highly recommend it,you should create the subhood in an artificial game environment using any game starter tool: https://modthesims.info/d/250555/anygamestarter-v-2-1-3-for-cd-dvd-games-upd-29-dec-2017.html(For people who use the cd/DVD version) https://modthesims.info/d/604873/tester-needed-anygamestarter-v-2-2-0-uc-ultimate-collection-upd-25-dec-2017.html(For people who use the ultimate collection, this also works with the origin ultimate collection repack from g4tw) This tutorial doesn't require simPE but it can be used optionally for just checking to see if everything is in order. You will also need bulk rename:https://www.bulkrenameutility.co.uk/Please note that this technique will not work for neighborhoods with attached subhoods, it will only work for unattached neighborhoods and subhood templates like the ones shipped with the game. - If you have FreeTime installed, you will have to manually disable the FreeTime stealth neighborhood to create an empty environment. The AnyGameStarter will not do this for you correctly. See this post for detailed instructions. - If you try to add multiple Downtowns to a neighborhood, only sims from the first Downtown added will actually appear in your neighborhood. The game will remove the sims from all additional Downtown subhoods before those subhoods are added to your neighborhood. If you want to add multiple occupied Downtowns to the same neighborhood, you may not be able to use more than one Downtown template. - If you just want a generic subhood, then you will probably want a Suburb. As examples, all of the stealth neighborhoods from Pets, Seasons, Bon Voyage, FreeTime, and Apartment Life are Suburbs; most Mega-Hoods are also made with Suburbs. - If your neighborhood has occupied apartments and you want to change it to a subhood, you will have to move the sims out first. Do not have occupied apartments in a subhood template; occupied apartments will be corrupted when the subhood is added to a primary neighborhood. Unoccupied apartment buildings should have no problem. - Sims in a subhood template will receive a new ID when a subhood is attached to a neighborhood. This can cause problems if the game doesn't properly update the ID everywhere it is used. Most of the time, the game updates the ID correctly. However, you should be aware that this problem can occur and be careful with sim relationships in subhoods. A problem has been noticed with hired maids needing to be rehired. There may be other types of relationships that are also handled incorrectly. Be sure to test your neighborhood or subhood before sharing it. (this info was pasted from the original post)
This method is a work in progress still
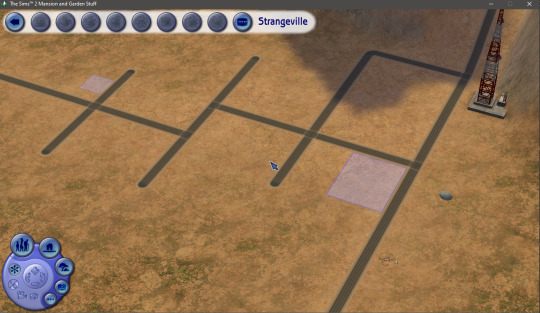
Step 1:Creating the anygame environment So after you have installed any game starter, open it! Then open the new shortcut that the setup file has created, Agree to the terms&liciense then select the packs that you would like! Mansion and garden will always be included for the ultimate collection version of the program (i think). Click next and select create an empty game (no maxis content included) then click next and install! Step 2: Turning On Debug Mode After the anygame has been created,run it and you should have no neighborhoods,if you do then you did something wrong,try again. Close the game and then go into the anygame documents >EA Games> The Sims 2 Ultimate Collection (for UC users)>Config and create a new text document called userStartup.cheat,then open it and type boolprop testingcheatsenabled true
Step 3: Creating the neirghborhood (later convert it) In order to create a subhood,we need to create a normal hood then convert it into a subhood,so enter the game then click the new hood button then click yes,select your preferred terrain and select ok then wait for it to load then leave the game. Step 4: Renaming your neighborhood
Install Bulk rename uttility then run it. I know it might look hard but it’s actually very easy,navigate to the hood you just created,this is the UC default anygame location : Documents\AnyGameStarter\AnyGame1\EA Games\The Sims 2 Ultimate Collection\Neighborhoods\N001 Select the match case option in the replace(3) section and also select subfolders in the filters section You need to rename the hood because it might conflict if you don t rename it

Make sure your characters folder and storytelling folder are both empty!!! If it's not then you did something wrong. It is recommended to stick to the maxis naming conventions Here is the standard naming convention: University: U### Downtown: D### Suburbs (Open for Business): B### Vacation (Far East): A### Vacation (Mountain Lake): M### Vacation (Island): T### I named my hood B002 because I wanted to do a shopping district aka subhood, name your hood something different than B001 or D001 or U001,U002,U003 because otherwise, it will replace the maxis original subhoods After renaming the hood folder, in the white area in which you see your hood folder then select ctrl+a and then go to the replace section and in the replace section type the original hood name with the “_” and in the “with” section type your desired new hood name and then press rename!,be sure to use both suffixes or prefixes!! Step 5: Launch the environment and convert the hood If you do not see your neighborhood on the main menu you’ve done something wrong. If you see it then you are good to go :D, Make sure it looks as it should! In the neighborhood view of the neighborhood that you want to change, open the cheat box (CTRL+SHIFT+C) and type the cheat: changeNeighborhoodType [primary/university/downtown/suburb/asia/mountains/tropics] For example if I want to change my hood into a shopping district I would type changeNeighborhoodType suburb If the game started the loading screen then you did everything right! If the game gave you an object error or cheat error then you did something wrong such as debug mode not being enabled (shown in the steps above) After the game finished loading it should look something like this in my example :
building
You can also check simPE if you’re not sure! Step 6:Install the subhood/downtown/university or etc University (UC) C:\ProgramFiles\Origin Games\The Sims 2 Ultimate Collection\University Life\TSData\Res\NeighborhoodTemplate Downtown (UC) C:\ProgramFiles\Origin Games\The Sims 2 Ultimate Collection\Double Deluxe\EP2\TSData\Res\NeighborhoodTemplate Shopping District (UC) C:\ProgramFiles\Origin Games\The Sims 2 Ultimate Collection\Best of Bussines\EP3\TSData\Res\NeighborhoodTemplate Vacation Destination(UC) C:\ProgramFiles\Origin Games\The Sims 2 Ultimate Collection\Bon Voyage\TSData\Res\NeighborhoodTemplate University(disk) C:\Program Files\EA GAMES\The Sims 2 University\TSData\Res\NeighborhoodTemplate Downtown(disk) C:\Program Files\EA GAMES\The Sims 2 Nightlife\TSData\Res\NeighborhoodTemplate Suburb(disk) C:\Program Files\EA GAMES\The Sims 2 Open For Business\TSData\Res\NeighborhoodTemplate Vacation Destination(disk) C:\Program Files\EA GAMES\The Sims 2 Bon Voyage\TSData\Res\NeighborhoodTemplate You should download this mod which fixes the add a new subhood selection menu! https://modthesims.info/download.php?t=420924 (it was created by the person who created the original post that inspired me to make this one) You can now start building the sub-hood freely and I hope I helped you! Have fun!
16 notes
·
View notes
Text
A Guide to Making iOS Text Messages on AO3, Miraculous Style
(This is a contribution to @miraculousfanworks for formatting tips in AO3)
Writers like to experiment with different fanfiction types. And one of the most popular types are the text fics.
A text fic resembles a log of two or more characters texting each other. It may be written entirely in the form of text messages, or it may contain narrated passages. Writers often prefer to include texting between characters in their stories, for it gives the readers a deeper insight into the characters’ lives and personality. And no doubts the level of personal interactions associated with texts is what makes text-fics a popular type amidst the readers.
A story can be written entirely in texts, or even contain a minor scene where the characters text each other. Often, writers have different ways to distinguish the texts from the rest of the narration, to enable the readers to easily differentiate between the two parts.
One of the most common ways is formatting. Aligning, boldifying and italicizing the texts is a common way to highlight them in the story. However, many a times, the formatting fails to give off the necessary vibes. To rectify the same, a few writers use screenshots of text conversations between the characters in their stories.
But what if there was a way to present the text messages in the story, WITHOUT using the images? Something like this:
Read under the cut to find out!
How to make iOs Text Messages on AO3 (Miraculous Style)
(Note: For this article/tutorial, the reference chosen is How to Make iOs Text Messages on AO3 by CodenameCarrot and La_Temperanza.)
The tutorial does not dive into the details of how exactly the CSS for the text messages is coded, for there is a predefined skin made available for all the main characters of Miraculous Ladybug. The skin is made such that the colors of the text differ on every character’s phone (civilian and superhero alter ego).
The right side (the darker bubble) is always the texts written by the character. The left side (the lighter bubble) is always the texts the character has received.
The skin used is Messaging Miraculous and since it is a bit tedious to make it available to public use, here’s a link to the document that contains the necessary CSS for the same.
To use the above skin
Simply go to your ao3 dashboard, click on Skins > My Work Skins > Create New
Fill in the necessary details there and at the part where you have to write the code, copy paste the CSS from the document linked above! Then click on Create and your skin is created!
Now, in your work, go to Select Work Skin and choose the Messaging Miraculous work skin. (This is the name of the skin that I have on my dashboard :) )

This will import the skin in your story.
The skin has different color formats for different phones. In other words, texts on Marinette’s phone will have a different color scheme from how they appear on Adrien’s phone or Ladybug’s phone and so on. The idea behind this is that each user has a specific color theme of their choice installed in their phones :)
So, a basic thing about the CSS involved in the skin.
The messages received have an attribute of text[code] and the messages sent have an attrivute of [code]reply
Now what is this [code] thing?
The code thing is the small piece of text used to differentiate the code for all the characters.
The codes used for the different characters are:


So, if I want to write a chat window for Ladybug’s phone, the received messages would be textlb and the sent messages would be lbreply
For Nino’s chat window, the received messages would be textnino and the sent messages would be ninoreply
What do these attributes mean to me? How will I use them?
These attributes are what we are going to use in our AO3 HTML editor to implement the chat format.
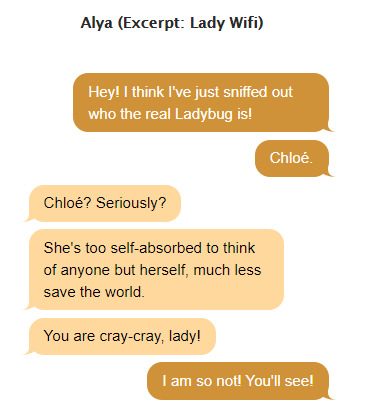
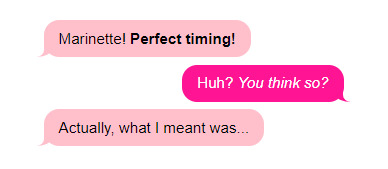
The usage of the skin is explained below based on a sample conversation between Marinette and Adrien from the episode Frozer, something that goes lke this:
Adrien: Marinette! Perfect timing! Marinette: Huh? You think so? Adrien: Actually, what I meant was...
It is done for Marinette’s chat window.
First of all, remove all the formatting from the chat texts that you have made. This is how your chat will start to look like:

Then, go to Edit, and click on the HTML button in the editor.

The HTML editor has automatically put a series of <p> tags around your text messages. Something like this:

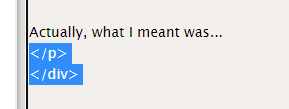
Remove these. The result looks like:
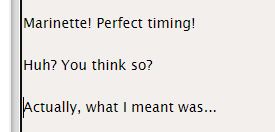
Remember: only remove the <p> and </p> tags that surround the text messages. You would not want to mess up the formatting of the rest of the story
Now, let’s get down to a little coding. Add this little code shown in the next image to the part just above the first text message.

and this little piece at the end of the last text message on the window.
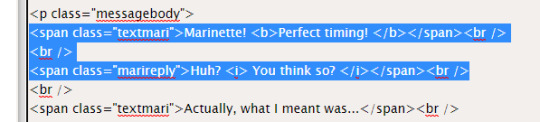
The <div> tag is what makes the editor aware that this is the place where we are using the imported worksin, and specifically, a coding that has the CSS attribute by the name “phone”.
The <p> tag indicates a new paragraph, and here it encloses all of the text messages that occur on the phone window, and the class “messagebody” tells the editor that it has to implement code for the same :)
Perfect! Now getting to the part of making the chat bubbles.
(This coding has been done for Marinette’s window. Hence the attributes used are textmari and marireply. You can similarly use the other attributes for different characters) The first dialogue is that of Adrien. So, Marinette received this text on her phone. Hence we go like:

The “span” attribute here differentiates between the different chat formats we have for the different characters. The <br> tags are for telling the editor to move to a new line :)
The next dialogue piece is of Marinette. So, she sends this text. Therefore, we go like:

The next (and last dialogue) is Adrien again, hence the code for it is like:

And now, clicking on “Preview” then “Save as Draft”, the result is:

Perfect!
(It is always recommended to preview the story before posting it. You can always check for non functional links or code errors if you find any :) )
You can make the same for other characters as well in the similar fashion! To check out the different color schemes offered by the skin, here’s the link to the document on AO3!
Miraculous Messaging Work Skin Tutorial
What if I want to boldify or italicise a certain word/phrase within the text message?
It’s simple! Enclose the certain word/phrase <b> , <i> and <u> tag for bold, italics and underline respectively! Like this:
gives:
Does this skin work all the time?
As long as “Hide Creator’s Style” is disabled, yes!
But what If someone uses “Hide Creator’s Style”? Will not that ruin the story?
There is a solution around that too! You simply need to add this extra piece of code to each text message, along with the name of who types that message :)

so when you click on that “Hide Creator’s Style” button on the top, you end up with
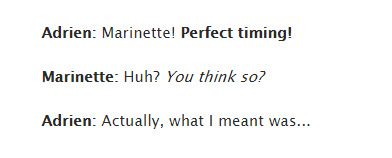
which is absolutely cool!!
Hoping this article helped explain all the doubts! For further queries or character suggestions, feel free to comment on the sample work linked above!
90 notes
·
View notes
Note
I slept okay hhhhhh went thru my goggle pictures yesterday and ruined my mood 🤠🤠🤠
Anyways!! I shall grant you the wisdom of gradients 🤺
On desktop! You first need to disable the beta editing option. Then you switch the editor from rich text (or whatever else it is) to html
Thennn you select the text (from the html and keep it highlighted) and yeet it into this website. You choose colors to create a gradient with and then click the "create gradient" button. Then it spits out a code - copy that and paste it into this website. There you have the options of "replace this _" and "replace with _" in the first one you put the semicolon and the second one stays empty because you just want the semicolon gone.
Then you copy the final link and replace it with the highlighted text from your html, view if it looks right and save it :D
I AM SO SORRY YOU DIDNT SLEEP LIKE THE ABSOLUTE QUEEN YOU ARE I HOPE U SLEEP BETTER U SEXC MF
this,,,,,,this is so sexy of you. thank you for bestowing thy wisdom unto thee, thy words show much appreciation for your wisdom m'lady
7 notes
·
View notes
Text
Firefox For Mac Touch Bar
Bringing this improved functionality to Firefox is our way of continuing to serve you now and in the future. Making search faster for you through the address bar. Did you know that there’s a super fast way to do your searches through the address bar? Simply press CTRL and L (command-L on a Mac). It’s just one of our many keyboard shortcuts.
The Touch Bar should never offer functionality unavailable to Firefox users without the Touch Bar. Most macOS Firefox users do not have the Touch Bar and some choose to disable it. Apple’s own Human Interface Guidelines (HIG) forbids this kind of Touch Bar functionality. Please read the HIG for more design considerations before you plan on implementing a new Touch Bar feature.
This article explains how to download and install Firefox on a Mac.

If you are updating from a previous version of Firefox, see Update Firefox to the latest release.
Firefox For Mac Touch Bar
Note: This article only applies to Mac. For instructions to install Firefox on Windows, see How to download and install Firefox on Windows.For instructions to install Firefox on Linux, see Install Firefox on Linux.
Press and hold the Fn (Function) key on your keyboard to see F1 through F12 in the Touch Bar. You can also make the function keys appear continuously in the Touch Bar: From the notification area on the right side of the Windows taskbar, click the up arrow to show hidden icons.
Make sure your Mac meets the System Requirements for Firefox.
If you use an old version of OS X, see these articles for more information:
Note:Firefox version 83 and higher support both Intel-based Macs (x86 architecture) and Apple devices with the new ARM-based CPU (Apple Silicon). Firefox 83 runs on new Apple Silicon devices by way of Apple's Rosetta 2 emulation software and thus performance speeds may suffer. Firefox 84 and higher versions will run natively (not under emulation).

To download and install Firefox:
Firefox For Mac Touch Bar Download
Visit the Firefox download page in any browser (for example, Safari). It will automatically detect the platform and language on your computer and recommend the best version of Firefox for you.
Click .
Note: If you want to have a choice of the language for your Firefox installation, click the Download options and other languages link instead.
Once the download has completed, the file (Firefox.dmg) may open by itself and pop open a Finder window containing the Firefox application. Drag the Firefox icon on top of the Applications folder in order to copy it there.
Note: If you do not see this window, open the Firefox.dmg file that you downloaded.
After dragging Firefox to the Applications folder, hold down the control key while clicking in the window and select Eject 'Firefox' from the menu.
Firefox Mac Touch Bar
Complete the steps above before running Firefox. Do not run Firefox directly from the Firefox.dmg file, as this can result in issues such as lost data and settings.
Firefox For Mac Touch Bars
Tip: You can add Firefox to your dock for easy access. Just open your Applications folder and drag Firefox to the dock.
Firefox For Mac Touch Bar App
Firefox is now ready for use. Just click on its icon in the dock or Applications folder to start it.
When you first start up Firefox, you will be warned that you downloaded Firefox from the Internet. Because you download Firefox from the official site, click .
Firefox For Mac Touch Bar Settings
Upon installation, Firefox will not be your default browser, which you'll be notified about. That means that when you open a link in your mail application, an Internet shortcut, or HTML document, it will not open in Firefox. If you want Firefox to do those things, click . If you're just trying out Firefox or simply do not wish to set Firefox as your default browser, click .
1 note
·
View note
Photo
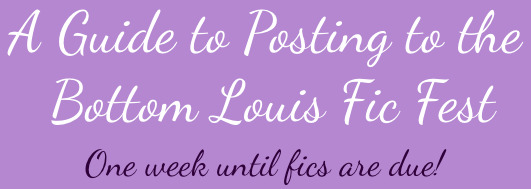
Hello, Bottom Louis Fic Fest participants! We know that some of our participating writers are seasoned professionals and have posted fics many times before, but we also know that there are some first-time writers participating and we want to ensure that everyone knows exactly how to post their fic to our collection on AO3 and to Tumblr and Twitter.
Please note that the due date for fics is November 15, 2020 at 10AM ET, but you may post your fic to the collection beginning today if your fic is already completed. Fics will begin being revealed publicly on November 18, 2020.
All Writers: Please read
Our collection is the Bottom Louis Fic Fest 2020 <-- submit your fic here!
You will be assigned a posting date/time via email on November 17, 2020.
Please include your prompt in the summary or beginning notes on AO3 or in the end notes on AO3 (if you want to avoid spoilers) so readers know what it was.
On Tumblr and Twitter, we’d recommend having your photoset with the fic information and link scheduled to post at your assigned date/time.
In your fic posts, please tag us (@bottomlouisficfest on Tumblr or @BLFicFest on Twitter) so people know you wrote the fics for the fest.
Your fic must remain public on AO3 until the fest is complete.
The photoset/moodboard and link to your fic will be posted to both Tumblr and Twitter, either by you or by the BLFF. We will sort out who is posting what when we email you with your assigned posting date and time.
If possible, please post your photoset/moodboard to Tumblr from desktop instead of mobile to avoid it looking distorted for users of Tumblr on desktop.
For Info on Posting to AO3, Tumblr, or Twitter: Please Read
Posting to AO3:
Step 1: Sign into AO3.
Step 2: Click or hover over “Post” in the upper right corner of your screen.
Step 3: Click “New Work.”
Step 4: Fill out all the basic information for your fic.
Rating: Choose a rating for your fic. Since all fics for the Bottom Louis fic fest will have smut, we’d suggest that all fics be rated either Mature or Explicit. Mature is more appropriate for fics with less graphic smut, whereas Explicit is more appropriate for fics with more graphic smut.
Archive Warnings: If you have any serious warnings that need to be issued for your fic (such as graphic violence, major character death, or rape), please select them here. If none of those more extreme warnings apply to your fic, we’d recommend selecting No Archive Warnings Apply.
Fandoms: Please type and select One Direction (Band). If your fic involves a crossover with another fandom, you can also add those here.
Categories: Though not required, we’d recommend selecting M/M (for a male/male pairing) and any other pairings that apply to your fic.
Relationships: Though not required, this is where you should enter the relationships that are featured in your fic. For example, you can put Harry Styles/Louis Tomlinson or Zayn Malik/Louis Tomlinson. You may enter as many pairings as you have in your fic.
Characters: Though not required, if you would like, this is where you can enter the names of all or most of the characters that are featured in your fic.
Additional Tags: Though not required, we’d highly recommend using tags to your advantage, as many people search through AO3 tags to find new fics to read and therefore may be more likely to stumble on your fic. You can enter tags related to tropes that are featured in your fic (e.g. Enemies to Lovers, Fake Relationship), descriptions of the type of sexual content that may be involved (e.g. Rimming, Bottom Louis), any additional warnings, and any other details that you think might draw people to your fic. If you need more tag ideas, feel free to ask the BLFF mods off anon or scroll through other fics on AO3 for inspiration.
Step 5: Fill out the Preface information for your fic.
Work Title: This is where you will put the title of your fic.
Summary: This is where you will put the summary of your fic.
Notes: Although this is optional, you may want to add notes at the beginning and/or end of your fic. Notes at the beginning might further explain any tags or warnings, provide any context that will help people understand your fic, or tell people what prompt your fic is based on. Notes at the end of the fic might request kudos and comments, link to your Tumblr and/or Twitter accounts, link to your photoset on Tumblr, inform people what prompt you wrote your fic based on, or thank people for reading. We’d highly recommend linking to your fic’s photoset in the end notes.
Step 6: Fill out the Associations information for your fic.
Post to Collections/Challenges: This is how you will add your fic to the collection. Our collection is Bottom Louis Fic Fest 2020. If you need further assistance adding your fic to the collection, please contact us.
This work has multiple chapters: If your fic has multiple chapters, select this box.
Set a different publication date: Although you can ignore this when you first submit your fic to the collection, on your assigned posting date (you cannot do it ahead of the date), you will want to check this box and change your publication date to that posting date. More information on this in Step 11 below or here.
Choose a Language: Be sure that English is selected.
All other options in this section are not relevant for the Bottom Louis Fic Fest.
Step 7: Fill out the Privacy information for your fic.
Only show your work to registered users: For this fest, please make sure your fic is public at least until all the fics are posted so that more people can read your fic.
Disable anonymous commenting: If you only want users with accounts to comment on this fic, select this box. Please note that this may decrease the number of comments you receive on your fic.
Enable comment moderation: If you would like to approve comments before they are posted on your fic, select this box.
Step 8: Enter your work text. If your fic will have multiple chapters, this is where you will enter the text from chapter one. You may add in any relevant HTML (such as bolding or italicizing text as desired). If you need a guide to HTML on AO3, check here. If you’ve found that copying and pasting your fic text into AO3 created extra spaces, there’s help on fixing that here.
Step 9: Post your fic (or preview it first, if that makes you more comfortable, and then post). Your fic is now officially part of the collection and will be revealed on your posting date. You will be able to edit your fic as necessary before it is made revealed, so don’t fret if you find typos or anything that you would like to add before your posting date.
Step 10: On November 17, 2020, you will be notified of your posting date/time by email. If you have an issue with that posting date/time for any reason, please let us know.
Step 11: On your posting date, please change the posting date of your fic from the day you submitted it to your assigned posting date. This will ensure that your fic is moved to the most recently posted fics on AO3, which will help more people see it. For more information on changing your posting date, click here.
Step 12: On your assigned posting day and time, the BLFF mods will reveal your fic. You will then be permitted to post your photoset/moodboard to Tumblr and Twitter (or the BLFF blog will post it for you if necessary). More on that below.
Posting Your Photoset/Moodboard to Tumblr on Your Posting Date:
Note: If you don’t use Tumblr, the BLFF will do this for you. We will confirm whether you or the BLFF will be posting your fic to Tumblr when we email you about your posting date for the fest on November 17, 2020.
Step 1: Start a photo post on Tumblr. We’d highly recommend doing this on desktop instead of on mobile because often posting photos from mobile ends up messing them up for desktop, which can mean your photoset ends up looking like a collection of huge photos instead of an actual photoset or some other issue with formatting occurs.
Step 2: Add your photoset/moodboard to the post either as one large image (if it’s in that form) or as separate photos and arrange them to your liking.
Step 3: In the text body of the post, include any relevant details about your fic.
Our suggestion would be to include:
Title:
Rating:
Word Count:
Summary:
A link to your fic (we’d suggest making the title of the fic into a link)
A mention that you wrote this fic for the BLFF (please tag us @bottomlouisficfest)
You can also include any relevant warnings (which should also be tagged or mentioned on AO3) or the number of chapters if it’s a chaptered fic (e.g. Chapters: 8/8) if you’d like to.
Step 4: In the tags of the post, be sure to tag any relevant blogs that might reblog it (e.g. @bottomlouisficfest, @blouisparadise, @hlsource, @hlcreators) so that it’s easier to find. Please be sure to tag any blogs within the first five tags of your post so they will be able to see it in their tag. The BLFF blog and BLP will be reblogging all of the fics at least twice.
Step 5: At your assigned time and posting date, you may post your photoset/moodboard to Tumblr. Our suggestion would be to schedule your photoset post to Twitter and Tumblr (if you have either of those social media sites) so that it goes up exactly at your assigned posting time on your posting date rather than waiting to post it when you have a chance that day.
Once you’ve posted your photoset or moodboard to Tumblr, please send an ask to the BLFF blog so we know it’s up and can find it to reblog it and spread the word. We will also be checking periodically throughout the day to be sure that we don’t miss it.
Posting Your Photoset/Moodboard to Twitter on Your Posting Date:
Note: If you don’t use Twitter, the BLFF will do this for you. We will confirm whether you or the BLFF will be posting your fic to Twitter when we email you about your posting date for the fest on November 17, 2020.
Step 1: Create a tweet to promote your fic. We’d recommend including:
Your photoset
A link to your fic on AO3
A mention that your wrote the fic is for the BLFF (please tag us @BLFicFest)
Step 2: Post this tweet on or after your assigned posting time on your assigned posting date. If you are not available to post it at that exact time, you can schedule it. To schedule a tweet, go to write a tweet as normal and look for the small calendar icon with the clock over it (this icon is furthest to the right). This will allow you to select a date and time for your tweet to be posted. The BLFF Twitter account and the BLP Twitter account will both RT it once it is up.
And there you have it! Your fic will officially be completed and a part of the BLFF. We’re so proud of you and excited to read your fic!
17 notes
·
View notes
Text
Review and feedback on CMS WordPress
WordPress is a free open source CMS that suits both novice users and professional developers. Here are just the first in order to understand the capabilities of the engine, at least at a basic level, you need to be ready to study instructions, guides and forums with tips.

WordPress can be used to create blogs, company websites, landing pages, online stores, portals with the ability to register users. The functionality of the engine largely depends on what plugins are installed on it - and also on the skills of the webmaster: open source allows experienced developers to customize the system for themselves.
Many users start out with WordPress on their way to web development. This is not the easiest solution because there really is a lot to learn to create and customize a website. However, the engine updates clearly demonstrate that it is moving towards simplification, although deep customization still requires programming skills.
Although we are focusing on wordpress here, there are better alternatives to wordpress too.
What's new in WordPress 5.5.1?
Major updates in recent versions concern the Gutenberg block editor. For example, in version 5.3, a new Group block was added, which allows you to divide the page into several parts, and in the Columns block, support for fixed column widths appeared. In addition, text and background controls are now available in title blocks. The possibilities for deep customization have also expanded - now, the preferred style can be set to any block that supports this function.
Version 5.4 has two new blocks - social icons and buttons. With their help, you can quickly add interactive elements to the interface for going to pages in social networks, reposting, opening other sections of the site. In addition, there are new ways to work with colour: you can use gradients in the button block and skin.
There are also less noticeable improvements. For instance:
Images are automatically rotated when loaded according to built-in landmarks.
The extended health check screen recommendations indicate potential site issues.
When you log in, you are periodically prompted to confirm your email address to reduce the likelihood of the site being blocked due to a change in the administrator's email address.
The last major WordPress update is version 5.5. It has updated three key areas - engine speed, search capabilities, and security.
Lazy loading of images. Images placed on the page are not loaded until the user scrolls to them. On mobile devices, this technology also prevents browsers from loading images intended for other devices - for example, widescreen photos for the desktop. This saves traffic and reduces the load on the battery.
New XML sitemap that helps search engines find important pages right away.
Ability to enable automatic updates for plugins and themes, as well as support for manual updates via downloading ZIP files.
Much attention has been paid to the visual editor as well. It has new templates with combinations of text and media files, from which you can assemble beautiful layouts. All available blocks are now collected in a catalogue available in the editor. In addition, there was a built-in image editing - you can crop, rotate and scale photos directly from the image block.
Functionality
WordPress is the most popular system in the world. This fact is usually enough to immediately draw close attention to it. But it's much more interesting to understand why developers love WordPress so much. We have identified several reasons:
Flexibility due to the open-source engine.
Unique extensibility provided by a huge plugin base.
Multifunctionality and ease of use.
If you have never created a website before, then you will be surprised how easy it is to do it in WordPress. Even to get additional features, no special knowledge is required - in most cases, it is enough to install the required plugin. Experienced developers, on the other hand, value WordPress for its common PHP language and detailed documentation.
Before you start creating a WordPress site, you need to choose a suitable hosting and purchase a domain. Some hosters offer special rates optimized for working with the engine, but you do not need to buy them - for the first site, ordinary shared hosting is fine.
Even a novice webmaster shouldn't have any problems with installing WordPress - on most hosting sites; the system is deployed in a few minutes in one click. This also applies to the latest version. However, you need to be careful with updates. The main danger is the incompatibility of the engine and plugins after the update.
If you already had a site with an old version of WordPress, but now you decide to upgrade to 5.5.1, then it is recommended to disable all extensions before updating and then enable them one by one and check the functionality.
Once installed, WordPress is a fairly crude system that requires additional configuration. At a minimum, you will have to:
Go through all the settings sections to specify the name and address of the site, the type of permalinks, the format of the main page and other parameters.
Select and install a template.
Add and configure plugins for spam protection, SEO optimization, sitemap creation, name transliteration, etc.
All these actions you will perform through the administrative panel. It has been completely translated into Russian and made very logically. The control panel is an excellent example of a balance between functionality and simplicity. It is convenient to use it in all browsers and even on mobile devices without installing any add-ons or applications - although they are also available for iOS, Android and Windows.
The main menu of the control panel consists of the following functional sections:
"Console" - the main page, which collects general information about updates, news, comments.
"Records" - all materials posted on the site with the ability to edit them, add new ones and delete unnecessary ones.
"Media files" is a manager of images, videos, tables and other types of files uploaded to the hosting.
"Pages" is a section for managing static information - for example, the "About" page, terms of use or advertising. It offers the same functionality as Posts, except that published content does not appear in the blog feed.
"Comments" - all discussions on the site and moderation tools.
"Appearance" - tools for adding and customizing themes, including a built-in editor for template files.
"Plugins" - section for adding, removing and configuring extensions.
"Users" - managing all registered visitors, adjusting access rights.
"Tools" - WordPress service features such as import and export.
"Settings" - the main parameters of the site: name, language, mail, file format, rules for generating addresses, etc.
Within each section, there are thematic subsections containing their own sets of settings. All this makes the system highly customizable.
For advanced users who know how to work with CSS and PHP, WordPress offers a built-in code editor. With its help, the site can be deeply customized by adding widgets and blocks or, for example, replacing standard comments with an application from a third-party service. True, when making serious changes, it is recommended to unload the template files from the hosting and edit them on the computer, first creating a backup copy - this allows you to quickly return the theme to its original state if necessary.
The main tool for adding pages and posts is the Gutenberg visual editor. The classic editor offered limited content management functionality. To add additional features, users had to install plugins, which is not always convenient, including due to the increased load on the server. The Gutenberg editor addresses this issue by offering content function blocks:
heading, paragraph, quote, list;
image, gallery, audio, video and file;
code and markup elements;
widgets and inserts from popular services.
Each block can be configured individually. To add a widget to a page or a post from Twitter to a post, you do not need to work with the code: just select the appropriate block and provide a link to the content of interest, after which it will appear in the editor field. Permanent block combinations can be saved as templates, increasing the speed of publication creation.
Basically, Gutenberg allows WordPress users to do what website builders have long been suggesting - focus on how the content will look without being distracted by complex configuration settings. In visual editing mode, you can immediately evaluate how the page or post will be displayed, and you can make changes to the interface without resorting to editing the code.
Many WordPress users didn't like replacing the classic editor with Gutenberg. For those who prefer a traditional text / HTML editor, the Classic Editor extension has appeared in the plugin list. After adding it, you can choose with which editor you will add content - classic or visual.
Designs and work with templates (themes)

Websites are built on the basis of templates, of which a huge number have been developed for WordPress. The standard theme catalogue is available from the engine control panel in the "Appearance" section. Here you can select and install a template from the library, as well as download files downloaded from other sources.
Finding free templates for WordPress is not a problem - even if the theme is not Russified, you can fix it manually or using special programs. Version compatibility is much more difficult. However, the official plugins are updated fast enough so that there are no problems. If you have a paid template with support from developers, then there should be no errors either. Only old free themes that are no longer supported by the creators cause problems.
To avoid unnecessary problems, before installing the template, make sure that it is optimized for the latest version of WordPress. If there are no suitable options, then it does not matter. The same Gutenberg editor can be used to customize the template that would have required code changes in the past.
In the functionality of WordPress, we have already explored what the new editor is capable of. In fact, you can use it to customize the site's interface by creating new pages and adding widgets and blocks to them. If you have had experience with website builders, then you will instantly understand how it works. But even if the WordPress site is the first one, there will be no difficulties. With the help of widgets, plugins and shortcodes, you can quickly build the look of the page you want.
In addition, each WordPress theme has its own settings that allow you to upload a site logo, change the colour scheme, create the main menu, and enable/disable the display of individual widgets. The number of configurable parameters varies depending on the template, but the basic set is present in any theme. If you know how to work with CSS and PHP, then there will be even more possibilities for customization thanks to the open-source code of the engine and the built-in code editor, in which all template files are available.
Optimization (SEO) and promotion
When analyzing the pages at the top of the search results, it becomes clear that most of them are made in WordPress. This is due not only to the popularity of the engine itself but also to its promotion capabilities. When used correctly, the content is well-indexed by robots and ranks high.
Basic WordPress is not the best example of SEO optimization. But if you work a little with the engine, then you can achieve good results in search results without any problems - of course, taking into account the publication of useful and interesting content.
The first step to optimizing your website is choosing an SEO friendly theme. For a template to be considered as such, it must meet a number of requirements, including layout according to CSS3 and HTML5 standards, as well as fast page loading. If you buy or download a free theme from a third-party site, pay attention to its description - it should contain an indication of SEO friendly or SEO Optimized.
After choosing a suitable theme, you need to change the default configuration for WordPress.
In the general settings, specify the site address in the same style - with WWW or without WWW. In order for search engines to accurately identify the site at the specified address, add it to Yandex. Webmaster and Google Search Console.
Set the format of links like "site/category/post name". Go to the "Permalinks" section in the settings, select the "Custom" option and insert the value /%category%/%postname%.html into the field.
Further optimization of the engine is possible only with plugins. The first extension to install is Cyr to Lat. This plugin will automatically transliterate the names of pages and posts in Cyrillic to Latin. This will avoid the difficulties with an encoding that search engines face due to addresses with Cyrillic characters.
To optimize, you will also need to install one of their powerful plugins - All in One Seo Pack or Yoast SEO. After adding them, a new section will appear in the editor, where you can specify the title, description and keywords of the post. But the impact of SEO plugins on WordPress is not limited to this: there are a lot of options in their settings, for which there are separate guides for working. All in One Seo Pack covers all optimization needs, from meta tags for search engine spiders to creating an XML sitemap. Yoast SEO offers no less functionality, so it will be difficult to make a choice, but in any case, you will get very powerful website promotion tools on WordPress.
To improve behavioural factors, it does not hurt to connect an online consultant widget and install an online calculator to calculate something right on the site. You can use a CRM system to work with clients and process orders/requests. Of course, we recommend adding buttons for social networks. Such tools have a positive effect on website promotion in the search engines Yandex and Google, add weight to the perception of the site and are able to bring customers.
Price policy
The engine itself is distributed free of charge. You can download it from the official website or install it directly from the hosting admin panel - most hosters provide this option. You can also not pay for plugins and templates: even if some extension is distributed for money, you can almost always find a free alternative that will do the job just as well.
If you still want to install a premium theme, then prepare between $ 50 and $ 100. In this price range, there are a huge number of options on different theme sites, such as TemplateMonster. The cost depends on the functionality of the theme, its prevalence and the degree of the seller's popularity. Popular template stores average $ 75, but you can find options for both $ 45 and $ 600.
VIEW PREMIUM TEMPLATES
The situation is similar to plugins. The price is usually tied to what opportunities they offer. Often a free light version of the plugin is available in the WordPress directory. If you use it but at some point understand that there are not enough tools, then you can easily upgrade to the Pro version. Expanded functionality isn't the only benefit of the paid plugins. You also give money for support from the developers, which ensures compatibility with new versions of WordPress.
Advantages and disadvantages
The main plus of the latest versions of WordPress is the development of the Gutenberg editor, which adds a visual content management mode. Its appearance demonstrates the movement of the system towards simplification, lowering the entry threshold for novice webmasters. Gutenberg makes installing a number of extensions pointless by offering similar functionality in the base CMS.
Version 5.5.1 finally has support for lazy loading images. This will noticeably affect the speed of page loading, especially on mobile devices, where high-resolution images added for the desktop will no longer be loaded.
Other advantages of the system after major updates remained unchanged:
simple admin panel;
built-in file manager, which has become even more convenient to use thanks to the introduction of the Gutenberg editor.
an extensive library of plugins that extend the basic functionality of the engine;
a competent community and a large number of training materials.
With a change in the updated policy, a problem may appear - the frequent occurrence of problems with the compatibility of templates and plugins. If earlier large updates arrived twice a year, now the developers will send them more often. But there is a way out - you can not update immediately but accumulate versions with changes. In addition, in WordPress 5.5.1, update management has become even more convenient - now you can install plugin and theme updates automatically or download them manually via ZIP files.
Best WordPress Hosting
Even if you don't pay for themes and plugins, you will still need money for a WordPress site - at least in order to purchase hosting space and register a domain name.
The best site for WP projects is Bluehost hosting. It has an official recommendation from WordPress.org - the developers of the engine. They recommend Bluehost as one of the best CMS optimizations. Independent experts agree with the WordPress developers, who, on an ongoing basis, include Bluehost in the rating of the best ratings in the world.
TRY BLUEHOST HOSTING
To understand why Bluehost.com has so many positive reviews, just look at the list of its advantages:
Automatic installation of CMS WordPress on hosting in one click!
Server uptime rates are steadily approaching 100%.
High download speed.
Using a CDN to quickly deliver content to users.
Hosting web projects on servers in different countries of the world.
Free domain and SSL when paying for the plan.
Support for one-click installation of a large number of web applications.
Prompt technical support that answers questions through tickets, online chat or by phone.
Bluehost has special rates for WordPress sites. They are based on shared hosting and come in two lines: WordPress Hosting and WP Pro. The first one is suitable for small projects and consists of three tariffs. In the minimum configuration for $ 3.95 per month, you get 50 GB of SSD, on which you can create one site. At higher tariffs, the restriction on the number of sites and the available disk space is removed. All service packages include a free domain and SSL as a gift.
The WP Proline provides more powerful solutions that allow you to create professional WordPress sites.
Build ($ 19.95 / month) - The foundation for launching a professional website with a built-in analytics centre, 100+ free themes, daily backups, and malware protection.
Grow ($ 29.95 / month) - All Build features plus additional SEO tools, video compression up to 10GB / month, premium support.
Scale ($ 49.95 per month) - All Grow features plus unlimited backups, PayPal integration, unlimited video compression, advanced search, live chat support.
The latest service pack is suitable for e-commerce. But if you want to create a store on WordPress, then it is better to immediately go into another category of tariffs called eCommerce. Here are service packages optimized for WordPress and WooCommerce, the most popular e-commerce plugin. The cost of the tariffs is from 6.95 to 12.95 dollars per month. All packages have a built-in theme tailored for sales, free SSL and a free callback widget.
For large projects, Bluehost also offers VPS and Dedicated rentals. Virtual servers start at $ 18.99, and physical servers start at $ 79.99. All the features of shared hosting are available for them, but some tools need to be installed manually - for example, a backup system.
The domain name of the site is also registered with Bluehost. The rental price for a year depends on the domain zone. For example, an address like mysite.com can be purchased for $ 11.99 and mysite.blog for $ 16.99. The cheapest solution for Bluehost is a.SPACE domain. National zones are not represented in the catalogue, so if you want a site in.RU / RF, then buy a domain on another site and then link it to a project on Bluehost in a few clicks.
WordPress counterparts and competitors
With its open-source code and many extensions, WordPress offers functionality that only a few web development tools can provide. But when creating a website, it is not the power of the tool that is more important, but its effectiveness for the implementation of the project. If you look at WordPress from this position, you can find many services that are much easier to learn and do the job just as well.
Best WordPress Alternatives
uKit is a website builder for business, where you can assemble a one-page page, a business card, a company website or a small online store in a few hours. Intuitively simple and straightforward. Its tools are selected so that the service is convenient for novice webmasters. uKit offers several hundred thematic templates, made at a very good level, and the sites created on it are no different from the projects of professional developers.
uCoz is the only website builder competitor that can easily compare to WordPress in terms of functionality. The service uses a modular system that makes it versatile. What is added to WordPress as plugins are presented on uCoz in the basic package or available for installation as a module. The builder can be used to create any type of site, from a one-page site to an information portal with a forum, blog, and user registration.
Wix - Can be an alternative to WP when it comes to customizing the look and feel of your site. The constructor offers a huge number of colourful design themes made by professional designers. Basic functionality is higher compared to WordPress. In the built-in Wix App Market, the user can find dozens of useful applications and integrations with third-party services that extend the functionality of the service. So when creating, for example, an online store, choosing between WordPress and Wix is a very real situation.
Drupal is a free content management framework. More flexible, versatile, but also much more difficult to work with when compared to the WordPress CMS. Contraindicated for beginners, strong programming skills are required. Suitable for creating stores, news portals, social networks, corporate and other large-scale types of sites. It is impractical to use it for business cards, landing pages and other things in this spirit. There are many templates and modules, but their number is several times less than those on WP. Suitable for professionals only.
Joomla is a slightly more complex free CMS compared to WP. Usually, newbies choose between these two engines. The number of templates and plugins is very large but still noticeably inferior to that on WP. Best used for creating business cards, corporate websites, shops and social networks. Not so good for creating blogs, landing pages and forums. Basic coding skills are required - knowledge of HTML / CSS, the page code is easier to edit here than on WP with its PHP base. Good SEO opportunities, but the level of security in the stock suffers—balanced and popular engine for beginners.
Despite the fact that WordPress, in the latest versions, is moving towards simplifying content management tools, it is still far from top builders in this regard. In fact, Gutenberg is the same extension that adds visual editor capabilities to the CMS, only provided in the basic package.
The logic of working with Drupal is complex and inaccessible to beginners. This engine is usually used by webmasters who have been developing sites on the same WP for a long time, wanting to get more scalability for large projects. Joomla is comparable to WP in complexity and many features, but still not so easy to use, has a slightly different specialization.
On constructors, the ease of learning is not limited only to the design of pages and content. When creating a site on uKit, uCoz or Wix, the user does not need to worry about anything at all, except for the design and content, which are fully customizable in visual editing mode. To fully manage WordPress, however, coding skills are still required. On the other hand, it provides more customization options, which not all designers can boast of.
Conclusions and recommendations
WordPress is one of the best website building tools out there, which has gotten a bit easier with the release of version 5 thanks to the introduction of a visual editor. However, in terms of creation and reconfiguration, there are no major changes. Users still have to choose to host, take care of security on their own and follow the updates.
Create a website with WordPress + Bluehost1-click CMS installation on hosting ↵
Fast, easy and secure hosting with automatic installation of CMS WordPress in 2 minutes. It included FREE domain registration for one year + a free SSL certificate!
Price: from $ 2.95
WordPress 5.5 offers almost unlimited functionality, which is based on open source code and a wide range of extensions. However, not every project requires such versatility and power.
uKit and Wix are much more efficient to use if you need to create a company business card website, landing page or a small online store - these builders offer all the necessary tools.
uCoz - it is wiser to choose when it comes to a complex project - at least it will eliminate the need to select hosting and monitor updates.
However, WordPress is one of the top website building tools used by both beginners and seasoned developers alike. It can be used to solve various problems, but only you yourself know whether it is suitable for the implementation of your idea.
4 notes
·
View notes
Text
A Guide In Firefox to New And Creative CSS DevTools
Over the last few years, our team at
Firefox
has been operating on new CSS gear that address both cutting-edge strategies and age-old frustrations. We’re the Layout Tools team, a subset of Firefox Developer Tools, and our quest is to improve the modern-day internet layout workflow.
The internet has seen an first-rate evolution inside the final decade: new HTML/CSS functions, browser improvements, and design strategies. Our crew is dedicated to constructing gear that fit that innovation so that designers and developers can harness extra of the performance and creativity that’s now possible.
In this guide, we’ll proportion a top level view of our seven new equipment, with memories from the design system and realistic steps for trying out each tool.
1. Grid Inspector
It all started out three years in the past while our CSS format expert and dev advocate, Jen Simmons, labored with members of Firefox
DevTools
to construct a device that would aid customers in examining CSS Grid layouts.
As one of the most powerful new functions of the cutting-edge internet, CSS Grid had quick gained decent browser adoption, but it still had low internet site adoption. There’s a steep studying curve, and you nevertheless need fallbacks for sure browsers. Thus, part of our purpose turned into to help popularize Grid by way of giving developers a more hands-on manner to research it.
The middle of the device is a grid outline, overlaid at the page, which facilitates devs visualize how the grid is positioning their elements, and the way the layout modifications once they tweak their styles. We introduced numbered labels to identify each grid line, the capability to view up to 3 grids at once, and colour customization for the overlays. Recently, we also introduced support for subgrid, a modern day CSS specification implemented in Firefox and hopefully in extra browsers soon.
Grid Inspector changed into an idea for all of the tools that followed. It was even an notion for a brand new team: Layout Tools! Formed in late 2017, we’re unfold across 4 time zones and collaborate with many others in Mozilla, like our rendering engine builders and the best parents at MDN.
TRY OUT THE GRID INSPECTOR
In Firefox, go to our Grid example site.
Open the Inspector with Cmd + Shift + C.
Turn on Grid overlay through one of 3 ways:
Layout Panel:
In the Grid section, check the checkbox subsequent to .Content.Grid-content;
Markup View:
Toggle the “grid” badge next to ;
Rules View:
Click the button next to display:grid; inside
#page
-intro .Grid-content;
Experiment with the Grid Inspector:
Change the crimson overlay coloration to red;
Toggle “Line numbers” or “Extend strains infinitely”;
Turn on greater grid overlays;
See what takes place while you disable grid-gap: 15px in Rules.
2. The Editor of Form Path
The next project we have been working on has been the Shape Path Editor: our first visual editing tool.
CSS Shapes permits you to define shapes for textual content to drift around: a circle, a triangle, or a many-sided polygon. It can be used with the clip-path assets which permits you to trim elements to any of those equal shapes. These two techniques collectively open the opportunity for a few very specific graphic design-stimulated layouts.
However, creating these sometimes complicated shapes can be difficult. Typing all the coordinates manually and the use of the right CSS units is error-inclined and some distance eliminated from the creative mind-set that Shapes allows. Therefore, we made a device that allows you to edit your code through at once clicking and dragging shapes on the web page.
This kind of feature—visible editing—became new for us and browser tools in general. It’s an instance of how we will go beyond inspecting and debugging and into the world of design.
TRY OUT THE SHAPE PATH EDITOR
In Firefox, go to this web page at the An Event Apart website.
Open the Inspector with Cmd + Shift + C and pick out the first circular image.
In Rules, click on the icon subsequent to the shape-outside property.
On the web page, click on the factors of the shape and notice what happens while you drag to make the shape massive or tiny. Change it to a size that appears exact to you.
3. Text Reader
We have had a Fonts panel in Firefox for years which displays an informative list of all the fonts used in a website. We decided to convert this into a Font Editor to fine-tune the properties of a font by continuing our trend of designing in the browser.
A driving force behind this assignment become our purpose to support Variable Fonts at the same time that the Firefox rendering engine team changed into adding support for it. Variable Fonts gives font designers a way to offer fine-grained variations alongside axes, like weight, within one font file. It also supports custom axes, which offer each font creators and web designers an exceptional amount of flexibility. Our device routinely detects these custom axes and offers you a manner to alter and visualize them. This would otherwise require specialized websites like Axis-Praxis. Additionally, we added a characteristic that gives the ability to hover over a font name to spotlight in which that particular font is being used at the page. This is helpful because the manner browsers select the font used to render a bit of text can be complex and depend upon one’s computer. Some characters may be abruptly swapped out for a special font due to font subsetting. TRY OUT THE FONTS EDITOR
In Firefox, go to this variable fonts demo site.
Open the Inspector with Cmd + Shift + C and pick out the word “variable” within the title (the element’s selector is .Title__variable-web__variable).
In the 1/3 pane of the Inspector, navigate to the Fonts panel:
Hover over the font name Output Sans Regular to look what receives highlighted;
Try out the load and slant sliders;
Take a take a look at the preset font versions within the Instances dropdown menu.
4. Flexbox Inspector
Our Grid, Shapes, and Variable Fonts equipment can together electricity some very advanced graphic layout at the internet, but they’re still somewhat present day based on browser support. (They’re nearly there, however still require fallbacks.) We didn’t need to work most effective on new features—we were drawn to the problems that maximum web builders face on a every day basis.
So we started work at the Flexbox Inspector. Design-wise, this has been our most ambitious assignment, and it sprouted some new consumer research strategies for our team.
Like Grid, CSS Flexbox has a fairly steep learning curve while you first get started. It takes time to truely recognize it, and a lot of us hotel to trial and error to gain the layouts we need. At the beginning of the assignment, our team wasn’t even sure if we understood Flexbox ourselves, and we didn’t recognize what the main challenges have been. So we leveled up our understanding, and we ran a survey to discover what human beings wanted the most when it got here to Flexbox.
The outcomes had a big effect on our plans, making the case for complicated visualizations like grow/decrease and min/max. We continued operating with the community at some point of the task by means of incorporating remarks into evolving visual prototypes and Nightly builds.
The tool consists of two main parts: a highlighter that works just like the Grid Inspector’s, and a detailed Flexbox device inside the Inspector. The middle of the tool is a flex item diagram with sizing info.
With help from Gecko format engineers, we have been able to show the step-by-step size choices of the rendering engine to offer users a full image of why and the way a flex object ended up with a positive size.
Note: Learn the full tale of our design manner in “Designing the Flexbox Inspector”.
TRY OUT THE FLEXBOX INSPECTOR
In Firefox, visit Mozilla’s Bugzilla.
Open the Inspector with Cmd + Shift + C and pick out the element div.Inner (simply inside the header bar).
Turn on the Flexbox overlay through one of 3 ways:
Layout Panel:
In the Flex Container section, turn on the switch;
Markup View:
Toggle the “flex” badge next to ;
Rules View:
Click the button next to display:flex.
Use the Flex Container panel to navigate to a Flex Item known as nav#header-nav.
Note the sizes shown within the diagram and length chart;
Increase and reduce your browser’s width and see how the diagram modifications.
Interlude: Doubling Down On Research
As a small team and not using a formal person research support, we’ve regularly resorted to design-by-dogfooding: basing our critiques on our personal stories in using the tools. But after our achievement with the Flexbox survey, we knew we wanted to be better at collecting statistics to guide us. We ran a new survey to assist tell our subsequent steps. We crowdsourced a list of the 20 largest demanding situations faced by internet devs and asked our community to rank them using a max-diff format. When we discovered that the huge winner of the demanding situations was CSS Layout Debugging, we ran a follow-up survey on unique CSS insects to discover the largest pain points. We supplemented these surveys with user interviews and user testing. We also asked folks to rank their frustrations with browser developer tools. The clear pinnacle difficulty became moving CSS modifications returned to the editor. This became our subsequent project.
5. Changes Panel
The difficulty in shifting one’s work from a browser developer device to the editor is one of those age-old issues that we all just got used to. We were excited to make a easy and straight away usable solution.
Edge and Chrome DevTools got here out with versions of this device first. Ours is centered on assisting a wide range of CSS workflows: Launch DevTools, trade any patterns you want, and then export your modifications by means of either copying the overall set of changes (for collaboration) or simply one changed rule (for pasting into code). This improves the robustness of the whole workflow, such as our other format tools. And this is just a start: We recognize accidental refreshing and navigation from the web page is a huge source of facts loss, so a manner to bring persistence to the tool may be an essential next step. TRY OUT THE CHANGES PANEL
In Firefox, navigate to any website.
Open the Inspector with Cmd + Shift + C and pick an element.
Make some adjustments to the CSS:
Modify patterns inside the Rules pane;
Adjust fonts within the Fonts pane.
In the right pane of the Inspector, navigate to the Changes tab and do the following:
Click Copy All Changes, then paste it in a text editor to view the output;
Hover over the selector name and click Copy Rule, then paste it to view the output.
6. Inactive CSS
Our Inactive CSS feature solves one of the top troubles from our layout debugging survey on precise CSS bugs: “Why is this CSS assets now not doing anything?”
Design-wise, this feature is very simple—it grays out CSS that doesn’t affect the page, and shows a tooltip to give an explanation for why the property doesn’t have an effect. But we understand this can enhance efficiency and cut down on frustration. We have been bolstered by research from Sarah Lim and her colleagues who constructed a similar device. In their studies, they observed that novice builders had been 50�ster at building with CSS when they used a device that allowed them to ignore beside the point code.
In a way, that is our favorite sort of feature: A low-placing UX fruit that barely registers as a feature, however improves the complete workflow without actually wanting to be determined or learned. Inactive CSS launches in Firefox 70 but may be used now in prerelease variations of Firefox, consisting of Developer Edition, Beta, and Nightly. TRY OUT INACTIVE CSS
Download Firefox Developer Edition;
Open Firefox and navigate to
wikipedia.Org;
Open the Inspector with Cmd + Shift + C and choose the center content material area, called central-featured;
Note the grayed out vertical-align declaration;
Hover over the data icon, and click on “Learn extra” if you’re interested.
7. Accessibility Panel
Along the way we’ve had accessibility functions developed by means of a separate group that’s typically one person — Yura Zenevich, this year together with his intern Maliha Islam.Together they’ve turned the brand new Accessibility panel in Firefox into a powerful inspection and auditing tool. Besides displaying the accessibility tree and properties, you could now run different varieties of checks on a page. So far the checks include shade contrast, textual content labels, and keyboard attention styling.
Now in Nightly, you can strive the new shade blindness simulator which harnesses our upcoming WebRender tech.
TRY OUT THE ACCESSIBILITY PANEL
Download Firefox Developer Edition;
Navigate to
meetup.Com;
In the developer tools, navigate to the Accessibility tab, and click the “Turn on Accessibility Features” button;
Click the drop-down menu subsequent to “Check for problems” and pick out “All Issues”;
Take a have a look at the diverse contrast, keyboard, and text label troubles, and click the “Learn greater” links if you’re interested.
Next Up
We’re currently hard at paintings on a browser compatibility tool that uses facts from MDN to expose browser-specific problems for a particular element. You can follow along on GitHub to learn extra. The Future
We’re committed to helping the modern-day web, and that means continuously converting and growing. New specs get implemented via browser vendors all of the time. Guidelines and nice practices around progressive enhancement, responsiveness, and accessibility evolve constantly. Us device makers need to hold evolving too.
And what of the long-lived, ever-present troubles in creating the web? What ordinary user interfaces need to be rethought? These are a number of the questions that preserve us going!
What approximately a better manner to navigate the DOM tree of a page? That a part of DevTools has gone essentially unchanged since the Firebug days.
We’ve been experimenting with functions like again and forward buttons that might ease navigation between lately visited elements. A extra dramatic trade we’re discussing is including a compact DOM view that makes use of a syntax much like HTML templating engines. The attention could be on the most common use case—navigating to CSS—as opposed to viewing/enhancing the source.
We’ve additionally been thinking about a higher element selector. We realize how it can be more effective to work inside the web page, with much less jumping backward and forward into DevTools. We should make the detail selector extra effective and greater persistent. Perhaps it could choose whitespace on a page and tell you what causes that space, or it can shed mild at the relationships between extraordinary elements.
As a reputed Software Solutions Developer we have expertise in providing dedicated remote and outsourced technical resources for software services at very nominal cost. Besides experts in full stacks We also build web solutions, mobile apps and work on system integration, performance enhancement, cloud migrations and big data analytics. Don’t hesitate to
get in touch with us!
Source:
whizzystack.co
#b2b ecommerce
#b2b content marketing
#b2b seo
#b2b marketing blog
1 note
·
View note
Text
Pop-Up Blockers
A ‘pop-up blocker’, also known as ‘pop-up awesome’, is a program that prevents pop-ups from being shown in an individual’s web internet browser. While some close the window before it shows up, others disable the command that calls the pop-up, and yet others alter the home window’s resource HTML. One problem with pop-up blockers is that they can not always distinguish between an unwanted pop-up window and one that is user-requested.
Let’s just start from the beginning: Pop-ups are those bothersome home windows that get in the method of us viewing the web websites that we want to watch. The most practical description for this is that even people that loathe internet ads yield that the surge in internet marketing has actually funded a no-cost Net rich in material.
Albeit the majority of web surfers would certainly, somewhat, settle on the need of advertisement as a financial resource for Internet-based companies that basically operate as content providers, the brand-new on the internet advertising techniques and also strategies that some advertisers have been using show up to cross the line in between what is reasonable as well as what is not; in other words, what can be taken into consideration a ‘fair amount of advertising’ as well as what is just an ‘dishonest use of marketing as a way to invade individuals’s eyeballs, minds as well as lives’. The method right here is that online marketing evolves faster than one could possibly imagine. You would be really naïve if you believed that the latest generation of on the internet advertisements simply sits timidly on a website lugging an identifying tag that claims ‘Advertising. Click on me’. Rather, the mass of adware stealthily masquerade advertisements as non-commercial web content or bombard our eyeballs with pyrotechnic unwanted. It is essentially difficult to define all the various types as well as layouts of existing on-line advertising and marketing, allow us walk you with the most typical ones that have actually so much been determined.
Second, there are the pop-up as well as pop-under ads. Third, there are Interstitials, which are ads that appear after you click on a link yet prior to you see the next page, as well as Pop-up Transitionals, a kind of advertisement that plays in a different home window in between 2 pages of web content. Fourth, there are Superstitials, a very evolved advertisement types which move across the face of an internet page, as if they were computer animations projected on an item of glass over the web page.
Many reputable web sites attempt to stay clear of making use of misleading ads to get clicks however some enable the technique banner, that is, an ad that mimics a dialog box. When you click its OKAY button to disregard a system message, you are instantly attracted right into a spiral of other internet advertisements: a total headache! After that there’s also adware like TopText, which skulks onto your system when you set up specific shareware or freeware programs and after that generates its own pop-ups to compete with those introduced by the sites you visit.
Given that a future free of irritating pop up advertisements does not appear to be an extremely viable opportunity, if you wish to put an end to the insanity on your desktop you can either make use of ad-blocking software application to eliminate most advertisements that appear in your browser, or you can use some ad-blocking techniques without using ad-blocking software application. If you opt for the second choice, all you have to do is switch off all graphics, Java, JavaScript, and also Flash in your browser - and also compromise almost all the interactivity and effectiveness of your web experience at the same time. That is why software that selectively removes the aggravating ads is probably the most intelligent option.
, ABF Internet Traveler Tools, AdBeGone PopUp Killer and CoffeeCup PopUp Blocker have actually received some excellent critiques. Free pop-up blockers, such as STOPzilla and Panicware, are readily available for download. Both the Google as well as Yahoo toolbars consist of the capacity to obstruct pop-ups.
A lot of ad-blocking programs function as specialized proxy web servers. When working on your COMPUTER, they check out the addresses that your internet browser demands, inspect each one against the entries in a regularly updated data source of advertisement server addresses, and after that go down ask for advertisement content. Some additionally depend on pattern matching to seek windows and photos that match recognized shapes and sizes of advertisements. Leaving trouble apart, there are other excellent factors to fight back. For instance, blocking advertisements frees up valuable transmission capacity and can secure your personal privacy. Ads require time to lots, and also they inevitably get in the way of what you are really curious about while surfing on the Internet. Due to the fact that several advertisement servers place cookies on your computer, advertisement firms are able to track your browsing. These companies declare that the feature of many cookies they set is to control the kind as well as quantity of promotions you obtain. However because the larger advertisement solutions cover a vast variety of website, ad-related cookies can likewise give advertisement companies a lot of insight into your web surfing preferences. And this is a crucial problem considering that you, as the majority of us consumers, have never explicitly consented to be complied with on the web. If you wish to learn more regarding your personal privacy rights, go to the www.Anti-Spam-League.org website. This company has a lot of important info on privacy, spam, identification burglary and various other typical Web abuses. Come to be a cost-free member by visiting www.Anti-Spam-League.org.
There is the discussion regarding whether using ad-supported web websites is giving the implied commitment to endure and sustain online advertisements. Realistically, advertisers think that the implied contract appears to be appropriate to many individuals as well as internet websites because without promotions, the Web as we understand it would vanish actually quick.
Some of the most intrusive ads have the unfavorable effect of quickly capturing consumers’ interest and as an outcome, pop-up obstructing software is obtaining more as well as a lot more preferred these days. Even Microsoft revealed in the end of 2003 that the brand-new Internet Explorer will certainly include popup advertisement blocker. In April of 2004 Falk eSolutions AG, a global provider of ad distribution and administration services, introduced a new advertisement targeting alternative to automatically spot pop-up blocker software application on users’ computers and also promptly convert pop-up and pop-under stock to alternating layouts for ideal shipment to those individuals.
If you want to discover more regarding this and also other associated topics, have a look at www.Anti-Spam-League.org. This organization uses cost-free subscription and the opportunity to access a vast amount of pertinent information on privacy, spam, email abuse, Internet scams, responsible marketing and also numerous various other subjects.
1 note
·
View note