#domain.com web hosting
Explore tagged Tumblr posts
Visit Tumblr Blog
Explore Tumblr blogs with no restrictions, modern design and the best experience.
Last Seen Tumblr Blogs


Fun Fact
In 2020, Tumblr had 29.4 million users in the US.
Link
#Apache#Automation#cloudhosting#configuration#controlpanel#DevOps#DNS#emailserver#Install#Linux#MySQL#NGINX#PHP#Security#servermanagement#systemadministration#Ubuntu22.04#Ubuntu24.04#Virtualmin#webhosting
0 notes
Text
Understanding SSRF Vulnerabilities in Laravel: A Guide for Developers
In today's cybersecurity landscape, it is crucial to safeguard web applications from various vulnerabilities. One such vulnerability, Server-Side Request Forgery (SSRF), can lead to severe consequences if not addressed properly. In this blog, we’ll walk through what SSRF is, how it works in Laravel applications, and how you can mitigate it to keep your web applications secure.

What is SSRF (Server-Side Request Forgery)?
SSRF occurs when a web application makes a request to an unintended server, typically under the control of an attacker. This type of attack exploits the trust relationship between a web server and internal resources. SSRF can lead to unauthorized access to internal servers, data exfiltration, or even remote code execution.
How SSRF Works in Laravel
Laravel, being a robust PHP framework, can also be susceptible to SSRF if not properly secured. Let’s explore how an SSRF attack might manifest in a typical Laravel application.
Consider the following scenario: An application takes user input (such as a URL) and makes an HTTP request using the file_get_contents() function or Guzzle, a popular HTTP client in Laravel. If the user input is not properly sanitized, an attacker could craft a malicious URL pointing to an internal server or a server under their control.
Example of Vulnerable Code:
public function fetchData(Request $request) { $url = $request->input('url'); $data = file_get_contents($url); // Vulnerable to SSRF return response()->json(json_decode($data)); }
In the above code, there is no validation of the $url input. An attacker could exploit this to make requests to internal resources, such as http://localhost/admin, which could lead to exposure of sensitive data or unintended behavior.
How to Prevent SSRF in Laravel
Input Validation: Always validate the URLs provided by users. Restrict the URLs that can be accessed to a whitelist of trusted domains or IPs.
Example: php $validated = $request->validate([ 'url' => 'required|url|regex:/^(http|https):\/\/(trusted-domain\.com)$/', ]);
Use Guzzle with Restrictions: If you must use external HTTP requests, ensure you limit access to external domains. You can do this by configuring the Guzzle HTTP client with options that restrict requests to only allowed hosts.
Example: php $client = new \GuzzleHttp\Client(); $response = $client->request('GET', $url, [ 'allow_redirects' => false, 'verify' => true, 'headers' => [ 'Host' => 'trusted-domain.com', ] ]);
Network Level Protection: Restrict internal network access by implementing proper firewall rules. This can prevent SSRF attacks from reaching internal services.
Use a Web Security Scanner: Tools like ours can help identify SSRF vulnerabilities. Check out our free Website Security Checker to ensure your website is secure. Here’s a screenshot of our free Website Security Checker tool:

Conclusion
SSRF is a dangerous vulnerability, but with proper precautions, Laravel developers can easily prevent it. By validating user input, using secure HTTP clients, and restricting network access, you can significantly reduce the risk of SSRF attacks on your Laravel applications. Regular vulnerability assessments using tools like ours to test website security free can help identify and mitigate potential security threats.
To check your website’s vulnerability against SSRF and other common security issues, use our free Website Security Scanner today!
Here’s an example of a vulnerability assessment report generated by our tool:

Stay ahead of the game and make sure your Laravel application is secure. Try our free Website Security Checker now and safeguard your website from common vulnerabilities like SSRF.
1 note
·
View note
Text
Deploying Laravel Applications to the Cloud
Deploying a Laravel application to the cloud offers several advantages, including scalability, ease of management, and the ability to leverage various cloud-based tools and services. In this guide, we will explore the steps to deploy a Laravel application to the cloud using platforms like AWS, DigitalOcean, and Heroku. We'll also touch on best practices for server configuration, environment variables, and deployment automation.
1. Preparing Your Laravel Application
Before deploying, it’s essential to ensure that your Laravel application is production-ready. Here are some preparatory steps:
Update Dependencies: Run composer install --optimize-autoloader --no-dev to ensure that only production dependencies are installed.
Environment Configuration: Make sure your .env file is configured correctly for the production environment. You’ll need to set up database connections, cache, queue configurations, and any other service keys.
Caching and Optimization: Laravel provides several optimization commands to boost the performance of your application. Run the following commands to optimize your app for production:bashCopy codephp artisan config:cache php artisan route:cache php artisan view:cache
Assets and Front-End Build: If your application uses frontend assets like JavaScript and CSS, run npm run production to compile them and ensure that assets are optimized.
Database Migration: Make sure your database schema is up to date by running:bashCopy codephp artisan migrate --force
2. Choosing a Cloud Platform
There are several cloud platforms that support Laravel applications, including AWS, DigitalOcean, and Heroku. Let's look at how to deploy on each.
A. Deploying Laravel to AWS EC2
AWS (Amazon Web Services) offers a robust infrastructure for hosting Laravel applications. Here's a high-level overview of the steps:
Launch an EC2 Instance: First, you need to create an EC2 instance running a Linux distribution (e.g., Ubuntu). You can choose the instance size based on your traffic and performance needs.
Install PHP and Required Software: Once the instance is up, SSH into it and install PHP, Composer, Nginx (or Apache), and other necessary services:bashCopy codesudo apt update sudo apt install php php-fpm php-mbstring php-xml php-bcmath php-mysql unzip curl sudo apt install nginx
Configure Nginx: Set up Nginx to serve your Laravel app. Create a new Nginx configuration file under /etc/nginx/sites-available/your-app and link it to /etc/nginx/sites-enabled/.Example configuration:nginxCopy codeserver { listen 80; server_name your-domain.com; root /var/www/your-app/public; index index.php index.html index.htm; location / { try_files $uri $uri/ /index.php?$query_string; } location ~ \.php$ { fastcgi_pass unix:/var/run/php/php7.4-fpm.sock; fastcgi_index index.php; fastcgi_param SCRIPT_FILENAME $document_root$fastcgi_script_name; include fastcgi_params; } error_log /var/log/nginx/error.log; access_log /var/log/nginx/access.log; }
Database Configuration: Set up a MySQL or PostgreSQL database (you can use Amazon RDS for a managed database) and configure your .env file with the correct credentials.
SSL and Security: Secure your application with SSL (using Let's Encrypt or AWS Certificate Manager) and ensure your firewall and security groups are configured correctly.
Deploy Code: You can deploy your Laravel application to EC2 using Git, FTP, or tools like Envoyer or Laravel Forge. For Git deployment, clone your repository and configure your environment variables.
B. Deploying Laravel to DigitalOcean
DigitalOcean provides a simple and cost-effective way to host Laravel applications. Here’s how to deploy:
Create a Droplet: Log into your DigitalOcean account and create a new Droplet with a suitable operating system (typically Ubuntu).
Install PHP, Nginx, and Composer: SSH into your droplet and install the necessary dependencies for your Laravel app:bashCopy codesudo apt update sudo apt install php php-fpm php-mbstring php-xml php-bcmath php-mysql unzip curl sudo apt install nginx
Configure Nginx and Laravel Application: Configure Nginx to point to your Laravel application’s public folder and set up SSL.
Database Configuration: Set up MySQL or PostgreSQL on your droplet, then configure the .env file for your database credentials.
Deploying the Code: You can either deploy your code via Git or use an automation tool like Envoyer to streamline deployments. You’ll also need to configure file permissions for storage and cache directories.
C. Deploying Laravel to Heroku
Heroku is an excellent choice for quick and easy Laravel application deployment with minimal configuration. Here’s how you can deploy a Laravel app on Heroku:
Create a Heroku App: Sign up or log into your Heroku account and create a new app. This will automatically provision a server for you.
Install Heroku CLI: Install the Heroku CLI on your local machine if you haven't already:bashCopy codecurl https://cli-assets.heroku.com/install.sh | sh
Configure the .env File for Heroku: Heroku uses environment variables, so make sure you configure your .env file correctly or set them directly in the Heroku dashboard.
Deploy the Code: Push your code to Heroku using Git:bashCopy codegit push heroku master
Database Configuration: Heroku offers a managed PostgreSQL database that you can provision with the command:bashCopy codeheroku addons:create heroku-postgresql:hobby-dev
Run Migrations: Run database migrations on Heroku with:bashCopy codeheroku run php artisan migrate
3. Automating Deployment with Laravel Forge or Envoyer
For smoother deployment management, you can use tools like Laravel Forge or Envoyer.
Laravel Forge: Laravel Forge is a server management and deployment service designed for PHP applications. It automates tasks like server provisioning, security updates, and Laravel deployments to platforms like AWS, DigitalOcean, and others.
Envoyer: Envoyer is a zero-downtime deployment tool that ensures your Laravel app is deployed with no interruption to your users. It handles the deployment process seamlessly, ensuring the application is running smoothly at all times.
4. Conclusion
Deploying a Laravel application to the cloud can seem daunting, but it becomes easier with tools and services that automate much of the process. Whether you choose AWS, DigitalOcean, or Heroku, each platform offers unique benefits for hosting your Laravel application. Using automation tools like Forge and Envoyer, you can further streamline the deployment process, ensuring your app runs smoothly and efficiently in the cloud.
0 notes
Text
How To Redirect Old Domain To New Domain

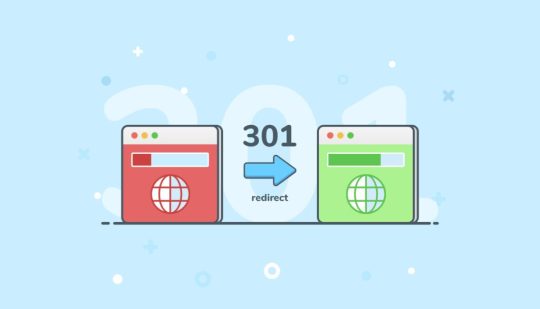
Redirecting an Old Domain to a New Domain
When you change domains, it's crucial to maintain the integrity of your old URLs. This ensures anyone clicking a link to your old website gets directed to the corresponding page on your new domain. This redirection is achieved using a 301 redirect, which tells search engines the move is permanent and helps preserve SEO value. Here are several methods to redirect your old domain to your new domain:
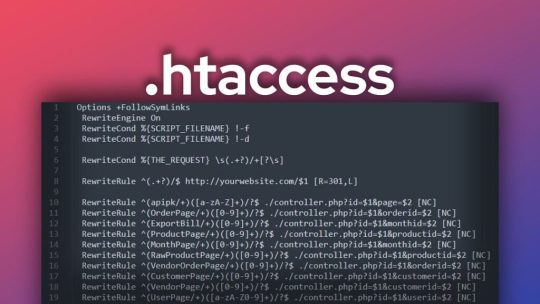
1. Using an .htaccess file: - .htaccess is a configuration file for Apache web servers. Even minor syntax errors can disrupt your content, so ensure you follow the instructions carefully. - Important: .htaccess is a hidden file. Make sure your FTP client is configured to show hidden files before proceeding. Here's a step-by-step guide: 1. Access your old domain's root directory through an FTP client. 2. Create a new text file using a text editor like Notepad and save it as `.htaccess` (ensure the filename starts with a dot). 3. Edit the contents of `.htaccess` with the following code, replacing `your-new-domain.com` with your actual new domain: ```apache RewriteEngine On RewriteBase / RewriteRule ^(.*)$ https://your-new-domain.com/$1 ``` - **Explanation:** - `RewriteEngine On` activates the rewrite engine. - `RewriteBase /` sets the base directory for the rewrite rules. - `RewriteRule ^(.*)$ https://your-new-domain.com/$1 ` defines the redirection rule: - `^(.*)$`: Matches any request URL. - `https://your-new-domain.com/$1`: The destination URL with the captured request path (`$1`) appended. - ``: Sets the redirect status code to 301 (permanent). - ``: Stops processing further rewrite rules after this one is applied. 4. Upload the `.htaccess` file back to your old domain's root directory.

2. Using PHP scripts: - You can leverage PHP scripts to redirect URLs using the header() function. This function sends an HTTP header instructing the client to redirect to a new location. Here's how to implement a PHP redirect script:- Create a new PHP file (e.g., redirect.php) using a text editor. - Add the following code to the PHP file, replacing https://your-new-domain.com/ with your new domain:```php ``` - **Explanation:** - `$newURL` stores the destination URL. - `header()` sends an HTTP header with the `Location` directive set to `$newURL` and a status code of 301 (permanent). - `exit()` terminates the script execution. - Upload the redirect.php file to your old domain's web server. - In your old website's code, link to redirect.php from the URLs you want to redirect.

3. Using DNS redirection: - Domain Name System (DNS) configurations can be used to point your domain to a new location. This method involves modifying your domain's DNS records at your domain registrar or DNS hosting provider. Here's a general process:- Log in to your domain registrar or DNS hosting provider's control panel. - Locate the DNS management section for your domain. - Create a new DNS record, typically labeled "URL Redirect" or "Forwarding." - Specify the destination URL (including http:// or https://) in the record. - Choose the redirect type (permanent or temporary). - Save the DNS record changes.Note: DNS propagation can take time (from a few minutes to several hours) for the changes to take effect globally.

4. Using cPanel (if your web hosting uses cPanel): Here's how to use cPanel's "Redirects" feature: - Access your cPanel account using your login credentials. - Navigate to the "Domains" section and locate the "Redirects" icon or option. - Within the "Redirects" section, you'll typically find options for different redirect types: - Permanent (301) Redirect: Use this for permanently moving visitors and search engines to a new URL. - Temporary (302) Redirect: Choose this for temporary redirects, like website maintenance or promotions. - Select the domain you want to redirect from the dropdown menu. - Enter the following details: - Redirects to: The full URL of the new destination page. - Source: The original URL or URL pattern you want to redirect from. - Choose whether to redirect with or without the "www" prefix (based on your preference). - (Optional) Enable wildcard redirection if you want all subdirectories within the old domain to redirect to the same path on the new domain. - Click "Add" or "Save" to apply the redirect configuration. - Test the redirect by entering the original URL in a web browser. It should automatically redirect to the specified new URL.
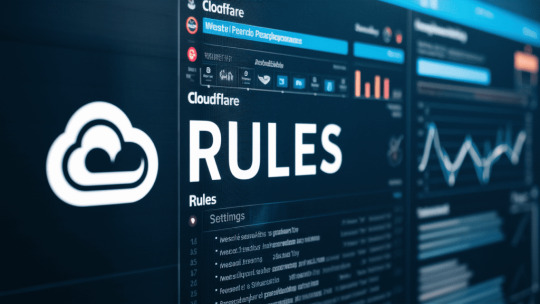
5. Using Cloudflare: - Cloudflare is a popular content delivery network (CDN) that also offers DNS management and redirection features. It provides free basic functionalities, including DDoS protection and SSL certificates. Here's a basic guide on using Cloudflare for redirection: Pre-requisite:- Sign up for a free Cloudflare account if you don't have one already.Steps: - Add your old domain to Cloudflare (it's a free process). - Update your domain's nameservers to point to Cloudflare's nameservers (provided during signup). This step propagates DNS changes, so allow some time for it to take effect globally. - Once your domain is active on Cloudflare, access the Cloudflare dashboard and navigate to the "Rules" section. - Create a new rule. - In the "For" field, enter your old domain name (e.g., your-old-domain.com). - Under "Settings," choose "Forwarding URL (301)" for a permanent redirect. - In the "To" field, enter your new domain name (e.g., https://your-new-domain.com/). - Click "Save" to activate the redirect rule.

Additional Considerations: - Testing: After implementing any redirection method, thoroughly test your redirects to ensure they work as expected. Use different browsers and devices to verify functionality. - SEO Impact: Using 301 redirects is generally SEO-friendly, as it signals to search engines that the content has permanently moved and helps transfer SEO value to the new domain. - Choosing the Right Method: The best method for you depends on your technical comfort level and hosting platform. If you're comfortable with editing configuration files, using .htaccess might be suitable. cPanel's "Redirects" feature offers a user-friendly interface for those using cPanel hosting. Cloudflare is a great option if you already use it for DNS management and want a convenient redirection solution. By following these methods and considerations, you can effectively redirect your old domain to your new domain, ensuring a smooth transition for your website visitors and preserving your SEO value. Read the full article
0 notes
Text
Alias Domain Là Gì? Cách Sử Dụng & Cấu Hình Trong cPanel
1. Alias Domain Là Gì?
Alias Domain được gọi với tên khác là Parked domain là một dạng tên miền khác chạy song song với tên miền chính.
Ví dụ: Khi đến trường bạn tên Nguyễn Văn A nhưng ở nhà bạn lại tên Tèo or Tý. Mặc dù có 2 tên khác nhau nhưng đều là 1 người.

Alias Domain là gì?
2. Tại sao bạn cần sử dụng Aliases Domain?
Aliases Domain là một tính năng thường có trên Windows hosting, được sử dụng cho hai mục đích:
2.1. Sử dụng 2 hay nhiều địa chỉ tên miền cho cùng một website.
Khách truy cập có thể sử dụng bất kì tên miền nào là “bí danh” để truy cập trang web. Chẳng hạn như việc bạn có thể truy cập vào tên miền phụ ngắn gọn và dễ nhớ hơn fb.com thay vì facebook.com. Điều này mang đến nhiều lợi ích như sự tiện lợi, mở rộng tầm ảnh hưởng, kết nối đến khách hàng,….
2.2. Giúp một tài khoản email được dùng với nhiều đuôi tên miền khác nhau.
Nếu bạn đang có nhiều hơn 10 tài khoản tên miền phụ @domain.com, tuy nhiên bạn lại muốn nhận email theo địa chỉ @domain.com.vn, tên miền chính đăng ký dịch vụ email doanh nghiệp. Tính năng Alias domain sẽ giúp bạn giải quyết vấn đề đề truy cập nhanh trong và vô cùng tiện lợi.
3. Alias Domain hoạt động như thế nào?
Aliases Domain hoạt động bằng cách thêm một tên miền mới vào cùng một máy chủ lưu trữ với tên miền gốc. Tên miền phụ sẽ chạy cùng cấu trúc tệp hoặc thư mục với tên miền gốc, nhưng có hai loại mã nguồn và hai URL riêng biệt.
Hai URL của tên miền phụ có thể giống nhau hoặc khác nhau. Tuy nhiên, URL chạy dữ liệu từ lần thứ hai trở đi sẽ phụ thuộc vào cấu hình URL của mã nguồn được sử dụng cho tên miền gốc.

Xem thêm: https://thuevpsgiare.vn/alias-domain-la-gi/
thuevpsgiare #vpsgiare #fastbyte #vps #thuevps #cloudserver #cloudvps
0 notes
Text
How to Host a WordPress website on Cyber Panel
Step 1: Install Cyber Panel.
If you haven't already, you'll need to install Cyber Panel on wordpress on your server. You can follow the installation instructions provided by Cyber Panel for your specific operating system.
Step 2: Access Cyber Panel.
Once Cyber Panel is installed, access the Cyber Panel control panel by navigating to the IP address or domain name of your server in a web browser, followed by :8090 (e.g., http://your-server-ip:8090). Log in using the username and password you created during the installation process.
Step 3: Create a Website.
In the Cyber Panel dashboard, click on the "Websites" tab and then click on "Create Website." Enter your domain name, select the package (or create a new one if needed), and click "Create Website."
Step 4: Install WordPress.
After creating the website, click on the domain name in the "Websites" list to open the website management page. Scroll down to the "WordPress" section and click "Install."
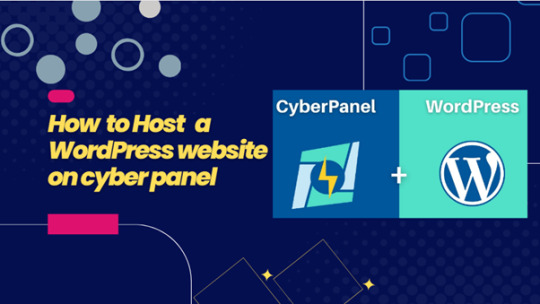
Step 5: Configure WordPress.
Follow the on-screen instructions to complete the WordPress installation. You'll need to enter the site title, admin username, password, and email address. Click "Install" to finish the installation.
Step 6: Access WordPress Admin.
Once WordPress is installed, you can access the WordPress admin dashboard by adding /wp-admin to your domain name (e.g., http://your-domain.com/wp-admin). Log in using the admin username and password you set during the installation.
Step 7: Customize Your Website.
Customize your website by choosing a theme, installing plugins, and adding content to your site.
Step 8: Configure Cyber Panel Settings (Optional).
You can further configure your website and server settings in Cyber Panel to optimize performance and security. Explore the various options available in the Cyber Panel dashboard.
Step 9: Launch Your Website.
Once you're satisfied with your website's setup, you can launch it for public access. Share your domain name with others to visit your WordPress site.
Please note that Cyber Panel offers advanced features and settings, so it's recommended to refer to the official Cyber Panel documentation for detailed instructions and best practices.
0 notes
Text
SMF Nedir ve Ne İşe Yarar?Simple Machines Forum (SMF), web sitesi sahiplerine online topluluklar oluşturmak için kullanılan ücretsiz forum yazılımıdır. SMF, kullanıcıların tartışabilecekleri, bilgi paylaşabilecekleri ve birbirleriyle etkileşime geçebilecekleri bir platform sunar. İhtiyaç duyabileceğiniz tüm özelliklere sahip olan SMF, web sitenize kolayca entegre edilebilir ve kullanıcı dostu bir arayüze sahiptir.SMF, forum sitesi oluşturmak isteyen kişiler için mükemmel bir seçenektir. Kullanıcıların rahatlıkla üye olabileceği, konulara katkıda bulunabileceği ve iletişim halinde olabileceği bir ortam sunar. Ayrıca, moderatörlerin ve yöneticilerin forumu yönetmesini ve istenmeyen içerikleri engellemesini sağlayan bir dizi güvenlik özelliği de sunar.SMF ayrıca, kişiselleştirilebilir tema ve eklenti seçenekleri sunar. Bu sayede, forumunuzun görünümünü istediğiniz gibi ayarlayabilir ve istediğiniz ek özellikleri ekleyebilirsiniz. Böylelikle, forumunuzu web sitenizin genel tasarımıyla uyumlu hale getirebilirsiniz.Tüm bu özellikleriyle SMF, web sitesi sahiplerinin online topluluklar oluşturmasına ve yönetmesine yardımcı olan güçlü bir forum yazılımıdır.SMF İle Web Sitesi Nasıl Oluşturulur? SMF (Simple Machines Forum), web sitesi oluşturmak isteyenlerin tercih ettiği bir forum sistemidir. SMF ile web sitesi oluşturmak oldukça kolaydır ve herhangi bir kodlama bilgisi gerektirmez. İlk adım olarak, SMF resmi web sitesinden en son sürümü indirerek kurulum dosyalarını bilgisayarınıza kaydedin. Daha sonra, bir web hosting sağlayıcısı üzerinden bir web sitesi barındırma hizmeti satın almanız gerekmektedir. Ardından, web hosting panelinize giriş yaparak veritabanı oluşturun ve SMF dosyalarını sunucunuza yükleyin. Eğer SMF kurulumu konusunda bir teknik bilginiz yoksa, bu adımları takip etmek zor olabilir. Bu durumda, web hosting sağlayıcınızdan destek alabilir veya SMF topluluğunun forumunda yardım isteyebilirsiniz. Kurulum tamamlandığında, web sitesi için temalar ve eklentiler seçebilirsiniz. Birçok ücretsiz SMF teması ve eklentisi mevcut olduğundan, istediğiniz tarzda bir web sitesi oluşturabilirsiniz. SMF ile web sitesi oluştururken dikkat etmeniz gereken en önemli noktalardan biri güvenliktir. Güvenlik önlemleri almadan bir web sitesi yayınlamak, hassas bilgilerinizi tehlikeye atabilir ve site ziyaretçilerinizin güvenliği tehlikeye girebilir. Bu nedenle, SMF forumunun güvenlik önerilerini dikkatlice inceleyerek uygulamanız önemlidir. Son olarak, web sitesi yayına alındıktan sonra moderatörlük nasıl yapılır konusunda bilgi sahibi olmanız gerekebilir. SMF forumunun moderasyon özelliklerini detaylı bir şekilde inceleyerek, site yönetiminin nasıl yapılacağını öğrenebilir ve web sitesi ziyaretçileri ile etkili bir iletişim kurabilirsiniz.SMF Kurulumu Nasıl Yapılır? SMF kurulumu yapmak oldukça kolay bir işlemdir. İlk olarak, resmi SMF web sitesinden en son sürümü indirmeniz gerekmektedir. İndirdiğiniz dosyayı zipten çıkarttıktan sonra, sunucunuzdaki FTP istemcisine dosyaları yüklemeniz gerekmektedir. Bu adımdan sonra, domaininiz ile ilişkilendirdiğiniz sunucuda yüklediğiniz dosyaları bulun ve domain.com/install.php adresine gidin. Bu sayfada, size kurulum sihirbazı rehberlik edecektir. Bu sihirbaz size, veritabanı bilgilerinizi girmeniz gerektiği gibi, forumunuzun adını ve diğer ayarlamaları yapmanızı sağlayacaktır. Veritabanı için gerekli bilgileri girerek, adımları takip edin ve kurulumu tamamlayın. Bu adımlardan sonra artık SMF forumunuzu kullanmaya başlayabilirsiniz. Eğer herhangi bir sıkıntı veya hata ile karşılaşırsanız, SMF topluluğu ve belgeleri size yardımcı olacaktır. Kurulum sonrası gelen ekranların talimatlarını dikkatle takip etmeniz, sorunsuz bir kurulum için oldukça önemlidir. Artık SMF forumunuzu kurma konusunda bilgi sahibisiniz. Herhangi bir sorunla karşılaşırsanız, yazılımın resmi web sitesi ve topluluk sizin için vardır. SMF Tema ve Eklenti SeçimiSMF Tema ve Eklenti Seçimi SMF (Simple Machines Forum), kullanıcı dostu arayüzü
ve kullanışlı eklentileri sayesinde web sitesi sahipleri tarafından sıklıkla tercih edilen bir forum sistemidir. SMF kullanıcıları, forumlarını kişiselleştirmek ve kullanıcı deneyimini artırmak için geniş tema ve eklenti seçeneklerine sahiptir. SMF'de tema seçimi yaparken dikkat edilmesi gereken en önemli nokta, site ziyaretçilerinin konforunu ve görsel olarak hoşnutluğunu sağlamaktır. Kullanıcı dostu bir tasarımın yanı sıra, seo uyumlu ve hızlı yüklenen temalar tercih edilmelidir. Ayrıca, responsive (duyarlı) temaların seçilmesi, mobil cihazlardan erişim sağlayan ziyaretçilerin memnuniyetini artırır. Eklenti seçimi yaparken de, sitede sunulan hizmetlere ve kullanıcı ihtiyaçlarına uygun eklentiler tercih edilmelidir. SEO, güvenlik, sosyal medya entegrasyonu gibi farklı kategorilerdeki eklentiler, sitenin performansını artırmak ve kullanıcı deneyimini zenginleştirmek adına önemlidir. SMF kullanıcıları, forumlarını istedikleri gibi kişiselleştirebilmek adına geniş tema ve eklenti seçeneklerine sahip olmaları sayesinde, kullanıcılarının beklentilerini karşılayan zengin içerikli forumlar oluşturabilirler.SMF Forumunda Moderatörlük Nasıl Yapılır?SMF forumunda moderatörlük yapmak,forumda düzeni sağlamak ve kullanıcıların kurallara uymasını sağlamak için oldukça önemlidir.Bunun için öncelikle forum yöneticisinin moderatör olmanızı onaylaması gerekmektedir.Bu onayı aldıktan sonra moderatör panelinden giriş yapabilir ve moderatörün yetkilerini kullanabilirsiniz.Moderatör olarak forumdaki mesajları kontrol edebilir, kullanıcıların tartışmalarını yönetebilir ve istenmeyen içerikleri silme yetkisine sahip olabilirsiniz.SMF Güvenlik Önlemleri ve İpuçları SMF Güvenlik Önlemleri ve İpuçları kapsamında, SMF forumunun güvenliğini artırmak için bazı adımlar atmak çok önemlidir. İlk olarak, forum yazılımınızı ve eklentilerinizi düzenli olarak güncellemelisiniz. Güncellenmemiş yazılım ve eklentiler, forumunuzun güvenliğini tehlikeye atabilir. Ayrıca, güçlü bir şifre politikası belirleyerek kullanıcıların güçlü şifreler oluşturmalarını sağlayabilir ve düzenli aralıklarla şifre değişimini zorunlu kılabilirsiniz. Bu, forumunuzun genel güvenliğini artıracaktır. Diğer bir güvenlik önlemi ise, gereksiz eklentilerden ve temalardan kaçınmaktır. Her eklenti veya tema, forumunuzun güvenliğini tehlikeye atabilir. Yalnızca güvendiğiniz kaynaklardan eklenti ve tema indirmeli ve düzenli olarak güncellemelisiniz. Ayrıca, forumunuzu sürekli olarak izleyerek ve düzenli olarak logları kontrol ederek potansiyel güvenlik ihlallerini tespit edebilirsiniz. Bu şekilde, erken aşamada güvenlik sorunlarına müdahale edebilirsiniz. SMF forumunuzun güvenliğini artırmak için önemli adımlardan biri de yedekleme işlemidir. Düzenli olarak forum veritabanını yedekleyerek, olası bir veri kaybı durumunda verilerinizi koruyabilirsiniz. Son olarak, güvenlik duvarı ve güvenlik eklentileri kullanarak forumunuzu kötü niyetli saldırılara karşı koruyabilirsiniz. Bu önlemleri alarak, SMF forumunuzun güvenliğini artırabilir ve kullanıcılarınızın güvenliğini sağlayabilirsiniz. SMF forumunun güvenliği konusunda dikkat edilmesi gereken önemli noktaları ele aldığımız bu yazımızda, forumunuzun güvenliğini artırmak için alabileceğiniz önlemleri bulabilirsiniz. Güvenli bir forum deneyimi için bu önlemlerin düzenli olarak uygulanması büyük önem taşımaktadır. Kullanıcılarınızın ve forumunuzun verilerinin güvenliği için bu önlemleri göz ardı etmemenizi öneririz.
0 notes
Text
Web Hosting Review Endurance International Group
About the Company Public companies in the Technology sector Headquarters: Burlington, Massachusetts Other Offices: The United States in Utah, Texas, Washington and Arizona and the United Kingdom, India, Israel and Brazil Establishment: 1997 Brands: Bluehost, HostGator, iPage, Domain.com, A Small Orange, Constant Contact, SiteBuilder, MOJO Marketplace, BigRock, and ResellerClub No. of…
View On WordPress
0 notes
Text

Domain.com WW
Domain.com is perfect for small businesses looking to get online. Domain.com, an ICANN-accredited registrar, offers a full range of solutions to create and market websites including web hosting, Email, SSL certificates, design, and email marketing.
Categories : Ecommerce, Utilities, Software
Landings : Domain.com WW
Targeting : Worldwide
0 notes
Text
Domain Alias là gì? Tìm Hiểu Về Alias Domain và Cách Cấu Hình Trong cPanel
Khi bạn bước chân vào thế giới rộng lớn của web hosting và quản lý tên miền, bạn sẽ thường xuyên gặp phải các khái niệm kỹ thuật phức tạp. Trong số này, "Domain Alias" (Alias Domain) là một thuật ngữ khá phổ biến. Nhưng vấn đề ở đây là Domain Alias là gì? Và làm thế nào để cấu hình chúng? Hãy cùng chúng tôi tìm hiểu sâu hơn về Alias Domain và cách sử dụng chúng trong cPanel.
Domain Alias Là Gì?
Trước khi đi sâu vào chi tiết kỹ thuật, hãy tìm hiểu về Domain Alias là gì. Đơn giản, Alias Domain (hay còn được gọi là Domain Bí Danh) là một tên miền bổ sung hoặc thay thế được tạo ra để hoạt động cùng với tên miền chính của một trang web. Nó cho phép bạn có nhiều tên miền trỏ đến cùng một trang web.

Để hiểu rõ hơn, giả sử bạn có một trang web với tên miền chính là "example.net". Bằng cách sử dụng Alias Domain, bạn có thể đăng ký một tên miền khác, ví dụ "example.com", và đặt nó trỏ đến cùng vị trí trang web của "example.net". Điều này giúp bạn có nhiều tên miền khác nhau để dẫn người dùng đến trang web của mình.
Một trong những điểm đặc biệt của Alias Domain đó là khả năng gán nhiều tên miền trỏ đến cùng một trang web. Điều này mang lại sự tiện lợi và mở rộng tầm ảnh hưởng của trang web của bạn. Ví dụ, thay vì người dùng phải gõ địa chỉ "facebook.com" để truy cập vào mạng xã hội Facebook, họ chỉ cần gõ "fb.com" và vẫn có thể truy cập được.
Lợi Ích Của Domain Alias
Việc sử dụng Domain Alias mang lại nhiều lợi ích cho trang web của bạn:
1. Loại Bỏ Sự Cần Thiết Phải Quản Lý Nhiều Địa Chỉ Email: Nếu bạn có nhiều tài khoản tên miền phụ ví dụ như "@domain.com" và muốn nhận email qua địa chỉ "@domain.com.vn", Alias Domain có thể giúp bạn thực hiện điều này một cách nhanh chóng và tiện lợi.
2. Tạo Nhiều Địa Chỉ Tên Miền Cho Cùng Một Trang Web: Khi sử dụng Alias Domain, người dùng có thể trải nghiệm việc thêm nhiều tên miền trên cùng một hệ thống website. Điều này giúp trang web của bạn trở nên linh hoạt hơn và dễ nhớ hơn đối với người truy cập.
3. Mở Rộng Tầm Ảnh Hưởng: Với khả năng trỏ nhiều tên miền vào cùng một trang web, bạn có thể mở rộng tầm ảnh hưởng của trang web đến nhiều đối tượng trong và ngoài nước. Điều này cũng giúp nâng cao khả năng quảng cáo hình ảnh công ty.
Cách Cấu Hình Alias Domain Trong cPanel
Giờ chúng ta đã hiểu rõ về Domain Alias và lợi ích của nó, hãy tìm hiểu cách cấu hình Alias Domain trong cPanel. Dưới đây là các bước chi tiết:
Bước 1: Đăng Nhập Vào cPanel
Trư��c tiên, bạn cần đăng nhập vào tài khoản cPanel của mình.
Bước 2: Truy Cập Mục Aliases
Sau khi đăng nhập, điều hướng đến mục "Domain" trong giao diện cPanel. Tại đây, bạn sẽ thấy mục "Aliases" hoặc "Domain Alias".

Bước 3: Thêm Tên Miền Alias
Nhấp vào mục "Aliases" và bạn sẽ thấy giao diện để thêm tên miền Alias mới. Hãy điền tên miền Alias bạn muốn tạo và nhấn "Add Domain".
Ví dụ, nếu bạn muốn tạo Alias Domain cho "example.com", bạn chỉ cần nhập "example.com" và nhấn "Add Domain".

Bước 4: Quản Lý Alias Domain
Sau khi đã thêm Alias Domain, bạn có thể quản lý chúng thông qua giao diện cPanel. Bạn có thể chỉnh sửa, thêm hoặc xóa Alias Domain theo nhu cầu của mình.
Domain Alias là một khái niệm quan trọng trong quản lý tên miền và web hosting. Nó cho phép bạn tạo ra nhiều tên miền bổ sung để trỏ đến cùng một trang web, mang lại sự tiện lợi và mở rộng tầm ảnh hưởng cho trang web của bạn. Cấu hình Alias Domain trong cPanel là một quy trình đơn giản, nhưng mang lại nhiều lợi ích.
Nếu bạn cần sự linh hoạt và quản lý nhiều tên miền trên cùng một trang web, Alias Domain là một công cụ mạnh mẽ mà bạn nên tận dụng. Chúng giúp bạn xây dựng và quản lý trang web của mình một cách hiệu quả, đồng thời giúp bạn tạo ra nhiều địa chỉ tên miền khác nhau cho cùng một nội dung trang web.
Xem thêm các bài viết của gofiber.vn trên Tumblr tại:
gofiber.tumblr.com
1 note
·
View note
Link
#autoSSL#Automation#cloud#configuration#containerization#DevOps#Docker#HTTPS#Let'sEncrypt#Linux#networking#NGINX#proxyserver#reverseproxy#Security#self-hosted#servermanagement#systemadministration#TLS#Traefik#webserver
0 notes
Text
A domain name is a unique address that identifies a website on the internet. It serves as a user-friendly way to access websites and is typically made up of two main parts: the domain name itself and the domain extension. The domain name is the part that you choose and register, such as "example" in the domain name "example.com". It can be a combination of letters, numbers, and hyphens. The domain extension, also known as a top-level domain (TLD), comes after the domain name and indicates the purpose or geographical location of the website. Some popular domain extensions include: .com: This is the most popular and widely recognized domain extension, originally intended for commercial websites but now used by various types of organizations. .org: Originally meant for non-profit organizations, this domain extension is now used by a variety of groups, including non-profit entities, schools, and communities. .net: Initially intended for network-related organizations, this domain extension is now used by a wide range of websites. .edu: Restricted to accredited educational institutions such as universities and colleges. .gov: Reserved for government entities and agencies. .io: Originally representing the British Indian Ocean Territory, it has become popular among tech startups and companies due to its association with "input/output." .co: Originally assigned to Colombia, it is now widely used as an alternative to .com for commercial websites. .info: Suitable for informational websites or resources. .me: Often used for personal websites or blogs. .xyz: A generic and versatile domain extension that gained popularity due to its availability and ease of use. These are just a few examples, and there are many other domain extensions available. The choice of domain extension depends on the purpose and nature of the website you are creating. Some popular domain registrars are GoDaddy: GoDaddy is one of the largest domain registrars and web hosting companies globally. It offers a wide range of domain name extensions and additional services. Namecheap: Namecheap is known for its affordable domain registration and offers various domain extensions. They also provide additional features like Whois privacy protection. Bluehost: Bluehost is primarily a web hosting provider, but they also offer domain registration services. They provide a free domain name for the first year with their hosting plans. Google Domains: Google Domains is a domain registration service by Google. It offers a straightforward and user-friendly interface, along with additional features like domain management tools and email forwarding. Domain.com: Domain.com provides domain registration services and offers a variety of domain extensions. They also provide web hosting, email, and website builder services. It's important to note that the popularity of domain registrars can change over time, and there may be other domain registrars that have gained popularity since my knowledge cutoff date. It's always a good idea to research and compare different registrars to find the one that best suits your specific needs. Everything you need to know about domain names https://www.youtube.com/watch?v=qO5qcQgiNX4 Domain registration cost, Renewal period , What happens after domain expires The cost of domain registration can vary depending on the domain registrar and the specific top-level domain (TLD) you choose. Generally, the cost can range from a few dollars to several hundred dollars per year. Popular TLDs like .com, .net, and .org tend to have higher registration fees compared to less common TLDs. The renewal period for most domains is typically one year, although some registrars offer longer renewal periods, such as two or more years. It's important to note that the renewal period can vary depending on the specific TLD and registrar policies. When a domain registration expires, several things can happen:
Grace Period: Many registrars provide a grace period after the expiration date, during which you can renew the domain without any additional fees. The length of the grace period varies between registrars, but it's usually around 30 days. During this period, your website and email associated with the domain may continue to function. Redemption Period: After the grace period, the domain enters a redemption period. During this phase, you can still renew the domain, but there is usually an additional fee imposed by the registrar. The redemption period typically lasts for about 30 days, although the duration can vary. Auction or Release: If you do not renew the domain during the redemption period, it may be released back into the pool of available domains for registration. In some cases, expired domains may go through an auction process, where interested parties can bid on them. The specific process for releasing expired domains can vary depending on the registrar's policies. It's essential to keep track of your domain's expiration date and ensure timely renewal to avoid any disruption to your website or email services. FAQ How do I register a domain name? To register a domain name, you need to find a domain registrar, which is a company accredited to sell and manage domain names. You can search for available domain names on their website, select the one you want, and follow their registration process. You will need to provide your contact information and pay a registration fee for a specific duration (usually 1 to 10 years). Can I transfer my domain to another registrar? Yes, you can transfer your domain from one registrar to another. The process typically involves unlocking the domain, obtaining an authorization code (also known as an EPP code), and initiating the transfer with the new registrar. Both the current and new registrars may have specific steps and requirements for the transfer, so it's important to follow their instructions. What is domain privacy protection? Domain privacy protection, also known as WHOIS privacy, is a service offered by some registrars to keep your personal contact information private in the publicly accessible WHOIS database. By enabling domain privacy protection, the registrar replaces your personal details with their own or a proxy's information, shielding your email address, phone number, and physical address from potential spammers, telemarketers, or identity thieves. Can I have multiple domain names pointing to the same website? Yes, you can have multiple domain names pointing to the same website. This is commonly referred to as domain aliasing or domain forwarding. By setting up proper domain forwarding or configuring DNS records, you can direct multiple domains to the same website, allowing users to access your site through different domain names while maintaining a single web presence.
0 notes
Text
0 notes
Link
Domain.com Web Hosting review 2021.
#qasimtricks#qasim tricks#domain.com#domain.com hosting#domain.com web hosting#domain.com hosting review 2021#domain.com hosting review#web hosting#wordpress hosting#domain hosting#cheap web hosting#cheap hosting
0 notes
Text
How to Make Money Blogging +4990

Blogging! Bloggers!! Bloggs!!! Make Money Blogging $4990
“Make Money Blogging” Maybe you might have heard about this all over the internet and you may be thinking how is this dude really making money by just writing…
Today you have done well by landing on this page and I want to reveal the deep-hole secret of blogging and various ways you can use it to make money blogging online.
But first I know many people that search for this term online are probably looking for a rich quick scheme where they don’t have to put in much work but instead just sleep and the money starts rolling in..
Disclaimer: No, you will have to put in the work to be able to make money blogging.
I know you are wholly interested in how to make that shitt$$$ money I mention in the headline which I will reveal in minutes but first, I want you to know that you can make more than the amount I stated there.
Many People are Making Bucks [Make money Blogging tip 1]
And they are lots of people making hundreds of dollars every month by just blogging it but since this is a tutorial to keep it safe from just promising heaven and earth without you even getting a breeze let’s stick to making that little first and they are two ways to start making money blogging.
What is Blogging?
Blogging is a simple process of putting out content just like detailed information like reviews, comparisons and so much more..
And it started as an opportunity for individuals to write diary-style entries, but it has since been incorporated into websites for many businesses.
How to Start Making Money Blogging (Creating Content)
First, let’s consider how to create content for our business and why?
So first if you are running a business or if you are a work from the home entrepreneur in order to get the maximum reach and make money you will have to create content that will get those customers coming in, you will have to draw them in with something they want or are searching for….
So putting out those content will help you draw them into your site and you can reach a really large amount of audience because they are a lot of searches or customers on the internet searching for your product online and all you have to do is true a blog post connects with them.
How to First Create a Website to make money blogging?
The way you can start blogging it to have a website to publish content from, and I will cover the full process so nothing looks new to you.
First having to have a website you will have to get it hosted and get a domain and they are various ways to host a website online which are:
Bluehost
Namecheap
Domain.com
Hostgator
And more…
But will in this guide stick with Bluehost, which is one of the cheapest hosting services online and reliable.
First head to Bluehost and sign up for the Basic Plan. Their plans start as low as $2.95 per month. You will also get a free domain name with your hosting plan!
Next, follow the instructions to set up your Bluehost account. Skip all the package extras except for domain privacy + protection. The extra privacy is worth the investment.
Finish setting up your account, and now you officially have your own little piece of the internet. Congrats!
But, don’t get too excited and carried over because you have just bought the shop but you need to put in things to sell.
Install WordPress (your blogging platform)
Install a free adorable theme and edit
Creat your first content and put it out (publish)
Get used to your calender and stick to a regular posting schedule
And after putting out your few posts and make sure to keep to your regular schedule basis by staying consistent and have that traffic coming in, then you should start thinking of how to make those few 10$ bucks.
By Displaying those Ads, physical product offerings, and affiliate marketing, you will surely start seeing some money come in.
Here are the Steps by Step guide to make money blogging
You have already created your blogging site and as a blogging beginner you would want to pay interest in what other blogging heads are doing to know;
What and where to avoid spilling your content or getting content ideas from…
Now let’s go through the whole process in detail. Here are the 10 steps to carry out to be able to make money blogging on the internet:
Brainstorm ideas and choose a name for your Blog
Get Web Hosting
Install WordPress
Install a WordPress Theme
Customize your Blog
Come up with Blog Topics
Write Your First Masterpiece
Create an Editorial Calendar
Monetize Your Blog
1. Find Ideas and Choose a name for you Blog
Creating a Blog you will have to pick a niche and your ideas or content should be very narrow-head to a particular industry (Niche) as possible.
And since they are millions of people like you already online doing or blogging the same thing as you intend to do, you will have to create some form of uniqueness that will differenciate your voice from your competitors.
And you will try to make it unique and diverse that will make you stand out and gain more attraction from your audience.
Note: when it comes to choosing your blog’s niche, there are two key questions to ask yourself.
Do you enjoy Learning about the Topic
Is the public also showing interest in your Topic
Check if the name you come up with is available;
A. What do we mean by Love what you will teach:
It’s all about your PASSION! for you to be able to make money blogging you will have to stay consistent and to be able to stay consistent you will have to love what you teach.
when we mean you should love what you will teach we are simply trying to keep you at the safe side.
Because when you teach what you love it helps you to always stay up with recent updates to share and more topics to come up with more topics to blog about…
If you are left in the wilderness alone (still confused) then think it this way
What do your friends and family normally come to you specially about for advice, that particular topic that they find interesting and think you are the perfect person to explain to them.
B. Are Other People Around the World Interested in the same Topic
Do people around the world search for the Topic or particular niche you have picked cuz if people are not then you will not be able to make money blogging.
For Example, let’s consider this Topic “My Family Matter”.
Here is the search result;
The search simply shows that this particular topic has been put out over (000) times but the score for people who are searching for this in a month is on the low side (10 searches).
So what’s is the need to go to that large broad market with a lot of wolf-like competitors which would not allow you to show up in a single search for just as little as 10 customers, NO! And if for any reason you really want to really talk about this then you should consider narrowing down the Topic or going for a more specific keyword.
Pick a Name for your Blog
To be able to Make money Blogging you will have to be known with a name your customers can regularly type in the search box ins search of your content.
This is the part you should be very careful and mindful of course a mistake you make while choosing your name can affect your business listing a lot.
At this point don’t overthink it and to even make things easier you can come up with your brand name by simply take a related word and combining it with your real name or personal name and that becomes your Brand name.
Let’s look at the name of my Business Praiz Digital @ prazdigitaltech.com which is simple and I came up with that by just simply combining my name PraiseGod (Praiz) with the industry I intend to go into which is Digital Marketing >Praiz >digitaltech>.com.
And they are another way you can come up with ideas by just taking a pen and paper. Then spend about ten minutes writing every word or name idea that comes to your mind.
From there you can start combining them and see which best sounds good and will definitely in the short run stand out the most.
With all that Been said you will have to pick a domain if you look above or below this you will find the .com at the last part of my Brand web name which is simply called a Domain.
Praiz > digitaltech > com.
And right now will have to find you a domain.
What is a Domain?
A domain is an area of control or a sphere of knowledge or rather a domain is a sphere of knowledge identified by a name i.e the sphere is your website and the knowledge is the articles or useful information you share and both are the attributes customers know when they visit your domain name they get… Understood!
It is necessary that every blogger looking to make money blogging should have a specific domain.
And the Domain Provider we will be using as I mentioned before is one of the cheapest web hosters on the internet Bluehost and All you have to do is head to Bluehost with this quickly.
But before that Make sure when choosing a Domain from Bluehost or any Web hosters to always go for a .com where possible and Avoid mixtures of numbers, hyphens, and homophones.
And also make sure to keep it short and simple for easy understanding and recollection, and above all avoid misspelling.
2. Get Web Hosting
Ready to get your Blog Live then let’s jump right to it.
To make things easier and simple I will break this guide into various segments that will help you get started in just minutes, that makes you happy then follow me ahead Now Click on the image Bluehost sign up:
And I really recommend you start with it because it’s one of the most reliable and cheaper web hoster on the internet and with its user-friendly integration you can get started in minutes.
Head to Bluehost and click on get started Now.
Next, you’ll see three different plans. Scroll down and select the Basic Plan for $2.95/month. It includes everything you need when you’re just getting started.
And you can always upgrade later if you need to. So, for now, select the Basic Plan and you will get that price as a fan of Praiz Digital.
I can’t go further on this guide but you can read the full guide on my site.
2 notes
·
View notes
Text
No one "purchased a very similar domain". www.fanfiction.net is the same domain as fanfiction.net
www.fanfiction.net - subdomain , overall domain
Or to break it out more:
www.fanfiction.net - subdomain, domain, top level domain (TLD)
Some specialized hosting services offer people subdomains (free or paid), like what tumblr does. ailurinae.tumblr.com is my subdomain on the tumblr.com domain. But from the POV of the DNS system, subdomains cannot be bought or sold. if you do the right DNS/whois lookups on ailurinae.tumblr.com, you will see it is just owned by tumblr. Which is why having your own domain online is nice, *you* can be the internet-wide recognized owner of that domain.
Anyway! What is happening with fanfiction.net is simple: they don't know how to configure their web server.
Most of the time on the modern internet, www.domain.com and domain.com point to/show the exact same thing. There are a few ways to make that happen, at the DNS level, at the web server/HTTP level, etc. Some places you can go to either one and the address bar will keep showing whichever one you put in, in others, if you go to the bare domain, it will immediately redirect you to the www version (or vice versa in some cases). But one way or another you get the same content.
However DNS and web servers don't do that automatically, it's just common. You could have two totally different things on www.domain.com and domain.com if you really wanted.
So fanfiction.net just forgot to turn on redirection... so you get some default config page, probably whatever their web hosting provider has set up.
FanFiction.net is not gone.
Right now it’s a victim of DNS (Domain Name Service) spoofing. This means that a malicious party is trying to steal traffic from FFn by purchasing a very similar domain.
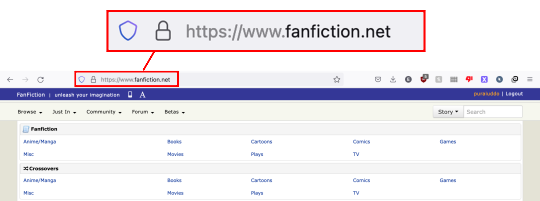
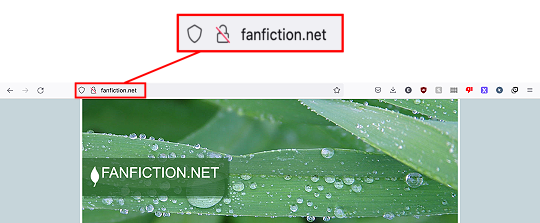
So if you want to read fanfiction and not see leaves, you have have to type out “www.fanfiction.net”.
Please share so people stop panicking.
49K notes
·
View notes