#filters save me gradient maps save me
Text
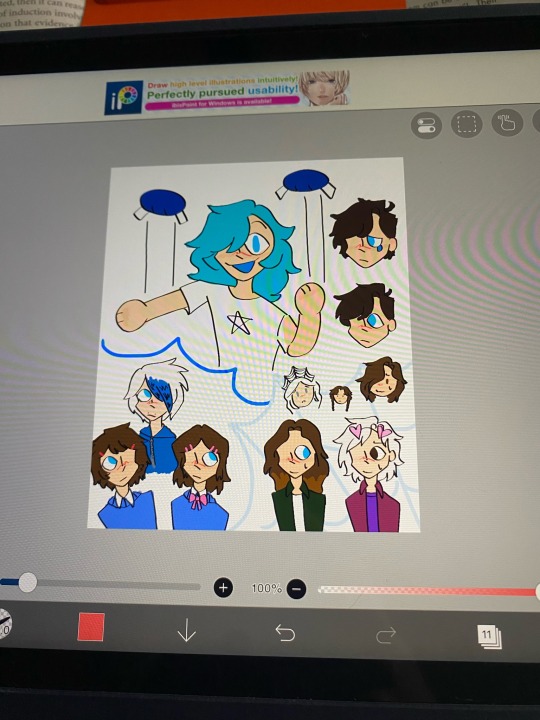
Sorry guys I set my stylus down and it went into the abyss can’t finish this I guess /j
#took a bit of break from thsi but!! I’m back!!!!#colors kicking my ass rn. this whole drawing is actually#filters save me gradient maps save me#ooc post
7 notes
·
View notes
Text
Krita tutorial the way I know it.
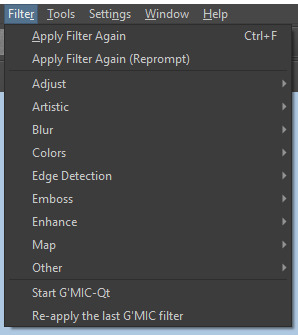
Basics: What is where.
Gimmicks.
Specific advice on specific tools.
Basics: What is where.

Upon opening the program this is what you're met with. First of all, must comment: The layout is HEAVILY editable so you can just drag menus anywhere you want, even leave them floating amidst the sheet you're drawing on.
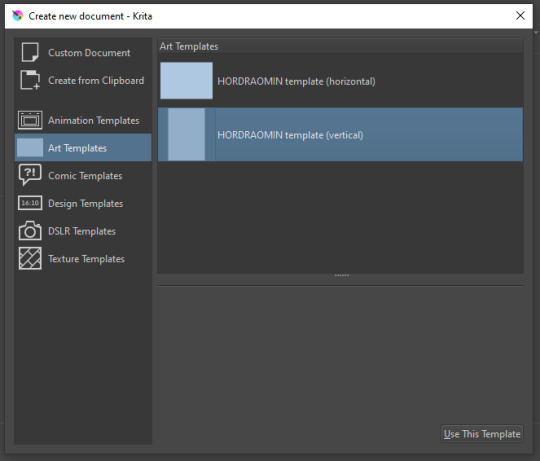
You can create custom art templates, I have two o'mine here as both have my signature background color.
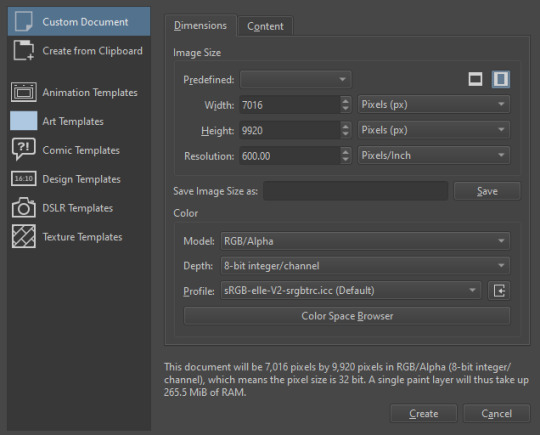
As well, you can edit the custom document settings, as in what size you want it, what resolution, even the initial content of the image. As well you can create from clipboard: Just copy some image from your browser and Krita will recognize it (useful for making meme edits lol).

Now, once you have your file, I will show you what is where.
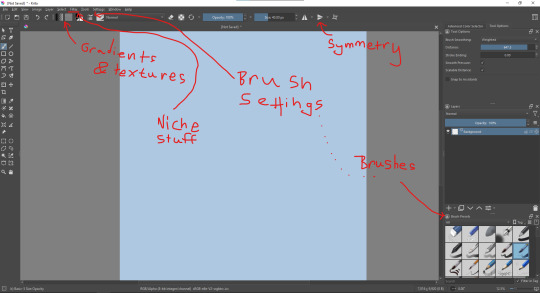
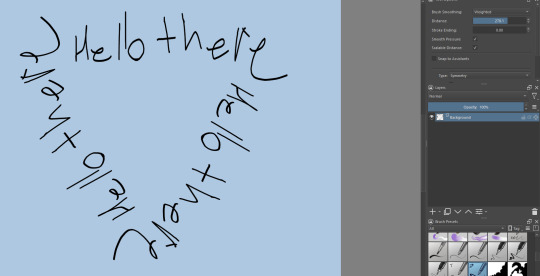
Brushes:
Brushes are easy to edit and there are tons of free bundles to download online. I myself only got one bundle, Jackpack (bit hard to find now due to original source being lost, it is still available but bit tricky to come by).
There. Are. Tons.

Some of these are my custom brushes for calligraphy in neography, you might even guess which ones. You can edit existing brushes, make new ones from the ones you've edited without changing the original, and all sorts of stuff (more below in the third chapter).
There are numerous packages of brushes once you enter Krita, but only one/two are available when you first open it. To unlock them all, click here:

And make sure all bundles are dark gray in color (example of both dark and light below).
Now Tools Options: those will pop up depending on what tool you're using.
Symmetry: Fun stuff. You can drag the lines depending on how you need them and then center them back to the center of the screen if needed.
Gradients and Textures also have their tools options, you can play with those to get the feeling what they can do (more in third chapter).

The Filters tab is useful too. Blurring, motion blurring, color mapping, artistic filters and all that: Quite fun.
Gimmicks.
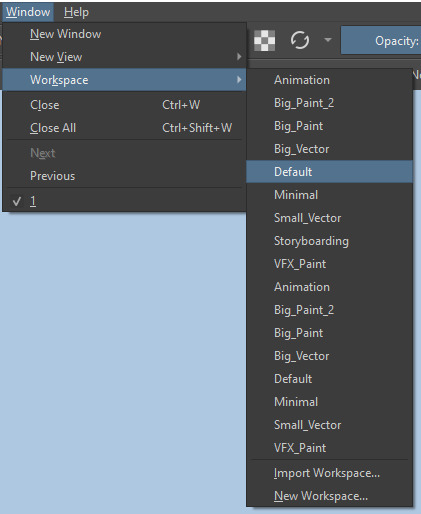
Krita allows you to customize your workspace freely. Floating menus, tabs, anything you want. It has quite many drivers at that-
To access the workspace templates, go to Window and choose Workspace.
Krita allows for copy-pasting any image onto the sheet. Though, for me it sometimes crashes if I accidentally copy-paste text into it without choosing the Text tool first.
The software allows for both raster and vector work. It is basically Photoshop sharpened to be used by artists primarily.
There are some interesting mechanics regarding the Eraser (default bind E).

You can use it with any brush, allowing for textured erasure/quick work. Good for sketching.
You can use it on gradients (given there's a transparent point on the gradient preset).
There's a Multibrush tool:

People say Krita is good for animation but my brain can't wrap around it yet honestly @~@.
The keybinds:
B - Brush tool.
E - Erase tool option.
M - Mirror (useful for checking accuracy from a new angle).
Ctrl - Color pick (when used with brush or other color-using tools).
Shift+L.Mouse+drag - Changes the size of the brush by dragging left and right.
Ctrl+E - Merge layer with the one below.
Ctrl+G - Group selected layers.
Ctrl+A - Select whole sheet.
Ctrl+Shift+A - Deselect everything.
F - Bucket tool.
G - Gradient tool.
Ctrl+S - Save document.
Ctrl+Shift+S - Save As document.
Ctrl+N - New document.
Ctrl+O - Open document (will be seen in a new tab on top of the sheet).
Ctrl+C - Copy selected layer or selection.
Ctrl+X - Cut selected layer or selection.
Ctrl+V - Paste copied/cut layer or selection.
Q - Multibrush tool.
R.Mouse - Interesting thing: Opens up a quick selector for brushes and colors you've already used in the piece.
1 - Zoom 100%.
2 - Zoom to fit the piece vertically.
3 - Zoom to fit the piece horizontally.
4, 5, 6 - Turn 15 degrees (4 and 6) or undo the turning whatsoever (5).
Ctrl+I - Negative filter applied to layer.
Ctrl+U - Color editing on the layer.
Ctrl+Y - Soft proofing mode (for color mistakes and stuff like that, mostly annoying for me tbh).
Ctrl+T - Transform selection/layer.
Ctrl+R - Square select tool.
Ctrl+J - Lasso select tool.
Honestly you can just hover your mouse over tools and see their shortcut binds, as well. Or edit them in Settings.
Specific advice on specific tools.
Brush:
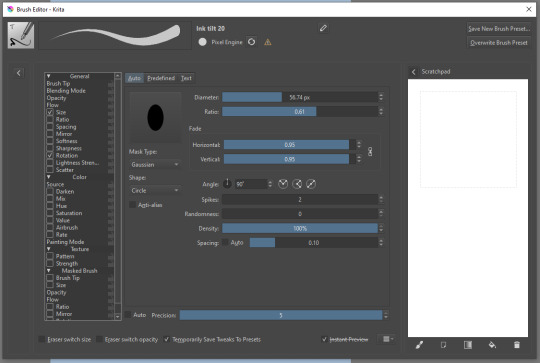
Brush editor is a great tool for making custom brushes, and it even has a sratchpad to test them out. Lots of settings, but no need to be afraid; Most of them you might never use on purpose.
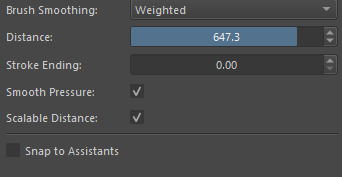
Use Brush Smoothing for great and pretty lines in lining pieces or making calligraphy.
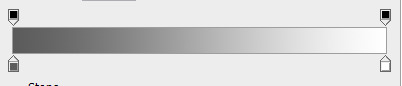
Gradient:
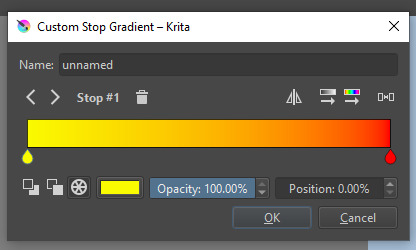
The four icons to the right top are:
Mirror gradient.
Arrange by lightness value.
Arrange by color value.
Space the stops evenly.
Click the gradient to add a new stop. The three things to the left are:
Make the stop use Primary Color.
Make the stop use Secondary Color.
Make the stop use a fixed color.
269 notes
·
View notes
Text
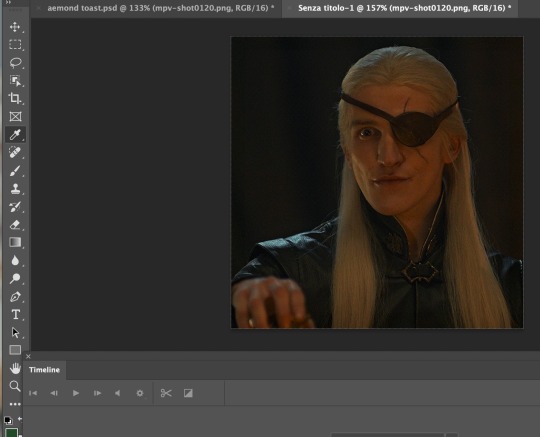
Aemond's toast PSD
Let's try this again. So, one of my moots asked me how I got this coloring for Aemond, erasing all the background colors but keeping his skin tone, so I thought to share it cause God knows what a nightmare is the dinner scene.
Disclaimer: I’m not an expert at making psds, this was literally a stroke of luck after months of toying with layers
Disclaimer 2: I made this psd before the camera raw filter bliss, may update it in the future.
So, after sharpening and converting to smart object we have this
We just need to open the psd and copy every layer into our gif. Et voilà:
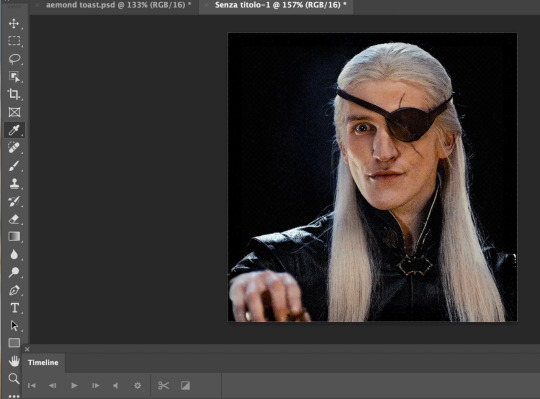
You can play with layers as much as you want of course and you can use this psd with other dark scenes but careful, it always depends on each scene and it better be a scene without too much movement otherwise, if the character moves too much, their face will be half natural half black and white lol.
Also, if you want to change saturation or make the skin stand out more (or less) you just have to delete my edits on the gradient map layer

Next create a new mask in the gradient map one

Then pick a soft brush with opacity at 40-45%

And start “painting” his face to erase the black and white. See?

When you’re done -> save for web -> post!
And that’s pretty much it! Happy giffing :)
psd
50 notes
·
View notes
Note
hii i love ur gifs so i have been wondering if u know how to low down the size of a gif without losing its quality?? i hate when i want to post a certain gif and it being 13MB but if i cut it it's ugly 😔😔😔 sorry for my english 😔
hi, thank you 💕 i think i have answered similar questions before in my gif help tag, but i can offer some more (hopefully) helpful tips and things you should consider to help keep your gif under 10mb.
1. crop size & amount of frames
the two go hand-in-hand. big cropped gifs with a large number of frames will result in a big file size. if you're making a 540px wide gif, you're either gonna wanna make the gif shorter in height or use fewer frames. for a square gif, i try to keep it between 50-70 frames, but sometimes i still have to trim it down depending on how bright or colorful the gif is (i'll get to that in the next points).
however, making the gif a shorter height like 350px or 400px might give you a little more room for more frames without having to delete any. i like big gifs if i have a great quality file. 600px tall is as far as i'll go (though it's rare) and in that case, i try to keep it limited to 40-50 frames.
basically:
540px wide gifs = fewer frames or shorter height
268px wide gifs = more frames, more potential
tip: for the sake of convenience, i really recommend making presets of all your go-to crop sizes by selecting "save preset" in the drop down menu next to your chosen dimensions. note that mine are all set two pixels more than i need because some photoshop versions leave a transparent border around gifs. when i use my convert to frames action, it deletes those two extra pixels for me and my gif will have the proper tumblr dimensions before i export.
more tips to get rid of extra frames:
delete frames with camera flashes, you will rarely notice a difference.
always check for duplicate frames.
original footage is slow motion? it's got duplicated frames. delete them.
2. sharpening
your sharpen settings can also increase the file size. here is a great post with examples of when to know when your sharpening is crossing into unchartered territory and how to avoid it. manually adding noise effects can also increase file size, so keep that in mind when you're doing it for aesthetics (i personally love noisy gifs too!).
3. brightening
adjustment layers that handle the "light" in a gif such as curves, levels, and exposure can all affect the file size in different ways. darkening the black points using these tools in your gif helps reduce grain as well as the amount of colors in the final product.
curves: use the white and black eye droppers to find the lightest and darkest points in the gif, thus adjusting the white balance of the footage if needed.
levels: move the left and right sliders inward to balance them out even more and bring back more details.
exposure: my favorite trick EVER to lowering the file size if it's over 10mb when i go to save for web is moving the "offset" slider of an exposure layer slightly to the left. it will darken the black points even more and add some contrast to your gif and it can minimize the file size by quite a lot.
3. coloring
you want to be able to save your gif with 256 colors without reducing the number manually in order to get it under 10mb (we've all been there). sometimes you can get away with doing that without losing much of your quality, but it's always ideal to NOT have to do this. selective coloring and color balance are your friends when it comes to enhancing and/or getting rid of tones you don't want. i can't give you a whole course on coloring alone, but i can say that ONCE AGAIN, darkening the blacks under the black tab in selective coloring will help. i usually go up to about +5 or more if i need to. neutralize your reds and yellows for skintones, especially when giffing idols. don't go too overboard with the vibrance if you use it. be conscious of colorwashing. experiment with photo filters or gradient maps if you're aiming for a cooler or warmer look.
i hope this helps, i am not a magician but i do think a lot of these key details help me a lot when my final gif is over 10mb and i need to go back and make adjustments.
18 notes
·
View notes
Text
bringing back old editing styles: picspams (no textures needed!)
hi everyone!
so i previously posted this picspam tutorial which was more ~texture~ heavy but if you’re looking to make a picspam that really just focuses on the colors and is simple, then keep reading! :)
example:
first screencap tutorial: changing the screencap to a color you want that is different from the original lighting
step 1: put a base coloring on your screencap
in this case i added a brightness layer and also a photo filter layer set to the cooling filter so that the screencap has no yellow lighting and more cool lighting

step 2: color the background in using the brush tool
in this case i also changed the color of her eyes) + set it to soft light (you can adjust opacity as needed but i usually leave it at 100%)

step 3: add another layer and use the brush tool to make a light leak + set it to screen
the brush layer should look like this, you can save this if you want and change the hue to whatever color you need!!

the results should look like this:

step 4: adjust the layer with brightness, vibrance, etc to your liking
pro-tip: use gradient map and have it be black to the color of your choice. so for me, i made it black to purple + set it to screen and adjusted the opacity

final product:
now this looks different from the picspam above bc i forgot to save my psd (stupid of me, i know lol) but i hope this helped! also i use topaz labs for sharpening and that's it!

alright next..coloring a picspam that already has the color you want!
step 1: add a base coloring + selective color
add your basics like brightness, vibrance, curves etc. AND selective coloring! for the selective coloring, increase the yellows to +100 and for this, i increased the cyan of the reds but you should just play around with the selective coloring to your liking

step 2: add brush layers
using the bush tool, i used light orange and dark burgundy and set the light orange one to soft light, and the dark one to screen


final product:
just add some more contrast or vibrance if needed and you’re done :D
overall, i recommend using the brush tool and setting it to soft light + screen along with using selective color to make the colors really pop out!
hope this helps and as always, my ask box is open to all and any questions <3
best,
~farah
#picspam tutorial#tutorials*#allresources#hisources#emeraldsources#photoshop tutorial#pstutorial#yeahps
167 notes
·
View notes
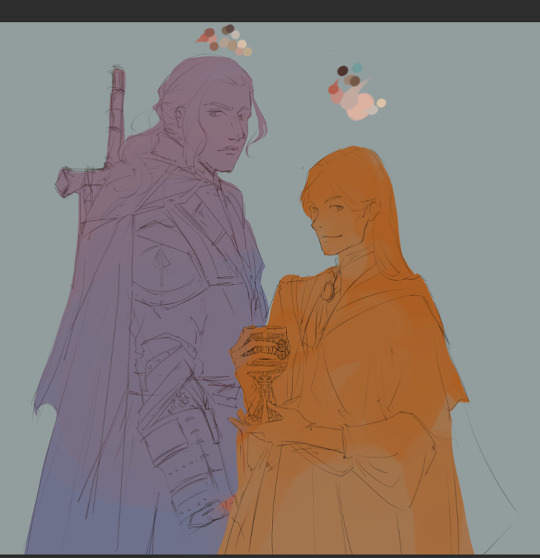
Text
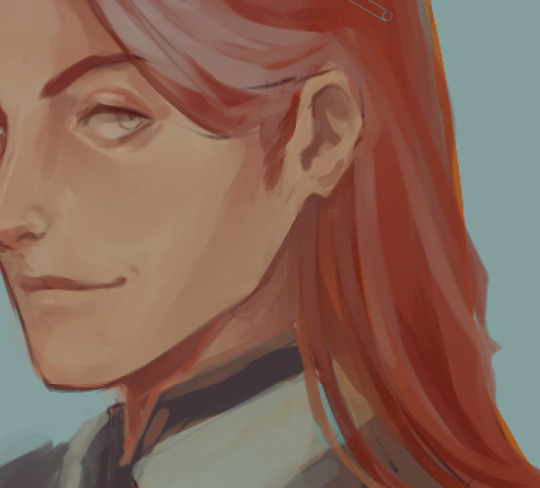
(long post ahead sorryyyyyy)
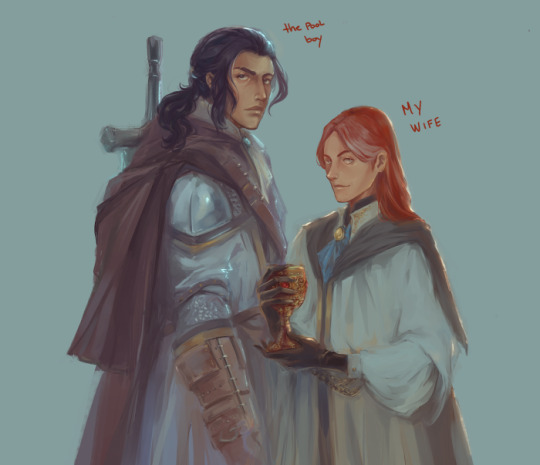
Some process shots at the request of @lizteaart :)
(sorry in advance - I was not struck with any impulse for originality, so you get these two posh mfs looking dumb and pretty.)
This is not meant to be a guide by any means, just a glimpse at how I (generally) build up paint and then colour correct. I work the same way unless I’m trying to achieve a particular style for practice or effect (like this piece, in which I strictly followed lineart and hated every second of it; or the Byrgenwerth portraits, done completely in greyscale and coloured with custom gradient maps).
I work in Clip Studio because there’s something about the colour blending that feels extra buttery, but I used to work in Photoshop; all of this applies cross-software anyway.
Step 1: lineart. If I’m not working stylistically for clean lineart, I leave it pretty loose. I almost always change things around while I’m colouring. I have about 3-4 rounds of progressive lineart until I’m happy (in a loose watercolour brush).
Step 2: I will have the lineart on multiply so I can work under it for a while. I sometimes (but not always) block in some rough colour underneath just for extra texture and in case I need to clip to layer later. I also put down a tentative palette (skin in this case) just so I can have a range for the colour dropper. I add and subtract from the palette while I work - but it also prevents things from getting too muddy, which can happen if you’re exclusively selecting colours from inside the work itself.

Step 3: (sorry, the screenshot is super small here) I do a VERY rough blocking in of colour just to see if things make sense (and so I don’t have to change my mind so much later). These are clipped to the colour-block layer from the previous image to save time. Sometimes I duplicate these layers and play around in modes to increase saturation, contrast, etc. Here I left them as is cause I’m going for a colouring style that’s a little more subtle.


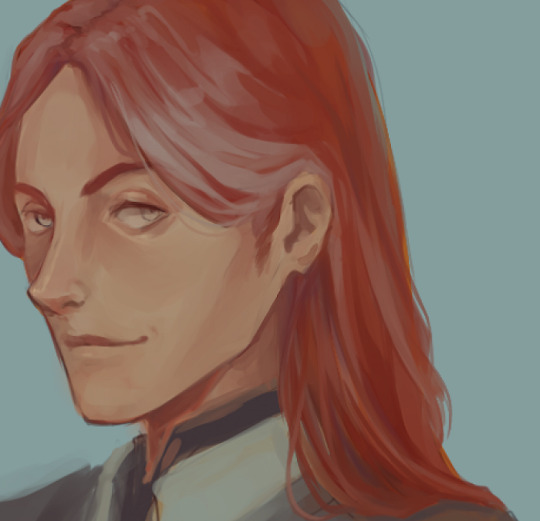
Step 4 ad infinitum: refining. Here I’m starting with the skin and hair, since the focus of my work is always the character’s face. I try to work in a way that’s non-destructive: every time I establish a baseline of good build-up, I create a new layer and work on top of that. That way, if I over-render or muck something up, I can just delete that layer, and the previous state will still exist. In this work, I deleted at least one layer of rendering from both their faces, because at some point I felt like I’d over-rendered or lost some nice texture or good shape definition. But I still had whatever acceptable state saved beneath. I merge them as I go so they don’t get to be too many.
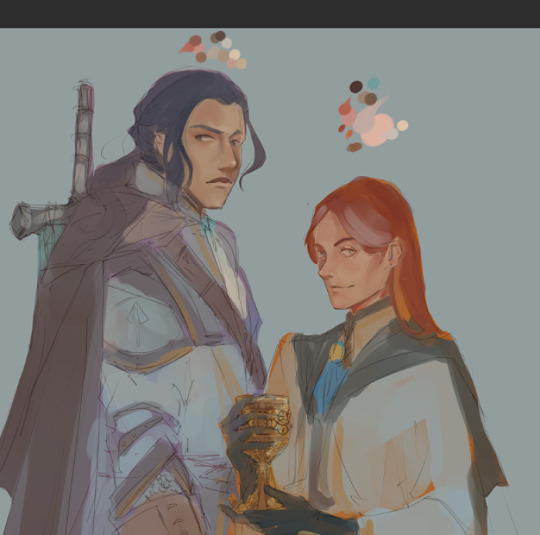

I’m trying to build a pretty smooth surface of skin here, which is a new thing for me, since I used to render with heavier, more textured brushes. Here I’m using about 3 different watercolour brushes. I work soft-hard-soft-hard: softening and blending, adding hard edges, and then going again until it looks somewhat convincing. I try to colour select as much pure colour from the palette so it doesn’t get too muddy, and I also like injecting some unexpected colour here and there, especially in shadows, like cyans, for a little more life.

Step 5: By now, I’ve started layering above the lineart. I only do this when I feel the facial structures are solid enough that I don’t need it anymore. But the lineart layers are still there, beneath, if I ever need to go back to it as a guide.
I also add a very low opacity gradient map at this step, for little more interesting saturation, and continue to work above it. I go back and forth between skin and hair so I don’t spend too much time on one thing, and give my brain a break to come back and notice things I would otherwise glaze over. I try not to over-render and still leave lots of evidence of painterly gesture.
Closeup of the hair from base to almost-rendered. I add a sharpen filter to the hair often to get parts of it a little visually crispier.
Step 6: the exact same thing but with fabric/armour/whatever. I mix my watercolour brushes with bulkier, meatier brushes for textile, since I can’t be arsed to render clothes with the same care as I do skin. These are the types I use (folks can DM/anon if they want the brush names, I have a million different sets and use maybe…ten).

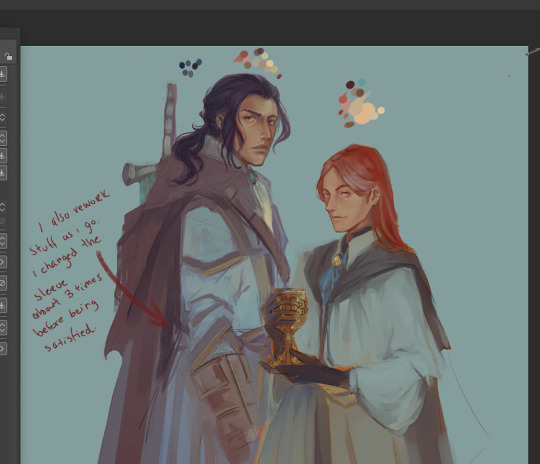
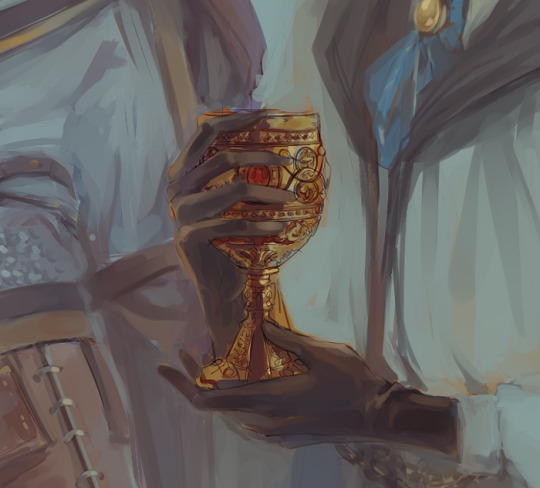
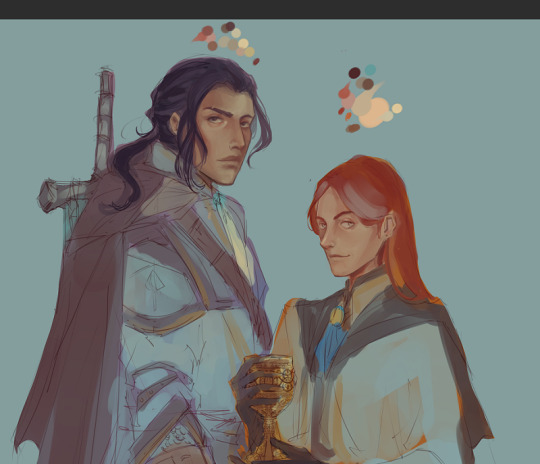
The chalice midway through render.
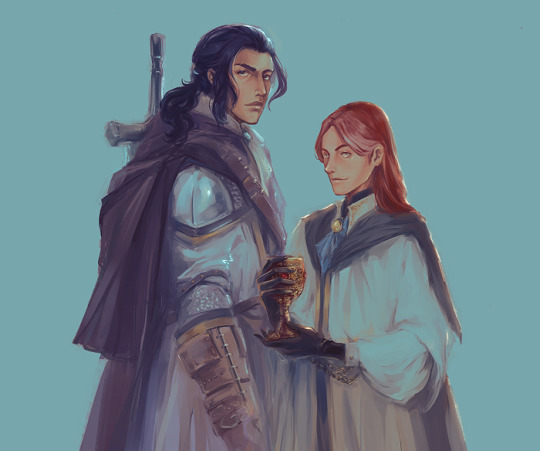
At this stage I will let it sit for a while longer. Whether it’s done is debatable and usually up to personal preference - you can render till kingdom come if you want something more realistic, but you might lose some lovely, sensitive evidence of gesture or interesting accidents. I also highly encourage playing with gradient maps if that’s something of stylistic interest. A good gradient map can do a bunch of things - change the whole temperature of a piece, push back certain details and pull others forward, etc (example here - this particular gradient didn’t suit what I was looking for, but it still manages to be visually interesting).
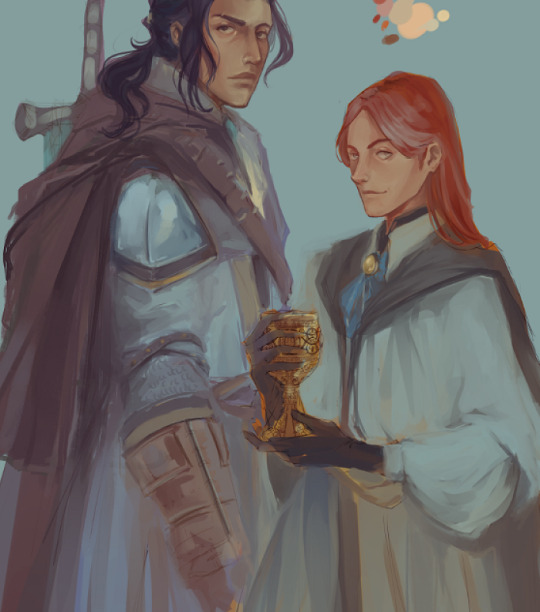
I usually come back and nitpick a few things before moving it into Photoshop where I’ll do colour management - another gradient map, fixing saturation/vibrancy, selective colour, etc - and anything structural that I may need liquify for. Then I’ll sharpen it one more time, slap a noise gradient on it if it feels like it needs some extra texture, and try not to hate it right after saving it LOL.
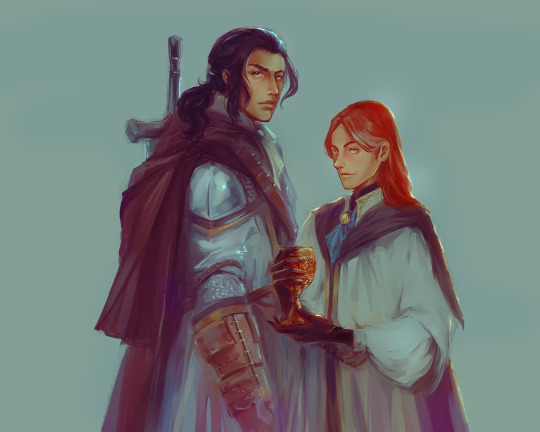
(I'll probably come back to this a few more times before posting something that feels more "finished").
Sorry for the long post - and hope this was helpful (•‿•)
#ask#wip#painting process#bloodborne#laurence the first vicar#ludwig the holy blade#digital painting#amateur hour
77 notes
·
View notes
Note
How do you get your gifts to be such a good quality? Whenever I try to make my own they always turn up low quality and pixelated 😭
Wow thank you so much, it means a lot <3 and no worries, I've been there too so I know that in the beginning it can be frustrating.
Here are some tips, hopefully they make sense :)
I think the best advice I can give you is to use at least 1080p video files for making gifs (I use only 1080p). There are gifmakers who gif in 4k for even better quality but my weak laptop would burn down if i did this lol. The file size is also important, my hotd episodes range from 4GB - 8GB.
It also depends on the scene alone you want to gif. Dark scenes are a pain in the ass. The more adjusting layers you add, the more grainy your gif becomes/the quality lowers (for hotd/got gifs especially). Scenes in broad daylight are so much easier to work with. You can see the difference in these two sets I made for Helaena and Alicent. In Helaena's case I experimented more with brightness and removing that awful yellow filter and it resulted in grainy quality. Meanwhile, Alicent's scenes are way smoother. I mostly played with selective color layer and reduced blue filter.
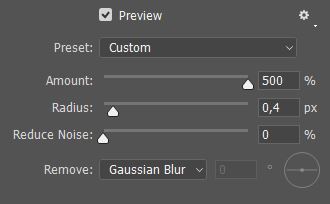
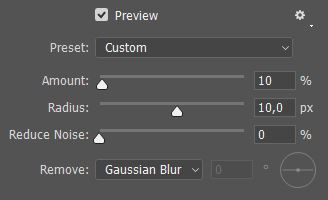
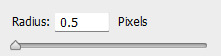
Use smart sharpen for sharpening your gif before any editing. If it helps here are my settings. Firstly, set amount to 500% and radius to 0.4px. Then, amount to 10% and radius to 10px.
I'm not going into details regarding adjustment layers, you have to try and decide what best works for you. For me, I always go Curves > Levels > Exposure > Brightness/Contrast > Color Balance > sometimes Gradient map > Selective color > Vibrance.
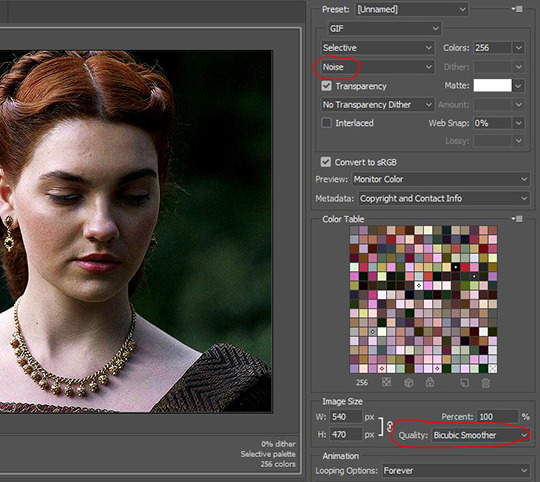
The last thing I do before saving the final gif is to set it to Noise and quality to Bicubic Smoother (hightlighted in red)
Well, I think that's all. I know that for the beginner gifmaker it can be a lot but trust me with practice you'll get your gifs in the quality you desire. Happy gifmaking!!
9 notes
·
View notes
Photo

As requested by a recent anon, here is a quick tutorial on my gifmaking process! I will be using the newest version of Photoshop as of November 2022 to make my gifs, as well as mpv to take screencaps before importing to Photoshop - I recommend this tutorial to get started on installing mpv and take screencaps of the scene you want to gif.
Once you get the scene you want to gif ready to go, open Photoshop and import your screencaps in a stack under the “scripts” section of the files tab. From there, you can select “browse” and highlight all of your screencaps, and click “okay” to load all the screencaps in Photoshop’s “layers” tab.

Next, create a frame animation in the timeline tab underneath your main workspace window, and use the icon with lines at the top right corner of the “timeline” section to select all the screencaps you’ve entered as frames and reverse their playback order.

With all the frames selected, click one of the down arrows next to the “0 sec.” tab and enter the frame delay to 0.05 seconds, it gives me the most natural playback after exporting my final gif.

After that, you can crop the gif to the dimensions you want using the “crop” tool towards the top of the left column. Next I update the size of my gif under the “image” tab under “image size” - I’m setting this gif to be 540 pixels wide, since I’m making just one gif by itself instead of 2 or 3 in a row.

Now that the gif’s frames are all loaded with their updated size, I’ll sharpen the frames with a sharpening action - I usually use this one. If you import a sharpening action to use, you can find it under the “actions” tab under the right-side column second from the top.

Now we can start on adding adjustment layers for coloring! Every gifmaker’s coloring style is a bit different, but I mainly lean towards bright and vibrant coloring. You can add new adjustment layers either on the bottom right section under the “layers” window or under the “layers” on the top left. If you’re working in frames instead of converting to a smart object, make sure to have all of your frames highlighted to make sure that the adjustment layer shows up on every frame. I usually start with a curves layer and find the lightest and darkest points in the first screencap to set as my black point and white point.


I’ll add an exposure layer to help brighten up the gif after that, plus a levels layer to add more to the shadows and highlights. My settings for that layer generally look like this:

After that, I’ll add a vibrance layer (set to +24 for saturation and -12 for vibrance) and a hue/saturation layer. I also tend to decrease the reds a little bit from the hue/saturation layer (by about 10 points) to separate Taylor’s skin tone from other parts of the gif, and add or reduce saturation of colors I want to emphasize from there - in this example, I mostly enhanced the blues and magentas. To make the gif itself slightly more cool-toned overall, I added a deep blue photo filter layer:

I also usually add a black and white gradient map on the “luminosity” blending mode - it adds extra depth for my coloring style, shown with the gradient map applied on top vs no gradient map on the bottom:

Lastly for coloring, I’ll add a color balance layer and selective color layer to bring out certain colors and neutralize others as needed. Once you’re happy with the coloring, you can export your gif! Go under the file tab and click export, then save for web.

From here you can get a preview of the first frame of your gif and an idea of the 256 colors included in your final gif file - press “save” and rename your file, and you’re done!

This is my final resulting gif after following this tutorial and exporting it onto my desktop:

This is just a rundown of my general process of making and coloring a gif - I highly recommend checking out @usergif for other resources on adding typography or more complicated effects like blending and layouts with more than one gif!
#gif tutorial#completeresources#allresources#userkosmos#userng#tuserheidi#userzesty#usercim#userdanni#userpjo#userdean#*
165 notes
·
View notes
Note
HELLO could you tell me PRETTY PLEASE how did you make the halftone colored effect on your latest gr63 poster? tysm!
Of course!! I love talking about my graphics!!
I learned how to create the halftone effect from a guide I cannot find right now but my steps are as follows. heads up that I work in photoshop so everything is photoshop specific I fear.
Under the cut since there is a ton of images here o7
For the halftone effect
Import image of my choice and convert it to a smart object. This guide should theoretically work without a smart object with clipping and/or layer masks but smart objects look better + they keep my workspace more organized
In the smart object I create a new layer with a solid fill of #808080, convert it for smart filters (Filter > Convert for Smart Filters) and also set it to Hard Mix in the layer blending modes menu
Open the smart filters menu for the layer (Filter > Filter Gallery) and I create two layers, first Halftone Pattern with the following settings and on top of it Torn Edges with the following settings
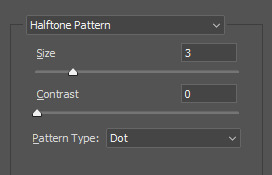
You can fiddle with these obviously but I have never changed these since I started using this for my halftone effect
4. Now your image probably looks like this, really wonky and bright
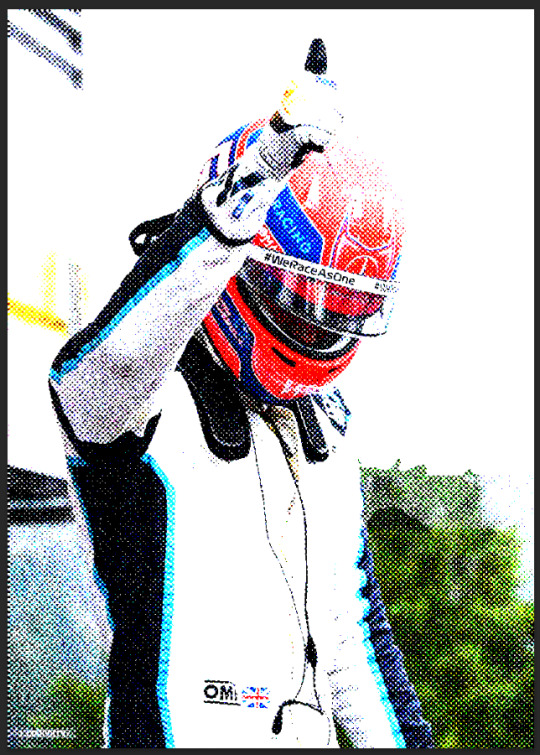
To fix it I create a new adjustment layer, usually Levels but I have used Curves before as well and fiddle with it until I like it. Dont be afraid to use multiple and just mask it! For example here Tadejs jersey is white but the background is black so to keep the texture I masked the jersey and adjusted it separately.
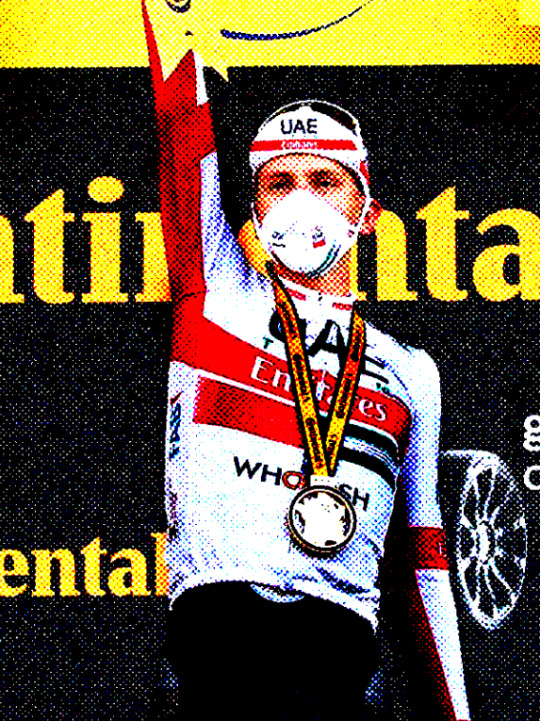
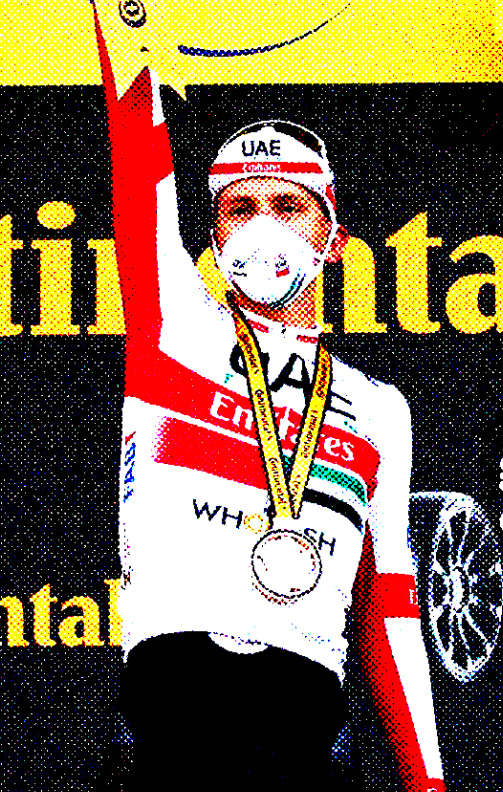
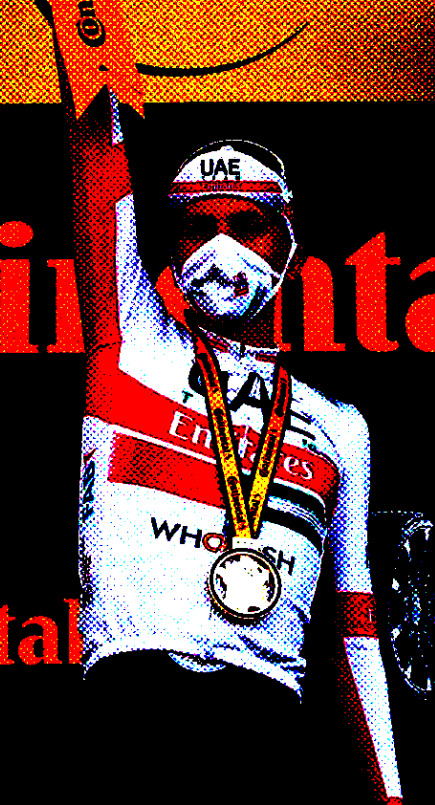
Final effect vs adjustments to keep the background texture vs adjustments to keep the jersey texture. By combining the latter two I achieved what I wanted
If I want my image in grayscale I also add a Black & White adjustment layer in between my initial image and the Levels layer, though for the effect I achieved with the George graphic we dont want that.
Gradient colors
First of all I make all my multicolored graphics using gradient maps. I am not particularly knowledgeable so my apologies but I cannot even try to begin explaining gradient maps.
So for a multi colored effect I create a gradient map once I have an image that I am satisfied with and adjust it until it looks good. Important that the color fully on your right on the gradient map is the color you want to have in the background which in my case is the beige I use everywhere.
After that I save my smart object as I would usually do (Ctrl + S) and exit to the main graphic and ideally, it should look the same in your graphic as the smart object looked.
Unfortunately I cannot help with color choices/color theory for the actual gradient map since I barely understand what is going on myself lmao. Fwiw personally I think Synth (@/jamesvowles) is awesome with colors and how they work together in his paintings so maybe he could be of any help o7
Solid colors
This is for cases like this, where all my colors are solid flat, no matter how many colors
This is where the Black & White adjustment layer mentioned comes into play. For when I do solid colors only, even with multiple like in this graphic, I create a new color layer on top of all my other layers, fill it with the color of choice, and set the blending mode to screen. no idea why screen works, someone smarter with blending modes would probably be able to explain though.
For different colors I just mask out the areas I want the color to appear in.
Final step is to combine all my layers into a folder and under that folder I create a new solid color layer with the background color of my choice, in my case beige, and set the folder blending mode to darken. Once again, I have no idea how it works but it does and that what counts to me haha, someone smarter with blending modes would be able to explain most likely.
On a final note, do experiment!! Oftentimes I like getting to the point of where I would have usually used a gradient map (so no B&W layer) and then see what I can do with blending modes! Thats how I ended up with this image of Primož, its just a yellow color fill layer set to Hue blending mode
Hopefully everything makes sense, feel free to ask more if you are confused or want to know more about any part of my graphics <3
#ask#anonymous#erika.graphics#thank you for asking about my graphics I love talking about them!! do ask more if you want to i get stupidly excited about this
8 notes
·
View notes
Text
shading and lighting tutorial!
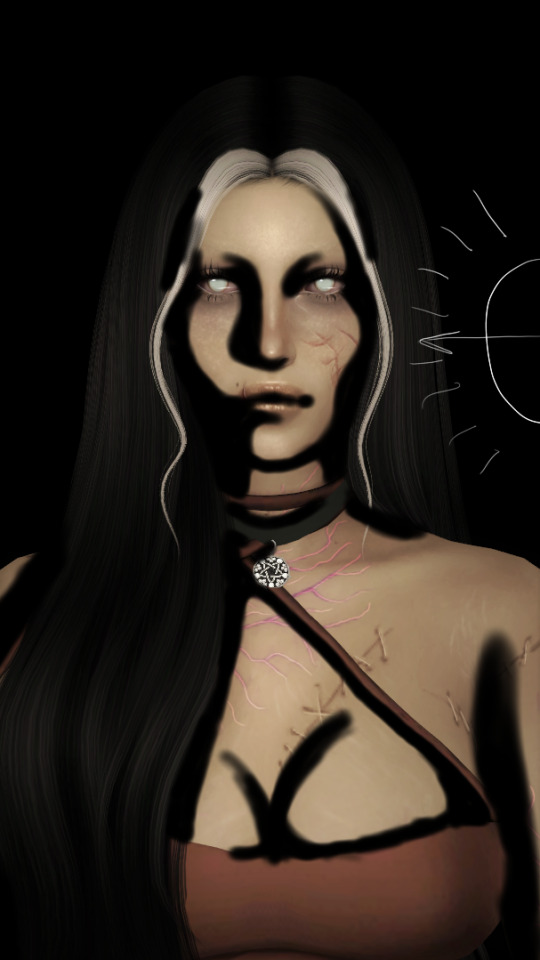
this was requested by an anon. a little before we start! i use procreate on my ipad pro with an apple pencil. unfortunately procreate is the only program i know but i imagine similar features exist in other programs as well. i feel like i need to say that i am in no way an expert on shading and i know it's not always accurate. also if you end up using this tutorial in some of your edits please feel free to tag me, i would love to see it! if i've missed something or if i explained something badly don't be afraid to ask me about it. okay long post ahead!

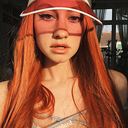
so i'm going to just make a little simple edit of my girl. this is a screenshot taken from cas that has the sunscreen filter on it from the built in windows photo editor on 20% intensity.
now i've added my normal little touch ups that i usually do, eyelashes, catch lights and highlights as well as touching up her scars. everything is painted with the soft airbrush except for some highlights that are painted with the 2B compressed charcoal brush. before adding highlights however you should figure out where you want the light to come from. i've drawn a little ugly sun for you to see where i've placed my light.
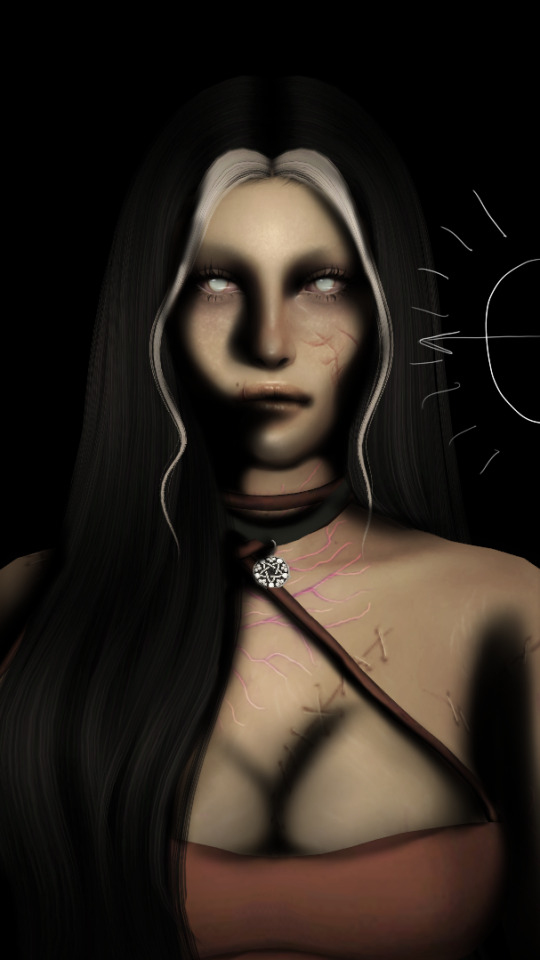
now i use the soft airbrush and paint with black where the shadows would be. if i would have fixed up the hair (which i didn't for this one because it's my least favorite part and i didn't have the energy) i would have made sure to make the shadow layer behind the hair ones since i think it looks better if the hair isn't shaded the way the face is. then i blend all of the black out with the smudge tool with the soft airbrush so it looks a little softer.
then change the layer to soft light and change the opacity to 60% and voilà! you have soft shadows! if some shadows still look to harsh for your liking just go back in with the smudge tool a little more.


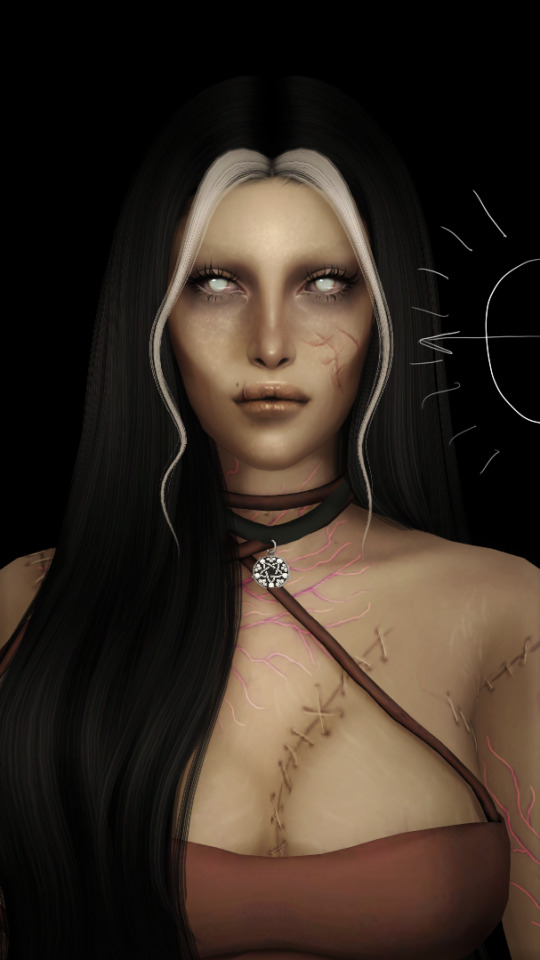
now do a layer on top of everything and kind of circle the part you want lit up the most with black again, smudge it and set the layer to soft light at 60% opacity.


this step is not a must, i don't do it very often anymore but if you want some extra color or light you can do this. choose a color you want your light source to be. i tend to feel like intense colors look the best. paint it where you want the light to come from, then use the gaussian blur tool until your satisfied.
now you can leave it in the normal layer setting or play around a bit with different ones until you find something that you feel fits. for this one i decided on using the difference layer setting on 70% opacity.


a step i always almost forget is shading the eyes! to do that you just repeat the normal shadow process. paint it black, smudge and put the layer to soft light on 60% opacity. it adds so much, i highly recommend this step! now you're done with the first part. now save it as an image and start a new canvas with that image.


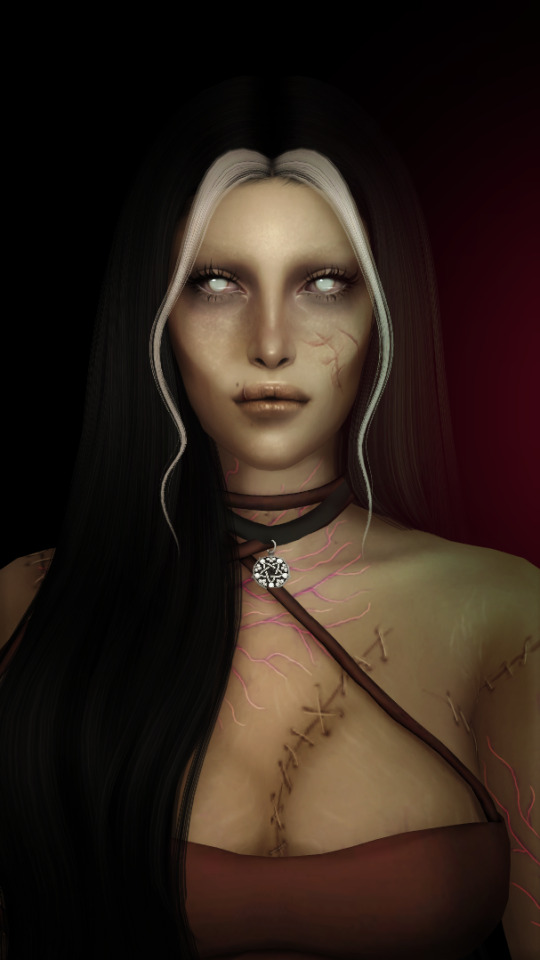
if you want to use gaussian, motion or perspective blur now would be the time. i didn't for this one but i almost always do. this next step is also totally optional. we are going to use chromatic aberration in the displace setting on 90% opacity and slightly pull it to the side. then use the normal chromatic aberration between 5-10%. it just adds a lot of fun and weird color that i just love and makes the edit look so much more alive. then use sharpen, i usually do 10-15%. and after that use bloom. my edits are almost always dark so i use a lot of it. i think i did 35% for this one to give it a little glow. then use noise. my go to is 3% on max octaves. then go into hue, saturation, brightness and change the saturation to 55% (you can do however much you want but these are my go to's) and brightness to 49%.

now go into curves and play around. i always make the gamma brighter but the colors i play around with so much.

completely optional again but i've recently started to add a gradient map, especially instant or noir. for this one i used noir on 20%. and that's it, we are done!
before/after.
hopefully this is understandable and helpful. have fun!!
134 notes
·
View notes
Note
hi, i'm that yannqi who asked you about making gifs, it really helped me to make yangyang gifs and upload them into tenor, thank you so much!! can i ask about the sharpness, smart sharpen, curves etc. settings for your gifs, you really helped me so much, I'm so grateful.
aw hi friend !! i'm so glad <3 and i hope you'll post your yangyang gifs here on tumblr too so i can see them !!! tag me !!! hehe
as for my settings - they are different with every gifset. i make all of my coloring from scratch and i adjust sharpening based on the source video depending on the quality, lighting, etc. but i'll try to share my most often used options, so you can play around and see what you like.
sharpening:
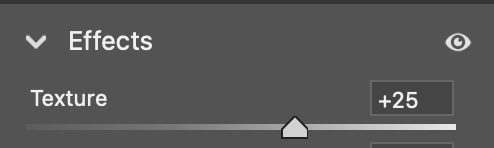
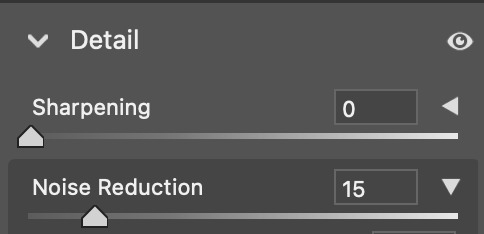
opt 1 (what i'm using most often currently, creates a smoothing and fine detail sharpening effect) - i use camera raw filter with texture to +25 and noise reduction to +15
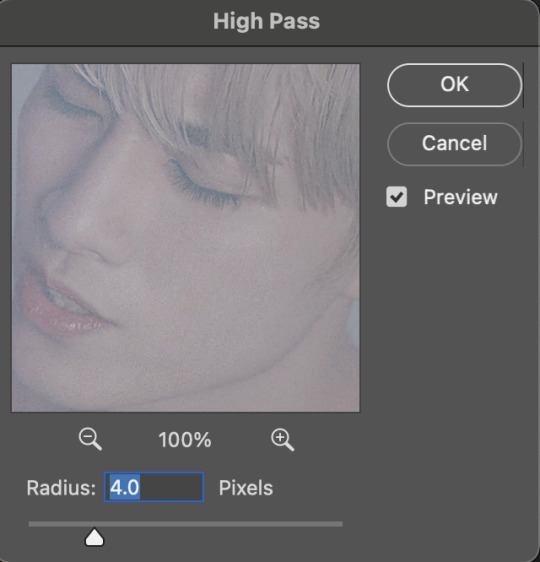
opt 2 (for a quick, easy way to create HD sharpening) - i use high pass at 4.0 px in soft light blending mode

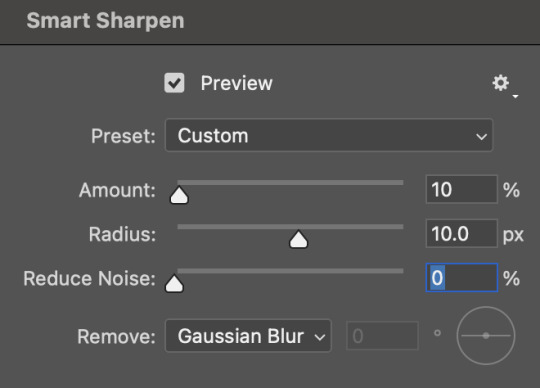
opt 3 (for a classic look with fine detail and definition) - i use smart sharpen in these settings

you can also combine some of these together! and if i am not using the camera raw noise reduction, i often will add a gaussian blur layer. usually just 1 px at ~20% opacity.
coloring:
you can see some examples of my psds here ! they are not the most up to date for me now but they are a place to start. some other coloring things i pretty much almost always do:
set my darkest point with curves (always always my first step!)
increase reds and blacks in selective color
mattify / even out overexposure (esp of stage lights) with a gradient map layer in black&white, reverse box checked, soft light blending, 50% opacity 50% fill
color correct with color lookup, color balance, and/or color fill layers
add a top coat with an exposure layer set to multiply or soft light at 25% opacity
as always ... try things out and see what you like and what makes your own style come together :) if there is a specific set of mine you want the exact settings for, let me know, and i'll pull them if i have it saved ! i don't save a lot rip but i can also try to remember what i did ahbghsb . good luck, happy giffing, and PLEASE TAG ME IN UR YANGYANG GIFS 🫶🏻
#sorry it took a while to respond i was at work today <3#hope this helps u !!!#erimail#mail from: anonymous friend!#gif help#.resource tag
4 notes
·
View notes
Note
Hi!!!! No worries if you don’t want to tell me or respond lol. But I really like the colour grading you did on that most recent Joel Miller gif set. I do photography and I’ve been struggling for ages to find a way to bring out the warm sort of brown tones without making things feel too muddy or red. Just curious about what HSL adjustments you made / what colour grading helped you get that look?
ohhhh my god thank you so much??? this might be a convoluted answer/unnecessary rant so i apologize in advance lol but i tend to keep the colorings/psds i use for gifs saved in a folder so every gif i make in a set is consistent with color/lighting/shading/whatever. i get anxious if there's even a little bit of difference per gif lol
a lot of what turned out in those gifs has to do with the lighting/coloring that's already in the show/that specific episode/scene. i've got the rest of the episodes' gifsets made and finished but i can try and kind of show what i'm talking about. they all look different color-wise, at least in my opinion, because of the differences in each episode's lighting. if that makes sense.
the goal with any gif i make, regardless of show/movie, is to make them either
1) better than what was there before (for example, if the movie is INCREDIBLY blue/yellow then i try and color correct that blue or yellow to be more neutral)(i'm looking at you triple frontier and your dark, blue ass scenes dfjkdflh)
and
2) not whitewash pedro. this is incredibly important (at least in my opinion) because i've noticed a lot of gifmakers (or least they used to) went for a really pastel/pale look and it whitewashed poc so dramatically and it was ~problematic~ to say the least. (i used to make gifs for a band that consisted of all mexican band members and i got hate a few times/people policing how i should color my gifs so the band wouldn't get whitewashed, so it's something i've been hyper aware of ever since)
so, even if i'm going for a more moody/darker aesthetic like i am with these gifsets of tlou, i never try and diminish the color pedro has in his skin tone. he's got a lot of color in his skin and i want to be able to see it, y'know what i mean?
basically, that boils down to keeping a lot of the warmer tones while also going for an ~aesthetic~ and it can be really hard sometimes. sometimes a show or movie, in this case the last of us, every episode is lit a little differently since it takes place over the course of a year.
i'll put some examples under the cut:
ok so i'll use episodes 2 and 8 as my examples.
to begin with, the last of us has, what i call, a "post-apocalyptic filter" over the top of it so i kinda have to work with that from the start. lots of greens/earthy brown tones and stuff.
this is with only sharpening applied and no color or anything:

and this is with my previously mentioned ~dark and moody~ psd applied on top of that sharpening:
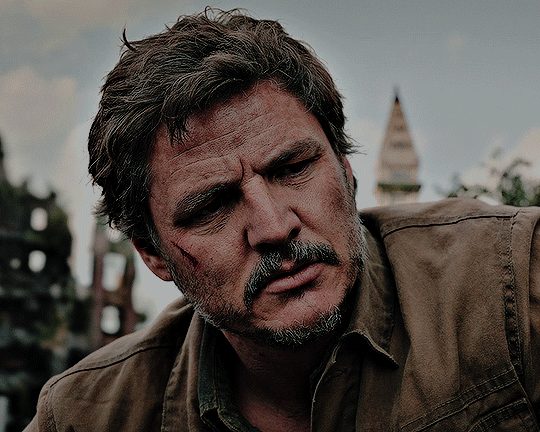
now, this is the same color grading i used on that gifset you were mentioning.
this is also the same color grading i used on episode 8, which takes place in the winter/snowy areas so the coloring to begin with is going to reflect that:
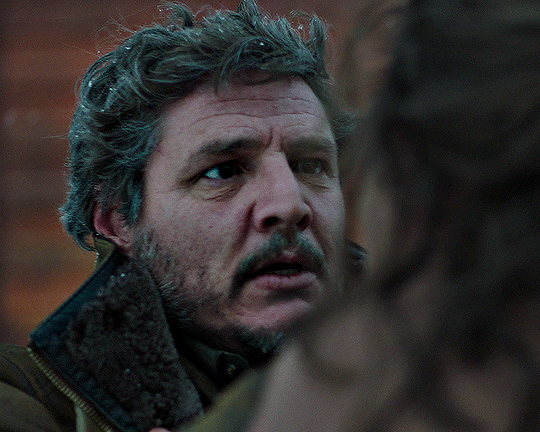
and now with the coloring:
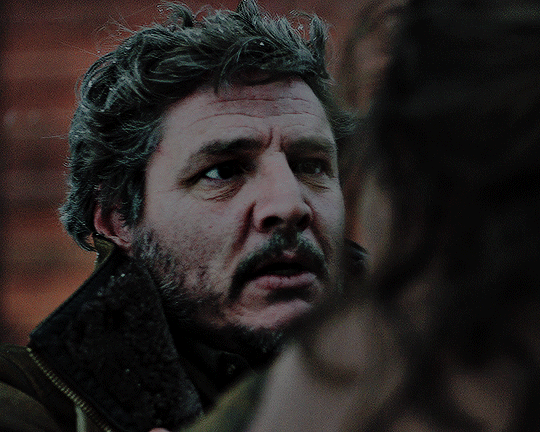
the big thing between these two scenes is that in the winter one, he's also recovering from actively dying and being deathly pale so any color he had in his face is really minimal lmao
so this is already way too fucking long and i don't think i even actually answered your question i am so sorry lol
to start, i ALWAYS start with an automatic curves layer and then adjust accordingly.
the actual color grading part mostly consists of vibrance, hue/saturation, selective color, channel mixer, gradient map, and level layers. i'm willing to give you the psd privately if you'd like to have a closer look at them!
thank you so much for asking and for putting up with my ranting lmao
#toointojoelmiller#asks#i really hope i answered this jfc#if i didn't i'm really sorry#it felt like i was trying to explain like 7 things at once lmao
3 notes
·
View notes
Note
hi dani, hope you're having a good one. your gifs are so vibrant and hq! if you don't mind sharing, what's your process?
i appreciate the compliment! i first started making gifs back during my glee fandom days in 2011 so i have been doing this for a while lmao, but here's my general process (under a cut because it got long as hell):
i'm gonna assume you know the general giffing process for this - if you need me to help you out with screencaps, lmk! just make sure whatever you use is 1080p. i torrent to get the best possible quality, which is its own tutorial, but there's plenty of those out there.
open up whatever you use to make gifs - i use adobe photoshop cc that i definitely legally got - and go into file -> scripts -> load files into stack and select all the pictures.
once you've done that, go to the window tab and check "timeline" to add the timeline window to your workspace and click "create video timeline, then click the three small boxes in the bottom left to convert it to a frame animation. then go to the hamburger menu in the top right and click "make frames from layers". this will actually put the frames in reverse, so go to the same menu and click "reverse frames". from here i go the same menu AGAIN, click "select all frames", then change the frame delay to 0.05.
now it's time to crop! for the best quality, make sure your image size matches that of tumblr's. tumblr's image width is 540px, if you're doing two images side by side it's 268px, and i do not recommend doing three side by side because things get weird. the height can be whatever you want.
sharpening is another aspect of getting those gifs as crisp as possible. there are many ways to get a good sharpen, but the way i do it, you have to convert your timeline back to video timeline, so click the little icon in the bottom left:

then select all your layers, right click, and select "convert to smart object". then, with that layer selected, go to filter -> sharpen -> smart sharpen, then use these settings:

duplicate that sharpened layer, then go to filter -> blur -> gaussian blur, with these settings:
then take the layer that has both the sharpen and the blur, and set the opacity to 50%.
now it's time to colour! i have the same general process to colour all my gifs, sometimes with an added selective colour layer if i really want to amp up or turn down a certain colour. but all of them can be found under layer -> new adjustment layer. first is a curves layer to brighten up the whole thing

then another, different curves layer to add some contrast:

then a vibrance layer set to pretty high, around 80-100% but i play it by ear because the next layer is actually a gradient map set to soft light with 50% opacity to add some more contrast and tone down the vibrancy a bit

now, in order, i mess around with a selective colour layer (generally i only touch the red, yellow, white, black, and neutral colours, unless there's something i really wanna specifically bring out like the cyans/blues/greens in a lot of the arcane gifs) and for this there's no real system. you just gotta play it by ear depending on the scene. next, do the same with a colour balance layer. i usually top it off with a levels layer to add just a tiny bit more contrast, but that isn't entirely necessary as you can do the same by amping up the blacks in the selective colour layer.
once you're done colouring, go to file -> save for web. make sure to set the looping to "forever", and keep an eye out for the file size. luckily for newer gifmakers, the size limit is a whole 10MB now (though sometimes it'll cap out at something like 9.8 so stay on the safe side). it used to be a LOT smaller, iirc it was 500KB when i first started. if your gif is over size, you're gonna have to just cut out some frames by playing with the edges on the timeline window, since cutting down the colours will affect quality.
you're actually not quite done here - after you've saved it, close your file and then open the gif you just made. it'll default open in frame animation, and you'll see that the delay on the frames is actually 0.07 now. it's something that happens during the conversion to video timeline. select all frames and change that delay back to 0.05 since 0.07 is actually a noticeably slower and less smooth gif. save that the same way you did before, and NOW you're done! thanks for sticking around! happy giffing!
5 notes
·
View notes
Text

chatter abt the ods set under here
ods is a very green show, so i was pretty sure i'd have to edit green -> purple no matter what. if you want that to look nice it takes a lot of layers (i think i had 11? selective color layers which is a lot for me i try not to use many). the rest of the purple is a low-opacity gradient + a photo filter that i basically hand-adjusted for each one
the font i eventually went with after Literal Hours of stressing is called 'afterglow' and i colored it using exclusion blending + a gradient map which i've never done before and was surprisingly difficult (mostly bc of the fucking. drop shadow settings. probably everyone should turn off 'use global light' itll save u a headache) also i put extra spaces in between the letters and i still can't decide if i hate it more or less than not
other scenes i thought about doing were 'you can do ehatever you want' from e6 and the 'youre blushing' kiss from e5 but in the end 'have you been well' is king for me. plus this hold... look at their eyes.... ahhh
3 notes
·
View notes
Text
Reflections on Tableturf
This blog post goes through a few of my Tableturf inspired artworks from 2023, ending with a quick timelapse of this painting:
With the launch of Splatoon 3 came a new game mode, Tableturf! I got quite into the idea of Tableturf, even being a part of coordinating an art collab project – Arty Siege – which paid homage to the in-game cards. I did lots of work for that – creating various design elements, having fun data merging artwork in InDesign, thinking about how the physical game would really play out, coordinating artists and creating artwork!
The art that I worked on included assets for the card backgrounds, and I illustrated one of the cards.
These background images were ink paintings traced from game screenshots. After doing a little photography tour in the game I exported the screenshots and used the Find Edges filter in Photoshop. I printed these reference lines to carbon paper and transferred them to watercolour paper.
After scanning the ink paintings, I applied some gradient map adjustments to them to adapt them into the card background.
I chose to illustrate the Splattershot Jr. as my designated card for the project. I’ve drawn the newbie squid before and as a Junior player (I became a Junior main because of having to unlock kits on many, many systems) I just feel a certain connection to the default loadout.
During initial project advertising, I used this artwork. The pose is taken directly from the pose of the original Tableturf card. With this version of the artwork, I mocked up the first version of how the cards would appear, including tweaks to the card UI and creating a 3D view of the card.
My motivations for changing the UI were to make the Arty Siege cards distinct from the in-game works, but also to think about what would make sense for a real card game. The original cards put all their important information at their base, but I wanted to make all the pertinent information visible easily from a fanned out hand of cards. So I moved the grid and special costs to the left side.
I also straightened the alignment of the block grid. The angled grid was cool, and saved a little space, but I felt that when looking down at the game board and determining how to make a move, it was easier to visualise the move you wanted to play by having an aligned grid. Maybe that was just me, it’s not like things in the real world would be completely squared anyway.
Anyhow, relatively late into the project I started feeling a bit insecure about that version of the Junior being my entry into the project. I was surrounded by an incredibly talented pool of artists and felt like I needed to step up to the standards of my peers! I still like my original artwork but I also felt inspired by the work I’d done on the backgrounds to do a piece in ink and use gradient mapping to add colour.
This time, I based the pose on some promotional artwork from Splatoon 2 – I wanted to show off the square ink tank because while the flat ink pack of Splatoon 3 features in some of the cards, many of the other ones seem to take cues from Splatoon 2’s fashion options.
Here’s the final version of the Splattershot Jr. card. Please do check out the Arty Siege website for all of the other works!
One of the things I did at the end of this project was to print out all the cards, which was a lot of fun! I felt like I built a new connection with each of the artists and their artwork in the process of printing, cutting and sleeving the cards.
While wrapping up Arty Siege I had a vague idea of running a promotional Tableturf tournament – maybe something in a casual vein, or with a bit of a team gimmick to allow a mix of player skills among drafted teams. The team angle was influenced by my favourite anime – Chihayafuru – a show that features a competitive karuta game based on the Ogura hyakunin isshu.
Chihayafuru is beautiful, and the way it depicts friendly competition really hits home. And there’s just something so great about the earnest enthusiasm of the players – they’re engaging in a pretty niche hobby so having the opportunity to play is something they’re truly grateful for. Coming from a grassroots Splatoon scene, I feel the parallels between the competition depicted in the show and some of my favourite times being a member of the Australian (and broader) Splatoon community.
I wish competitive video gaming was filled with people as kind and grateful for the opportunity to play with others as the karuta players in Chihayafuru.
— David Michael Kinne (@Mewd462) May 18, 2019
This kinda sums it up!
Although I didn’t end up running a Tableturf tournament, the imagery and the idea for an art piece stuck with me.
As much as I adore Chihayafuru, I’ve never felt brave enough to try to tackle fan art for it. The gorgeous scenes, the sense of movement, the game that I only have the most superficial understanding of… it all felt quite intimidating.
But Splatoon, I feel comfortable in that universe…
(A universe which coincidentally seems to have a version of karuta already!)
However, my painting is not an attempt to retcon that karuta into Tableturf. In my headcanon, the two coexist. I just wanted to borrow the aesthetics of karuta for my Tableturf scene. I was inspired by the glowing sunset scenes of karuta which I associated with the characters practicing in the school clubroom, but also by the tournament games played while wearing kimono.
Before starting this painting I did two “mood studies” – just getting a feel for whether I could tame the contrast of yellows, oranges and purples before I started. Watercolour can be a tricky medium, and it’d be hubris to walk into this kind of endeavour without a plan.
That first image is sort of a Chihayafuru fanart, I guess – the scene is most likely Arata sitting alone with his cards – but that wasn’t the purpose of the sketch. I wanted to get a feel for how I’d depict the trees in the windows, and the light entering the room. The second sketch really sets up the composition that I’d ultimately use for the final piece.
After deciding on that sketch, I made simple 3D version of the scene in Blender.
A digital sketch then filled in the character details
Which was then printed out and transferred to stretched watercolour paper, then painted over the span of a few weeks.
I also wrote a poem to go with this painting. It’s based on poem 77 of the Ogura hyakunin isshu. Here’s one blogger’s translation and writeup about the poem (I chose to highlight this blogger because they also have a post about the Karuta that appears in Splatoon 2!)
The translation included in that post is credited to Joshua Mostow,
Because the current is swift, even though the rapids, blocked by a boulder, are divided, like them, in the end, we will surely meet, I know
Other translations summarise the scene as
Swift waters parted by the jagged rocks are joined at river's end.
The overall mood that I get from this poem, having only experienced it through translations, is a mix of urgency and yet steadfast certainty that comes from love. Apparently, the “swift currents” were not in the original poem, and were a later edit, but I think the imagery is certainly much stronger with the idea of rapid waters.
I felt the scenario could be mapped quite closely to the energy and movement of Turf War, and by extension, Tableturf. The rapid currents can be whirls of paint instead, and the boulder standing in the way of the lovers could well be a grey block, created in Tableturf when both players play their cards over the same squares.
I chose to write my poem following the rough syllabic rules of the original poetry, the lines having 5-7-5-7-7 syllables. But I put a western poetic spin on them as well, making use of rhyme throughout.
Our rapid advance, Blocked by chance or wit wherefore. Must we halt our dance? No - surge forth in this turf war! We'll unite our ink once more.
The rapid advance describes that rush to claim turf, as well as for the rivals/lovers to meet at the middle of the map. “Chance or wit wherefore” refers to how the grey block ended up in their way. Was it coincidence that they played in the same tile, or was it cunning strategising from one of the players? With this obstacle in place, the shape of their relationship (whether it be a rivalry or a romance) is affected.
The ending couplet describes the characters choosing to rise above (or work around) adversity – in-game the boulders would not be passable at all, so they must certainly have some grit! Like the swift waters in the original poem, they’ll be sure to meet again.
I love how this artwork and poem came together. Reflecting upon them I feel all those warm fuzzy feels from all the ways that Splatoon – and more recently Tableturf – have made their impact on me. I’m grateful to have had another great year of art, friends and community and I’m looking forward to more good times in the future.
"Reflections on Tableturf" was originally published on Proairesis
0 notes
Note
hi amy, sorry to bother you!! do you have any tips for those edits where you replace somebody's face with taylor's? you've done a couple of them and they always look amazing!!
I've been trying to do one of those but mine looks weird, can't quick figure out how to improve it :/
thank yoooou
I roughly described my process here. The main part is really finding pictures that match and adjusting the lighting and shadows (the soft light or multiply blending option is your friend). I personally found that basic knowledge of facial structure goes a LONG way when it comes to making manips, because it helps with deciding where the shadows go etc. However, I tried making another manip yesterday and failed miserably, so it is a trial and error thing and has a lot to do with finding photos that match (the angle of the face is key here!) As with most things: Practice makes perfect.
#also: me putting the softening filter and gradient map on my manips hugely improved them and made them look much more smooth#i might show some process pics later if i saved them#ask#boyapologist
3 notes
·
View notes
Last Seen Blogs
umbird
UMBIRD

ross-montsot
Ross

musicistheair-blog
Music Is The Air

pebblebbles
Pebbles

semogaterbaik
Tanpa judul