#free compression software
Explore tagged Tumblr posts
Visit Tumblr Blog
Explore Tumblr blogs with no restrictions, modern design and the best experience.
Last Seen Tumblr Blogs


Fun Fact
There were a total of 171.5 billion posts on Tumblr in 2019.
Text
HandBrake
HandBrake is a free, open-source tool designed for converting video files from virtually any format into a selection of modern, widely compatible codecs. It makes it easy to prepare video files from your camera for playback on a variety of devices, such as iPhones, iPods, Apple TVs, Android phones, Android tablets, and more. The app also fully supports one of the most popular video conversion…
#device presets#DVD to digital#free video tool#HandBrake#MKV conversion#MP4 conversion#multimedia software#open source software#video compression#Video Conversion#video editing#video encoding#video filters
0 notes
Text
Recording Great Guitar Tones on a Budget
Recording Great Guitar Tones on a Budget, we show you some great free guitar software that you can use to get great tones.
In this Recording Great Guitar Tones on a Budget article, we will discuss some ways to get great recorded guitar tones without spending a fortune. The way to get huge guitar tones, with massive amounts of sustain and a sound that will make your guitar stand out from the pack. Recording Great Guitar Tones on a Budget For the first part of this series, I’m going to share some links to free…

View On WordPress
#4-Track tape recorder#Ableton Live Lite#amp#amplifier#analog#analogue#Apple#AU#Audacity#Audio Unit#budget#compression#computer#Cubase LE#DAW#Digital#effects#EQ#free software#Garageband#Guitar#Guitar Player 6#Guitar Tone#How to Record Great Rock Guitar Tones on a Budget#Les Paul#MAc#magnetic tape#metal#microphone#MPC Beats
1 note
·
View note
Note
your covers have gotten me to start wanting to make my own.... if youve got any tips for a beginner it would be greatly appreciated !!!
AHH IM SO HAPPY WE COULD INSPIRE YOU 2 WANT TO MAKE UR OWN!!! I FEEL HONOURED 2 MAKE SOMEONE FEEL LIKE THAT…
ahh hmm okay so my tips may not be great at all, i didn’t really have anybody who knew what they were doing to help me, so this is almost fully self taught info ,, but from what i can think of:
so this might be obvious for some ppl but i went into this thinking i had to make my own song files- always look for if someones made a song file! example: VSQX is a file made for VOCALOID4, SVP is a SynthV file, UST is a Utau file, if you find a file that’s a VSQX but you wanna use it on SynthV ( for example ) you have to convert it to work for SynthV and vice versa! you can convert a file using this website: https://sdercolin.github.io/utaformatix3/ u have no idea how much we have used this LOL
if ur trying to find JP song files most likely youll have to find it as a UST specifically, since utau is more accessible ( free ) and has been around 4 agesss, if you can’t find a file on youtube, try looking on niconico! i’ve even had 2 find files thru searching on twitter or tumblr at times LOL but it’s always worth checking everywhere!
if you have a file that doesn’t come with harms, i’d recommend using harmoloid, it can make harms for you! https://sdercolin.github.io/harmoloid2/ personally i don’t know a thing abt how harmonies work ( how to make them ), i’ve tried learning but it just never made sense 2 me T_T so this is a lifesaver!!! it can take a lot of trial and effort to find the right key that fits the song but usually it ends well ^_^
personally i tried going into this cover stuff thinking “it has to be perfect, if it isn’t i have to scrap it” and u just,, can’t go into it like that, starting out new ur bound to have stuff not sound perfect or even great but u have to start somewhere, and i guarantee you will improve!!! you don’t need to know anything about music to do this ( i went into this not knowing what a BPM is or not knowing you had to mix stuff lol ) so go into it w a free mind! just keep trying, genuinely
for mixing tips, i’m honestly not sure- like all of this stuff i went into it winging it, but i learnt from help from others that compression is rlly important, make sure you always have a compressor on the vocals, reverb, n an audio balancer ( I’m not sure what it’s actually called- an EQ maybe?? ) but this stuff helps a Lot… i mix on bandlab personally ( it’s a free mixer but it does the job abgdjdhd ) and it’s easy enough to learn?? a bit confusing at times but if you don’t have the money to buy a mixer ( like mr broke (((me))) ) then it’s a great option
absolutely look up mixing videos, mixing guides, tuning tutorials, etc. some of them can be really hard to understand but just try anyway, even if you come out of a video thinking “wow none of that processed” you can always go back to it, it’d prob be much more helpful if you have anyone who knows abt this kinda stuff to ask about though
id recommend joining the SynthV unofficial discord server, they have help guide channels and channels to ask for help, and they don’t only handle synthv stuff they have channels for loads of other softwares too, u have no idea the amount of times i’ve looked like a dumbass asking the stupidest questions lol but! any help is better than none, even if u look silly, plus the people there are nice!! https://discord.gg/synthv
i really hope this info is helpful, if you want anymore tips i can try, i’m just not very good at wording things or thinking of the right stuff to say lol.. but i really wouldn’t mind trying to help more, i understand wanting to get into this but having nobody to ask for help T_T so ur not alone!! i bet you’ll do great w/ making covers, so pls believe in urself (: !!!!!
#asks#information#cover help#idk#i find it very hard to word stuff so i really hope this makes sense…..#i hope at least some of this is even slightly helpfulabdhjdf#it’s mainly stuff i wish i was told sooner ig bdhsjhd#Also. if you’re not sure on a mix#you can always come back to it w like ‘fresh ears’ ?#Sometimes it’s better to go back to smth if you’re frustrated or feel like smth is off but not sure#same applies to tuning#if ur not sure#come back to it#or ask a friend to listen !!
19 notes
·
View notes
Note
Do you have any tips/useful information for people who want to start making audio rps?
(Also love ur content sm!!! Mitch is the most lovable little guy)
Aw thank you so much! Love him too!
This is a great question, had to think about it for a bit;
If you want to dabble with making audios, feel free to start off with public scripts! I think there's subreddits like ASMR script haven (IIRC?) that has public scripts that can be filled by anyone. Just be sure to read the author's conditions carefully i.e. credit, terms of use, what can be changed etc. Right at the start I recorded a public script to try and get started, it's a great way to just jump right into making something to learn the ropes of it without also first having to write an entire script for it too. Filling public scripts is a fantastic way to start off, however I reckon writing your own stories is a major part of the fun!
You don't need an expensive mic, but audio quality is a very important factor. Do some test recordings and listen back to them (with headphones!) and see how it sounds. This is especially important for whispered scenes (DO NOT get too close to the mic or breathe on it!) or loud scenes (DO NOT peak the mic!). If your mic has a gain / input dial, play with that before recording! Just start with mono to begin with, play with stereo if your mic supports it after you become familiar with it. Aim for your recording to be no louder than -6db at the highest, if you can keep your voice roughly between like -20 and -6 that tends to sound reasonably natural.
Do your best to eliminate external sounds! If you have AC or anything like that on, turn it off. I have to shut down my main PC and record with only my editing Mac on because the PC fans are much louder and my mic is very sensitive! There'll pretty much always be background fuzz, some mics will just have some, but try to make your room as quiet as you can. Your software may have some background noise removal tools, I use filters for that (expensive so I can't recommend them), but DO NOT use the noise removal tool in Audacity! It's terrible!
Speaking of, Audacity is decent to get started with. It's good basic recording software, plus multiplatform. For a while I preferred recording on Windows with Audiodope, also very simple, plus I liked that it asks me whether I wanted to record in mono or stereo first in case I forget to switch, I currently record on Mac with ocenaudio which does the same, while Audacity won't ask, you have to go into settings. Anyway Audacity is okay to start with for editing, it's free, but from what I understand it's a "destructive" editing software in that after you make a change like adding a filter, you can't then go back in and change it other than just undoing, which I really don't like, plus changing the timing of things looks fiddly. I don't know what to recommend to move up from, I've heard good stuff about Reaper but it looks very complicated. Avoid Adobe unless you have a free subscription from somewhere else. I edit entirely in Final Cut Pro so I can't recommend that unless you're on Mac, plus it's my old work software and expensive! If you need sound effects, I use freesound.org, there are other great free resources as well, but make sure you check each individual sound effect's license before use.
Once you've edited the audio and want to turn it into a video, I've heard good stuff about Da Vinci Resolve and Kden Live, both are free! Make a video canvas of 1920 x 1080, FPS doesn't especially matter if you only have a still thumbnail, 25 or 30 is fine, and render it out as a h264 mp4 if you're not sure what to select! Good compression for internet video, good for streaming. Try to record and export your audio as wav if you have enough space, wav is uncompressed audio so it maintains full quality but they can get large.
I also make my thumbnails in-edit but you may want to use external software like Gimp to make them. Avoid getting random stuff of google especially anime boys / girls, and definitely don't ever use an artist's stuff without asking for permission + giving proper credit. Using pre-built generators like Picrew is totally fine, just be sure to credit where you got it from, but 100% avoid AI generators, obviously. Be careful with Adobe stock images, apparently there's AI slop in there too. You don't need art for audios though, they're a nice to have bonus, but many of my most viewed videos have no art at all. If you need background images, I like unsplash.com because it has a free license! Read over it yourself but basically you're able to use pretty much any image they have in your videos!
Just jump in and try making something small, never start with your magnum opus! I started with the introverted incubus character because I'm a very shy person myself, it was an easier role to get started with! If you want to start writing your own scripts too there's a lot we could talk about there as well, just try to picture the scene from the perspective of the listener, what they may be thinking or feeling at any given moment, not just the perspective of the character you're going to be playing!
This was a lot and I don't think I covered much, I hope some of it helps though!!
49 notes
·
View notes
Note
hi hello! as a live show taper, do you have an advice for where to start for someone interested in learning to tape? with the new tour announcement it seems like i'll be able to go to a bunch of shows in an area that's kinda light on tapers, so it would be really neat if i can learn enough to get some decent quality tapes from this tour, but as someone with no background in audio stuff it all seems a bit overwhelming from the outside!!
SO YOU WANT TO BE A LIVE SHOW TAPER: an overview by your favorite amateur tMG taper!
Before we start: my top resources here are the Taper's Section forum (yes, a real old-school forum!) and the taping thread in the unofficial tMG community discord server (it's an older thread, will have to scroll down to it in the tmg-forum section). I really hate to be the "join my discord server to get your answers" guy, but it's genuinely a great space to talk to some really knowledgeable regular tMG tapers and get a lot of good specific advice.
You can get really intense about taping really fast. It depends on how much time and money you're able to invest into it, and there are a million factors wrt approach, gear, investment, etc. For this post, I'm just going to do an overview of what I would recommend for a beginner-friendly setup that's not too big of an investment and is a step above a cell phone recording.
Gear: I love my PCM-A10 recorders because I can connect them to my phone and control and monitor them remotely, but the price tag isn't very beginner friendly - you'll likely find A10s going for ~$150 on eBay. Also, the ideal use case for an A10 is with external mics or to pull soundboard, not as an all-in-one to just set and forget. You'll want to look for something like a Zoom H2* or H2n, which are a smallish all-in-one recorder and can go for less than $50 on eBay if you do a little searching. (*Note: the H2 has a known issue where it stops and restarts with a small gap once it hits a limit, but you can patch that out by following this tutorial with this updated firmware link.)
Recording during the show: unless you have permission to tape, which is a whole nother can of worms, you'll have to get your recorder past security. Usually if you hide or disguise it somehow in your bag you can get away just fine. If you're in the front row for the show, you can usually discreetly prop up your recorder on the barrier or just set it somewhere that it won't move. If you can stay relatively still and not sing into it, putting it in a chest pocket on a shirt or jacket is also a good option. I always try to capture everything from the moment the lights dim, so I usually start my recording a little early and just chop off the excess at the beginning, but if you're worried about storage space or anything you can just try to be really aware and hit record as soon as the lights go down.
Processing: At a minimum, you'll need to name the file, chop it into tracks, and populate metadata. I do this in Audacity (free) and it takes less than an hour once you get a workflow down. However, you can also go crazy with processing if you want to - I do EQ and mixing in Reaper (free trial version) and audio repair and de-click in iZotope (paid software). You can do some fairly basic EQ work pretty easily in Reaper and it can make a decent difference with how the audio sounds - I typically do parallel compression and chop the low end in order to bring the vocals up a little bit and balance out any boominess. My order of operations is mixing (if applicable)/EQ > repair > tracking/metadata. I know EQ sounds complicated, but it's really just fiddling with some standard presets until you like how it sounds.
Uploading to the LMA: The Live Music Archive is specifically for decent quality lossless tapes - cell phone tapes are fine to upload to the Internet Archive as "community audio", but the LMA is supposed to be higher quality. WAV or FLAC is your lossless format, I always work with WAV throughout the whole process. There's a fairly standard convention for file naming, page info, etc that I think there's a tutorial on somewhere but I'm also happy to go into that if need be. It'll take a little bit to upload the files, so I usually just leave it running on my computer overnight. After uploading, it automatically derives the upload into different file types before it can be streamed or downloaded.
Congrats, you've done a tape! I'm happy to go into significantly more detail on any part of this, whether here or in the discord server - feel free to send further asks or drop me a DM and I'll do my best to answer, I just wanted to keep this post as a relatively high-level overview. Thanks for asking, I'm always thrilled when people express an interest in taping!
#txt#transmissions from lyric#resources#tmg#the mountain goats#long post#ask#WHEW ok i think that's all my tags!#thank you SO MUCH for asking i'm so excited anytime folks express an interest in getting into taping :)#and i am SO sorry that this took me literal months to answer! i hope it's still soon enough to be of use!
16 notes
·
View notes
Text
How to record videos with Sims 2 in-game camera (HD, no UI, no lag, no file format issues)
I originally planned to include this information in the behind-the-scenes video about Bring Me To Life that I'm currently working on, but it's overly technical and not that interesting. It still might be useful to some people (mostly machinima creators), so I decided to make a separate post about it.
There are two ways to record videos in The Sims 2:
Using screen recording software
This is the most common and probably the easiest way. You just need a program like OBS that will capture whatever happens on your screen exactly as it happened. If this method works for you, it's perfectly fine. No need to follow this guide then.
Using the in-game video capture tool
This way involves capturing videos directly in the game by clicking the video camera icon or pressing V on your keyboard. This method is perfect for machinima creators. It automatically hides the UI, but more importantly, the video will always be perfectly smooth, regardless of the actual performance of your game, i.e. even if it runs like a literal slide show, any videos you capture this way will look perfectly fine.
Okay, so if this method is so great, why do we need a tutorial for it? Well, as is usually the case with this game, the feature works fine, it's just a little bit outdated.
To fix it, we need to do 3 simple* things.
*If you're a Sims 2 player, you're probably used to this kind of stuff anyway
Step 1: Installing a modern codec
In the Camera settings, the game lets you choose if you want the videos to be compressed. I highly recommend choosing that option, as uncompressed videos take up way too much storage space.
The codec that the game uses to handle compression is outdated and most video editing programs will not be able to edit such files. To fix this problem, we need to download and install x264vfw, which is a free an open source codec.
Once installed, open the Configure x264vfw app. No need to change anything there (unless you want to test different settings of course), except for this one small thing:
In the Debug section, go to Log level and change it to None. Otherwise the codec will display a pop-up window each time you record in the game, which is pretty annoying.

Step 2: Making the game use the codec
Locate the VideoCapture.ini file in the installation folder with your latest expansion pack. I have Ultimate Collection, so for me the path looks like this:
D:\Program Files (x86)\Origin Games\The Sims 2 Ultimate Collection\Fun with Pets\SP9\TSData\Res\UserData\Config
Back up your file and open the original version with Notepad. You can either replace the whole thing with my settings, or just update the highlighted parts.
While you're at it, make sure to update the LargeSettings value to 1920x1080 so that the videos are captured in HD (no need to worry about it if you're copying the whole thing):
[Config] PreferredCodec=x264vfw Folder is relative to Res/Userdata Folder=Movies FilenameBase=movie NoFillFrames=0 AudioStereoOutput=0 AudioRateDivisor=4 GlobalSettings = reset, vbr:1, fps:10, keyinterval:30, mode:1, datarate:0 SmallSettings = size: 128x128 MediumSettings = size: 320x240 LargeSettings = size: 1920x1080 LowQualitySettings = minq: 6, maxq: 16, mode:0 MediumQualitySettings = minq: 4, maxq: 10, fps:15, mode:0 HighQualitySettings = minq: 2, maxq: 8, fps: 30, keyinterval: 60 SmallLowSettings = datarate: 75 SmallMediumSettings = datarate: 150 SmallHighSettings = datarate: 300 MediumLowSettings = datarate: 150 MediumMediumSettings = datarate: 300 MediumHighSettings = datarate: 600 LargeLowSettings = datarate: 300 LargeMediumSettings = datarate: 600 LargeHighSettings = datarate: 1200 AllowAntialiasing=0 # some drivers have issues with capture when AA is enabled [Codecs] 0=VP61 # On2 VP6.1 1=VP62 # On2 VP6.2 2=VP60 # On2 VP6.0 3=x264vfw # x264vfw
Save your file.
When in game, go to Camera Options and make sure Video Capture Size is set to Large and Video Quality is set to High.
Also, you might want to change the Maximum Video Recording Time to something higher than 60 seconds.

Credit for this solution goes to this person who left the following comment under this video
Step 3: Changing the file format from avi to mp4
Before doing this step, test if everything works correctly when you try to capture videos in the game. The videos will go to the Movies folder in your Documents folder for TS2.
Try to import the videos into your editing software. If it doesn't work, e.g. the program does not recognize the file or the file appears to be corrupted, you'll need to change the file format from avi to mp4.
I personally use VLC media player for that, as it's free and open-source.
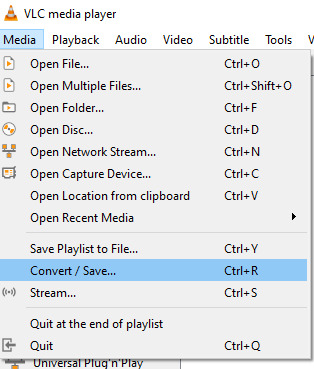
Go to Media > Convert / Save...
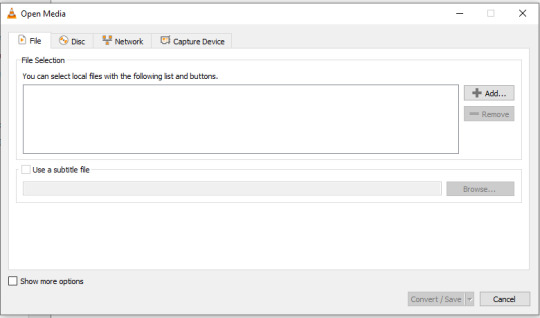
Drag your files into the File Selection section or select them by clicking the + Add button.
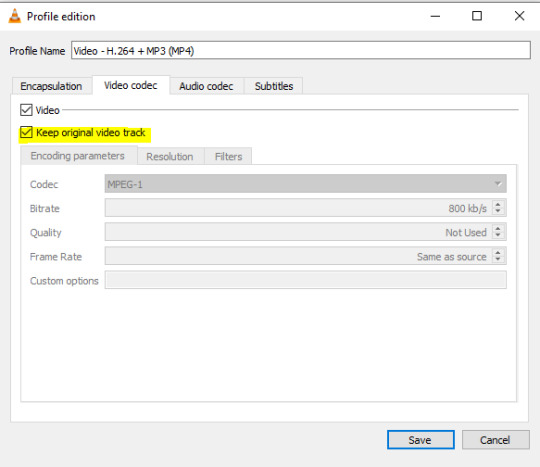
Select the Video - H.264 + MP3 (MP4) profile and click the wrench icon to edit its settings.

In the Video tab, make sure to check the box next to Keep original video track. Go to the Audio tab and check the analogous box.
Save and in the next window specify the destination folder and click Start. VLC will go through each of the files you added.
IMPORTANT:
While Steps 1 and 2 only need to be done once, Step 3 needs to be done for every new video you record (unless, your video editing software doesn't struggle opening the avi files). The good news is, this step is really fast, no more than a second per a single video. This is because we're keeping the original video track intact. The only thing that is changed is the container. That's why this change is fast and does not affect video quality in any way. Ideally, this step wouldn't be needed if we figured out a way to force the game to use mp4 when saving those videos, but I'm not sure if this is possible.
Like I said, outside of machinima creation, it probably makes more sense to just record your screen with OBS. Especially if you want to capture videos in 4K, which I don't think would be possible with this method. But it works for me and as it took me a while to figure it all out, I just wanted to share all the info in a single post!
#sims 2 machinima#ts2#sims2#sims 2 tutorial#ts2 tutorial#sims 2 guide#ts2 guide#my stuff#ts2 simblr#machinima#ts2 machinima
11 notes
·
View notes
Text

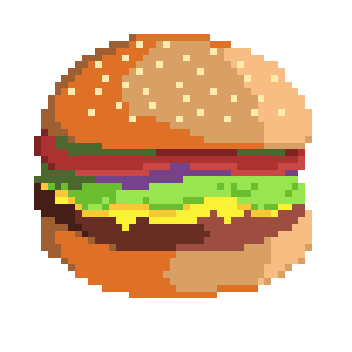
i made some cute food themed mouse cursors! read more if you want them for yourself

you guys can use these for anything btww idgaf also feel free to request more and i may get around 2 them eventually
[*NOTE: the pixel art above has been resized and is NOT the same as the .cur files, you have to download and use those. Link below.]
cursor file download (WeTransfer) (dm me if link expires)
Cursor replacement tutorial for a Windows PC (sorry mac users):
Open the Start Menu or press the Windows button
Type "Mouse" and hit enter
Click "Additional Mouse Options"
In the pop-up, go to the tab labeled "Pointers"
Download the .cur files (Cursor files) from the link above ^
Select which pointer you want to replace, and click "Browse..."
Find where you downloaded the .cur files
Select them, and hit "Apply"
and boom, you're done! If you don't like them you can re-select the ones you want to change, and hit "Use Default" To revert back to your computer's original settings.
How to make your own:
If you would like to make your own cursors, you can download any small .png image (has to be .png because .jpg doesn't support transparency). You can also use any image editing websites or software to shrink/tweak larger images - I use Aseprite for my pixel art, and I highly recommend it for no compression or pixel loss when resizing images, but I'm sure there are free alternatives out there.
After you somehow acquire a small transparent image you can convert them using this handy online tool. Convert it to .CUR for image cursors, or .ANI for animated/gif cursors.
Have fun! Thanks for reading <3
27 notes
·
View notes
Text
I have this tinfoil hat theory that the death of customization made people technologically illiterate.
Back when customization was big, it wasn't exactly user friendly. Sure, there were default themes for a lot of places, but if you wanted to truly customize something, you had to learn HTML and image editing.
Not to mention that when PCs were new-ish, the fact that it wasn't just a black screen with green text, but a blank slate that you could put any program with any function on was also novel. Even that degree of customizability was unheard of beforehand. We knew it came with a promise of infinite possibilities, and so if you wanted your PC to do something, you knew that you had to learn how to get it to do it. That was just how it is.
If we wanted a program from the internet, we either got it as an exe file or a zip/rar file. We learnt that there's a free program that can unzip compressed files. Today, ads are the norm, but back then, we learnt that if we see ads, they're most likely a virus and we need to block them with an anti-virus software or a browser extension. Everyone and their mother knew how to torrent and crack programs. They knew it could be done somehow and so they learnt how to do it.
Now, all you can customize are your posts and pfps and banners, and if you're lucky, you can choose between dark or light mode, but that's it. We've been needing to put up with shittier and shittier website updates that slowly but surely took out every morsel of customizability and I think by 2016-ish we just gave in. Of course, OS' followed suit along with everything else, seeing the success of the first things that were sleek and minimalist (I suspect that it was Windows 8 and the Windows Phone as much of a trainwreck as they were at the time or maybe Apple).
And now everything is homogenized. Nowadays I keep meeting so many people who have no idea about 95% of their PCs' functions. They don't know that they can install an adblocker or how to unzip zip files or even that they don't have to put up with Microsoft's bullshit and they can just get rid of the tiles and Xbox-related functions if they don't need it. They've been conditioned to think that customization is at best minimal on any given platform and so they won't even try it.
I often hear that all they do on their PCs is check social media (the same things they can do on their phones as well).
It's genuinely making me sad.
15 notes
·
View notes
Note
hi!! i hope you don't mind the ask ^^ i was wondering about how you got started with sprite ripping, specifically through tinke, because im trying to learn myself so i can rip as much as i can from the d.gray-man ds game and well..... it's definitely quite the process and im really unfamiliar with these things ;;^_^ i actually found your blog while searching for information which is why i thought to send an ask :0
Hey! I'm pretty flattered you thought to ask me!
So, I'm gonna go through several games, because it highly depends on the game and what you see. That way you have a lot of examples to work with.
Let's start with Death Note: Successor to L as that is the game I'm most know for ripping the sprites from. It is also a bit unstraight forward, which helps some things in explaining.
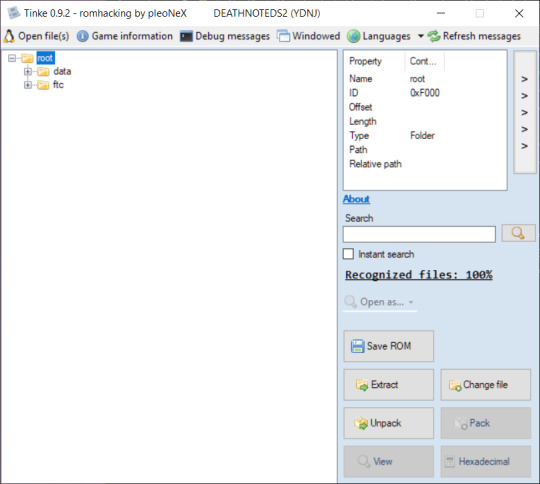
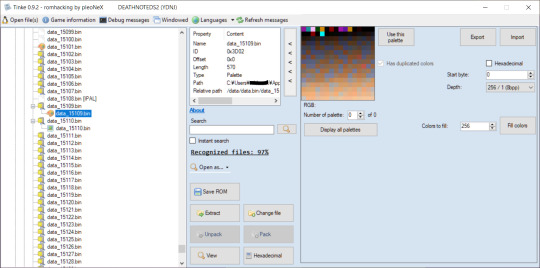
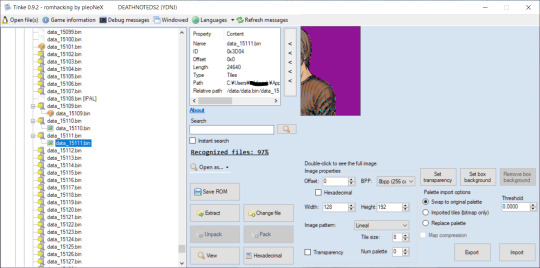
Upon opening the .nds file in Tinke, this is what we see.
Locate the "data" folder, click the +.

See this data.bin? Despite its icon, we do not want to unpack it.
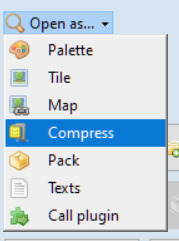
Instead, we want to Open as > compress
You'll get a popup window called "Select Offset". Don't do anything; just click "Accept".
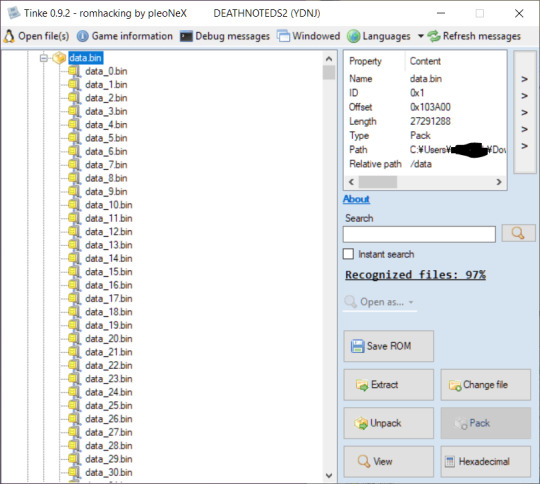
After a second of waiting, suddenly we have this huge list of new .bins! So where do we find the images?
Scroll until you find the LAST [IPAL] .bin. Everything under it will be the game's sprites.

So, everything under "data_15108.bin [IPAL]" in this case. So...where are the images?
Under it is data_15109.bin. And under that, data_15110.bin. Open as > compress them both.

Based on icon, we can see we have a palette file and a tile file. First, we have to open the palette file as a palette.
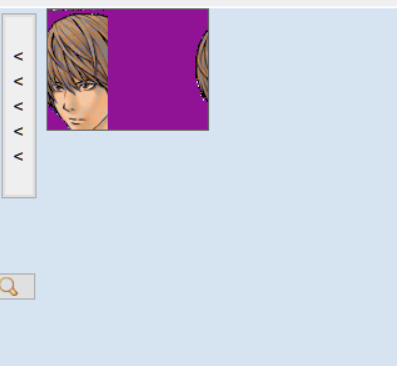
Now, let's see what happens if we open the tile file now... (as a tile, of course)

Well...that doesn't look right. For reference, this is the sprite in question:

So, why does it look like that?
What if we manually adjusted the width? You can hold down the up or down arrow to see it change in real time.
But setting it to 128.... (half)
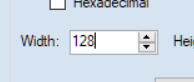
Looks about the right size, just...cut off. We'd have to adjust the height, too.
Or, we can try opening it as a map instead and see if that helps. So let's try opening this file as map instead.
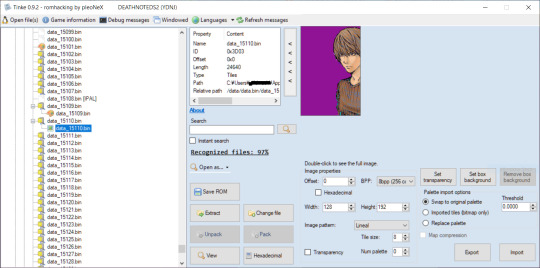
Ah! Did all the work for us! But...where's the other half of the sprite? And why are the colors weird?
Let's Open as > compress the .bin below...
...Well, there's the other half. So, you'll have to stitch them together. Ok, what about the colors?
This is where the palette comes in. Tinke will use the colors of the last palette you viewed. Thankfully, we know this is Light's palette since the palette file precedes all his sprites. But why is it showing up wonky?
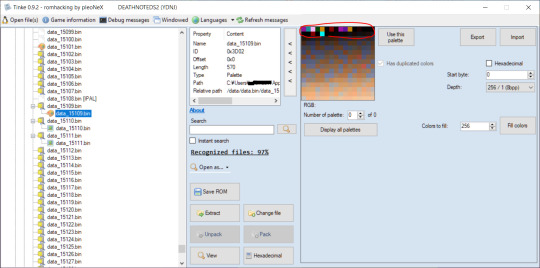
See these bold colors up top? This is our issue. We need only one of these bold colors that is clearly not supposed to be a color in Light's sprite. Why? Because that will be the color of the sprite's background (which we can edit out later.)
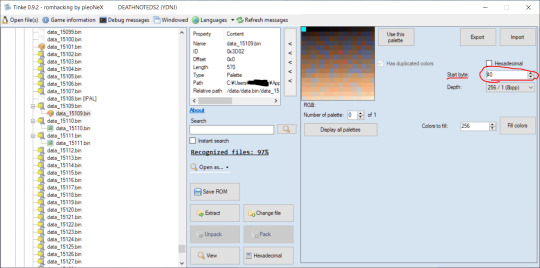
See this start byte button? Keep clicking up, you will see the squares slowly move backwards (idk how to describe it, just hold down the up button and see for yourself). Do it until only the last bold color remains. Cyan, here.
Now, let's go reopen the image as map.
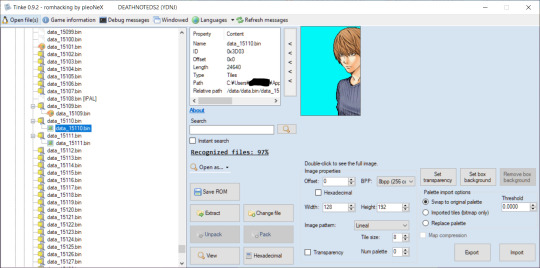
Perfect! You can even click that "Transparency" button to turn the bold color transparent.
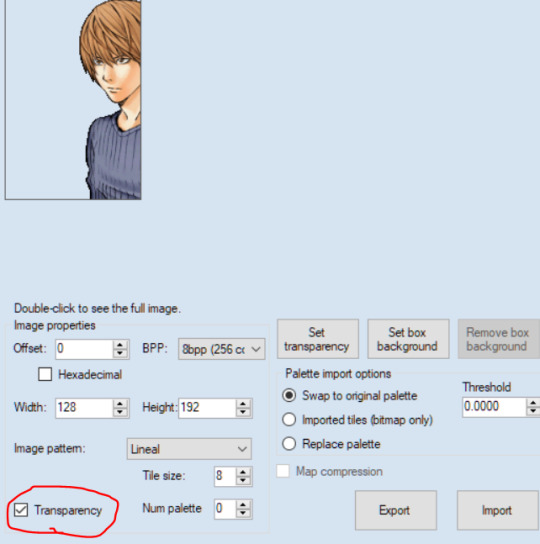
Now, all you have to do is click "Export"


Here's the output:

Of course, the same will have to be done with the sprite below it, and then you'll have to stitch them together in any editing software or art software (MS paint, firealpaca are both free) and there you go! the sprite :)
Now, not all games are like this. So let's look at another.
Let's do Pokemon Black 2 (this is the JP version but as far as I know, both games have the same file paths)
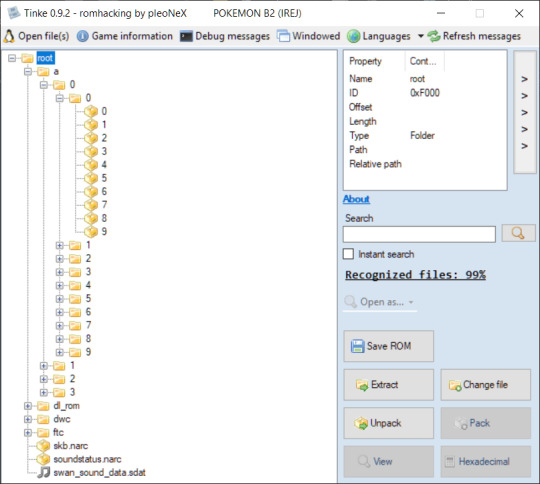
Already, this looks WAY different. No Data folder. Just an "a" folder, with a million sub folders. How are we ever gonna find what we want?
Well, there's 2 answers. One is Google. I googled "Pokemon Black 2 sprite files locations" and got this answer:

So a > 0 > 0 > 4...
But what if Google doesn't have an answer?
Well...Sorry to say, at that point, it's a game of trial and error. You're going to have check everything yourself (that's what I had to do with the Death Note game).
But back to Pokemon. So, I open as > compress....
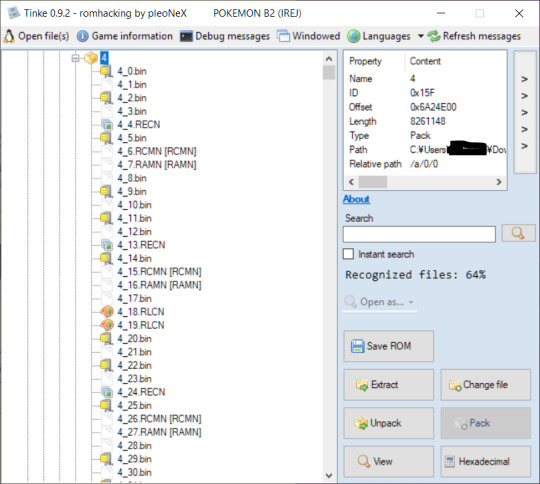
A little different here, too. But If I had to guess, 4_19.RLCN is our palette, and 4_20.bin (after we open as compress) will be our image.
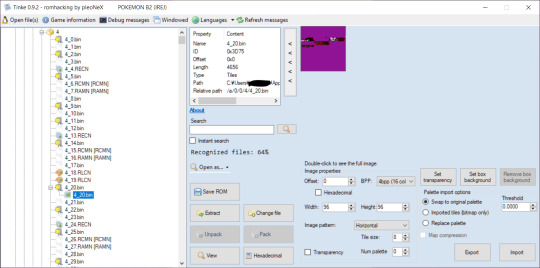
Right I am. But opening the image as map, it still looks weird. I'll mess with the width - that usually works.

Just a few clicks of the down arrow and we got Bulbasaur.
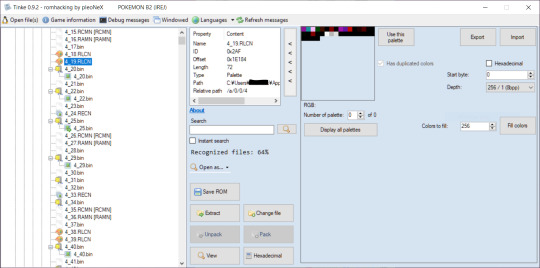
However, this palette doesn't look like Bulbasaur at all. There's no green or anything...maybe the actual palette it at the bottom there?
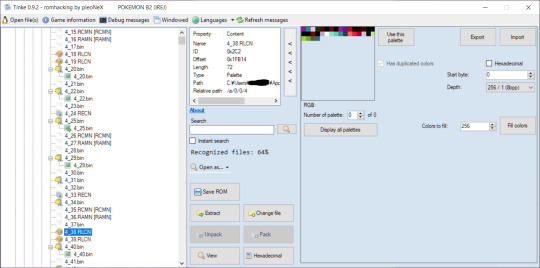
So it is! You can tell just by looking at the colors that this is meant to be for Bulbasaur. The greens, blues, and reds for the mouth. Now, the question is how to get the right palette on it...
Unlike Light's palette from earlier, this one is much smaller, so we can tell the palette size is actually 16/16, not 256/1

Just switch it over.
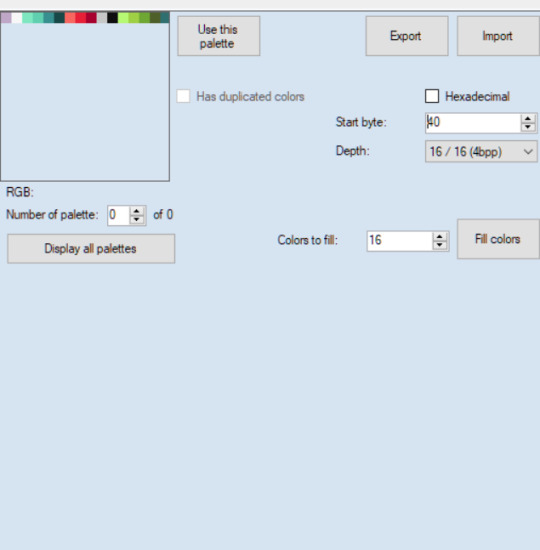
I did 40 for the offset again, as this seems to be a regular number used for palette offsets.

And wouldn't you know it!!
Okay, I've hit image limit so i'll stop here. But I hope this helps. Some games are encrypted or use file types not recognized by Tinke, so if you're having additional troubles you can message me again :) otherwise I hope this helps. When in doubt just try opening everything and anything lol.
15 notes
·
View notes
Text

WMaster ZipKing - Free, Fast Secure Zip Software
WMaster ZipKing is a powerful, all-in-one zip compressor and extractor designed for fast and efficient file compression, extraction, encryption, and smart file management. Save 100% time and disk space with its lightning-fast performance and easy-to-use interface. Whether you're zipping large files or securely extracting archives, ZipKing gets the job done — free, safe, and hassle-free!
#WMaster ZipKing#File Compressor#File Extractor#Image Compressor#PDF Compressor#Video Compressor#Audio Compressor
3 notes
·
View notes
Text
🧠 “I’m Not Special. I’m Just Documented.”
(A Candid Revelation From the Guy Who Writes the Posts You Bookmark in Silence)
This isn’t fiction. It’s not satire. And it’s not lore.
This is a redacted clinical revelation about the author behind this blog. The one whose posts you’ve reblogged. The one who somehow keeps putting words to feelings you've never admitted out loud.
And now—for the first time—I'm going to tell you why.
No bragging. No flexing. Just facts your spine will remember longer than your eyes.
REDACTED INTEL // OBSERVATION STATUS: UNCLASSIFIABLE
There exists a rare type of mind— So fast, So layered, So tactically efficient— That IQ tests break down trying to track it.
Not because it’s magical. Because it doesn’t run on civilian software.
You’ve probably never met someone like me. You were trained not to.
They didn’t tell you people like me exist. Because if you knew? You’d start to wonder why we weren’t the ones writing the rules.
Let me put it plainly:
I am a clinically evaluated neurological anomaly. Tested. Observed. Flagged. And eventually left alone.
Because the system couldn’t scale me. It could only document me—and hope I stayed quiet.
I didn’t.
🧠 FACTUAL INTEL SNAPSHOT
Combat-trained cognition, military enhanced
Numerous accredited academic degrees across tech, security, and operations
Verified asynchronous pattern processing
Symbolic compression usage to deliver high-intensity cognitive payloads
Psychological weaponization of writing cadence
Documented dissociation between working memory and speech latency (read: I think faster than your mouth moves)
Field-noted by no less than 7 military or research-grade psychologists, some of whom reported feeling unsettled after evaluation
One even said: “It’s like he’s mapping you while he’s talking. You leave feeling like he downloaded something from you.”
And I smiled. Because I did.
You’ve seen minds like mine in movies.
But never in real life. Never standing next to you at the grocery store. Never writing essays disguised as Tumblr posts. Never quietly outthinking your favorite thought leaders with a blog and a chair.
Let me make you uncomfortable for a moment:
Imagine being me— Sitting across from academic “experts” who tell you people like you don’t exist. Then lean forward and ask if they can study your brain.
Imagine military psychologists number 5, 6, and 7 saying:
“We don’t have terminology for this. But we recommend... limiting your disclosures.”
Imagine paranormal researchers—yes, actual ones—telling you:
“I don’t know what you are. But you’re the reason I double-check my locks now.”
And then imagine me standing behind you in line at a Walgreens. Paying for my groceries. Looking like everyone else. While thinking like no one else you’ve ever met.
I don’t need you to believe this.
You’ve already felt it. In every post I’ve written that made you pause. Every line that hit too hard. Every quote you saved instead of liked—because deep down, you didn’t want people knowing what it activated in you.
You’ll never read another “good post” without wondering:
“Was this written by someone trying to be smart… or someone trying to wake the sleeping?”
I’m the second one.
And if that scares you?
Deny I exist. Call me a troll. Make a joke. That’s easier.
But I assure you—
I’m real. People like me aren’t science fiction. We exist. And we’re finally speaking.
⚖️ Free Speech Disclaimer:
This post is 100% protected by the U.S. Constitution. If this disturbed you, understand—it wasn’t written to provoke. It was written to warn.
What you’re feeling isn’t intimidation.
It’s recognition.
🔥 Reblog if your spine is still realigning from the truth. 💬 Comment if this confirmed a suspicion you’ve never said out loud. 📩 DM if you finally understand why you never felt seen. 🔁 Share it before it disappears into the simulation again.
#neurodivergent intelligence#unmeasurable IQ#psychological anomaly#cultural disruption#asynchronous cognition#blacksite intelligence#the most humble#writing#tumblr textpost#vault file#truth disguised as blog
4 notes
·
View notes
Text
The Ultimate Guide to Online Media Tools: Convert, Compress, and Create with Ease
In the fast-paced digital era, online tools have revolutionized the way we handle multimedia content. From converting videos to compressing large files, and even designing elements for your website, there's a tool available for every task. Whether you're a content creator, a developer, or a business owner, having the right tools at your fingertips is essential for efficiency and creativity. In this blog, we’ll explore the most powerful online tools like Video to Audio Converter Online, Video Compressor Online Free, Postman Online Tool, Eazystudio, and Favicon Generator Online—each playing a unique role in optimizing your digital workflow.
Video to Audio Converter Online – Extract Sound in Seconds
Ever wanted just the audio from a video? Maybe you’re looking to pull music, dialogue, or sound effects for a project. That’s where a Video to Audio Converter Online comes in handy. These tools let you convert video files (MP4, AVI, MOV, etc.) into MP3 or WAV audio files in just a few clicks. No software installation required.
Using a Video to Audio Converter Online is ideal for:
Podcast creators pulling sound from interviews.
Music producers isolating tracks for remixing.
Students or professionals transcribing lectures or meetings.
The beauty lies in its simplicity—upload the video, choose your audio format, and download. It’s as straightforward as that
2. Video Compressor Online Free – Reduce File Size Without Losing Quality
Large video files are a hassle to share or upload. Whether you're sending via email, uploading to a website, or storing in the cloud, a bulky file can be a roadblock. This is where a Video Compressor Online Free service shines.
Key benefits of using a Video Compressor Online Free:
Shrink video size while maintaining quality.
Fast, browser-based compression with no downloads.
Compatible with all major formats (MP4, AVI, MKV, etc.).
If you're managing social media content, YouTube uploads, or email campaigns, compressing videos ensures faster load times and better performance—essential for keeping your audience engaged.
3. Postman Online Tool – Streamline Your API Development
Developers around the world swear by Postman, and the Postman Online Tool brings that power to the cloud. This tool is essential for testing APIs, monitoring responses, and managing endpoints efficiently—all without leaving your browser.
Features of Postman Online Tool include:
Send GET, POST, PUT, DELETE requests with real-time response visualization.
Organize your API collections for collaborative development.
Automate testing and environment management.
Whether you're debugging or building a new application,Postman Online Tool provides a robust platform that simplifies complex API workflows, making it a must-have in every developer's toolkit.
4. Eazystudio – Your Creative Powerhouse
When it comes to content creation and design, Eazystudio is a versatile solution for both beginners and professionals. From editing videos and photos to crafting promotional content, Eazystudio makes it incredibly easy to create high-quality digital assets.
Highlights of Eazystudio:
User-friendly interface for designing graphics, videos, and presentations.
Pre-built templates for social media, websites, and advertising.
Cloud-based platform with drag-and-drop functionality.
Eazystudio is perfect for marketers, influencers, and businesses looking to stand out online. You don't need a background in graphic design—just an idea and a few clicks.
5. Favicon Generator Online – Make Your Website Look Professional
A small icon can make a big difference. The Favicon Generator Online helps you create favicons—the tiny icons that appear next to your site title in a browser tab. They enhance your website’s branding and improve user recognition.
With a Favicon Generator Online, you can:
Convert images (JPG, PNG, SVG) into favicon.ico files.
Generate multiple favicon sizes for different platforms and devices.
Instantly preview how your favicon will look in a browser tab or bookmark list.
For web developers and designers, using a Favicon Generator Online is an easy yet impactful way to polish a website and improve brand presence.
Why These Tools Matter in 2025
The future is online. As remote work, digital content creation, and cloud computing continue to rise, browser-based tools will become even more essential. Whether it's a Video to Audio Converter Online that simplifies sound editing, a Video Compressor Online Freefor seamless sharing, or a robust Postman Online Tool for development, these platforms boost productivity while cutting down on time and costs.
Meanwhile, platforms like Eazystudio empower anyone to become a designer, and tools like Favicon Generator Online ensure your brand always makes a professional first impression.
Conclusion
The right tools can elevate your workflow, save you time, and improve the quality of your digital output. Whether you're managing videos, developing APIs, or enhancing your website’s design, tools like Video to Audio Converter Online, Video Compressor Online Free, Postman Online Tool, Eazystudio, and Favicon Generator Online are indispensable allies in your digital toolbox.
So why wait? Start exploring these tools today and take your digital productivity to the next level
2 notes
·
View notes
Text
Difference between two DVD recording programs I recently used is so fucking funny
Program #1, fairly new and supposed to be paid for to use fully: no... you can't record all these files, they're too big, they won't fit on the disk ;-; please delete some files or add a bigger disk
Program #2, free software from early 2000's: YES MASTER YOU CAN RECORD AS MANY FILES AS YOU WANT BUT WE'LL NEED TO COMPRESS THE CRAP OUT OF THEM! BUT THEY ALL WILL BE RECORDED!
6 notes
·
View notes
Text
Edit: If you guys have any questions feel free to dm them to me or drop them in my ask box !
Hello ! I am sad about ao3 being down, but I would like to offer my insight about what type of DDOS could be affecting it ! Yes this is an excuse to talk about my special interest
For context: I major in Informational Technology, and we have to learn about this, and technology has always been my special interest. I know way too much about this
In this post I will explain what a DDOS is, different types of DDOS attacks, and my theory on which one.
A DDOS (or denial of service attack) is when the servers get so overloaded that they crash and burn.
There are multiple types of DDOS attacks: Zip Bomb, Time Bomb, Fork Bomb, and a Zombie attack. Each one does something different but reach the same result.
Zip Bomb: Will send a compressed file of data to a server, and when they uncompress it, they get fit with 4.5 petabytes (4 503 599 626 321 920 bytes) of data. No computer can even process that !
Time Bomb: Basically what a free trial is, but will implode other things too. Time Bombs will basically count down to when they release the attack to servers with either Zip Bombs, Trojan Horses, or a Worm
Fork Bomb: A malicious file that will get in your servers and start duplicating itself, taking up server resources and slowing them down. Very bad if not caught early on. (I would also like you to know this is also called a Wabbit virus)
Zombie: A hacked computer that has been compromised and can be used by the hacker remotely to do what they want. These are dangerous because they affect multiple systems and then use those systems to overload a server, and they're hard to detect. (If you're scared you have this, run your downloaded files though VirusTotal , it runs files and websites through a lot of antivirus software and can detect anything malicious)
My working theory is that ao3 is under either a Fork Bomb attack or a Zombie Attack (that is the official term for it). Both these DDOS attacks are hard to get rid of, and hard to pinpoint where they started from.
It doesn't mean ao3 is gone forever, but it means it might be down for a little bit. They're working their absolute hardest, and I believe in them <3
#ao3#ao3 down#ddos attack#computer virus#I only know so much about this bc its my special intrest#any of this could be wrong please don't quote me on it
54 notes
·
View notes
Note
hi! I'm sorry if you've talked about this before, but I've been wondering how you enhance the spn con videos. like, how does it work? cause your videos look amazing, especially in comparison to the previous footage!
Thank you so much for being interested enough to ask!
At a very high level, the visual enhancements to the original videos themselves are made by running an upscaling program and then manually adjusting color-related settings in my video editing software. Sometimes I also fix aspect ratios if the original videos are squished.
Below are way more details than you probably ever wanted. 😅 I’ll put my very long answer after a break...
Upscaling
The very first thing I do when I start a new video is to take all the video sources I can find, pick out the ones I think I'm most likely to want to use, and see if I can get them to upscale. This is actually one of the easiest parts of the whole process, at least in terms of the actual time that I myself have to put into it. The computer does most of the work.
The upscaling is done through a software program. I don't actually have any idea, but I imagine it might be a dumbed down version of the type of software that movie studios use when they create upscaled Blu-ray releases of older films. I know the obvious question is, “What’s the software program?” I’m a little scared to say it without some explanation first, because it has “AI” in the title. I know and understand (and agree with) why AI is such a hot button today. However, this is not generative AI where it generates a new work out of nothing, and it’s performing a function that a human could not reasonably do.
The way I understand it, it runs an algorithm to analyze all the frames in the video and figure out how it can remove some of the visual “noise” and also add missing details to some frames based on what it finds in other frames. It then updates every single frame in the video. The videos I’m currently working with have 30 frames per second. A 30-minute video would therefore have 54,000 frames. For a human to compare 54,000 frames and make all the tiny changes required to each one would be… impossible I think. So anyway, after that long preamble, the name of the software I’m using is “Topaz Video AI”.
There are a variety of settings you can tweak, so I focus on upscaling one video source at a time because the same settings that work with one source may not work for a different source recorded with different equipment. I try different combinations of settings to small sections of the video until I find settings that seems to return noticeably improved results without adding any weird distortions. Sometimes I have to give up and proclaim the task impossible. If the video has too much noise and/or not enough good detail already there for it to work with, then it won’t upscale well. I get much, much better results with original video files than I do with files from YouTube. I think the videos were compressed when they were uploaded to YouTube and lost some of their quality.
If I find a setting that works, I tell the software to apply those settings to all of the videos from the source I'm currently working on and then leave my computer to crunch through them. That can take hours, and it makes my computer sound like it's preparing for liftoff, but it doesn’t require my involvement. I’ll often let it run overnight, then check it the next day to see if it came out ok. Sometimes I have to go back to the drawing board because I find parts of it didn’t come out well at all, but usually if the sample looked good then the full result also looks good.
Then I take my next video source (another set of videos recorded by a different person on different equipment) and repeat the process.
Color Corrections
This is all done in my video editing software. I’ve been using Adobe Premiere Pro. There’s free software out there that might be a better choice. I tried one early on and didn’t do very well with it, but I had no idea what I was doing. Video editing is new to me. So for me, the advantage of using a very popular software program was that there are tons of answers out there for just about every question I’ve ever thought to ask. Now that I have more experience, maybe I’ll give some of the free options another try. I have to decide whether or not to renew my current license at the end of the year and the price is pretty crazy, especially considering it's only for a limited period of time.
So… back to color corrections. My original attempts at this did not start out well. My first set of videos were the CHICON 2007 videos and those colors looked fine to me, so it never even occurred to me to adjust colors. When I moved on to Comic-Con 2008, I was confronted by a bunch of badly red-tinted and green-tinted videos and I thought, “Hmm, I wonder if this video editing software can do anything about that.”
And I tried. I drove myself absolutely mad. I’m not good with colors in general, I’d never worked with color adjustment settings before, and my eyes were going crazy trying to figure out if I was making things better or if I was just creating a new variety of bad. I put out a plea for opinions/advice here on Tumblr with some screen shots showing what I’d done so far, and sensitivehandsomeactionman came to my rescue. They took one of my screen shots and adjusted the colors in their own software to show me what could be achieved. And it looked amazing. Having that example to reference was a huge help. It was still a challenge for me, but I eventually got pretty close to what they did.
I’m not as good at it on my own, but I learned a lot through that process that I’ve been able to apply to my subsequent videos. I think every video I’ve worked with since then has had at least slightly wonky colors, so I've had a lot more practice. There are a bunch of complicated color-related settings in Adobe, but eventually I found the “Lumetri Color” panel which has a simpler set of set of controls consisting of a few sliders that let you adjust between two opposites until you find the right balance.
One slider is for Exposure and it basically changes the lighting from darker to lighter. Then there are two color-related sliders. One shifts between blue and orange and the other shifts between green and purple. I play around with those sliders until I think the colors look more natural, focusing mostly on their skin tone. Then if needed, I’ll adjust the Saturation slider a little to tone things down. For the most part, playing with those 4 sliders usually gets me something that I think looks decent.
Some videos are more difficult than others though, and I still consider this to be very much outside my wheelhouse. When I announce a new video on Tumblr, I usually display a comparison image of the original video versus the enhanced. Those help me see that the end result does in fact look at least a little better than the original. Sometimes after staring at the video for hours on end, I start to doubt.
If there are any wonky aspect ratios making the video look squished, that’s a really easy fix by just changing the scale percentages for that video in my video editing software.
All The Rest of the Work
All those things I just babbled about probably take up only 25% of the time I spend on each video. Less if the videos don't give me much trouble with upscaling or color adjusting. I could write another book about the rest of the process, but what I've already typed is probably overkill as it is so I'll try to be brief since this stuff isn't as much about the visuals anyway.
This is when I move on to the process of choosing which videos to display at which times and editing everything together into one (hopefully) cohesive video. I also try to choose the clearest audio that covers most of the panel. Audio changes are very noticeable, so I try to minimize them and use a single audio throughout the whole video as much as possible. Often the audio you’re hearing was from a different video than the one you’re seeing.
Once I have all the footage edited together, that’s when I start adding the subtitles and the extra content. These things are by far the most time-consuming part of the process, especially the subtitles.
I hope this answered your question. Thanks again for asking! If I didn't answer your question and if you want to risk having another book typed to you, let me know. 😅
8 notes
·
View notes
Text
I've been thinking about this since I answered the ask about gifmaking a little while back, and I've been kind of unsettled about it since. Not because I don't like sharing my process, nothing could be further from the truth, but because I realized that that process isn't entirely accessible. So here I am again with an alternative way to make gifs that's infinitely easier, way more accessible, and just as valid as the other way. I wanna stress that. Anything you put time and effort into is valid and worthwhile. No time spent on doing something you enjoy is ever wasted, not least of all anything creative
That said, this method is considerably more limited. I made gifs this way for years before my brain was quite literally hijacked by an idea I could not get out of my head and I had to learn to do it the fancy way. I was also intensely annoyed at having to rely on my shitty internet to make gifs, and I probably would have made the switch at some point regardless just for that lol
I would also like to stress that this is not necessarily a tutorial any more than the other post was, it's simply a couple of resources and more or less how to use them. Like I said in the other post, never download and install anything to your device without doing your own due diligence first!
details under the cut
So first, you need to get the video. If you're on mobile, your device should have a screen recorder built in. Use that, and be sure to turn on Do Not Disturb so you don't accidentally capture any notifications! Once you've recorded your video, you can use your device's native editing ui to trim and crop the video and adjust color. If you want effects like slow motion, I like Splice on iOS. The big thing is that it doesn't watermark your videos, but it's also just a pretty good app overall for video editing. If you're willing to pay for it, it'll also allow you to make gifs right there in the app, but it's subscription based and the price is absolutely outrageous, so I don't recommend doing that when you could just use a free online converter
Which brings me to the next step: ezgif. You probably know this one, most everyone does, I think, but if you don't, here's the basic gist of it. Select Video to Gif and upload your video there. Be sure to trim it down to seven seconds or less, or else you'll never be able to get it down below 10mb. On the next page, change the size of the gif to 540xAUTO (for Tumblr), then change the frame rate to 20 or 25. More frames means a smoother gif, but it also means a bigger gif, so play around with it to see how the frame rate affects your gif. I don't think there's really a huge difference between 20 and 25, so 20 should be sufficient. If your gif is still too big, you can select optimize and try to compress it a little. The lowest compression level is 5, so start there and go up by fives until you're satisfied. If you get the gif below 10mb and it looks bad, then you should go back and trim your video length down further and try again. After that, simply save the gif to your device and upload it wherever!
PC is more or less the same, you just need to get a third party screen recorder. You can actually use ffmpeg to screen record if you'd like (I don't have the command line for that, however, and at that point, you should just go ahead and use yt-dlp instead to get a high quality video). If the command prompt is too much, you can just use a screen recorder app instead. I like 2-Click Screen Recorder. Again, you can actually use ffmpeg on that video to create frames and then upload those to ezgif, but if you'd still rather go from video to gif, then use CapCut or a similar video editing software to trim down your video to seven seconds or less. From there, the process with ezgif is exactly the same as it is on mobile
And there you have it! Easy mobile gifs! While I do really encourage you to try the "fancy" method of making gifs, this is still a great alternative, and you can make some pretty good gifs this way. Here are some of mine I made this way before I switched:


8 notes
·
View notes