#git vs svn
Explore tagged Tumblr posts
Visit Tumblr Blog
Explore Tumblr blogs with no restrictions, modern design and the best experience.
Last Seen Tumblr Blogs


Fun Fact
Forty percent of Tumblr users are between the ages of 18 to 25.
Text

Use Git if: ✅ You need speed and distributed development ✅ You want better branching and merging ✅ You work offline frequently
#git tutorial#git commands#git basics#git workflow#git repository#git commit#git push#git pull#git merge#git branch#git rebase#git clone#git fetch#git vs svn#git version control#git best practices#git for beginners#git advanced commands#git vs github#git stash#git log#git diff#git reset#git revert#gitignore#git troubleshooting#git workflow strategies#git for developers#cloudcusp.com#cloudcusp
1 note
·
View note
Text
Desktop Application Development in Nagpur

Introduction: The Evolution of Desktop Applications in the Digital Age
Despite the rise of mobile and web apps, desktop applications remain crucial for industries requiring high performance, data security, offline capabilities, and advanced hardware integration. In Nagpur, the desktop application development landscape is flourishing, powered by a skilled IT workforce and cost-effective infrastructure. This comprehensive, SEO-optimized blog explores the scope, advantages, services, top developers, technology stacks, industries served, and the future of desktop software development in Nagpur.
What is Desktop Application Development?
Desktop application development involves creating software that runs on operating systems such as Windows, macOS, or Linux. These applications are installed directly on a computer and can work offline or online.
Key Characteristics:
High performance and speed
Offline functionality
Hardware integration (printers, scanners, sensors)
Secure local data storage
Platform-specific user interface (UI/UX)
Benefits of Desktop Applications for Nagpur-Based Businesses
Enhanced Performance: Ideal for computation-heavy or graphics-intensive tasks
Offline Access: Useful in logistics, warehouses, and manufacturing units
Data Security: Localized storage enhances data privacy
Tailored Functionality: Full control over features, behavior, and deployment
Reduced Internet Dependency: No reliance on constant connectivity
Industries Leveraging Desktop Apps in Nagpur
Manufacturing & Automation: Equipment control, ERP integration
Healthcare: EMR systems, diagnostic device control
Education: E-learning tools, testing software
Retail & POS: Billing systems, inventory control
Logistics: Shipment tracking, fleet monitoring
Finance: Accounting systems, portfolio management
Top Desktop Application Development Companies in Nagpur
1. Lambda Technologies
Focus: Custom desktop apps with hardware interface and BI dashboards
Tools: WPF, Electron, Qt, .NET, C#
Clients: Local manufacturing firms, medical device providers
2. TechnoBase IT Solutions Pvt. Ltd.
Expertise: Inventory management, ERP desktop apps
Platforms: Windows, cross-platform (Electron.js)
3. Biztraffics
Specialty: Retail billing systems, accounting apps
Features: GST compliance, barcode printing, local database support
4. LogicNext Software Solutions
Services: Desktop CRM and finance tools
Technologies: Java, JavaFX, Python PyQt
Clients: Finance consultants, small businesses
5. Neolite Infotech
Offerings: EdTech and LMS software for desktops
Tech Stack: C++, Electron.js, SQLite
Features Commonly Integrated in Desktop Apps
User Authentication
Database Management (MySQL, SQLite, PostgreSQL)
Barcode/QR Code Scanning Support
Multi-language Interface
Data Encryption & Backup
Print & Export (PDF/Excel)
Notifications and Alerts
System Tray Applications
Desktop App Development Technologies Used in Nagpur
Languages: C#, C++, Java, Python, Rust
Frameworks: .NET, Electron.js, Qt, JavaFX, Tkinter
Databases: SQLite, PostgreSQL, MySQL
UI Design Tools: WPF, WinForms, GTK
Cross-Platform Tools: Electron.js, NW.js, JavaFX
Version Control: Git, SVN
Windows vs Cross-Platform Development in Nagpur
Windows-Specific Apps:
Preferred by industries with Microsoft-based infrastructure
Developed using WPF, WinForms, .NET
Cross-Platform Apps:
Developed using Electron.js, JavaFX
Cost-effective, consistent UI/UX across macOS, Linux, Windows
SEO Strategy for Desktop Application Development Companies in Nagpur
Primary Keywords: Desktop application development Nagpur, desktop software developers Nagpur, custom desktop apps Nagpur, POS software Nagpur
Secondary Keywords: Windows app development Nagpur, inventory software Nagpur, ERP desktop app Nagpur
On-Page SEO:
Meta tags, image alt text, header tags
Keyword-rich titles and internal linking
Content Marketing:
Use cases, blogs, whitepapers, client stories
Local SEO:
Google Maps, business listings on IndiaMART, Sulekha, JustDial
Custom vs Off-the-Shelf Desktop Apps
Custom Desktop Apps
Designed to meet exact business requirements
Local development support
Better performance and security
Off-the-Shelf Software
Quick setup, lower initial cost
Limited customization and features
Dependency on third-party vendors
Testimonials from Clients in Nagpur
"TechnoBase built our billing desktop app, and it works flawlessly offline."
"Lambda created a custom desktop ERP that revolutionized our manufacturing unit."
"Biztraffics’ GST billing software helped streamline our retail operations."
Case Study: Desktop ERP for a Nagpur-Based Furniture Manufacturer
Challenge: Manual inventory, production tracking
Solution: Desktop ERP integrated with barcode printers, accounting tools
Results: 50% inventory accuracy improvement, 3x faster order processing
Future Trends in Desktop App Development in Nagpur
AI-Integrated Desktop Software: Smart assistants, auto-suggestions
Cloud Sync + Offline Mode: Hybrid functionality
Desktop SaaS Models: Licensing and subscription management
Hardware-Integrated Apps: IoT, USB device access, POS peripherals
Minimal UI Frameworks: Lightweight interfaces with rich UX
Why Choose Desktop Software Developers in Nagpur?
Affordable Development: Lower costs compared to metros
Highly Skilled Talent: Engineers from VNIT, IIIT, and RTMNU
Faster Turnaround Time: Agile and iterative models
Local Presence: Physical meetings, training, support
Domain Expertise: Manufacturing, education, healthcare, retail
Conclusion: The Strategic Role of Desktop Applications in Nagpur's Tech Future
Nagpur has become a hotspot for desktop application development, thanks to its cost-efficiency, technical talent, and industry alignment. Whether your business needs a custom POS, ERP, or inventory management tool, Nagpur’s desktop developers offer scalable, robust, and secure software tailored to local and global.
0 notes
Text
Unlocking Creativity and Efficiency with Development Tools Software
Development tools software is the backbone of modern software creation, empowering developers to design, build, test, and deploy applications with precision and speed. From writing code to debugging errors and managing projects, these tools streamline every stage of the development process, making them essential for programmers, businesses, and tech innovators. But what exactly is development tools software, how does it work, and why is it so vital in today’s tech-driven world? In this guide, we’ll explore its fundamentals, types, benefits, and tips for choosing the right tools, followed by an FAQ to address common questions.

What Is Development Tools Software?
Development tools software refers to a suite of applications, frameworks, and utilities designed to assist developers in creating software, websites, or apps. These tools cover a wide range of tasks: writing and editing code (e.g., Visual Studio Code), debugging (e.g., Chrome DevTools), version control (e.g., Git), and automating builds (e.g., Jenkins). They can be standalone programs or integrated into larger platforms called Integrated Development Environments (IDEs), which combine multiple tools into a single interface.
At its essence, development tools software enhances productivity by automating repetitive tasks, catching errors early, and providing a structured environment for coding. Whether you’re building a mobile game, a web app, or an enterprise system, these tools are the craftsman’s kit for turning ideas into functional software.
How Does Development Tools Software Work?
Development tools software operates by providing specialized functionalities tailored to the software development lifecycle:
Coding: Editors like Sublime Text or IDEs like IntelliJ IDEA offer syntax highlighting, auto-completion, and code suggestions.
Debugging: Tools like GDB or built-in IDE debuggers identify and fix bugs by stepping through code execution.
Testing: Frameworks like JUnit or Selenium automate testing to ensure code reliability.
Collaboration: Version control systems like Git (via GitHub or GitLab) track changes and enable team workflows.
Deployment: Build tools like Maven or CI/CD platforms like CircleCI compile and release software to production.
For example, a developer might use Visual Studio Code to write Python, debug it with PyCharm’s tools, test it with pytest, and push it to GitHub—all powered by different development tools software working in harmony.
Types of Development Tools Software
The category is broad, with tools specializing in various development stages:
Code Editors: Lightweight tools like VS Code or Atom for writing and editing code.
Integrated Development Environments (IDEs): All-in-one platforms like Eclipse or Xcode, combining editing, debugging, and more.
Version Control Systems: Git, Subversion (SVN), or Mercurial for tracking code changes.
Build Tools: Maven, Gradle, or npm for automating compilation and dependency management.
Testing Tools: Jest, Mocha, or Postman for validating functionality and APIs.
CI/CD Tools: Jenkins, Travis CI, or GitHub Actions for continuous integration and deployment.
Each type addresses a specific need, often used together for a seamless workflow.
Applications of Development Tools Software
Development tools software powers a vast array of projects:
Web Development: Tools like VS Code and Webpack build responsive sites.
Mobile Apps: Android Studio or Flutter create apps for iOS and Android.
Game Development: Unity and Unreal Engine craft immersive games.
Enterprise Software: IntelliJ IDEA and Jenkins support complex business systems.
Open-Source Projects: Git and GitHub enable global collaboration.
AI/ML: Jupyter Notebook and TensorFlow aid machine learning development.
These tools are the foundation for innovation across industries, from startups to tech giants.
Benefits of Development Tools Software
Productivity: Automates repetitive tasks, letting developers focus on logic and creativity.
Accuracy: Debugging and testing tools catch errors before they reach users.
Collaboration: Version control fosters teamwork on shared codebases.
Scalability: Build and CI/CD tools handle projects from small scripts to massive systems.
Learning Curve: Modern tools often include tutorials and community support, easing onboarding.
Popular Development Tools Software Options
Visual Studio Code: A free, extensible code editor with broad language support.
IntelliJ IDEA: A powerful IDE for Java and beyond, with smart code assistance.
Git: The leading version control system, paired with platforms like GitHub.
Jenkins: An open-source CI/CD tool for automating builds and deployments.
Postman: A go-to for API testing and development.
Unity: A game development engine with robust tools for 2D and 3D projects.
These range from free, community-driven options to premium, enterprise-grade solutions.
How to Choose the Right Development Tools Software
Selecting the best tools depends on your needs:
Project Type: Web devs might pick VS Code; game devs might choose Unity.
Language: Ensure compatibility—e.g., PyCharm for Python, Xcode for Swift.
Skill Level: Beginners favor simple editors; pros might use full IDEs.
Budget: Free tools like Git suit tight budgets; paid IDEs like IntelliJ offer advanced features.
Community: Tools with active forums (e.g., VS Code) provide better support.
Experimenting with free versions or open-source options can guide your decision.
The Future of Development Tools Software
The landscape is evolving with trends like:
AI Assistance: Tools like GitHub Copilot suggest code in real time.
Cloud Integration: IDEs like Gitpod run entirely in the browser.
Low-Code Platforms: Simplifying development for non-coders.
Collaboration: Real-time coding tools like Replit enhance teamwork.
As software grows more complex, development tools will become smarter and more accessible.
Conclusion
Development tools software is the engine driving software creation, offering developers the power to build efficiently, collaboratively, and innovatively. Whether you’re a hobbyist coding a side project or a team launching a global app, these tools are your allies in turning vision into reality. By understanding their types and benefits, you can pick the perfect toolkit to elevate your development journey.
FAQ: Development Tools Software
What is development tools software? A: It’s software that helps developers write, test, debug, and deploy code, including editors, IDEs, and version control systems.
How does it differ from regular software? A: Regular software is for end-users; development tools software is for creating that software.
What are the main types of development tools software? A: Code editors (VS Code), IDEs (IntelliJ), version control (Git), build tools (Maven), testing tools (Jest), and CI/CD (Jenkins).
Who uses development tools software? A: Programmers, web developers, app creators, game designers, and tech teams rely on it.
Do I need coding skills to use development tools software? A: Basic tools like VS Code need minimal coding knowledge, but advanced ones like Jenkins require expertise.
Is development tools software free? A: Many are—like Git and VS Code—though premium tools (e.g., IntelliJ Ultimate, $499/year) offer extra features.
Can I use development tools software offline? A: Yes, editors and IDEs often work offline, but cloud-based or collaboration tools need internet.
What’s the best development tools software for beginners? A: VS Code is lightweight and beginner-friendly, with plenty of tutorials and extensions.
How do development tools improve productivity? A: They automate tasks, catch errors early, and streamline workflows, saving time and effort.
What’s the future of development tools software? A: Expect more AI-driven coding aids, cloud-based IDEs, and tools for non-coders as the field evolves.
0 notes
Video
youtube
Welcome to the video series on git, a source control a.k.a Version control system or VCS
Git is one of the widely used and powerful distributed version control system. It was originally created in 2005 by Linux Community and Linus Torvalds (The Creator of Linux). Git has grown a lot after that and github (https://www.github.com) is a preferred repository for storing, managing and distributing open source code.This is an introductory git tutorial for beginners video of this series where I'm talking about git basics but very important aspects of this distributed VCS. These concepts are a MUST before one can properly understand git and that's the precise reason why I've dedicated a complete video on gitHere are the things which are covered in this video- What is version control ? What exactly is meant by it and why we should use the same?- Type of VCS (aka Version Control Systems)- An introduction to Centralized VCS liks SVN- An introduction of Decentralized VCS like git- How git store the data as compared to other VCS (Snapshot Vs. Delta)- GIt States - Modified, Staged and Committed- How to install git in your system and check the sameGit works in all operating system i.e. Windows, Linux and MacOS . At the end of this video there will be a small git bash tutorial, where I'll tell you about git bash. In the windows operating system the git installation install git bash automatically
2 notes
·
View notes
Text
git commands cheat sheet hack 6S6W+
💾 ►►► DOWNLOAD FILE 🔥🔥🔥🔥🔥 Git cheat sheet that serves as a quick reference for basic Git commands to help you learn Git. Git branches, remote repositories, undoing changes, and more. Git has many different commands you can use. And I've found that these fifty are the ones I use the most often (and are therefore the most. Visit this Git commands cheat sheet to learn common Git commands like clone, push, pull, branch, etc. git clone is a command which is used to clone or copy a target repository. The following image shows an illustration of the git clone command. Using the command. 9 Use this handy git cheat sheet guide to enhance your workflow. This Git cheat sheet saves you time when you just can't remember what a command is or don't want to use git help in the command line. It is hard to memorize all the important Git commands by heart, so print this out or save it to your desktop to resort to when you get stuck. Learn about code review in Bitbucket Cloud Create a repository Clone and make a change on a new branch If you're using command line If you're using Sourcetree Create a pull request to merge your change. Learn branching in Bitbucket Cloud Get set up Review branching workflow. Learn undoing changes with Bitbucket Cloud git status git log git reset git revert. Beginner What is version control Benefits of version control. Source Code Management. Why Git for your Organization Git for developers Git for marketing Git for product management Git for designers Git for customer support Git for human resources Git for anyone managing a budget. Git SSH. Git archive. Git Cheatsheet. Getting Started Setting up a repository git init git clone git config git alias. Saving changes git add git commit git diff git stash. Inspecting a repository git status git tag git blame. Undoing changes git checkout git clean git revert git reset git rm. Rewriting history git commit --amend git rebase git rebase -i git reflog. Collaborating Syncing git remote git fetch git push git pull. Using branches git branch git checkout git merge Merge conflicts Merge strategies. Migrate to Git from SVN. Perforce to Git - why to make the move. Migrating from Perforce to Git. How to move a Git repository with history. Advanced Tips Advanced Git Tutorials. Merging vs. Resetting, Checking Out, and Reverting. Git submodules. Git subtree. Large repositories in Git. Git LFS. Git gc. Git prune. Git Bash. How to store dotfiles. Git Cherry Pick. Git cheat sheet. Download now Download now. Ready to learn Git? Try this interactive tutorial. Powered By. Want future articles? Site hosted by.
0 notes
Text
Looking into Version Control and Version Control Services
This quarter, we were formally introduced to version controlling in our Computer Science seminar. We learned to navigate through git because git emerged as the most successful and convenient version controlling software. This made me wonder: how does other version control software, especially the more popular ones, compare to git?
According to this medium post, other popular version control software are Mercurial, CVS, and SVN.
To start off, some characteristics of Git include distributed repository model, good support for non-linear development, and project size independent. Some pros of Git include fast, efficient, convenient, easily maintainable; cross-platform; code change is easily detectable. However, Git fails to support keyword expansion, does not preserve timestamp, and history log becomes increasingly complex.
CVS, a.k.a. Concurrent Version System, is a centralized repository model released in 1990. It keeps historical snapshot of the project and uses compression technique for storage. The greatest pro of CVS is that it is very compatible with collaboration work. However, CVS fails to support signed merge tracking and does not perform integrity tracking.
SVN, or Subversion, was released in 2000 as an improvement to CVS. SVN is also centralized, supports versioned directory, supports cheap and efficient branching, authorization, and file locking. However, SVN is slower and managing repositories is complicated.
Mercurial was released in 2005 as a decentralized repository model similar to git. Mercurial is lightweight, high performance, scalable, and supports collaborative development. However, Mercurial’s downside is that partial checkouts are not allowed and it does not fare well with additional extensions.
Ideally, developers should decide which version control software to use based on the project’s needs. However, appears that the decentralized nature of git and Mercurial provides much more lightweight-ness and easy usage compared to centralized CVS and SVN. Local branching in git is an especially cheap operation that allows for intuitive, efficient, fast, and collaborative version controlling. The largest cons of Git and Mercurial, how merging can be complicated and how it becomes complex to manage large projects, also applies to CVS and SVN as well.
Git emerges superior (for most aspects). To enhance user experience, git is naturally used along with version control managing tools, like GitHub. GitHub provides functionalities and helps manage software better beyond the standard git. In additional to GitHub, enterprises also developed their own software for managing specific version controlling. Microsoft, even though they own GitHub from 2018, developed Azure DevOps which is geared towards closed enterprise software. Beyond standard version controlling, Azure DevOps offers more industry-common continuous delivery/integration (CI/CD) features including Kubernetes integration, Jenkins server support, integration to IDE, cloud build, cloud load testing, performance tracking, and machine-learning based detecting and diagnosing. The Azure DevOps’s lifecycle management tools make it a great choice for a well-developed proprietary software, which contrasts with GitHub’s emphasis on open source development. AWS CodeCommit is Amazon’s version/source control service that offers security, scalability, and ease in addition to basic functionalities of Git. Like Azure DevOps, AWS CodeCommit is geared towards company-owned-software. Regardless, Azure DevOps and AWS CodeCommit’s integration with git demonstrates how git emerged as the most powerful and prevalent version control software.
Sources: https://medium.com/@derya.cortuk/version-control-software-comparison-git-mercurial-cvs-svn-21b2a71226e4
https://aws.amazon.com/codecommit/
https://www.g2.com/categories/version-control-systems
https://www.upguard.com/blog/microsoft-visual-studio-team-services-vs-github
0 notes
Photo

"Hacking Away by Wolnir"
This incredibly detailed commission by Wolnir ( https://www.furaffinity.net/user/wolnir/ ) shows me "at work", while I was working in a large scientific computing center.
In addition to the important message on the T-Shirt, each sticker on the notebook belongs to one of my favourite tools or is a joke/statement.
0) T-Shirt label: "Legalize Awoo" *AWOOOOOOooooo* 1) Dragon sticker: Clang/LLVM (clang wasn't even released when I was working there, but since it's my favorite compiler now, I wanted to include it here) 2) "g" sticker: Gentoo Linux Distribution 3) Blowfish sticker: OpenSSH 4) "Fight for Net Neutrality" sticker: Keeping the net free from outside influence, large scale deep packet inspection, selective throttling and surveillance is very important to me 5) Shark sticker: The wireshark network diagnosis is a useful tool for debugging - but like every tool it can be misused by ethically challenged people 6) git sticker: git was brand new when I worked there, so I still had to use svn and cvs back then - fortunately that's no longer the case :D 7) python sticker: The BEST scripting language there is - and together with 10) it is a perfect team to tackle almost any kind of problem 8) "strange" collection of symbols: This is a reference to my favourite linux shell bash ... and I'll let you figure out what that command does :D 9) "home": There is no place like 127.0.0.1 - a nice little reference to the saying "There is no place like home"... 10) C++ sticker: just a nice reference to my favourite, compiled programming language C++(17) - and works wonderfully together with 7) 11) mc sticker: This is the logo of the awesome program "midnight commander" - a command line file manager with many, many useful features, that I use all the time
PS: I explicitly did not want to put a sticker about controversial topics like the big editor wars or the great space-vs-tabs debate on it ... although I have strong opinions in both cases :D
75 notes
·
View notes
Text
Trend has converted to GIT over SVN: Pros and Cons of each version control system and trend comparison in development community
09/15/20
To begin with understanding about the two version control systems, GIT and SVN, one must comprehend and understand the term Version Management or similarly Version Control System.
When people come to develop/progress with project development and management, tasks tend to be distributive among the developers in a collaborative manner. Different source codes and/or documentation implemented by individual developers should be integrated into one storage; the storage is often called Version Control System (VCS), Configuration Management, or Version Management. Since the meanings used in practice are almost the similar, they are often interpreted without distinction.
Usually, Version Control System (VCS) is often categorized into centralized and distributed management systems. Today, we are going to explore two popular version control systems from each category: Git and Subversion (SVN). More specifically, Git is distributed version control system, and SVN is a centralized version control system.
I would like to begin with main differences between the two version control systems: Git vs.SVN, followed by some visualized trend data of both.

Advantages of Git version control system
The most popular version control system among developers – Git is the most widely-used version control system in the software development community now. To precisely delineate on the popularity/trend, https://codingsans.com/ has reported that over 90% of professional developers worldwide have been using Git for version control. As Git is not only the preferred version control system in the industry, but also it may potentially decrease the time it takes for new developers to learn the system in a company that uses Git.

Distributed Version Control – Git uses a distributed method for version control, which is a significant contrast compared to SVN’s centralized method. By using Git, each user clones a full version/commit history of the repository to their local machine (PC). It is advantages compared to SVN, in that it removes the single point of failure of the centralized repository, reduces network traffic in terms of day to day performances, and allows users on a team to work offline and individually without interference.
Git is useful in terms of capacity and speed – Git offers several useful technical abilities to developers such as branching and merging: easy to fork, branch, and merge. Moreover, creating a branch / branching does not take much time and is relatively lightweight in size, thereby allowing users to work efficiently, faster and merge easier.
Now, I want to switch the focus into SVN for you to be able to draw reasonable comparison between SVN and Git, with brief introduction to advantages of SVN.
As Subversion (SVN) is one of the most well-known centralized version control system, a user’s data is stored on a central server, allowing the user to check out a single version of the repository.
The following points out some advantages of SVN:
SVN has one central repository – makes it easier for managers to have more of a top down approach to control, security, permissions, mirrors, and dumps.
Usability and ease of use – SVN is easier to use than Git. SVN is easier to create a new feature. With Git, it takes an extra step to create a new feature.
Better handling of binary files – This feature is superior in SVN, as SVN supports with Lock-Modify-Unlock model, allowing users to handle large binary files in addition to code. On the other hand, Git offers no exclusive file locking at all due to its distributed nature. For instance, with enterprise projects that have multiple non-mergeable binary assets in the codebase, SVN handling model of binary files is advantageous and often is the reason that developers choose to stick with SVN.
As of now, you have figured out some of the major differences between Git and SVN. Yet, there still exist many differences between Git and SVN, Ilana Brudo on his blog post, “SVN vs. Git: Which is right for you in 2020?”, underlines more distinct differences between Git and SVN.
Visualized Data for comparison between Git vs. SVN:

Moreover, I have delved into more research about trend of VCS usage among developers on other communities, the data shows that Git started to become highly noticeable during the year of 2011. Git became the most-used source code management system by Eclipse Community respondents in 2014 (As the use of Git exceeded that of SVN around the year of 2014). As data drawn from Google trends reflect the interest dynamics for a version control system, Git overtook Subversion around September of 2011.

Data Source: Google Trends, 2004-present (www.google.com/trends)
For your help with some references:
This article suggests about benefits of using version control systems.
This blog post shows a step by step method of how to migrate to Git from SVN (if needed).
In retrospect, there still are many more ways that GIT and SVN differ. If one spends time on looking for examples of how one or the other is best suited to one’s enterprise or workflow, one may have an easier time to select the right VCS for one’s needs. Even though version control system trend has now converted to Git over SVN, the matter of choice should be developed by one’s reasonable opinion for which version control system would suit one’s development environment and circumstance.
0 notes
Link
After doing some comparisons between the various hosting options suggested in the comments on my previous post and on the side bar – and now just seeing the side bar on the hosting questionnaire (sorry for not using it last time, mods)…I still need a bit more guidance on deciding.
What we plan to have for website:
5 sections – About Us, Contact, Blog, Features, Pricing
Landing page may have a 1-2 mins video
Blog will be a mix of blog posts and embedded social media feed
Features: Comparison table
Contact: Contact form
Social media icons
MAYBE a chatbot down the line but that will depend on how much inquiry we’ll get
This is as far as we can foresee within the next 1-2 years.
Answers to the questionnaire:
Monthly budget: Don’t have one. Don’t know what the budget should be since first time launching a website. But cheap or reasonably price is always good!
User location: Mainly US, second probably UK, and then rest of the EU/world
Kind of site we are hosting/ use case: This is a basic site for an app we plan to launch. We are doing the site via Webflow.
Estimated monthly traffic volume: Hard to say as new territory for us. We were not able to gauge it from our competitor websites either. So, going to take a random guess and say…3000?
VPSes: No need. We are going for shared hosting.
Here’s what we read from the various shared hosting plans, googled and still cannot wrap our heads around to determine if we even need it in our case. If any of these are irrelevant in our case, please help us eliminate:
LiteSpeed/ LiteSpeed LS Cashe and Redis
Patchman
First Raid 10 Pure SSD – we don’t even know what SSD is/does
Railguns
Softaculous Script Auto-installer – we know what an installer is. But what’s Softaculous Script for in lament terms?
Node.js support
Access to git + SVN – vaguely heard of git. Don’t know if we need either or both.
PHP My Admin
PHP version selector
AwStats & Webalizer
Custom Error Pages – Is this the 404 pages? Should this be designed in Webflow too in our case?
CGI and Perl
Ruby on Rails
SSH & Python
HTTP/2
SMTP
Hotline Protection
Databases – we don’t really know what that means in this context. Some hosting plans said “Unlimited”, others say “2 MySQL”
Speed and IOPS – what is IOP? Is 5MB/s I/O + 2.5K IOPS ok?
Entry Processes
iNodes
Processor: We have one host mentioning “0.5 Core Xeon Gold”
Cloud Linux OS
SSL certificate – we need this. Just don’t know if a Comodo SSL is different from a Comodo Positive?
Supercharged with CloudFlare
Cloud hosting vs. traditional shared hosting – does this matter in our case?
Long list. Sorry – really try to learn so we can make a more informed decision. Thanks in advance for the help here

Submitted May 20, 2020 at 11:45PM by keepmyheadhigh https://www.reddit.com/r/webhosting/comments/gnru86/choosing_a_host_can_be_so_overwhelming_for_noobs/?utm_source=ifttt
from Blogger http://webdesignersolutions1.blogspot.com/2020/05/choosing-host-can-be-so-overwhelming.html via IFTTT
0 notes
Photo

Visual Studio Code: A Power User’s Guide
In this guide, you’ll learn how to take advantage of Visual Studio Code to supercharge your development workflow.
This article is written for beginners who may be using Visual Studio Code for the first time. VS Code, as it’s commonly known, is considered a "lightweight" code editor. In comparison with full integrated development environment (IDE) editors which occupy gigabytes of disk space, VS Code only uses less than 200MB when installed.
Despite the "lightweight" term, VS Code offers a massive number of features which keep increasing and improving with every new update. For this guide, we'll cover the most popularly used features. Every programmer has their own tool set which they keep updating whenever new workflows are discovered. If you want to learn every tool and feature VS Code has to offer, check out their official documentation. In addition, you may want to keep track of updates for new and improved features.
Prerequisites
In order to follow along this guide, you need to be proficient in at least one programming language and framework. You also need to be conversant with versioning your project code with git. You'll also need to have an account with a remote repository platform such as GitHub. I recommend you setup SSH Keys to connect with your remote repo.
We'll use a minimal Next.js project to demonstrate VS Code features. If you’re new to this, don't worry, as the framework and the language used are not the focus for this guide. The skills taught here can be transferred to any language and framework that you’re working with.
A Bit of History
If you’re new to programming, I recommend you start with a simple text editor such as Windows NotePad. It’s the most basic text editor and doesn't offer any kind of help whatsoever. The main advantage of using it is that it forces you to memorize language syntax and do your own indentation. Once you get comfortable writing code, upgrading to a better text editor such as NotePad++ is the next logical step. It offers a bit of essential coding help with features like syntax colorization, auto indentation and basic autocomplete. It's important when learning programming not to be overwhelmed with too much information and assistance.
Once you’ve gotten used to having a better coding experience, it's time to upgrade. Not so long ago, these were the fully integrated development environments on offer:
Visual Studio IDE
NetBeans
Eclipse
IntelliJ IDEA
These platforms provide the complete development workflow, from coding to testing and deployment. They contain tons of useful features such as analyzing code and highlighting errors. They also contain a ton more features that many developers weren’t using, though they were essential for some teams. As a result, these platforms took a lot of disk space and were slow to start up. Many developers preferred using advance text editors such as emacs and vim to write their code in.
Soon, a new crop of platform independent code editors started appearing. They were lightweight and provided many features that were mostly exclusive to IDEs. I've listed them below in the order they were released:
Sublime Text: July 2013
Atom.io: June 2015
Visual Studio Code: April 2016
Mac developers had access to TextMate which was released in October 2004. The snippets system used by all the above editors originated from TextMate. Having used all of them, I felt that the editor that came after was a significant improvement over the current one. According to a developer survey done by Stack OverFlow in 2019, Visual Studio Code is the most popular code development environment with 50.7% usage. Visual Studio IDE comes second and NotePad++ comes third.
That's enough history and stats for now. Let's delve into how to use Visual Studio Code features.
Setup and Updates
Visual Studio Code package installer is less than 100MB and consumes less than 200MB when fully installed. When you visit the download page, your OS will automatically be detected and the correct download link will be highlighted.
Updating VS Code is very easy. It displays a notification prompt whenever an update has been released. For Windows users, you'll have to click on the notification to download and install the latest version. The download process occurs in the background while you’re working. When it's ready to install, a restart prompt will appear. Clicking this will install the update for you and restart VS Code.
For Ubuntu-based distributions, clicking on the update notification will simply open the website for you to download the latest installer. A much easier way is simply running sudo apt update && sudo apt upgrade -y. This will update all installed Linux packages including VS Code. The reason this works is because VS Code added its repo to your package repo registry during the initial installation. You can find the repo information on this path: /etc/apt/sources.list.d/vscode.list.
User Interface
Let's first get acquainted with the user interface:
Image source
VS Code's user interface is divided into five main areas which you can easily adjust.
Activity Bar: allows you to switch between views: explorer, search, version control, debug and extensions.
Side Bar: contains the active view.
Editor: this is where you edit files and preview markdown files. You can arrange multiple open files side-by-side.
Panel: displays different panels: integrated terminal, output panels for debug information, errors and warnings.
Status: displays information about the currently opened project and file. Also contains buttons for executing version control actions, and enabling/disabling extension features.
There's also the top Menu Bar where you can access the editor's menu system. For Linux users, the default integrated terminal will probably be the Bash shell. For Windows users, it's PowerShell. Fortunately, there’s a shell selector located inside the terminal dropdown that will allow you to choose a different shell. If installed, you can choose any of the following:
Command Prompt
PowerShell
PowerShell Core
Git Bash
WSL Bash
Working with Projects
Unlike full IDEs, VS Code doesn't provide project creation or offer project templates in the traditional way. It simply works with folders. On my Linux development machine, I'm using the following folder pattern to store and manage my projects:
/home/{username}/Projects/{company-name}/{repo-provider}/{project-name}
The Projects folder is what I refer to as to the workspace. As a freelance writer and developer, I separate projects based on which company I'm working for, and which repo I'm using. For personal projects, I store them under my own fictitious "company name". For projects that I experiment with for learning purposes, and which I don't intend to keep for long, I'll just use a name such as play or tuts as a substitute for {repo-provider}.
If you’d like to create a new project and open it in VS Code, you can use the following steps. Open a terminal and execute the following commands:
$ mkdir vscode-demo $ cd vscode-demo # Launch Visual Studio Code $ code .
You can also do this in File Explorer. When you access the mouse context menu, you should be able to open any folder in VS Code.
If you want to create a new project linked to a remote repo, it's easier creating one on the repo site — for example, GitHub or BitBucket.
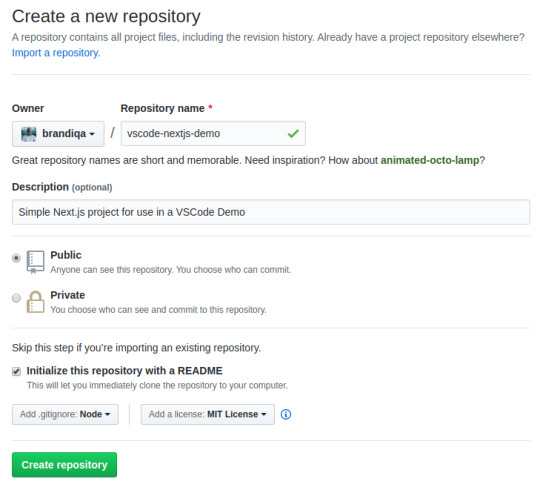
Take note of all the fields that have been filled in and selected. Next, go to the terminal and execute the following:
# Navigate to workspace/company/repo folder $ cd Projects/sitepoint/github/ # Clone the project to your machine $ git clone [email protected]:{insert-username-here}/vscode-nextjs-demo.git # Open project in VS Code $ cd vscode-nextjs-demo $ code .
Once the editor is up and running, you can launch the integrated terminal using the keyboard shortcut Ctrl+~ (tilde key). Use the following commands to generate package.json and install packages:
# Generate `package.json` file with default settings $ npm init -y # Install package dependencies $ npm install next react react-dom
Next, open package.json and replace the scripts section with this:
"scripts": { "dev": "next", "build": "next build", "start": "next start" }
The entire VS Code window should look like this:

Before we look at the next section, I’d like to mention that VS Code also supports the concept of multi-root workspaces. If you’re working with related projects — front-end, back-end, docs etc. — you can manage them all in a single workspace inside one editor. This will make it easier to keep your source code and documentation in sync.
Version Control with Git
VS Code comes built-in with Git source control manager. It provides a UI interface where you can stage, commit, create new branches and switch to existing ones. Let's commit the changes we just did in our project. On the Activity bar, open the Source Control Panel and locate the Stage All Changes plus button as shown below.

Click on it. Next, enter the commit message “Installed next.js dependencies”, then click the Commit button at the top. It has the checkmark icon. This will commit the new changes. If you look at the status located at the bottom, you'll see various status icons at the left-hand corner. The 0 ↓ means there's nothing to pull from the remote repo. The 1 ↑ means you’ve got one commit you need to push to your remote repo. Clicking on it will display a prompt on the action that will take place. Click OK to pull and push your code. This should sync up your local repo with the remote repo.
To create a new branch or switch to an existing branch, just click the branch name master on the status bar, left bottom corner. This will pop up a branch panel for you to take an action.

Do check out the following extensions for an even better experience with Git:
Git Lens
Git History
Support for a different type of SCM, such as SVN, can be added via installing the relevant SCM extension from the marketplace.
Creating and Running Code
On the Activity Bar, head back to the Explorer Panel and use the New Folder button to create the folder pages at the root of the project. Select this folder and use the New File button to create the file pages/index.js. Copy the following code:
function HomePage() { return <div>Welcome to Next.js!</div>; } export default HomePage;
With the Explorer Panel, you should see a section called NPM Scripts. Expand on this and hover over dev. A run button (play icon) will appear next to it. Click on it and this will launch a Next.js dev server inside the Integrated Terminal.
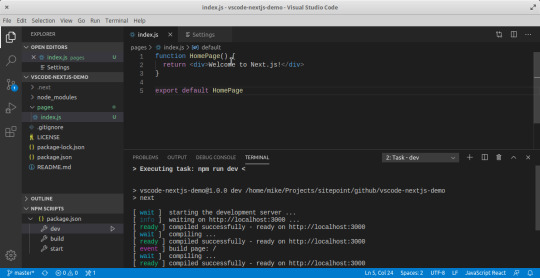
It should take a few seconds to spin up. Use Ctrl + Click on the URL http://localhost:3000 to open it in your browser. The page should open successfully displaying the “Welcome” message. In the next section, we'll look at how we can change VS Code preferences.
The post Visual Studio Code: A Power User’s Guide appeared first on SitePoint.
by Michael Wanyoike via SitePoint https://ift.tt/2V9DxEo
0 notes
Link
Many of us aware of the version control when it comes to work with multiple developers on a single project and collaborate with them. There is no doubt that version control makes developers work more easy and fast. In most of the organization, developers use either Centralized Version Control System(CVCS) like Subversion(SVN) or Concurrent Version System(CVS) or Distributed Version Control System(DVCS) like Git (Written in C), Mercurial (Written in Python) or Bazaar (Written in Python).
Now come to the point, which one is best or which one we need to choose? We will compare each one’s workflow, learning curve, security, popularity, and other aspects. Firstly we need to break a myth which most of the beginners have about DVCS is that “There is no central version in the code or no master branch.” That’s not true, In DVCS there is also a master branch or central version in the code but it works in a different way than centralized source control.

Let’s go through the overview of both version control systems.
Centralized Version Control System
In centralized source control, there is a server and a client. The server is the master repository which contains all of the versions of the code. To work on any project, firstly user or client needs to get the code from the master repository or server. So the client communicates with the server and pulls all the code or current version of the code from the server to their local machine. In other terms we can say, you need to take an update from the master repository and then you get the local copy of the code in your system. So once you get the latest version of the code, you start making your own changes in the code and after that, you simply need to commit those changes straight forward into the master repository. Committing a change simply means merging your own code into the master repository or making a new version off the source code. So everything is centralized in this model.
(adsbygoogle = window.adsbygoogle || []).push({});
There will be just one repository and that will contain all the history or version of the code and different branches of the code. So the basic workflow involves in the centralized source control is getting the latest version of the code from a central repository that will contain other people code as well, making your own changes in the code and then committing or merging those changes into the central repository.
Distributed Version Control System
In distributed version control most of the mechanism or model applies the same as centralized. The only major difference you will find here is, instead of one single repository which is the server, here every single developer or client has their own server and they will have a copy of the entire history or version of the code and all of its branches in their local server or machine. Basically, every client or user can work locally and disconnected which is more convenient than centralized source control and that’s why it is called distributed. You don’t need to rely on the central server, you can clone the entire history or copy of the code to your hard drive. So when you start working on a project, you clone the code from the master repository in your own hard drive, then you get the code from your own repository to make changes and after doing changes, you commit your changes to your local repository and at this point your local repository will have ‘change sets‘ but it is still disconnected with master repository (master repository will have different ‘sets of changes‘ from each and every individual developer’s repository), so to communicate with it, you issue a request to the master repository and push your local repository code to the master repository. Getting the new change from a repository is called “pulling” and merging your local repository ‘set of changes’ is called “pushing“. It doesn’t follow the way of communicating or merging the code straight forward to the master repository after making changes. Firstly you commit all the changes in your own server or repository and then the ‘set of changes’ will merge to the master repository.
Below is the diagram to understand the difference between these two in a better way:

Basic difference with pros and cons
Centralized version control is easier to learn than distributed. If you are a beginner you’ll have to remember all the commands for all the operations in DVCS and working on DVCS might be confusing initially. CVCS is easy to learn and easy to set up.
DVCS has the biggest advantage that it allows you to work offline and gives flexibility. You have the entire history of the code in your own hard drive, so all the changes you will be making in your own server or to your own repository which doesn’t require internet connection, but this is not in case of CVCS.
DVCS is faster than CVCS because you don’t need to communicate with the remote server for each and every command. You do everything locally which gives you benefit to work faster than CVCS.
Working on branches is easy in DVCS. Every developer has an entire history of the code in DVCS, so developers can share their changes before merging all the ‘set of changes’ to the remote server. In CVCS it’s difficult and time-consuming to work on branches because it requires to communicate with the server directly.
(adsbygoogle = window.adsbygoogle || []).push({});
If the project has long history or the project contain large binary files in that case downloading the entire project in DVCS can take more time and space than usual, whereas in CVCS you just need to get few lines of code because you don’t need to save the entire history or complete project in your own server so there is no requirement for additional space.
If the main server goes down or it crashes in DVCS, you can still get the backup or entire history of the code from your local repository or server where the full revision of the code is already saved. This is not in case of CVCS, there is just a single remote server which has entire code history.
Merge conflicts with other developers code are less in DVCS. Because every developer work on their own piece of code. Merge conflicts are more in CVCS in comparison with DVCS.
In DVCS, sometimes developer takes the advantage of having the entire history of the code and they may work for too long in isolation which is not a good thing. This is not in the case of CVCS.
Conclusion: Let’s see the popularity of DVCS and CVCS across the world.

Image Source: Google Trends
From Google Trends and all the above points, it’s clear that DVCS has more advantages and it’s more popular than CVCS, but if we need to talk about choosing a version control, so it also depends on which one is more convenient for you to learn as a beginner. You can choose any one of them but DVCS gives more benefit once you just go with the flow of using its commands.
0 notes
Text
Enginursday: Efficient Arduino Programming with Arduino CLI and VS Code
I’m always looking for the most productive way to get my work done. When I’m in software-engineer mode, my familiarity with the features of my development environment play a huge role in that efficiency. My favorite integrated development environment (IDE) varies by programming language, but, increasingly – whether I’m programming in C/C++, Javascript or Python – I try to find any excuse I can to use Visual Studio Code.
VS Code (not to be confused with Visual Studio) is a free, open source code editor supported by Microsoft. It has a long list of features including powerful key-bind-ability, file navigation, extensions to support just about any language and a pleasantly modern UI.
I’ve used VS Code as my IDE for platforms ranging from the nRF52840 and the C-based nRF5 SDK to a Raspberry Pi running Python scripts. However, a big chunk of the software development we do here at SparkFun revolves around Arduino, which usually means utilization of the Arduino IDE. Compared to VS Code, the Arduino IDE’s feature-set is limited – there’s basic syntax highlighting, auto formatting, and line numbering, but not much more. It’s missing modern IDE features like:
Quick code navigation – Whether it’s find-by-reference (instantly navigating to the definition of the function you’re using), search-by-symbol (quick navigation to function or symbol definitions within a file), or a quick link to a compilation error, code navigation is critical to managing large code bases.
Auto-complete – This feature can, of course, help complete long constant names, but it can also provide insight into the parameters that a function may be expecting.
Version control integration – Whether you’re using git or SVN, many modern IDE’s provide source-control integration that can show, line-by-line, the changes you’ve made since your last commit.
Refactoring – Need to overhaul a function’s naming scheme? Or convert a common block of code into a function that can be more widely used throughout your application? Sounds like a refactoring job! A modern IDE can help with that.
Integrated Terminal – Whether you use bash or the Windows CMD, an integrated terminal can save you loads of time. This tool allows you to run “make,” “grep,” or any of your favorite terminal commands without ever swapping windows.
Until recently, beyond exploring Arduino’s “Use External Editor” preference, there wasn’t much to be done to add more functionality to the Arduino development workflow. That all changed with the release of Arduino CLI.
Arduino CLI is a command-line software tool that features board and file management functionality plus compilation and programming tools. Whether you want to download a new Arduino library or upload a compiled Arduino sketch to a RedBoard, the Arduino CLI is there for all of your scripting and command-lining needs. Taking it a step further – combined with an IDE or editor (like VS Code) – Arduino CLI can become an integral part of a powerful, DIY Arduino sketch, library, and core development environment.
To document this pairing, I wrote up a quick tutorial:
New!
Efficient Arduino Programming with Arduino CLI and Visual Studio Code
December 6, 2018
How to eschew the Arduino IDE for a combination of and Arduino command-line tool (Arduino CLI) and a professional code editor (Visual Studio Code).
Favorited Favorite 0
The tutorial explains how to pair VS Code with Arduino CLI to get the best of both development worlds: a modern IDE and the simplicity of Arduino’s API and board support.
comments | comment feed
0 notes
Text
9/11 Reflections
While it seems like merging is the popular option for combining changes from one branch to another in a repository, merging, together with branching, should still be used sparingly. According to Michael Aranda’s article on Hackernoon, a project’s git log with a dense history of branching and merging make it difficult for new developers to understand the development process. Thus, branching and merging should only be used if we want a set of commits to stand out, such as when major features or large refactorings are added. These merge commits, in turn, can be identified as milestones in the development of a project. The action of creating grandchild branches is therefore strongly discouraged unless there is a convincing reason why its parent (the child branch) cannot serve the development goal.
Decentralized (distributed) version control is favored over centralized version control due to the ease of changes, less possibility for code build fails, and offline development support. However, Atlassian suggests that decentralized version control might not be the best choice for projects with a longer history (50,000 changesets or more). This will require an enormous amount of time and disk space to store the entire history. In addition, the practicality of decentralized version control also depends on what file types exist in the repository. If a repository contains large binary files that are not easily compressed, the same issue emerges – developers might not have all the necessary space to store these files.
Sources: https://www.atlassian.com/blog/software-teams/version-control-centralized-dvcs https://hackernoon.com/git-merge-vs-rebase-whats-the-diff-76413c117333 https://backlog.com/blog/git-vs-svn-version-control-system/
0 notes
Text
Visual Studio Code: A Power User’s Guide
In this guide, you’ll learn how to take advantage of Visual Studio Code to supercharge your development workflow.
This article is written for beginners who may be using Visual Studio Code for the first time. VS Code, as it’s commonly known, is considered a "lightweight" code editor. In comparison with full integrated development environment (IDE) editors which occupy gigabytes of disk space, VS Code only uses less than 200MB when installed.
Despite the "lightweight" term, VS Code offers a massive number of features which keep increasing and improving with every new update. For this guide, we'll cover the most popularly used features. Every programmer has their own tool set which they keep updating whenever new workflows are discovered. If you want to learn every tool and feature VS Code has to offer, check out their official documentation. In addition, you may want to keep track of updates for new and improved features.
Prerequisites
In order to follow along this guide, you need to be proficient in at least one programming language and framework. You also need to be conversant with versioning your project code with git. You'll also need to have an account with a remote repository platform such as GitHub. I recommend you setup SSH Keys to connect with your remote repo.
We'll use a minimal Next.js project to demonstrate VS Code features. If you’re new to this, don't worry, as the framework and the language used are not the focus for this guide. The skills taught here can be transferred to any language and framework that you’re working with.
A Bit of History
If you’re new to programming, I recommend you start with a simple text editor such as Windows NotePad. It’s the most basic text editor and doesn't offer any kind of help whatsoever. The main advantage of using it is that it forces you to memorize language syntax and do your own indentation. Once you get comfortable writing code, upgrading to a better text editor such as NotePad++ is the next logical step. It offers a bit of essential coding help with features like syntax colorization, auto indentation and basic autocomplete. It's important when learning programming not to be overwhelmed with too much information and assistance.
Once you’ve gotten used to having a better coding experience, it's time to upgrade. Not so long ago, these were the fully integrated development environments on offer:
Visual Studio IDE
NetBeans
Eclipse
IntelliJ IDEA
These platforms provide the complete development workflow, from coding to testing and deployment. They contain tons of useful features such as analyzing code and highlighting errors. They also contain a ton more features that many developers weren’t using, though they were essential for some teams. As a result, these platforms took a lot of disk space and were slow to start up. Many developers preferred using advance text editors such as emacs and vim to write their code in.
Soon, a new crop of platform independent code editors started appearing. They were lightweight and provided many features that were mostly exclusive to IDEs. I've listed them below in the order they were released:
Sublime Text: July 2013
Atom.io: June 2015
Visual Studio Code: April 2016
Mac developers had access to TextMate which was released in October 2004. The snippets system used by all the above editors originated from TextMate. Having used all of them, I felt that the editor that came after was a significant improvement over the current one. According to a developer survey done by Stack OverFlow in 2019, Visual Studio Code is the most popular code development environment with 50.7% usage. Visual Studio IDE comes second and NotePad++ comes third.
That's enough history and stats for now. Let's delve into how to use Visual Studio Code features.
Setup and Updates
Visual Studio Code package installer is less than 100MB and consumes less than 200MB when fully installed. When you visit the download page, your OS will automatically be detected and the correct download link will be highlighted.
Updating VS Code is very easy. It displays a notification prompt whenever an update has been released. For Windows users, you'll have to click on the notification to download and install the latest version. The download process occurs in the background while you’re working. When it's ready to install, a restart prompt will appear. Clicking this will install the update for you and restart VS Code.
For Ubuntu-based distributions, clicking on the update notification will simply open the website for you to download the latest installer. A much easier way is simply running sudo apt update && sudo apt upgrade -y. This will update all installed Linux packages including VS Code. The reason this works is because VS Code added its repo to your package repo registry during the initial installation. You can find the repo information on this path: /etc/apt/sources.list.d/vscode.list.
User Interface
Let's first get acquainted with the user interface:
Image source
VS Code's user interface is divided into five main areas which you can easily adjust.
Activity Bar: allows you to switch between views: explorer, search, version control, debug and extensions.
Side Bar: contains the active view.
Editor: this is where you edit files and preview markdown files. You can arrange multiple open files side-by-side.
Panel: displays different panels: integrated terminal, output panels for debug information, errors and warnings.
Status: displays information about the currently opened project and file. Also contains buttons for executing version control actions, and enabling/disabling extension features.
There's also the top Menu Bar where you can access the editor's menu system. For Linux users, the default integrated terminal will probably be the Bash shell. For Windows users, it's PowerShell. Fortunately, there’s a shell selector located inside the terminal dropdown that will allow you to choose a different shell. If installed, you can choose any of the following:
Command Prompt
PowerShell
PowerShell Core
Git Bash
WSL Bash
Working with Projects
Unlike full IDEs, VS Code doesn't provide project creation or offer project templates in the traditional way. It simply works with folders. On my Linux development machine, I'm using the following folder pattern to store and manage my projects:
/home/{username}/Projects/{company-name}/{repo-provider}/{project-name}
The Projects folder is what I refer to as to the workspace. As a freelance writer and developer, I separate projects based on which company I'm working for, and which repo I'm using. For personal projects, I store them under my own fictitious "company name". For projects that I experiment with for learning purposes, and which I don't intend to keep for long, I'll just use a name such as play or tuts as a substitute for {repo-provider}.
If you’d like to create a new project and open it in VS Code, you can use the following steps. Open a terminal and execute the following commands:
$ mkdir vscode-demo $ cd vscode-demo # Launch Visual Studio Code $ code .
You can also do this in File Explorer. When you access the mouse context menu, you should be able to open any folder in VS Code.
If you want to create a new project linked to a remote repo, it's easier creating one on the repo site — for example, GitHub or BitBucket.
Take note of all the fields that have been filled in and selected. Next, go to the terminal and execute the following:
# Navigate to workspace/company/repo folder $ cd Projects/sitepoint/github/ # Clone the project to your machine $ git clone [email protected]:{insert-username-here}/vscode-nextjs-demo.git # Open project in VS Code $ cd vscode-nextjs-demo $ code .
Once the editor is up and running, you can launch the integrated terminal using the keyboard shortcut Ctrl+~ (tilde key). Use the following commands to generate package.json and install packages:
# Generate `package.json` file with default settings $ npm init -y # Install package dependencies $ npm install next react react-dom
Next, open package.json and replace the scripts section with this:
"scripts": { "dev": "next", "build": "next build", "start": "next start" }
The entire VS Code window should look like this:
Before we look at the next section, I’d like to mention that VS Code also supports the concept of multi-root workspaces. If you’re working with related projects — front-end, back-end, docs etc. — you can manage them all in a single workspace inside one editor. This will make it easier to keep your source code and documentation in sync.
Version Control with Git
VS Code comes built-in with Git source control manager. It provides a UI interface where you can stage, commit, create new branches and switch to existing ones. Let's commit the changes we just did in our project. On the Activity bar, open the Source Control Panel and locate the Stage All Changes plus button as shown below.
Click on it. Next, enter the commit message “Installed next.js dependencies”, then click the Commit button at the top. It has the checkmark icon. This will commit the new changes. If you look at the status located at the bottom, you'll see various status icons at the left-hand corner. The 0 ↓ means there's nothing to pull from the remote repo. The 1 ↑ means you’ve got one commit you need to push to your remote repo. Clicking on it will display a prompt on the action that will take place. Click OK to pull and push your code. This should sync up your local repo with the remote repo.
To create a new branch or switch to an existing branch, just click the branch name master on the status bar, left bottom corner. This will pop up a branch panel for you to take an action.
Do check out the following extensions for an even better experience with Git:
Git Lens
Git History
Support for a different type of SCM, such as SVN, can be added via installing the relevant SCM extension from the marketplace.
Creating and Running Code
On the Activity Bar, head back to the Explorer Panel and use the New Folder button to create the folder pages at the root of the project. Select this folder and use the New File button to create the file pages/index.js. Copy the following code:
function HomePage() { return <div>Welcome to Next.js!</div>; } export default HomePage;
With the Explorer Panel, you should see a section called NPM Scripts. Expand on this and hover over dev. A run button (play icon) will appear next to it. Click on it and this will launch a Next.js dev server inside the Integrated Terminal.
It should take a few seconds to spin up. Use Ctrl + Click on the URL http://localhost:3000 to open it in your browser. The page should open successfully displaying the “Welcome” message. In the next section, we'll look at how we can change VS Code preferences.
The post Visual Studio Code: A Power User’s Guide appeared first on SitePoint.
via SitePoint https://ift.tt/2Vx8yRS
0 notes
Text
GitHub vs Bitbucket: Which is Right for Your Development Team?
Choosing the right source control platform for your team is one of the most important decisions you’re going to make. There’s a good chance that you’ll choose Git for the version control software (VCS) itself, but the platform where the code lives is equally important. Many times, it comes down to Bitbucket vs GitHub. Over the years the two have grown strong communities and userbases. In this post we want to take a look at both platforms to see which would better serve your development team’s needs.
GitHub vs Bitbucket: The Basics
If you are a newcomer to Git, GitHub, and Bitbucket entirely, you may want to have a look at our beginner’s guide to Git. It will walk you through the fundamentals and get you prepped for understanding just what is going on in this article.
If you boil it down to the most basic and fundamental difference between GitHub and Bitbucket, it is this: GitHub is focused around public code, and Bitbucket is for private. Basically, GitHub has a huge open-source community, and Bitbucket tends to have mostly enterprise and business users.
That’s not to say that you can’t have a private repository on GitHub (you can). Or that you can’t post your code publically on Bitbucket (again, you can). However, the majority of the users aren’t doing so. Plus, the defaults are set that way, too: public and private repositories respectively.
Outside of that difference, the two platforms function very similarly. You can create and manage repositories through the website or command line, log in with two-factor authentication (2FA), invite collaborators, open issues and discussions, create/merge pull requests, and generally handle all the fundamental things you would need to from the website. They’re super similar that way. That said, let’s dig into the specifics on each platform so that you can make the most informed decision possible.
Bitbucket
Because Bitbucket is an Atlassian product (the makers of Trello and other apps), you have a slick and clean interface from the moment you log in. You see immediately that they’re focused on professional teams as an all-in-one solution for software development. Let’s see how.
1. Not Just Git
GitHub, obviously, is a hub for git version control. BitBucket, on the other hand, supports more than just git. You can also track your repositories in Mercurial, another popular version control management system. It does not support SVN, another major system, but at least with Bitbucket, you have a choice.
2. The Interface
Using Bitbucket’s website is just wonderful. It’s easy and simple, and you always know what’s going on. GitHub’s website works, but it’s not always clear as to what you need to do to accomplish certain things. That is rarely the case with Bitbucket. A sidebar tells you plainly where you are and what you can do. Note, this is only the graphical side of the website — both use the same git commands when you access it via command line.
4. Desktop Client
One area that is surprisingly absent from Atlassian’s Bitbucket is a desktop client (GitHub makes one, though). While many users will default to the command line interface and the fine control that it gives over your software versioning, there are still a lot who really like the feel and interaction of a git app. If you go with Bitbucket, you will not get a first-party one, but rather, an open-source program called Sourcetree.
Sourcetree is good stuff. It works, it’s smooth, and it’s free. Atlassian may not have made it, but that doesn’t matter. Regardless, neither GitHub’s client or Sourcetree feel quite as robust as the CLI if you’re coming from that. It is a good way, however, to introduce new people to git and have them be a little less intimidated.
5. Wikis and Boards
Having a project wiki is insanely helpful. Not only can your team use it for internal notes during development, but that also can then be opened up to the public as a source of post-release documentation. With Bitbucket, every repository can have a wiki. All you have to do is enable it, and you can control it exactly like you do the rest of the repo.
Additionally, lots of development teams use Kanban boards for project management. GitHub offers a Boards tab by default, and Bitbucket does not. What they do, however, is let you link your Trello account to a repository, so you have that service available within the website dashboard. It embeds whatever Trello board you already have, or you can create a new one.
Atlassian also has a robust app marketplace that you can search to install various integrations for your project. You may or may not need this kind of thing, but it’s good to know that it’s there.
6. Branch Permissions
And finally, branch permissions. With Bitbucket, you can choose who can work on any individual branch. Rather than simply giving Karen access to the repository, you can give her access to only a single branch. That way, the fear of an accidental master push is removed. This feature is huge, and it’s standard with Bitbucket, even in their free plans. If you have a huge team and need to manage features, bug fixes, releases, betas, and different aspects of the project with a delicate hand.
GitHub
Moving onto GitHub, we should probably mention that GitHub is the service with by far the largest market share. In fact, it was bought out by Microsoft last year, which actually made people migrate off the platform — to Bitbucket mainly. But in that time, Microsoft has not affected the day-to-day workings of most devs, whether it’s on private, internal code or open-source work.
1. The Interface
Since we started out with Bitbucket’s interface, let’s start the same place with GitHub. It’s functional, and it works. What else needs to be said? It’s not necessarily pretty, but what it lacks in style, it makes up for in pure utility. With the majority of GitHub users working through the command line, the website’s aesthetics aren’t really on trial. But you use it for some things pretty regularly, and it works and is never quite confusing, but it’s not exactly straightforward all the time, either.
2. Desktop Client
GitHub does offer its own desktop client. In terms of aesthetic and ease of use, the client is a lot more in line with what Bitbucket’s web interface is like. Like above with Sourcetree, the GitHub client is great for easing people into git who may not like the command line, but if you’re a power user or need a very specific command that’s not one of the main ones (pull, push, add, commit, checkout, etc.), there’s a good chance that you will find either client lacking. That said, for what it does, the GitHub client is lightweight and does what it is supposed to do.
3. Free Private Repos
In what used to be Bitbucket’s strongest selling point, GitHub now offers unlimited free private repositories. Previously, only public repos could be created for free, and private ones were for paying members only. Now, however, you can create as many as you want, totally for free. The catch, though, is that you can only have 3 contributors to the repo (not counting yourself). So if you’re on a large team, you’re going to be paying, regardless.
But for hobbyists, people who need to share their code with someone but can’t be public, and for smaller projects, unlimited free repos is an amazing addition to GitHub that was a severely painful absence until this inclusion.
4. Wikis and Boards
As mentioned above, Atlassian’s ownership of Trello gives them a slight advantage by being able to integrate directly with Bitbucket. GitHub, however, has a built-in Kanban solution in the Projects tab. Every Project you create is its own board, and while GitHub’s isn’t as feature-rich as Trello by a long shot, a lot of planning and documentation can happen here because you can use markup to style anything you need in each card.
One weakness that GitHub has to Bitbucket, though, is that private repositories can’t have a wiki. Well, let’s rephrase that: free, private repositories can’t have a wiki. If you have a free, public repo, you can have a wiki. If you are a paying member, your private repos can have wiki access. While this isn’t a deal breaker for many people, it can be a little annoying when you have to go through some hackey steps to get the Readme, Project boards, and Issues to function as documentation.
5. High Storage Limit
Let us say this first: git is not a backup utility. You do not use git for online storage or backups. It’s inefficient for that, and it bogs down the servers and your computers. That said, however, when you get a large number of commits and pushes and branches, your repo can start packing some serious mass.
A benefit of GitHub is that you don’t get charged for that storage. Even on a free plan. There is a hard 100-gigabyte cap on GitHub repositories, though they recommend it being under 1gb (which many of them will be). The file uploads are limited to 100mb for command line and 25mb for web uploads.
Bitbucket, though, only allows free users 1gb total. Instead of requesting that you keep it below 1gb and then emailing you when you reach 75 (which is a very large range and kind of an odd choice), Atlassian pushes you toward the paid plans at 1+gb.
Now, that is 1gb per repo, so you can have multiple repos for free like that. But you don’t have to worry about that with GitHub. Both of them offer large file solutions, too (Bitbucket’s is here, and GitHub’s is here).
GitHub vs Bitbucket: The Winner?
I don’t think there is one. While the services absolutely have a different feel to them, and they absolutely target different demographics, you’re going to get good service and get your work done regardless of if you go Bitbucket vs GitHub.
In the end, you’re not going to go wrong with your choice. If you’re a small dev team, either will work almost exactly the same for you. But, if you’re new to git, Bitbucket is a little more forgiving and easy to use as you learn the workflow. If you are interested in open-source development at all, GitHub is the main hub for that.
In terms of business solutions…it’s a toss-up. The paid plans are pretty similar. It’s hard to make any kind of recommendation on that. Bitbucket kind of specializes in business clients, offering an all-in-one solution through Atlassian’s overall suite, but GitHub being the major platform in open-source and public code, if your company is involved in that, they may be the way to go.
In reality, neither is a bad choice to serve you and your source control needs. You can’t go wrong with either, honestly.
Which version control software and platform do you and your team prefer? Tell us why in the comments!
Article features image by Teguh Jati Prasetyo / shutterstock.com
The post GitHub vs Bitbucket: Which is Right for Your Development Team? appeared first on Elegant Themes Blog.
😉SiliconWebX | 🌐ElegantThemes
0 notes