#google tips
Text

Fic Finding Tips: Google site searching edition!
This post is an additional resource to our Fic Finding Tips post, this time focused on using Google to find your lost fics!
For the best results when using Google, it really helps if you know which site you read the fic on. You can search for webpages from that site containing unique words and phrases using site search and quotation marks.
For ao3 fics, use this to begin your Google search: site:archiveofourown .org "draco malfoy/harry potter" (delete the space before .org, .net, or .com for any of the search examples in this post) Then add quotes, words, and phrases in quotation marks to narrow things down. Keep in mind that each chapter of a multi-chaptered fic is it's own webpage, so you'll want to search for specific details that would show up in the same chapter. For example, we received a request describing Draco having a T (for traitor) carved over his dark mark during the Battle of Hogwarts while he was helping to search for Ravenclaw's Diadem. We found it by googling site:archiveofourown .org "draco malfoy/harry potter" "traitor" "dark mark" "diadem". This search brought up Chapter 3 where this scene takes place, but if we had included a detail from Chapter 1 ("motorbike", for Hagrid's motorbike) it would have excluded the webpage we wanted to find.
Google site searching is most helpful when you have really specific details that are not going to be in the tags or fic summary, meaning the ao3 search feature is nearly useless with the information you have. Another example is a request we received describing Veela!Draco being protective of Harry at a picnic with their friends. You can do a search on ao3 with Veela Draco and Picnics tags, but nothing would come up. We found the correct fic by googling site:archiveofourown .org "draco malfoy/harry potter" "veela" "picnic".
This method works with FFN fics as well, with this Google search: site:fanfiction .net "Draco M., Harry P." Be aware that including the pairing in quotations will not always exclude other pairings and you will probably see plenty of Draco/Hermione FFN fics show up in your search too (and others pairings, but Dramione being popular will mean you'll see that one most often).
You can also use this method with LJ, but the pairing description may vary from fic to fic. It’s sometimes listed as HPDM, Draco Malfoy/Harry Potter, draco x harry, Drarry, or just Draco/Harry. You may want to just put their names separately in quotes (site:livejournal .com “draco” “harry”).
With any of these sites, remember to try different combinations of words and phrases! Get creative with your searching and try your best to remember unique details. Even adding simple words such as “beetle”, “Christmas”, or “Burrow” will narrow things down a great deal. Include reoccurring characters as well (“Luna” “Blaise” “Pansy” etc.), and if you can remember the name of an OC that information is extremely useful. Including Ron or Hermione doesn’t always do much, since they are often a staple of Drarry fanfics. But if you’re looking for a certain scene they are a part of, it wouldn’t hurt to include them. Keep in mind that Draco POV fics might refer to them as “Granger” and “Weasley” though! It can get tricky the more details you include, but too few details will result in too many webpages to skim through.
The key to a successful fic find on Google is usually combining multiple common words (“healer” “classroom” “portkey”), or remembering unique words and phrases you can recall being quoted exactly (“astral projection”, “orphanage”, “climbed over the fence”, “things change”, “Masudi the cat”).
Last but not least, when looking through a page of search results it’s usually best to skip over webpages that are just featuring tags:

Instead, focus on the webpages of fics and fic chapters. Google will often show a passage from the fic containing one or more of the words you have put in quotations. You can sometimes tell immediately whether or not the story fits depending on the context:

Good luck, we hope you find the fic you’re looking for! Feel free to reply to this post if you have any questions, need clarification, or have more tips we couldn’t think of. Happy finding!
#housekeeping#fic finding tips#google#google tips#fanfic search#drarry#drarry fic#drarry fic search#drarry squad
138 notes
·
View notes
Text
I don’t know if everyone knows this but there are tricks to google search that can help you make searching easier. If any of you remember the post about searching for big bird (if I can find it I’ll link it and reblog it) where they wanted a big bird and not Big Bird. But everytime they put more words into the search He’d always be there? Watching and being sad?
Well let me show you how these little tricks can make the process way easier.
And because this will be kinda long…
Well let’s just type big bird first

Well shit…that’s not what we want
Now if we use the minus (-) we can remove things we don’t want soo -sesame and -yellow

Awww sweet big birds. There’s other tricks too like using ��quotation marks” to make sure the google results use what’s in them. Cause sometimes you’re trying to search something and one of the words is super important and google will be like “nah, you didn’t mean that word right?” The quotations is like grabbing google by the throat and saying “I did you dumb fuck”
There’s the star* that can just make it random like in this example

There’s others but I usually use the minus and quotations the most.
#google#using google#tips#tricks#tips and tricks#google tips#how to use google#trust me it’s very useful when doing research papers or research in general#it makes finding things so much easier tbh#I discovered back in high school and even used it into college#I’m the best researcher of random shit out of the people I know irl#mostly cause of this skill
4 notes
·
View notes
Text
Segment By Placement Within YouTube [Video]
#GoogleMarketing#Marketing#DigitalMarketingStrategy#GoogleTips#Google Marketing#Digital Marketing Strategy#Google Tips
2 notes
·
View notes
Text
https://www.fastcompany.com/90954125/google-tips-gmail-maps-docs-sheets-calendar-drive-search
77 incredibly useful tips for Google apps: Gmail, Docs, Sheets, and beyond
I’ll let you in on a little secret: Google’s apps and services are absolutely overflowing with buried treasures.
More than any other tech company, Google loves tucking interesting options and features into out-of-the-way places. Some of the best elements of Gmail, Google Calendar, and other popular productivity tools are almost completely out of sight, in fact, and all too easy to overlook if you don’t know where to find ’em.
Once you have a road map, though, these virtual jewels couldn’t be easier to embrace. And once you get yourself in the habit of using them, you’ll never look at Google’s apps the same way again.
1. Give yourself more room to write
First things first: Gmail’s default compose window for new emails is a small box in the lower-right corner of the screen. That can be nice if you want to keep an eye on your inbox—but it can also be quite distracting when you actually want to focus on what you’re writing.

Gmail’s compose window, in its little-known full-screen form
Ta-da! Now your Gmail compose window will always open up as large as your current browser window allows. Should you ever want to shrink it back down into that smaller setup, just click the icon with two arrows pointing inward in the window’s upper-right corner.
5. Set yourself up for smarter snoozing
Snoozing is one of my favorite Gmail features, but it’s also one of the most confusing when it comes to settings. The reason: You can actually customize the default times for email snoozing in Gmail—the specific morning, afternoon, and evening times that pop up by default in the various one-click snoozing options—but the setting to make that adjustment isn’t located within Gmail.
You’d never know it, but those innocuous-looking “Keep snooze settings” also tie into Gmail.
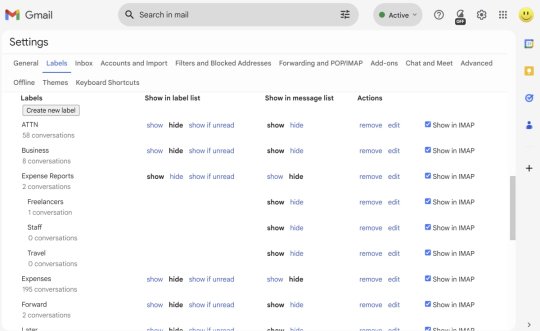
You can control exactly when and where every Gmail label appears, if you know where to look.
Hide anything you don’t often access in either of those places, and you’ll stop wasting time looking through superfluous stuff.
8. Boost your second-guessing buffer
Gmail has a tremendously useful feature called “Undo Send,” which lets you pull back a message, in case you suddenly reconsider something you said (or included a wildly inappropriate attachment by mistake). By default, though, Undo Send gives you a measly 5 seconds to make that call—which isn’t much time at all, especially when potentially mortifying errors are involved.
Take two seconds now to find the “Undo Send” option in the General section of Gmail’s desktop settings, and you can boost your buffer from 5 seconds to a full 30. There’s little real downside, outside of your messages sitting for an additional 20 or so seconds before they’re actually delivered. And there’s a world of face-saving gained.

You can create a custom view to show anything from two days to four weeks within Google Calendar.
11. Stop focusing on the past
Why distract yourself with events that already happened? Instead, let Calendar dim past appointments so you can focus on what’s next.
Look for “Reduce the brightness of past events” checkbox within “View options” of Calendar’s settings. You’ll notice the difference immediately in Calendar’s week and month views.
12. Get a more global view
You can manage appointments across multiple time zones by activating Calendar’s secondary time zone option, which lets you have events start or end in different locales without the need for mental conversions.
Look for “Time zone” header in the website’s settings, then check the “Display secondary time zone” box, and select the time zone you want. You also can give each time zone a label (“Boston” and “California,” for example) to make things even simpler.
13. Convert time zones like a pro
In addition to its time-zone-converting capability, Calendar can show you a world time clock to give you an at-a-glance view of the current time in any number of places.
Simply seek out “World clock” in the website’s settings. Once it’s activated, you can add however many time zones you want, and they’ll all be displayed in the site’s lefthand sidebar.
14. Jump into the past—or future
One of Calendar’s most helpful shortcuts is also one of the easiest to miss: You can press “g” from any calendar view to jump directly to any specific date, in any year.
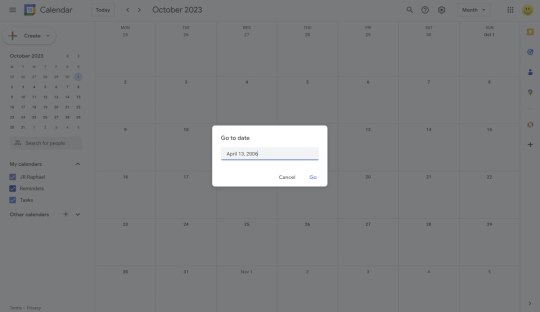
Calendar’s date-jumping shortcut will zap you to any date in the blink of an eye.
15. Return to the present in a snap
Speaking of smart shortcuts, here’s another one worth remembering: From anywhere on the Calendar site, you can hit the Esckey to jump right back to the main calendar screen. And while looking at any calendar view, you can hit “t” to return to today’s date.
16. Save an event the speedy way
The next time you create a new event, try hitting Ctrl-S once you’ve put in all the information. That’ll let you save the event without having to lift your fingers and mess with your mouse.
17. Uncover Calendar’s undo option
Calendar also has a little-known command that’ll let you undo errant actions—like moving an event by mistake or deleting the wrong appointment. Hit Ctrl-Z or even just “z” by itself on your keyboard. You have only about a 10-second window, but if you catch your slipup soon enough, it’s a great way to fix your flub.
18. Don’t forget the trash
For times when you delete an event entirely and then need to get it back later, make yourself a mental note about Calendar’s tucked-away Trash section. It gives you the opportunity to recover any deleted event for a month after axing. You can find the Trash section by clicking the gear in the site’s upper-right corner and selecting “Trash” in the menu that appears.
Google Maps tips
19. Go completely hands-free
We’ve all been guilty of glancing down at our devices while driving—to look ahead at the next turn, perhaps, or see how long is left in a commute. If you have an Android phone, there’s a better way: Google Maps has a whole series of helpful voice commands that’ll work whenever you’re actively navigating.
Just say “Hey, Google”and then try variations on these examples:
“What road is this?”
“What’s my next turn?”
“What’s my ETA?”
“How’s traffic ahead?”
“How’s traffic to work?”
“Avoid tolls”
“Avoid highways”
“Find gas stations”
“Find restaurants”
“Navigate home”
“Take me to McDonald’s”
“What’s the closest hotel?”
“Exit navigation”
You can also instruct your phone to make calls, send texts, play music, or look for your next appointment—all without ever taking your eyes off the road.
If your device doesn’t respond to your commands, search your system settings for “Assistant” (but, um, not while you’re driving) to find the Google Assistant settings, then make sure you have “Hey Google” voice detection enabled.
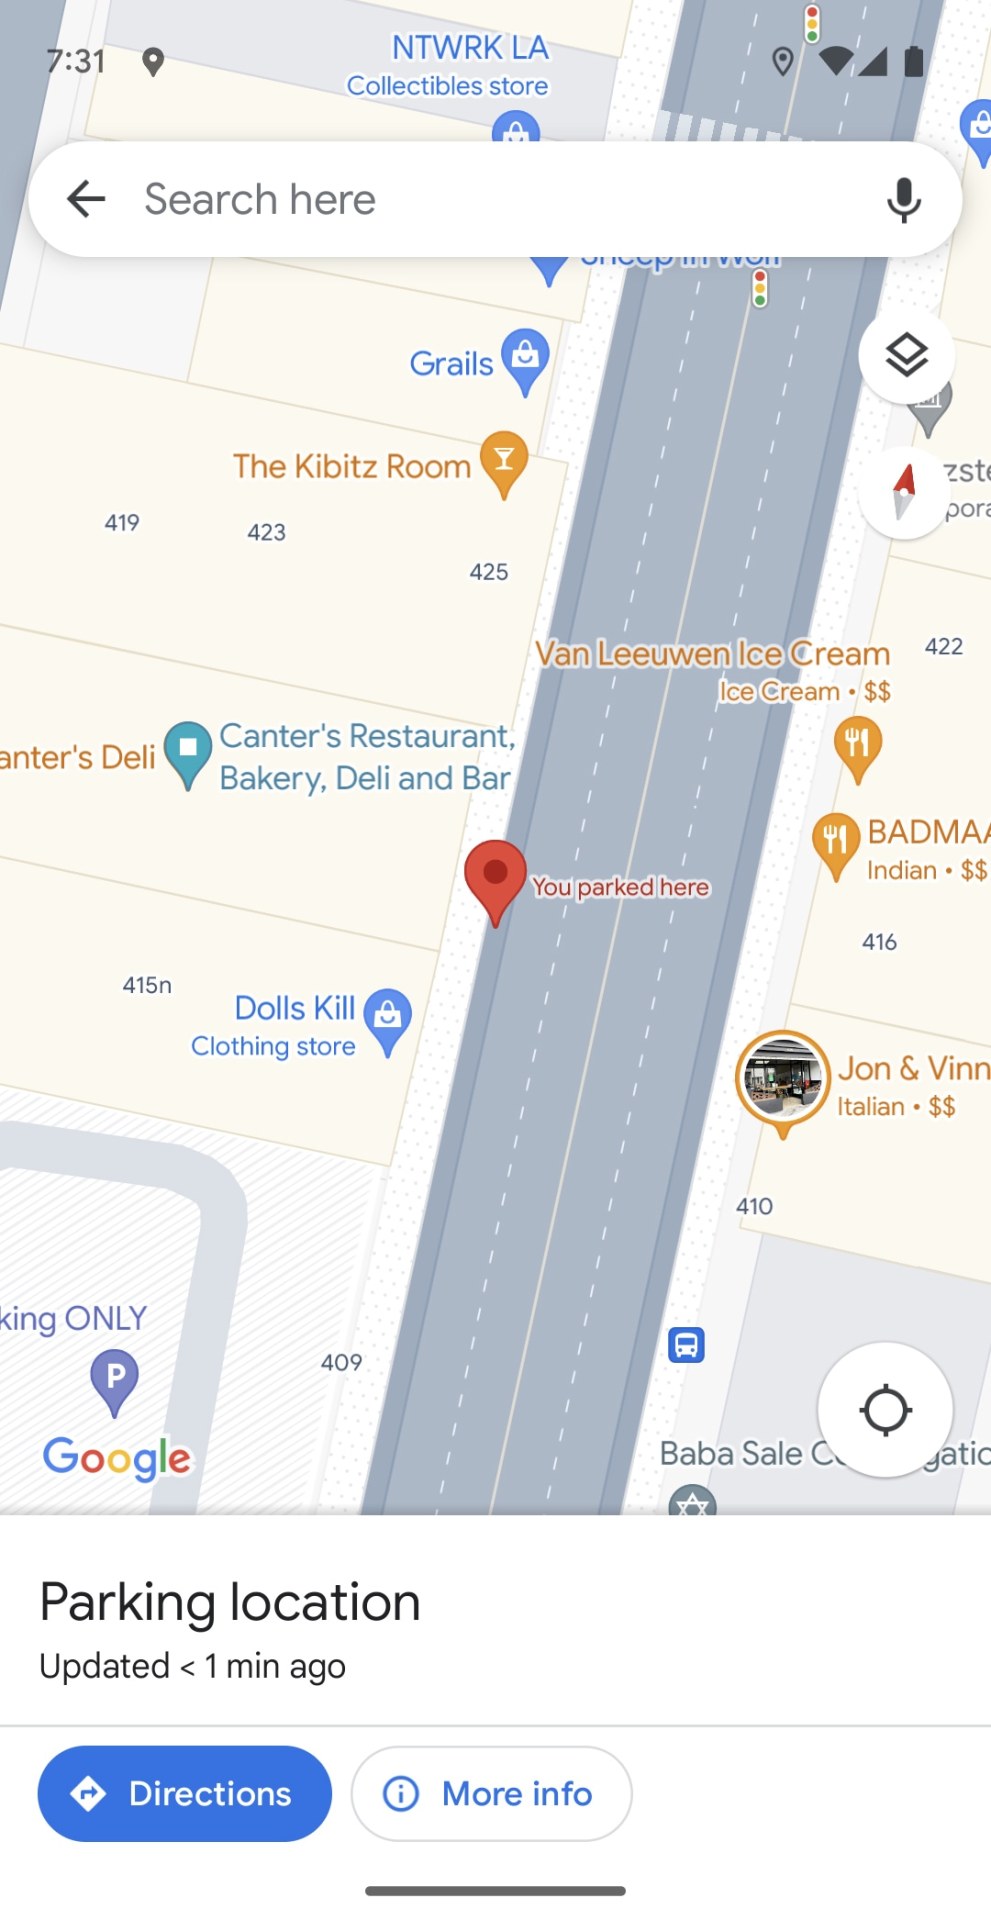
Everything you need to remember where you parked is right within the Maps mobile app.
When you’re ready to get back to your spot, look for the saved parking notification on your phone, or just open Maps, and tap the “Parking location” card at the bottom of the screen.
21. Share your location, even while moving
Need someone to find you—or maybe just know where you are? Take a look at Maps’ simple system for real-time location sharing.
To try it, open Maps on your phone, tap the blue dot, and select “Share location.” You’ll be able to set an end time for location-sharing or opt to keep it active until you manually turn it off. Then select any of your contacts to share with or get a private web link to paste wherever you want.
You can also access the sharing function while in the midst of a Maps navigation by swiping up from the white bar at the bottom of the screen and then selecting “Share trip progress.” That’ll share your location with whomever you choose until you reach your set destination.
In either scenario, people who open the link will see an icon showing your current position on a map as you move—within the Maps app, if they have it, or in a regular browser window if they don’t. You’ll see an indicator at the bottom of Maps letting you know location-sharing is active, and you can always stop the sharing by tapping that box.
22. Search along your route while navigating
That swipe-up-while-navigating menu has one other useful pearl: an option to search along your current route.
Activating it will give you one-tap buttons for finding gas stations, restaurants, grocery stores, coffee shops, etc. along your way. You can also type in your own custom search term—if, say, you want to see every Starbucks or Taco Bell that’s on your present route.
23. Find out what’s near anything
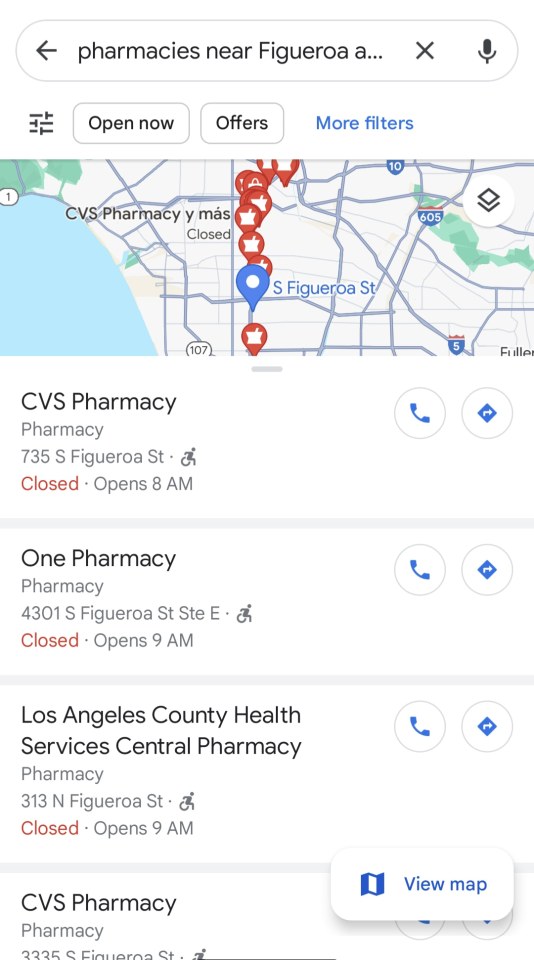
Speaking of search, Maps makes it easy to find anything you need even when you aren’t actively navigating. Anytime you want to find specific types of places near your current location or any other spot, tap the search bar at the top of the mobile app and try variations on these queries:
“Restaurants near here”
“Pharmacies near Figueroa and 1st Street”
“Vegetarian restaurants near me”
“Book stores near UCLA”
“Gas stations near the airport”
“Things to do near the Florida Theatre”
Maps can act as your guide to practically anything, anywhere.
You can also browse to see what’s near your current location by opening Maps and scrolling and swiping through the Explore tab at the bottom of the screen.
24. Get a ticket to ride
The next time you’re looking up a location on your phone and decide to hail an Uber or a Lyft to get there, save yourself some steps and order your ride from right within the Maps app. After searching for a specific place, tap the Directions button and look for the cab-hailing icon (between walker and cyclist) that pops up, showing the amount of time to get there. Tap on the icon, and at the screen’s bottom it will show cost and wait times for whichever ride-sharing apps are installed on your phone—and allow you to hop directly into the ride-ordering process within that app.
25. See how busy businesses are
Before you head out to the grocery, your favorite deli, or even the DMV, let Maps show you how long of a wait you’ll face upon arriving. Search for the spot in the Maps app—or find and tap it within your current map view—then tap the business’s name in the white bar at the bottom of the screen and scroll down until you see the section labeled “Popular times.”

See precisely how busy businesses are or are likely to be in the future with Maps’ Popular times tool.
26. Beam a map directly to your phone
When you’re looking up directions on your computer, save yourself a step and beam them directly to your phone for easy on-the-go access.
Click on an inconspicuous option that appears when you search for a place or pull up directions on the Google Maps website. It’ll be in the box on the left side of the screen—either as an icon beneath the place’s name or address, if you’re looking at a regular map, or as a plain-text link immediately above the route options, if you’ve already pulled up directions. (If you’ve clicked through to a specific route, it’ll be an unlabeled icon immediately to the right of the travel time estimate. And yes, there’s some irony in the fact that you practically need a map to find this feature.)
Click whichever version appears, and you’ll see a list of devices that are connected to your Google account. Android devices should show up automatically, while iPhones will require you to first install and sign into the Maps app and then enable notifications within the app’s settings.
Whichever way you go, the Maps info will show up as a notification on your device seconds after you send it over.
27. See time-specific traffic estimates
You can find out how long a drive is likely to take at any given time with Maps’ intelligent traffic estimation tool. Just search for a location in Maps’ desktop version, then click Directions and type in whatever starting point you want.

Maps’ traffic estimation tool will help you figure out how much time you need to leave for a drive, even if you aren’t hitting the road right away.
28. Get parking info before you go
Nothing’s more annoying than arriving somewhere at the last second and having to scramble for where to park. Maps can help—at least, if you have an Android device. Before you hit the road, search for your destination in the Google Maps app on your phone. Tap the Steps button toward the bottom of the screen, then look for “Find parking.” However, the parking feature is only available in some U.S. cities, and Google doesn’t specify which ones. So, if you don’t see the “Find parking” option, it’s most likely not live in your area.
29. Measure the distance between multiple points
Want to map out your morning jog—or maybe just know exactly how far you have to travel on a particular trip? Maps can precisely measure the distance between two or more points, all the way down to the second decimal.
On your phone, tap and hold your finger on your starting point. That’ll cause a red pin to appear along with a white box showing more info about the location. Swipe up on the box and select the “Measure distance” option. After that, use your finger and the blue + to find and select the second point. Repeat as many times as needed to measure your full path.

Maps’ distance-measuring feature makes it easy to figure out the precise distance between any number of points.
30. Save time with advanced gestures
Beyond the classic pinch-to-zoom, Maps has a bunch of other useful gestures to help you get around the app on your mobile device. Try out these advanced maneuvers:
To zoom in or out of a Map with a single hand, double-tap and then slide up or down on the screen without lifting your finger.
Spin a map around to change your orientation by placing your index finger and thumb on the screen and then twisting them together to the left or right.
Shift your perspective by placing two fingers on a map and sliding them both upward on the screen. That’ll take you into a “flyover” view of the area you’re looking at, complete with three-dimensional buildings in a lot of places.
Google Drive tips
31. Scan on demand
Most average mammals never realized it, but you can actually scan documents and receipts directly into Drive with the Google Drive app for Android.

The Google Drive Android app offers several options for on-demand scanning.
However you do it, Drive will save your image as a PDF and make its text searchable for future discovery. (And sorry, iPhone-toting pals: The option isn’t available in Drive’s iOS app as of now.)
32. Save stuff with a single click
Whenever you’re wading your way around the web on a computer, you can quickly save any web page, image, file, or screenshot directly from your browser to Drive by using the official Save to Google Drive Chrome extension.
Once the extension’s in place, just right-click any hyperlink to save its target into your Drive storage—or click the icon within the puzzle-shaped extension menu in the upper-right corner of the browser to capture and save a screenshot of your current view.
33. Maintain multiple versions of files
You’d be forgiven for failing to notice, but Drive has a potentially life-saving option to maintain multiple versions of any file for easy reference and later retrieval. You can use it with a PDF, an image, an archive, an audio file—you name it.
To get started, right-click a file in Drive and select Manage versions within the “File information” menu. Click the Upload New Version button to upload the file’s new version, then repeat that process as needed. Drive will show just a single file in its main interface, but when you right-click the file and select “Manage versions,” you’ll be able to see and download all the versions you’ve created.
Just keep in mind that, by default, only 100 older versions will be saved—and all older versions will be deleted after 30 days. You can tell Drive to hang onto a version eternally by clicking the three-dot menu icon next to the file’s name and selecting “Keep forever” from the menu that appears.
34. Search for stuff within your files
In addition to being able to search for text within regular documents and even PDFs, Drive can find images in your storage via a simple keyword search.
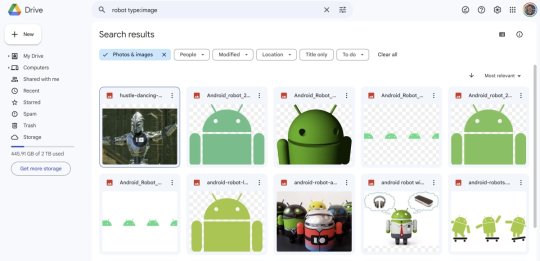
Just like its cousin Google Photos, Google Drive can find images when you search for keywords.
35. Sort your storage
Running out of space? Let Drive identify your biggest files so you can see what’s eating up your storage and clear out some room.
Start by clicking “Storage” on the left side of the Drive website. Then all your Drive files will appear in order of size, starting with the largest. You can even click the “Clean up space” option if you want some suggestions on stuff to delete.
36. Set a timer on your sharing
If you have a paid Google Workspace account, you can opt to make a file in your Drive storage available to someone else for only a limited period of time.
Right-click the file on the Drive website and select Share, then type in the name or email address of the person with whom you want to share and click Send. Once that’s done, make your way back to that same sharing menu—and this time, click the downward-facing arrow to the right of the person’s name (alongside Viewer, Commenter, or Editor).
Look for Add expiration in the menu that pops up, and you’ll be able to set a date on which the access will expire, then click Save.
Google Docs tips
37. Tap into a swift shifting trick
The next time you need to move text within a document, skip cutting-and-pasting for this faster way: When viewing a document within Docs on the web, just highlight the paragraph you want to reposition, then click and drag it with your mouse—or, in an even more efficient twist, place your cursor anywhere inside the paragraph, hold down Alt and Shift together, and use your arrow keys to move it wherever you want. (Who knew, right?!)
38. Format the faster way
With just a few quick clicks, Docs can copy the formatting from one area of text and apply it to another. The trick lies within that paint roller icon in the upper-left corner of the Docs website toolbar (to the right of the print icon). Place your cursor on the text that has the formatting you want, click the paint roller, and then click the paragraph where you want the formatting to be applied. The font, size, style, and color should all show up instantly.
If you want to apply the formatting to more than one area of text, double-click the paint roller at the start of the process. That’ll force it to remain active as you apply it repeatedly.
39. Find any command in no time
Save yourself the trouble of digging through Docs’ menus to find what you need and instead use the Alt-/ shortcut to search all available functions in no time.
You can get to any Google Docs function in no time by using the program’s menu search command.
40. Dictate your document
Give your fingers a break and let Docs turn your spoken words into text: As long as your computer has a microphone, all you have to do is open the Tools menu and select Voice typing—or hit Ctrl-Shift-S (or Cmd-Shift-S)—and speak away. Docs will use Google’s standard voice-to-text system to figure out what you’re saying (mostly, anyway) and put it on the page.
41. Use your voice to format
Docs’ voice-to-text function also lets you speak commands for common forms of punctuation and paragraph formatting. You can say things like “period,” “comma,” and “question mark” or give instructions like “new line” or “new paragraph.” If you want to take a break, say “stop listening” and then say “resume” when you’re ready to continue.
42. Edit aurally
In addition to taking down text, Docs’ voice-typing mode allows you to perform advanced edits via spoken command. The system supports a huge range of functions—selecting specific words, phrases, or paragraphs; applying different types of formatting to text; cutting, copying, and pasting; and even scrolling through a document or jumping to specific parts of the page.
43. Dig up info without ever leaving your document
Docs makes it possible to do all your research without ever leaving your word processor—both on a computer and from your mobile device.
Open up Docs’ Explore tool by looking in the Explore menu (or pressing Ctrl-Alt-Shift-I or Cmd-Alt-Shift-I) on the desktop site or by finding the Explore in the mobile apps’ main menu (while you’re actually editing a document). Docs will bring up a series of web results, images, and related documents from your past work.

Docs’ Explore function brings a world of research right into your word processor.
44. Connect to your own image collections
Attention, Google Photos users: Docs makes it so easy to add images from your Photos collection directly into your documents. When editing a document on the Docs website, click the Insert menu, and select Image to find the option. You can also add an image from your Google Drive storage, by URL, or by searching the web from that same area.
45. Edit images within Docs
Docs has its own tool to let you crop or edit images, too: Click on an image within your document, then click the Format menu and select Image. There, you’ll find the command for cropping as well as a broader Image Options selection that contains functions for recoloring and adjusting the image’s transparency, brightness, and contrast.
46. Get an on-the-fly dictionary check
Not confident about a word’s meaning? Hit Ctrl-Shift-Y (or Cmd-Shift-Y) with your cursor on the word. Docs will dig up a definition and show it on the right side of the screen.
47. Take note of your notes
If you use Google Keep as a note-taker, you can access your notes while working on a document and even insert an entire note into your current page.
Look for the Keep icon within the right-of-screen side panel to pull up the Keep widget. If you don’t see that side panel, look for a small left-facing arrow in the lower-right corner of the screen to reveal it.
Once the widget is visible, you can view and edit your notes. If you want to dump a note’s contents into your document, hover over the note and then click the three-dot menu icon that appears.
48. Translate anything, anytime
Don’t let a language barrier keep you from communicating. Docs has a native system that can translate entire documents into other languages: Click the Tools menu, then select Translate document. You’ll then be able to select the language you want and provide a new name for your translated file. Fácil, ¿no?
49. Email anyone without ever leaving Docs
How’s this for a hidden feature? You can email people directly from Docs to save yourself a step and make collaboration more efficient.
If you’re already sharing a document with someone, look for the Email collaborators option within Email in the File menu to get started. (Your message will come from the primary email address associated with your Google account.)
Or maybe you want to send a copy of your current document to someone via email without adding them as a collaborator—to provide the file to a client, for instance, or share it with someone outside your organization for review. Docs can do that, too: Just open that same Email option within the Docs File menu and select Email this file. You’ll be able to select from a variety of formats or even opt to include the text within the email body.
50. Create convenient in-document links
If you want to point people to a specific section of your document, use Docs’ bookmarking feature to create a direct link to any area of the text.
Place your cursor where you want the link to reside, then open the Insert menu and select Bookmark. A pop-up will appear with the link, though you’ll still need to be sure to share the document appropriately (either with the people you want to be able to view it or publicly, if you want everyone to be able to access it) before it’ll work for anyone other than you.
51. Make a PDF on demand
Need to send someone a link to a PDF version of your document?
Copy the full URL in your browser’s address bar while you’re editing the document, then change the “/edit” at the very end to “/export?format=pdf” (without the quotation marks). As long as people to whom you’re sending have access to the document, they’ll get a PDF of your work as soon as they open the link.
52. Build your own Docs template
You can use a similar trick to turn your document into a template for other people’s ongoing use: Once again, copy the full URL in your browser’s address bar while you’re editing the document—but this time, change the “/edit” at the end to “/copy” (again, without the quotation marks).

Let anyone copy your document as a template with Docs’ handy “/edit” URL trick.
Google Sheets tips
53. Summon the date in no time
Sheets has plenty of keyboard shortcuts, but one series that’s especially worth noting is the collection of commands that quickly insert the current date and/or time wherever you want:
Hit Ctrl or Cmd and the semicolon key within any spreadsheet to add the date; Ctrl or Cmd along with Shift and the semicolon key to add the time; and Ctrl or Cmd along with Alt and Shift and the semicolon key to add the date and time together.
54. Format text fast
Google Sheets’ fast-formatting shortcuts are also worth remembering. With the right combination of keys, you can format any cell or selection of cells however you want, without having to dig around in menus.
Commit these to memory:
Ctrl-Shift-1: Format as decimal
Ctrl-Shift-2: Format as time
Ctrl-Shift-3: Format as date
Ctrl-Shift-4: Format as currency
Ctrl-Shift-5: Format as percentage
Ctrl-Shift-6: Format as exponent
55. Make your own custom Sheets shortcut
You can actually create your own personalized shortcut within Sheets to perform a complex series of custom actions with a single command.

Sheets’ macro-recording system lets you create your own custom shortcuts for practically any actions imaginable.
You could do something like set a specific sort of formatting for a cell’s contents (bolded white text with the Open Sans font and a dark-gray background, for instance) or you could manipulate data in a more involved manner, like copying a cell’s contents and then erasing that cell and pasting the contents one cell over to the left. When you’re finished, click Save in the macro-recording panel, and you’ll be able to give your new shortcut a name and assign it to any available key combination for future activation.
56. Copy cells swiftly
Speaking of copying a cell’s contents, if you ever need to duplicate a cell’s data and have it appear in multiple cells above it, below it, or on either side of it, click the original cell to outline it in blue, then look for the little blue square in its lower-right corner. Click that square and drag it in whatever direction you want, for as far as you need. When you let go, the original cell’s contents will instantly appear in all of the other cells you selected.
57. Link two sheets together
Need to show some live data from one spreadsheet inside another? Copy the full URL of the sheet with the data and paste it into Sheets’ ImportRange function, using the following format (with your own URL, sheet number, and cell range in place):
=IMPORTRANGE (“https://docs.google.com/spreadsheets/d/1aBcDEfgHiJKLMnOPQRSTuVWXZ”, “Sheet1!D1:D15”)
Then paste that function into the sheet where you want the data to appear. You’ll have to hover over the cell and click a button to allow the two sheets to be connected, but then—hocus-pocus! All of the data from your other sheet will magically appear and remain current whenever any changes are made.
58. Grab data from the web
Sheets can pull in data from any publicly available web page, too, as long as the page has a properly formatted table. The secret lies within the ImportHTML command. Use it with whatever URL you need and the number indicating which table on the page you want to import (“1” for the first table, “2” for the second, and so on):
=IMPORTHTML(“https://en.wikipedia.org/wiki/List_of_sandwiches”,”table”,1)
Sheets’ ImportHTML command imports live data from any public web page in a nicely formatted table.
59. Bring any feed into your sheet
A similar kind of command can let you import recent entries from a website’s RSS feed into any spreadsheet. All you do is enter the ImportFeed command along with the URL of the feed you want. For instance, if you wanted to see all my Fast Company stories in Google Sheets, you could enter:
=IMPORTFEED(“https://fastcompany.com/user/jrraphael/rss”)
If you wanted only the titles of the stories—and wanted only, say, the most recent five entries—you could add in the following parameters:
=IMPORTFEED(“https://fastcompany.com/user/jrraphael/rss”,”items title”,false,5)
And then if you wanted to place the links to each story in a separate column alongside that, you could use this:
=IMPORTFEED(“https://fastcompany.com/user/jrraphael/rss”,”items URL”,false,5)
60. Eliminate extra spaces
If you spot some extra spaces before or after data in your spreadsheet, whether you’re looking at numbers or text, don’t forget the Google Sheets function TRIM. You can type it in for whatever cell you want (=TRIM(A1), for instance), and it’ll take away any leading or trailing spaces, and give you a cleaner version of the cell’s value.
If you want to perform the function for multiple cells at once, use this format for whatever range you need:
=ArrayFormula(TRIM(A2:A50))
61. Fix your formatting
Looking at lots of data with RanDoM or ImPropeR CaPitaLiZaTion? Sheets can standardize case formatting for you with a few simple functions:
=Upper(A1) will make all the text uppercase for whatever cell you mention; =Lower(A1) will do the same with lowercase; and =Proper(A1) will capitalize the first letter of each word for a title-case effect.
62. Enforce your email addresses
Maybe you have a database of user-submitted email addresses. Tell Sheets to look through the addresses and determine if they’re all properly formatted: Use the function IsEmail(A1) with whatever cell you need—or if you want to perform the function for a range of cells, use this format:
=ArrayFormula(ISEMAIL(A2:A50))
Sheets will give you a True or False answer for every email address you feed it.
63. Check out a chart
You can easily create a tiny chart within a single cell using Sheets’ nifty Sparkline feature. Just type the command =Sparkline followed by the cells you want to include, the word “charttype,” and then the type of chart you want to create—such as line, bar, or column—formatted like this:

The Sparkline feature puts tiny charts of data into single cells within your spreadsheets.
If you really want to get wild, you can even include a variety of customization commands that’ll control the colors used in different parts of your chart along with other visual factors.
64. Add some color to your rows
Want a quick and easy way to make your spreadsheet shine? Look for the Alternating Colors option in Sheets’ Format menu. It’ll give you a simple set of options that’ll apply a sharp-looking color pattern to your rows—no thought or effort required.
65. Try a Sheets text trick
While you’re jazzing up your spreadsheet’s appearance, think about letting Sheets rotate the text in your header row. Highlight the row, then click on the icon that shows an “A” with a right-facing arrow beneath it (toward the right of the top-of-screen toolbar—or possibly within the three-dot menu icon, if your window width is narrow).
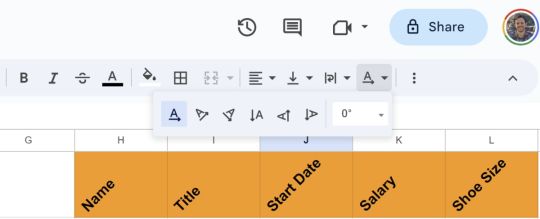
Rotating header-row text and adding alternating colors are easy ways to give your spreadsheet some extra pizzazz.
66. Stay on top of edits
When you’re sharing a spreadsheet or using a form to accept survey-like responses, you can ask Sheets to notify you whenever an edit or addition occurs—either immediately or as a once-daily email digest. Look for the Notification settings option in the Tools menu to set your preferences for any particular spreadsheet.
67. Finesse financial data
Sheets has the power of Google Finance (which—who knew?—is still a thing) baked right in for your stock-knowledge needs. The system is able to give you real-time or historical stock prices along with all sorts of other market-related data for any publicly traded company.
Simply use the function GoogleFinance followed by the info you desire, using the variables and formats described on this page.
68. Translate right within Sheets
Ever find yourself scrolling through a list of responses in different languages? Sheets can identify any language used in a spreadsheet and even translate it into your own native tongue on the spot. To detect a language, use the following function (with the appropriate cell number in place of “A1”):
=DETECTLANGUAGE(A1)
You can also enter in a word in place of a cell number, if you want:
=DETECTLANGUAGE(“pepinillo”)
Google will give you a two-letter code telling you the language that was used. To translate, meanwhile, use the following command—with your own word or cell number in place of “A1” and the code for whatever language you want to translate into (if it’s anything other than English, as referenced below):
=GOOGLETRANSLATE(A1,”auto”,”en”)
It just goes to show you: Much like the language of love, the language of spreadsheets truly is universal.
Google Search tips
69. Go back in time when a site’s offline
Trying to reach a site that’s temporarily down or permanently offline? Type “cache:” followed by the site’s address directly into Google. That’ll take you to a recently saved version of the site hosted on Google’s own servers.
70. Let Search decide your fate
The next time you need an impartial judge to help make a decision, try typing “random number generator” into Google. That’ll bring up a tool that lets you specify a minimum and maximum number—for however many choices you have, or even representing a specific set of values within a spreadsheet—and then have the Google genie randomly pick a number within that range.
The Google Search number spinner will land on a random digit, with anywhere from 2 to 20 options in place.
And for even simpler decisions, let Google flip a coin or roll a die for you by typing either command into the search box. (Bonus tip: You can also ask Google to spin a dreidel.)
71. Keep track of time
Make Google serve as your personal time-keeper by typing “timer” or “stopwatch” into a search box. You can also launch right into a specific timer by typing “20 minute timer” (or whatever amount of time you desire).

Google’s geometry calculator can work with a variety of advanced formulas.
Google has separate stand-alone calculators that can figure out tips and monthly mortgage payments, too. Search for “tip calculator” or “mortgage calculator” to give either a whirl.
73. Convert anything, anytime
The next time you need to convert between units, ask Google to do the heavy lifting for you. In addition to handling currency and practically any measurement system, Google can convert megabytes to gigabytes, Fahrenheit to Celsius, and days into minutes or even seconds.
You can explore all the possibilities by typing “unit converter” into the search box and then looking through the dropdown menus that appear—or you can perform most conversions directly by searching for the exact changeover you want (e.g. “14.7 lbs to oz”).
74. Turn digits into words
Who among us hasn’t come across a sprawling number and stared at it blankly while trying to figure out how to say it aloud? Search for any number followed by “=english”—”53493439531=english,” for example—and Google will spell out your number for you in plain-English words.
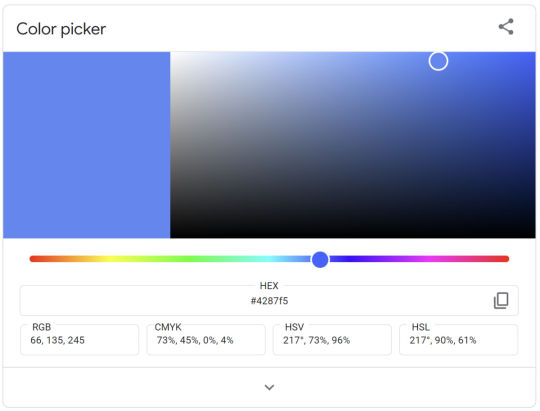
The color picker tool is an easy way to find color codes and convert among different code types.
You can also see an identifying swatch for a specific color code by typing it into Google in almost any form: “#fcef00,” “rgb(252, 239, 0),” “pantone 444 u,” and so on.
76. Start your streaming adventures
Figure out which streaming service has the show or movie you want by searching for “watch” followed by the program’s title. Google will give you a list of places where you can find it—both as part of an active subscription and on an à la carte purchasing basis.
77. Have some fun
When you’re ready for a break, let Google entertain you with a hidden Search game. Try searching for some of the following terms:
Google Pacman
Solitaire
Minesweeper
Tic Tac Toe
And last but not least, take a trip back in time by searching for “Google in 1998.” That’ll let you look through one of Google’s earliest site designs, from the time of the company’s launch—and make you appreciate just how far things have come.
#google#google tips#google tricks#77 incredibly useful tips for Google apps: Gmail#Docs#Sheets#and beyond
1 note
·
View note
Text
Sometimes, Google Chrome experiences a black screen on Windows 10, Windows 8, and Windows 7 devices. This is a known bug and fairly simple to fix.
The steps provided in this article to resolve the Google Chrome black screen issue are applicable for Windows 10, Windows 8, and Windows 7 devices.
#education#free education#google chrome crashes#google chrome#google tips#google chrome tips#windows10
0 notes
Text
How does Google Search work?

#getmoretraffic#seo#google#seo tips#digital marketing#content writing#google indexing#ranking in google#google tips
0 notes
Text
I have had these thoughts bubbling away in my head for like...eighteen months or so now (it will become very obvious why shortly) but the discussion in this post has pushed me to write them down: I think societally we HUGELY underestimate how motherhood for primary caregivers, particularly first-time motherhood, can be a source of vulnerability to radicalisation.
There is obviously huge cultural variance here, but for a lot of cis women becoming primary caregiver to an infant in a capitalist Western society represents a time of immense vulnerability because in general you are:
Incredibly sleep-deprived (which has well-documented knock-on effects for your judgement, mental health, etc)
If you gave birth, recovering from a significant challenge to your physical health (even in the best-case scenario)
Isolated from your previous networks and communities of people in full-time work
Completely separated from the context of your prior career goals and achievements
Under huge amounts of stress to learn how to care for an infant (don't get me started on breastfeeding)
And on top of this, you are also be experiencing a huge amount of messaging about how all this is natural, wonderful, something you're meant to do, something you should love doing, and something that you must do for the welfare of their child. It's a huge amount of pressure and life change even when everything goes right and there's very little cultural space to express negative feelings about it.
Any group of people who offer community, support, and affirmation to cis women in this situation are going to have a really good shot at radicalising them into some very weird and dangerous headspaces and in fact we see this happen all the time - think antivaxxers and TERFs. It flies under the radar because of the hazy positive glow that associates with motherhood and babies and also because we don't take the radicalisation of women seriously I guess because they rarely shoot anybody, but...yeah. It is such a vulnerable time!
#people who do not see themselves in the cishetero stereotype#are obviously going to have some separation from this & therefore protection#full confession: obviously in the last year and a half I have done a LOT of midnight Googling about Baby Things#and you know what. very often the top hits are Mumsnet forum threads#which...often contain useful and sympathetic advice#I can so easily see how people get sucked into that#they're not getting people with TERFy shit they're getting them with 'tips for getting your four month old to nap better'#which is the MOST IMPORTANT THING IN THE WORLD when your kid is four months old#and then the TERFy nonsense presumably comes later#because that's how radicalisation works
1K notes
·
View notes
Text
You don’t have to pay for that fancy worldbuilding program
As mentioned in this post about writing with executive dysfunction, if one of your reasons to keep procrastinating on starting your book is not being able to afford something like World Anvil or Campfire, I’m here to tell you those programs are a luxury, not a necessity: Enter Google Suite (not sponsored but gosh I wish).
MS Office offers more processing power and more fine-tuning, but Office is expensive and only autosaves to OneDrive, and I have a perfectly healthy grudge against OneDrive for failing to sync and losing 19k words of a WIP that I never got back.
Google’s sync has never failed me, and the Google apps (at least for iPhone) aren’t nearly as buggy and clunky as Microsoft’s. So today I’m outlining the system I used for my upcoming fantasy novel with all the helpful pictures and diagrams. Maybe this won’t work for you, maybe you have something else, and that’s okay! I refuse to pay for what I can get legally for free and sometimes Google’s simplicity is to its benefit.
The biggest downside is that you have to manually input and update your data, but as someone who loves organizing and made all these willingly and for fun, I don’t mind.
So. Let’s start with Google Sheets.
The Character Cheat Sheet:

I organized it this way for several reasons:
I can easily see which characters belong to which factions and how many I have named and have to keep up with for each faction
All names are in alphabetical order so when I have to come up with a new name, I can look at my list and pick a letter or a string of sounds I haven’t used as often (and then ignore it and start 8 names with A).
The strikethrough feature lets me keep track of which characters I kill off (yes, I changed it, so this remains spoiler-free)
It’s an easy place to go instead of scrolling up and down an entire manuscript for names I’ve forgotten, with every named character, however minor their role, all in one spot
Also on this page are spare names I’ll see randomly in other media (commercials, movie end credits, etc) and can add easily from my phone before I forget
Also on this page are my summary, my elevator pitch, and important character beats I could otherwise easily mess up, it helps stay consistent
*I also have on here not pictured an age timeline for all my vampires so I keep track of who’s older than who and how well I’ve staggered their ages relative to important events, but it’s made in Photoshop and too much of a pain to censor and add here
On other tabs, I keep track of location names, deities, made-up vocabulary and definitions, and my chapter word count.
The Word Count Guide:
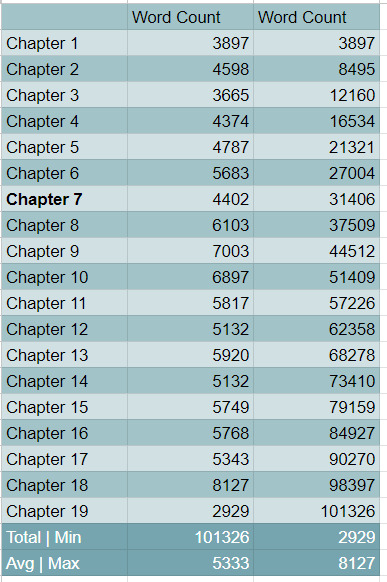
*3/30 Edit to update this chart to its full glory. Column 3 is a cumulative count. Most of what I write breaks 100k and it's fun watching the word count rise until it boils over.
This is the most frustrating to update manually, especially if you don’t have separate docs for each chapter, but it really helps me stay consistent with chapter lengths and the formula for calculating the average and rising totals is super basic.
Not that all your chapters have to be uniform, but if you care about that, this little chart is a fantastic visualizer.
If you have multiple narrators, and this book does, you can also keep track of how many POVs each narrator has, and how spread out they are. I didn’t do that for this book since it’s not an ensemble team and matters less, but I did for my sci-fi WIP, pictured below.

As I was writing that one, I had “scripted” the chapters before going back and writing out all the glorious narrative, and updated the symbols from “scripted” to “finished” accordingly.
I also have a pie chart that I had to make manually on a convoluted iPhone app to color coordinate specifically the way I wanted to easily tell who narrates the most out of the cast, and who needs more representation.
—
Google Docs
Can’t show you much here unfortunately but I’d like to take an aside to talk about my “scene bits” docs.
It’s what it says on the tin, an entire doc all labeled with different heading styles with blurbs for each scene I want to include at some point in the book so I can hop around easily. Whether they make it into the manuscript or not, all practice is good practice and I like to keep old ideas because they might be useful in unsuspecting ways later.
Separate from that, I keep most of my deleted scenes and scene chunks for, again, possible use later in a “deleted scenes” doc, all labeled accordingly.
When I designed my alien language for the sci-fi series, I created a Word doc dictionary and my own "translation" matrix, for easy look-up or word generation whenever I needed it (do y'all want a breakdown for creating foreign languages? It's so fun).
Normally, as with my sci-fi series, I have an entire doc filled with character sheets and important details, I just… didn’t do that for this book. But the point is—you can still make those for free on any word processing software, you don’t need fancy gadgets.
—
I hope this helps anyone struggling! It doesn’t have to be fancy. It doesn’t have to be expensive. Everything I made here, minus the aforementioned timeline and pie chart, was done with basic excel skills and the paint bucket tool. I imagine this can be applicable to games, comics, what have you, it knows no bounds!
Now you have one less excuse to sit down and start writing.
#writing advice#writing resources#writing tips#writing tools#writing a book#writing#writeblr#organizing your book#outlining#shut up and write the book#google sheets#google docs
959 notes
·
View notes
Text

so happy for her
309 notes
·
View notes
Text
for my feline friends: this purr generator is my favorite thing on the internet, you can adjust the timbre as you wish and it's so warm and calming
for my canid friends: these generators for wolf pack howling and sled dogs running are by the same sound engineer on a different website, also adjustable, the sound quality is great and they never exactly repeat
overall i really recommend the site mynoise.net!! it's got so so many different noise generators and you only have to donate like $5 once to access them all there's no subscription or anything. some of my favorites are northern woodland, sailing ship, japanese garden, mr. rhodes, distant thunder, and dreaming nautilus <3
#there's also one called alpha omega that's actually just a lot of ominous brooding electric guitar lolll#i feel like more people should know about mynoise it's so nice#misceblr#misceanimalis#miscemunity#otherhearted#otherkin#alterhuman#therian#mynoise#mur.txt#also!!! pro tip the generators themselves aren't paywalled you just can't navigate to them from the main page for free#so if you can't donate rn you can just google 'mynoise fire' or 'mynoise railroads' and find the soundscape that way!#would highly recommend donating if you can though it's well worth it and there's so much to explore#it even has rpg soundscapes like a battlefield and a dungeon and a medieval town square!!! idk why this isn't bigger news on tumblr tbh#anyways. mynoise.net!! highly recommend#now i gotta clean my damn room :/
163 notes
·
View notes
Text
Help a girl out!
Hi all! After 5 years of excellent service, my phone is starting to fall apart. Literally, the screen is coming loose.
So in order to fund my new phone, and be able to keep annoying you with pretty pictures and update my OF/Google Drive, I'm asking for your help. With a little something something in return, of course.
Access to my Google Drive will be 35 eur (instead of 45 eur) for lifetime access over the entire weekend and I will be adding two or three whole new videos later tonight! I'll be adding the same to my OF, probably through a paid message.
Please, if you have anything to spare, I'd appreciate it (and you) a lot!
Donate through my PayPal or Follow my OnlyFans
P.s. if you don't want to pay me/whatever, it's fine as well! No hard feelings. I'm only asking those who want to. Also, I have a job, but I'm waiting to get paid and PayPal is a lot quicker than waiting for my clients tyvm
#mine#pay me#paypal me#pay my bills#paypal#pay piggy#buy me things#buy my love#buy my pics#buy google drive#content creator#my content#i sell content#buy my premium#buy my videos#paypaal me#please share#please donate#donations#donate if you can#support me#tip me
142 notes
·
View notes
Text
Use This A.I. Marketing Strategy To Grow Your Business In 2023 ( [Video]
1 note
·
View note
Text
Of all the devices the modern smartphone has managed to kill off, the point-and-shoot camera has got to be right up there near the top of the list. And while it’s easier than ever to snap a quick but breathtaking photo or grab a minute or two of high-quality video, it’s what you do with those memories that counts.
In that spirit, here’s a list of tips and tricks you can use to make sure you’re leveraging Google Photos—which now has a billion-plus users—and all its powerful features to the fullest.
1. Back ’em up and clear ’em out
We’ve all had our lives turned upside down by the dreaded low-storage message popping up on our phones. And you know what’s probably the culprit? Photos and videos. They’re huge! One of Google Photos’ killer features is the ability to automatically back up your photos and videos for free at 16 megapixels for photos (which is pretty good) and 1080p full-HD for videos (also pretty good).

From here, you’ve got two options for upload sizes: High quality or Original quality. High quality backs up your photos and videos for free at the aforementioned resolutions, while the original quality setting grabs whatever resolutions your phone is set at and counts against your Google storage limits. These options can be found under Backup mode and Upload Size on Android and iOS devices, respectively. More info here.
And finally, once your photos and videos are safely backed up, you can clear them off your phone’s storage to free up space and get rid of low-storage warnings. Tap the menu icon and select Free up space to do just that. Your photos and videos will be accessible via the Google Photos app and on the web at photos.google.com, while your device itself will be freed up to take additional photos and videos. More info here.
2. Sharing is caring

Another great feature is the ability to automatically share some or all of your photos with a partner. My wife and I use this feature for the bajillion photos of our kids that each of us take with our respective phones. Tap the menu icon, then select Settings, then tap the Shared libraries item. From there, you’ll have the option of sharing all your photos or just photos of specific people (more on that in the next tip), and whether you want to start sharing photos taken after a specific date. Pretty cool!
3. Put a name with each face

4. Search like a pro

5. Get prints promptly
Finally, if you’re longing for the good old days of printed photos, Google has made it pretty painless to zip your favorites around the corner to your local CVS or Walmart for near-immediate pickup. Simply tap and hold the photo you want to print and select other photos if you’d like to print additional ones. Once you’re ready, tap the shopping cart icon in the upper-right corner and select Photo print. From there, you’ll be able to choose the size and quantity of your prints and then choose the nearest CVS or Walmart location for pickup. It’s about as easy as it gets when it comes to going from digital to tangible. More info here.
#5 Google Photos tricks to help you get the most out of your memories#google#google tips#google photos#photos#photo tips#electronic photos
1 note
·
View note
Text
Hey writers with Scrivener, IDK if anyone has posted this yet, but Scrivener actually has a pretty helpful guide on how to import all your work from Google Docs that makes it way easier than just copying and pasting everything. I only just found this today, so I wanted to share!
304 notes
·
View notes
Last Seen Blogs

sfm786
Untitled

l-art-en-image
L'art en image Portfolio

sweet-faerie16
el sol y la luna

bogorone
BogorOne.co.id

oldeward
Charlotte