#gradient background overlay
Explore tagged Tumblr posts
Visit Tumblr Blog
Explore Tumblr blogs with no restrictions, modern design and the best experience.
Last Seen Tumblr Blogs


Fun Fact
US Tumblr user growth rate is estimated to slow down to 4.1%.
Text

How to add Gradient Background Overlay
#gradient background overlay#css gradient#html css#divinector#css#html#css3#code#webdesign#frontenddevelopment#css gradient effect#css tricks#css effects#learn to code
1 note
·
View note
Text

MayI offer a Majin Vegeta again, anyone? 😏

Erm, uh…Goku…can I fight him next perhaps…you can wait…

And if curious, here’s the obvious and most importantly VERY immaculate reference!!
#crying screaming throwing up#Ohhh puffy tail he angy#Welp this one was quite the challenge actually#I had to add gradient to the background or else I’ll get a headache it HAS to be there#And I made accidentally goku a bit bigger#but maybe it’s because I didn’t overlay him first and just eyeballed mostly everything#But it’s whatever :p#Let us feast upon this my moots#delectable#anyway#dragonball#dbz#goku#vegeta#son goku#majin vegeta#buu saga#dragonball z
165 notes
·
View notes
Text

KNiFELACE ──── a(n edit) resource blog run by @chocospresso .

𓊆 my neospring . if you wish for me to delete a post / reblog , let me know .

#𓊆 ✑ 𓊇 posts.#𓊆 ✑ 𓊇 asks.#𓊆 ✑ 𓊇 reblogs.#𓊆 ✑ 𓊇 not resources.#𓊆 ✑ 𓊇 transparents.#𓊆 ✑ 𓊇 masks.#𓊆 ✑ 𓊇 pfp masks.#𓊆 ✑ 𓊇 banner masks.#𓊆 ✑ 𓊇 dividers.#𓊆 ✑ 𓊇 lace.#𓊆 ✑ 𓊇 frames.#𓊆 ✑ 𓊇 backgrounds.#𓊆 ✑ 𓊇 psds.#𓊆 ✑ 𓊇 gradient maps.#𓊆 ✑ 𓊇 overlays.#𓊆 ✑ 𓊇 fonts.#𓊆 ✑ 𓊇 tutorials.#𓊆 ✑ 𓊇 websites.#𓊆 ✑ 𓊇 graphics.
65 notes
·
View notes
Text
Labyrinth Angel
#digital art#doodle#this was a test for blocking in lineart by hand w a pixel brush instead of using the polygon tool i did over a week ago#ive just had the angel sitting in my files bc i didnt wanna post it as a transparet png#the background is heavily scrabbled together classic mortem red+black gradients n weird overlay#the censored woman in the bottom right is purely bc this pose sux 4 composition but i liked it 2 much n it was already drawn#overly stylistic empty space fill. it was still 2 empty even w the maze pattern
31 notes
·
View notes
Text

^ tensely deliberating whether or not i want to separately gradient dye every piece of fabric on this mans outfit. I think i already own denimy blue and black fabric dyes which would work for the skirt and outer cape, and i could get purple dye for the inner cape. How hard is gradient dyeing fabric tho?
Also i already own shoes that are the same shape and color as his but theyre like swirly florally burnt velvet, so not totally accurate but might add to the vibe
BTW if anyone knows of anyone whos already cosplayed eugene and wants to namedrop them, pls let me know!
#for his collar im thinking theres probably a sparkly glittery gold mesh out there#and it might work to dye that teal (blue over gold colored mesh?) to get a fabric thats tealish with gold sparkles#and overlay it on a teal background#might have some nice dimension and variation in color#also part of me genuinely considered getting his cartilage piercing LMAO but ill probably just glue some baubles on my ear#i do want to get a septum piercing but the con is in abt a month so no i do not have time to heal it and change out the jewelry#so fake septum will do#oh also i know the gradients are probs just shorthand for silky fabric or adding dimension but i love accuracy and going overboard#drawtectives
13 notes
·
View notes
Text
remembering how to even simply blend a gif, fucking around with font choices and overlaying png's after so long has reminded me why i stopped in the first place. i'm once again back to wanting to yeet my laptop out the window :)
#hello darkness my old friend#tbf the blending was pretty easy it's embedded in my muscle memory but oh boy picking a font has me wanting to kms#trying to use gradient overlays on pngs & text without it looking like garbage because of the gif background etc is testing me#this is why i stopped with edits because i don't have the patience for them & learning new techniques but i am trying to persevere.#maybe ill finish one before the years out lol
6 notes
·
View notes
Text

CSS Gradient Background Overlay
#css gradient background overlay#codenewbies#html css#frontenddevelopment#html5 css3#css tricks#css effects#css gradient effect#css#webdesign#code
1 note
·
View note
Text
easy to read version of my pinned here (hyperlink)

— till ou comet
┊ xyu / byte / star
@idolki's resource / edit blog .
see under the cut for more...?
“ I COULDNT HURT SOMEBODY SO SWEET, ”

“ BUT ITS TURNING ME ON JUST WATCHING YOU LEAVE ”
till irl . minor . see @endearie for more info . no dni .
top divider nf2u (as it has my url). banner & icon nf2u.
i am anti ai generated content; however, it is difficult for me to catch it. if i accidentally use or reblog ai content, please notify me asap.

my qpp also runs an edit rsrc blog ; check it out . @tatsugirii
i do take requests . however , i am primarily focused on resources . i am a resource blog first and foremost .
#🌌 my own#🌌 dividers#🌌 pngs / transparents#🌌 masks#🌌 frames#🌌 overlays#🌌 backgrounds#🌌 text#🌌 psds / gradient maps#🌌 stamps / blinkies / buttons / etc#🌌 graphics#🌌 other#🌠 chats#save#tag later
0 notes
Text

most annoying computer in the whole wide world
(inspired from @inkzectz)
[image id: digital illustration of gordon freeman and benrey from hlvrai. benrey is a screen monitor with cracks in his screen and has a large grin looking up at gordon who is angrily yelling "SHUT UP!!!" with closed eyes. computer benrey is sitting between gordon's legs. gordon is wearing a white tank top with gray sweatpants and socks and has a scar on his left arm where his hand was cut off and reattached. in the top right corner there is a doodle of gordon kissing benrey's screen as smoke rises from benrey's vents with text above them saying "grossest wet smooch to ever occur". the background is a green to blue gradient with 1's and 0's overlayed on top. end image id.]
#hlvrai#half life vr but the ai is self aware#gordon feetman#hlvrai benrey#described art#frenrey#my art#not original at all but i love idea of benrey taking over gordon's computer esp if it was his streaming computer or whatever#they would literally be so lame#techum#objectum
845 notes
·
View notes
Note
can you talk about your process when designing your illustrations :)
hiiii marisa <3 <3 hope you're doing really well !! :))
my illustrations are usually either the result of building slowly on thumbnails, or they kind of come to me in a sudden visual flash while i'm walking around. the former tend to be landscapes while the latter can often be more expressive or fluid. here are some thumbs as examples !


i try to get some sense of perspective and space here, but generally it's just to pin the idea down.
then comes colour - i've spoken a bit about how i select colours based on warmth and saturation, but mostly these days i take some loose inspiration and then continue with whatever feels right. my biggest colour inspirations have come from celia lowenthal and alexandre 'zedig' diboine.


i block the colours in under the loose thumbnail layer, then get straight to inking.

there are some speedpaints on my youtube if you'd like to see more of my process here - i usually put on an audiobook or a video essay and use my trusty ink fineliner to outline each and every detail. sometimes if something is in the background i'll reduce the brush size, but generally my lines are all the same weight.

and then I take the colours I outlined under the thumbs and reapply them to the precise lines. ^ here I use a soft round brush for gradients along with the ink sumi-e brush for applying flat colours.

then, finally, comes the overlay layer for lighting effects and extra details!
I hope this helps, as I feel like I always have so much room to improve (especially where composition and layout are concerned). if there's interest i'll make a more concise and clear step-by-step breakdown, but for now i'm always happy to take any suggestions or thoughts on how i can keep trying to make engaging narrative-based illustrations :))
660 notes
·
View notes
Note
sorry if this has been asked before but how do you make your gradients look so good?
Hi Anon! First of all thank you so much 🫶
I like to use gradient maps (which I've explained here) or gradient fills + gradient tool. I'll drop a little tutorial under the cut:
GRADIENT FILL
I'll be using this gif which I've already sharpened and coloured:

First of all let's make the background pop so I'm going to add a gradient fill (Layer -> New fill layer -> Gradient) with these settings (I'm using this colour #0099ff):

Now it's the time to play with the blending settings! Depending on your scene some will look better than others but I usually switch between Soft Light, Overlay, Color or Hue. 90% of the time I use soft light but this scene looked much better using overlay:

As you can see the background looks more blue and vibrant but it's not too much you know.
GRADIENT TOOL
Now it's time to use the gradient tool to give this gif a hazy look. I haven't seen many gifmakers talk about this tool but it's soooo useful and it takes gradients to a whole new level.
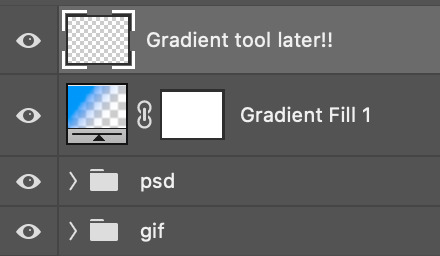
Before using this tool we'll need to add a new layer above the gradient fill, like this:
(HELP I just realised I typed “later” instead of “layer” 🤡 but let’s ignore that)
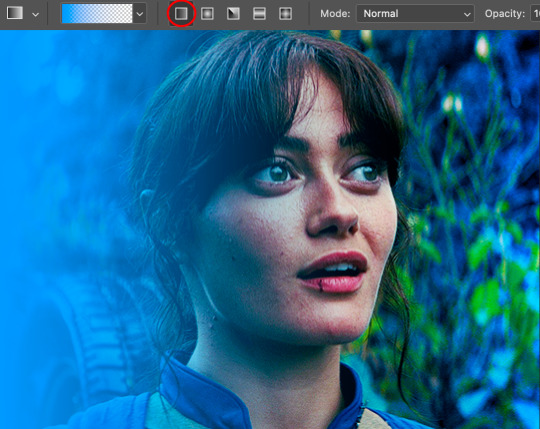
You can choose the gradient tool by pressing 'G' and then clicking here:
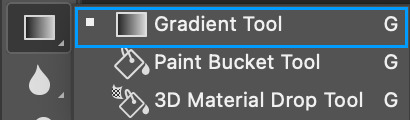
Make sure your gradient goes from any colour to a transparent background.

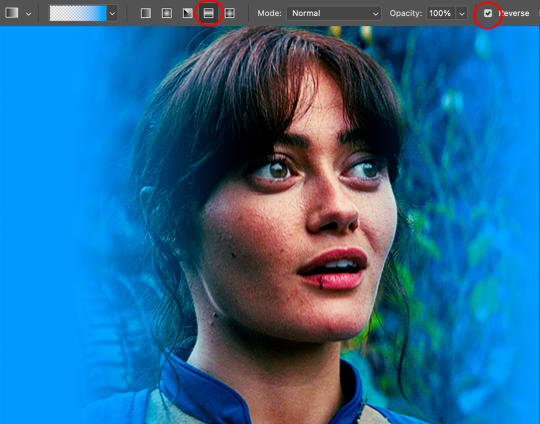
Okay so next to this gradient settings we have five different styles and each one will create a different shape. Depending on the scene I'll use the first, second or fourth one. Here are how they look:
1. Linear gradient
2. Radial gradient + Reverse (if you don't click this you'll end up with a blue circle above your gif)
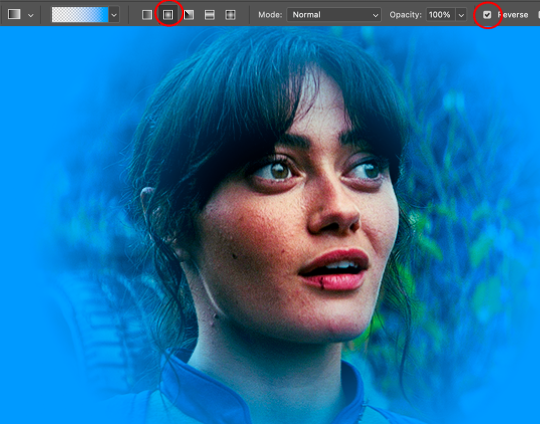
3. Reflected gradient + Reverse
This time I'm going to use the radial gradient so to draw it start by clicking on the centre of the gif and drag the line (the farther you drag it the less intense the gradient looks):
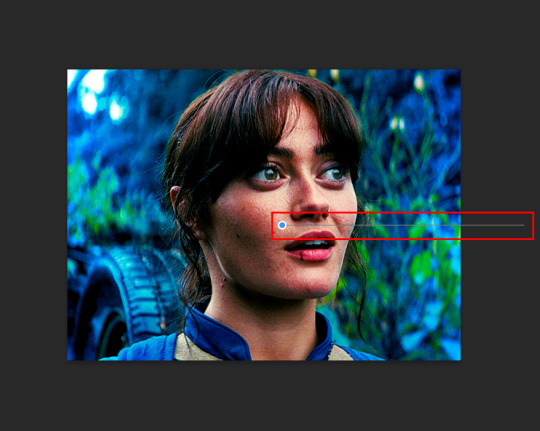
And this is the gradient:
And here comes the fun part again, playing with the blending setting and the opacity! Before doing anything I duplicate my gradient layer because I always use more than one so this is how your layers should look like:

Let's go to the first gradient tool layer and again try different blending modes: soft light, overlay, hue... Most of the time I'll use 'Soft layer' and I'll leave the opacity at 100%.
For the second layer choose 'Screen' and don't worry if your gif looks too bright because we're going to fix this by decreasing the opacity. Anything between 20-60% should look good but it depends if you want a more vibrant or more natural effect. I ended up using 40% and this is the result:

And we're done!!! As you can see the result looks much different from our first gif and it only takes a couple of layers!
Honestly the best advice I can give you is to play with the opacity and blending mode of the different gradient layers because depending on the scene some will look better than others!
#ask#Anonymous#ps tag#tutorial#usernolan#userrin#useraljoscha#uservalentina#userbunneis#userlockescoles#usernik
561 notes
·
View notes
Note
Hello, Ashes! :o]
I wanted to ask how you get your lines to look Like That! Do you color them manually or do you use a filter/gradient map?
Hello there! Hm, I'm not sure if I know what a gradient map is. I assume you mean how do I make my lines look "burned" like this?

It's a really easy process! Only thing I do is create a layer above the lineart, paint it completely orange and put it in overlay mode, then I merge them together. Make sure the lineart doesn't have a transparent background, but a completely white one, then it should work.

Now, bad thing is: you have to color on a higher layer, with the multiply mode. Same with rendering. Also, the lineart must be black. So it's pretty limiting when it comes to style. Personally I apply the effect only when I draw sketches without color.
Surely there's a better, much less complicated way of doing it here in Paint Tool SAI (which, of course, I'd love to learn), but this is how I do it! Hope this is what you were referring to. Otherwise, feel free to ask again and I'll answer!
142 notes
·
View notes
Note
hello i love ur art <3 may i ask how you shade/render? or if you can share any helpful tutorials you learned from ^^


Unhinged Art Tutorial
Well, anon and @merlucide! I'm not sure if I'm the best person to learn from (I'll attach some video links at the end to people who I personally look to for art advice) but I happen to have a series of screenshots for how i render with a strawpage drawing I did recently(at the time I drafted most of this a month+ ago), so I'll go over what I do, at least in this case.
Warning: A bit rambly. Not sure if intelligible.
Tutorial..? Explanation? under the cut.
I have a few different shading styles based on ease of program usage and effort level, but in this case i had to individually streak the shadows. I'll be focusing on hair and skin for the most part here.
My sketches are pretty poor, because I'm hasty:


Honestly I find the better the initial sketch, the easier the final profuct will come. So take your time, use layers when sketching to be clean. The airbrush layering shows vaguely how I tend to shade hair.

Backlighting *Applicable mostly when there is a bright background, light behind the subject, or in neutral lighting.
The 'underside'/inside I tend to use a peachier, brighter tone closer to the skin color (for tanned skinned characters I'd use a shade closer to a rosy orange, since that's just a more saturated peach. For darker skinned characters, I'd recommend a slightly redder & brighter version of their skin tone. This works pretty well with dark hair+dark skin, but in the case that your character's hair color is a lot lighter compared to their skin tone [also in the case of a fair skinned character with WHITE hair] it's totally fine to ignore the natural undertone of the character and shade it with a pinkish white.) This works for any hair texture but can be more time consuming for coily hair textures. (2c-4c)

Lineart when I take my time / Old rendering video


It looks more stable if you start off with a solid lineart base because you won't struggle with big-picture placement issues.
"Lineart" when I just try to pump out a drawing

I first did a rough sketch, kept it as an overlay layer and drew over it.

(Chickenscratching is valid though, honestly. I think it has a look to it!) I usually block out base colors, and vaguely where I want the shading to go, unless I need a special type of lighting, which then I'd do the base colors and either choose to wait until I'm finished rendering or do light processing* (*will discuss this later in this post) with different blending modes and layers.
For example if I'm doing the colors mostly FIRST (Choosing a grayed out palette) and then rendering, it'd look a little something like this: Left (Trackpad, on FireAlpaca) / Right (iPad, on Clip Studio & Procreate)


Sometimes, I'll shade with a dark, grayed out tone and then fill it in with something slightly more vibrant. This kind of gives it a bounce-light feel? Also with a lot of pieces I do recently I try to block out entire parts as white because lighting especially on white background pieces looks better if you pretend that it's white behind the character due to an intense sunlight.

Also, I use gradient layers to tweak with the colors. It's pretty useful and looks nice!!!! Gradient maps are available in every software I use: Procreate, FireAlpaca and Clip Studio Paint.

I find that the more intense the light (but not scattered, as in the source is either very bright or it's very close) the darker the shadows usually look? And if there's a brightness coming from behind the figure and the hair is splayed out in some way, it will appear semi translucent because it's just a bunch of strands made of keratin and collagen, something like that....


Anyway this is all very messy but I hope it helped

Here's a process photo for how I shade if that helps too.


More examples..

I broke down my thought process in my lighting so here's a close up of that.
i totally forgot about the video links so here's my idol the one and only:
And I think this guy makes quick but concise tip videos:
Finally I really like the in depth professional explanations from a long time illustrator:
I've personally taken advice from all three's videos and used them to improve my own art, so take a peek!!!!
76 notes
·
View notes
Note
this a gorgeous gifset for wicked 💗
https://www.tumblr.com/tidescaller/781106467228073984/glinda-in-wicked-part-i-happy-birthday?source=share
I would appreciate a tutorial for the first gif blending and colouring

Hi anon! thank youuu, i'll leave the tutorial under the cut ૮(˶˃ᆺ˂˶)
As always, basic knowledge on making gifs is required to do this type of edits. I linked some useful guides on my previous tutorial here.
PART I: BLENDING
STEP 1, BASE GIF
I recommend getting ready the gifs you're going to use before any try on blending them. And which ones are right to blend? That's just depends on the scenes you're working on. On this gifset, I made two previous blends that didn't make it to the final version cause I didn't like how it turned out. It's all about trial and error.
For this specific blending, as I'm working with only 2 gifs, I'll start editing first the base and then the one "blended". Adjust your BASE GIF in your canvas as you want.

I sized mine like this cause I imagined the second scene of Glinda behind this one.
STEP 2: BACKGROUND
i followed becca's coloring tutorial for this part, except I didn't add any adjustments yet. only coloring the background for a later gradient blending.

STEP 3: BLENDING
Duplicate your other gif into the canvas and change its blending to screen

Now add a layer mask (the button marked with red in the picture) and, with a soft brush at 200px/300px, start erasing whatever you don't want. Remember black is 0% opacity and white is 100%.


STEP 4: THE BLENDED GIF
The problem I noticed by this point is that my background coloring on the BASE GIF was kinda irrelevant cause now the BLENDED GIF completely covered it (。•́︿•̀。) and I also wanted this one to be pink. In order to do this, I created a gradient map layer and made it as a clipping mask so it wouldn't affect my main gif.


PART II: COLORING
STEP 5: BASE
For the base coloring, I always follow this tutorial cause it's literally how I learned how to do it. Honestly, check all maziekeen's tutorials (she made A TON) cause they are so good and your learn a lot. However, I tend to give my personal touches like adding another vibrance layer if i feel like it, cause I like the colors to pop; or skipping steps if I don't think they fit my gif/style. Anyways, this is the result for now:

and these are my settings


i tried to translate as much as possible (,,>﹏<,,)
STEP 6: SMALL TOUCHES
Could leave the gif as it is, but when I was working on it, I felt like something was missing. So the last step is to apply/paint some small touches of pink (or whichever color you're working on). This trick I learned it from this beautiful and very detailed tutorial from dani (she is awesome!! and her tutorials and gifs are flawless!!)
Create a new layer, use the soft brush tool at 1000px, zoom out your gif and start painting out of the canvas (you can totally paint inside if you feel like it) Play with different opacities and blending modes of the layer, this is literally how I created all these gifs. I know it sounds stupid ajskjas but it's true!! Try what best fits the structure of the gif. The first one I made is with multiply at 60% and you can see how much the gif changed already.

The second being color at 100% and the third one hard light at 30%
STEP 7: THE CHERRY ON TOP
Finally I added an animated overlay from this post. Changed the blend mode to screen and erased a bit of it on glinda's face creating a layer mask and with a soft brush. Added my texts... and that's a wrap! :D

I used the same process on gifs 3 and 5 ⸜(。˃ ᵕ ˂ )⸝♡
#*tutorial#gif tutorial#photoshop tutorial#blending#coloring#allresources#completeresources#dreamcreations#dailyresources#gifmakerresource
74 notes
·
View notes
Note
your rendering is so good how do you do it
Thanks, I love your rendering too!! Gonna try and make a tutorial ^^
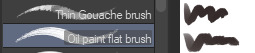
To start off, I'm on Clip Studio Paint and these are the brushes I use! First two for rendering characters (round brushes) and the other two for mostly backgrounds (square brushes)

I used to do lineart, but it takes too long >:( now I just make a sketch and sorta clean it up!

Next I fill it in with a gray color. For simpler pieces I just put in the flat colors, but for more paint-y pieces I do grayscale -> color! I'll be doing that here :)
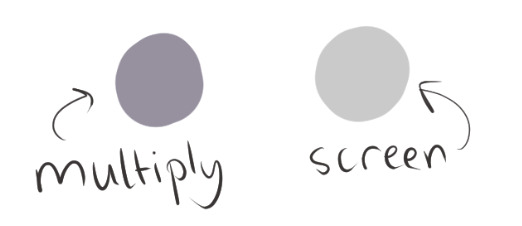
Also, I make 3 clipped layers on top of the gray - two are multiply, and the top one is screen. On the first multiply, I do a soft gradient using an airbrush
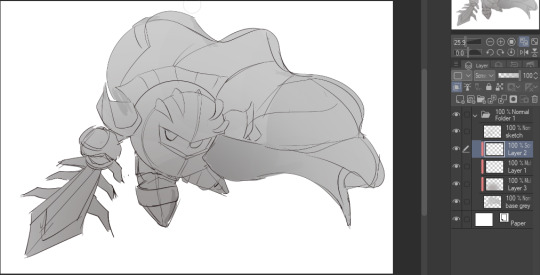
On the next multiply layer, I fill everything in with either a cool-ish or warm-ish gray, depending on the mood ^^
I also determine a light source, and use the lasso tool on the screen layer to block out where (I think) the light hits! Tbh I just do wherever feels right lmao, but I recommend having a reference! I like doing it in triangle patterns

Then adjust the opacity of each layer to whatever feels right, and merge everything (I don't merge the sketch/lineart yet, I do it before adding colors in!)
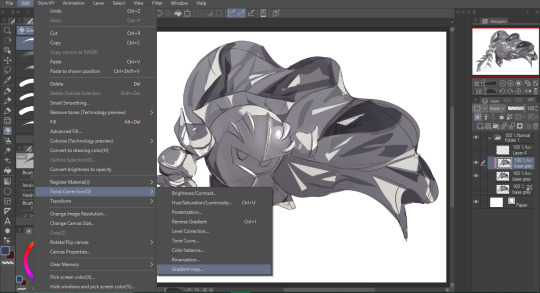
Now... rendering. Some tips I have are color pick (greys) off of the canvas and use them to paint! Clean up the sketch more, erase edges, but I save details (like Galaxia's red gem, his eyes, etc.) for the end, or during coloring.
After I'm sorta happy with it, I merge the sketch layer, then duplicate it, and add a gradient map! I did this sunset-y one but changed the hue to yellow-ish, then lowered the layer's opacity ^^
Play around with the hue-saturation-luminosity setting!


Now go crazy with blending modes! Multiply, overlay, color, glow/color dodge, etc. Feel free to layer them up on top of each other too, and this is to add the character/piece's actual colors in. For example, I used a white-blueish overlay layer for his mask and glove, blue for his cape, blah blah
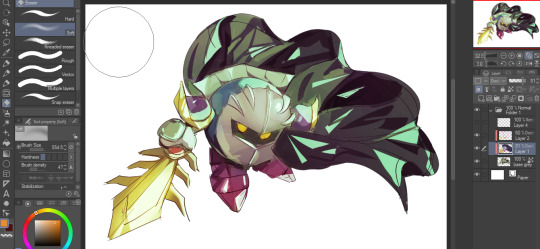
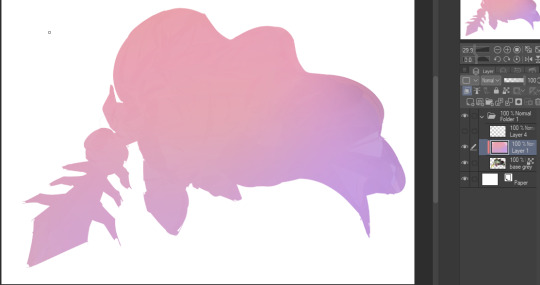
Now I clean the sketch up/refine it more. Also, to "harmonize" the color palette, you can add a colored gradient on top. Then set it to multiply, and add overlay/glow dodge layers with any colors you see fit! I like using teal and light/warm orange! Here is an example of a colored gradient:
Another tip is to add saturated colors on the edges of both lighting and darker shadows, before blending it:

Also I usually add in a light blue/grey in shadowy areas, and lower the opacity for reflective light:

Also! You can lasso + use an airbush with a light blue to block out parts of the background (his cape here, for example). It helps with more depth!
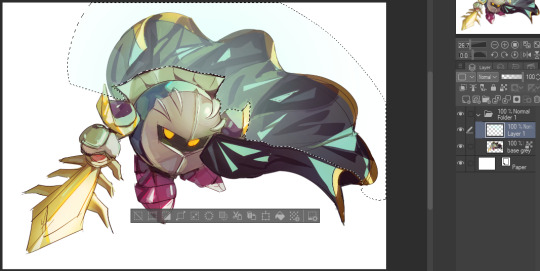
Finally, I like adding sparkles on low opacity :3 And gaussian blur to certain areas! I'm using radial blur on this piece though ^^

For the background, I like doing blocky shapes!! I use my square brush on 90% ish opacity, to color pick different hues from the piece. For lighting I use a glow dodge layer, here's a mini timelapse as well as the finished art!
At the very end, play around with the hue/saturation and contrast tools to change the colors :)
#iiii hope this helped??#first time making a tutorial sorry!!#art tutorial#kirby meta knight#meta knight fanart#meta knight#nintendo kirby#kirby nintendo#kirby fanart#kirby series
589 notes
·
View notes
Note
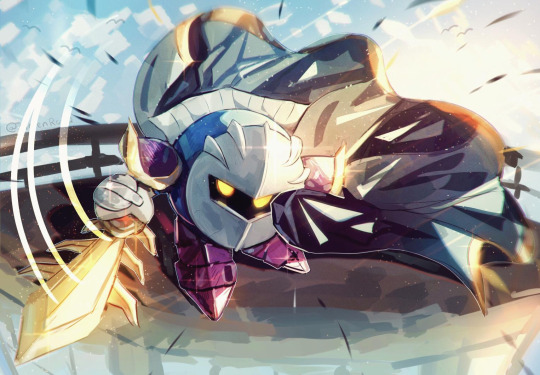
If it is okay to ask, what brushes would you use when it comes to drawing in the Professor Layton Artstyle?
Hi!! if you mean for sprites like these:

then i just use the basic lineart pen that can probably be found on any art program. for csp it's the G-pen and my settings look like this:
i set the pen pressure to a lower range just to have more consistency

if you mean for the box art style like this:

then i still use the G-pen for the lineart, but i use the basic default round brush which can again be found on any art program for the shading, for csp i used this:

more in depth tutorial for the box art style below, i guess?

obviously start with references, i was picturing diabolical box in my mind so i used that as my main inspo but i also had all the other box arts up, was definitely also thinking of last specters art
(note: weirdly the 3ds titles go from soft shading to hard shading? not sure why but i was going for the soft one personally)
anyway, after that i went into compositional thunbnail, sketch, then lineart, fairly basic, i would show you what these looked like but im running out of space for images. the main thing to make it look "layton style" is to have a good grasp of the characters and shapes and how they move which is not something i can teach you in one Tumblr post i have just spent a lot of time staring at layton arts
also for your compositional sketch be sure to include where youre gonna put the logo because i forgot to !!!!!!!!


for the base colours i just used the colours from their official arts, its much easier than trying to figure out how to keep their palletes later
my layers here looked like this (but turned on obviously) the first few are an overlay on battler & co. to make them more orange to fit the tone of the art, and a multiply layer for both descole and beato since theyre more in the background. theres also a black gradient around battler & co. to make the transition into beato less jarring


from there is the lighting, i just used a yellow overlay layer for the light and a greyish brown multiply layer for the shadows

deceptively simple! the whole process probably took me about 1hr and 30 mins maybe
103 notes
·
View notes