#how do u...resize things
Explore tagged Tumblr posts
Visit Tumblr Blog
Explore Tumblr blogs with no restrictions, modern design and the best experience.
Last Seen Tumblr Blogs


Fun Fact
There were a total of 171.5 billion posts on Tumblr in 2019.
Text
SAND CASTLES AND FIRST LOVES — PARK SUNGHOON

synopsis . a day at the beach was for relaxing and also apparently for meeting your first love?
psh : new kid! sunghoon x fmr O.8K — fluff, crack ❨ warnings ❩ 🫧 teeth rotting fluff I PUKED. 𓍼 note — chat can u tell im tweakinh┆(bookshelf)

The sun iced your hands as you squinted your eyes under the hot weather. It was perfect. All you could do was sit down and relax and just babysit your sister? Right? It couldn't be that hard to watch over a five year old.
But one small thing you quite forgot was how hyper that little brat could be. Now you were stuck in being the little devil's assistant in help make her numerous sandcastles.
"Y/n! Don't you think that one is a bit crooked?" Your little sister pointed at the sand castle that you just made.
You dramatically sighed at your sister's remarks, "Jeez, wouldn't hurt for a compliment."
"Crooked towers don't get compliments!" Your sister huffed, "Now get to work." She said and continued making more sand castles, filling the mold with the damp sand sitting on the land.
You oughta throw her into the ocean if you could, but you stayed calm and followed the boss's orders.
Just as it started to get calm with no more snarky remarks from your little sister and calm waves crashing the sand near you, you were towered by a tall, slim figure.
Before you could even let out a warning, one of your precious sandcastles were toppled down by the boy's feet. Your sister didn't seem to care as she continued to make more sand figures to compliment her sandy mansion, but that was the one that you were most proud of so you knew you had to give him a piece of your mind.
"Hey! Watch it!" You stood up to face the rude boy, your hands on resting at your hips.
The boy turned around and you realised that it was the new kid in your school. Sunghoon looked youthful and charming as ever, his dark hair was slightly tousled from the breeze.
But the thing that caught your attention the most was the genuine look in his eyes, "I'm really sorry about that." He said, looking at the destroyed sandcastle.
"Oh— no it's fine!" You awkwardly laughed, scratching the back of your head after resizing you just screamed at the cutest boy you met.
"No really," He smiled sincerely. "Let me fix it." He knelt down, ready to fix the structure of the sandcastle.
"You don't have to do that you know," You giggled, kneeling down to his level. "I've seen you around..."
He furrowed his eyebrows and shot his eyes at you.
"Oh no! Not like that." You laughed once again. "I meant at school. New kid, yeah?"
He chuckled with you, nodding his head. "How come I've never seen your pretty face around?"
Oh jeez.
You blushed at his flirty remark, shrugging your shoulders not really knowing what to say.
"Hey! Stop flirting and get back to making the sandcastles. New kid, quick!" The little devil sassed, making your eyes widened.
"Shut up!" You whisper-screamed at her and looked back at Sunghoon with a sheepish smile, "Sorry about her. She gets a bit bossy sometimes."
"No she's right." He laughed, "Sorry miss, I'll get straight onto it." He said, trying to fix the sandcastle as quick as possible which made a snicker escape from you.
Sunghoon looked back up at you, finding your giggles really cute. The way your hair ever so slightly brushed against your face due to the light breeze and the sun slightly reflecting in your eyes, making it twinkle just might've been the cherry onto to make his heart skip a beat.
Gosh, you looked really pretty.
He was in a daze watching you make some sandcastles, craving out the minute details onto it with a slight smile fixed onto your face. He slowly panned it to your little sister staring dead straight at him.
Sunghoon went right back to the sandcastle he was fixing, clearing his throat hoping your little sister would be a little less intimidating.
"There, all done." He smiled, while getting back up.
"Hmm, good job new kid." Your little sister crossed her arms together. "It's better than Y/n's" She giggled, making you glare at her.
"Thank you though," You thanked him once again.
"No it's my fault." He brushed it off, "How about I make it up to you? What about some ice cream?"
You smiled at the request, "Of course, I'd love to."
"Me too." Your sister butted in as she walking closer to Sunghoon making him giggle.
"Sure princess." Sunghoon said, ruffled her hair and looked back at you. His warm brown eyes met yours, and for a moment, everything else faded away.
As you three walked away to head to an ice cream stand, Sunghoon stayed close by your side. He knew he didn't need to say nothing more; the look in his eyes said it all. And as your arm gently brushed against his, you suddenly became aware of how close you were.
And that today might be the day you would never forget, the summer leaving a fresh stain in your mind—the summer where you met your first love.
tags . @zuyairus @bubblytaetae @yenqa @redm4ri @hanniluvi @haechansbbg @taejaysreads @shinunoga-iie-wa @teddywonss @naespas @isoobie @dimplewonie @jennaissantes @aishigrey
#enhypen imagines#sunghoon#enhypen#sunghoon imagines#sunghoon x reader#park sunghoon#enhypen x reader#imagines#kpop imagines#sunghoon angst#enhypen angst#angst#fluff#enhypen fluff#sunghoon fluff#park sunghoon x reader#enhypen soft hours#sunghoon soft hours#drabble#kpop fluff#sunghoon social media au#sunghoon smau#sunghoon headcanons#sunghoon enhypen#enhypen sunghoon#sunghoon reactions#sunghoon fic#enhypen smau#enhypen social media au#enhypen socmed au
323 notes
·
View notes
Note
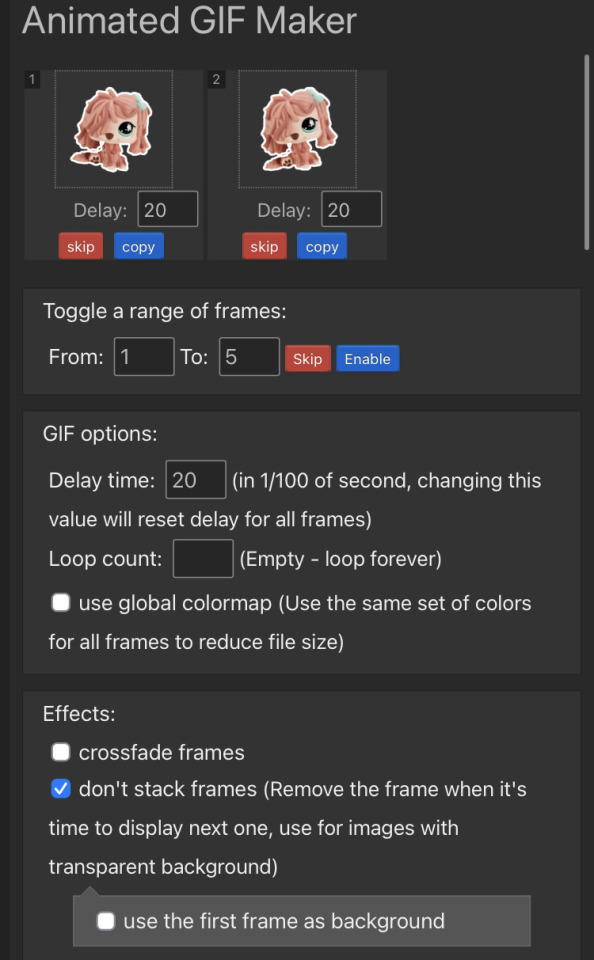
PLEASE GIVE A TUT ON HOW TO MAKE PIXELS I AM BEGGING YOU

HKEGDUSHDGDGD okay this is gonna probably be really overexplained since i talk a lot BUT ITS VERY EASY tuto under cut
What i personally do is start on picsart with a blank canvas (make sure its a perfect square, anything like 700x700, 400x400 whatever), What i do is use some of the cute stickers i can find by using certain search terms and rotate/move it to each frame id want it to be, picsart lets u see where its centered or not so its a lot easier than just winging it
this would be so much easier to explain if picsart allowed me to take screenshots on this DAMN PHONE!
But anyway save each frame to whatever ur using and go to Ezgif.com's gif maker to combine those frames together :3 theres a delay option on the bottom of each frame u saved, i usually set that from around 50-80 so it doesnt go too fast

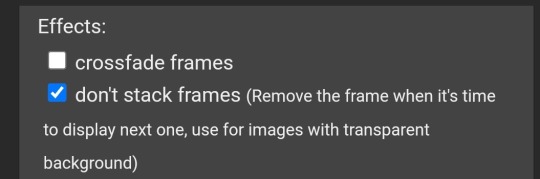
Once u set that and u have ur frames in order, remember to set THIS option
And then u click "make gif" at the bottom and horray :3 u can still edit things on the page if u might not like it
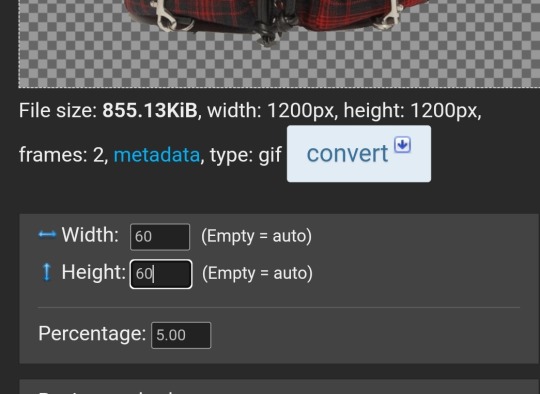
Once u get the finishing gif, u can save it as the original size (if youd like to have an extra), and go to Resize at the bottom

U should get to this, what i do is make the width and length 60x60 or 80x80 but it doesnt really matter tbh, if u want it bigger or smaller then go ahead
Disregard everything else after that and click Resize image :D and boom we did it

Both original and teeny size IF I DIDNT MAKE SENSE THATS TOTALLY MY BAD but i hope this helps😅😅😅 maybe..
372 notes
·
View notes
Note
how do u make ur graphics? ^_^
Thanks for asking! I’ll give a quick tutorial here on how to make pixels.
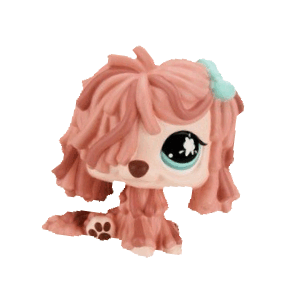
1. Find the Image you want.
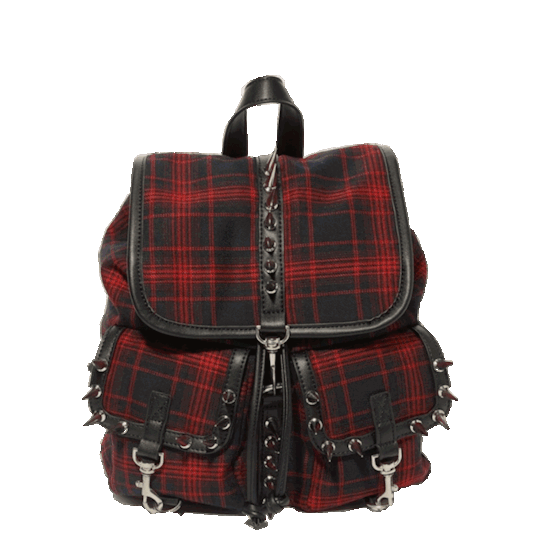
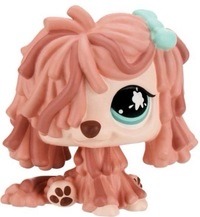
I think this will be fairly simple, just find what you want. If it doesn’t have a transparent background you will need to follow step 2. For this example I will be using this LPS below;
2. Remove the background.
If your background is already transparent, ignore. But if not you would want to go to remove.bg and upload the image of your choice.
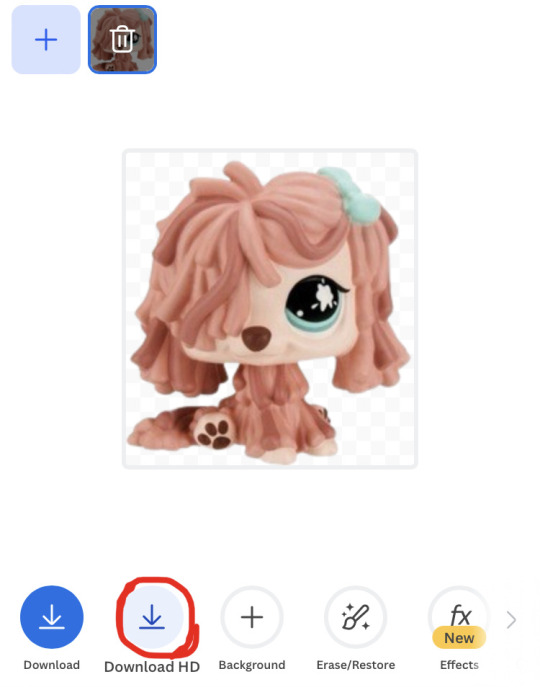
Don’t click “Download,” instead click “Download HD” for a higher quality image. Once it pops up click on the image and save.
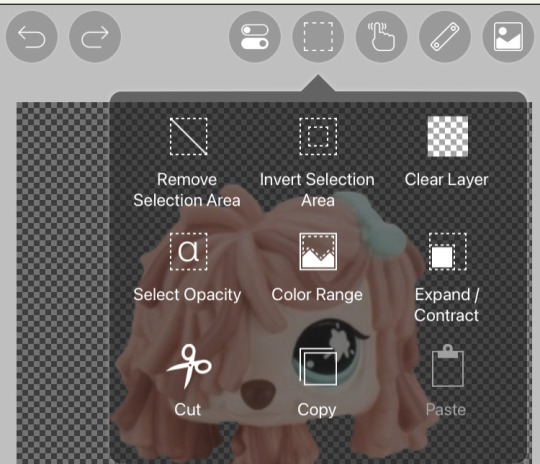
3. Go to Ibispaint
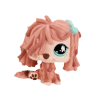
Wait, didn’t we already clear the background though? No. When you make it transparent it will still have invisible dots.
Open Ibispaint and open a canvas at least 100x100 (I use 300x300.) and import your transparent image. Open the second button on the right and you will see a drop down option. You would want to click select opacity, invert selection area, then clear the layer 3-4 times.
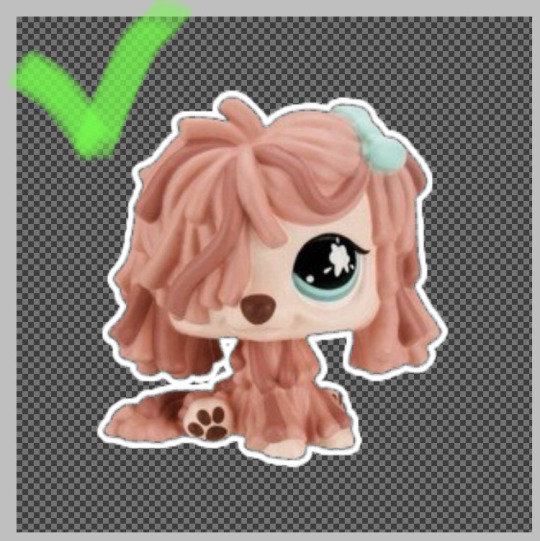
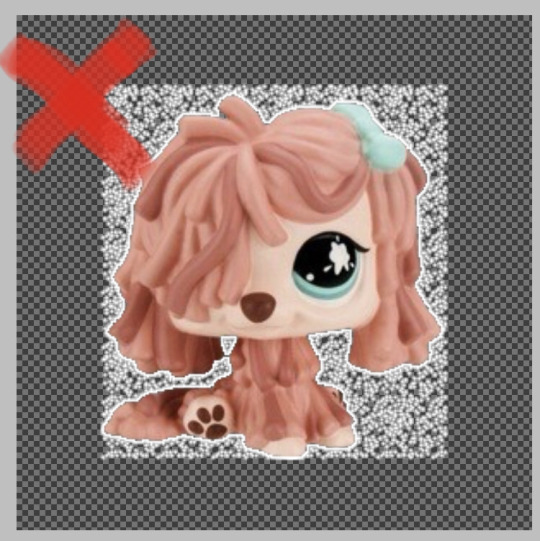
The example below presents before and after. Congrats if you did it right!
Now, if you want to animate it you can put it at different angles etc etc. It’s up to you. Save both frames with a transparent background.
4. Final step, animating it!
Now that we have our images we want to make a pixel go to Ezgif.com then click “Gif Maker”
It will ask to upload your static images, once you uploaded your images it should look like this;
You can crossfade or not stack frames. It’s up to you. Personally I just use one frame at a time.
And now we have our gif! You can stop here if you wan’t but here are some optional choices that I personally do.
Extras:
To edit how fast it goes, click the “speed” button and it will show you some options to edit speed. “% of current speed” and “hundredth of second between frames.” I use % so we will use that for the example. You can do whatever percentage you want though I would suggest 20-50% of current speed. I do 40% for all of my pixels.
To edit the size of it, click “resize” and it will show width, height, and a percentage. The only thing you would need is width or height. When you type a number into either it will auto resize to fit with that number. You can do any size, but I suggest 50x50-100x100.
And there you go! I hope this helped someone and I’m open to more tutorials! I can do more graphic tutorials if needed, I don’t gatekeep :)
#🌸﹕yapping#rentry#rentry decor#rentry graphics#tutorial#pixel graphics#graphic design tutorial#idk how to tag#heh im so helpful…
105 notes
·
View notes
Note
i hope this hasn't been asked before. what size do you make your canvas? and do you crop it to fit other socials (like Instagram for example)? i hear that 300 dpi is standard. i never know if it's good to make my canvas big or not.
hi i think this ask is like at least 4 months old but i was scanning my sketchbooks from last year and i abruptly remembered i had gotten this ask because i had made a little chart in my sketchbook trying to figure out how to answer it
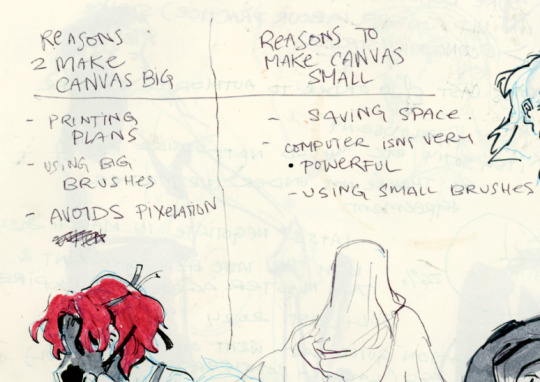
anyways theres pros and cons. and the size of your canvas is really going to depend on personal needs + preference. how good ur computer is, how complicated ur art style, how comfortable drawing feels, how much disk space you have to spare, what youre gonna end up using the art for in the end...300dpi is standard for PRINTING specifically, if you only plan to ever post things online then 72dpi works great and will save you space (fun fact a lot of professional animation files i deal with are 72dpi. and those eventually go on your tv screen). but personally i make everything i draw 300dpi because i am always printing stuff for cons, zines, etc and its nice to have the option even if i dont end up printing.
when I was a teen I used to draw on a rly shitty laptop and i made everything 800x800px 300dpi because big canvases would cause a lot of lag and also the resolution on this laptop was pretty small so 800px was a lot of the screen already. now i have a slightly better laptop with a bigger resolution and i sketch on giant 10000px-40000px canvases with the hard round brush and no shape dynamics or transfer whatsoever to minimize lag. when it comes to making a final illustration when i know ill be using a bunch of layer effects/blending modes/colors/mixing brushes etc etc ill generally crop the canvas down to the 6000px range. most illustrations i try to make sure are comfortably printable on tabloid size paper so thats pretty much anything hovering around or above 3000x5000px w 300dpi (so 11x17in). HOPE THIS HELPS?
EDIT: OH ALSO re: socials. i always ALWAYS size down my art to post on the internet. i think its crazy when other artists dont. because why would i ever let the internet have my hi-res file for free. also in general i think it looks better if you do the resizing yourself because if you don't then many social media sites will compress your file for you! a lot of people will post a hi-res file to twitter and then go "Wow twitter killed the quality of this img!!!" UH YEAH because they have an automatic image compressor. because they need to save space too lol and they dont want your image to take 248263895 years to load. same with instagram and to a lesser extent tumblr. when i post anything on social media i resize it down to 1200px-1600px on the longest side... its a little arbitrary but im kind of basing it on the smallest resolution of widely available screens. mostly because i think it looks stupid when u open up an image file fullsize and u have to scroll to see the whole thing... also iirc instagram only takes images up to 1080px before it resizes them? granted if you upload something smaller than that itll also resize it up which will look worse so I think bumping the numbers just over 1080px is pretty safe.
I should really be bringing the dpi down to 72 too when i post online but often im too lazy to do that. but it will technically help ur image load faster and stuff. and make it less likely for people to yoink it off the web and print it themselves.
148 notes
·
View notes
Note
I love your art so much!! It's inspiring me to get back into pixel art (I gave up quickly). A huge problem I had was I didn't know what size was best to set my canvas for specific projects. I always ended up overestimating and making it too big and then it looked less like pixel art and more like grainy digital art. Do you have a rough guide you stick to for landscapes/bedrooms/cities VS. things like animals and characters?
aw thank you i'm happy to hear that! i hope u stick with it ♥
with landscapes/bedrooms/cities i use 275x155. this provides a fair amount of detail while still keeping it pixely, plus it resizes to wallpaper size. for vertical i just reverse it at 155x275.
i've also recently started to use 215x215 (same amount of pixels as above) so that i can resize my art to easily fit both wallpapers, and mobile videos... since tiktok and instagram reels are everything nowadays 😒
for characters and animals, generally i will base the size of the canvas around how i stylize eyes.
so i'll draw the eyes first, then just draw everything else around that.
i also have a smaller resolution style with 2px dot eyes that i use for adding characters to landscapes, since my landscape resolution is too small for my regular style unless the character is close to the screen.
hope this helps!
#asks#Anonymous#artists on tumblr#pixel art#pixel art tutorials#pixel art tutorial#8 bit#art tutorial#art resources#just tagging in case someone else needs it
83 notes
·
View notes
Text
A little insight from me when it comes to drawing
Over the past year or so, ive gotten allot of people asking me "how do u do that?/i dont understand how you can draw this??" & "how do you draw so fast?" & "i wish i could be as productive as you" & "how are you so good at art?" <- to name a few of the most common comments i get.
——————
I never have a good answer for that in the moment because i overthink and spiral. But i can ramble my thoughts about it here.
I dont THINK i draw very fast, comparatively to some other people my art style/method that ive developed up over the years actually makes drawing for me take longer than it would for someone else.
Theres definitely artists out there who take a longer time to draw than me, and artists out there who can draw much faster than me.
But for me personally? Im probably somewhere in the middle.
I technically do draw very fast with the amount of details i can add in a short span of time, but 50% of the time spent drawing is actually me sketching, adjusting the sketch, using the liquify tool, resizing and rotating things a bunch of times, resketching the sketch and basically creating a whole rough draft of the artwork before i even begin drawing the actual lineart.
If my artwork took 2 hours to complete, i can guarantee you the first hour was just the sketch.
And after explaining that 👆 it makes it easier to explain "how are you so good at art?". For me, being good at art is... tough to explain because the way i view "good art" is probably different to how others think it is. Itll be a long info dump but ill circle back to that at the end.
——————
I unfortunately have a bit of a perfectionist streak and a very spur of the moment "if i can, why not?" attitude and that heavily influences my art. This is where being neurodivergent (think adhd, autism) becomes a very important factor to consider during my art process:
If the inspiration hits me to draw *something* in a cool dynamic pose that the art gods just beamed into my brain, ill go "ohhh hey that would look awesome!" which then turns into "why not draw that right now? whats stopping me?" ill pause whatever im doing and leap into sketching out that idea. I am a tragedy when it comes to impulse control.
This part is where i inevitably get doomed by my own brain xD
I have two options ahead of me:
1, 'Start drawing right now before the idea runs away' OR 2, 'Let that idea float around in my head for a few weeks, procrastinating how awesome it would be but never actually act on it'
And when i pick option 1?
Ill forget and drop whatever half baked plans i had for the day, ill forget i havent had anything to eat in the last 10 hours, ill forget i should probably go outside and touch grass. Ill lock in, grab my pen and get comfortable because i wont be moving for a couple of hours.
Ill leap into sketching that idea while its still hot, because i know if i just sit there and let myself procrastinate about it, ill never actually draw anything.
I can spend around 2 - 5 hours on average just non-stop drawing when it comes to bigger projects. I absolutely suck at taking breaks, and i only ever do when i get thirsty or begin to feel my brain telling me it needs some enrichment (which is usually just getting up for a snack or drink). Take this with a grain of salt because im no professional or psychologist, but i like to think that i have found my own personal ways weaponize my adhd/autism to aid me with art.
(Lots of people are probably going to relate to what i say next, so buckle up! I need to do some explaining first so you can understand how my brain works)
I tend to lose focus, SO EASILY, i can switch up conversations really fast without a sweat and enjoy it. I can be reading, listening/humming to a song, and have a secret third option where a corner of my brain is thinking of fanfic and art ideas all at the same time. Ill zone out in the middle of a book, a show, an artwork, and start procrastinating about the randomest of things. Ill spend a good couple of minutes trying to stack my pillows just right to sit in a comfortable posture, ill get pissed off if theres itchy fabric brushing against my drawing arm and ill drop everything to fix that, ill keep fluffing up that blanket on my lap until its in the exact right position.
These things often make it difficult for me to sit down, get focused, and start drawing...
But i actually have a good list of tricks that make it possible for me to avoid distractions and comfortably lock in on drawing. And oh boy, when i lock in i reeaaaallly lock in.
——————
Some common problems i face when drawing, that you might have trouble with aswell:
🔶 Ill have an art idea hit me, but by the time i open up the program i use to draw its already nyoooomed back into the void it came from: IT SUCKS!! I lost the idea and cant grasp it in my imagination :C but ive got a strategy i use to grip that idea and keep it in my head long enough for me to draw. And its MUSIC. I love scrolling my playlist for the right song/playlist that fits the "vibe" of what im trying to draw, and i often associate an artwork to a specific song. Some examples of what happens when i just looped 1 song (or playlist) the entire time as i drew it: - 'Odysseus' - 'King Of The World' - 'Falling Feels A Little Like Your Flying' - 'Let The Wind Carry Us' - 'Gold' - 'First Flight/Flight Over Alps' - 'To The Ends Of The Earth' For ALL of these big artworks, i owe so much to music for enabling me to lock in and get that idea down on paper. Not every artwork is based on 1 song though, sometimes ill just have a playlist on shuffle in the background instead as i draw away. I find music helps slow down and focus my thoughts long enough for me to imagine what im actually trying to draw.
🔶 Ill stop midway drawing and lose focus, just zone out for seemingly no reason: Ive discovered when that happens for me, ive simply gotten lost in a decision making process at some point while i was drawing. When i eventually notice ive zoned out, i pause what im doing and take a step back to think... "What was i trying to do earlier?" -> I was trying to decide what part of the artwork i was going to draw next, theres a few things i rlly wanna draw now but i can only pick one! I got lost imagining how both options would look when i do them, and once id stopped to procrastinate about those my thoughts had taken the wheel and spiraled into a ditch instead of actually going ahead and drawing it. This is really common in my case, and its often about 5 songs later that ive noticed im just sitting here staring into space thinking about a fanfic i read 2 months ago and how much i loved it, and not working on the artwork in front of me xD
🔶 Ive lost the motivation to start/finish an artwork/project: Happens all the time, and its horrible, i have projects, commissions and owed art that people are waiting for... yet i cant seem to find the will to work on them. I dont really have advice for this, but i want to drop some wisdom on you and say that Its okay if you cant seem to draw that right now. You dont need to put everything else on hold to finish this, you can start a fresh project instead of continuing that old one thats looming at you from the corner of your files. Dont allow yourself to feel burdened and pressured to complete something, dont let the mere thought of losing motivation turn something you love to do into something you hate. (this is probably not effective advice for anything with a due date, but it can still help in a roundabout way) Ive come to think that when youve lost motivation, your brain is simply just still loading the ideas and motivation, theyll come to you in time. Its like waiting for a massive game to install or update, its going to take a while, but youll still get it in the end. When your motivation finally returns, you can be satisfied that youll enjoy what your drawing again! Maybe you just needed a break from it, maybe your brain needed a moment to work up the courage.
I still have artworks that are MONTHS in the making, and that people are still waiting for, but im content to know what when my motivation returns to finish those ill actually be able to put genuine effort and joy into completing them. Meanwhile, ill keep drawing what im currently motivated for so that i dont get rusty <3
🔶 ARTBLOCK!!! *falls into the void/dies for a month* The thing thats always peeking over my shoulder and asking if its time.... From my perspective, i perceive art block TWO ways:
Exhausted mentally, burnt out <- OR -> Literally art-blocked, your stuck without ideas, trapped in a rut D:
Exhausted and burnt out? Too dead inside to draw? Thats the universe knocking on your door saying you reeaaally need to take a vacation, listen to it. Burning out is NOT fun, and the longer you push past your limits the longer youll have to spend recovering from it. Having breaks for a couple days to a week every once in a while does wonders for my sanity.
Literally facing art-block, ideas not idea-ing? Ive discovered that my brain is asking for enrichment when i face that, it wants to try something new and exiting and fresh, it wants to stretch its muscles and stop drawing the same old boring stuff youve been drawing for the past couple of weeks.
Try drawing in a new artstyle!! Maybe change what brushes you draw lineart with, make them thicker, or thinner? Try a brush with a unique texture to it. Draw with a smaller/larger canvas than usual, participate in a daily art challenge or event? Spontaneously draw someones OC that you like. You just need a breath of fresh air and to mix things up a little bit <3
🔶 Hyperfixating so much that i forget to take care of myself: Half the time I WILL get really bad hyperfixation on a bigger artwork because im in the zone and i locked in too hard that its become obsessive, and it often feels like...
"If i dont finish this or keep drawing, my anxiety spikes like theres something after me and theres this unwarranted sense of NEED to do good and get that artwork done"
Thats the big driving force that gets me to be productive with my art. Depending on how you view it, it can be seen as a good or bad thought process. This is usually a good heads up that im getting close to a burn out when im finally done with that artwork, and i really NEED a break. Stop for lunch, or dinner, grab a snack and walk around a bit.
——————
To the people who say: "how are you so good at art? how do you do that?", "i wish i could be as productive as you", "tell me how/teach me your ways"
Im gonna be sappy and say its NOT straightforward and this is definitely not the answer youd expect, but im good at what i do because ive taken time to look at myself and understand how my own brain works.
Im good at art because ive spent all this time getting SUPER introspective, picking my own brain apart and discovering that: "when i do this, it makes me enjoy drawing! If this makes it enjoyable it means i can draw more" and that ultimately leads to "When im able to draw more, im constantly growing and improving my skills from all of the experiences im gaining, i now have the motivation and passion to do THIS because im actively enjoying it"
If i know what distracts me, what makes me lose motivation, what causes me to burn out, what i dont enjoy drawing... and ive learned ways to overcome those obstacles? Thats what i think enables me to be a good artist and be so productive.
Im gonna be cliche and say LOTS of practice is also literally the only reason why im where im at today. Sure, i already had a boost at the beginning because i was naturally artistic and its probably genetic somehow with all the artistically talented people in my family, but its because ive put work into refining those skills and honing them that theyre actually GOOD. They would be useless if i hadnt done anything to build them up.
You dont need to have a predestined skillset to become good at art, your just a little behind and have a longer learning curve. Ive watched a close friend of mine over about 5 years, go from really bad scribbles and awkward looking doodles to practicing and discovering they have a really good knack for colors and shapes.
I like to think "whats actually stopping me from learning to draw?", whats stopping me from downloading an art app and messing around, whats stopping me from doodling in the corner of a book, whats stopping me from stealing sticky notes and scribbling on them, whats stopping me from wanting to improve more and more? Too many people are close-minded and negative with "i dont have any devices to draw on" so what? grab a book and pen, i started with traditional art myself. "But i dont have pens or drawing books?" that sucks, but whats stopping you from grabbing a stick and even drawing in the dirt or sand or snow?
#cimmerian1275#cimmers rambles#cimmers art tips#haha get hit with a wall of text#feeling really introspective and nostalgic today soooo... info dump of all my thoughts that ive never shared before
15 notes
·
View notes
Text
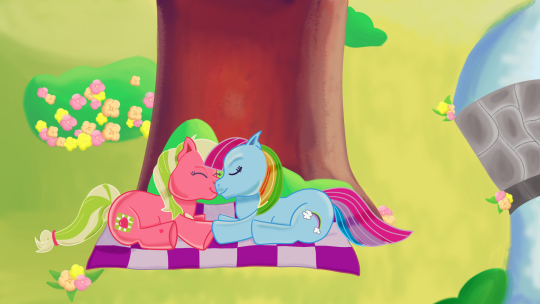
consider: g3 appledash
(additional notes under the cut!!)
[like my art? c0mmissions r open!!]
ahhh FINALLYYYY this took me FOREVERRRR to do!!! this idea came to me in a dream and i KNEW i had to draw it. i wanted to imitate the g3 style, but i also wanted to make aj and rd look more distinct from each other. a lot of g3 ponies look the same, so i decided right off the bat that i wanted to give them each some little features to avoid making a recolor of the same pony yknow? (this is in no way meant to disrespect the g3 art style ofc, i love the art, thats why i drew this piece SAKFJFJDS i understand why they had 2 do it that way bc yknow. thats how the toys are LMAOOOO)
more specific details include:
applejack is chunkier and has shorter legs, along with the softer features that most g3 ponies have. i also gave her ponytails as a nod to her g4 incarnation!!
rainbow dash is thinner with longer legs and slightly sharper, more angular features (like pointier ears/snout). i wanted to make her mane and tail look more like an arch, just like real rainbows!!
i studied a lot of g3 art pieces to try to get the look just right. i think i did....ok for my first time!! there r some things im not quite happy with but it was a lot of fun!! (except for the flowers. the flowers were a nightmare)
SPEAKING of the flowers, i basically just drew three in each color and then just copy pasted/resized them all LMAOOOO i later went in and added more detailed shading to each one to make them look slightly different
that bridge was actually the most fun part of the background to draw i was NOT expecting 2 like that bridge so much. please look at my bridge everypony i worked rly hard on it
if u made it this far congrats!! now u know the Lore behind this piece. god bless it took me so long 2 do LMAOOOOO
#my doodles#mlp#my little pony#g3 my little pony#g3 mlp#applejack#rainbow dash#appledash#rainbowjack#g3 rainbow dash#g3 applejack#digital art#firealpaca#artists on tumblr#shipping#wlw#sapphic#lesbian#yuri#femslash
29 notes
·
View notes
Note
hey! i'm completely obsessed with your bound copy of otnwas and I'm currently planning to bind a copy of a different hijack fic for my dearest friend! (it is her favorite and she is the hiccup to my jack, lol). I've been picking my way slowly through the wonderful bookbinding sources you piled together in some of your posts and I was wondering if you could elaborate on how you created the beautiful cover? (the gorgeous title, the spine, design, corner covers). Thank you so much for sharing btw, you've blown me away with how beautiful it is!
aw hi, thanks so much !! :) truly there is no greater joy and love than gifting a friend a hand bound book of their favorite fic huh.. that's so sweet of u !!!! (i relate, am binding another one rn for some dear friends of mine 🥹) and yes i can totally explain, or try my best to!
for the cover design, i edit/make all my stuff in adobe illustrator but i drew the corner filigree (the fancy swirly things) on procreate first before transferring it to illustrator to do the rest of the cover design, playing around with resizing etc. (title + spine). i made sure that the canvas size (in mm) is the same as the cover so that the proportions were accurate. if you don't have illustrator i think canva might also work well? i've seen a lot of people use it!
for the foiling, i basically followed the simple but most time-consuming way which is to use a foil quill pen. i bought the standard tip (0.5) but i honestly should've bought the fine tip (0.38) bc there was so much detail i lost you just can't tell from the pics aksjdhaskj. i printed out the cover and spine true-to-size and just traced over it with the foil pen. i taped down the silver foil underneath and the printed cover on top so that nothing moves. don't lift up your foil or your paper until you've finished everything - things get really wonky because they tend to misalign if you do that (TAKE IT FROM MEEEE) you just have to trust that the foil transferred. the pen gets hot enough to transfer through the paper layer, though you do just have to press a little harder than you might usually have to or else it might not come through (the hand cramps i got from it... though it was worth it to me)
for the last step, once you've attached the cover to the text block and all that jazz - the silver book corners you can buy from amazon! make sure that it's in the same thickness as your cover board. mine was 0.3mm, so that's what i bought! you just attach it to the corner and press.
i wish i was one of those people who have those silly fancy machines that do all the foiling work for you but alas i don't have the money for that rn.. maybe in the future kjashdkjh if you don't mind me asking, i'd love to know which hijack fic ur friends loves ;u; anyway i hope your binding goes well, i'm glad i could help !! <3
#SORRY IF THIS MAKES NO SENSE#or if u have more questions just send me another ask#there was no rocket science for how i did the cover ..#i had a quill pen and a dream...#and maybe a bachelor in graphic design but u don't need all that to be able to make art !!!#just peace and love and heart xoxo#jackshiccup ask#anon
18 notes
·
View notes
Note
do you have any advice or tips on how to make object assets? love ur work btw!!
Thank you very much! I take a bit of pride in my craft and I'm gonna show all of you kiddos at home how to make assets like me!
Lets start with this Example Object!

the humble dry-erase marker!
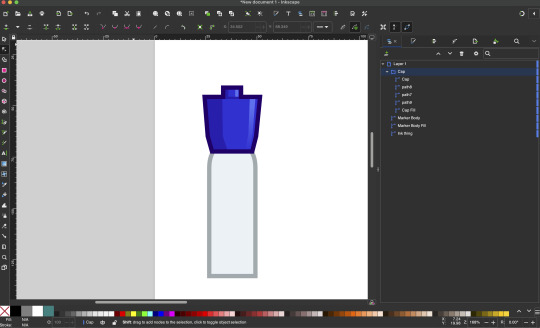
First, I break it down to it's simplest shapes in INKSCAPE.
Don't worry if your object looks too complex, just getting a general shape with points where they need to be is good enough! In this example, the basic shapes are simple and geometrical, with some slight curving on the marker body itself!
(tip, dragging lines using the node tool curves them)
Now that i have my parts, I'll assemble them and organize their layers.

Now, we select the colors we want, for this example, I want this marker to be Blue, so I'mma make some of these outlines reflect this. I'm also going to make the marking tip thing a solid color, taken by that one cap-less marker asset,

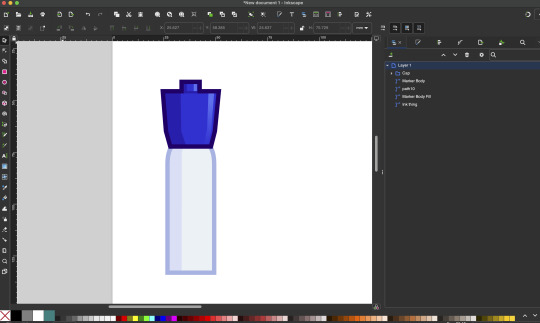
Now, I'll make basic fills, I usually duplicate the outlines (Command+D/ Ctrl+D) Remove the outlines, and set the fill.
It's okay to re-adjust some stuff too! Don't be afraid to do so!

Here comes shading! Some general tips!
When shading, stay consistent! keep shadows aligned based on your light source! In this example, my light source is on the Right.
For highlights, never make sure they fit with the colors ur using, like using a light blue for the highlight on this cap.
If u really wanna be fancy, You can also use gradients to shade, just don't overdo it!
Lemme just shade the base off screen!
Pro tip! COLOR CHOICE IS kinG!!! Take this logo for example

I personally would not give it this color because it takes too much attention away from the face In my opinion, It works, but, Its honestly up to personal preference


with this kind of color, you are still acknowledging the existence of the logo, but, it's not taking too much attention from the face, Either works!!! It just based on taste! (I also manually added an outline for the logo)
I then duplicate the asset layer and take the cap off in case i want just the cap or the marker without the cap.

then, i open the document properties tab (File>Document Properties) and click on "Resize to Content". I also tick off the "Checkerboard" Setting for the background

I finally export as a PNG in case i need to use it as a PNG! I set the size to about 2.5 times the size for higher resolution and quality!
And there we have it!

A Dry-Erase Marker!
Hope my tutorial was understandable and easily digestable!
19 notes
·
View notes
Note
hi! ive liked your aesthetic and simstyle for a while and i was wondering if you could give tips or sort of walk thru how you make sims? like the face, makeup, skin details, etc. i have trouble making my male sims look as pretty as yours😭 thank u in advance!
Oh thanks so much for the interest! (ㆁᴗㆁ✿) I'm actually surprised people likes my simstyle....
---- How I make my male sims ----
Let's make this handsome guy with me~
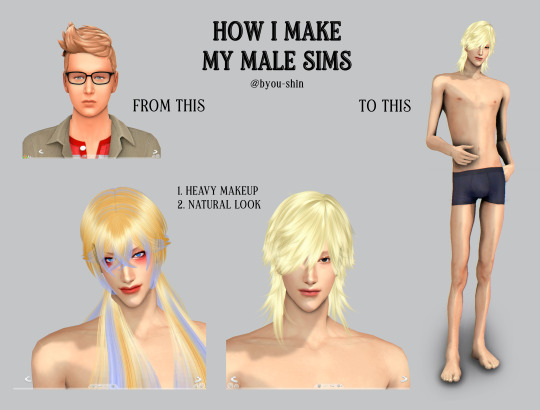
NOTES :
all my male sims (masc or fem looking; Adam, Xion, Moa) are made in masculine frames
I don't use alpha skin, but skin overlays. I find it easier to layer makeup and skin details
all of these are my personal preferences, so back to you again for which you want to take from me
Tutorial undercut
-------------------------------------------
One - choosing skin overlay
First thing I always be choosing skin overlay. I always use Obscurus skin, sometimes Darkstone. I don't like cartoonish looking, but I don't make it way too realistic, so I like it in between realistic and animate. I choose other skin details very later.
-------------------------------------------
Two - head size & body propotions
a.
After it I choose body preset. After it I will using the EA slider on left whether make it like I want to.
So.. I do really think that EA makes the head size big lol. So I will resize the head using the slider on forehead from afar (zoom out), then make it "slim" by drag the slider to center (still zoom out). Most of the times I max it, but there are sims that I made a liiiiitle bit wider.
See what I mean, right?
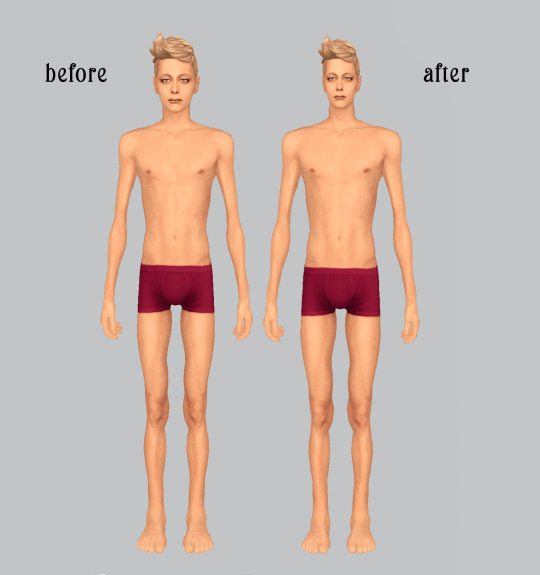
b.
If the sim is not tall enough or too short for the character I want to make, I will slider it to using slider in the back of leg

I also slider the back so the sim doesn't have a hunchback. Then usually I will slimmer the neck to max
For fingers I also slide it smaller according to which kind of sim. If I want to make it fragile and delicate, I will slider it to max. If I want to make it masculine still, (or slender) I will slider it until I got the good result I want.

I don't really pay attentions to feet sizes lol, sometimes but rarely, I will slide it smaller or bigger.
c.
Body reshaping is up to my liking actually. Making the shoulders wide or not, it's depend on the sim itself too afterall. So i don't know what to write (u_u;). This guy tho, you can see what I made him like what in introduction post
-------------------------------------------
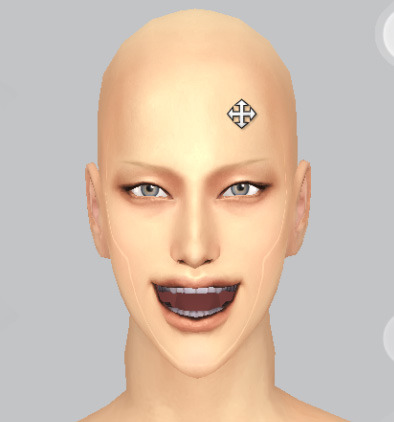
Three - choosing eyebrows & face presets
I do this freely actually, depends on the character itself. There are no differences choosing between masc and fem male sims. All is back to the character, even the jaw and chin presets. I do all that in sliding proccess (making it look feminine or masculine). I use both EA Presets or cc creators presets.
-------------------------------------------
Four - eyebrows & face features shaping/sliders
Actually the process is -> chose preset for one feature -> shape it -> chose preset for another feature -> shape it, but ye lol :3
a.
For eyes, I always slider them smaller, usually max or near to max. Depends again. Sometimes I imagine few sims to extra eyelids tape that makes eyes appear really big (see : Taiga & Asakusa).
If you notice it, in this post my sims have different eye sizes
b.
For nose, usually I will make bigger or smaller as I like (depends on character). But the important is to keep the ratio of the face nicely. Don't make the nose too high or too low. There should be enough gap for lips and nose.
*btw I did the change of skin color after hand reshaping

c.
For eyebrows, is as I said above. Also, it's all depend on the sim face and the makeup look (especially for my vkei sims), so idk what should I say (*´・▿・)ゞ
d.
For mouth, i always make it smaller a bit using the slider on corner of mouth (face zoom out), and make it wider as needed (face zoom out). I always make my sims have relaxed mouth, not frowning but not smiling either. Zoom in shaping is also used of course.
e.
For chin, cheeks, jawline etc. Pay attention to it. I slider it little by little as needed. Chin doesn't have to be small. But for this guy, I made it a lil bit smaller. See the chin or jaw shapes in this post.
f.
Important!! I always size up or down(? the head until it have nice ratio with the teeth. (zoom out face)
-------------------------------------------
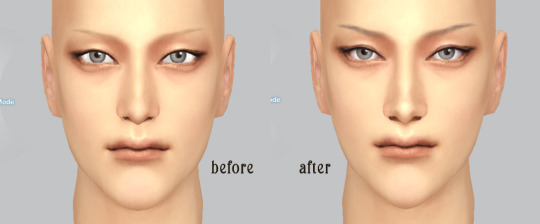
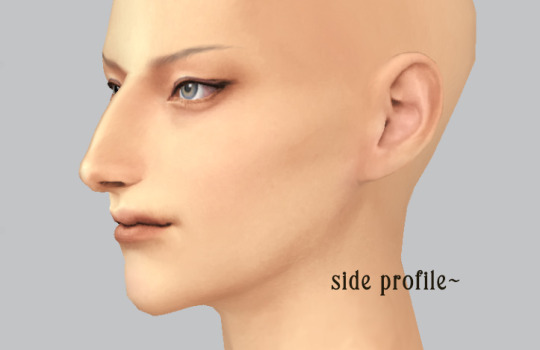
Four - choosing skin details (face & body)
Honestly I do this freely.... if it fits then it fits... lol. Oh also in this part, if I think I should change the skin overlay, then i do it.
a.
Eye details -> if the skin overlay has no eyelids and I want the sim to have it, i'll give them eyelids cc. If I want the sim has eyebags I will give it. Just tiiiiny bit detail. Eyelids cc I use is from Dalsuk and Obscurus. Alsooo, this one is important, I use sclera cc too. I also use eyedepth sometimes.
Also katrina-y eyesocket is good. Sometimes i use it. (See: Xion & Asakusa)
b.
Nose mask/details -> I use nosemask from Obscurus and ddarkstone, faeesih. Depending which suit the best. Not much given to the nose actually.
c.
Mouth details -> i use mouth/smile mask(? from miiko and pralinesims (not always, only if needed). This guy used from miiko
d.
hairline -> I use from setsuki (this time I forgot to gave him hairline but it doesn't show since the hair was covering..
f.
body details -> it depends on the character.. (again). I recommed moonchildlovesthenight abs mask if you want to make muscular sim. This guy though, I didn't add anything to body details.
-------------------------------------------
After reshaping face features and add skin details~ I really like the nose.
-------------------------------------------
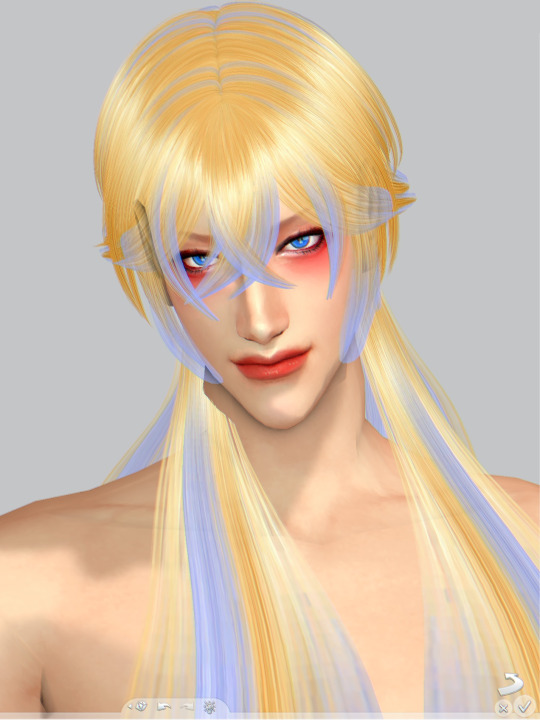
Five - makeup
How should I describe this part? ( ;´ - `;) it depends on the sim itself. What do you want them to be? But I prepared two option
One is "heavy" look type, like.. some neo-vkei bandmen (I was trying to imitate one of Shiyu from Ashmaze makeup :'D. I need more makeup cc..). But you can also look at my other sims. "Heavy" makeup will carry the atmosphere the sim gives. Take look at Nozomi in this post. He looks mysterious, dark and gloomy.
I will list the makeup cc used, but I'm too tired to link.. zzzzzz
So when i saved this guy I actually deleted the first makeup look... I forgot to add the eyelashes back again..
[BBSims] blush1 RemusSirion_Lipstick_195_Hydra JIUJIANWU 晕染眼影 [PARISE]SelenaEyes(UNNATURALS)
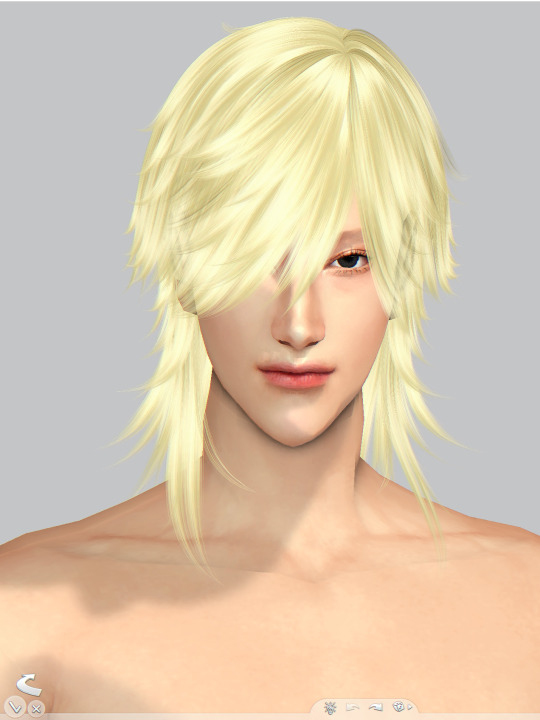
Two is natural beauty type of way. Fresh look. The type to wake up with perfect face, even he was drooling in the sleep. (still depends on the sim characters! In this case, he's the type of people who only uses concealer to hide the face "imperfections").
Makeup cc used.
obscurus_lips_N12 ddarkstonee_eyelashes_N5 [baekbobohu] 04Eyes
-------------------------------------------
Other tips
Give your male sims eyelashes! Big or not, natural or not.
Use every prossible sliders that is available!
Slide the pupil to imagine them wear big ass contact lens :D (See: Taiga & Asakusa)
-------------------------------------------
DONE~
whew,, this took me at least 7-ish hours...
so yeah.. I...... hope this helps...?
^_^; .....................

105 notes
·
View notes
Note
Hey Sunny! Do you have any advice/tips for making comics on paint tool sai? I really want to start making my own comics and sai is my preferred program but I’m a little lost when it comes to how to start. Do you have a normal canvas size for your comic pages? I always worry that things will come out all pixel-y. Literally any advice would be great, I love your work so much and I really look up to you! I hope you’re having an amazing day and thank you as well for the klance food 🙏
hello! I do have a standard canvas size I use but it's just in reference to the place I print my zines at so that I don't have to resize them later (2079x2905) u can even pick something bigger or smaller depending from what you're comfortable with!
I draw some other comics at 1440px wide, by pixelated you mean when zooming in? because if you view any image at 100% it's not gonna be pixelated, but if you want the image itself to be bigger when viewed at 100% choose a bigger canvas (=
thank you so much that's sweet of you, and same to you! 💛
63 notes
·
View notes
Note
Hiya! I found your blog through your neocities website! I was wondering if there’s any tips or things you read/watched that help you make your site. (Im heavily considering making one of my own neocities site it just seems fun)
hihi welcome !! i have quite a few pieces of advice, but the tldr is you should come up with an idea for what you want to make beforehand, and look up how to do each piece! your knowledge will start to fill in along the way :]
(this is probably gonna be long as hell so under the cut is all of the fun stuff /silly)
the way i personally started off was by sketching out what i wanted my site to look like! if you know what you want before you begin, you'll know where to look to figure out what you need to do. html+ css are extremely easy languages to read/write once you know what to look for!
^ this was the original sketch for my site, where i planned out everything i wanted to include. it's a bit different from what actually ended up on the site, but that's alright! it's just about having an outline to work from. i think of it like outlining before you write, it feels like such a pain in the ass because u just wanna start working NOW but u will thank yourself later for taking the time to plan.
once you know what you want to make, start looking for tutorials and resources to make it easier! the grid for my homepage and some of my other subpages was made using a css grid generator, since its one of the more confusing bits of css. you can make grids without it, but its a very easy way to make a more asymmetrical design if ur using the generator!
thats linked here, it gives you some css to put in your head or css sheet, and then the html for the different boxes to slap in your main document. it can be easier to understand what itll look like if you give each one a border while you work, even if its just temporary!
when looking for information about css and html, w3schools is your best friend. its a pretty comprehensive database of every little piece of html + css you could ever need, with examples you can play with yourself to understand what each variable does! it's been a lifesaver for me, ive watched basically zero video tutorials because everything on there is explained so well and you can find basically Anything.
they even have code snippets for things that take more than one or two lines of code, which you can use and adapt yourself! (the tooltips on the official art + my art sections on the hinata shrine were adapted from a tutorial on there!)
in general, having a plan and working from there will make ur life so much easier. the pages that ive sketched out beforehand or ive had a very clear vision for have been WAYY easier to code than the ones i tried to come up with on the fly, and ive been much happier with how they've turned out as well. though i do also have some smaller, rapidfire tips as well that ill go thru now!!
— inline css (the style="" tag) seems so so useful but really should only be used when you're resizing images like buttons. when u keep all of your css in the head or in a seperate document, its way easier to debug and read later. i cleaned up my homepage recently by removing all of the inline css and looking at the code stresses me out WAY less because i can actually read it LOLOL ... plus cutting the css out and putting it in its own document made me realize that id accidentally wrote some really weird code in some places
— this is very much 'do as i say, not as i do,' but use an external editor (like visual studio code) instead of editing live on neocities! you can set up a live preview, and generally wont be pushing out 100 updates every single time you change or add something. i tend to code directly on neocities but its a bad habit and i want to break it eventually v_v
— if you really like an effect someone else has on their site, you can peek using inspect element i promise the coding police won't get you !! dont steal code line for line, but you can figure out what theyre doing and put your own spin on it. things like border images can be really cool, and i only figured out about them because i looked at what someone else was doing and figured out how to adapt it for my own site! check linkbooks and credit sections as well, a lot of people will include links to any effect they didnt make themself or got help with. (including me! the credits section of the linkbook has a ton of little things i got from other places, including a really neat little music player, the rss feed for my status cafe, and the wobbly text on the homepage!)
— most stuff in html and css basically just... says what it does in the tag. so looking stuff up for it is extremely easy! if you've used carrd before you honestly probably already know more abt html than u'd think just intuitively. when ur adjusting the margins or padding in carrd, you're adjusting the margin: and padding: properties in the css of the website it's outputting!
this is getting way too long but!! my best advice is to just get started. you'll never be able to learn without trying, and it genuinely is so fun to have something that's truly your own!
(if u have any specific questions im happy to answer anytime as well! i love talking abt neocities, its a super fun hobby and way easier to pick up than u would think!)
#originals.txt#inbox.txt#neocities.zip#god im so sorry abt how long this is i havent had time to work on the site for a while and its getting to my head /silly
6 notes
·
View notes
Note
sorry if u answered this before lol, but where and how do u make ur gifs? any app or site i use butchers the quality /:
i have not! actually. no one's asked yet (on this blog, that is. i've had many over the years lol) so you're fine! <3
well, to start with, i do not use apps or sites or whatnot. precisely bc like u said, they butcher quality :/// so, to simplify my process:
what i do is, first, i download the vid i want to make gifs from in the highest available resolution onto my computer. if the vid is on yt i usually use 4k video downloader, if it's somewhere else there's online downloaders for just abt every site there is so no sweat.
then i put the vid through a program called avisynth (......which actually is outdated ASDJFJSFA most everyone uses vapoursynth instead these days but honestly idc enough to switch. they're basically the same thing. i'm used to avi & it does its job so like. whatever lol) and what it does is it lets you resize the vid to set dimensions, pick the exact moment you want by selecting frames, and can sharpen it too, if you pick that option.
then i pop the resized vid into photoshop, where to finish it off i add coloring & maybe apply additional sharpening if i think the gif needs it, and then i can save it in gif format & upload it here! voilà~

now, all that being said, the avi/vapoursynth step is actually totally optional, if u dont feel like learning how to use it just yet, and it's possible to do everything straight in photoshop & still end up with very decent quality gifs!! so if you'd like a more detailed tut on that process i'd be happy to explain it! <3
#that was. VERY simplified sfhdfjs#theres other methods of giffing too like screencapping for example#but i wont be getting into that one bc ive never used it lmao#ANYWAY. hmu if u want more info! <3
8 notes
·
View notes
Note
Hi yes sorry to bother really quick question though uhm when you draw a human head do you draw put the the uh the circle thing that displays the top the head and then draw a chin oooor no?
If not what do you start with when you draw someone? And also how do you draw hair? I love the way you draw it and I am literally struggling sm w/ my art style(?? Idk Ik i don like it much tho) atp and wanna know what you do when you draw...and you seem like yk what ur doing so... yaaaaa thank youu! :3
Haii don't worry you're not bothering at all ^_^
To answer your question well i don't really draw the full circle usually i just draw circle heads but when I'm not doing that i like to try n get the chin shape as I'm drawing the head
Like this

After that i like to finish Woking on the head before moving on to the body
It can sometimes be a problem when you start drawing the body n you realise that maybe you need to resize or move the guy so you'll have to erase the head you already finished but if you're drawing digitally you don't have to worry about it 👍
I usually finish the face then draw the hair n neck but the order doesn't matter do whatever you want


There's a lot of different ways to draw the body n you can use whatever technique is easier for u but for me i like to start w the shoulders n do some chest n back lines
They don't have to be accurate just a general shape to indicate the body type/pose you're doing

Once i add the arms i start doing some fixes to the body
The arms make it more coherent all together so you start to see what issues can be fixed in the general shape of the body or maybe even the position of the shoulders or the pose
Once the guy looks right you can hide all your hard work w some clothes


Then yea i just add some last details like clothes folds n stuff n also go back to fix some lines that don't look right just erase as much as u want till the guy looks decent enough

As for the hair i just do general shapes i can never figure out how to do the detailed hair with all the individual strands rendered so this is the best i can do
I have some general strand shapes i like to use every style gotta have one of these

I like to start w the bangs then draw the rest of the hair sometimes if the drawing is too tiny i won't draw the bangs at all just do whatever till u get a shape you like 👍

Also for the artstyle thing if you're not happy w how your art looks i advice trying new styles
For me i have my little lap rat blorbo who i draw every time i wanna try a new style or technique
Look at other artists n pick out certain aspects you like about their style n try to replicate it if you're vibing w the style or technique then good for u king(gender neutral) draw that all the time 👍
Don't worry about changing ur style either even after u found a style you like it's always fun to experiment w new stuff n who knows you might even develop a new style that u like even more
Just have fun bestie do whatever brings u joy

Anyways i talked too much be gay do spinjitzu or whatever ✌️
11 notes
·
View notes
Note
hello! i hope ur day is going well! im not really sure how to word this but ur one of my favorite gifmakers on this site!! and i was wondering if u have any tutorial or would be willing to tell how!! do u make ur gifs so sharp! along w being so smooth and gorgeous im foremost always just stumped at how beautifully sharp ur gifs r!! not to mention the coloring!! regardless of if u get to answer any part of ur process or not, i just wanted to tell you ur gifs r very very beautiful. im always so awed and admiring wnv i see them! so warm and prettily colored yet so sharp!! apologies for gushing here, pls have a good day!!!
AHHH THIS MAKES ME SO HAPPY, ANON! It always makes me so happy, when I get any kind of compliments on my gifs, so this really really really warms my heart!! ♥
I did a gif tutorial like 1,5 years ago which you can find here! My sharpening has changed slightly from back then, so I'll just tell you what I do now.

Much more detail under the cut (this got way longer and detailed than I had expected)!
This is a walk through of my sharpening/effect process, so if you want any tricks about colouring or anything let me know!
The first important step to sharp gifs is the video quality! The higher the video quality is, the prettier and sharper your gifs will be. TS files are the highest quality (most of the time, sometimes they kind of scam you ngl) files you can get. Else 4k videos are great too! For me I usually don't go under 1080p (with few 720p exceptions). Sometimes I don't really like TS files, because they're a bit too sharp for me. This is mostly if it's a variety show. Concerts tend to be not as sharp in my experience.
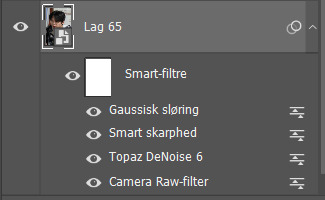
I use vapoursynth to resize my gifs before putting them in photoshop. I usually don't do any sharpening or denoise in vapoursynth. This site has everything you need for vapoursynth!
For sharpening and stuff in photoshop, I usually do camera raw + topaz denoise + sharpening + 1% blur at 30% oppacity.
A bonus tip is, if you've done everything and tried soooo hard to make it non-grainy, but you just can't get it to do whatever you want it to... embrace the grain and add a noise layer! I do this with big gifs (540x540) usually.
To go more in depth, my settings for those are as following...
Camera raw
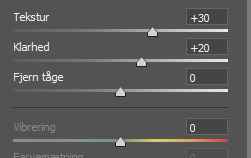
Texture (tekstur) I usually go between 20 and 30, depending on the thing I'm giffing. For Clarity (klarhed) I do the same number as texture, but minus 10. Idk why, it's just how I usually roll!
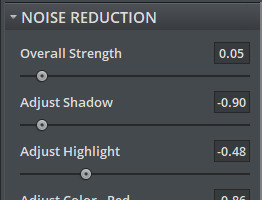
For Topaz denoise I usually only use a little bit. Like 0.04-0.06 overall strength. I don't really have any "this is what I always do" settings, but usually my shadow is at 0.90 and my highlight is 0.48 (because I liked it one time and then just kept it). You can also use the denoise option in vapoursynth, I just prefer photoshop, because it feels like I have more control over it. I know a lot of people don't use denoise at all, but I usually do with files less than 4k quality!
OBS! Using topaz denoise on smart objects in photoshop is a bit tricky, but I made a video about it once, so here you go! (the video is kind of outdated for me, so ignore the sharpening part and focus on the "how to do after you've put denoise on your gif" part. Also ignore my voice, thank you).
Sharpening:
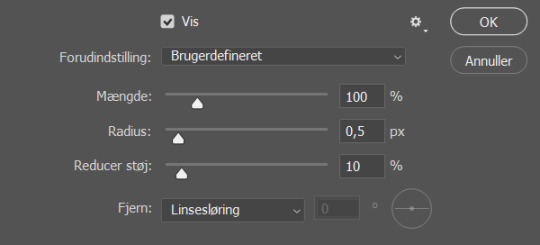
These are my settings for sharpening. If I think the gif is a bit too sharp after I've added a blur filter, I change the amount (mængde, sorry my ps is in Danish) to 80% and that usually does the trick!
If you use all of these, this is how the smart object will look, before you convert it into frames
Let me know if you have any other questions or anything at all!! ♥
#ask#answered#anon#tutorial#kind of#I've kind of considered doing a “maja's tricks and tips for colouring and other stuff with gifs” post so let me know if that has any intere#i answered this as soon as i got home cause I got excited that someone was asking me for tips ♥
16 notes
·
View notes
Note
Hey, I'm a big fan of your work. I wanna make my own default eyes based on some contacts I found. I've already done the first default colours, but how do you go about making the eyes for the occults and pets? Would I need to draw the eyes?
if theres no swatches in the contacts you think you can use then yeah i would say draw them for occults. you can get pretty far with masking the iris in ps and using curves/overlays or gradient maps to alter the colours how youd like, but its kinda just try ur best! the method is the exact same however. pets are a pain because they use a entirely different texture space and have seperate textures for each eye. AND the pupil is bigger/different shaped in pet eyes. the way i did it was make a photoshop action to turn a human eye swatch into an animal eye swatch. ie it would resize, duplicate and then translate the eye tex, paste the bigger pupil etc in an action, so all i had to do was mess with the colours, apply that action and i had a pet swatch ready to go! also for ur other ask about duotones. a quick and easy way to do it is literally paste one swatch over another and erase parts of the top with a very soft eraser to blend the two together, then you can change the opacity if it looks too harsh! theres no easy way to do most of this stuff unless u make ur own actions as u go so its just kinda mess abt until things look good! and also thank u sm !!!<3
7 notes
·
View notes