#how to patch pants
Explore tagged Tumblr posts
Visit Tumblr Blog
Explore Tumblr blogs with no restrictions, modern design and the best experience.
Last Seen Tumblr Blogs


Fun Fact
Tumblr’s website traffic is steadily declining.
Text
Slowing Down Fast Fashion :: an Ecological approach to mending clothing on a budget.
Mend and repair :: patch hand-me-down sweaters, fix holes in leggings from department stores. By giving items a longer life, and preventing unnecessary garbage, fast fashion items become slow fashion!
youtube
There are so many ways to make this world a better place. As a lover of clothing and crafty person, mending clothing is one small way I can help out. And so can you!!
#slow fashion#upcycling#mending#mending 101#sewing#sewing tutorial#how to patch pants#calendula craft#cottagecore#cottage craft#handmade#sewing 101#easy sewing projects#Youtube
25 notes
·
View notes
Text

tried a new technique for patches and i am obsessed with the result!!??!? ok so the background is paint made from equal parts cheap acrylic paint and fabric softener, then i let it dry, stamped on a cybertruck, and boom u have a lovely cybertruck on fire patch. largely inspired by the fact that we have one of these fuckers in my town now
i also used a mix of orange and neon orange paint and hopefully that will make it look Extra Cool under black light and shit. making some white stamp versions soon!! YIPPEE
#art#lino patches#patches#punk patches#crust pants#crust punk#patch jacket#patch pants#fuck tesla#punk fashion#diy or die#fuck elon musk#u would not believe how hard it is to draw a cybertruck bro oh my GODDD#solarpunk
503 notes
·
View notes
Note
Question...how do you make your patches? They seem so fuckin cool. I'm working on a vest and a jacket atm, and I'd like for them to be done by the time a pride fest rolls around next month.
Main technique I use for making patches nowadays is linocut. Its best suited for mass production of patches.
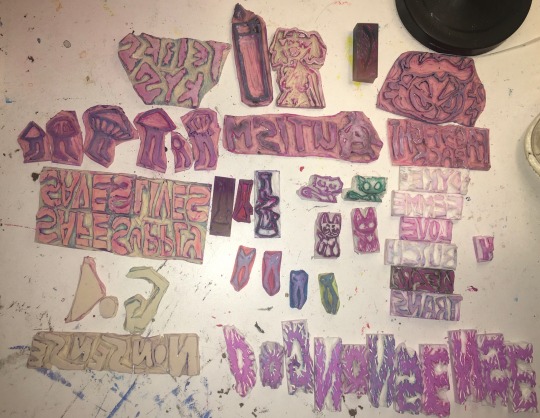
Make sure to remember your carving the mirror image so you have to flip all the text. Using tracing paper to flip the design is a good trick, as well as leaving graphite marks on side, then pressing that to the lino to leave the marks in the same spot. Another trick with pencil is to view what ur carving in negative space quickly, put a paper over your design and shade over it with pencil, darker marks will be where you haven't carved yet.
I use speedball fabric ink, it takes 1 week to set then will be fine to be washed. I have magenta, violet, turqouise, and white. They have a limited range of fabric colors at the store. I have seen gold and silver fabric paint for sale and I will investigate it one day.

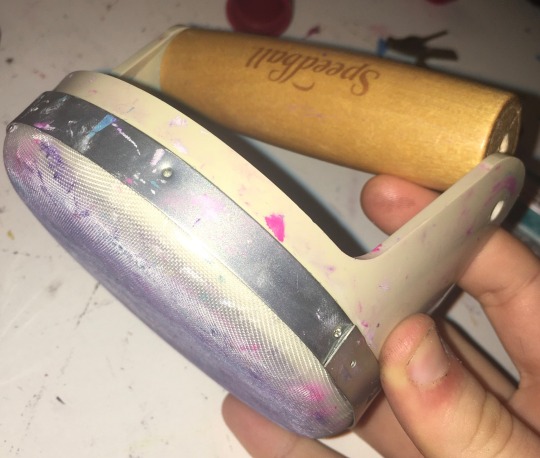
I use a speedball roller, i find the smaller one to be better than the big one as I can be more precise and waste less ink.
I got a fancy handle for $40 but the screws fallen out so its broken now so just get some heavy books. I used to use a mug. Whats important is pushing your whole body weight into it.
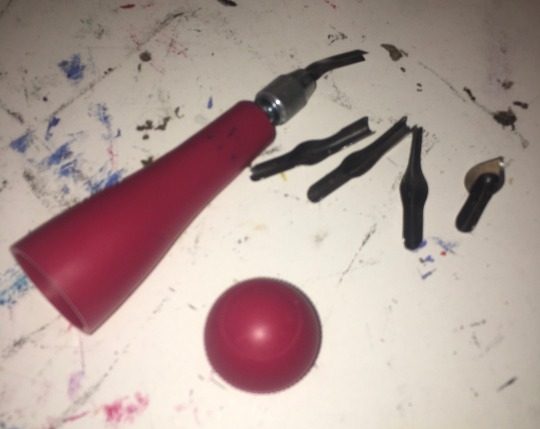
I got a speedball carving tool with different heads I can swap out so I can cut into the lino at different deepness and widths. The heads are stored inside the tool since its hollow and has a screwable removable bottom. I use linocut or dollar store erasers for my carvings. Make sure to wash the ink off your linocuts after your done using them.
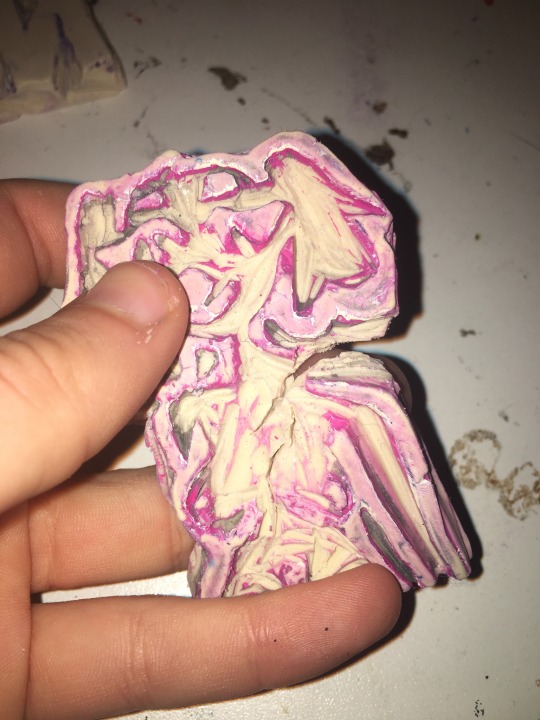
A thing to increase the lifespan of you're linocuts is to use wood glue, some cork or wood pieces, and glued the lino stamps onto them. I dont do that yet so my stamps fall appart from overuse sometime and because I cut way too deep into the lino since I hate chatter.
Chatter is the term for in linocutting when theres little messy lines and stuff. It makes the art more recognisably to be linocut. My work is very clean with no chatter which is why people don't notice its linocut usually. This is a stylistic choice, with diy styles having a lot of chatter can look really cool so experiment with leaving bits of extra uncarvered lino sticking out in ur stamp. I need to experiment and buy some more lino.
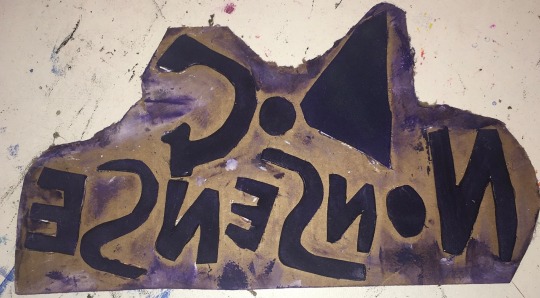
You can also use multiple linocut stamps together to make a patch. Some patches ive made have like 8 different stamps. Ive made a dog nonsense patch where each letter was their own eraser stamp. You can also use different colors between the different lino stamps on the same patch to add more color. An effect I like to do is first stamp it in color, then the next day I stamp it in white over the same spot but shifted to the right and down slightly. It makes the text have a cool border 3D effect I love doing.
If making a more detailed picture with colors, i reccomend hand painting patches. I use white fabric paint mixed with acrylics for color to get all the shades i need. Acrylic paint mixed with fabric softener works too.
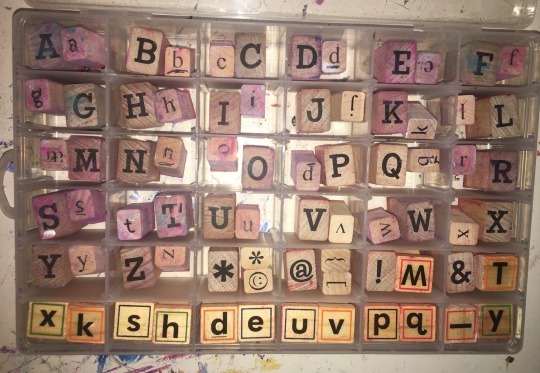
If doing words and you dont want a unique font reccomend using letter stamps. If you want a unique font for that i recommend hand paint for individual or linocut for mass produce.
The positive of letter stamps is the font is neat and can be done quickly. I know from lending them to my roommate that they are very helpful if you have dyslexia and have trouble getting letters right.
A visual effect of the letter stamps is that have a nice boxy edge effect, its an imperfection that adds a personally touch to it. I have both lower and upper case stamps that I got from michaels. You can use a hair band or elastic to hold a bunch of letter stamps together to make a word stamp.
You can use other stamps than letters that you find at craft stores for example my racoon print is a craftstore stamp.
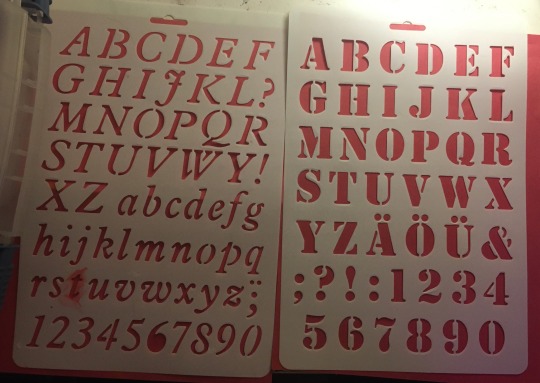
You can also find big plastic letter stencils at the dollar store that you can use to do lettering by filling in gaps with a sponge or or paintbrush. They make special paintbrushes just for using stencils.
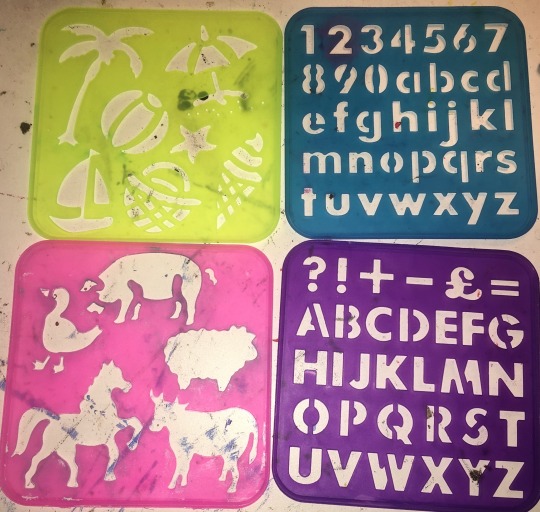
You can also get plastic stencils in the shapes of things, i got some for children and use a horse stencil for my horse smoking weed patch. Easier than drawing a horse myself.
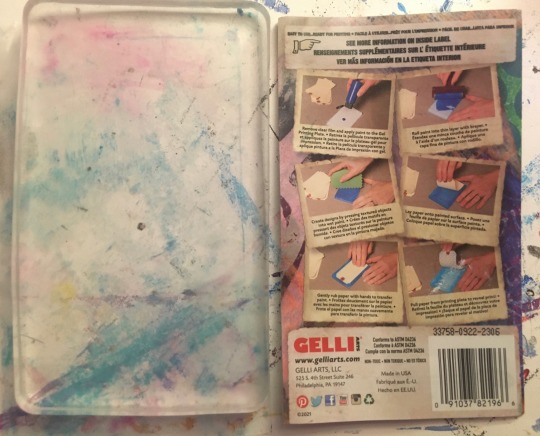
Another technique I use for more unique clean patches is gel plating. I haven't tried printing laserprint images with it as ive seen online a lot but I will try one day. What i personally do is use it to make imprints with chains and physical objects.
Another thing i use with gelplates are any stamps or linocuts that dont have words, or words ones that i fucked up with and forgot to mirror when carving. It flips mirror image twice with the gel plate so it goes back to being right again on the patch.
Another patch making technique is using foamboard cut into shapes glued onto cardboard. This is good for a quick test of a design and is very cheap to make. It will not hold under water so is more difficult to clean.
#punk#diy#patches#diy patches#patch pants#diy punk#crust punk#crust pants#battle vest#punk fashion#punk diy#punk patch#queer art#linocut patch#gel plate#linocut#stencil#my patches#patch tips#how to make patches#patch 101
629 notes
·
View notes
Text

frank sewing a patch with that little smirk~🎃
#this gif gives me motivation to keep working on my patch pants#gotta get them done by october#they’re just so much work tho 😭😭#how is he so hot sewing a fucking patch#what the fuck#like???#frank iero#frnkiebby#mcr5#mcr#mcrmy#frnkiero#frnkie#my chemical romance#my chem
417 notes
·
View notes
Text


some mcr patches i impulsively made using cut up bits of painting canvas + pens and alcohol markers
#is painting canvas the best material for patches? probably not but i dont care#i have been frothing over the thought of patches for a bit now and i suddenly realised that canvas could work#originally i only intended to make a patch for each album but then i (a pretty new mcr fan)#found out about pool boy at the vampire mansion and knew i HAD to include it#im sooo happy with how the demolition lovers turned out i had the perfect size/shape scrap of canvas for them#i also really like the better living patch which i (again) didnt know was a thing until recently#i dont actually want to permanently alter my good pair of pants so i plan to just attach these using safety pins when i feel like it lmao#my chemical romance#mcr#patch#patches#justa's art
93 notes
·
View notes
Text
a patch in honor of the goodest boi ever
#i love how this design came out#use for inspo is encouraged#punk#diy punk#hand made#diy#patches#personal#patch pants#punk fashion#ares
284 notes
·
View notes
Text

can we all please appreciate the patches my godchildren made for my patch pants???
( @annkthatcher )

#i love them#they are my darlings#and you’d better know they will be learning how to sew tonight while they sew these fuckers on my pants#they’re so fucking precious#punk#patch pants#fashion#punk fashion#patches#punk patches
78 notes
·
View notes
Text

Started the long process of destroying a new pair of jeans
#they wont replace my babies that I've been working on dor over 3 years now. but it will be nice to have a choice#these are a soft cotton/denim so fraying a lot already. theyre green and black striped so i dont wanna cover that too much#they look kinda naff rn with a couple of patches and rips that arent worn in yet#but im gonna see what scraps I've got to enhance them#may do away with rhe rips altogether and patch them up cus rn I'm not liking how frail the material is when it's ripped#i want things to look like theyve already had a few years in them even though they havent. so it's figuring that out#monty barks#diy#patch pants
12 notes
·
View notes
Text
i think going fishing would fix me
#or maybe dip netting so i can look at pretty specimens#i really do need to get a fishing license so i can get some trout and process it for eating#im getting a little less sick with the warm weather but theres other stuff i need to work towards first#my area has a lot of really cool fish actually :} if i told you what kinds it would dox me though so you'll have to guess haha#should probably pick up more knife skills in advance so i can debone it easier though. and learn how to dispatch the fish -#very quick and painlessly. its cruel how ive seen them killed before and i cant stomach it. you owe it to the animal to dispatch quickly#ough. hopefully my health doesnt take a nosedive i want to go out this year and learn and grow and change and hit milestones -#i honestly never thought id be able to tbh. whether that be from audhd or just being sick yeah?#i wanna learn how to make shoes and how to talk to people. i wanna learn the best fishing spots and how to patch my pants invisibly#i wanna carve some bowls with strands of wheat on the sides and i want to build muscle strength back up#i want to fix the cracked step. and oil the hinges on doors so they dont squeak#i wanna finish my neon colored knit socks! i want to get better! i want novel experiences!#i could have probably put this on my sideblog but i think it will be fine. im going to finish my socks today#good morning. good evening. good night. please have an absolutely wonderful day. i hope you can do the things you've been too sick to do too#not a horse
10 notes
·
View notes
Text
How to Make a Printing Screen from Home
I wanted to share a quick cute little tutorial for how I made my own screen for making patches (and other things that don't require exact measurements). Cute lil how-to under the cut >:)
Disclaimer: I have absolutely no idea what I'm doing at any given moment. There could be a better tutorial out there for you. I'm just guessing for a lot of the things I do and this is no exception. With that out of the way:
THE SUPPLIES YOU DEFINITELY ABSOLUTELY NEED:
a small/medium canvas (depending on what you have and how big your design will be)
paintbrushes
a tight-woven sheer fabric (preferably not stretchy and STRONG)
a fine-tip pen
water-resistant gloss of some kind (mod podge works, but make sure it's a waterproof kind if you want to make more than one print)
paint that won't come off in the wash (acrylic/spray paint work)
good strong tape
a good sturdy card-like thingy
an easy/cool design for your print :)
THE SUPPLIES THAT ARE RECCOMENDED BUT NOT NECESSARY (aka things I like to use):
a good canvas fabric/thick cotton for printing on
fabric paint (will stay on the fabric best duh)
a 1/2in, 1/3in, and fine tip paintbrush for details (depending on your design)
some company for fun :)
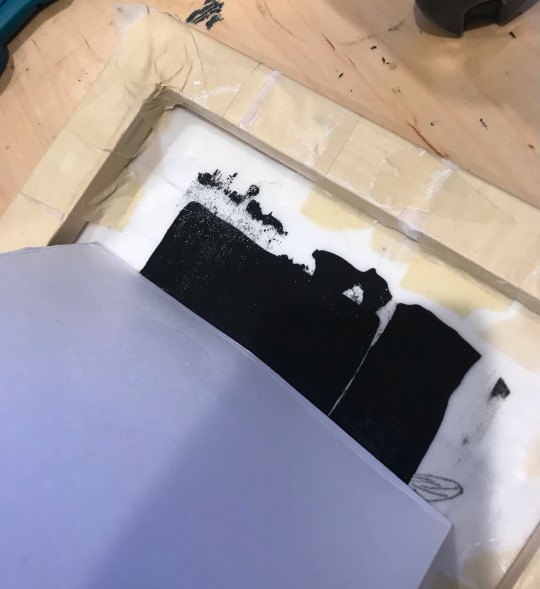
Alright, so first you'll want to figure out the design you want to print out and get a good sketch over it. I'm a detail freak so I like sketching out my design then going over it in a black pen. The ideal is hard contrast and clear and discernable lines/fill-in spots, like pictured below:
(Note how I emphasized which spots were to have thicker lines, which parts of the stripes were to be printed, etc. I tried to think a lot about which portions I wanted to show up on the finished design and how they would look on the fabric as a whole.)
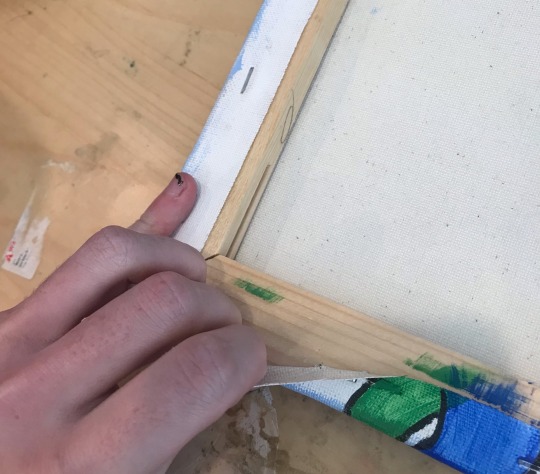
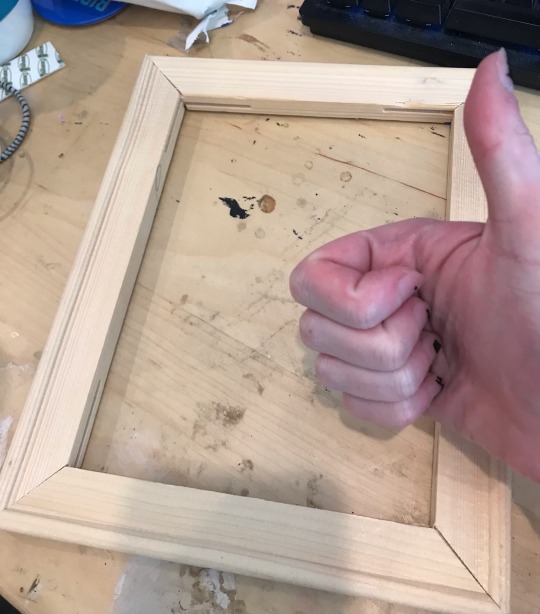
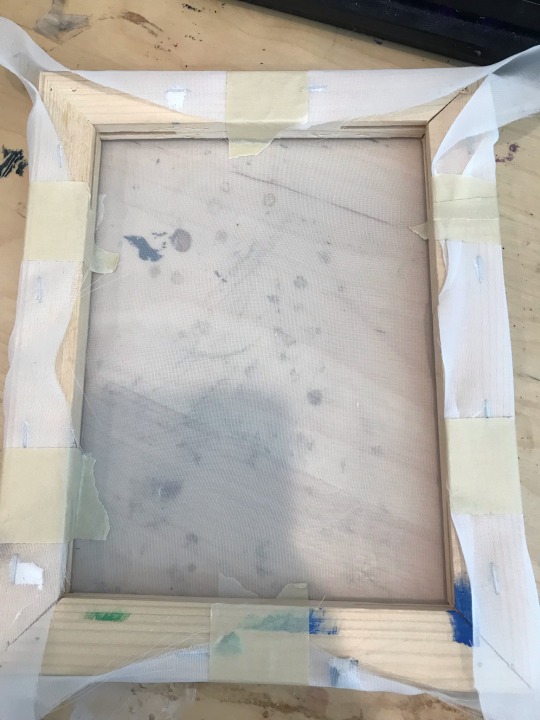
So you've got your design. Great! Next step is a fun one: Grab a canvas you are willing to part with (this one was a painting I made when I was 16. I hate it), and rip all the fabric off of that fucker!! If you pull off some staples in the process, don't worry. Just make sure you can retain the shape of the frame, since that's the part you'll need to keep. You don't need to take off every single bit of the fabric, but as previously stated, I'm a freak, so I did. You'll come out with something like this:
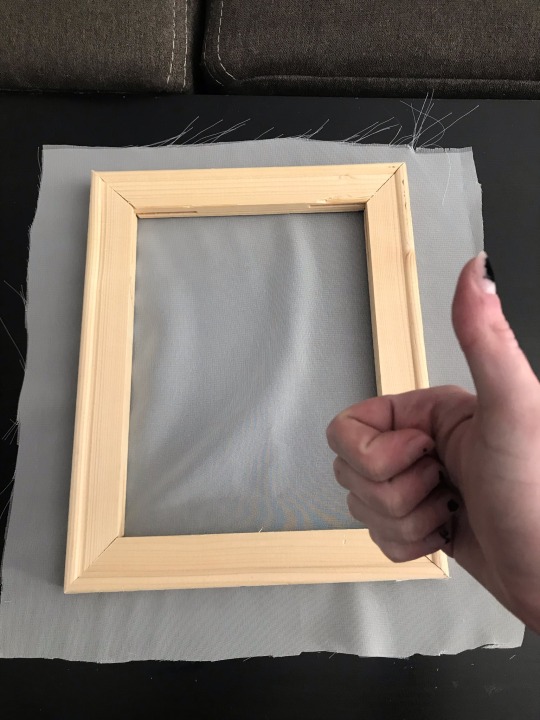
For the next steps you'll need a good pair of scissors as well as your pen and your sheer fabric. You're going to want to set the frame on your fabric and cut about an inch and a half around it so there's extra to wrap around the frame and tape down. You can draw a guideline for where to cut if you want, but once again, I'm a freak:
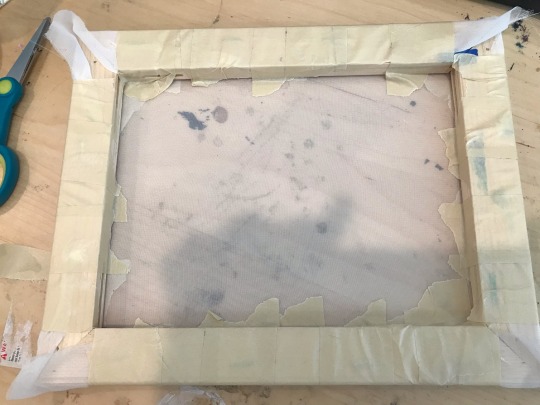
Now lay the front of the canvas frame (the part without staples on it) face down on the fabric and grab your tape! Now we're going to tape down each end of the frame so the sheer lays taut on the frame. I like to put one or two strips of tape on the ends parallel to each other and pull them tight, then do the same with the other side, then continue adding tape until the whole outside of the frame is covered. See below:
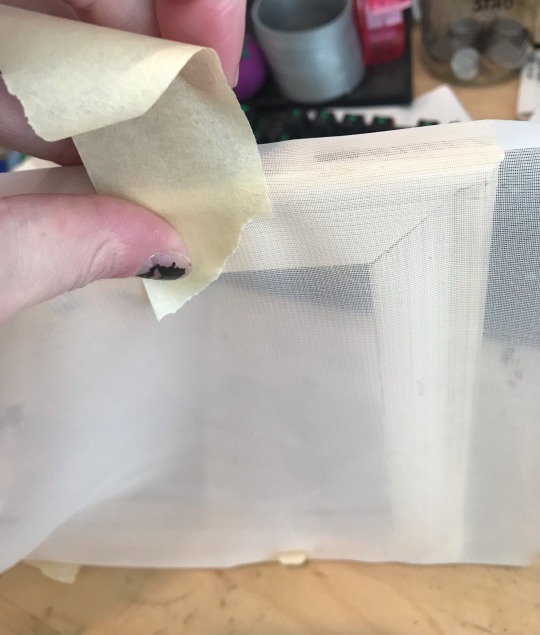
(Note: your goal in this step is to stretch the sheer as tight as it can comfortably go so there are no wrinkles or depressions in the fabric.)
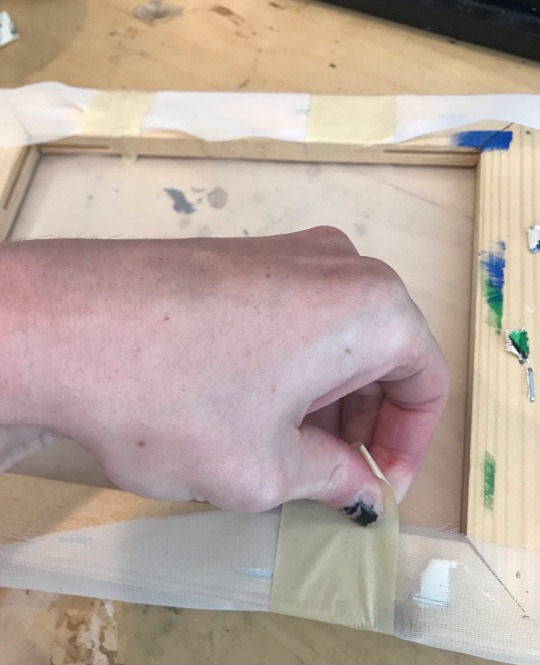
So now you have you're frame. Fuck yes!!! Go ahead and grab the design you came up with as well as your pen (you can use a pencil too, but the pen shows up much better through the fabric so I definitely prefer it), and put the frame front side down onto the sketch.
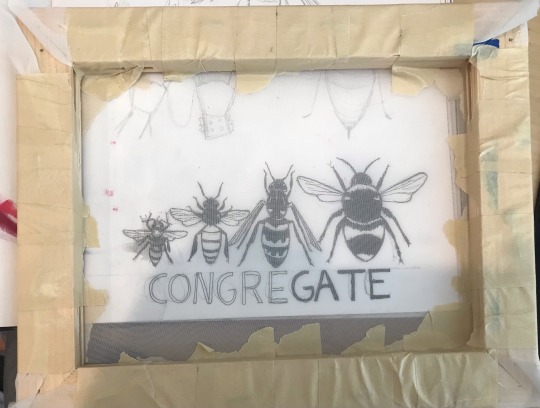
If you're worried about keeping the frame steady, feel free to tape the frame down and go ahead and trace over the design with your pen. Make sure to fill in all the dark parts enough that you can differentiate them from the light parts.
Once you have your sketch copied to the frame, now you can grab your gloss!!! Hurry!!! You're almost done!!!!
With this step I like to start big and go into the details once all the larger portions of the sheer are covered. Pretty much you're going to paint over every part that isn't the black of the pen with your waterproof gloss. This ensures that once you start printing, the only parts that are going to bleed through the fabric will be the black parts that weren't painted over with gloss/varnish/mod podge/whatever you used as long as it's waterproof!!! Take all the time you need, it's not a race. Once you're done and the gloss has dried, your screen is going to look something like this when put up to a light:
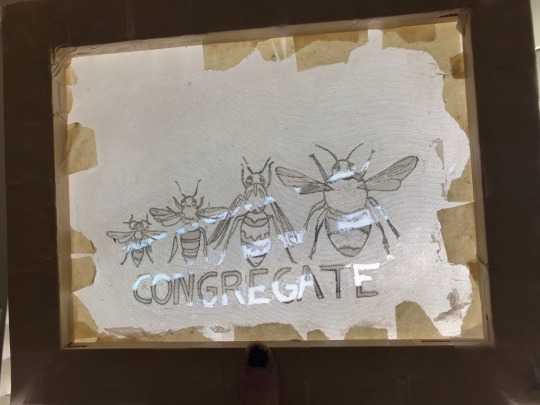
Now that this step is over with, congratulations - you have just made a mesh screen!!! Keep reading to learn how to use it lol
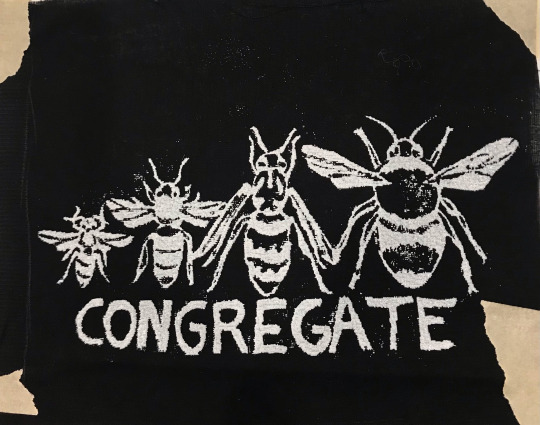
So for the patches that I make I just went with black and white paint, and black and white fabric to keep it traditional, but you can use any colors of paint and fabric you want, truly! The world is your oyster! I do not care! That being said, we're keeping it simple today.
Grab your screen, a piece of fabric that can cover the design and leave at least an inch of space around it, and a surface you won't mid getting paint on on accident. You'll also want to grab that card-like thingy for this as well. It can really be anything that can provide a sturdy, even pressure across the screen consistently. Go ahead and pick up that fabric paint too, I guess. We'll probably need that.
At this point, this is what your workspace might look like:

Next up you are going to center your design onto your piece of fabric-

-and grab your fabric paint. put a thin little stripe over the top (start slow and add more - as you can see I added a little too much and kinda fucked up my design) then grab your card thingy. Make sure you have even pressure on it and swipe it down at a medium speed so you're dragging the paint down the screen:


Once you've got everything covered I like to go over it a few more times for even coverage. Then you pull it up from the screen (which you might want to rinse off so no paint sticks to it!!!), wait for that bitch to dry, and you're done!! Congratulations, you have your very own fun silly patch! Go sew it on something! Or not! I do really do not care!!!!!!

#blog post#cant-shake-it#patches#homemade#punk#punk diy#punk patches#tutorial#how to#screen printing#diy#fashion#if i get hate for this im prepared bc i ride life on the seat of my pants#there are no rules and i am so inefficient
166 notes
·
View notes
Text

new patch (it's wrapped around my lower calf and i am in love with it)
#this was so fun to make i love how hard it is to read it kinda just looks jumbled until u really try to read it.....#musicposting#patches#punk patches#crust pants#diy punk#diy or die#punk diy#diy patches#machine girl#infinite potentiality#reporpoised phantasies#Spotify
62 notes
·
View notes
Text
trying to make bg3 work for me today got me like

#the bg3 adventures#i ain't touching that shit for a year i s2g#whatever they mixed into that patch 7 sauce it got everywhere#on my saves on my mods on my load orders#i downgraded to patch 6 that didn't do dick (my mods would just not appear in the game no matter what)#so i figured imma put my big girl pants on and tackle every challenge that patch 7 + mods has to offer#let me tell you how i spent 3 hours mud-wrestling the bg3 executable#only to go back home crying covered in shit head-to-toe#and yes i've reinstalled bg3mm and the SE and deleted and reloaded and restarted and updated the mods that had newer versions#it's just the built-in mod manager is an absolute nightmare to fucking work with#the back-and-forth between the mod manager the menu the saves the mod page while loading the saves#the random mods showing up that are not even in the mod folder/??? i'm-#and then some other mods showing up like... 20 times? dsdfdsf#yeah nah take me back to the peaceful pre-patch days#when i could just load in play around with pretty dresses then spend 2 hours taking pics or game footage#anyway where was i? ah yes period crying at my desk before any of this sdfdsfgfdg#maybe i should log off and just go write#yea
30 notes
·
View notes
Text

A lovely little photoshoot for the young pros, Jet-Black Hero: Tsukuyomi and Acid Rush!!
(This realistically would take place after Tokoyamis internship with North BUT I think both of them would look older + different than how I drew them… considering they’d be like.. 23-27.. but oh well.)
#Mina is wearing her own merch here#because it suits her beautifully#i wanted to draw her in chargebolt pants but the colour looked weird#but Tokoyami has a uravity and tentacole pin#and a cosmic 7 pin because North likes em#and an every child matters patch from North#and a tentacole patch#i got the idea earlier whilst listening to music#of a photoshoot where Tokoyami is stepping on Mina’s back#and Mina looks super cool and silly#but I don’t know how much the pose came across#sigh#fumikage tokoyami#mina ashido#bnha#bnha hero#bnha fanart#bnha art#pro hero
15 notes
·
View notes
Note
Benny!!!! Love how you draw the guy!!! Your art is wonderful!
AUUUUUU WEEPS THANK YOU ANON !!!! <3 have a quick sprite redraw ! [:
#[does a gay little radical pose to piss you off]#i forgor if this is actually his radical pose sprite or not. but it was in the rips i had and it was fun so i drew it <3#lisa#lisa the hopeful#ask#benny oberwinch#art tag#the reqs are still open !! please send them in this was the only other one i got my ask box is req free again !#i keep changing how i wanna draw benny. removed the patches from his pants this time so they look more like leather#also i change the placement of the patches on his jacket every time. but its fine. its fine#ok i need to wake up in like 6 hours for my lecture so uh. goodnight and thank you for the req !!!!!! [:
75 notes
·
View notes
Text

jerkin is now altered for going to the ren faire w my friends on sunday
trying to decide what to wear under it with these fake leather pants
#messages from the ouija board#i have two off-white shirts that are competing but ill probably go w the townsends one#im also trying to figure out how to spice up the pants#i might try to find interesting fabric to tack on like knee patches#snd/or do a wyll ravengard thing w wrapping the bottom in an interesting ribbon or twine#the pants arent pleather-pleather theyre 'coated denim' and i got them for like $5 a year ago#so im not super worried about fucking them ul#im also holding up all my great grandfather's jewelry bits and bobs against it like ok is this anything
7 notes
·
View notes
Text

this was the first patch my god daughter made. she was absolutely devastated that she had messed it up and it didn’t come out how she wanted. i tried to convince her that it was perfect and i loved it but she’s a perfectionist like me and insisted on making me a prettier patch.
it was a pretty sweet moment tho bc i got to teach her that punk is perfect in its imperfections.
that it’s about taking all the shit that happens in life and making it into something meaningful. that one of the many facets of punk is that life is ugly and imperfect and that’s the beauty of it. how we get to live, create, love, and do it all while loving it for it’s ugliness.
she doesn’t know it yet but this patch is definitely going on my pants bc how could i not??? it’s fucking amazing, my name is now Jexie????
#it was also super precious bc we were driving into boston and i had commented about how much i love the city#and how it’s a mod podge of ugly and old and how people have taken it and made it beautiful with their art and personalities#and she goes#‘Boston is punk as fuck then!!’#and i just#i love that child so fucking much#punk#patch pants#fashion#punk fashion#patches#punk patches
48 notes
·
View notes