#i figured out basic blender functionality for this
Explore tagged Tumblr posts
Visit Tumblr Blog
Explore Tumblr blogs with no restrictions, modern design and the best experience.
Last Seen Tumblr Blogs


Fun Fact
Tumblr Inc. is using 66 technologies for its website.
Text
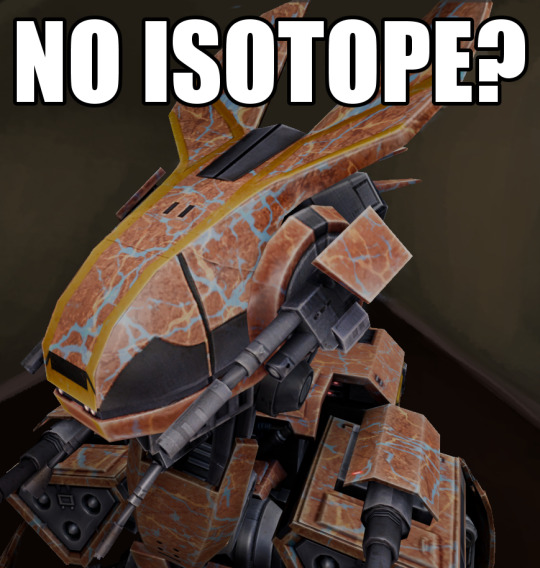
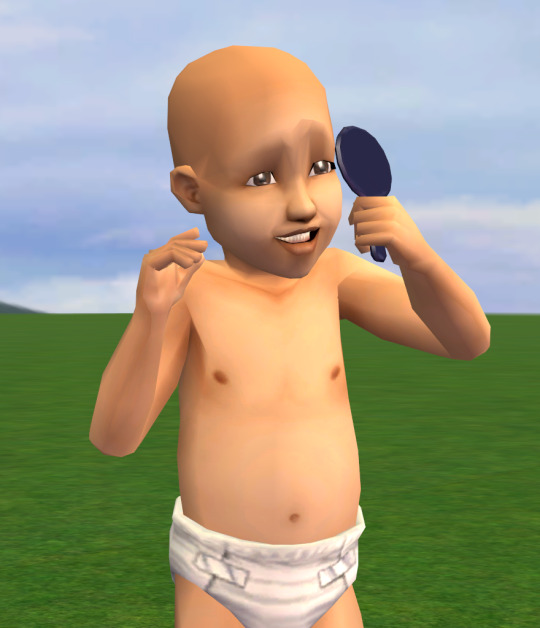
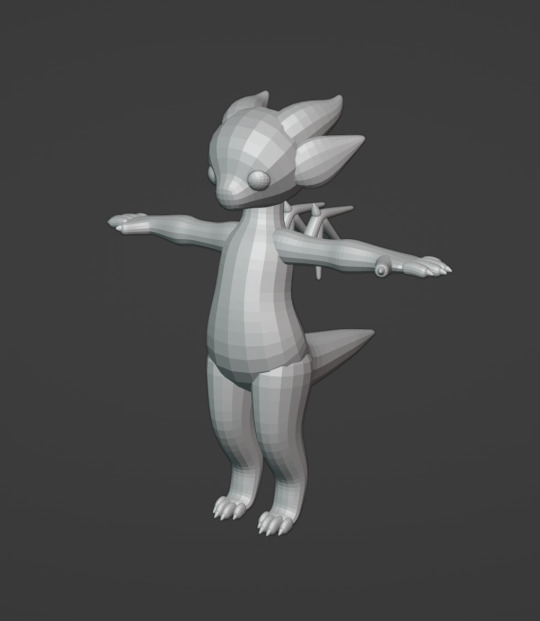
#swtor#star wars the old republic#star wars#isotope droid#isotope-5r#dead meme#meme#my art#blender#i figured out basic blender functionality for this#thank vod that my fren ket told me how FoV works#no isotope? osik vod osik
32 notes
·
View notes
Text

Cardboard Decoration Box (Requires Seasons!)
Ho ho ho hello!
This is a small little thingy I made, hoping to release it as a Christmas gift to you all! Better late than never, I suppose!🎅🎁
I didn't want only the decoration box that came with Seasons, so I wanted to make a basic one resembling moving boxes, that fits in any basement or attic you might want to build. Of course, it's functional too, opening and closing as your sim uses it, but it REQUIRES SEASONS to work. I'm unsure whether it will even show up as a decoration without the pack... Let me know!
Another fun thing is I figured out how to make edge highlights using Blender, so they will bump up the visual quality of my objects quite a bit! The sad part is I already finished all the swatches for my upcoming Outhouse Stories set, so now that will have to take a little longer.
Download (Patreon, FREE)
Enjoy and Happy New Year!⭐
#the sims#the sims 4#ts4#ts4cc#s4cc#ts4mm#s4mm#sims 4 cc#sims 4 mm#maxis match#sims 4 furniture#sims 4 seasons#mycc#s4
5K notes
·
View notes
Text
High waisted trousers for Masc frame - Teen version + Adult renewal

High waisted trousers for male sims, doesn't sound too complicated, does it? Well, it actually kinda is. See bottom of the post. But first, let's get the basic info you're here for out of the way...
Pants are snatched from this store outfit and then altered a bit.
So without further ado:
Teen Version
Higher waisted and lower waisted version
2 Presets each, with ombre and plain mask.
Found under Everyday, formal, career & outerwear
All lods, low poly: 988 F 658 V / +- 500 F 350 V / +-250 F 200 V
Fat, fit, thin Morphs
1K textures
Download simblr.cc / SFS / Mediafire

High waisted

Slightly-lower-high-waisted

Custom Thumbnails

Adult Version
Will override the files from my original post (Simblr.cc / Tumblr)
Higher waisted and lower waisted version
2 Presets each, with ombre (3 channels) and plain mask (2 channels).
Found under Everyday, formal, career & outerwear, enabled for maternity.
All lods, low poly: 988 F 658 V / +- 500 F 350 V / +-250 F 200 V
Fat, fit, thin, preg Morphs.
Redone weights.
Cleaned up morphs.
Made the booty nicer.
Changed the bonedeltas for the pregnant morph with bonedelta editor, so there will be no/less clipping with the belly in animations.
1K textures
Download simblr.cc / SFS / Mediafire
High waisted

Slightly-lower-high-waisted

Booty & preg morphs

The original presets & custom thumbnails

"What do I use these with?"
They will work with:
Very cropped tops.
Tops whose waist is texture only/painted on. You might need to change their overlay priority to 5 in S3PE (ask me for details how if necessary), or alternatively, actual naked torso with a texture-only accessory top. Texture-only Accessory tops will be, or should be, usually be enabled for teen-elder.
Slightly lower waisted version will work with most tops that are called "cropped" minus some very minor clipping
Both will generally work with very wide/bulky tops, that aren't too long (the nice booty might clip otherwise)
Items it is combined with in the pictures:
Cropped Hoodie for teenagers is on the way, adult version here
Cropped Tee for teenagers is on the way, adult version here (Version 1, most cropped)
The Female to male Supernatural bustier jacket is on the way for teen & adult.
The sleeveless Turtleneck for teens is by Aya here, however it had some issues in the materials (Very, very, very shiny in dark colors) so I made a fix which is here
Lace Turtleneck is converted-by-me Eros by Joliebean Here. Meshed version is adults only right now, Accessory version (dark green in morph pics) is Teen-elder.
Edit: i just discovered they will clip when heavily using bodysliders. Unless i can get said sliders in blender as functional sliders, there is not much i can do that will also keep me sane.
!!!The creation ramble!!!
(The below figure is in profile view and bending their knees and waist)

Clarification: I mean the transferred-over bones from the original TS4 creator might be imperfect to begin with, so even if it is a conversion, just using those might not be the end of the story.
Basically, making pants like this that by definition will overlap with whatever top, is a delicate balance between aesthetic (close to the body) and no clipping (requires great bones or further from the body). The female frame seam between top and bottom mesh sits higher, making high waisted stuff for them easy, this is obviously done as high-waisted stuff is popular amongst women and EA knew. Femme male sims they didn't really consider.
I also tried a version where they were texture-only above the traditional seam, but unless I gave the pants absolutely no normal map, there was still a visible seamline. I also didn't like how painted on/jegging-like the details looked.
After learning you can import rigs in blender with geom tools to connect to your geom, and literally see the shape change as you change the weights, I started abusing that possibility.
Due to weights transferring improperly due to the inner tights intersecting, meaning I had to repaint the whole crotch when I did between the slightly differently meshed versions, I also had to repaint the thighs & waist of all 4 versions. But, five days with several 8-hour sessions repainting until 2 am later, I am here:

Note that I didn't check like 15 different extreme animations and there might still be some clipping with certain very active animations, particularly in extreme morphs. But as you can tell I am a huge perfectionist and I am happy
Credits & tools used
GIANT thanks to @virtual-hugs for pointing out to me you can import a rig, and doing some end-stage testing & figuring out the why of something happening after I had given up hope on fixing that, and generally keeping me sane.
@elvgreen for some additional encouragement/rambles between us perfectionists as I worked on this ashhole.
The creators of Blender, S3PE, Cmar (RIP) for Meshtoolkit, and to a degree TSRW even though I only used you for the presets as you Kept. Ruining. The. Bones. (the last two days I always just replaced the bones & morphs with s3pe and meshtoolkit straight to the packagefile)
@wanderingsimsfinds @katsujiiccfinds @pis3update @eternalccfinds and whoever, you'll find it.
#florian pistache#andres bardem#sims 3#ts3cc#downloads: me#downloads: cas#downloads: clothing#ts3#sims 3 cc#s3cc#clothing AM#clothing TM
105 notes
·
View notes
Note
Hi i love your art!! I really like how you integrate 3d in illustrations, which tips would you tonnato someone who wants to learn 3d art / how do you approach it?
thanks in advance!
i never took a proper class for it, but youtube tutorials do a pretty dang good job for this! and messing around by yourself!
first things first, is to choose the software to use i use blender, it's free and very powerful for 3d and animation
starting out, follow some tutorials for basic functionality perhaps a stick figure-esque rigged model
after that, you can experiment yourself with what you want to make and look up specific things as you go along
Here are some links, it's been awhile since I've started so idk how helpful they are but hope they help!
Beginner Tutorial Playlist
Rigged Character Playlist
UV Transparency
Shape Keys
73 notes
·
View notes
Text
The Sims 2: 20th anniversary - Gigantic Baby Costume Updated
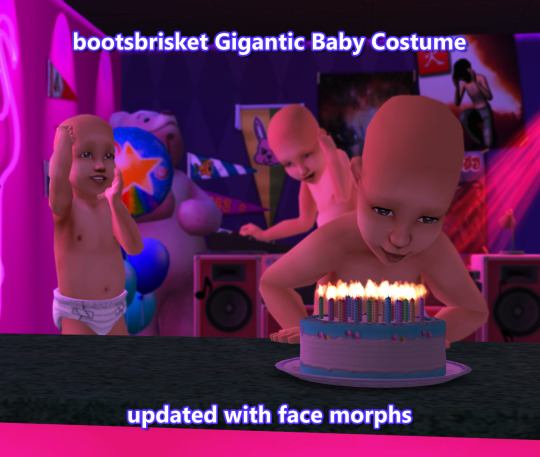
This thing is cursed, you say? How dare you.
Since I learned how to add face morphs to meshes, I thought to myself “what better way to celebrate this anniversary than updating this classic, this piece of Sims 2 history, this iconic masterpiece by bootsbrisket?” Of course all credits go to them!
Download here: SFS / GD
Please read all the details under the cut if you want to download this!
Here’s all the changes for my version of this costume, which basically makes it so it’s actually, in fact, a real giant baby, not a costume anymore lol:
-I split this into two pieces: the body, found in fullbody outfits, and the head, found in the custom hairs section. This makes it so you’ll see the baby head on the pie menu, instead of the Sim’s head that’s wearing it underneath.
-Both pieces are available for all categories, unisex and ages range from young adult to elder.
-Added all face morphs using the original toddler face as a reference.
-Replaced the bones assignments on the body, this time using the toddler diaper outfit as a reference. Now they’ll look smoother.
-The body outfit replaces the original cc by bootsbrisket, so delete the original one if you have it. The head is a new piece of cc hair. You’ll probably find the head at the top of your custom unnatural hairs catalog, and the body buried (no pun intended) all the way at the bottom of the outfits catalog, right before the maxis clothing, due to how old the original one is.
If you want to see this thing in motion, here’s this video capture I took of them rapping while testing 🔥
Known issues:
-Due to how the Blender plugin works for the Sims 2, I haven’t been able to avoid making the head look bright in CAS. This is a sorta common issue that’s easily fixable using Milkshape3D, but again, I could only use Blender for the head mesh. Luckily, there’s Lazyduchess Overly Bright CAS fix, which I totally recommend you use to avoid this minor annoyance.
-While the eyes are fully animated and open and close as they should, the direction they look at won’t be animated. Haven’t figured out a way to implement that into a custom mesh yet.
-When the baby head opens their mouth, the nose’s Sim underneath might clip a little bit inside the mouth. Not very noticeable, but if you want to avoid this, you can make the Sim with an invisible skin like this one by MDP.
-This is something the original mesh had too: due to the size of the giant baby, there might be some clipping with itself in certain animations. Nothing too bad though I think.
And last but not least, some small tips to set up this Giant Baby character:
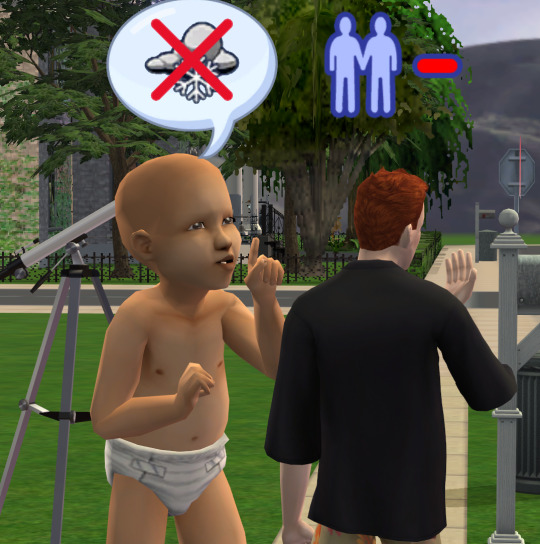
When the Sim wearing this goes to the shower, they’ll change into their naked adult bodies, which might look pretty creepy. Fortunately, there’s a way to make this outfit showerproof: the Never Nude trait and mod by Hexagonal Bypiramid! Change all the Sim’s outfits to the baby body, most importantly their swimwear, and place the Never Nude trait on their inventory.
Same goes for job outfits. If you want this Giant Baby to follow their dreams and pursue their professional career, they might change into something else when they go to work. For this I recommend the Job Outfit Stopinator by episims. Same as the other one, install the mod and place the object in the Sim’s inventory to prevent them from changing into job outfits.
And voila! You now have a fully functional Giant Baby Sim!
Want more screenshots of this majestic baby? Here ya go:
… Why am I taking this weird thing so seriously, you ask? Well, why wouldn’t I? I may be a little too perfectionist, even for stuff like this 🤓
Anyway, happy birthday Sims 2! 20 years and still going like a champ 🎉
God I love this game.
If you find any issues, please let me know! I have absolute Splatoon brainrot right now playing the Grand Festival 😬
239 notes
·
View notes
Text
We Don't Gatekeep Art Resources | A Comprehensive List
Here's a list of some of the tools/sites I currently use or have used previously for works/studies. I'll separate it into Software/Utility, Reference, and 'Other' which will be just general things that could help you map out things for your experience with art. **[Free highlighted in pink, paid highlighted in green. Blue is variable/both. Prices Listed in USD]**
Software/Utility:
2D
Krita Painting app (PC) (my main digital art software on PC for 5+ yrs)
Clip Studio Paint [PC] [CSP 2.0+ allows for 3d modelling within the painting app and a lot of other cool features] [apparently allows up to 6 months free trial]
Procreate (12.99) [iPad/iPad Pro] (the GOAT)
Artstudio Pro [iPad/iPad Pro] (An alternative to Procreate if you enjoy the more traditional art app layout) -- I find this app handy when Procreate is lacking a feature I need, or vice versa. (you can easily transfer files between the two, but keep in mind Procreate's layer limit)
2D "Collaborative Painting/Drawing apps"
Magma Studio
Drawpile
Discord Whiteboard
Gartic Phone (Pretty decent for 2d animation practice, but has a hard limit on frames)
3D
Blender [3D Modelling, Sculpting + Layout] (PC)
Sculptris [PC] (it's an old unsupported version of Zbrush, but can help to get ideas out, and functions better than browser sculpting apps
Nomad Sculpt [iPad/iPad Pro] ($20) Works pretty well if you prefer a mobile setup, but it is a bit intense on the battery life and takes some getting used to
References + Study
Magic Poser [ PC and Mobile ] Has both free and paid versions, I've made do with just the lite version before
Artpose ($9.99) [Iphone + Steam]
Head Model Studio [IPhone] A 3D head, with both a basic blockout version for angles, and a paid version with more detail
Cubebrush [simply search "[keyword] pose reference pack"], they usually have good results + they frequently have sales!
Line of Action [Good for Gesture practice + daily sketching], also has other resources built in.
Quickposes Similar to Line of action, more geared toward anatomy
Drawabox | Perspective Fundamentals Improvement modules (Suggested by @taffingspy )
Sketchfab, this skull in particular is useful, but there is other models that can help you study anatomy as well.
Pinterest can be good, you just have to be careful, usually you're better off just finding reference pack if you have the money, sometimes certain creators have freebies as well
Artstation Marketplace can be decent [make sure to turn on the Aye-Eye filter so it doesn't feed you trash], a colleague of mine recommended this head model for practicing facial blocking, there is also this free version without lighting.
Local Art Museums [Unironically good for studying old "master work" if you're into that, or even just getting some inspiration]
Brushes + Other Useful software:
I personally have used both of these brush packs before making my own
(I actually don't know how to share my daily brush set because I frequently switch between Krita, Procreate, and ASP, but once I figure that out I'll be sure to do that lol)
Marc Brunet's Starter brush pack [Technically free but supporting him for this if you like it is ideal, there's some good brushes]
Dave Greco Brush Pack [$3]
Gumroad in general is a good place to find brushes and art resources. *Note; for Krita specifically, brush packs are a bit weird, so it may require you to find different packs, or import them in a particular way
PureRef [PC] - Reference Compiler/Moodboarding
VizRef ($3.99) [iPad] - Moodboarding/Reference Compiler
Artist Youtubers/Creators that helped me improve/guide me along as a self-taught artist from when I first started digital art to where I am today:
Proko
Marco Bucci
Sinix Design
Sycra
Hardy Fowler
Lighting Mentor
Winged Canvas
Moderndayjames
Swatches
Chommang_drawing
Marc Brunet (YTartschool)
+ Observing a lot of speedpaint art by people whose work I enjoy on social media/youtube, trying to dissect their processes
If you've gotten this far, first of all, congrats, you can read a lot, and second of all, thank you for reading and I hope this helps! I'll continue to come back and update this if I find any new resources in the future, or if my processes change :)
Much Love,
-Remidiy
#art#artwork#digital painting#painting#artists on tumblr#drawing#anime art#sketch#digital illustration#transfem#art tools#art resources#useful websites#small artist#illustration#digital art#artist on tumblr#procreate#my process#my art#krita#art tag#sharing is caring#learning#knowledge#useful stuff#links#reference
260 notes
·
View notes
Text
Things I like about Sweden:
Super walkable within your town! And even if you did need to go a bit further out there’s bus stops everywhere and the buses come along every 10 minutes or so.
The food! I was expecting to be disappointed because the Swedish food I have experienced in America is not good. But fuck me I’m eating like a king.
Prices! The tax is included and you don’t need to tip. We went out for a fancy lunch, like starkly modern restaurant on the harbor, waiters who pull chairs out, astounding views and artistic plating. I got a very nice fish entree that would easily be $50 at home. It was 179kr, or $17.90. Insane.
The houses are fucking cute. This town is like a mix of the one in the original Willy Wonka, and Mystic CT.
People behave better. No one’s standing in the way oblivious at the grocery store. Drivers are patient (unless you’re in an Epa, then they hate you).
Food packaging makes much more sense. Yogurt is pourable from a carton. Bottle caps all have a hinge. Not everything is wrapped in plastic.
Signage makes a lot of sense. Even without knowing the language I can easily figure out billboards and road signs. There is random English around but it’s a novelty. A local catering company has a sign that says “THAT’S FRESH!” And American city names are all over clothes.
Nowhere smells bad. A busy parking garage doesn’t smell like exhaust and garbage. The fish dock didn’t smell like rotten fish. Not even a whiff.
A classroom’s worth of children came down to the harbor during school hours (with a teacher) and I was told they’re there to pick up trash. I haven’t seen a single scrap of litter.
Things I don’t like about Sweden:
The produce isn’t very good. Apples have worm holes, fruit skin is wrinkled, everything is bruised.
The Epa cars. Basically the shell of a smaller car but with a moped engine, mostly built by teenagers they are legally required to drive 30mph so they cause big traffic congestion.
All the kids are wearing Yankees caps.
A “quick hike” was 5 fucking miles. I was unprepared. No water bottle because they pointed ahead and said “it’s just there”.
Very much lacking in kitchen gadgets. We had to ask several people before we could locate a blender to borrow. Tupperware also doesn’t seem to be common unless it’s very small.
People turn and look when you speak English. I’ve been very demure, very mindful. But when I say “excuse me” or “thank you” in public it’s always 👀👀👀 In America I don’t think I’d even notice if someone said these things in another language, it wouldn’t be an oddity.
The furniture that isn’t Ikea is very weird. Maybe it’s just old fashioned but like this isn’t comfortable or functional. Ikea had to have been a huge game changer.
22 notes
·
View notes
Note
hi brandii! i didn't want to bother but youre the nicest simblr i interact with so i figured it'd give it a shot and ask if you had a tutorial for recoloring electronics like TV and computers to have like a custom screen in game for screenshots. every time I finish the basic tutorial, in game the screen is just black. it would be greatly appreciated!!!
hiii that's really sweet ;-; i've actually recolored a bunch of tvs so i know exactly what you're talking about!!
but i still can't get sims 4 studio working for me so this is entirely based on my memory & leftover files i've worked with, i'm sorry about that :(

step 1: open your tv in s4s (this could be an in-game tv or a cc one, both will work), then extract the mesh and the texture file (just the diffuse one). you can close this when you're done.
step 2: in photoshop, open the texture. you can adjust the canvas size of this to give yourself some more space for whatever you want to put on the tv screen. i like to keep my textures in squares.
for example, if my tv texture originally looked like this, with an image size of 1024x512:

then i would increase the canvas height so it would be 1024x1024 and that leaves me room to put the screen texture on there:

you'll put all your screens in that spot. make sure you test out the placement & size first before you make a ton of them, because sometimes i've had to stretch them in awkward ways to make them look nicer and it's a pain to have to redo them.
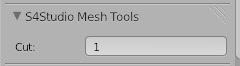
step 3: in blender, open the mesh you extracted earlier. click the eye icon next to studio_mesh_1 (the shadow) to hide it. typically, tvs will have studio_mesh_1 which is the outer part of the tv, and studio_mesh_2 which is the screen. click studio_mesh_1, then shift click studio_mesh_2, then ctrl+J to join them together. change the cut number to 1.

step 4: hit tab to enter edit mode, hover your mouse over a corner of the tv screen, and hit L to select it. repeat this as needed until the entire screen is highlighted yellow (if you ever select the wrong thing, just hit ctrl+Z to undo, or hit A to completely start over). once you've got it, head over to the UV section and open a new image, then find the texture you created above. hover over the UV and hit A to select it all. you'll want to make this rectangle fit exactly over top of JUST the screen part of your tv texture. use the S key to change the size. hitting S and then Y will change the height. S & X will change the width. G will move your selection. just play around with it until you've got it fitting nicely!
once you're done, deselect everything by hitting A, then repeat the process of selecting every part of the tv OTHER THAN the screen, and adjust the UVs to fit the outer part of the texture.
step 5: open sims 4 studio again. select "create 3d mesh", and select a painting as your base mesh, NOT a tv. this will make it deco instead of a functional screen. name your file, and finally import your textures and mesh.
step 6: test it in game first before you create the rest of your textures!
17 notes
·
View notes
Text
I’m gonna share another very useful approach to life as an adult with ADHD: cooking and nutrition edition.
The American idea that dinner is “meat/protein with a veggie and a side” and that this is somehow an easy thing to prepare is a lie. That’s so much work. Sometimes I like making a meal that requires a lot of effort but that’s not sustainable for my average weeknight dinner.
I would like to instead introduce you to my world of Sauce Based Cooking. It is predicated on the idea that the “one pan meal” is not a category of recipe but rather a decision made by the chef. There are some deviations (some meals require a pasta pot and/or sheet pan) but that’s still way less than a lot of recipes call for. If it requires a blender, simply close the link and step away.
Rules for Sauce Based Cooking Freedom:
Have more spices/flavorful pastes than you know what to do with. Better than Bouillon and miso paste and curry paste and spice mixes etc etc. You are not running an authentic Tex-Mex restaurant from your kitchen just get the taco seasoning packets.
If you eat meat, you should be buying bone-in skin-on chicken thighs. Not chicken breasts. You can braise a chicken thigh for two hours and it will only get tastier and better. Cooking a chicken breast is stressful and requires a level of precision im not prepared to give to a chicken.
Focus on learning to make tasty BASES. You have learned if you make it and it tastes good to you. Nail down a good cream sauce, perfect your 20 minute marinara, learn a coconut curry, figure out the basic components of a marinade. Add some ground ginger to your chicken soup and thank me later. Then cooking is just beating protein and veggies into submission under your sauces and above your grains.
Don’t try and make ~dishes~. I call this “Zelda cooking.” You need something that you enjoy eating and gives you the nutrients you need to function. Prep vegetables and proteins you like and dump them into a sauce you also like. Add some polenta or bread or rice or couscous or any other grain to soak up the sauce and make it filling and satisfying. 9 times out of 10 it’s gonna work. The only decision you need to make is the flavor profile of the sauce.
Buy the precut vegetables. I know. It feels wasteful. So much plastic. But I promise you it’s way more wasteful to throw out half your groceries and order Uber eats 5 days in a row because you never managed to chop an onion. It’s okay. Precut/frozen vegetables and canned ingredients and prepared food items are going to be your lifeline. I can turn a rotisserie chicken and plastic tub of mirepoix (pre chopped onions, celery and carrots) into a delectable soup with just things in my pantry at this very moment.
Same as above but line the pan with foil. Save yourself a dish.
Add at least one vegetable to everything you cook. This might be controversial but you need fiber. And all sorts of other vitamins and minerals that things like kale and carrots and sweet potatoes have. My go to is canned chickpeas. A jar of marinara plus some canned chickpeas and kale is suddenly a hearty and filling topping for pasta that’s gonna satisfy me way more than just the pasta and sauce. And all I had to do was dump a can and a bag into the pot. That’s not a dish that really exists or has a recipe but it’s Sauce Based and I eat it a lot.
Keep some fortified cereal (most cereal is fortified by default) and trail mix on hand. Sometimes I get in a funk and order a lot of takeout or just eat a lot of carbs and not much else and then get woozy because I’m a little dumb and don’t eat a lot of animal products so all my Nutrients are low and that makes cooking harder. Fortified cereal and trail mix together will have most of the stuff you need to get rid of the lightheaded wooziness (iron and b12 and fats and sugar) in a dense little package that’s easy to munch on while cooking.
Finally, I know online recipes and Pinterest are great and wonderful but get proper cookbooks whenever you can. The first reason is that even with AdBlocker online recipes are a minefield and can be distracting and frustrating and overwhelming which are all things you don’t want when knives and hot pans are around. The second is that you will learn so much about cooking from a proper cookbook and the better you are at cooking the easier and faster it goes. ThriftBooks has plenty as will your local library or even older relatives. Ones like “Cook What You Have” by Christopher Kimball and “The New York Times Cooking No-Recipe Recipes” book and the classic “The Art of Simple Food” by Alice Waters are great.
#adhd advice#adhd tips#adhd adult#living with adhd#cooking#food#nutrition#nutrients#adhd nutrition#cooking tips#cooking advice
43 notes
·
View notes
Text
Resources!
Here is a list of the resources I use to make my graphics as somebody who doesn’t have Photoshop or Illustrator! All my graphics are made by me, except for my manga icon base which were made by solaariicons. My Carrd was made by poohresources who has free templates but some may require a pro account.
Photopea - is what I use for adding gradients and spot correcting unwanted marks in manga icons, but it has a lot more tools than that! It’s very similar to Photoshop and can open various file formats including PSDs! So if you’re looking to make your own edits to templates you find on tumblr, I highly recommend this!
Pixlr - which has sadly gone paid and has begun to use AI. As somebody who used this religiously for icons for the past several years, I was bummed out. But quickly realized that it still functioned in Wayback Machine! Everything but “Add element” still works but might take a little to load in. You can still upload your own elements to place in though. This is what I use for lighting correction, color correction, toning, and adding my borders around my icons.
Photoscape X Free - is not my favorite. It has it’s uses of course but it’s pretty limited and the Pro version isn’t worth it in my opinion. Free comes with some basic tools, basic borders, and some pretty tints, overlays, and textures as well as some stylization options.
Canva - mostly free and what I use for my borders, banners, promos, dividers, etc.. I’m able to use the Pro version since my sister is kind enough to share it with me! It consists primarily of simple tools and premade graphics, but of course you can also upload your own! You can save graphics in the form of JPGs, PNGs, GIFs, MP4s, and PDFs. If there’s a graphic you’d like to use but it’s locked behind the Pro account, let me know! I can try see about saving it myself and sending it.
CGI icons - are made with The Sims 4 and Blender 2.93 both of which are free! It was a little bit of a process to learn since it required moving a lot of things around, as well as figuring out the virtual photography aspect, but I’ve eventually managed some good results over time! I use custom content from various creators to make my Sim look and pose the way I want to.
The process of creating a Sim to look like your character is a little broad, but there’s a vast community of Sims 4 modders. I’ll at least share my favorite rendering tutorials here. This is the one I used to learn lighting, this one covers the basic process of exporting and rendering, and this one is the one I used to get rid of seams on models. For framing and lighting, I recommend looking for photography inspiration on Pinterest! If this is something you’re interested in doing, hit me up! I’m more than happy to help others!!
Unsplash - Is my primary resource for stock images! Most photography there has a nice modern look and covers a wide array of subjects. It is mostly free, and all images are free to use for commercial and noncommercial use.
Check out my Ray's Leftovers tag for graphics or edits I ended up not using or made for fun! Feel free to modify them to your liking as well and there's no need for credit, though it is appreciated.
My Ray Made tag is where you can find roleplay graphics that I have made, for myself and others!
#Resource#Posting this for my RP partners but if somebody I don't know stumbles upon this. . .Go ham!!
31 notes
·
View notes
Text
Whether it's in C++ or Blender, arrays remain the bane of my existence. Anyway, y'all knew I was going to get robots into this eventually.

Low poly prototype of an optic. I have no idea how light is getting in on the upper left corner, and you can see around the edge of the lens that I'm still having some modeling issues. I think that's a result of clipping this time, as I had a lot of duplicate faces while I was working on this. It's probably bad practice to leave them there, even on a test run, but I was more concerned with functionality than aesthetics.

The "face" bit is curently connected to the sphere in an effort to fill in holes, but in a finished face, the optic would rotate like a human eye. It's also missing the aperture blades inside the light ring and sensors on the outer edge of the ring (more on that in a bit). The ring itself is off-center because figuring out how to center the lights would have been more trouble than a quick prototype was worth. The lights would also be smaller and further from the edge on a finished optic, so it can move up and down properly.

And, of course, it glows, which informed basically every part of the design.
About a month ago when I first started pondering how to model an optic, I had a thought: assuming optics work like cameras, wouldn't glowing eyes interfere with a robot's vision? Obviously in real world terms, robot eyes glow because it's cool, or to help viewers track the robots in the dark. But since my brain doesn't let that sort of thing go, I needed to figure out how to make glowing optics work, and what purpose the glow serves.
The first part was easy. All you need to do is keep the light out of the aperture, which was accomplished by putting a wall between the hole and the lights. To minimize the impact on color vision, I gave the lens only a very slight red tint, then made it iridescent to add additional color.

Seen here, the edges closest to the light are transparent, while the iridescence gives the rest of the faces a stronger tint. This creates the illusion of a red lens without impacting the bot's color vision. I also put an actual Blender camera inside the optic to see just how much the lens affects colors, and I'm quite satisfied with the results.

So we've got a glowing optic that doesn't impair the robot's vision. But I still needed to figure out why it glows, and I ultimately decided it's for depth perception: optic light bounces off nearby objects, and then sensors in the optics measure the returning light to determine how far away things are. These sensors have not yet been added to the optic, as I hadn't decided where they are while I was working on it.
Next version of the optic will have additional details (aperture blades, extra sensors), and may or may not be shaped to fit more naturally in a face. This last step requires actually making a face for it to fit in, so we'll see when I get to that.
#Transformers#The robots aren't called such but y'all know I was talking about TFs#My art#Blender#3D modeling
6 notes
·
View notes
Text
... I made a Blender addon.
I like using a mirrored skin modifier with a level 2 subdivision as the block out for my sculpting. If a character is simple enough, sometimes I can get by without retopologizing. Suffice to say, I find myself adding those three modifiers over and over and over. Below are two recent of examples of how I use them:
My addon (which is really just a simple script) adds a object consisting of a single vertex with mirror, skin, and subD modifiers already applied and toggles Xray mode. There's just one catch: I made it with help from ChatGTP.
(musings on AI below the cut)
I have very mixed feelings on AI; as a creator, it's infuriating that decades of work was stolen and used to replace its creators. As someone who works in tech, I know it's an invaluable tool and here to stay. I know very little about Python scripting--my coding is about as sophisticated as playing Twinkle, Twinkle Little Star on the piano--and ChatGPT 3.5 was able to get me an outline that was almost workable. What I asked was a very basic set of steps, and the model failed as soon as I tried to inject logic. Sometimes we don't notice when AIs do things like throw in some extra fingers or an errant limb, but code requires precision. ChatGPT only had a tenuous grasp on the intricacies of Blender's API, and I don't have the python experience to figure out where it was going wrong. If I wanted to complete my short laundry list of functionalities, I would need at least a beginner overview of Python (and a stack overflow account, lol). As it stands, ChatGPT made 60% of this.
So far I have only dabbled with whatever model of ChatGPT I could access for free. It was mostly useful to me as a digital rubber duck. This experience makes me both curious and trepidatious about the cutting edge models and whatever comes next. I also feel squicked out having used it for anything creative :/
3 notes
·
View notes
Text
Portfolio, Documentation and Pitch (Aryan Raj Adhikari)
Modeling #5
I believe I will finish the modeling phase by today as I only have a couple more assets I need to start working on my Unreal scene. I resume my modeling by attempting to model new assets, which include a futuristic ray gun, a portal, an ancient statue, a boat and a treasure scroll.
Although these models may seem too intensive and complex, all of those can be simply created using basic calculations in the choice of your 3D softwares. I will be using a mix of both Maya and Blender for it.
Figure 1 (Creating a boat)
I start creating a boat by using a simple sphere with a low number of segments. It's a bit unconventional as most would start using a sphere but I wanted to experiment if I could create the model using another method.
I remove the upper half faces of the sphere leaving the lower faces intact. I then use a simple modifier called 'Deform' which allows you to deform selected meshes. I change the default preset to a 'Stretch' and increase the factor to a .800 value which stretches out the sphere.
Figure 2 (Deleting upper half faces)
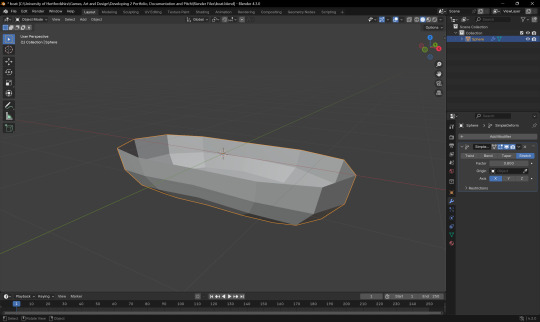
Figure 3 (Stretching the boat sphere)
I then solidify the boat with the solidify modifier and export it over to Maya as I find it more easier to unwrap the seams in Maya as opposed to Blender. I use a third party plugin to easily cut UV seams but you can also do it with the default UV engine inside Maya as it is really powerful.

Figure 4 (Unwrapping UV seams in Maya)
I start working on the treasure scroll for the scene. These are really easily to create as I use a capless cylinder and duplicate its smaller versions a couple more time. I add a subdivision edge loop in the middle and scale it down. It also helps if you bevel the middle loop as you get more control over how detailed you want it to be. However, as the name of the game here is optimization, I want to make it really low-poly and stylized.
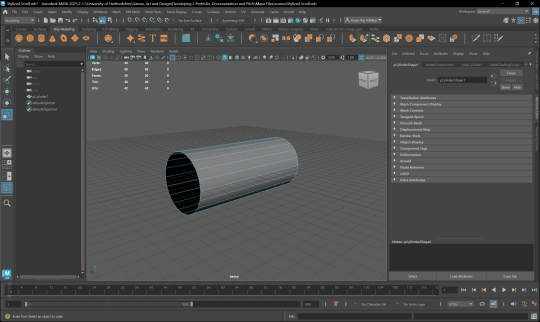
Figure 5 (Creating the treasure scroll #1)
I also make it so that the scroll is not properly rounded but a bit jagged. It gives the essence of an old dried scroll paper. I also manipulated certain vertices so that the entire scroll doesn't appear much symmetrical.
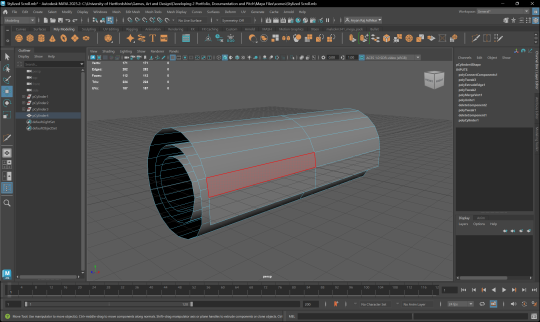
Figure 6 (Creating the treasure scroll #2)
Now, I work on creating the futuristic ray gun. This gun will be very low poly, as I aim to texture it better in substance designer. This is a very common and a mandatory workflow used in almost all games where the game ready assets itself are very low poly but are textured well. As the process of creation is quite similar to other meshes, I will skip through how I created each assets.
The ray gun is similar to how I modeled some of the metal greeble parts for the Unreal scene. A lot of basic primitives reshaping, extruding and inseting.
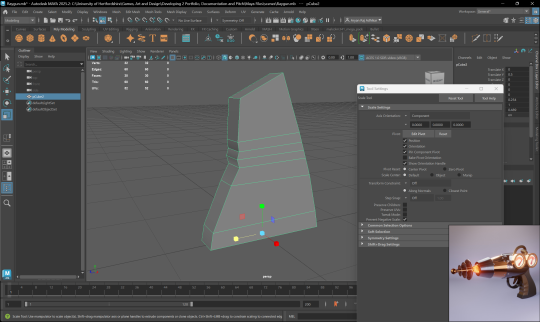
Figure 7 (Manipulating simple cube primitive to create the handle)

Figure 8 (Marking UV seams)
I am also working on the UV maps of the assets while I am creating them. It does generally speed up the process than to create all the models and then one by one, start UV marking the seams.
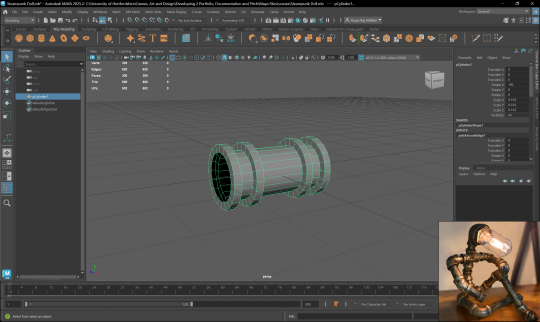
Figure 9 (Creating a steampunk doll)
I also decide to model a steampunk doll made up of metal rods and a light bulb for its face. This was a very straightforward process of using capless cylinders and extruding faces and beveling when necessary.
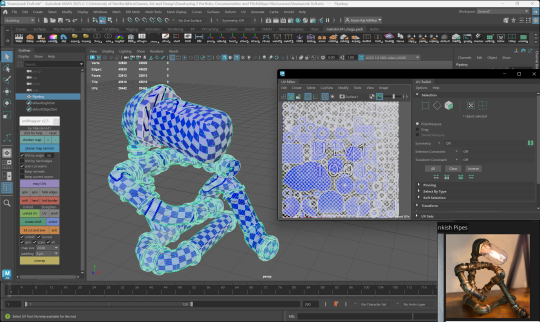
Figure 10 (Creating a steampunk doll)
Since, this is not a heavy deformation from the simple primitives, it is very easy to UV unwrap the model. In certain instances, you can even use the 'Automatic' wrap function as it does a pretty good job for simple primitive shapes. Do be wary that the texel density for the UV maps must be similar as it might lead to UV stretching issues.
0 notes
Text
Bite the bullet, let’s dig into 3D
post 4 - by Chong Lin Wai
As a concept artist, who mainly focuses on 2D visual design and workflows, this was my very first experience working with Unreal Engine. However, as our group only has 4 group members, I had to share the workload in the project to prevent others from becoming overloaded. Given my knowledge of Zbrush, I was responsible for creating the figurative sculpture scene.
The metaphorical meaning of the scene is internal conflict. I wanted to convey the idea of struggling and painful emotions through the human sculptures. Here are some research and reference images:
Rigging in blender
Due to lack of time, instead of creating a human model from scratch, I decided to use the default human models in Zbrush. The T pose function in Zbrush is very limited, so I decided to use the rig feature in Blender for better posing. I first turned the the male and female models into the lowest subdivision level, and exported them into .fbx files for importing to Blender. I followed a beginner tutorial of rigging in Blender to practice rig controlling.
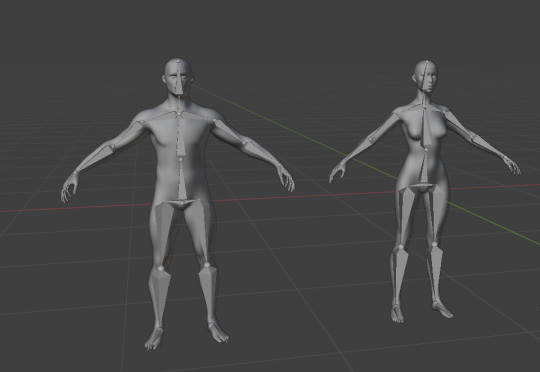
Fig.1 Rigged models

Fig.2 Three designs of the sculpture
I rigged the models and controlled the rigs to pose the figures into a variety of poses. I created several designs to see which one was the best for the sculpture design.

Fig.3 Low poly cave mesh
I also used a cylinder to create a simple low poly mesh for the cavern. I exported the models in .obj files and imported them into Zbrush for further polishing.
Polishing in Zbrush
After importing meshes into Zbrush, I bumped into the issue that there was abnormal behaviour happening on the Zbrush viewport.

Fig.4 Abnormal behavior in Zbrush viewport
The figurative models were facing in the wrong direction whenever the viewport was rotated. I spent some time to figure out that the normal orientations were messed up.

Fig.5 False normal orientation
I opened up Blender again, and fixed all the normal orientations one by one, and then imported the models to Zbrush again. I used a smooth brush to polish the model and sculpted an artistic wall behind it. I also added some detailing textures on the models’ surface using different brushes.

Fig.6 Stone Slate material on the sculpture in UE

Fig.7 Cave texture and imported to UE
I then unwrapped the UV maps and exported all the models in fbx files and used Substance painter for texturing. After I bake the material map of all the models, I assigned a stone slate material for the models and painted some ground sand details on the cave mesh.
Gets started with Unreal Engine
It is impossible for me to create a complicated scenery with intricate blueprints in a very short time. I decided to start with something simple, following the UE beginner tutorial step by step. I followed Neil's suggestion on Unreal Sensei's tutorial to start learning some basic commands.
youtube
Fig.8 Unreal Sensei - UE5 Starter Course
The interface and camera movement were overwhelming at first, however I enjoyed the process of learning new things, and everything came to handy after I spent some time on practicing and recognising certain major features.
Kitbashing
I was very glad that my teammates were aware of my situation as a UE beginner, so one of my teammates, Chuang Xin taught me how to use premade assets, by importing some static meshes and dragging them from the content drawer, to create a simple scenery. I really appreciate her help, she also shared some of the useful assets with me, which are related to the environment I was responsible for. I started to build the cave with simple shapes and then I added all the premade assets to decorate both the exterior and interior of the cavern.
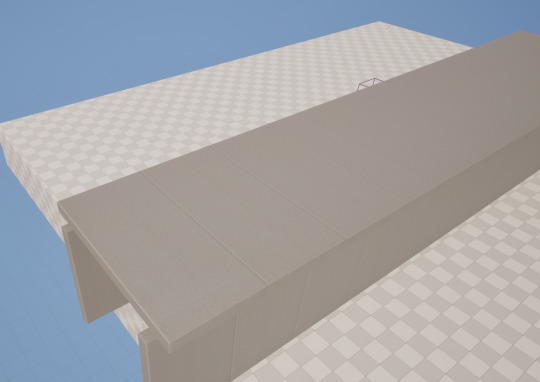
Fig.9 Blocking out with default cubes
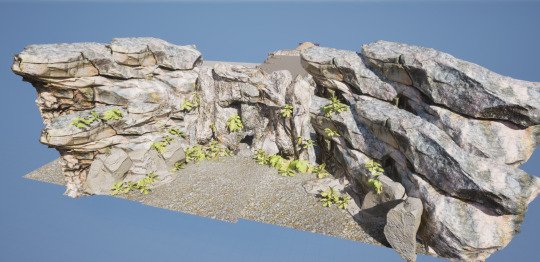
Fig.10 Exterior design of the cave
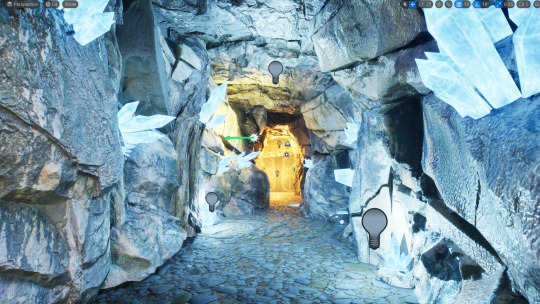
Fig.11 Interior design of the cave

Fig.12 Modified interior design 2 of the cave
Lighting
There was some issue with my lighting. The rendered video appears to be extremely dark, no matter how I cranked up the intensity value. I then noticed that there was a cross out icon on some of my spotlight actors. I searched for a solution and found that this issue is related to the limitation in Unreal Engine. Lighting actors cannot be overlapped, otherwise the distribution of the light map would be messed up, thus, some of the spotlight actors did not take effect. Therefore, I solved the problem by adjusting the area of my spotlights.
1 note
·
View note
Text
Animation work
Rooshil Hibbert
Over the weekend I was working on the main animation for the large statues. The first thing I did was convert the existing rigs into IK rigs which would be easier to animate.
To understand the functionality of Blender’s animation system I looked at a few tutorials, which were relatively easy to understand. The main workspaces I needed were the Timeline, Dope Sheet and Graph Editor. The Timeline and Dope Sheet were used for the basic setting up of keyframes while the Graph Editor was used for more minute changes and adjustments of motion paths. It took some experimentation to figure out how changing the curves in the Graph Editor affected the movements of the character, and throughout the animation process I needed to continuously go back to adjust previous movements and make sure they were smooth and natural.
The most difficult part of the animation process was tracking the hand of the statue to the shape of the dome the viewer would reside in. This took quite some time to get right, but the result was very satisfying.
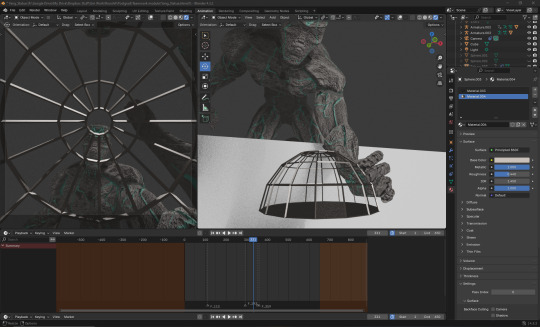
Following a meeting with my group, the movements needed to be made much slower and drawn out to make the size of the statue seem more believable. I also needed to add some buildup before the statues grabbed the viewer, further developing that sense of drama.
This was the final result:
Learning how to export animations so that they work in Unreal Engine was slightly frustrating, but I eventually got it working. Unfortunately I was unable to keep the dome and the statue attached in the transfer process.
0 notes
Text
Expression Test: Rowan Ookami (A More Indepth Explaination of My Workflow and Thought-process for the Change)
One of my characters from my old webcomic Silent Shadow—who has been completely redone from his original 2005 appearance. Still using Daz's Hiro3 but with a custom rig in Blender.
What's My Workflow? Or Make a Fucking Tutorial Already
So how? Long story short, I ported over Hiro3 from Daz into Blender with the FBM for Rowan attached. This process uses the Daz to Blender bridge—which works on the older Millennium 3 figures as well as the Genesis figures.
From there, I do some extensive modifications to the default rig—one of which involves renaming the bones (and associated weight-groups) to Blender's naming convention so symmetrical posing works. Then I adjust the bone rotations so that they're also symmetrical—coming from Daz, they're not symmetrical like you'd think and I'm not sure if the Daz/Blender Bridge does something to change them or what the deal is.
Once things are where I like them, then I create new bones and weight groups for the face—so I'm not reliant on morphs (or shape keys) to control expressions. IMO, the resulting face rig is more flexible than the morph-based solutions that Daz and Poser originally offered. It gets rid of some of the weird "frog-mouth" (maybe that's not the right term?) issues that the morphs caused.
Once that part is done, I delete the existing IKs that came over and create new ones that also add elbow and knee poles, along with some modifications to the shoulder bones that uses the damped track constraint to control bending.
Next up, I set up FK/IK rigs for the fingers to make hand posing easier. There's a bunch of different tutorials on how to do this on YouTube. I started off with a basic FK using copy rotation constraints to mimic the functionality in Poser/Daz Studio, but then took it a step further by adding the same copy rotation constraint for each finger so that they can be controlled independently of the main control.
Then I worked in the IK controls for each finger—including the thumb. I've learned that IK posing on thumbs is easier than FK posing. I also worked in drivers controlling the influence of the IK constraint to get the best of both worlds.
I actually started this process with Aiko3, then applied to Hiro3 afterwards. I'm not using Rigify or Auto-Rig Pro—it's all done manually. I've actually experimented with Rigify on the Hiro3/Aiko3 figures and honestly, I was less than satisfied with the results. I'm not sure if it has anything to do with me preferring to work with real-world scales or not. I know Blender has that issue with cloth simulations, so when I create clothes for my characters, I have to create "dress forms" that are 10x the original size for the sim to work properly.
Although, I wonder if that's still the case? I had the issue with 3.6, but I should probably check and see if that's been figured out.
I wonder—should I try rigging the toes next?
All that aside, I do want to make the rig available, along with the Python script I wrote to automate the name-change for the bones.
Why the Change in Appearance?
Since last spring, I've never been able to shake off the feeling that a certain author ripped off my character and the one way I could get over that feeling was to change Rowan's appearance. There was also the fact that Rowan is supposed to be a Lycan (aka werewolf)—originally, Silent Shadow was loosely influenced by Inu-Yasha, so Rowan had those "otherworldly" attributes that you'd expect of a yokai from Japanese mythology.
What it came down to is that few years after I initially released Silent Shadow, I started wondering if readers would really understand what I was trying to get at so I started mentally playing around with ways of making Rowan's werewolf attributes more obvious (blame Underworld: Evolution for that). However, at the time, I was still in college and my 3D modelling skills weren't up to the task. The only access I had to decent 3D modelling software was either through school (I fucking hate Maya) or well 🏴☠️—you get the idea. Finally, Blender was nowhere near where it is now. I tried Blender out sometime at the end of 2006 and honestly, it confused the living shit out of me, since I was used to 3DS Max.
So fast-forward to 2019 and Blender 2.8, then later discovering how I could get my fully-rigged characters from Poser (via Daz Studio) to Blender, and the rest is history.
Below is how Rowan looked in 2005, and you can probably figure out why that certain author's character bothered me so badly.
Anyway, that's it for now. I need to get started on an expression sheet for Syleth and the other characters so stick around for those.
God knows I have enough time sitting on the unemployment bench at the moment.
0 notes