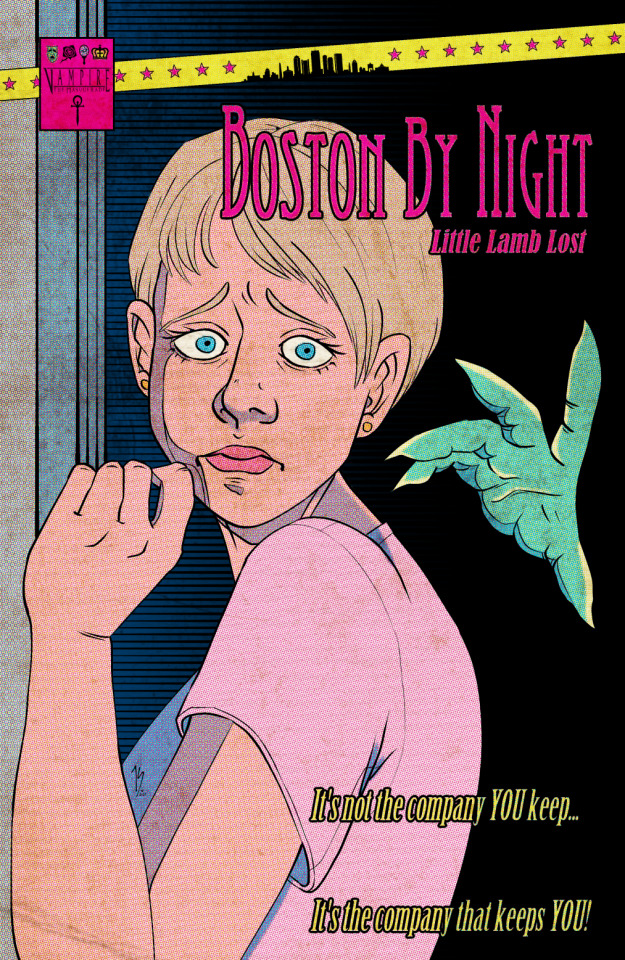
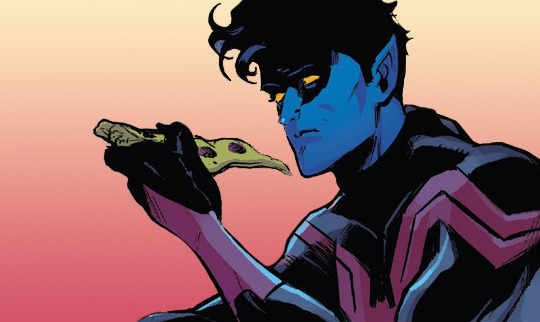
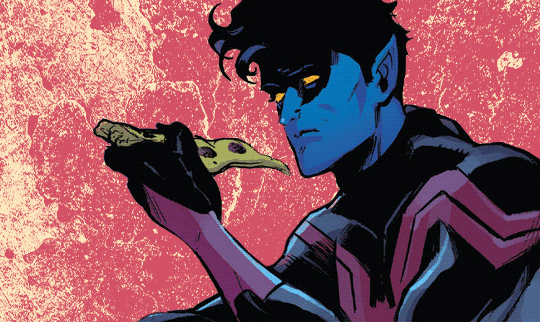
#i'll make a new photoshop document
Text
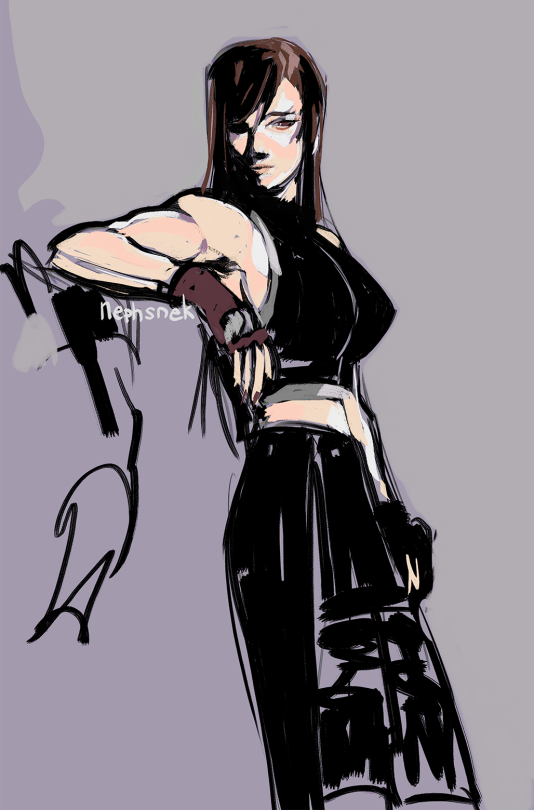
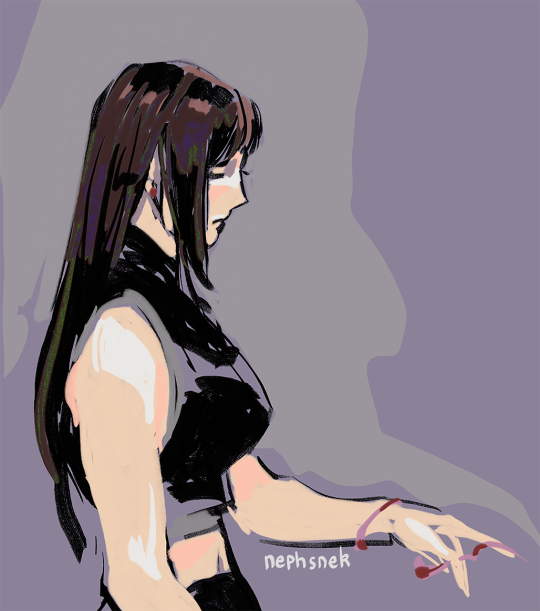
my massive photoshop document told me this is the end and crashed, so heres the final drawings from it lol
#ff7#tifa lockhart#i'll make a new photoshop document#and in its folder i'll create a scribbly new future#ff7 advent children
398 notes
·
View notes
Text
surprise, in more explosiontooth news i've been slowly working on the metalocalypse shrine for my website (agentkaz.com of course) so i wanted to make some blinkies, so here's an explosiontooth one and also a bonus skwisgaar one that i made like months ago when i was gonna make the whole band and then just. never made any more. he was just lurking in a photoshop document.
stick 'em on whatever pals, i'll get more done eventually


56 notes
·
View notes
Text


Above: before-and-after pictures of this process. Thank you to @cloudywithachanceofsims, @silverthornestudfarm, and @blueridgeequines for giving me permission to use their coats as examples!
CK's Guide to Fixing Pixelated Horse Coats
As we all know, every time you paint a horse (or any pet or werewolf, really) in Create-a-Pet, it inevitably gets pixelated. This is due to the TS4 engine's compression of Sims textures, which it does to theoretically save on file space and load time. The more you paint on your horse (and the more you save it over and over again), the greater the artifact damage becomes, until you're left with a pixelated mess.
Luckily, I've figured out a way to fix it. Yay!
This method uses a program called chaiNNER, which is an incredibly versatile node-based graphics UI that (among many other things) uses AI models to upscale and process images. After a month and a half of experimenting on multiple different types of coats with about a dozen different models, I've identified two AI models that work best at repairing the artifacting damage done by TS4: RealESRGAN_x2plus and 2xAniscale. I extract the painted coats from the tray files using Cmar's Coat Converter, process them using chaiNNER, use Photoshop to make any touch ups (softening hard edges, fixing seams, adding in the appropriate hoof texture), and then create a new hoof swatch to put the newly fixed coat back into the game.
Fair warning: chaiNNER is a bit of a hefty program that requires significant RAM and VRAM to run. If you have a beefy gaming computer, you should have no issues running this (as long as no other major programs - games, graphics programs, etc. - are running as well). If you've got a lower end computer, though, your computer might not be able to handle it and this method might not be for you. Make sure to read all the documentation on chaiNNer's github before proceeding.
Before we begin, we're going to need to gather some resources. We will need:
A graphics program. I use Photoshop, but GIMP or any other program that can work in layers will work too.
chaiNNER
AI Models; these are the ones I use are RealESRGAN_x2plus and 2xAniscale
Cmar's Coat Converter to extract the coat textures from your tray files
Tray Importer (Optionally) to isolate your household tray files and save you the trouble of searching the Tray Folder
The TS4 Horse UV as a helpful guide to make sure all our textures are lined up properly
Sims 4 Studio to create your new package.
I recommend using S4S to export hoof swatch textures from the game or from existing hoof swatch cc. Some popular hoof swatch CC include @walnuthillfarm's Striped Hooves and @pure-winter-cc's Glorious Striped Hooves
This tutorial assumes you are familiar with the basics in how to use Sims 4 Studio, such as how to clone a base-game item & how to import and export textures, and the basic functions of your graphics program, such as adding multiple different image files together as layers. I'll try to keep my explanations as straight-forward as possible.
STEP ONE: Extract the Coats
Install Cmar's Coat Converter and run it. Cmar's Coat Converter works by looking through your tray files for specific texture files (ie. The coats of cats, dogs, horses, and werewolves) and converting them to png files. You can go through the households of your Tray folder one by one, but I typically just use Tray Importer to separate the household containing the horses I want to fix.
Save the extracted coats in a project folder. These are your OG coats.
STEP TWO: Extract the hoof textures
Open up S4S. To extract the hoof swatches from the base game, create a new package by clicking CAS -> New Package, filter everything by species (ie. Horse) and then part type (Hoof color). Highlight all the basegame swatches and then save your new package.
Open up that package and then extract the texture for each swatch. Save them in your project folder (In a 'basegame hooves' folder to keep things organized).
To extract the textures from Hoof Swatch CC files, simply open them up in S4S and repeat the above.
STEP THREE: Download the AI Models
Right as it says on the tin. These are the models I use currently & some notes about them:
RealESRGAN_x2plus - this model is THE workhorse. It repairs artifact damaging with minimal loss to texture quality and results in a very smooth coat. It may sometimes darken the texture a little bit, but it's not noticeable in-game. That being said, it has a harder time with finer details such as spots, individual ticking for roans, dapples etc. I run this one first on all the coats because it usually does the job.
These models are trained to find and repair any incidence of artifacting/jpeg damage and approximate what the image is supposed to look like. The reason RealESRGAN_x2plus has an especially hard time with spots/dapples/tiny repetitive details etc. because it registers those areas as particularly damaged and works extra hard to smooth it out… which can sometimes result in a bit of an iffy coat repair. When things don't turn out the way I want, I turn to...
2xAniscale - I use this model for any appaloosas, roans, sabinos etc. that have very fine detail and came out mangled by RealESRGAN_2xPlus. It's also good for light-duty repairing (in cases where people have only 'saved' the coat once, as opposed to working on it on and off). While not strong enough on its own to tackle the more heavily damaged coats, it still does a decent job while keeping the fine details intact.
Go make a folder somewhere and name it 'AI Models' or something similar, and drop these guys in there.
STEP FOUR: Setting up chaiNNER
Obviously, go ahead and download chaiNNER, and then (through chaiNNER itself) download & install the dependencies. You really only need PyTorch for this, so if you'd like, you can skip NCNN, ONNX, and Stable Diffusion.
At first glance, chaiNNER is a bit overwhelming. It is unlike any other graphics ui I've seen before, but the basic premise is pretty straightforward: you 'chain' together specific functions ('nodes') in order to get your result.
We're going to start by setting up a chain for single coat conversions.
Drag & drop these nodes into your workspace:
Load Image
Save Image
Upscale Image
Load Model (From the PyTorch tab only!)
Text append
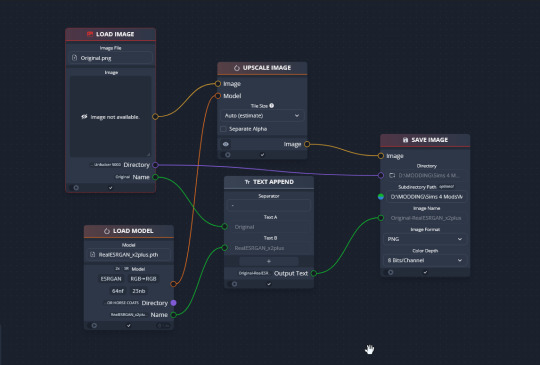
Next, connect the nodes just as I have connected them in the image.
Load Image, obviously, loads your image. We then tell the program we want to upscale that image by linking to the Upscale Image node. Upscaling can't happen without a model, so we then want to link Upscale Image with Load Model.
Text Append takes the original name of the image and combines it with the model name. This is super helpful, because if you're playing with many models at a time, you need to tell your result images apart. Link the output text to the Save Image Model.
Finally, Save Image obviously saves the image. We link the directory from Load Image to save it in the same place as the OG image, or, optionally, add in a file path link to another folder (in my case, I load images from a folder called 'Unprocessed' and save them into a folder called 'Processed'. Link the image from Upscale Image to Save Image to complete this chain.
Go in and select your image, model, and save locations.
Ta dah! You made your first chain.
To create an Iterator to batch process coats, we follow the same general idea, only we use 'Load Images'.
STEP FIVE: Run chaiNNER
Go ahead and run chaiNNER. Repeat using 2xAniscale if your spotty/dappled coat comes out funky.
Optionally, you can also add 'Resize' between 'Upscale' and 'Save Image' so the output texture is the same size as the OG. I like keeping mine big, as it makes it easier to fix any fine details in Photoshop.
STEP SIX: Combine in Photoshop
Go ahead and open up the horse UV, your coat texture & hoof swatches in Photoshop. This is a fairly straightforward process: layer the hooves overtop the texture, and then hide all hoof layers except the one you want. Make sure everything is lined up properly using the horse UV.
This is also where you would go in and fix any sharp, jagged edges you might spot. I often notice jagged edges on white face markings. Since the head is often one of the worst areas for artifacting, the AI models don't really have much to work with, resulting in jagged edges as they try to extrapolate what had been there 'before'. Either paint over it or use blur to smooth it out.
I personally would also remove any stray color that isn't the horse texture (body + ears). It won't hurt to leave it there, but I personally like things neat and tidy. Use the horse UV as a guide.
I also add in any little details using extracted stencils & layer masks.
Save your new coat as a png. Optionally, downsize it by 50% back to the original size. I don't do this because I'm very forgetful, but this would definitely help in keeping your package size smaller.
STEP SEVEN (Optional): Make a thumbnail
I make thumbnails for all the coats I do because it makes it much easier to identify them under the Hoof Swatch category. TS4 thumbnails are 144 x 148. You can label it with your horse's name, or stick a headshot in there etc. whatever works for you that will help it stand out from the other hoof swatches.
STEP EIGHT: Put it all Together
Finally, we've come to the end.
Using S4S, create a new package cloned from a hoof swatch. Import your new coat into 'Texture', and your thumbnail into 'Thumbnail'. Make sure you import the thumbnail for both Male and Female!
Check to make sure there aren't major seams, and that your texture is properly projected onto the S4S horse model. If there are seams, go back to check that your texture is lined up properly with the Horse UV. If there are minor seams (legs, chest, underbelly etc.) you can carefully paint (using the same color as on either side of the seam) just beyond the UV mesh boundaries to close the seam.
Then, go into Categories, scroll down, and uncheck Random. This will prevent random townie horses from wearing the coat.
Save your package.
Congratulations! You're done!
#ts4 tutorial#ts4 resource#ts4 guide#Ts4 horse cc#ts4 equestrian cc#sims 4 horse cc#sims 4 equestrian cc#ts4 equestrian#sims 4 equestrian#ts4 horses#sims 4 horses#ts4 horse ranch#sims 4 horse ranch#sims horses
68 notes
·
View notes
Text
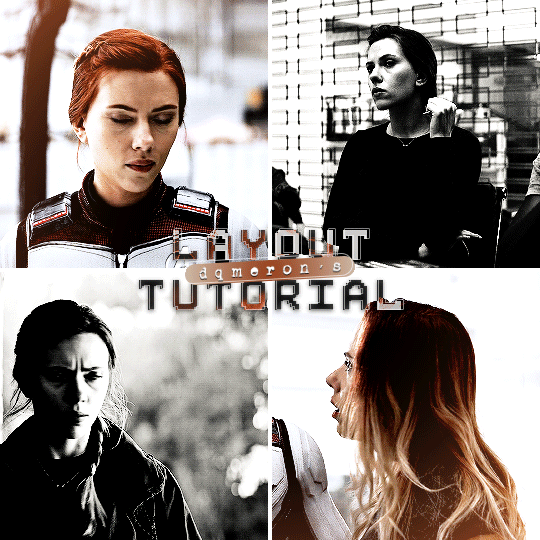
here's my quick tutorial for making layouts in photoshop! i'll be going over how to make this 4-panel square one!
↳ requires basic knowledge of photoshop
「 step 1: making your file 」
make a new file, 540 x whatever height you want (just make sure it fits within tumblr’s image size guidelines), and make sure the background is set to transparent. for this specific layout, i want the overall shape to be square, so my dimensions are 540x540!

「 step 2: mapping out 」
the best way to make sure your layouts are even and spaced equally is using guides! go to view > guides > new guide layout. the color of your guides doesn’t matter at all (i just like green so mine are green lol), and you can have as many columns and rows as you want. since this is going to be a 2x2 layout, i’ll have 2 columns and 2 rows. the general rule of thumb for gutter is 4px.

once your guides pop up, select the rectangle tool by pressing U on your keyboard. make sure shape is selected from the drop-down menu at the top (right by the home button in the top left), and make sure that you have snapping on (view > snap).
using the rectangle tool, trace out your layout panels! as long as you have snapping on, your path should naturally snap to the guidelines, making it a LOT easier to do this! when you’re done making your rectangles, you can turn off guides by going to view > guides > clear guides (i usually keep them on until i’m done adding in my gifs but this is up to you). i always name each shape layer after where it is in the grid to not get confused.


「 step 3: adding gifs 」
some quick things before i go over actually adding in your gifs:
1. make each of your gifs in their own individual files. you’ll be adding them into the main one later.
2. your gifs have to be the same length — you can cut them down to length in their own individual files or later in the main one. either way is fine, totally up to you!
now you have your layout set up, you can make and add your gifs! in order to make sure that they fit into the panels, check the dimensions of each shape you’ve created by selecting the layer and looking in the properties tab. my panels are each 268x268.

i’ll actually be making each of my gifs 270x270, just to make sure that i don’t have any weird gaps or anything (i’ll talk about how i’ll be getting rid of the 2 extra pixels on each side later).
once you have your gifs done, you can duplicate them into the main one. convert your gif and anything else (coloring etc) into a smart object (right click > convert to smart object), and then right click it and select “duplicate layer”. make sure the document you’re duplicating to is the one with your layout in it.
layers automatically duplicate aligned into the top left corner. since this is where my first panel is, i can just leave my gif there, but for the other ones, drag your gifs into place using transform and your mouse (once again making sure that snapping is on).
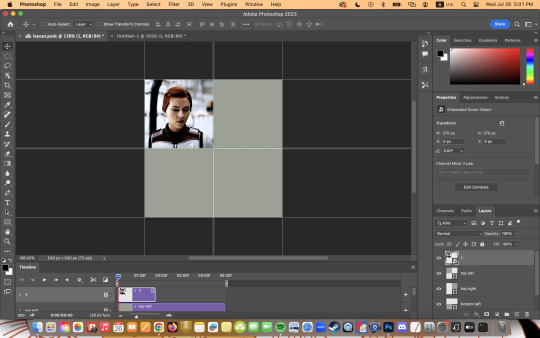
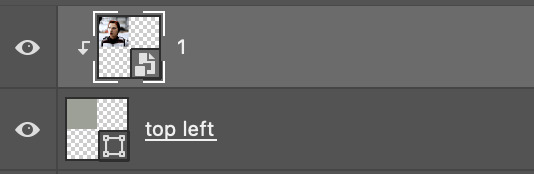
now to get rid of those extra pixels. this step also makes sure your gif is perfectly in line with the shape you’ve outlined the layout with. make sure your gif is right above the shape layer in the layers tab, and then right click and select “create clipping mask”. this makes sure your gif doesn’t go outside the limits of your guidelines. this is what it should look like in the layers tab:
「 step 4: exporting 」
exporting a layout gif is pretty much like exporting any other gif, but you do need to check your matte settings before saving. the wrong ones can make what should be the transparent dividers solid, which can throw off the look of your gifs. make sure matte is set to “none”, and then save as normal!

here's my finished gif:
happy giffing!
feel free to send me an ask/message me w any questions!
#gif tutorial#gif tutorials#allresources#completeresources#userchibi#userpjo#uservivaldi#userraffa#userbess#usermorgan#tuserheidi#userrobin#userkosmos#usershreyu#userzaynab#userisaiah#thingschanged#rogerhealey#*mine
231 notes
·
View notes
Note
Can you please do a blending/overlay tutorial!?!?!
ohhh i can definitely give you some tips on how i do it!
so, assuming you know how to make gifs and use the timeline/smart object gifs, this is how i usually go about it. I use photoshop cs5, for reference.
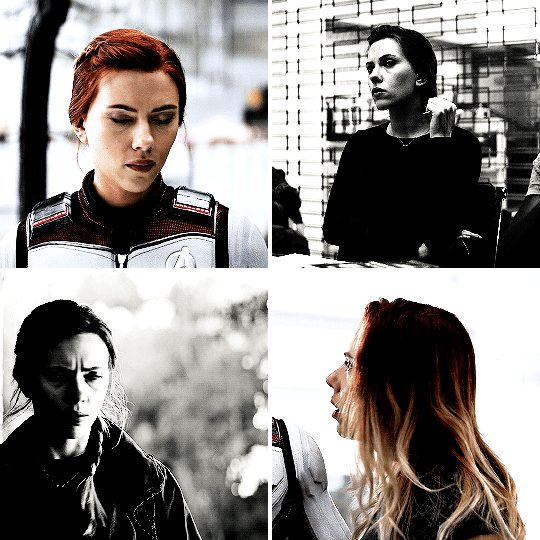
i'll use this recent gif from my don’t blame me gifset as an example:

1. Choosing what to blend
It's much easier to blend 2 gifs together when at least one of them has dark areas. Two bright gifs don't usually work as well, but it's still doable with some work. For example these 2 moments are both mostly dark, so it makes things easier:

2. Bringing 2 gifs together
To put 2 gifs on the same canvas, what I usually do is:
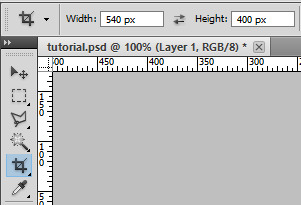
In one of the gifs, I select the size I want with the crop tool (540px by 400px in this case). You then drag the resize box how you want it on your gif. This will resize and crop your gif.
Then I go to the other gif and do the same thing. With that resized and cropped layer, I right lick on it, go Duplicate layer... and then choose to send it on my other gif's document. When both gifs are on top of each other you can start moving them around and blending them.
3. Blending options
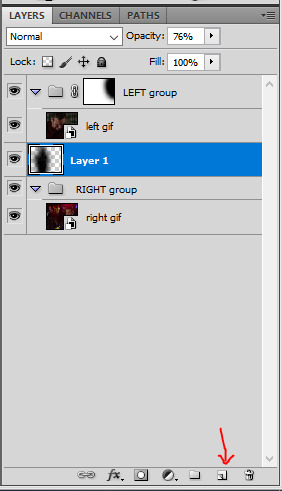
Photoshop has multiple blending options that will give you many different results. What works best for blending gifs is usually the option Screen. This is what I get when I put these 2 gifs on top of each other, with the top group with the left gif set to Screen. Make sure the Screen layer is always on top.
I like to put the gifs in groups, it makes things easier (and tidier) further down the road, but it will work anyway with the smart object gif layers. For this particular gif, groups were not 100% necessary, but for more complicated gifs with different colorings, it's definitely a must in my book.

4. Layer masks
As you can see, this works, but there are definitely parts I would like if they didn't overlap, especially on the right ride. You can easily remove unwanted parts by painting them out with a Layer mask. In this particular case I want to remove the right side of the left gif, so I selected that group and made a layer mask by clicking on the icon at the bottom of the layers window. You'll get a white window next to your layer name. Select it. You then want to use a very soft brush and paint in black what you want to remove.
These layer masks act as "alphas" to drive the opacity of the layer. What is white will be at 100% opacity, and what is black will be at 0% opacity. You can definitely brush in some gray if you want an in-between look. Here I went full black.

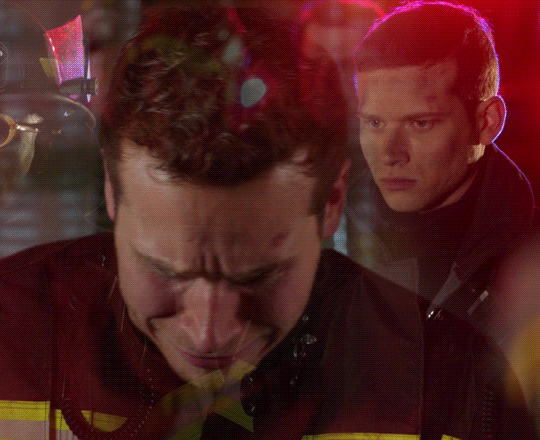
This is the result I get after masking out the unwanted right part. Now I only have that one gif showing on the right side, instead of a blend of the two:

5. Painted layer
So you can see other characters still showing through on the left side of the gif. You can definitely go and paint the parts you want to remove on the right group as well, but if your layer masks overlap, it can create some transparency in your gif and we don't want that. Instead, I create a new empty layer by clicking on the icon, and put it in between the two groups. This layer doesn't need a different blending mode. With a soft brush and the black color, I go paint where I want to mask the right gif, so it doesn't show on the left side.
I played with that layer opacity because I liked to still see some of the right gif's details peeking through. Here's the result:
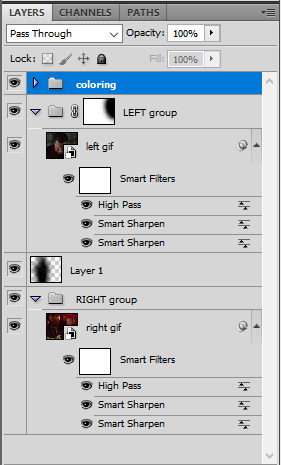
6. Final touches
At this point I will usually sharpen both gif layers and make the coloring, and then I will adjust the layer masks if I feel like I need to. In this case I thought it was fine as it was so I didn't change anything.
For this one I simply put the coloring on top of both gifs because it worked fine for this example, but you can also have a different coloring for each gif if you want. Just make sure you put the two different colorings in their respective gif groups. Remember that the top folder should always be set to Screen for the blending to work, even with coloring layers/groups inside that "main" gif group.
And that's pretty much it! This one was quite simple, but it's incredible what a screen layer and some layer masks can do :) I hope it helps!
Also, @usergif has an amazing tutorials directory for more resources if you need! I always find great tutorials there.
#*ps help#resource#usergif#blending tutorial#userrin#tutorial#uservivaldi#userkosmos#usermills#usermarsy#userdean#userelio#usermadita#flashing gif#alie replies#anonymous#tusereste#userives#tuservaleria#usermorgan
721 notes
·
View notes
Text
A "brief" tutorial on how I make gifs. I know there are better ways to handle some of these steps, but these methods had worked for me so far. I'll tried to make this as organized as possible and other parts I'll be redirecting you to other guides that I have used myself in the past and just overall I think they are really neat! Some of the programs used here are paid, but there are always ways to obtain them through "other ways"...

Programs Used:
Internet Download Manager (IDM) - Paid
OBS - Free
Adobe Photoshop - Paid
Acquiring the Footage:
I usually use footage that I've recorded during gameplay or download it from YouTube (such as trailers, music videos, etc.).
There are many sites and extensions available for downloading these videos, but I personally use IDM to download footage from YouTube.
The higher the quality of the footage, the better your content will be.

Working with Video Formats:
(Note: This step is also relevant if you plan to record your own gameplay.)
If your footage is already in one of the supported file types (or at the desired framerate), you can skip to the next step.
Supported video formats in Photoshop:
(.264, .3GP, .3GPP, .AVC, .AVI, .F4V, .FLV, .M4V, .MOV, .MP4, .MPE, .MPEG, .MPG, .MTS, .MXF, .R3D, .TS, .VOB, .WM, .WMV)
OBS Best Settings for Recording Guide: Link Here
We've acquired our footage, but as you can see, it's in .mkv format. To handle this, I use OBS to record the video from the media player classic (Yes, you could use a converter for this step, but I haven't found one that I like that maintains the original quality.)
The video is in 60fps, but I recommend recording at 30fps. In my experience, 60fps videos tend to look a bit choppy, so I prefer sticking with 30fps.
If you're unsure about the frame rate of your footage, you can check it by following these guides:
For Mac
For Windows
Below are examples showing the differences between the two frame rates (note that the frame delay remains unchanged):


Importing Into Photoshop:
Now that we have our footage, let's import it into Photoshop. There are multiple ways to do this, but the key difference between them is your ability to control the frame delay. This can be really useful when you have a fast-paced scene and need to slow it down a bit.
File > Open: No control over the frame delay.
File > Import > Video Frames to Layers: Allows control over the frame delay.
Below are examples with different frame delays. The original frame delay for this footage is 0.03 seconds:


1 . File > Open:

2 . File > Import > Video Frames to Layers:

For this tutorial I will stick with Import Video Frames to Layers.
Now, we select the desired range for our GIF (note that the maximum supported frames are 500).

Voilà! We've successfully imported it:

Editing the Footage:
If you can't see the Timeline window, go to Window > Timeline, and it will appear.
Now, let's delete the unwanted frames and layers from the beginning and the end:


Next, let click on "Covert to video timeline":

And now, we select all of our layers and convert them to Smart Filters:
From there we create a new document where we'll edit everything (For this I chose these dimensions: 540x700).
And now we drag our Smart Object to our newly created document:

Now for the coloring, sharpening and exporting I will leave that to actual experts so I'll be redirecting you all to these wonderful guides:
General gif-making tips by @mercymaker.
Dimensions, Sharpness and Exporting by @anya-chalotra.
I included the edited final PSB file with the coloring and sharpness I've applied, you can download it here, and below are the export settings I used for this gif:

#well anyways i hope this helps someone#because this was messy#resources#./resources#long post#if you see any typos look way it's 2am
17 notes
·
View notes
Note
hi, idk if you've been asked but how do you make/edit skin overlays like Wednesday's? thank you in advanced
Hello! I think years ago but I'll give an updated answer!
I make skin blends for my sims because I want to use more skin details than there are slots in CAS, so I layer all the details together on one skin. I use alpha skins so I can't use most overlay skin details but I can if I add them to a skin blend! Remember that the ones you make are for personal use because they are primarily just a culmination of other custom content. It's really easy!
First, you'll need to grab the package files for all the CCs you want. Make sure you make a note of which swatch you want to use. I have a Discord server I use for myself and I just send screenshots of the thumbnail and swatch to myself there.
Next, you'll need Sims4Studio. After you've installed Sims4Studio, open your Documents folder, go to Sims4Studio, and then the Mods folder. Drop all the package files you'd like to use there. Next, you'll go to CAS, and Create CAS Standalone.

From there you'll sort the Content by Custom. This is the tedious part. You'll want to go through and open each of the skin details you'd like to use by clicking on it (use Shift-Click to open the item with all the swatches, I recommend doing this) and clicking next. You'll need to save the new package file, you'll have a lot of them over time so I recommend making a folder for skin blending and labeling everything accurately, it will save you a headache later. Once the skin detail is open, find the swatch you want to use and Export the texture. Save and label the textures.
Here comes the blending part! You'll start with the skin or overlay you want to use. Open it in Photoshop, and start to layer the other skin details you'd like to use on top of it.

Just make sure they are aligned correctly! You can even take aspects of different skin details and blend them into others by using a soft eraser brush or layer mask. If you have elements that aren't skin details you've found but want to make something of your own, I'd recommend using the same soft brush method and playing around with placement. Here are just a couple tips of mine:
Tip #1: Skin overlays are black and white if you want to use them you'll want to set them to Multiply. They can be very dark on top of alpha skins so lowering the opacity or lifting the top end of its curves with a curve adjustment can help soften it.
Tip #2: I don't recommend this method as much with making an overlay, if you did want to use just overlay elements I would recommend exporting the skin tone you'd like to use and using that as a base and then doing the aforementioned tip.
Tip #3: If you're using an alpha skin or skin mask, you can adjust the color match by changing the saturation and/or the hue. You can use color balance to shift the undertones and levels/curves to deepen it.
Tip #4: Adding tattoos is so much easier because you don't need to remove them from the background if they are on a flash sheet for example. You'll just place them on the skin and set them to Screen.
To test and/or finish up your skin blend you'll open the base skin you're using again (you can find it in My Projects), import the skin blend PNG you made as a swatch, add a custom thumbnail if you'd like, save, add the package to your game and you're all done!
Hopefully, this helps! If you have any other questions along the way I can try my best to help!
Oh, and I'd make note of everything you use for WCIFs/resource pages/questions since you won't be able to easily look it up after you blend everything together.
12 notes
·
View notes
Note
‘Twas both 👁👁, but yeah honestly I’m very interested cause damn- (sorry if I seem awkward I’m not good with online interaction 😭😭 LMAO)
NAH no worries you're doing fine!!
It's a pretty wide array of topics but touching the surface of it, I'll go into my art process.
Here's a short thread where I went into this similarly!
I pretty much follow the steps of what I mentioned there, but it varies a little bit based on the style I go for too: painting whole illustrations or design or more simple fun things.
I could describe what I did in each frame of my process gifs which I've posted before but I would need some time. With big pieces, the steps I go by (read slowly, it's a pretty dense text):
thumbnailing -> sketching with bigger shapes to get the line of action/feel (that is, I'm just blocking out the composition) -> refine that a bit -> hide BG, draw the characters (lineart) and add the base colors of them. (then merge & rasterize a copy of it for later) -> put them back in the environment (unhide BG), make them grey -> add shading in greyscale style (multiply layers, glow dodge layers, you name it) -> get that previous rasterized layer back and put it on color mode -> those characteristic shiny parts get a new layer with overly saturated + high brightness colors -> color BG with a new color layer -> then rendering/refining for concerning amounts of time -> add effects and change color/brightness/contrast curves + gradient map -> profit???
For software, I generally use Paint Tool SAI (I adore blending/painting here), I use Clip Studio Paint for the 3D posing library/sketching/lineart, and Photoshop for final effects. (Update: I mostly do all things in CSP now)
(if you have CSP, try out this brush... it saved my life)
As for improvement:
I experiment, watch a lot of youtube videos (I personally like the ones which analyse an artist). I suggest thoroughly understanding how something moves and works (for anatomy I can recommend the book 'Anatomy for Sculptors'), I also study and jot down important pieces of advice or insights to a collective document, rather than saving them to my device where it is highly likely to be forgotten.
I believe if you put great importance on colors and composition, that can cause the most noticeable, 'fastest' improvement, at least if you view it from the lens of social media. (While online environments provide significant reassurance, it must be engaged with in moderation, as it is easy to fall into a lot of negative mindsets, taking the enjoyment out by perfectionism, comparison, or seeking validation, etc.)
Another improvement technique you can try is to slow down a speedpaint video of your choice and follow along with the artist. Extremely useful, I recommend, put your artist under a microscope.
Of course I don't do all of these things every single waking hour, it's just a side hobby to my unrelated studies in real life. Even if you don't actively draw your visual library and knowledge can improve passively, I find that so fascinating. I don't touch a paper for months and there's a sudden jump, like damn what. (Not saying you should do this, active learning is still better ofc) Either way my point with that is, that improving does and did take a lot of time for me as well.
Apologies if this goes all over the place, I tried to touch upon every subject that came to mind at the moment, in not too much in detail, overall I hope it makes sense
If you have any specific questions related, feel free to ask! Or if there's any specific problem you'd like to tackle but find yourself lost, same applies!
#i wrote this before sleeping so it might all be chaotic/nonsensical#thank you for the ask!#asks#art tutorial#art tips
10 notes
·
View notes
Text
TW: S**ualizing minor characters
In the Eternitydev document Kaiden claims that Eternitydev s**ualizes minor characters. He provides screenshots as evidence so I'll start with the first screenshot:
Eternitydev also has a few aliases, MrDrnose, Cursed Ariral, and Shameless Ariral, just to name a few. The person in this screenshot is not Eternitydev. Eternitydev goes by many names and many profiles, this however, is not one of them. The profile picture isn't in Eternitydev's artstyle and Eternitydev does not have a character that looks remotely like this. Kaiden did not provide any other screenshots, or even say where Eternitydev himself says that he made Angell a minor. This screenshot is about as good of evidence as Kaiden just saying that he believes Angell is 14.

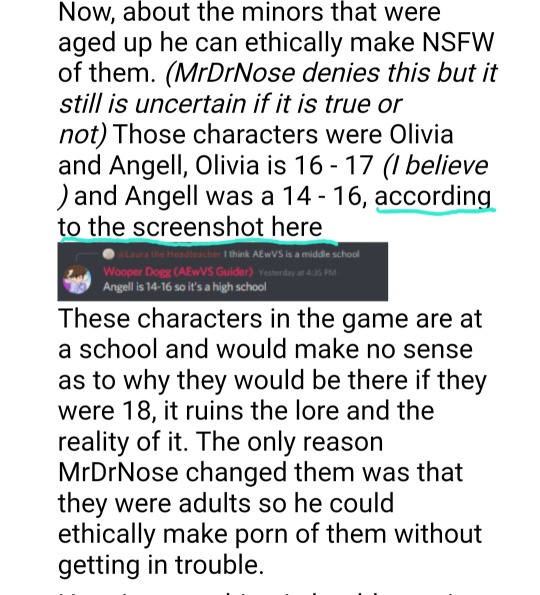
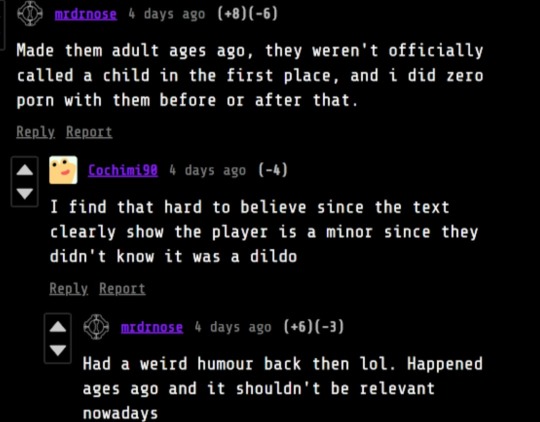
Here is a screenshot of MrDrnose saying Angell's age and why.
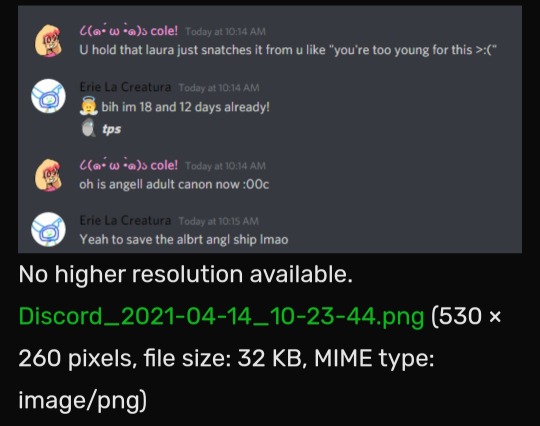
Also something the note, yes he did make this long after the "stick joke" was added. The reason why I believe this over Kaiden's screenshot is that for one, this is a way that MrDrnose usually speaks, using slang and abbreviations. The profile picture is also not drawn in an artstyle that MrDrnose doesn't have, and both the profile picture and the username relate to Erie like a few other of his accounts, so this would be a plausible alias. Also, here is a screenshot from MrDrnose himself saying that they (assuming Angell and Olivia) were made adults ages ago.
Now I should bring up the whole reason why Angell's age is being talked about, the stick joke.
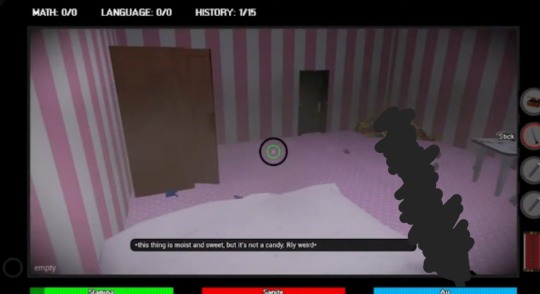
The text says "this thing is moist and sweet but not a candy. Really weird." Implying that Angell licked the "stick". Based on the fact that I had to censor this, I think you know why this could be bad. This also only happened once, there was also no evidence that MrDrnose made graphic imagery or descriptions of Angell created before or after. The argument that MrDrnose ***ualizes minor characters is based solely off this one line and a discord channel's name (that one's on discord so I can't confirm or disprove it).
Something that Kaiden also didn't mention is how old MrDrnose was. Based on the time AEwVS was being made, MrDrnose was about 16-18 when making this joke. He was not an adult making this joke about a child, he was a teenager writing this about another teenager.

Saying this as a person who also has/had a weird sense of humor, the joke here is either how blatent/graphic the stick was while also not explicitly saying what it was, or how dumb someone would have to be to not know what it is. Leaning towards the former. Basically the joke is not "child licks a *** toy". Yes I do think this joke was also done badly.
This was also 4-6 years ago. This was one gross line written by a 16 year old about another 16 year old (assuming Angell isn't 18) in a joking context 4-6 years ago. It shouldn't be relevant now, especially because the only other evidence they have is one discord channel's name.
Also, this is a game where you can eat dead rats, get impaled, boiled alive, dismembered, reassemble a dead body, and just generally has a lot of photoshopped violence (especially the older versions). The very least you can do is make the victim of these crimes slightly older.
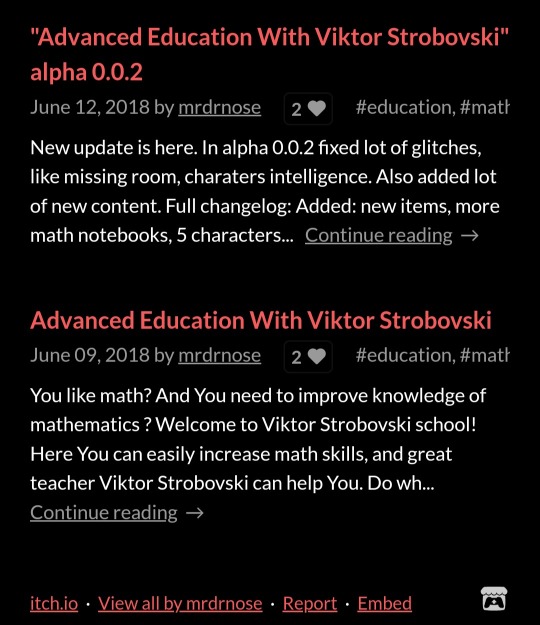
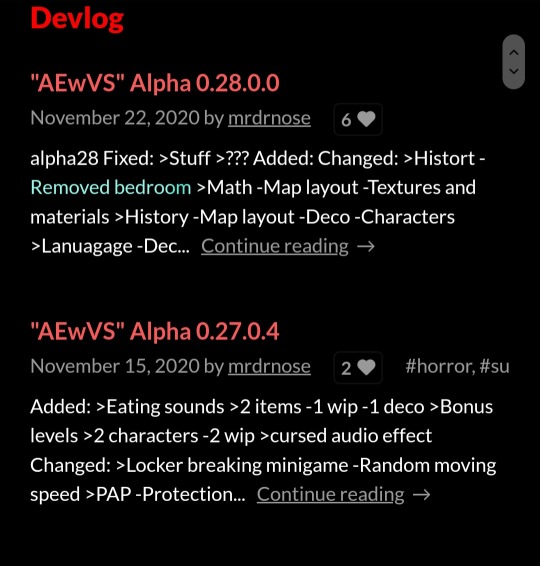
I don't hate/blame Eternitydev for that now. Advanced Education with Viktor Strobovski, Alex's Basics in Biology and Zoology and other games like it were made years ago and he seems to not include graphic g-ry stuff in any of his new content.
#aewvs#advanced education with viktor strobovski#abibaz#alex basics in biology and zoology#eternitydev#ariral#votv
7 notes
·
View notes
Note
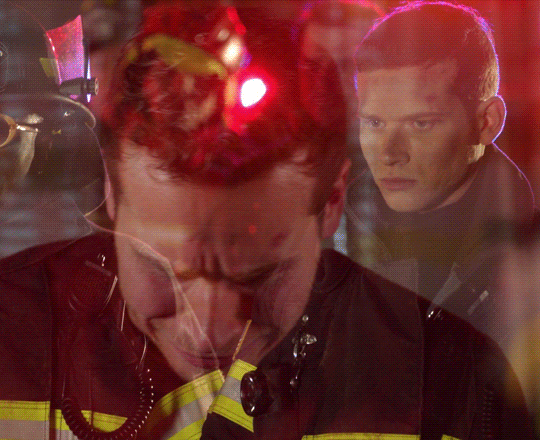
Hi! I'm wondering if it's too much to ask by wondering if you could explain how to do gifs like this: /post/665885361316233216. Or if you know of some other tutorial or just things to think about while making it? Thank you!
Not at all, I’m happy to know someone appreciated my template! I'm sure there are other tutorials out there on how to create layouts like this but I haven’t seen any lately to link you to so I'll go ahead and show you my approach to getting this type of layout. This will be very detailed and image heavy to make it easy for those who might have never worked with putting gifs into templates before to follow.
This tutorial assumes you have:
just about any version of photoshop (I use CC23)
basic knowledge of giffing with this program
some experience with layer masks
If you want to actually learn how to make a template like this from scratch, keep reading. Otherwise you can just download the template I created here and skip to step 3, or download this anyway for a visual and follow along.
(STEP 1): HOW DO I GET STARTED?
Create a new blank document with the dimensions of the entire size of the canvas (file > new) and change the highlighted settings to match these (with your own choice of dimensions of course):

Before you do anything else, make sure your timeline is visible (window > timeline) and select “create video timeline” from the drop down.

(STEP 2): MAPPING IT OUT AND CREATING THE TEMPLATE
With your blank canvas is where you have to use a little imagination to create your layout to fill in the space and where you start is up to you.

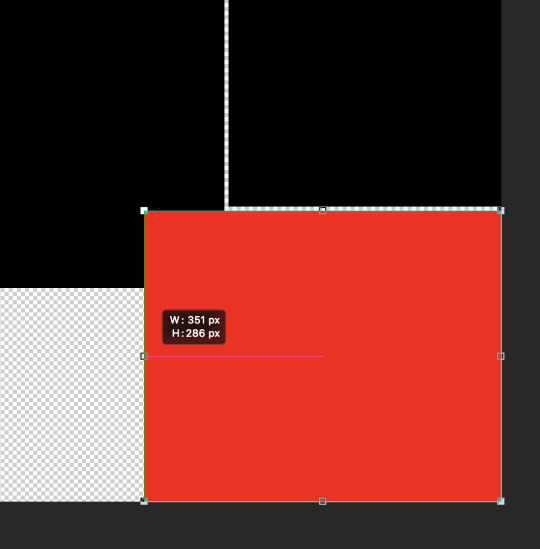
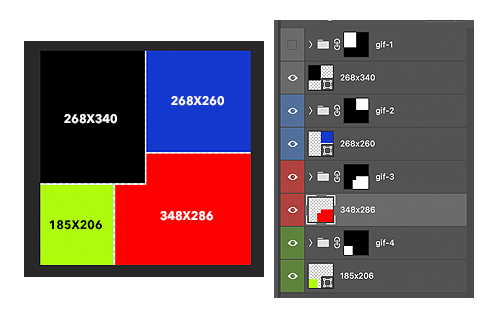
I started at the top of the canvas in the left corner and decided my first gif was gonna be 268 x 340. Why these dimensions? 268 is tumblr’s standard width for (2) side-by-side gifs and I want the gutter alignment at the top of this canvas to be centered. The height of the block just felt right. As you drag the tool, photoshop will tell you what the dimensions are.
Now I have this:

Our second shape will also have a width of 268px to ensure the transparent space between them is perfectly centered. My second block ended up being 268 x 260.
Make sure there is a gutter of 4px between all of the squares you create. This is important because tumblr’s standard gutter size between gifs is 4px, and this means you need to subtract 4px from your squares on all sides that face each other.

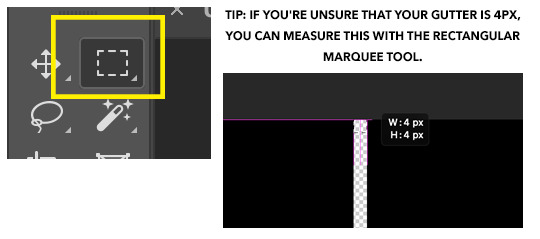
The easiest method to make and align the squares without spending too much time on it is to click off the canvas in the corner and drag the shape inward. Then click on the shape you’ve just created and align it with its designated 90 degree corner of the canvas first. [Edit > free transform] the sides until they align correctly by holding shift + control while dragging. Zoom in to a microscopic level to make sure the gutter is right if you have to 📐🔬🔎👀
If you’re not using weird shapes in your template, do the same thing with all the blocks until you get your desired outcome.
Otherwise, you’ll have to deal with this:
(STEP 2.1): THE ANGLE

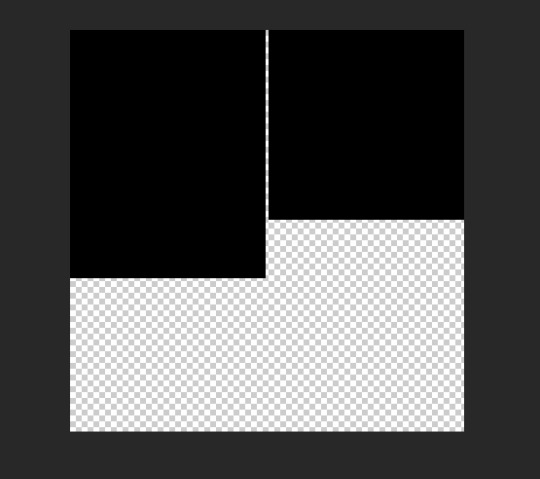
In order to create a template like this, you will need to delete the corner of your shape. Create your rectangle like normal as you did with the others, but this one is going to overlay the layer on the top left.
To make sure everything will be even, I used the rectangle tool again to measure and with a new square (in yellow for visibility), I determined that this corner overlay is 75x75, so I fixed the alignment of the red rectangle to make it even.
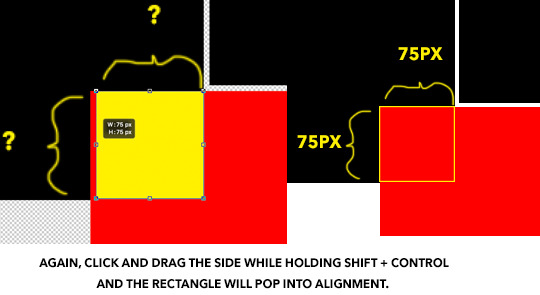
(STEP 2.2): DELETING THE CORNER OUT OF THE SHAPE
Using the yellow square as your new guide, extend its edges to cover the gutter on the two sides while maintaining its 1x1 proportion.
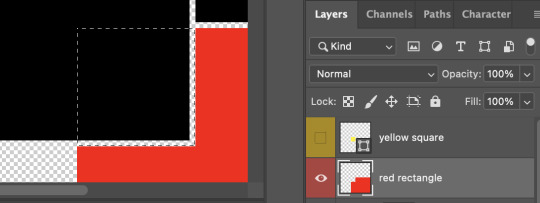
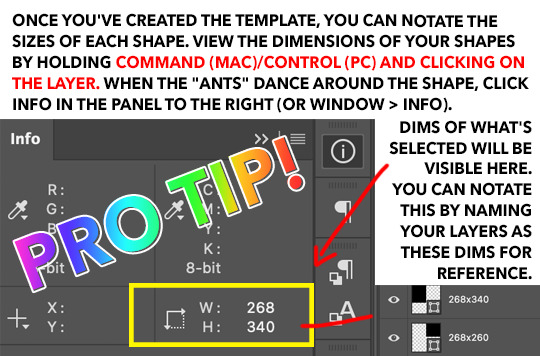
Keyboard command + click on your yellow square layer and once the “ants” dance around the square, hide the layer so it’s invisible on the canvas.
Right click on the red rectangle layer and select “rasterize” from the drop down menu, then you can hit “delete” or “backspace” on your keyboard which will remove the selected portion only to reveal the gutter. command + D will make the 🐜s go away. Then the yellow square layer can be deleted.
Once this is complete, you can finish up your template by adding your small rectangle in the left bottom corner in the space that remains and VOILA! You have a template!
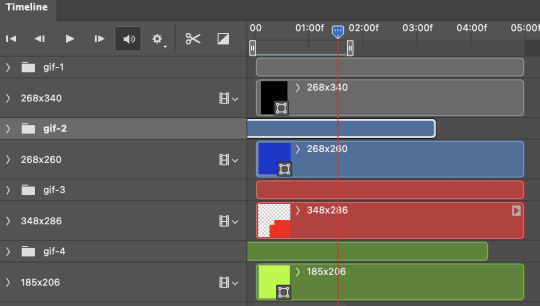
3. REPLACING THE SHAPES WITH GIFS USING LAYER MASKS ETC
When you make your gifs, remember that they will need to be in timeline form in order to drag them onto the template. You can resize them to match the dimensions of the shapes, or you could just drag your gif—whatever be the size—directly onto the canvas, and “free transform” them to fit inside each space.
Create a group for each shape and create a layer mask for each group, containing it’s designated shape. I’ve colorized this visual to make it make sense.
Now you can finally drag your gifs onto the template. The coloring can be added before or after, it doesn’t matter as long as you place your gifs and the colorings inside the groups with the layer masks to contain the effects of the color adjustments.
And the best thing about putting gifs in a template in timeline is you can move the groups containing the gifs from left to right to get your desired part of the clip.
Once you’re finished with this, hide the original shape layers, as they were just guides and we no longer need them, but also if you don’t do this, you may be able to see them on the sides rather than transparency once you upload to tumblr. And AT LAST you can convert everything into frames as you normally would and save.
It seems like a lot, but these are very satisfying to make. Feel free to drop me another ask if you have any questions regarding some detail I might have left out.
#gif tutorial#tutorials*#resources*#templates#template tutorial#pshelp#completeresources#quirkyresources#answered#idk who to tag in tutorials tbh
70 notes
·
View notes
Note
Your VTM comic book covers are simply GORGEOUS, I'm totally in awe! How did you get the super cool halftone/coloured dots effect? It looks super cool and realistic, I love it! Have a lovely day! :)
Thank you so much!
So to get the halftones, I use an old-ass tutorial I got off deviantArt literally....more than a decade ago? (Rosalarian's Golden Age Tutorial). The account appears to be deactivated, but I'll go through the steps here:
For reference, I bounce between Clip Studio Paint and a very old-ass copy of Photoshop, but if you're using other programs that have fun pixelate filters and you can change the color mode, you should be ok.
NOW...
Ink your drawing in straight black on its own layer
Block your colors on another layer (I hunted up some old comic color palettes thanks to madformidcentury dot com/2013/10/mid-century-color-palette-in-comics dot html)
Turn off any and all blackwork (this is INCREDIBLY important), and take your colorwork into Photoshop. (if there are any gaps in your color work, fill a separate layer with white and then merge the layers so it's all solid)
Set the mode to CMYK
Go to Artistic Filters >> Pixelate >> Color Halftone (the only thing I mess around with is the size of the dots; the default for my era of Photoshop is 8 and that's a lil big for my taste--all the VTM covers are between 4-6. It's up to your own best judgement, but I go by how "readable" things look--does the face still look like a face at a reasonable distance or is it just a smudge? If it's not readable, undo and change your dot size)
Add 3 new layers to your document and LABEL THEM: Cyan, Magenta, and Yellow
Then go to your channels panel and click on the Cyan layer to make a selection of it
Back to your Layers panel, make sure you're on your Cyan layer, and SELECT INVERSE
Then FILL the selection with the CMYK cyan that you've picked out
Deselect your selection, move to the next layer (and make sure you've got CMYK magenta in your bucket) and repeat steps 6-8 selecting Magenta and Yellow respectively
NOW you've got the beginnings of retro-feeling halftone. At this point, I import the halftone manipulation back into CSP and turn my blackwork back on.
For the ✨ grunge ✨ effect, I grab an old paper texture (after reducing its saturation and upping the contrast until it's mostly black and white splotchy) and set it to OVERLAY at anywhere from 50-20% (this is a 'let your soul decide' moment) over the whole thing
Then I grab another old paper texture and put underneath the Overlay Texture Layer, on MULTIPLY, at anywhere from 65-25% (again, let your soul decide). Both layers will give you a nice level of funk to go with your halftone shenanigans
A lot of the colorwork is going back and forth and back and forth because what looked ok in flats didn't translate after toning, but it works out eventually!
Some important things to remember:
Cool tones tend to fade back and warm tones tend to move forward if you're gonna use this method on any kind of scene
Keep your shapes SIMPLE; don't get bogged down in tones of gradients and fades and all of that because most of it WILL NOT come across once you start toning! Think of it this way: mass-production doesn't have time for fine detail, that's why comics are a lot of heavy black inks and flat color contrast
Experiment with the colors! You're working in a limited palette (if you're using any of the old Marvel/DC print books especially), and it doesn't have to be photorealistic/absolute. For instance, my Nos isn't actually green, but the tone suited the funky retro vibe so I went with it!
Let yourself fall down the research rabbit hole of pulp covers because they're both hilarious and informative. Same dot energy is an interesting collection website to go through, you can also go through your search engine (remember to add -pinterest -youtube to your search term to filter out that crapola)
HAVE FUN!
💖
24 notes
·
View notes
Note
hi hi! hope you're well. idk if you did this before but can you do a small tutorial on how to make an icon like yours where the person fits inside the frame but there are parts outside of it
im a beginner to photoshop and while i know to create clipping mask to put an element inside of the shape, i can't figure out how to do that !! thank you sm if you choose to answer this <33
Sure thing! This is a very basic tutorial, but I'll show you how to get Jeff Satur's little head popping up over this square.

First you want to create a png of your fc, or if you're not quite confident in your skills cutting out images (or if you just want to save time) deviantart as a lot of png packs available for use, just make sure you're following the creator's rules by favoriting, commenting, etc.
Then I open a new document, usually 150x150, and create the shape I'm going to want my fc contained in. Because we want them to pop out of the top, we're going to want the shape smaller than the document and lower towards the bottom.

Add a group and place your shape inside. Now, we're going to create a layer mask instead of a clipping mask. In order to do this, click on the ctrl key and click on this box on your shape layer. This will give you "marching ants" around your shape.

The layer mask should look like this. Now when you place your png in there, the top is cut off.

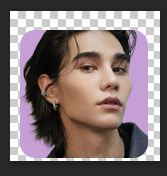
In order to fix that, you're going to use the selection tool, select a portion of the canvas above the square that you want to show up, then hit delete.
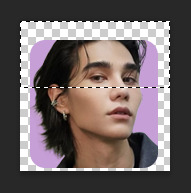
The layer mask should look like this after deleting that portion. And now the top of your fc should be visible!

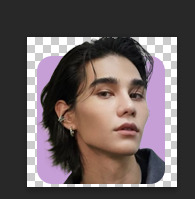
After that, I usually throw in a gradient or image for the background, clean up the edges of the fc, and add some coloring and remember to save as png!
44 notes
·
View notes
Text

New simblr! (pt. 2)
Simblr is a place where a sea of CC spreads out, where the inhabitants speak some strange slang and where it’s better not to travel because you may not come back. It’s a colourful part of the internet where anything is possible. That's where I'm heading, with a feeling of excitement and anxiety at the same time.
I am reaching the border zone. The passage is blocked by a barrier. There is a guard's booth on the side. A bored man sticks out of the open window. I get out of the car and greet him. He immediately starts the usual monologue: Tumblr does not recommend continuing the journey. If the passenger still decides to drive on, they do so entirely at their own risk.
- I know, I know, I say. - I've been there before, just under a different name.
The border guard reaches out his hand for my documents.
- So we have a Simblr comeback, huh?
- Yes, and I'll try not to screw it up this time.
- How long have you been playing the Sims?
- Since 2002! I'm a real veteran. I had the opportunity of playing every The Sims generation and frankly, I love them all. Here I'll focus on TS4 & TS3, though.
- What are you planning to post?
- CAS and Photoshop are my natural habitats - that means edits, lookbooks and sim dumps (in Maxis Mix style) will be the main points of the programme.
- So no stories or gameplay?
- I have some stories in the making, but absolutely no patience to set the scenery and take photos. But everything will come out in the wash anyway, so stay tuned.
- Ok, this all sounds quite interesting and ambitious. All I can do is wish you good luck, Kithlien!
- Thanks, call me Kits.
He raises the barrier, I wave him goodbye and set off to meet new adventures. Do you want to experience them with me? Feel free to shoot me a message! You can also like or/and reblog this to spread the word! 🧡
P.S. If you get the reference of this post, I already love you! ^^
#ts4#the sims 4#sims 4#ts3#the sims 3#sims 3#sims edit#ts4 edit#sims 4 edit#simblr#ts4 simblr#sims 4 simblr#ts3 simblr#sims 3 simblr#new simblr#new simblr alert
4 notes
·
View notes
Note
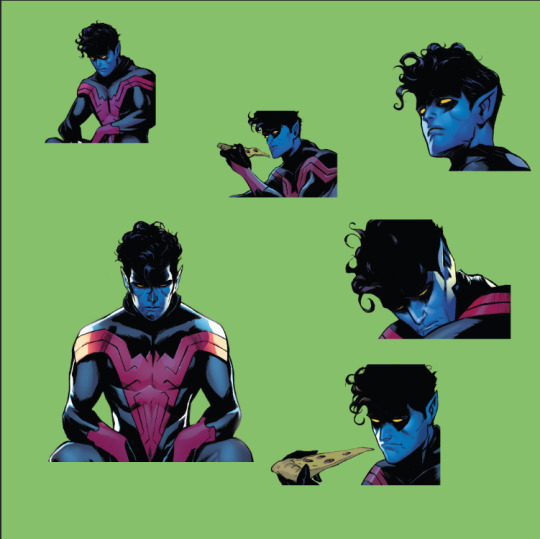
May I ask how you did the edit of Nightcrawler in Uncanny Spider-Man #1?
I liked it a lot
Sure, I've talked about how I do edits before but I can't find that post right now so here's a bit of a quick guide below the cut:
Launch Photoshop or Photopea or possibly GIMP.
Copy/screen grab the panels you want to use and paste them into en empty document. If you're smart you just grab the panels you know you're going to use. I don't.
Remove the background. I use a variety of tools for this, including the polygonal lasso tool, the magic wand and the eraser. How hard this is will depend a lot on the original art. I also sometimes paint over speech bubbles or other stuff like that at this stage. You should end up with something like this (the green is a separate background layer):
4. Create a new document with a width of 540 px (native size for tumblr, divide by half or a third if you're doing several pictures next to each other) and a height of whatever but not too tall, IIRC the recommended max height for one image is 810 px. Create multiple documents if your images are going to be different heights.
5. Paste the picture you want to use into the new document, resize to taste. It should look like this:
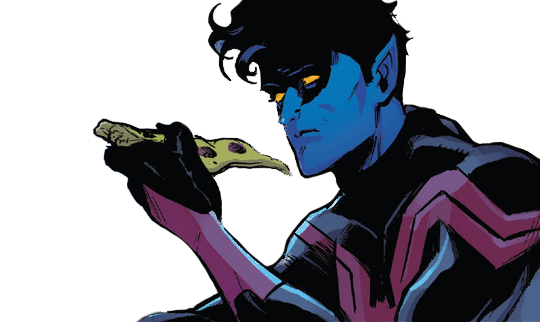
Now, from this step forward my process depends a lot on what edit I'm doing and the effect I'm going for, so I'll describe what I did with this edit in particular. I have a bunch of free for non-commercial use textures and assets I use for this purpose, which I've accumulated through the years from sites like Creativemarket.
6. I added a gradient layer to the background, in this case using colours picked from the middle image. I sometimes use online colour scheme generators or just pick something I like too, it depends on the edit.
7. I added a black and white texture image as a new layer. I then added a gradient map to that layer using the same colours as the background gradient, set the layer opacity to 47% and set the layer blending mode to overlay.

8. I added a new texture image with raster dots (you can also make these in PS but I'm lazy so) and set that layer's blending mode to soft light.


And there you have it! I did more or less the same thing for every image in that edit, rotating, resizing and swapping out assets as needed.
8 notes
·
View notes
Note
I was trying to recolor some trees in your color actions, but I ran into a problem. I have a similar problem to a previous anon, who was having their background be filled with a whole color. I did what was mentioned, locking the background, but my background still becomes just one color. I also get this message background copy 2 doesn't exist. I tried duplicating the background and renaming it background copy 2, but doesn't work. I'm using photopea, which is like a free version of photoshop.
Hey anon!
So the essential problem is that the actions do not work on images with transparency. They cannot possibly, due to all the steps involved. They all need the same starting point to run without the type of errors you're encountering.
The easiest way around this is a tip provided by @skulldilocks: when you export your texture from SimPE, export both the texture and the alpha as .bmp files not .png. You just change the file type in the drop-down menu to .bmp. This will give you a solid texture to work with, so you can recolor it however you want and then apply the alpha after the fact. (I'll provide an action for applying the alpha.)
Just remember to export both the alpha and the texture, by right-clicking and selecting "Export..." and then "Export Alpha Channel..."
If you no longer have the original .package file for any reason, you can still get a recolorable texture that you can apply an alpha to, but it's a little more involved, so I'll put it under a read more.
First off, here's a download link to the actions you'll need for the following steps.
Step 1: Open up your transparent texture. There should only be one layer. Do not use a texture that you have already started recoloring.
Step 2: Run the action named "1 Make Alpha From Transparent Texture." You will now have a new alpha layer that looks like this:

You will also see the following pop-up:

Per the instructions, copy this new alpha layer into a separate document. Return to your original document and delete that new alpha layer.
Step 3: Run the action named "2 Solidify Transparent Texture" on your original texture. You will receive the following pop-up at the beginning of the action:

Click "Continue." Your texture now looks like this:

All of the edges of the leaves have been solidified and the background is flat white.
Step 4: This is the point at which you recolor your texture. So I brightened it up a little with a levels layer so it is closer to the correct luminosity of a Volatile hair texture, ran Volatile over it, adjusted the brightness a little bit more, ran Volatile again, and then used the RDX action to make some very alien foliage:

Step 5: Now you go back to that black and white alpha layer we made before, copy and paste it as a new layer on top of your recolored texture. Run the action named "3 Apply Alpha To Solid Texture (after recoloring)." You will get the following pop-up at the beginning of the action:

Click "Continue." Your texture will now have a transparent background:
And that's it! Do this for all of your recolors. You can omit the first action as you proceed, you only need to make the alpha once, unless you are working with multiple different alphas.
Notes:
You can use this method on hairs if you have only saved textures with the alpha already applied and long since deleted the original hair .package file (I do this a lot).
Once you are familiar with this method, you can get rid of the pop-up messages in the actions by clicking the little triangle next to the action title to expand the steps, click the step entitled "Stop" (at the end of action 1, and at the beginning of actions 2 and 3) and delete it with the little trashcan symbol in the bottom right. Make sure you do NOT delete any other action steps or the action will break.
If you were able to export solid .bmp textures from SimPE, you would only need to do step 5 of the above tutorial to get a transparent texture that you can import into your recolors.
20 notes
·
View notes
Note
hi there! how would one go about adding gifs to the discord template you made? i adore it and i wanted to try it myself because it’s beautiful and i wanted to try something new, but i’m still very new to photoshop 😭
hello!! thank you so much for the kind words <3
there's a couple ways you can go about adding gifs to the template, though i recommend moving the template onto the gif itself.
i'll do my best to explain below but if you're still confused, you can send another ask and i can do my best to help <3
1. duplicating the template folders to your gif
this is probably the easiest way to do it. select the template group in the layers panel, right-click and select duplicate group. in the dialogue box that pops up, select your gif document under the document drop down in the destination section.
2. copy + pasting the template folders to your gif
make sure all of the layers for the template are grouped together and unlocked (you can do this by clicking the lock symbol on any of the layers that are locked to make them editable), and select the group. right-click and copy the group (command + c on mac / control + c on windows), go to your gif document and select edit > paste special > paste into place.
3. dragging the template folders on to your gif
for this, make sure all of the layers are unlocked and grouped together. select the group, and then click and drag the group onto your gif. if you hold shift while dragging the layers, they should be centered on the canvas.
1 note
·
View note
Last Seen Blogs

sintosc
Untitled

imperiumraka
Imperium Reseller Raka

myhouseinhistory
無標題

visitbutlercounty
Udderly Fascinating Tourism Tales
