#install windows 11 in hyper v
Explore tagged Tumblr posts
Visit Tumblr Blog
Explore Tumblr blogs with no restrictions, modern design and the best experience.
Last Seen Tumblr Blogs


Fun Fact
Tumblr has a 66 index score for customer satisfaction in the US.
Text
Fix PXE Boot Stuck or No Boot Image was found for HyperV VM
In this article, we shall discuss how to “fix PXE Boot Stuck or No Boot Image was found for HyperV VM. The bootloader did not find any operating system”. This means that the bootloader could not find a bootable image from the network to boot the VM. Please see Linux Boot Process Explained Step by Step for Beginners, and how to Fix Windows Stuck on System Restore. Here is how to Fix Hyper-V VM…
#Add CD/DVD Drive drive on Hyper-V#Hyper V#hyperV#HyperV tutorial#HyperV VM#Microsoft Windows#Post VM Installation Configuration#PXE Boot Stuck#PXE Server Setup#Virtual Machine#Virtual Machine Failed#Virtual Machines#VM#VMs#Windows#Windows 10#Windows 11#Windows Server#Windows Server 2012#Windows Server 2016#Windows Server 2019#Windows Server 2022
0 notes
Text
I am gonna disagree with OP on something here; I don't thing that knowing how to fuck around in CMD.exe is a necessary prerequisite to playing around with Linux.
There's this presumption that understanding the guts of Windows is some kind of stepping stone to understanding the guts of Linux, and I'm gonna tell you as a professional sys admin who works with both Windows and Linux... I absolutely hate working with Windows.
Windows is a fucking nightmare. Microsoft changes basic design theory every five minutes. It has no unifying philosophy, and no real intention to ever be messed with outside of the UI (and even that is deeply hostile, with the 10/11 UI being comprised of hacked together layers of different interfaces from different eras of Windows design).
Linux is somehow more coherent than this, despite being built by hundreds of random contributors. Seriously, open the KDE settings window and fucking marvel at how everything is just there. Every setting you need, all easily searchable. It's still got its quirks, especially when it comes to theming, but given that Windows theming requires third party software I'd say it still wins that one. And no home user needs theming, it's just cool.
Linux has clearly understood standards for where things like config files go; /etc/ or your home folder. Easy. You have to learn this stuff, but once you learn it it mostly holds true. But God only knows where I'll find that shit on Windows. Maybe in my Documents just fucking cluttering up the place (because no one puts this stuff in hidden folders like they do on Linux), maybe in one of the various meaningless subfolders of AppData, maybe in the program's install folder, maybe somewhere else, who the fuck knows?
You ever install Hyper-V? Your default location for your VMs is in My Documents. On a server. Tell me how that makes any fucking sense.
The Windows permission system is a Lovecraftian nightmare. The Linux permission system can be boiled down to a fucking 3 digit code.
Yeah, learning this shit takes work, but kids learn fast when they're engaged by something and have some good resources to work from. If you're at a place of not knowing anything about how either OS works under the hood, I would absolutely rather throw someone at Linux. Get 'em to make a TryHackMe account and set them loose on the basics course, they'll have a great time.
I'm sure people are gonna yell at me for this, because "Oh well you're a linux nerd so of course you hate Microsoft" without remotely understanding that the reason Linux nerds hate Microsoft is nothing to do with ideology and everything to do with ease of use. Once you take the term to actually get past that barrier and learn the guts, Linux makes so much more sense than Windows. People think Windows is the stepping stone, but it's not; it's just the first rock you washed up on, so everything else looks far away.
Telling young zoomers to "just switch to linux" is nuts some of these ipad kids have never even heard of a cmd.exe or BIOS you're throwing them to the wolves
61K notes
·
View notes
Text
Why Windows 10 Professional OS Is Still a Smart Choice
Technology moves fast, but not every upgrade suits everyone. Many users and businesses still rely on Windows 10 Professional OS for its stability, compatibility, and features. While Windows 11 is the latest release, Windows 10 remains a top performer for those who prioritize productivity and reliability.
The Power and Flexibility of Windows 10 Professional OS
Windows 10 Professional OS is designed for professionals, power users, and businesses. It supports essential features like Remote Desktop, BitLocker encryption, and Group Policy management. These tools give users more control over their systems.
Compared to the Home edition, Windows 10 Pro allows domain joining, enterprise mode Internet Explorer, and assigned access. These are essential features for business environments and system administrators.
Security features are also stronger in the Pro edition. BitLocker protects your files even if your device gets lost or stolen. Built-in antivirus, firewall, and internet protections keep your system secure from threats.
With Windows 10 Professional OS, users get the best of both worlds—stability and functionality.
Subheading With Keyword: Getting Windows 10 with License Key
For smooth installation and full access to features, it’s critical to get Windows 10 with license key from a trusted provider. The license key activates your copy, ensuring it is genuine and supported.
Without activation, certain features remain locked. You may not receive regular updates either. This could expose your system to bugs or security risks. That’s why choosing a valid license is not just smart—it’s necessary.
If you're reinstalling or upgrading a PC, always confirm that the version you're buying includes a valid product key. Retailers like SoftwareBase provide fully licensed products that are safe and secure.
Compatibility Is a Major Win for Windows 10
One of the reasons people prefer Windows 10 with license key is its broad hardware and software compatibility. It runs on a wide range of laptops and desktops, including older hardware. That means fewer upgrades and lower costs.
Most professional and enterprise-grade applications are built for Windows 10. Whether it’s accounting software, engineering tools, or design platforms, compatibility is rarely an issue.
Its driver support is also extensive. Users rarely face problems finding the right drivers for printers, monitors, and other peripherals. This compatibility gives Windows 10 Professional OS a significant advantage over newer or niche operating systems.
Subheading With Keyword: Why Stick With Windows 10 Professional OS?
Some users wonder if they should upgrade to Windows 11. While Windows 11 has a modern design, not all systems are compatible. Additionally, many users find the Windows 10 interface easier to navigate.
Windows 10 Professional OS will continue to receive security updates and support until October 14, 2025. For businesses that want to avoid the cost and time of upgrading, this is welcome news.
Also, enterprise features like Windows Sandbox, Hyper-V, and group policies make it a powerful choice for developers and IT pros. These features aren’t available in the Home version.
The familiar interface, combined with strong multitasking tools like Snap Assist and virtual desktops, makes it easier to stay productive.
Easy Setup and Activation Process
Setting up Windows 10 with license key is simple. After purchasing, you'll receive your key digitally. You can download the ISO file, install the OS, and enter your key during or after setup.
Once activated, the OS runs smoothly and allows personalization. You'll receive security updates directly from Microsoft, ensuring long-term reliability.
SoftwareBase makes the buying process easy, with instant delivery and reliable customer support. Whether you're upgrading one device or multiple, it’s a hassle-free experience.
Subheading With Keyword: Benefits of Choosing Windows 10 Professional OS for Business
Businesses often need extra control, security, and flexibility. That’s exactly what Windows 10 Professional OS delivers.
Here are some benefits:
Group Policy: Manage multiple users and systems with ease.
Remote Desktop: Access work computers from anywhere.
Assigned Access: Lock down the system for kiosk use or task-specific devices.
BitLocker Encryption: Protect data even if the device is lost or stolen.
Domain Join: Easily connect to work networks.
These features help streamline IT operations and improve data protection.
Regular Updates and Long-Term Support
Microsoft continues to support Windows 10 with security patches and feature updates. While newer versions may come out, businesses often prefer proven systems that don’t disrupt their workflows.
Windows 10 Professional OS is mature and stable. It has fewer bugs compared to newer releases, making it a reliable option for organizations that require a consistent performance standard.
Wrapping Up: Should You Still Buy Windows 10?
Absolutely. If you're not ready for Windows 11 or need strong business features, Windows 10 with license key remains a great choice. Its robust features, security tools, and compatibility make it ideal for work or personal use.
Before purchasing, make sure to use a trusted source like SoftwareBase.uk to avoid counterfeit copies. Once activated, you're ready to enjoy a reliable and flexible operating system.
0 notes
Text
Create Ubuntu 24.04.2 VM in Hyper-V, with "Enhanced Session" RDP support (Windows 11, xrdp, development)
To setup an Ubuntu 24.04.2 development Hyper-V VM, with built-in “Enhanced Session” + Remote Desktop Protocol (RDP) support (until it’s available in Hyper-V’s “Quck Create”): Create Hyper-V VM Configure VM for “Enhanced Session”, allow nested virtualisation Start VM, install Ubuntu XRDP Setup Optional, but really useful setup Fix Xrdp slow performance Connect to VM Create Hyper-V VM Create VM…
0 notes
Text
Windows 11 Pro Product Key – Fast Email Delivery
Windows 11 Pro is Microsoft’s latest operating system, offering a modern interface, enhanced security features, and productivity tools designed for both personal and professional use. To fully unlock its potential, you need a genuine Windows 11 Pro product key. With the convenience of fast email delivery, obtaining and activating your license has never been easier. This article explores the importance of a genuine product key, the benefits of fast email delivery, and how it ensures a seamless and secure activation process.
Why a Genuine Windows 11 Pro Product Key is Essential
A genuine Windows 11 Pro product key is the cornerstone of a secure and functional operating system. Without a valid key, your system may run in an unactivated state, which comes with limitations such as a persistent desktop watermark, restricted personalization options, and the inability to receive critical updates. An unactivated system is also more vulnerable to security risks, as it may lack the latest security patches and protections. By using a genuine product key, you ensure that your licenta windows 11 pro installation is fully functional, secure, and compliant with Microsoft’s licensing terms. This is the first step toward a seamless and optimized computing experience.
The Convenience of Fast Email Delivery
Fast email delivery has revolutionized the way software licenses are purchased and distributed. Instead of waiting for physical copies or shipping, you can receive your Windows 11 Pro product key immediately after purchase. This method is not only quick but also environmentally friendly, eliminating the need for packaging and transportation. Once you complete your purchase, the product key is sent to your email, allowing you to activate your operating system right away. Fast email delivery is ideal for users who need immediate access to their software, whether for personal use, business, or emergency system repairs.
How Fast Email Delivery Works
The process of obtaining a Windows 11 Pro product key through fast email delivery is simple and straightforward. First, you purchase the key from a trusted retailer or Microsoft’s official website. After completing the payment, the product key is sent to your email address within minutes. The key is a unique alphanumeric code that you enter during the Windows installation process or through the system settings. Once activated, your Windows 11 Pro operating system is fully functional, with access to all features and updates. This seamless process ensures that you can start using your new OS without delays.
Benefits of a Genuine Product Key
A genuine Windows 11 Pro product key provides access to all the features and benefits of the operating system. These include advanced security tools like Windows Defender Antivirus, BitLocker encryption, and Windows Hello for biometric authentication. Productivity features such as Remote Desktop, Hyper-V virtualization, and Snap Layouts are also fully accessible with a genuine license. Additionally, a genuine key ensures that you receive regular updates from Microsoft, including security patches, bug fixes, and new features. These updates are critical for maintaining the performance and security of your system.
Enhanced Security and Privacy
One of the primary benefits of activating Windows 11 Pro with a genuine product key is enhanced security. The operating system includes advanced security features that are only fully functional with a genuine license. These features protect your system from malware, unauthorized access, and data breaches. Windows Defender Antivirus provides real-time protection against threats, while BitLocker encrypts your data to prevent unauthorized access. Windows Hello offers secure biometric authentication, ensuring that only authorized users can access your system. By activating Windows 11 Pro with a genuine key, you create a secure environment for your data and applications.

Avoiding the Risks of Counterfeit Keys
Using counterfeit or unauthorized Windows 11 Pro product keys can lead to serious consequences. These keys are often obtained through illegal means and may not activate your system properly. In some cases, they can expose your system to malware or other security threats. Moreover, Microsoft can detect and deactivate illegitimate keys, leaving you with an unusable system. By choosing a genuine product key with fast email delivery, you avoid these risks and ensure that your system is secure, stable, and compliant with Microsoft’s licensing terms. This guarantee provides long-term value and reliability.
Conclusion: Upgrade with Confidence
In conclusion, a Windows 11 Pro product key with fast email delivery is a convenient and reliable way to activate your operating system. A genuine key ensures that your system is compliant with Microsoft’s licensing terms, providing access to all features, updates, and support. The fast email delivery process makes it easy to obtain your key and activate your system immediately. By choosing a genuine product key, you avoid the risks associated with counterfeit software and ensure a stable and optimized computing experience. Whether you’re a professional, a student, or a casual user, a Windows 11 Pro product key is a valuable investment that delivers long-term value. Upgrade to Windows 11 Pro today and enjoy the benefits of a modern and reliable operating system.
0 notes
Video
youtube
Step-by-Step Guide: Installing Windows 11 on Hyper-V Virtual Machine on ...
In this comprehensive guide, you will learn how to install the official Windows 11 operating system on a Hyper-V virtual machine running on Windows 10. The step-by-step instructions provided in this video will make the process easy to follow, even for those new to virtualization. Additionally, this guide also includes tips and tricks to prevent TPM error messages during the installation process, ensuring a smooth and successful installation of Windows 11 on your Hyper-V virtual machine.
#youtube#Windows11 HyperV Virtualization Windows10 OperatingSystem InstallationGuide TechTips TPMerror VirtualMachine StepbyStep
0 notes
Text
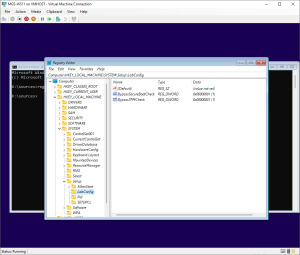
Bypass Windows 11 TPM Setup Checks
Quick one – I’m doing some testing in my home lab environment with Windows 11 and this box doesn’t have a TPM (so it’s not enabled in Hyper-V). Booting up the Windows 11 iso and trying to install will tell you that it’s unsupported. To get around that, load the setup as normal and once you reach the language and time screen press Shift+F10 to bring up the command prompt. Type regedit and hit…
View On WordPress
0 notes
Video
youtube
Installation de Windows 11 sur Hyper-V : Un Guide Complet
0 notes
Text
What's the difference between Windows server 2025 and Windows Server 2022
Windows Server 2025 download is available on the archive, and if you need the Windows server 2025 Product key and Server 2025 Cals , you can get it from the Microsoft partner store keyingo.com
There are key improvements in Windows Server 2025 in the following areas:
Hotpatching – rebootless patches
Active Directory – new scalability, domain and forest functional levels
Storage – Faster NVMe, new features added
Clusters and Hyper-V – Workgroup clusters, configuration maximums in Hyper-V
Networking – New Network HUD, multisite SDN, and more
Containers – Smaller containers, decoupled host and container updates
File Services with SMB Over QUIC & Security – QUIC now in Standard and Datacenter
Modern Server Experience – Winget, OS upgrades through Windows Updates
1. Hotpatching
It allows you to install security patches without a reboot. Every patch Tuesday patches are released. Hotpatching allows applying those patches without a reboot. It modifies the in-memory code and the server processes don’t have to be restarted.
Hotpatching was released in Azure Edition of Windows Server 2022. However, Windows Server 2025 brings to the realm of any type of infrastructure (Hyper-V on-premises, VMware, physical hardware, etc). Through Arc-enablement you can enable hotpatching as a monthly subscription.
XBOX is currently making use of this new rebootless technology with patching in their services.
2. Active Directory
Compared to Windows Server 2002, Active Directory is much more scalable with 32K page size. Before it was 8K pages. Now with Windows Server 2025 and 35K pages, it significantly enhances the amount of data that can be stored and the scalability of Active Directory in general. It will require the new functional level update (forest and domain levels)
3. Optimized NVMe storage enhancements
Microsoft mentions that just by upgrading to Windows Server 2025 you get 70% faster NVMe performance. Windows Server 2025 dramatically enhances the performance of data-intensive applications.
This helps with lower latency and higher throughput for applications and helps remove any bottleneck to performance from the storage layer.
Microsoft has also folded in a lot of other advancements that have come about on the storage front from Azure as they do with many of the LTSC releases. Those improvements include:
Storage Replica – performance enhancements and enhanced log, SR compression
ReFS – Optimized dedup and compression for active workloads like virtual machines
Storage Spaces – Thinly provisioned storage spaces and stretched cluster support
4. Clusters and Hyper-V
Compared with Windows Server 2002, there are many improvements for clustering and failover clustering. Now cluster-aware updating has many enhancements including:
Reliability and performance improvements
You can now upgrade to Windows Server 2025 from Windows Server 2022 without downtime. In the same fashion you apply new versions of Windows 11 it will run the update to newer versions of the OS. Windows Server 2025 will do the same thing.
Workgroup clusters (no domain join) – cert-based VM live migration now works without domain join
GPU-P VM live migration on a failover cluster
Storage Spaces Direct (S2D) stretch clusters between two sites
Improved storage replica (SR) performance
Hyper-V’s role in Windows Server 2025 is more powerful than ever. It has many enhancements in this release. The introduction of improved GPU partitioning capabilities allows for more efficient allocation of graphics processing resources among virtual machines. It is a feature particularly beneficial for applications requiring intensive graphical processing or machine learning tasks.
Microsoft touts that Hyper-V is everywhere and they are using across many technologies:
Azure
Azure Stack Family
Windows Server/ Windows
Containers with Hyper-V isolation
Platform security
Xbox
Dynamic processor compatibilities in Windows Server 2025 has been significantly improved. It is much more granular and looks at the capabilities between the processors and reducing the capabilities to match the processors.
Furthermore, there is greatly increased scalability with Hyper-V, It now supports up to 248 virtual processors and 240 terabytes of RAM, prepare Hyper-V. These features, coupled with the refined dynamic processor compatibility, make sure Hyper-V is a modern solution capable of handling anything you want to throw at it.
To take advantage of these new features, use Gen 2 VMs and UEFI BIOS.
5. Networking
There are many advancements coming in networking in Windows Server 2025 vs Windows Server 2022.
Network ATC one-click deployment and drift remediation
Network HUD – “heads up” display for networking
SDN Multisite – multisite for stretched cluster of SDN
SDN Gateway Performance Improvements
Modern AKS applications
6. Containers
Windows Server 2025 container support has been enhanced and is more flexible than Windows Server 2022. Host upgrades have been decoupled from container upgrades, making lifecycle management much more flexible for Microsoft Windows containers.
Performance has been improved along with image size reductions for containers. There is also improved application compatibility with Nano server with Features on Demand.
7. File Services with SMB Over QUIC & Security
SMB over QUIC is a huge improvement for remote file access technology. It enables encrypted file access over the internet without the need for a VPN. Windows Server 2025 addresses a critical need for more flexible and secure remote work solutions.
Features include:
SMB for telecommuters, mobile devices, cloud
No VPN required
Runs over standard port 443
Encryption is always on
Authenticated with TLS 1.3
Available in non-Azure versions, including Standard and Datacenter
It makes for new possibilities in how organizations manage remote access to their data. You can now offer a solution that is both highly secure and user-friendly. SMB over QUIC used to be only available with Windows Server Azure Edition. However, SMB over Quick has been brought into all editions of Windows Server 2025 (Standard and Datacenter) so that organizations of all sizes can benefit. These are only available in Windows Server 2022 Azure edition.
File services security improvements
There are many great security improvements, including:
SMB Signing – required by default and stop relay and attacker-in-the-middle, phishing
Auth Rate Limiter – throttle bad NTLM passwords by default
SMB Firewall rule hardening – No longer opens NETBIOS ports by default
SMB NTLM Disable Option – Granular control of NTLM from remote
SMB Dialect Control – Allow or refuse SMB 2 or SMB 3
8. Modern Server Experience
Winget is one of the coolest new tools that provides a “store-like” experience for Windows Server that is contained by default in Windows Server 2025 vs Windows Server 2022. Like we have been able to do with windows client machines running Windows 10 and 11, you can use winget to install tools and other utilities you need, including PowerShell.
You can easily install tools like Sysinternals (Process Monitor, Process Explorer, TCPmon, etc). You can even install apps like Microsoft SQL Server using winget. Also, there is OS Upgrades through Windows Updates and this is controllable through Group Policy.
Other miscellaneous modern server features
Arc integration wizards built-in
Wi-Fi support and Bluetooth support
Windows Server with Desktop Experience
New Subscription-based purchasing model.
Subscription model like Azure Stack HCI and SQL Server 2022
Conclusion
Windows Server 2025 is a great new operating system from Microsoft that includes all of the latest technologies and features that Microsoft has been previewing in Microsoft Azure for the last while. There are great new things in Windows Server 2025 compared with Windows Server 2022. It includes things like Hotpatching, new Active Directory scalability and performance improvements, including a new domain and forest functional level, new storage features, including NVMe performance improvements, networking enhancements, better container support and efficiencies, SMB over QUIC, and a modern Windows Server experience with tools like winget, OS upgrades through Windows Updates and others.
0 notes
Text
Linux Life Episode 84

Hello everybody and welcome back to Linux Life I admit its been a little while since I made an entry which was informing you of the death of Mangelwurzel and entry of the new Dell Inspiron 3525 I am currently using to type this article on.
Reason its been so long was I actually went back to Windows (stop spitting at back please it’s not pretty) because I wanted to play Blur and a few other games. Well I did and in that time I also tried several ways to have a Linux installation in some form of VM.
So first I used Virtualbox which is a Type 2 Hypervisor basically what that means is everything is emulated in its own little sandbox and all the hardware is virtual. I did manage to get Ubuntu Studio running but to say it was rough would be an understatement.
Virtualbox does not like KDE to say the least and it was painful to run. Also the networking was slow. Sure I could have used normal Ubuntu to see if GNOME was faster but for all I have tried it many times I really don’t like GNOME. Everything needs extensions and the interface is horrible.
Finding apps requires typing in a search because of that stupid Mac Launchpad icon design. I really detest it. I’m sure if you were using a touchscreen then it makes sense but most laptops definitely are not.
Anyway after far too many hours wasted with that I moved on to try Hyper V which is a Type 1 Hypervisor which allows much more connection to base metal components... it lets you use your actual graphics card, the hard drive can be accessed better and you have access to USB and the likes which makes it much better.
Now at the time I was using Windows 11 Home as that’s what came pre-installed on the Dell. So I had to download Hyper V as it wasn’t there by default. So first I try Ubuntu as Canonical have an agreement with Microsoft due to WSL.
Sure enough it installed and was pretty fluid but it had no sound. There was an enhanced mode which refused to work as to do so it needed RDS (Remote Desktop Support) which also prevented sound from working (Huh ?).
To get RDS you need Windows 11 Pro which Microsoft informed me if I wanted a key would be £119. Hmmm not happy obliterated Ubuntu VM. Went web-side got a Windows 11 Pro for £1.67 as it was OEM key. They key would have been £3.35 but I found a 50% off code.
After a bit of fiddling I got Windows 11 Home to go to Pro using a key to switch it then once it did that registered the new OEM key and it worked and guess what I have access to Remote Desktop Services.
So as I felt that Hyper V could cope I now tried installing EndeavourOS which installed without a single hitch. I admit the network was slow but a million times quicker than Virtualbox.
It had no issues with KDE whatsoever but once again no sound. I installed several Hyper V tools and things from the AUR. Even changed out pipewire back to pulseaudio but no matter what I did, sod all worked. RDS couldn’t see the VM even including doing the various Powershell tips.
Bugger all, now sure I could have run Endeavour without sound but I had come this far damn it. OK deleted VM. OK I now have Win 11 Pro so lets try the Ubuntu stuff again.
OK now enhanced mode shows a dialogue and when I log in screen goes black and bugger all happens. Click off enhanced mode and Ubuntu is working. Enhanced mode just black. Setup Ubuntu. reboot now enhanced mode doesn’t come up and even the VM crashes now.
This wasted too many hours and days of messing around. I even got the RDS side running but when I tried to Remotely Access using RDS it crashed. What a complete waste of bloody time.
I even tried running a Ubuntu Studio VM using VMWare Player 17. It didn’t work.
I doing think about setting up a KVM version of QEMU to run a Linux installation but guess what if you want sound on QEMU you need to get a specific version called the Screamer and it won’t let you use KVM setup meaning it wouldn’t allow you to install the Linux.
By this point I just gave up I honestly don’t care what type of Hypervisor it is I am obviously too thick to get things running as they should and I gave up.
I almost tried Proxmox and XCP-NG but upon seeing what they entailed just gave up.
After all that I thought I would leave alone and just use Windows. Then everyone started informing my Facebook had been cloned, well lets just say that didn’t happen when I had Linux.
The internet under Windows just ran slower than when I had Linux. Watching YouTube stalled regularly, downloads failed due to time out and my frustration levels were getting to breaking point.
I tried to dual boot Linux as I found out how to shrink the partition in Windows and use it for Linux installation. So tried EndeavourOS but because of the Secure boot it wouldn’t let the system install.
However for some reason Fedora will install if Secure boot is still on. So I installed Fedora Beta 40 because I wanted to try the new KDE Plasma 6. Now I know it’s beta software so not to have many expectations but most of the software I use was not in the store nor could I find the appropriate dnf installer.
However Fedora now would boot but my Windows 11 wouldn’t the partition was there but it didn’t add it to the menu so now I could load Fedora but Windows wouldn’t load.
Tried OS Prober, Grub Customizer, no matter what I did could not get the Windows 11 partition to boot or get it in the options
Pissed off now I finally turned off Secure boot. Wiped the whole hard drive and installed EndeavourOS Galileo Neo (the latest version) and set up the Dell with KDE.
It now is running on KDE 6 Plasma 6.0.2 running Wayland. It is running seamlessly, the internet is quicker. No issues with YouTube. Updating fine. When I tried KDE 5 Plasma Wayland, Steam and several other programs stopped working.
Well Steam is working fine using XWayland (a Wayland to X11 bridge) and there is a version of Cairo Dock that works with Wayland (it is experimental but so far has not died on me).
So all is right with the world in that respect. Only issue is screen capture isn’t great in Wayland but someone is working on it. OBS and other video capture work fine but screen capture programs such Flameshot, Shutter and other need work.
Well Wayland is slowly being adapted so in time I am sure these things will be fixed over the next few months as more and more main distros seem to be moving to Wayland.
It works well enough and to be honest it's even faster for program launch it seems than the original X11 which is now over twenty years old.
I am yet to try the Steam Proton games such as Path of Exile but who knows maybe next time we speak I may have done so.
So with all that madness abound I bid you farewell for this episode.
Hopefully I will try not to break anything major... until next time take care.
#linux life#ubuntu#ubuntu studio#virtualization#virtual machines#hyper v#virtualbox#wayland#x11#waffle#steam
1 note
·
View note
Text
How to Fix BlueStacks Problems
Error 1: Incompatible Windows Settings Error Message
While using the Android 11 (Beta) or Nougat (32-bit) versions of BlueStacks 5, you will get the “incompatible Windows settings”pop-up message. Also, you can get an error message that reads; your Operating System is not supporting Nougat 32-bit/Android 11 (Beta) when creating a new Instance. This happens on the Windows system with Hyper-V, which has enabled Microsoft’s hardware visualization product.
Solutions to Fix the Issue
The first method is to utilize a different version of the BlueStacks emulator. Move to the official BlueStacks download page and hit the Download a specific version tab. Choose either Nougat 64-bit or Pie 64-bit; these versions support Hyper-V.
If you wish to use the latest version of Android (Android 11 Beta), you must disable Hyper-V on the system. Launch the Control Panel, hit the Programs tab, and pick Turn Windows features on or off. On the menu, untick Hyper-V, Windows Hypervisor Platform, Virtual Machine Platform, Windows Sandbox, and Windows Subsystem for Linux. You should restart the PC. Launch BlueStack to check if it works.
Sometimes, users might also need to disable Memory Integrity. Move to the Setting tab, choose Privacy & Security> Windows security, and tap the Open Windows security button. Next, navigate to Device Security, hit the Core isolation details tab, and turn off Memory Integrity. Note that this service helps stop attacks via malicious code, so turn off this service at your own risk. If you do not wish to take a chance, choosing a BlueStacks version compatible with Hyper-V is best.
A quicker method to turn off Hyper-V on your device is through the Command Prompt. Write “cmd” in the search box and tap the Run as administrator button in the menu. Then write “bcdedit /set hypervisorlaunchtype off.”
BlueStacks emulator also eases the procedure by offering a .exe file that users can download and use to disable Hyper-V.
Error 2: Device isn’t Compatible with this Device Message When Installing Apps
Sometimes, users may get a “device is not compatible with this device” message while downloading apps via the Play Store in BlueStacks.
Solutions to Solve the Error
The best method to solve this issue is to change the device profile. In the BlueStacks emulator, launch the Settings menu under Predefined profile, move to Device, and select another device from the list. You can try different options until you get a device profile where you do not see the incompatibility error.
Also, you can clear the Google app data to solve the problem. Launch the System apps on the home screen and hit Settings (note: these are Android settings). Hit the Apps tab and launch the Play Store. Tap the Storage button and choose the Clear app data option. After confirming the selection, you can install the problematic app.
Error 3: Installation Failed or BlueStacks not Opening Error
Users may get error codes when installing or running a game on BlueStacks or launching the app. A few users also encounter a problem when installing BlueStacks.
Steps to Fix the Error
If you have issues downloading or launching BlueStacks, confirm that your computer fulfills the lowest requirements of the app. This includes an Intel or AMD processor, Windows 7 or higher, 5GB of free storage, 4GB of RAM, updated graphics drivers, and computer administrator access. Of course, the lowest requirements might not provide the best experience. BlueStacks suggests a computer with Windows 10 or higher, an Intel or AMD multi-core processor with a one-thread benchmark score of more than 1000, SSD storage, a Broadband Internet connection, and 8GB of RAM.
Confirm that you have enabled Virtualization on your computer. A straightforward method to check is by utilizing the Task Manager. Write Task Manager in the search box, or hit the Ctrl + Shift + Esc keys to open it. Move to the Performance tab, and you will see Virtualization: Enabled. If you have disabled it, you must enable virtualization to utilize BlueStacks. The procedure relies on your computer manufacturer.
If you cannot open BlueStacks, dedicate more RAM to the app and CPU cores. Launch the BlueStacks Multi-instance Manager and hit the Settings tab. Navigate to the Performance tab and choose High (4 cores) under the CPU allocation tab and High (4GB) under the Memory allocation tab. BlueStacks suggests the settings for the graphic-intensive games. If users can open BlueStacks but have difficulty launching a game, they can switch the allocation within the app. Launch the BlueStacks setting, move to the Performance tab, and select these settings. Also, you can pick the Custom option and allocate more RAM and cores, but confirm that you do not allow all the RAM and CPU cores to BlueStacks. Also, choose the High-Performance option from the performance mode list. Hit the Save Changes tab and relaunch the app.
The anti-virus program of your device can also interfere and create installation issues with BlueStacks not launching.
Error 4: Error 2318 When Uninstalling BlueStacks
A few users obtain an error message (error 2318) when uninstalling BlueStacks. This issue generally pops up due to corrupted registry keys.
Solutions to Resolve the Issue
BlueStacks provides a dedicated Uninstaller program you will get in the installation folder. It may be better to utilize this program to uninstall BlueStacks instead of doing this via the settings menu on Windows.
The Windows Installer program may be a problem, but users can restart it. Write “cmd” in the search box to launch Command Prompt and hit Run as administrator from the menu. In Command Prompt, write net stop msiserver to stop Windows Installer, then write net start msiserver to reboot the service. After this, try uninstalling BlueStacks like other Windows apps and check if it has fixed the issue.
If the issue is due to corrupted registry keys, users can remove them. Launch the Registry Editor (write reg in the search box). You may need to backup the registry to avoid the problems. Choose the Files options and hit the Export tab in the toolbar. Give the name of your backup file and choose the All option in the Export Range box. After this, hit Ctrl + F to launch the search window and write bluestacks. Delete every visible BlueStacks registry key.
Error 5: Hardware Decoding isn’t Accessible on BlueStacks
While utilizing hardware decoding, the GPU of the computer is essential to provide compressed textures and typically offers a better gaming experience. However, some users encounter the grayed-out hardware decoding option and are unavailable or do not utilize the dedicated GPU even when chosen.
Remedies to Fix the Issue
This could be an issue with hardware compatibility. Users of AMD GPUs report issues when using hardware decoding, while users of NVIDIA GPUs do not face this issue as much. Contact BlueStacks customer support to ensure whether the dedicated GPU will permit hardware decoding.
Settings issues can also be why the hardware decoding is unavailable.
Confirm that you have set up all for BlueStacks to utilize your dedicated GPU. Move to the BlueStacks settings, choose Graphics > GPU in use, and turn on Prefer dedicated GPU. Once you relaunch BlueStacks, you will see your dedicated GPU in this section.
Also, you can change settings via Windows. Look for Graphics settings in the search box or hit Settings > System > Display > Graphics and choose the Browse option under the Graphics performance preference tab. In the location search section, look for the folder where you have installed BlueStacks, choose HD-player.exe, and hit Add. When added, select BlueStacks on the menu and tap Options. Choose High Performance (with a dedicated GPU) and save the setting.
Hardware decoding is not accessible with DirectX. Move to the BlueStacks settings tab, hit Graphics > GPU renderer, and choose the OpenGL option. Select the Hardware decoding option from the ASTC textures menu on the Graphic setting screen. If your dedicated GPU is incompatible, you will get a “Hardware decoding isn’t available” error pop-up in this section.
Error 6: Google Play Store Login Problems
Users encounter some problems when logging into the Google Play Store on BlueStacks. While a few login errors have particular solutions, the best way to solve this issue is to clear the app cache. Launch the System Apps folder in BlueStacks, move to the Settings tab, tap Apps > Play Store > Storage, and hit Clear cache.
Solutions
Having a problem on the loading screen when logging in or a ” Could not sign-in error: The anti-virus program in your device may interfere with BlueStacks running properly. Configure the program utilizing the right settings.
Black/white login screen: This occurs when your graphics setting on BlueStacks does not match the system specifications. Navigate to the BlueStacks settings tab, choose the Graphics option, and change settings such as Graphics engine mode, interface renderer, and Performance mode to other options. Reboot BlueStacks and check if the issue goes away.
“Authentication required/Validate it’s you” issue: If you get this issue, clear the Google Play app cache and delete the Google account before signing in again. To delete the Google account, move to the System app tab and hit Settings > Account. Choose your account and tap the Remove Account option. Return to the previous screen, tap Add account, and specify the login credentials.
“This device is not Play Protected” issue:This issue generally shows if you use a custom device profile. Navigate to BlueStacks settings > Phone, move to Select a predefined profile, and choose any of the phones from the list.
How to sign in without a Gmail account: You can access BlueStacks with a non-Gmail account but must open a Google account connected to that email address. Move to the Google website and hit the Sign-in tab at the top. Tap the Create Account button. Specify your information and choose the Use currency email account instead option. Provide the non-Gmail address and follow the validation procedure. After setting up the account, you can sign in to BlueStacks with this email account.
Error 7: BlueStacks is Slow
BlueStacks might be resource-heavy, based on what applications you are using, and there are situations when you find it laggy or slow.
Tips to Solve the Problem
Users can enhance the performance of BlueStacks by allocating more RAM and CPU cores to the app. Hit BlueStacks settings > Performance and select High (4 cores) and High (4GB). Also, you can choose Custom to select more RAM and cores, but do not allocate all RAM and CPU cores to BlueStacks. Confirm that you have set High performance in the Performance mode list.
Anti-virus programs can also create performance issues.
Ensure you have enabled Virtualization to get the best experience.
Also, you can enhance performance by empty RAM. Launch Task Manager by hitting Ctrl + Shift + Esc and close the idle or unwanted apps in the background. Apps such as Google Chrome are a notable issue in this regard. Choose the app you need to close and hit the End task button.
Error 8: Can’t Install APK Issue
You can get a “Can’t install APK” error message if the app or game you are installing is not compatible with the Android version of BlueStacks you are using. It will happen if you use the older versions, such as Android Pie 32-bit.
Tricks to Fix the Error
The way to play a game or utilize an app that is not compatible is by opening a new instance with the latest version of Android. Launch the Multi-instance Manager ( a three-layer tab at the right, two above the gear icon), hit the Instance tab, and choose Fresh instance. Select the latest Android version from the available list, like Android Nougat (64-bit) or Android 11 (Beta). If you haven’t installed these, you must download a few additional files and choose settings like memory allocation, CUP allocation, performance mode, resolution, and others for this new instance. Tap Download to generate a new instance, then hit Start on the Multi-instance Manager page. Now, you must be able to install the APK with issues.
Some Common BlueStacks Problems
BlueStacks features a weekly running list of issues and bugs that it solves so that users can check to see the solution for their issues.
Advertisements
about:blank
REPORT THIS AD
Users with Mac can encounter the “System extension blocked” error. Older Macs with M1 processors, MacOS 13 Ventura, and Macs running MacOS 12 Monterey do not support BlueStacks. Users can report an error by tapping the “?” icon in the BlueStacks app window and choosing the Report a problem option. Choose the issue type, specify other information, and hit the Submit a Report button. Also, you can download the BlueStacks 5 Log Collection Tool to offer an issue log if you encounter problems with BlueStacks not downloading or launching.
Source:https://hariguide.com/how-to-fix-bluestacks-problems/
0 notes
Text
How to uninstall Hyper-V on a Windows PC
In the last article, we discussed how to “Run Hype-V on Windows 11 and Install Windows OS via PXE Boot“. This can be done in many ways including using the Windows control panel, PowerShell or using the Deployment Imaging Servicing and Management tool (DISM). But in this article, we shall discuss How to uninstall Hyper-V on a Windows PC. Please see how to fix “An error occurred while attempting to…
0 notes
Text
Watch "Install windows 11 in hyper v - fix tpm 2.0 security boot error" on YouTube
Watch “Install windows 11 in hyper v – fix tpm 2.0 security boot error” on YouTube
youtube
View On WordPress
#how to install windows 11#how to install windows 11 in hyper v#how to install windows 11 on pc#how to install windows 11 on virtual box#how to install windows 11 on vm#how to install windows 11 on vmware#how to install windows 11 on windows 10#how to solve secure boot problem in windows 11#how to solve TPM 2.0 Error in windows 11#install windows 11 in hyper v#install windows 11 on hyper v#install windows 11 on top of the windows 10#Install Windows 11 on Windows 10 Hyper-V#install windows 11 on yper v#Installing windows 11 using Microsoft Hyper V Bangla Review#tpm 2.0 fix#tpm error windows 10#windows 11#windows 11 installation#windows 11 upgrade from windows 10#Youtube
0 notes
Text
Why Choose Windows 11 Professional for Your System
The operating system you choose determines how your computer performs every day. Windows 11 Professional is Microsoft’s most advanced OS for business users, tech enthusiasts, and professionals. Its features improve security, productivity, and flexibility. If you're thinking about upgrading your setup, this version is well worth considering.
What Sets Windows 11 Professional Apart?
Windows 11 Professional is designed for serious users. While the Home edition works well for general use, Professional offers advanced tools. These tools are critical for developers, small businesses, and IT professionals.
Some key features include:
BitLocker encryption for improved security
Remote desktop access for remote work flexibility
Hyper-V for virtual machine management
Group Policy support for better device control
Windows Information Protection (WIP) for data loss prevention
Each of these features improves workflow while maintaining top-level system security.
Advantages of a Windows 11 Pro Key
If you're planning to activate this OS, using a valid Windows 11 Pro key is essential. This license unlocks all premium features and gives you peace of mind. It also ensures that you receive regular security and performance updates directly from Microsoft.
A Windows 11 Pro key gives lifetime access to the OS on a single device. Whether you're building a new PC or upgrading an older system, this key provides full functionality. Activation is simple and takes just minutes.
Windows 11 Professional and Business Users
For business users, security and system stability are top priorities. That’s where Windows 11 Professional shines. With support for domain joining, Microsoft Azure Active Directory, and Windows Update for Business, it fits perfectly into any business IT infrastructure.
These features reduce downtime, automate updates, and improve overall control. Companies with multiple devices benefit from seamless integration with cloud services and centralized management.
Getting the Most Out of Your License
Once you purchase a Windows 11 Pro key, the installation process is quick. First, make sure your system meets the minimum hardware requirements. Then, download the official Windows 11 ISO file, install it, and enter your key during setup.
If you're already running Windows 10, upgrading to Windows 11 Professional is even easier. You only need to enter the new product key under system settings and restart the computer.
Buying from trusted sellers is also important. Reputable vendors like SoftwareBase.uk provide authentic keys with guaranteed activation.
Subheading with Keyword: Benefits of Using Windows 11 Professional
Windows 11 Professional isn’t just for tech pros. Even freelancers and remote workers benefit from its advanced functions. The OS provides smoother multitasking, better memory management, and improved battery optimization for laptops.
It supports more RAM than the Home version, which is a must for resource-heavy applications. This makes it ideal for users who run design software, code editors, and data analytics tools.
Gamers may also benefit. Though it’s not marketed primarily for gaming, Pro includes support for DirectStorage and AutoHDR, enhancing performance and load times.
Windows 11 Pro Key vs. Home Key
While both versions look similar at first glance, the real difference lies in the core functions. A Windows 11 Pro key activates many professional features not found in the Home edition.
For example, Windows Sandbox is a useful tool available only in the Pro version. It allows you to run suspicious apps in an isolated environment without risk to your main system.
In addition, Pro supports multiple remote desktop sessions and allows easier access to shared files across networks. This is ideal for teams working in different locations.
Keep Your Data Secure
In today’s digital world, cybersecurity matters. Windows 11 Professional includes Microsoft Defender Antivirus and TPM 2.0 support. It also supports hardware-based security like Secure Boot and core isolation. These features protect against malware and unauthorized access.
Encryption tools like BitLocker keep sensitive files safe even if your device is lost or stolen. If you handle confidential data, this is a must-have.
Is Windows 11 Pro Right for You?
If you only use your PC for browsing, streaming, and simple tasks, the Home version may be enough. But for professionals, students, or small business owners, Windows 11 Professional is the smart choice.
It’s built for users who want more control, better performance, and top-tier security.
Final Thoughts
Choosing the right operating system affects your daily productivity and long-term performance. If you’re serious about getting the most out of your PC, Windows 11 Professional offers unbeatable value.
With enhanced security, system control, and powerful tools, it’s more than just an OS—it’s an investment in your future efficiency.
Don’t forget to activate your copy using a genuine Windows 11 Pro key from a reliable source. That ensures long-term support, system stability, and peace of mind.
0 notes
Text
Enable virtualization to run multiple ststems on Windows 11
2 notes
·
View notes
Text
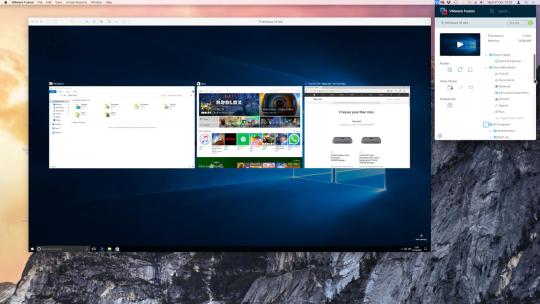
Vmplayer For Mac

Vmware Player For Mac
Vm Player For Mac Os
Free Vm Player For Mac
There is no version of VMware Player for OS X. Instead, VMware sells a Mac version of their product called VMware Fusion. You may use it as trial version 30 days for free If you don't want to purchase VMware Fusion, you can. VMware Fusion: Powerfully Simple Virtual Machines for Mac VMware Fusion Pro and VMware Fusion Player Desktop Hypervisors give Mac users the power to run Windows on Mac along with hundreds of other operating systems, containers or Kubernetes clusters, side by side with Mac.
For Hyper-V Enabled Hosts:
CPU Requirements:
Intel Sandy Bridge or a newer CPU
AMD Bulldozer or a newer CPU
Host Operating Systems:
Windows 10 2004
Minimum Requirements to Run Container Runtime on workstation Windows Host Operating Systems:
Windows 10 1809 or higher
Minimum Requirements to Dark Theme support on Workstation Windows Host Operating Systems:
Windows 10 1809 or higher
For 3D Hardware Accelerated Graphics Support:
Despite Apple's plans to move the Mac to Apple Silicon processors, there are still plenty of options available for people who need to run Windows software or games on their Macs. In this article. With many uses ranging from a personal educational tool, to a business tool for providing a simplified experience to run a corporate desktop on a BYO device, Workstation Player leverages the VMware vSphere Hypervisor to provide a simple yet mature and stable, local virtualization solution. Buy Workstation Player Today.
Hardware Requirements:
For Windows hosts, a GPU that supports DirectX 11 is required.
For Linux hosts, the latest NVIDIA proprietary drivers are required.
For Linux hosts, AMD devices are not supported
Software Requirements:
64-bit Host Operating System:
Windows 8 or higher
GNU/Linux with NVIDIA drivers that support OpenGL 4.5 and above
Guest Operating System
Windows 7 or higher
GNU/Linux with vmwgfx
*With exception, the following CPUs are not supported:
Intel Atom processors based on the 2011 “Bonnell” micro-architecture (e.g. Atom Z670/Z650; Atom N570)
Systems using Intel Atom processors based on the 2012 “Saltwell” micro-architecture (e.g. Atom S1200, Atom D2700/D2500, Atom N2800/N2600.
Systems using AMD processors based on the “Llano” and “Bobcat” micro-architectures (e.g. code-named “Hondo”, “Ontario”, “Zacate”, “Llano”)
In addition, the following CPUs are supported:
Intel processors based on the 2010 “Westmere” micro-architecture (e.g. Xeon 5600, Xeon 3600, Core i7-970, Core i7-980, Core i7-990)
For a complete list of supported host and guest the operating systems visit the VMware Compatibility Guide.
If your machine is part of the mainstream configuration, you can discard the traditional real native partition installation method, while the use of virtual machine method described in this article, not only greatly reduce the problems encountered difficult, but also in the use of Mac OS X to get the experience is excellent the. (This tutorial configuration needs: support hardware virtualization technology (Virtualization) of the CPU. Current mainstream Intel Core series and AMD Athlon series CPU virtualization technology is supported, the name was Intel VT-x and AMD-V.)
Description of the whole process
Preparatory work Installing VMware Crack VMware supports Mac OS X In VMware Install Mac OS X Finishing work late
Preparation
This tutorial method used by the virtual machine, provided that the machine's CPU must support hardware virtualization technology. Readers can be CPU-V or CPU-Z and other tools to test the result. Open CPU hardware virtualization technology can be turned on via the motherboard BIOS settings.
Download and install VMware Workstation VMware can go to the official website or on the ed2k network search download (recommended). Described here no longer compile.
Apple systems on Mac OS X installation disc image, use the dmg format of the original image. I recommend to search for ed2k network download (recommended), the keyword is 'Mac OS X Mountain Lion dmg' or 'Mac OS X Lion dmg'. Described here no longer compile.
Vmware Player For Mac
Crack VMware Workstation supports Mac OS X Here we need to use the tool 'Workstation and Fusion Mac OS X Unlocker'
VMware Workstation and complete the installation after the restart, completely unpack Unlocker compressed package to the administrator mode windows/install.cmd.
Unlocker will automatically stop VMware services, backup VMware program files, program files crack VMware, restart the VMware service and a series of operations, and will automatically end the command line window.
After the break VMware has created a virtual machine system selection dialog:
Create Mac OS X, VMware virtual machines
After Unlocker crack, start VMware Workstation normally create a virtual machine, select 'Apple Mac OS X' (depending on the Mac OS installation disk in the system, select the corresponding version of the correct version, here I use a Mac OS X Mountain Lion, version 10.8 64-bit). Creation process has the following non-default configuration:
(1) in the processor options, select 'Number of cores per processor (each processor cores)' for the two, which can induce a VMware virtual machine automatically enables advanced hardware virtualization technology.
(2) after created, first click on the 'Edit virtual machine settings', the hardware's 'Floppy' delete option is enabled in the display 'Accelerate 3D graphics'.
(3) In Virtual machine configuration, in the Advanced Settings, set the priority of the input capture 'high', and check 'Disable memory page trimming.
With a text editor (such as Notepad) to edit the virtual machine files (where the author is E:Program Files(x86)Virtual_MachinesMac OS XMac OS X.vmx), add a line at the end of the file:
This operation is used to disable the VMware virtual machine is placed on your hard disk memory mirroring prevents the virtual machine hard disk read and write operation occurs during the busy horrors.
Start the VMware virtual machine and install Mac OS X
Edit the virtual machine configuration 'CD / DVD' option in the 'Use ISO image file' at the choice of our Mac OS X installation disc image. (Please select the browse file dialog box when the file type, select 'All Files (*. *)', You can see the file name suffix for the dmg image file.) Confirmation is complete, start the VMware virtual machine.
Start the virtual machine, the virtual machine default boot from the CD, the Apple Logo appears after officially came to Mac OS X installation interface.
Vm Player For Mac Os
In the 'Mac OS X Utilities' select 'Disk Utility', select the first hard drive on the left and on the right select 'Erase' (the 'Format' select 'Mac OS X Extended (Journaled)'), Click the 'Erase' button to format the current drive.
After formatting the hard disk partition, back to 'Mac OS X Utilities' and click 'Install Mac OS X', enter the installation process.
Completed in a VMware virtual machine after installing Mac OS X, the first thing of course is to install VMware Tools. VMware Tools includes the VMware virtual machine 'hardware' drive, the virtual machine and the host communication between functional support.
Free Vm Player For Mac
Tools used herein Attachments Download
1 note
·
View note