#just wanted to stack some pngs
Text


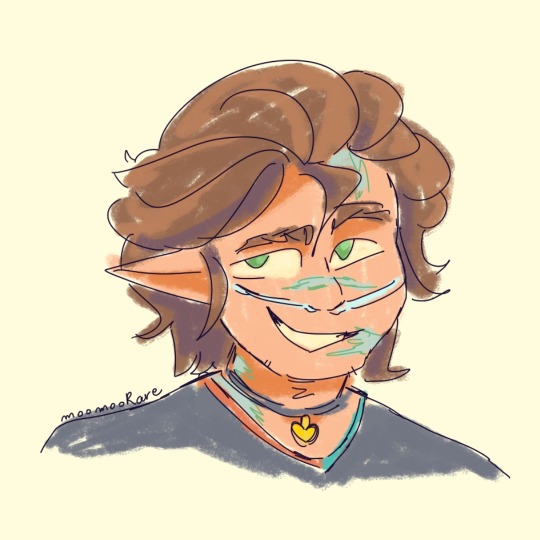
pearlcatcher pthursday. pearlcathursday. pursday
64 notes
·
View notes
Note
Any chuuya icons in a soft pink and can you recommend tips on how to start making rentrys

sure thing!! i’ll put your request up top, but the tips can be found under the cut!!

♡ — posted !

so there’s a few components to making rentries!! here’s a few of the bigger ones. if you need any specific details on anything let me know!!
finding inspo : pinterest is one of the best places for this!! just search “rentry inspo” and you’ll get hundreds of results!! i also post some rentry/sntry inspo on @holybunnie (as well as some of my own psds) if you wanna check it out!!
image masks : for image masks for graphics, i recommend searching “rentry image masks” on pinterest, or checking out my png board. this carrd has some realli neat masks as well!!
pngs : as for little cute pngs to add to your graphics, i recommend picsart stickers!! pull up a transparent background in the app (it should be titled “blank”) and search for whatever you want in the sticker tool search bar! for the best results, i recommend searching “color png”!!
creating your graphic : photopea (free website version of photoshop) and ibis paint x (app) are your best friends!! i recommend ibis paint x for beginners, while more advanced editors may appreciate photopea for its ability to, well, behave much like photoshop would in the photo editing department! for me personally, i used to use ibis paint x (see @digichu) while now i primarili use photopea!! to make a very simple graphic, import your mask and whatever image you want for your graphic. then (assuming the background doesn’t need to be removed or you alreadi did so) use a clipping mask!! your image while now adhere to the shape of your image mask! isn’t that neat?
gif-ing your graphic : if you’d like to give your graphic more pizazz ezgif (website) is another one of your friends!! there are two types of gif graphics you can make in ezgif. you can select the “crossfade frames” option in the animated gif maker to have multiple images fade into one another, or you can hit the “don’t stack frames” option to have a png appear to move! to have the second effect in your graphic, you’d need to save two of the same graphic, with the only difference being one of the accent pngs is rotated a bit.
finding pixels/dividers/etc : there’s a ton of resources out there for finding these. some of my personal favorites would have to be my resources blog (@digitalita), my resources discord server (which has a ton of masterlists and resources rentries within), my resources rentry, and pixelprism!!
putting it all together : the age old saying realli is true, practice does make perfect!! my first rentry (which i don’t think i still have screenshots of or anything) was realli, realli bad. the graphic wasn’t even a graphic, it was literalli just a cutecore edit of strawberri cookie i found on pinterest. there was no image masking, no gif-ing, and certainli no psd-ing. if you’re feeling silli, look at my templates from @digichu compared to the ones i make now!! the difference is wild right? i feel like those were only made like a year ago at most. don’t beat yourself up about not having the perfect rentry. if you need more specifics about anything i said here, please let me know.

88 notes
·
View notes
Note
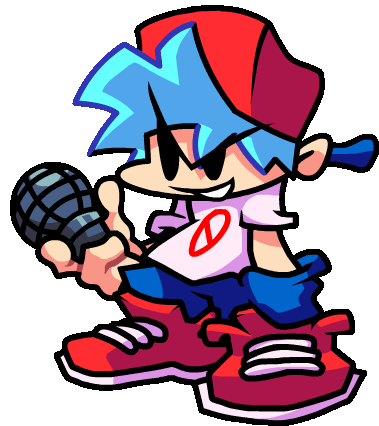
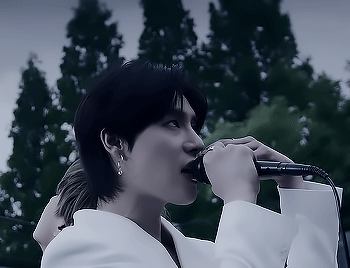
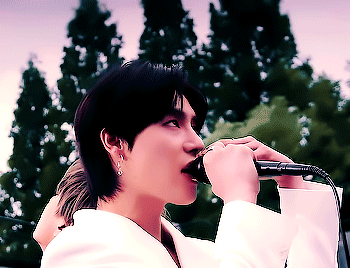
what program did you use to make the looping achievementlass gif? it looks amazing!!
thank you, i'm really happy with how it turned out!!
I used a program called AnimeEffects! this video is really good at explaining how it works/how to use it:
youtube
additional notes:
I can't remember if this was specified in the video, but when drawing it (in an art program of your choice; I use FireAlpaca) make sure each individual body part that you plan to animate is on its own layer. and then save as a psd. you don't have to name or sort the layers but it helps a lot
also DON't export it as a gif. to quote my friend: "the quality is actual trash garbage and it doesn't export as transparent either"
INSTEAD try exporting as a PNG Sequence @ 30 fps (preferably in its own folder just so everything is all in one place without extra files muddling it up)
slap the pngs together using ezgif. it may take a while to load depending on how many frames you have but it will eventually just give it some time. then set the Delay time to 3

also remember to check "don't stack frames" otherwise the previous frames won't disappear. unless that's specifically what you want it to do

aand you got your own gif the end !! ✨✨
121 notes
·
View notes
Text
I'm Opening Commissions Once Again!!!!!
Hey y'all! I'm likely gonna be running into work issues real soon and need to get some extra money. If you've been following me a while you've probably heard me talk about not planning on ever doing commissions again, but desperate times and all that.
ADDITIONAL SECRET SALE [aka I forgot to write it on there...]: If you show me proof of a donation of $20 or more to the PCRF, I'll knock 25% off of ANY commission.
More Details Below the Cut!!!
What I will and won't draw:
I will draw, mechs, furries, Sonic characters, complicated armor and clothing. However these may be subject to change in price for extra detail.
I will draw gore, blood, and mildly suggestive art (including partial nudity). However on account of gore, I will not allow self harm injuries or heatshot wounds.
I will not draw NSFW, porn, or fetish art. Sorry! Maybe someday!
I will not draw anything I find might be offensive and I reserve the ability to decline a commission request for ANY reason. Feel free to ask anything if you are unsure.
Payment
I accept payment through Paypal and Venmo, payment must be in USD. After I complete the initial sketch for your commission I will ask for a down payment of $5USD, this payment comes out of the final price! Tips are greatly appreciated as well, but please make a note of it so I know there wasn't a mistake on your end!
Additional Characters:
For lined drawings each additional character is the base price minus %30. For render style 1, each additional character is the base price minus 15%. Additional characters in render style 2 are however the same as the base price, digital paintings take a long time.
About Sales
I have two ongoing sales currently available, Sonic art and Final Fantasy VII art. All sales apply to the full price of the piece, so if you have extra detail or background charges, the sale will apply to the full price PLUS these charges.
And of course, if you'd rather I draw a character that you or a friend created, so long as they are designed to be from either Sonic or FFVII, they are included in these two sales.
For proof of donation to the PCRF I only need to see your email confirmation showing the amount you donated, feel free to redact your name if you want.
All three current sales can stack to a maximum of 35% off!
All sales however have a minimum of $5USD, you have to pay me at least SOMETHING..
All sales end on April 1st! If I start working on your commission before that date, the sale will apply to your total even if I finish it AFTER April 1st.
About Backgrounds
I am absolutely happy to do backgrounds, for a price! The price of backgrounds is highly dependent on what you want so I can’t really put estimates here. Please know this can vastly extend the time I would require to finish the piece which may affect refunds.
By default, all of my drawings will be transparent PNGs with a solid color BG variant. If you would like a gradient background, those are completely free! Just ask!
Timeline and Refunds
Art takes time, for me as a disabled artist, it's a bit more time than many other artists I know.
Commissions are first come first serve, so please know that I can only get to you when I finish anyone else on the waitlist before you.
If I do not finish your piece in 30 business days, I will refund your down payment, regardless of how far in I am.
If you have any other questions just ask! Thanks so much!
33 notes
·
View notes
Text
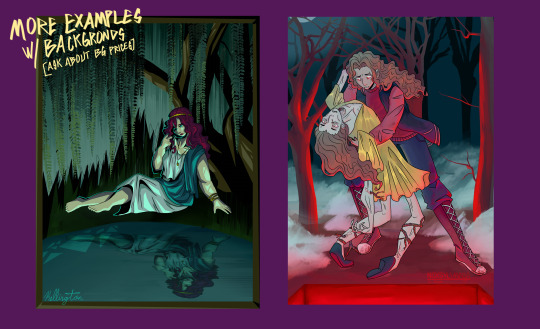
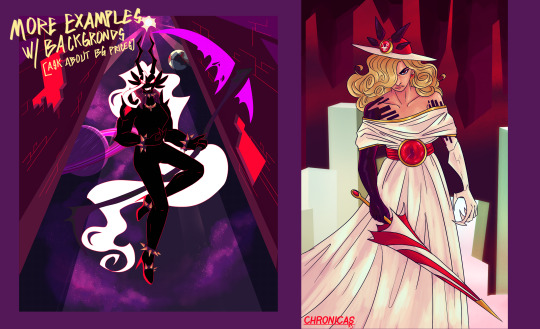
Opening cheap commissions because I really need money!
References and prices ↓ :D
(tap for better quality, tumblr tends to compress quality when images are stacked)
sketchline type! 5-7 € (depending if you ask for half or full body)


sketchy and colored: 10 € (for half and full body)


clean and rendered: 22 € (bust only)


you can ask for more characters but each addition adds half the price of the initial price ( ex. sketchy + colors is 10 and with another character i'd add 5)
If you're curious I will draw slight nsfw (non-sexual nudity, and boobs), slight gore, but won't draw hateful imagery or complicated backgrounds. You can choose any color you want as background, or PNG :).
my p4ypal is: moomoorare and my email is [email protected]
If you just want to donate a few bucks here's my ko-fi :>
And some more art I've made!! :]


If you can't commission,
please reblog! That'd help me out a lot <3
#had to remake bc an anon told me the otehr post would be cut as read more and tehyre so right#i added more examples#i feel annoying for posting it twice but i kinda really need it#to amke up for it next month I'll do something cool :D art requests :]#rare commission#rare rambling#art commisions#art commissions open#commission#comm info
26 notes
·
View notes
Note
you probably get this all the time but your neocities site is so amazing, do you have any advice/resources for people who are new to html/css or just coding in general, i eventually really want to achieve the same sort of perfectly cluttered vibes but I don't know where to start 😵💫 your site is seriously impressive!
aw thank you!!!
main html/css advice would be if you don't know how to do something/something breaks, search it on the internet! w3 schools and stack exchange are your best friends. also like everyone on neocities im gonna point you towards sadgrl, who has a ton of resources for this kind of stuff. my in general coding advice would be to start with a relatively easy language, but imo html is a PERFECT starting point so you're already on the right track.
AS FOR WEBSITE SPECIFIC ADVICE.... I have a few things :)
1. GO INTO IT KNOWING WHAT YOU WANT TO MAKE AND HOW YOU WANT IT TO LOOK!! this saves SO much time and heartache. I spent maybe a good 4 months debating what I wanted my site to look like before I actually started coding, and I'm glad I did. which brings me to my next point..
2. draw out a thumbnail of what you want your site to look like! try drawing a few different ideas too, it'll save you time if you draw them instead of code them in.

[Image description: A pencil and paper thumbnail for the site on the left, and the finished site on the right. The overall layout is the same for both.]
3. i highly recommend learning how to use iframes if you plan on doing a container-based layout! this is especially useful for graphic heavy sites like mine since it helps cut down on loading times
4. position: absolute and left:...px/top:...px are your besties. this positions a div wherever you want on the page (relative to the dimensions of whatever div its in) and keeps it there. great for positioning images like stickers!
5. this might just be a me thing but REUSE YOUR CSS CLASSES AS MUCH AS POSSIBLE AND CUSTOMIZE THEM WITH HTML... if it's like 1-3 properties difference I don't like to make a new class because after a while the stylesheet gets rather lengthy. my stylesheet on odditycommoddity is so fucking messy because I didn't know i could do this starting out lmao
6. last one and most important imo.... USE AND EXTERNAL CODE EDITOR!!!!!! WHY DOES EVERYONE USE THE NEOCITIES EDITOR IT SUCKS ASS.. check out BRACKETS, it's open source and free and very sexy. if you're on a chrome book check out PHEONIX, which is web-based and by the same people. using an external editor makes it easier to jump between files, and it keeps your site from updating while it's half baked.
in terms of stylization advice/"How To Make Shit Cluttered", treat your web page like a scrapbook! hoard transparent pngs! put them all over your site like stickers! use patterns for the backgrounds instead of solid colors! whenever I make a new page on the site, i think of it as "digital scrapbooking" since it's basically the same thing as doing a physical collage.
some good resources for that would be gifcities, transparentstickers, other people's graphics pages, but you can also find some good stuff in just the "transparent" tag here on Tumblr. the only thing is I would advise against taking an artist's transparents on here + follow usage rules for transparents if theyre there, obviously regular nettiquette applies.
uhh that’s all i can really think of! have fun and good luck webmastering!!

[Image description: A divider gif of a worm wriggling across the screen. End ID]
#SORREY this took me so long i remember seeing it and being like ohoho!! and then writing everything out and being like ok ill add links#later. and then forgot#hope this was helpful at least a little bit!! i have a habit of being disorganized in my advice-giving lol#wormwerds#neocities#magic 8 ball
83 notes
·
View notes
Text
Cloud's FNF GIF Making Tutorial
Hello there, have you ever wanted to make FNF GIFs like this for example?
Well, your in luck, because in my personal guide, I'll teach you how to do so.
This is for desktop users by the way, I don't know how to do this on mobile.
1. Getting Started
You'll need the following program to make your GIFs. I personally use.
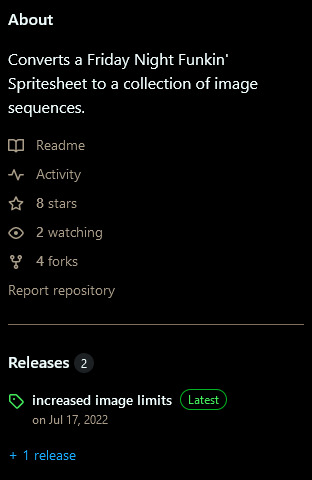
Spr2PNG (Highly Recommended | Automated, Simple Process)
Java (Needed for Spr2PNG to work.)
EZGif (Needed for GIF Making.)
But there are other options such as FnF-Spritesheet-and-XML-Maker but I personally use Spr2PNG as that is more simple.
To download Spr2PNG, first go to the releases tab and click on the Latest release you see, then click the zip file to download it automatically. You'll want a ZIP Extractor like 7-Zip, which I recommend, but WinRAR is another good option.

Now, once you have your programs, you'll want to download the FNF mod you want to rip the sprites from, like for instance; VS Sonic.EXE, or basically any other FNF Mod and download that either from GameBanana or GameJolt, depending on where it is.
2. Ripping the Sprites
Okay, now, to make the GIF, you have to rip the sprites. To do this, go to your FNF Mod that you downloaded and go to either mods\images\characters or assets\shared\images\characters. It depends where all the [charactername].xml and [charactername].png files of that character is located so you might have to do some digging around in the mod files. But once you find those, you want to copy & paste them into a separate folder, I recommend creating one to store all your ripped sprites at, aswell as your gifs.
3. Making the GIFs
Okay, now that you have your sprites ripped from the mod files. You'll want to open SprToPNG.bat or SprToPNG.jar. It doesn't really matter what you choose to open. It should show a small window that says “Select XML or PNG Files to Open” and you'll want to locate the files you ripped from the mod files. Please keep in mind that the .png and .xml files of that character must be in the same folder together otherwise it won't work. Just double-click on either file, again, it doesn't matter. Then, SprToPng will do the rest and separate the animation sprites into one folder that is named after that character, aswell as all the sprites.
Now, click on the folder of the sprites that you want to animate, it might say "Idle Dance" or any of the character poses, aswell as the special animations if the character has them. There should be some PNGs that are ranging from 0000 to random, depending on how many animation sprites that animation has.

Now, open EZGIF.com and click on "GIF Maker" and then click on Browse and then locate the separate PNG files of the character. A good tip is that you can select the first PNG with 0000 and then the last by shift-clicking, just click the first png and then the last one with shift-click and it'll select all the following PNG files and then select "Open". It might take a couple of seconds, depending on the file but it should show all the PNG Sprites in order.

Set the delay time to either 4, 5, or 6. You want it to act like how the actual in-game sprites would. If it's too fast, increase the delay time, if its too slow, decrease the delay time. Optionally, you can set the last PNG to 30, then select "Don't Stack Frames" so the sprites don't overlap over each other and make it look ugly.
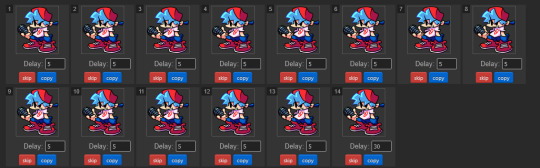
I'll show two examples, one with "Don't Stack Frames" on and off.

On the left is with it on while on the right is with it off. You see how on the right the sprites are behind the ones that are displayed? Yeah, you don't want that. So I highly encourage and recommend you to turn on "Don't Stack Frames" on.
Now, select "Crop" and then scroll down and select "Trim Transparent Pixels around the image" as this will remove any transparent pixels we don't want, while also reducing the file size, either a tad bit or a lot, depending on the sprite.


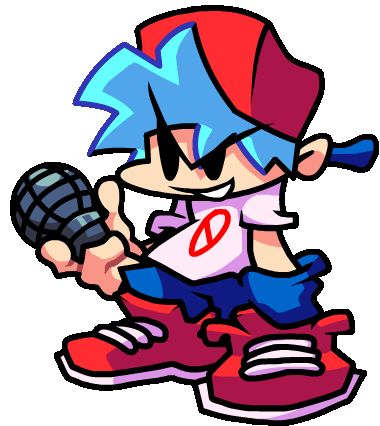
And once you're done, click save, your sprite should look like this!
Now that you made your Sprite, you can upload it to the Funkipedia wiki to help out with pages and such that need sprites.
Fin.
Feel free to leave any suggestions in reblogs or comments, they'll really help out. Also, make sure to reblog this so more people know how to make GIFs in the future (on desktop or laptop).
4 notes
·
View notes
Text
Leaks- you want them I got them
Vanguard-
Huge beatstick, as long as she’s not hitting an enemy that’s just spawned in she’s doing an extra 18% damage thanks to being a debuff FIEND, her secondary always crits which is weird but I won’t say no fuck suicide boats, she’s pretty stacked AA wise and gets a slick buff to it to boot, her crossfleet buffs other fleets hms vanguards fp and thankfully that’s the only real faction lock she has (her other faction lock only says “when other hms ships” so if it’s only one it’s practically free) my only worry is she seems to like to buff her reload which might make her hard to time to so maybe no helly no nj but her 10% across the board if you’ve been in her personal space too long plus fat damage if she’s hitting the yeet more then makes up for it imo
Bellona- ohi dido with ara I didn’t read any of her other skills I love her she could do no wrong say she’s bad and I’ll kill you im not joking I value this png over the average human life by leaps and bounds
Cheshy chan- she do be a ship, less stats but she’s a fairly good ship plus a zombie if you don’t have cheshy already she’s a very nice budget ship
Unikai(n)-
Gets a preload, heals backrow (possibly only for preload) puts her maybe on par with percy maybe better against medium light solid choice especially if you’ve missed percy twice now
And that’s where the fun ends
Jervis-
They want her to be mt and they’ve roided her with every damage reduc know to man but good lord she only has 2k hp and a vg heal at fucking 20 god damn seconds for FIVE percent, she’s faction locked and hull locked (three hms and no hulls heavier then CL) first naturally ssr hms dd (most decorated one too) and they did this to her puts a horrible taste in my mouth, so we’ll stop here before I upset myself over a png
Indommy-
I can’t decide if she’s good or not, gives our plenty spec burn, lots of fighters, if she shoots down planes take even less avi damage, weird and strange tho every lusty class ship (including herself I presume) take 8% more damage (why) if there are other lusties in the fleet buff them 15% for acc and avi (not herself tho), if she’s the only one she gets the buff, but she doesn’t get acc for some reason (WHY), BUT if you also use PoW (I’m gonna vomit) or repulse (this includes repulse meta), you get both- but she still only gets fuckign 12% acc
Revenge-
She’s actually really interesting with some good self buffs and the ability to fire from flagship while being off flag as long as another bb is flag, but tragically she’s also a purple bb
You all know I don’t do metas but Memphis doesn’t look terrible
AFCS (new equip) is just hpfcr but better (knew it would be but it still hurts)
All in all a good event but when it hurts it really fucking hurts holy shit
3 notes
·
View notes
Text
About to reach a kiloword (2^10 aka 1024) followers...

First, thanks to all of you by so sooooo much for caring and sticking around, you are amazing sapient individuals and deserve my praise for it.
Now, I want to make myself and my income future-proof. So, don't mind if I start creating and selling a few products on a few online storefronts? I am still making free stuff for you all to enjoy, I just want to develop some more usefulness and improve upon my skills going forward.
PRODUCT IDEAS (the Nth list)
Syndicalist stickers, buttons & cutouts (derived from Kaiserreich) derived for a handful of countries in the world.
Contemporary legalism-compliant axis-victory world fan-merch (merely immersive feelies that avoid specific connotated patterns & malicious use intents)
Reprint templates for "Landlords Game" and its 1930s "Prosperity" ruleset
Custom ancients-style games & classic board games...
Memetic stylized personalized "branded" stickers
Customized iconography packs for autistic organization
Cardboard double-sided counters
Cutout sticker sheets
Memo pads & sticky note stacks
FontForge typefaces / fonts (in TTF, WOFF & OTF formats)
Artistic notecards
Regular playing cards and Tarot cards decks
Visualization decks / deques for colouring & gratitude
Animated yesteryear retroweb-like pixel assets for Neocities
Reality scripture worksheets with visualization tips & aids
New desktop theme customization packs (mostly aiming towards KDE Plasma & GTK-derived desktop environments, with limited support for macOS / Windows)
Printable stylized documents and their model source files in PDF & LibreOffice source file types form (with some Blender, Inkscape, GIMP...)
PNG / GIF / SVG graphical packs
OGG / OGV / OPUS multimedia packs (for physical media too!)
3D paper prints / papercrafts environmental packs
Hexagonal dotted grids for speculative world generation paradigms (TTRPGs-friendly)
Kid topics worksheets (w/ source files) for constructed languages & cultures...
(Add)venturing prompt / question / query modules
Construction toys & their thematic sets
TTRPG modules (game adventures, campaign settings, ruleset complements...)
Personalized computer builds (with both aesthetics and function in mind...)
Educational flashcards?
Art prints / posters?
Paper dollhouse packs?
Code snippets and scripts (GitLab / GitHub / Sourcehut)?
Visual previews for community review:


Farewell to soon!
0 notes
Note
Do you have any advice on figuring out photoshop and templates? I’m new to all of this and I’m really struggling :(((((
Oh gosh I’m so sorry anon, life’s been so chaotic that I completely forgot about your ask! But I am here now to help :)
I will say off the bat that I’m v much a trial and error kinda gal/look things up on YouTube lmao so I’m self taught in pretty much everything I know with photoshop (aside from a few helpful tips while at uni) so I’ll try and list some things that I find quick and easy to use when editing:
Templates in general tend to come pretty organised with layers names etc so it’s easier to navigate, but I also always recommend NAMING YOUR LAYERS!!! It saves SO much time and even grouping them into relevant sections (groups) can really help navigate the layers panel (especially when you get to 200+ layers like me lmao)
I always edit the resolution of my documents when creating them to be at least 100px (pixels) because then the final design is higher quality! That being said; that’ll depend on your computers RAM capacity and how much of it is used by photoshop - my desktop has A LOT of RAM cus it was custom built, but laptops etc have a lot less (otherwise it’ll make the app glitch and crash essentially)
I use the magic wand tool religiously lmao - it may not be the most perfect outline but if I’m gonna edit the image more afterwards, just getting the background out the way first helps a lot! (Using the layer effect drop down will also give you options of ‘multiply’, ‘screen’ and ‘overlay’ plus a bunch more to add effects to your layers, but a quick way of removing a white bg from a layer is to use ‘screen’ and it’ll auto remove it! Careful tho cus sometimes it removes TOO MUCH of the image aha)
If that tool doesn’t work for you then the ‘colour select’ option in one of the drop downs will do the same thing but will select every bit of colour on the document that you select - ie if you click on the white background, it’ll also pick up every other bit of white on the document so keep that in mind (I apologise that I’m not more specific, I’m writing this on my phone and haven’t got photoshop open)
For text layers, I ALWAYS turn off the ‘hyphenate’ tick box in the text box settings! Hyphenate is more for professional documentation/printed work, so for template edits and personal use I always turn it off cus it makes it look weird imo (the text box settings will open up on the right when you click on your text, so just scroll down a little until you get to the paragraph settings and there’ll be a little ‘…’ to show more options and it’ll be in there!)
CLIPPING MASKS ARE A LIFE SAVER!! On your layers panel, if you have a shape drawn out (ie a square for example) and you add an image/colour layer/literally any kind of layer on top and move the mouse to the line between the 2 layers and click ALT, it’ll add the clipping mask so the layer on top is only visible within the shape underneath! Works for filter layers as well as images in general etc PLUS they stack!
For templates specifically it’s a lot of fiddling until things sit nicely with one another for me, but one thing I use often is PSD filter packs that you can download! Lots are on tumblr and deviantart etc but you should always credit who you use, unless you make them yourself! They help tie a design together so all the colours match!
I also like using the ‘blending mode’ options on the layers panel. So when you right click a layer - it’ll give you the ‘blending mode’ option at the top and that allows you to add shadows/gradients/texture and a bunch of other stuff to that specific layer!! Including ‘stroke’ outlines around the edge of your layer!
I ALWAYS save my PSD files separate to the final product in case I wanna edit them, and I will export any final designs as an image!! For highest quality in your exports use PNGs!! JPEGs reduce the quality SO much so always go with PNGs but if you don’t want a transparent background, make sure you untick ‘transparent’ in the export window!
There’s plenty more tools to use on photoshop, but I recommend just creating a blank document, adding a bit of text and an image and just playing around with it!! You’ll discover so many new ways of doing things and ways that suit you!
If you ever want more specific advice for something then pls ask! I have 8+ years of experience and a graphic design degree so I like to think I know some things haha!
I hope that helps🤍
#misc: asks#misc: anonymous#I’m sorry I couldn’t be more specific!#I’ll probably think of a bunch more tips down the line so I’ll reblog this if I do#for now that’s a good start
1 note
·
View note
Text
Unity navmesh unwalkable

UNITY NAVMESH UNWALKABLE HOW TO
UNITY NAVMESH UNWALKABLE UPDATE
UNITY NAVMESH UNWALKABLE PRO
UNITY NAVMESH UNWALKABLE TV
path nearest.y+12 } var nearest inverseblocking so it marks all tiles as nonwalkable then the walkable tiles. Because of the angle at which the object was.Īll my rendering is working great but my path finding isn't being to get to the center of the isometric tile. By first.Ī variety of path finding algorithms have been developed some as a general solution There are several drawbacks when applying evolutionary tactics to path finding. Also note that in This algorithm first searches the tiles closest to start and then starts circling wider and wider over the walkable tiles until a tile of the given tile is found. That way A will behave the same as Djikstra's.
UNITY NAVMESH UNWALKABLE PRO
Paso Ejerci.mp3 | A Star Pathfinding Pro Tutorial.mp3 | Turky Nn N Gulml Xbrlr.mp3. | Easy stitching class Part 2 | Shivan Class mp3 Basic tailoring classes in hindipart 1A line frock mesurment mp3 More video please visit You tube channel. Here we introduce four components for the navigation system: NavMeshModifier affects the NavMesh generation of NavMesh area types based on the section or in the NavMesh building components section of the Unity Manual. for Runtime NavMesh Building UnityTechnologies/NavMeshComponents. What could be causing this and how do i make the ai not rub up. Quick Navigation General DDO Discussion Top.īlog Forums Answers Evangelists User Groups Beta Program Advisory Panel The green line is the path generated and my ai the capsule just moves it rubs the path again when it is closer to the goal and has to round a corner.
UNITY NAVMESH UNWALKABLE TV
Thread: Multiple quests having issues due to mob pathing horde of zombies was doing the same thing to my left on the tv and on the screen things were randomly running off cliffs into lava etc. I should make the aesthetic tweak more prominent on the page. could be locations and graph edges the possible actions such as move left move right jump up jump down. It prioritizes paths that seem to be leading closer to a goal. In games we often want to find paths from one location to another.
UNITY NAVMESH UNWALKABLE UPDATE
img link: i./CN1h1.png When you update your graph instead of making the nodes unwalkable e.g if the collider of. Pathfinding for dynamic obstacles and player made blockages? Then somehow detect if there is a block tower in the path to attack it before continue to the destination. if current.x
UNITY NAVMESH UNWALKABLE HOW TO
Question by Raspilicious at 07:25 AM pathfindinggridhexagon exactly how to make the unit or game object that is move exactly along the path toward the next waypoint effectively cutting the corner of the turn. Note that you can stack multiple nukes from different rooms at the same target position to A cost greater than or equal to 255 will be treated as unwalkable. Use setActiveSegments to fetch segments on the next tick. Contains powerful methods for pathfinding in the game world.
0 notes
Text
youtube
Watch the American Climate Leadership Awards 2024 now: https://youtu.be/bWiW4Rp8vF0?feature=shared
The American Climate Leadership Awards 2024 broadcast recording is now available on ecoAmerica's YouTube channel for viewers to be inspired by active climate leaders. Watch to find out which finalist received the $50,000 grand prize! Hosted by Vanessa Hauc and featuring Bill McKibben and Katharine Hayhoe!
#ACLA24#ACLA24Leaders#youtube#youtube video#climate leaders#climate solutions#climate action#climate and environment#climate#climate change#climate and health#climate blog#climate justice#climate news#weather and climate#environmental news#environment#environmental awareness#environment and health#environmental#environmental issues#environmental justice#environment protection#environmental health#Youtube
16K notes
·
View notes
Text
Image converter to svg

#IMAGE CONVERTER TO SVG UPDATE#
#IMAGE CONVERTER TO SVG SOFTWARE#
#IMAGE CONVERTER TO SVG SERIES#
Read the entire article here - it's very informative.
#IMAGE CONVERTER TO SVG SERIES#
Since these formulas are far more dynamic than a series of static boxes, vector formats (like SVG) offer many more benefits, like being fully editable with vector graphics software, and having the ability to enlarge them infinitely without quality loss." Vector graphics (unlike raster graphics) are not made of pixels they’re made of mathematical formulas that dictate all of the properties of a graphic on an X and Y axis. The more you zoom in on them or try to enlarge them, the more visible the individual pixels become. Graphics made of pixels are static and set at a specific size. png are raster graphics, meaning they’re made entirely of individual colored boxes known as pixels.
#IMAGE CONVERTER TO SVG SOFTWARE#
When you upload an svg, each color is it's own layer, and the software knows to cut each layer separately. When you tell it to cut, it only knows to cut around the outside. If you upload a jpg or png to design space, it will upload as a one layer image. It will come with each color as it's own "layer", and it can be made very large, or very small, without distorting. That's it for this tutorial, we hope you enjoyed it and that the information will help you in your future projects.SVG stands for Scalable Vector Graphic. This is especially great for purchased items that only have a JPG file attached. Here we tested our SVG in Silhouette Studio.Īs quick as that you can convert a JPG into a SVG in Inkscape. You can now open your SVG in the software used for your cutting machine. For the Save as type option, click the drop down menu and choose Optimized SVG then click Save. In the window called Select File to Save to, choose a location and give the file a name. Once you are satisfied with your traced image, go to File > Save As. The final step is to save the traced image as a SVG. You can choose to remove the other designs if you only want the design itself. Luckily, the design trace was nice and clean, ready for use. This will also allow you to see if anything needs to be cleaned up. In the image below, we have separated all of the elements, or in this case, the colors. Right click the traced image and select Ungroup. You can delete the original JPG image as we no longer need it. Now that we have traced the image we want to ungroup all of the elements. The original JPG is on the left while the traced result is on the right. The image below is the result of the Trace Bitmap scan settings. Once you are happy with the settings, click Apply.
#IMAGE CONVERTER TO SVG UPDATE#
We left the rest of the settings as is and clicked on Update to get a preview of the scan. Stacking will separate the colors into stacked layers, which are easier to handle. Smooth, Stack and Remove Background were all ticked. We left the Scans at 8, just a little more than the amount of colors in the image. Click on the image to select then click on the drop down menu under Multiple Scans. As our image is in color, we will use the Multiple Scans option. Singles Scans is generally used for black and white images. Make sure to select Trace Bitmap, the first option and then Multiple Scans. The Trace Bitmap panel will open on the right hand side. This tool can be found by going to Path > Trace Bitmap. We will be using the Trace Bitmap feature to turn our JPG into a SVG. This is more a feature that requires you to experiment until you find the result you want. Results will vary from image to image and some options available will have no effect. It is not a perfect tool that will give you consistent results. Something to note regarding the Trace Bitmap option. When you open an image in Inkscape a window called PNG Bitmap Image Import will appear. Once you have opened Inkscape, import your JPG file by going to File > Open.
0 notes
Text
Google picasa 3.9

#Google picasa 3.9 install
#Google picasa 3.9 software
They can be filtered by starred images, faces, movies, and photos with geotag. Sorted folders are shown on the left side of the library, while the right one holds the thumbnails of all containing photographs. It has received some improvements since our previous review. The multi-tabbed interface has a clean aspect that makes it comfortable to work with. Associations can be made with any of these formats when it comes to viewing content. The file types supported by Picasa are JPG, BMP, GIF, PNG, TGA, TIF, TIFF, WEBP (Google Chrome), and RAW photos. It is possible to include only common areas like My Documents, My Pictures, and the Desktop, or to cover all parts of the hard disk instead. Toward the end of the setup, Picasa offers to set Google as the default search engine in Internet Explorer, as well as to send anonymous usage statistics to Google.Īt its first run, the program is prepared to search for pictures on the PC.
#Google picasa 3.9 software
The utility is free to use and very easy to install. Picasa 3.9.141.303 is a software product developed by Google and it is listed in Graphic & Design category under Viewers. Picasa Photo Organizer will help you organize and edit your digital photos, then create online. Apart from the fact that it lets users view and manage photographs, the app integrates support for easily sharing albums with the public by uploading them on Picasa Web Albums (Google's image hosting website) and other platforms, among many other useful features. Picasa Photo Organizer 3.9 Build 141.303. As such, it is affected by the following vulnerabilities in the. Picasa is Google's answer in this matter. Official Picasa and Picasa Web Albums Help Center where you can find tips and tutorials on using Picasa and Picasa Web Albums and other answers to frequently asked questions. The version of Google Picasa installed on the remote host is earlier than 3.9 Build 137.69. IV) To uninstall everything: sudo apt-get remove -purge wine sudo apt-get remove -purge winetricks sudo apt-get autoremove sudo rm /usr/share/applications/sktop rm ~/picasa39-setup.exe rm -r ~/.tmp rm -r ~/.wine rm -r ~/.local/share/applications/wine* sed -i '/wine/d' ~/.local/share/applications/mimeinfo.As digital photos keep stacking up on our hard disks, a reliable image organizer is essential to declutter, browse, and locate them, not to mention fix any small mistakes made by cameras, such as unflattering lighting. Now, thanks to Picasa, you will have the album you want, and you will be able to see your photos anytime you want. III) After the step 5, the file "picasa39-setup.exe" can be deleted: An attacker could exploit this issue through the use of a specially crafted TIFF image, potentially causing a. The installer is digitally signed by Google Inc. This is the final version of Picasa that was released by Google. As such, it is affected by the following vulnerabilities: - A buffer underflow vulnerability exists in the 'LZWDecodeCompat' function in the LibTIFF library. Google, Picasa, Google Picasa, Picasa 3.9.
#Google picasa 3.9 install
II) If you are feeling lazy, just paste this at terminal and all the steps above will be done for you (as a user specific installation): sudo apt-get install wine winetricks & cd ~/ & wget & wine ~/picasa39-setup.exe & env WINEARCH=win32 WINEPREFIX=~/.tmp winetricks ie6 & cp -r ~/.tmp/* ~/.wine/ The installed version of Google Picasa is earlier than 3.9 Build 3.9.14.34. Or ask for he/she to run this once at terminal: cd ~/ & wget & wine ~/picasa39-setup.exe & env WINEARCH=win32 WINEPREFIX=~/.tmp winetricks ie6 & cp -r ~/.tmp/* ~/.wine/ I) With this method each user will have to run the steps 2 to 5 to get Picasa fully working into his/her user folder. As such, it is affected by the following vulnerabilities: - A buffer underflow vulnerability exists in the 'LZWDecodeCompat' function in the LibTIFF library. You will have to click "Next" and "Accept" in a few windows:ĥ) Copy the installation into wine folder:Ħ) Done! Now just open Picasa as any other program: The installed version of Google Picasa is earlier than 3.9 Build 3.9.14.34. Now you have Picasa 3.9 installed but there is a problem if you want to login to Google to upload some pictures, so to fix it do this:Įnv WINEARCH=win32 WINEPREFIX=~/.tmp winetricks ie6 3) Install Picasa with wine: wine ~/picasa39-setup.exe
1 note
·
View note
Text
Acdsee photo editor 11 review

#ACDSEE PHOTO EDITOR 11 REVIEW WINDOWS 10#
#ACDSEE PHOTO EDITOR 11 REVIEW PRO#
#ACDSEE PHOTO EDITOR 11 REVIEW SOFTWARE#
#ACDSEE PHOTO EDITOR 11 REVIEW TRIAL#
#ACDSEE PHOTO EDITOR 11 REVIEW PROFESSIONAL#
#ACDSEE PHOTO EDITOR 11 REVIEW SOFTWARE#
I think you are at the point where you need to DL the trials of both and compare for yourself.ACD Systems has announced the latest version of its ACDSee photo management and editing software for PC. I saw nothing in the standalone ACDSee Editor that would limit the article's relevancy to it. Several years ago, I wrote an article on LIght EQ describing just how useful this tool is.: I like the ACDSee User interface better, and certain features are better in ACDSee Editor.ĪCDSee Editor includes the Light EQ tool which makes it fairly easy to maximize all the dynamic range your camera can collect. Things that the ACDSee editor either lacks or which relies on the other modules in the Ultimate product to produce. It offers HDR, Focus stacking, and Panorama stitching. When comparing the two editors in a features list, I think Affinity Photo stands out.
#ACDSEE PHOTO EDITOR 11 REVIEW TRIAL#
I have both Affinity Photo and ACDSee Ultimate, and I just uninstalled the Trial version of the ACDSee standalone editor so I will have to rely on generic platitudes and my memory of those things I examined on the ACDSee Editor. Sorry for the delay, I just saw this post. )? Are they both in the same league? DAM and related is not important for me. can you briefly compare it with Affinity, keeping in mind that you have and use both (. If even you think that this editor is kind of cool. Good to see that the product is getting better and ACDSee guys do not sleep. As a result, I can use my NIK tools plugins which are installed in the Appdata location, but not my Topaz plugins which are installed in their own unique locations.Ī photographer who doesn't need all the Photoshop tools that an Art Director might need could do worse than this editor. While the version built into ACDSee Ultimate allows one to point to anywhere a plugin is installed as well as the Appdata location. "./Appdata/Local/ACDSee Systems/3rd Party Plugins" The only major difference I can see so far is (and it may not be important to others) is that It will only allow 3rd party plugins that are installed in: I can't claim it's identical, I haven't played with it enough to say that with absolute certainty. If you don't need the ACDSee DAM tool and don't want the hassle of managing XMP files and the ACDSee version of virtual copies (called Snapshots) outside of the ACDSee DAM, this comes very close to that level of raw development. I felt I can get fairly close to what I would get with the ACDSee raw, "Develop" tab in Ultimate. However, it is non-destructive in the sense that the raw file is not altered.Īpparently, ACDSee Systems is more aggressive in improving their product line than even I thought!Īfter playing a bit with Editor 11, I think it's kind of cool. Instead, it opens the raw file and allows you to edit and save the image as a bitmapped file (jpg, png, tif, etc), in addition to the ACDC project file format. After your post, I DL'd the free trial and played a bit with it.Īpparently, this version of the editor CAN open raw files! However, it doesn't do a true nondestructive raw development. Consider me humbled! And not a little red-faced. It has been a while since I last looked in on to the Standalone editor! Apparently, some new features have been added. I can download another trial version or/and another manual, but am fully sure that you already know the answer.
#ACDSEE PHOTO EDITOR 11 REVIEW PRO#
What it can not do - but Studio Pro can? Am I missing something? Talking about raw: Photo Editor 11 can open a raw file (say.
#ACDSEE PHOTO EDITOR 11 REVIEW WINDOWS 10#
I have never known it to be particularly slow, but I have been using Windows 10 since before this editor was released. I really like staying within the same user interface and color management environment whenever possible. I use the ACDSee Editor module about as much as I do Affinity. I have both the ACDSee Ultimate program and Affinity Photo. Is it as complete as Photoshop? NOPE! Not even close! But it is a very good and reliable editor that will do almost as much at a fraction of the cost. It does adjustment layers, and supports most standard *.8bf photoshop plugins. I would be surprised if the latest standalone was any different. Aside from the ability to function as a standalone, it was identical to that of the "Ultimate" Editor module of its generation. I don't own the current version of the standalone Editor, but I do have the previous version. In fact, it IS the same module as Photo Editor 11, only enough additional infrastructure was added, to allow it to function as a stand-alone editor program without the DAM or the Raw development. The bitmapped editor in "Pro" is the standard 'touch-up' editor that ACDSee has used for 15 years at least (with a few improvements over the years, but still a basic touch-up editor.) The editor module in "Ultimate" is virtually identical to Photo Editor 11.
#ACDSEE PHOTO EDITOR 11 REVIEW PROFESSIONAL#
ACDSee's raw development is only available through ACDSee Photo Studio Professional and ACDSee Photo Studio Ultimate. The stand-alone photo editor does not have a raw development feature.
0 notes
Text
I always wanted to make a giffing + colouring tutorial.
So, Welcome to my long and somewhat helpful guide that no one asked for <3
For starters, i use VaporSynth (links for installation compiled by @soonhoonsol <hi bestie3 which has a guide ). Photoshop 2021 version for making the gif and colouring it . Install PS from this site. it’s free and cracked ver ;)
STEP 1 : the video for giffing
i don’t need .ts files cause my gifs can be made with normal .mp4 file which i either download from a 4k downloader or screen record on my laptop (windows key + alt + R), which is actually pretty convenient since it allows you to record even 4K resolution videos with perfect quality. the only downside it that, it take a lot more space than a normal downloaded video. but you can always delete the videos after you’re done giffing.
STEP 2: using VS to make & sharpen your gif
(i will be giffing and colouring Dongmyeong from ONEWE since their mv's are very monotonous but not fully black and white. We need to have some colours present in the video/gif so that we have some colours to manipulate in the first place.)
After you decide what part you want to gif, note down the timestamps. After installing and setting up VS, you’ll have a .bat file on which you have to drag your .ts or .mp4 file which will open a timestamp window which looks like this :
And will open a resizing tab in your default search engine after you press enter after entering the timestamp and gif duration. Use settings: qtgmc 60p cause it saves it at a better quality and has 60 frames per second so it’s smoother and small gif size.
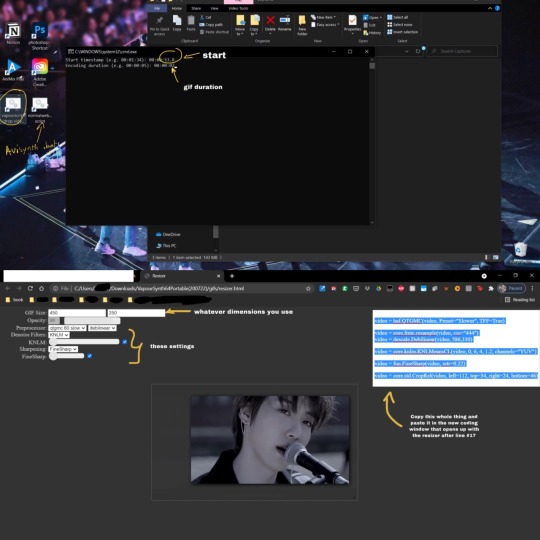
Simultaneously, a vapousynth script will open. Remove whatever there is from line #17 to #26. paste what you copied from the resizer on line #17. Enter your sharpening settings on line #24 and your denoise settings on line #22. After entering your numbers, remove the # before cache size command so it doesn’t hang your laptop. Mine does when I don’t do that. Save that setting, file > save script. Then you won’t have to remove it everytime you make a gif. Your final script before encoding should look like this (refer to the script in the 3rd photo of the collage):
after that, follow these steps:
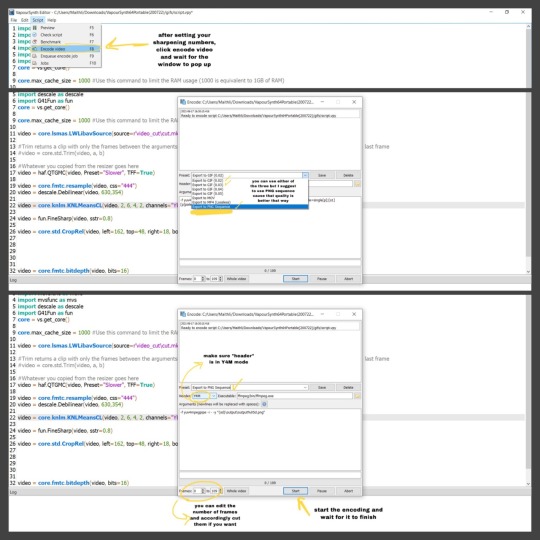
i personally like to use PNG SEQUENCE for my gifs cause one, it’s compatible; two, the quality of the gif turns out good. For me, normal gif output is pretty dithered which i don’t like.
you can close the script after you see green bar in encode window that says '100%. video has finished encoding'
STEP 3: accessing your output png frames / gif
after you close all the vs .html windows, you’ll find your gif/png fames under your VaporSynth folder that you have extracted under VapourSynth64Portable(200722)> gifs>output. i have separate folder where i cut and paste these frames so that they’re easily accessible later.
imp!!!(this may only be my problem): either rename or change the location of the output PNGs before you start with a new one. if not, they will get replaced with the new one since vs automatic name system is 'output00001' for each new batch of encode. Same goes if you decide to encode to gif cause it will be saved as 'output' and be replaced by new one.
after you're done with accessing your output PNGs, close all the windows and repeat the same for a new set of PNGs for another gif.
STEP 4: loading your frames into Photoshop
if you have made an output gif, then you can just open it. File > Open and select all from where you saved it and it’ll load in frames.
after you’ve opened your PS, make sure your Timeline mode is on (window > timeline) then go to File > Scripts > Load Files into Stack. click Browse and it’ll open your file manager; select where you’ve pasted your output frames. select them all and press enter, let them load and press okay.
After PS is done loading your frames, it’ll look something like this. After that click create frame animation. It’s show only one frame so you have to click this ≡ symbol on the top right of the timeline. Then click Create Frames from layers and it’ll make all frames. Then click ≡ again and click “reverse frames” because ps loads frames in reverse so you have to un-reverse it.
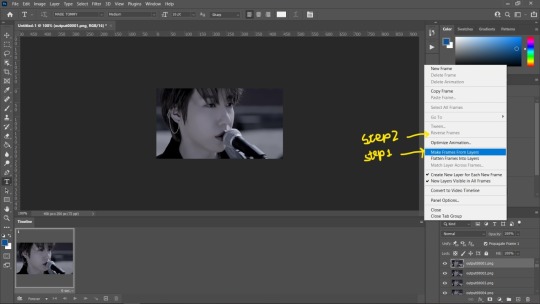
then click bottom left Switch to Video Timeline.

Then select all your layers from the side panel and convert it into a smart object so that you can sharpen it and add other filters.
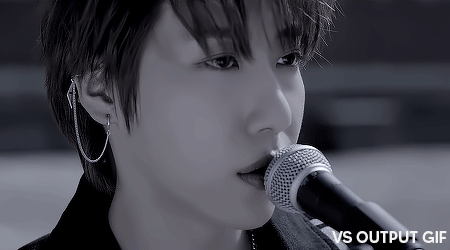
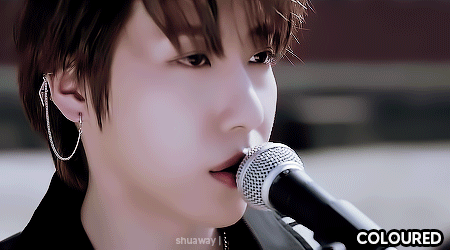
STEP 5: Colouring. Turning dull/monotone gifs into natural colour (not total b&w gifs)
again, we need to have some colour in the gif that we can manipulate. this tutorial won’t be helpful for b&w gifs.
without colouring you can see some faint reds and blues there.
Here’s the colouring tutorial !
A TIP : If you want to dull out a certain colour, use the opposite colour of it. For example of red you can use green/cyan. For blue you can use orange.
A TIP: If you want to add more colour to the skin, you can use gradient map (taught by @scoupsy <33) esp for pale skin. here is her awesome tutorial !
A TIP: direct output gif from vs will be faster than a png sequence created gif. png sequence loads in 0.02 sec delay between each frame but that you can change by selecting all frames in timeline and right clicking them and change it to “no delay”

idk why there are bigass pixels on the monotonous gifs on mobile, ignore that pls
i read tags on my cc game and saw many of you wondered how i coloured this, so:
adjustments layers used for this:
Brightness / Contrast
Vibrance / Saturation
Colour Balance
Photo Filter (Sepia)
Selective Colour 1 (red, blue, magenta, white, neutrals, blacks)
Selective Colour 2 ( red, yellow, green)
Curves
i hope this tutorial was little helpful ! for any problem, you can always reach out to me <3 i tried my best with all the things i know about giffing.
#lee.guide#svt#onewe#kpopccc#colouring guide#colouring tutorial#giffing guide#giffing tutorial#ps#photoshop#gyukwans#vs#lee.gif.gfx#vapoursyth guide#vapoursynth gifs#gif tutorial#gif guide#gif tumblr#allresources
190 notes
·
View notes
Text
youtube
Watch the 2024 American Climate Leadership Awards for High School Students now: https://youtu.be/5C-bb9PoRLc
The recording is now available on ecoAmerica's YouTube channel for viewers to be inspired by student climate leaders! Join Aishah-Nyeta Brown & Jerome Foster II and be inspired by student climate leaders as we recognize the High School Student finalists. Watch now to find out which student received the $25,000 grand prize and top recognition!
#ACLA24#ACLA24HighSchoolStudents#youtube#youtube video#climate leaders#climate solutions#climate action#climate and environment#climate#climate change#climate and health#climate blog#climate justice#climate news#weather and climate#environmental news#environment#environmental awareness#environment and health#environmental#environmental issues#environmental education#environmental justice#environmental protection#environmental health#high school students#high school#youth#youth of america#school
17K notes
·
View notes
Last Seen Blogs
fallingbyjuleecruise
a tongue without a mouth to feed

stopsmartmetersaustralia
Stop Smart Meters Australia

mieraluna
𝒾𝓃𝒻𝒾𝓃𝒾𝓉𝓎

musically-new
Musical Chairs
fellheros
unhand me