#linux find file containing text
Explore tagged Tumblr posts
Visit Tumblr Blog
Explore Tumblr blogs with no restrictions, modern design and the best experience.
Last Seen Tumblr Blogs


Fun Fact
The Tumblr app for Google Glass was released on May 16, 2013.
Text
on the topic of writing software
I want to ramble at you about some writing software options. 98% of the time I'm perfectly content with LibreOffice Writer (and previously I used Word, back when Microsoft products were less shitty). But every now and then when I have a new project (like now - more on that later) I start looking for something shiny and new to try. And I fell down into another research rabbit hole lol
I usually don't talk a lot about this bc my needs are very simple, and not sure how useful my opinion is to others, but I enjoy the topic. It's an intersection of creative writing and tech nerdiness and I like both of those things. Also what writing software you prefer really depends on the type of writer that you are, and everyone has a slightly different writing process and I find that fascinating.
Now, as I said, I'm coming at it from a slightly tech-nerd angle. I don't care if the installation is clunky, I'm happy to see the words open-source, and the need to create an account will already mildly piss me off (:
Don't worry, I'm not as intense as the guy writing his novel in Vim. Though fucking respect. And I can't say I'm not tempted to try it even with the steep learning curve lmao (Seriously, if you don't know Vim is notorious among software developers.)
Anyway, things I've tried so far:
Manuskript: this was listed as an open-source Scrivener alternative (though I haven't tried Scrivener. so.). I gave it a go when I was writing heart worth the trouble and it was pretty nice. It helped me when I had to move scenes and chapters around. But overall I think it was made with plotters in mind bc it wants you to enter a lot of information upfront. I'm not a planner/architect type of writer so this type of software is a bit overwhelming for me. Still, the fact that it's open source and works on Linux gets kudos from me.
Wavemaker: I recently played around with this, and I actually surprisingly like the features it has. You can put multiple books in a project, which is very nice if you like to work on different things, like fanfic, novels, etc. The mindmap is a feature I liked, though it's a bit clunky bc it collapses the text fields when you exit, and once I added an image field by accident that I could never remove lol I do like a bit of a snowflake method, so that feature is cool, and the cards are pretty straightforward too. Usually, my problem with these apps is that I don't even want to touch half of the features so they are pointless to me, but the features of Wavemaker were kind of nice. It's a web app that you can download and use offline but it's still working from your browser if that makes sense. That was what I didn't really appreciate. Also, it doesn't give you a lot of options to back it up. You either save the wavemaker file, export it into a document (which is fine, but it adds an extra step to the backup process) or you sync with Google Drive *shudders*
Things I want to try out:
Calmly Writer: now this is just purely a text editor that focuses on being very zen, streamlined, distraction-free, etc. It's pretty and it has typewriter sounds. (Yeah, I'm not immune to a pretty UI and harmless fun features alright? I can contain multitudes :P) It has an online version, but you can also download it, and works on Windows, Mac, and Linux. On paper, the desktop app requires a license, but the way they put it is that you can evaluate it for free and the evaluation doesn't have an enforced time limit... So. As good as free. (Though if I really like it, I would totally consider buying a license for 20usd that I can use on 3 computers, that seems fair. I appreciate a license over a subscription model for sure.) Honestly, I think this is the one I'm going to try next bc it just integrates perfectly into my writing process. That being: a multitude of messy, hand-written notes and notebooks + a document editor + backups on hard drive and GitHub (yes, really) ^^"
Shaxpir: This is on the opposite end of the spectrum basically, but out of the "fancy" ones, I kind of like the look of this the most. I like the statistics part in particular. But honestly, I probably won't try it bc it doesn't have a Linux version which would be a pain in the ass for me, and is cloud-based. I kind of don't really trust them, which is my biggest issue with these companies. (Although the creator's heart seems to be in the right place when it comes to AI. Basically, some of their features are based on machine learning and language models. For example, it will recognize passive voice, if it's an adverb with "-ly" or the emotion of a word. Which I think is all cool and fine and shouldn't be lumped in with generative AI. But he also had a website that did this analysis for already published works, and when people pointed out that it was sketchy, he took that down and I can respect that. I'm not sure how much it influenced the actual features of the app, maybe I'll just take a peek out of curiosity. The whole thing does make me have trust issues though lmao) If anyone has experience with it though, I'm interested to hear about it.
Obsidian: not a dedicated writing software, but rather an elaborate note-taking app. I heard good things about it from smart people lol If I really wanted to access my writing on my phone, I would probably use this bc it works on every platform and has end-to-end encrypted sync with version control. I heard you can also integrate it with GitHub which is always music to my ears lol But the setup probably takes a bit of time and I'm not particularly motivated to do that right now.
So yeah, those are the options that appeal to me right now. If anyone used these and has opinions, I'm all ears :D
137 notes
·
View notes
Note
Hello! Sorry for the bother but do you know how the live 2D files of Tokyo debunker is accessed? I'm like so hyped about this help- Let me know if you could answer for me! THANK YOUUUU
I'm on the way to work so I'll just copypaste what i sent to someone else over DMs. Lmk if you run into any trouble, but it'll be like 8+ hours before I get to it
Hiya! No need to apologize for the sudden message. I just woke up so sorry for the wait!
I can explain the process for you and get screenshots to hopefully help out, and if you have any problems with it you can let me know!
You'll need:
An android phone and a way to transfer files between your phone and computer(a wire is preferable in my experience)
I think you need a windows or linux computer? I'm not sure if the necessary programs will work on mac.
AssetStudioGUI https://github.com/Perfare/AssetStudio
UnityLive2DExtractor https://github.com/Perfare/UnityLive2DExtractor/releases/tag/v1.0.7
First you'll need to transfer the game files to your computer. I assume you already have that part done so I won't walk you through it.
Next go into AssetStudioGUI and go into 'Debug' and turn off 'Show error message' to save yourself some headache
Now you need to open the folder with the files in AssetStudio. This will probably take a long time. Get yourself something to eat or play a game or read or something!
Once everything is loaded you'll need to find one of the live2d files. For tokyo debunker the easiest way to do this is just to go to "Filter Type" and filter to "Texture2D". I don't know the file structure or naming convention for Twst, but the image you're looking for should look kind of like this

Right click and choose "Show original file".
Copy the FOLDER that this file is in to another folder.
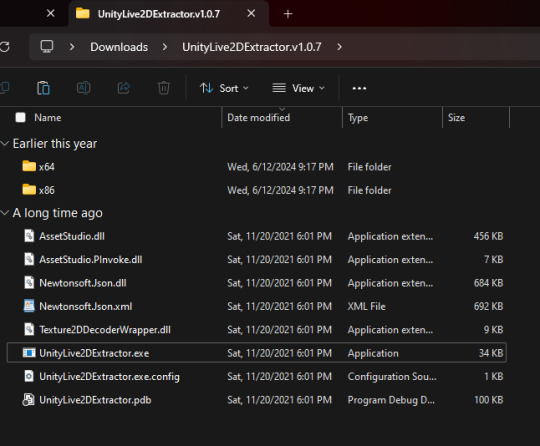
If you haven't already extracted L2DExtractor, do that now. You should have these files.
Open the L2DExtractor FOLDER in another tab or window. Then drag the folder that you copied before to "UnityLive2DExtractor.exe" in the UnitLive2DExtractor folder that you have in a separate window. (You can also copy it and right click→paste it INTO THE EXE FILE if dragging is difficult.)
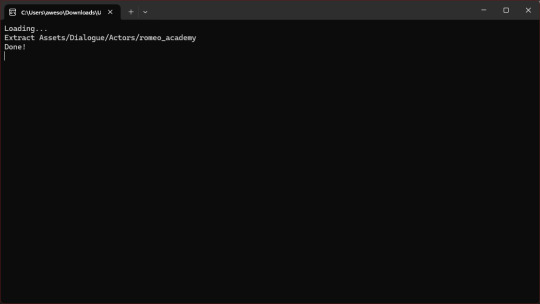
You should get a command prompt(the black box with text in it) with the name of the asset in it. Wait until it says "Done!" Close the command prompt.
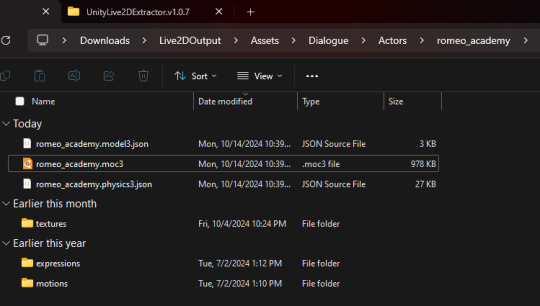
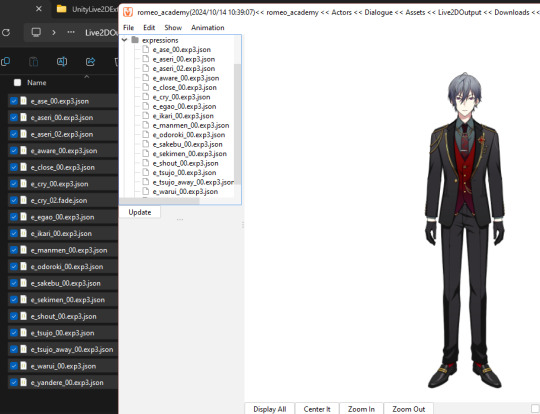
Go to the folder that you put the asset folder in. You should now have a new folder named "Live2DOutput". That will have a folder in it. Go into the folder until you find the asset you just extracted.
You should now have the .moc3 file, textures, and motions! You can open the moc3 file with Live2D's Cubism Viewer which you get off of their website. It's free.
If you don't have the expressions in there you'll have to extract them separately! I always have to extract them separately and I'm not sure why, but it's easy enough once you know where they are.
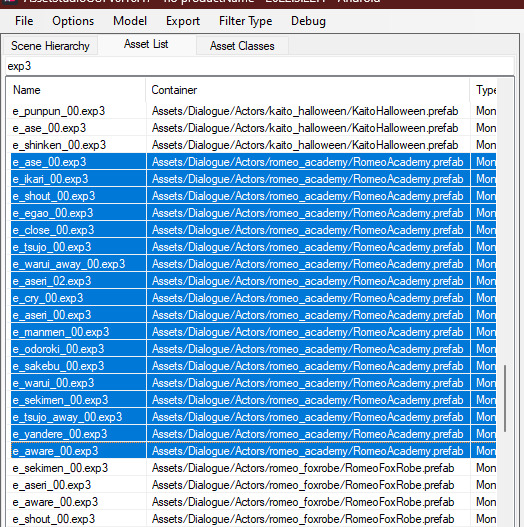
Open AssetStuido back up and change your filter to "MonoBehavior"
Search "exp3"
Order by Container and find the character character and outfit you just extracted(in this case I just need to find "romeo_academy". The name of the asset you extracted should be in the container path.
Highlight only the .exp3 files that go to this asset.
Go to "Options→Export options"
Change "Group exported assets by" to "Do not group". If you want to do any datamining in the future you're probably going to want to change this back to "container path" or else you'll just get a ton of files in one folder, so don't forget you did this! If you're only using assetstudio to get the l2d files however you can leave it as is.
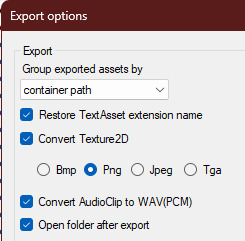
Press "OK"
Right click on one of your highlighted exp3 files
Choose "Export selected assets"
Navigate to the folder with the moc3 file in it. Make a new folder. The name doesn't matter because you'll have to manually move the expressions into l2d every time, but I just use "expressions" for simplicity
Extract the exp3 files into here.
Once they're extracted you can select them all at once and drag them into the Cubism Viewer window OF THE CORRECT CHARACTER. This will instantly import all of the expressions.
You're done! You can view and play with them all you want. But you'll have to do every character individually and then export their expressions separately.
Hope that helps. If you need anymore help let me know.
#ridiculous-reina#danie yells answers#do i have a tag for explaining this stuff? idr.#datamining cw#just so it'll come up if i search datamining or something ugh
20 notes
·
View notes
Text
How to Find Files with Specific Text on Linux
15 notes
·
View notes
Text
Inform Basics (#17: your project)
I've said it before: we've covered enough material for you to start your own Inform 7 project, even if you are a beginner like me. Let's take a break from coding to talk a bit about development environments.
Have you downloaded an Inform 7 Integrated Developemnt Environment (IDE for short) yet? If you've been clicking on my code snippets, you've already encountered Borogove, an online IDE for not only Inform 7 but several other IF development platforms. Its ability to share live snippets of code that are fully functional in many forum softwares is rather amazing and makes it easer to assist other developers in need.
Nevertheless, I don't recommend it for creating a full-fledged game. Why is that?
No external file support for features like images, sound, and other shared documents.
The Index is not fully functional, as it does not contain links to either default or custom actions.
Borogove does not support Inform 7's table of contents feature (more on this in a minute).
My understanding is that it does support external files for Inkle and others, but not Inform 7. While I encourage using the snippets as a great way to share and demonstrate code, Borogove falls short of the standard Inform 7 IDEs. Windows, MacOS, and Linux are supported. You can find and download the latest versions here:
Note that Windows Defender and other antivirus softwares tend to mistakenly flag the interpreter executables--git, frotz, and glulxe--as malicious. This has been reported to Microsoft repeatedly, but the files have yet to be whitelisted. If you get an error about these files, you can consider it a false positive.
After installing the IDE, you'll find a two-panel layout. By default, the left pane is for entering and reading source code, while the right pane contains a playable instance of your compiled code. You can compile and recompile by clicking "go" at the top-left of the application window.
My practice is to create a backup of a project every couple of days, while compiling frequently as I work. In informal polling, Inform 7 authors of varying levels of skill tend to do the same.
On to the main purpose of this post: using Inform 7's built-in features to organize your program. Let's look at an automatically generated table of contents for Repeat the Ending, which is among the larger (code-wise) Inform 7 games. The left-hand pane of the IDE shows tabs at the right and top edges. The top tabs are "source" and "contents." This is a screenshot of the contents tab.
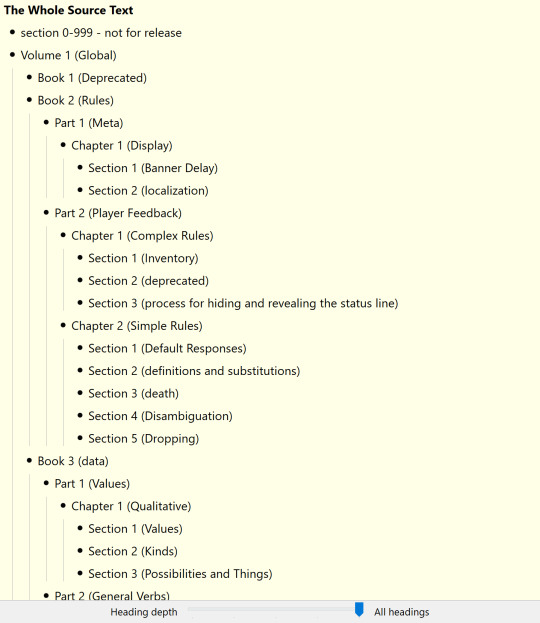
See the slider at the bottom? Inform 7's automatically generated TOC features five tiers by default, and the slider can be used to dictate the level of detail displayed. Those tiers are as follows:
Volume (top level)
Book
Part
Chapter
Section (bottom level)
We can use these tiers in our code, and the IDE will detect them automatically. The practice looks like this:
Volume 1 - Global
It's as simple as that. We have a lot of freedom in what we say there. That isn't to say there aren't restrictions:
The heading must have a blank line above and below it.
The heading cannot contain characters that have specific functions in Inform 7 code. No periods, colons, semicolons, and the like.
The heading must begin with one of the five designations (volume, book, part, chapter, and section)
You have a lot of freedom in terms of how to order your code. I've gotten the impression that I do things differently, but I like the way my approach works.
For top-level headings, I used the following:
global: used to define verbs, data, kinds, variables, the player characters, and so forth. All things that apply to the game and its world generally.
the game: the actual geography, things, and specific action responses.
the companion text: the entirety of the Reader's Guide to Repeat the Ending.
the artwork: I chose to maintain the rules governing the display of artwork and alt descriptions separately.
mix and match: a true mixture of various late stage requirements.
Regarding mix and match: some rules in Inform 7 must follow related rules. For instance, a region (a group of individual rooms that can be dealt with as a collective) must follow the room definitions. For this reason I decided to define certain rules related to regions at the end, even if they seem to be global rules. This is the way that those late definitions were used:
The game world is a region. The eighties and the 90s are in the game world. Energy is a backdrop. Energy is in the game world. Instead of doing anything to the energy: say "It doesn't work that way. Entropic magic requires specificity.".
Sometimes, things just make sense at the end. I also kept all of my test scripts there.
How should you build your TOC? While you can see my example above, give equal or greater consideration to what will be easiest for you to read and update. The TOC is a tool to for you to manage your project. If it doesn't make intuitive sense to you, it's worthless. Think about the way you process information and build from there.
I hope this is helpful! Consider maintaining a test/scratch project where you can keep copies of useful code and test the cases we discuss here. Feel free to AMA!
Next: scenery and backdrops.
5 notes
·
View notes
Link
#Apache#Automation#build#configuration#database#full-textsearch#ht://Dig#indexing#informationretrieval#Linux#open-source#Performance#scripting#searchengine#self-hosted#Server#systemadministration#webcrawler#webdevelopment#websitesearch
0 notes
Text
Linux CLI 41 🐧 regular expressions
New Post has been published on https://tuts.kandz.me/linux-cli-41-%f0%9f%90%a7-regular-expressions/
Linux CLI 41 🐧 regular expressions

youtube
a - regular expressions and POSIX metacharacters 1/2 Regular expressions (regex) are powerful tools for pattern matching and text manipulation. You can use regex with various commands like grep, sed, awk, and even directly in the shell. You can use literal characters(abcdef...) but also metacharacters Basic regex metacharacters (BRE) → ^ $ . [ ] * . → matches any character - f..d matches food but not foot. ^ → matches at the start of the line. ^foo matches lines that start with foo If inside [ ] then means negation - [^0-9] matches any non-digit. $ → matches at the end of the line - bar$ matches lines that end with bar [ ] → matches any characters within the brackets - [aeiou] matches any vowel '*' → matches 0 or more occurrences - fo*d matches fd, food, and fod but not fed b - regular expressions and metacharactes 2/2 Extended regex (ERE) → ( ) ? + | ( ) → grouping and allows for subexpressions and backreferences - (foo)bar matches foobar n → matches exactly n occurrences of the preceding element - o2 matches two o's n,m → matches between n and m occurrences of the preceding element - o1,3 matches one to three o's ? → matches 0 or one occurrence of the preceding element - fo?d matches fd and fod, but not food '+' → matches one or more occurrences of the preceding element - fo+` matches food and fod, but not fd | → alternation/or, matches one of the two expressions - foo|bar matches foo or bar c - regular expressions and POSIX character classes [:alnum:] → matches any alphanumeric character (letters and digits). [:alpha:] → matches any alphabetic character (letter). [:digit:] → matches any digit. [:lower:] → matches any lowercase letter. [:upper:] → matches any uppercase letter. [:blank:] → matches a space or a tab character. [:space:] → matches any whitespace character (spaces, tabs, newlines, etc.). [:graph:] → matches any graphical character (letters, digits, punctuation, and symbols). [:print:] → matches any printable character. [:punct:] → matches any punctuation character. [:xdigit:] → matches any hexadecimal digit (0-9, a-f, A-F). d - regular expressions examples grep -E '[0-9][0-9]' numbers.txt →finds lines containing two consecutive digit grep -E '^[aeiouAEIOU]' vowels.txt →finds lines that start with a vowel (a, e, i, o, u) sed -E 's/f([a-z])o\1d/b&r/' input.txt output.txt → replaces all occurrences of foo with bar awk '/^[0-9]/ && /a/' data.txt → prints lines that start with a number and contain the letter a awk 'gsub(/f([a-z])o\1d/, "b&r"); print' input.txt output.txt →replaces all occurrences of foo with bar grep -E '\.com' domains.txt →finds lines containing the string .com \ → escapes special characters for example \. \\ Regex operations can be slow on large files.
0 notes
Text
Linux for Developers: Essential Tools and Environments for Coding
For developers, Linux is not just an operating system—it's a versatile platform that offers a powerful array of tools and environments tailored to coding and development tasks. With its open-source nature and robust performance, Linux is a preferred choice for many developers. If you're looking to get the most out of your Linux development environment, leveraging resources like Linux Commands Practice Online, Linux Practice Labs, and Linux Online Practice can significantly enhance your skills and productivity.
The Linux Advantage for Developers
Linux provides a rich environment for development, featuring a wide range of tools that cater to various programming needs. From command-line utilities to integrated development environments (IDEs), Linux supports an extensive ecosystem that can streamline coding tasks, improve efficiency, and foster a deeper understanding of system operations.
Essential Linux Tools for Developers
Text Editors and IDEs: A good text editor is crucial for any developer. Linux offers a variety of text editors, from lightweight options like Vim and Nano to more feature-rich IDEs like Visual Studio Code and Eclipse. These tools enhance productivity by providing syntax highlighting, code completion, and debugging features.
Version Control Systems: Git is an indispensable tool for version control, and its integration with Linux is seamless. Using Git on Linux allows for efficient version management, collaboration, and code tracking. Tools like GitHub and GitLab further streamline the development process by offering platforms for code sharing and project management.
Package Managers: Linux distributions come with powerful package managers such as apt (Debian/Ubuntu), yum (CentOS/RHEL), and dnf (Fedora). These tools facilitate the installation and management of software packages, enabling developers to quickly set up their development environment and access a wide range of libraries and dependencies.
Command-Line Tools: Mastery of Linux commands is vital for efficient development. Commands like grep, awk, and sed can manipulate text and data effectively, while find and locate assist in file management. Practicing these commands through Linux Commands Practice Online resources helps sharpen your command-line skills.
Containers and Virtualization: Docker and Kubernetes are pivotal in modern development workflows. They allow developers to create, deploy, and manage applications in isolated environments, which simplifies testing and scaling. Linux supports these technologies natively, making it an ideal platform for container-based development.
Enhancing Skills with Practice Resources
To get the most out of Linux, practical experience is essential. Here’s how you can use Linux Practice Labs and Linux Online Practice to enhance your skills:
Linux Practice Labs: These labs offer hands-on experience with real Linux environments, providing a safe space to experiment with commands, configurations, and development tools. Engaging in Linux Practice Labs helps reinforce learning by applying concepts in a controlled setting.
Linux Commands Practice Online: Interactive platforms for practicing Linux commands online are invaluable. They offer scenarios and exercises that simulate real-world tasks, allowing you to practice commands and workflows without the need for a local Linux setup. These exercises are beneficial for mastering command-line utilities and scripting.
Linux Online Practice Platforms: Labex provide structured learning paths and practice environments tailored for developers. These platforms offer a variety of exercises and projects that cover different aspects of Linux, from basic commands to advanced system administration tasks.
Conclusion
Linux offers a powerful and flexible environment for developers, equipped with a wealth of tools and resources that cater to various programming needs. By leveraging Linux Commands Practice Online, engaging in Linux Practice Labs, and utilizing Linux Online Practice platforms, you can enhance your development skills, streamline your workflow, and gain a deeper understanding of the Linux operating system. Embrace these resources to make the most of your Linux development environment and stay ahead in the ever-evolving tech landscape.
0 notes
Text
Red Hat Training Overview
Red Hat training provides hands-on, lab-based instruction across a wide range of topics, including system administration, cloud computing, DevOps, and more. The training is designed to help individuals and teams improve their productivity, enhance their skills, and stay current with the latest technologies.
Popular Red Hat Course
Red Hat System Administration I (RH124)
Description: This course is designed for IT professionals without previous Linux system administration experience. It covers basic command-line skills, managing physical storage, and installing and configuring software components and services.
Key Topics:
Introduction to the command line
Managing files from the command line
Getting help in Red Hat Enterprise Linux
Creating, viewing, and editing text files
Managing local users and groups
Red Hat System Administration II (RH134)
Description: This course is intended for IT professionals who have completed Red Hat System Administration I and introduces key tasks needed to become a full-time Linux administrator.
Key Topics:
Automating installation with Kickstart
Managing filesystems and logical volumes
Managing scheduled jobs
Accessing network filesystems
Managing security with firewall and SELinux
Red Hat Certified Engineer (RHCE)
Description: This course is for experienced Linux administrators who need networking and security skills to manage Red Hat Enterprise Linux servers. It also prepares for the RHCE certification exam.
Key Topics:
Configuring static routes, packet filtering, and network address translation
Configuring an Internet Small Computer System Interface (iSCSI) initiator
Producing and delivering reports on system utilization
Using shell scripting to automate system maintenance tasks
Configuring system logging, including remote logging
Red Hat OpenShift Administration I (DO280)
Description: This course is designed for system administrators, architects, and developers who want to install, configure, and manage OpenShift clusters.
Key Topics:
Installing OpenShift Container Platform
Configuring and managing OpenShift clusters
Creating and managing containerized services
Managing users and policies
Securing OpenShift applications
Red Hat Certifications
Red Hat Certified System Administrator (RHCSA)
Exam Code: EX200
Description: Validates the knowledge and skills required of a system administrator responsible for Red Hat Enterprise Linux systems.
Exam Format: Hands-on, practical exam
Red Hat Certified Engineer (RHCE)
Exam Code: EX294
Description: Builds on the RHCSA certification and demonstrates advanced knowledge and skills required of senior system administrators.
Exam Format: Hands-on, practical exam
Red Hat Certified Specialist in OpenShift Administration
Exam Code: EX280
Description: Validates skills and knowledge to create, configure, and manage a cloud application platform using Red Hat OpenShift.
Exam Format: Hands-on, practical exam
Training Methods
Classroom Training
Instructor-led training conducted in a physical classroom environment.
Virtual Training
Instructor-led training delivered online in a virtual classroom.
On-Demand Training
Self-paced online training that provides flexibility to learn at your own pace.
Red Hat Learning Subscription
A subscription-based service that provides access to all Red Hat Online Learning courses, video classroom courses, and early access content.
Benefits of Red Hat Training
Hands-On Experience: Training includes practical, real-world tasks to build competency.
Certification Preparation: Courses are designed to prepare you for Red Hat certification exams.
Updated Curriculum: Content is regularly updated to align with the latest technology and industry trends.
Expert Instructors: Courses are taught by certified Red Hat instructors with extensive industry experience.
Getting Started
To get started with Red Hat training, visit the Red Hat Training and Certification website. You can browse courses, find a training location, and register for classes or exams.
This should give you a comprehensive overview of Red Hat training. If you have any specific questions or need more detailed information on a particular course or certification, feel free to ask!
For more details click www.qcsdclabs.com
#linux#docker#information technology#redhatcourses#containerorchestration#containersecurity#aws#kubernetes#container#dockerswarm
0 notes
Text
Tutorial: How to use WMLgettext on Windows to make a .pot file for translating your Wesnoth UMC (actually, no nonsense, no technobabble)
Want to translate your UMC, or make it easier for others to translate, but struggle to make the template file? If you’re like me, you are not a Linux user yet, and all of the available tutorials may as well be written in another language already. GetText was made for Linux users after all, and it expects a level of computer literacy that us Windows users may not quite measure up to, so WMLgettext may seem no different.
But it’s actually far easier than they make it sound. Here is how you really use it.
You don’t need to know any Python, but you need Python installed to use WMLgettext. Make sure when you’re installing it, tick the “add to PATH” checkbox in the installer!
Find “GUI.pyw” in the folders of your preferred Wesnoth. It should be under \data\tools\ in its file location.
Shift + right-click on GUI.pyw, and select “Copy as path”
Open the Command Prompter. If you don’t know how to do this, use your Start search bar at the bottom of the screen and search for “cmd”. Its icon is mostly a black rectangle and it should be called either “cmd” or “Command Prompt”; choose to open this program.
Once the Command Prompt is open, type “python” (with no quotes), a space, then paste the text you copied earlier. For me, this would be python "C:\Program Files\Battle for Wesnoth 1.17.24\data\tools\GUI.pyw"
Press the Enter key.
If you have followed the instructions, a window titled “Maintenance Tools GUI” should have just popped up. This is what you’ve been looking for!
In Maintenance Tools GUI, click the tab called “wmlgettext”
Under “Working Directory”, click “Browse” and navigate to the add-on you want to translate. You don’t need to select a specific folder inside the add-on, just the main folder that all of the other folders are kept inside of. This points the program towards the entirety of the add-on you want to translate.
Under “Output Directory”, browse for your add-on’s “translations” folder. This will choose where the .pot file is placed when it’s complete, and it also creates a translations folder for you if you don’t already have one.
Under “Advanced options”, check “Filter textdomains”, and in its little box type in the textdomain of your add-on. This makes it so gettext only creates a template using text and documents specified under that textdomain, and is thus useful if your add-on uses multiple textdomains (ex. if it contains both an Era and a Campaign, and you want them to have different translation files).
Click the button with a triangular symbol that looks like a “play” button; when moused over, this button should say “Run wmlgettext”
Check your add-on’s translation folder once it’s finished running. There’s your long-awaited .pot file!

Here is how your screen would likely be looking if you were translating the Merry Christmas campaign.
If you already have completely memorized where GUI.pyw is kept, if you want you can skip steps 2 and 3, and during step 5 you can type in the file path instead of copy-pasting it. Now you can finally use your program of choice to translate your add-on! Happy translating!
0 notes
Text
Basic Linux Commands
When you hear of Linux, most people think of a complex operating system that is only used by programmers. But it’s not as weird as it sounds.
When running a Linux OS, you need to use a shell—an interface that allows you access to the resources of the operating system. The shell is a program that receives commands from the user and gives them to the OS to process and displays the output. The shell of Linux is its core component. Its distros come from the GUI (Graphical User Interface), but essentially, Linux has a CLI (Command-Line Interface). To open the terminal, press Ctrl+Alt+T in Ubuntu, or press Alt+F2, type gnome-terminal, and press Enter. In Raspberry Pi, type lxterminal.
Shell is the user interface responsible for handling all CLI typed commands. Reads and interprets commands and instructs the operating system to execute tasks as requested. In other words, a shell is a user interface that controls the CLI and functions as a man-in-the-middle interface that links users to the operating system.
And if you’re thinking of using Linux, knowing primary command lines is going a long way. Here is a list of basic Linux commands:
pwd-Use the pwd command to find the direction of the actual working directory (folder) you are in. The command returns an absolute (full) path, which is essentially the path of all directories beginning with the forward slash (/). The/home/username is an example of an utter road.
cd-Use the cd command to browse through Linux files and folders. It needs either the full path or the directory name, depending on the current working directory you’re in. Let’s assume you’re in/home/username/Documents and you want to go to Images, the Documents subdirectory. To do this, simply type the following command: cd Images. Know, this command is case sensitive, and you have to type the folder name exactly as it is.
ls-Use the “ls” command to know which files are in the directory you are in. You can see all the secret files using the command “ls-a.” If you want to know the contents of other folders, type ls, and then the directory path. For example, enter ls/home/username/Documents to display the contents of the Documents.
mkdir & rmdir-Use the mkdir command to build a new directory—if you type mkdir Music, a directory called Music will be formed. Use this Linux simple command mkdir Music/Newfile to create a new directory within another directory. Use the choice p(parents) to create a guide between two existing directories. For example, a new “2020” file will be generated by mkdir-p Music/2020/Newfile.
rm-Use rm to remove files and folders. Using “rm-r” to uninstall the directory. Deletes both the folder and the files that it holds by using just the rm button.
touch-The touch command is used to construct a file. It may be anything from an empty text file to an open zip file. “Touch new.txt” for example.
locate-You can use this command to locate a file, much like the Windows search command. What’s more, using the-i argument along with this command will make it case-insensitive, so you can scan for a file even if you don’t know its exact name. To check for a file containing two or more words, use an asterisk (*). For example, locate-i school*note will search for any file that contains the names “school” and “note” whether it is a case or case.
man & –help – Use the man button to know more about the command and how to use it. Shows the man pages of the command. For example, “man cd” shows the cd command manual pages. Typing the name of the command and the argument allows you to see how the command can be used (e.g., cd-help).
cp – Use the cp command to copy files from the current directory to another directory.
mv – Use the mv command to transfer files around the command line. We may also use the command mv to rename a file. For example, if we want to change the name of the file “text” to “new,” we can use “mv text new.” It takes the two arguments, much like the command cp.
Here are a few more complicated commands that should prove very useful:
cat – One of the most commonly used commands in Linux is cat – (short for concatenate). Used to list a file’s contents on the standard output. To run this command, type cat, followed by a file name and an extension of that file. Cat file.txt, for example.
diff- The diff command, short for difference, compares the contents of two files line by line. It will output the lines that do not fit after evaluating the files. Programmers also use this order instead of rewriting the entire source code when they need to make program alterations.
job-Job command shows all current employment along with their status. A work is simply a mechanism triggered by the shell.
find – Similar to the locate command, you can also use find to scan for files and folders. The difference is that you use the find command to locate files inside a directory. For example, find/home/-name notes.txt can search for a file called notes.txt in the home directory and its subdirectories.
echo – The “echo” command lets us transfer some data usually text, to a file. For example, if you want to build a new text file or add a text file, you just need to type “echo hello, my name is alok >> new.txt.”
grep – Another simple Linux command that is certainly useful for daily use is grep. It helps you to browse through all the text in a given file.
head – The head command is used to display the first rows of any text file. By default, the first 10 lines will be shown, but you can change that number to your taste.
tail – This one has a similar feature to the head command, but instead of displaying the first lines, the tail command shows the last ten lines of the text file.
ping – Using ping to verify your link to your server. Ping is a computer network management software utility used to measure the accessibility of an Internet Protocol (IP) network host.
kill -If you have a non-responsive program, you can terminate it manually by using the kill button. Sends an essential signal to the misbehaviour app and instructs the app to release itself. There are a total of sixty-four signals that you can use but people typically only use two signals: SIGTERM (15)-requests a program to stop running and give it some time to save all of its development. If you do not mention a signal when entering the kill command, this signal will be used. There’s also SIGKILL (9)-forces programs to stop immediately. Unsaved progress is going to be lost.
Basic Linux commands allow users to quickly and easily perform tasks. It might take a while to learn some of the simple commands, but with plenty of practice, nothing is impossible. In the end, it would undoubtedly be helpful for you to learn and master these simple Linux commands.
#linux #linuxdistros #kalilinux #linuxdistributions #archlinux #unix #linuxcommands #linuxmemes
0 notes
Text
Unlocking the Power of Python Scripts: A Comprehensive Guide
Dakidarts
Python, a versatile and widely-used programming language, offers a multitude of tools and libraries that empower developers to create efficient and automated solutions. One of the key features that make Python so powerful is its ability to create and execute scripts. In this article, we will explore Python scripts, their applications, and how to harness their capabilities to streamline tasks and boost productivity.
What Are Python Scripts?
Python scripts are sequences of Python code saved in a file with the ".py" extension. Unlike traditional software applications, which often have graphical user interfaces (GUIs), scripts are typically run from the command line. They are designed to perform specific tasks, automate processes, or manipulate data. Python's simplicity and readability make it an excellent choice for writing scripts.
Advantages of Python Scripts
Cross-Platform Compatibility: Python is available on various operating systems, including Windows, macOS, and Linux. This ensures that Python scripts can run seamlessly across different platforms.
Wide Range of Libraries: Python boasts a vast ecosystem of libraries and modules, such as NumPy, pandas, and requests, which can be easily integrated into scripts. This extensive library support simplifies complex tasks.
Ease of Learning: Python's clear and concise syntax makes it accessible for beginners and experienced developers alike. Writing and maintaining Python scripts is straightforward.
Community Support: Python enjoys a robust community of developers who continually contribute to its growth. This means that you can find ample documentation, tutorials, and support online.

Practical Applications of Python Scripts
Python scripts find applications in various fields, from data analysis to web development. Here are some common use cases:
1. Data Processing and Analysis
Python is a go-to language for data professionals. Scripts can be written to clean, transform, and analyze data, utilizing libraries like pandas and Matplotlib for data visualization. This is especially valuable in industries like finance, healthcare, and marketing.
2. Automation
Python scripts excel at automating repetitive tasks. For instance, you can write scripts to automatically back up files, send emails, or perform system maintenance, saving time and reducing human error.
3. Web Scraping
Scripts can scrape data from websites, helping businesses gather valuable information, monitor competitors, or track market trends. Libraries like BeautifulSoup and Scrapy simplify web scraping tasks.
4. Scripting for Games and Multimedia
Python can also be used for scripting in game development and multimedia applications. Popular game engines like Unity support Python, allowing developers to create game logic and scripts.
5. DevOps and System Administration
System administrators use Python scripts to manage servers, automate deployment processes, and monitor system performance. Tools like Ansible and Docker also leverage Python for automation.
Writing and Running Python Scripts
Creating and running Python scripts is a straightforward process:
Create a Python File: Start by opening a text editor and writing your Python code. Save the file with a ".py" extension, like "myscript.py".
Run the Script: To execute the script, open a command prompt or terminal and navigate to the folder containing the script. Then, enter python myscript.py, replacing "myscript.py" with your file's name.
View Output: The script will run, and you'll see the output in the command prompt or terminal.
Conclusion
Python scripts are invaluable tools for developers and professionals across a range of industries. Their ability to automate tasks, process data, and streamline workflows makes them a go-to choice for efficiency and productivity. Whether you're a seasoned developer or a newcomer to programming, harnessing the power of Python scripts can simplify your work and help you achieve your goals more effectively. So, dive into the world of Python scripting and unlock the full potential of this versatile language.
0 notes
Text
All right, as someone who is of that tech literate generation ("geriatric" millennial) and who works in tech (network engineer) I need to say one thing, give the kids a bit of a break.
Look, my first computer was a Windows 3.1/DOS machine. In order to play a game, I first had to boot to the command prompt, go through a command line install, and then create a boot disk so I could play the game.
That's why kids these days don't know the tech stuff, they didn't have to. These days you can just press a button and a game installs itself. We didn't learn this stuff because we wanted to be computer gurus, we had to learn all these things in order to do fun stuff, they don't, that's as simple as it gets.
And, for the kids wondering where all that stuff we talk about is, it's all still there. Windows hasn't changed much in 40 years. The command line and folder structure that I used in DOS is still there, you just don't have to use it to run Windows anymore. Windows 11 still has all of the same stuff Windows 3.1 did, it just has a pretty interface layered on top of it.
If you want to understand tech stuff, I'd suggest starting small. Open the file explorer (search "file explorer" in the Windows search bar or press CTRL + E) and start exploring the folders. Every program you run is stored in either the Program Files or Program Files (x86) directory on the C: drive, find their folders and start looking at their files. See what other folders you have. Make new folders and start storing things like pictures and videos in them.
Notice that different types of files do different things. The .exe files run things, .dat and .config files contain data. You can open some of the files up in a text editor (I recommend Notepad++) and edit them yourself to change settings. If you're worried about breaking things, create a copy of the file and look at that. Breaking the copy won't affect anything.
Honestly, the main reason you should know tech these days is so that you can pirate software either because it's horrifically expensive or because it's no longer possible to buy legally at all. Download and install a torrent client (I recommend Tribler, but find one that works for you). When you open the client, go to its settings and change the folder that downloads go to. Then go to a torrent site like The Pirate Bay, search for what you want, and download the torrent file (I recommend finding one with a high SE value. This means a lot of people are "seeding" or providing it). Open the file with your torrent client and let the program or file download.
You don't have to do any of this stuff to use computers anymore, but you do have to know this kind of stuff to be good with computers. And all computers generally work this way, BTW, even Linux and Mac.
If you want to get more advanced than that, you can open up the Command Prompt (search "command prompt" in Windows) and Google some command line commands. This is power-user stuff, but you might find that it comes in handy more often than you'd think.
These days all work programs are still on PCs, it's very rare that you'll have a job that runs programs on tablets, chromebooks, or phones. Even just learning simple stuff like Excel functions can make you seem like a wizard to some people in the modern world.
Hope some of that helps and feel free to ping me with any other questions you might have.
this can't be true can it
99K notes
·
View notes
Text
Custom Comfort » Linux Magazine
Custom Comfort » Linux Magazine
A first for laptops, Keyboardio Atreus offers an ergonomic, portable keyboard with customizable key programming. Generally speaking, laptops are not designed for typists. On many laptops, the keys are smaller than on a full-sized keyboard. Almost always, laptops use chiclet keys (small, flat squares) that slow typing, take a toll on fingers and hands after a few hours, and can cause serious…

View On WordPress
#linux commands#linux distributions comparison#linux distributions market share#linux find file containing text#linux mint download 20
0 notes
Text
Basic LINUX commands
When you hear of Linux, most people think of a complex operating system that is only used by programmers. But it’s not as weird as it sounds.
When running a Linux OS, you need to use a shell—an interface that allows you access to the resources of the operating system. The shell is a program that receives commands from the user and gives them to the OS to process and displays the output. The shell of Linux is its core component. Its distros come from the GUI (Graphical User Interface), but essentially, Linux has a CLI (Command-Line Interface). To open the terminal, press Ctrl+Alt+T in Ubuntu, or press Alt+F2, type gnome-terminal, and press Enter. In Raspberry Pi, type lxterminal.
Shell is the user interface responsible for handling all CLI typed commands. Reads and interprets commands and instructs the operating system to execute tasks as requested. In other words, a shell is a user interface that controls the CLI and functions as a man-in-the-middle interface that links users to the operating system.
And if you’re thinking of using Linux, knowing primary command lines is going a long way. Here is a list of basic Linux commands:
pwd-Use the pwd command to find the direction of the actual working directory (folder) you are in. The command returns an absolute (full) path, which is essentially the path of all directories beginning with the forward slash (/). The/home/username is an example of an utter road.
cd-Use the cd command to browse through Linux files and folders. It needs either the full path or the directory name, depending on the current working directory you’re in. Let’s assume you’re in/home/username/Documents and you want to go to Images, the Documents subdirectory. To do this, simply type the following command: cd Images. Know, this command is case sensitive, and you have to type the folder name exactly as it is.
ls-Use the “ls” command to know which files are in the directory you are in. You can see all the secret files using the command “ls-a.” If you want to know the contents of other folders, type ls, and then the directory path. For example, enter ls/home/username/Documents to display the contents of the Documents.
mkdir & rmdir-Use the mkdir command to build a new directory—if you type mkdir Music, a directory called Music will be formed. Use this Linux simple command mkdir Music/Newfile to create a new directory within another directory. Use the choice p(parents) to create a guide between two existing directories. For example, a new “2020” file will be generated by mkdir-p Music/2020/Newfile.
rm-Use rm to remove files and folders. Using “rm-r” to uninstall the directory. Deletes both the folder and the files that it holds by using just the rm button.
touch-The touch command is used to construct a file. It may be anything from an empty text file to an open zip file. “Touch new.txt” for example.
locate-You can use this command to locate a file, much like the Windows search command. What’s more, using the-i argument along with this command will make it case-insensitive, so you can scan for a file even if you don’t know its exact name. To check for a file containing two or more words, use an asterisk (*). For example, locate-i school*note will search for any file that contains the names “school” and “note” whether it is a case or case.
man & –help – Use the man button to know more about the command and how to use it. Shows the man pages of the command. For example, “man cd” shows the cd command manual pages. Typing the name of the command and the argument allows you to see how the command can be used (e.g., cd-help).
cp – Use the cp command to copy files from the current directory to another directory.
mv – Use the mv command to transfer files around the command line. We may also use the command mv to rename a file. For example, if we want to change the name of the file “text” to “new,” we can use “mv text new.” It takes the two arguments, much like the command cp.
Here are a few more complicated commands that should prove very useful:
cat – One of the most commonly used commands in Linux is cat – (short for concatenate). Used to list a file’s contents on the standard output. To run this command, type cat, followed by a file name and an extension of that file. Cat file.txt, for example.
diff- The diff command, short for difference, compares the contents of two files line by line. It will output the lines that do not fit after evaluating the files. Programmers also use this order instead of rewriting the entire source code when they need to make program alterations.
job-Job command shows all current employment along with their status. A work is simply a mechanism triggered by the shell.
find – Similar to the locate command, you can also use find to scan for files and folders. The difference is that you use the find command to locate files inside a directory. For example, find/home/-name notes.txt can search for a file called notes.txt in the home directory and its subdirectories.
echo – The “echo” command lets us transfer some data usually text, to a file. For example, if you want to build a new text file or add a text file, you just need to type “echo hello, my name is alok >> new.txt.”
grep – Another simple Linux command that is certainly useful for daily use is grep. It helps you to browse through all the text in a given file.
head – The head command is used to display the first rows of any text file. By default, the first 10 lines will be shown, but you can change that number to your taste.
tail – This one has a similar feature to the head command, but instead of displaying the first lines, the tail command shows the last ten lines of the text file.
ping – Using ping to verify your link to your server. Ping is a computer network management software utility used to measure the accessibility of an Internet Protocol (IP) network host.
kill -If you have a non-responsive program, you can terminate it manually by using the kill button. Sends an essential signal to the misbehaviour app and instructs the app to release itself. There are a total of sixty-four signals that you can use but people typically only use two signals: SIGTERM (15)-requests a program to stop running and give it some time to save all of its development. If you do not mention a signal when entering the kill command, this signal will be used. There’s also SIGKILL (9)-forces programs to stop immediately. Unsaved progress is going to be lost.
Basic Linux commands allow users to quickly and easily perform tasks. It might take a while to learn some of the simple commands, but with plenty of practice, nothing is impossible. In the end, it would undoubtedly be helpful for you to learn and master these simple Linux commands.
57 notes
·
View notes
Note
Sorry to burst into your asks like this, but I'm really interested in the exocolonist datamining-can you tell me what/where to find the file you looked through?
So! Number 1 thing!! You never have to apologize for asking me to talk at great length about something I love. I am extremely autistic. This is one of my favourite kinds of social interaction.
Now then!!
I play on linux, so all the files are just out there in the open and most of them are plain text files with custom file endings.
I don't know what the file structure looks like on windows, but since the game seems to have been written in java, probably basically identical. Assuming nothing is encrypted on windows either, I would say this game is the most beginner friendly for data mining I've ever seen.
So for me, the files are in ~/.steam/debian-installation/steamapps/common/Exocolonist/Exocolonist_Data/StreamingAssets/ and then in the Data and StreamingAssets folders.
On windows, that would be in your steam folder, then steamapps/common/Exocolonist/Exocolonist_Data/StreamingAssets/
You can also just right click on the game in steam, and go to Manage > Browse Local Files. That will open you to the main Exocolonist folder, so you'll navigate to exocolonist_data/StreamingAssets/
The data folder is where you will find the bulk of the writing for endings, character profiles, cards, card abilities, etc. If you want to modify how much a particular card is worth, view the full names of characters you only see mentioned briefly, etc, this is the folder you want.
The Stores folder contains the actual "gameplay" parts, in the sense that the buildings, locations, jobs, combat calls, etc are in it. That includes mid-game dialogue!
There's also a specific file in Stories called 'unimplemented memories' that shows the specific coding syntax for modifying the game, to ensure any changes you make look and play correctly!
Between that and save files being basically plaintext with a button on the 'load game' menu that will take you directly to them in your file system you you can edit them even easier, this game is a GREAT choice for learning more about how to datamine or mod a game. Everything is so straightforward.
I mean, the code is fully commented, with all human-readable variables and methods. That's insane! I didn't even code shit that tightly when I was in school, actively being graded on it!!!!!!!!
The endings are all written out in Exocolonist - endings.TSV. I mean that's. That's SO straightforward!! You can open TSV files in any spreadsheet editorfor a more visually pleasant experience, or in a plain text editor if you're hardcore for the sake of being hardcore.
Oh, save games are actually located in your documents folder (I think?) on windows, and in the home folder on linux. The folder is helpfully called "exocolonist/save_games" so it's very simple to find. You can edit your save files (which end in .JSON) in any plain text editor. For windows, I like notepad++ since it will automatically color code the formatting. For Linux, I use Kate but any of the ones that come pre-packaged will do just fine.
Some of my favourites so far from fucking around where I don't belong:
The "releasing endorphins" card you get for distracting Tangent from her Big Government Project by fucking her is called "TangBang" in the data. This is, to me, the single funniest phrase on earth. I can't stop saying it.
Unimplemented Memories contains tons of non-canonical filler text including gems like:
"Git outta me bloody face, ye sodding nullshite!" Vace yelled, as Rex blew him another kiss.
~set bg = pinup_tammy_saved WOW you saved Tamtam! Tammadammadingdong lives!
Anemone Enhancement: Scaly lizard lady. > facts
marz: "Ho ho ho welcome to _my_ bridge which _I_ am totally the boss of." dys: "Ug Marz this place smells funny." marz: "He who smelt it dealt it, Nerd."
But, most importantly of all, the dog-like creature that tries to kill you/Anemone in the opening sequence??
Is named Doggo.
#asks#ask answers#drmobiusvanch#Exocolonist#I was a teenage Exocolonist#Spoilers#Exocolonist spoilers
42 notes
·
View notes
Text
TOOL TUTORIAL #1
FFmpeg | Script 1
GIF GENERATION AND OPTIMIZATION
Tool type: Command Line tool
Operating systems: Mac, Windows, and Linux
Difficulty: Moderate to Advanced
Input: Video files (any video file format).


Installation
I recommend you install via Homebrew if you're on Mac or Linux by pasting this into your terminal (if/once Homebrew is installed):
brew install ffmpeg
Windows users or other users who don't want Homebrew can follow directions on the FFMPEG website.
Converting one video file to GIF
In your system shell (Powershell on Windows, Terminal on Mac) change directories to the location containing your MP4 file (or whatever video file type you have—just replace .mp4 in the script with .mkv or whatever extension you have). Use this command:
cd FilePathToYourMP4 ffmpeg -y -i input.mp4 -filter_complex "fps=18,smartblur=ls=-0.25,scale=540:-1:flags=lanczos,split [a][b];[a] palettegen=stats_mode=single [p];[b][p] paletteuse=new=1" output.gif
Explaining and altering the script
The script does the following to your the clip you want to turn into a GIF, input.mp4:
Generate a gif with 20 frames per second (fps=18 controls frames per second. Change the number to changes the FPS).
Sharpen each frame (smartblur=ls=-0.25 controls sharpening. Negative values between -1 and 0 sharpen the image).
Scale every frame in the gif down to a 500 pixels using the lanczos technique. (scale=540 controls scale. Change 500 to different numbers to scale up and down)
Generate a custom color pallet for every frame and overlay it on your gif as a filter (split [a][b];[a] palettegen=stats_mode=single [p];[b][p] paletteuse=new=1)
Generates and saves the resulting gif under the name output.gif.
NOTE: Video files inputs don't have to be .mp4. You can use .mkv, .mov, or any other video type.
Converting a folder of video files to GIF
Place all of your video clips into a folder called gifset1. Put an empty subfolder inside the gifset1 folder called gifs. Go to your system shell and copy and paste the following indented text:
Mac and Linux users:
cd ~/desktop/gifset1 for i in *.mp4; do ffmpeg -y -i "$i" -filter_complex "fps=18,smartblur=ls=-0.25,scale=540:-1:flags=lanczos,split [a][b];[a] palettegen=stats_mode=single [p];[b][p] paletteuse=new=1" gifs/${i%.*}.gif; done
Windows users:
cd ~desktop\gifset1 for i in *.mp4; do ffmpeg -y -i "$i" -filter_complex "fps=18,smartblur=ls=-0.25,scale=540:-1:flags=lanczos,split [a][b];[a] palettegen=stats_mode=single [p];[b][p] paletteuse=new=1" gifs\${i%.*}.gif; done
Once the process is finished running (your shell prompt will reappear allowing you to type in commands again) if you go to to the gifs subfolder in your gifset1 folder, you will find an optimized gif of every video file has been rendered.
Does this script run slowly for you?
The Palletegen function of this script may take a long time to run on certain computers. There is a faster script here you can try for very similar results.
3 notes
·
View notes