#manual action
Explore tagged Tumblr posts
Visit Tumblr Blog
Explore Tumblr blogs with no restrictions, modern design and the best experience.
Last Seen Tumblr Blogs


Fun Fact
After the announcement of the deal with Yahoo!, there were 170K signatures of unhappy Tumblr users petitioning to prevent the sale in 2013.
Text

Google March 2024 Update, 6 Insights On Manual Actions, Important Updates
0 notes
Text
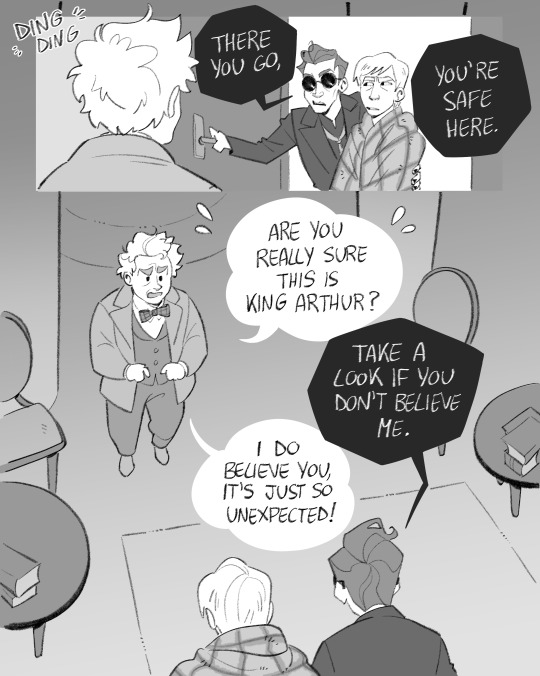

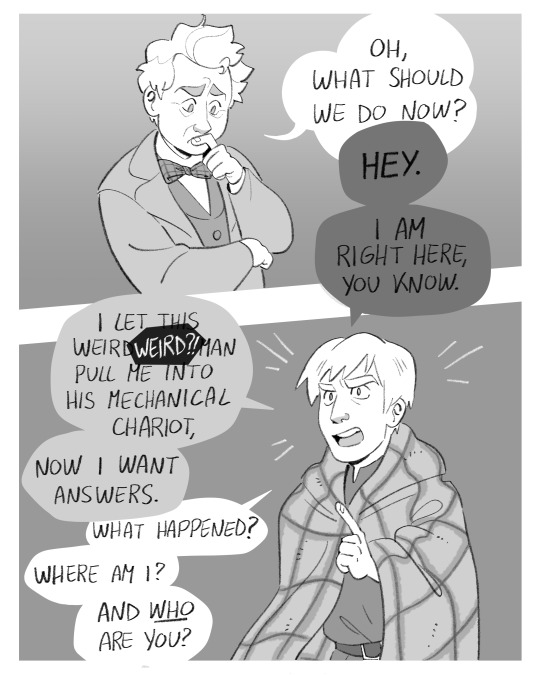
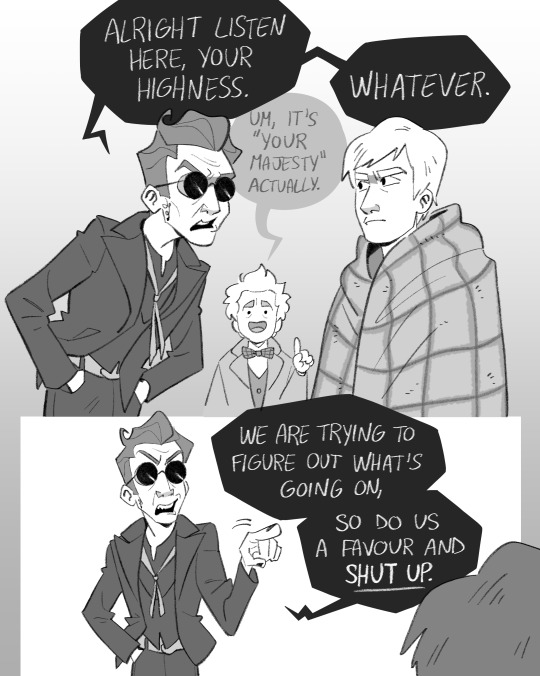


Pretty sure "ease him" doesn't mean anything but I'm NOT rewriting that now >:/
First >> Next
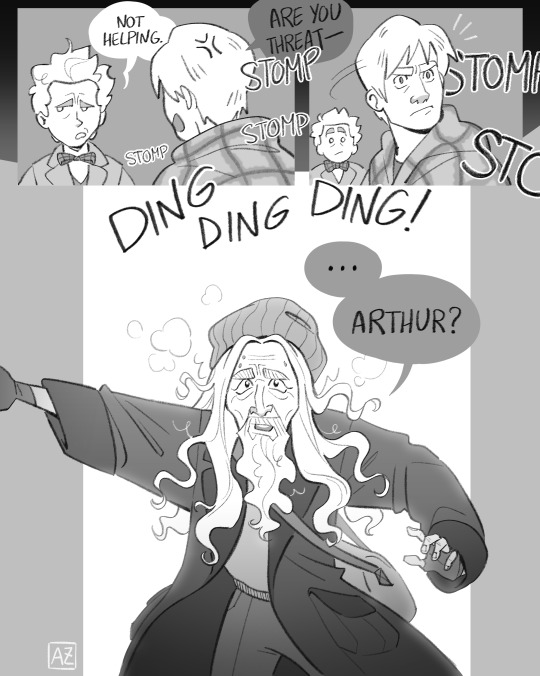
#good omens#bbc merlin#aziraphale#crowley#arthur pendragon#merlin#magic omens au#crowley stop trying to look cool this is NOT the right moment#this took 16 hours im not even joking#entirely my fault bc i insist on drawing the speech bubbles manually#tune in for next part for some thrilling action! (more hostility)#my art#long post
13K notes
·
View notes
Text


Direct action, simply put, means cutting out the middleman: solving problems yourself rather than petitioning the authorities or relying on external institutions. Any action that sidesteps regulations and representation to accomplish goals directly is direct action—it includes everything from blockading airports to helping refugees escape to safety and organizing programs to liberate your community from reliance on capitalism. Here we present a step-by-step guide to organizing and carrying out direct action, from the first planning stages to the debrief at the end, including legal support, media strategy, and proper security.
There are countless scenarios in which you might want to employ direct action. Perhaps representatives of despicable multinational corporations are invading your town to hold a meeting, and you want to do more than simply hold a sign; perhaps they’ve been there a long time, operating franchises that exploit workers and ravage the environment, and you want to hinder their misdeeds; perhaps you want to organize a festive, community-oriented event such as a street party. Direct action can plant a public garden in an abandoned lot or defend it by paralyzing bulldozers; it can occupy empty buildings to house the homeless or shut down government offices. Whether you’re acting in secret with a trusted friend or in a mass action with thousands of people, the basic elements are the same.
#direct action#how-to#guides#manuals#anarchism#anarchy#anarchist society#practical anarchy#practical anarchism#resistance#autonomy#revolution#communism#anti capitalist#anti capitalism#late stage capitalism#daily posts#libraries#leftism#social issues#anarchy works#anarchist library#survival#freedom#CrimethInc
2K notes
·
View notes
Text
My GIF Making process: Screen capturing using MPV player, Organizing files, 3 Sharpening settings, Basic Coloring PSD + Actions set

This is a very long post so heads up.
I’ll try to be as thorough and true as much as possible to the way I make my gifs (I already use Photoshop Actions which I’ve long since set up but now for this tutorial I’m reviewing them to show you the exact steps I’ve learned to create my gifs 😃) and present them to you in a semi-coherent way. Also, please bear with me since English is my second language.
First things first. Below are the things and tools we need to do this:
Downloaded 4K or 1080p quality videos (let’s all assume we know where to get these—especially for high definition movies and tv series—so this post doesn’t get removed, okay? 😛)
Adobe Photoshop CC or the CS versions can work as well, but full disclosure I haven’t created gifs using the CS versions since 2020. I’m currently using Adobe Photoshop 2024.
mpv player. Use mpv player to get those frames/screenshots or any other video player that has a screen grabber feature. I’ve used adapter for the longest time but I’ve switched to mpv because the press to screenshot feature while the video is playing has been a game changer not to mention ultimate time saver for me. For adapter you need to play it in another video player (like VLC player), to get the start and end timestamps of the scene you want to gif which takes me ages before I can even open Photoshop.
Anyway! Please stop reading this post for a moment and head over to this amazing tutorial by kylos. She perfectly tells you how to install and use mpv player, both for Mac and Windows users.
One thing I have to share though, I had a tough time when I updated my MacOS to Sonoma since MPV is suddenly either duplicating frames or when I delete the duplicates the player seems to be skipping frames :/ I searched and found a solution here, though it didn’t work for me lol. My workaround for this in the meantime is decreasing the speed down to 0.70 then start screenshotting—it’s not the same pre Sonoma update but it works so I’ll have to accept it rather than have jumpy looking gifs.
Now, after this part of kylos’ tutorial:

you can continue reading the following sections of my gif tutorial below.
I want to share this little tip (sorry, this will only cater to Mac users) that I hope will be helpful for organizing the screenshots that MPV saved to the folder you have selected. Because believe me you don’t want to go through 1k+ of screenshots to select just 42-50 frames for your gif.
The Control + Command + N shortcut
This shortcut allows you to create a new folder from files you have pre-selected. As you can see below I have already created a couple of folders, and inside each folder I have selected screenshots that I want to include in one single gif. It's up to you how you want to divide yours, assuming you intend to create and post a Tumblr gifset rather than just one gif.

Another tip is making use of tags. Most of, if not all the time, I make supercorp gifs so I tag blue for Kara and red (or green) for Lena—just being ridiculously on brand and all that.
Before we finally open Photoshop, there's one more thing I want to say—I know, please bear with me for the third? fourth? time 😅
It's helpful to organize everything into their respective folders so you know the total number of items/frames you have. This way, you can add or delete excess or unnecessary shots before uploading them in Photoshop.
For example below there are 80 screenshots of Kara inside this folder and for a 1:1 (540 x 540 px) Tumblr gif, Photoshop can just work around with 42-50 max number of frames with color adjustments applied before it exceeds the 10 MB file size limit of Tumblr.

Sometimes I skip this step because it can be exhausting (haha) and include everything so I can decide visually which frames to keep later on. You'll understand what I mean later on. But it's important to keep the Tumblr 10 MB file size limit in mind. Fewer frames, or just the right amount of frames, is better.
So, with the screenshot organization out of the way, let's finally head over to Photoshop.
Giffing in Photoshop, yay!
Let’s begin by navigating to File > Scripts > Load Files into Stack…

The Load Layers window will appear. Click the Browse button next.
Find your chosen screenshots folder, press Command + A to select all files from that folder then click Open. Then click OK.
After importing and stacking your files, Photoshop should display the following view:

By the way, I'll be providing the clip I've used in this tutorial so if want to use them to follow along be my guest :)
If you haven't already opened your Timeline panel, navigate to Windows > Timeline.
Now, let's focus on the Timeline panel for the next couple of steps.
Click Create Video Timeline, then you’ll have this:

Now click the menu icon on the top right corner then go to Convert Frames > Make Frames from Clips

Still working on the Timeline panel, click the bottom left icon this time—the icon with the three tiny boxes—to Convert to Frame Animation
Select Make Frames From Layers from the top right corner menu button.
So now you have this:

Go and click the top right menu icon again to Select All Frames
Then click the small dropdown icon to set another value for Frame Delay. Select Other…

The best for me and for most is 0.05 but you can always play around and see what you think works for you.
Click the top right menu icon again to Reverse Frames.
I think Photoshop has long since fixed this issue but usually the first animation frame is empty so I just delete it but now going through all these steps there seems to be none of that but anyways, the delete icon is the last one among the line of feature buttons at the bottom part of the Timeline panel.
Yay, now we can have our first proper GIF preview of a thirsty Lena 😜

Press spacebar to watch your gif play for the very first time! After an hour and half of selecting and cutting off screenshots! 😛 Play it some more. No really, I’m serious. I do this so even as early (lol) as this part in the gif making process, I can see which frames I can/should delete to be within the 10 MB file size limit. You can also do it at the end of course 🙂
Now, let’s go to the next important steps of this tutorial post which I’ve numbered below.
Crop and resize to meet Tumblr's required dimensions. The width value should be either 540px, 268px, or 177px.
Convert the gif to a Smart Object for sharpening.
Apply lighting and basic color adjustments before the heavy coloring. I will be sharing the base adjustments layers I use for my gifs 😃.
1. Crop and Resize
Click on the Crop tool (shortcut: the C key)

I like my GIFs big so I always set this to 1:1 ratio if the scene allows it. Press the Enter key after selecting the area of the frame that you want to keep.
Side note: If you find that after cropping, you want to adjust the image to the left or another direction, simply unselect the Delete Cropped Pixels option. This way, you will still have the whole frame area available to crop again as needed and as you prefer.
Now we need to resize our gif and the shortcut for that is Command + Opt + I. Type in 540 as the width measurement, then the height will automatically change to follow the ratio you’ve set while cropping.
540 x 540 px for 1:1
540 x 405 px for 4:3
540 x 304 px for 16:9
For the Resample value I prefer Bilinear—but you can always select the other options to see what you like best.
Click OK. Then Command + 0 and Command + - to properly view the those 540 pixels.

Now we get to the exciting part :) the sharpen settings!
2. Sharpen
First we need to have all these layers “compressed” intro a single smart object from which we can apply filters to.
Select this little button on the the bottom left corner of the Timeline panel.


Select > All Layers
Then go to Filter > Convert for Smart Filters
Just click OK when a pop-up shows up.
Now you should have this view on the Layers panel:

Now I have 3 sharpen settings to share but I’ll have download links to the Action packs at the end of this long ass tutorial so if you want to skip ahead, feel free to do so.
Sharpen v1
Go to Filter > Sharpen > Smart Sharpen…
Below are my settings. I don’t adjust anything under Shadows/Highlights.
Amount: 500
Radius: 0.4
Click OK then do another Smart Sharpen but this time with the below adjustments.
Amount: 12
Radius: 10.0

As you can see Lena’s beautiful eyes are “popping out” now with these filters applied. Click OK.
Now we need to Convert to Frame Animation. Follow the steps below.
Click on the menu icon at the top right corner of the Timeline panel, then click Convert Frames > Flatten Frames into Clips
Then Convert Frames > Convert to Frame Animation
One more click to Make Frames From Layers
Delete the first frame then Select All then Set Frame Delay to 0.05

and there you have it! Play your GIF and make sure it’s just around 42-50 frames. This is the time to select and delete.
To preview and save your GIF go to File > Export > Save for Web (Legacy)…
Below are my Export settings. Make sure to have the file size around 9.2 MB to 9.4 MB max and not exactly 10 MB.

This time I got away with 55 frames but this is because I haven’t applied lighting and color adjustments yet and not to mention the smart sharpen settings aren't to heavy so let’s take that into consideration.
Sharpen v1 preview:

Sharpen v2
Go back to this part of the tutorial and apply the v2 settings.
Smart Sharpen 1:
Amount: 500
Radius: 0.3
Smart Sharpen 2:
Amount: 20
Radius: 0.5
We’re adding a new type of Filter which is Reduce Noise (Filter > Noise > Reduce Noise...) with the below settings.

Then one last Smart Sharpen:
Amount: 500
Radius: 0.3
Your Layers panel should look like this:

Then do the Convert to Frames Animation section again and see below preview.
Sharpen v2 preview:

Sharpen v3:
Smart Sharpen 1:
Amount: 500
Radius: 0.4
Smart Sharpen 2:
Amount: 12
Radius: 10.0
Reduce Noise:
Strength: 5
Preserve Details: 50%
Reduce Color Noise: 0%
Sharpen Details: 50%
Sharpen v3 preview:

And here they are next to each other with coloring applied:
v1

v2

v3

Congratulations, you've made it to the end of the post 😂
As promised, here is the download link to all the files I used in this tutorial which include:
supercorp 2.05 Crossfire clip
3 PSD files with sharpen settings and basic coloring PSD
Actions set
As always, if you're feeling generous here's my Ko-fi link :) Thank you guys and I hope this tutorial will help you and make you love gif making.
P.S. In the next post I'll be sharing more references I found helpful especially with coloring. I just have to search and gather them all.
-Jill
#tutorial#gif tutorial#photoshop tutorial#gif making#sharpening#sharpening tutorial#photoshop#photoshop resources#psd#psd coloring#gif coloring#supercorp#supercorpedit#lena luthor#supergirl#my tutorial#this has been a long time coming#guys. i'm BEGGING you. use the actions set - it was a pain doing all this manually again ngl LMAO#i've been so used to just playing the actions#so this has been a wild refresher course for me too 😆
758 notes
·
View notes
Note
how do you turn your black line art into coloured line art? trying to get a feel for it but i'm struggling in determining what's the most effective method
i USED to do it by hand but then i discovered this lovely little thang, an auto-action for clip studio paint that just. does it for me. i've been really enjoying the black outer-lines and colored inner-lines lately, so how i've been doing it is like this: 1.) use the auto action on my flat colors layer to create a dark + saturated clipping layer 2.) move the newly created colored clipping layer above my lines....coloring them. i usually spend time tweaking these colors w/ hue + saturation adjustments and manual touchups, but for the sake of a visual tutorial in gif form i didn't here outside of re-adding the white to the eyeshines.

3.) select the line layer and expand the selection by two or three pixels. 4.) reselect the colored lines clipping layer. 5.) use ctrl+x to cut the now selected out edges of the colored lines, showing the black lines underneath

and then from there i'll sometimes add more outlines/drop shadows/ect or change the black to just a very dark saturated color, based on the Vibe. i hiiiiighly recommend clip studio paint + it's awesome auto actions forever because of how much time it saves (also also how fun they are to use)
#tutorial#ask#i hope dis helps i may have overexplained#its rlly just#for me at least#use auto action and tweak it from there#if u do it Manual Style i recommend just coloring the whole layer in a darker and more saturated version of whatever color is most#prominent on the character/object/whatever and hue sliding it from there.#sometimes i go with bright and saturated lines. sometimes i do rlly dark lines. smtmes every part of the piece gets diff lines based on the#color around it#experiment and have fun w it
167 notes
·
View notes
Text
Lu Guang’s character intrigues me.
Not for the time traveller thing he’s got going on. But for the way he seems to generally carry himself. Outside of the overarching plot, or objective-focused interactions.
When he’s interacting with others purely for the act of interacting with them. He reads like a guy that’s trying to convince others, and himself most of all, that he’s human. He’s always thinking, always within this careful threshold of polite but calculated sincerity. He wants you to think he means well, but it’s not his first instinct to mean well— his first instinct is to ensure he’s not misunderstood by the recipient. And he seems aware of this, and prosecutes himself for it.
He can’t live in the moment and always prepares to account for any slip up. Sometimes he’ll find the words needed in a situation. Other times he seems to go dormant, or resides in a whole other world where no one can reach. Not because of inherited timeline trauma or ptsd— that wasn’t the causation. And not because he knew that silence was what the other person wanted. But because he couldn’t find the words within the established script provided to well socialised people. A script he’s had to manually curate for himself.
The guy seems to have always masked himself like it’s second nature, as though he’s never had the space to consider subjectivity within himself nor others. With what little can be surmised, his life before Cheng Xiaoshi seems isolated, devoid of passion or individuality. A blank and beautifully desolate canvas.
He doesn’t tell people things unless prompted or if it’s the socially appropriate thing to do. He doesn’t tell people things about himself unless prompted— and even when he does, he can’t fully separate the objective reasoning from any personally compelled inclination. What’s his favourite food? Food that aid in maintaining his chemical balance. What activities does he do? Activities like reading, sunbathing and basketball, which keeps both his mind and body maintained. Why does Cheng Xiaoshi sleep in the lower bunk bed? Because his constant movements would make the bed audibly creak, so it’s best that he slept on the lower bunk.
Lu Guang seems to be conditioned to constantly rationalising his actions and moralising his and others’ decisions. “It’s childish to do [x],” “this outfit looks weird,” “don’t impose yourself on others” are his typical branch of reactions to Cheng Xiaoshi’s actions. It communicates Cheng Xiaoshi’s emotionally-driven impulsivity but equally conveys Lu Guang’s aversion to subjective thinking and slight adherence to social propriety. Also conveys a cheeky, unspoken hypocrisy considering he also fails to adhere to social expectations— but this is where things get more intriguing.
After meeting Cheng Xiaoshi and Qiao Ling, you can observe how Lu Guang changes in relation to his proximity with them. Around Cheng Xiaoshi, he bears minute smiles that aren’t placating nor rehearsed. With Qiao Ling, he speaks with an understated vulnerability that comes from the heart— a subjective truth if nothing else. He doesn’t become socially trained per se, but his eccentricities are seen and accommodated to.
His comfort is wordlessly accounted for, his boundaries (while he doesn’t often communicate them) will be respected when realised, and he is regularly checked on by Cheng Xiaoshi and Qiao Ling should he seem too reticent or despondent for a long time. Even though Lu Guang still does mask himself instinctively, he carries himself more securely within his place in the studio and with his friends. He’s comfortable being childish, bratty, and emotional without reservation.
Around them, he’s not trying to convince anyone that he’s human. He’s dropped the proverbial script entirely, and lost the need to prove things. Because he’s been shown unconditional love, and even against the concept of fate, destiny, and any rational pretences— that love persists and keeps him going.
#I didn’t want to make a ramble cuz ik i’d end up doing it on mobile#and i knew that i’d have to manually gather all the link click tags cuz i don’t go on here spouting#link click thoughts#this is so unscripted cuz i’m recovering from a long assignment#also figured it’d be poetic to do an unscripted tangent on a character heavily reliant and defined by scripts#link click#shiguang dailiren#shiguang daili ren#shiguang#lu guang#cheng xiaoshi#qiao ling#link click lu guang#link click cheng xiaoshi#link click qiao ling#i love characters who are careful with their words#and terribly conscious of their actions and how they may be perceived if they acted on them#forcing my whole arm joint to post this
74 notes
·
View notes
Text


Art from the official Devil May Cry Perfect Guide (2001)
Dedicated to Mick!
#devil may cry#dmc#dante#gothic#video games#retro gaming#ps2#playstation#manual#official#trish#vergil#capcom#action games
63 notes
·
View notes
Text
I really need our curriculum to stop teaching shit like "I like reading books" and "she likes drawing pictures" and "tomorrow I am going to sing songs". Those objects are implied, it's so unnatural to include them in English.
#language library#treepie teacher time#ruffled feathers#like what the fuck else am i gonna sing#by default if you sing something it becomes a song even if it wasn't a song in the first place#drawing? i guess you could draw a weapon but in that case you pretty much always specify that's what you mean#'i like drawing' very rarely means 'i like specifically the action of pulling weapons out and pointing them at people'#interesting wordplay though i guess#reading... i guess you could mean idk magazines or instruction manuals. but if you didn't specify people would assume you meant books
10 notes
·
View notes
Text


Brainstorming: Choose a project and devise a plan
Brainstorming can start with a problem you want to solve, or a social contribution you want to make; it can be informed by the resources you have, the kind of experience you desire, or the people you want to work with. You can plot a single short adventure or a long-term campaign. Often, the best brainstorming occurs in the course of daydreams and informal conversations—it’s good policy to trust that your craziest ideas can become reality and try them out.
By the same token, even when attending events organized by others, it’s best to bring a plan so you can contribute in your own way.
If it makes sense for your action to be organized openly, establish a format, such as a public assembly, in which to work out a strategy and tactics. Invite friends, or circulate fliers, or go from door to door announcing it. Come up with your own proposals ahead of time, in case no one else does.
For more clandestine actions, brainstorm in a secure environment with a trusted friend or two. Keep your ideas to yourselves as you hash them out so you won’t have already given them away when you’re ready to try them.
#direct action#how-to#guides#manuals#anarchism#anarchy#anarchist society#practical anarchy#practical anarchism#resistance#autonomy#revolution#communism#anti capitalist#anti capitalism#late stage capitalism#daily posts#libraries#leftism#social issues#anarchy works#anarchist library#survival#freedom
23 notes
·
View notes
Text
i finished that boss fight with 20 rings to my name T-T
#WHAT THE FUCK WAS EVEN GOING ONNNNNNNNNBBNNNNNNJNNNJNH#okay cuz it started giving me instructions this time. i did what i eas told i had to do#BUT THEN THE STUPIF GUN#I COULDJT DO ANYTHIHG ABOUT THE GUN#it didn’t tell me what to do ANS MY STINKING CYCLOOP DOESNT EVEN WORK HALF THE TIME I HAD TO DO IT MANUALLY#IT WAS HELL#i didn’t even know i needed to do anything with the gun. it didn’t tell me besides like randomly telling me later#‘try doing something besides attacking The End’ BITCH WHAT THE HELL DOES THAT EVEN MEAN GIVE ME CLEAR INSTRUCTIONS#I MADE THE GUNCOME OUT. whatever i did THREE TIMESSSSS#and i only had 200 rings by the time i’d finally done that. i finally MANUALLY looped the stupid gun in the like 10 second time frame it#gave me to do so.#AAHHHHHHHHHHHH#IM NIT JOKING ABOUT THE 20 RINGS EITHER#THNAK GOD EVERYTHING ELSE WAS A CUTSCENE. ACTION TIME what are those things called#quick time event?!?)?!!!#thank goodness for that………..#or else i would’ve had to do that all over again#maybe then it would’ve given me clear instruction >:T but whatever…#tough!!!!!!!!!!!!!#probably a skill issue. probably….
5 notes
·
View notes
Text

beaming my caden trevelyan prosthetic hand blueprints in your mind so i dont have to draw them when hand hurty but you can still appreciate my beautiful vision ive concocted. various kinds of complications involved in making a unique asset i assume but actual inquisitor hand in veilguard quite disappointing to me tbh
#caden trevelyan#'should solas be cancelled for misgendering caden trevelyan when he still doesn't even know he's trans and for real thinks he is a spirit#of duty at the time and it actually might be but clearly thinks he is caden trevelyan??' <- new veilguard crew roundtable discussion#the more i think about and write little bits of this Thing im like this is just so fucking crazy and for me specifically.#i CAN accept handwavey 'well it's magic' explanations but i would like for it to feel. a little bit grounded.#anyway caden's hand has manually posable fingers but for the most part he's using it to hold a shield and so basically has quick#grab and release actions. i figure that anchor removal is a below the elbow amputation i will admit half so i dont have to worry about#the plausibility of thedas having figured out body-powered prosthetics re: elbow movement#his leg is a whole other thing we can't start getting into all that right now. mygoogle searches look crazy.
7 notes
·
View notes
Text
i can’t believe I’m saying this but I think this action scene might need more funny dialogue…
#idk how to write action it very much feels like it’s from an instruction manual + loaded language#i also laid across the floor for distance reference & jumped real far if you wanna talk about the Silly things i do for Writing Research#valdangelo#pjo
8 notes
·
View notes
Text
i think i figured out my central issue with neocities. its primarily self-generated content. i dont want people seeing that much of me. i'm like a bagworm you need to discern my shape through the things i surround myself with
#indexed post#also everyoen being like ohh just write everything in HTML its so web 1.0core its so nostalgiapilled.#Im a markdown bitch okay. Stop playing these games. I don't believe you when you say you love writing text in html i think you're lying.#other big issues are i'm predominately a mobile user (gasp) and so would need to wait to be at computer to sync pages#i also probably will need to set up github actions for it because the idea of manually adding posts every time is miserable to me
17 notes
·
View notes
Note
for real WHERE does the idea that [utdr humans] are nongendered so that "you can project on them" come from. their literal character arcs are about NOT being a blank slate to be filled in by the audience
i think i understand the assumption on some level for undertale, because there is a very intentional effort to make you identify with the "player character" in order to make your choices feel like your own (the beating heart of undertale's metanarrative lies in giving you an alternative path to violence against its enemies after all, and whether you're still willing to persue it for your own selfish reasons. YOUR agency is crucial).
of course, the cardinal plot twist of the main ending sweeps the rug from under your feet on that in every way, and frisk's individuality becomes, in turn, a tool to further UT's OTHER main theme: completionism as a form of diegetic violence within the story. replaying the game would steal frisk's life and happy ending from them for our own perverse sentimentality, emotionally forcing our hand away from the reset button.
i think their neutrality absolutely aids in that immersion. but also, there's this weird attitude by (mostly) cis fans where it being functional within the story makes it... somehow "editable" and "up to the player" as well? which is gross and shows their ass on how they approach gender neutrality in general lol.
but also like. there's plenty of neutral, non PCharacters in undertale and deltarune. even when undertale was just an earthbound fangame and the player immersion metanarrative was completely absent, toby still described frisk as a "young, androgynous person". sometimes characters are just neutral by design. it's not that hard to understand lol.
anyone who makes this argument for kris deltarune is braindead. nothing else to say about it.
#this is a very difficult topic to discuss imo because on Some level I don't completely disagree with people who make that argument for chara#in SPIRIT. if not in action. like my point still stands characters can just Be neutral. and if that level of customization had been intended#well Pokemon's been doing the ''are you a boy or a girl'' shtick for ages. no reason why that couldn't have been included as well#but i do feel that we're supposed to identify with chara within the story. not as in chara is us but as in we are chara#and i think someone playing the game without outside interferences and (wrongly) coming to the conclusion that chara IS literally#themselves in the story. and thus call them by their own name (the one they likely inputted at the start) and pronouns#will be someone who grasped undertale's metanarrative more than someone who went in already spoiled on the NM route who thinks of chara#(and on some level frisk as well) as completely separate from us with independent wills and personhoods at any time#who treats them as nonbinary. even if their approach is more ''appropriate'' to a gender neutral person#systematic error vs manually changing every measure to fit what you already think is going to be the correct result. ykwim?#of course this opens a whole new parentheses while discussing the game outside of your personal experience#because even if you DO see chara as a self insert then they are a self insert for EVERYONE. women men genderqueer people#i don't call chara ''biscia'' even though that's what i named the fallen human in my playthrough. neither do i use they because i also do#if you're describing the character/story objectively in how they are executed then you're going to talk about them neutrally#because you ain't the only sunovabitch who played the darn game sonny#so like. either way you turn it. even in the most self insert reading you'd STILL logically use they/them so ¯\_(ツ)_/¯ git gud#answered asks
117 notes
·
View notes
Text

i think this is part of what confused me so badly about that post is because it seems like its acting like "artist" is a separate class of person and not just like, an action anyone can do. it says "an artist is just Some Jackass" while acting like they are completely separate from everyone else. like sanitation workers and people who collect trash also make art. what are you (general you) talking about
#dib noise#Hi#the idea that the only worthwhile actions are manual labor while making art is futile and useless is infact not revolutionary#i also agree that “artist” as a categorization isnt very useful in general
5 notes
·
View notes
Text


The Black Cat Sabotage Handbook (1996)
6 notes
·
View notes