#microsoft access tutorial
Explore tagged Tumblr posts
Visit Tumblr Blog
Explore Tumblr blogs with no restrictions, modern design and the best experience.
Last Seen Tumblr Blogs


Fun Fact
Women make up for the other 50% of Tumblr’s audience.
Text
Managing Track Changes in Microsoft Word|Section 508 for Word
Learn how to manage Track Changes in Word for Section 508 compliance, ensuring your documents are accessible and professional. #TrackChanges, #MicrosoftWord, #Section508, #Accessibility, #WordTips, #DocumentEditing, #InclusiveDesign, #AssistiveTech
Welcome to another post in our series on enhancing Word accessibility to ensure Section 508 compliance. Today, we explore how to manage Track Changes effectively. This feature, while incredibly useful for document collaboration and editing, needs special attention to ensure Word accessibility. Video Guide Understanding Track Changes in Word Track Changes is a powerful tool in Word that allows…

View On WordPress
#Accessibility Compliance#Assistive technology#Document Accessibility#Editing Tips#microsoft word#section 508#Track Changes#Word Tutorial
0 notes
Text
so, you wanted to start bookbinding?
so @princetofbone mentioned on my post for "factory settings" about wanting to know more about the binding style that i used for it. so i thought i might make a post about it.
i was as terrible as i always am for taking in progress shots, but i can link you to the resources i used in order to make my book. i would also like to point out that "factory settings" is my 120th bind, and i have been doing bookbinding as a hobby for just over 3 years now. unfortunately this means some of the methods that i used for that bind aren't particularly beginner friendly, just in terms of the tools and methods i have used, but i would love to point you in the right direction when it comes to resources. i dont say this to sound pretentious which i fear i might come across, just so that youre fully informed. getting into this hobby is fun and rewarding, but it can definitely be intimidating.
with that caveat, heres a list of links and resources that i have used for bookbinding in general, with additional links to methods i used specifically in regards to this bind.
ASH's how to make a book document. it gives you a great introduction into typesetting fics (where you format the text of fics to look like a traditionally published books) and then turning them into a case-bound book (the style i used for "factory settings"). it is comprehensive, and explains how to use microsoft word to do your bidding. it was invaluable to me when i was just starting out! currently i use affinity publisher to typeset/format my fics for printing, but i only bought and learned how to use that after i had been binding books for a year and a half. i made some beautiful typesets with word, and some of my close friends use it still and design stuff that i never would be able to in my wildest dreams (basically anything by @no-name-publishing)
DAS Bookbinding's Square Back Bradel Binding. a great style to do your first bind in! this method requires, when making the case, to attach the cover board and the spine board to a connecting piece of paper, which makes it so much easier to match the size of the case to the size of the text block (your printed out and sewn fic). using this method is what allowed me to get much more accurately fitting cases, and made me much more confident with the construction of the books i was making. a well-made book is something that is so wonderful to hold in your hands!
DAS Bookbinding's Rounded and Backed Cased Book. This is the specific method that i used to create my bind for "factory settings"! even before i could back my books, i found that watching DAS's videos in particular helped me see how books were traditionally made, and i was able to see different tips and tricks about how to make nicer books.
Book Edge Trimming Without... i trim the edges of my text block using my finishing press and a chisel i have sharpened using a whetstone and leather strop with buffing compound on it. i follow the method for trimming shown in this video!
Made Endpapers. i follow this method for my endpapers, as i used handmade lokta endpapers, and they can be quite thin, but they look beautiful! i used "tipped on" endpapers (where you have your endpaper and then put a thin strip of glue on the edge and attach it to your text block) i used for a very long time before this, but these feel like they are much more stable, as they are sewn with your text block.
Edge Sprinkling. this is the method that i used for decorating the edges of my text block. but the principle is basically clamping your text block tight and then sprinkling the edges. i do not believe you need to trim the edges in order to do sprinkles on the edges, and that's what makes it accessible! i personally just use really cheap acrylic paint that i water down and then flick it onto the edges with my thumb and a paint brush.
Double-Core Endbands. i sew my own endbands, which i followed this tutorial for. that being said, it's kind of confusing, and this video is a bit easier to follow, but it is a slightly different type of endband.
Case decoration. i used my silhouette cameo 4 to cut out my design for "factory settings" in htv (heat transfer vinyl). i also used my cameo 4 to cut out the oval of marbled paper on the front, as i honestly didn't want to try my hand at cutting an oval lol. i also glued some 300 gsm card with an oval cut out of the centre of it onto the cover before covering it with bookcloth, to get a kind of recess on the cover. i then glued the oval of marbled paper onto the top of the recessed area once it was covered with bookcloth, so that it was protected. the images i used were sourced from a mix of rawpixel, canva and pixabay. a more accessible way to get into cover decoration is by painting on a design for your cover as described in @a-gay-old-time's tutorial just here. or even doing paper labels, which look classy imo.
physical materials. sourcing these will depend on your country. i am located in australia, and have compiled a list with some other aussie bookbinders of places to buy from. here is a great post describing beginning materials for getting started binding.
@renegadepublishing. this tumblr is great! its what got me started bookbinding, and being in the discord has been inspiring, motivating, and honestly just one of the best online experiences i have ever had. it is full of resources, and most people in there are amateur bookbinders, with a couple of professionals thrown in. the discord is 18+, and anyone can join!
i'm sorry this post got so long, but i hope that this has a lot of information for you if you would like to get started bookbinding. its one of the best hobbies ive ever had, and i genuinely believe i will have it for the rest of my life.
4K notes
·
View notes
Text
I have a lot of feelings about the use of AI in Everything These Days, but they're not particularly strong feelings, like I've got other shit going on. That said, when I use a desktop computer, every single file I use in Google Drive now has a constant irritating popup on the right-hand side asking me how Gemini AI Can Help Me. You can't, Gemini. You are in the way. I'm not even mad there's an AI there, I'm mad there's a constantly recurring popup taking up space and attention on my screen.
Here's the problem, however: even Gemini doesn't know how to disable Gemini. I did my own research and then finally, with a deep appreciation of the irony of this, I asked it how to turn it off. It said in any google drive file go to Help > Gemini and there will be an option to turn it off. Guess what isn't a menu item under Help?
I've had a look around at web tutorials for removing or blocking it, but they are either out of date or for the Gemini personal assistant, which I already don't have, and thus cannot turn off. Gemini for Drive is an integrated "service" within Google Drive, which I guess means I'm going to have to look into moving off Google Drive.
So, does anyone have references for a service as seamless and accessible as Google Drive? I need document, spreadsheet, slideshow, and storage, but I don't have any fancy widgets installed or anything. I do technically own Microsoft Office so I suppose I could use that but I've never found its cloud function to actually, uh, function. I could use OneNote for documents if things get desperate but OneNote is very limited overall. I want to be able to open and edit files, including on an Android phone, and I'd prefer if I didn't have to receive a security code in my text messages every time I log in. I also will likely need to be able to give non-users access, but I suppose I could kludge that in Drive as long as I only have to deal with it short-term.
Any thoughts, friends? If I find a good functional replacement I'm happy to post about it once I've tested it.
Also, saying this because I love you guys but if I don't spell it out I will get a bunch of comments about it: If you yourself have managed to banish Gemini from your Drive account including from popping up in individual files, I'm interested! Please share. If you have not actually implemented a solution yourself, rest assured, anything you find I have already tried and it does not work.
1K notes
·
View notes
Note
Should I learn emacs I've been coding in nano
@perl-official
I always recommend emacs. But depending on your use case you might want to learn something else first.
If you hop between different servers a lot and can't expect to have access to your favourite editor on there, I recommend learning the basics of vi/vim since that is preinstalled pretty much everywhere. Also, most bigger IDEs you might use in the future have a setting or extension to use vim-keybinds.
If you just want to program on your own machine, I recommend trying out a few different text-editors and then decide on one.
To learn emacs, I recommend using the built in tutorial. You can access it using C-h t (thats CTRL-h followed by t) while beeing in emacs.
To learn vim, you can use the vimtutor. I think it is automatically installed with vim on most distros, but may have to be installed separately on some. Also neovim/nvim is way better in term of extensibillity to regular vim
Other Editors you could try:
- VS Codium (Visual Studio Code fork that removed most Microsoft Stuff)
- helix - a Vim like Editor
- zed - way too fucused on AI features for my taste but I heard it has some other nice features
If you want some more infos on why emacs is great: here two semi serious posts I made in the past:
Pingin some people who also might have something to say:
@vim-official @helix-editor @emacs-evil-mode
25 notes
·
View notes
Text
Free software recommendations for various things:
LibreOffice - A full home office suite comparable to Microsoft Office. Easy to use and you can choose the UI layout from several types; it can handle docx and other Microsoft Office document formats; it still does not include AI unless you specifically add that extension on purpose, so unlike other office suites it's not shoving AI down your throat.
Calibre - Ebook manager bundled with an ebook editor and ereader software. It can follow news feeds, downloading them into epub format. Convert ebooks from one format into (many) others. Run a server to make access your books from different computers/phones/tablets easier. And so much more... without even touching on the additional functionality that plugins can add. With plugins it can be used for DRM stripping (which can still remove DRM from even Kindle ebooks, if you have a kindle that you can download the ebook to and use to transfer to your computer). It can also handle downloading fanfics and their metadata using the FanFicFare plugin. (Which I've written tutorials about.) There are officially supported plugins (like FanFicFare) that are easy to install and unofficial plugins (like the DRM stripper) that take more work, so it's extremely customizable.
Syncthing - Want to host your own local file backup system? Have an old laptop that you can reformat with a linux distro? And maybe a spare hard drive? Perfect, you have what you need to set up a home file backup system. Reformat the computer with the new operating system, install syncthing on that computer and on the computer you want to back up files for and the two installations of the software can sync over your home network. Put it on your phone and back up your photos. The software is open source, encrypted, and you can turn it off so that your computer (or phone) is only running it on a trusted network. You control where the synced data lives, which computers on your network those synced folders are shared with (allowing for sharing between multiple computers) and even what type of file backups happen if data is, say, accidentally deleted. (File recovery!!!)
Plex or Emby - Both are free to install on any computer, point at any movie/tv show/audiobook/music files you've got sitting around, and bam you've got a home media streaming server. Both have paid tiers for more features (including tv tuner integration to act as a DVR), but what they can do for free is already impressive and well handled. Both have easy to use UI and it largely comes down to personal preference as to one is better than the other.
Notepad++ - A notepad type program that can also serve as a decent lightweight code editor. I use it for noodling around with code scripts and snippets, writing lists, and various other small tasks. It's not something I'd use for my professional code writing but it's great for just messing around with something on my own time.
16 notes
·
View notes
Note
Hey I just gotta say your bind of OTNWAS is GORGEOUS! Do you mind explaining how you formatted the pages? <3
hello, thank u sm <3!! and yes ofc i can :)
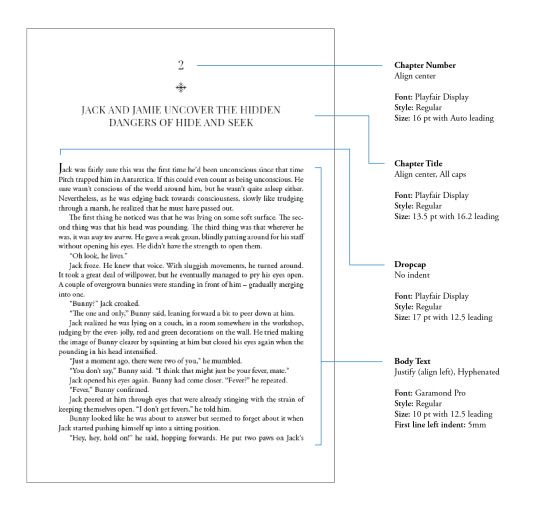
i used Adobe InDesign to do all my typesetting! the document i have has a total of 948 pages (475 spreads) which all include: title page, contents page, chapters, and a few customized + blank pages.
starting with document size first — mine is in A5 (so that i can print A4 spreads) you can play around with the margins, i recommend having at least 3mm added on to it if you’re going to trim it (the bleedline basically). my margins are 15mm left, 20mm right, 15mm top, 20mm bottom.
i had 2 chapter templates - one for short titles (i.e. jack flies) and one for long titles (i.e. jack and jamie uncover the hidden dangers of hide and seek). if you look at the pictures i posted, i added a snowflake as part of that template as an indicator of whose pov the chapter starts in. i designed one for hiccup and jamie too so i change it accordingly! i also use it as dinkuses whenever there’s a pov change within the chapter.
my body text size was 10pt with a 12.5 leading (justified + hyphenated) but honestly that also depends on the font you choose and your personal preference in terms of how spaced out you want your body text to be. i suggest doing test prints so you can adjust !! standard book fonts are: caslon, garamond, minion and palatino.
here’s a silly diagram i made for my friends of my exact settings 📖
in terms of actually formatting the fic— i copy-pasted chapter by chapter from ao3 because for some reason InDesign doesn’t recognize italics automatically so i had to do that manually LOL.
what else .. uhhhh i’m pretty sure i’m forgetting something… i’ll just add on when i remember but crossing my fingers this helps!! i know InDesign isn’t what’s the most accessible to people (i have it bc of my job), but there are lots of tutorials out there on how to do it on microsoft word or even google docs!
hope your binding goes well ⭐️
#local-dragon-haunt#jackshiccup ask#otnwas#IF U NEED ANYTHING CLARIFIED LMK#im pretty bad at explaining#ndbdjsbdd#also if anyone would like to copy my format/typesetting design you can go ahead!#a credit would be nice tho maybe dkdnnddbnxbx#but please design your own book covers !!!#that’s like the most fun part tbh#go crazy go stuuuuupid
47 notes
·
View notes
Note
Good news about google drive: many people do not know what it is or how to use it. I work with a lot of people like this. They have been working for a long time and they are brilliant- just not great with technology.
Google drive is cloud storage. If you have ever saved files to your computer, moved them from the default downloads folder, and renamed them, then you have the basic idea of how to work google drive. The big difference is that files on your computer are stored on Your Harddrive inside your computer and that files saved to google drive or any cloud-based storage option are stored remotely on a bank of servers Somewhere Else. But in theory even if something happens to your computer, your files on google drive are perfectly fine.
Also you can access them from anywhere.
The thing that people in businesses like google drive for (aside from being able to work on files from anywhere) is that you can share files with other people while still maintaining ownership of the file.
You can decide what level of permission people have. So you can let people view a file, or comment, or edit it.
Dont give other people manager access to your files. Your drive is like your personal filing cabinet. Nobody else needs a key to your filing cabinet but you.
If you need to use a "shared" drive its just the digital equivalent of a filing cabinet everyone has access to. Multiple people can have keys and get in - even if you arent the one letting them in.
We use shared drives at work so that multiple employees can upload, rename, and delete files, and so that they can add data to the documents inside without making a whole new copy.
Anyway i hope i dont sound super condescending- i just have a lot of experience with it and those explainations have helped a few folks at work understand.
If you have use google docs and google sheets, those are just google's version of a word processor and a spreadsheet/accounting software. So microsoft word and microsoft excel.
Google actually has some courses that can walk you through some of the functionality and there are definitely some video tutorials on youtube if thats more your thing.
Hopefully that helps?
Anyway my original point was: dont even worry about not knowing how to use google drive or what it is. You're definitely not the only one and if you are so inclined, there are thinga that can help you learn.
Can I have it on my phone though? Because I genuinely don't own a computer at the moment...
19 notes
·
View notes
Note
Man, this stuff is crazy. Amazing how you create these.
What AI program do you use?
I have been experimenting with DreamStudio for my art reference, it does a pretty good job but I don't think it can create anything like what you have done.
Following you. Awesome :)
I use Dall-E 3, which is accessible for free via Bing's Image Creator and Microsoft's Designer. They both have advantages and disadvantages. Bing gives up to four results per prompts, lets you save results to a collection it keeps for you, and keeps a history of your last 15 generations. Microsoft Designer only gives one result per prompt, and the minute you make a new one the old one is lost forever unless you saved it to your device. However, Bing is a little touchier about what it considers NSFW; Microsoft Designer is more permissive in what words and phrases it lets you use and in what results it lets you see (with the added side effect - and this could be good or bad depending on you - that it lets more weird, freaky, anatomically impossible things through. Like two-headed men and such). Creating prompts takes a bit of inventive poetry. I've made a few posts about it on here, under the tag #ai tutorial and #ai muscle tutorial (I've also tagged this post with them), but please be aware that all of them but the most recent are a little out of date. The AI is evolving and what worked two months ago may not work today. The AI remembers your activities and it's possible to be too much of a naughty boy, and it will freeze up and become almost unusable eventually. Mix things up by generating innocent SFW things (I do pics of my TTRPG characters). If that doesn't work, get a new account - you just need a new email address, but throwaways from free services work just fine.
18 notes
·
View notes
Note
would you happen to have a flight sim recommendation? Ive seen you post about using them and wondered which one you thought would be best
Depends what you're looking for.
The two big players are Microsoft Flight Simulator and X-Plane.
MSFS is very pretty, it has some decent tutorials built-in, and there's a huge array of content for it, but, at least on my computer, it runs somewhat unstably. It's also very accessible, bordering on hand-holding, which can be good if you're new to flight sims but can also get very old very quickly once you know what you're doing. It's also designed for a gamepad primarily, and you can play it on Xbox. I think its a a little over-designed actually. There's a ton of aftermarket planes available, mostly thru the in-game browser. There might be freeware, i haven't really looked into it.
X-Plane is less pretty, the graphics are maybe a tiny bit more dated, you don't get the photorealistic scenery, but the flight dynamics are much, much more realistic. The difference is hard to explain succinctly but the long and short of it is that, on average, a well designed aircraft for X-Plane will feel "more real" than one in MSFS. X-Plane is also usable on Windows, Mac, and Linux. There's a lot of aftermarket content for it, but less than MSFS, although last i checked there's a larger portion of freeware. It's also a little more persnickty vis-a-vis installation and management. X-Plane also comes with a utility to help you make airplanes for it, though you have to provide the 3D modeling software (like blender) yourself.
Overally, it really boils down to what you want in your flight simulator
MSFS
Pros:
Photorealistic Scenery
Wide variety of assistance
Highly accessible tutorials
Lots of aftermarket content
Available on Windows and Xbox
Cons:
Less realistic flight dynamics
Pretty graphics means higher system requirements
Can be overbearing if you're experienced with flight sims
Designed for a gamepad first and foremost, feels somewhat awkward with the old fashioned joystick, mouse, and keyboard
X-Plane
Pros:
More realistic Flight Dynamics
Built-in plane maker utility
Runs on Windows, Linux, and Mac
Slightly more generous system requirements
Takes up waaaaaaaaaay less space (my install, which has a shitload of aftermarket content in it, takes up 30gb less than my vanilla MSFS install)
Great if you're familiar with flight sims or flying in general
Cons:
Finicky installation and content management compared to MSFS. If you're used to digging in folders and installing mods that way, you won't have any trouble with it, but if you're not experienced with that its got a bit of a learning curve (and you should learn that! it's a great skill!)
Scenery is more generic than MSFS, particularly outside of major cities
Requires a computer, not available on PS5 or Xbox (Imo this is a pro, not a con, but if you don't have a gaming computer its obviously a problem)
Less aftermarket content available
Requires a bit of manual configuration to get going right
Fewer tutorials
Now, I understand it sounds like MSFS is "better" but i really feel that X-Plane is the better choice if you're going to get seriously into this stuff. That being said, i have both, and I play both, but I play X-Plane a whole lot more. If you're brand-new at flight simming, i'd recommend getting MSFS, but don't splurge for the super-deluxe editions. If you've simmed before, i can't recommend X-Plane enough.
TL;DR: MSFS is good for beginners, X-Plane is better for anyone beyond beginner level.
7 notes
·
View notes
Text
cant sleep on account of i was reminded again of the utter disappointment of robotnik's ring racers
Like fuck me the presentation is immaculate and the amount of content is staggering and it's all dashed by dogshit design decisions.
a resource you NEED to spend to get up steep hills, that you can't spend if you're holding an item, under all of which lies a parry mechanic destined to rot because A) it sucks ass compared to any item and B) you can't use it if you have any of the resource on hand
then there's the tutorial situation, a 40-minute escapade full of both the old shit you probably already know having played SRB2K or any other contemporary kart racer as well as five or six new mechanics that feel like they've been included less for the sake of innovating the genre / making the game more enjoyable and more for the sake of.. having new mechanics. And there's a good argument to be made that, of all the new mechanics introduced, the tutorial doesn't even cover the most meaningful ones, like tethering or the rival system!
also of note is shit like modding and online multiplayer being unlockables rather than there from the get-go. Particularly fucked is one of the passwords for unlocking add-ons instantly being "McDonald's", which is either in reference to the infamous patent illustration from Sony or Microsoft or whomever, or simply an allusion to children screaming for fast food. The game's download page proudly states that drrr isn't a pick-up-and-play game, but the password gives that statement an exclusionary and infantilizing context bordering on hostile -- which is really fucking weird considering that SRB2K's entire goddamned draw was how accessible and moddable it was.
it doesn't help that, by merit of being the team's newest project, it's receiving a ton of modding attention, none of which is going to be backported to its more enjoyable predecessor.
I don't know. There are people who are enjoying this game. I think it's an elitist, hypermaximalist, self-indulgent wankfest that's more concerned with raising the skill floor with conflicted and self-defeating design than with being an enjoyable experience.
If you want your kart racer to be competitive melee and you want to spurn anyone who doesn't, go nuts with it. It's drained my enthusiasm for itself and for SRB2K, frankly
5 notes
·
View notes
Text
youtube
Huge lifehack to make editing your own writing way less stressful
Change the color of Track Changes in Microsoft Word
It is so much easier to do your edits when all of the changes are in a nice, soothing turquoise instead of screaming at you in bright red like the pen like your scariest English teacher!
And here's a text version of this tutorial (from the same creator) for people like me who want something more accessible and/or hate videos
#writing#writer stuff#writeblr#creative writing#writing tips#writing advice#writing tools#writer tips#editing#editing resources#editing help#editing tips#wips#Youtube
8 notes
·
View notes
Text
gif making tutorial for the inimitable @snowysobsessions
disclaimer: this is exactly how i do it, but im basically just winging it tbh. there may be other methods that are quicker and/or look way better. this is just the way to which i have become accustomed. i am not a fancy ass gif maker who does colouring and sharpening or uses photoshop whatever, those folks are the real pros. i just like to get the job done :) if you wanna make really fancy gifs other tutorials may be more appropriate. ok lets get into it under the cut!
step 1:
select your source. for the purposes of this tutorial im going to stay on-brand and use this video of weird al on 30 rock (aka the original Milf Weird Al).
youtube
step 2:
either download the video (i dont have a good recommendation for a website for that unfortunately, they all seem virus-ridden these days) or screen-record the part of the video you want to turn into a gif. for me, thats the part with al in it.
my computer runs windows something - 11 maybe? and it comes with screen recording software built in that saves into a folder called "captures" in the video folder, which can be activated with the keyboard shortcut Windows Key + Alt + R. most phones also have screen recording functions, you could record it on your phone and transfer it to your computer? (for the record the website i use works on mobile too, but its very slow and annoying so i much prefer to use my laptop.)
step 3:
use video editing software of your choice to cut the clip down to just the part you want giffed. i use microsoft clipchamp because thats whats on my computer. it can also be used to crop away any black bars around any video clip, which is useful, because a properly cropped gif will probably be better quality. export the clip in as high quality as possible.
tip: try to keep the gif 3 seconds or under. this keeps the filesize down. tumblr gif size limit is 10MB, but i keep all my gifs 5MB or below because otherwise the loading time/storage burden is painful, and like i said, im not making fancy ones here, i dont mind them being a bit lower quality.
here is my clip. i saved it muted because its filesize is smaller that way.
step 4:
go to https://ezgif.com/video-to-gif which looks like this.
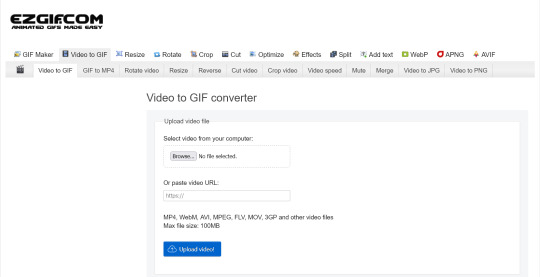
note that ezgif has tools for cutting, cropping and resizing videos if you dont have access to any video editing tool. its quicker if you do it in advance, though, i find.
upload your video and you will see this type of screen appear.
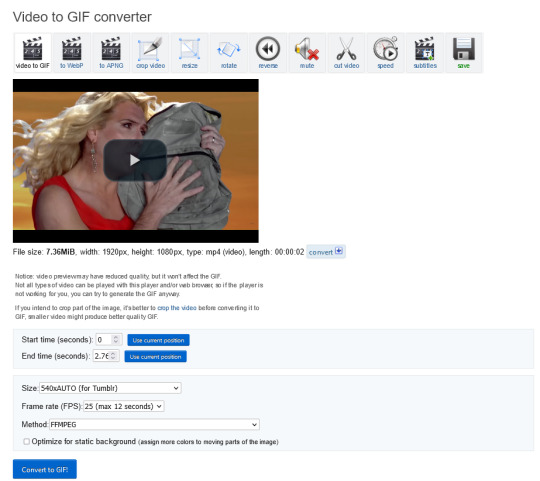
if youre uploading it to tumblr, the 540xAUTO size option is the one i go for by default, but it also has the following size options.
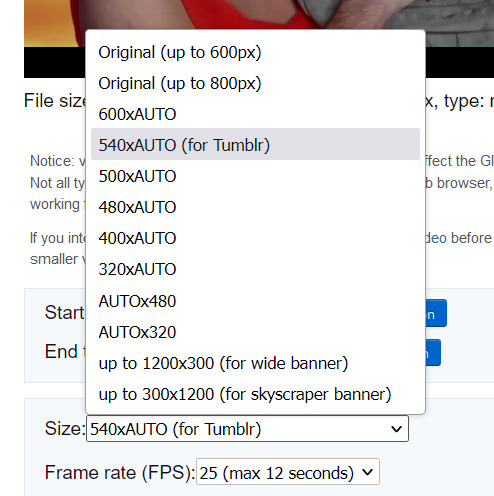
smaller size = smaller filesize, and you want the filesize as small as possible within reason. i sometimes make a gif smaller in dimensions if i'm really struggling to get the filesize below 5MB.
next is the frame rate: i set it to 25 because thats closest to the oriignal frame rate of most recorded video, but in order to make savings on filesize, it can be selected to 20FPS or 12FPS. i wouldnt recommend lower than that unless you want it to look weird and choppy, in which case, go ahead, and i wouldn't recommend higher unless you literally need the animation to be smooth as silk - for making it slowmo, for example.
i don't mess with the "method" drop down bc idk what it means.
the "Optimise for static background" tickbox is useful for if someone is doing something on a totally still background, because it reduces filesize by not animating every single bit of background in every frame. it could be helpful here as our background is not moving at all, just our heroine Alfina. i'm going to tick it.
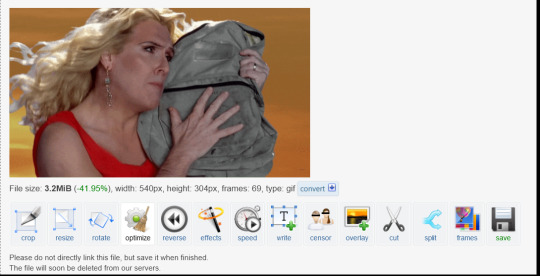
now you can click "Convert to GIF". you should see something like this - itll be animated of course, this is just a screenshot.
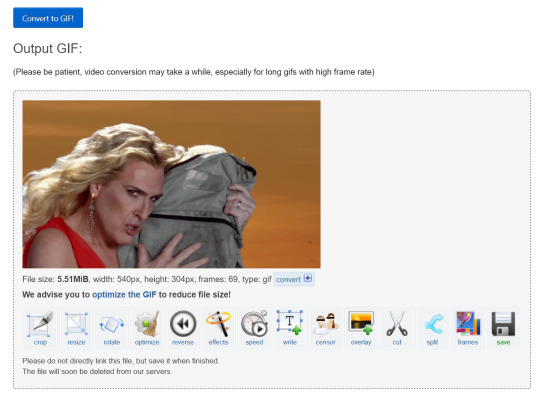
our gif looks crispy fresh (and has 69 frames - NICE), but its filesize is 5.51MB which is more than id like it to be, but first we're gonna look at Effects, so I'm not going to click the "Optimise" option yet.
step 5:
clicking effects will provide the following options
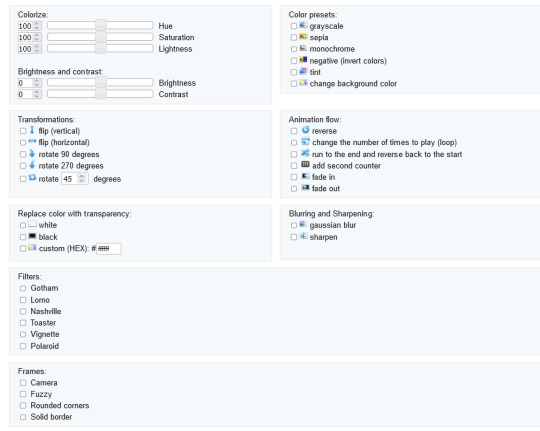
if the video was sort of dark and hard to see, for example if it was live footage, it can be helpful to increase the brightness. changing the brightness and contrast makes our gif look like this, and makes it pop a little more.
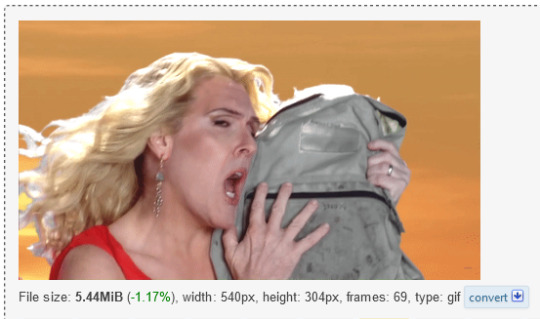
you can keep playing with the settings and clicking "Apply selected" until it looks about right to you, or not add any effects at all - it's up to you. I hit the back button in my browser to go back to the gif before i added the effects, then I went to Optimise.
step 6:
the Optimise screen is like this
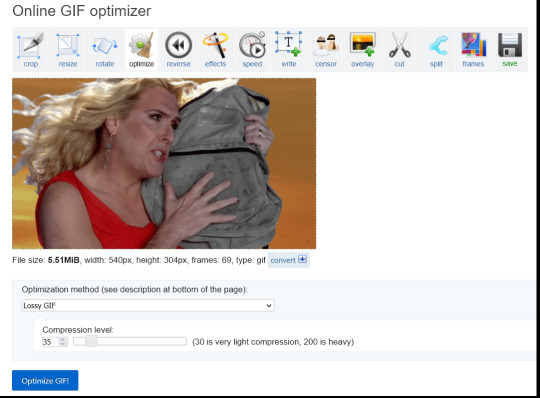
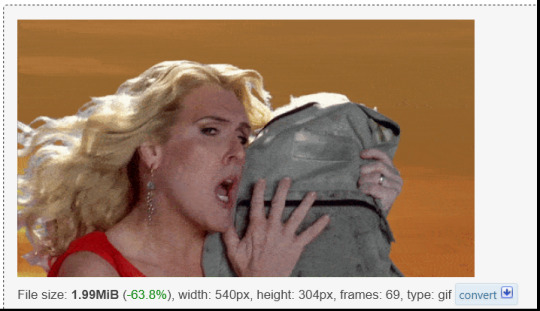
i tend to stick with the Lossy GIf optimization method. I put the compression level down to 30, and press Optimise GIF and see what happens.
as you can see, the filesize has been reduced by 41.95% to 3.2MB without a super noticeable drop in quality.
if you set the compression level to 200, this is what it looks like
much more pixely, and not much further reduced in size, so i stick to the lower end of the compression scale.
this is our finished gif! isnt she beautiful. i just right-clicked and hit save on it on the webpage after generating - on mobile, i guess you'd long-press on it to download it.

hope that helps!!! lmk if you need help with any other aspect like changing speed or overlays or anything but honestly it's pretty intuitive once you know how to do these bits.
17 notes
·
View notes
Text
Intel VTune Profiler For Data Parallel Python Applications

Intel VTune Profiler tutorial
This brief tutorial will show you how to use Intel VTune Profiler to profile the performance of a Python application using the NumPy and Numba example applications.
Analysing Performance in Applications and Systems
For HPC, cloud, IoT, media, storage, and other applications, Intel VTune Profiler optimises system performance, application performance, and system configuration.
Optimise the performance of the entire application not just the accelerated part using the CPU, GPU, and FPGA.
Profile SYCL, C, C++, C#, Fortran, OpenCL code, Python, Google Go, Java,.NET, Assembly, or any combination of languages can be multilingual.
Application or System: Obtain detailed results mapped to source code or coarse-grained system data for a longer time period.
Power: Maximise efficiency without resorting to thermal or power-related throttling.
VTune platform profiler
It has following Features.
Optimisation of Algorithms
Find your code’s “hot spots,” or the sections that take the longest.
Use Flame Graph to see hot code routes and the amount of time spent in each function and with its callees.
Bottlenecks in Microarchitecture and Memory
Use microarchitecture exploration analysis to pinpoint the major hardware problems affecting your application’s performance.
Identify memory-access-related concerns, such as cache misses and difficulty with high bandwidth.
Inductors and XPUs
Improve data transfers and GPU offload schema for SYCL, OpenCL, Microsoft DirectX, or OpenMP offload code. Determine which GPU kernels take the longest to optimise further.
Examine GPU-bound programs for inefficient kernel algorithms or microarchitectural restrictions that may be causing performance problems.
Examine FPGA utilisation and the interactions between CPU and FPGA.
Technical summary: Determine the most time-consuming operations that are executing on the neural processing unit (NPU) and learn how much data is exchanged between the NPU and DDR memory.
In parallelism
Check the threading efficiency of the code. Determine which threading problems are affecting performance.
Examine compute-intensive or throughput HPC programs to determine how well they utilise memory, vectorisation, and the CPU.
Interface and Platform
Find the points in I/O-intensive applications where performance is stalled. Examine the hardware’s ability to handle I/O traffic produced by integrated accelerators or external PCIe devices.
Use System Overview to get a detailed overview of short-term workloads.
Multiple Nodes
Describe the performance characteristics of workloads involving OpenMP and large-scale message passing interfaces (MPI).
Determine any scalability problems and receive suggestions for a thorough investigation.
Intel VTune Profiler
To improve Python performance while using Intel systems, install and utilise the Intel Distribution for Python and Data Parallel Extensions for Python with your applications.
Configure your Python-using VTune Profiler setup.
To find performance issues and areas for improvement, profile three distinct Python application implementations. The pairwise distance calculation algorithm commonly used in machine learning and data analytics will be demonstrated in this article using the NumPy example.
The following packages are used by the three distinct implementations.
Numpy Optimised for Intel
NumPy’s Data Parallel Extension
Extensions for Numba on GPU with Data Parallelism
Python’s NumPy and Data Parallel Extension
By providing optimised heterogeneous computing, Intel Distribution for Python and Intel Data Parallel Extension for Python offer a fantastic and straightforward approach to develop high-performance machine learning (ML) and scientific applications.
Added to the Python Intel Distribution is:
Scalability on PCs, powerful servers, and laptops utilising every CPU core available.
Assistance with the most recent Intel CPU instruction sets.
Accelerating core numerical and machine learning packages with libraries such as the Intel oneAPI Math Kernel Library (oneMKL) and Intel oneAPI Data Analytics Library (oneDAL) allows for near-native performance.
Tools for optimising Python code into instructions with more productivity.
Important Python bindings to help your Python project integrate Intel native tools more easily.
Three core packages make up the Data Parallel Extensions for Python:
The NumPy Data Parallel Extensions (dpnp)
Data Parallel Extensions for Numba, aka numba_dpex
Tensor data structure support, device selection, data allocation on devices, and user-defined data parallel extensions for Python are all provided by the dpctl (Data Parallel Control library).
It is best to obtain insights with comprehensive source code level analysis into compute and memory bottlenecks in order to promptly identify and resolve unanticipated performance difficulties in Machine Learning (ML), Artificial Intelligence ( AI), and other scientific workloads. This may be done with Python-based ML and AI programs as well as C/C++ code using Intel VTune Profiler. The methods for profiling these kinds of Python apps are the main topic of this paper.
Using highly optimised Intel Optimised Numpy and Data Parallel Extension for Python libraries, developers can replace the source lines causing performance loss with the help of Intel VTune Profiler, a sophisticated tool.
Setting up and Installing
1. Install Intel Distribution for Python
2. Create a Python Virtual Environment
python -m venv pyenv
pyenv\Scripts\activate
3. Install Python packages
pip install numpy
pip install dpnp
pip install numba
pip install numba-dpex
pip install pyitt
Make Use of Reference Configuration
The hardware and software components used for the reference example code we use are:
Software Components:
dpnp 0.14.0+189.gfcddad2474
mkl-fft 1.3.8
mkl-random 1.2.4
mkl-service 2.4.0
mkl-umath 0.1.1
numba 0.59.0
numba-dpex 0.21.4
numpy 1.26.4
pyitt 1.1.0
Operating System:
Linux, Ubuntu 22.04.3 LTS
CPU:
Intel Xeon Platinum 8480+
GPU:
Intel Data Center GPU Max 1550
The Example Application for NumPy
Intel will demonstrate how to use Intel VTune Profiler and its Intel Instrumentation and Tracing Technology (ITT) API to optimise a NumPy application step-by-step. The pairwise distance application, a well-liked approach in fields including biology, high performance computing (HPC), machine learning, and geographic data analytics, will be used in this article.
Summary
The three stages of optimisation that we will discuss in this post are summarised as follows:
Step 1: Examining the Intel Optimised Numpy Pairwise Distance Implementation: Here, we’ll attempt to comprehend the obstacles affecting the NumPy implementation’s performance.
Step 2: Profiling Data Parallel Extension for Pairwise Distance NumPy Implementation: We intend to examine the implementation and see whether there is a performance disparity.
Step 3: Profiling Data Parallel Extension for Pairwise Distance Implementation on Numba GPU: Analysing the numba-dpex implementation’s GPU performance
Boost Your Python NumPy Application
Intel has shown how to quickly discover compute and memory bottlenecks in a Python application using Intel VTune Profiler.
Intel VTune Profiler aids in identifying bottlenecks’ root causes and strategies for enhancing application performance.
It can assist in mapping the main bottleneck jobs to the source code/assembly level and displaying the related CPU/GPU time.
Even more comprehensive, developer-friendly profiling results can be obtained by using the Instrumentation and Tracing API (ITT APIs).
Read more on govindhtech.com
#Intel#IntelVTuneProfiler#Python#CPU#GPU#FPGA#Intelsystems#machinelearning#oneMKL#news#technews#technology#technologynews#technologytrends#govindhtech
2 notes
·
View notes
Note
Hi i just want to say I saw the post of the fics you bound and they look amazing!! I was wondering if you would share the type facing or any tips on how to do that? They are amazing and exactly how I pictured in my head. I’m just starting out on bookbinding.
Omg hiiii! My first ever ask 🥹 also thank you for the kind words!
I do share a lot of my typesets, but it depends on the authors policies (so one’s like Just Lovers I made just for myself).
For typesetting: I use a macro made by @black_book_bindery (on insta) which saves me so much time. You plug it into your Microsoft word doc and it takes like 5 min to format your doc for printing. Then I just use canva to add decorative aspects to the typeset.
I’m happy to share my typesets with you—there’s a link down below gives you access though you may need to open on a computer rather than mobile, I just ask they’re used for personal binds only. There’s also a ton of talented binders who give access to theirs in the community. There’s also tutorials on TikTok that helped me when I first started out (I have a few as well that are pinned).
So so exciting that you’re taking on this hobby! Can’t wait to see your binds 🤩
10 notes
·
View notes
Text
Marketing Strategies And Marketing Mix Of Adobe
Source: The Brand Hopper
"Adobe’s Marketing Mix (4Ps): A Deeper Dive
Adobe’s success can be attributed to its strategic implementation of the marketing mix, the 4Ps: Product, Price, Place, and Promotion. Let’s explore each element in detail:
1. Product:
Breadth: From Photoshop and Illustrator for design to Premiere Pro and After Effects for video editing, Adobe covers diverse creative needs. They even offer XD for web design and Spark for social media content creation.
Depth: Each software has various versions. Photoshop Elements caters to beginners, while Photoshop CC caters to professionals. This ensures accessibility and scalability for different user groups.
Innovation: Adobe Research invests heavily in AI, machine learning, and other cutting-edge technologies. This translates into features like Content-Aware Fill in Photoshop and Rotoscoping in After Effects.
Integration: Adobe products work seamlessly together. For example, you can edit a photo in Photoshop and directly export it to Premiere Pro for video editing.
Services: Adobe Creative Cloud offers 20GB of cloud storage, access to Adobe Fonts, and integration with stock photo libraries like Adobe Stock, enhancing the overall creative workflow.
2. Price
Subscription Model: Adobe transitioned from perpetual licenses to subscriptions in 2013. This makes their software more affordable for individuals and small businesses, especially with monthly payment options.
Tiered Pricing: Individual, team, and enterprise subscriptions offer different features and functionalities, catering to diverse needs and budgets.
Free Trials and Freemium Options: Adobe offers free trials for most products, allowing users to experience the software firsthand. Some products also have limited free versions with basic features.
Discounts: Educational institutions, students, and teachers receive significant discounts on Adobe Creative Cloud, expanding access to future generations of creative professionals.
Bundled Offerings: Adobe Creative Cloud offers various bundles combining multiple products at a discounted price. This incentivizes purchases and increases perceived value.
3. Place
Direct Sales: Adobe sells directly through its website and flagship stores, offering personalized recommendations, tutorials, and in-depth product demonstrations.
Partner Channels: Strategic partnerships with leading tech companies like Microsoft and Apple expand reach and distribution channels. This makes Adobe software easily accessible through familiar platforms.
Online Marketplaces: Adobe software is available on Amazon and the Microsoft Store, increasing visibility and accessibility for users who prefer these platforms.
Cloud Delivery: Adobe Creative Cloud is delivered through the cloud, eliminating installation hassles and allowing users to access their files and projects from any device with an internet connection.
Mobile Apps: Adobe offers mobile versions of popular products like Photoshop and Lightroom, catering to the on-the-go creative needs of users and expanding their creative potential beyond desktops.
4. Promotion
Content Marketing: Adobe offers high-quality content across various formats. The Adobe Blog features in-depth tutorials, industry insights, and creative inspiration. They also have dedicated YouTube channels for each product, offering tutorials, tips, and behind-the-scenes glimpses.
Community Engagement: Adobe fosters a strong community through forums like the Adobe Help Center and user groups. They also host events like Adobe MAX, which connects users, showcases new features, and inspires creativity.
Social Media Marketing: Active engagement on platforms like Twitter, Instagram, and YouTube builds brand awareness and connects with users directly.
Influencer Marketing: Collaborations with renowned creative professionals like photographers and designers amplify brand messaging and reach new audiences. Adobe also has an Adobe Creative Experts program, empowering passionate users to share their knowledge and expertise.
Events and Conferences: Adobe hosts and participates in industry events like Adobe MAX and Adobe Summit. These events showcase innovation, connect with potential customers, and build brand awareness.
Paid Advertising: Adobe uses targeted ads on platforms like Google and social media to reach specific audience segments and drive traffic to their website and free trial offers.
By strategically implementing these elements, Adobe has created a marketing mix that is comprehensive, effective, and adaptable. They have gone beyond simply selling software; they have built a community, fostered creativity, and established themselves as a leader in the industry. This approach not only drives sales but also builds brand loyalty and establishes a strong foundation for future growth. "
#mktmarketing4you#corporatestrategy#marketing#M4Y#lovemarketing#IPAM#ipammarketingschool#ContingencyPlanning#virtual#volunteering#project#Management#Economy#ConsumptionBehavior#BrandManagement#ProductManagement#Logistics#Lifecycle
#Brand#Neuromarketing#McKinseyMatrix#Viralmarketing#Facebook#Marketingmetrics#icebergmodel#EdgarScheinsCultureModel#GuerrillaMarketing#STARMethod#7SFramework#gapanalysis #AIDAModel #SixLeadershipStyles #MintoPyramidPrinciple #StrategyDiamond #InternalRateofReturn #irr #BrandManagement #dripmodel #HoshinPlanning #XMatrix #backtobasics #BalancedScorecard #Product #ProductManagement #Logistics #Branding #freemium #businessmodel #business #4P #3C #BCG #SWOT #TOWS #EisenhowerMatrix #Study #marketingresearch #marketer #marketing manager #Painpoints #Pestel #ValueChain # VRIO #marketingmix
Thanks for following us.

https://thebrandhopper.com/2024/02/06/marketing-strategies-and-marketing-mix-of-adobe/
3 notes
·
View notes
Text
Mastering Excel: Grayson Garelick Shares Essential Tips and Tricks for Beginners
In today's data-driven world, proficiency in Microsoft Excel is a valuable skill that can open doors to countless opportunities in various industries. Whether you're a student, a professional, or an entrepreneur, mastering Excel can significantly enhance your productivity, efficiency, and decision-making capabilities. To help beginners embark on their journey to Excel mastery, seasoned Excel expert Grayson Garelick shares some essential tips and tricks that lay the foundation for success.
Get Comfortable with the Basics: Before diving into advanced features, it's crucial to familiarize yourself with the basics of Excel. Learn how to navigate the interface, enter data, and perform simple calculations using formulas like SUM, AVERAGE, and COUNT. Understanding these foundational concepts will set you up for success as you progress to more complex tasks.
Explore Keyboard Shortcuts: Excel offers a plethora of keyboard shortcuts that can save you time and streamline your workflow. Take the time to learn commonly used shortcuts for tasks like copying and pasting, formatting cells, and navigating between worksheets. Memorizing these shortcuts will make you more efficient and productive in Excel.
Practice Regularly: Like any skill, proficiency in Excel comes with practice. Dedicate time each day to practice using Excel and experimenting with different features and functions. The more you practice, the more comfortable and confident you'll become in navigating Excel and performing various tasks.
Utilize Online Resources: Take advantage of the wealth of online resources available to learn Excel. Websites like Microsoft's official Excel help center, YouTube tutorials, and online courses offer valuable insights and guidance for beginners. Additionally, forums and communities like Stack Overflow and Reddit can be excellent places to ask questions and seek advice from experienced Excel users.
Master Essential Formulas and Functions: Formulas and functions are the backbone of Excel's functionality, allowing you to perform calculations, manipulate data, and analyze trends. Start by mastering essential formulas like VLOOKUP, SUMIF, and IFERROR, which are commonly used in data analysis and reporting. As you become more comfortable with these formulas, you can explore more advanced functions to expand your skill set further.
Learn Data Visualization Techniques: Excel offers powerful tools for visualizing data, such as charts, graphs, and pivot tables. Learning how to create visually compelling and informative visualizations can help you communicate insights effectively and make informed decisions based on your data. Experiment with different chart types and formatting options to find the best visualization for your data.
Stay Organized: Keeping your Excel workbooks organized is essential for efficiency and productivity. Use descriptive file names and folder structures to easily locate and access your files. Within your workbooks, use clear and consistent naming conventions for sheets, ranges, and cells. Additionally, consider using color coding and formatting techniques to visually distinguish different types of data.
Stay Updated: Excel is continuously evolving, with new features and updates released regularly. Stay informed about the latest developments by subscribing to Excel-related blogs, newsletters, and forums. Keeping up-to-date with the latest features and best practices will ensure that you're maximizing Excel's potential and staying ahead of the curve.
By following these tips and tricks shared by Excel expert Grayson Garelick, beginners can lay a solid foundation for mastering Excel and unlocking its full potential. With dedication, practice, and a willingness to learn, anyone can become proficient in Excel and leverage its powerful capabilities to excel in their personal and professional endeavors.
2 notes
·
View notes